

Panasonic 2Line KX-TH102-M, 2Line KX-THA13, 2Line KX-THA12 Operating Instructions Manual

Operating Instructions
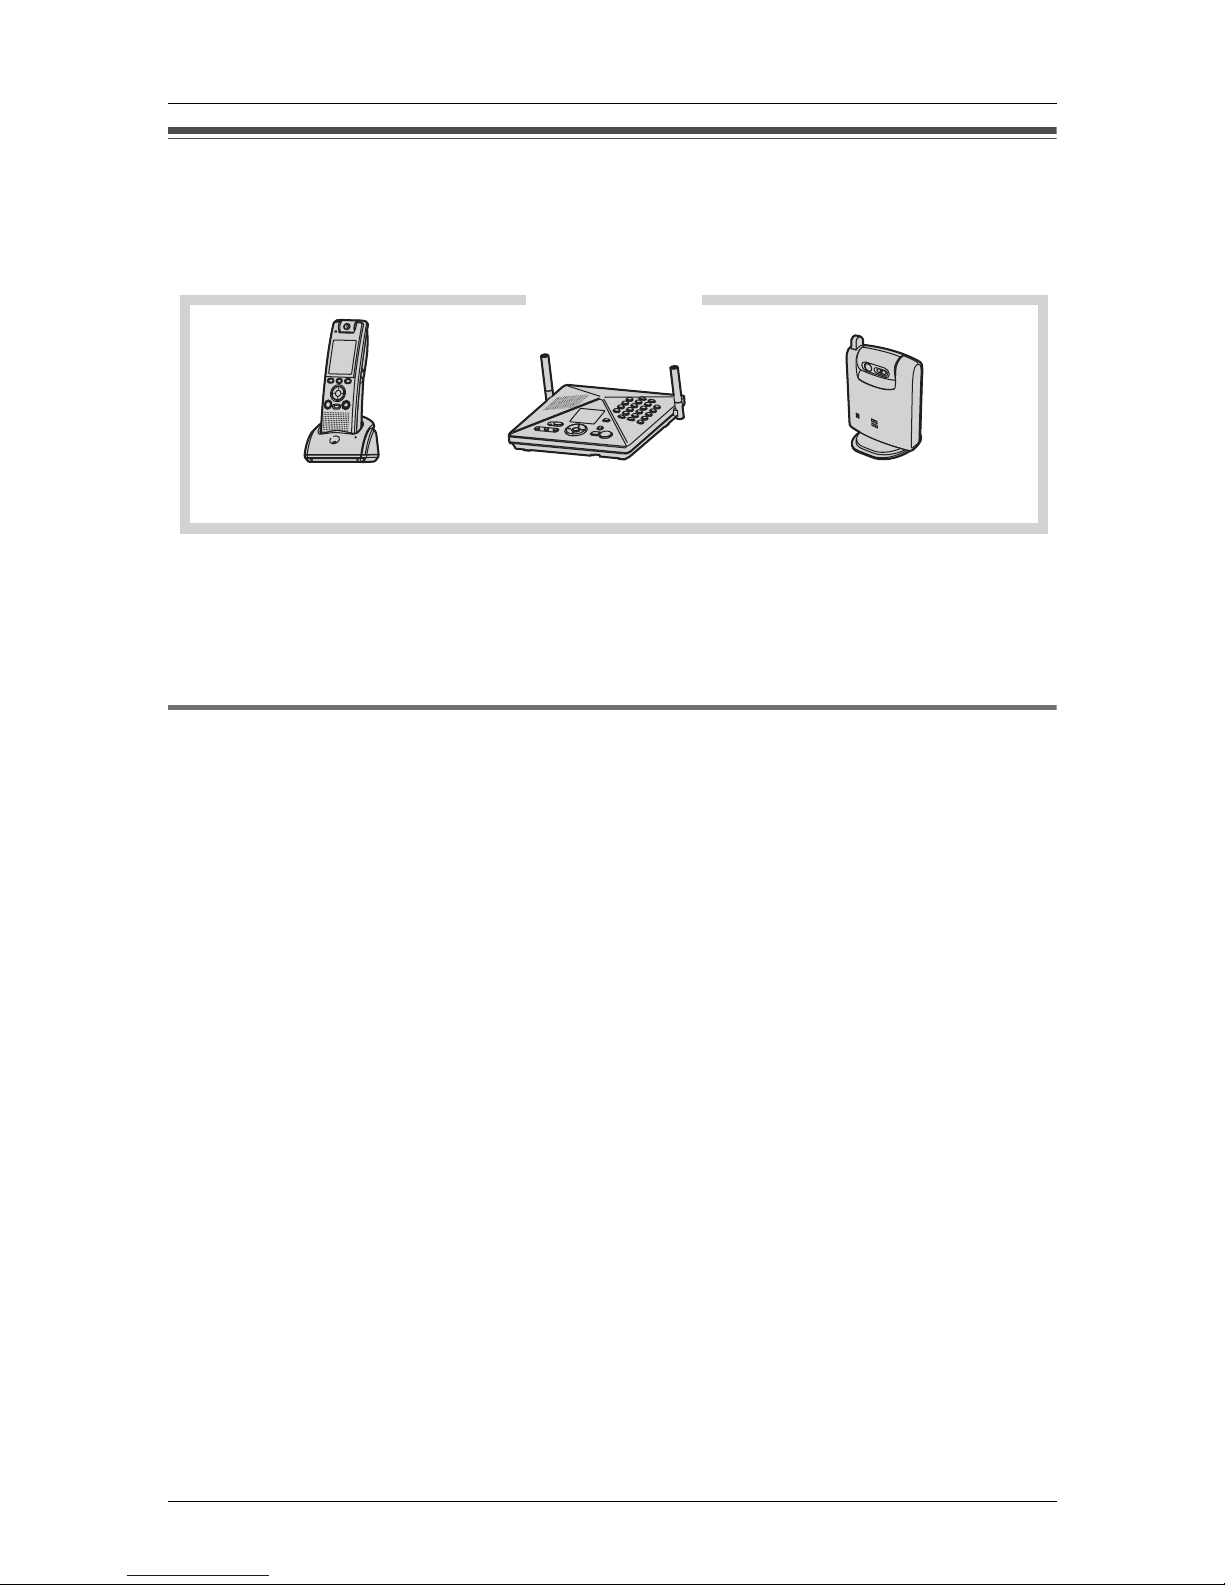
Home Communication System
Monitoring Package
Model No.
KX-TH102-M
This unit is compatible with Caller ID. To use this feature, you must
subscribe to the appropriate service offered by your service provider.
Charge the handset battery for 4 hours before initial use.
Please read these Operating Instructions before using the unit and save
for future reference.
For assistance, visit our website:
http://www.panasonic.com/phonehelp for customers in the U.S.A. or
Puerto Rico.

Table of Contents
Introduction
Feature highlights. . . . . . . . . . . . . . . . . . 3
Accessory information . . . . . . . . . . . . . . 5
Expanding your phone system . . . . . . . . 7
Important safety instructions . . . . . . . . 10
For best performance . . . . . . . . . . . . . . 12
Preparation
Setting up the base unit . . . . . . . . . . . . 15
Setting up the cordless camera . . . . . . 18
Setting up the handset . . . . . . . . . . . . . 19
Battery charge . . . . . . . . . . . . . . . . . . . 19
Battery replacement . . . . . . . . . . . . . . . 20
Controls . . . . . . . . . . . . . . . . . . . . . . . . 21
Displays . . . . . . . . . . . . . . . . . . . . . . . . 25
Symbols used in these operating
instructions . . . . . . . . . . . . . . . . . . . . . . 27
Setting the unit before use . . . . . . . . . . 28
C Making/Answering Calls
Making calls . . . . . . . . . . . . . . . . . . . . . 30
Answering calls . . . . . . . . . . . . . . . . . . 32
Useful features during a call. . . . . . . . . 32
Using the other line during a call . . . . . 34
d Phonebook
Handset phonebook . . . . . . . . . . . . . . . 35
Base unit phonebook . . . . . . . . . . . . . . 38
G Caller ID Service
Using Caller ID service. . . . . . . . . . . . . 40
Caller list. . . . . . . . . . . . . . . . . . . . . . . . 41
u Video Phone
Video phone feature . . . . . . . . . . . . . . . 44
Video phone settings . . . . . . . . . . . . . . 47
Intercom
Intercom feature . . . . . . . . . . . . . . . . . . 48
Transferring a call. . . . . . . . . . . . . . . . . 49
Conference calls. . . . . . . . . . . . . . . . . . 50
Call share . . . . . . . . . . . . . . . . . . . . . . . 52
F Monitoring
Monitoring feature . . . . . . . . . . . . . . . . 53
Audio monitor . . . . . . . . . . . . . . . . . . . . 53
Video monitor using the handset . . . . . 54
Video monitor using your computer . . . 57
Useful settings while monitoring . . . . . . 60
v Handset Camera
Taking a picture . . . . . . . . . . . . . . . . . . 67
Picture gallery. . . . . . . . . . . . . . . . . . . . 67
Programmable Settings
Ringer settings . . . . . . . . . . . . . . . . . . . 69
Display settings . . . . . . . . . . . . . . . . . . 72
Other settings . . . . . . . . . . . . . . . . . . . . 73
Registering a unit . . . . . . . . . . . . . . . . . 77
i Answering System
Answering system feature . . . . . . . . . . 79
Setting up the answering system . . . . . 79
Listening to messages using the base
unit . . . . . . . . . . . . . . . . . . . . . . . . . . . . 80
Listening to messages using the
handset. . . . . . . . . . . . . . . . . . . . . . . . . 81
Voice memo . . . . . . . . . . . . . . . . . . . . . 82
Remote operation . . . . . . . . . . . . . . . . . 83
Answering system settings . . . . . . . . . . 84
Using a Cellular Phone with
this Unit
Configuring a cellular phone . . . . . . . . . 86
Making/answering calls using a cellular
line . . . . . . . . . . . . . . . . . . . . . . . . . . . . 87
Useful features during a cellular call. . . 89
Cellular settings . . . . . . . . . . . . . . . . . . 90
Transferring a cellular call. . . . . . . . . . . 92
Conference calls. . . . . . . . . . . . . . . . . . 93
Useful Information
Connecting to your network . . . . . . . . . 95
Wall mounting. . . . . . . . . . . . . . . . . . . . 97
Headset (Optional) . . . . . . . . . . . . . . . 102
Error messages . . . . . . . . . . . . . . . . . 103
Troubleshooting . . . . . . . . . . . . . . . . . 105
FCC and other information . . . . . . . . . 114
Specifications . . . . . . . . . . . . . . . . . . . 117
Warranty . . . . . . . . . . . . . . . . . . . . . . . 119
Customer services . . . . . . . . . . . . . . . 121
Direct command chart/programming
index . . . . . . . . . . . . . . . . . . . . . . . . . . 122
Index
Index. . . . . . . . . . . . . . . . . . . . . . . . . . 126
2 For assistance, please visit http://www.panasonic.com/phonehelp
Introduction
Feature highlights
Thank you for purchasing a Panasonic Home Communication System
Monitoring Package.
KX-TH102-M
Cordless video
camera handset
Important:
L KX-TH102-M includes a cordless video camera handset (KX-THA12), a cordless
camera (KX-THA13), and a base unit.
L In these operating instructions, the included “cordless video camera handset” is referred
to as the “handset”.
Cordless cameraBase unit
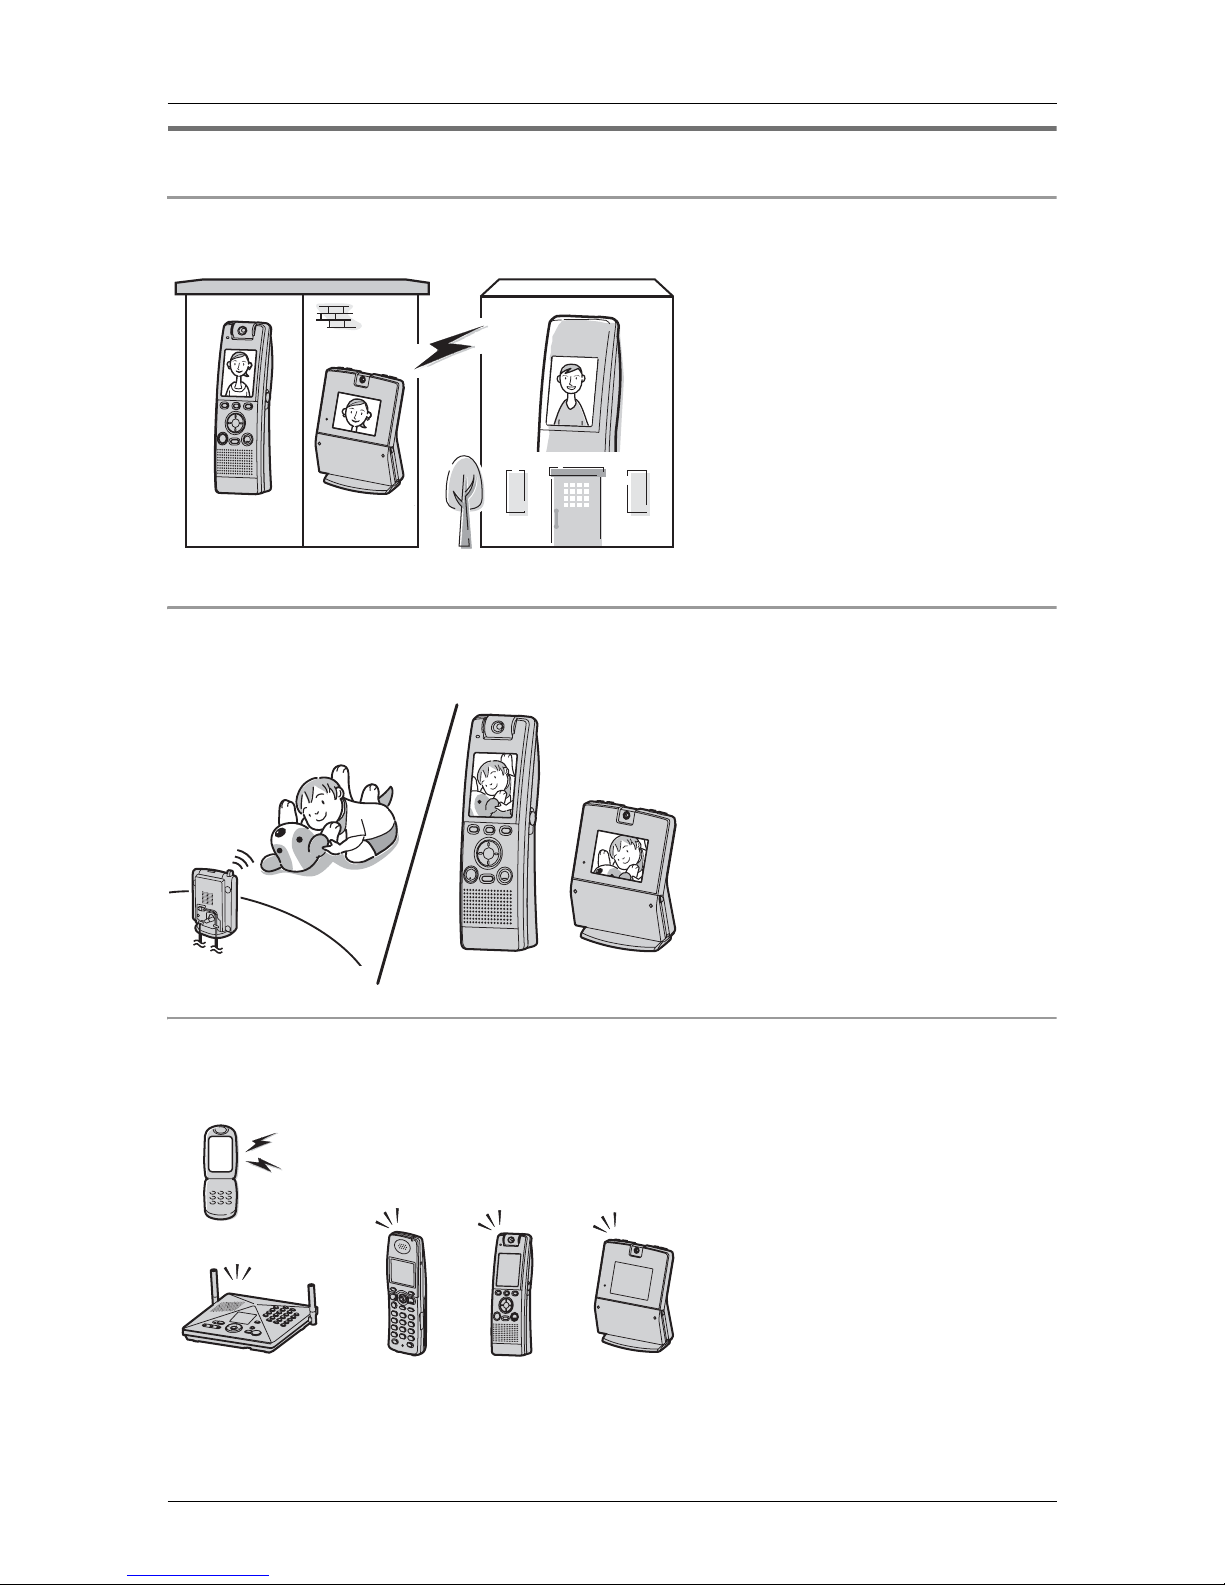
Telephone and monitoring features
N 2 line telephone
While one line is in use, you can make or answer a call using the other line.
N Video phone
The handset allows you and the person you are talking to to see each other in real time
during an outside call, if you have ITU-T H.324 compatible video phone (page 44).
N Audio monitor (between handset and base unit)
You can listen to the audio in the room where the handset or base unit is located (page
53).
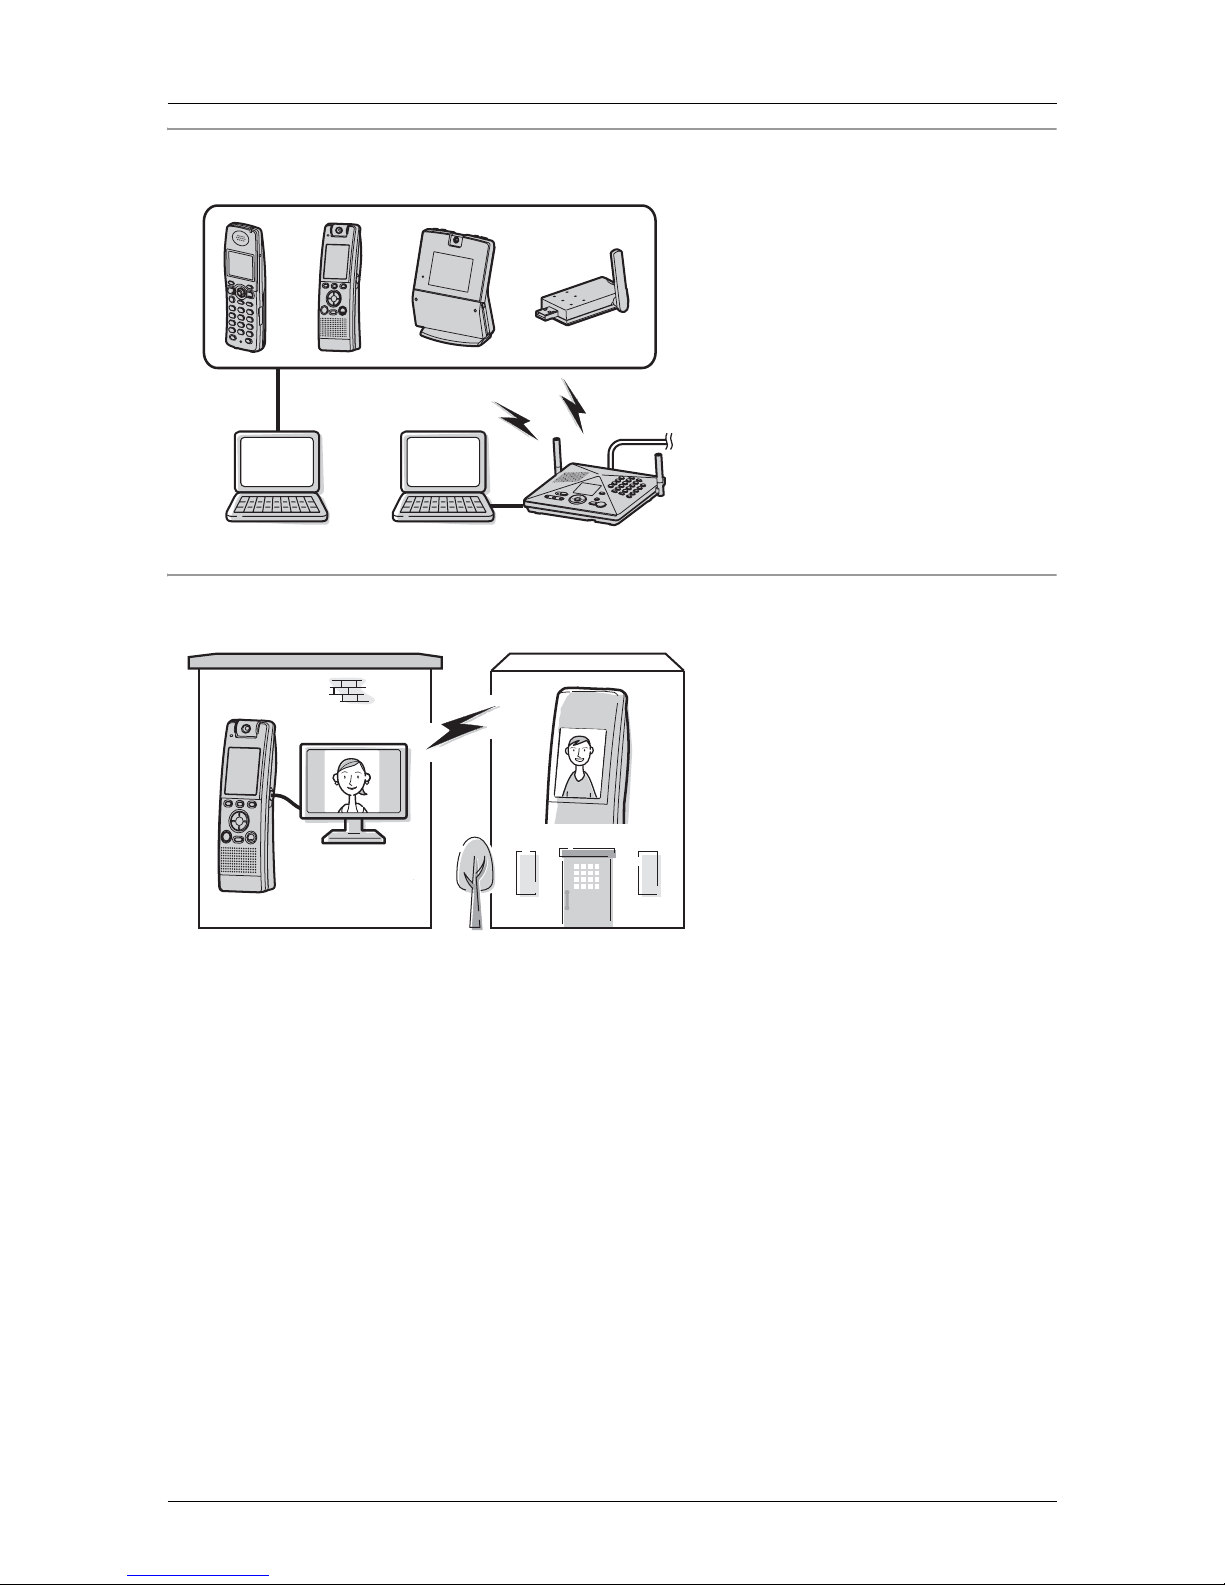
N Video monitor (between the cordless camera and handset or your computer)
You can monitor the room where the cordless camera is located when:
– you access the cordless camera using the handset or your computer (page 54, 57).
– the cordless camera pages the handset or notifies your computer with a pop-up
message when it detects motion and/or sound (page 55, 58).
– the cordless camera user pages the handset or notifies your computer with a pop-up
message using the call button (page 56, 60).
N Handset camera
You can use the handset camera to take pictures (page 67). These pictures can be used
for the phonebook, as wallpaper, and as privacy images for the handset.
N Customize ring
You can connect an audio device to the handset using the included audio cable and
record songs to be used as the handset ringer tone (page 70).
For assistance, please visit http://www.panasonic.com/phonehelp 3
Introduction
N Changing the device name
You can customize the name for the cordless camera, handset, and base unit (page 61,
73).
N Cellular connection
This feature allows you to make or answer cellular calls using the handset or base unit,
®
if your cellular phone is Bluetooth
wireless technology compatible to the home
communication system (page 86). For more information for this feature, please visit our
website (page 7).
MULTI TALK V software
The included CD-ROM contains the MULTI TALK V Utility suite. The suite consists of the
following utilities.
N MULTI TALK V USB Utility
Allows you to use your computer to:
– Add, edit, erase, and copy phonebook entries
– Send images and melodies stored in your computer to your phone
– Change phone settings
– Play, erase, and save answering system messages
– Connect to the Internet or to another computer using a MULTI TALK V phone
N MULTI TALK V Camera Utility
Allows you to use your computer to register a cordless camera (KX-THA13) in order to
view cordless camera images with a web browser.
N MULTI TALK V Printing Utility
Allows you to use your computer to register a cordless video camera station (KXTHA16, sold separately) in order to print images from the KX-THA16 to your computer’s
printer.
To install the MULTI TALK V software in
your computer, refer to the “Installation
Guide for MULTI TALK V Software” for
Installation Guide for
MULTI TALK V Software
Model no.
KX-TH102-C
KX-TH102-M
installation details.
Este software se puede usar en español. Una vez que instale el software, haga clic con
el botón derecho en los iconos de la herramienta MULTI TALK V de la bandeja del
sistema y seleccione “Español”. Para obtener información sobre cómo utilizar el
software, consulte el archivo de Ayuda oprimiendo la tecla F1 mientras usa cualquiera
de las herramientas.
The MULTI TALK V software utilities are provided for use with the KX-TH102 base unit and
the following models:
LCordless handset: KX-THA11
LCordless video camera handset:KX-THA12
LCordless camera: KX-THA13
LUSB adaptor: KX-THA14
LCordless video camera station:KX-THA16
LCordless video camera handset with TV output:KX-THA17
In this guide, the above mentioned models are generically referred to as “MULTI TALK V
devices”.
For assistance, visit our website:
http://www.panasonic.com/phonehelp for customers in the U.S.A. or Puerto
Rico.
When using the MULTI TALK V features
with your computer, refer to the help
section of the MULTI TALK V USB Utility.
For the operations of the Camera Utility
and Printing Utility, refer to their individual
help sections indicated by the following
“Help” icon.
4 For assistance, please visit http://www.panasonic.com/phonehelp
“Help” icon
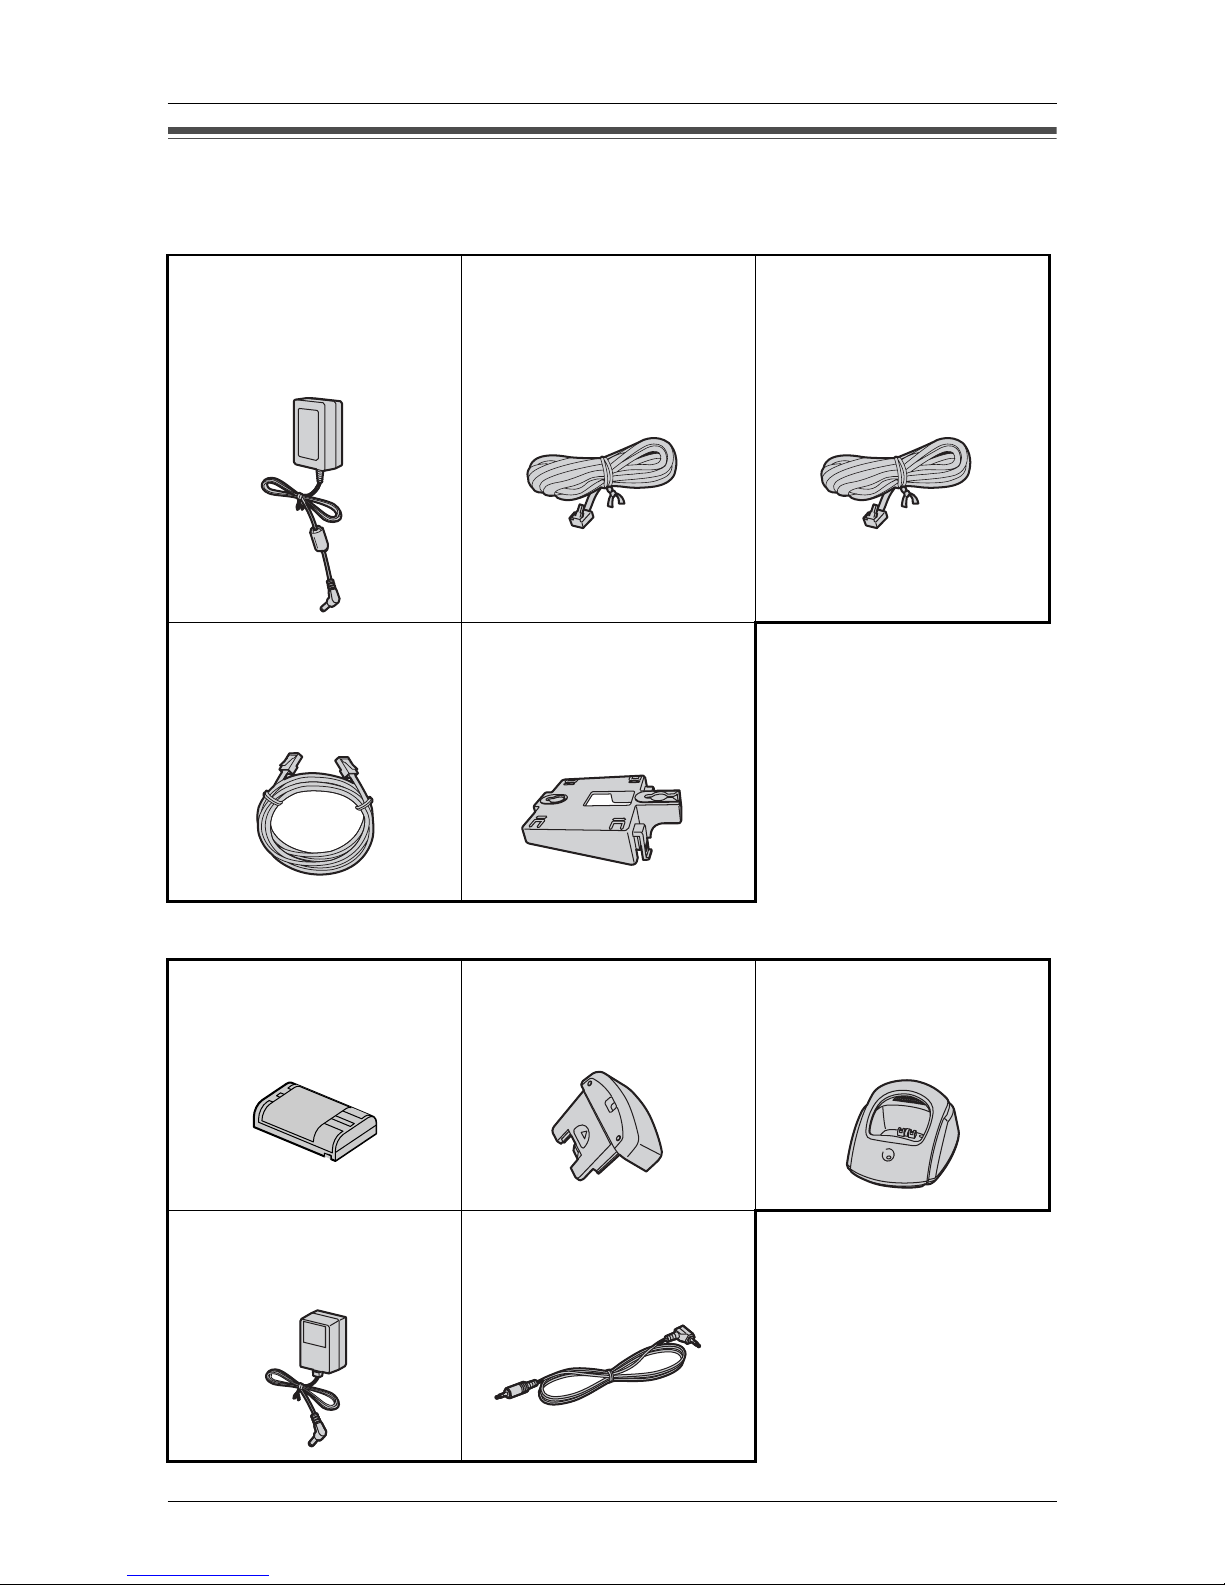
Accessory information
Base unit
Introduction
A AC adaptor for base unit
PQLV205
(Order No. PQWETH102M)
A LAN cable
(Order No. PQJA10169Z)
A 4-wire telephone line
cord with green plugs
(Order No. PQJA10088Z)
A Wall mounting adaptor
for base unit
(Order No. PQKL10070Z1)
A 2-wire telephone line
cord with transparent
plugs
(Order No. PQJA10075Z)
Handset
A Battery
(Order No. HHR-P104)
A AC adaptor for charger
(Order No. PQLV203Z)
A Handset cover
(Order No. PQKK10593Z1)
A Audio cable
(Order No. PQJA10172Z)
A Charger
(Order No. PQLV30039ZS)
For assistance, please visit http://www.panasonic.com/phonehelp 5

Introduction
Cordless camera
A AC adaptor for cordless
camera
PQLV203
(Order No.
PQWE1THA13M)
MULTI TA L K V utilit y
A USB cable
(Order No. PQJA10166Z)
A Wall mounting adaptor
for cordless camera
(Order No. PQLP10267Z)
A CD-ROM
(Order No. PQJKTH102Z)
*1
A Call button for cordless
camera
(Order No. PQLP10270Z)
*1 Allows you to install the MULTI TALK V software on a compatible computer. Refer to the
included “Installation Guide for MULTI TALK V Software” for details.
Other additional/replacement accessories
Accessory item Order number
Rechargeable nickel metal hydride
(Ni-MH) battery
Corded headset KX-TCA86, KX-TCA88HA
T-adaptor KX-J66
2-line splitter KX-J42
Note:
L You can expand your phone system by registering additional compatible Panasonic
units (page 7).
HHR-P104
Sales and support information
L To order these accessories, call 1-800-332-5368.
L TTY users (hearing or speech impaired users) can call 1-866-605-1277.
6 For assistance, please visit http://www.panasonic.com/phonehelp
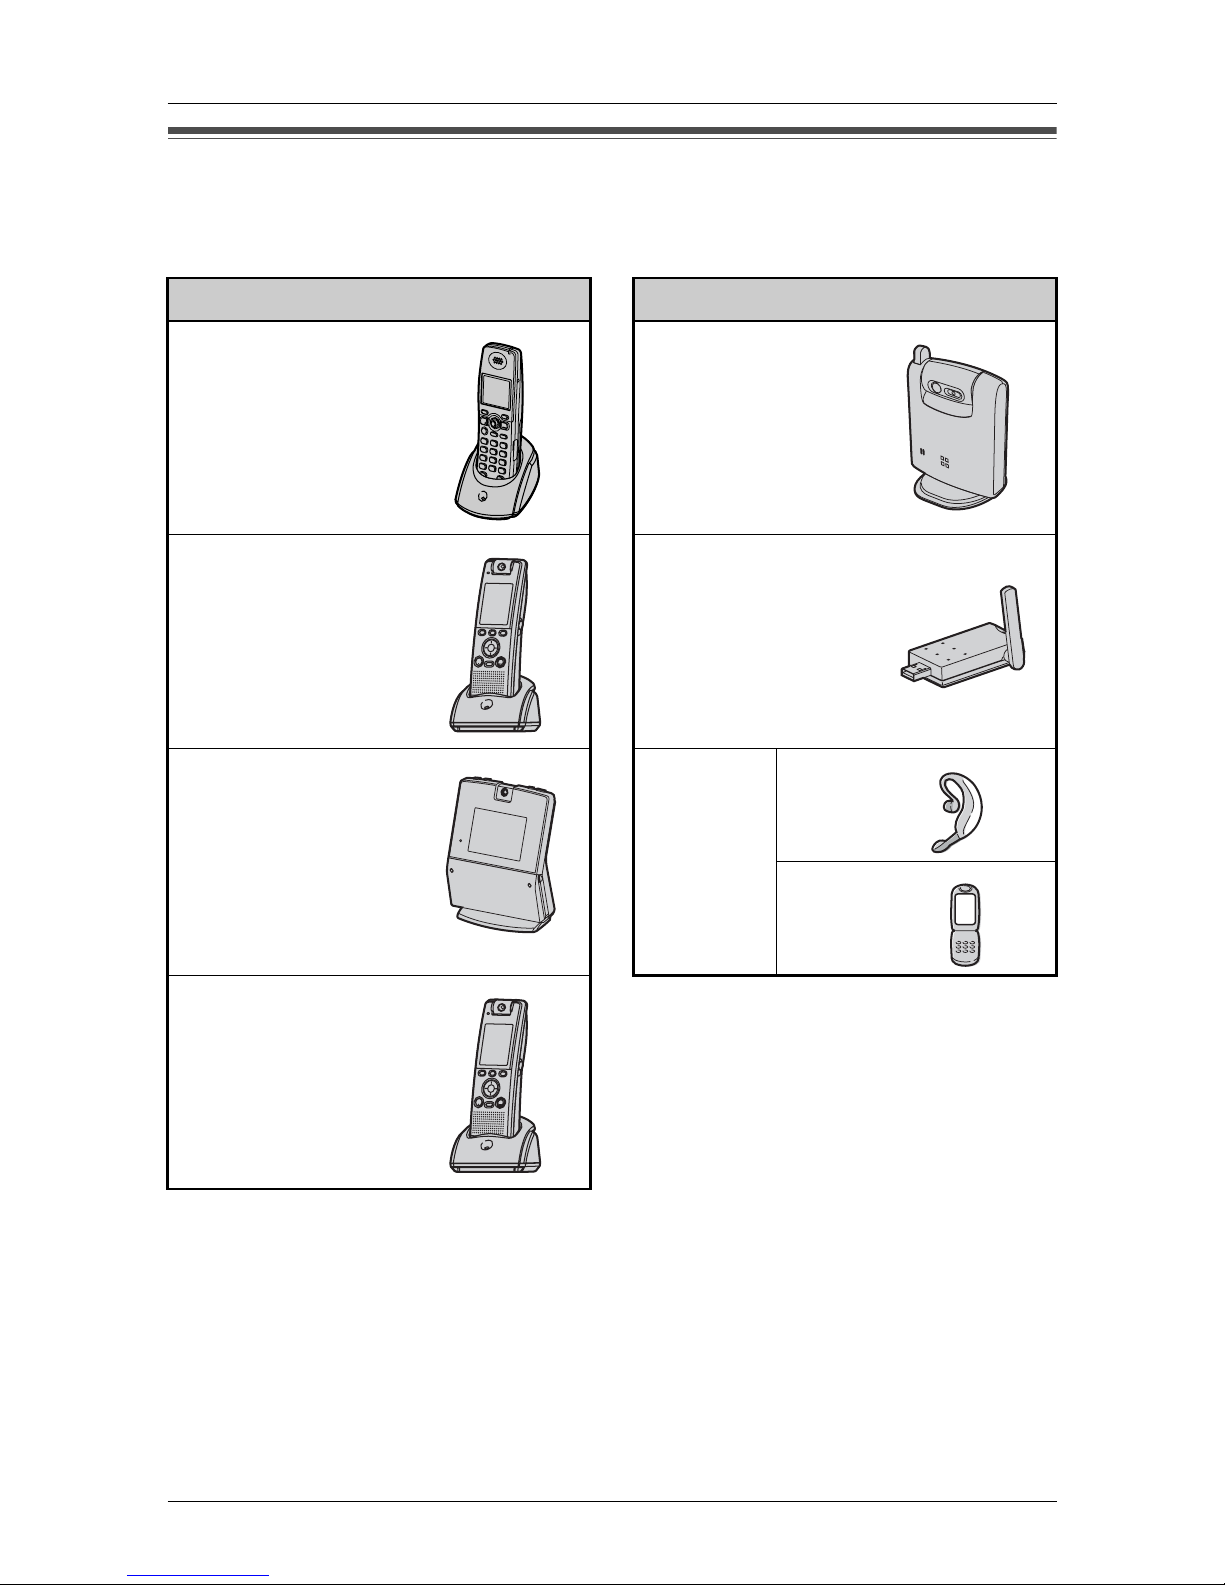
Introduction
Expanding your phone system
You can expand the phone system by registering the following units to a single base unit:
max. 18
Handsets: max. 8 Other devices: max. 10
Cordless handset
KX-THA11
(Monochrome display
type)
Cordless video camera
handset
KX-THA12
(Color display type)
Cordless video camera
station
KX-THA16
(Large color display
type)
Cordless camera
KX-THA13: max. 2
(For monitoring)
USB adaptor
KX-THA14
(For data link)
Other
Bluetooth
compatible
devices
(Optional)
Headset
Cellular
phone:
max. 5
Cordless video camera
handset with A/V
output
KX-THA17
(Color display type with
audio/video output
jack)
Note:
L Headset and cellular phone must have Bluetooth capability and must be compatible to
the home communication system. For more details and the list of compatible cellular
phones, please visit: www.panasonic.com/MultiTalkV
For assistance, please visit http://www.panasonic.com/phonehelp 7
Introduction
Various features using the optional units
Video phone
AB
Your home
Video monitor
This feature allows you and the
person you are talking to to see
each other in real time for an
outside call using the handsets.
If you have additional units (A,
B), you can also make a video
call during an intercom call.
A KX-THA12/KX-THA17
B KX-THA16
Cellular connection (Bluetooth compatible)
Your cellular phone
This feature allows you to
monitor the room where the
cordless camera (A) is located
from the units (B, C).
You can also monitor the room
between the units (B, C).
A KX-THA13
B KX-THA12/KX-THA17
C KX-THA16
CA B
This feature allows you to make
or answer cellular calls using
your unit (A, B, C, and the base
unit), if you have Bluetooth
compatible cellular phones.
A KX-THA11
B KX-THA12/KX-THA17
C KX-THA16
8 For assistance, please visit http://www.panasonic.com/phonehelp
BAC
Data link feature
A CB D
Video phone using TV
Introduction
This feature allows you to access
the Internet or another computer
by connecting the units (A, B,
C, and the base unit) with the
USB cable or a USB adaptor (D)
to your computer.
A KX-THA11
B KX-THA12/KX-THA17
C KX-THA16
D KX-THA14
This feature allows you to use
your TV to see the other person
during a video call.
A KX-THA17
A
Your home
TV
For assistance, please visit http://www.panasonic.com/phonehelp 9

Introduction
Important safety
instructions
When using the product, basic safety
precautions should always be followed to
reduce the risk of fire, electric shock, or
personal injury.
1. Read and understand all instructions.
2. Follow all warnings and instructions
marked on the product.
3. Unplug the product from power outlets
before cleaning. Do not use liquid or
aerosol cleaners. Use a moist cloth for
cleaning.
4. Do not use the product near water, for
example near a bathtub, wash bowl,
kitchen sink, etc.
5. Place the product securely on a stable
surface. Serious damage and/or injury
may result if the product falls.
6. Do not cover slots and openings on the
product. They are provided for
ventilation and protection against
overheating. Never place the product
near radiators, or in a place where
proper ventilation is not provided.
7. Use only the power source marked on
the product. If you are not sure of the
type of power supplied to your home,
consult your dealer or local power
company.
8. Do not place objects on the power
cord. Install the product where no one
can step or trip on the cord.
9. Do not overload power outlets and
extension cords. This can result in the
risk of fire or electric shock.
10. Never push any objects through slots
in the product. This may result in the
risk of fire or electric shock. Never spill
any liquid on the product.
11. To reduce the risk of electric shock, do
not disassemble the product. Take the
product to an authorized service center
when service is required. Opening or
removing covers may expose you to
dangerous voltages or other risks.
Incorrect reassembly can cause
electric shock when the product is
subsequently used.
12. Unplug the product from power outlets
and refer servicing to an authorized
service center when the following
conditions occur:
A. When the power cord is damaged
or frayed.
B. If liquid has been spilled into the
product.
C. If the product has been exposed to
rain or water.
D. If the product does not work
normally by following the operating
instructions. Adjust only controls
covered by the operating
instructions. Improper adjustment
may require extensive work by an
authorized service center.
E. If the product has been dropped or
physically damaged.
F. If the product exhibits a distinct
change in performance.
13. During thunderstorms, avoid using
telephones except cordless types.
There may be a remote risk of an
electric shock from lightning.
14. Do not use the product to report a gas
leak, when in the vicinity of the leak.
SAVE THESE
INSTRUCTIONS
CAUTION:
Installation
L Never install telephone wiring during a
lightning storm.
L Never install telephone jacks in wet
locations unless the jack is specifically
designed for wet locations.
L Never touch uninsulated telephone
wires or terminals unless the telephone
line has been disconnected at the
network interface.
L Use caution when installing or modifying
telephone lines.
10 For assistance, please visit http://www.panasonic.com/phonehelp

Introduction
L Do not touch the plug with wet hands.
L The AC adaptor is used as the main
disconnect device. Ensure that the AC
outlet is installed near the product and is
easily accessible.
Battery
To reduce the risk of fire or injury to
persons, read and follow these
instructions.
L Use only the battery(ies) specified.
L Do not dispose of the battery(ies) in a
fire. They may explode. Check with local
waste management codes for special
disposal instructions.
L Do not open or mutilate the battery(ies).
Released electrolyte is corrosive and
may cause burns or injury to the eyes or
skin. The electrolyte may be toxic if
swallowed.
L Exercise care when handling the
battery(ies). Do not allow conductive
materials such as rings, bracelets or
keys to touch the battery(ies), otherwise
a short circuit may cause the battery(ies)
and/or the conductive material to
overheat and cause burns.
L Charge the battery(ies) provided, or
identified for use with the product only, in
accordance with the instructions and
limitations specified in this manual.
Medical
L Consult the manufacturer of any
personal medical devices, such as
pacemakers or hearing aids, to
determine if they are adequately
shielded from external RF (radio
frequency) energy. (The product
operates in the frequency range of 2.402
GHz to 2.48 GHz, and the power output
is 125 mW (max.).) Do not use the
product in health care facilities if any
regulations posted in the area instruct
you not to do so. Hospitals or health care
facilities may be using equipment that
could be sensitive to external RF (radio
frequency) energy.
WARNING:
L To prevent the risk of fire or electrical
shock, do not expose the product to rain
or any type of moisture.
L Unplug the product from power outlets if
it emits smoke, an abnormal smell, or
makes an unusual noise. These
conditions can cause fire or electric
shock. Confirm that smoke has stopped
and contact the Panasonic Call Center
at 1-800-211-PANA (1-800-211-7262).
For assistance, please visit http://www.panasonic.com/phonehelp 11

Introduction
For best performance
Base unit location/noise
The base unit and other compatible
Panasonic units use radio waves to
communicate with each other.
For maximum distance and noise-free
operation, we recommend the following:
L Placing the base unit in a HIGH and
CENTRAL location with no obstructions
such as walls.
L Raising the antennas vertically.
L Placing the product away from electrical
appliances.
L If you use the handset near other
electrical appliances (microwave,
wireless LAN appliance, etc.), noise may
be heard. Move away from those
appliances and closer to the base unit.
L If you use the handset near another
cordless phone’s base unit, noise may
be heard. Move away from the other
cordless phone’s base unit and closer to
your base unit.
Environment
L Keep the product away from electrical
noise generating devices, such as
fluorescent lamps and motors.
L The product should be kept free from
excessive smoke, dust, high
temperature, and vibration.
L The product should not be exposed to
direct sunlight.
L Do not place heavy objects on top of the
product.
L When you leave the product unused for
a long period of time, unplug the product
from the power outlet.
L The product should be kept away from
heat sources such as heaters, kitchen
stoves, etc. It should not be placed in
rooms where the temperature is less
than 5 °C (41 °F) or greater than 40 °C
(104 °F). Damp basements should also
be avoided.
L The maximum calling distance may be
shortened when the product is used in
the following places: Near obstacles
such as hills, tunnels, underground, near
metal objects such as wire fences, etc.
L Operating near 2.4 GHz electrical
appliances may cause interference.
Move away from the electrical
appliances.
Routine care
L Wipe the outer surface of the product
with a soft moist cloth. Do not use
benzine, thinner, or any abrasive
powder.
Conditions for using the
handset camera/cordless
camera
L The handset camera/cordless camera is
intended for indoor use only. Prolonged
exposure to direct sunlight or halogen
light may damage CMOS sensor.
L Use the handset camera/cordless
camera in a bright place such as under
daylight or a well-lit room.
L Do not use the handset camera/cordless
camera in the following places:
– near incandescent lamps.
– near any electrical appliance that
emits a strong radio signal.
– where the subject of the picture is
against a light source or in front of a
mirror.
L In darker environments other than
daylight or in a well-lit room, the
smoothness of motion decreases in
order to keep the appropriate brightness
and sharpness of images. In such
environments, the smoothness of
motion may not increase/decrease
much even if you change the display
sharpness settings (page 45, 60).
12 For assistance, please visit http://www.panasonic.com/phonehelp
Introduction
L When using the handset camera/
cordless camera, please take into
consideration the rights of others with
regard to privacy.
For the cordless camera only:
L Do not use the cordless camera in the
following places:
– in places where temperature varies
greatly, such as near an air
conditioner or heater.
– anyplace exposed to oil or steam such
as a kitchen.
– where an object such as glass can
cause temperature change due to
reflection.
L When you move the cordless camera
from a cold place to a warm place, wait a
little while to let the cordless camera
adapt to the change in environment
before use. In this case, condensation
such as the formation of dew may occur,
resulting in error or malfunction.
Operating conditions for the
cordless camera
To use the sensor detection feature of the
cordless camera, you need to change the
detection mode (page 62).
Motion detection
The cordless camera features a sensor
that detects motion by sensing
temperature variations in the room where it
is placed in. When an object (a person,
animal, etc.) enters the range of the
sensor, the sensor can detect the
temperature variation caused by the
object. Once the sensor has detected
motion, the cordless camera pages the
handset or notifies your computer with a
pop-up message.
N Vertical detection range
B
A
C
A Vertical angle: Approx. 20°
B Photograph angle: Approx. 35°
C Distance: Approx. 5 m (16.4 feet)
N Horizontal detection range
Audio detection
The cordless camera features a sensor
that detects human voices such as a baby
cry. Sounds other than human voices may
be difficult to detect. To use this feature,
confirm that the cordless camera is located
in a place where it can easily detect
voices. Once the sensor has detected
sound, the cordless camera pages the
handset or notifies your computer with a
pop-up message.
For assistance, please visit http://www.panasonic.com/phonehelp 13
D
E
D Horizontal angle: Approx. 30°
E Photograph angle: Approx. 46°
F Distance: Approx. 5 m (16.4 feet)
F

Introduction
N Motion detection range
Motion across the cordless camera’s
detection range (A) can be easily
detected, but motion toward the cordless
camera (B) is difficult to detect.
Cordless camera
A
A
B
Note:
L Locate the cordless camera where the
objects often pass across the detection
range.
L Do not install the cordless camera in a
place where the temperature is high.
The cordless camera detects objects by
the difference in temperature between
the moving objects (such as human) and
their surroundings. If the cordless
camera is located where the
temperature between them is slight, the
sensor is not responsive to motion even
within the detecting range.
L The cordless camera may respond to
temperature changes caused by air
movement due to opening/closing doors
or from outside breezes.
14 For assistance, please visit http://www.panasonic.com/phonehelp
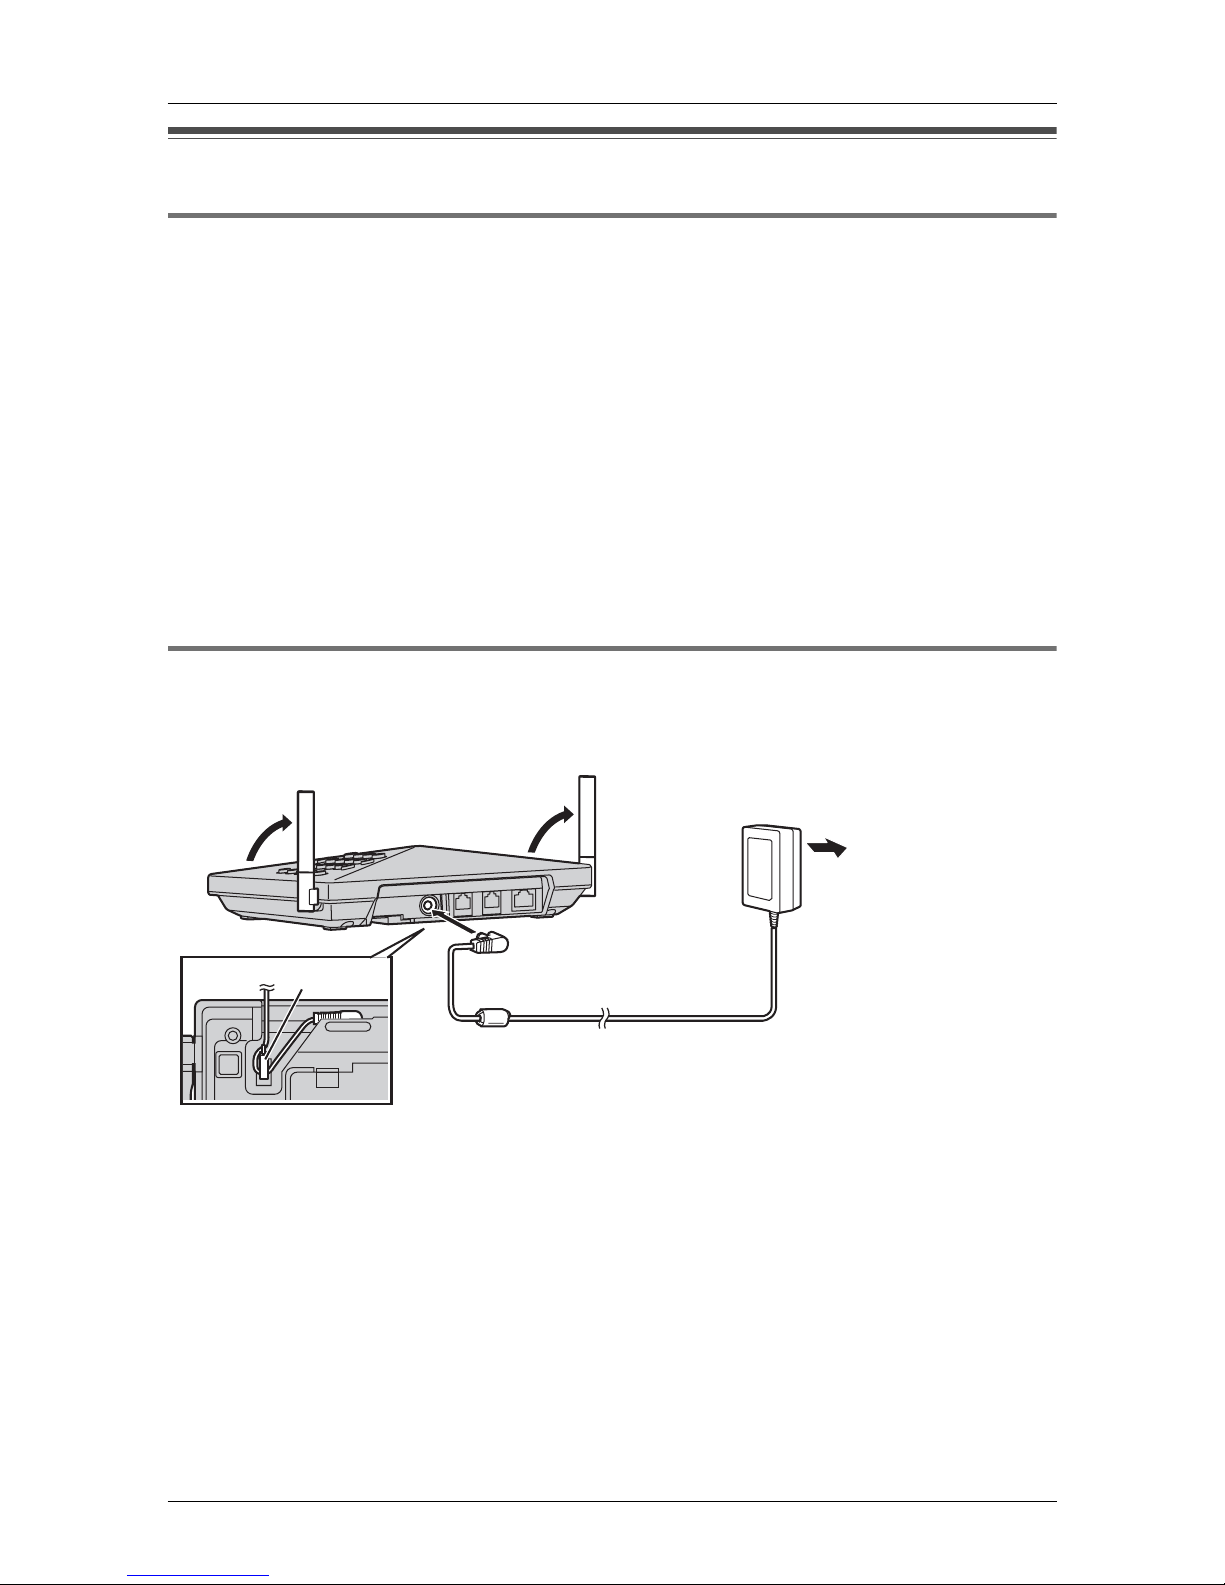
Setting up the base unit
Overview
1 Connect the AC adaptor.
2 Connect the telephone line cord.
Refer to one of the following methods depending on your situation.
L To connect to a 2-line telephone jack: page 16
L To connect to 2 single-line telephone jacks: page 16
L To connect to a single-line telephone jack: page 16
For DSL service subscribers:
L To connect to a 2-line telephone jack: page 17
L To connect to 2 single-line telephone jacks: page 17
3 To connect to your LAN, see page 95.
Preparation
Connecting the AC adaptor
Connect the AC adaptor, then raise the antennas.
L Use only the included Panasonic AC adaptor PQLV205.
(120 V AC, 60 Hz)
LAN
E2
LIN
LINE1/2
Hook
Note:
L The AC adaptor must remain connected at all times. (It is normal for the adaptor to feel
warm during use.)
L The AC adaptor should be connected to a vertically oriented or floor-mounted AC outlet.
Do not connect the AC adaptor to a ceiling-mounted AC outlet, as the weight of the
adaptor may cause it to become disconnected.
L The unit will not work during a power failure. We recommend connecting a standard
telephone to the same telephone line or to the same telephone jack using a Panasonic
T-adaptor (page 6).
For assistance, please visit http://www.panasonic.com/phonehelp 15
Preparation
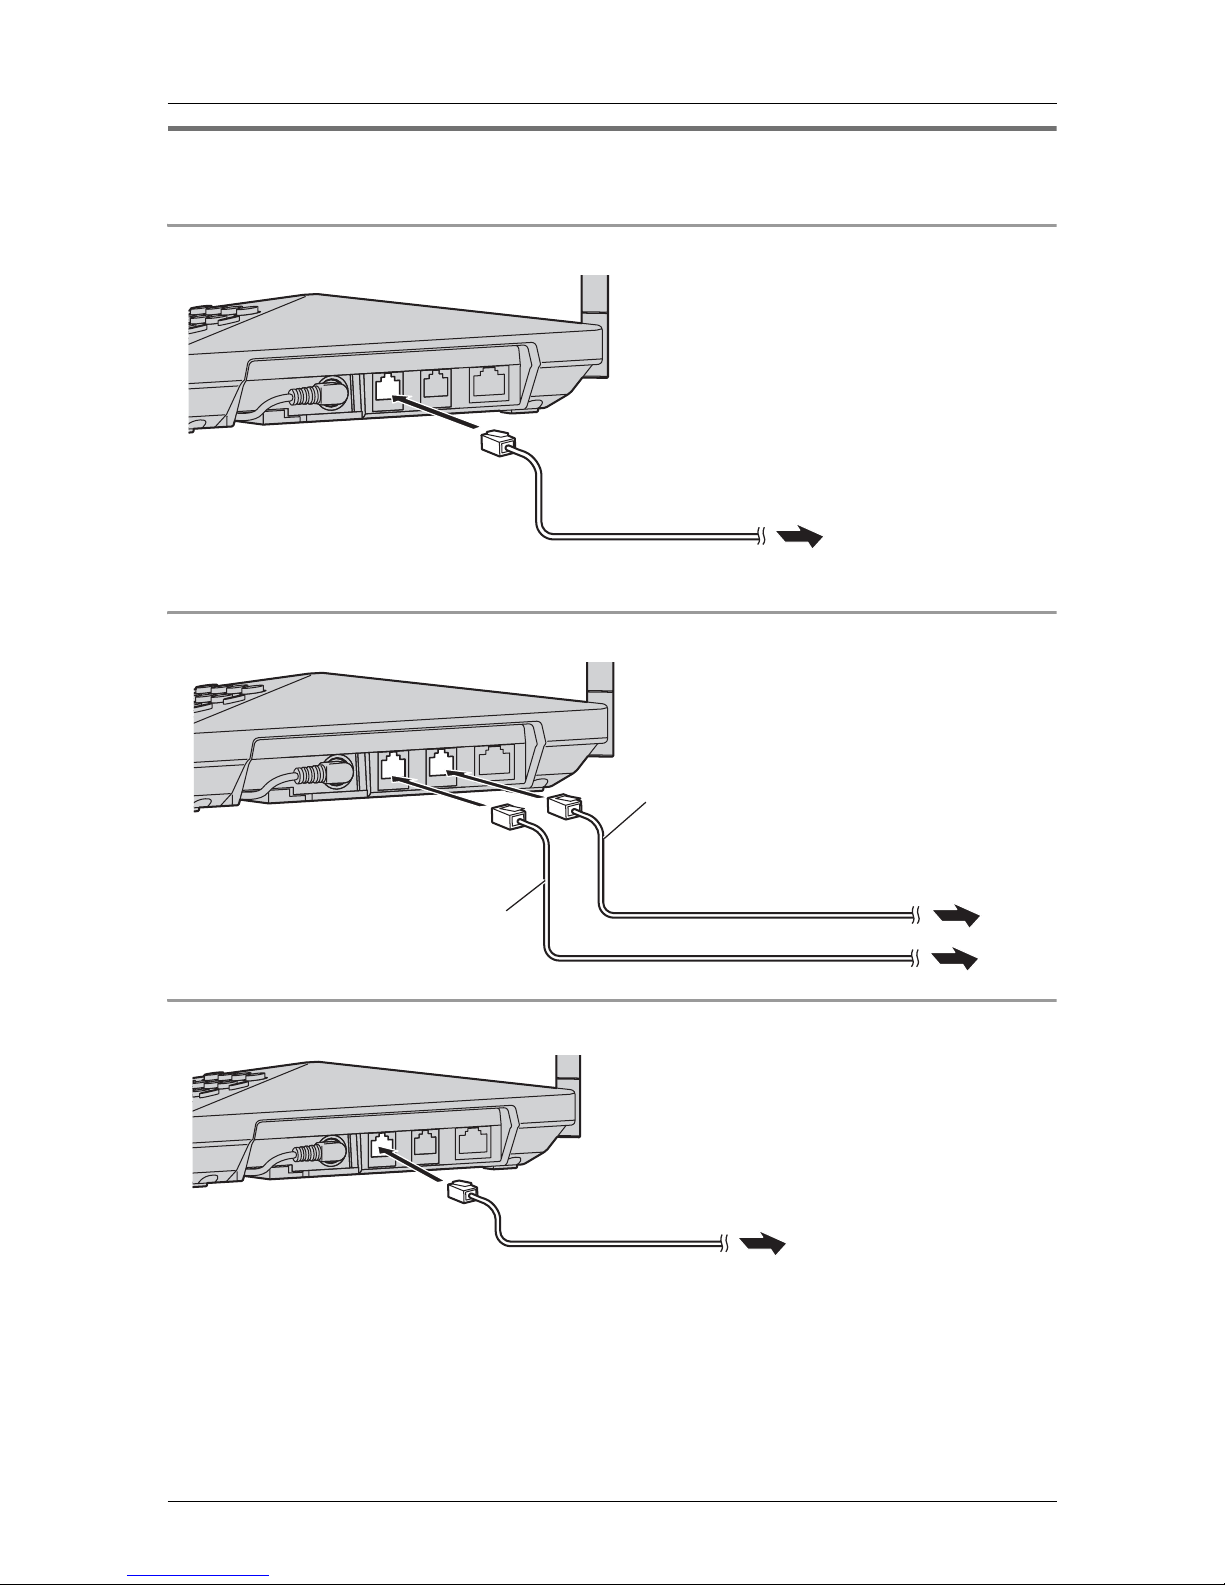
Connecting the telephone line cord
Connect the telephone line cord until it clicks into the telephone jack.
To connect to a 2-line telephone jack
LAN
LINE2
LINE1/2
4-wire telephone line cord with green plugs
To 2-line telephone
jack (RJ14C)
To connect to 2 single-line telephone jacks
LAN
LINE2
LINE1/2
4-wire telephone line cord
with green plugs
To single-line telephone jacks (RJ11C)
2-wire telephone line cord
with transparent plugs
To connect to a single-line telephone jack
LAN
LINE2
LINE1/2
2-wire telephone line cord with transparent plugs
To single-line
telephone jack (RJ11C)
Note:
L Make sure you connect the telephone line cord into LINE1/2 telephone jack.
Line 2
Line 1
16 For assistance, please visit http://www.panasonic.com/phonehelp
Preparation
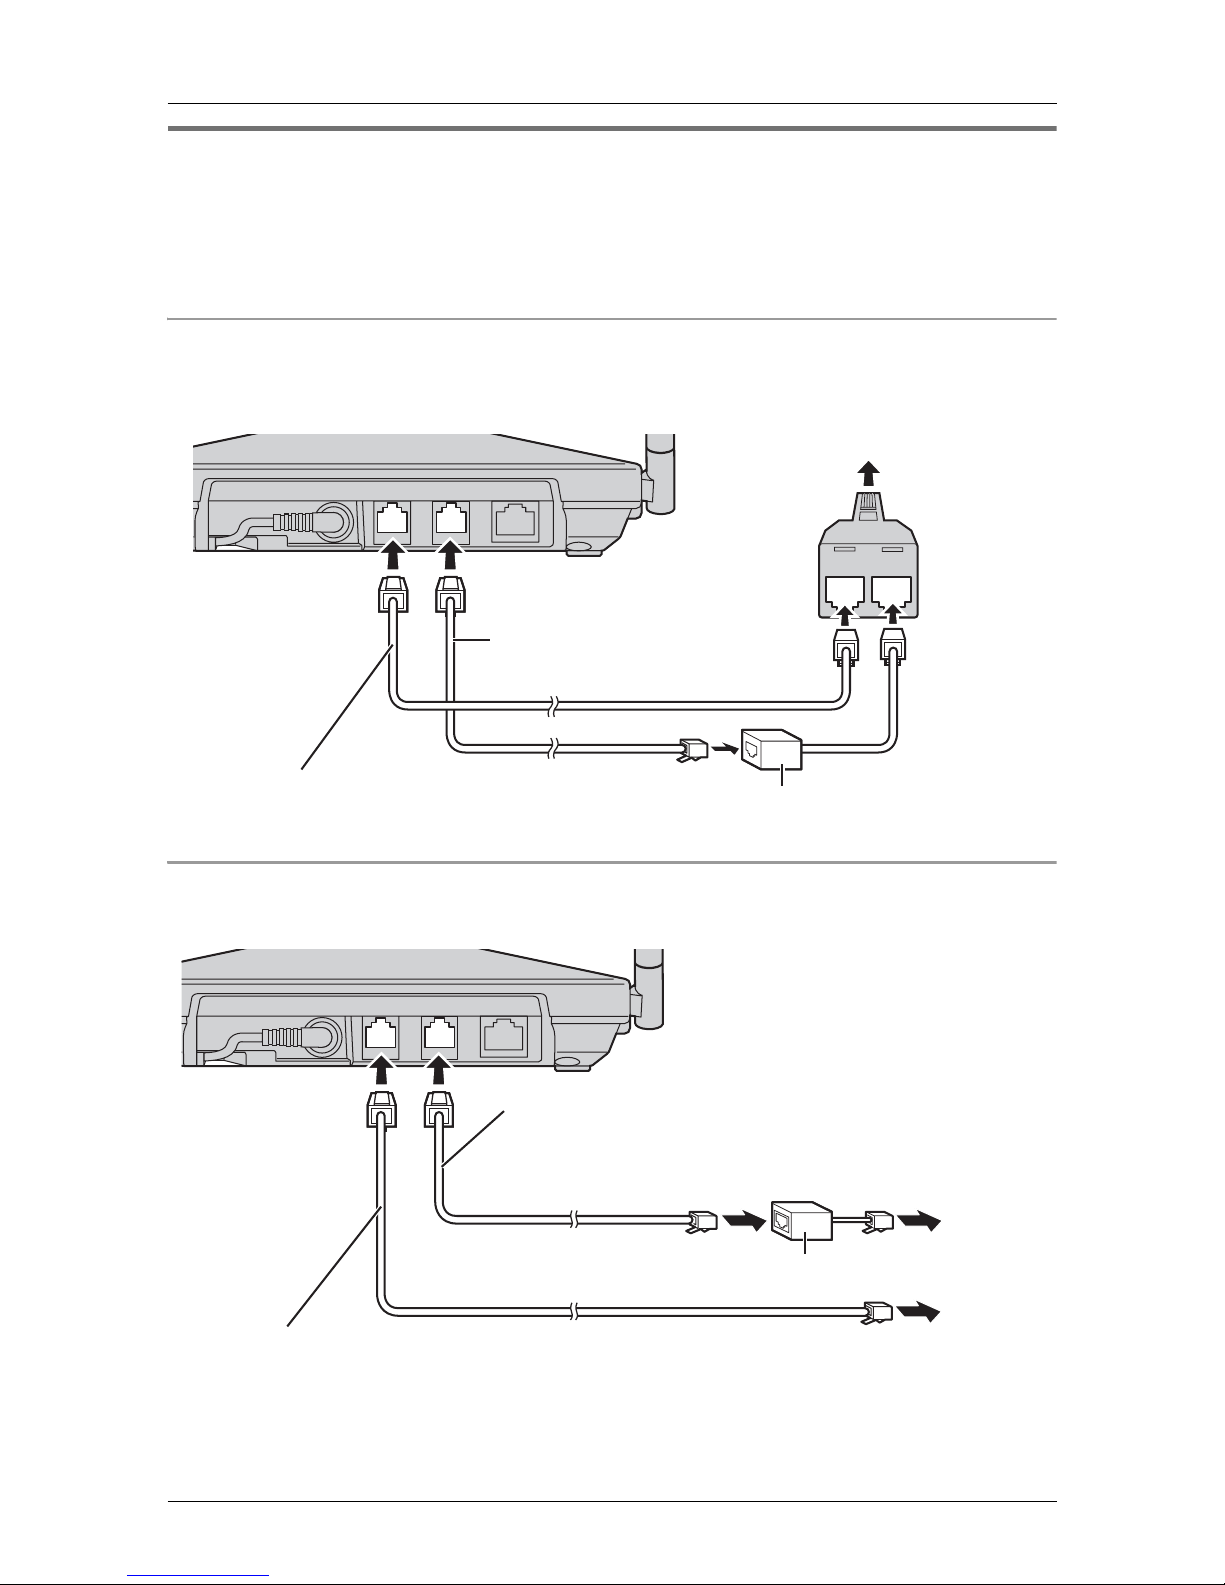
If you subscribe to a DSL service
Please attach a noise filter (contact your DSL provider) to the telephone line between the
base unit and the telephone line jack in the event of the following:
– Noise is heard during conversations.
– Caller ID features (page 40) do not function properly.
To connect to a 2-line telephone jack
For this connection, please purchase a Panasonic 2-line splitter (page 6).
Example: DSL line is line 2
To 2-line telephone jack (RJ14C)
LINE1/2 LINE2 LAN
LINE 2LINE 1
2-line
splitter
4-wire telephone line cord
with green plugs
2-wire telephone line cord
with transparent plugs
To connect to 2 single-line telephone jacks
Example: DSL line is line 2
LINE1/2 LINE2 LAN
4-wire telephone line cord
with green plugs
2-wire telephone line cord with transparent plugs
Noise filter
To single-line telephone
jacks (RJ11C)
Line 2
Noise filter
Line 1
For assistance, please visit http://www.panasonic.com/phonehelp 17
Preparation
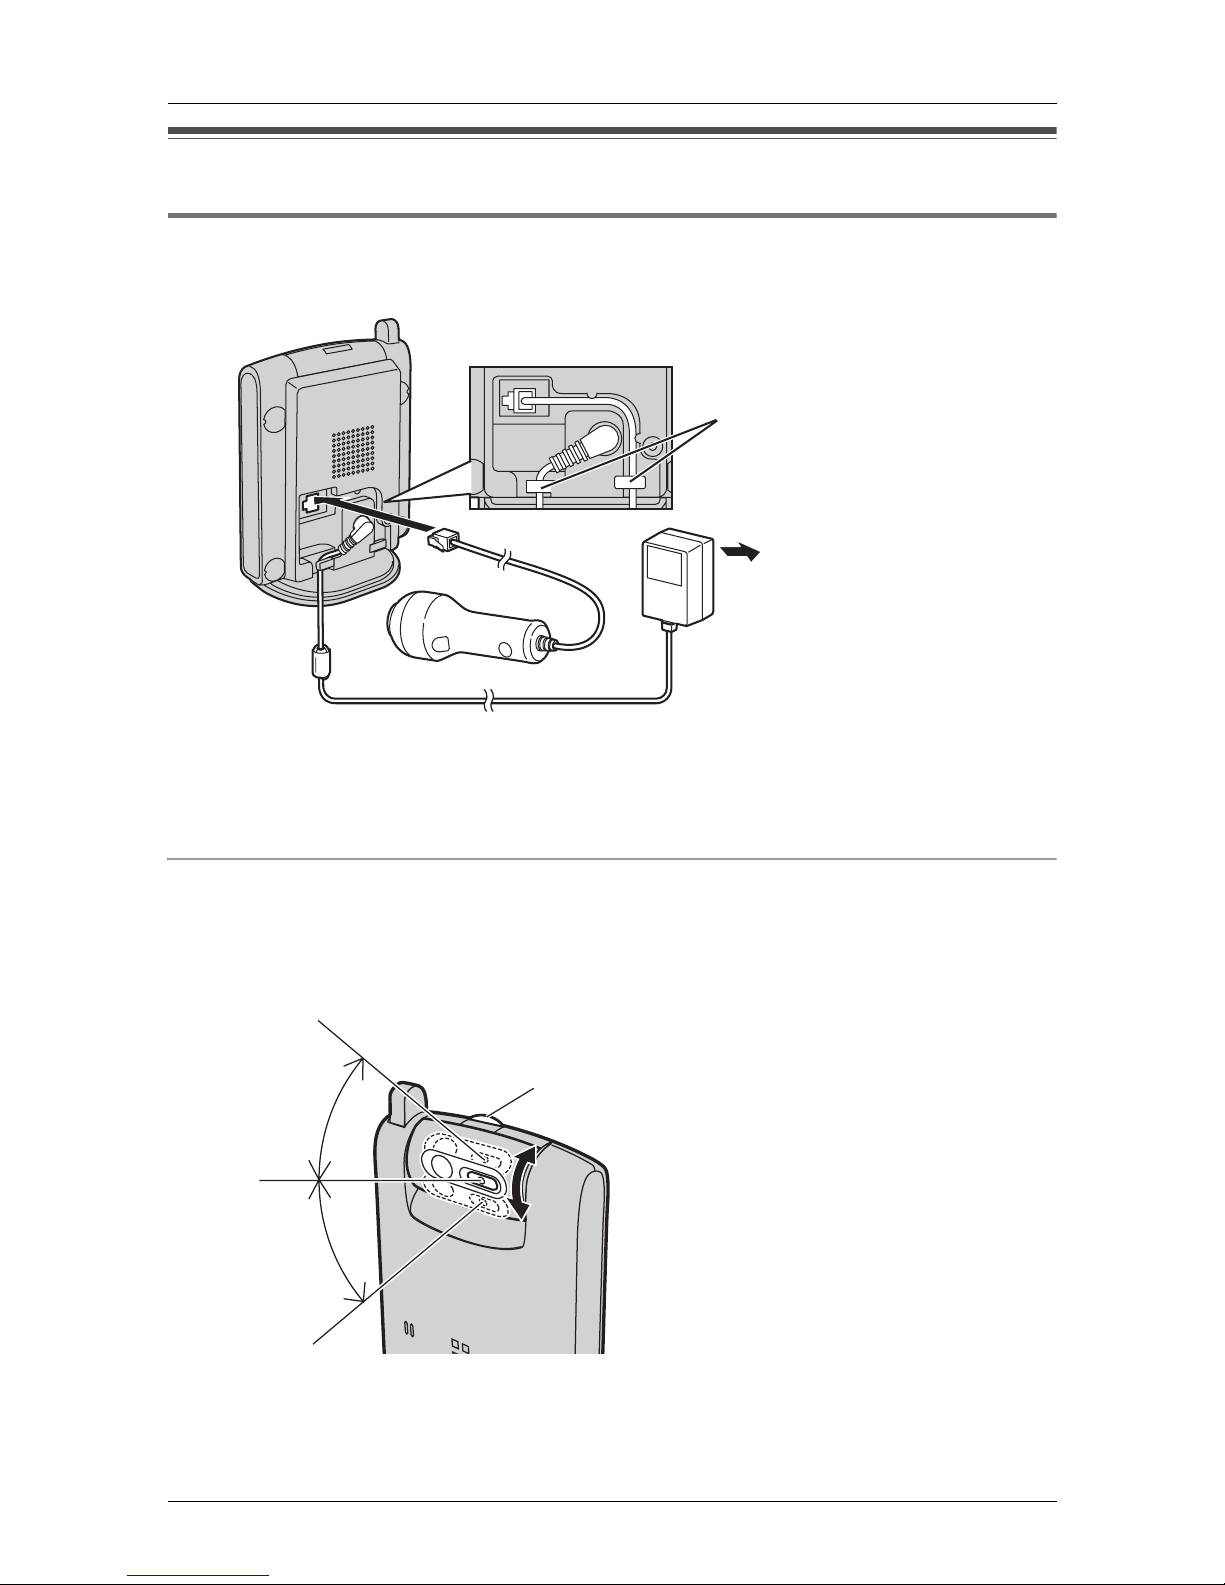
Setting up the cordless camera
Connecting the AC adaptor and the call button
L Use only the included Panasonic AC adaptor PQLV203.
Hooks
(120 V AC, 60 Hz)
Note:
L When the AC adaptor is connected, the indicator lights yellow-green.
L For information of the cordless camera location, see page 12.
Adjusting the cordless camera lens angle
Aim the camera lens by pushing the tab (A) and rotating the lens forward or backward.
L Using the handset or your computer, confirm that the area you want to monitor from the
cordless camera is displayed (page 54, 58).
A
Approx. 40°
Approx. 40°
Note:
L Do not touch the camera lens and sensor (page 23).
18 For assistance, please visit http://www.panasonic.com/phonehelp
Preparation
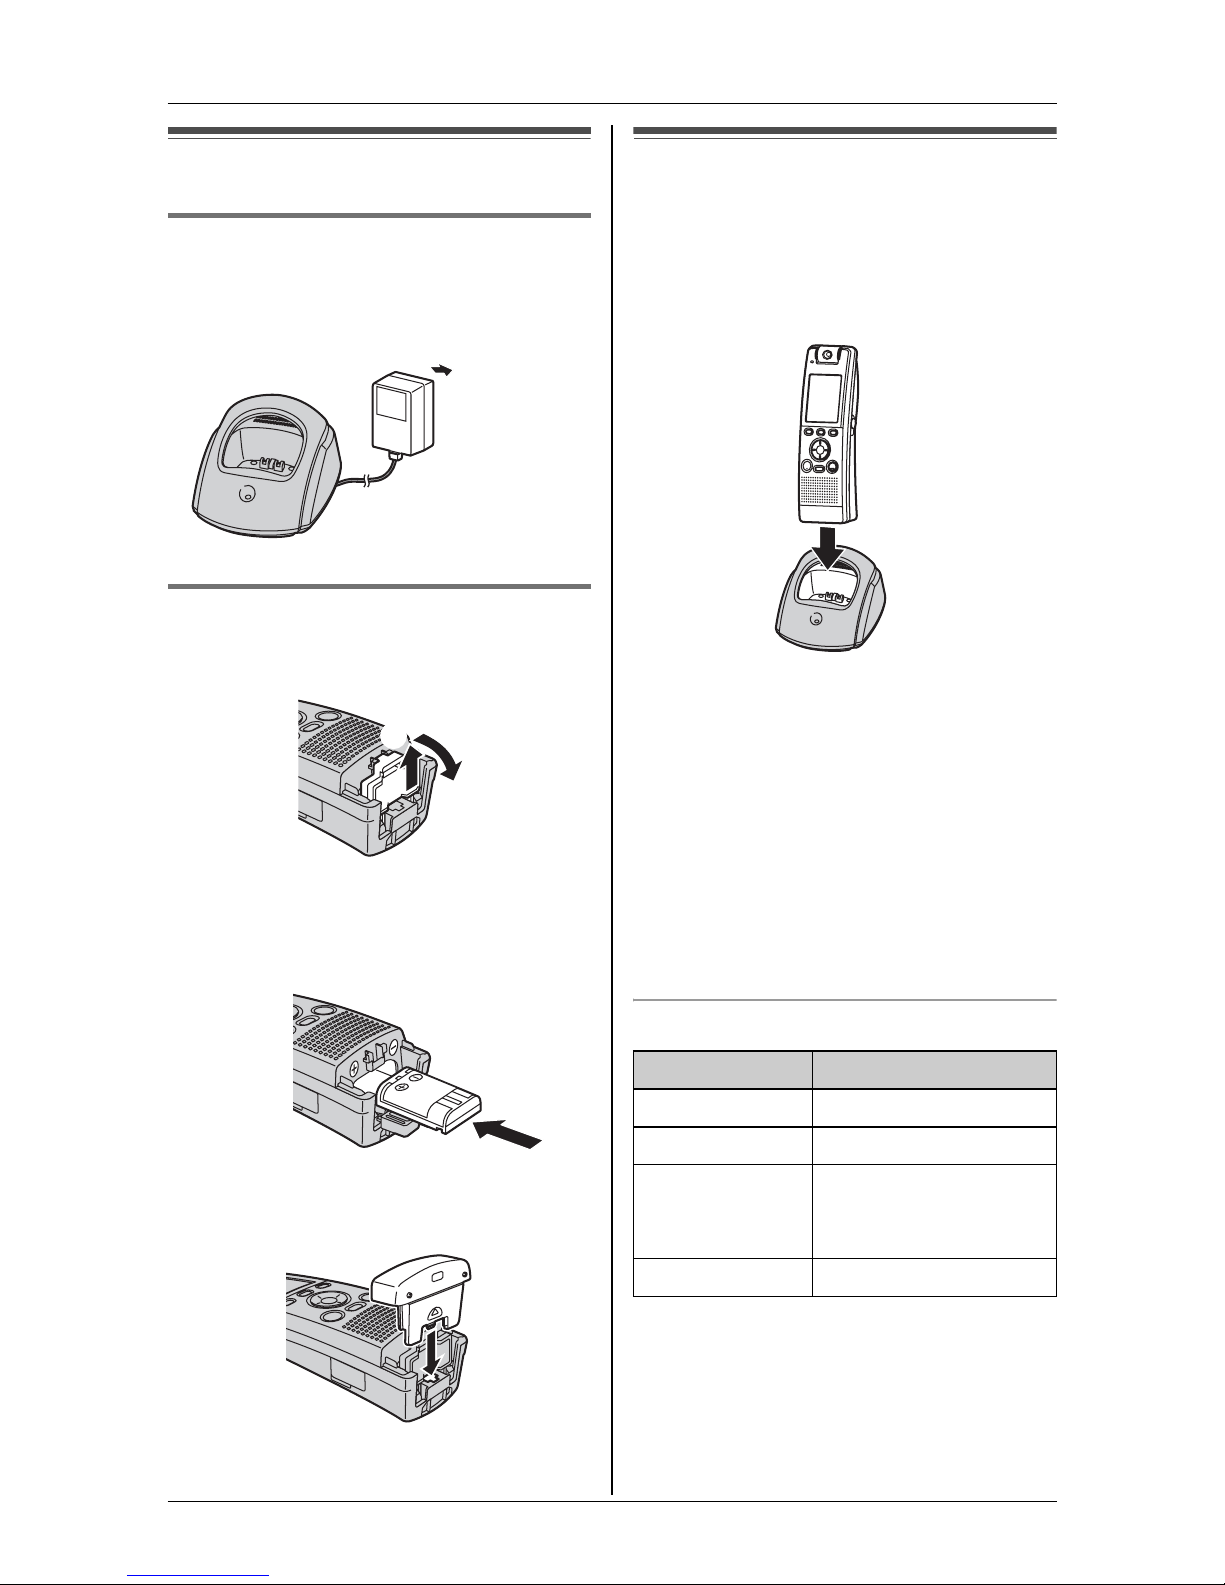
Setting up the handset
Connecting the AC adaptor
L Use only the included Panasonic AC
adaptor PQLV203.
(120 V AC,
60 Hz)
Battery installation
1 Open the inside cover.
A
2 Insert the battery as shown. Insert the
S and T end of the battery first. Close
the inside cover.
B
Battery charge
Place the handset on the charger for 4
hours before initial use.
While charging, the CHARGE indicator on
the charger lights.
Note:
L If you want to use the handset
immediately, charge the battery for at
least 15 minutes.
L To ensure that the battery charges
properly, clean the charge contacts of
the handset and charger with a soft, dry
cloth once a month. Clean more often if
the unit is subject to grease, dust, or
high humidity.
3 Close the handset cover in the direction
of the arrow.
For assistance, please visit http://www.panasonic.com/phonehelp 19
Battery strength
Battery icon Battery strength
1 Fully charged or high
2 Medium
3 Low
Flashing: needs to be
recharged.
4 Discharged
Note:
L When the battery needs to be charged,
the handset beeps intermittently while it
is in use.

Preparation
Panasonic battery performance
Operation Operating time
While in use
(talking)
While not in use
(standby)
While using the
clarity booster
feature (page 33)
Note:
L Battery operating time may be
shortened over time depending on
usage conditions and ambient
temperature.
L Battery power is consumed whenever
the handset is off the charger, even
when the handset is not in use. The
longer you leave the handset off the
charger, the shorter you can actually talk
using the handset.
L Once the battery is fully charged, you do
not have to charge it again until
“Recharge battery” is displayed or
3 flashes. This will maximize the
battery life.
Voice call: Up to 3.5
hours
Video call: Up to 1.5
hours
Up to 4 days
Up to 2.5 hours
Battery replacement
Important:
L Use only the rechargeable Panasonic
battery noted on page 6.
1 Press the notch of the handset cover
firmly (A), and slide it in the direction of
the arrow (B).
A
B
2 Open the inside cover (page 19).
3 Remove the old battery, then insert the
new battery. Close the inside cover.
20 For assistance, please visit http://www.panasonic.com/phonehelp
4 Close the handset cover (page 19).
Attention:
A nickel metal hydride battery that is
recyclable powers the product you have
purchased.
Please call 1-800-8-BATTERY (1-800822-8837) for information on how to
recycle this battery.

Controls
Base unit
Preparation
ABCDE FGHIA
KJLMNOQRPTS
A Antenna
B Speaker
C Display
D {CELLULAR}
E {*} (TONE)
F {PAUSE}{REDIAL}
G {FLASH}{CALL WAIT}
H {LINE1}
I {LINE2}
J USB port
K {ERASE}
L {EDIT}
M {MEMO}
UV W X Y
N {ANSWER ON}
ANSWER ON indicator
O {MENU}{SET}
P Navigator key
Q {LINE SELECT}
R {STOP}
S MIC (Microphone)
T {MESSAGE}
U {TRANSFER}{INTERCOM}
V {MUTE}
W {SP-PHONE} (Speakerphone)
X {HOLD}
Y {CONF} (Conference)
For assistance, please visit http://www.panasonic.com/phonehelp 21
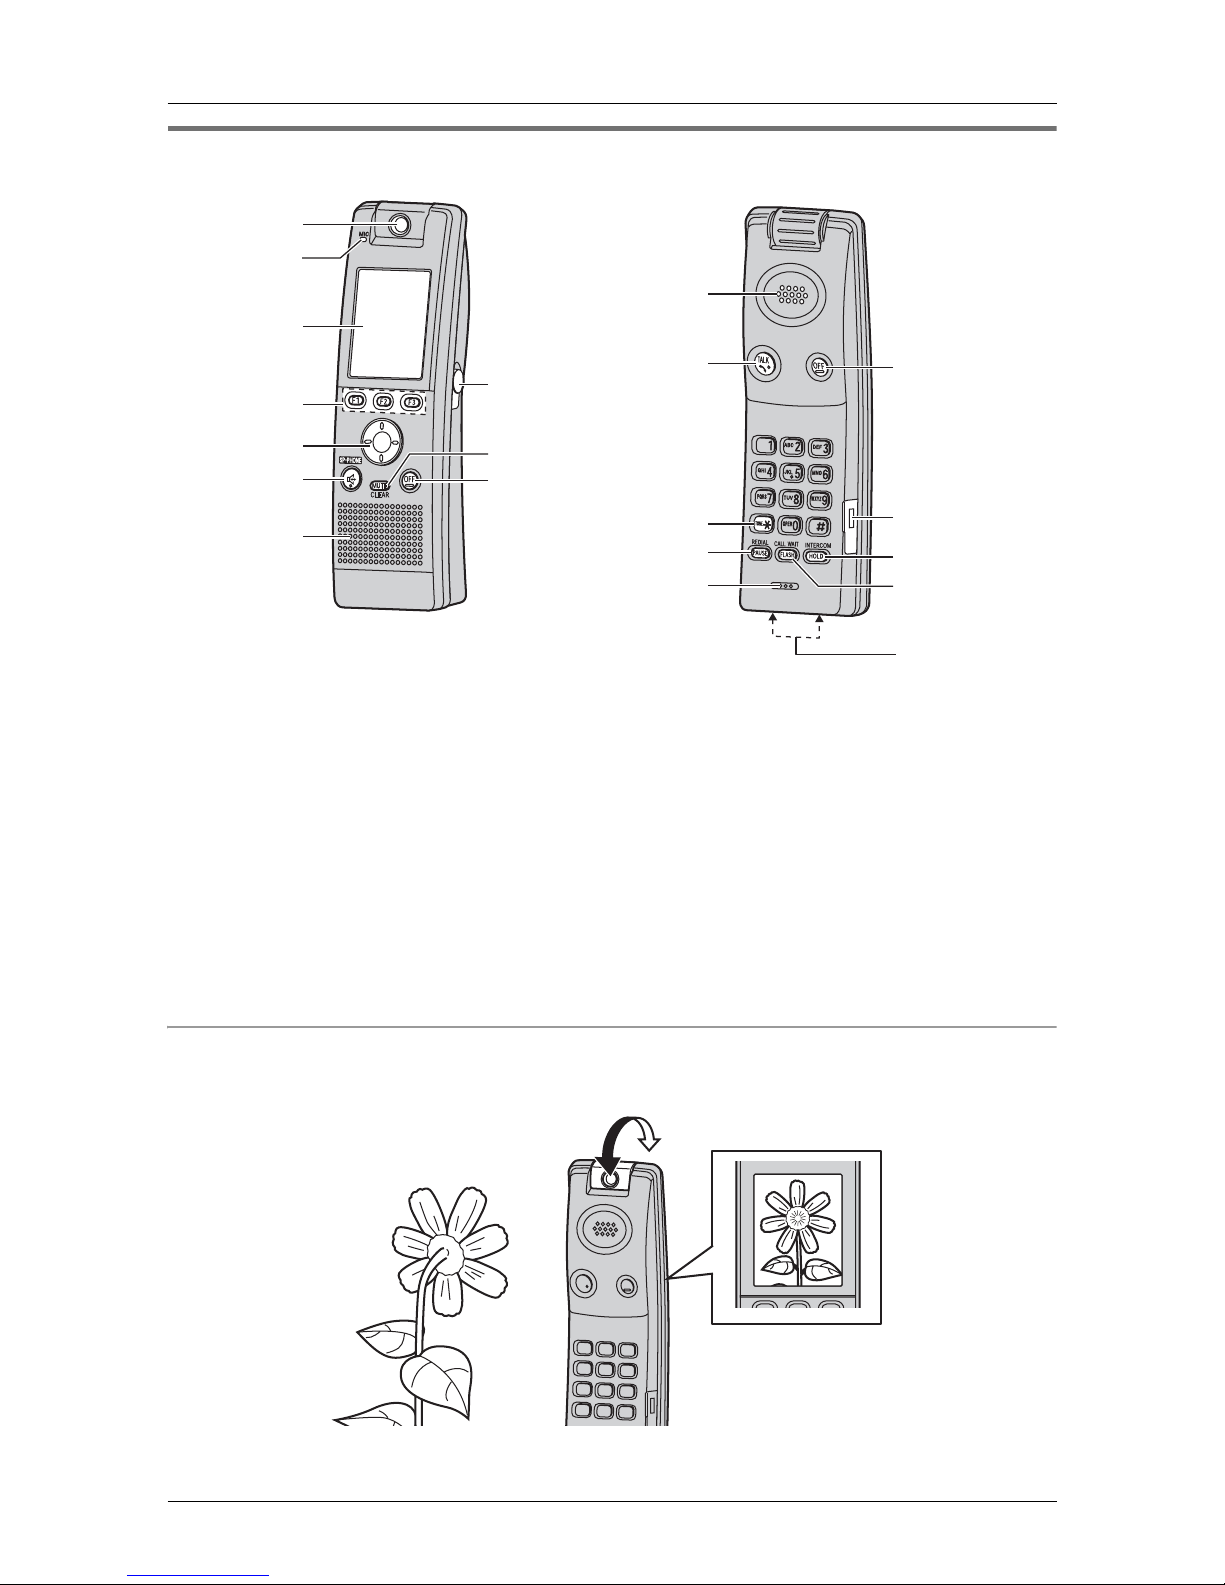
Preparation
Handset
A
B
C
K
D
E
F
G
A Camera lens
B MIC (Microphone)
C Display
D Soft keys (F1, F2, F3)
E Navigator key
F {s} (SP-PHONE)
G Speaker
H Headset jack/Audio jack
I {MUTE}{CLEAR}
H
I
J
L
M
N
B
J {OFF}
K Receiver
L {C} (TALK)
M {*} (TONE)
N {PAUSE}{REDIAL}
O USB port
P {HOLD}{INTERCOM}
Q {FLASH}{CALL WAIT}
R Charge contacts
J
O
P
Q
R
Adjusting the camera lens angle
Aim the camera lens by rotating the lens forward or backward.
22 For assistance, please visit http://www.panasonic.com/phonehelp
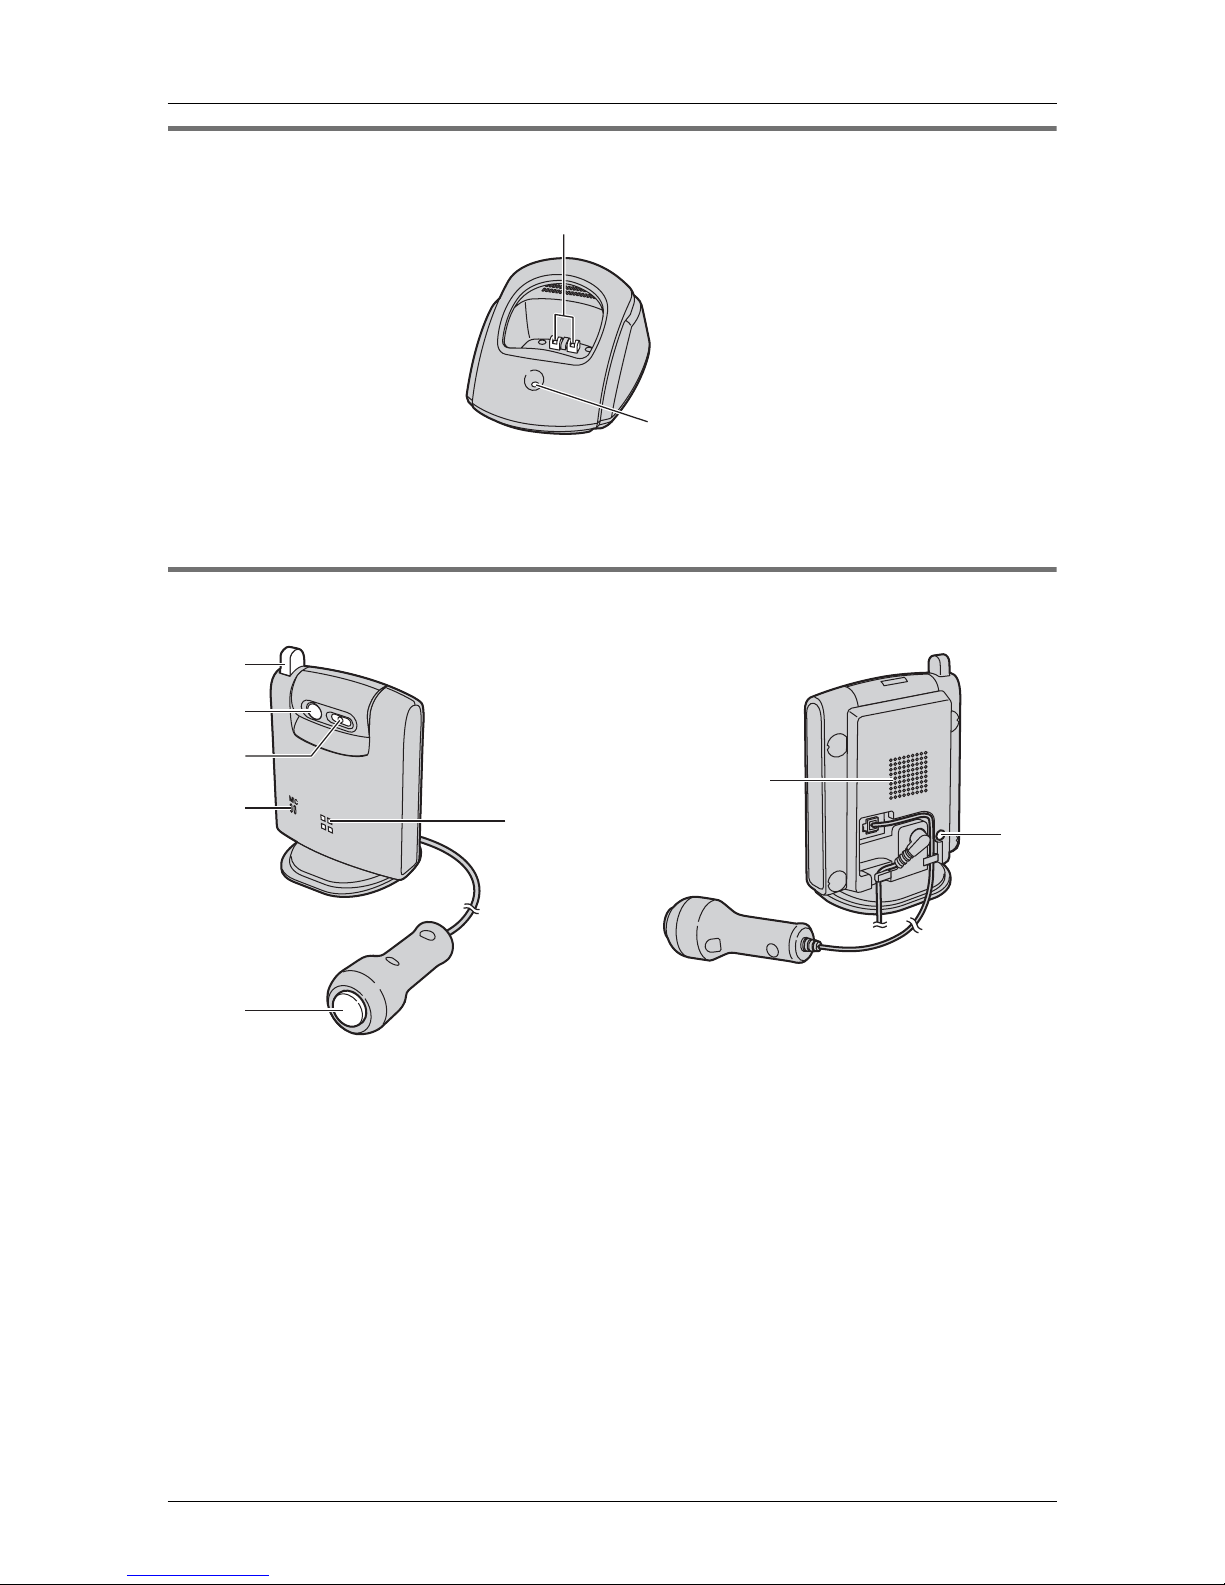
Charger
A Charge contacts
B CHARGE indicator
Cordless camera
Preparation
A
B
A
B
C
D
E
A Antenna
B Sensor
C Camera lens
D MIC (Microphone)
E {Call button}
F
G
H
F Indicator
G Speaker
H PROG. (Program)
For assistance, please visit http://www.panasonic.com/phonehelp 23
Preparation
Understanding the indicators
Base unit line buttons
The line buttons ({LINE1}, {LINE2}) show the status of each line as follows.
Status Meaning
Light off The line is free.
Light on The line is in use.
Flashing rapidly A call is being received.
Flashing A call is put on hold on another unit or the answering
system is answering a call.
Base unit {CELLULAR} button
The {CELLULAR} button shows the status as follows.
Status Meaning
Light off The cellular line is free.
Light on The cellular line is in use.
Flashing rapidly A cellular call is being received.
Flashing A cellular call is put on hold or the answering system is
answering a cellular call.
Cordless camera indicator
The cordless camera indicator shows the status as follows. You can select when the
cordless camera indicator turns on (page 64). The default setting is “Always on” (The
indicator lights at all times).
Status Meaning
Red, flashing rapidly The cordless camera is not registered. Register the
cordless camera (page 78).
Red, flashing The cordless camera is out of range. Locate the cordless
camera near the base unit.
*1
Yellow-green The cordless camera is registered and in standby mode.
Yellow-green, flashing
rapidly
The camera sensor responds and the cordless camera is
paging the handset or your computer.
Yellow-green, flashing The cordless camera is connected and sending the live
video to the handset or your computer.
*1
*1 Only when the cordless camera indicator setting is “Always on”.
24 For assistance, please visit http://www.panasonic.com/phonehelp

Preparation
Displays
Base unit display items
Displayed
item
L1
L2
L
L1
,
ANSWER
L1 L2
MESSAGE
FULL
1 This icon is displayed in
Meaning
Flashes when the date
and time need to be set.
Ringer for both line 1 and
line 2 on the base unit is
off.
Line 1 or line 2 ringer on
2
the base unit is off.
Call privacy mode is on.
The line icon is displayed
when the displayed line is
selected for the answering
system.
Flashing:
– the answering system is
answering a call on that
line.
– you have new
messages on that line.
Flashes when message
memory is full.
You are using a cellular
line. The number of bars
indicates the signal
strength of the cellular
line. Depending on a
connected cellular
phone’s capability, these
bars may not be
displayed.
the lower right
representing a connected
cellular phone’s battery
strength. It may not be
displayed depending on
the cellular phone’s
capability.
Displayed
Meaning
item
The base unit is
connected to your network
using the LAN cable.
PC
Computer is connected.
Handset display items
Displayed
item
i Battery is charging.
1 – Battery strength
k
l
Example: Handset extension
VE
L1
L2
Meaning
indicator for the handset
(located in the upper
right of the display)
– This icon is also
displayed in the lower
right representing a
connected cellular
phone’s battery
strength. It may not be
displayed depending on
the cellular phone’s
capability.
The line is in use.
Flashing:
– the call is put on hold on
that line.
– the answering system is
answering a call on that
line.
Flashing rapidly: a call is
being received on that
line.
number
Voice enhancer is on.
Speaker is on.
Call privacy mode is on.
Ringer for both line 1 and
line 2 on the handset is off.
For assistance, please visit http://www.panasonic.com/phonehelp 25
Preparation
Displayed
item
,
L1 L2
Q When customizing the
MUTE
HOLD
z The cordless camera
Meaning
Line 1 or line 2 ringer on
the handset is off.
handset: indicates the
current setting.
Mute is on during a video
call.
A call is put on hold during
a video call.
You are sending a still
image to the other party
during a video call.
You are receiving a still
image during a video call.
Monitor access is on.
detects motion and/or
sound, or its {Call
button} is pressed.
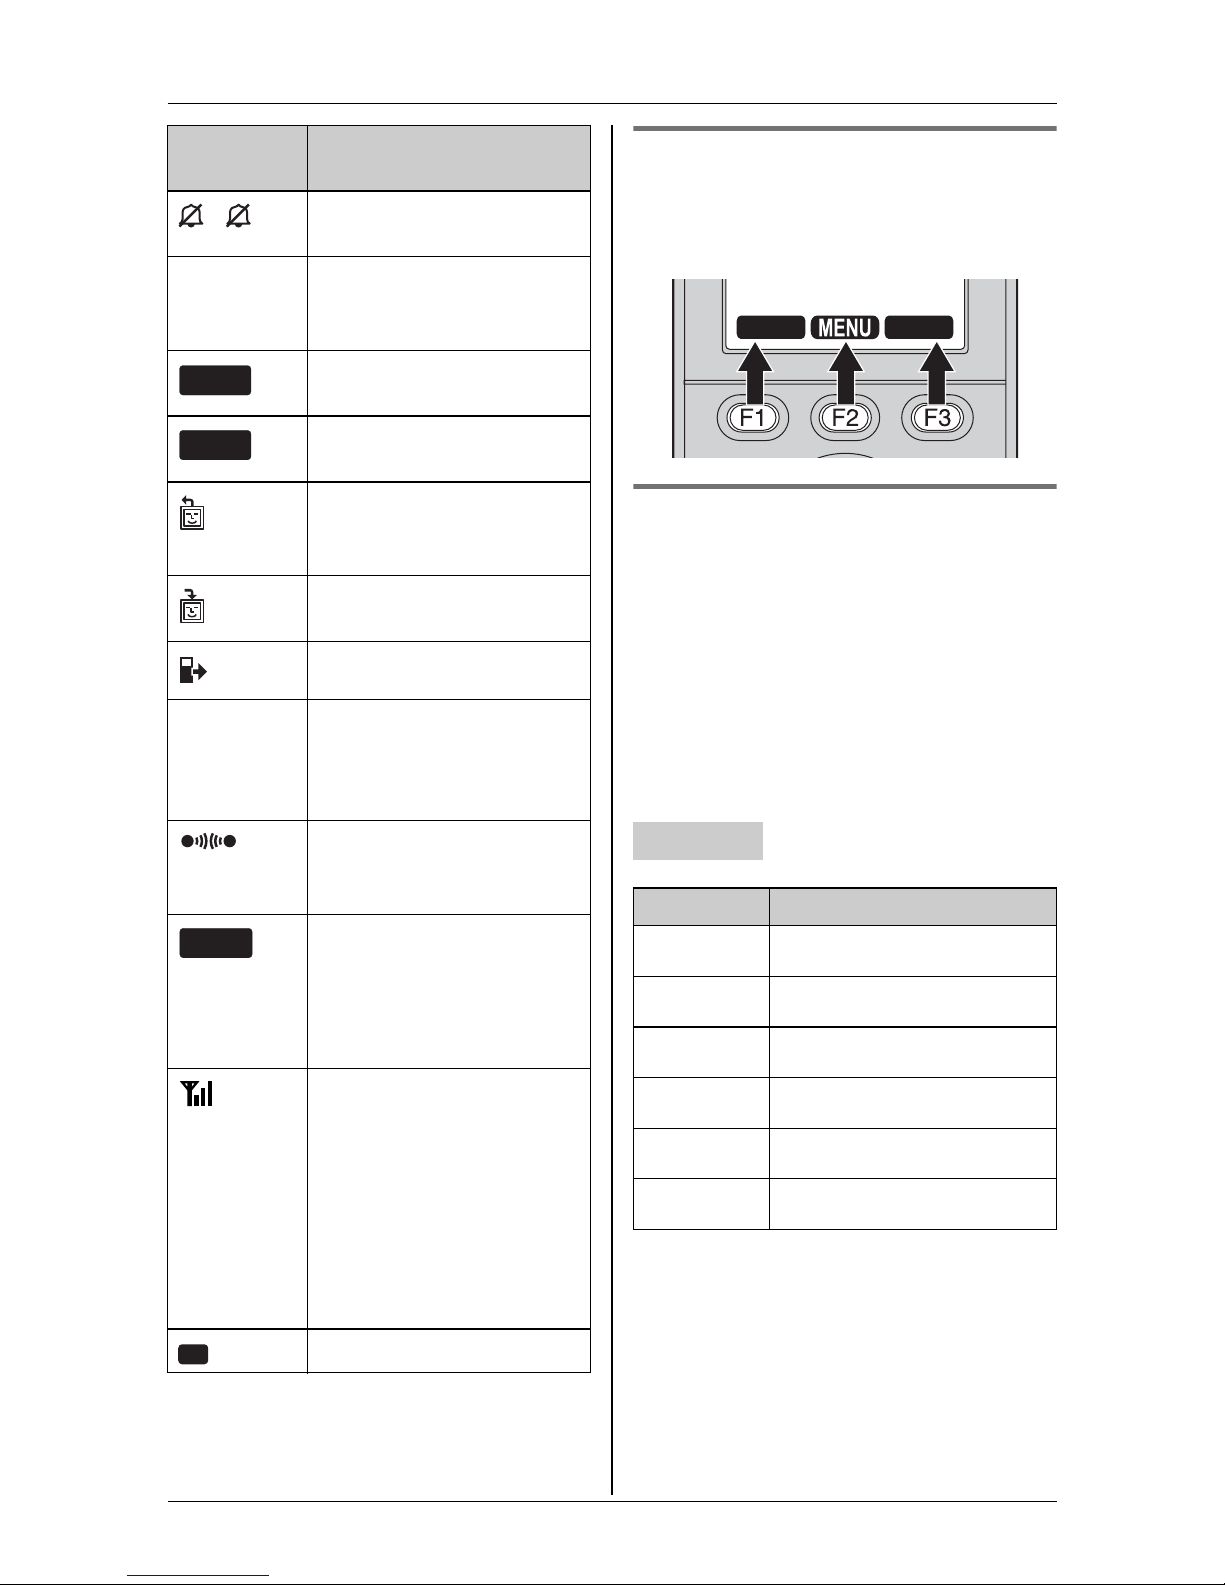
Handset soft keys
The handset features 3 soft keys. By
pressing a soft key, you can select the
function displayed directly above it.
LINE1
LINE2
Menu icons
When in standby mode, pressing {MENU}
(F2) on the handset or {MENU} on the
base unit reveals the main menu. From
here you can access various features and
settings.
Note:
L The menu icons shown in these
operating instructions vary slightly from
the actual icons shown on the display.
CELL
(displayed
in the top
center)
PC
You are talking with the
other party when
monitoring.
The cellular line is in use.
Flashing: a cellular call is
put on hold.
Flashing rapidly: a cellular
call is being received.
You are using a cellular
line. The number of bars
indicates the signal
strength of the cellular
line. Depending on a
connected cellular
phone’s capability, these
bars may not be
displayed.
Computer is connected.
Base unit
Menu icon Menu/feature
d
G
A
f
F
h
Phonebook
Caller list
Set answering
Ringer settings
Audio monitor
Other items
26 For assistance, please visit http://www.panasonic.com/phonehelp
Preparation
Handset
Menu icon Menu/feature
q
G
i
s
t
u
v
H
x
Phonebook
Caller list
Message playback
Ringer settings
Display settings
Video phone set.
Camera & Viewer
Monitor
Other items
Handset screen saver
After 1 minute of inactivity, the handset
enters screen saver mode if the handset is
not on the charger.
“Screen saver” is displayed, and will
occasionally change position in order to
preserve the life of the display.
Symbols used in these
operating instructions
Symbols used at the end of titles
Symbol Meaning
o
Y
j
Z
Symbols used for operations
Symbol Meaning
d, G,
A,
f,
F, h
Operate with the base unit.
Operate with the handset.
Operate with the cordless
camera.
Operate with your
computer.
The symbols to the left
represent the base unit
menu icons.
Example: d
Press the navigator key of
the base unit up, down, left,
or right to select that menu
icon shown on the display.
To cancel screen saver mode
To use the handset when it is in screen
saver mode, first press {OFF} to turn the
display on again.
For assistance, please visit http://www.panasonic.com/phonehelp 27
q, G,
i, s,
t, u,
v, H,
x
Example:
“Ringer
volume”
The symbols to the left
represent the handset
menu icons.
Example: q
Press the navigator key of
the handset up, down, left,
or right to select that menu
icon shown on the display.
Base unit and handset:
Press the navigator key up
or down to select the words
in quotations shown on the
display.
Your computer:
Left-click on the words in
quotations shown in the
browser to select the
setting.
Preparation
Symbol Meaning
i Proceed to the next
operation.
Example:
{MENU}
{^}, {V} Press the navigator key up
The words in the brackets
show button names on the
handset and base unit.
or down to scroll through
the displayed items.
Setting the unit before
use
Display language Y o
Handset
1 {MENU} (F2) i x i {SELECT}
{<}, {>} Press the navigator key left
or right to select the desired
items.
Example:
[Top]
The words in the brackets
show tabs and button
names on your computer.
2 “Change language” i {SELECT}
3 Select the desired setting. (Default:
“English”)
4 Press the soft key (F2) to save. i
{OFF}
Note:
L If you select a language you cannot
read, press the middle soft key (F2),
{#}{1}{1}{0}{1}, and {SAVE} to
change the display language to English.
Base unit
1 {MENU} i h i {SET}
2 “Change language” i {SET}
3 Select the desired setting. (Default:
“English”) i {SET} i {STOP}
28 For assistance, please visit http://www.panasonic.com/phonehelp
Note:
L If you select a language you cannot
read, press {MENU}, {#}{1}{1}{0}{1},
and {SET} to change the display
language to English.

Preparation
Dialing mode Y o
If you cannot make calls, change this
setting depending on your telephone line
service.
“Tone”: For tone dial service.
“Pulse”: For rotary pulse dial service.
L You only need to program this setting
once, using either the handset or base
unit.
Handset
1 {MENU} (F2) i x i {SELECT}
2 “Set tel line” i {SELECT}
3 “Set dial mode” i {SELECT}
4 Select the desired setting. (Default:
“Tone”) i {SAVE} i {OFF}
Base unit
1 {MENU} i h i {SET}
2 “Set tel line” i {SET}
3 “Set dial mode” i {SET}
4 Select the desired setting. (Default:
“Tone”) i {SET} i {STOP}
Date and time Y o
L You only need to program this setting
once, using either the handset or base
unit.
Handset
1 {MENU} (F2) i x i {SELECT}
2 “Date and time” i {SELECT}
3 Enter the current month, day, and year
by selecting 2 digits for each.
Example: May 15, 2006
{0}{5}{1}{5}{0}{6}
4 Enter the current hour and minute (12-
hour clock format) by selecting 2 digits
for each.
Example: 9:30
{0}{9}{3}{0}
5 Press {*} to select “AM” or “PM”.
6 {SAVE} i {OFF}
Base unit
1 {MENU} i h i {SET}
2 “Date and time” i {SET}
3 Enter the current month, day, and year
by selecting 2 digits for each.
Example: May 15, 2006
{0}{5}{1}{5}{0}{6}
4 Enter the current hour and minute (12-
hour clock format) by selecting 2 digits
for each.
Example: 9:30
{0}{9}{3}{0}
5 Press {*} to select “AM” or “PM”.
6 {SET} i {STOP}
Note for handset and base unit:
L If you make a mistake when entering the
date and time, press {^}, {V}, {<}, or
{>} to move the cursor, then make the
correction.
For assistance, please visit http://www.panasonic.com/phonehelp 29
C
Making/Answering Calls
Making calls
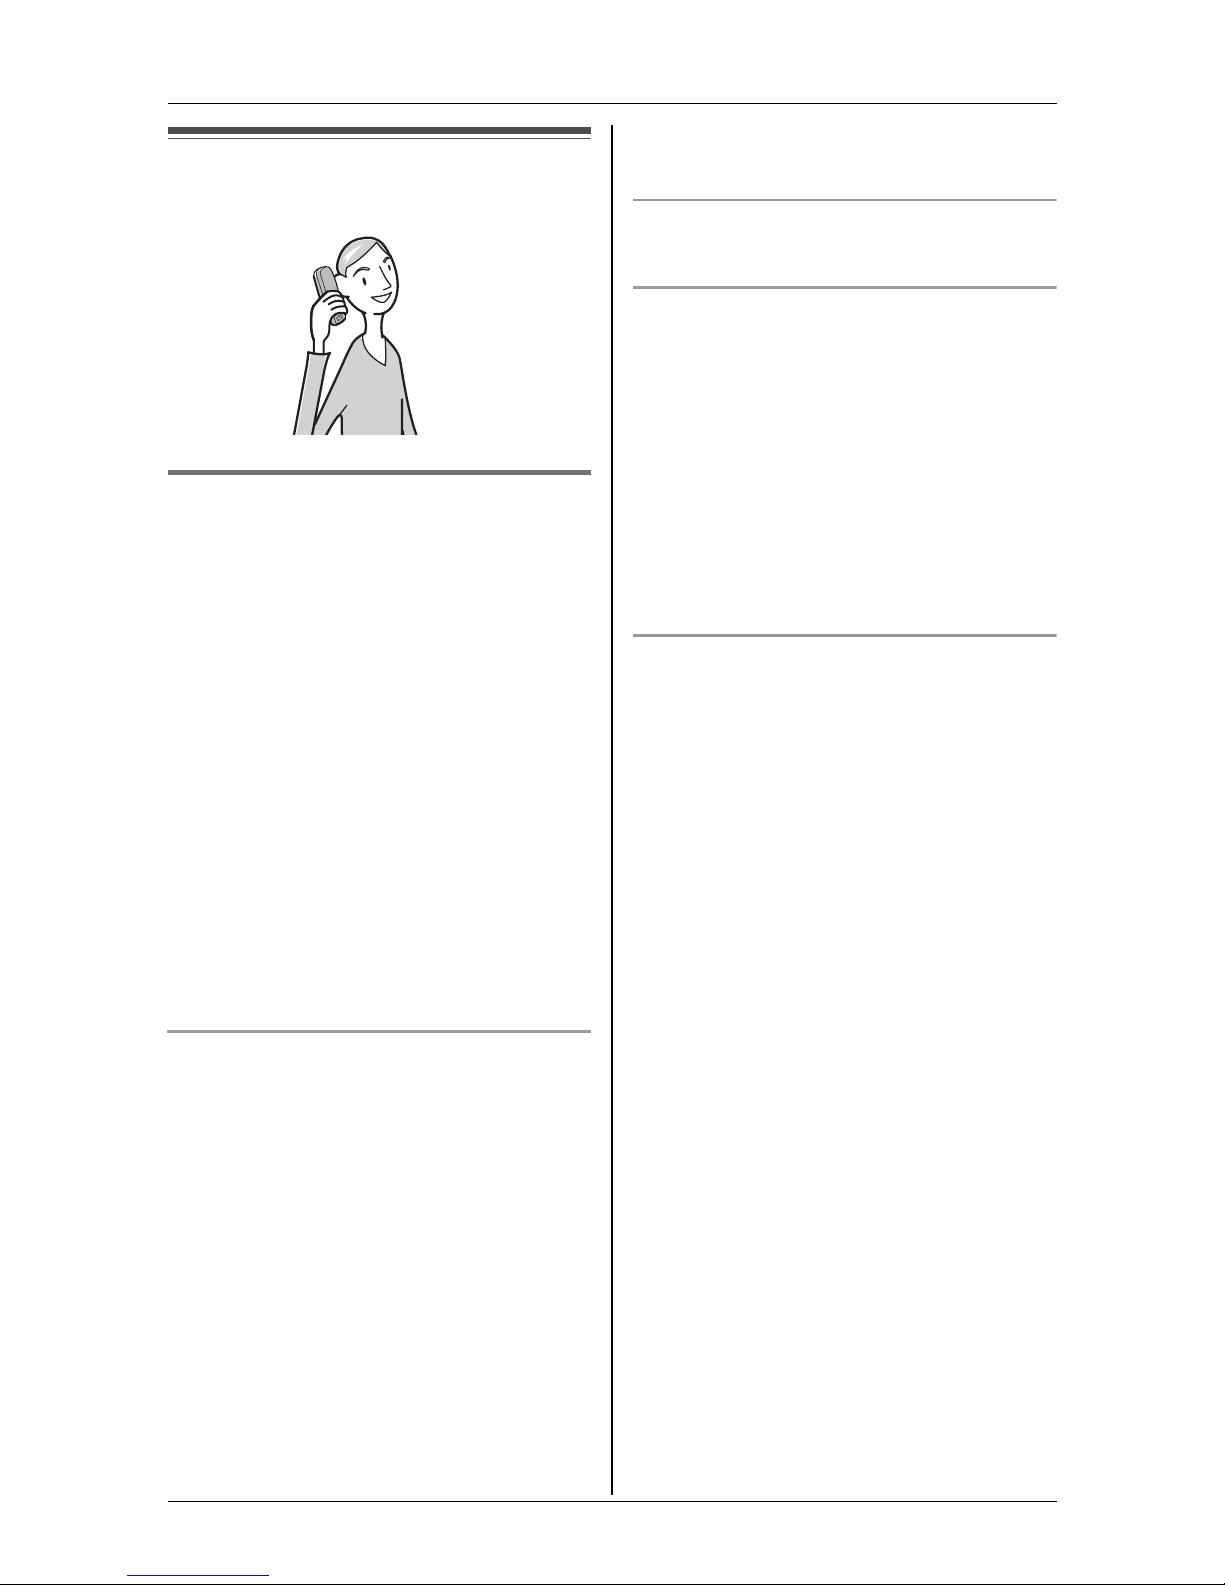
Using the handset Y
1 Lift the handset and dial the phone
number.
L To correct a digit, press {CLEAR}.
L To switch back to the receiver, press
{C}.
Adjusting the receiver/speaker volume
Press {^} or {V} while talking.
Making a call using the redial list
The last 10 phone numbers dialed are
stored in the redial list.
1 {REDIAL}
2 Press {^} or {V} to select the desired
number.
L To erase the displayed number, press
{CLEAR}.
3 {C}
2 {C}
L An available line is automatically
selected and the line number is
displayed.
3 When you finish talking, press {OFF}.
Note:
L You can also select a line by pressing
{LINE1} or {LINE2} in step 2. The
speakerphone is activated.
L To change the line selection, see page
74.
Using the speakerphone
Important:
L You can place the handset on the
charger while using the speakerphone.
The call is not disconnected.
PAUSE button (for PBX/long distance
service users)
A pause is sometimes required when
making calls using a PBX or long distance
service.
For example, if you need to dial the line
access number “9” when making outside
calls with a PBX:
1 {9} i {PAUSE} i Dial the phone
number.
2 {C}
Note:
L A 3.5 second pause is inserted each
time {PAUSE } is pressed. Press
repeatedly to insert longer pauses.
1 During a conversation, press {s} to
turn on the speakerphone.
L Speak alternately with the other party.
2 When you finish talking, press {OFF}.
Note:
L Use the speakerphone in a quiet
environment.
30 For assistance, please visit http://www.panasonic.com/phonehelp
 Loading...