

Page 1
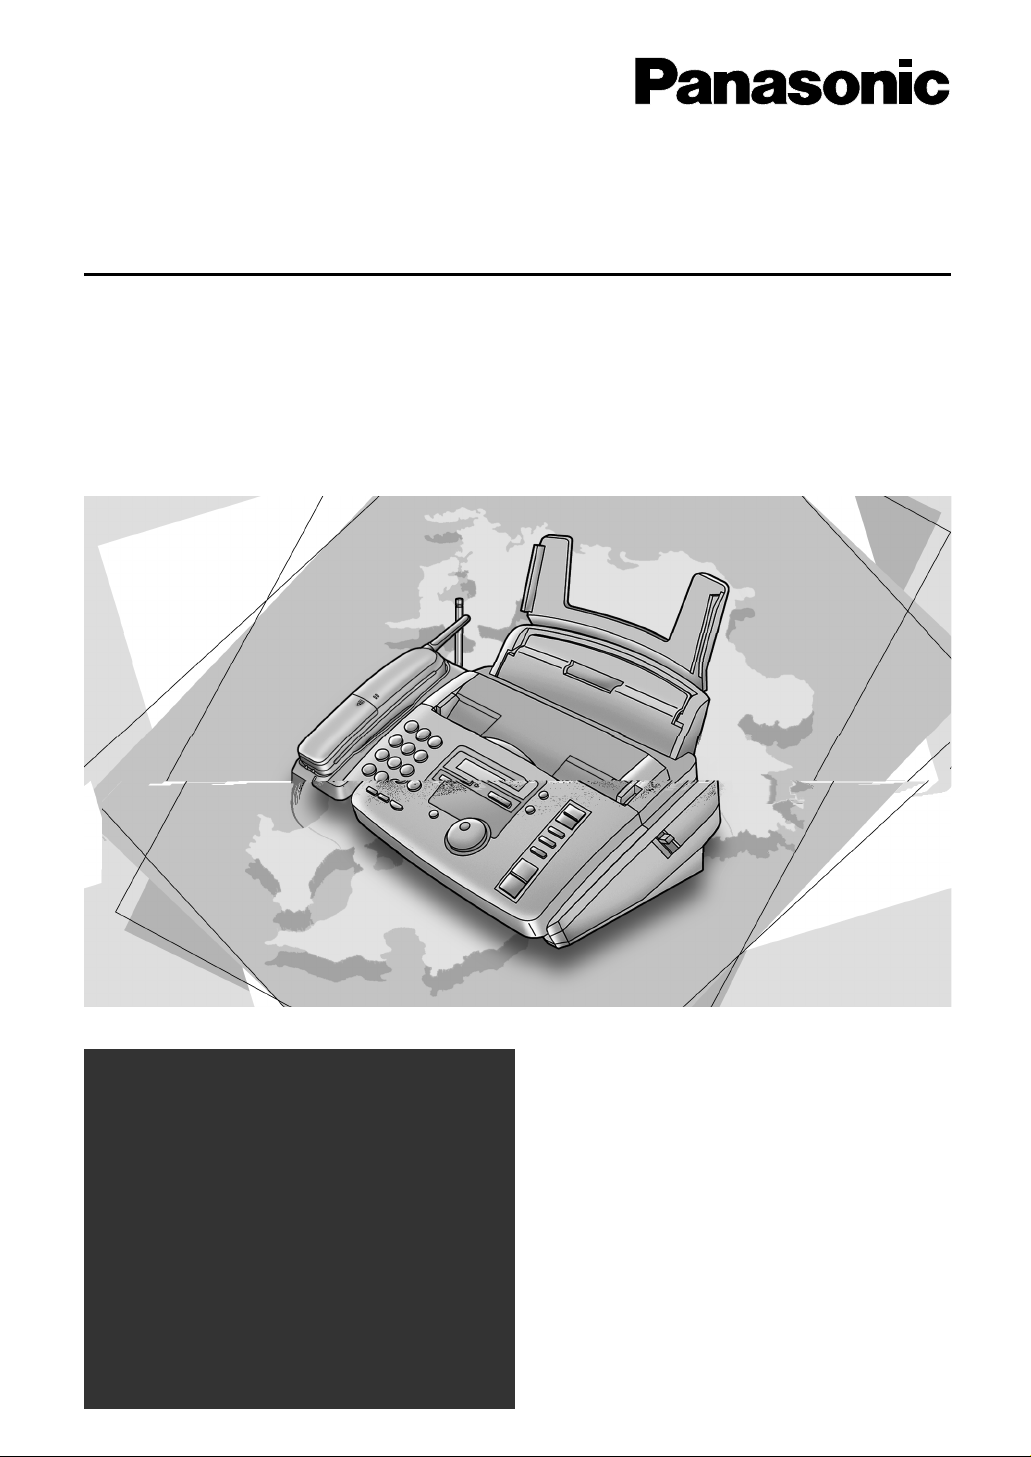
Compact Plain Paper FAX
with Cordless Phone
Operating Instructions
Model No. KX-FPC91
FOR FAX ADVANTAGE ASSISTANCE:
– CALL
1-800-HELP-FAX (1-800-435-7329)
– E-MAIL TO
[email protected]
for customers in the USA or
Puerto Rico
– REFER TO
www.panasonic.com
for customers in the USA or
Puerto Rico
Please read these Operating
Instructions before using the unit
and save for future reference.
Page 2
2
Thank you for purchasing a Panasonic facsimile.
Welcome to the world of Panasonic facsimiles.
This product combines facsimile, telephone and copier features to provide you
with more efficient office or home use. By utilizing these convenient features,
you can maximize the effectiveness of this unit.
Copyright:
This manual is copyrighted by Kyushu Matsushita Electric Co., Ltd. (KME) and its licensee.
Under the copyright laws, this manual may not be reproduced in any form, in whole or part,
without the prior written consent of KME and its licensee.
©
Kyushu Matsushita Electric Co., Ltd. 2000
Things you should keep record of
Attach your sales receipt here
For your future reference
Date of purchase Serial number
(found on the rear of the unit)
Dealer’s name and address
Dealer’s telephone number
Caution:
●
The Telephone Protection Act of 1991 requires the following information to be clearly stated
either at the top or bottom margin of the first message page when transmitting messages via
telephone facsimile:
— Date and time of transmission,
— Identification of the business, entity or person(s) sending the facsimile, and
— Telephone number of the business, entity or person(s).
To program this information into your unit, complete all the instructions on pages 15 to 18.
●
Note that the images of copied or received documents will remain on the used ink film. Use
discretion when disposing of the used ink film.
●
Do not rub or use an eraser on the printed side of recording paper, as the print may smear.
Trademarks
Hammermill is a registered trademark of INTERNATIONAL PAPER in the United States and/or
other countries.
All other trademarks identified herein are the property of their respective owners.
R
Page 3
3
For fax advantage assistance, call 1-800-435-7329.
For best performance
Battery charge
To power the handset, charge for about 4 hours before initial use (p. 20).
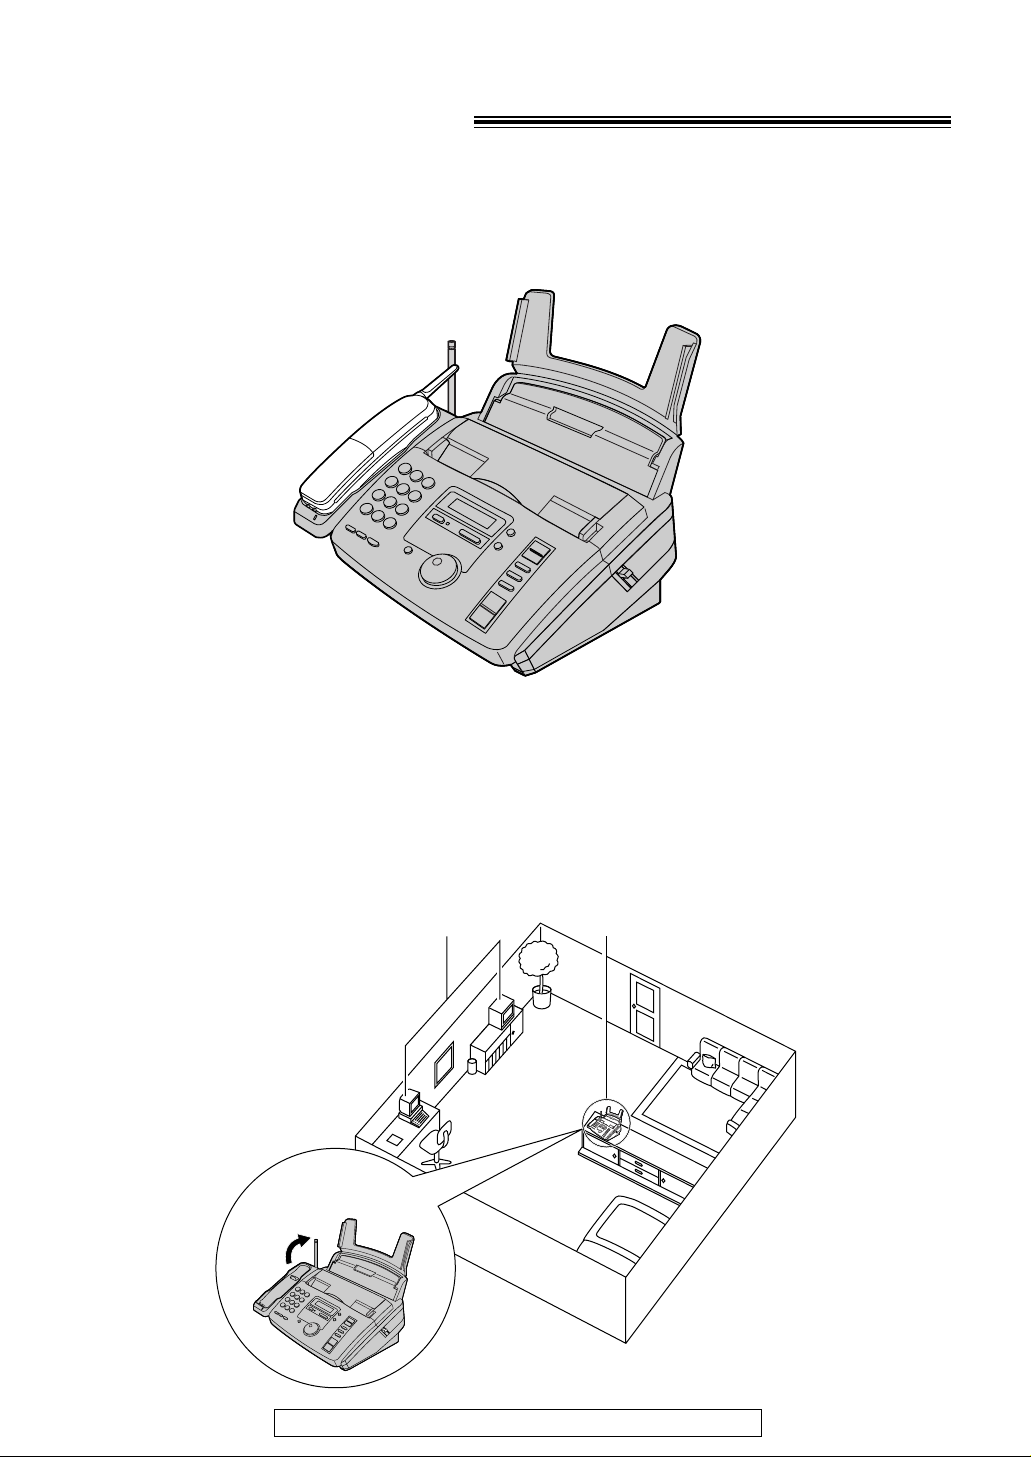
Operating distance and noise
Calls are transmitted between the main unit and the handset using wireless radio waves.
For maximum distance and noise free operation, the recommended main unit location is:
Away from electrical
appliances such as TVs,
radios, or personal computers.
In a HIGH and CENTRAL
location with no obstructions
such as walls.
Raise the antenna.
Page 4

4
For fax advantage assistance, call 1-800-435-7329.
Important safety instructions!
When using this unit, basic safety precautions
should always be followed to reduce the risk of
fire, electric shock, or personal injury.
1. Read and understand all instructions.
2. Follow all warnings and instructions marked
on this unit.
3. Unplug this unit from power outlets before
cleaning. Do not use liquid or aerosol
cleaners. Use a damp cloth for cleaning.
4. Do not use this unit near water, for example
near a bath tub, wash bowl, kitchen sink, or
the like.
5. Place the unit securely on a stable surface.
Serious damage and/or injury may result if
the unit falls.
6. Do not cover slots and openings on the
unit. They are provided for ventilation and
protection against overheating. Never place
the unit near radiators, or in a place where
proper ventilation is not provided.
7. Use only the power source marked on the
unit. If you are not sure of the type of power
supplied to your home, consult your dealer
or local power company.
8. For safety purposes this unit is equipped
with a three prong grounded plug. If you do
not have this type of outlet, please have
one installed. Do not use any type of
adaptor plug to defeat this safety feature.
9. Do not place objects on the power cord.
Install the unit where no one can step or trip
on the cord.
10. Do not overload wall outlets and extension
cords. This can result in the risk of fire or
electric shock.
11. Never push any objects through slots in this
unit. This may result in the risk of fire or
electric shock. Never spill any liquid on the
unit.
12. To reduce the risk of electric shock, do not
disassemble this unit. Take the unit to an
authorized servicenter when service is
required. Opening or removing covers may
expose you to dangerous voltages or other
risks. Incorrect reassembly can cause
electric shock when the unit is subsequently
used.
13. Unplug this unit from the wall outlet and
refer servicing to an authorized servicenter
when the following conditions occur:
A. When the power supply cord or plug is
damaged or frayed.
B. If liquid has been spilled into the unit.
C.If the unit has been exposed to rain or
water.
D.If the unit does not work normally by
following the operating instructions.
Adjust only controls covered by the
operating instructions. Improper
adjustment may require extensive work
by an authorized servicenter.
E. If the unit has been dropped or
physically damaged.
F. If the unit exhibits a distinct change in
performance.
14. During thunderstorms, avoid using
telephones except cordless types. There
may be a remote risk of an electric shock
from lightning.
15. Do not use this unit to report a gas leak,
when in the vicinity of the leak.
SAVE THESE
INSTRUCTIONS
Page 5

5
For fax advantage assistance, call 1-800-435-7329.
CAUTION
To reduce the risk of fire or injury to
persons, read and follow these instructions.
1. Use only the battery(ies) specified.
2. Do not dispose of the battery(ies) in a fire.
They may explode. Check with local waste
management codes for special disposal
instructions.
3. Do not open or mutilate the battery(ies).
Released electrolyte is corrosive and may
cause burns or injury to the eyes or skin.
The electrolyte may be toxic if swallowed.
4. Exercise care in handling batteries in order
not to short the battery to conductive
materials such as rings, bracelets, and keys.
The battery and/or conductor may overheat
and cause burns.
5. Charge the battery(ies) provided with or
identified for use with this product only in
accordance with the instructions and
limitations specified in this manual.
INSTALLATION
1. Never install telephone wiring during a
lightning storm.
2. Never install telephone jacks in wet
locations unless the jack is specifically
designed for wet locations.
3. Never touch uninsulated telephone wires or
terminals unless the telephone line has
been disconnected at the network interface.
4. Use caution when installing or modifying
telephone lines.
WARNING
●
To prevent the risk of fire or electrical shock,
do not expose this product to rain or any type
of moisture.
OTHER INFORMATION
●
Keep the unit away from electrical noise
generating devices, such as fluorescent
lamps and motors.
●
The unit should be kept free from dust, high
temperature and vibration.
●
The unit should not be exposed to direct
sunlight.
●
Do not place heavy objects on top of this unit.
●
Do not touch the plug with wet hands.
Page 6

6
For fax advantage assistance, call 1-800-435-7329.
Table of Contents
Initial Preparation
Accessories Included accessories . . . . . . . . . . . . . . . . . . . . . . . . . . . . . . . . . . . . . 8
Accessory order information . . . . . . . . . . . . . . . . . . . . . . . . . . . . . . . 9
Help Button Help function . . . . . . . . . . . . . . . . . . . . . . . . . . . . . . . . . . . . . . . . . . 10
Finding the Location . . . . . . . . . . . . . . . . . . . . . . . . . . . . . . . . . . . . . . . . . . . . . . 11
Controls Overview. . . . . . . . . . . . . . . . . . . . . . . . . . . . . . . . . . . . . . . . . . . . . 12
(Main unit)
Setup Removing the information leaflet . . . . . . . . . . . . . . . . . . . . . . . . . . . 12
(Main unit) Paper tray . . . . . . . . . . . . . . . . . . . . . . . . . . . . . . . . . . . . . . . . . . . . 12
Recording paper . . . . . . . . . . . . . . . . . . . . . . . . . . . . . . . . . . . . . . . 13
Connections . . . . . . . . . . . . . . . . . . . . . . . . . . . . . . . . . . . . . . . . . . 14
Date and time, your logo and facsimile telephone number. . . . . . . . . 15
Setup Location . . . . . . . . . . . . . . . . . . . . . . . . . . . . . . . . . . . . . . . . . . . . . 19
(Handset) Battery charge. . . . . . . . . . . . . . . . . . . . . . . . . . . . . . . . . . . . . . . . . 20
Belt clip . . . . . . . . . . . . . . . . . . . . . . . . . . . . . . . . . . . . . . . . . . . . . . 21
Headset (not included) . . . . . . . . . . . . . . . . . . . . . . . . . . . . . . . . . . . 21
Volumes Adjusting volumes . . . . . . . . . . . . . . . . . . . . . . . . . . . . . . . . . . . . . . 22
Telephone
Making and Voice calls - making . . . . . . . . . . . . . . . . . . . . . . . . . . . . . . . . . . . . 23
Answering Calls
Voice calls - answering . . . . . . . . . . . . . . . . . . . . . . . . . . . . . . . . . . 25
Paging the handset from the main unit (handset locator). . . . . . . . . 25
Remote monitor . . . . . . . . . . . . . . . . . . . . . . . . . . . . . . . . . . . . . . . 26
TONE, FLASH and PAUSE buttons. . . . . . . . . . . . . . . . . . . . . . . . . 27
Automatic Storing telephone numbers in the handset . . . . . . . . . . . . . . . . . . . 28
Dialing
Making a voice call with the handset using stored numbers. . . . . . . 28
(Handset)
Storing a telephone number in the DIRECT button . . . . . . . . . . . . . 29
Dialing a stored number in the DIRECT button . . . . . . . . . . . . . . . . 29
JOG DIAL Storing names and telephone numbers in the JOG DIAL directory. . 30
Making a voice call using the JOG DIAL directory . . . . . . . . . . . . . . 33
Voice Contact Talking to the other party after fax transmission or reception . . . . . . 34
Fax
Sending Faxes Sending a fax manually/using the JOG DIAL directory. . . . . . . . . . . 35
One time broadcast transmission . . . . . . . . . . . . . . . . . . . . . . . . . . 38
Broadcast transmission to pre-programmed parties. . . . . . . . . . . . . 39
Receiving Setting the unit to receive faxes . . . . . . . . . . . . . . . . . . . . . . . . . . . 42
Faxes TEL mode (answering all calls manually) . . . . . . . . . . . . . . . . . . . . . 44
FAX ONLY mode (all calls are received as faxes) . . . . . . . . . . . . . . 45
Using the unit with an answering machine . . . . . . . . . . . . . . . . . . . . 46
(continued)
Page 7
7
For fax advantage assistance, call 1-800-435-7329.
Help
Error Messages
Reports. . . . . . . . . . . . . . . . . . . . . . . . . . . . . . . . . . . . . . . . . . . . . . 60
Display . . . . . . . . . . . . . . . . . . . . . . . . . . . . . . . . . . . . . . . . . . . . . . 61
Operations When a function does not work, check here before
requesting help . . . . . . . . . . . . . . . . . . . . . . . . . . . . . . . . . . . . . 63
If a power failure occurs . . . . . . . . . . . . . . . . . . . . . . . . . . . . . . . . . 68
Jams Recording paper jam. . . . . . . . . . . . . . . . . . . . . . . . . . . . . . . . . . . . 69
Sending document jams . . . . . . . . . . . . . . . . . . . . . . . . . . . . . . . . . 70
Sending document does not feed, or multi-feeds. . . . . . . . . . . . . . . 70
Battery Replacing the handset battery . . . . . . . . . . . . . . . . . . . . . . . . . . . . . 71
Ink Film Replacing the ink film . . . . . . . . . . . . . . . . . . . . . . . . . . . . . . . . . . . 72
Cleaning Document feeder . . . . . . . . . . . . . . . . . . . . . . . . . . . . . . . . . . . . . . 74
Thermal head . . . . . . . . . . . . . . . . . . . . . . . . . . . . . . . . . . . . . . . . . 75
Charge contacts . . . . . . . . . . . . . . . . . . . . . . . . . . . . . . . . . . . . . . . 75
General Information
Print Reports Reference lists and reports . . . . . . . . . . . . . . . . . . . . . . . . . . . . . . . 76
FCC List of FCC requirements and information . . . . . . . . . . . . . . . . . . . . 77
Information
Limited Limited Warranty . . . . . . . . . . . . . . . . . . . . . . . . . . . . . . . . . . . . . . . 78
Warranty Servicenter Directory . . . . . . . . . . . . . . . . . . . . . . . . . . . . . . . . . . . 79
Notes for product service and shipping the product . . . . . . . . . . . . . 80
Energy Star Energy Star . . . . . . . . . . . . . . . . . . . . . . . . . . . . . . . . . . . . . . . . . . 80
Specifications Technical data about this product . . . . . . . . . . . . . . . . . . . . . . . . . . 81
Index Index. . . . . . . . . . . . . . . . . . . . . . . . . . . . . . . . . . . . . . . . . . . . . . . . 82
Copy
Copying Making a copy . . . . . . . . . . . . . . . . . . . . . . . . . . . . . . . . . . . . . . . . 52
Programmable Features
Features Programming. . . . . . . . . . . . . . . . . . . . . . . . . . . . . . . . . . . . . . . . . . 54
Summary Basic features . . . . . . . . . . . . . . . . . . . . . . . . . . . . . . . . . . . . . . . . . 55
Advanced features . . . . . . . . . . . . . . . . . . . . . . . . . . . . . . . . . . . . . . 56
Fax
Receiving TEL/FAX mode (receiving voice calls with rings and fax calls
Faxes without rings when you are near the unit). . . . . . . . . . . . . . . . . . 48
(continued) Extension telephone . . . . . . . . . . . . . . . . . . . . . . . . . . . . . . . . . . . . 50
Pager call - when the unit receives a fax. . . . . . . . . . . . . . . . . . . . . 51
Page 8
8
Accessories
For fax advantage assistance, call 1-800-435-7329.
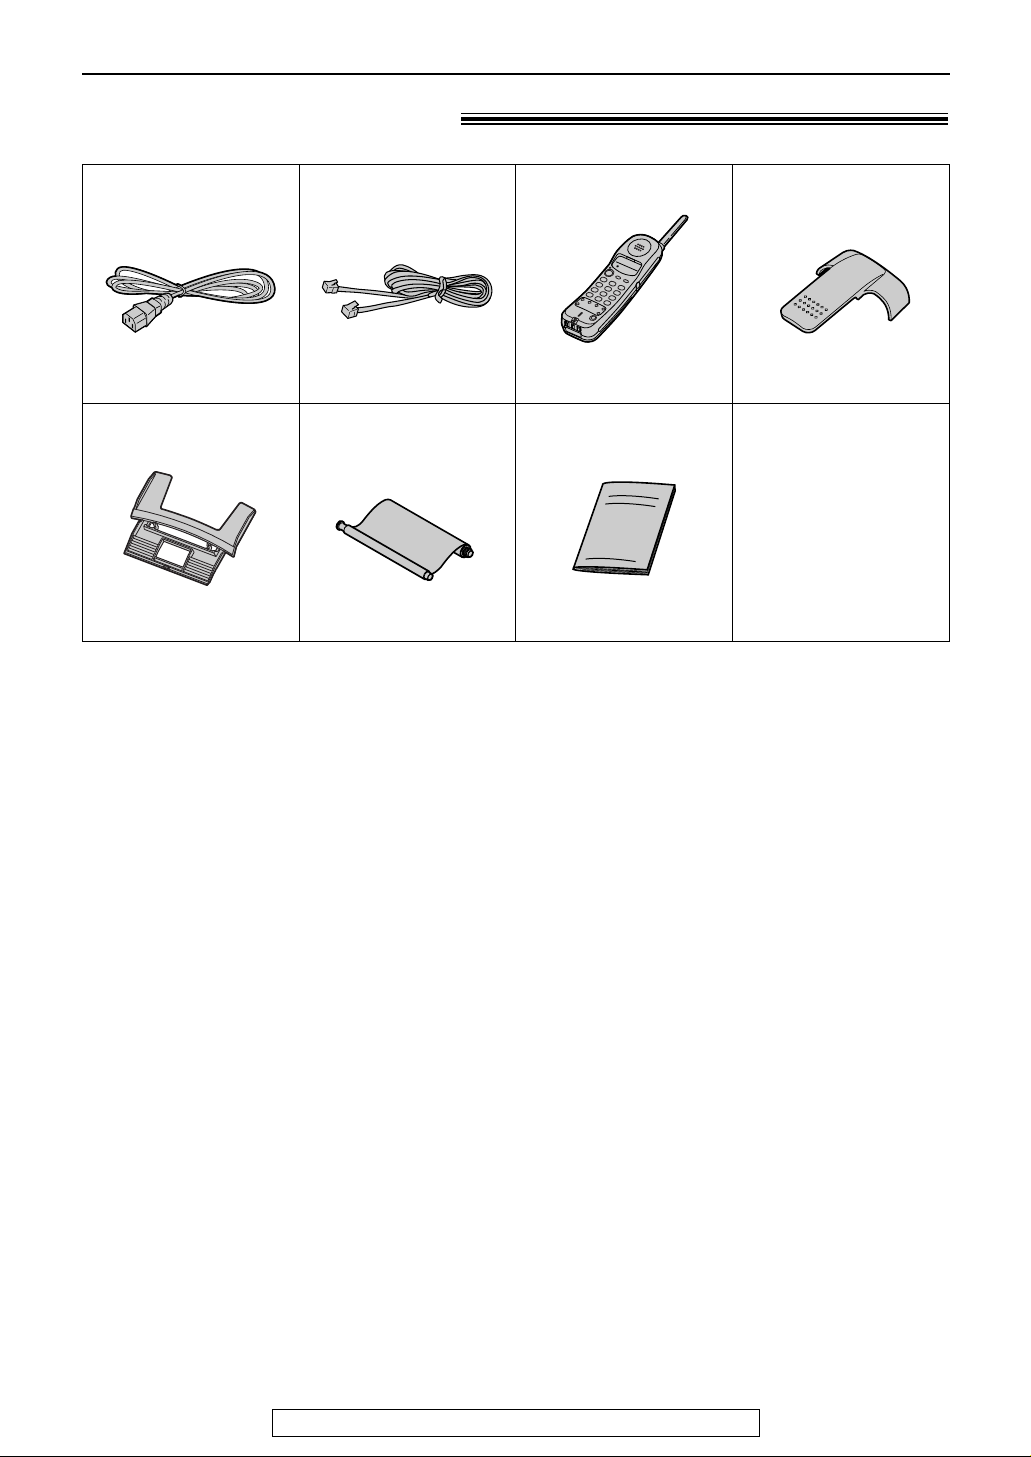
Included accessories!
Power cord..............1
Telephone line cord
...1 Cordless handset....1
Operating instructions
...1
●
If any items are missing or damaged, check with the place of purchase.
●
The part numbers listed above are subject to change without notice.
●
Save the original carton and packing materials for future shipping and transportation of the
unit.
Part No. PFJA1030Z Part No. PQJA10075Z
—
The rechargeable
battery is pre-installed.
Ink film.....................1
(included film roll)
Part No. PFQX1453Z
—The ink film is
pre-installed.
Belt clip ...................1
Part No. PQKE10079Z3
Paper tray ...............1
Part No. PFKS1040Y1
Page 9
9
Accessories
For fax advantage assistance, call 1-800-435-7329.
Accessory order information!
Model No.
KX-FA53 Replacement film
1 roll – 216 mm x 50 m (8
1
⁄2"x 164')
Item Specifications / Usage
●
The included film roll is 10 meters (321⁄2') long.
We recommend that you buy full-size replacement film – 50 meters (164
'
) for
continuous use of your unit.
For best results, use genuine Panasonic replacement film Model No. KX-FA53
or KX-FA55.
●
To install legal size recording paper, use a legal paper tray, Model No. KX-FA50
(p. 12).
KX-FA55 Replacement film
2 rolls – 216 mm x 50 m (8
1
⁄2"x 164')
KX-FA50 Legal paper tray To install legal size recording paper.
Note:
●
The ink film is not reusable. Do not rewind and use the ink film again.
To order
Telephone: Call 1-201-348-7292.
Fax:
Send a fax to 1-877-375-4020.
Include:
–your name, shipping address and telephone number,
–credit card type, number, expiration date and your signature,
–order part number and quantity.
Via the Internet:
Visit our web site: http://www.panasonic.com/store
(for customers in the USA or Puerto Rico ONLY)
●
If you have any questions regarding accessory orders, please contact us at
this E-MAIL ADDRESS: [email protected]
(for customers in the USA or Puerto Rico ONLY)
or call us at: 201-348-7292
KX-A36
Rechargeable
battery
Ni-Cd battery
KX-TCA87 Headset For a hands-free telephone conversation
Page 10
10
Help Button
For fax advantage assistance, call 1-800-435-7329.
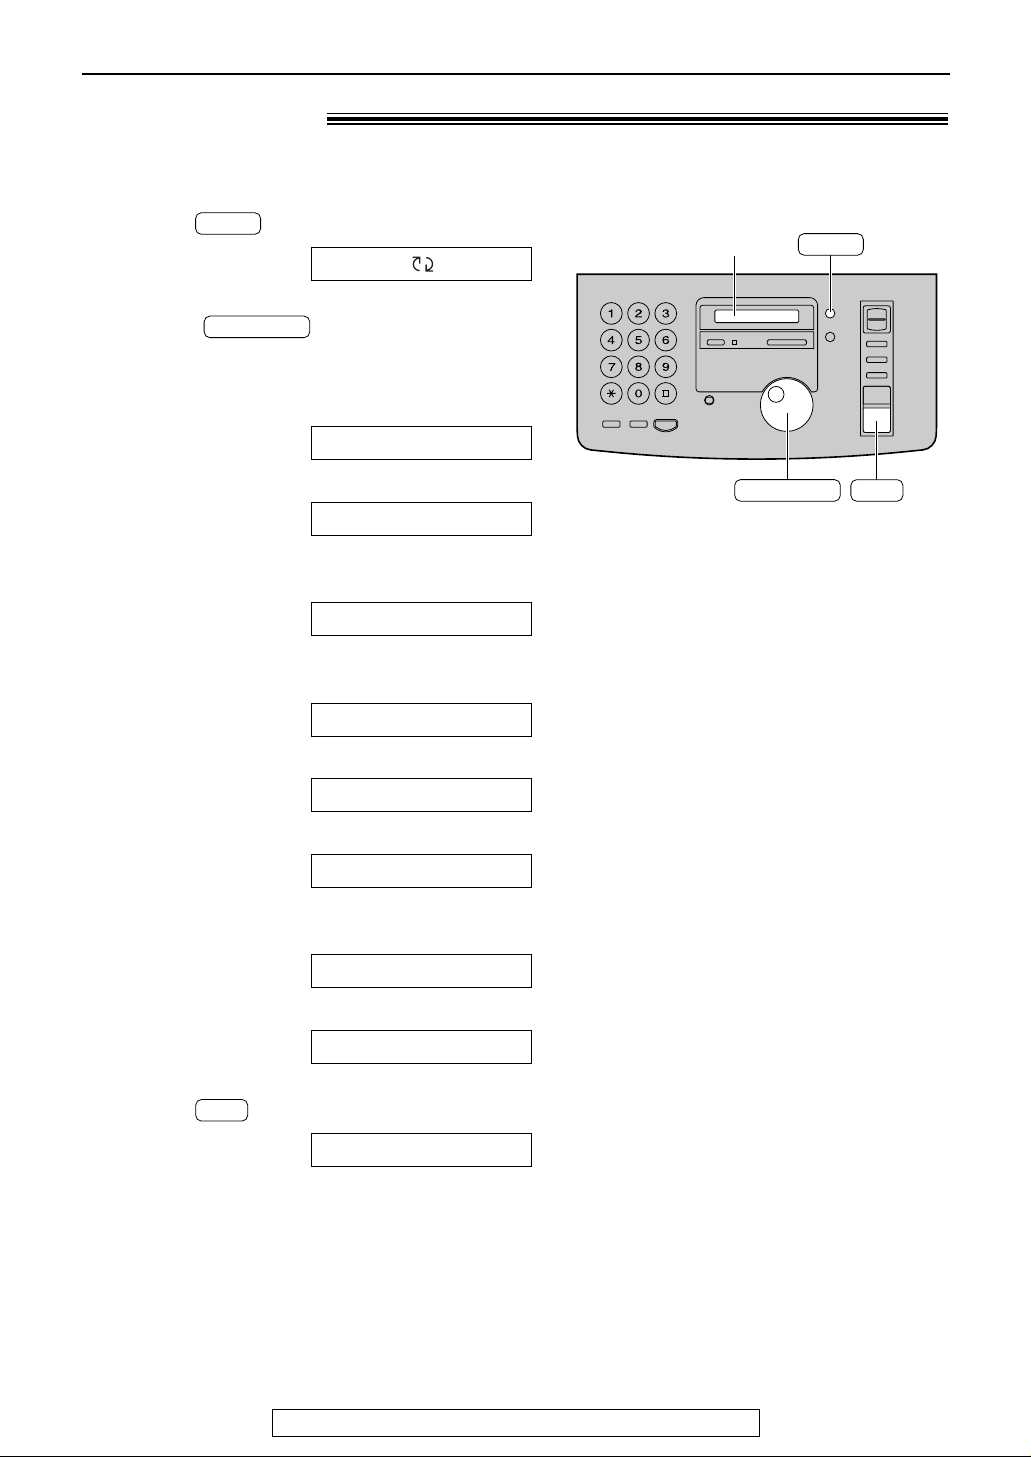
Help function!
1
Press .
Display:
2
Rotate until the desired item is
displayed.
1. How to set the date, time, your logo and
fax number
2. How to program the features
3. How to store names in the JOG DIAL
directory and how to dial them
4. Help with problems sending/receiving
faxes
5. How to use the copier function
6. Frequently asked questions and answers
7. Explanation of error messages shown on
the display
8. List of available reports
3
Press .
PRINTING
SET
8.REPORTS
7.ERRORS
6.Q and A
5.COPIER
4.FAX SND/RCV
3.JOG-DIAL
2.FEATURE LIST
1.QUICK SET UP
JOG DIAL
ROTATE & SET
HELP
SET
HELP
Display
JOG DIAL
You can print a quick reference for assistance as follows.
Page 11
11
Finding the Controls (Main unit)
For fax advantage assistance, call 1-800-435-7329.
Location!
TTOONNEE
CC
BB
AA
FF
EE
DD
LL
KK
JJ
OO
NN
MM
VV
UU
TT
ZZ
YY
XX
WW
RR
EE
PP
OO
II
HH
GG
SS
RR
QQ
PP
MOMONNIITORTOR
REDIREDIAALL
//PPAUSEAUSE
FLASHFLASH
SSTTAARRTT
FFAAXX
SSTOTOPP
DIRECTORY DIRECTORY
PROGRAMPROGRAM
MENUMENU
SESETT
HEHELLPP
VOVOLLUUMMEE
CCOOLL LL AATTEE
RESOLUTIONRESOLUTION
QUICK SCANQUICK SCAN
B
A
C
K
MEMORY% ONMEMORY% ON
JOG DIALJOG DIAL
AUTO ANSWERAUTO ANSWER
F
W
D
TTOONNEE
CC
BB
AA
FF
EE
DD
LL
KK
JJ
OO
NN
MM
VV
UU
TT
ZZ
YY
XX
WW
RR
EE
PP
OO
II
HH
GG
SS
RR
QQ
PP
HANDSET LOCATORHANDSET LOCATOR
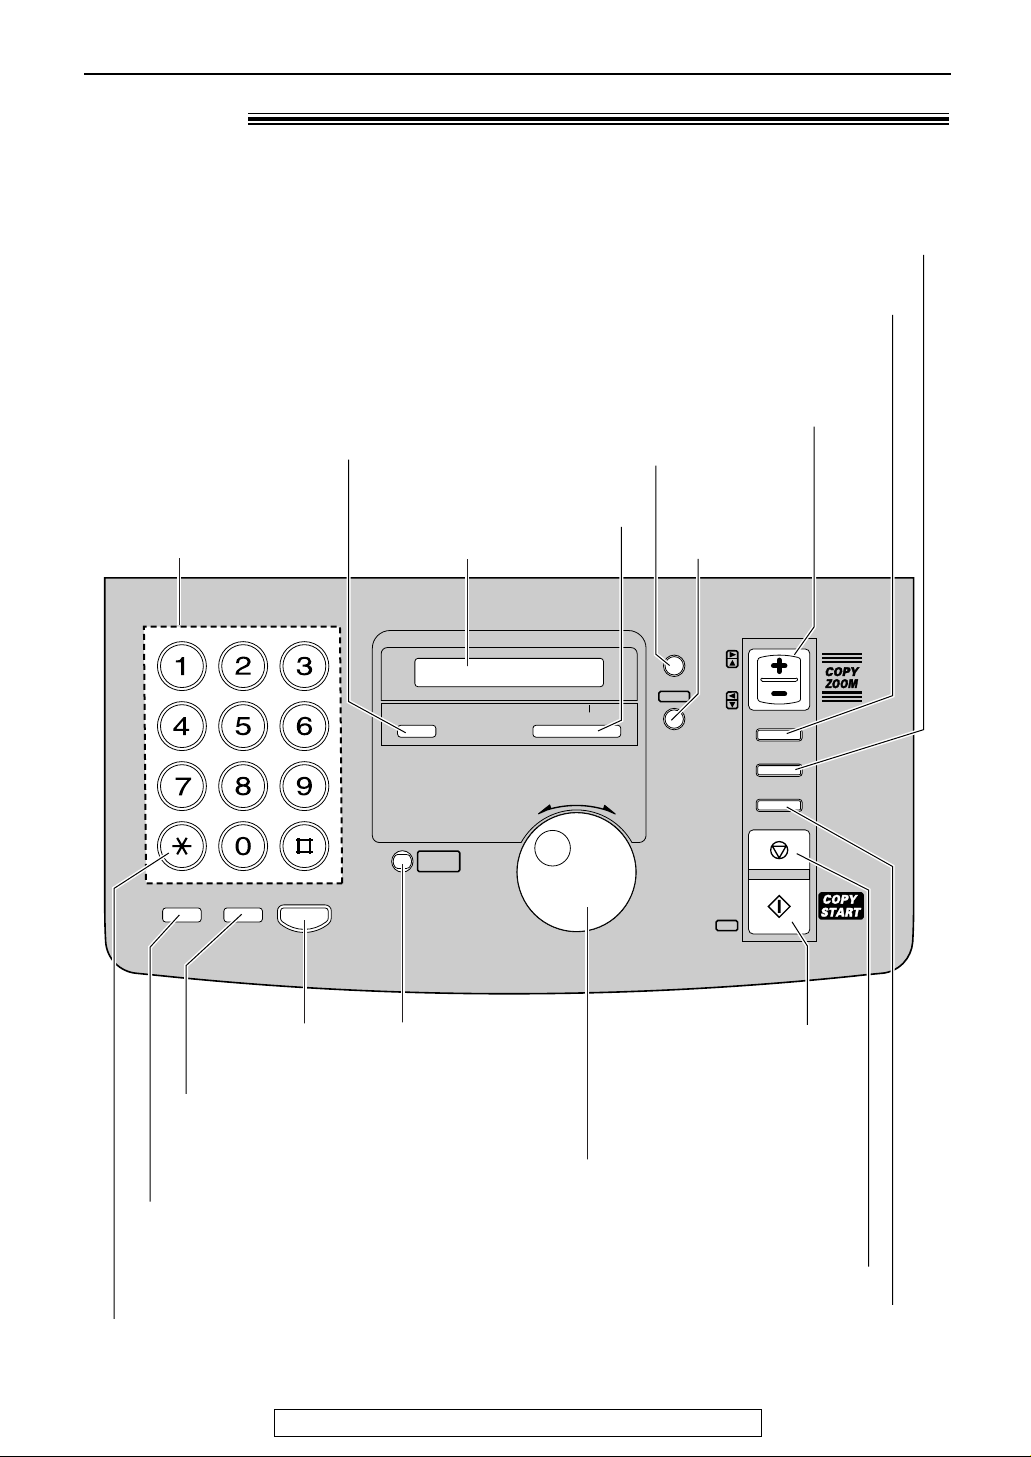
Dial keypad
●
To redial the last number
dialed (p. 24, 36).
●
To insert a pause during
dialing (p. 27).
●
To store or edit names
and telephone
numbers (p. 30).
●
To change from pulse to
tone during dialing (p. 27).
●
To dial without
lifting the handset.
●
To use special features
or services (p. 27).
●
To insert a hyphen
(p. 30, 31).
●
To search for a stored name (p. 33, 35).
●
To select characters during programming (p. 17).
●
To select the features/feature settings during
programming (p. 54).
●
To initiate fax transmission,
reception or copying.
●
To store a setting during
programming.
●
To stop an operation or cancel programming.
●
To page or locate the handset (p. 25).
●
To turn on/off the AUTO
ANSWER mode (p. 42, 43).
●
To print a quick reference (p. 10).
Display
●
To initiate
or exit
programming.
●
To select a resolution (p. 35).
●
To choose “Collated” (sorted) in the copy mode (p. 52).
●
To adjust volumes (p. 22).
●
To select an enlargement/reduction rate in the
copy mode (p. 52, 53)
.
●
To confirm a stored telephone number (p. 33).
●duct
Page 12
12
Finding the Controls/Setup (Main unit)
For fax advantage assistance, call 1-800-435-7329.
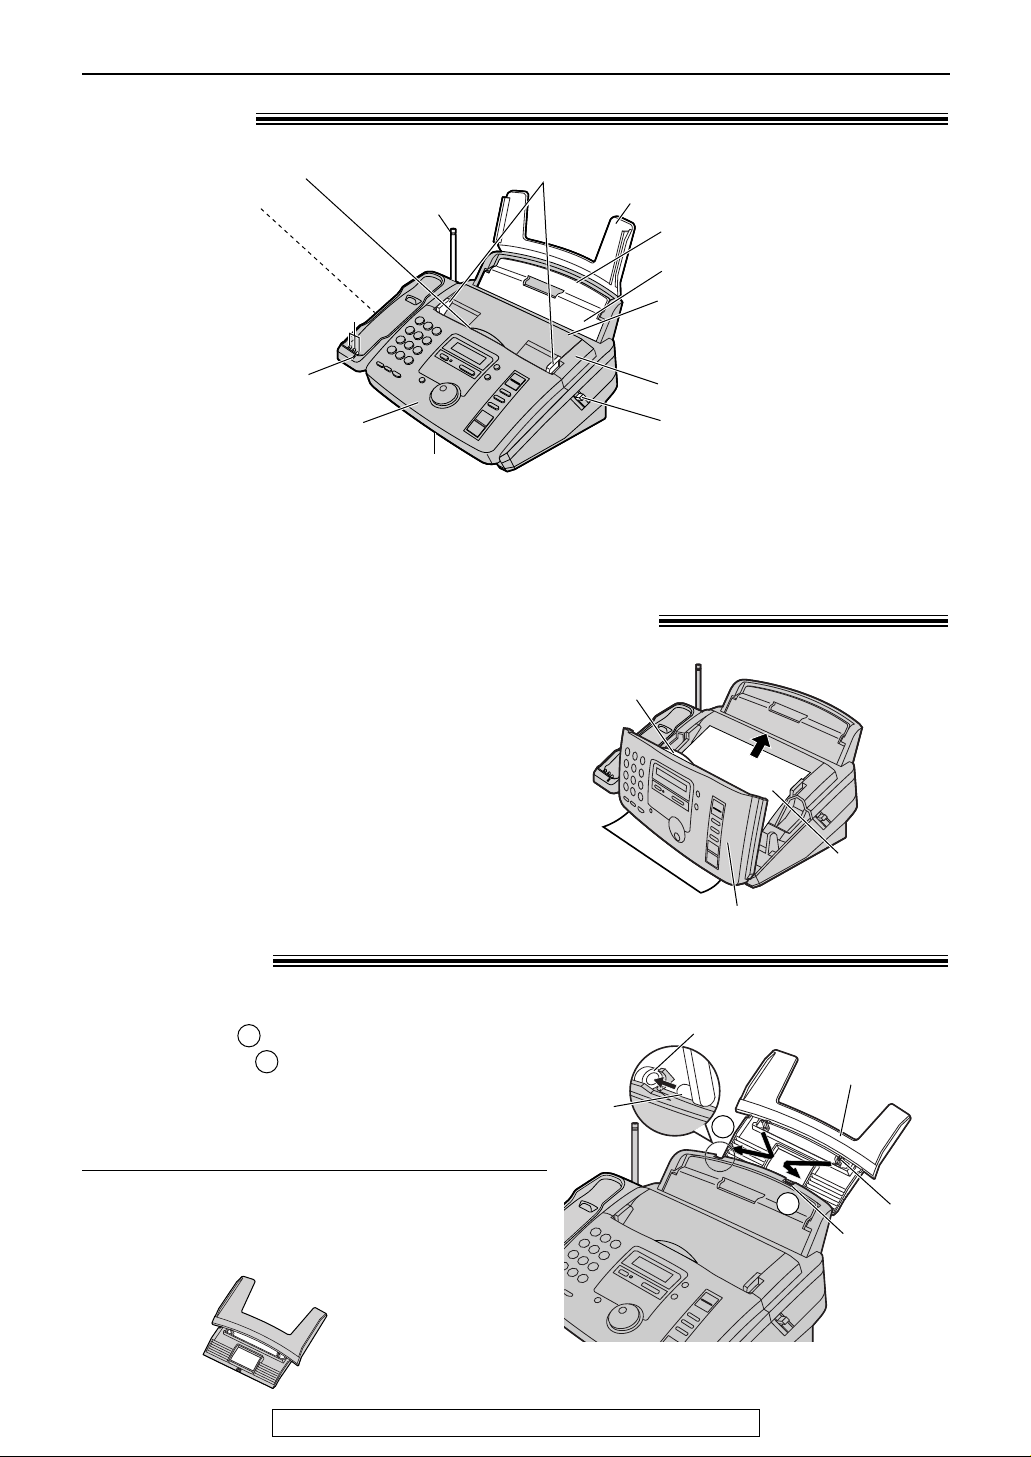
Paper tray!
Insert one tab on the paper tray into one slot on the
back of the unit ( ) and then insert the other tab
into the other slot ( ).
2
1
Paper tray
Slot
Tab
1
1
Slot
2
Tab
Note:
●
Do not place the unit in areas where the paper tray may
be obstructed by a wall, etc.
KX-FA50
Legal paper tray
To use legal size paper
Please purchase a legal paper tray, Model No. KX-FA50
(p. 9) and install as shown above.
Removing the information leaflet!
1
Open the front cover by pulling up the center
part.
2
Remove and read the information leaflet.
3
Close the front cover securely.
Information
leaflet
Center part
Front cover
Note:
●
The document will be ejected from the front of the unit. Install the unit on a desk or floor with a smooth
surface and do not place anything in front of the unit.
Overview!
Back cover open button
Back cover
Tension bar
Recording paper entrance
Paper tray
Document entrance
Speaker
(Left side
of the
handset cradle)
Document guides
Front cover
Document exit
Recording paper exit
●
Up to 30 sheets of printed
paper can be held.
Antenna
Charge contacts
CHARGE light
Page 13
13
Setup (Main unit)
For fax advantage assistance, call 1-800-435-7329.
Note for recording paper:
●
Avoid paper with a cotton and/or fiber content that is over 20%, such as letterhead paper or paper
used for resumes.
●
Do not use different types or thicknesses of paper at the same time. This may cause a paper jam.
●
Avoid extremely smooth or shiny paper that is highly textured.
●
Avoid paper that is coated, damaged or wrinkled.
Note:
●
Avoid double-sided printing.
●
Do not use paper printed from this unit for double-sided printing with other copiers or printers, or the
paper may jam.
●
Some paper only accepts print on one side. Try using the other side of paper if you are not happy with the
print quality.
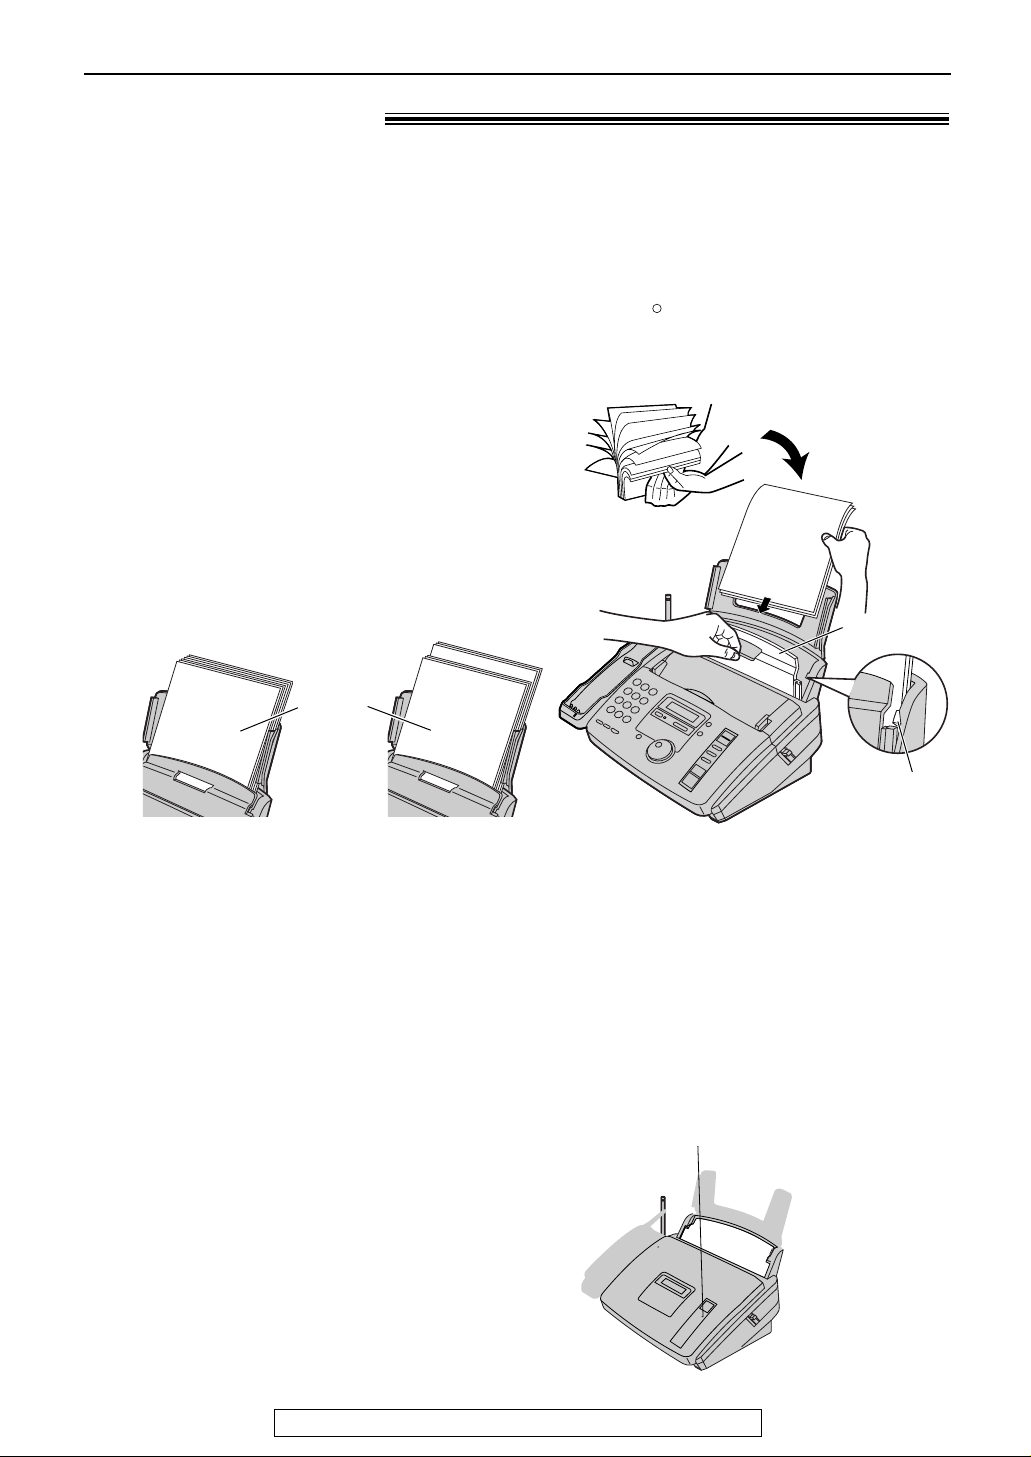
Recording paper!
1
Fan the stack of paper to prevent a paper
jam.
2
Pull the tension bar forward and hold open
while inserting the paper.
●
The paper should not be over the tab.
●
If the paper is not inserted correctly,
readjust the paper or the paper may jam.
Tab
Tension bar
Stack of
paper
Correct
Incorrect
Letter* or legal** size recording paper can be loaded. The unit can hold up to 50 sheets of
60 g/m2to 75 g/m2(16 lb. to 20 lb.) paper or 30 sheets of 90 g/m2(24 lb.) paper.
* Letter=
216 mm x 279 mm (81⁄2"x 11")
**Legal=
216 mm x 356 mm (81⁄2"x 14")
If you use legal size paper
, please purchase a legal paper tray, Model No. KX-FA50 (p. 9) and
install it (p. 12).
For best results, only use inkjet paper such as Hammermill Jet Print. If you use other
types of paper, the print quality may be affected.
R
Adding paper
1. Pull the tension bar forward and hold open while
removing all of the installed paper.
2. Add paper to the removed paper and straighten.
3. Fan the stack of paper.
4. Pull the tension bar forward and hold open while
inserting the paper.
Page 14
14
Setup (Main unit)
For fax advantage assistance, call 1-800-435-7329.
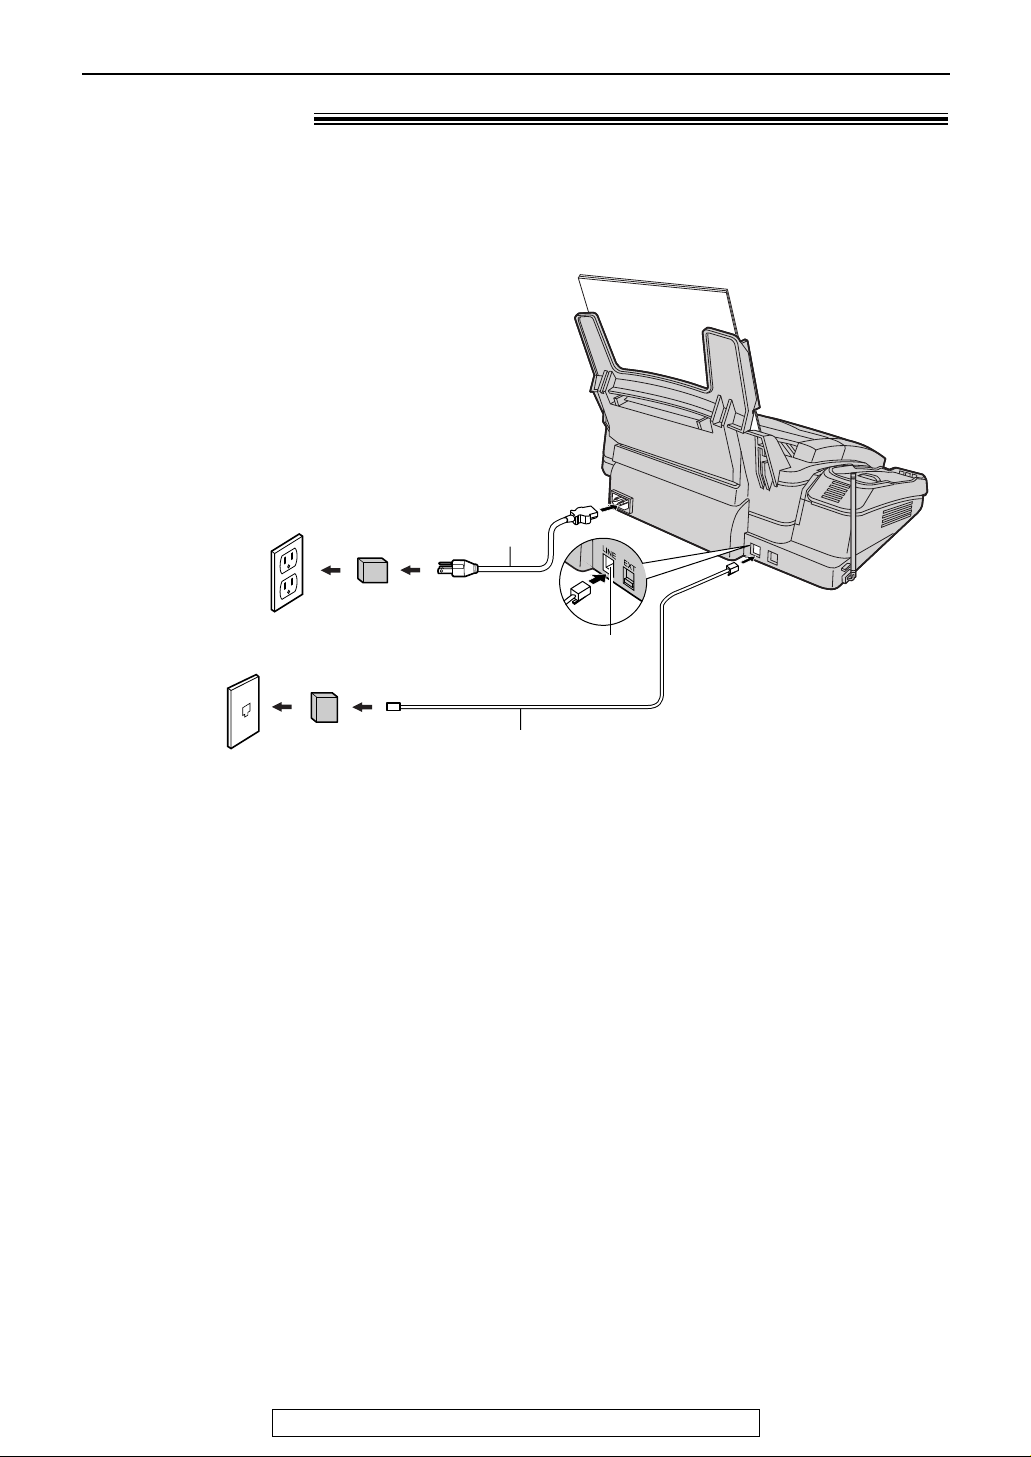
Connections!
Wall jack
(RJ11C)
120 V, 60 Hz
Telephone
line cord
Power cord
Power surge
protector
( )
Line surge
protector
( )
Connect to “LINE”.
1
Connect the telephone line cord.
2
Connect the power cord.
●
When the power is turned on for the
first time, the unit will print some
basic information.
Note:
●
For additional equipment protection, we recommend the use of a surge protector. The following types are
available; TELESPIKE BLOK MODEL TSB (TRIPPE MFG. CO.), SPIKE BLOK MODEL SK6-0 (TRIPPE
MFG. CO.), SUPER MAX (PANAMAX) or MP1 (ITW LINX).
The warranty does not cover damage due to power line surges or lightning.
●
When you operate this product, the power outlet should be near the product and easily accessible.
●
If you want to connect an answering machine to the unit, see page 46.
Page 15
15
Setup (Main unit)
For fax advantage assistance, call 1-800-435-7329.
Date and time, your logo and facsimile
telephone number!
You should program the date and time, your logo and facsimile telephone number. This
information will be printed on each page transmitted from your unit, fulfilling the requirements of
the Telephone Protection Act of 1991.
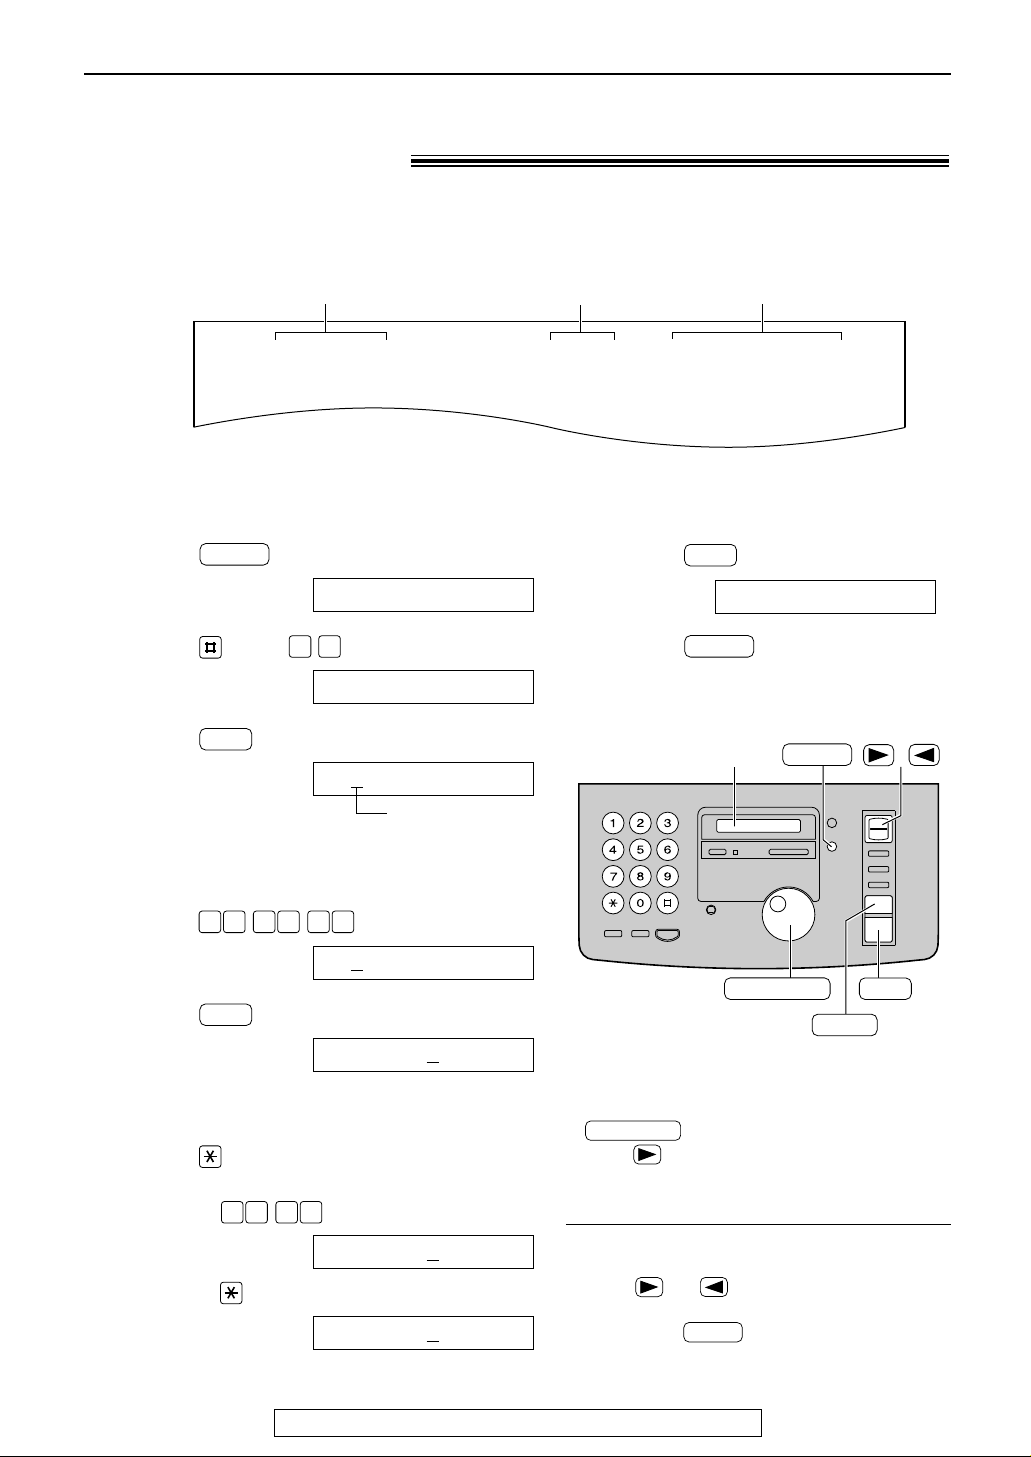
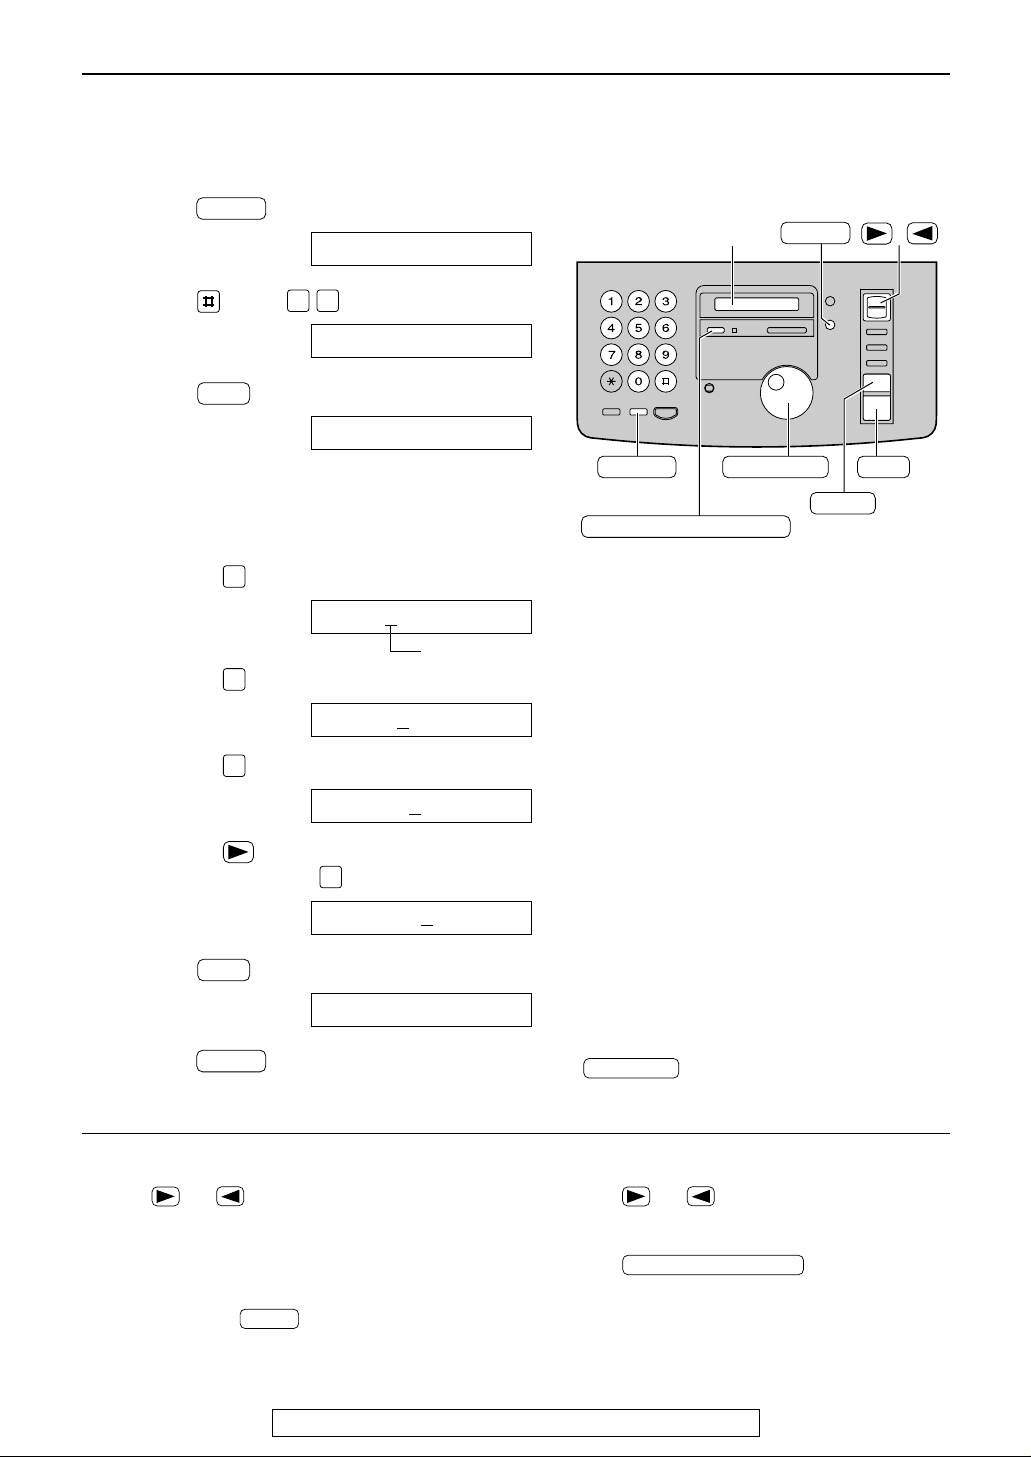
Setting the date and time
Fax Correspondence
Your logo
Your facsimile telephone number
Date and time
FROM : Panasonic Fax
Example:
FAX NO. : 1234567 Feb. 26 2000 09:02AM P1
1
Press .
Display:
2
Press , then .
3
Press .
Cursor
4
Enter the correct month/day/year by selecting
2 digits for each, using the dial keypad.
Example: Aug. 10, 2000
Press .
5
Press .
6
Enter the correct hour/minute by selecting
2 digits for each, using the dial keypad.
Press to select “AM” or “PM”.
Example: 3:15PM
1. Press .
2. Press until “PM” is displayed.
TIME: 0
3:15PM
TIME: 03:15AM
1 50 3
TIME: 12:00AM
SET
M:08/D:10/Y:00
00 1 08 0
M:01/D:01/Y:00
SET
SET DATE & TIME
0 1
1.SYSTEM SET UP
MENU
7
Press .
8
Press .
MENU
SETUP ITEM [ ]
SET
/
JOG DIAL
SET
MENU
STOP
Display
To correct a mistake
●
Press or to move the cursor to the
incorrect number, and make the correction.
●
If you press while programming, the
display will return to the previous one.
STOP
Note:
●
You can enter your number by rotating
in steps 4 and 6. In this case,
press to move the cursor.
●
The accuracy of the clock is approximately
±60 seconds a month.
JOG DIAL
Page 16
16
Setup (Main unit)
For fax advantage assistance, call 1-800-435-7329.
/
JOG DIAL
SET
MENU
STOP
Display
(Hyphen)
(Delete)
FLASH
HANDSET LOCATOR
(Insert)
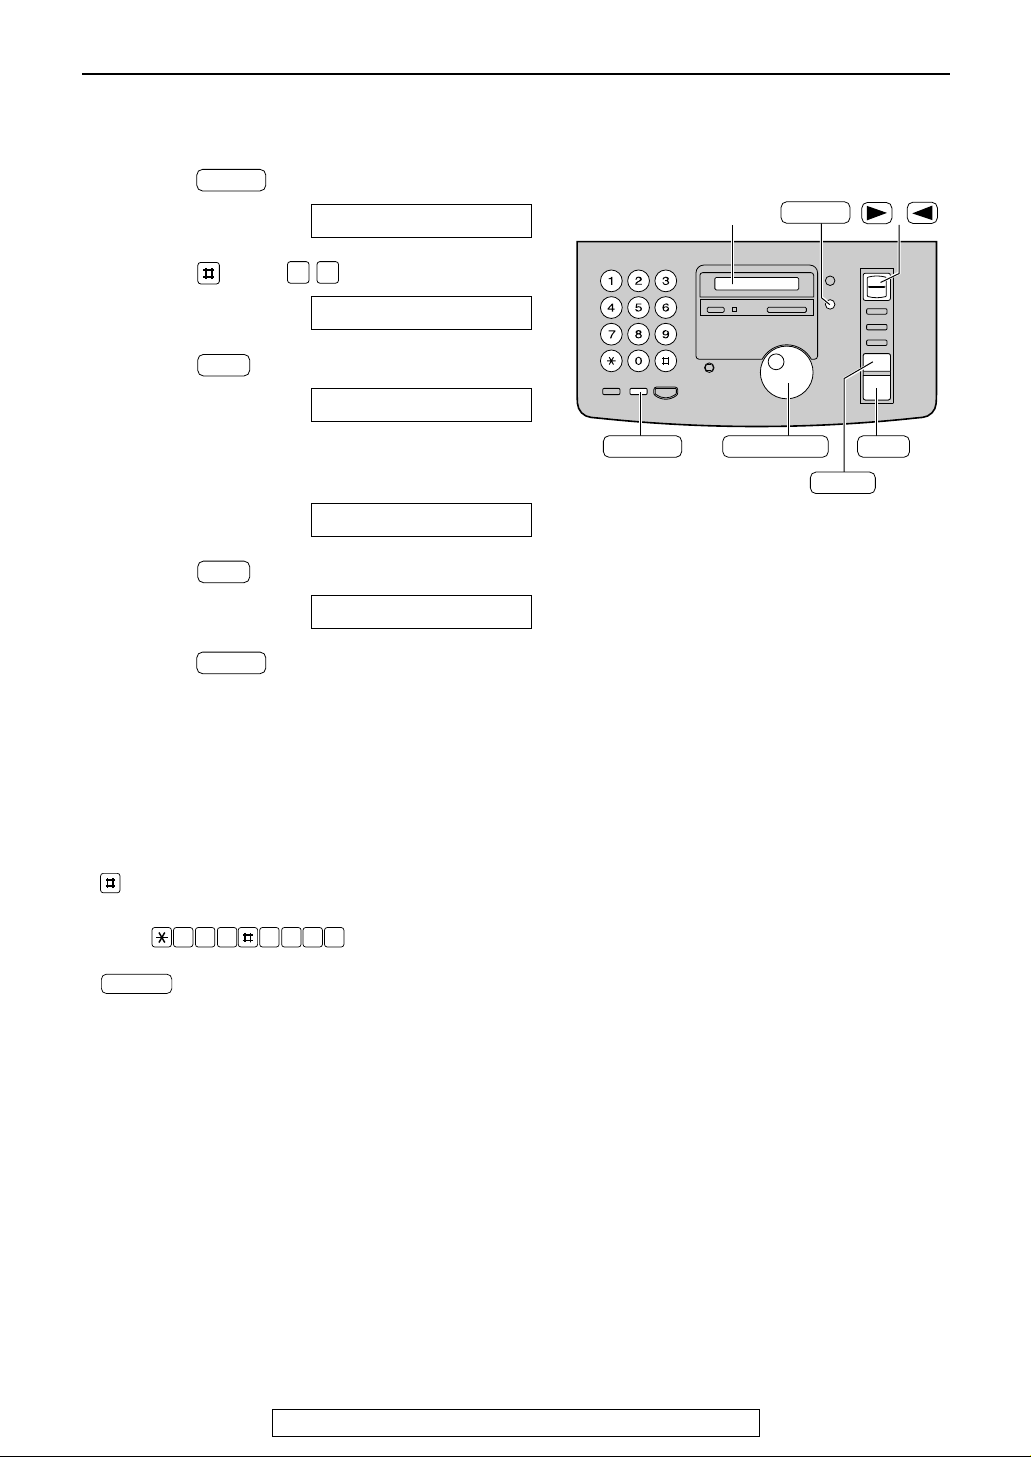
1
Press .
Display:
2
Press , then .
3
Press .
4
Enter your logo, up to 30 characters, using
the dial keypad. See next page for details.
Example: Bill
1. Press twice.
Cursor
2. Press six times.
3. Press six times.
4. Press to move the cursor to the next
space and press six times.
5
Press .
6
Press .
MENU
SETUP ITEM [ ]
SET
LOGO=Bill
5
LOGO=Bil
5
LOGO=Bi
4
LOGO=B
2
LOGO=
SET
YOUR LOGO
0 2
1.SYSTEM SET UP
MENU
Setting your logo
To correct a mistake
●
Press or to move the cursor to the
incorrect character, and make the correction.
To delete a character
●
Move the cursor to the character you want to
delete and press .
STOP
To insert a character
1. Press or to move the cursor to the
position to the right of where you want to insert
the character.
2. Press (Insert) to insert
a space and enter the character.
HANDSET LOCATOR
Note:
●
You can enter your logo by rotating
(see next page).
JOG DIAL
The logo can be your company, division or name.
Page 17

key (To move the cursor to the left.)
17
Setup (Main unit)
For fax advantage assistance, call 1-800-435-7329.
To select characters with the dial keypad
Pressing the dial keys will select a character as shown below.
To select characters using the JOG DIAL
Instead of pressing the dial keys, you can select characters using the JOG DIAL.
1. Rotate until the desired character is
displayed.
2. Press to move the cursor to the next space.
●
The character displayed in step 1 is inserted.
3. Return to step 1 to enter the next character.
JOG DIAL
Display order of characters
JOG DIAL
Capital
alphabet
Lower case
alphabet
Number
Symbol
: Rotating to
the right
: Rotating to
the left
1
2
3
4
5
6
7
8
9
0
FLASH
STOP
HANDSET LOCATOR
Keys Characters
Hyphen button (To insert a hyphen.)
Insert button (To insert one character or one space.)
Delete button (To delete a character.)
key (To move the cursor to the right.)
To enter another character using the same number key, move the cursor to the next space
.
1 [ ] { } + – / = , . _ ` : ; ? |
A B C a b c 2
D E F d e f 3
G H I g h i 4
J K L j k l 5
M N O m n o 6
P Q R S p q r s 7
T U V t u v 8
W X Y Z w x y z 9
0 ( ) ! " # $ % & ¥ @ ^ ’ →
Page 18
18
Setup (Main unit)
For fax advantage assistance, call 1-800-435-7329.
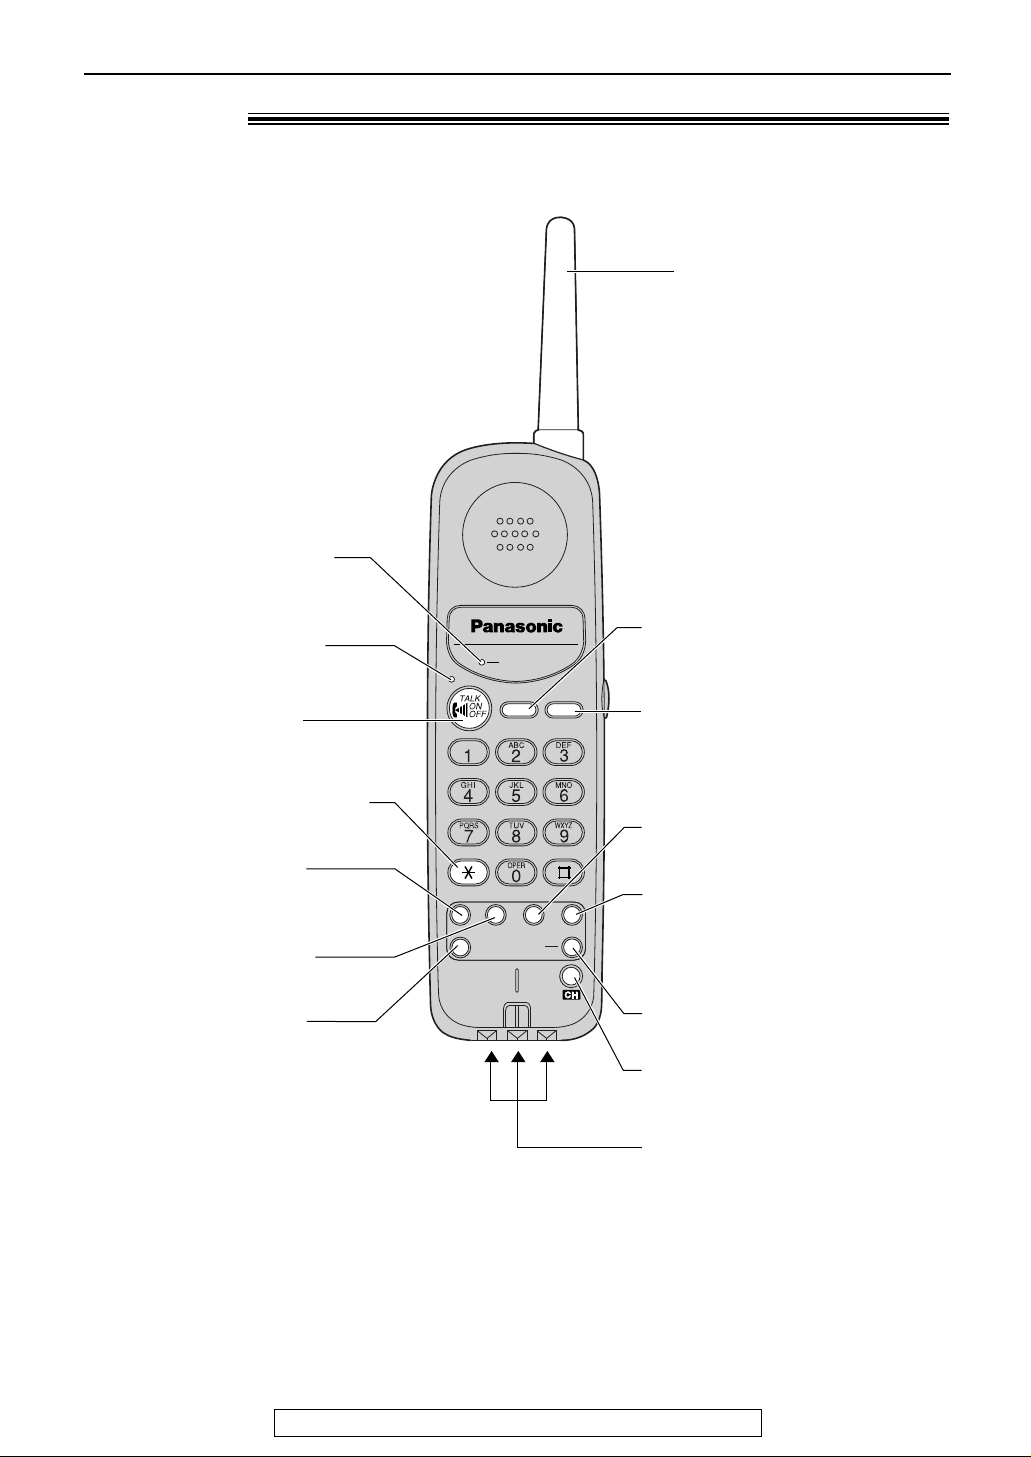
Setting your facsimile telephone number
1
Press .
Display:
2
Press , then .
3
Press .
4
Enter your facsimile telephone number, up to
20 digits, using the dial keypad.
Example:
5
Press .
6
Press .
MENU
SETUP ITEM [ ]
SET
NO.=1234567
NO.=
SET
YOUR FAX NO.
0 3
1.SYSTEM SET UP
MENU
/
JOG DIAL
SET
MENU
STOP
Display
(Hyphen)
(Delete)
FLASH
Note:
●
You can enter your facsimile telephone number by
rotating . If using , press
to move the cursor.
●
The button replaces the digit with a “+” and the
button replaces it with a space.
Example (using the dial keypad): +234 5678
Press .
●
To enter a hyphen in a telephone number, press
(Hyphen).
FLASH
2 4 6 7 83 5
Page 19
19
Setup (Handset)
For fax advantage assistance, call 1-800-435-7329.
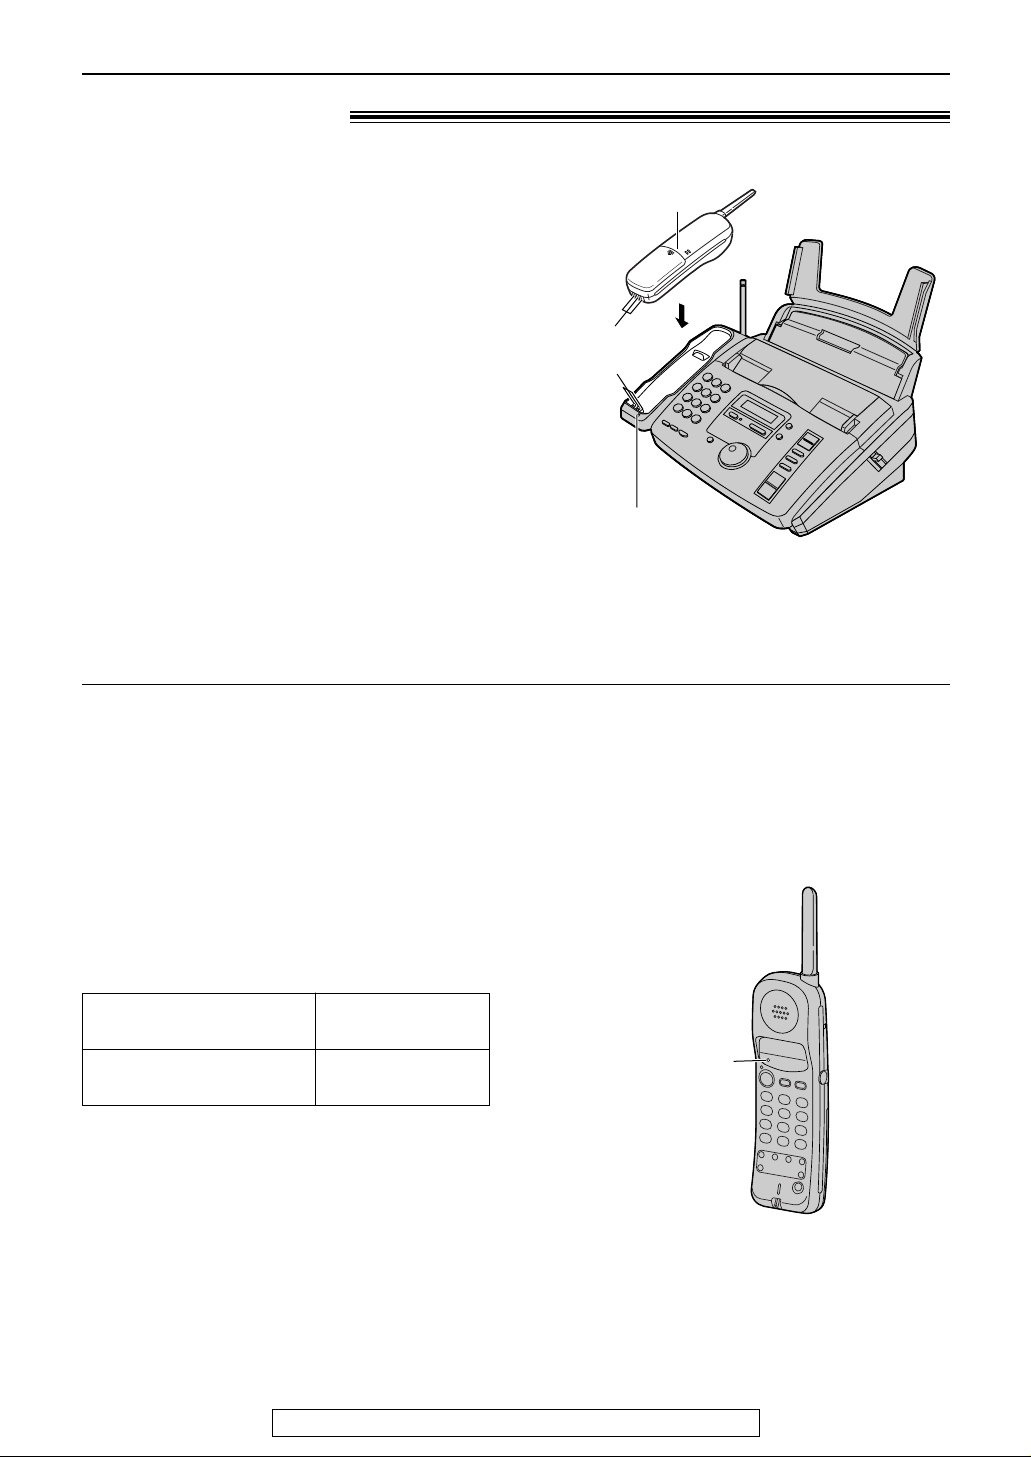
RECHARGE
AUTO DIRECT
REMOTE SP FLASH LOUD REDIAL
PAUSERINGER
FAX
PROGRAM
TONE
Antenna
●
Flashes when the battery
needs to be charged (p. 20).
●
Lights when the handset
is in use (p. 23).
●
To make/answer calls
(p. 23, 25).
●
To change from pulse to tone
during dialing (p. 27).
●
To redial the last number
dialed (p. 23).
●
To insert a pause during
dialing (p. 27).
●
To enter programming
functions (p. 28).
●
To turn on the monitor
on the main unit using the
handset (p. 26).
●
For automatic dialing
(p. 28).
●
For most frequently dialed
number (p. 29).
●
To receive a fax on the main
unit (p. 44).
●
To adjust volumes (p. 22).
●
To use special features
or services (p. 27).
●
To select a clear channel
(p. 23).
Charge contacts (p. 75)
Location!
Page 20
Up to about 8 hours
Up to about 21 days
While in use
(on conversation)
While not in use
(stand-by/off the main unit)
20
Setup (Handset)
For fax advantage assistance, call 1-800-435-7329.
Battery charge
Place the handset on the cradle of the main unit for
about 4 hours.
●
The CHARGE light will turn on.
Handset
Charge
contacts
CHARGE light
Note:
●
Clean the handset and the main unit
charge contacts with a dry cloth once a
month, or the battery may not charge
properly (p. 75).
●
The battery cannot be overcharged.
Automatic security code setting
Whenever you place the handset on the main
unit, the unit will automatically select one of a
million security codes. These codes help to avoid
unauthorized use of your telephone line by
another cordless telephone.
Battery life
If your Panasonic battery is fully charged, the
battery life will be as follows.
Note:
●
Battery life may vary depending on usage
conditions and ambient temperature.
RECHARGE
indicator
Recharge
When the RECHARGE indicator flashes or the
handset beeps intermittently, place the handset on
the cradle to recharge the battery.
Page 21
21
For fax advantage assistance, call 1-800-435-7329.
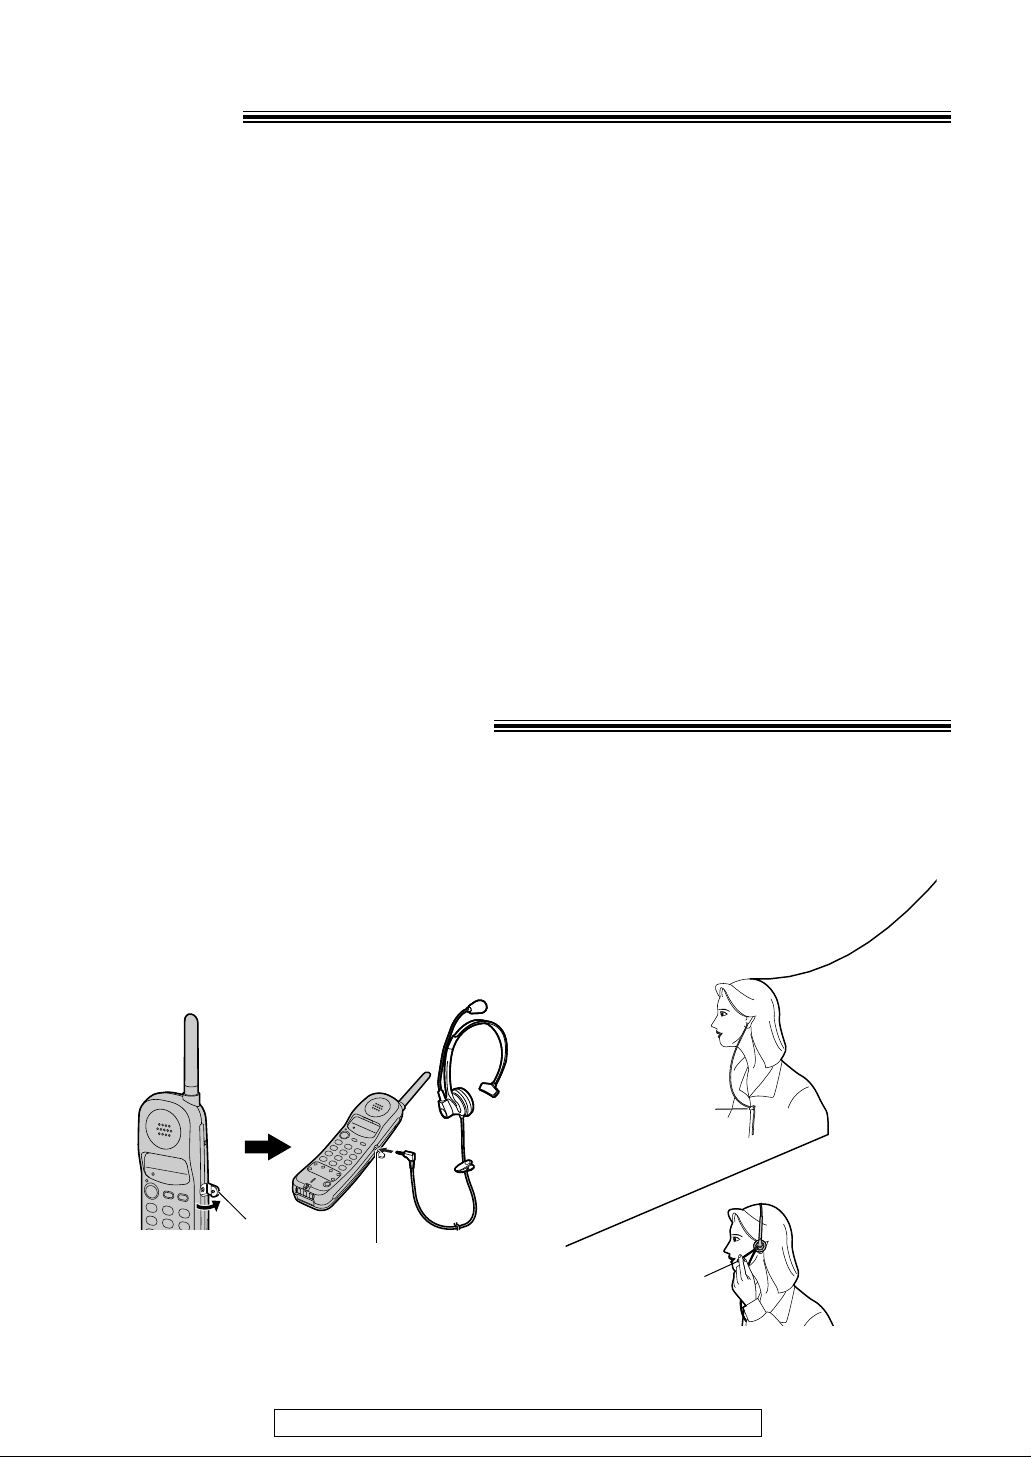
Belt clip
Headset (not included)
Plugging the headset into the handset allows a hands-free telephone conversation. For best
results, use the Panasonic headset Model No. KX-TCA87. To order, see page 9.
■
To connect the headset
Open the headset jack cover, and connect the
headset to the headset jack as shown below.
Headset
jack cover
Headset jack
1. Place the headset on your head and
attach the clothing clip to the desired
position.
Microphone
2. Adjust the microphone so it is near
your mouth.
Clothing
clip
Page 22
22
Volumes
For fax advantage assistance, call 1-800-435-7329.
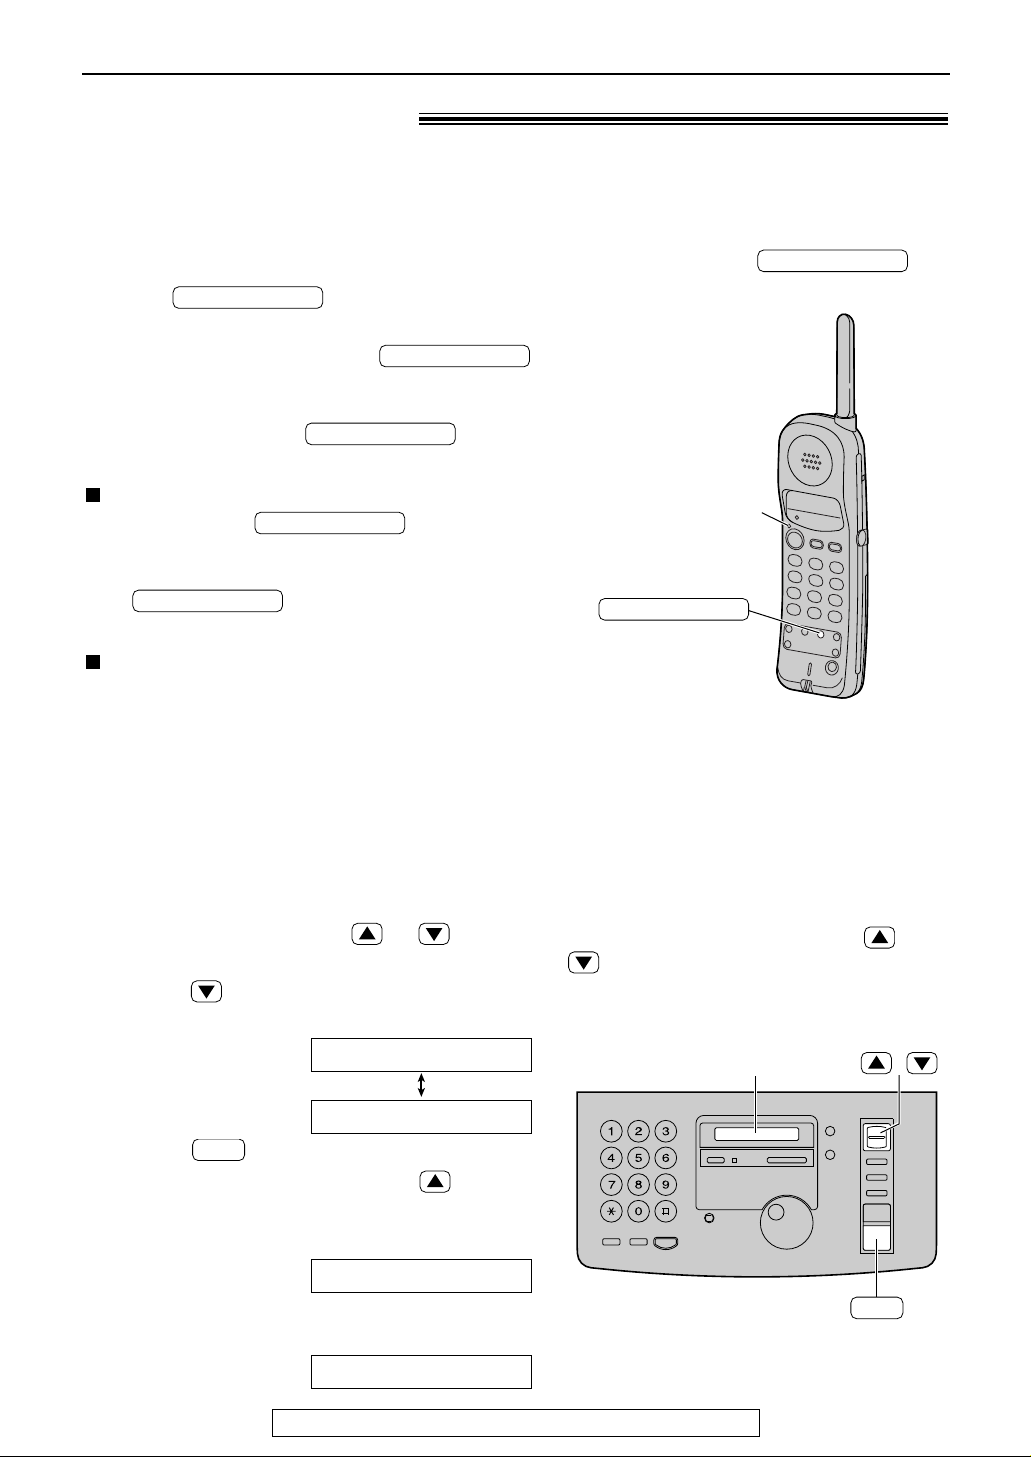
Adjusting volumes!
Ringer volume
4 levels (high/middle/low/off) are available.
While the unit is idle, press or .
■
To turn the ringer off:
1. Press repeatedly until the following
message is displayed.
Display:
2. Press .
●
To turn the ringer back on, press .
■
While the ringer volume is set to off:
The display will show the following message.
When a call is received, the unit will not ring and
will show the following message.
INCOMING CALL
RINGER OFF
SET
YES:SET/NO:STOP
RINGER OFF= OK?
/
SET
Display
Monitor volume
8 levels (high to low) are available.
While using the monitor, press or
.
Handset
Ringer volume
3 levels (high/low/off) are available.
Make sure the TALK indicator is off.
1. Press .
●
The current ringer will sound.
2. To change the volume, press
again within 5 seconds.
●
The new ringer will sound.
●
If you do not press within
5 seconds, the volume will not change.
To turn the ringer off:
Press and hold until 2 beeps
sound.
●
To turn the ringer back on, press
. It will sound at a high
level.
While the ringer volume is set to off:
When receiving a call, the handset will not ring,
and the TALK indicator will flash.
Handset volume
3 levels (high/middle/low) are available.
While talking, press .
LOUD/RINGER
Main unit
LOUD/RINGER
LOUD/RINGER
LOUD/RINGER
LOUD/RINGER
LOUD/RINGER
TALK indicator
LOUD/RINGER
Page 23
23
Making and Answering Calls
For fax advantage assistance, call 1-800-435-7329.
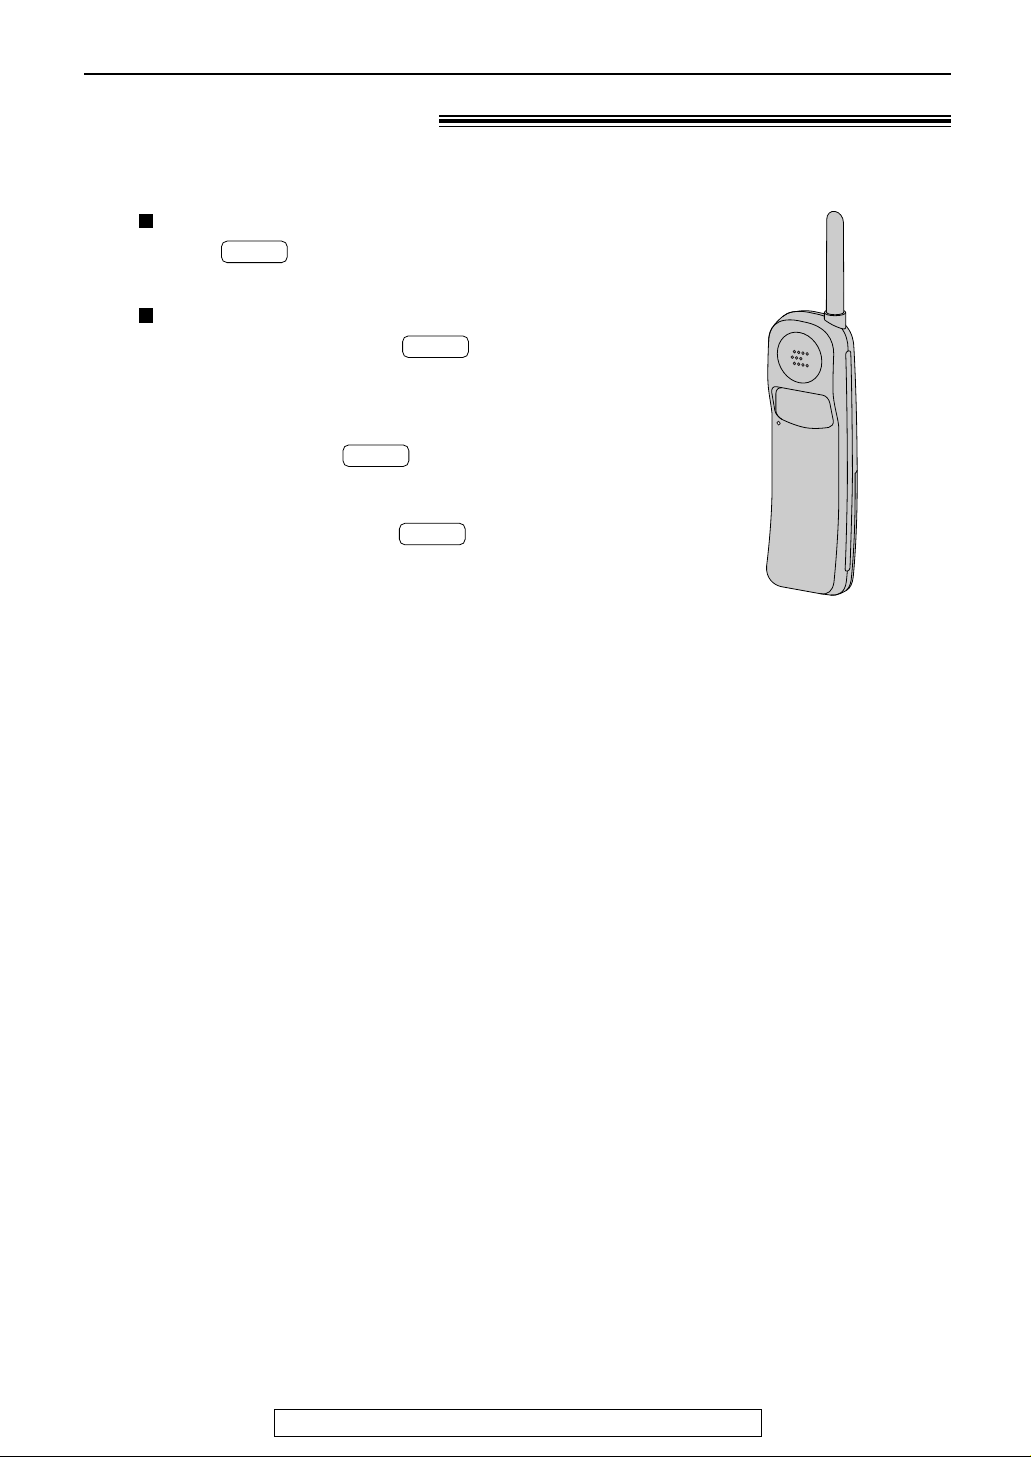
Voice calls - making
1
Handset is off the main unit:
Press .
●
The TALK indicator will light.
Handset is on the main unit:
Lift the handset and press .
●
The TALK indicator will light.
2
Dial the telephone number.
●
If you misdial, press and start
again from step 1.
3
When finished talking, press or
place the handset on the main unit.
●
The TALK indicator will turn off.
TALK
TALK
TALK
TALK
Page 24
24
Making and Answering Calls
For fax advantage assistance, call 1-800-435-7329.
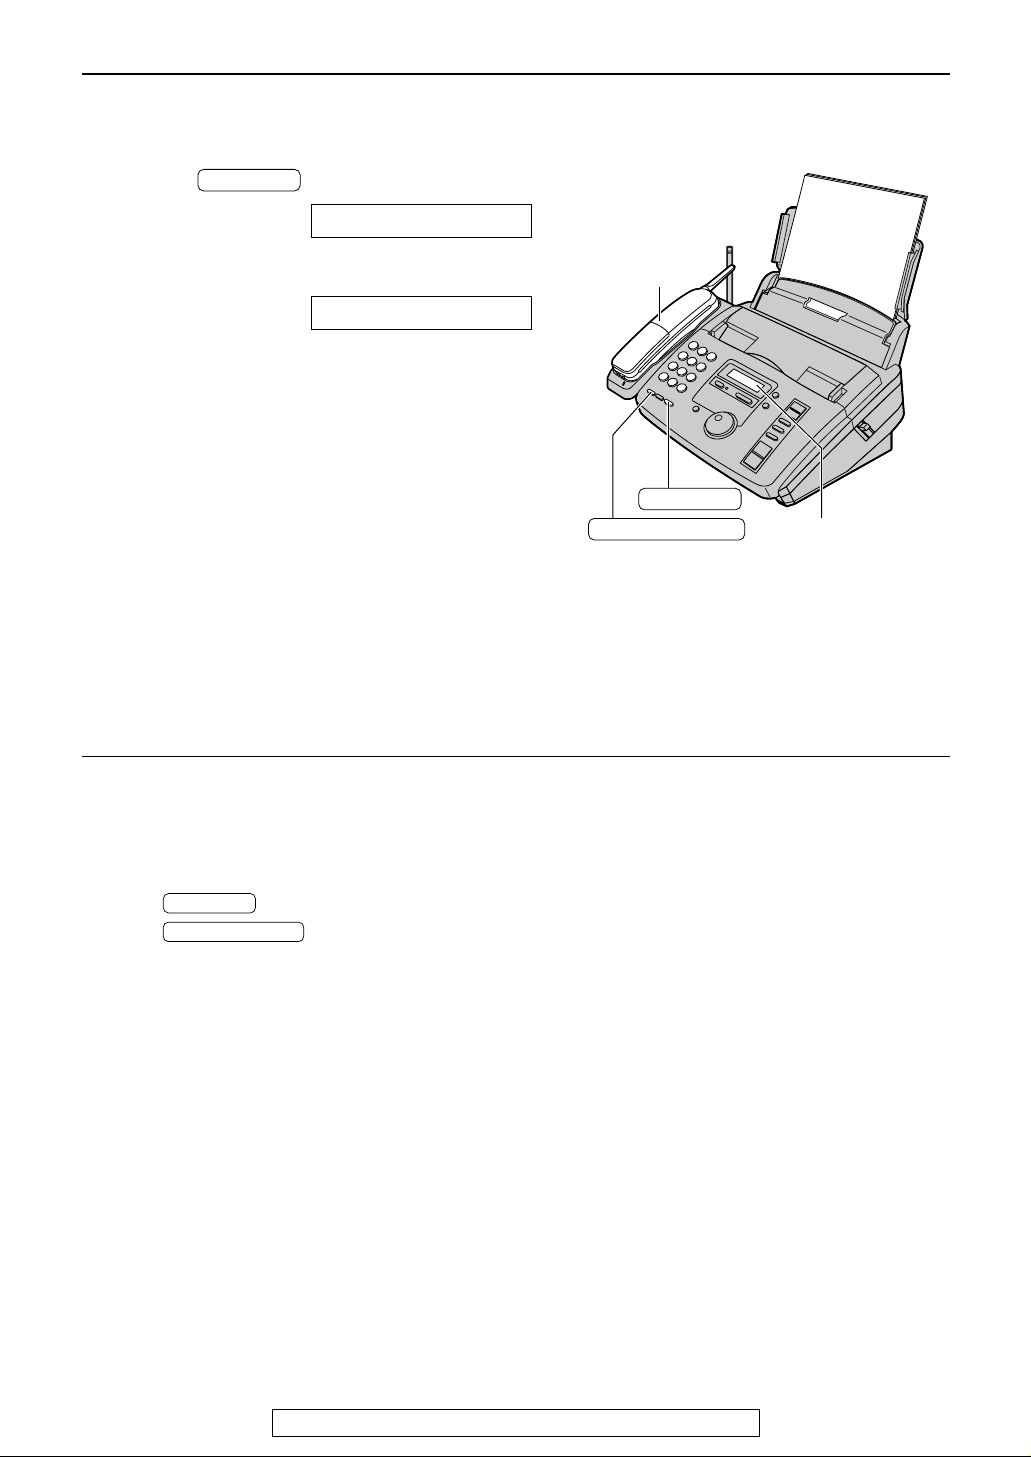
1
Press .
Display:
2
Dial the telephone number.
Example:
●
If you misdial, hang up and dial again.
3
When the other party answers, speak with
the handset.
4
When finished talking, replace the handset.
TEL=2345678
TEL=
MONITOR
MONITOR
REDIAL/PAUSE
Handset
Display
To redial the last number
Regardless of whether the main unit or the
handset was used, the last number dialed will be
redialed.
1. Press .
2. Press .
3. When the other party answers, speak with the
handset.
REDIAL/PAUSE
MONITOR
Note:
●
If the TALK button on the handset is pressed while
using the main unit, the call is switched to the handset
and the main unit is disconnected.
●
The dialing mode is set to “TONE” as a default setting.
If you cannot dial, change to “PULSE” with feature #13
(p. 55).
With the main unit
Page 25
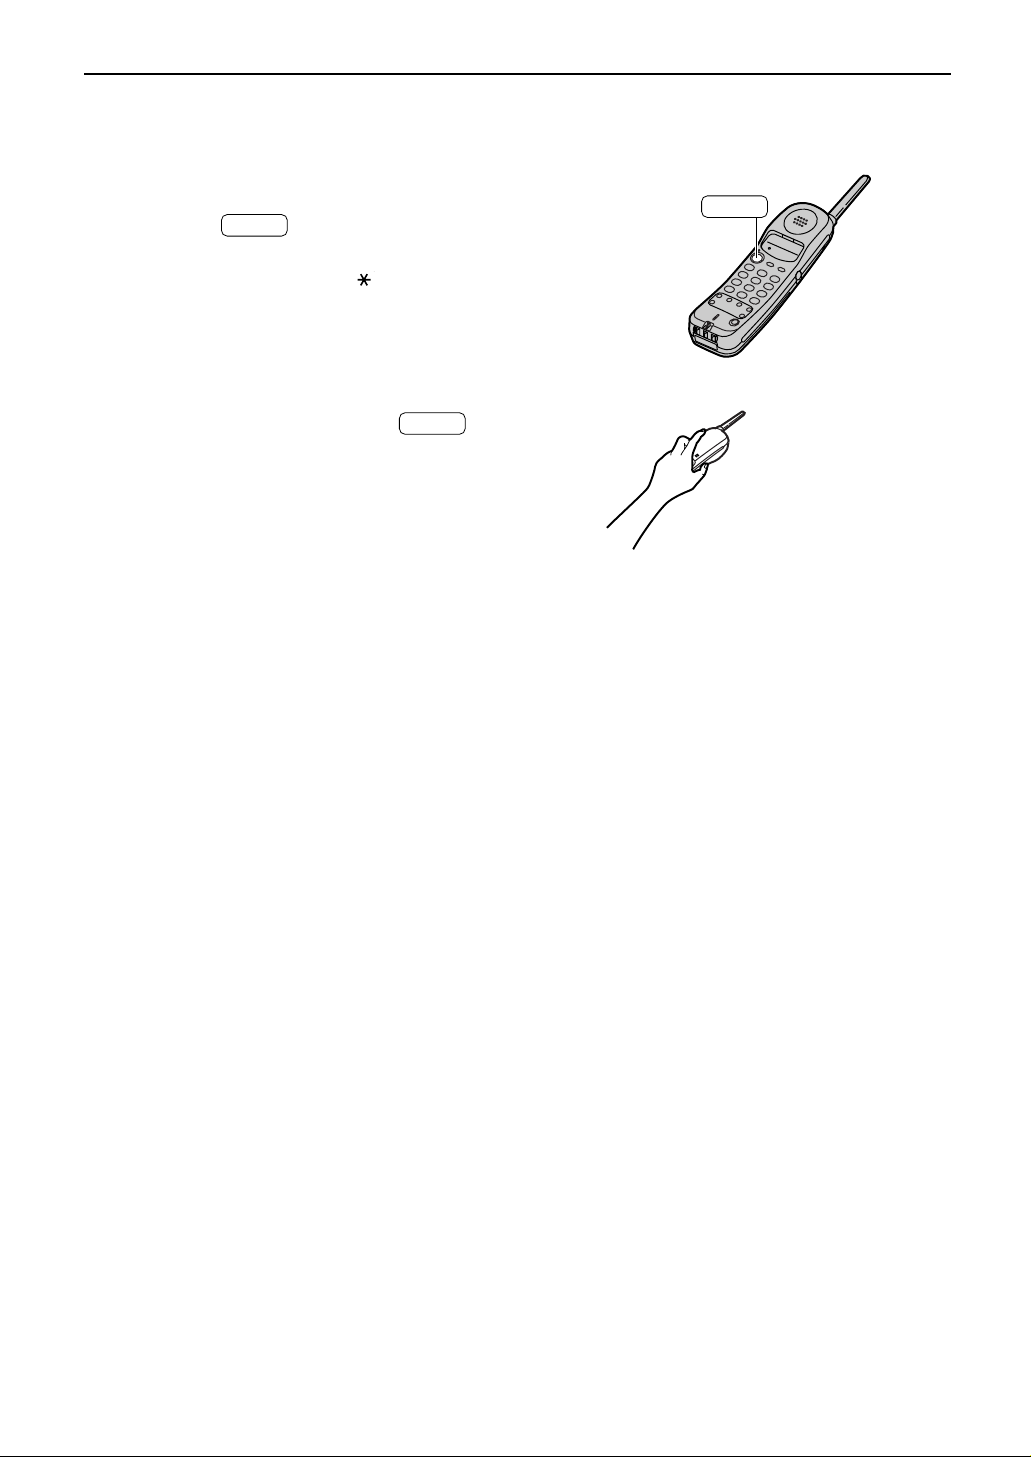
■
TALK
OR
TALK
Handset is off the main unit:
1
2
Press when the handset rings.
●
■
Handset is on the main unit:
Lift the handset when the main unit rings.
When finished talking, press or
place the handset on the main unit.
TALK
You can also answer a call by pressing
any dial key 0 to 9, or #.
(Any key talk feature)
Making and Answering Calls
25
Page 26
26
Making and Answering Calls
For fax advantage assistance, call 1-800-435-7329.
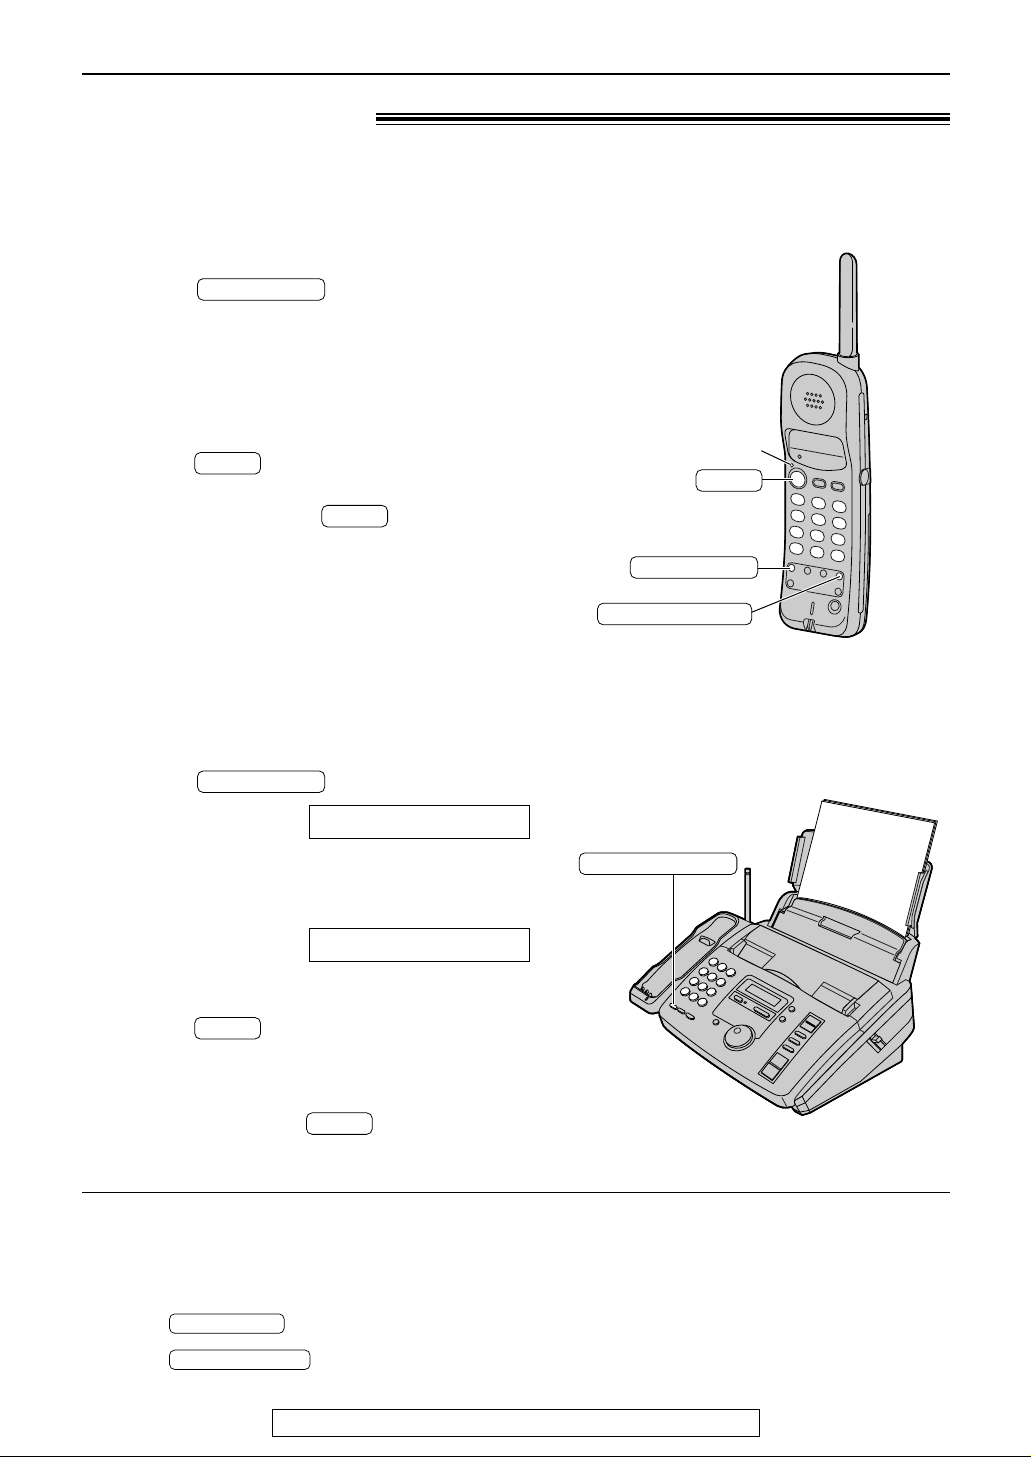
Remote monitor
1
Press on the handset during
a call.
●
The TALK indicator flashes.
●
The call is switched to the main unit.
2
When you hear the other party answer,
press on the handset to begin the
conversation.
●
To hang up, press .
TALK
TALK
REMOTE SP
Switching a call to the MONITOR
with the handset
1
Press .
Display:
2
Dial the telephone number.
●
You can also dial with the main unit keypad.
Example:
3
When you hear the other party answer,
press on the handset to begin the
conversation.
4
To hang up, press .
TALK
TALK
TEL=1234567
TEL=
REMOTE SP
REDIAL/PAUSE
Making a call using the handset
as a remote control
To redial the last number
Regardless of whether the main unit or the handset
was used, the last number dialed will be redialed.
1. Press .
2. Press .
REDIAL/PAUSE
REMOTE SP
TALK
TALK indicator
REMOTE SP
REDIAL/PAUSE
Page 27
27
Making and Answering Calls
TONE
FLASH
REDIAL/PAUSE
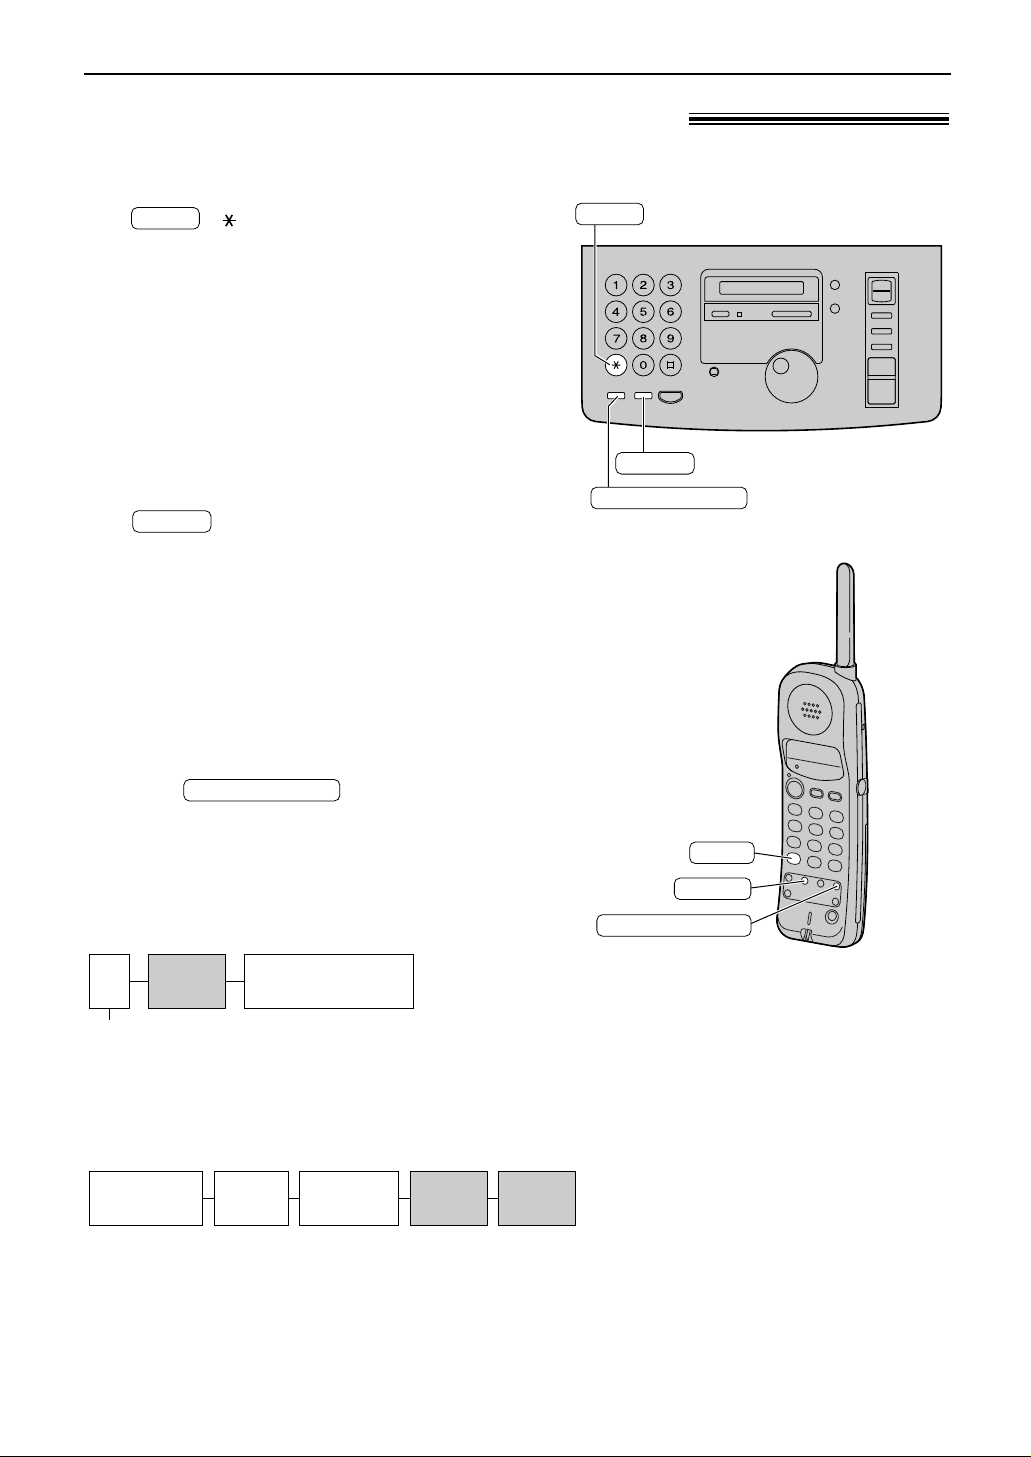
TONE, FLASH and PAUSE buttons!
TONE button
The ( ) button is used for rotary pulse
dial services and allows you to temporarily change
from pulse to tone mode during a dialing
operation.
When you hang up, the unit will automatically
return to the pulse mode.
TONE
FLASH button
The button also allows you to use
special features of a host exchange (if connected)
or local telephone company services such as call
waiting. For further details, contact your host
exchange supplier or local telephone company.
FLASH
Entering pauses
When the button is pressed
during dialing, a pause will be inserted.
REDIAL/PAUSE
9 PAUSE
Line access code
Telephone number
Example 2:
If a transmission error occurs during an overseas
fax transmission, add two pauses at the end of the
telephone number.
International
access code
Country
code
PAUSE PAUSE
Telephone
number
Example 1:
If your unit is connected to a host exchange, insert
a pause to get an outside line.
Note:
●
TONE and PAUSE can be stored into a
telephone number in the JOG DIAL
directory.
TONE
FLASH
REDIAL/PAUSE
Page 28
28
Automatic Dialing (Handset)
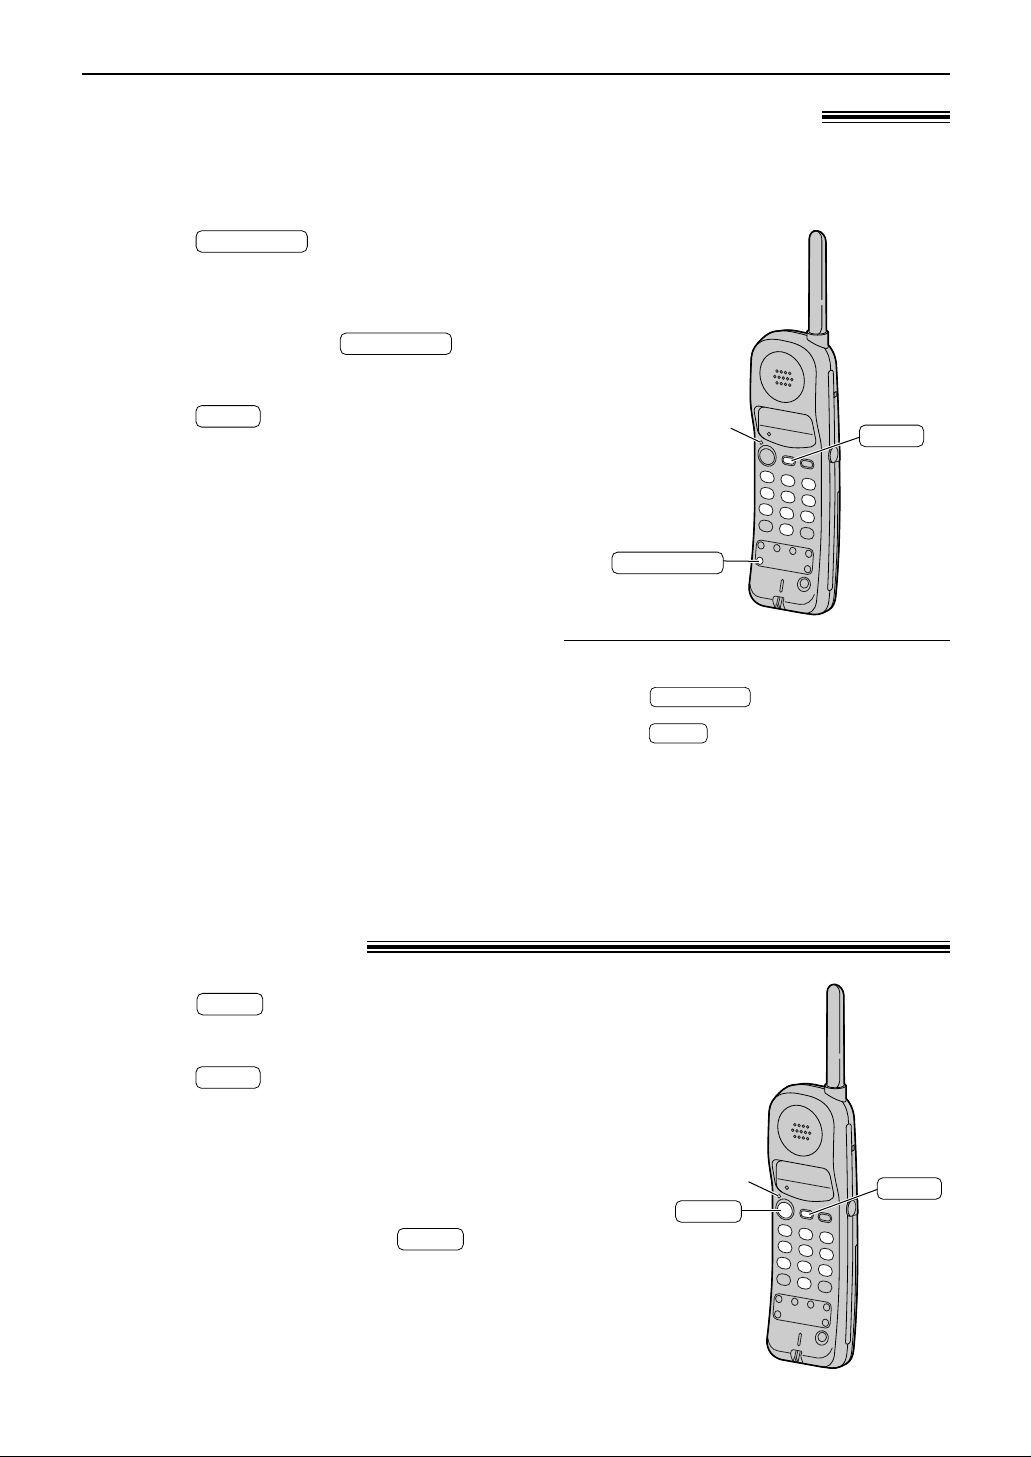
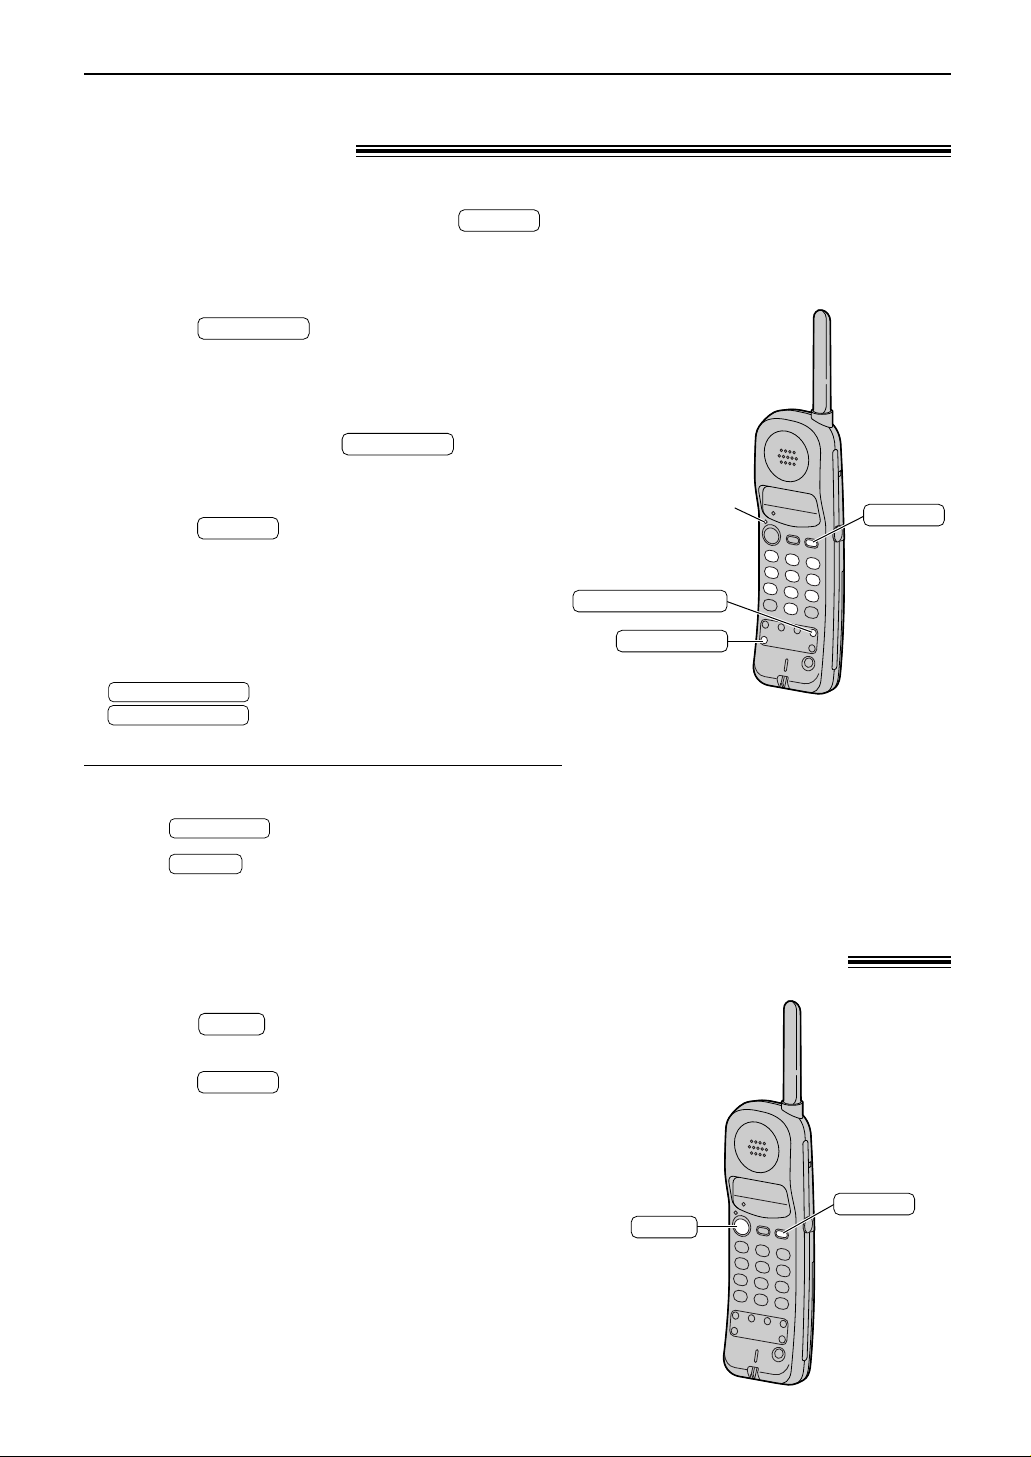
Storing telephone numbers in the handset
Making a voice call with the handset using
stored numbers
1
Press .
●
The TALK indicator will flash.
2
Enter the telephone number up to 22 digits.
●
If you misdial, press to end
storing, and start again from step 1.
3
Press .
4
Press a memory station number (0 to 9).
●
A one beep confirmation tone will sound.
●
The TALK indicator will turn off.
●
To store other numbers, repeat steps 1 to 4.
AUTO
PROGRAM
PROGRAM
TALK indicator
AUTO
PROGRAM
Note:
●
Numbers stored in the handset cannot be accessed
by the main unit.
●
A pause entered in a telephone number counts as
one digit.
1
Press .
●
The TALK indicator will light.
2
Press .
3
Press the desired memory station number
(0 to 9).
●
The stored telephone number will be dialed.
4
When finished talking, press .
●
The TALK indicator will turn off.
TALK
AUTO
TALK
TALK
TALK indicator
AUTO
Note:
●
Numbers stored in the handset cannot be accessed
by the main unit.
●
For further details on handset operation, see page 23.
To erase a stored number
1. Press .
2. Press .
3. Press the memory station number (0 to 9)
you want to erase.
●
1 beep sounds and erasing is completed.
AUTO
PROGRAM
You can store up to 10 telephone numbers in the handset. The dial keys (0 to 9) function as
memory stations. Make sure the TALK indicator is off.
Page 29
29
Automatic Dialing (Handset)
Storing a telephone number in the
DIRECT button
1
Press .
●
The TALK indicator will flash.
2
Enter a telephone number up to 22 digits.
●
If you misdial, press to end
storing, then start from step 1.
3
Press .
●
A beep sounds.
DIRECT
PROGRAM
PROGRAM
DIRECT
TALK indicator
PROGRAM
REDIAL/PAUSE
Note:
●
If a pause is required for dialing, press
where needed. Pressing
counts as one digit.
To erase a stored number
1. Press .
2. Press for the telephone number to be
erased.
DIRECT
PROGRAM
You can store a telephone number in the button. The stored number can be dialed
with a one-touch operation.
The TALK indicator light must be off before programming.
DIRECT
Dialing a stored number in the DIRECT button
1
Press .
2
Press .
●
The stored telephone number will be
dialed.
DIRECT
TALK
DIRECT
TALK
REDIAL/PAUSE
REDIAL/PAUSE
Page 30
30
JOG DIAL
Storing names and telephone numbers
in the JOG DIAL directory!
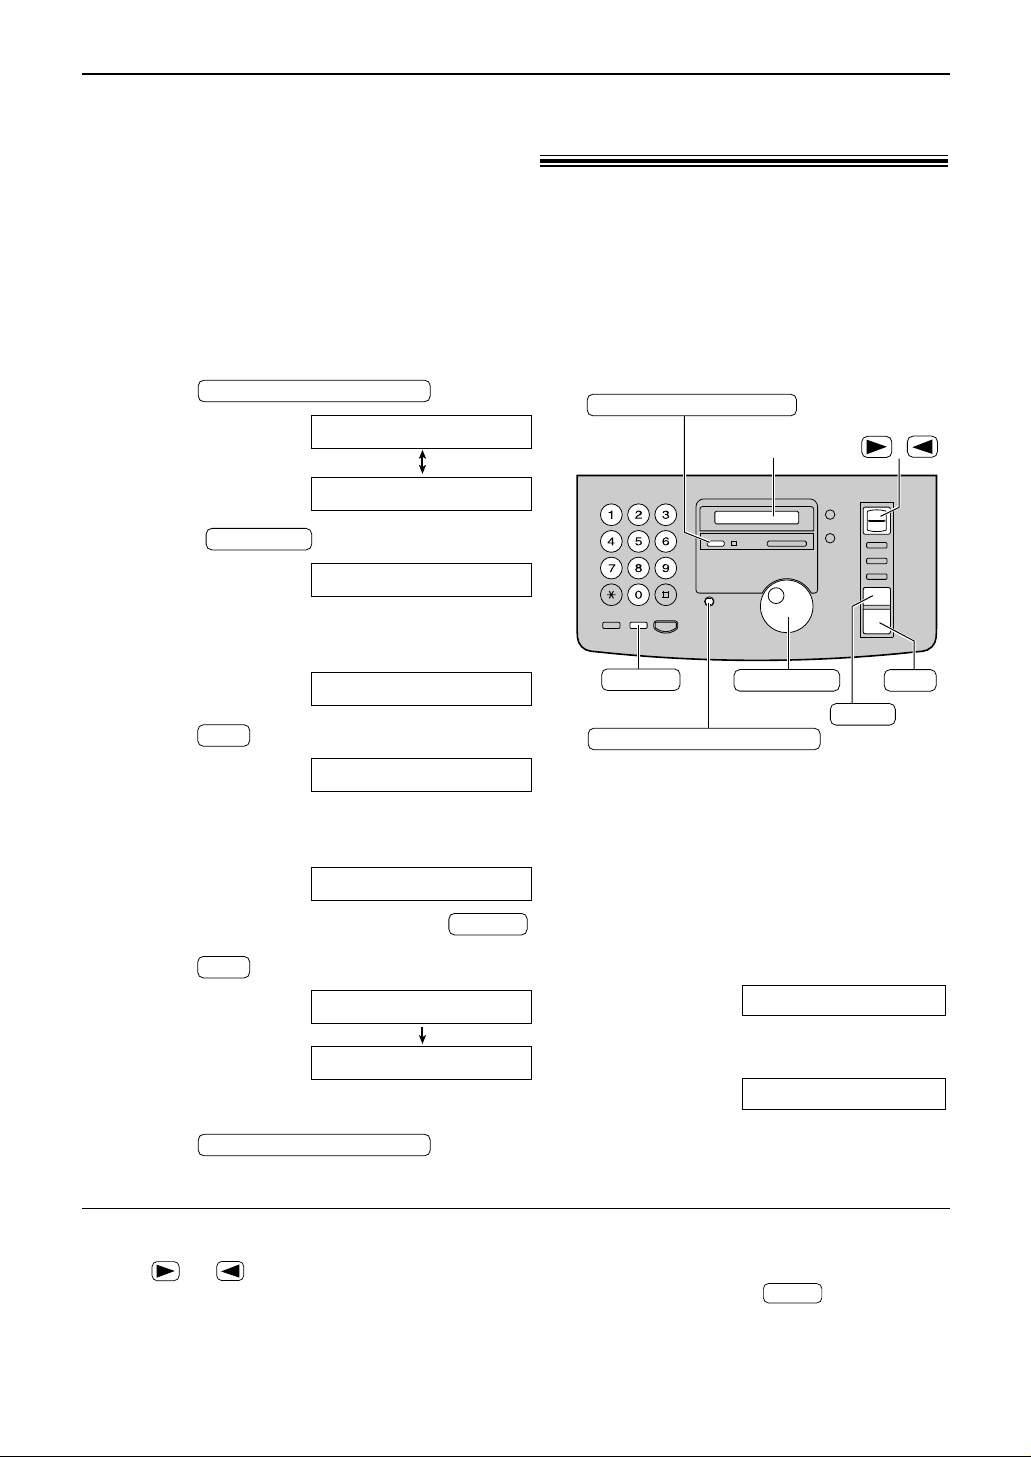
For rapid access to frequently dialed numbers, the unit provides a JOG DIAL directory
(50 stations).
For your convenience, the following station has been pre-programmed.
HELP-FAX (1-800-435-7329): If you cannot correct a problem after trying the help function
(p. 10), call using this station (p. 33).
If you do not need the above station, you can erase it (p. 32).
1
Press .
Display:
2
Rotate until the following is
displayed.
3
Enter the name, up to 10 characters, by
following the instructions on the next page.
Example:
4
Press .
5
Enter the telephone number, up to 30 digits,
using the dial keypad.
Example:
●
If you want to enter a hyphen, press .
6
Press .
●
To program other items, repeat steps 3 to 6.
7
Press to exit the
program.
DIRECTORY PROGRAM
NAME=
REGISTERED
SET
FLASH
NO.=5552233
NO.=
SET
NAME=Alice
NAME=
JOG DIAL
PRESS DIR.PROG.
USE JOG-DIAL OR
DIRECTORY PROGRAM
/
JOG DIAL
STOP
(Hyphen)
(Delete)
DIRECTORY PROGRAM
FLASH
SET
Display
(Insert)
HANDSET LOCATOR
Helpful hint:
●
You can confirm the stored items on the
display (p. 33) or on the telephone number list
(p. 76).
Note:
●
When the following message is displayed in
step 6, you can only store 5 more items.
Display:
●
If there is no space to store new stations, the
following message is displayed in step 1.
Erase unnecessary stations (p. 32).
●
A hyphen or a space entered in a telephone
number counts as two digits.
JOG-DIAL FULL
SPACE= 5 DIRS.
To correct a mistake
●
Press or to move the cursor to the
incorrect character/number, and make the
correction.
To delete a character/number
●
Move the cursor to the character/number you
want to delete and press .
STOP
Page 31
key (To move the cursor to the left.)
31
JOG DIAL
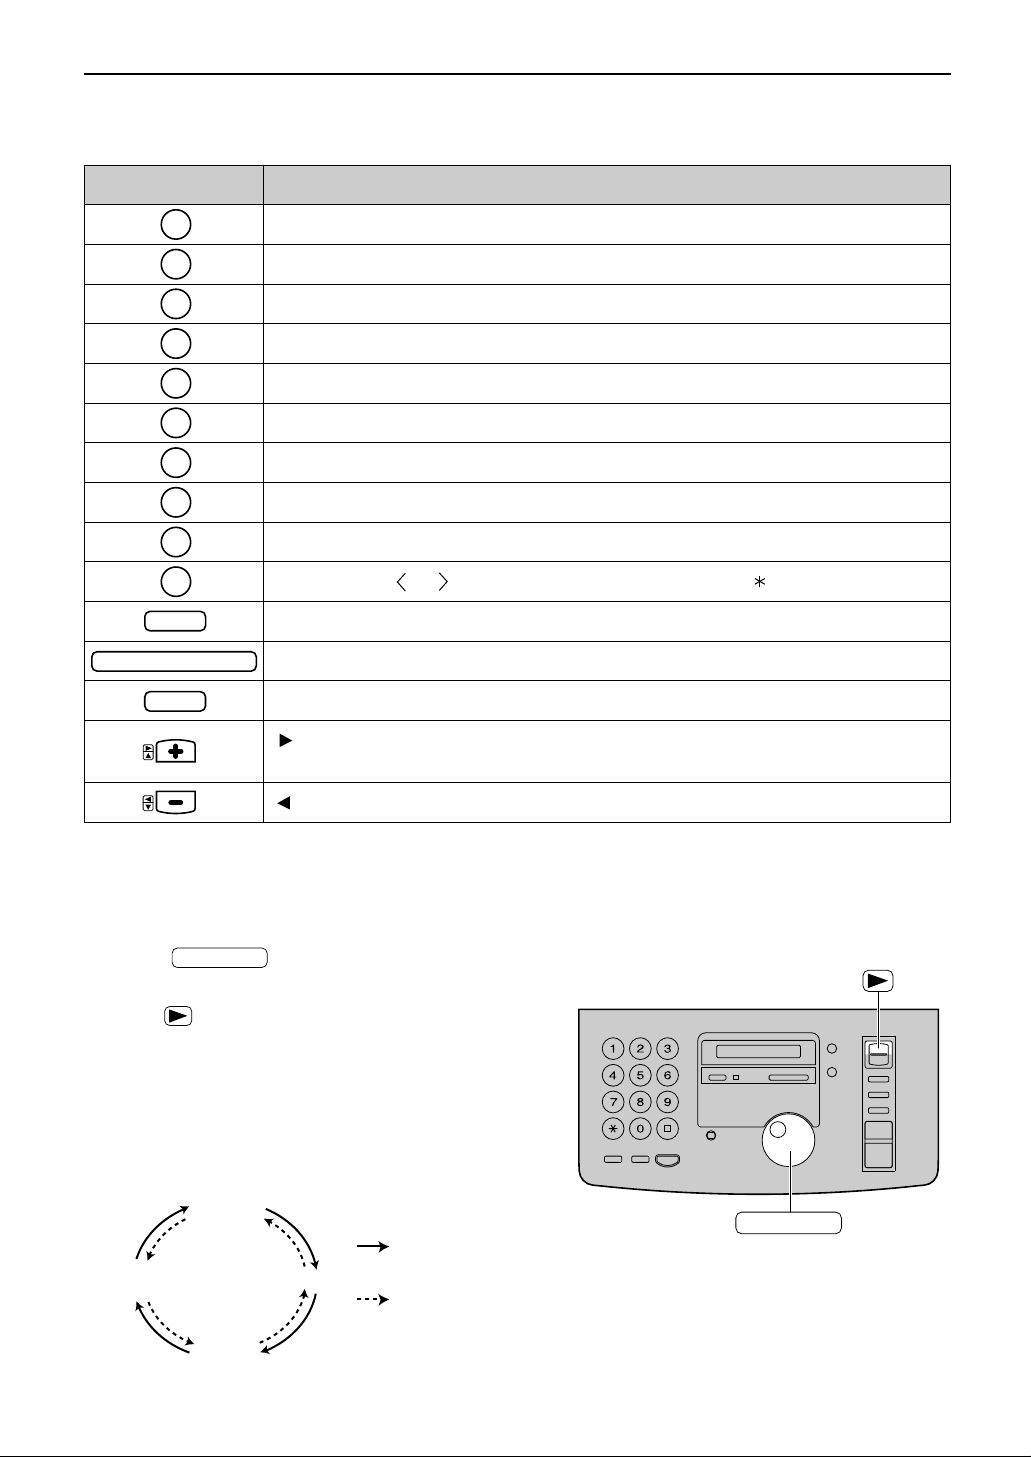
To select characters with the dial keypad
Pressing the dial keys will select a character as shown below.
To select characters using the JOG DIAL
Instead of pressing the dial keys, you can select characters using the JOG DIAL.
1. Rotate until the desired character is
displayed.
2. Press to move the cursor to the next space.
●
The character displayed in step 1 is inserted.
3. Return to step 1 to enter the next character.
JOG DIAL
JOG DIAL
Display order of characters
Capital
alphabet
Lower case
alphabet
Number
Symbol
: Rotating to
the right
: Rotating to
the left
1
2
3
4
5
6
7
8
9
0
FLASH
STOP
HANDSET LOCATOR
Keys Characters
Hyphen button (To insert a hyphen.)
Insert button (To insert one character or one space.)
Delete button (To delete a character.)
key (To move the cursor to the right.)
To enter another character using the same number key, move the cursor to the next space
.
1 [ ] { } + – / = , . _ ` : ; ? |
A B C a b c 2
D E F d e f 3
G H I g h i 4
J K L j k l 5
M N O m n o 6
P Q R S p q r s 7
T U V t u v 8
W X Y Z w x y z 9
0 ( ) ! " # $ % & ¥ @ ^ ’ →
Page 32

32
JOG DIAL
Page 33
33
JOG DIAL
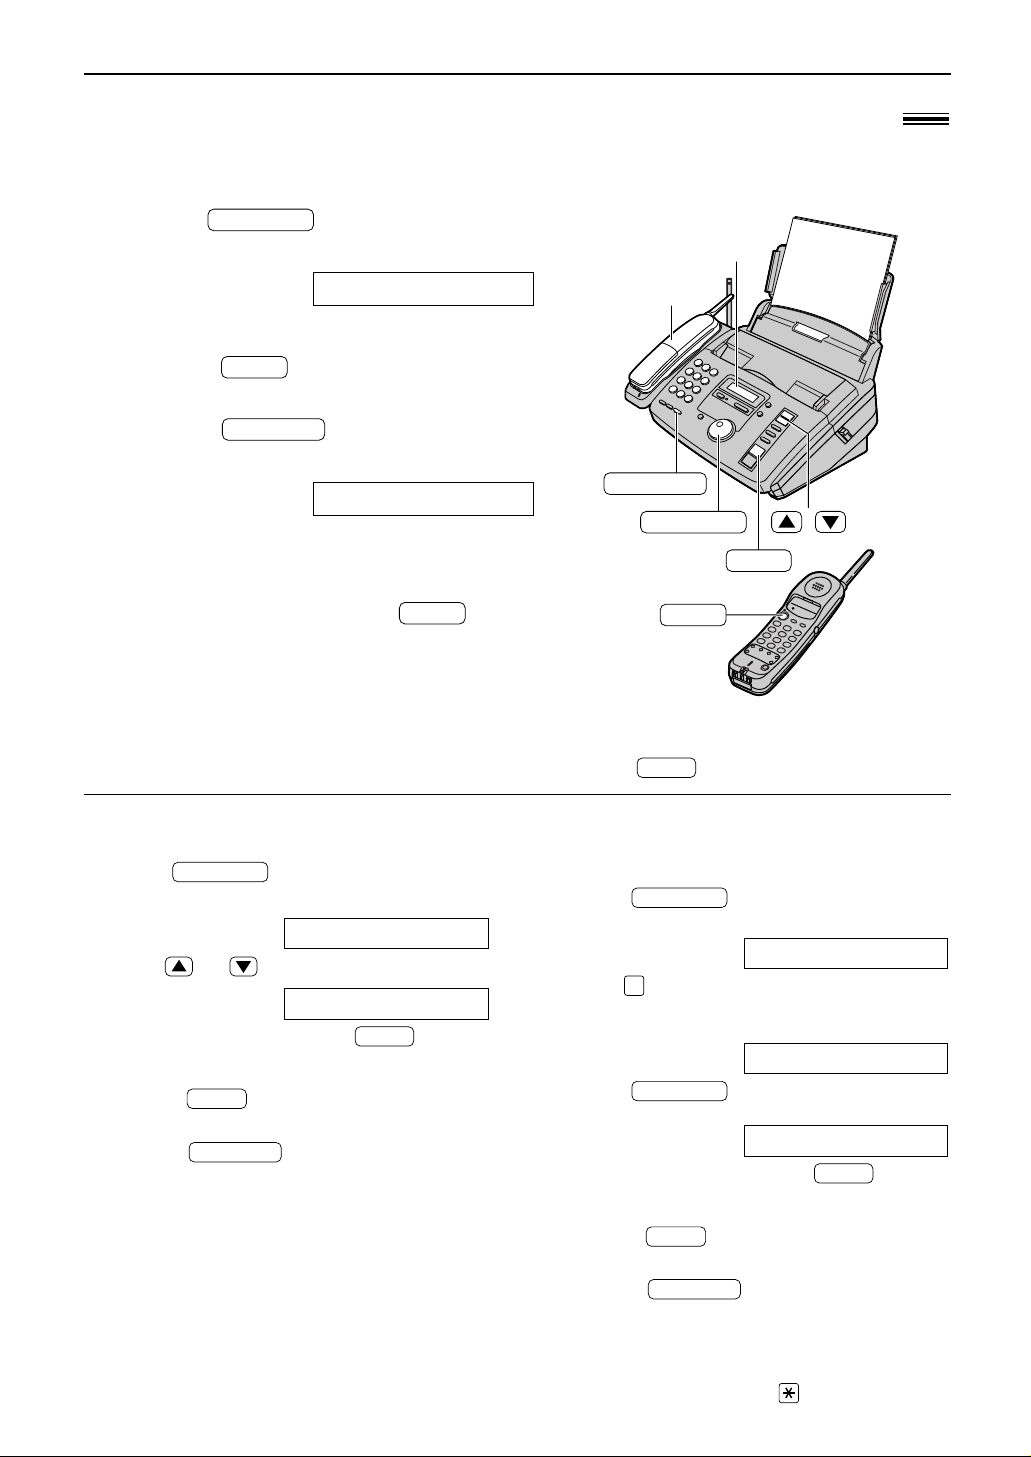
Making a voice call using the JOG DIAL directory
!
Before using this feature, program the desired names and telephone numbers into the directory
(p. 30).
1
Rotate until the desired name
is displayed.
Example:
2
■
Handset is off the main unit:
Press on the handset.
■
Handset is on the main unit:
Press or lift the handset.
●
The unit will start dialing automatically.
3
When the other party answers, speak with
the handset.
4
When finished talking, press or
replace the handset.
TALK
DIALING
MONITOR
TALK
Lisa
JOG DIAL
MONITOR
Handset
STOP
JOG DIAL
Display
/
TALK
Helpful hint:
●
You can confirm the stored items on the display
(see below) or on the telephone number list (p. 76).
Note:
●
If the desired name has not been stored,
press and dial the number manually.
STOP
To confirm the stored items on the
display
1. Rotate until the desired name is
displayed.
Example:
2. Press or .
●
To stop the operation, press .
3.
■
Handset is off the main unit:
Press on the handset.
■
Handset is on the main unit:
Press or lift the handset.
●
The unit will automatically dial the number.
MONITOR
TALK
STOP
4567890
Kim
JOG DIAL
To search for a name by initial
Example: If you want to search for the name
“Lisa”
1. Rotate until any name is
displayed.
Example:
2. Press repeatedly until any name with the
initial “L” is displayed (see the character table
on page 31).
3. Rotate to the right until “Lisa” is
displayed.
●
To stop the operation, press .
4.
■
Handset is off the main unit:
Press on the handset.
■
Handset is on the main unit:
Press or lift the handset.
●
The unit will automatically dial the number.
MONITOR
TALK
STOP
Lisa
JOG DIAL
Larry
5
Alan
JOG DIAL
Note:
●
When you want to search for symbols (not
letters or numbers), press in step 2.
Page 34
34
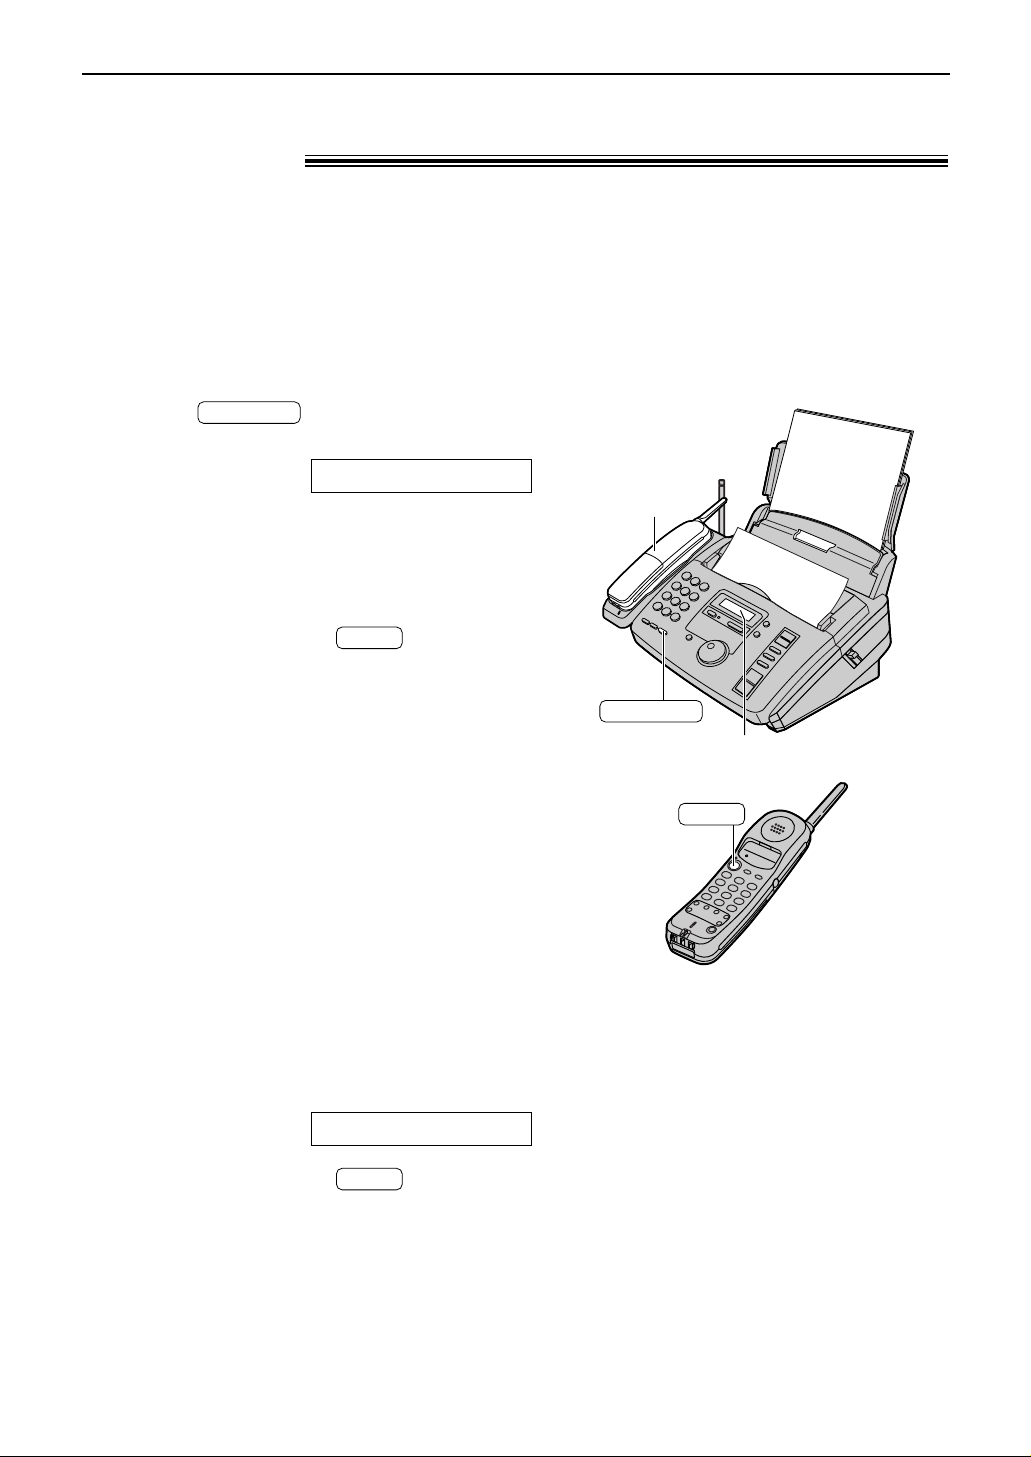
Voice Contact
1
Press while transmitting or
receiving documents.
Display:
●
Your unit will call the other party with a
distinctive ring.
●
When the other party answers, your unit
will emit a distinctive ring.
2
To start talking, press on the
handset or lift the handset from the main
unit.
TALK
VOICE STANDBY
MONITOR
Handset
MONITOR
FACE DOWN
Display
TALK
Note:
●
If you initiate voice contact during transmission, the
unit will call you with a distinctive ring after all of the
documents have been transmitted.
●
If you initiate voice contact during reception, the unit
will call you with a distinctive ring after the current
page of the document has been received.
Talking to the other party after fax transmission
or reception!
You can talk to the other party after a fax message is completed. This will save the added
expense and time of making another call.
This feature only works when the other party’s fax machine is equipped with a voice
contact feature.
1
If the other party initiates voice contact, your
unit will sound a distinctive ring and the
following will be displayed.
Display:
2
To start talking, press on the
handset or lift the handset from the main unit
within 10 seconds of the distinctive ring.
TALK
PLEASE PICK UP
Receiving a request for voice contact
Initiating voice contact
Page 35
35
Sending Faxes
To select the resolution
Select the desired resolution according to
the type of document.
STANDARD:
For printed or typewritten
originals with normal-sized characters.
FINE: For originals with small printing.
SUPER FINE:
For originals with minute
printing.
HALF TONE:
For originals containing
photographs, shaded drawings, etc.
●
Using the “FINE”, “SUPER FINE” or
“HALF TONE” setting will increase the
transmission time.
●
If the resolution setting is changed
during feeding, it will be effective from
the next sheet.
●
The “SUPER FINE” resolution only
works with other compatible fax
machines.
From memory
You can press instead
of to scan the document
into memory before sending.
After storing, the unit will transmit the
document.
●
The memory capacity is approx. 25
pages based on the ITU-T No. 1 Test
Chart in standard resolution (p. 81).
●
If the document exceeds the memory
capacity, sending will be canceled.
QUICK SCAN
Sending a fax manually/using the JOG DIAL directory
!
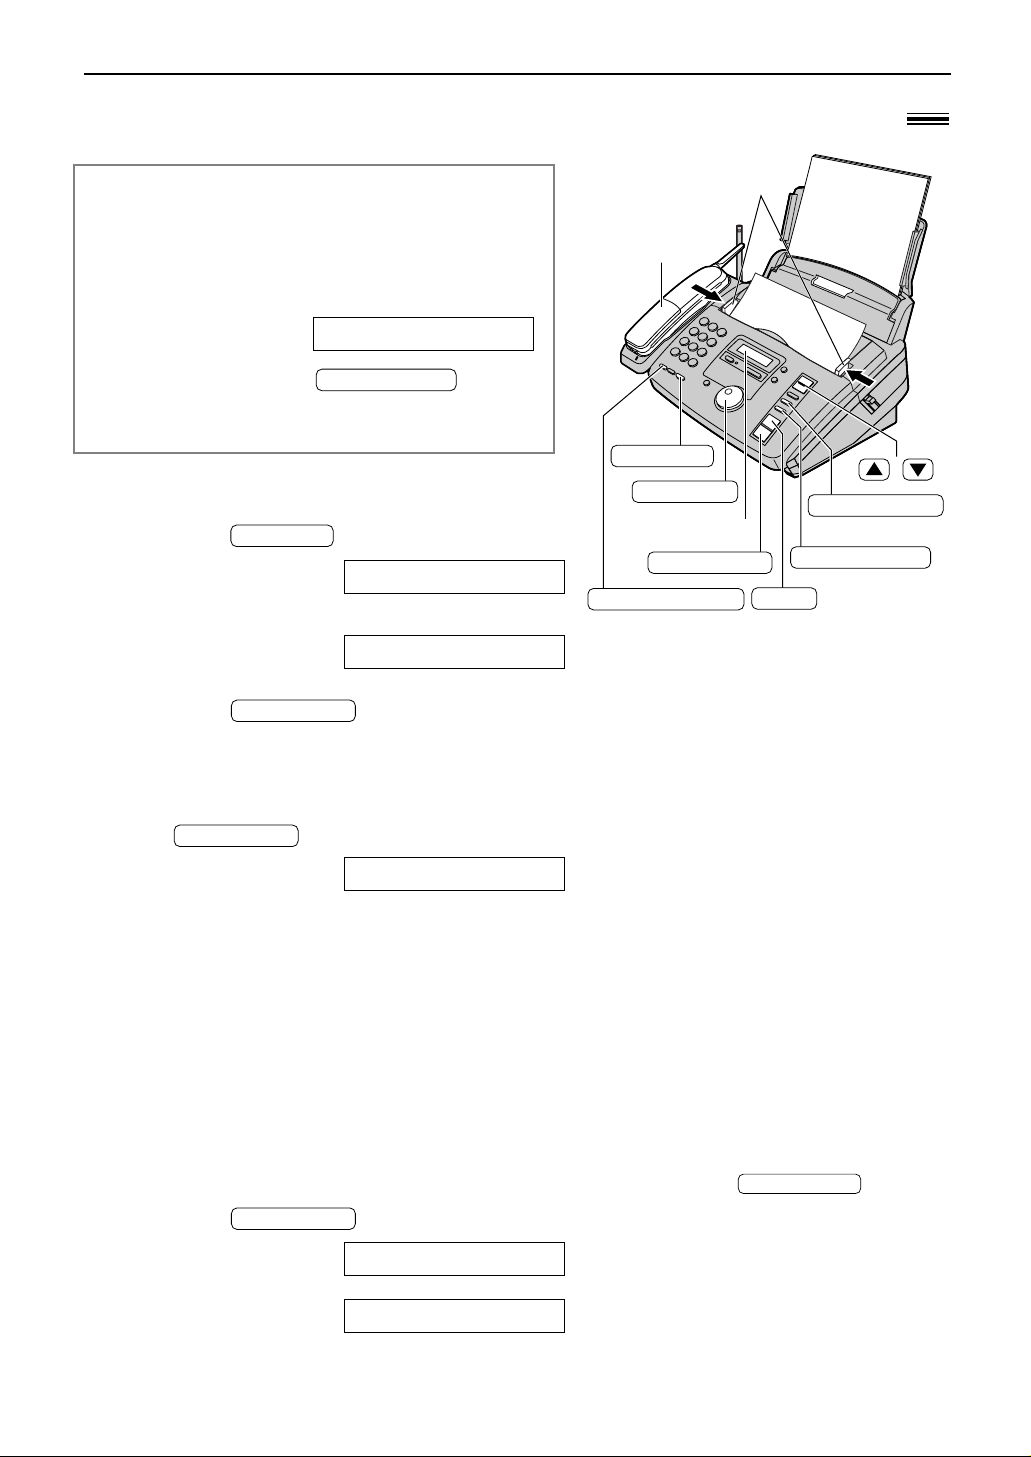
1
Adjust the width of the document guides to
the size of the document.
2
Insert the document (up to 10 pages) FACE
DOWN until a single beep is heard and the
unit grabs the document.
Display:
3
If necessary, press
repeatedly to select the desired setting
(see right).
RESOLUTION
STANDARD
Handset
MONITOR
FACE DOWN
Document guides
FAX START
JOG DIAL
RESOLUTION
STOP
REDIAL/PAUSE
Display
/
QUICK SCAN
Manually
4
Press on the main unit.
5
Dial the fax number.
Example:
6
When a fax tone is heard:
Press .
OR
When the other party answers your call:
Lift the handset and ask them to press their
start button. When a fax tone is heard, press
and replace the handset.
CONNECTING.....
FAX START
FAX START
TEL=5678901
TEL=
MONITOR
Using the JOG DIAL directory
4
Rotate until the desired name
is displayed.
Example:
●
To confirm the number, press or .
●
For further details about using the JOG
DIAL, see page 33.
5
Press .
CONNECTING.....
FAX=<Alice>
FAX START
Page 36
36
Sending Faxes
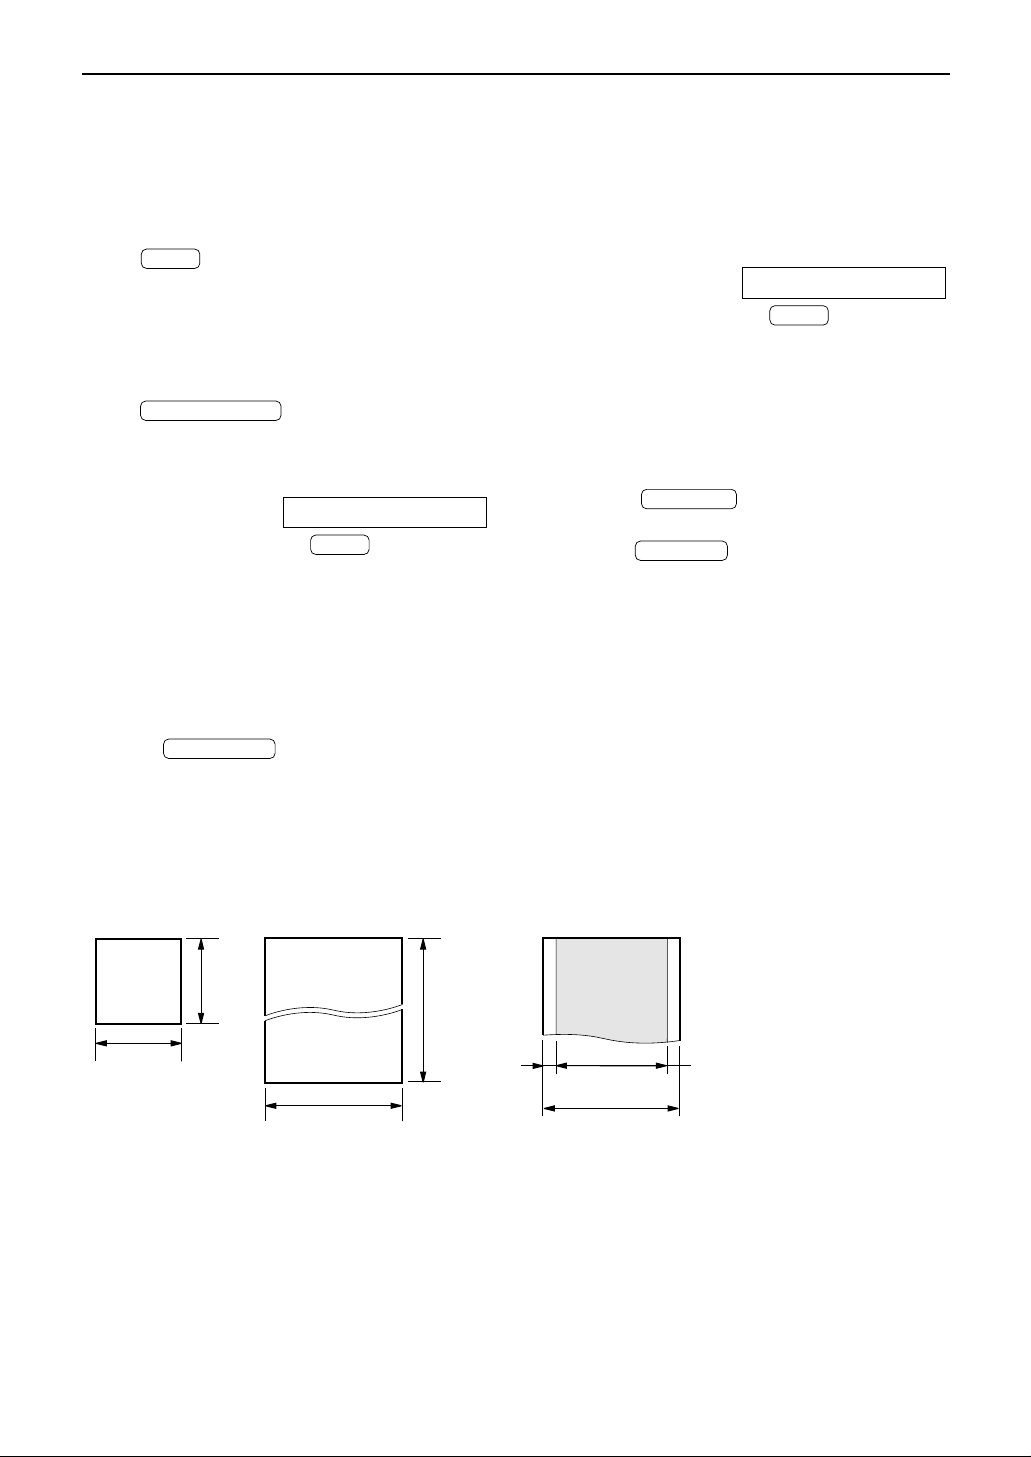
600 mm
(23
5
⁄8
"
)
Paper width
Minimum size
128 mm
(5
"
)
128 mm
(5
"
)
Maximum size
216 mm
(8
1
⁄2")
208 mm (83⁄16")
Effective scanning area
4 mm
Scanned
area
216 mm (81⁄2")
Note:
●
Remove clips, staples or other similar fastening objects.
●
Check that ink, paste or correction fluid has dried.
●
Do not send the following types of documents. Use copies for fax transmission.
— Chemically treated paper such as carbon or carbonless duplicating paper
— Electrostatically charged paper
— Heavily curled, creased or torn paper
— Paper with a coated surface
— Paper with a faint image
— Paper with printing on the opposite side that can be seen through the front (e.g. newspaper)
Documents you can send
Document weight
Single sheet:
45 g/m
2
to 90 g/m
2
(12 lb. to 24 lb.)
Multiple sheets:
60 g/m
2
to 75 g/m
2
(16 lb. to 20 lb.)
Fax auto redial for the JOG DIAL directory
If the line is busy or there is no answer when
using the JOG DIAL directory, the unit will
automatically redial the number up to 2 times.
●
This feature is also available for delayed
transmission (feature #25 on page 56).
●
During redial, the following will be displayed.
Display:
●
To cancel redialing, press .
If your unit does not send a fax using the
JOG DIAL directory
●
Confirm the stored items on the display (p. 33)
or on the telephone number list (p. 76).
●
Check that the number dialed is answered by
the other party’s machine.
1. Rotate until the desired name is
displayed.
2.
Press .
●
The connecting tone will be heard during
dialing to tell you the status of the other
party’s machine (feature #76 on page 59).
MONITOR
JOG DIAL
STOP
WAITING REDIAL
To transmit more than 10 pages at a time
Insert the first 10 pages of the document. Add the
extra pages (up to 10) before the last page is fed
into the unit.
To stop transmission
Press .
To redial the last number
Regardless of whether the main unit or the
handset was used, the last number dialed will be
redialed.
Press .
●
If the line is busy, the unit will automatically
redial the number up to 2 times.
●
During redial, the following will be displayed.
Display:
●
To cancel redialing, press .
Convenient way to send a fax
You can dial the fax number first before inserting
the document. This is convenient if the other
party’s number is indicated on the document.
1. Enter the fax number.
●
The handset must be on the cradle.
2. Insert the document.
3. Press .
FAX START
STOP
WAITING REDIAL
REDIAL/PAUSE
STOP
Page 37
37
Sending Faxes
Reports for confirmation
To confirm the communication results, the following reports are available.
Sending report
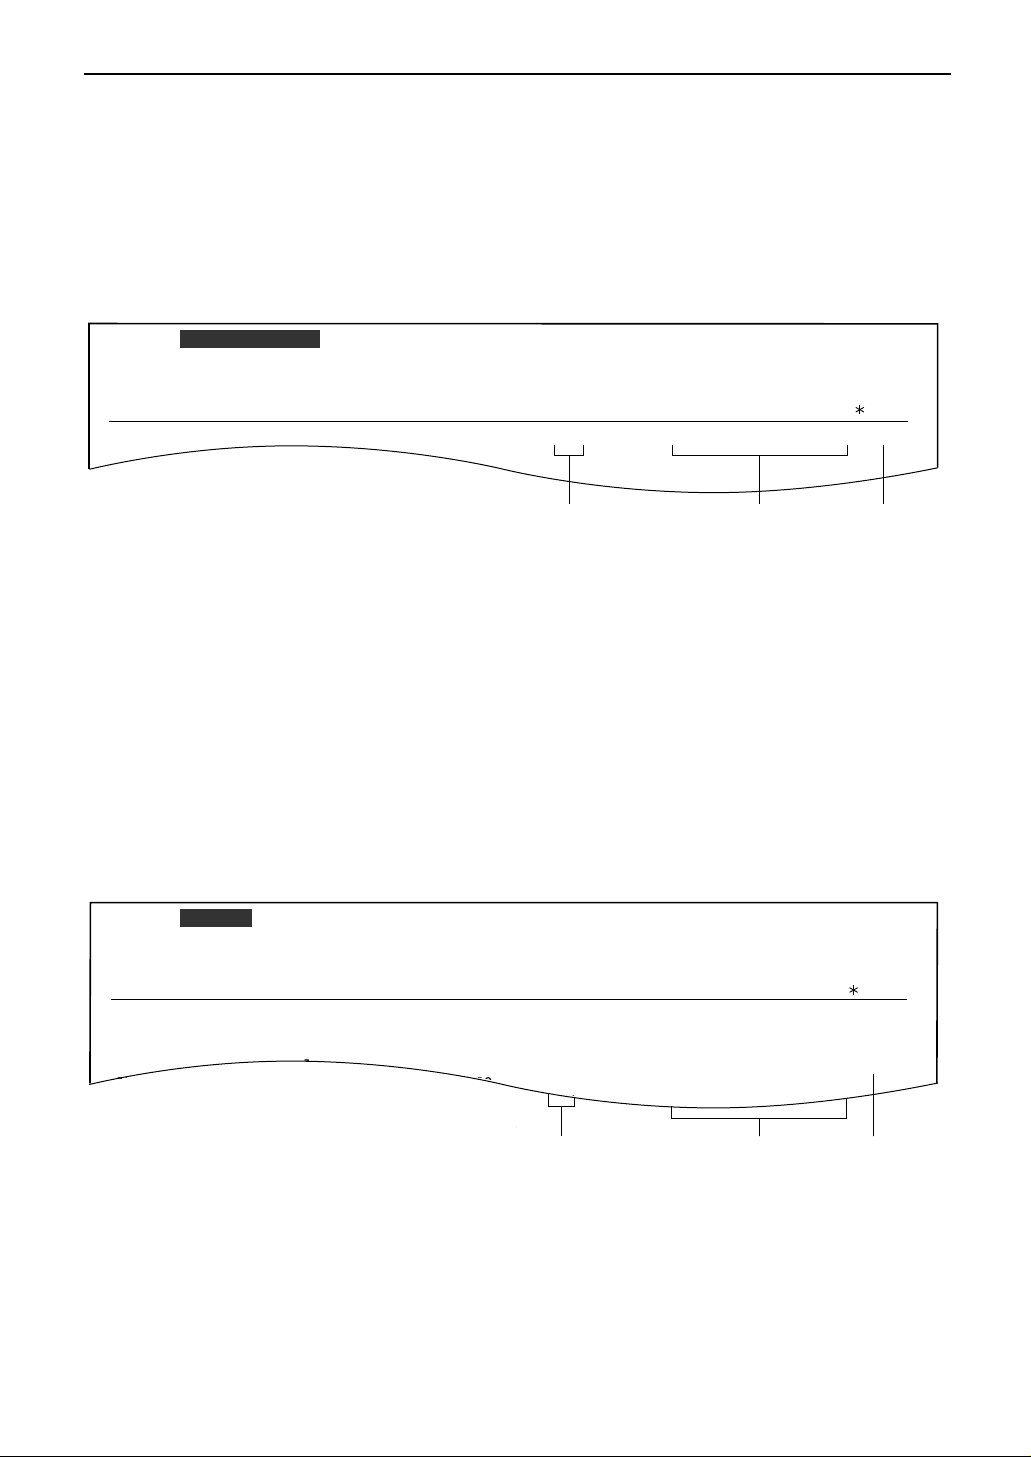
This report will provide you with a printed record of transmission results. To use this feature,
activate feature #04 (p. 55).
01 2345678 00'51 SND
00
COMMUNICATION ERROR 43
Jan. 20 2000 09:19AM
YOUR LOGO :
YOUR FAX NO. :
Jan. 20 09:18AM
SENDING REPORT
CODE
NO. USAGE TIME MODE PAGESSTART TIME RESULT
OTHER FACSIMILE
SND: Sent directly. Communication
message (p. 60)
Error code
Sample of a sending report
Journal report
The unit stores the 30 most recent fax communication results. When a new communication
occurs, the oldest communication result will be erased.
—To print manually, see page 76.
—
To print automatically after every 30 new fax communications, select “ON” with feature #22 (p. 56).
If you select “OFF”, the unit will not print the journal automatically but store the records of fax
communications.
NO.
01
02
03
04
05
3332222
9998765
John
555556677
USAGE TIME
00'45
00'58
00'48
02'45
03'50
MODE
SND
RCV
RCV
SND
SND
RCV
PAGES
01
02
01
03
05
OK
OK
OK
COMMUNICATION ERROR 43
OK
OK
START TIME
Jan. 25 2000 11:22AM
Jan. 21 07:14AM
Jan. 21 08:17AM
Jan. 21 09:18AM
Jan. 22 10:35AM
RESULT CODE
OTHER FACSIMILE
JOURNAL
SND: Sent directly.
RCV: Received directly.
Communication
message (p. 60)
Error code
Sample of a journal report
YOUR LOGO :
YOUR FAX NO. :
Page 38
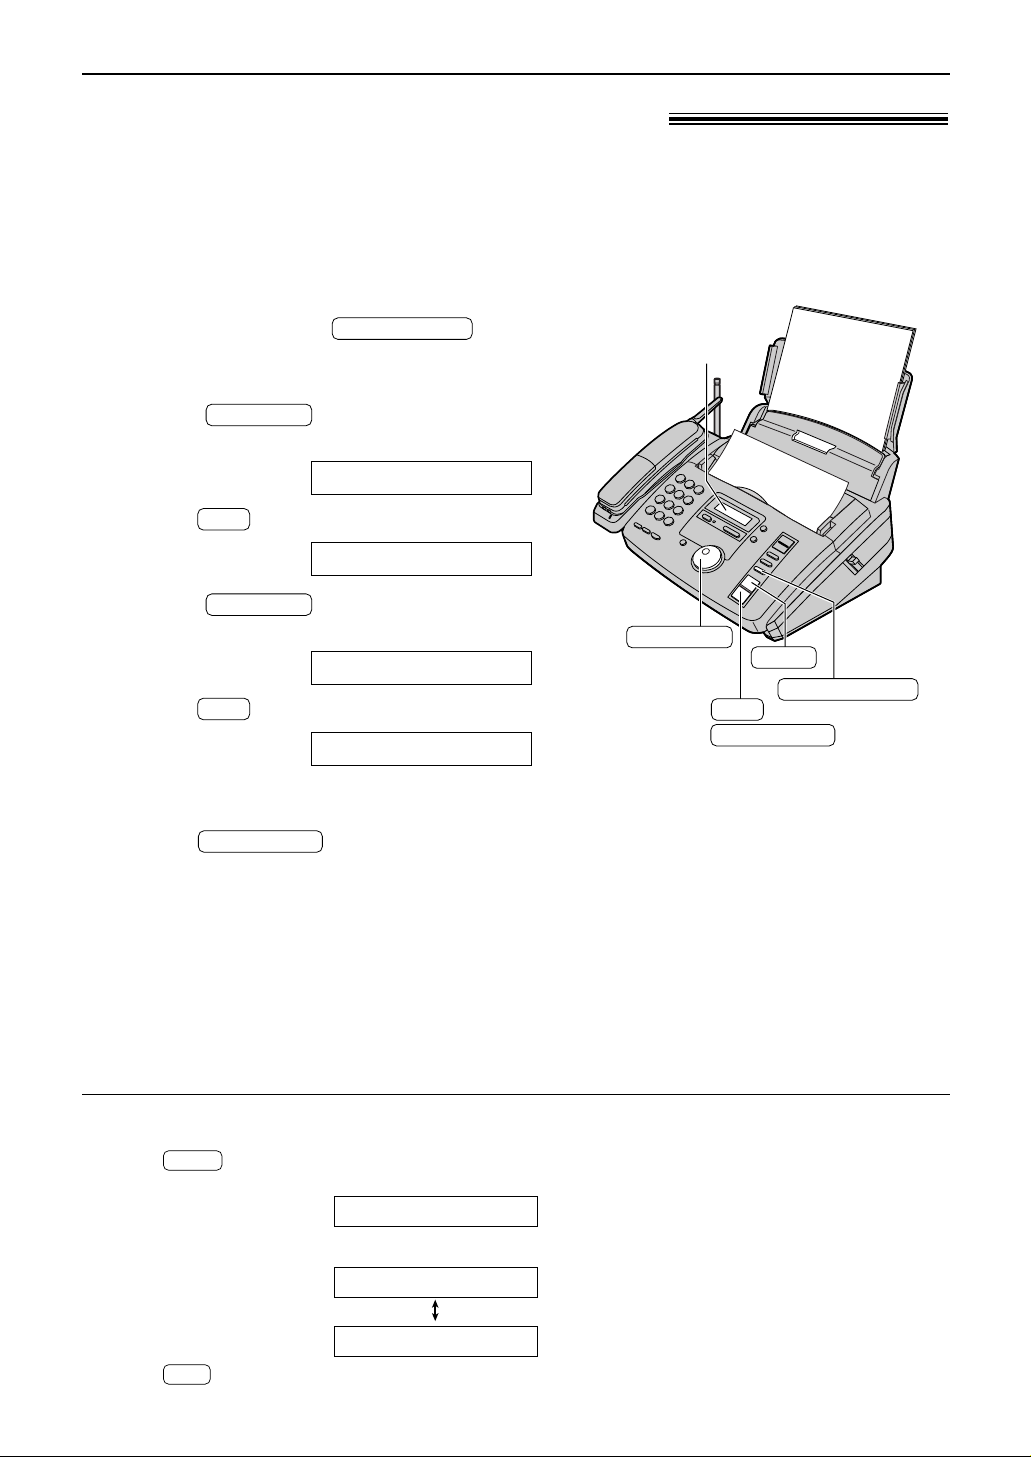
38
Sending Faxes
1
Insert the document FACE DOWN.
●
If necessary, press
repeatedly to select the desired setting
(p. 35).
2
Rotate until the following is
displayed.
Display:
3
Press .
4
Rotate until the desired name
is displayed.
Example:
5
Press .
●
To program other stations, repeat steps 4
and 5 (up to 20 stations).
6
Press after programming all
of the desired stations.
●
The document will be fed into the unit and
scanned into memory. The unit will then
transmit the data to each station, calling
each number sequentially.
●
After transmission, the stored document will
be erased automatically, and the unit will
automatically print a broadcast sending
report (p. 41).
FAX START
DIR=Bill [001]
SET
Bill [000]
JOG DIAL
DIR= [000]
SET
<ONE TIME BROAD>
JOG DIAL
RESOLUTION
FACE DOWN
JOG DIAL
STOP
SET
FAX START
RESOLUTION
Display
One time broadcast transmission!
This feature is useful for sending the same document to selected parties whose fax numbers are
stored in the JOG DIAL directory. If you only wish to send a document once, select the parties
for each transmission.
Before programming, make sure that the desired stations have been stored in the JOG
DIAL directory (p. 30).
Note:
●
If you select the “FINE”, “SUPER FINE” or
“HALF TONE” resolution, the number of
pages that the unit can transmit will decrease.
●
If one of the stations is busy or does not
answer, the station will be skipped. All
skipped stations will be redialed up to 2 times
after all of the other stations have been
called.
To cancel the broadcast setting
1. Press while the unit displays the following
message.
Display:
●
The display will show the following.
2. Press .
SET
YES:SET/NO:STOP
SEND CANCELED?
BROADCASTING
STOP
Page 39

39
Sending Faxes
Programming the stations in the broadcast memory
1
Press twice.
Display:
Page 40

40
Sending Faxes
Page 41
41
Sending Faxes
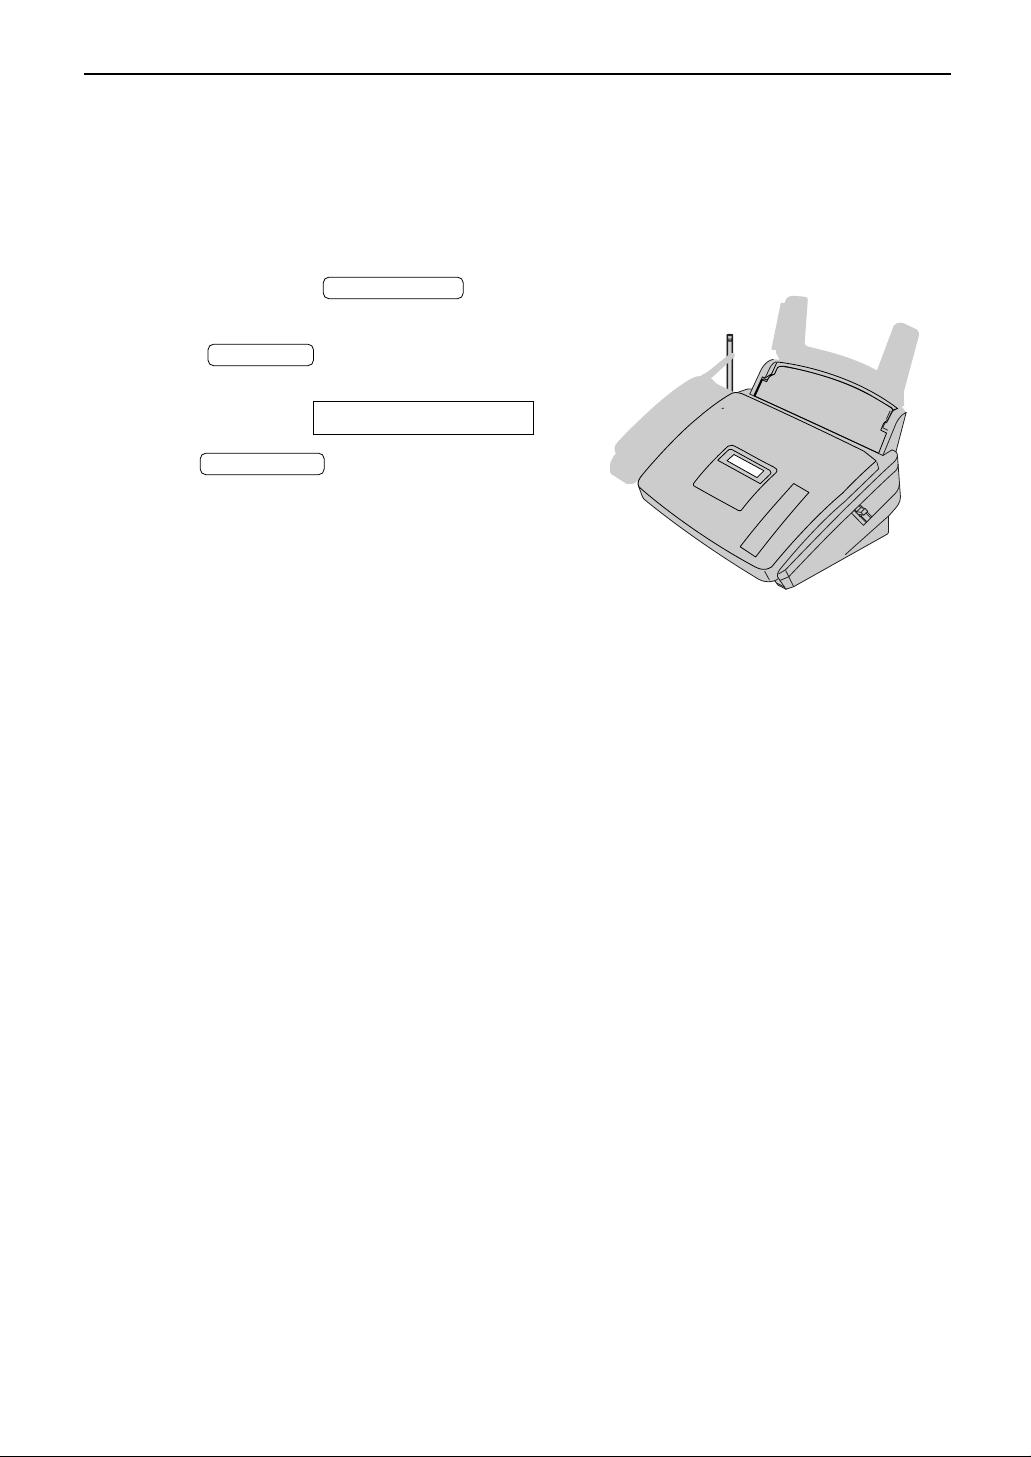
Sending to pre-programmed parties in the broadcast memory
The same document will be sent to the specific parties whose numbers are stored in broadcast
memory.
The memory capacity is approx. 25 pages based on the ITU-T No. 1 Test Chart in standard
resolution (p. 81).
1
Insert the document FACE DOWN.
●
If necessary, press
repeatedly to select the desired setting (p. 35).
2
Rotate until the following is
displayed.
Display:
3
Press .
●
The document will be fed into the unit and
scanned into memory. The unit will then
transmit the data to each station, calling
each number sequentially.
●
After transmission, the stored document will
be erased automatically, and the unit will
automatically print a broadcast sending
report
(see below).
FAX START
<BROADCAST>
JOG DIAL
RESOLUTION
Page 42
42
Receiving Faxes
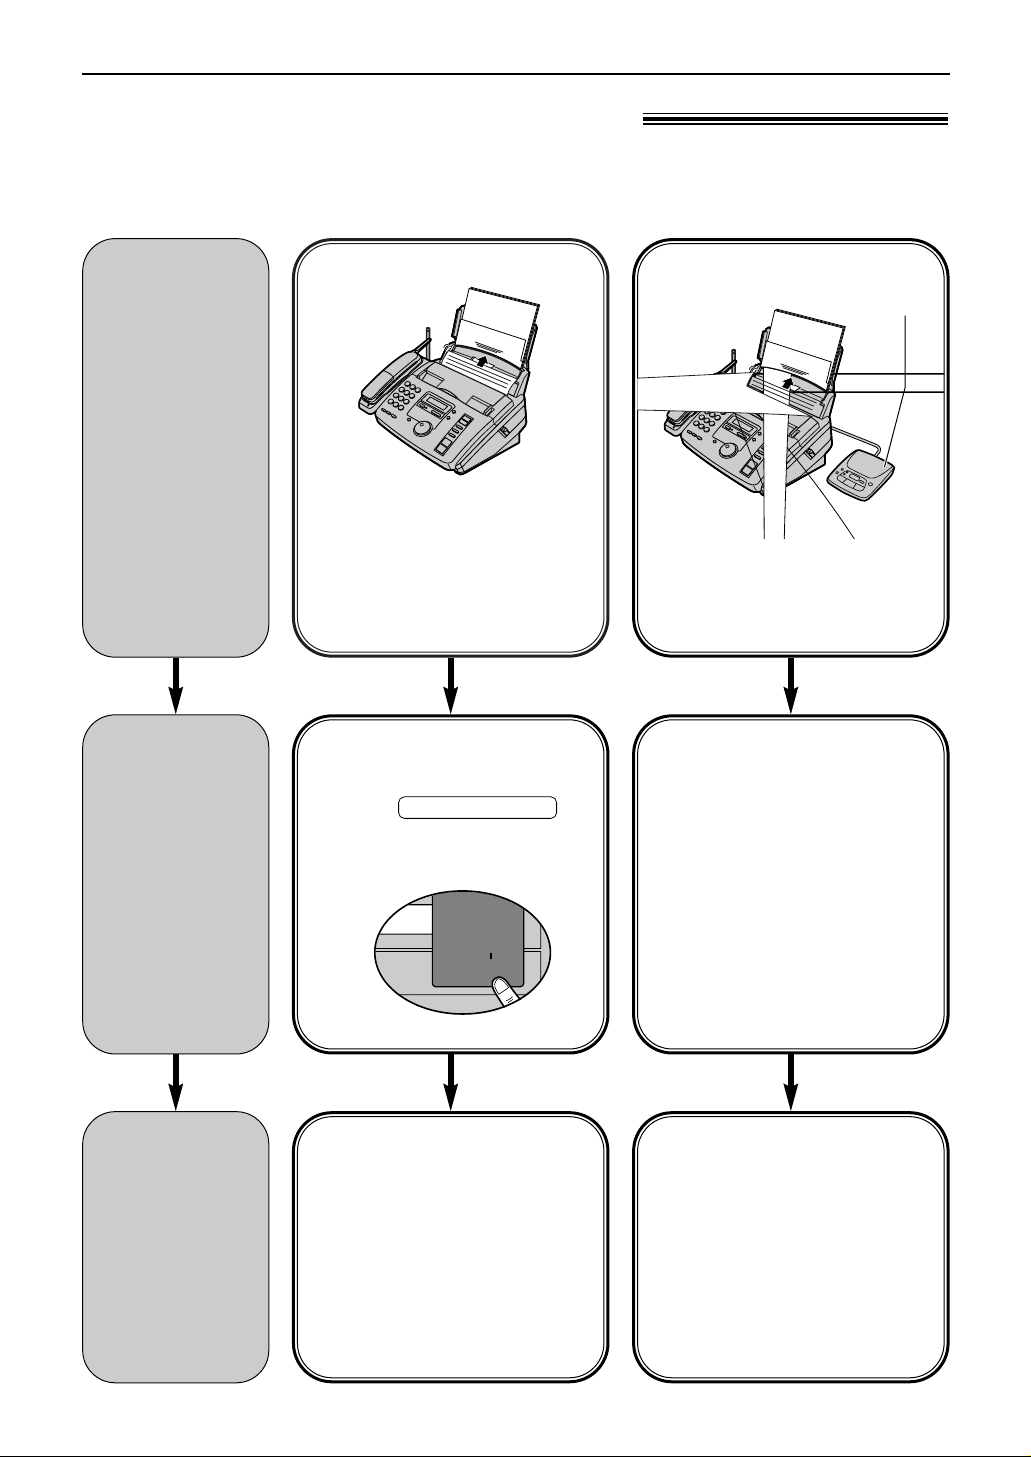
Setting the unit to receive faxes!
You have a separate
telephone line just
for faxes.
FAX ONLY mode (p. 45)
Turn AUTO ANSWER on by
pressing ,
and set the desired ring count
(default setting: 3 rings).
AUTO ANSWER
When receiving calls:
All incoming calls will be
answered as faxes.
Use only as fax
You want to use the
fax machine with an
answering machine.
Activating an answering
machine (p. 46, 47)
Connect an answering
machine and set the ring
count of the answering
machine to less than 4.
●
Set the ring count in the
FAX ONLY mode of the fax
machine to “5 EXT.TAM”, if
you use with AUTO
ANSWER on.
When receiving voice calls:
The answering device will
record voice messages.
When receiving fax calls:
The fax machine will
disconnect the answering
machine and receive
documents.
Answering machine
(not included)
With answering machine
MEMORY% ON
AUTO ANSWER
▼
How you
want the unit
to receive
calls
You have to
set this.
This is how
the unit will
operate.
Page 43
43
Receiving Faxes
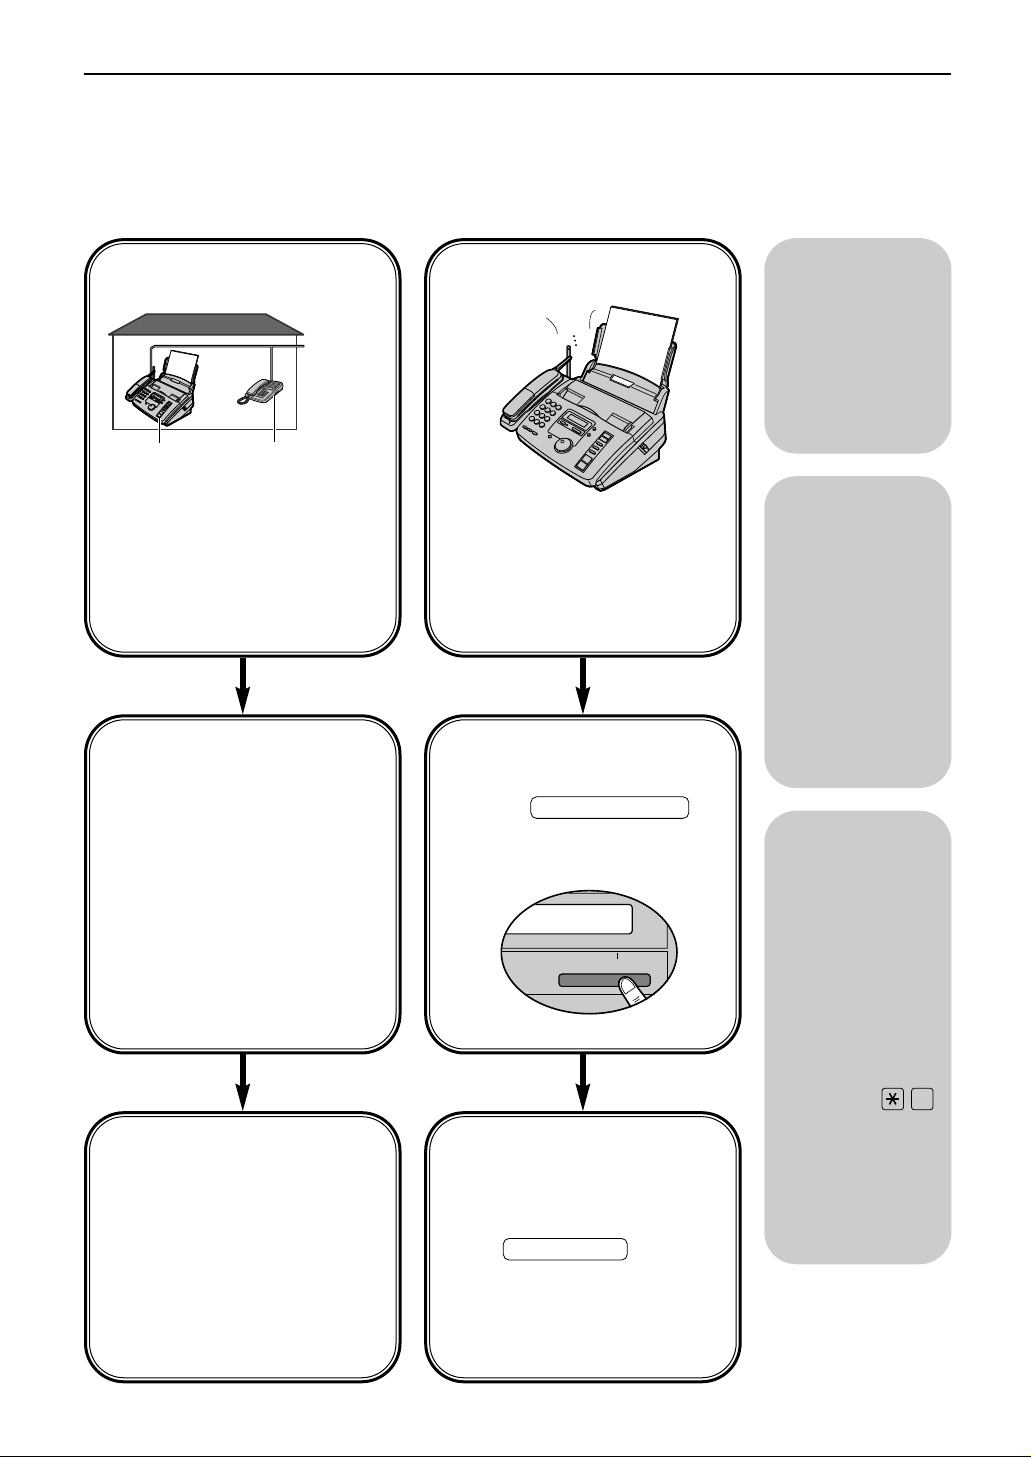
With PC
If you have a
computer
attached to the
same telephone
line, see page 47.
Other
options
You need to subscribe
to Distinctive Ring
Service.
Setting the Distinctive
Ring pattern (feature
#31 on page 57)
Select the same ring pattern
assigned to the facsimile
number.
A:
Standard ring (one long ring)
B:
Double ring (two short rings)
C:
Triple ring (short-long-short
rings)
D:
Other triple ring (short-shortlong rings)
To the
same line
2-number example
Telephone No.
(555-1111)
Facsimile No.
(555-1333)
Voice mail service
(Distinctive Ring)
You plan to answer
the calls yourself.
TEL mode (p. 44)
Turn AUTO ANSWER off by
pressing .
AUTO ANSWER
When receiving calls:
You have to answer all calls
manually.
To receive a fax document,
press for
each fax call.
FAX START
Ring
Ring
Ring
Mostly voice calls
TEL/FAX mode
If you are near
the unit and want
to use it to
receive voice
calls yourself and
fax calls
automatically, see
pages 48 and 49.
MEMORY% ONMEMORY% ON
AUTO ANSWERAUTO ANSWER
When the fax machine
detects a call matching the
selected Distinctive Ring
pattern: The fax machine will
activate the fax function.
When the fax machine
detects other ring patterns:
The fax machine will operate
based on the AUTO
ANSWER setting.
Remote
fax activation
You can also
receive a fax
from an extension
phone. If you
answer a call with
an extension
phone and hear
the fax calling
tone, press
(pre-selected fax
activation code)
to receive a fax
(p. 50).
9
Page 44
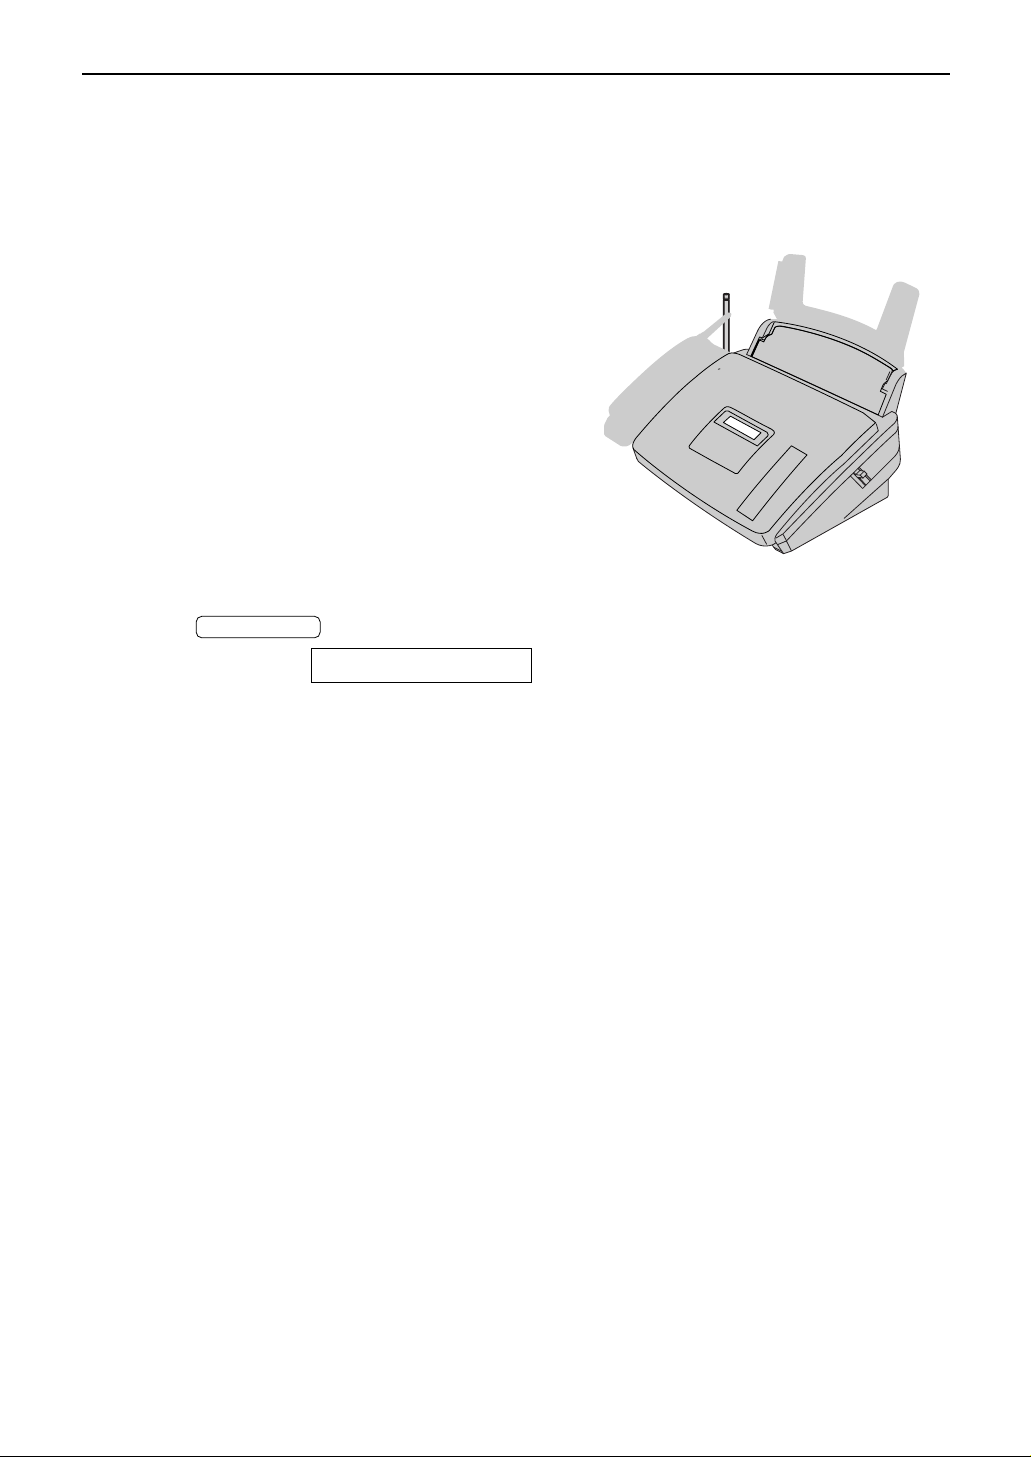
44
Receiving Faxes
1
When the unit rings, lift the handset to
answer the call.
2
When:
— document reception is required,
— a fax calling tone (slow beep) is heard, or
— no sound is heard,
press .
3
Replace the handset.
●
The unit will start fax reception.
CONNECTING.....
FAX START
Page 45
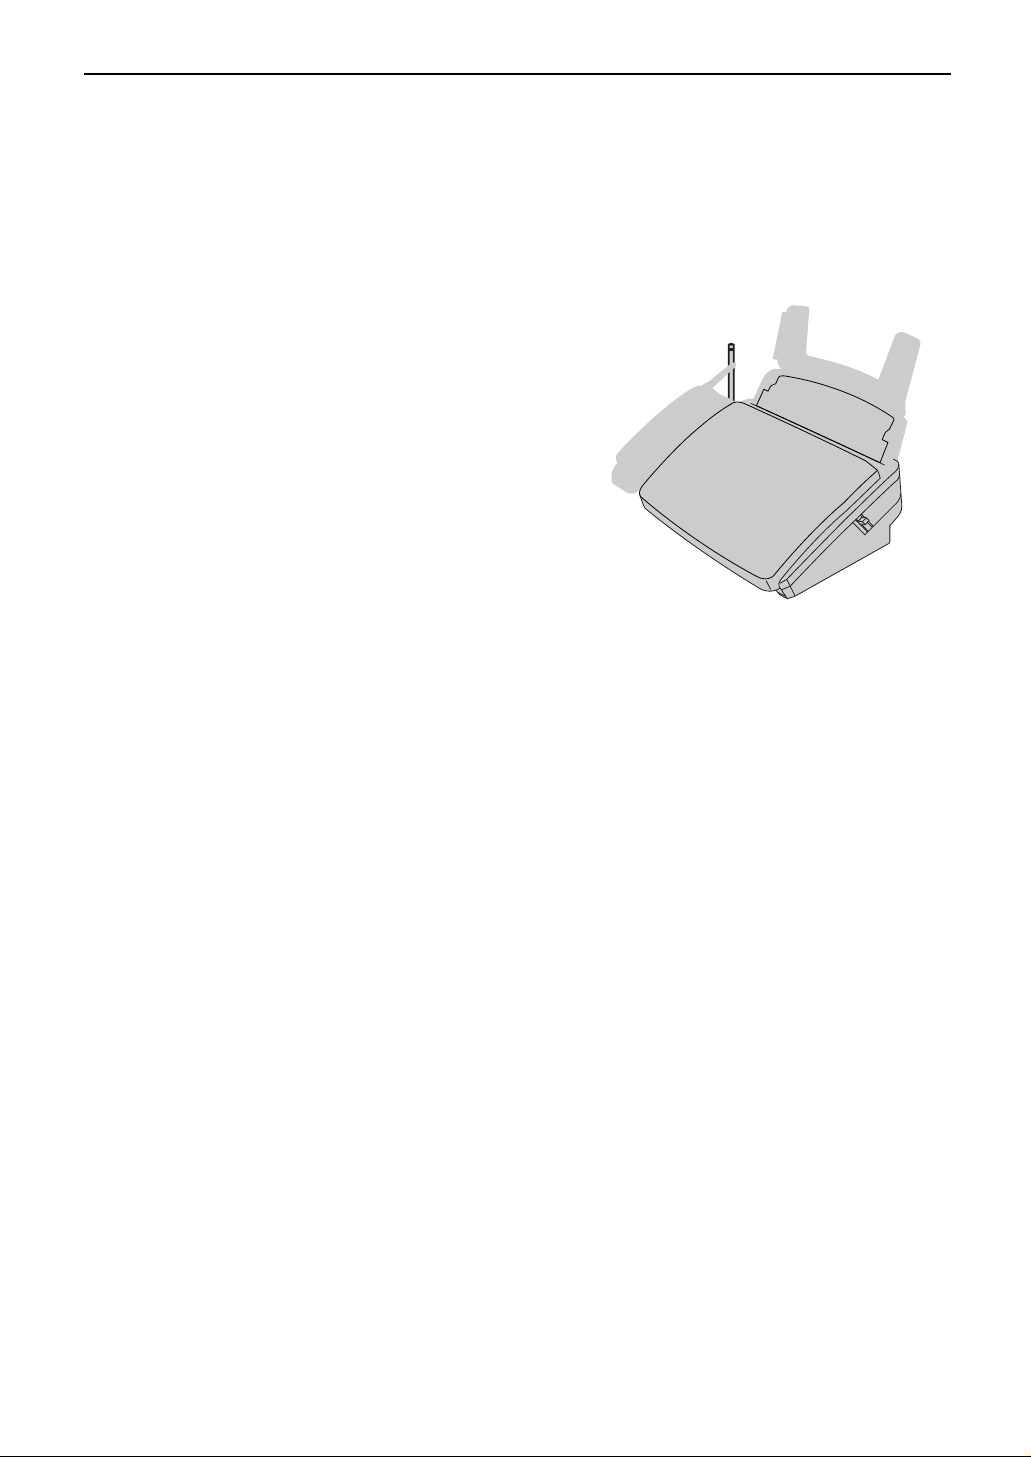
45
Receiving Faxes
Page 46
46
Receiving Faxes
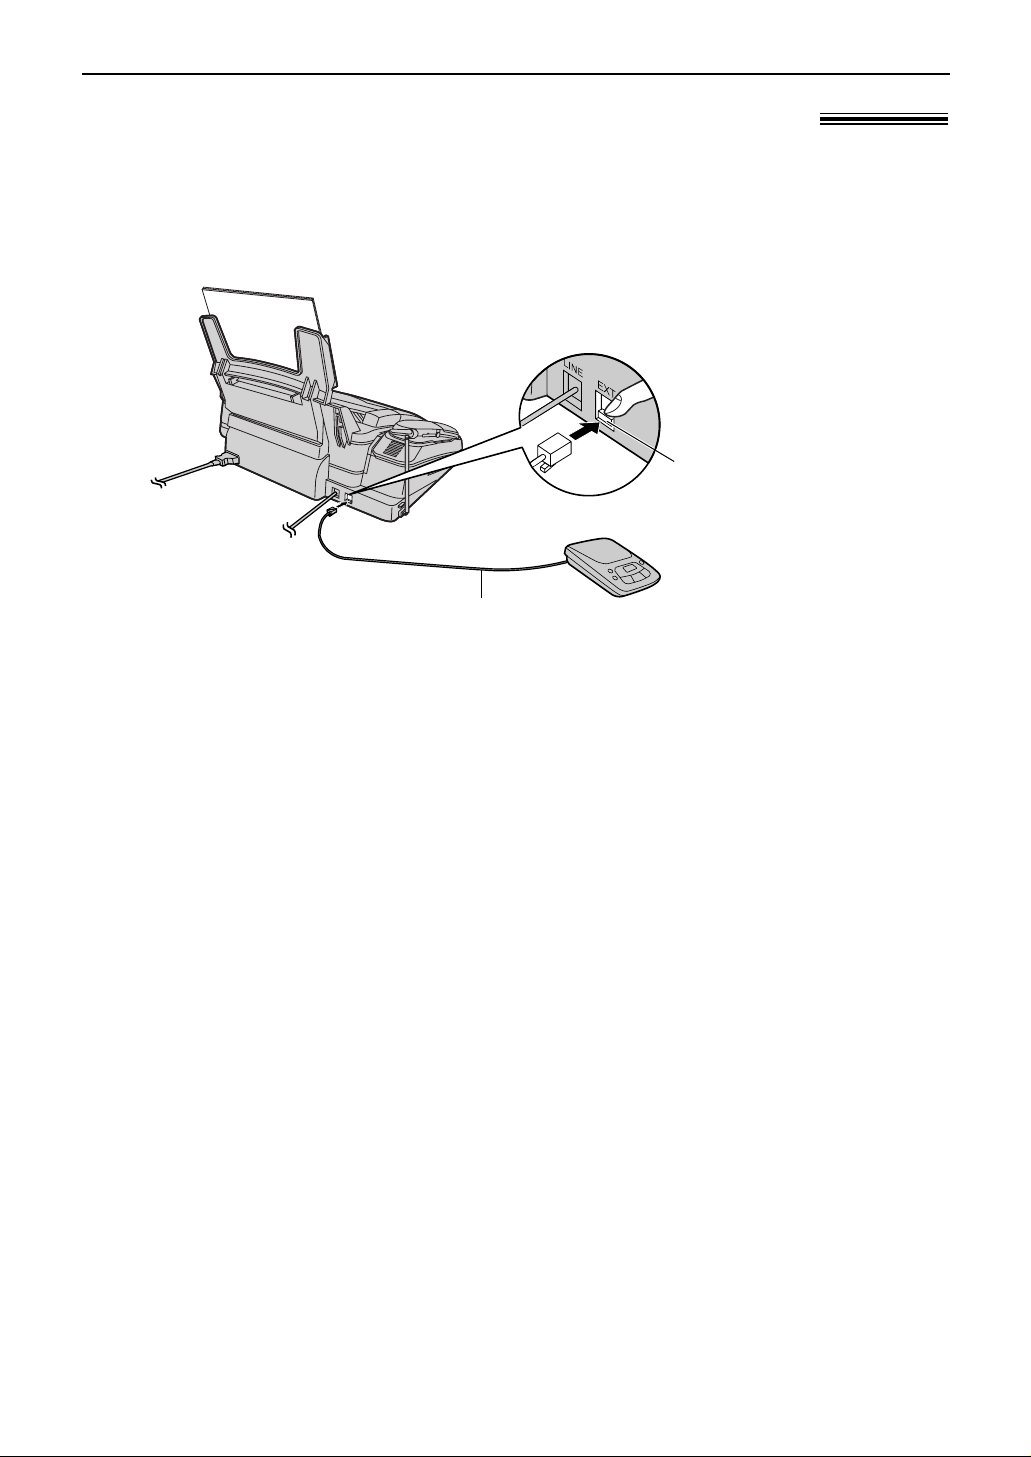
1
Connect the answering machine.
Using the unit with an answering machine!
Setting up the fax machine and an answering machine
Note:
●
Do not pause for more than 4 seconds during the greeting message. If a 4-second pause is stored in the
greeting message, all incoming calls will be routed to the fax machine from the answering machine even
while the greeting message is playing.
●
We recommend you keep the greeting message to around 10 seconds long. If the greeting message is
too long, some incoming fax calls may not be answered by the fax machine.
●
Every time the fax machine receives a document, a silent pause or fax tone may be recorded on the
answering machine.
2
Set the number of rings on the answering machine to less than 4.
●
This will allow the answering machine to answer the call first.
3
Record a greeting message on the answering machine.
Example:
“This is (your name, business and/or telephone number). We are unable to
answer the phone right now. To send a fax, start transmission. To leave a
message, please speak after the beep. Thank you.”
4
Activate the answering machine.
5
Set the receive mode of the fax machine to the TEL mode (p. 44) or FAX ONLY mode
(p. 45).
●
If you set to the FAX ONLY mode, set the ring count in the FAX ONLY mode to
“5 EXT.TAM” (feature #06 on page 55). Using the FAX ONLY mode will allow you to
receive faxes if the answering machine is full.
6
Check the remote access code of the answering machine and program the same code into
the remote operation ID of the fax machine. See feature #12 on page 55.
Remove the stopper with
your finger and connect
the cord to the EXT jack.
Telephone line cord
(not included)
Stopper
Answering machine
(not included)
Page 47
47
Receiving Faxes
How the fax machine and answering machine work
Receiving voice calls
The answering machine will record voice messages automatically.
Receiving fax calls
The fax machine will receive documents automatically.
Receiving a voice message and fax document in one call
The answering machine will record the voice message first. The fax machine will then be
activated by the caller’s request and will receive the document.
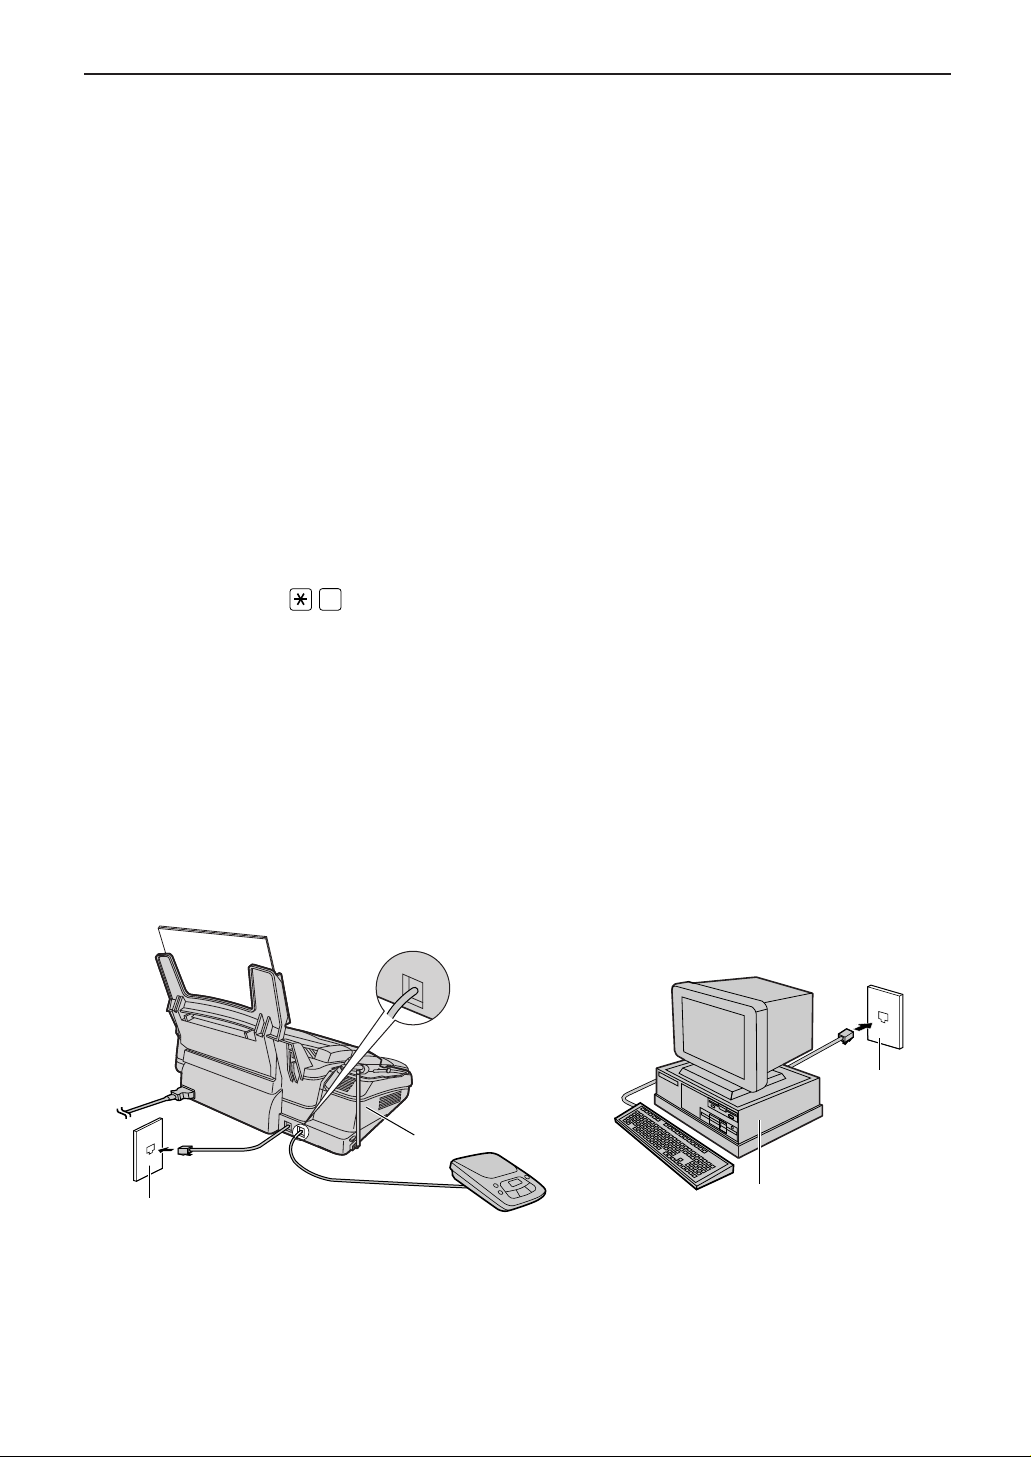
To use with an answering machine and computer
Wall jack
Computer
Fax machine
Answering machine
(not included)
EXT
Wall jack
We recommend that you always connect the fax machine directly to the wall jack.
Note:
●
Set the fax machine to the TEL mode.
●
The device which has the shortest ring count will answer a call first.
●
If you use your computer as an answering machine, connect the telephone line cord from the EXT jack to
the computer.
Receiving a voice message and fax document in one call
The caller can leave a voice message and send a fax document during the same call.
Inform the caller of the following procedure beforehand.
1. The caller calls your fax machine.
●
The answering machine will answer the call.
2. The caller can leave a message after the greeting message.
3. The caller presses (pre-selected fax activation code).
●
The fax machine will activate the fax function.
4. The caller presses the start button to send a document.
Note:
●
The fax activation code can be changed in feature #41 (p. 58).
●
If the wrong fax activation code is entered, the caller must wait at least 5 seconds to reenter the correct
code.
9
Page 48
48
Receiving Faxes
TEL/FAX mode!
(receiving voice calls with rings and fax calls
without rings when you are near the unit)
Note:
●
The fax machine will display the following when
a call is received.
Display:
●
The ringer should be on (p. 22).
INCOMING CALL
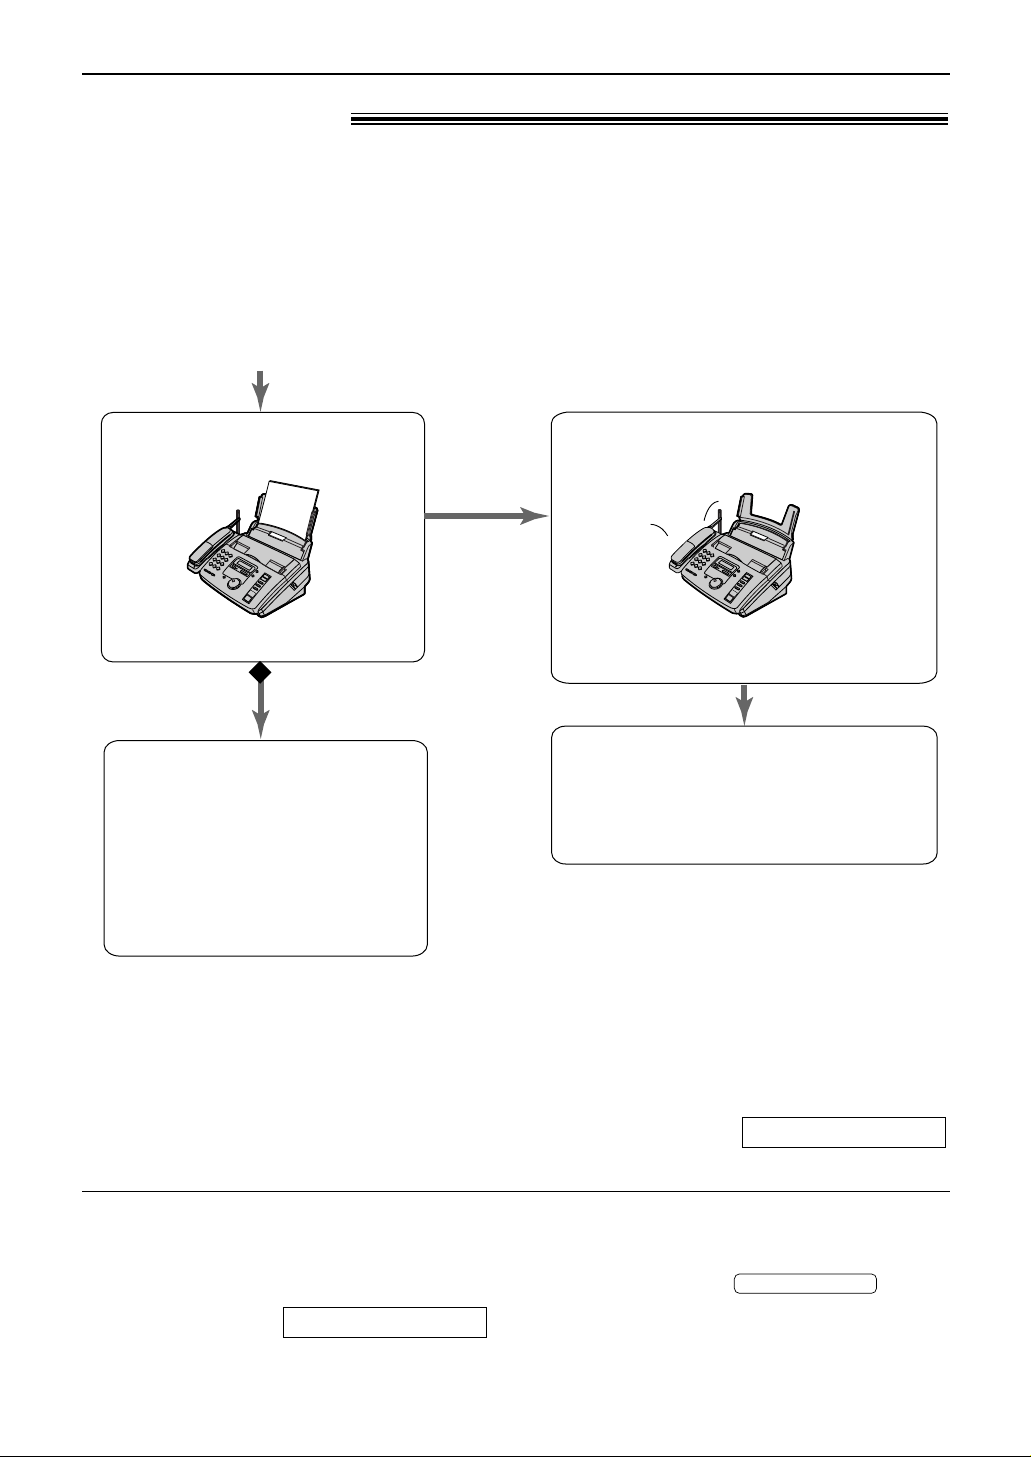
Use this mode when you are always near the fax machine, and want to receive faxes without
ringing. When a call is received, the fax machine will work as follows. To set the TEL/FAX mode,
see below.
To set the TEL/FAX mode
1. Set feature #77 to “TEL/FAX” (p. 59).
2. If the arrow (
▼) is not shown on the right of the display, turn it on by pressing .
Display:
ON
▼
AUTO ANSWER
The fax machine will not ring.
TEL/FAX delayed ring count
●
The call is connected.
Voice call
Fax calling
tone*
A call is received.
The fax machine will ring up to 3 times.
Silent fax recognition ring count
The fax machine will automatically
receive documents without
ringing.
●
The calling party will hear a different
ring back tone.
Ring
Ring
Ring
Answer the call.
●
If the call is not answered, the fax
machine will activate the fax function
for the other party’s fax machine that
does not send a fax calling tone.
Page 49
49
Receiving Faxes
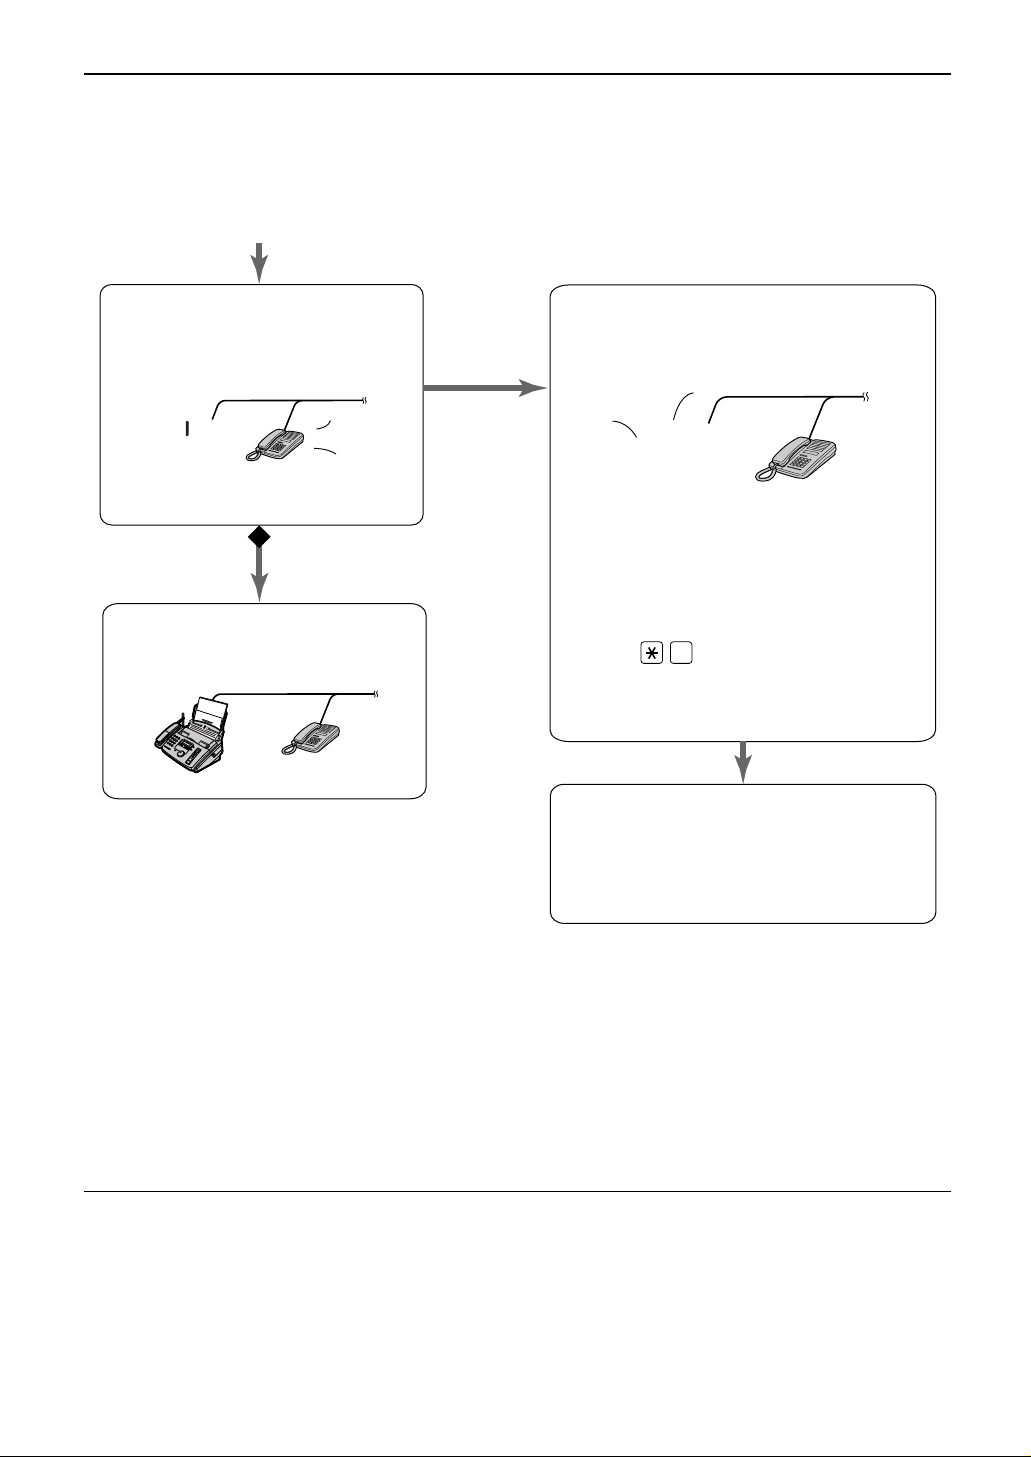
When an extension telephone is connected
TEL/FAX delayed ring count
The number of rings generated before the fax
machine answers depends on the setting of feature
#78 on page 59. The fax machine will not generate
an audible ring during this time.
Silent fax recognition ring count
The fax machine generates audible rings to
indicate that it is receiving a voice call. The number
of rings generated depends on the setting of
feature #30 on page 57. This signal will not ring at
an extension telephone.
Answer the call.
●
If the call is not answered, the fax
machine will activate the fax function
for the other party’s fax machine that
does not send a fax calling tone.
●
The calling party will hear a different
ring back tone.
You can answer the call with the
extension telephone.
1. Lift the handset.
2. Enter (default code) while the
ring back tone is heard.**
●
The code number can be changed
in feature #49 (p. 59).
0
The fax machine will not ring but
the extension telephone will ring
once.
TEL/FAX delayed ring count
●
The call is connected.
Voice call
Fax calling
tone*
A call is received.
The extension telephone will not ring but
the fax machine will ring up to 3 times.
Silent fax recognition ring count
The fax machine will automatically
receive documents without
ringing.
Ring
Ring
Ring
Ring
Page 50
50
Receiving Faxes
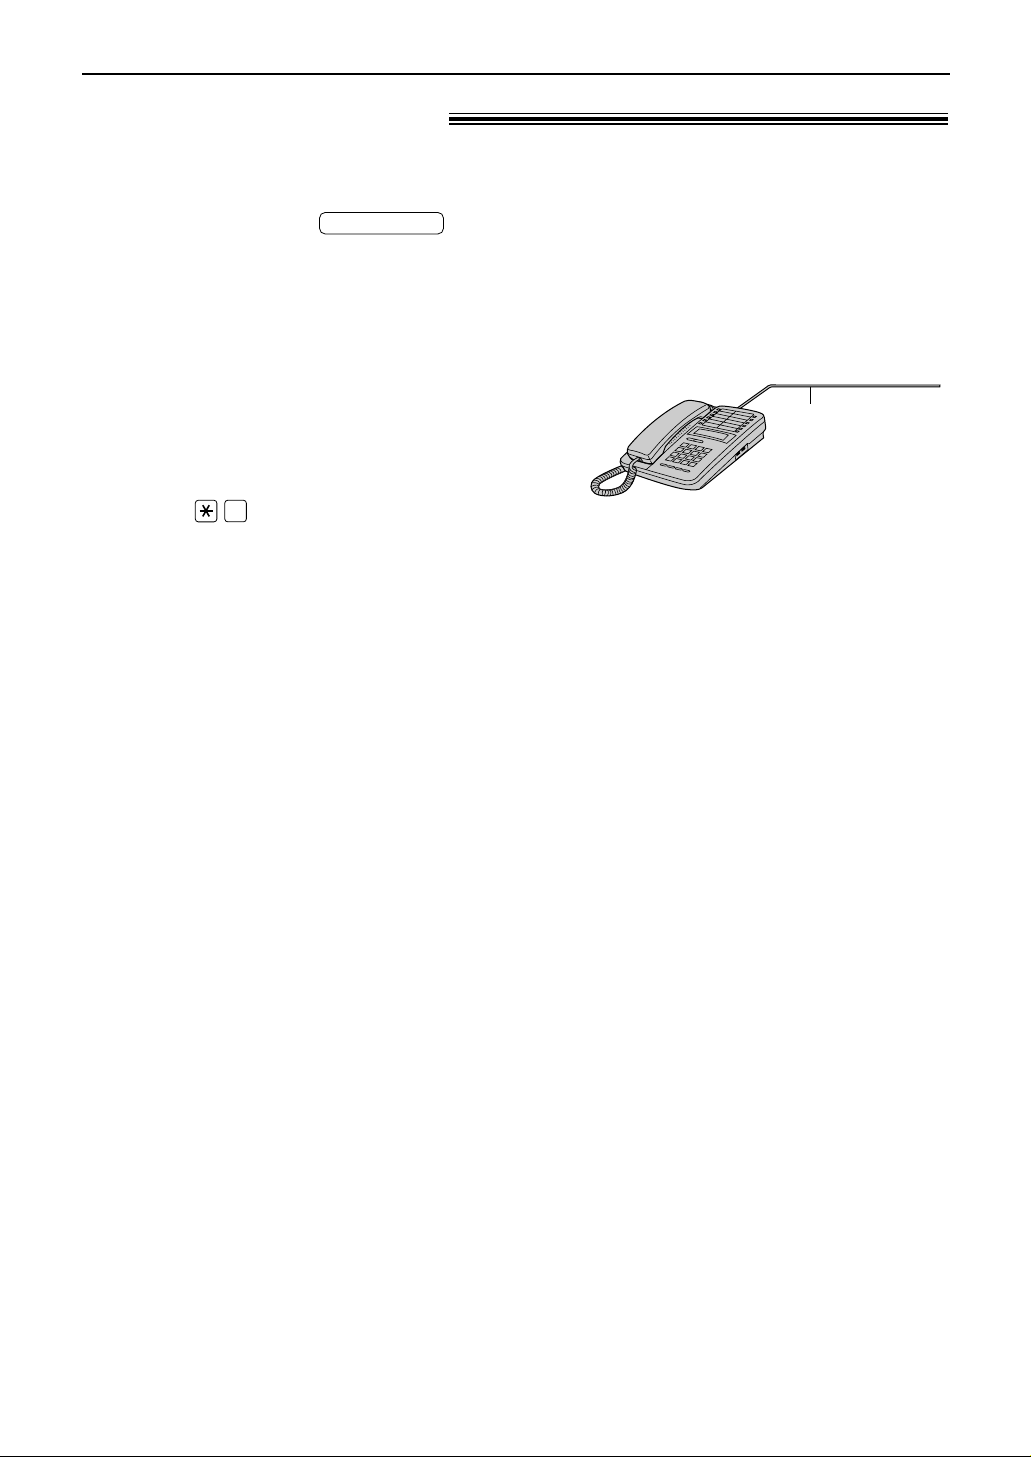
Extension telephone!
To the EXT jack
or the same line
Extension telephone
Note:
●
You can change the fax activation code in feature #41
(p. 58).
If you use the fax machine with an extension telephone, you can receive fax documents using
the extension telephone.
You do not have to press on the fax machine.
Important:
●
Use a touch tone telephone as the extension telephone and enter the fax activation code firmly.
FAX START
1
When the extension telephone rings, lift the
handset of the extension telephone.
2
When:
— document reception is required,
— a fax calling tone (slow beep) is heard, or
— no sound is heard,
press (pre-selected fax activation
code) firmly.
3
Hang up the handset.
●
The fax machine will start reception.
9
Page 51
51
Receiving Faxes
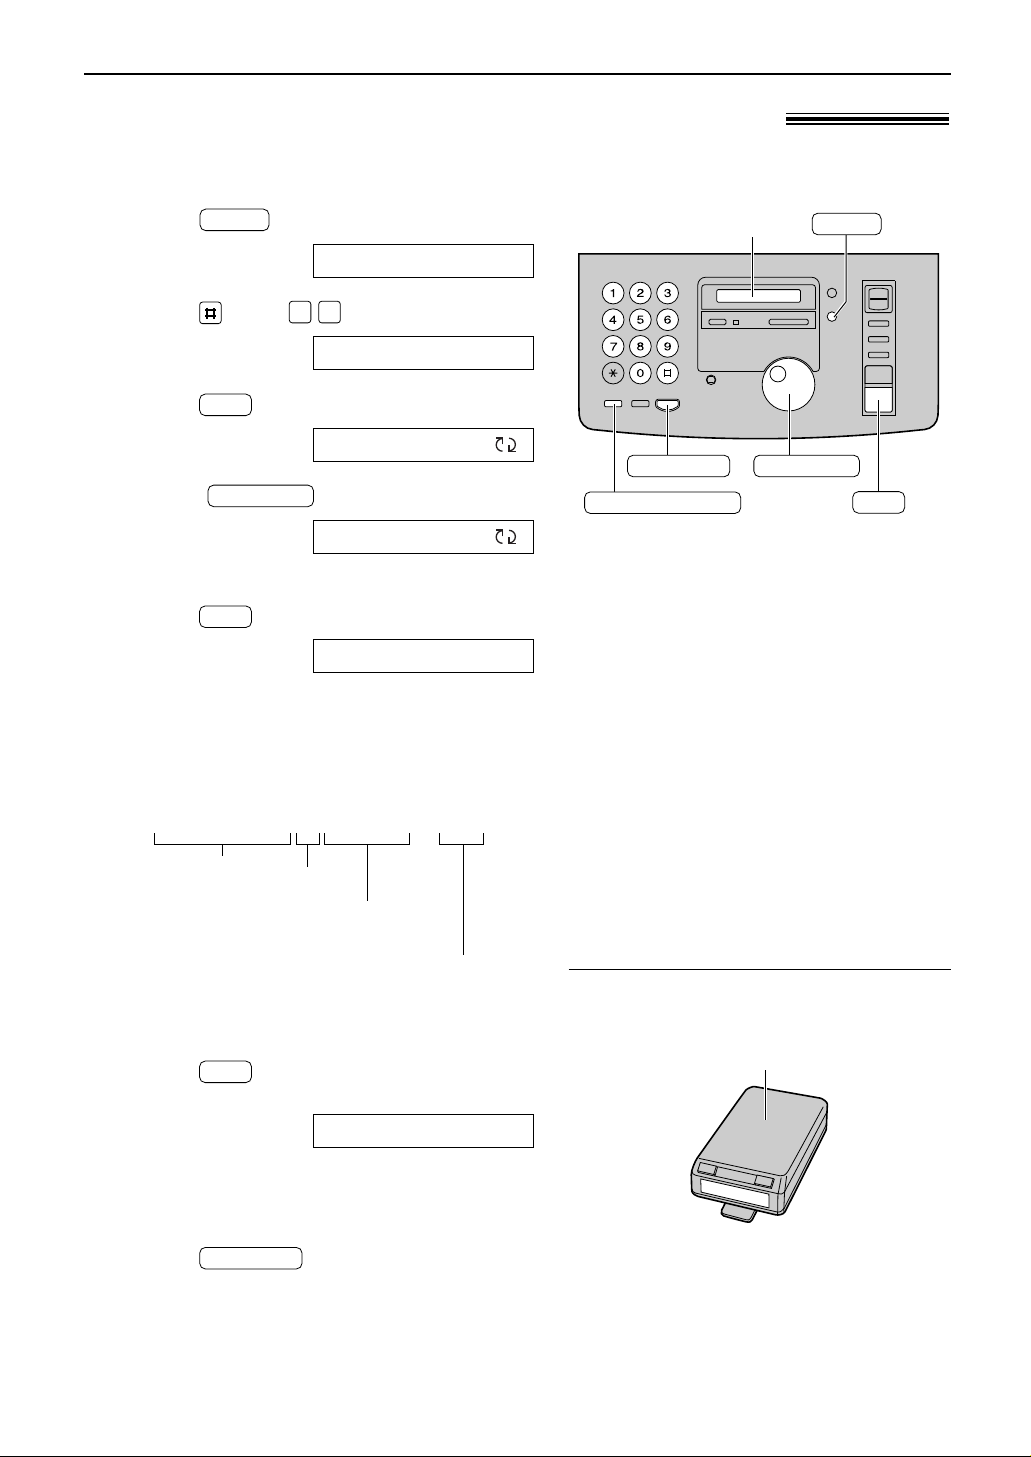
Pager call - when the unit receives a fax!
This feature allows your unit to call your pager when your unit receives a fax document.
1
Press .
Display:
2
Press , then .
3
Press .
4
Rotate to select “ON”.
●
If this feature is not required, select “OFF”.
5
Press .
6
Enter your pager number.
●
You can enter a total of 46 digits and/or
pauses.
Example:
1 202 555 1234PP12345678PP5555#
7
Press .
●
The unit will dial the stored number.
8
Check that the message is displayed on your
pager.
9
Press .
MONITOR
PAGER TEST
SET
NO.=
SET
MODE=ON
JOG DIAL
MODE=OFF
SET
FAX PAGER CALL
7 0
1.SYSTEM SET UP
MENU
SET
REDIAL/PAUSE
MONITOR
(Pause)
JOG DIAL
MENU
Display
Your pager
number
Pauses
Your pager access
code, if required.
Message you want displayed
on your pager when your
unit receives a fax.
5555
Pager
Your pager will display the message you
entered in step 6 above. (For example: 5555)
When your pager receives a pager call
Page 52
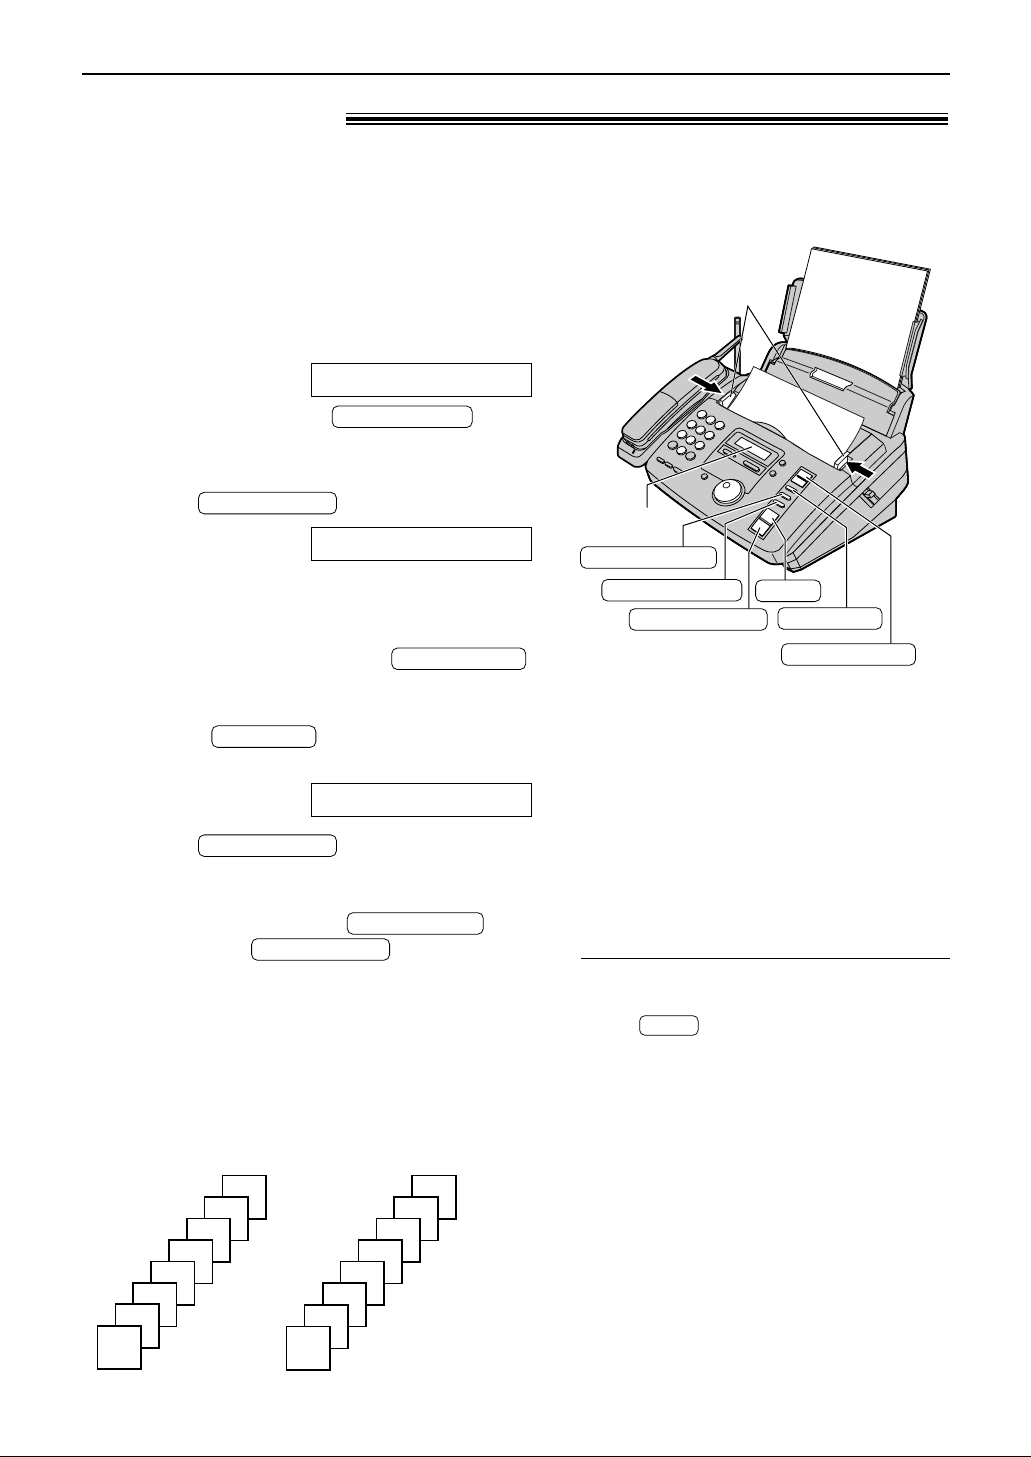
52
Copying
Making a copy!
1
Adjust the width of the document guides to
the size of the document.
2
Insert the document (up to 10 pages) FACE
DOWN until a single beep is heard and the
unit grabs the document.
Display:
●
If necessary, press
repeatedly to select the desired setting
(p. 35).
3
Press .
●
If necessary, enter the number of copies
(up to 50).
●
If necessary, choose an enlargement/
reduction rate by pressing .
See next page.
●
I
f you want to print collated (sorted) copies,
press until the following is
displayed.
4
Press .
●
The unit will start printing.
●
If you want to remove the copy document
for other uses, press
instead of .
The unit will feed the document and scan it
into memory, then start printing.
COPY START
QUICK SCAN
COPY START
COLLATE=ON
COLLATE
COPY ZOOM
NUMBER=1 [100%]
COPY START
RESOLUTION
STANDARD
The unit can make single or multiple copies (up to 50). Any transmittable document (p. 36) can
be copied.
FACE DOWN
Document guides
RESOLUTION
STOP
COPY ZOOM
COPY START
COLLATE
QUICK SCAN
Display
To stop copying
Press .
STOP
Note:
●
If a resolution is not selected, “FINE”
resolution will automatically be selected.
●
You can make or receive a voice call while
making copies.
●
After copying, the enlargement/reduction
rate setting will return to “100%”.
Printing collated (sorted) copies
Collated (sorted)
4
3
2
1
4
3
2
1
Uncollated
1
1
2
2
3
3
4
4
Note:
●
If you turn the collating feature on, the unit
will store the documents into memory. If
memory becomes full while storing, the unit
will only print out the stored pages.
●
After copying, the collating feature will turn off
automatically.
Example: Making two copies of a 4-page original document
Page 53
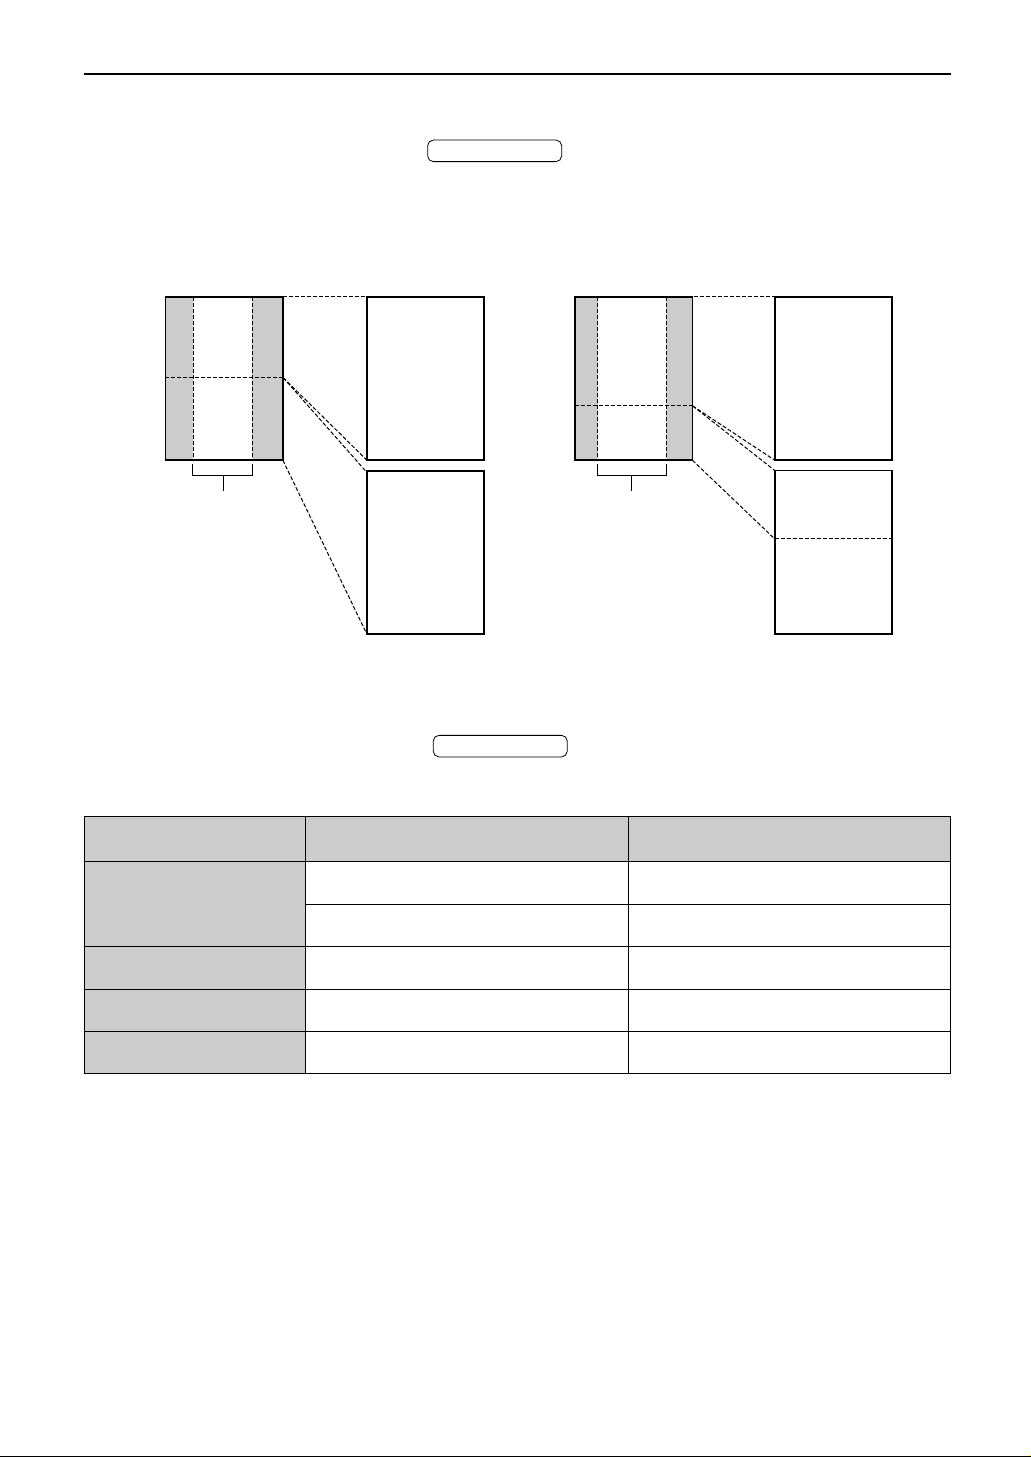
53
Copying
Note:
●
If the appropriate reduction rate is not programmed, the document may be divided and the top of the
second sheet will be deleted.
To enlarge a document
Select “200%” or “150%” by pressing (+). The unit will only enlarge the center
part of the document and print it on two pages.
COPY ZOOM
To reduce a document
The unit can reduce the original document.
Select the desired setting by pressing (–).
Recommended reduction rates:
COPY ZOOM
Original document
Enlarged copy
Example of a 200% enlarged copy
Area to be
enlarged
B C
F G
A B C D
E F G H
Original document
Enlarged copy
Example of a 150% enlarged copy
B C
F G
A B C D
E F G H
Area to be
enlarged
Letter = 216 mm x 279 mm (81/2"x 11")
Legal = 216 mm x 356 mm (81/2"x 14")
A4 = 210 mm x 297 mm (81/4"x 1111/16")
*If you use legal size paper, please purchase a legal paper tray, Model No. KX-FA50 (p. 9) and
install it (p. 12).
Size of original document
Letter
Setting
100% (default)
92%
86%
72%
Size of recording paper
Letter
Letter
Letter
Letter
A4
A4
Legal
Legal* Letter, A4, Legal
Page 54
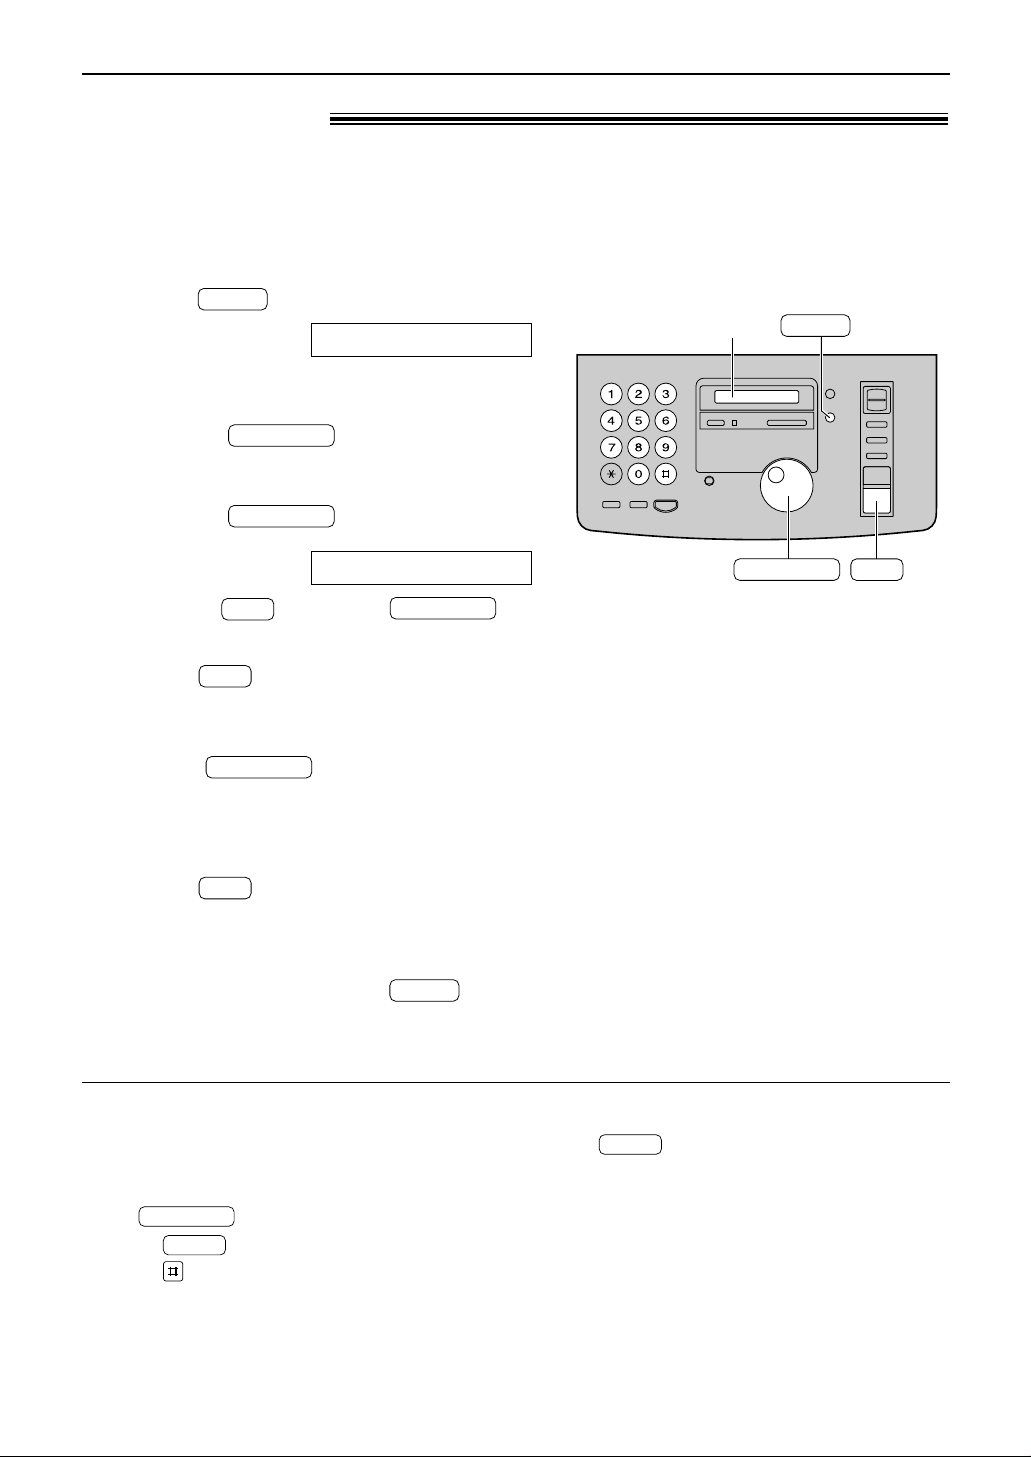
Features Summary
54
The unit provides various programming features. Program the desired setting by referring to the
programming tables (p. 55–59).
1
Press .
Display:
2
Select the feature you wish to program.
■
For basic features (p. 55)
Rotate until the desired
feature is displayed.
■
For advanced features (p. 56–59)
Rotate until the following is
displayed.
Press and rotate
until the desired feature is displayed.
3
Press .
●
The current setting of the feature will be
displayed.
4
Rotate until the desired setting
is displayed.
●
This step may be slightly different
depending on the feature.
5
Press .
●
The setting you selected is set, and the
next feature will be displayed.
6
To exit programming, press .
MENU
SET
JOG DIAL
SET
JOG DIAL
SET
ADVANCED MODE
JOG DIAL
JOG DIAL
1.SYSTEM SET UP
MENU
Programming by entering the program
code number directly
You can select a feature by directly entering the
program code (# and 2-digit number) instead of
using .
1. Press
.
2. Press and the 2-digit code number.
3. Follow steps 3 to 6 above.
●
See programming tables (p. 55–59) for codes.
MENU
JOG DIAL
Programming!
JOG DIAL
SET
MENU
Display
General programming method
To cancel programming
Press to exit the program.
MENU
Page 55
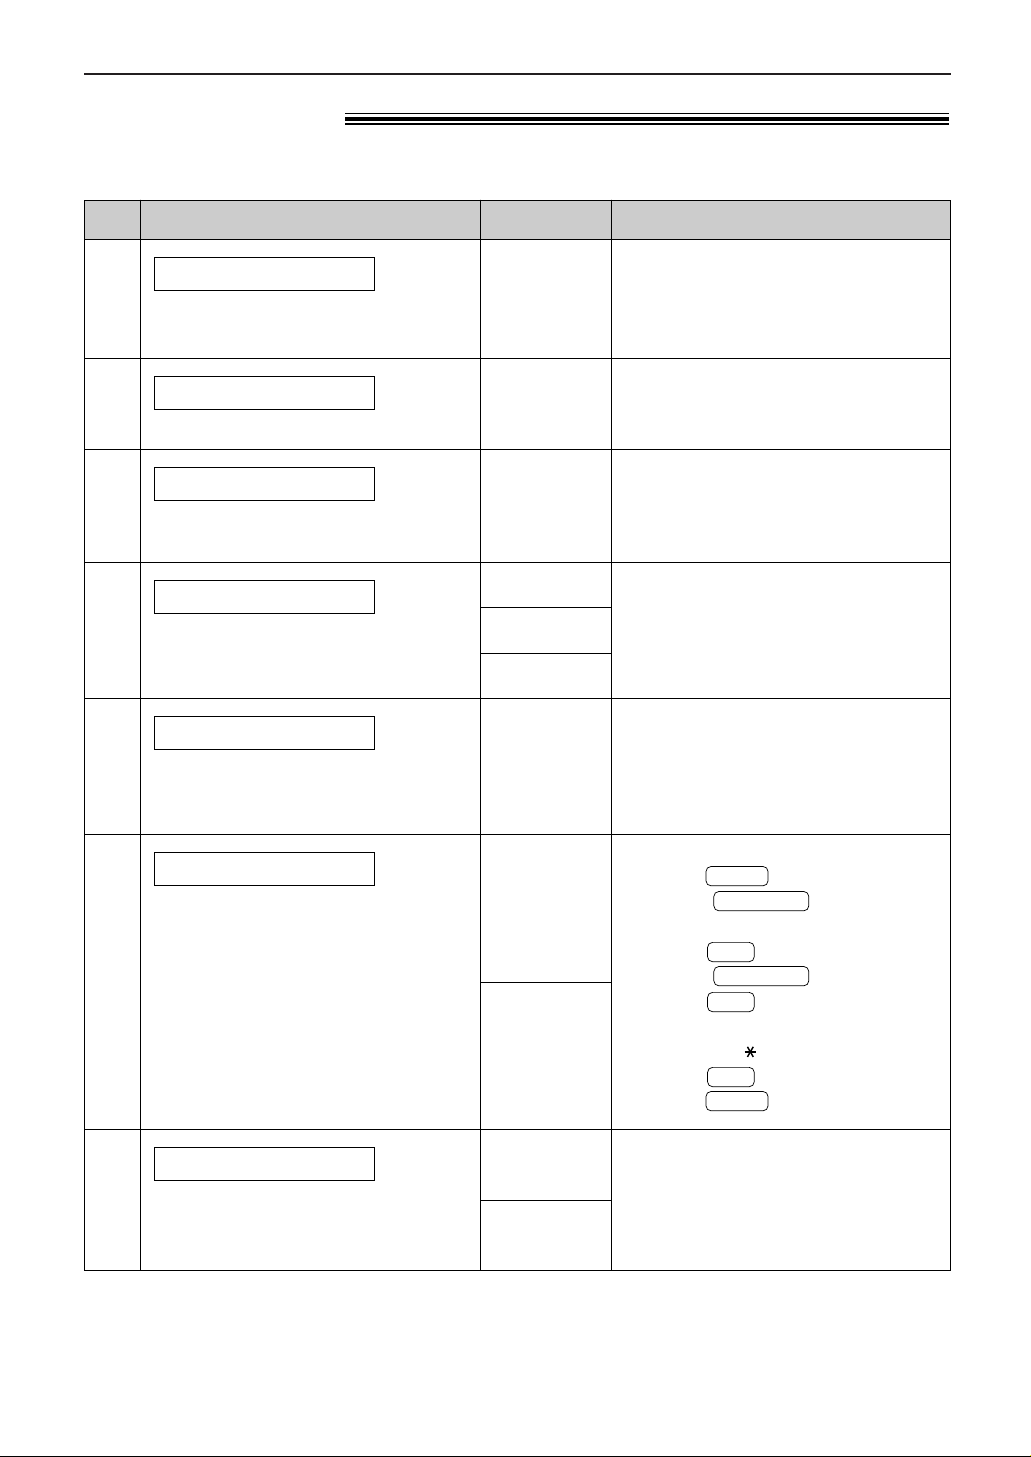
See pages 16 and 17 for details.
See page 15 for details.
55
Features Summary
ON / ID=11
OFF
Basic features!
Programming table
Code
#01
To set the date and time
SET DATE & TIME
mm/dd/yy
hh:mm
(2 digits for
each entry)
See page 18 for details.
“ERROR”: The sending report will
be printed only when fax
transmission fails (p. 37).
“ON”: The sending report will be
printed out after every transmission.
This setting is also available after
activating the FAX ONLY mode
(p. 45). “5 EXT.TAM” is used when
using the unit with an answering
machine (p. 46).
#02
To set your logo
YOUR LOGO
(Up to 30
characters)
Display & Feature Settings How the unit operates
#03
To set your facsimile telephone
number
YOUR FAX NO.
(Up to 20
digits)
#04
To print and check the sending
report for fax transmission results
SENDING REPORT
ERROR
ON
OFF
#13
If you cannot dial, change the
setting depending on your
telephone line service.
DIALING MODE
TONE
PULSE
#06
To change the number of rings
before the unit answers a call in the
FAX ONLY mode
FAX RING COUNT
1, 2, 3, 4,
5 EXT.TAM
(The default setting is in bold type.)
#12
If you use the unit with an
answering machine, activate this
feature and set the remote
activation ID for remote operation
to secure the remote operation for
the answering machine.
REMOTE TAM ACT.
To select “ON” and enter ID:
1. Press .
2. Rotate and select this
feature.
3. Press .
4. Rotate to select “ON”.
5. Press .
6. Enter your ID from 1 to 5 digits,
using 0–9, and #.
7. Press .
8. Press .
MENU
SET
SET
JOG DIAL
SET
JOG DIAL
MENU
“TONE”: For tone dial service.
“PULSE”: For rotary pulse dial
service.
Page 56
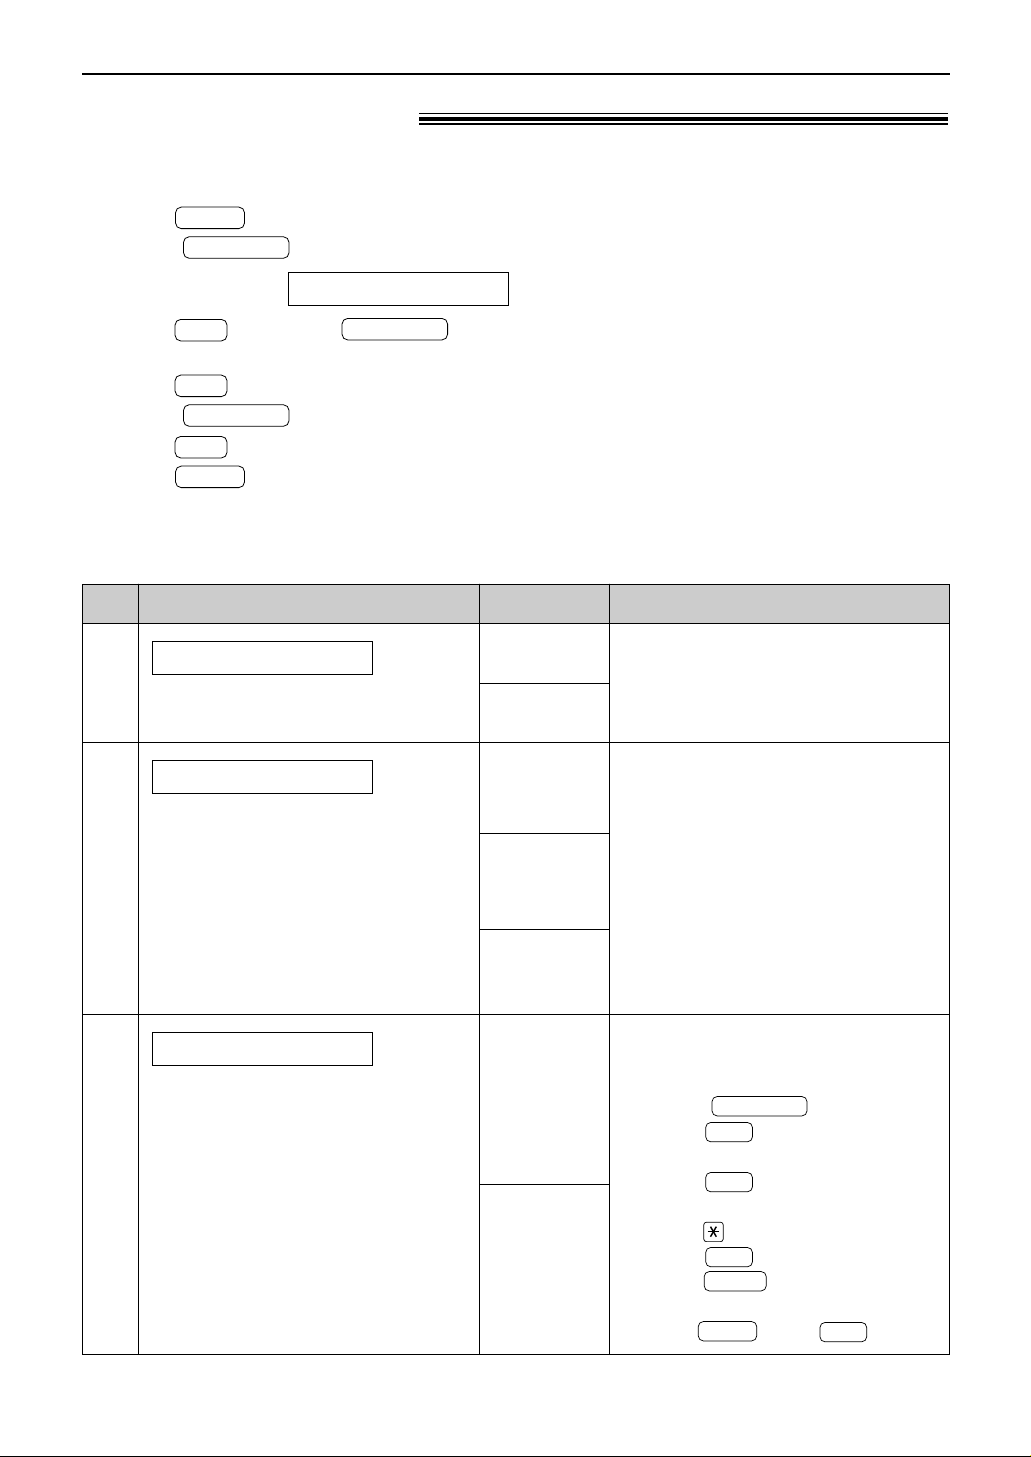
“ON”: The unit will print the journal
report automatically after every 30
new fax communications (p. 37).
Features Summary
56
How to set menu options
1. Press .
2. Rotate until the following is displayed.
Display:
Press and rotate until the desired
feature is displayed.
3. Press .
4. Rotate until the desired setting is displayed.
5. Press .
6. Press .
MENU
SET
JOG DIAL
SET
JOG DIAL
SET
ADVANCED MODE
JOG DIAL
MENU
Programming table
Code
#22
To print the journal report
automatically for fax communications
AUTO JOURNAL
ON
OFF
To send a document:
1. Insert the document.
2. Follow steps 1–3 above.
3. Rotate to select “ON”.
4. Press .
5. Enter the fax number.
6. Press .
7. Enter the transmission start time.
Press to select “AM” or “PM”.
8. Press .
9. Press .
●
To cancel after programming,
press then
.
SET
STOP
MENU
SET
SET
SET
JOG DIAL
“NEXT FAX”: For the next
attempted fax transmission. After
transmission, the unit will return to
the previous setting.
“ERROR”: When previous fax
transmission fails and you redial
the same number.
●
This feature is not available for
broadcast transmission.
●
The calling charge may be higher.
#23
If you have difficulty sending an
overseas fax, activate this feature
before starting transmission. This
feature makes sending documents
easier as the transmission speed is
slowed down.
OVERSEAS MODE
Display & Feature Settings How the unit operates
#25
To send a fax automatically at a
specified time.
This allows you to take advantage
of low-cost calling hours offered by
your telephone company.
●
The setting can be reserved to
take place up to 24 hours in
advance.
DELAYED SEND
NEXT FAX
ERROR
OFF
ON /
fax no. /
hh:mm
OFF
(The default setting is in bold type.)
Advanced features!
Note:
●
Step 4 may be slightly
different depending on the
feature.
●
See page 54 for more details.
Page 57
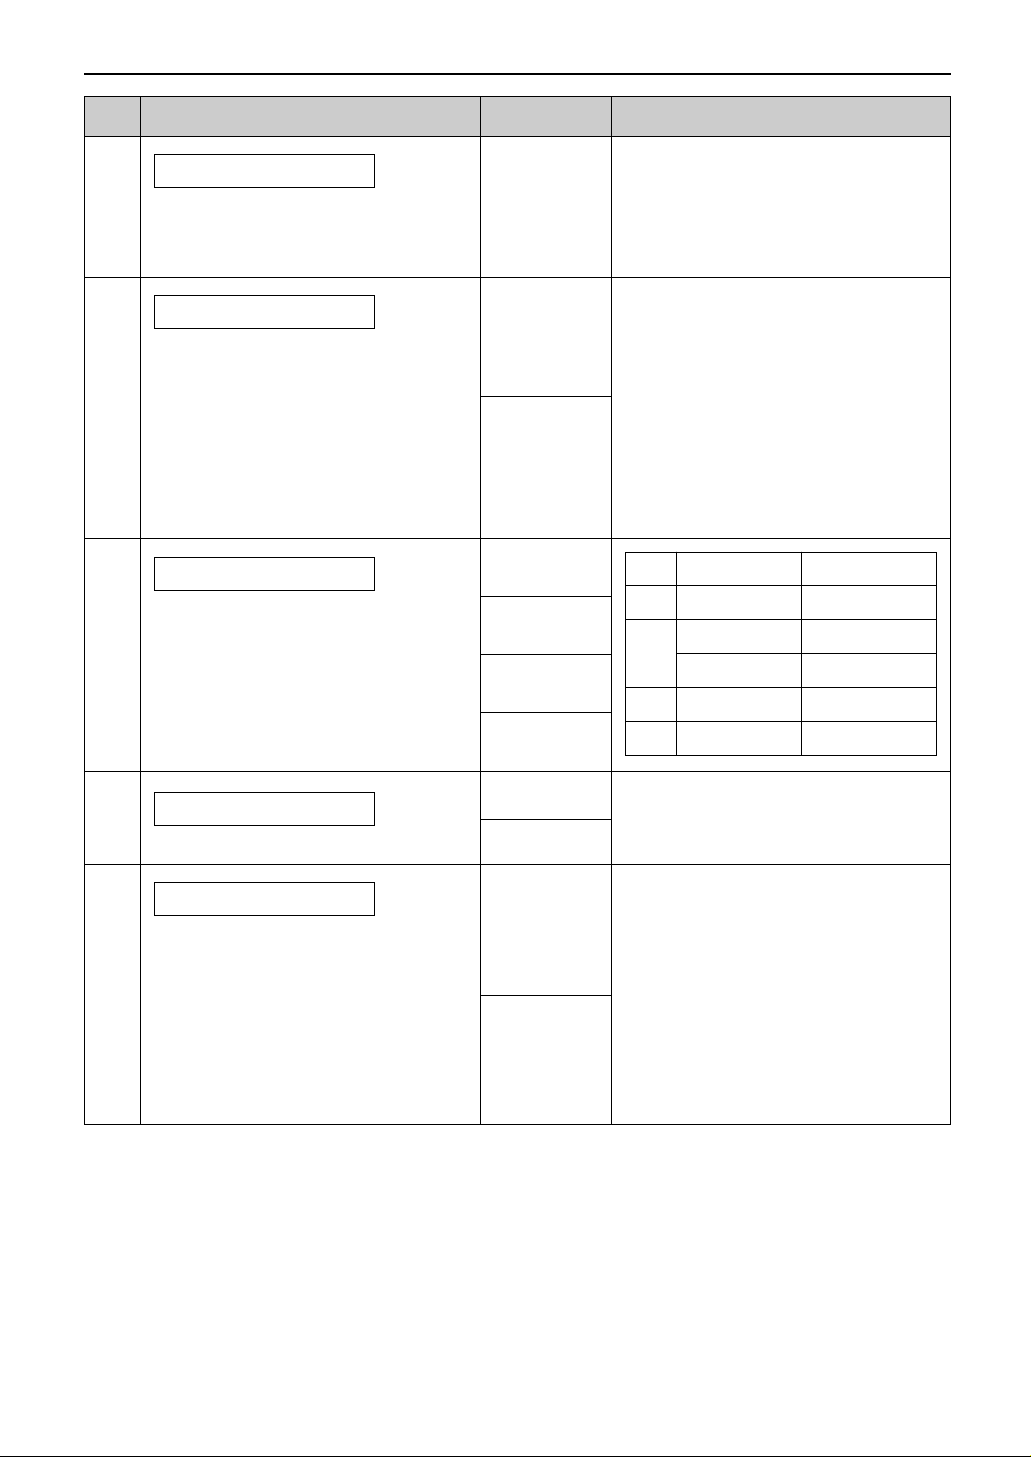
See pages 48 and 49 for details.
57
Features Summary
A, B, C, D
OFF
#31
If you subscribe to a Distinctive
Ring Service (Identa-Ring) from
your telephone company, activate
this feature.
This feature is also required for
voice mail service.
RING DETECTION
Select the ring pattern to be
assigned to the facsimile number.
A: Standard ring (one long ring)
B: Double ring (two short rings)
C: Triple ring (short-long-short rings)
D: Other triple ring (short-short-long
rings)
●
For more information about
telephone services, contact your
telephone company.
Code Display & Feature Settings How the unit operates
(The default setting is in bold type.)
#40
If you use the unit with an
answering machine and wish to
receive faxes from older model fax
machines, activate this feature.
SILENT DETECT.
ON
OFF
#39
To adjust the display contrast
LCD CONTRAST
NORMAL
DARKER
“NORMAL”: For normal contrast
“DARKER”: Used when the display
contrast is too light.
●
If the other party’s fax machine
does not send a fax calling tone,
select “ON”. The unit detects a
silent pause and activate the fax
function.
●
If you use an answering machine
to give greeting messages and
record incoming messages on a
single cassette tape, select
“OFF”.
#30
To change the number of rings
when the unit detects a voice call in
the TEL/FAX mode
SILENT FAX RING
3, 4, 5, 6
(continued)
#36
If the size of the document sent by
the other party is as large as, or
larger than the recording paper, the
unit can reduce and print the
document.
Select the desired reduction rate.
RCV REDUCTION
100%
92%
86%
72%
Legal
Setting
Recording paper Original document
100% Legal Letter, A4
92%
Letter Letter
Legal Legal
86% Letter A4
72% Letter
Page 58
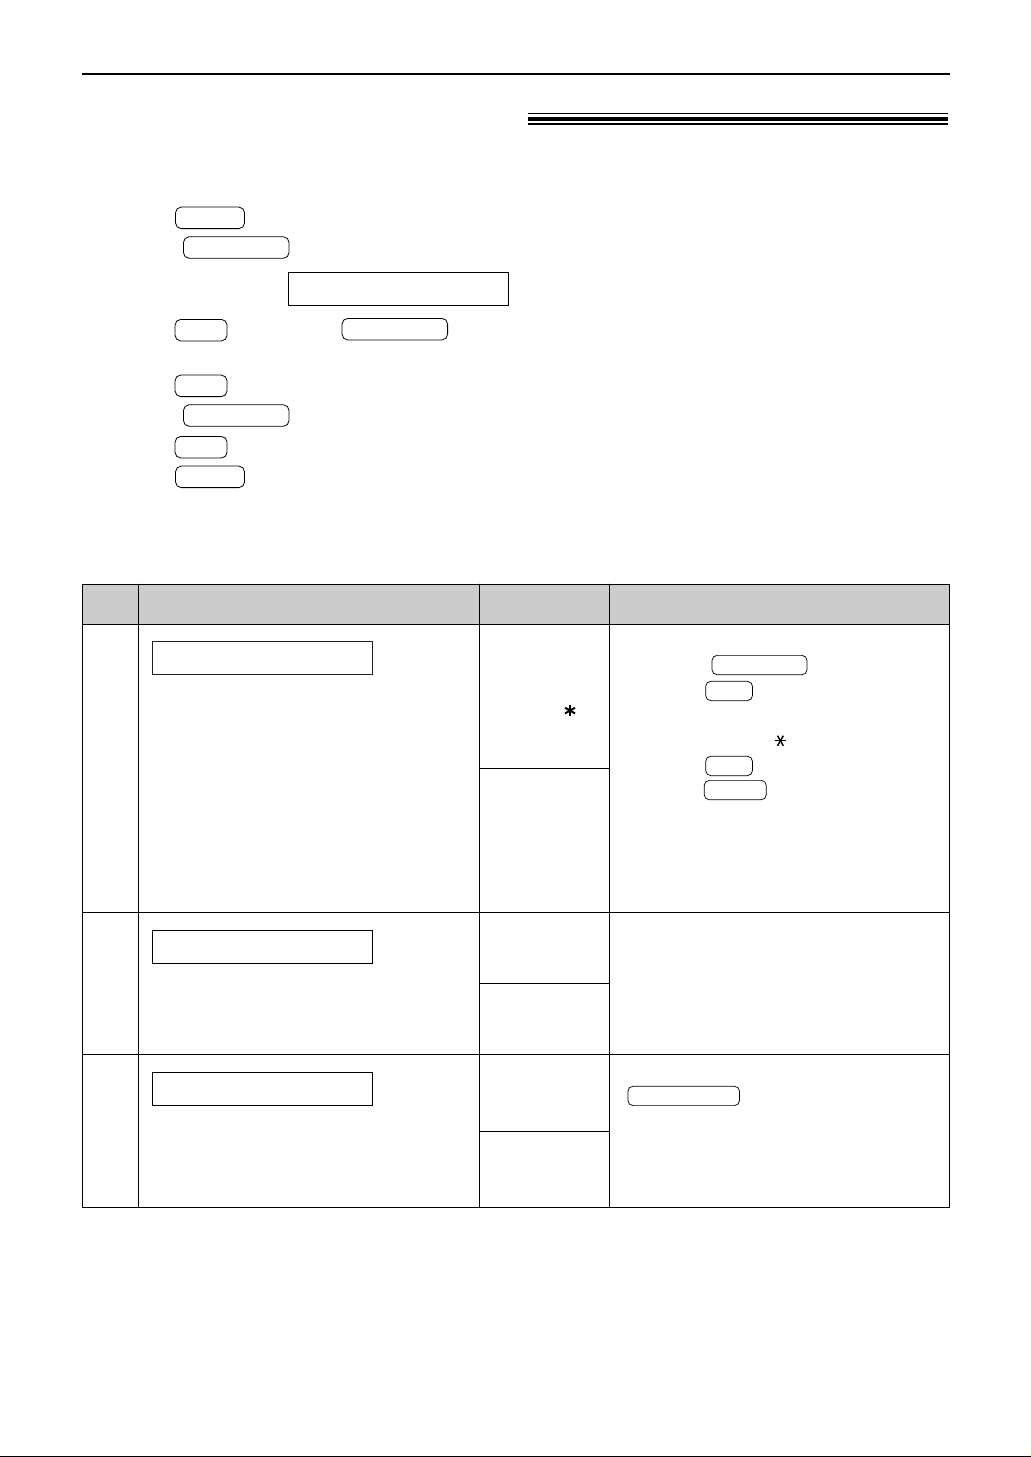
If you use an extension telephone
and wish to use it to receive a fax,
activate this feature, and enter the
code (p. 50).
FAX ACTIVATION
Features Summary
58
(The default setting is in bold type.)
Programming table (cont.)
Code Display & Feature Settings How the unit operates
#46
To receive a fax automatically
when you answer a call and hear
a fax calling tone (slow beep).
FRIENDLY RCV
ON
OFF
#44
To alert you with beeps when a
received document is stored into
memory due to a problem.
RECEIVE ALERT
ON
OFF
Advanced features (cont.)!
#41
ON /
CODE= 9
OFF
1.
Follow steps 1–3 above.
2. Rotate to select “ON”.
3. Press .
4. Enter your code from 2 to 4 digits,
using 0–9 and .
5. Press .
6. Press .
●
Do not enter “0000”.
●
This code is also used to receive
a voice message and a fax in the
same call (p. 47).
MENU
SET
SET
JOG DIAL
If you hear slow beeps, clear the
printing problem or supply paper to
print the stored document. The
beeps will stop.
“ON”: You do not have to press
for fax reception.
FAX START
How to set menu options
1. Press .
2. Rotate until the following is displayed.
Display:
Press and rotate until the desired
feature is displayed.
3. Press .
4. Rotate until the desired setting is displayed.
5. Press .
6. Press .
MENU
SET
JOG DIAL
SET
JOG DIAL
SET
ADVANCED MODE
JOG DIAL
MENU
Note:
●
Step 4 may be slightly
different depending on the
feature.
●
See page 54 for more details.
Page 59
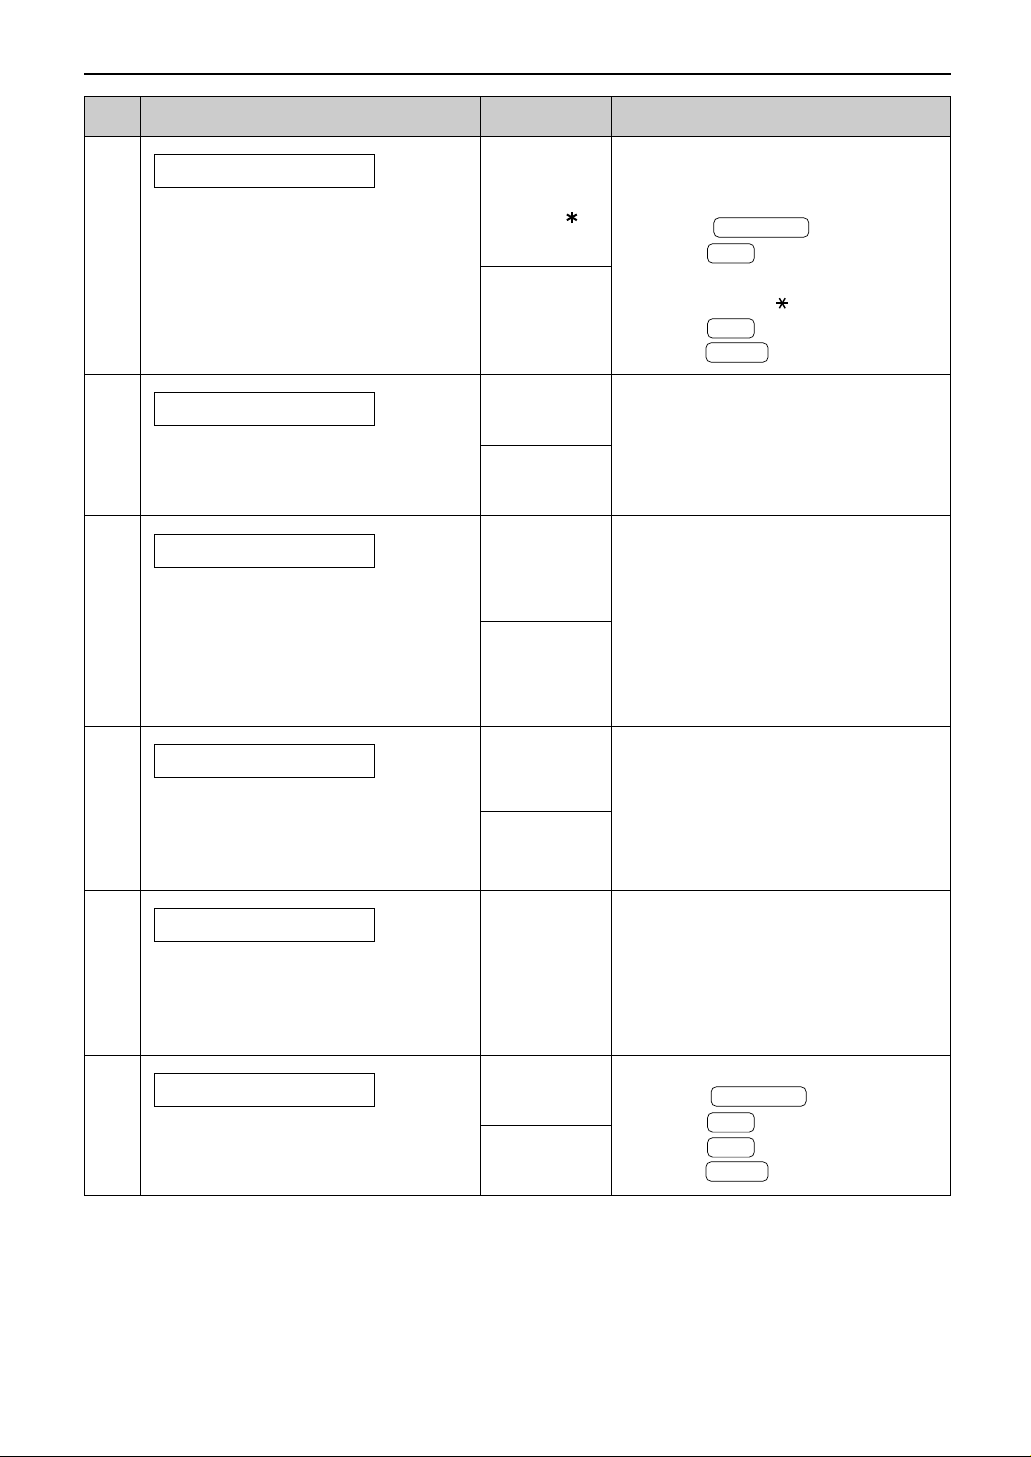
1. Follow steps 1–3 on page 58.
2.
Rotate to select “YES”.
3. Press .
4. Press again.
5. Press .
MENU
SET
SET
JOG DIAL
Features Summary
59
#78
If you use an extension telephone
in the TEL/FAX mode, select the
desired number of rings to be
generated before the unit answers.
TEL/FAX RING
1, 2, 3, 4
#80
To reset the advanced features to
their default settings
SET DEFAULT
YES
NO
See pages 48 and 49 for details.
You can confirm the status of the
other party’s machine.
●
If the ring back tone continues, the
other party’s machine may not be
a facsimile or may have run out of
paper. Check with the other party.
●
The connecting tone volume
cannot be adjusted.
#76
If you often have trouble when
sending a fax, this feature allows
you to hear connecting tones; fax
tone, ring back tone and busy tone.
CONNECTING TONE
ON
OFF
#77
To change the receive mode in the
AUTO ANSWER setting
AUTO ANSWER
FAX ONLY
TEL/FAX
“FAX ONLY”: Facsimile only mode
(p. 45)
“TEL/FAX”: Telephone/Facsimile
mode (p. 48, 49)
●
If you select “TEL/FAX”, the unit
will print an information list.
Code Display & Feature Settings How the unit operates
(The default setting is in bold type.)
See page 51 for details.
#70
If you have a pager and wish to
know when your unit receives a
fax, activate this feature.
FAX PAGER CALL
ON
OFF
#49
To answer a call with an extension
telephone in the TEL/FAX mode
AUTO DISCONNECT
ON /
CODE= 0
OFF
See page 49 for details.
To program:
1. Follow steps 1–3 on page 58.
2. Rotate to select “ON”.
3. Press .
4. Enter your code from 2 to 4 digits,
using 0–9 and .
5. Press .
6. Press .
MENU
SET
SET
JOG DIAL
Page 60
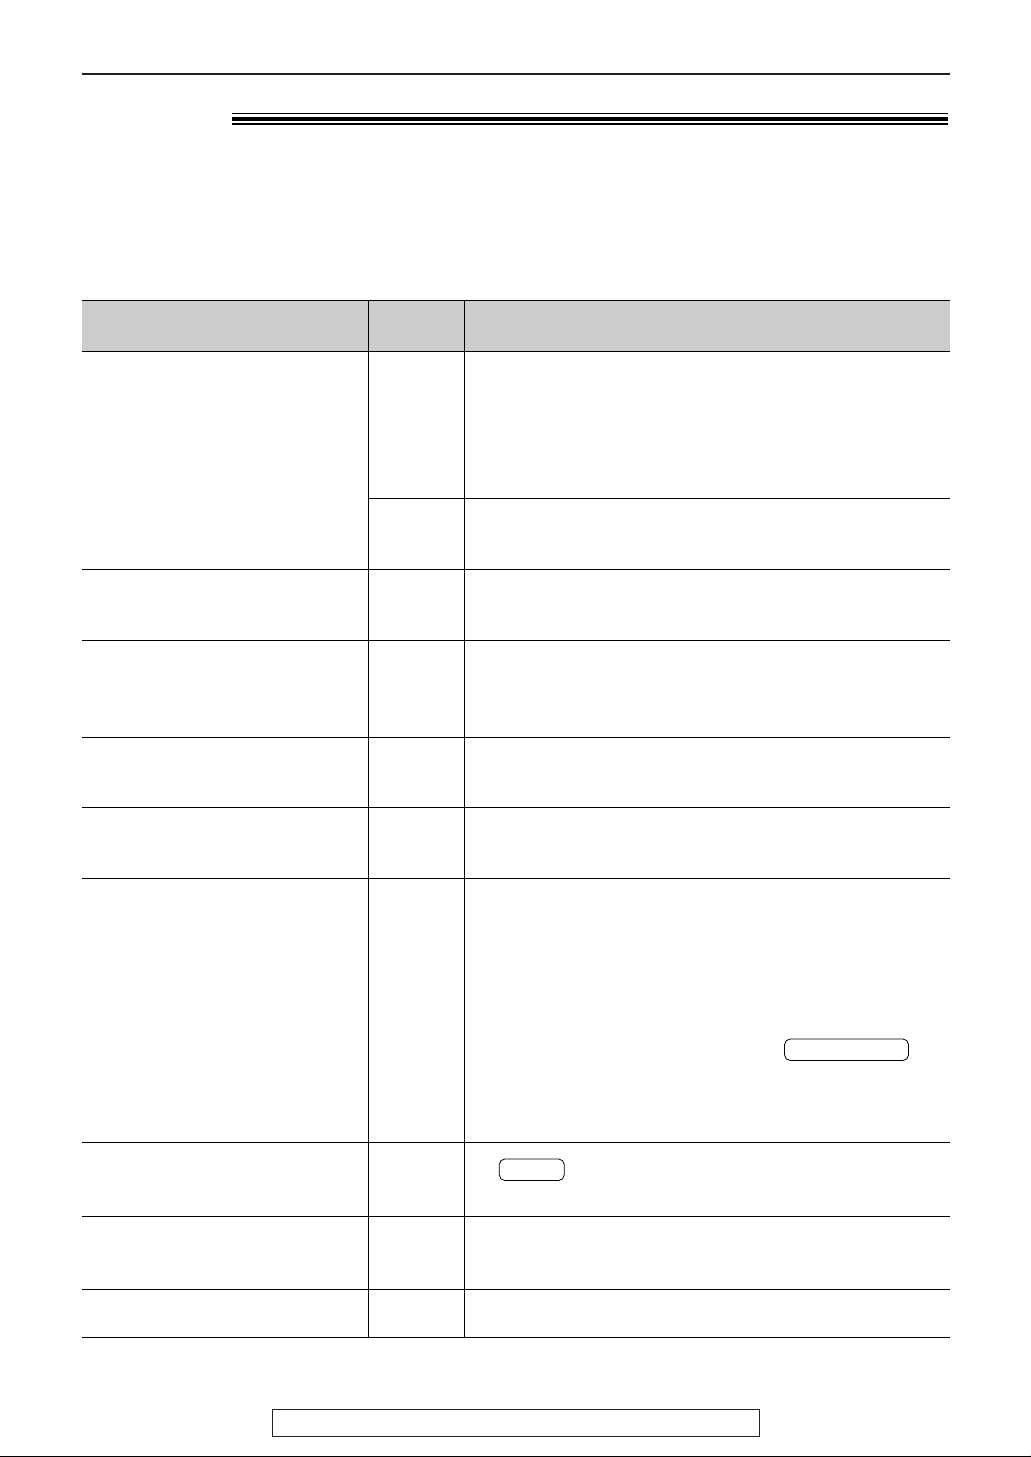
For fax advantage assistance, call 1-800-435-7329.
Error Messages
Reports!
Communication message
COMMUNICATION ERROR
DOCUMENT JAMMED
ERROR-NOT YOUR UNIT
MEMORY FULL
NO DOCUMENT
OTHER FAX NOT RESPOND
PRESSED THE STOP KEY
THE COVER WAS OPENED
OK
40–42
46–52
58, 65
68, 72
FF
43
44
—
54
59
70
—
—
—
—
—
—
●
A transmission or reception error occurred. Try
again or check with the other party.
●
An overseas transmission error occurred. Try using
the overseas mode (feature #23 on page 56).
●
The document is jammed. Remove the jammed
document (p. 70).
●
A transmission or reception error occurred
because of a problem with the other party’s fax
machine. Check with the other party.
●
The document was not received due to memory
being full.
●
The document was not fed into the unit properly.
Reinsert the document and try again.
●
The other party’s fax machine is busy or has run
out of recording paper. Try again.
●
The document was not fed properly. Reinsert the
document and try again.
●
The other party’s fax machine rings too many
times. Send a fax manually – dial the number,
confirm the fax tone, and press .
●
The other party’s machine is not a facsimile.
Check with the other party.
●
The number you dialed is not in service.
●
was pressed and fax communication was
canceled.
●
The covers were opened. Close them and try
again.
●
Fax communication was successful.
STOP
FAX START
Error
code
Cause & Remedy
60
If your unit cannot send a fax, check the following.
– The number you dialed is correct.
– The other party’s machine is a facsimile.
If the problem remains, correct it by following the communication message printed on the
sending and journal reports (p. 37).
Page 61
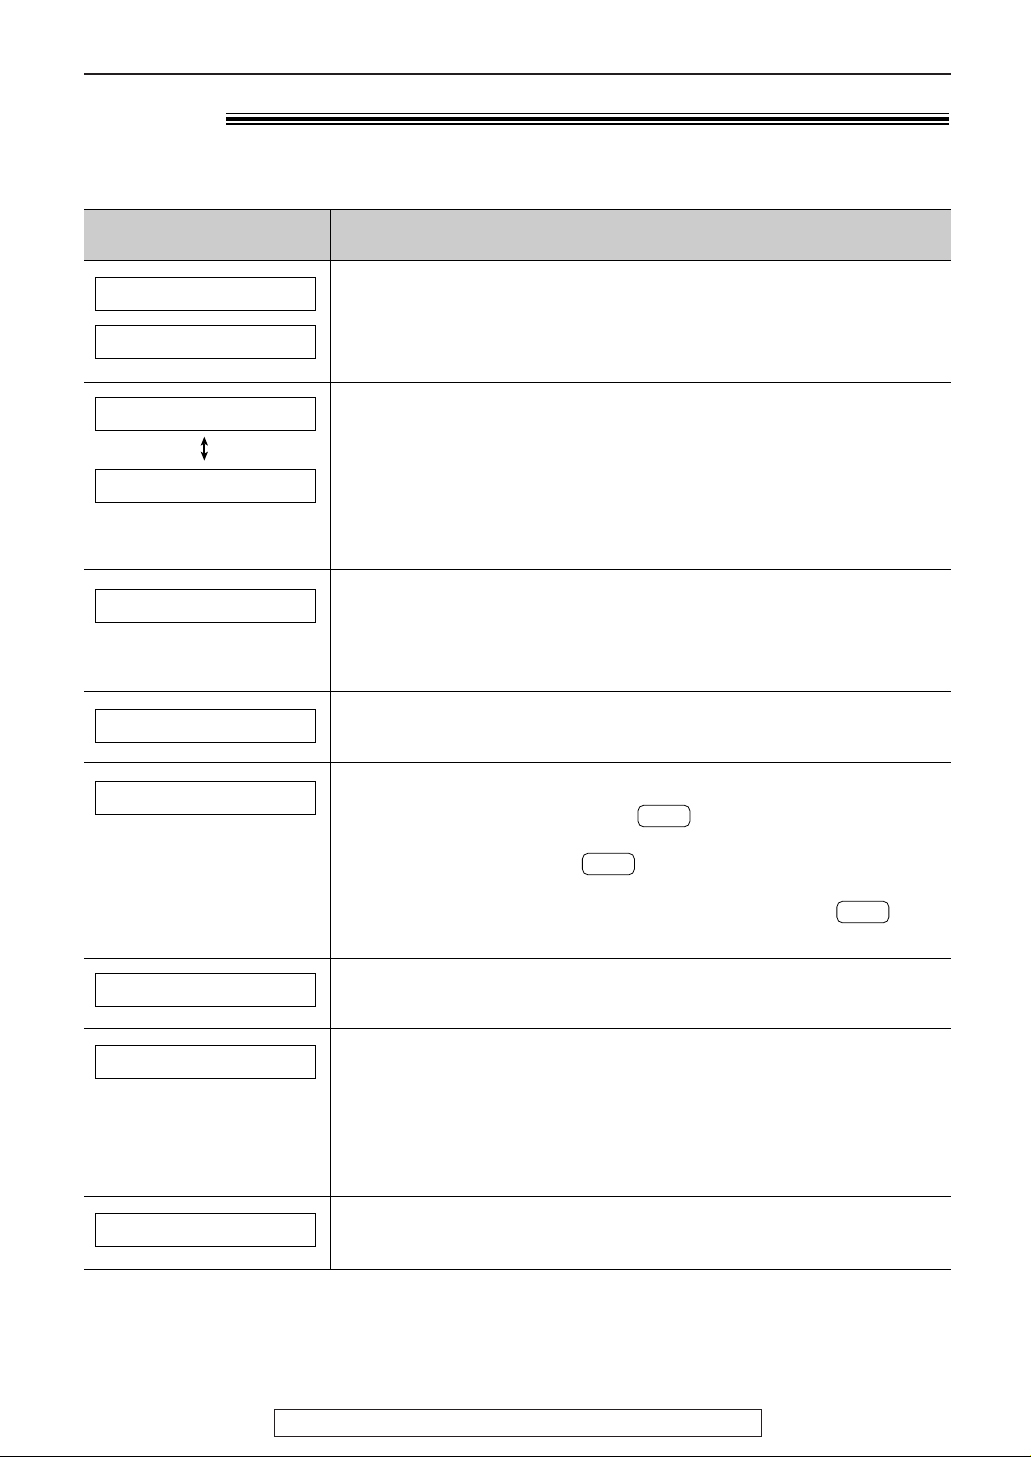
For fax advantage assistance, call 1-800-435-7329.
61
Display!
Display message
JOG-DIAL FULL
FAX MEMORY FULL
FAX IN MEMORY
CHECK PAPER
CHECK MEMORY
CHECK DOCUMENT
CHECK FILM
COVER OPEN
CALL SERVICE2
CALL SERVICE
●
There is something wrong with the unit. Contact our service
personnel.
●
The covers are open. Close them.
●
The ink film is empty. Replace the ink film with a new one
(p. 72, 73).
●
The ink film is not installed. Install it (p. 72, 73).
●
The ink film is slack. Tighten it (see step 6 on page 73).
●
The document is not fed into the unit properly. Reinsert the
document. If misfeeding occurs frequently, clean the document
feeder rollers (p. 74) and try again. If the problem remains, adjust
the feeder pressure (p. 70).
●
Memory (telephone numbers, parameters, etc.) has been erased.
Re-program.
●
The recording paper is not installed or the unit has run out of
paper. Install paper and press to clear the message.
●
The recording paper is not fed into the unit properly. Reinstall
paper (p. 13) and press to clear the message.
●
The recording paper has jammed near the recording paper
entrance. Clear the jammed paper (p. 69) and press to
clear the message. Do not install folded or heavily curled paper.
●
The unit has a document in memory. See the other displayed
message instructions to print out the document.
●
Memory is full of received documents due to a lack of recording
paper or a recording paper jam etc. Install paper or clear the
jammed paper.
●
When performing memory transmission, the document being
stored exceeds the memory capacity of the unit. Transmit the
entire document manually.
●
There is no space to store new stations in the JOG DIAL
directory. Erase unnecessary stations (p. 32).
SET
SET
SET
Cause & Remedy
If the unit detects a problem, one or more of the following messages will appear on the display.
Error Messages
(continued)
Page 62
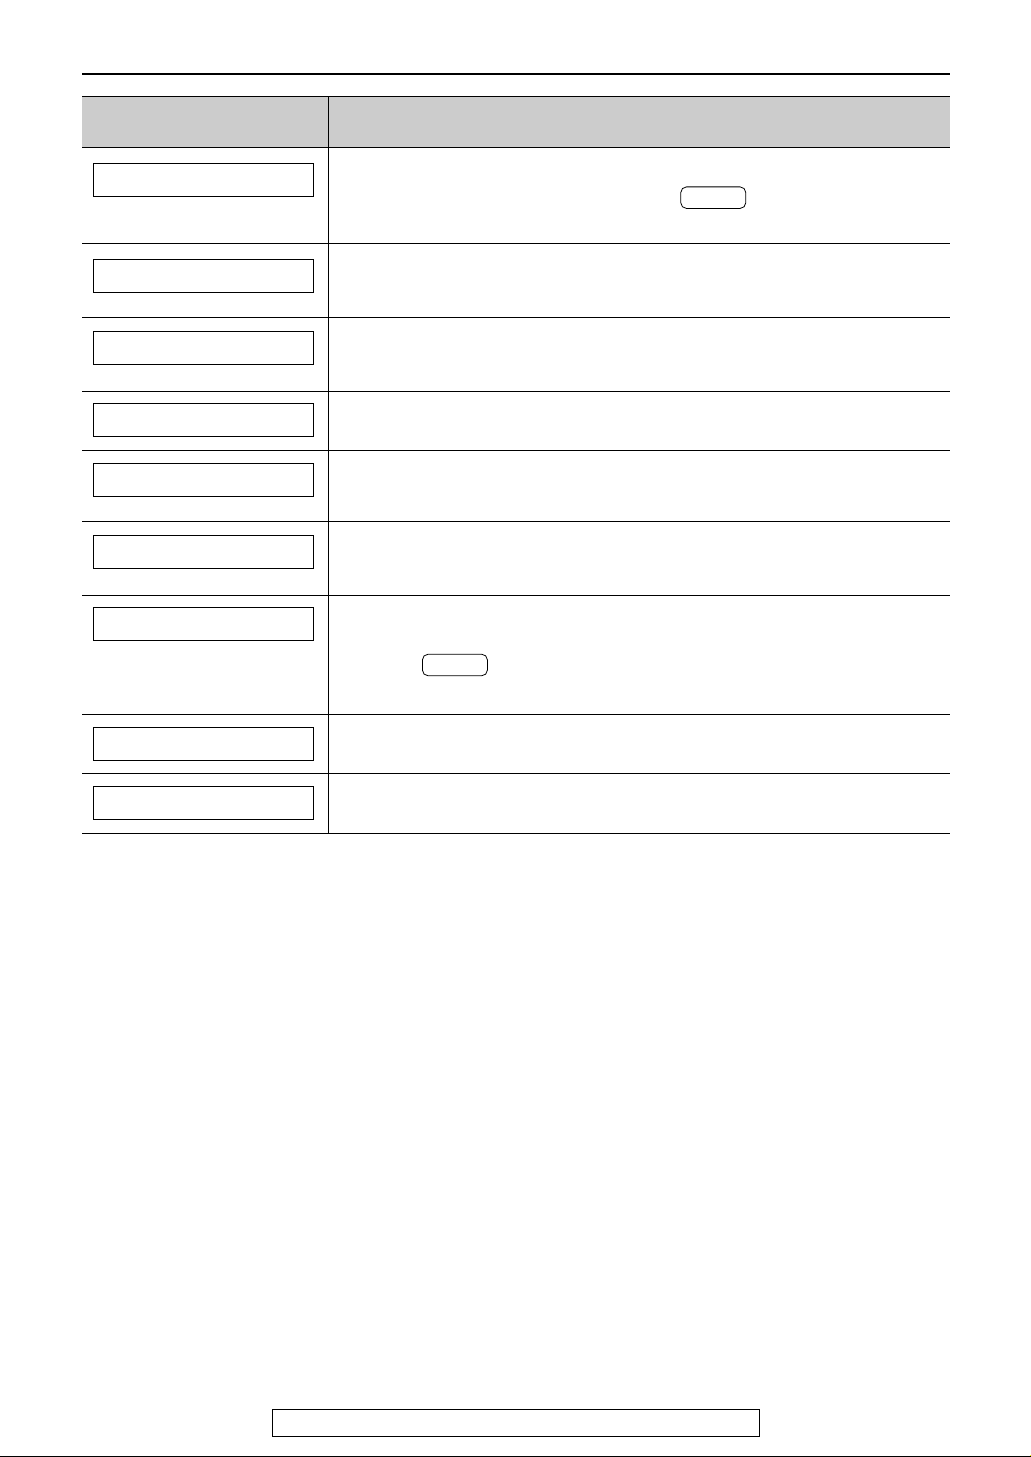
62
Error Messages
For fax advantage assistance, call 1-800-435-7329.
Display message
UNIT OVERHEATED
TRANSMIT ERROR
REMOVE DOCUMENT
REDIAL TIME OUT
PLEASE WAIT
PAPER JAMMED
NO FAX REPLY
MODEM ERROR
MEMORY FULL
●
When making a copy, the document being stored exceeds the
memory capacity of the unit. Press to clear the
message. Divide the document and try again.
●
There is something wrong with the modem circuit. Contact our
service personnel.
●
The other party’s fax machine is busy or has run out of recording
paper. Try again.
●
A recording paper jam occurred. Clear the jammed paper (p. 69).
●
The unit is checking that there is no slack on the ink film. Wait for
a while.
●
The other party’s fax machine is busy or has run out of recording
paper. Try again.
●
The document is jammed. Remove the jammed document (p. 70).
●
Attempted to transmit a document longer than 600 mm (235⁄8").
Press to remove the document. Divide the document
into two or more sheets and try again.
●
A transmission error occurred. Try again.
●
The unit is too hot. Let the unit cool down.
STOP
STOP
Cause & Remedy
Page 63

For fax advantage assistance, call 1-800-435-7329.
63
When a function does not work, check here
before requesting help!
General
Problem
I cannot make and receive
calls.
I cannot make calls.
The unit does not work.
The unit does not ring.
The unit displays the following
message though the paper is
inserted.
The other party complains
they only hear a fax tone and
cannot talk.
The button
does not function properly.
The receive mode does not
function as explained on
pages 42 and 43.
During programming, I cannot
enter the code or ID number.
The ink film runs out quickly.
The unit beeps.
The
button does not function.
The CHARGE light never goes
out while charging.
HANDSET LOCATOR
Page 64
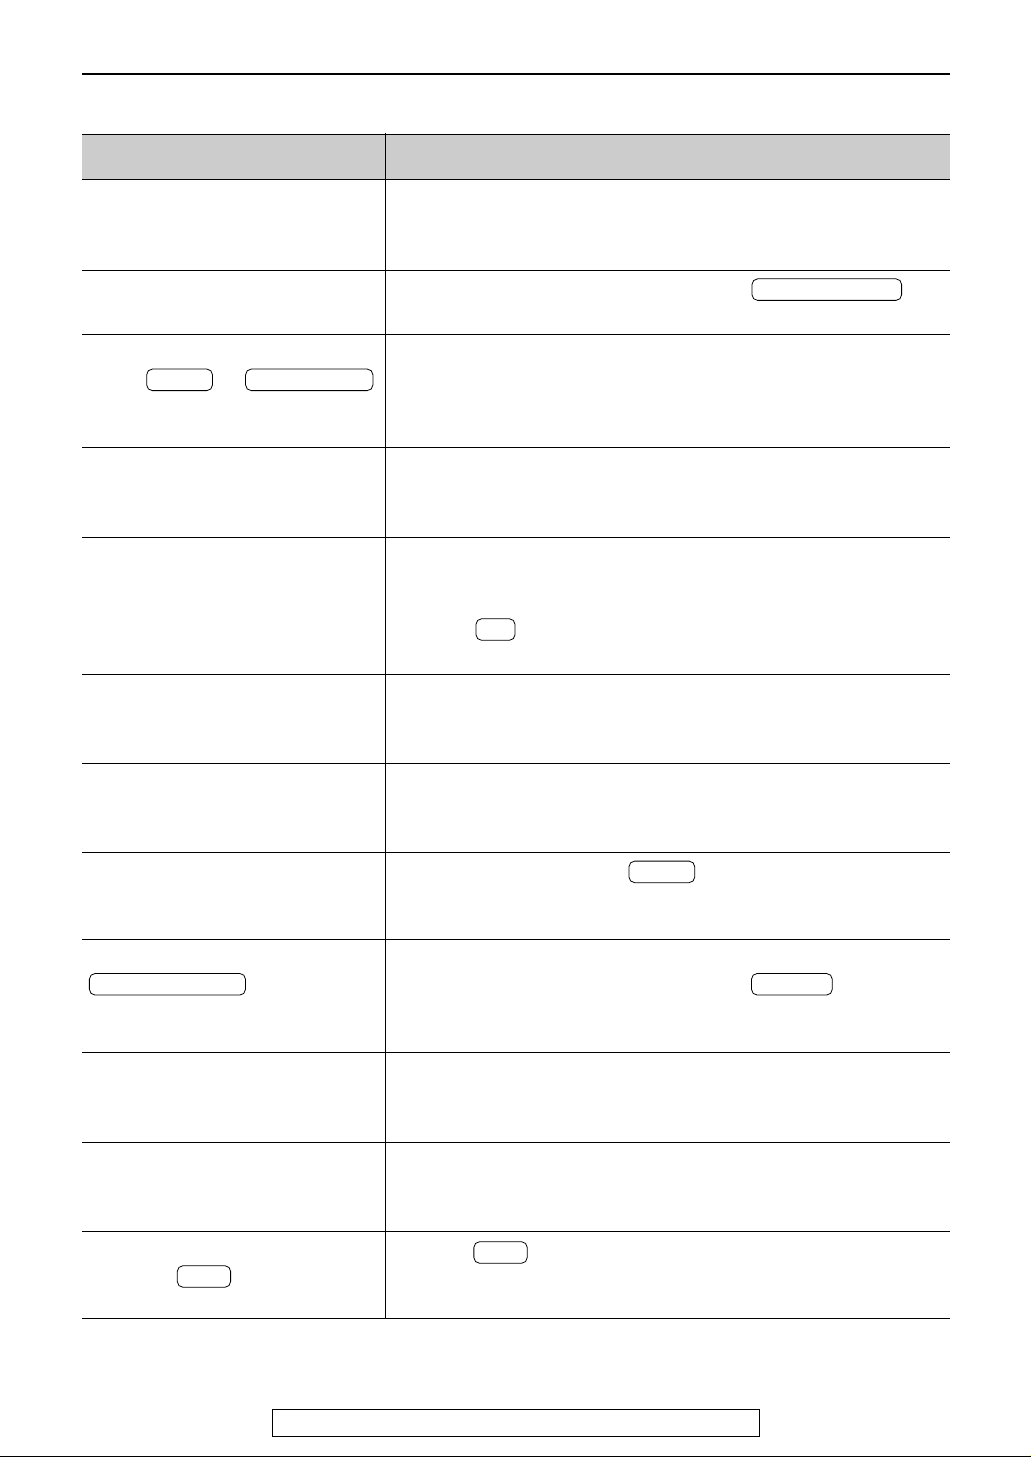
64
Operations
For fax advantage assistance, call 1-800-435-7329.
Cordless handset
Problem Cause & Remedy
The handset does not work.
The handset does not ring.
An alarm tone sounds when I
press or .
An alarm tone sounds
continuously while using the
handset.
Static, sound cuts in/out,
fades. Interference from other
electrical units.
The handset stops working
while being used.
I cannot store a telephone
number in the handset
memory.
While storing a telephone
number in the handset, it
starts to ring.
I cannot redial by pressing
.
The RECHARGE indicator
flashes or the handset beeps
intermittently.
I charged the battery fully, but
the RECHARGE indicator
flashes.
I cannot receive documents by
pressing on the
handset.
FAX
REDIAL/PAUSE
TALK
●
Make sure that the battery is installed correctly (p. 71).
●
Charge the battery fully (p. 20).
●
Clean the charge contacts (p. 75) and charge again.
●
The ringer volume is set to off. Press
(p. 22).
●
The handset is too far from the main unit. Move closer and
try again.
●
Place the handset on the main unit and try again.
●
The power cord is disconnected. Plug in the power cord.
●
Quickly move closer to the main unit or the call will be
terminated within 60 seconds.
●
The power cord is disconnected. Plug in the power cord.
●
Locate the handset and the main unit away from electrical
appliances.
●
Move closer to the main unit.
●
Press to select a clear channel.
●
Raise the main unit antenna.
●
Place the handset on the main unit, and disconnect the
power cord to reset the unit. Connect the power cord, and
try again.
●
You cannot store a number while the unit is in the talk or
intercom mode.
●
Do not pause for over 30 seconds while storing a mumber.
●
To answer a call, press .
The program will be canceled. Store the number again.
●
The redial function does not work right after storing
telephone numbers in the handset or (p. 28, 29).
●
If the last number dialed was more than 32 digits long, the
number will not be redialed.
●
Charge the battery fully (p. 20).
●
Clean the charge contacts (p. 75) and charge again.
●
It is time to replace the battery. Please purchase a new
battery (p. 9).
●
Press until a single beep is heard.
FAX
DIRECT
TALK
CH
LOUD/RINGER
REMOTE SP
Page 65
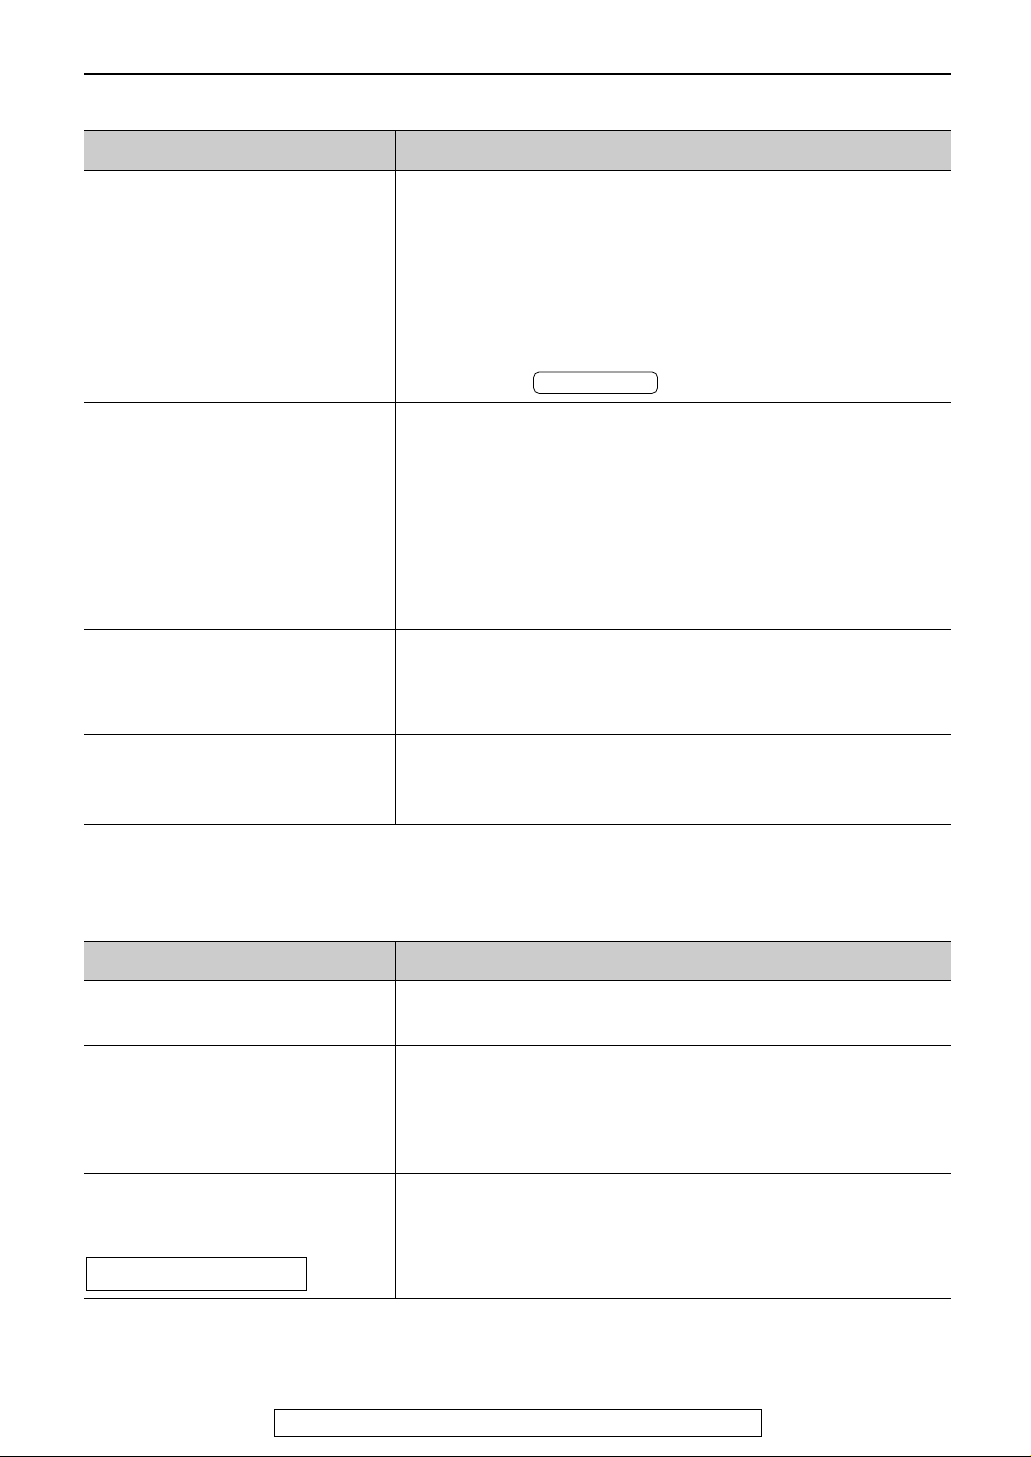
65
Operations
For fax advantage assistance, call 1-800-435-7329.
Fax – sending
Problem
●
The telephone line cord is connected to the EXT jack on
the unit. Connect to the LINE jack (p. 14).
●
The other party’s fax machine is busy or has run out of
recording paper. Try again.
●
The other party’s machine is not a facsimile. Check with
the other party.
●
The other party’s fax machine rings too many times. Send
a fax manually – dial the number, confirm the fax tone,
then press .
●
If your line has special telephone services such as call
waiting, the service may have been activated during fax
transmission. Connect the unit to a line that does not have
these services.
●
The extension telephone on the same line is off the hook.
Hang up the extension telephone and try again.
●
Try copying the document. If the copied image is clear,
there may be something wrong with the other party’s
machine.
●
The glass or rollers are dirty. Clean them (p. 74).
●
Use the overseas transmission mode of feature #23 (p. 56).
●
Add two pauses at the end of the telephone number
(p. 27) or dial manually.
FAX START
Cause & Remedy
I cannot send documents.
The other party complains that
letters on their received
document are distorted or not
clear.
The other party complains that
dirty patterns or black lines
appear on their received
document.
I cannot make an international
fax call.
Fax – receiving
Problem
●
The telephone line cord is connected to the EXT jack on
the unit. Connect to the LINE jack (p. 14).
●
The receive mode is set to the TEL mode. Set to the FAX
ONLY or TEL/FAX mode (p. 42, 43).
●
The time taken to answer the call is too long. Decrease the
number of rings of features #06 (p. 55), #30 (p. 57) and
#78 (p. 59).
●
The incoming call is not a fax. Change the receive mode
to the TEL mode (p. 43).
Cause & Remedy
I cannot receive documents.
I cannot receive documents
automatically.
The display shows the
following message but faxes
are not received.
CONNECTING.....
(continued)
Page 66
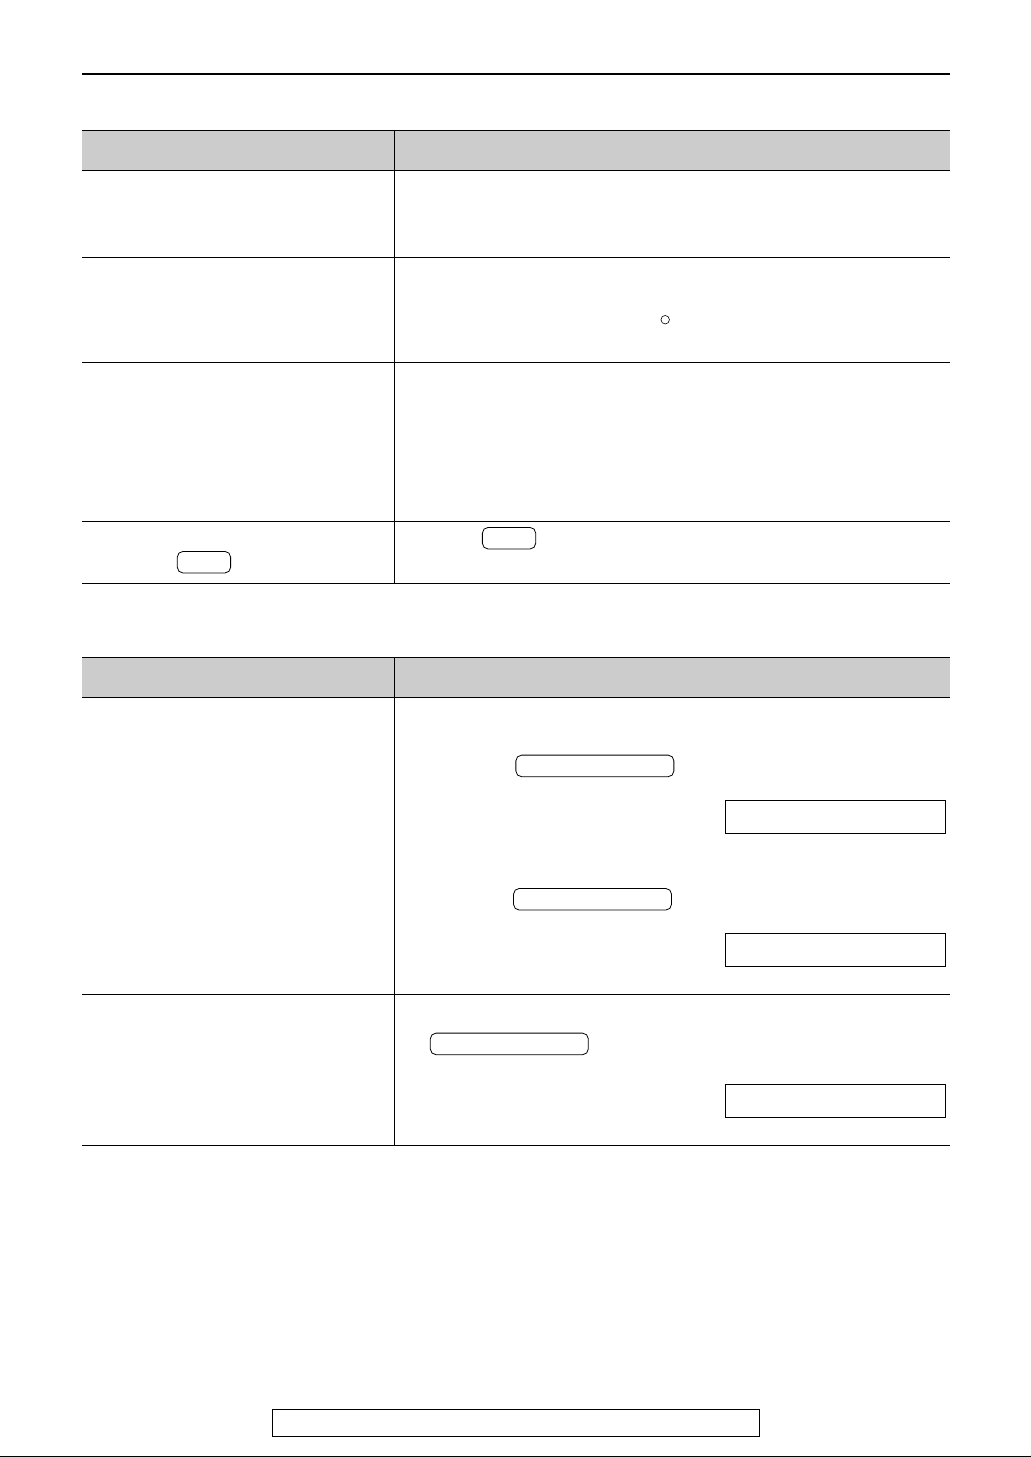
66
Operations
For fax advantage assistance, call 1-800-435-7329.
Receive mode
Problem
●
If you want to set the FAX ONLY or TEL/FAX mode:
— Select the desired mode using feature #77 (p. 59), and
— Press to turn on the arrow (▼) on
the right of the display.
Display:
ON
●
If you want to set the TEL mode:
— Press to turn off the arrow (▼) on
the right of the display.
ON
●
The unit is not in AUTO ANSWER mode. Press
to turn on the arrow (▼) on the right of
the display.
ON
▼
AUTO ANSWER
AUTO ANSWER
▼
AUTO ANSWER
Cause & Remedy
I cannot select the desired
receive mode.
The other party complains that
they cannot send a document.
Fax – receiving (cont.)
Problem
●
The other party sent a faint document. Ask them to send a
clearer copy of the document.
●
The thermal head is dirty. Clean it (p. 75).
●
Some paper has instructions recommending which side to
print on. Try turning the paper over. We recommend smooth
paper such as Hammermill Jet Print for clearer printing.
●
Check the document of the other party.
●
If a blank sheet is ejected after the received document is
printed out, the receiving reduction rate is not
programmed correctly. Program the proper rate in feature
#36 (p. 57).
●
The other party placed the document in their fax machine
the wrong way. Check with the other party.
●
Press until a single beep is heard.
FAX
R
Cause & Remedy
The recording image is faint.
The printing quality is poor.
A blank sheet is ejected.
I cannot receive documents by
pressing on the handset.
FAX
Page 67
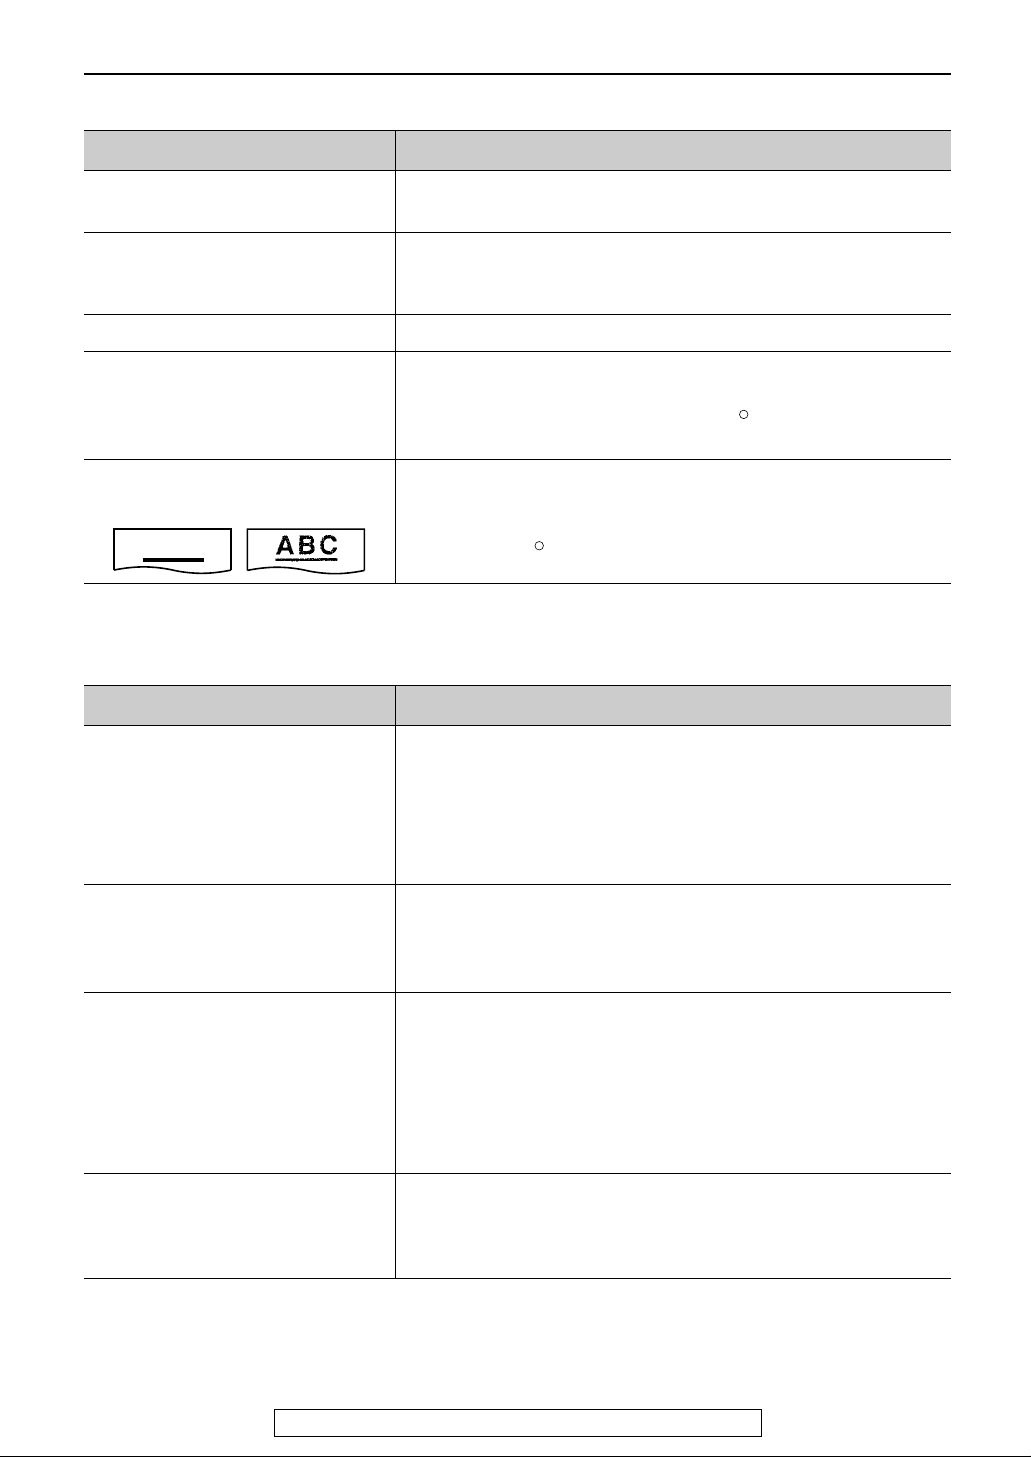
67
Operations
For fax advantage assistance, call 1-800-435-7329.
Using an answering machine
Problem
●
Your greeting message on the answering machine is too
long. Shorten the message (up to 10 seconds).
●
The answering machine rings too many times. Set to 1 or
2 rings.
●
The silent detection feature is deactivated. Activate feature
#40 (p. 57).
●
Check if the answering machine is turned on and
connected to the fax machine properly (p. 46).
●
Set the number of rings on the answering machine to 1
or 2.
●
The remote access code on your answering machine is
the same as your fax activation code. Set a different
number for features #12 (p. 55) and #41 (p. 58).
●
You did not program your remote access code in your fax
machine correctly. Program the same code that is
programmed on the answering machine to the fax
machine with feature #12 (p. 55).
●
The greeting message has a silent pause longer than 4
seconds. Re-record the greeting message.
Cause & Remedy
I cannot receive documents
automatically.
I cannot receive voice
messages.
I cannot retrieve recorded voice
messages on the answering
machine from a remote
location.
The greeting message on the
answering machine is interrupted
halfway and the caller cannot
leave a voice message.
Copying
Problem
●
You cannot make a copy during programming. Make the
copy after programming or stop the programming.
●
The glass or rollers are dirty. Clean them (p. 74).
●
The thermal head is dirty. Clean it (p. 75).
●
Some paper has instructions recommending which side to
print on. Try turning the paper over. We recommend
smooth paper such as Hammermill Jet Print for clearer
printing.
●
You may have used paper with a cotton and/or fiber
content that is over 20%, such as letterhead or resume
paper. We recommend smooth paper such as
Hammermill Jet Print for clearer printing.
R
R
Cause & Remedy
The unit does not make a copy.
A dirty pattern or a black line
appears on the copied
document.
The copied image is distorted.
The printing quality is poor.
The printing is faint.
ABC
Original
Copy
(continued)
Page 68
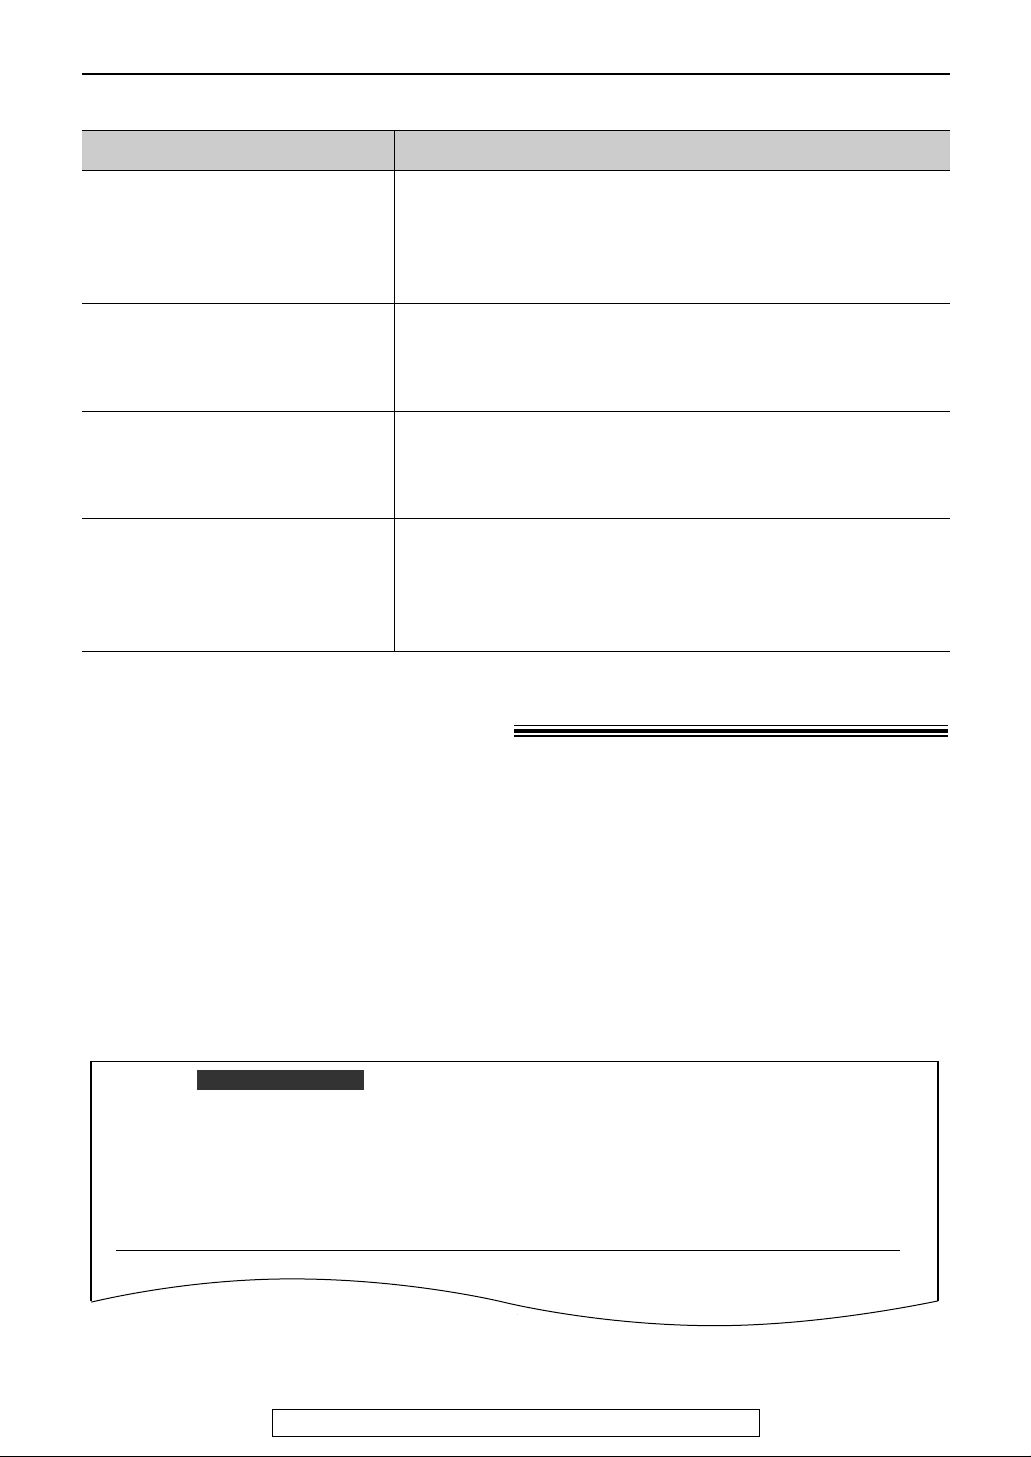
68
Operations
For fax advantage assistance, call 1-800-435-7329.
If a power failure occurs!
●
The unit will not function.
●
Fax transmission and reception will be interrupted.
●
If delayed transmission of feature #25 (p. 56) is programmed and the start time has passed
during a power failure, transmission will be attempted soon after power is restored.
●
If an extension telephone/answering machine is connected to the EXT jack of the fax machine,
you may be able to use it during a power failure.
●
If fax documents are stored in memory, they will be lost. When power is restored, a power
down report will be printed out stating which contents in memory have been erased.
Sample of a power down report
NO.
01 <FAX # NOT AVAIL.>
MODE
RCV
PAGES
01
MEMORY RECEIVE
POWER DOWN AT:Jan. 05 2000 04:30AM
YOUR LOGO :
YOUR FAX NO. :
RESTARTED AT:Jan. 05 2000 04:31AM
FUNCTION
OTHER FACSIMILE
<< WARNING >>
CONTENTS HAVE BEEN CLEARED DUE TO POWER DOWN.
FOR ADDITIONAL INFORMATION, PLEASE SEE THE JOURNAL REPORT.
POWER DOWN REPORT
Using an answering machine (cont.)
Problem
●
The code may include “#” which is used for certain
features provided by telephone companies. Change the
code on the answering machine to another number which
does not include “#”. Also change the code of the fax
machine with feature #12 (p. 55).
●
Advise the caller not to pause for over 4 seconds while
recording their voice message.
●
Your answering machine has run out of recording tape.
Rewind the tape to record messages.
●
You set the answering machine to only give a greeting
message.
●
You paused for over 4 seconds during the conversation.
Do not pause for more than 4 seconds, or turn off feature
#40 (p. 57).
Cause & Remedy
I pressed the remote access
code to access the answering
machine remotely, but the line
was disconnected.
Callers complain that their
voice message is interrupted
halfway and they cannot leave
a message.
Callers complain that they
cannot send a document.
When I answer a call with the
extension telephone, the fax
machine switches to the fax
mode and I cannot talk with the
other party.
Page 69
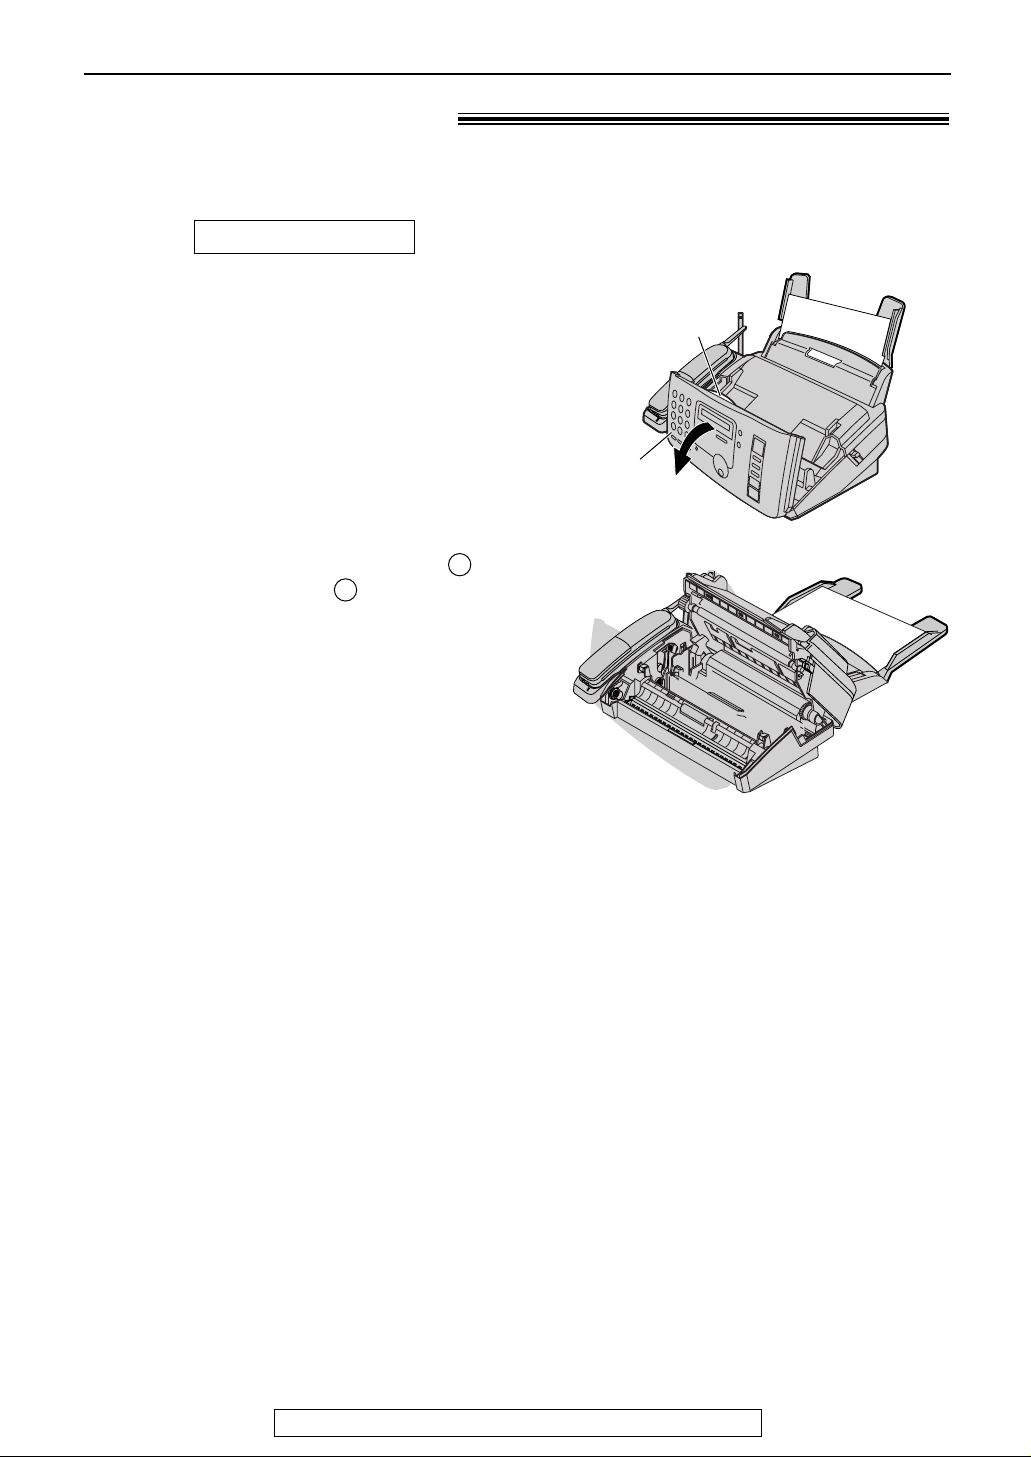
Jams
Center part
Front
cover
2
1
Recording paper jam!
If the unit does not eject any recording paper during fax reception or copying, the recording
paper has jammed and the display will show the following message.
Display:
Remove the jammed paper as follows.
Open the front cover by pulling up the center
1
part.
Push the back cover open button ( ) and
2
open the back cover ( ).
PAPER JAMMED
For fax advantage assistance, call 1-800-435-7329.
69
Page 70
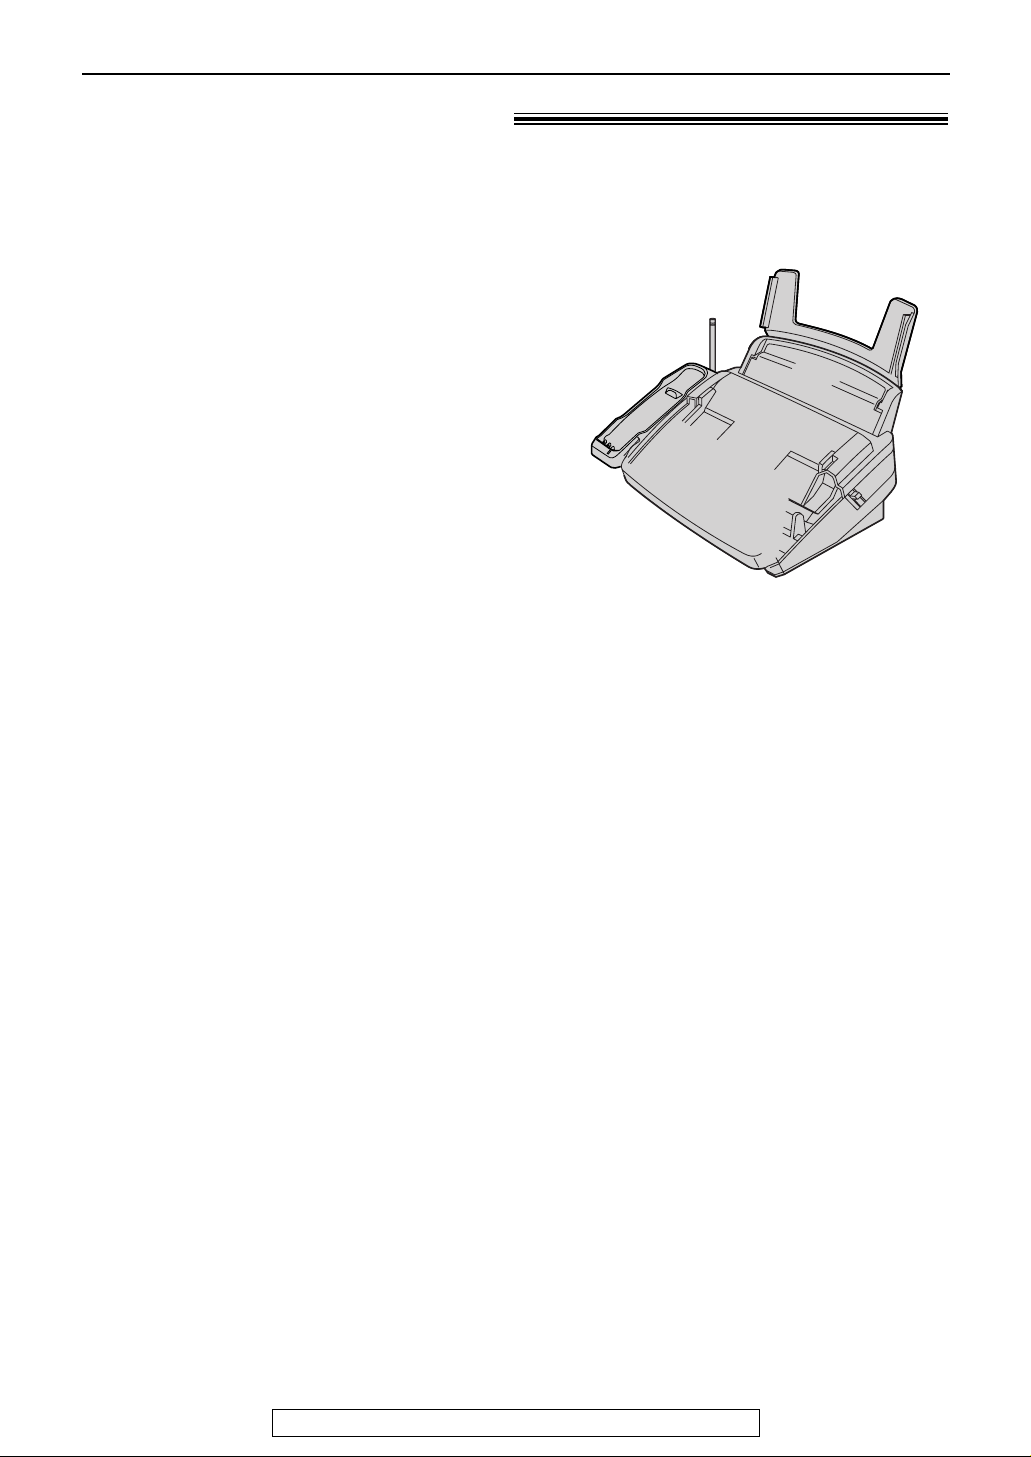
70
Jams
For fax advantage assistance, call 1-800-435-7329.
Sending document jams!
1
Open the front cover by pulling up the center
part.
2
Remove the jammed document carefully.
3
Close the front cover securely.
Page 71
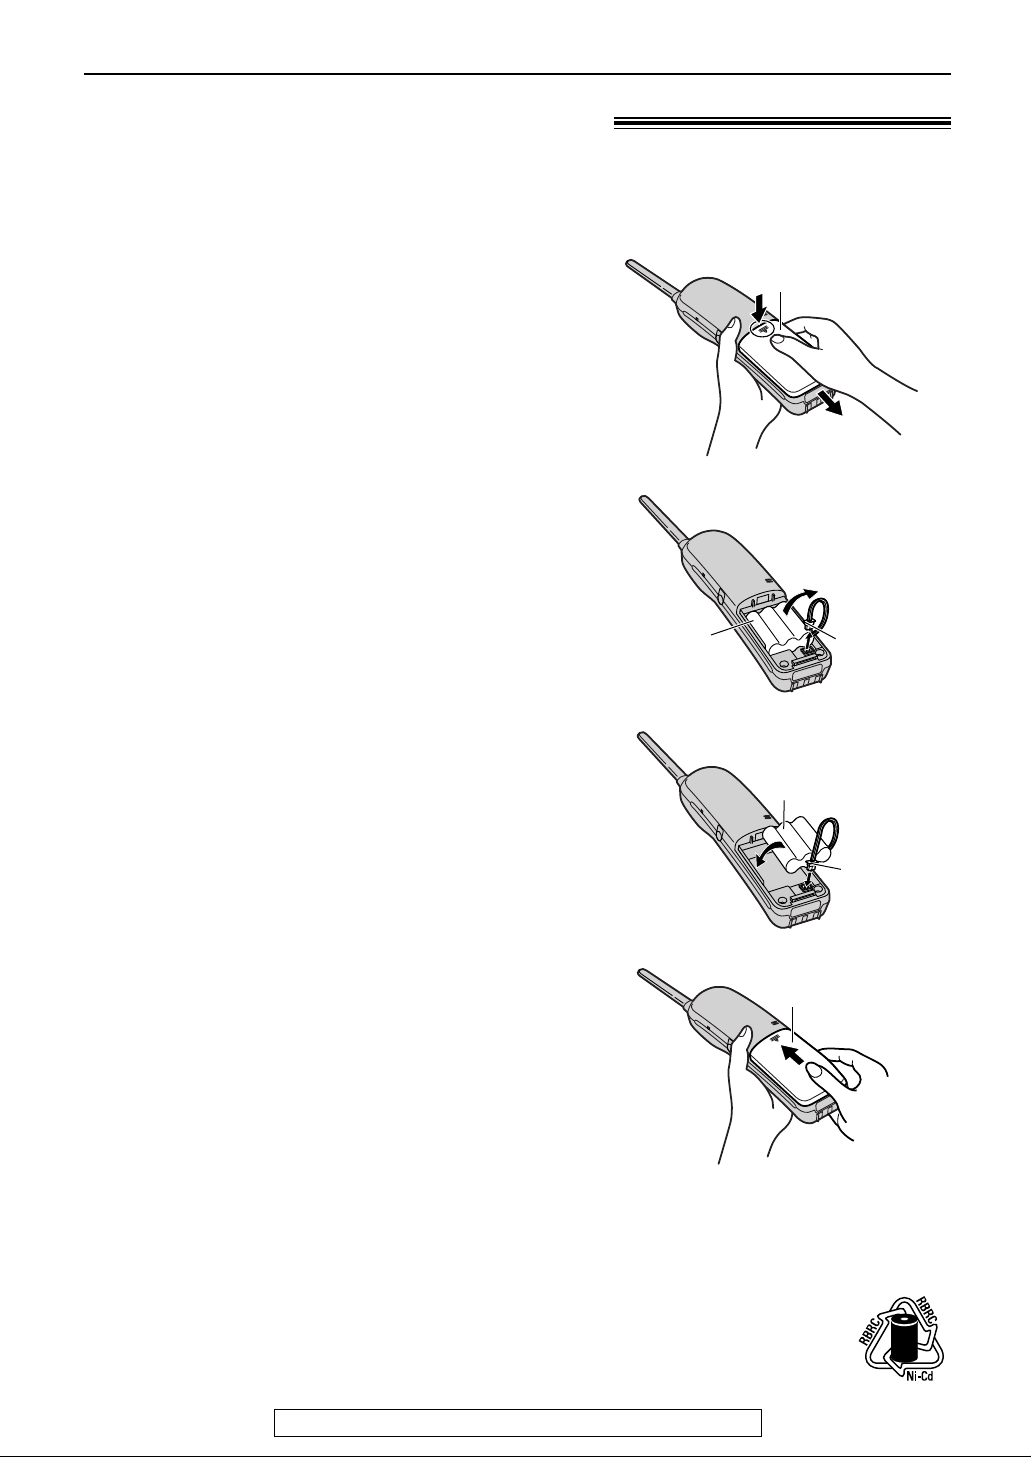
71
Battery
For fax advantage assistance, call 1-800-435-7329.
Replacing the handset battery
If the RECHARGE indicator flashes after being fully charged, replace the battery with a new
Panasonic rechargeable battery Model No. KX-A36. To order, see page 9. To prevent memory
loss, replace the battery within 3 minutes.
2
Disconnect the battery lead and remove the
battery.
Battery
Battery
lead
1
Press down on the arrow and slide the
handset cover.
Handset cover
3
Connect the new battery lead and insert the
battery into the handset.
Battery
Battery
lead
4
Replace the handset cover on the handset.
●
Be sure to charge the new battery for about
4 hours (p. 20).
Handset cover
Attention:
●
Use only a Panasonic rechargeable battery Model No. KX-A36.
●
The product you have purchased is powered by a nickel cadmium battery which is
recyclable.
At the end of its useful life, under various state and local laws, it is illegal to dispose of this
battery into your municipal waste stream.
Please call 1-800-8-BATTERY for information on how to recycle this battery.
Page 72
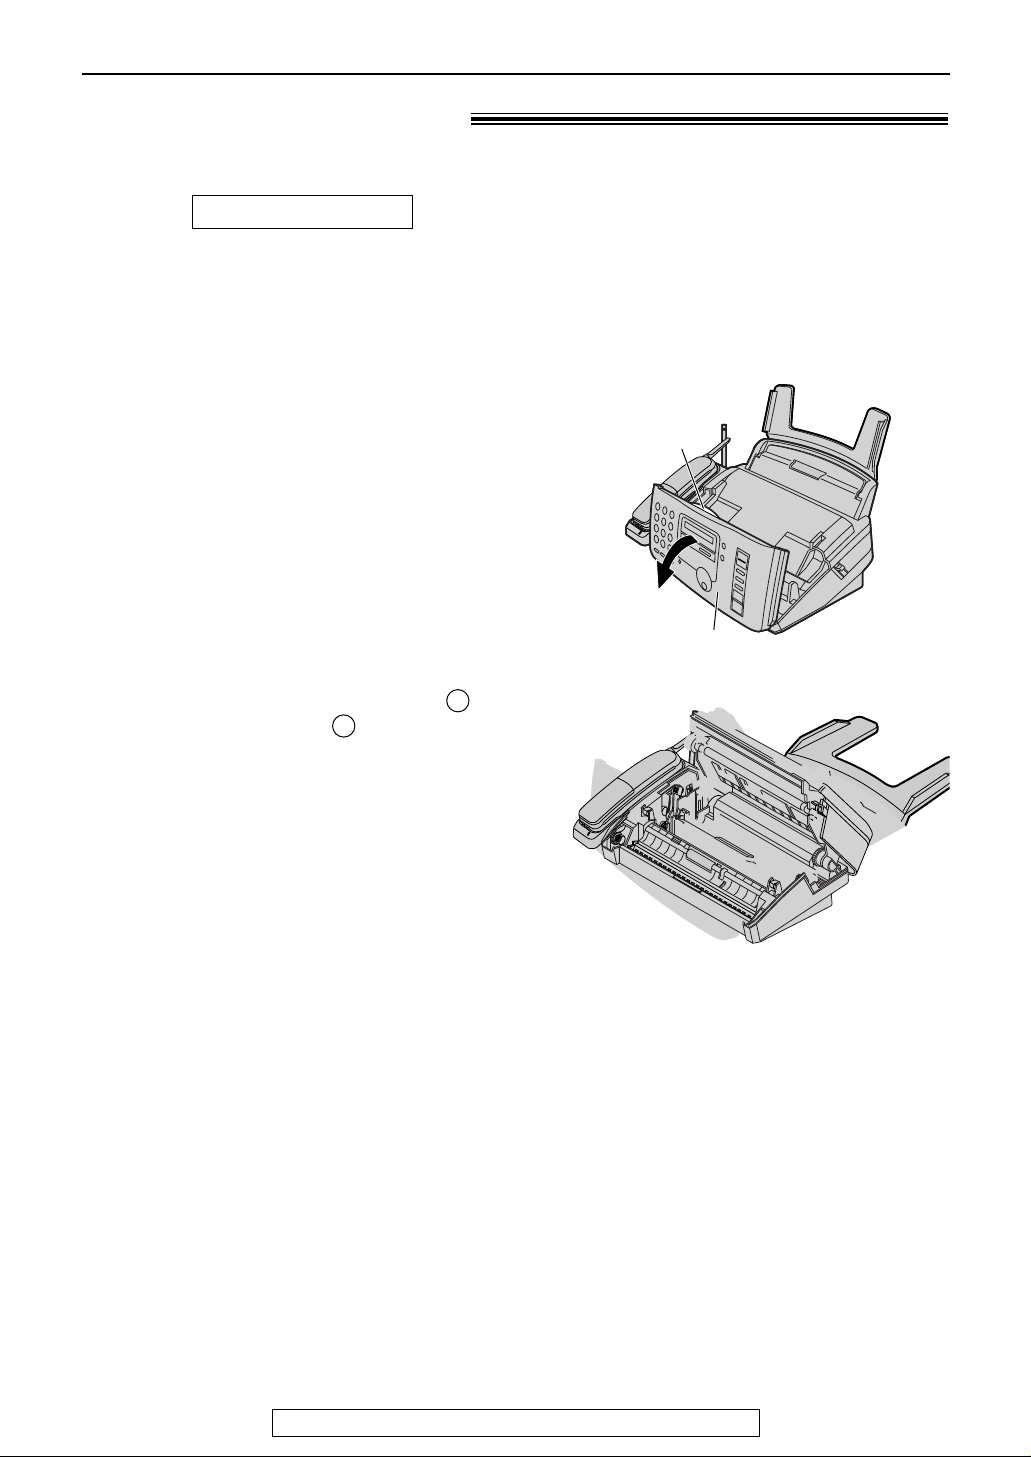
72
Ink Film
For fax advantage assistance, call 1-800-435-7329.
Replacing the ink film!
1
Open the front cover by pulling up the center
part.
When the unit runs out of ink film, the following message will be displayed.
Display:
Install a new ink film. The following ink films are available for replacement. Each roll prints about
150 letter-size pages. See page 9 for accessory order information.
Model No. KX-FA53: Replacement film (1 roll)
Model No. KX-FA55: Replacement film (2 rolls)
CHECK FILM
Center part
Front cover
2
Push the back cover open button ( ) and
open the back cover ( ).
2
1
Page 73
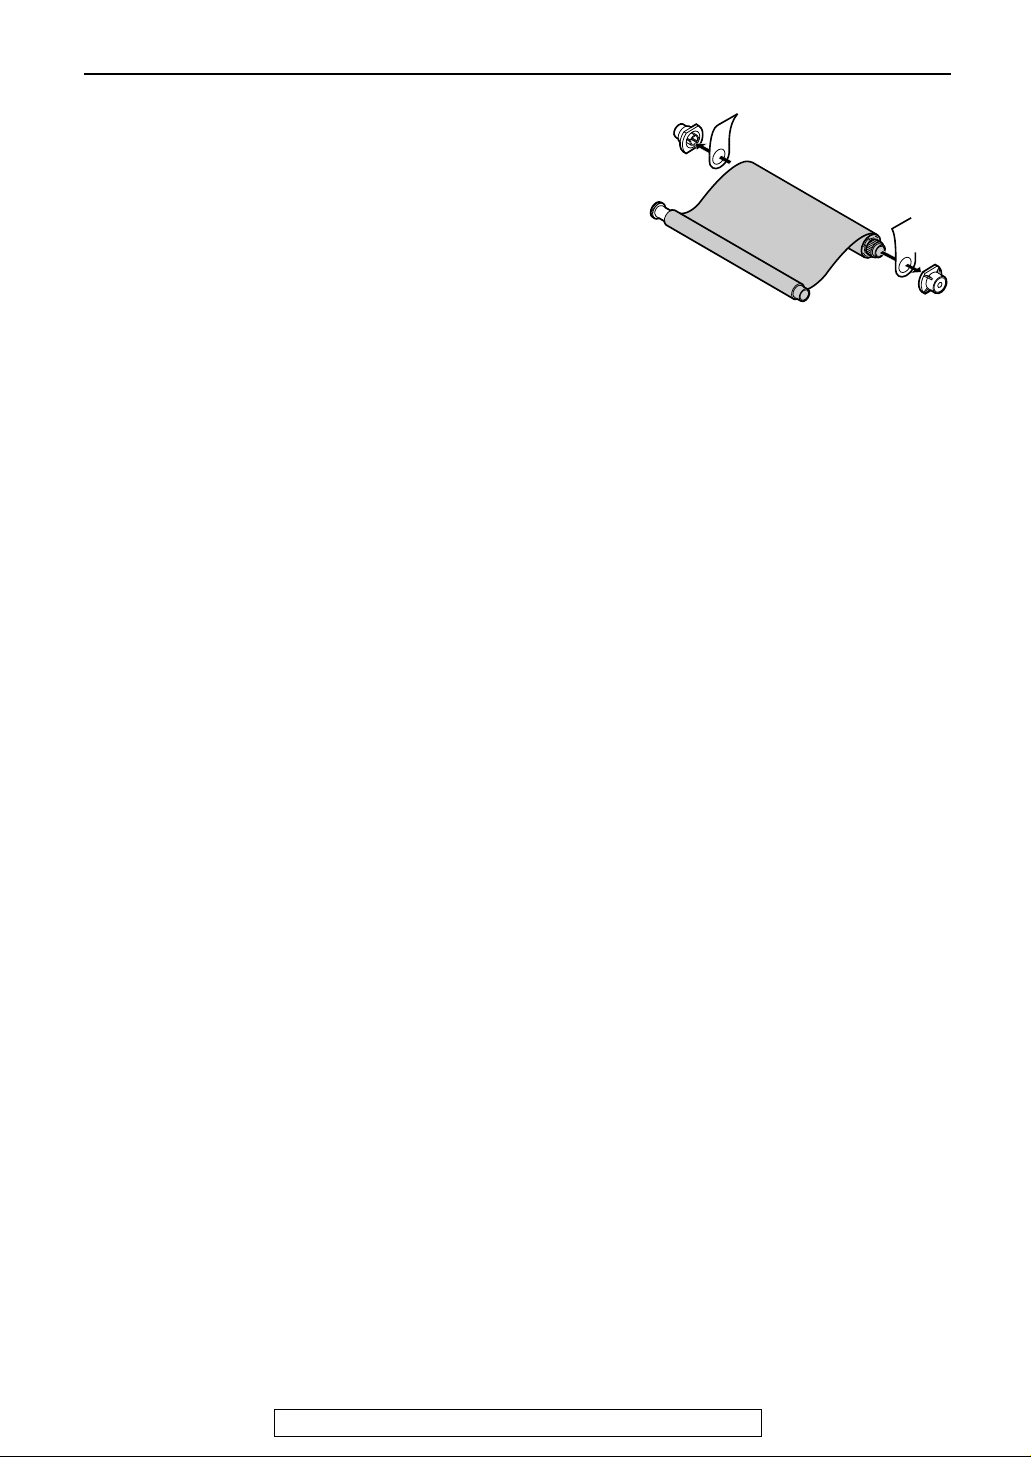
73
Ink Film
For fax advantage assistance, call 1-800-435-7329.
4
Remove the stoppers and tags from the new
ink film. Find the “T” shaped gear (blue).
Page 74

74
Cleaning
For fax advantage assistance, call 1-800-435-7329.
Document feeder!
1
Disconnect the power cord and the
telephone line cord.
2
Open the front cover by pulling up the center
part.
3
Clean the document feeder rollers and
rubber flap with a cloth moistened with
isopropyl rubbing alcohol, and let all parts
dry thoroughly.
4
Clean the glass with a soft dry cloth.
5
Close the front cover securely.
6
Connect the power cord and the telephone
line cord.
Page 75
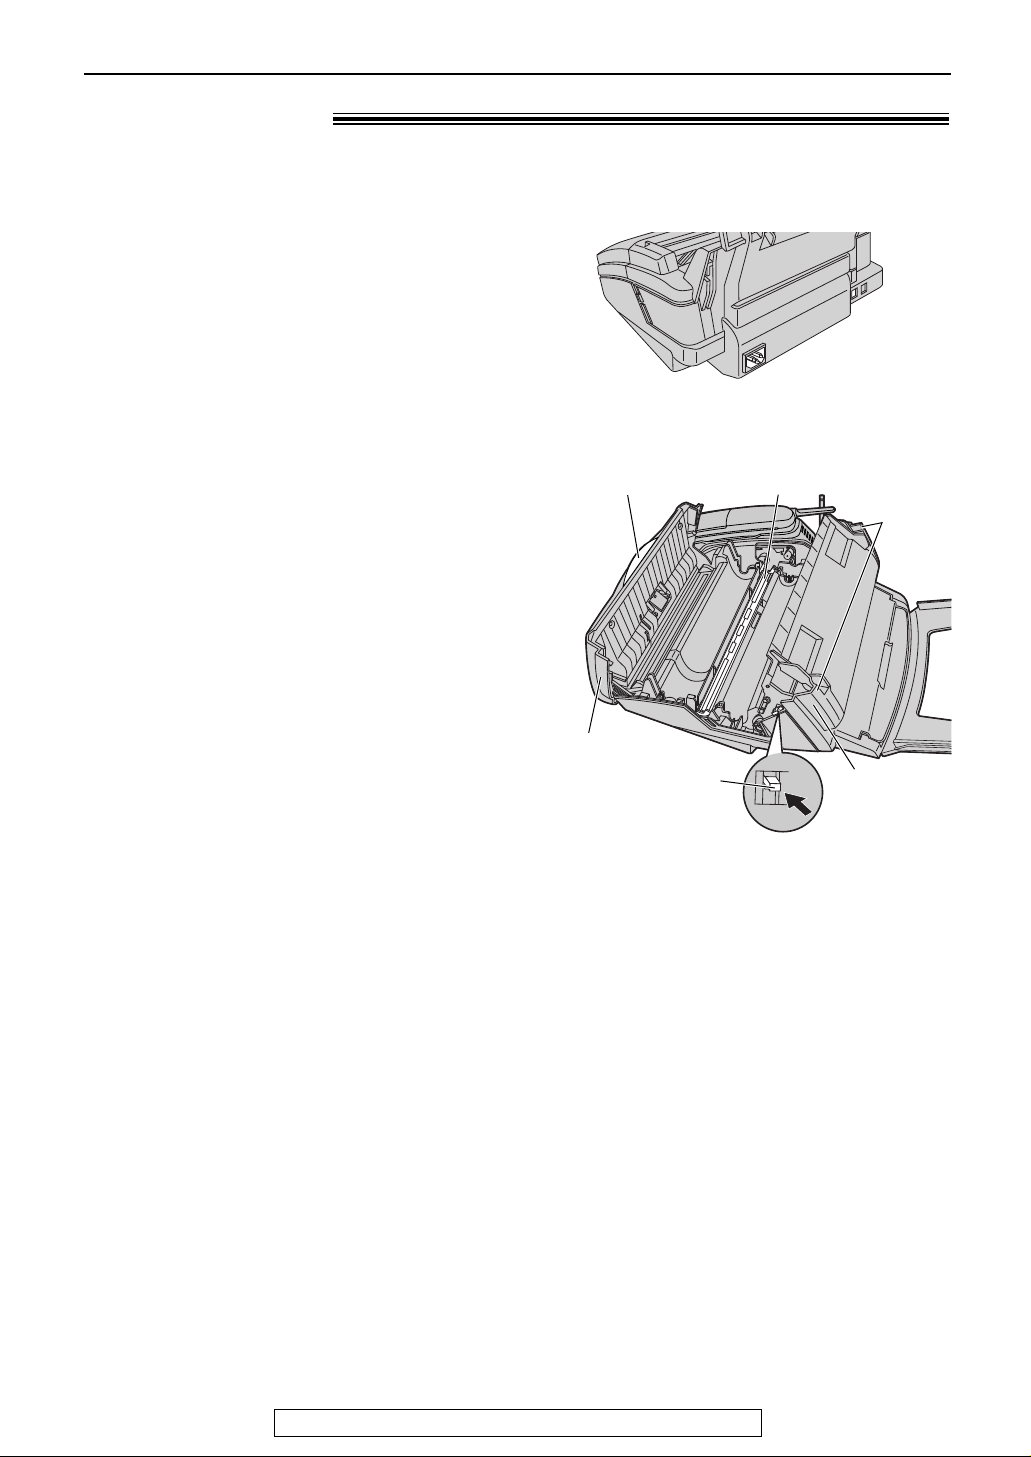
75
Cleaning
For fax advantage assistance, call 1-800-435-7329.
Thermal head!
1
Disconnect the power cord and the
telephone line cord.
2
Open the front cover by pulling up the center
part.
3
Open the back cover by pushing the back
cover open button.
4
Clean the thermal head with a cloth
moistened with isopropyl rubbing alcohol,
and let it dry thoroughly.
5
Close the back cover securely by pushing
down on the dotted area at both ends. Close
the front cover securely.
6
Connect the power cord and the telephone
line cord.
Thermal head
Dotted
area
Center part
Back cover
open button
Front cover
Back
cover
If dirty patterns or black or white bands appear on a copied or received document, clean the
thermal head.
Caution:
●
To prevent malfunction due to static
electricity, do not use a dry cloth and do not
touch the thermal head directly.
Page 76
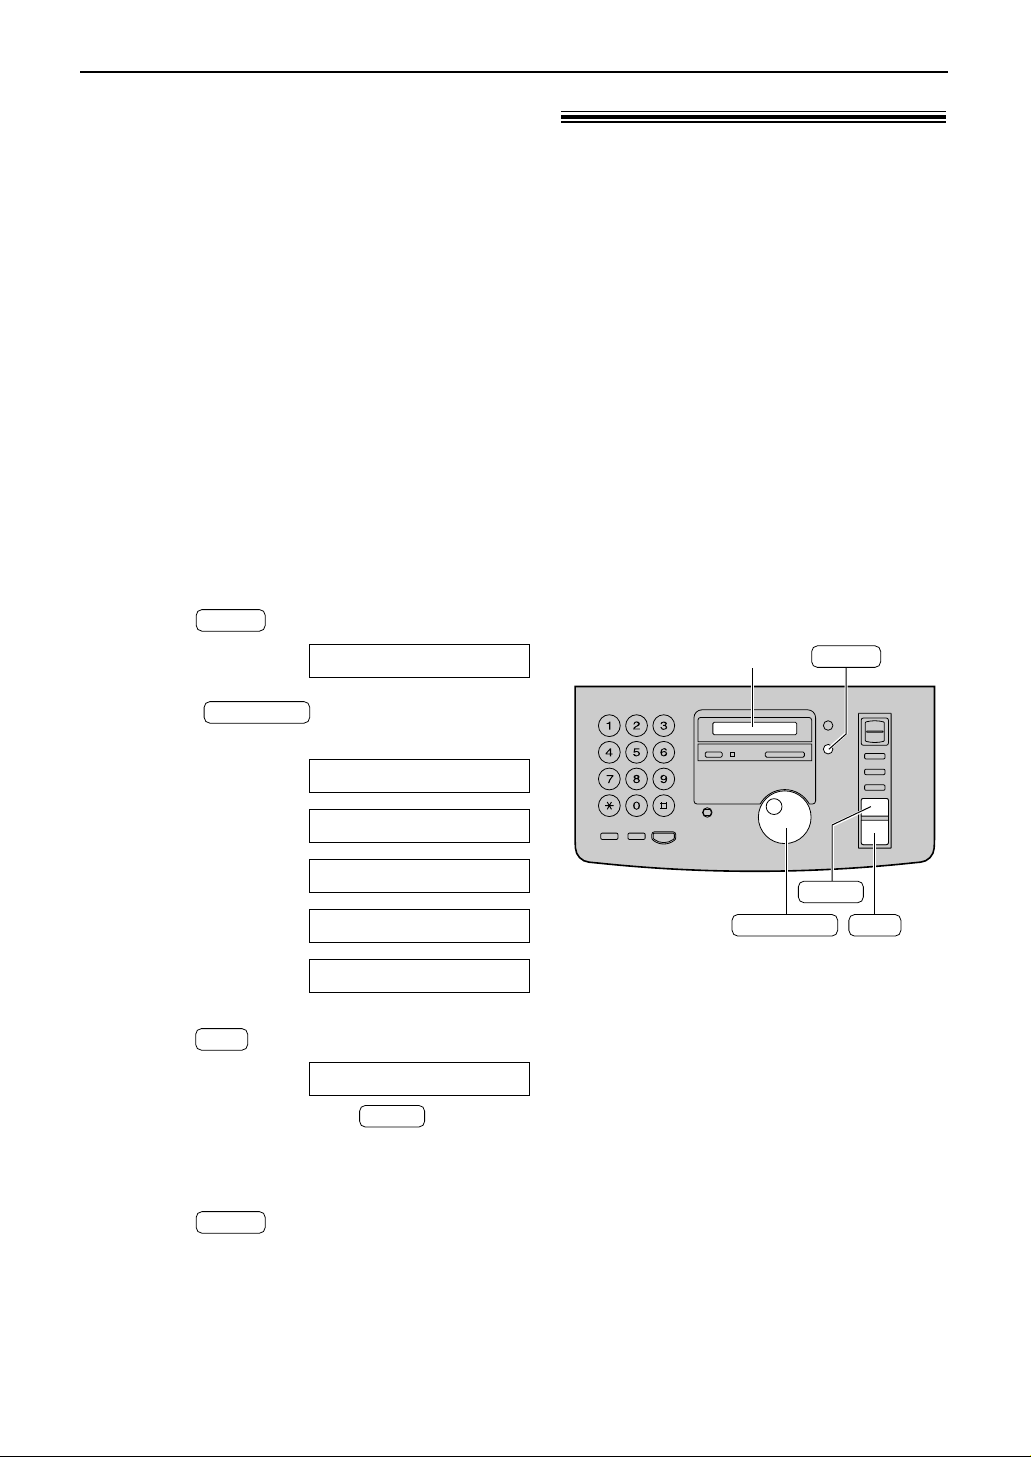
76
Print Reports
Reference lists and reports!
JOG DIAL
SET
STOP
MENU
Display
1
Press two times.
Display:
2
Rotate until the desired item is
displayed.
3
Press to start printing.
●
To stop printing, press .
●
After printing, the printed item will be
displayed.
4
Press .
MENU
STOP
PRINTING
SET
BROADCAST LIST
PRINTER TEST
JOURNAL REPORT
TEL NO. LIST
SETUP LIST
JOG DIAL
2.PRINT REPORT
MENU
You can print out the following lists and reports for your reference.
Setup list: provides you with the current settings of the basic and advanced programming
features (p. 55–59).
Telephone number list: provides you with names and telephone numbers which are stored in
the JOG DIAL directory. The telephone number codes are as shown below.
P: A pause has been entered.
F: A flash has been entered.
Journal report: keeps records of fax transmission and reception. This report will be printed
automatically after every 30 fax communications (p. 37).
Printer test list: allows you to check the print quality of your unit. If the test print has a dirty
pattern, or blurred points or lines, clean the thermal head (p. 75).
Broadcast programming list: provides you with names and telephone numbers which are
stored in the broadcast feature (p. 39).
Page 77

77
FCC Information
List of FCC requirements and information!
If required by the telephone company, inform them
of the following.
●
FCC Registration No.:
(found on the rear of the unit)
●
Ringer Equivalence No.:
(found on the rear of the unit)
●
The particular telephone line to which the
equipment is connected.
This unit must not be connected to a coin operated
line. If you are on a party line, check with your
local telephone company.
Ringer Equivalence Number (REN):
This REN is useful in determining the quantity of
devices you may connect to your telephone line
and still have all of those devices ring when your
telephone number is called. In most but not all
areas, the sum of the REN’s of all devices
connected to one line should not exceed five (5.0).
To be certain of the number of devices you may
connect to your line, as determined by the REN,
you should contact your local telephone company
to determine the maximum REN for your calling
area.
In the event that terminal equipment causes harm
to the telephone network, the telephone company
should notify the customer, if possible, that service
may be stopped. However, where prior notice is
impractical, the company may temporarily cease
service providing that they:
a) Promptly notify the customer.
b) Give the customer an opportunity to correct the
problem with their equipment.
c) Inform the customer of the right to bring a
complaint to the Federal Communication
Commission pursuant to procedures set out in
FCC Rules and Regulations Subpart E of Part
68.
The Telephone Company may make changes in its
communications facilities, equipment operations, or
procedures where such action is reasonably
required in the operation of its business and is not
inconsistent with the rules and regulations in FCC
Part 68. If such changes can be reasonably
expected to render any customer terminal
equipment incompatible with telephone company
communications facilities, or require modification or
alteration of such terminal equipment, or otherwise
materially affect its use or performance, the
customer shall be given adequate notice in writing,
to allow the customer an opportunity to maintain
uninterrupted service.
CAUTION:
Any changes or modifications not expressly
approved by the party responsible for compliance
could void the user’s authority to operate this
device.
When programming emergency numbers and/or
making test calls to emergency numbers:
1. Remain on the line and briefly explain to the
dispatcher the reason for the call before
hanging up.
2. Perform such activities in the off-peak hours;
such as early morning or late evenings.
This telephone provides magnetic coupling to
hearing aids.
NOTE:
This equipment has been tested and found to
comply with the limits for a Class B digital device,
pursuant to Part 15 of the FCC Rules. These limits
are designed to provide reasonable protection
against harmful interference in a residential
installation. This equipment generates, uses, and
can radiate radio frequency energy and, if not
installed and used in accordance with the
instructions, may cause harmful interference to
radio communications. However, there is no
guarantee that interference will not occur in a
particular installation. If this equipment does cause
harmful interference to radio or television
reception, which can be determined by turning the
equipment off and on, the user is encouraged to
try to correct the interference by one or more of
the following measures:
— Reorient or relocate the receiving antenna.
— Increase the separation between the equipment
and receiver.
— Connect the equipment into an outlet on a
circuit different from that to which the receiver is
connected.
— Consult the dealer or an experienced radio/TV
technician for help.
Page 78

78
Limited Warranty
Panasonic Consumer Electronics Company,
Division of Matsushita Electric Corporation
of America
One Panasonic Way, Secaucus,
New Jersey 07094
Panasonic Sales Company
Division of Matsushita Electric of
Puerto Rico, Inc.
Ave. 65 de Infantería, Km. 9.5, San Gabriel
Industrial Park, Carolina, Puerto Rico 00985
PANASONIC
Facsimile Products
Limited Warranty
Have any questions? CALL 1-800-HELP-FAX (1-800-435-7329) on:
How to operate the unit, How to get repair service, How to get supplies.
Panasonic Consumer Electronics Company or Panasonic Sales Company (collectively referred to as “the
warrantor”), will repair this product with new or refurbished parts, free of charge, in the USA or Puerto Rico
for one (1) year limited warranty from the date of original purchase in the event of a defect in materials or
workmanship.
This Limited Warranty Excludes both Labor and Parts for: batteries, antennas, and cosmetic parts
(cabinet).
Carry-in or mail-in service in the USA or Puerto Rico can be obtained during the warranty period by
contacting a Panasonic Services Company (PASC) Factory Servicenter listed in the Servicenter Directory.
Or call, toll free, 1-800-HELP-FAX (1-800-435-7329) to locate a PASC Factory Servicenter. Carry-in or mailin service in Puerto Rico can be obtained during the warranty period by calling the Panasonic Sales
Company telephone number listed in the Servicenter Directory.
This warranty is extended only to the original purchaser. A purchase receipt or other proof of date of original
purchase will be required before warranty service is rendered.
This warranty only covers failures due to defects in material or workmanship which occur during normal use
and (when applicable) does not cover the ink film, the toner cartridge and drum unit or the print and ink film.
The inability of this product to interface with any specific computer is not a manufacturing defect and is
outside of the scope of this Limited Warranty. In no event shall the warrantor be liable by reason of such
incompatibility. The warranty does not cover damages which occur in shipment, or failures which are caused
by products not supplied by the warrantor such as non Panasonic ink film, or failures which result from
accident, misuse, abuse, neglect, mishandling, faulty installation, misapplication, set-up adjustments,
improper operation or maintenance, alteration, modification, power line surge, improper voltage supply,
lightning damage, signal reception problems, rental use of the product, or service by anyone other than a
PASC Factory Servicenter or a PASC authorized Servicenter, or damage that is attributable to acts of God.
LIMITS
AND EXCLUSIONS
There are no express warranties except as listed above.
THE WARRANTOR SHALL NOT BE LIABLE FOR INCIDENTAL OR CONSEQUENTIAL DAMAGES
RESULTING FROM THE USE OF THIS PRODUCT, OR ARISING OUT OF ANY BREACH OF THIS
WARRANTY. ALL EXPRESS AND IMPLIED WARRANTIES, INCLUDING THE WARRANTIES OF
MERCHANTABILITY, ARE LIMITED TO THE APPLICABLE WARRANTY PERIOD SET FORTH ABOVE.
Some states do not allow the exclusion or limitation of incidental or consequential damages, or limitations on
how long an implied warranty lasts, so the above exclusions or limitations may not apply to you.
This warranty gives you specific legal rights and you may also have other rights which vary from state to
state. If a problem with this product develops during or after the warranty period, you may contact your
dealer or Servicenter. If the problem is not handled to your satisfaction, then write to the Customer
Satisfaction Center at the company address indicated above.
Page 79

79
Limited Warranty
Servicenter Directory!
Service in Puerto Rico
Matsushita Electric of Puerto Rico, Inc. Panasonic Sales Company/ Factory Servicenter:
Ave. 65 de Infantería, Km. 9.5, San Gabriel Industrial Park, Carolina, Puerto Rico 00985
Phone (787) 750-4300 Fax (787) 768-2910
As of May 2000
For Product Information, Operating Assistance, Literature Request, Dealer
Locations, and all Customer Service inquiries please contact:
1-800-HELP-FAX (1-800-435-7329), Monday-Friday 9am - 8pm EST.
Web Site: www.panasonic.com
(for customers in the USA or Puerto Rico ONLY)
You can purchase parts, accessories or locate your nearest servicenter by
visiting our Web Site.
Factory Servicenters Locations
CALIFORNIA
6550 Katella Avenue
Cypress, CA 90630
800 Dubuque Avenue
S. San Francisco,
CA 94080
20201 Sherman Way
Suite 102
Canoga Park, CA 91306
3878 Ruffin Road
Suite A
San Diego, CA 92123
COLORADO
1640 South Abilene Street
Suite D
Aurora, CO 80012
FLORIDA
3700 North 29
th
Avenue
Suite 102
Hollywood, FL 33020
GEORGIA
8655 Roswell Road
Suite 100
Atlanta, GA 30350
ILLINOIS
9060 Golf Road
Niles, IL 60714
1703 North Randall Road
Elgin, IL 60123
(Pick-up / Drop-off only)
MARYLAND
62 Mountain Road
Glen Burnie, MD 21061
MASSACHUSETTS
60 Glacier Drive
Suite G
Westwood, MA 02090
MICHIGAN
37048 Van Dyke Avenue
Sterling Heights, MI 48312
MINNESOTA
7850-12
th
Avenue South
Airport Business Center
Bloomington, MN 55425
OHIO
2236 Waycross Road
Civic Center Plaza
Forest Park, OH 45240
PENNSYLVANIA
2221 Cabot Blvd. West
Suite B
Langhorne, PA19047
TEXAS
13615 Welch Road
Suite #101
Farmers Branch,
TX 75244
WASHINGTON
20425-84
th
Avenue South
Kent, WA98032
HAWAII
99-859 Iwaiwa Street
Aiea, Hawaii 96701
Phone (808) 488-1996
Fax (808) 486-4369
Page 80

80
Limited Warranty / Energy Star
For product service
●
Servicenters are listed on page 79.
●
Call toll-free 1-800-HELP-FAX (1-800-435-7329) for the location of an authorized servicenter.
●
After the fax advantage program, please contact our Continued Services Technical Support
Line at 1-900-555-PANA (1-900-555-7262). If you have difficulty reaching this number, it may
be blocked by your phone company. Please contact your local phone company to correct this.
When you ship the product
●
Carefully pack your unit, preferably in the original carton.
●
Attach a letter, detailing the symptom or problem, to the outside of the carton.
●
Send the unit to an authorized servicenter, prepaid and adequately insured.
●
Do not send your unit to the Panasonic Consumer Electronics Company or to any executive or
regional sales offices. These locations do not repair consumer products.
As an ENERGY STAR Partner, Panasonic has determined that this product meets the
ENERGY STAR guidelines for energy efficiency.
ENERGY STAR is a U.S. registered mark.
R
R
Notes for product service and shipping
the product!
Energy Star!
Page 81

81
Specifications
T echnical data about this product!
■
Main unit
Applicable Lines: Public Switched Telephone Network
Document Size: Max. 216 mm (8
1
⁄2") in width
Max. 600 mm (23
5
⁄8") in length
Effective Scanning Width:
208 mm (83⁄16")
Recording Paper Size: Letter: 216 mm x 279 mm (8
1
⁄2"x 11")
Legal: 216 mm x 356 mm (8
1
⁄2"x 14")
Effective Printing Width: 208 mm (8
3
⁄16")
Transmission Time*: Approx. 15 s/page (Original mode)**
Scanning Density: Horizontal: 8 pels/mm (203 pels/inch)
Vertical: 3.85 lines/mm (98 lines/inch) –“STANDARD” mode
7.7 lines/mm (196 lines/inch) –“FINE”/“HALF TONE” mode
15.4 lines/mm (392 lines/inch) –“SUPER FINE” mode
Halftone Level: 64-level
Scanner Type: Contact Image Sensor (CIS)
Printer Type: Thermal Transfer on plain paper
Data Compression System:Modified Huffman (MH), Modified READ (MR)
Modem Speed: 9,600 / 7,200 / 4,800 / 2,400 bps; Automatic Fallback
Operating Environment: 5 °C – 35 °C (41 °F – 95 °F), 20 % – 80 % RH (Relative Humidity)
Dimensions (H x W x D): 185 mm x 368 mm x 276 mm (7
9
⁄32"x 141⁄2"x 107⁄8")
Mass (Weight): Approx. 3.8 kg (8.5 lb.)
Power Consumption: Standby: Approx. 5.0 W
Transmission: Approx. 15 W
Reception: Approx. 35 W (When receiving a 20% black document)
Copy: Approx. 37 W (When copying a 20% black document)
Maximum: Approx. 138 W (When copying a 100% black document)
Power Supply: 120 V AC, 60 Hz
Memory Capacity: Approx. 28 pages of memory reception
Approx. 25 pages of memory transmission
(Based on the ITU-T No. 1 Test Chart in standard resolution.)
■
Handset
Operating Environment: 5 °C – 35 °C (41 °F – 95 °F), 45 % – 85 % RH (Relative Humidity)
Dimensions (H × W × D): Approx. 39 mm × 55 mm × 271 mm (1
17
/32"× 25/32"× 1011/16")
Mass (Weight): Approx. 200 g (0.4 lb.)
Power Supply: Ni-Cd battery (3.6 V, 600 mAh)
Frequency: 926 MHz–927 MHz, 902 MHz–903 MHz (30 channels)
Security Codes: 1,000,000
** Transmission speed depends upon the contents of the pages,
resolution, telephone line conditions and capability of the other
party’s machine.
** The 15 second speed is based upon the ITU-T No. 1 Test
Chart and original mode.
If the capability of the other party’s machine is inferior to your
unit, the transmission time may be longer.
Note:
●
Any details given in these instructions are subject to change without notice.
●
The pictures and illustrations in these instructions may vary slightly
from the actual product.
ITU-T No. 1 Test Chart
Page 82

Index
82
Index!
A Accessories . . . . . . . . . . . . . . . . . .8, 9
Advanced features . . . . . . . . . . .56–59
Answering machine . . . . . . . . . . .46, 47
Any key talk feature . . . . . . . . . . . . .25
AUTO ANSWER button/mode . . .42, 43
AUTO ANSWER setting (Feature #77)
. .59
AUTO button . . . . . . . . . . . . . . . . . . .28
Auto disconnection (Feature #49) . . .59
B Basic features . . . . . . . . . . . . . . . . . .55
Battery
(Charging) . . . . . . . . . . . . . . . . . .20
(Life) . . . . . . . . . . . . . . . . . . . . . .20
(Replacing) . . . . . . . . . . . . . . . . .71
Belt clip . . . . . . . . . . . . . . . . . . . . . . .21
Broadcast programming list . . . . . . . .76
Broadcast sending report . . . . . . . . .41
Broadcast transmission . . . . . . . .38–41
C CH button . . . . . . . . . . . . . . . . . . . . .23
Character table . . . . . . . . . . . . . . . . .17
Cleaning . . . . . . . . . . . . . . . . . . .74, 75
COLLATE button . . . . . . . . . . . . . . . .52
Communication messages . . . . . . . .60
Computer, using with . . . . . . . . . . . . .47
Connecting tone (Feature #76) . . . . .59
Connections . . . . . . . . . . . . . . . . . . .14
Copy . . . . . . . . . . . . . . . . . . . . . .52, 53
Copy enlargement/reduction . . . .52, 53
COPY START button . . . . . . . . . . . . .52
D Date and time (Feature #01) . . . .15, 55
Delayed transmission (Feature #25)
. .56
Delete button . . . . . . . . . .16, 17, 30, 31
Dialing mode (Feature #13) . . . . . . . .55
DIRECT button . . . . . . . . . . . . . . . . .29
Directory feature . . . . . . . . . . . . . . . .30
DIRECTORY PROGRAM button . . . .30
Display
(Contrast)(Feature #39) . . . . . . . .57
(Error messages) . . . . . . . . . .61, 62
Distinctive Ring Service
(Feature #31) . . . . . . . . . . . . .43, 57
Document feeder . . . . . . . . . . . . . . .74
Document jam . . . . . . . . . . . . . . . . . .70
Document size . . . . . . . . . . . . . .36, 81
E Enlarge copy . . . . . . . . . . . . . . . .52, 53
Error messages . . . . . . . . . . . . . .60–62
Extension telephone . . . . . . . . . .49, 50
F Facsimile telephone number
(Feature #03) . . . . . . . . . . . . .18, 55
FAX button . . . . . . . . . . . . . . . . . . . .44
Fax activation code (Feature #41) . . .58
Fax auto redial . . . . . . . . . . . . . . . . .36
FAX ONLY mode . . . . . . . . . . . . .42, 45
FAX ONLY ring count
(Feature #06) . . . . . . . . . . . . .45, 55
Fax pager (Feature #70) . . . . . . .51, 59
FAX START button . . . . . . . . . . . . . .35
Feature programming . . . . . . . . .54–59
Feeder cleaning . . . . . . . . . . . . . . . .74
Feeder jam . . . . . . . . . . . . . . . . . . . .70
Feeder pressure . . . . . . . . . . . . . . . .70
Film . . . . . . . . . . . . . . . . . . . . .9, 72, 73
FLASH button . . . . . . . . . . . . . . . . . .27
Friendly reception (Feature #46)
. .44, 58
H HANDSET LOCATOR button . . . . . . .25
Handset volume . . . . . . . . . . . . . . . .22
Headset . . . . . . . . . . . . . . . . . . . . . .21
HELP button . . . . . . . . . . . . . . . . . . .10
Hyphen button . . . . . . . . . . . . . . .30, 31
I Identa-Ring (Feature #31) . . . . . . . . .57
Ink film . . . . . . . . . . . . . . . . . . . .72, 73
Insert button . . . . . . . . . . . . . . . .16, 17
J Jams . . . . . . . . . . . . . . . . . . . . . .69, 70
JOG DIAL
(Making a voice call) . . . . . . . . . . .33
(Selecting characters) . . . . . . . . . .31
(Sending faxes) . . . . . . . . . . . . . .35
(Storing) . . . . . . . . . . . . . . . . .30–32
Journal auto print (Feature #22) . . . .56
Journal report . . . . . . . . . . . . . . .37, 76
L Legal paper . . . . . . . . . . . . . . . . .12, 13
List / Report
(Broadcast programming) . . . . . . .76
(Broadcast sending) . . . . . . . . . . .41
(Journal) . . . . . . . . . . . . . . . . .37, 76
(Power down) . . . . . . . . . . . . . . . .68
(Printer test) . . . . . . . . . . . . . . . . .76
(Sending) . . . . . . . . . . . . . . . . . . .37
(Setup) . . . . . . . . . . . . . . . . . . . . .76
(Telephone number) . . . . . . . . . . .76
Logo (Feature #02) . . . . . . . . . . .16, 55
LOUD/RINGER button . . . . . . . . . . .22
Page 83

83
Index
M Memory reception alert
(Feature #44) . . . . . . . . . . . . .44, 58
Memory transmission . . . . . . . . . . . .35
MONITOR button . . . . . . . . . . . .24, 34
Monitor volume . . . . . . . . . . . . . . . . .22
O Overseas transmission mode
(Feature #23) . . . . . . . . . . . . . . . .56
P Pager call (Feature #70) . . . . . . .51, 59
Paper jam . . . . . . . . . . . . . . . . . . . . .69
Paper tray . . . . . . . . . . . . . . . . . . . . .12
PAUSE button . . . . . . . . . . . . . . . . . .27
Power down report . . . . . . . . . . . . . .68
Power failure . . . . . . . . . . . . . . . . . . .68
Power supply . . . . . . . . . . . . . . .14, 81
Printer test list . . . . . . . . . . . . . . . . . .76
Printing paper size . . . . . . . . . . . . . .81
Printing reports . . . . . . . . . . . . . . . . .76
Problem solving . . . . . . . . . . . . . .63–68
PROGRAM button . . . . . . . . . . . .28, 29
Programmable features . . . . . . . .54–59
Pulse dialing (Feature #13) . . . . . . . .55
Q QUICK SCAN button . . . . . . . . . .35, 52
R Receiving
(Fax) . . . . . . . . . . . . . . . . . . . . . .44
(Setting) . . . . . . . . . . . . . . . . .42, 43
Receiving alert (Feature #44) . . . . . .58
Receiving reduction (Feature #36) . . .57
Recording paper . . . . . . . . . . . . .13, 81
Recording paper jam . . . . . . . . . . . . .69
REDIAL button
(Handset) . . . . . . . . . . . . . . . .23, 26
(Main unit) . . . . . . . . . . . . . . .24, 36
Reduce copy . . . . . . . . . . . . . . . .52, 53
Remote activation ID (Feature #12) . .55
REMOTE SP button . . . . . . . . . . . . .26
Replacement film . . . . . . . . . . .9, 72, 73
Reset (Feature #80) . . . . . . . . . . . . .59
RESOLUTION button . . . . . . . . . . . .35
Ring count
(FAX ONLY)(Feature #06) . . . . . .55
(Silent fax recognition)(Feature #30) . .
57
(TEL/FAX)(Feature #78) . . . . . . . .59
Ring pattern detection (Feature #31)
. .57
Ringer volume
(Handset) . . . . . . . . . . . . . . . . . . .22
(Main unit) . . . . . . . . . . . . . . . . . .22
S Sending
(Broadcast) . . . . . . . . . . . . . . .38–41
(From memory) . . . . . . . . . . . . . .35
(JOG DIAL) . . . . . . . . . . . . . . . . .35
(Manually) . . . . . . . . . . . . . . . . . .35
Sending document
(Does not feed or multi-feeds) . . .70
Sending report (Feature #04) . . . .37, 55
Set default (Feature #80) . . . . . . . . .59
Setup list . . . . . . . . . . . . . . . . . . . . . .76
Silent detection (Feature #40) . . . . . .57
Silent fax recognition ring
(Feature #30) . . . . . . . . . . . . . . . .57
Specifications . . . . . . . . . . . . . . . . . .81
Storing
(DIRECT button) . . . . . . . . . . . . .29
(Handset) . . . . . . . . . . . . . . . . . . .28
(JOG DIAL) . . . . . . . . . . . . . .30–32
T TALK button . . . . . . . . . . . . . . . .23, 25
TEL mode . . . . . . . . . . . . . . . . . . . . .44
TEL/FAX delayed ring count
(Feature #78) . . . . . . . . . . . . . . . .59
TEL/FAX mode . . . . . . . . . . . . . .48, 49
Telephone number list . . . . . . . . . . . .76
Thermal head cleaning . . . . . . . . . . .75
TONE button . . . . . . . . . . . . . . . . . . .27
Tone dialing (Feature #13) . . . . . . . . .55
Transmission
(Broadcast) . . . . . . . . . . . . . . .38–41
(From memory) . . . . . . . . . . . . . .35
(JOG DIAL) . . . . . . . . . . . . . . . . .35
(Manually) . . . . . . . . . . . . . . . . . .35
Transmittable document . . . . . . . . . .36
V Voice call
(Answering) . . . . . . . . . . . . . . . . .25
(JOG DIAL) . . . . . . . . . . . . . . . . .33
(Making) . . . . . . . . . . . . . . . . .23, 24
Voice contact . . . . . . . . . . . . . . . . . .34
Voice mail . . . . . . . . . . . . . . . . . . . . .43
VOLUME button . . . . . . . . . . . . . . . .22
Page 84
Panasonic FAX ADVANTAGE PROGRAM
Panasonic Consumer Electronics
Company, Division of Matsushita
Electric Corporation of America
One Panasonic Way, Secaucus,
New Jersey 07094
Panasonic Sales Company,
Division of Matsushita Electric of
Puerto Rico, Inc. (“PSC”)
Ave. 65 de Infantería, Km. 9.5
San Gabriel Industrial Park, Carolina,
Puerto Rico 00985
Printed in Malaysia PFQX1453ZA WM0500EN0
KX-FPC91
Proof of Purchase
Free peace of mind,
direct from Panasonic
NO EXTRA COST
■
1-year limited warranty1parts & labor
■
Toll-free help line
■
Free overnight replacement
3
and repair program
F
AX ADVANTAGE PROGRAM
The Panasonic Fax Advantage Consumer Service Program.
Panasonic knows that if your fax machine is not up and running,
neither is your business. That’s why we created the Panasonic Fax
Advantage Program. Included at no extra cost with the purchase of a
Panasonic Fax Machine, the Fax Advantage Program can provide a free
replacement unit3overnight if your original unit is in need of repair.
Here’s how it works:
1. If you have a problem with your fax while it is covered by the oneyear limited warranty1, call our toll-free help-line at 1-800-HELPFAX2.
2. Talk to one of our technical experts to diagnose your problem over
the phone.
3. If repairs are necessary and you are entitled to service under the
terms and conditions of the limited warranty
4
, we will send a refurbished replacement unit to you overnight or second business day
delivery, depending on the time of your call.
A second option available under our one-year limited warranty is to
mail-in or carry-in your fax to one of our Regional Service centers,
where the unit will be repaired and returned to you.
Instructions
If you choose to receive a replacement unit under the Fax Advantage
Program, Panasonic will provide a replacement unit which will be
completely refurbished, quality-tested by Panasonic technicians and
individually hand-inspected before it is shipped to you. You will keep the
replacement unit and send the original unit to us in the replacement
unit’s box. UPS will pick up the unit at no charge to you, should it be
determined that you are entitled to warranty service. Aproof-of-purchase
must be included with the returned product. Any unit that is replaced by
Panasonic and not shipped with proper proof-of-purchase by you will be
subject to a minimum $100.00 charge. The original unit must be
properly packaged in the same manner as the replacement unit, utilizing
the packing materials provided. Damage due to improper or
inadequate packing will be charged to you as an out-of-warranty cost.
If our 1-800-HELP-FAX technicians determine that your unit may be an
“out-of-box failure”5, we will attempt to provide you with a factory-new
replacement unit6. You must ship a copy of your receipt with your original unit to verify that you purchased the unit within 10 days prior to
your 1-800-HELP-FAX call.
Requirements
You must give our technicians a valid credit card number (Discover,
VISA, Master Card, or American Express/Optima). Product that is not
returned to Panasonic by 10 business days after shipment of the
replacement product will be charged to your credit card account at
Panasonic’s Suggested Retail Price (see dealer for details). If your
original unit is not eligible for warranty service, your card will be
charged for the non-warranty repair of the unit at Panasonic’s current
rate for parts and labor and for any shipping charges associated with
this program. If you do not wish to pay out-of-warranty repair costs,
you will be responsible for returning the replacement unit to Panasonic
and for paying all shipping charges associated with this program
including the overnight delivery of the replacement product to you,
shipment of the problem unit to Panasonic, shipment of the
replacement unit back to Panasonic and the return of your original
unit back to you. Credit status will be verified prior to sending the
replacement product.
1. See dealer for limited warranty details.
2. After the fax advantage program, contact our Continued Services Technical Support
Line at 1-900-555-PANA(1-900-555-7262), for fee based technical support.
3. Replacement unit is refurbished.
4. Replacement program excludes Puerto Rico and is subject to termination at any time
without advance notice.
5. “Out-of-box failure” is an inoperable unit that was purchased no more than 10 days
prior to your 1-800-HELP-FAX call, and would otherwise qualify for warranty service
under the terms and conditions of the limited warranty.
6. Panasonic reserves the right to send a refurbished unit.
 Loading...