

Page 1

Using Your
Zodiac™ Console
Page 2

Copyright
Copyright
CopyrightCopyright
Copyright © 2003 - 2004, Ta pwave, Inc. All rights reserved. Port ions copyright © 1996 - 2004, PalmSource, Inc. and its affiliates. All right s
reserved. This documentation may be printed and copied solely for use in using the Zodiac console. In addition, two (2) copies of this documentation may be made for archival and backup purposes. Except for the foregoing, no part of this documentation may be reproduced
or transmitted in any form or by any means or used to make any derivative work (such as translation, transformation or adaptation) without express written consent from Tapwave, Inc. and PalmSource, Inc.
Tapwave, Inc. reserves the right to revise this documentation and to make changes i n content from time to time without obligati on on the
part of Tapwave, Inc. to provide notification of such revision or changes.
TAPWAVE, INC. AND ITS SUPPLIERS MAKE NO REPRESENTATIONS OR WARRANTIES THAT THE D OCUMENTATION IS FREE OF ERRORS OR
THAT THE DOCUMENTATION IS SU ITABLE FOR YOUR USE. THE DOCUMENTA TION IS PROVIDED ON AN “AS IS” BASIS. TAPWAVE, INC. AND
ITS SUPPLIERS MAKE NO WARRANTIES, TERMS OR CONDITIONS, EXPRESS OR IMPLIED, EITHER IN FACT OR BY OPER ATI O N OF LA W, STA TUTORY OR OTHERWISE, IN CLUDIN G WARRANT IES, T ERMS, OR CON DITIONS OF MERCHANTA BILIT Y, FITN ESS FOR A PARTIC ULAR PURPOS E,
AND SATISFACTORY QUALITY. TO T H E FULL EX TEN T A LLO WED B Y LAW, TAPWAVE, INC. ALSO EXCLUDES F OR I TSEL F AND ITS SUPPLIERS
ANY LIABILITY, WH ETHER BASED IN CONTRACT OR TORT (INCLU DING NEGLIG ENCE), FOR DIRE CT, INCIDENT AL, CONSEQU ENTIAL, IND IRECT, SPECIAL, OR PUNITIVE DAMAGES OF ANY KIND, OR FOR LOSS OF REVENUE OR PROFITS, LOSS OF BUSINESS, LOSS OF INFORMATION
OR DATA, OR OTHER FINANCIAL LOSS ARISING OUT OF OR IN CONNECTION WITH THIS DOCUMENTATION, EVEN IF TAPWAVE, INC. OR ITS
SUPPLIERS HAVE BEEN ADVISED OF THE POSSIBILITY OF SUCH DAMAGES.
Tapwave, the stylized Tapwave logo, and Zodiac are trademarks of Tapwave, Inc. in the United States and/or other countries. Palm OS,
Graffiti, HotSync, and PalmSour ce are registered trademar ks of PalmSource, Inc. or its affili ates. Palm, the Palm log o, the HotSync logo,
Palm Powered, the Palm trade dress, are trademarks of PalmSource, Inc. or its affiliates. All other product and brand names may be trademarks or regist er ed trademarks of their respective ow n ers.
IF THIS DOCUMEN TATION IS PROVIDE D ON A COM PACT DISC, THE OTHE R SOFTWAR E AND DOC UMENTAT ION ON TH E COMPAC T DISC
ARE SUBJECT TO THE LICENSE AGREEMENT ACCOMPANYING THE COMPACT DISC.
MPEG Layer-3 audio decoding technology is licensed from Fraunhofer IIS and Thomson Licensing S.A.
Tapwave Photos application is based in part on the work of the Independent JPEG Group. Image scaling algorithm copyright 1999 Carsten
Haitzler and va r i o u s c o n t ributors.
P/N: 50-0007-01 Rev 10
Page 3

Table of Contents
Table of Contents
Table of ContentsTable of Contents
About This Guide
About This Guide 11
About This GuideAbout This Guide
1 Introduction to you
1 Introduction to your Z
1 Introduction to you1 Introduction to you
r Zodiac Console
odiac Console 12
r Zr Z
odiac Consoleodiac Console
System requirements . . . . . . . . . . . . . . . . . . . . . . 12
Connecting the cable or cradle. . . . . . . . . . . . . . . . . . 13
Charging the battery. . . . . . . . . . . . . . . . . . . . . . . 14
Charging tips . . . . . . . . . . . . . . . . . . . . . . . . . 15
Battery life . . . . . . . . . . . . . . . . . . . . . . . . . . 15
Starting your console for the first time . . . . . . . . . . . . . . 16
Palm Desktop software . . . . . . . . . . . . . . . . . . . . . 16
Installing Palm Desktop software . . . . . . . . . . . . . . . 17
Using your console with another desktop organizer . . . . . . 18
Zodiac components . . . . . . . . . . . . . . . . . . . . . . . 19
About the front panel . . . . . . . . . . . . . . . . . . . . . 19
About the back panel . . . . . . . . . . . . . . . . . . . . . 21
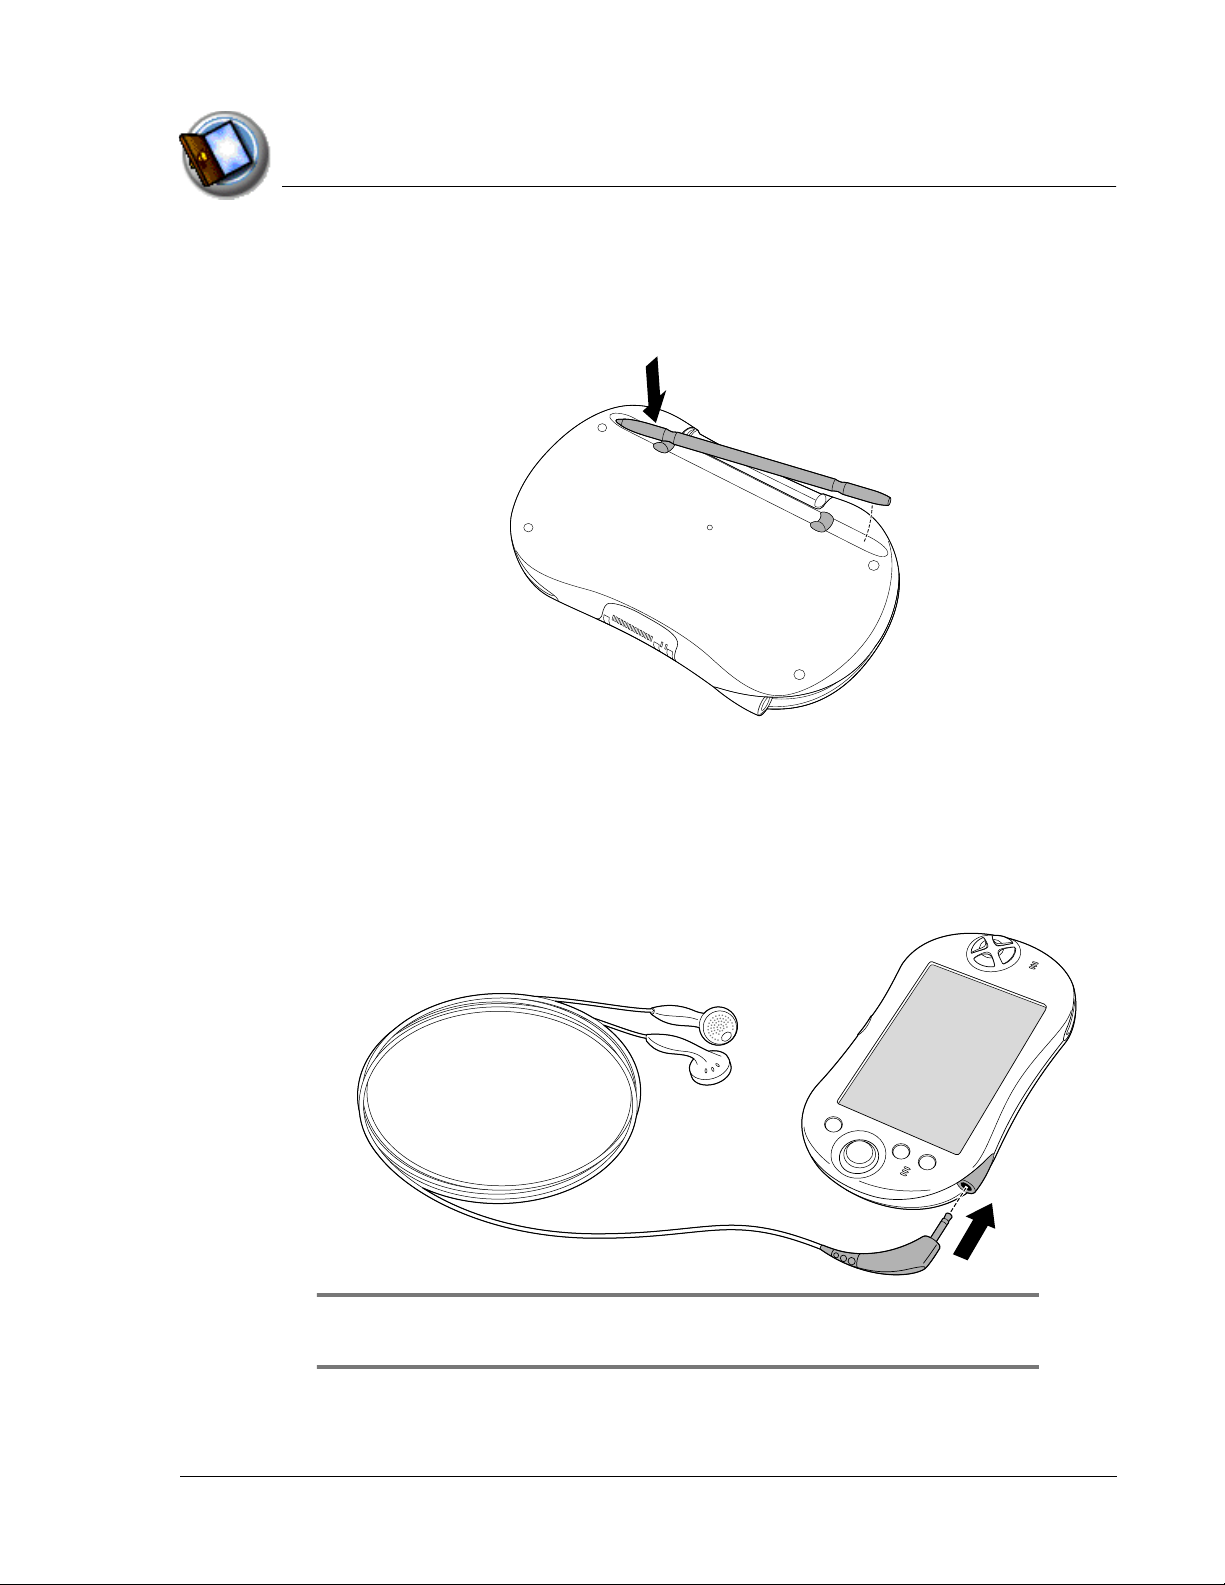
Removing the stylus . . . . . . . . . . . . . . . . . . . . . 22
Connecting the headphones . . . . . . . . . . . . . . . . . 22
Adjusting the screen orientation . . . . . . . . . . . . . . . 23
Adjusting the speaker volume and screen brightness . . . . . 23
Opening applications . . . . . . . . . . . . . . . . . . . . . . 24
Learning to navigate. . . . . . . . . . . . . . . . . . . . . . . 25
Status Bar. . . . . . . . . . . . . . . . . . . . . . . . . . . 26
Input Area . . . . . . . . . . . . . . . . . . . . . . . . . . 27
Entering data . . . . . . . . . . . . . . . . . . . . . . . . . 28
Navigation controls . . . . . . . . . . . . . . . . . . . . . . 29
Menus . . . . . . . . . . . . . . . . . . . . . . . . . . . . 29
Command toolbar . . . . . . . . . . . . . . . . . . . . . . 30
Tips. . . . . . . . . . . . . . . . . . . . . . . . . . . . . . 31
11
1111
12
1212
Using Your Zodiac Console 3
Page 4

2 Entering Data i n You
2 Entering Data i n Your Z
2 Entering Data i n You2 Entering Data i n You
3
3 Managing Applications
Managing Applications 43
3 3
Managing ApplicationsManaging Applications
r Zodiac Console
odiac Console 32
r Zr Z
odiac Consoleodiac Console
Entering data using Graffiti 2 handwriting software . . . . . . . . 32
Learning to write Graffiti2 characters . . . . . . . . . . . . . 32
General Guidelines for Graffiti 2 Writing . . . . . . . . . . . . 33
Graffiti 2 tips . . . . . . . . . . . . . . . . . . . . . . . . . 35
The Graffiti 2 alphabet . . . . . . . . . . . . . . . . . . . . 35
Writing punctuation marks and other special characters . . . . 36
Using Graffiti2 Gestures . . . . . . . . . . . . . . . . . . . . . 38
Using Graffiti2 ShortCuts . . . . . . . . . . . . . . . . . . . . 38
Using the onscreen keyboard . . . . . . . . . . . . . . . . . . 39
Using your computer keyboard . . . . . . . . . . . . . . . . . 40
Using an external keyboard . . . . . . . . . . . . . . . . . . . 41
Importing data . . . . . . . . . . . . . . . . . . . . . . . . . 41
Using the Home screen . . . . . . . . . . . . . . . . . . . . . 43
Customizing the Home screen display . . . . . . . . . . . . . . 45
Arranging icons on the radial menus. . . . . . . . . . . . . . 45
Organizing applications. . . . . . . . . . . . . . . . . . . . 45
Setting Home screen preferences . . . . . . . . . . . . . . . 47
Viewing information on an application . . . . . . . . . . . . . . 48
Installing add-on applications . . . . . . . . . . . . . . . . . . 49
Removing add-on applications. . . . . . . . . . . . . . . . . . 51
Removing Palm Desktop software . . . . . . . . . . . . . . . . 52
32
3232
43
4343
4
4 Using Music
Using Music 53
4 4
Using MusicUsing Music
Opening Music . . . . . . . . . . . . . . . . . . . . . . . . . 53
Uploading songs from your computer . . . . . . . . . . . . . . 55
Deleting songs . . . . . . . . . . . . . . . . . . . . . . . . . 56
Conserving power while playing songs. . . . . . . . . . . . . . 56
Setting Music preferences . . . . . . . . . . . . . . . . . . . . 57
5
5 UUUUsing
sing PPPPhoto
5 5
sing sing
hotossss59
hotohoto
Opening Photos . . . . . . . . . . . . . . . . . . . . . . . . . 59
Uploading pictures from your computer . . . . . . . . . . . . . 62
Setting Photos preferences. . . . . . . . . . . . . . . . . . . . 63
Using Your Zodiac Console 4
53
5353
59
5959
Page 5

Deleting pictures . . . . . . . . . . . . . . . . . . . . . . . . 63
Deleting a single picture . . . . . . . . . . . . . . . . . . . 64
Deleting multiple pictures. . . . . . . . . . . . . . . . . . . 64
Copying pictures . . . . . . . . . . . . . . . . . . . . . . . . 65
6
6 Playing Games
Playing Games 66
6 6
Playing GamesPlaying Games
Playing multi-player games . . . . . . . . . . . . . . . . . . . 67
7
7 Using
Using CCCCloc
7 7
Using Using
8
8 Performing Common Tasks
Performing Common Tasks 71
8 8
Performing Common TasksPerforming Common Tasks
lockkkk68
locloc
Opening Clock. . . . . . . . . . . . . . . . . . . . . . . . . . 68
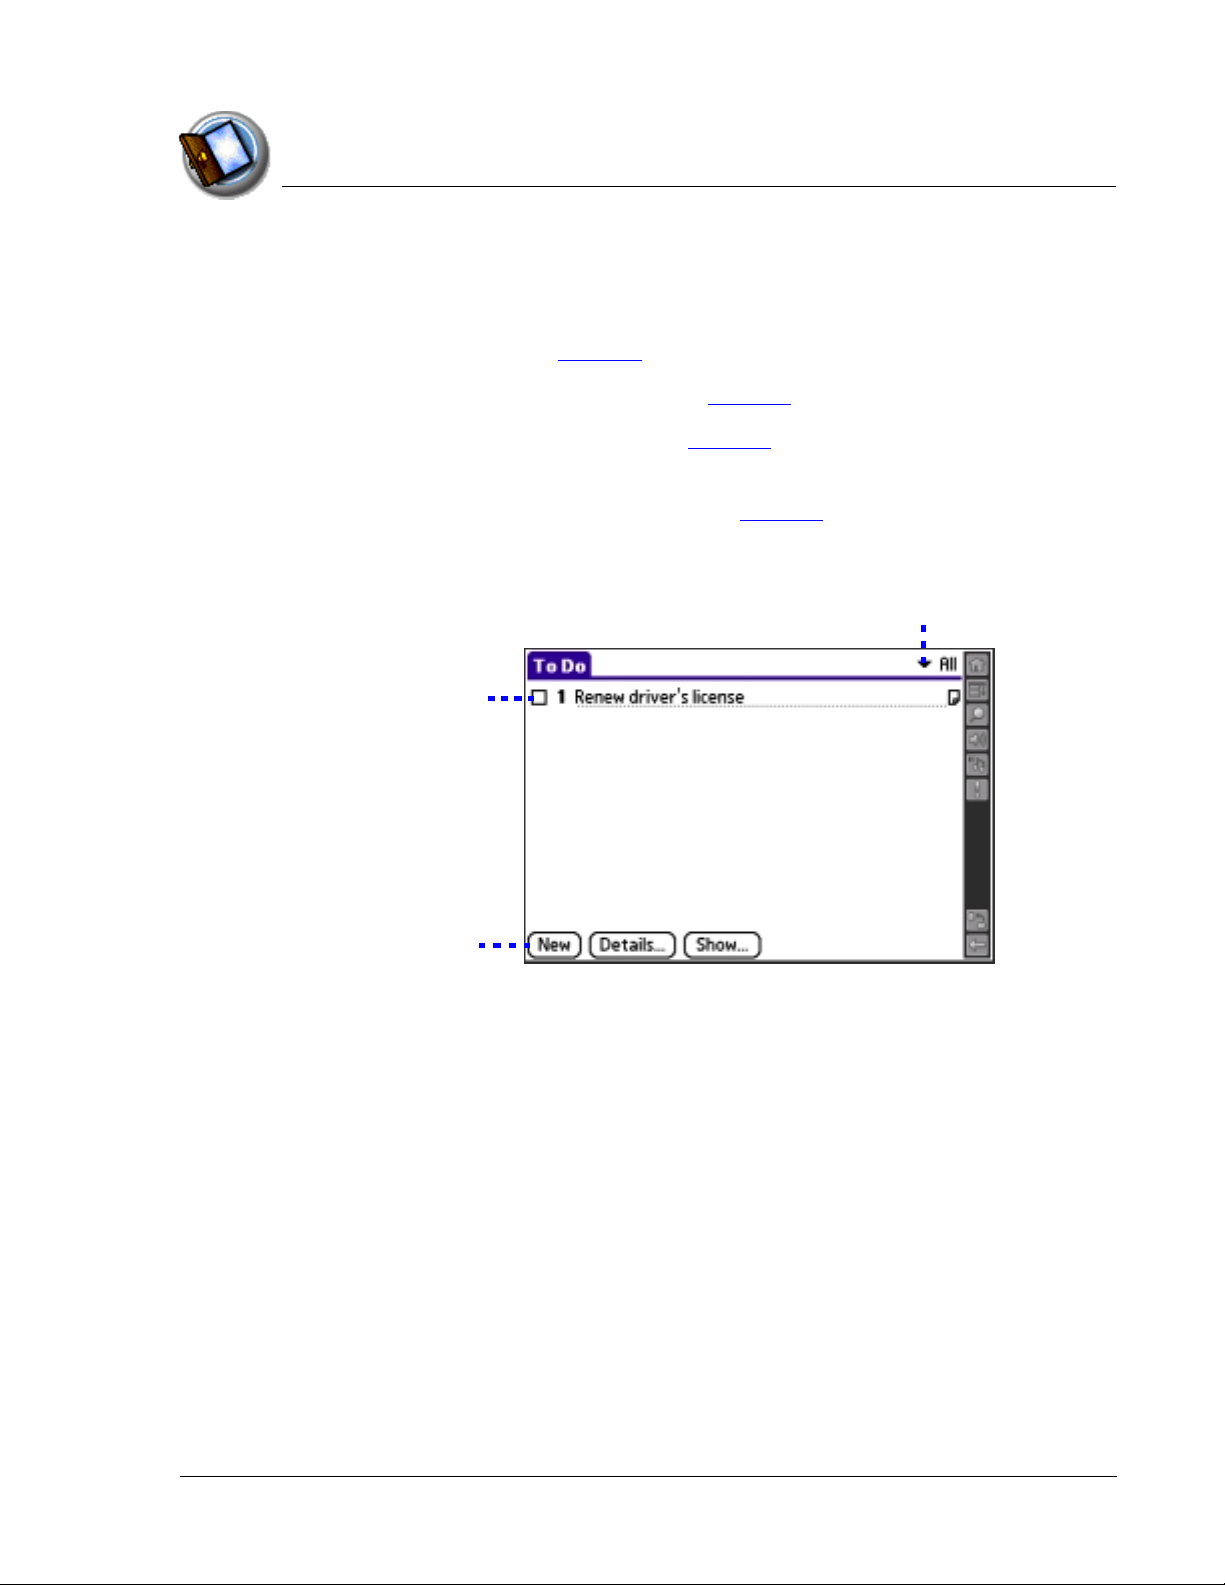
Creating records. . . . . . . . . . . . . . . . . . . . . . . . . 71
Editing records . . . . . . . . . . . . . . . . . . . . . . . . . 72
Selecting Text. . . . . . . . . . . . . . . . . . . . . . . . . 72
Using the Edit menu . . . . . . . . . . . . . . . . . . . . . 72
Deleting records. . . . . . . . . . . . . . . . . . . . . . . . . 73
Purging records . . . . . . . . . . . . . . . . . . . . . . . . . 74
Categorizing records. . . . . . . . . . . . . . . . . . . . . . . 74
Moving a record into a category. . . . . . . . . . . . . . . . 75
Displaying a category of records. . . . . . . . . . . . . . . . 75
Adding or editing categories . . . . . . . . . . . . . . . . . 76
Finding records . . . . . . . . . . . . . . . . . . . . . . . . . 77
Finding Address Book records . . . . . . . . . . . . . . . . . 77
Using the Find dialog box . . . . . . . . . . . . . . . . . . . 78
Using Phone Lookup . . . . . . . . . . . . . . . . . . . . . 78
Sorting records . . . . . . . . . . . . . . . . . . . . . . . . . 79
Sorting To Do List records . . . . . . . . . . . . . . . . . . . 79
Sorting Address Book and Memo Pad records . . . . . . . . . 80
Making records private. . . . . . . . . . . . . . . . . . . . . . 81
Hiding private records. . . . . . . . . . . . . . . . . . . . . 81
Displaying private records. . . . . . . . . . . . . . . . . . . 82
Attaching notes . . . . . . . . . . . . . . . . . . . . . . . . . 82
Deleting a note . . . . . . . . . . . . . . . . . . . . . . . . 83
Choosing fonts . . . . . . . . . . . . . . . . . . . . . . . . . 84
66
6666
68
6868
71
7171
Using Your Zodiac Console 5
Page 6

9
9 Using Address Boo
Using Address Bookkkk85
9 9
Using Address BooUsing Address Boo
Opening Address Book. . . . . . . . . . . . . . . . . . . . . . 85
Adding and using Address Book entries . . . . . . . . . . . . . 86
Creating an Address Book entry . . . . . . . . . . . . . . . . 86
Viewing an address entry . . . . . . . . . . . . . . . . . . . . 88
Duplicating an entry . . . . . . . . . . . . . . . . . . . . . . . 88
Selecting different types of phone numbers and addresses . . . . 88
Editing Address Book entries. . . . . . . . . . . . . . . . . . . 89
Changing Address Book display . . . . . . . . . . . . . . . . . 90
Adding custom fields at the end of Address Edit screens . . . . . 90
10
10 Using Date Boo
Using Date Bookkkk92
10 10
Using Date BooUsing Date Boo
Opening Date Book . . . . . . . . . . . . . . . . . . . . . . . 92
Scheduling events . . . . . . . . . . . . . . . . . . . . . . . . 93
Scheduling timed events for the current date . . . . . . . . . 94
Scheduling a timed event for another date. . . . . . . . . . . 96
Scheduling untimed events . . . . . . . . . . . . . . . . . . 96
Adding Address Book information to an event . . . . . . . . . 97
Rescheduling events . . . . . . . . . . . . . . . . . . . . . 97
Scheduling repeating or continuous events . . . . . . . . . . 98
Changing repeating or continuous events . . . . . . . . . . . 99
Setting the alarm . . . . . . . . . . . . . . . . . . . . . . . .100
Setting an alarm for an event . . . . . . . . . . . . . . . . .100
Snoozing the alarm . . . . . . . . . . . . . . . . . . . . . .101
Setting alarm options . . . . . . . . . . . . . . . . . . . . .102
Changing the Date Book view . . . . . . . . . . . . . . . . . .103
Working in Week view. . . . . . . . . . . . . . . . . . . . .103
Working in Month view . . . . . . . . . . . . . . . . . . . .105
Working in Agenda view . . . . . . . . . . . . . . . . . . .106
Spotting event conflicts . . . . . . . . . . . . . . . . . . . . .107
Changing the Date Book display . . . . . . . . . . . . . . . . .107
Changing the displayed Start and End Times. . . . . . . . . .108
85
8585
92
9292
Using Your Zodiac Console 6
Page 7

11 Using Memo Pad
11 Using Memo Pad 110
11 Using Memo Pad11 Using Memo Pad
Opening Memo Pad . . . . . . . . . . . . . . . . . . . . . . .110
Creating memos. . . . . . . . . . . . . . . . . . . . . . . . .111
Reviewing memos . . . . . . . . . . . . . . . . . . . . . . . .112
Arranging the Memo List. . . . . . . . . . . . . . . . . . . . .112
12
12 Using To Do Lis
Using To Do Listttt 113
12 12
Using To Do LisUsing To Do Lis
Opening To Do List . . . . . . . . . . . . . . . . . . . . . . .113
Creating To Do List items. . . . . . . . . . . . . . . . . . . . .114
Setting To Do List priorities. . . . . . . . . . . . . . . . . . . .115
Checking off To Do List items. . . . . . . . . . . . . . . . . . .116
Changing priorities and due dates . . . . . . . . . . . . . . . .117
Sorting To Do items . . . . . . . . . . . . . . . . . . . . . . .118
Setting To Do List preferences . . . . . . . . . . . . . . . . . .118
13
13 Using
Using CCCCalculato
13 13
Using Using
alculatorrrr 120
alculatoalculato
Opening Calculator . . . . . . . . . . . . . . . . . . . . . . .120
Using the Calculator buttons. . . . . . . . . . . . . . . . . . .121
Displaying recent calculations . . . . . . . . . . . . . . . . . .122
110
110110
113
113113
120
120120
14
14 Setting
Setting PPPPreferences
14 14
Setting Setting
references 123
referencesreferences
123
123123
Opening the Preferences screens. . . . . . . . . . . . . . . . .123
Bluetooth . . . . . . . . . . . . . . . . . . . . . . . . . . . .124
Calibration . . . . . . . . . . . . . . . . . . . . . . . . . . .125
Connection . . . . . . . . . . . . . . . . . . . . . . . . . . .125
Date & Time . . . . . . . . . . . . . . . . . . . . . . . . . . .127
Formats . . . . . . . . . . . . . . . . . . . . . . . . . . . . .129
General . . . . . . . . . . . . . . . . . . . . . . . . . . . . .130
Graffiti 2. . . . . . . . . . . . . . . . . . . . . . . . . . . . .131
Network. . . . . . . . . . . . . . . . . . . . . . . . . . . . .132
Network Details. . . . . . . . . . . . . . . . . . . . . . . .134
Login scripts . . . . . . . . . . . . . . . . . . . . . . . . .136
Connecting to your ISP or dial-in service. . . . . . . . . . . .139
Owner. . . . . . . . . . . . . . . . . . . . . . . . . . . . . .139
Phone. . . . . . . . . . . . . . . . . . . . . . . . . . . . . .140
Using Your Zodiac Console 7
Page 8

Quick Launch. . . . . . . . . . . . . . . . . . . . . . . . . . 141
ShortCut . . . . . . . . . . . . . . . . . . . . . . . . . . . . 141
Sound . . . . . . . . . . . . . . . . . . . . . . . . . . . . . 143
15
15 Synchronizing Data
Synchronizing Data 144
15 15
Synchron izing D ataSynchron izing D ata
Performing a cable or cradle HotSync operation . . . . . . . . . 144
Selecting HotSync setup options . . . . . . . . . . . . . . . . 146
Customizing HotSync application settings. . . . . . . . . . . . 147
16
16 SSSSecurity
ecurity 149
16 16
ecurityecurity
Masking and hiding records. . . . . . . . . . . . . . . . . . . 150
Masking private records . . . . . . . . . . . . . . . . . . . 150
Hiding private records . . . . . . . . . . . . . . . . . . . . 150
Assigning and editing passwords . . . . . . . . . . . . . . . . 151
Locking your console . . . . . . . . . . . . . . . . . . . . . . 152
Turning on and unlocking your console. . . . . . . . . . . . 153
Recovering from a forgotten password . . . . . . . . . . . . 153
Deleting a forgotten password . . . . . . . . . . . . . . . . 153
144
144144
149
149149
17
17 Using the A
Using the Atttttention Manag er
17 17
Using the AUsing the A
18
18 Using Expansion Card
Using Expansion Cardssss 158
18 18
Using Expansion CardUsing Expansion Card
tention Ma nager 154
tention Managertention Manager
Insistent alarms. . . . . . . . . . . . . . . . . . . . . . . . . 154
Using the Reminder dialog screen . . . . . . . . . . . . . . 154
Setting alarm sound effects . . . . . . . . . . . . . . . . . 155
Using the Reminders list screen . . . . . . . . . . . . . . . 156
Subtle alarms. . . . . . . . . . . . . . . . . . . . . . . . . . 157
Understanding the blinking alarm indicator . . . . . . . . . 157
Inserting and removing an expansion card . . . . . . . . . . . 159
Accessing applications on an expansion card . . . . . . . . . . 159
Displaying information about applications on an expansion card. 160
Copying an application from an expansion card . . . . . . . . . 161
Beaming or sending applications from an expansion card . . . . 162
Deleting applications from an expansion card . . . . . . . . . . 163
Using CardInfo . . . . . . . . . . . . . . . . . . . . . . . . . 164
Renaming an expansion card. . . . . . . . . . . . . . . . . 165
Reformatting an expansion card . . . . . . . . . . . . . . . 165
154
154154
158
158158
Using Your Zodiac Console 8
Page 9

19
19 Beaming and Sending Information
Beaming and Sending Information 167
19 19
Beaming and Sending InformationBeaming and Sending Information
Creating a business card . . . . . . . . . . . . . . . . . . . . .168
Beaming a record . . . . . . . . . . . . . . . . . . . . . . . .168
Beaming an application . . . . . . . . . . . . . . . . . . . . .169
Receiving beamed information. . . . . . . . . . . . . . . . . .169
Sending information with Bluetooth communication . . . . . . .170
IR HotSync operations . . . . . . . . . . . . . . . . . . . . . .171
Preparing your computer for infrared communication . . . . .171
Configuring HotSync Manager for infrared communication. . .172
Performing an IR HotSync operation. . . . . . . . . . . . . .172
Returning to cable or cradle HotSync operations. . . . . . . .173
20
20 Maintaining Your Console
Maintaining Your Console 174
20 20
Maintaining Your ConsoleMaintaining Your Console
Migration information . . . . . . . . . . . . . . . . . . . . . .174
Creating a user profile . . . . . . . . . . . . . . . . . . . . . .176
Using a profile for the first-time HotSync operation . . . . . .177
Caring for your Zodiac . . . . . . . . . . . . . . . . . . . . . .177
21
21 Troubleshooting
Troubleshooting 178
21 21
TroubleshootingTroubleshooting
I’m having trouble installing add-on software. . . . . . . . . . .178
I’m trying to run a game I just installed and I get an
“Authentication Error.” What does this mean? . . . . . . . . .178
My Zodiac won’t turn on.. . . . . . . . . . . . . . . . . . . . .179
My console is not responding. . . . . . . . . . . . . . . . . . .179
I did a soft reset and my console is still not responding. . . . . . .179
I did an extensions-off reset and console is still not responding. . .180
When I tap an area on my screen, something else gets
highlighted or I have to tap above or below my target. . . . . .181
I’m having trouble synchronizing with my computer. . . . . . . .181
When playing a game, the graphics are slow and choppy. . . . . .182
I beamed (or sent) one of my Zodiac games to my friend and
it won’t run on his device. . . . . . . . . . . . . . . . . . . .183
I’m using an SD/MMC card reader to load files directly onto an
expansion card. What folder should I use? . . . . . . . . . . .183
How do I connect to my Bluetooth-enabled phone? . . . . . . .183
How do I connect to my Bluetooth-enabled computer? . . . . . .185
167
167167
174
174174
178
178178
Using Your Zodiac Console 9
Page 10

How do I connect to my Bluetooth-enabled access point?. . . . .185
I just downloaded and installed a game. I’m now getting
an error that I’m missing a file.. . . . . . . . . . . . . . . . .186
I’m having trouble establishing a network connection. . . . . . .186
How do I view progress messages during network login? . . . . .187
How do I view the Network Log? . . . . . . . . . . . . . . . . .187
22
22 Regulatory Information
Regulatory Information 188
22 22
Regulatory InformationRegulatory Information
Federal Communication Commission Interference Statement . . .188
Important Note: FCC Radiation Exposure Statement . . . . . . .188
188
188188
Using Your Zodiac Console 10
Page 11

About This Guide
About This Guide
About This GuideAbout This Guide
Welcome to Using Your Zodiac™ Console. This guide is designed to help you
get up and running quickly on your console. It describes all you need to know
about how to use your Zodiac console and the applications that come with it.
This guide shows you how to:
• Identify all the parts of your console
• View and enter data
• Use the applications that come with your console
• Use your console with your computer
• Personalize your console with your own preference settings
After you become familiar with the basic functionality of your Zodiac console,
you can use this guide as a reference for less common tasks, for maintaining
your Zodiac console, and as a source of information if you have problems
operating it. For additional information visit tapwave.com.
Some of the applications that come with your Zodiac console are
documented separately. If you do not find information about a particular
application in this guide, look for the PDF file in the folder for that application
on the CD that came with your Zodiac console or visit tapwave.com.
Using Your Zodiac Console 11
11
1111
Page 12
Introduction to your
Introduction to your
Introduction to your Introduction to your Zodiac Console
Zodiac Console
Zodiac ConsoleZodiac Console
Your Zodiac console combines a full mobile entertainment experience -including music, photos, movies, and interactive video games -- with the best
organizer tools available.
Using HotSync® technology you can add media to your console as well as
synchronize (exchange, update, and backup) your personal data.
Your Zodiac console gives you everything you need to go, do, and play.
System requirements
System requirements
System requirementsSystem requirements
To install and operate Palm Desktop software your computer system must
meet the following minimum requirements:
1
• Windows 98 SE/2000 (with service pack 3)/me/XP Home/XP Pro (with
administrator rights)
• IBM-compatible Pentium computer or higher
• 40 MB available hard disk space
• CD-ROM drive
• One available USB port
In addition, the following equipment is required for optional connectivity
features:
• Internet service provider (ISP)
• Compatible mobile phone
Using Your Zodiac Console 12
12
1212
Page 13
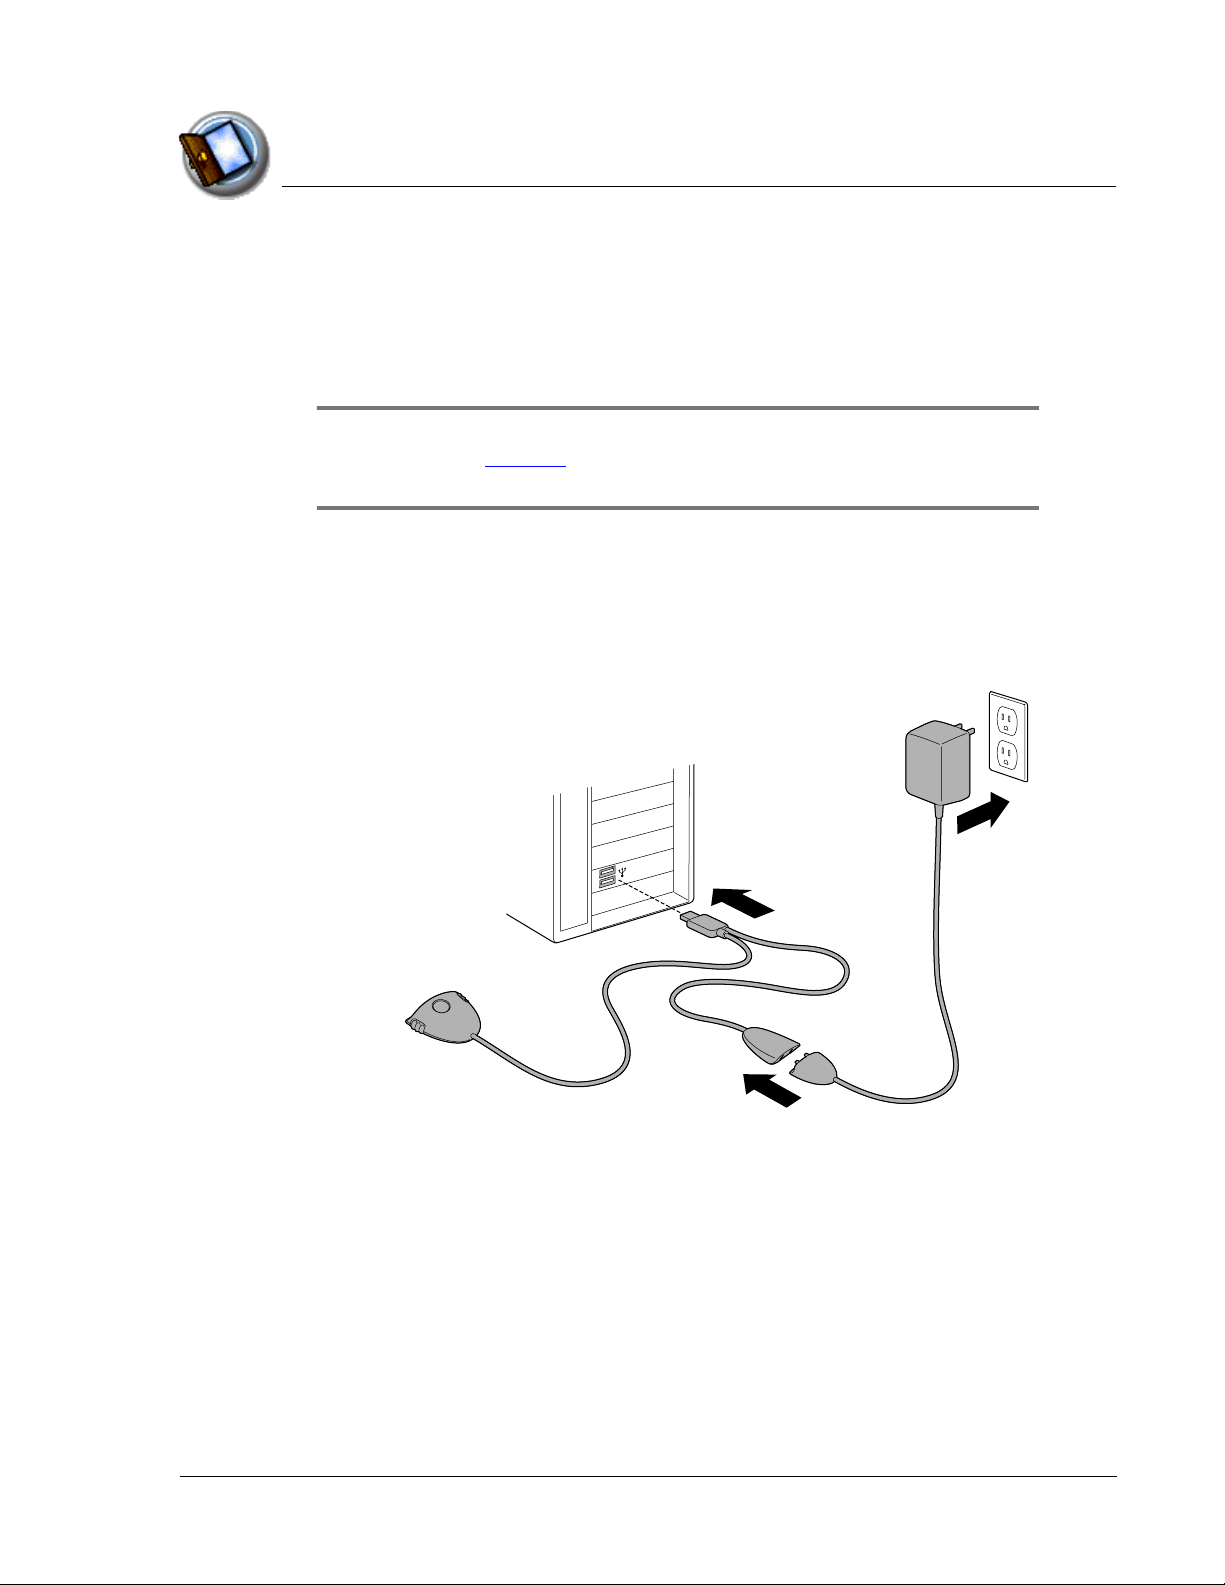
Connecting the cable or cra dl e
Connecting the cable or cra dl e
Connecting the cable or cra dl eConnecting the cable or cra dl e
The HotSync cable that comes with your Zodiac console enables you to
synchronize the information on your console with your computer. You can
also purchase an optional HotSync cradle to synchronize your console.
IMPORTANT:
IMPORTANT: If you are migrating from another Palm Powered™ console, follow
IMPORTANT:IMPORTANT:
the instructions on page 174 before connecting the cable or cradle and installing
the Palm Desktop software.
1. Turn off your computer.
2. Plug the HotSync cable or cradle into a USB port on your computer.
3. Plug the power adapter into a power outlet.
4. Connect the power adapter cable and the HotSync cable.
Introduction to your Zodiac Console
Connecting the cable or cradle
Using Your Zodiac Console 13
13
1313
Page 14

Charging the battery
Charging the battery
Charging the batteryCharging the battery
To use your Zodiac console, you must connect it to an AC outlet and charge
the battery.
1. Connect your console to an AC outlet using one of these three setups:
• Desktop Setup. C onnect the optional HotSync cradle (sold separately)
to the HotSync cable, your computer, and an outlet as described in the
cradle instructions, and then insert your console in the cradle.
• Travel Setup. Connect the HotSync cable to your computer and an
outlet as described on page 13, and then connect your console to the
HotSync cable.
• Ultra-light Setup. Connect the power adapter cable to your console.
Travel Setup Ultra-light Setup
Introduction to your Zodiac Console
Charging the battery
2. Wait approximately 2 hours for the battery to fully charge.
While your console charges, the LED is yellow. When your console is fully
charged, the LED turns green.
When your console needs to be recharged, the LED blinks and turns yellow.
When the LED turns red, your battery is extremely low.
Using Your Zodiac Console 14
14
1414
Page 15

Introduction to your Zodiac Console
Charging the battery
Charging tips
Charging tips
Charging tipsCharging tips
• Although you can turn your console on while it is charging, your
console charges more quickly while it is turned off.
• The battery has a built-in sensor to prevent it from overheating. This
also means that it stops charging if the environment is too warm.
– Keep in mind that operating your console while charging the
battery generates heat.
– We do not recommend charging your console in environments
that are over 86 degrees Fahrenheit.
– If you must charge your console in temperatures above 91 degrees
Fahrenheit, do not turn it on while it is charging.
Battery life
Battery life
Battery lifeBattery life
Extend the life of your battery by following these guidelines:
• Use the lowest brightness setting you find comfortable (see page 23).
• Turn off your console as soon as you finish using it. Do not wait for the
auto timeout to turn it off.
• Keep the Auto-off after setting in General Preferences set to 30
seconds in case you forget to turn off your console.
• Use the headphones when listening to music and videos and keep the
volume low. Playing them loudly through the internal speakers will
significantly reduce battery life. Playing them loudly through the
headphones can permanently damage your hearing.
• Turn off Bluetooth when you’re not using it.
• Turn off the Beam Receive setting in General Preferences when you’re
not using the IR port to receive information from another device.
Using Your Zodiac Console 15
15
1515
Page 16

Introduction to your Zodiac Console
Starting your console for the fir st time
Starting your console for the fir st time
Starting your console for the fir st timeStarting your console for the fir st time
The first time you start your Zodiac console, setup instructions appear on the
screen. These instructions guide you through calibrating the touch-screen
(also called the digitizer) and the analog controller.
1. Press the Power button .
2. Follow the onscreen instructions, tapping the screen and moving the
analog controller where indicated.
Palm Desktop software
Palm Desktop software
Palm Desktop softwarePalm Desktop software
Palm Desktop software includes many of the same applications as your
Zodiac console: Photos, Music, Address Book, Date Book, To Do List, and
Memo Pad. You can use the HotSync feature of this software to load,
exchange, and backup files between your console and your computer.
Starting your console for the first time
It’s a good idea to back up your files in case something happens to the data on
your Zodiac console. Changes you make on your Zodiac console or Palm
Desktop software appear in both places after you synchronize.
Using the Palm Desktop software, you can do the following:
• Work with your Zodiac console applications on your computer to view,
enter, and modify files stored on your console.
• Back up the files stored on your console with HotSync technology and
synchronize the files in your Palm Desktop software. Synchronization is
a one-step procedure that ensures your data is always safe and up-todate. See page 144
for more information.
• Load compatible files and applications onto your console from your
computer.
• Import and export data, so you can easily transfer data from other
desktop applications into selected applications. See page 41
information.
for more
• Print your Date Book, Address Book, To Do List, and Memo Pad
information on any printer.
Using Your Zodiac Console 16
16
1616
Page 17

Introduction to your Zodiac Console
Palm Desktop software
Installing Palm Desktop software
Installing Palm Desktop software
Installing Palm Desktop softwareInstalling Palm Desktop software
The following instructions guide you through installing Palm Desktop
software so that you can transfer data from your computer to your console.
Before you begin, make sure you connected the HotSync cable or cradle to
your computer as described on page 13.
After installation, refer to the online Help in Palm Desktop software for
information on how to use the software.
IMPORTANT:
IMPORTANT: Do not copy the Palm Desktop software files to your
IMPORTANT:IMPORTANT:
computer’s hard disk. You must use the installer to place the files in
their proper locations an d to decompress the files .
TIP:
TIP: If you are a System Administrator preparing several consoles fo r a group
TIP:TIP:
of users, you may want to create a user profile to install a standard set of data.
See page 176 before performing the first HotSync operation.
1. Exit any open programs, including those that run at startup (such as
Microsoft Office), and disable any virus-scanning software.
2. Insert the Palm Desktop software CD into the computer’s CD-ROM drive.
NOTE:
NOTE: If the installation does not begin automatically, click the Windows
NOTE:NOTE:
Start button, choos e Run , enter D:\autorun.exe, and then click OK. If necessary,
replace D: with the drive letter assigned to your CD-ROM drive.
3. Follow the onscreen instructions to complete the installation. When
prompted, complete the following steps:
a. Install Palm Desktop software, which also installs your free Bonus Software
applications.
b. Select or create a user name.
c. Connect your console to the cable or cradle and synchronize.
Using Your Zodiac Console 17
17
1717
Page 18

Introduction to your Zodiac Console
Palm Desktop software
d. Create your FREE tapwave.com account.
Using your console with another desktop organizer
Using your console with another desktop organizer
Using your console with another desktop organizerUsing your console with another desktop organizer
If you prefer to use another desktop organizer, such as Microsoft Outlook, you
can do so. After you install Palm Desktop software, simply install the
connection software for your desktop organizer, called a conduit. The conduit
lets you synchronize the data between your console and your desktop
organizer.
The Palm Desktop software CD includes PocketMirror from Chapura conduit,
which enables you to synchronize the PIM applications (Date Book, Address
Book, To Do List, and Memo Pad) with Microsoft Outlook. If you would like to
synchronize these applications with Microsoft Outlook, first install Palm
Desktop software, and then browse the CD for Chapura PocketMirror, and run
the setup program to install it.
If you want to synchronize with a desktop organizer application other than
Palm Desktop software or Microsoft Outlook or, you must purchase the
necessary conduit software (if available).
Using Your Zodiac Console 18
18
1818
Page 19
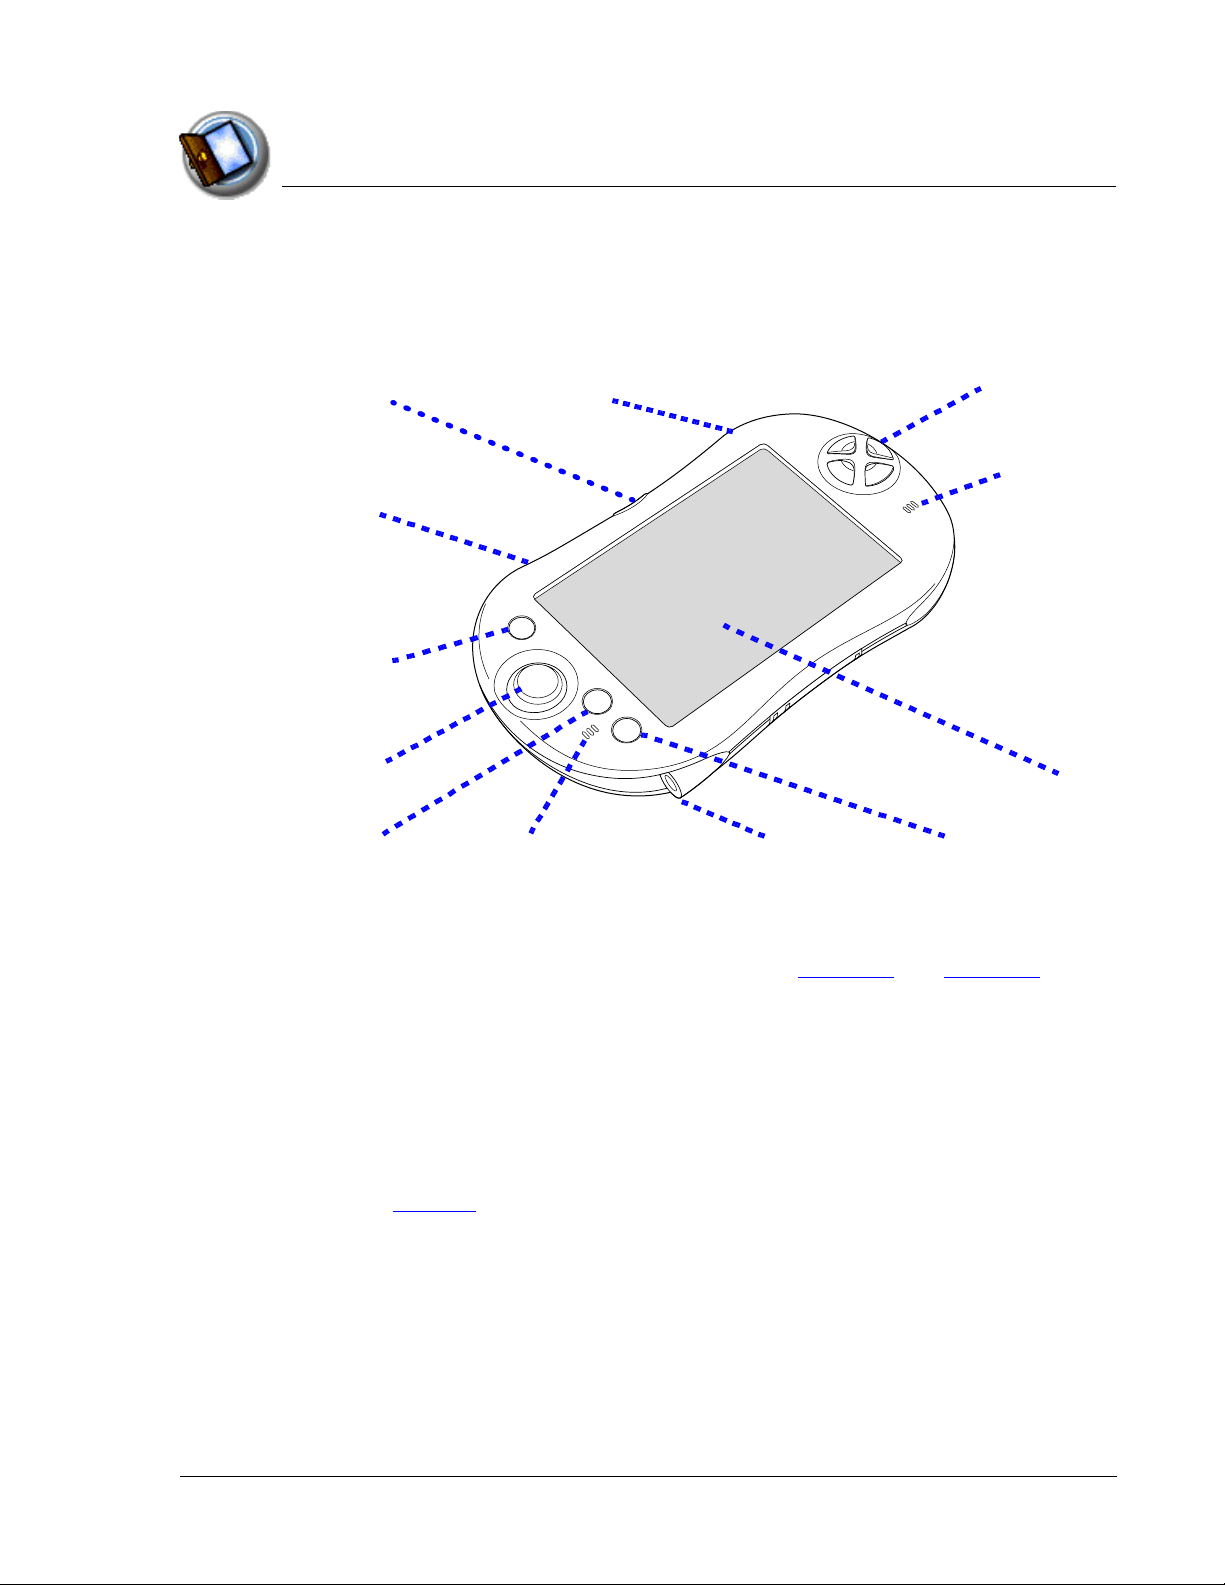
Zodiac components
A
Zodiac components
Zodiac componentsZodiac components
AAAAbout the front panel
bout the front panel
bout the front panelbout the front panel
Introduction to your Zodiac Console
Zodiac components
Bluetooth button
Left trigge r
Power button
nalog controller
Function button Home button
Left speaker
Right trigg er
Action buttons
Right speaker
Console screen
Headphone jack
• Bluetooth button. Activates the built-in Bluetooth radio so that your
Zodiac console can communicate with other devices that are enabled
with Bluetooth technology. For details, see page 124 and page 170.
• Trigger buttons. Performs various actions based on the application.
• Power button. Turns the console on (if it is off) and returns to the last
screen that was displayed. Press the Power button again to turn the
console off.
Pressing and holding the Power button opens the dialog box where
you can adjust the sound volume and screen brightness. For details,
see page 23.
The Power button also includes an LED that changes color based on
the status of the battery.
Using Your Zodiac Console 19
19
1919
Page 20

Introduction to your Zodiac Console
Zodiac components
– Green. Appears when your console is connected to the cable or
cradle and it is fully charged.
– Yellow. Appears when your console is charging.
– Red. Appears when your console battery is critically low and needs
to be charged.
• Analog controller. Allows you to navigate through the Home screen
and move around within applications. Move it in the direction you
want to go, or press it when centered to select an item. For details, see
page 25.
• Function button. Performs various actions based on the application.
For example, in Date Book you can press this button to change the
calendar display f ormat.
• Left/Right speakers. Enables you to listen to music and game sounds
without using the headphones.
• Headphone jack. Enables you to connect headphones to your console
so you can discreetly listen to music and game sounds.
• Home button. Opens the Home screen where you can select a game
or application that you want to start. For details, see page 43.
• Console screen. Displays the applications and data stored in your
console. It is touch-sensitive and responds to the stylus.
• Action buttons. Activates various functions based on the application.
For example, in a game, these buttons might be used for acceleration,
braking, stunts, or weapons, but in the Home screen, these buttons are
shortcuts to your favorite games or applications. See page 47 for
details on the Enable Quick Launch option to assign your favorite
shortcuts to these buttons.
Using Your Zodiac Console 20
20
2020
Page 21
About the back panel
About the back panel
About the back panelAbout the back panel
Expansion slots
IR port
Introduction to your Zodiac Console
Zodiac components
Stylus channel
and stylus
Reset button
HotSync connector
• Reset button. Under normal use, you should not have to use the reset
button. See page 179 for information on when and how to use the
reset button.
• IR port. Uses infrared technology to transmit data to and receive data
from other devices, see page 167 for details.
• Expansion slots. Enables you to expand your console’s storage
capacity and capabilities by inserting expansion cards. See page 158 to
learn more about using expansion cards.
• HotSync connector. Connects your console to the cable or cradle,
which in turn connects to your computer and the AC adapter. This
allows you to recharge your console and to synchronize the
information between your console and your computer using HotSync
technology. For more information, see page page 144.
• Stylus channel and stylus. Holds the stylus when you are not using it.
The stylus is the writing instrument you use to enter data on your
console.
Using Your Zodiac Console 21
21
2121
Page 22
Introduction to your Zodiac Console
Zodiac components
Removing the stylus
Removing the stylus
Removing the stylusRemoving the stylus
To use the stylus, remove it from the channel and hold it as you would a pen
or pencil.
Connecting the headphones
Connecting the headphones
Connecting the headphonesConnecting the headphones
Your Zodiac console includes a pair of stereo headphones that you can use
while listening to music, playing games, or watching video clips. Using
headphones or external speakers instead of the built-in speakers also
conserves battery power.
IMPORTANT:
IMPORTANT: When usi ng the headphones, keep the volume soft. List ening to
IMPORTANT:IMPORTANT:
loud volumes through the headphones can pe rmanently damage your hearing.
Using Your Zodiac Console 22
22
2222
Page 23
Introduction to your Zodiac Console
Zodiac components
Adjusting the screen orientation
Adjusting the screen orientation
Adjusting the screen orientationAdjusting the screen orientation
In many applications you can change the orientation of your Zodiac display
by switching between portrait (vertical) and landscape (horizontal) mode.
• Tap the Orientation icon in the Status Bar to switch between
portrait and landscape mode. See page 26 to learn about the Status
Bar.
TIP:
TIP: In landscape mode, you can also choose whether the Status Bar
TIP:TIP:
and Input Area appear on the left or right side of the screen. For details,
see page 130.
Adjusting the speaker volume and screen brightness
Adjusting the speaker volume and screen brightness
Adjusting the speaker volume and screen brightnessAdjusting the speaker volume and screen brightness
You can quickly adjust the volume level or sound in your applications and the
brightness of your screen to make it easy to see in a variety of lighting
conditions.
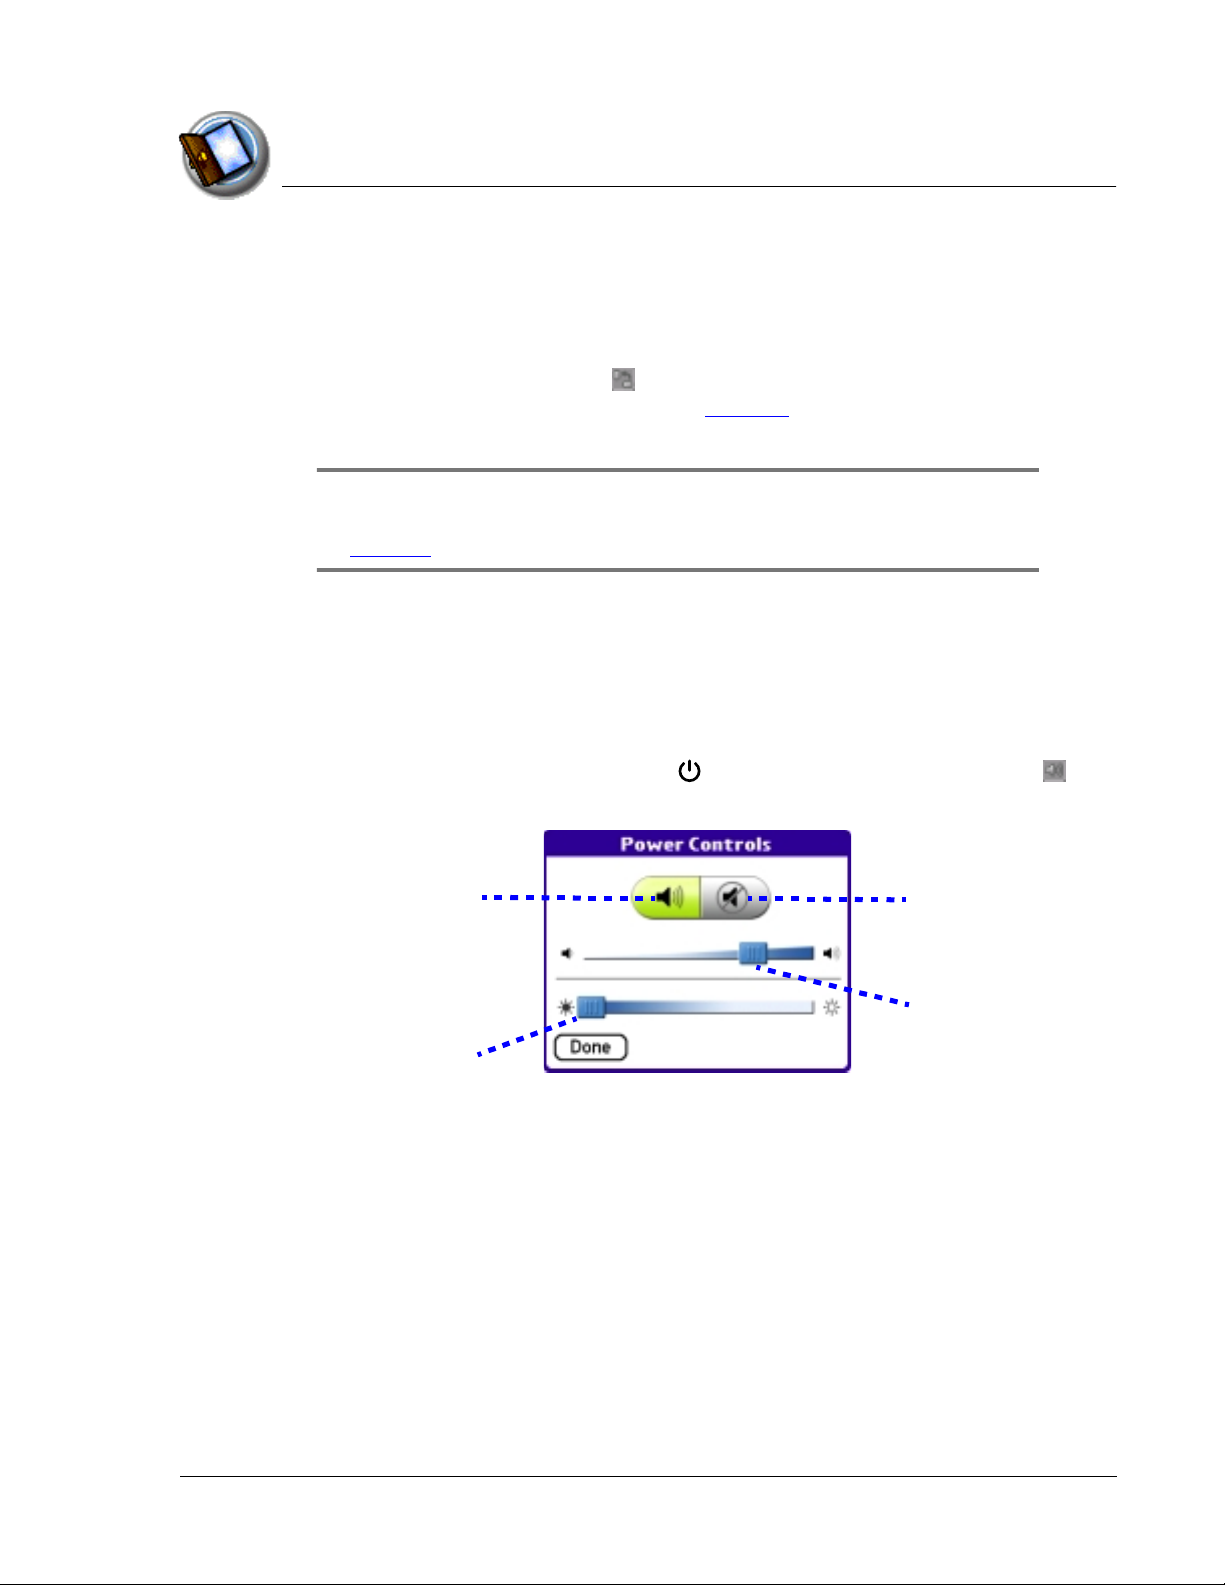
1. Press and hold the Power button or tap the Power Controls icon in
the Status Bar.
Sound icon Mute icon
Sound
slider
Brightness
slider
2. Adjust the sound by doing one of the following:
• Tap the Sound icon and drag the slider to adjust the volume level.
• Tap the Mute icon and choose how long the sound remains off.
3. Adjust the brightness by doing one of the following:
• Drag the slider to adjust the brightness.
• Tap to the right or left of the slider to adjust the brightness in small
increments.
4. Tap Done.
Using Your Zodiac Console 23
23
2323
Page 24
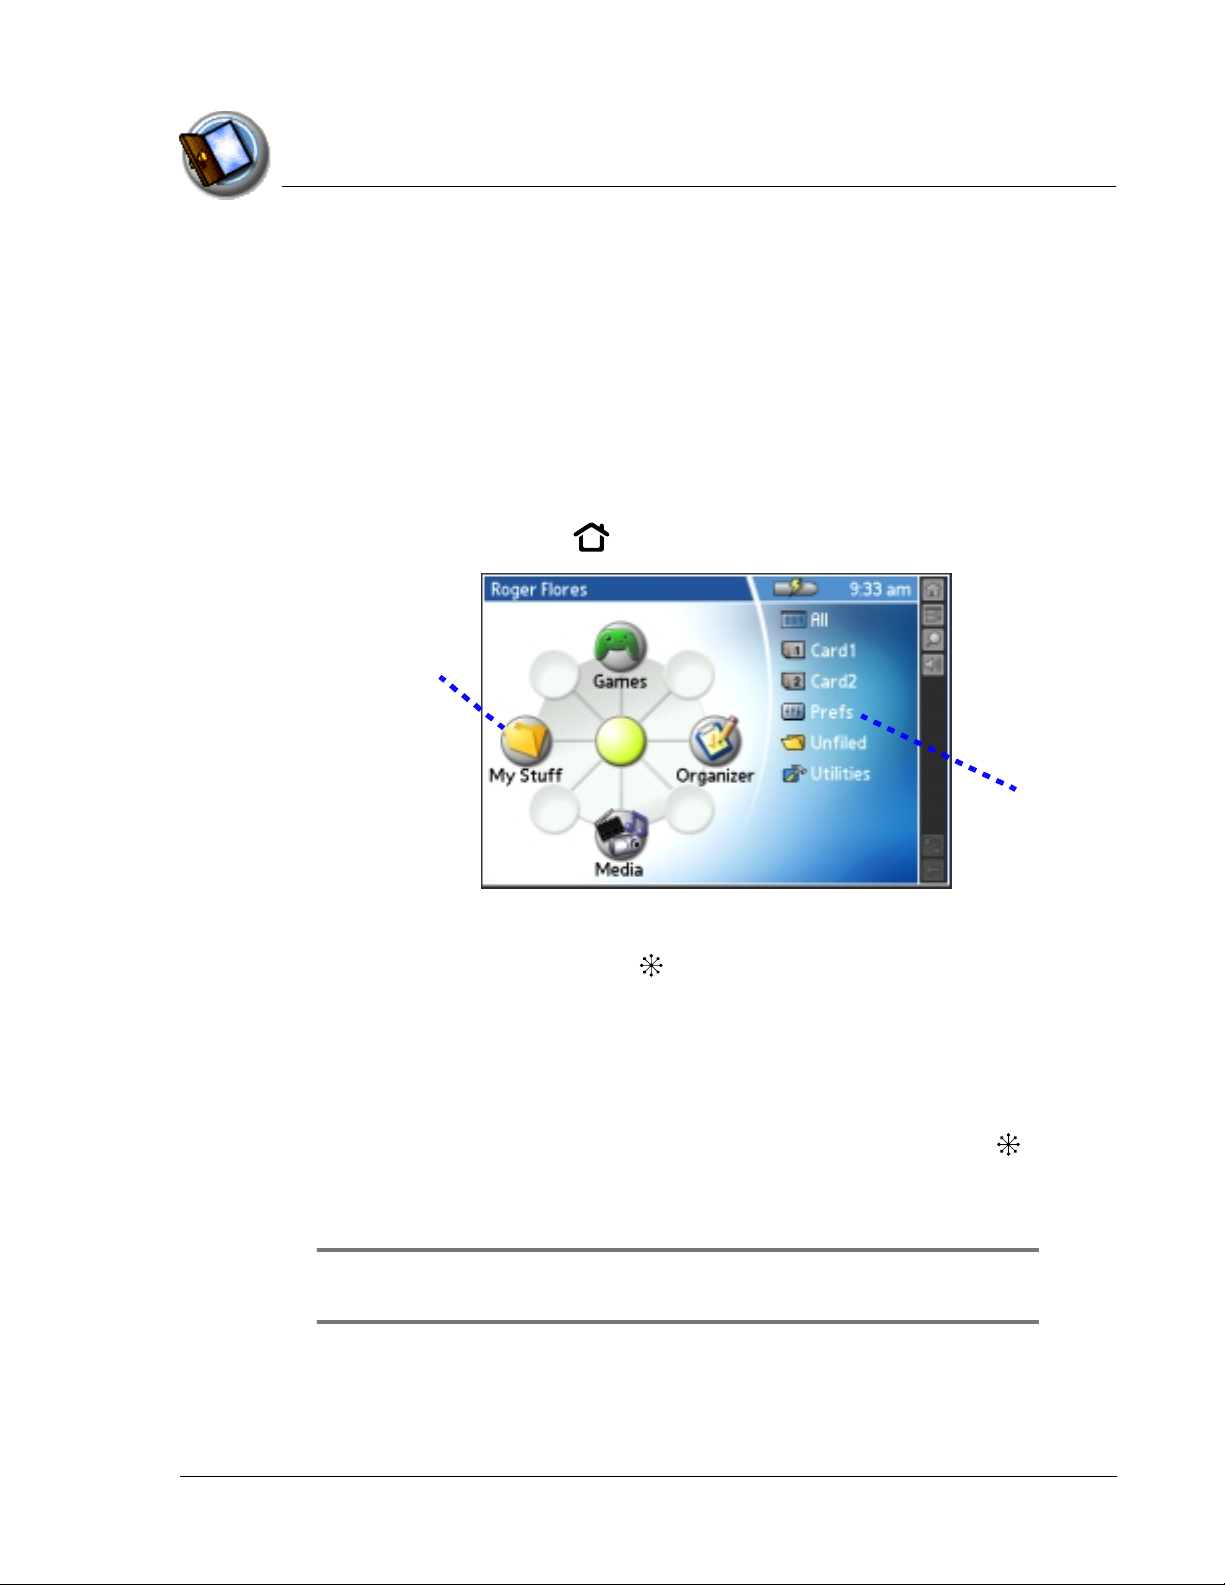
Opening applications
Opening applications
Opening applicationsOpening applications
You can use the Home screen to open any application installed on your
console. The Home screen displays your user name, the current time, the
battery level, a radial menu of your favorite categories, and a list of remaining
categories.
You can choose which icons appear on the radial menu and which icons
appear on the list. If you have expansion cards inserted in the expansion slots,
each card appears as a category.
1. Press the Home button .
Radial menu
Introduction to your Zodiac Console
Opening applicatio ns
2. Open a category by doing one of the following:
• Move the analog controller in the direction that corresponds to the
category you want to open. The placement of the icon on the radial
menu corresponds to the directional controls on the analog controller.
After you highlight your selection, release the analog controller to
open the category.
• Press the Function button to move from the radial menu to the list, and
then scroll to a category on the list. With the analog controller
centered, press it to open the category.
• Tap a category icon on the screen.
TIP:
TIP: To view a list of all your applications, select All from the category list on
TIP:TIP:
the right side of the screen.
Menu list
Using Your Zodiac Console 24
24
2424
Page 25
Introduction to your Zodiac Console
Learning to navigate
3. Open an application by doing one of the following:
• Move the analog controller in the direction that corresponds to the
application you want to open. The placement of the icon on the radial
menu corresponds to the directional controls on the analog controller.
After you highlight your selection, release the analog controller to
open the application.
• Scroll to an application icon in the All view list (if you already selected
the All category). With the analog controller centered, press it to
open the application.
• Press the Function button to move from the radial menu to the list, and
then scroll to an application on the list. With the analog controller
centered, press it to open the application.
• Tap an application icon on the screen.
Learning to navigate
Learning to navigate
Learning to navigateLearning to navigate
Just as you use a mouse pointer to click elements on your computer’s screen,
you use the stylus to tap elements on your console’s touch-sensitive screen.
T apping is the basic action used to perform tasks on your console. In addition,
you can drag the stylus to select text.
IMPORTANT:
IMPORTANT: Always us e the point of the stylus for tapping or making str okes
IMPORTANT:IMPORTANT:
on the console screen. Do not use a pen, pencil, or any other sharp object to
write or tap on the console screen, as it may damage the screen. If you
misplace your stylus, visit tapwave.com for information on a replacement.
Using Your Zodiac Console 25
25
2525
Page 26

Introduction to your Zodiac Console
Learning to navigate
Status
Status Bar
Status Status
The Status Bar can appear on the far right, on the far left, or at the bottom of your
screen. When you tap an icon on the Status Bar, it performs the following actions:
Bar
BarBar
Status Bar
• Home icon . Displays the Home screen where you can open applications.
• Menu icon . D isplays the menu bar where you can choose menu commands.
• Find icon . Opens the Find dialog box where you can perform system-wide
searches on a text string.
• Power Controls icon . Displays th e volum e, m ute, and brightness controls.
• Music Controls icon . Opens the Music Controls dialog box where you can
control music settings with the analog controller, switch to the power-saving
Hold state, or open the Music application. A pause symbol appears in the
upper-left corner of this icon when playback is paused. For more information,
see page 57.
• Attention icon . Flashes when you have alerts to review.
• Orientation icon . Switches the orientation of the screen display between
portrait and landscape mode (when available). In landscape mode, y ou can also
choose whether the Status Bar and Input Area appear on the left or right side of
the screen. This option is designed to facilitate left-handed data entry in
applications that support this feature. For more information, see page 130
.
• Expand/Collapse icon . Expands and collap ses the Input Area display to
provide a larger viewing area while playing games or using applications where
data entry is not required. If the application is designed to take advantage of
the extra screen space, you can view additional information where the Input
Area normally appears.
Using Your Zodiac Console 26
26
2626
Page 27
Introduction to your Zodiac Console
Learning to navigate
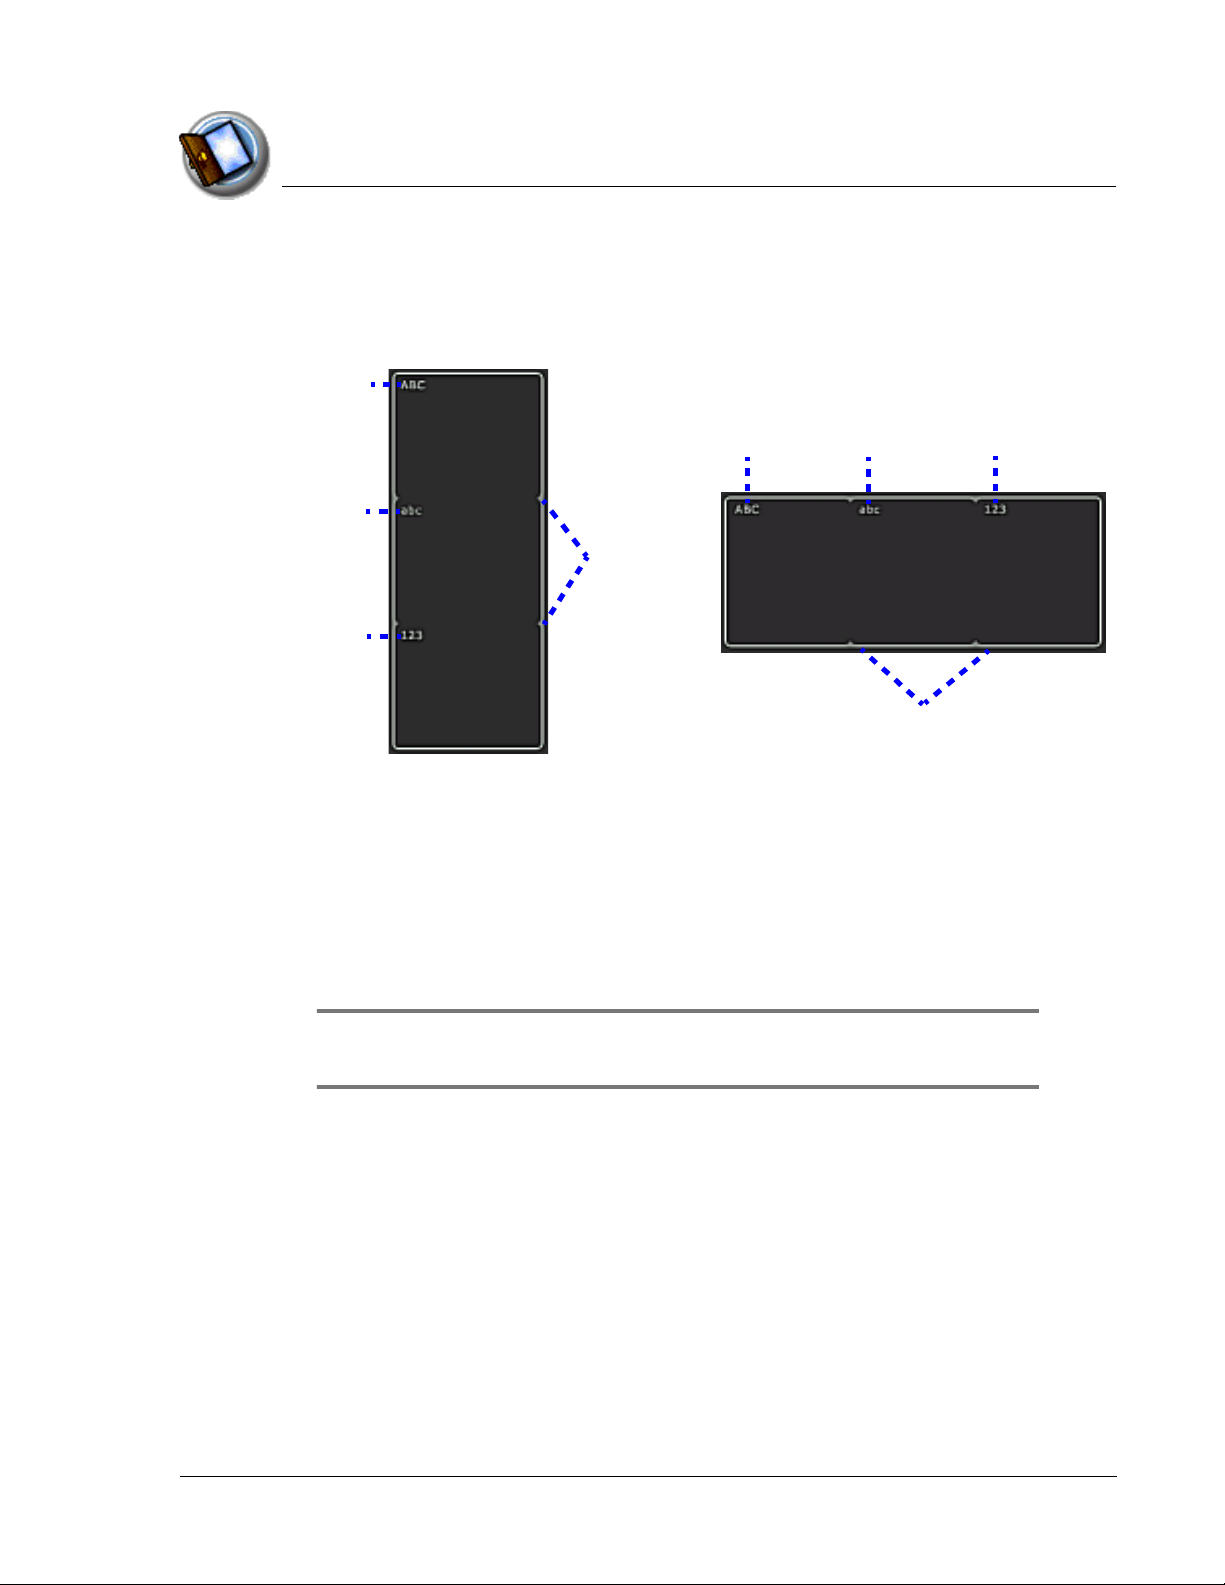
Input Area
Input Area
Input AreaInput Area
The Input Area enables you to enter data on your console using Graffiti® 2
characters or the onscreen keyboard. It includes the following elements:
ABC
ABC
abc
Division
marks
123
abc 123
Division
marks
• Division marks. Separates the various portions of the Input Area.
• ABC and abc. Indicates which type of Graffiti 2 characters (upper or
lower case) you can write in this portion of the Input Area. When you
tap these icons, the alphabetic onscreen keyboard appears.
• 123. Indicates that you can write numeric Graffiti 2 characters in this
portion of the Input Area. When you tap this icon, the numeric
onscreen keyboard appears.
NOTE:
NOTE: The cursor must be in an input field to enter Graffiti 2 characters
NOTE:NOTE:
or open the onscree n keyboard.
Using Your Zodiac Console 27
27
2727
Page 28
Introduction to your Zodiac Console
Learning to navigate
Entering data
Entering data
Entering dataEntering data
You can enter text, numbers, and symbols into your Zodiac in four ways:
• Using Graffiti 2 (see page 32)
• Using the onscreen keyboard (see page 39)
• Using an external keyboard (see page 41)
• Entering or importing data in Palm Desktop software, and then
synchronizing with your console (see page 40)
There are also onscreen controls that enable you to enter data by selecting
options:
Pick list
Box
Button
• Pick list. Displays a list of choices. Tap the black triangle next to the
pick list name to display a list of choices, and then tap an item in the list
to select it.
• Box. Indicates the state of the corresponding option. A check mark in a
box means the option is active. If a box is empty, tapping it inserts a
check mark. If a box is checked, tapping it removes the check mark.
• Button. Initiates a command when tapped. Buttons, such as New or
Done, appear in dialog boxes and at the bottom of application screens.
Using Your Zodiac Console 28
28
2828
Page 29

Introduction to your Zodiac Console
Learning to navigate
Navigation controls
Navigation controls
Navigation controlsNavigation controls
Many applications include onscreen controls that enable you to navigate
through your data:
Previous
arrow
Next
arrow
Scroll bar
slider
Scroll bar
arrow
• Next or previous arrow. Displays the previous or next page of
information.
• Scroll bar. Moves through long notes or memos. Tap and hold down
the scroll bar slider to scroll through pages; tap the slider arrow at
either end to move one line at a time. To scroll to the previous page,
tap the scroll bar just above the slider; to scroll to the next page, tap
the scroll bar just below the slider. You can also scroll to the previous
and next pages by moving the analog controller Up and Down.
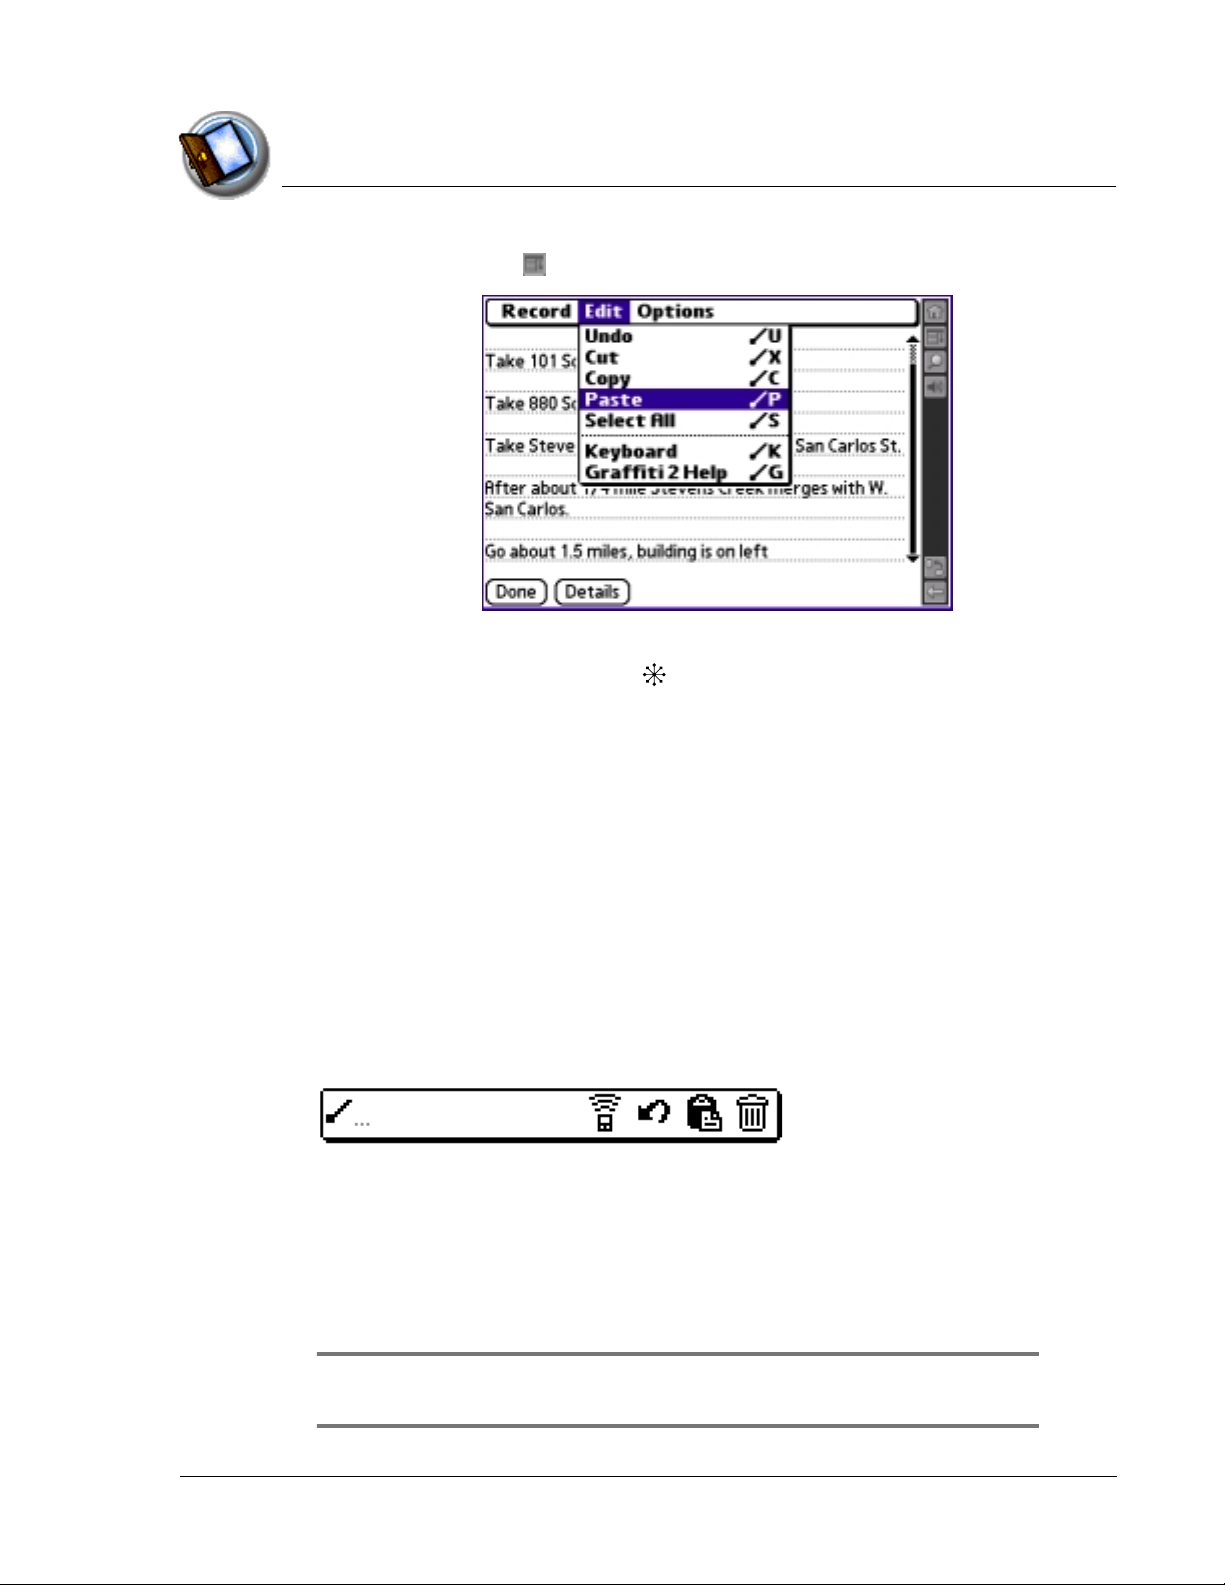
Menus
Menus
Menus Menus
Menus and commands are specific to each application and area within the
application. For example, in Memo Pad, the Memo List screen and the Memo
screen display different menus.
Some applications or screens do not have menus. Where available, menu
commands for each application are described in the corresponding
application’s chapter, with the exception of the Edit menu. For information on
Edit menu commands, see page 72.
Using Your Zodiac Console 29
29
2929
Page 30
Introduction to your Zodiac Console
Learning to navigate
1. Tap the Menu icon or the title bar to open the menu bar.
2. Select a command from the menu by tapping it with the stylus or by
moving the analog controller to highlight it and then pressing the
analog controller while it is centered.
Command toolbar
Command toolbar
Command toolbarCommand toolbar
The command toolbar enables you to initiate a command by tapping an icon
or writing a Graffiti 2 quick stroke instead of using the menus. Most menu
commands have an equivalent Graffiti 2 quick stroke, which is similar to
keyboard shortcuts used to execute commands on computers.
The Graffiti 2 quick stroke appears next to the command in the menu. To use
Graffiti 2 quick strokes, menus must be closed.
1. In the abc or ABC portions of the Input Area, draw the Graffiti 2 menu
command stroke (a diagonal line from the lower-left to upper-right) to
display the command toolbar.
2. Within 4 seconds, do one of the following:
• Tap an icon that represents the command you want. The icons vary
within each application.
• Enter a Graffiti 2 quick stroke in the Input Area. For example, to choose
Select All from the Edit menu, draw the letter S.
TIP:
TIP: If you wait more than four seconds to draw th e quick stroke letter, you
TIP:TIP:
need to redraw the menu comm a nd st ro ke to redisplay the command too lb ar.
Using Your Zodiac Console 30
30
3030
Page 31

Introduction to your Zodiac Console
Learning to navigate
Tips
Tips
TipsTips
Many of the dialog boxes that appear on your console contain a Tips icon in
the upper-right corner. Tips anticipate questions you may have and provide
shortcuts for using the dialog box or other useful information.
1. Tap the Tips icon in the upper-right corner of the dialog box.
Tips icon
2. Tap Done after reading the tip.
Using Your Zodiac Console 31
31
3131
Page 32

Entering Data in
Entering Data in Your
Entering Data in Entering Data in
Zodiac Console
Zodiac Console
Zodiac ConsoleZodiac Console
Y o u can ente r data int o your Z odiac console b y using the onscree n keyboard ,
writing with the stylus in the Input Area, using your computer keyboard,
using an external keyboard, or by importing data from another application.
EEEEntering data using
ntering data using GGGGraffiti2 handwriting software
ntering data using ntering data using
You can use Graffiti 2 strokes to create letters, numbers, punctuation, and
symbols. The Graffiti2 writing strokes include all letters, numbers, and
symbols found on a standard keyboard.
Learning to write
Learning to write GGGGraffiti2 characters
Learning to write Learning to write
raffiti2 handwriting software
raffiti2 handwriting softwareraffiti2 handwriting software
raffiti2 characters
raffiti2 charactersraffiti2 characters
Your
Your Your
2
With only a few minutes of practice, you’ll find it easy to enter accurate text
and numbers using Graffiti 2 writing strokes.
The Graffiti 2 demo shows how to use the handwriting software. The first
time you turn on your console the Welcome application automatically guides
you through the setup process. When you complete setup, you are in vited to
learn how to use the Graffiti 2 handwriting software.
After you view the Welcome application the first time, a Graffiti 2 Demo icon
appears in the Utilities category on the Home screen. Select this icon to
view the demo at any time. You can also select the Welcome icon in the
Utilities category to view the Welcome application again.
TIP:
TIP: When you reach the Stroke Lookup screen of the demo, use the pick
TIP:TIP:
list to view the wide variety of characters that you can make. As you tap a
character, an animation of the strokes used to form that character appears.
Using Your Zodiac Console 32
32
3232
Page 33

Entering Data in Your Zodiac Console
Entering data using Graffiti2 handwriting software
Tap here to view
other strokes
General Guidelines for Graffiti 2 Writing
General Guidelines for Graffiti 2 Writing
General Guidelines for Graffiti 2 WritingGeneral Guidelines for Graffiti 2 Writing
Follow these guidelines to learn and use Graffiti2 writing strokes successfully:
• To achieve 100% accuracy, practice drawing characters exactly as they
appear in the tables later in this chapter.
• The heavy dot on each shape indicates where to start the stroke. Some
characters have similar shapes, but different starting and ending
points. Always start the stroke at the heavy dot, but do not draw the
heavy dot; (it is there only as a guideline).
• The Graffiti 2 writing strokes for letters closely resemble letters of the
standard English alphabet, both uppercase and lowercase. Graffiti 2
includes symbols made with a single stroke and symbols made with
multiple strokes.
For multi-stroke characters, a temporary character appears after the
first stroke, to show that the stroke was recognized. For example, after
the first vertical stroke of “t”, a temporary “l” is shown. There is a limited
time window, during which you must draw the second stroke.
Otherwise the temporary stroke is recorded.
• The Input Area is divided into three parts, one for writing uppercase
letters, one for writing lowercase letters, and one for writing numbers.
The small marks at the top and bottom of the Input Area define the
division lines. To have your console recognize uppercase letters,
lowercase letters, and numbers, you must begin the strokes in the
corresponding portion of the Input Area.
Using Your Zodiac Console 33
33
3333
Page 34

Entering Data in Your Zodiac Console
Entering data using Graffiti2 handwriting software
Write lowercase letters here
Write uppercase
letters here
Division marks
Write numbers
here
1. T ap the scr een where y ou wan t to write t ext, fo r example , on a line ne xt to
a time in Date Book.
NOTE:
NOTE: A blinking cursor must appear onscreen in the entry field before you
NOTE:NOTE:
can begin writing text.
2. Use the tables on the following pages to find the stroke shape for the
letter you want to write. For example, the stroke shown below creates the
letter A.
Start stroke at
heavy dot
Lift stylus here
You use the same shape to create both the lowercase letter and the
uppercase letter.
3. Position the stylus in the appropriate place of the Input Area depending
on whether you want to write an uppercase or lowercase letter.
4. Start your stroke at the heavy dot, and draw the stroke shape as it
appears in the tables.
5. Lift the stylus from the screen at the end of the stroke shape.
6. Your console recognizes your stroke immediately and displays the letter
at the insertion point onscreen. As soon as you lift the stylus from the
screen, you can begin the stroke for the next character you want to write.
Using Your Zodiac Console 34
34
3434
Page 35

Entering Data in Your Zodiac Console
Entering data using Graffiti2 handwriting software
Graffiti2
Graffiti2 ttttips
Graffiti2 Graffiti2
When using Graffiti 2 writing, keep the following tips in mind:
ips
ipsips
• For greater accuracy, draw letters with large strokes; strokes that nearly
fill the Input Area are easily interpreted.
• To delete characters, set the insertion point to the right of the
character you want to delete, and draw the Backspace stroke (a line
from right to left) in the Input Area.
• Write at natural speed. Writing too slowly can produce errors.
• Do not write at a slant. Keep vertical strokes parallel to the sides of the
Input Area.
• When letters and numbers can be written using two different strokes,
use the one that’s easiest for you.
• Press firmly.
• Some characters can be formed in more than one way, and you can
choose which method you prefer. See page 131 for details.
The
The GGGGraffiti2 alphabet
The The
Draw Graffiti2 letters according to the following alphabet.
raffiti2 alphabet
raffiti2 alphabetraffiti2 alphabet
Using Your Zodiac Console 35
35
3535
Page 36

Entering Data in Your Zodiac Console
Entering data using Graffiti2 handwriting software
Writing
Writing ppppunctuation marks and other special characters
Writing Writing
Using Graffiti 2 writing, you can create any punctuation symbol and special
character available from a standard keyboard.
unctuation marks and other special characters
unctuation marks and other special charactersunctuation marks and other special characters
• Punctuation marks. The period and comma punctuation marks can
be written in any portion of the Input Area (the uppercase, lowercase,
or number area). Other common punctuation marks can be written
only in specific parts of the Input Area. The chart below indicates
where the punctuation marks must be drawn (in general, the more
frequently used punctuation is on the left side).
– Characters that appear on the left side of the chart must be drawn
in the alphabetic (uppercase or lowercase) portions of the Input
Area.
– Characters that appear on the right side of the chart must be drawn
in the number portion of the Input Area.
TIP:
TIP: If you draw the Shift stroke (see page 36) before entering a punctuation
TIP:TIP:
mark, you can enter punctuat ion strokes anywhere in the Input Area . This
requires an extra stroke, but you may find it easier, since you don’t have to
remember on which side of the I np ut Area to make the punctuation strokes.
• Symbols and other special characters. You can write symbols and
other special characters using the Shift command. When you make a
vertical stroke from the bottom to the top in the Input Area, the Shift
indicator arrow appears in the lower right corner of the screen. While
this arrow is visible, you can make the characters shown in the
illustration below. Once the arrow goes away, the symbol or other
special character appears.
Using Your Zodiac Console 36
36
3636
Page 37

Entering Data in Your Zodiac Console
Entering data using Graffiti2 handwriting software
TIP:
TIP: Using an additional Sh ift stroke to finish writin g the character (as shown
TIP:TIP:
in the demo) is optional, but it makes the character appear more quickly.
After drawing the Shift stroke, draw punctuation marks, symbols or accent
marks using the following strokes:
TIP:
TIP: Samples of the character strokes are available in the Graffiti2 Help file.
TIP:TIP:
To view the Help file, tap the Menu icon , and from the Edit menu, select
Graffiti2 Help. Note that the accented characters appear on a Punctuation
Shift screen, but do not use the Shift command.
• Accented letters. When writing letters with accent marks, first write
the uppercase or lowercase letter stroke in the appropriate portion of
the Input Area. Then quickly write the accent stroke (shown above) in
the number portion of the Input Area.
Using Your Zodiac Console 37
37
3737
Page 38

UUUUsing Graffiti2 Gestures
sing Graffiti2 Gestures
sing Graffiti2 Gesturessing Graffiti2 Gestures
Gestures are editing commands, such as cut, paste, and the ShortCut
command which is explained in the next section. To use gestures, draw the
following strokes:
Entering Data in Your Zodiac Console
Using Graffiti2 Gestures
TIP:
TIP: The Menu command str o ke must be drawn in either of the letter
TIP:TIP:
portions of the Input Area. The remain in g strokes can be drawn anywhe re
in the Input Area.
Using Graffiti2 ShortCuts
Using Graffiti2 ShortCuts
Using Graffiti2 ShortCutsUsing Graffiti2 ShortCuts
Graffiti 2 Shor tCuts let you quickly and easily enter commonly used words or
phrases. ShortCuts are similar to the Glossary or Autotext features of some
word processors. Graffiti2 writing comes with several predefined ShortCuts.
You can also create your own for any words , letters , or numbers, see page 141
for details.
Yo ur console inc ludes the following predefined Graffiti2 ShortCuts for
common entries:
• br—Breakfast
• di—Dinner
• ds—Date stamp
• dts—Date/time stamp
• lu—Lunch
Using Your Zodiac Console 38
38
3838
Page 39

• me—Meeting
• ts—Time stamp
1. Draw the ShortCut stroke.
2. Draw the ShortCut character(s).
When you draw the ShortCut stroke, the ShortCut symbol appears at the
insertion point.
ShortCut
Using the onscreen keyboard
Using the onscreen keyboard
Using the onscreen keyboardUsing the onscreen keyboard
You can open the onscreen keyboard anytime you need to enter text or
numbers on your console.
Entering Data in Your Zodiac Console
Using the onscreen keyboard
1. Open any application (such as Address Book).
2. Tap any record, or tap New.
3. In the Input Area, tap one of the following to display the corresponding
onscreen keyboard:
• ABC
ABC or abc
ABCABC
• 123
123 - displays the numeric keyboard.
123123
ABC
abc
123
abc - display the alphabetic keyboard.
abc abc
ABC
Division
marks
abc 123
Division
marks
Using Your Zodiac Console 39
39
3939
Page 40

Entering Data in Your Zodiac Console
Using your c o mputer keybo ard
4. To display the international keyboard, open an onscreen keyboard, and
then tap Int’l at the bottom of the keyboard display.
TIP:
TIP: To select any of th e thre e keyboards, tap the Menu icon and then
TIP:TIP:
tap Edit. Tap Keyboard, and then tap the keyboard you want.
.
Alpha
Alpha
AlphaAlpha
Tab
Caps Lock
Caps Shift
Tap here to display
Numeric
Numeric
NumericNumeric
Tap here to display
numeric keyboard
alphabetic keyboard
5. Tap the desired characters or numbers; then tap Done to enter the text or
numbers.
Using your computer
Using your computer kkkkeyboard
Using your computer Using your computer
eyboard
eyboard eyboard
Backspace
Carriage return
International
International
InternationalInternational
Tap here to display
international keyboard
At times, you may prefer to use your computer keyboard rather than the
onscreen keyboard to enter or modify information on your console.
You can enter information from your computer keyboard using Palm™
Desktop software or any supported desktop organizer installed for use with
your console. You can then perform a HotSync operation to synchronize the
information on your computer with the information you entered on your
console. All the Organizer applications on your console are available in Palm
Desktop software and in most desktop organizer software.
Refer to Palm Desktop online Help for more information on entering data on
your computer.
Using Your Zodiac Console 40
40
4040
Page 41

Using an external keyboard
Using an external keyboard
Using an external keyboardUsing an external keyboard
You can connect an optional external keyboard accessory to your console so
you can type data directly into your console. External keyboards are very
useful for typing large amounts of data quickly and accurately while you are
away from your computer. Visit tapwave.com to learn about keyboards and
other accessories available for your console.
Importing
Importing ddddata
Importing Importing
ata
ataata
If you have data stored in computer applications such as spreadsheets and
databases, or if you want to import data from another device, you can transfer
the data to your Zodiac console without entering it manually. Save the data in
one of the file formats listed below , import it into Palm Desktop software, and
then perform a HotSync operation to transfer the data to your console.
Palm Desktop software can import data in the following file formats:
Entering Data in Your Zodiac Console
Using an external keyboard
• Comma delimited (.csv, .txt): Address Book and Memo Pad only.
• Tab delimited (.tab, .tsv, .txt): Address Book and Memo Pad only.
• CSV (Lotus Organizer 2.x/97 Mapping): Address Book only.
• vCal (.vcs): Date Book only.
• vCard (.vcf): Address Book only.
• Date Book archive (.dba).
• Address Book archive (.aba).
• To Do List archive (.tda).
• Memo Pad archive (.mpa).
Archive formats can only be used with Palm Desktop software. Use the archive
file formats to share information with other people who use Palm Powered
devices or to create a copy of your important Palm Desktop information.
1. Open Palm Desktop software.
2. Click the application into which you want to import data.
3. If you are importing records that contain a field with category names, do
the following:
Using Your Zodiac Console 41
41
4141
Page 42

Entering Data in Your Zodiac Console
Importing dat a
a. Select Edit Categories from the Category list.
b. Make sure that all the categories that appear in the imported file also exist in
the application.
c. If any of the categories do not exist, click New and create the categories now;
otherwise, the records you import will be placed in the Unfiled category.
d. Click OK.
e. Select All from the Category list.
4. Choose File > Import; then select the file you want to import, and click
Open.
5. To import data into the correct Palm Desktop fields, drag fields in the left
column so that they are opposite the corresponding imported field on the
right.
6. To exclude a field from being imported, uncheck the field’s box.
7. Click OK.
8. The imported data is highlighted in the application.
9. To add the imported data to your console, perform a HotSync operation.
See Palm Desktop online Help for more information on importing and
exporting data.
Using Your Zodiac Console 42
42
4242
Page 43

Managing Applications
Managing Applications
Managing ApplicationsManaging Applications
This chapter explains how to switch between applications on your Zodiac
console, how to personalize application settings, and how to organize
applications into related groups.
Using the
Using the HHHHome screen
Using the Using the
ome screen
ome screenome screen
The Home screen enables you to open applications on your console. All the
applications installed on your console are organized into categories which
appear in the Home screen. By default the Home screen displays a radial
menu and list of your application categories. When you choose a category,
the applications in that category appear on the radial menu and in the list.
In addition to providing a way for you to open applications, the Home screen
also displays your user name, the battery level, and the current time. When
you open a category, the category name replaces your user name.
3
You can customize the Home screen as described later in this chapter.
1. Press the Home button or tap the Home icon.
.
Radial menu
Menu list
Using Your Zodiac Console 43
43
4343
Page 44

Managing Applications
Using the Home screen
2. Open a category by doing one of the following:
• Move the analog controller in the direction that corresponds to the
category you want to open. The placement of the icons on the radial
menu correspond to the directional controls on the analog controller.
After you highlight your selection, release the analog controller to
open the category.
• Press the Function button to move from the radial menu to the list,
then scroll to a category on the list. With the analog controller
centered, press it to open the category.
• Tap a category icon on the screen.
TIP:
TIP: To view a list of all your applications, select All from the category list on
TIP:TIP:
the right side of the screen.
3. Open an application by doing one of the following:
• Move the analog controller in the direction that corresponds to the
application you want to open. The placement of the icons on the radial
menu correspond to the directional controls on the analog controller.
After you highlight your selection, release the analog controller to
open the application.
• Scroll to an application icon in the All view list (if you already selected
the All category). With the analog controller centered, press it to
open the application.
Using Your Zodiac Console 44
44
4444
Page 45

• Press the Function button to move from the radial menu to the list, and
then scroll to an application on the list. With the analog controller
centered, press it to open the application.
• Tap an application icon on the screen.
CCCCustomizing the
ustomizing the HHHHome screen display
ustomizing the ustomizing the
There are several ways you can customize the Home screen display. You can
rearrange the icons on radial menus, move applications to a different
category, create new categories, and set display and button preferences.
Arranging
Arranging icons on
Arranging Arranging
Each radial menu can contain up to eight icons. You can move icons to a
different spoke on a radial menu, or move them between a radial menu and
the corresponding list.
ome screen displ ay
ome screen displ ayome screen displ ay
icons on the radial menus
icons on icons on
the radial menus
the radial menusthe radial menus
Managing Applications
Customizing the Home screen display
To arrange the radial menus, do any of the following:
• Drag an icon from the list to a spoke on the radial menu. If that spoke is
already occupied, the previous occupant moves to the list.
• Drag an icon from one spoke on the radial menu to another spoke. If
the new spoke is already occupied, the icons trade places.
• Drag an icon from the radial menu to the list. The spoke remains empty
and the icon appears in alphabetical order on the list.
Organizing
Organizing aaaapplications
Organizing Organizing
Your Zodiac console supports up to 15 categories. The category feature
enables you to organize your applications into logical groups so that you can
easily find and open them. You can move applications between categories
and add, rename, and delete categories as needed.
Moving applications between categories
1. Press the Home button .
2. Tap the Menu icon .
pplications
pplicationspplications
3. From the App menu, select Category.
Using Your Zodiac Console 45
45
4545
Page 46

Managing Applications
Customizing the Home screen display
4. From the pick list next to an application, select a different category.
5. Tap Done.
Creating or renaming a category
1. Press the Home button .
2. Tap the Menu icon .
3. From the App menu, select Category.
4. Tap Edit Categories.
5. Tap New or Rename.
6. Enter the category name, and then tap OK to add or rename the category.
7. Tap OK to close the Edit Categories dialog box.
8. Tap Done.
Using Your Zodiac Console 46
46
4646
Page 47

Managing Applications
Customizing the Home screen display
Deleting a category
1. Press the Home button .
2. Tap the Menu icon .
3. From the App menu, select Category.
4. Tap Edit Categories.
5. Select a category, and then tap Delete.
6. Tap Yes to confirm deletion.
7. Tap Done.
Setting Home screen preferences
Setting Home screen preferences
Setting Home screen preferencesSetting Home screen preferences
You can use the Home screen Preferences settings to change the background
graphic, display all your applications in an alphabetical list, and map
applications to the action buttons.
1. Press the Home button .
2. Tap the Menu icon .
3. From the Options menu, select Preferences.
4. Set any of the following options:
• Background. Replace the background with any JPEG picture available
in the Photos application on your console.
• Color Theme. Set the background color for the Home screen. To
change the colors, tap the color box to open the Home Color Themes
dialog box, tap a color theme, and then tap OK.
Using Your Zodiac Console 47
47
4747
Page 48

Managing Applications
Viewing information on an application
Tap pick list to create
a custom color background
TIP:
TIP: To create a custom color background , tap the pick list in the lower-
TIP:TIP:
right corner of the Home Color Themes dialog box and use the Palette, RGB,
or HSV settings to create your own background.
• Open to. Choose which screen appears when you press the Home
button.
– Home Screen. Display the top level radial menu that shows the
various categories.
– All Applications. Display all of your application icons in an
alphabetical list (instead of radial menus).
– Last View. Display the last Home screen or category you viewed.
• One button Quick Launch from Home Screen. Open the assigned
applications when you press each of the four Action buttons from the
Home screen. Use the Quick Launch Preferences screen to assign
applications to the Action buttons. See page 141 for details.
5. Tap Done.
Viewing information on an
Viewing information on an aaaapplication
Viewing information on an Viewing information on an
You can get information on any application by displaying the Info screen. The
Info screen displays the name, version number, size, and number of records
associated with each application on your console.
pplication
pplicationpplication
1. Press the Home button .
2. Tap the Menu icon .
3. From the App menu, select Info.
Using Your Zodiac Console 48
48
4848
Page 49

Managing Applications
Installing add-on applications
4. From the Device pick list, select Console or the name of an expansion card
inserted in a slot.
5. Tap Version, Size, Records to view the corresponding information for the
selected device.
6. Tap Done.
Installing add-on
Installing add-on aaaapplications
Installing add-on Installing add-on
In addition to the applications that came with your console, you can use the
Install Tool to install applications (called add-on applications) during a
HotSync operation. A variety of third-party games and applications are
available for your console; for more information visit tapwave.com.
Add-on applications can reside in your console’s in ternal me mory or on an
expansion card. You can remove add-on applications at any time; for more
information, see page 51
There are also several Bonus Software applications included on the CD that
came with your console. If you did not install these applications when you
installed Palm Desktop software, you can install them at any time by choosing
the Install Bonus Software option from the CD menu. After you install an
application, check the CD for the accompanying documentation.
IMPORTANT:
IMPORTANT: Some games require special installation tools. Check the README
IMPORTANT:IMPORTANT:
file for your game to see if you can use the Palm Install Tool or if you need a
special installation tool.
pplications
pplicationspplications
.
Some add-on applications consist of multiple PRC or PDB files. Check the
application’s manual to ensure that you install all the required files.
Using Your Zodiac Console 49
49
4949
Page 50

Managing Applications
Installing add-on applications
1. From your computer, do uble-click the PRC or PDB file you want to install.
The Install Tool window opens and the selected file appears in the list of
applications to install.
TIP:
TIP: You can also select the Install Tool dialog box by selecting Install Tool
TIP:TIP:
from the Palm Desktop program group, or by clicking the In stall icon in Palm
Desktop software.
2. In the User drop-down list, select the user name that corresponds to your
Zodiac console.
3. (Optional) Click Change Destination, click the arrows to indicate whether
you want to install the application on your console or an expansion card,
and then click OK.
TIP:
TIP: If you decide not to install an application, select it in the list of files in the
TIP:TIP:
Palm Install Tool dialog box and click Remove. The application is removed from
the dialog box list, but not from your computer.
4. Click Done. A message appears to indicate that the application(s) will be
installed the next time you perform a HotSync operation.
5. Perform a HotSync operation to install the application(s). For details, see
page 144
.
Using Your Zodiac Console 50
50
5050
Page 51

Removing
Removing aaaadd-on applications
Removing Removing
1. Press the Home button .
2. Tap the Menu icon .
3. From the App menu, select Delete.
dd-on applications
dd-on applicationsdd-on applications
If you run out of memory or no longer need them, you can remove add-on
applications, patches, and extensions from your console.
You cannot remove the built-in applications that reside in ROM on your
console.
Managing Applications
Removing add-on applications
4. From the Delete From pick list, select Console.
5. Tap the application you want to remove.
6. Tap Delete.
7. Tap Yes.
8. Tap Done.
The application is deleted. Applications that are loaded in ROM (for example,
Memo Pad) cannot be deleted, and are not listed.
Using Your Zodiac Console 51
51
5151
Page 52

Removing
Removing Palm Desktop software
RemovingRemoving
Palm Desktop sof tware
Palm Desktop sof tware Palm Desktop sof tware
If you no longer want to synchronize data with your computer, you can
remove Palm Desktop software from your computer.
NOTE:
NOTE: Do not remove Palm Desktop software if you plan to synchronize
NOTE:NOTE:
data with another desktop organizer application such as Microsoft Outlook.
Palm Desktop software also includes the HotSync Manager software used
to synchronize with your selected desktop application.
1. From the Windows Start menu, choose Settings > Control Panel.
2. Double-click the Add/Remove Programs icon.
3. On the Install/Uninstall tab, select Palm Desktop software; then click Add/
Remove.
Managing Applications
Removing Palm Desktop software
Using Your Zodiac Console 52
52
5252
Page 53

Using Music
Using Music
Using MusicUsing Music
Music provides a full-featured mobile MP3 player right on your console.
Use Music to:
• Listen to songs and other MP3 files stored on your console or an
expansion card.
• Upload songs from your computer to your console or an expansion
card.
• Update a list of songs you created with the Music component in Palm
Desktop software.
Opening
Opening Music
Opening Opening
Music
MusicMusic
1. Press the Home button .
4
2. Select the Media category .
3. Select the Music icon .
• Previous Track . Restart the current track, or if the current track has
been playing for less than 2 seconds, select the previous track on the
song list.
Using Your Zodiac Console 53
53
5353
Page 54

Using Music
Opening Music
• Next Track . Select the next track on the song list.
• Volume Down . Lower the speaker or headphone volume level.
The volume indicator appears when you tap this button.
• Volume Up . Raise the speaker or headphone volume level. The
volume indicator appears when you tap this button.
• Play/Pause . Start and stop playback of the selected song. When a
song is playing, the Pause button appears. When a song is not playing,
the Play button appears.
• Repeat . Select Repeat replays the entire song list after the last
song plays. If Repeat is not selected, your console shuts off after the
last song.
• Shuffle . Select Shuf fle to create a randomly ordered song list.
Deselect Shuffle to return the songs to their prior order.
• Console . Selec t console to display songs stored in the internal
memory on your console. If there are no songs in internal memory,
then the button is inactive. You can display songs on your console and
expansion cards at the same time.
• Card 1 or Card 2 . Select one of the Card buttons to display
songs stored on an expansion card that is seated in an expansion slot.
If there are no songs on the card seated in the expansion slot, then the
button is inactive. You can display songs on your console and
expansion cards at the same time.
• Details . View the following information when available: song title,
artist name, album title, progress bar, counter.
• List . View the order in which songs will play and the location
where the songs are stored. You can drag and drop song titles to
arrange them in a particular order, or use the Music application on
your computer to create a song list, and then synchronize your console
with your computer. See the Palm Desktop Online Help for details.
TIP:
TIP: To scroll throug h the song list, tap the onscreen scr oll arrows or press the
TIP:TIP:
blue or green Action buttons. To play a sp ecific song, tap List and then
tap the song title.
Using Your Zodiac Console 54
54
5454
Page 55

Uploading
Uploading so ngs
Uploading Uploading
songs from your
songs songs
Use the Music application in Palm™ Desktop software to choose which songs
you want to upload and to arrange them in the order in which you want to
play them on your console. During synchronization, Music copies the songs
from your computer to your console or to any a va ilable expansion cards in the
your console’s expansion slots.
1. Double-click the Palm Desktop icon on your computer desktop.
2. Click the Music button on the left side of the screen.
3. Click Add Song.
4. In the Open dialog box, locate and select a song.
5. Click Open to add this song to the list.
The song title and performer's name appear in the list, along with a HotSync
“pending” icon.
from your computer
from your from your
computer
computercomputer
Using Music
Uploading songs from your computer
6. Repeat steps 3 through 5 to add other songs to the list.
7. For each song, click the Location list and select Handheld or any available
expansion card to indicate where you want to upload the song.
8. Perform a HotSync operation to load the selected songs onto your
console. See page 144 for details.
TIP:
TIP: You can also use a card reader and Windows Explorer to copy MP3 files to an
TIP:TIP:
expansion card. Once the songs are on the card simply insert the card int o one of
your console’s expansion slots to play them on your console.
For additional information about uploading songs and using the Music
application on your computer, see the Palm Desktop online Help.
Using Your Zodiac Console 55
55
5555
Page 56

DDDDele ting son gs
eleting songs
eleting songseleting songs
When you delete a song, Music removes the song from your song list and
deletes the song file from your console or expansion card. If you also have a
copy of the song on your computer, it does not de lete the copy on your
computer.
1. Tap the Menu icon .
2. From the Track menu, select Delete.
Using Music
Deleting songs
3. From the Delete From pick list, select the location of the song you want to
delete.
4. Highlight the song you want to delete, and then tap Delete.
5. Tap Yes to confirm deletion.
Conserving power while pl ayin g songs
Conserving power while pl ayin g songs
Conserving power while pl ayin g songsConserving power while pl ayin g songs
When your console is not plugged into a power outlet, you can put your
console into a special power-saving Hold state to conserve battery power
while playing songs. In the Hold state, the screen and backlight turn off while
your songs continue to play.
If you forget to put your console in the Hold state, it automatically enters this
state if the auto-shutoff interval expires while you’re listening to a song.
Using Your Zodiac Console 56
56
5656
Page 57

Using Music
Setting Music preferences
1. Tap the Menu icon .
2. From the Options menu, select Hold.
The LED blinks slowly to indicate that the Hold state is active.
TIP:
TIP: You can also activate the Hold state by simultaneously pressing the Left and
TIP:TIP:
Right Trigger buttons.
3. To return your console to the normal operating state, press either the
Power button or the Home button .
TIP:
TIP: You can also conserve power by listening to music through the headphones
TIP:TIP:
or amplified external speakers inst ead of playing music t hro ugh the internal
speakers.
Setting Music preference s
Setting Music preference s
Setting Music preference sSetting Music preference s
Use the Music Preferences dialog box to choose background, bass level, and
color settings.
1. Tap the Menu icon .
2. From the Options menu, select Preferences.
3. In the Preferences dialog box, choose from the following settings:
Using Your Zodiac Console 57
57
5757
Page 58

Using Music
Setting Music preferences
• Background Playback. Listen to music while you play games, read an
eBook, or use other applications on your console.
When this box is checked you can tap the Music Controls icon on
the Status Bar to open the Music Controls dialog box and access the
background playback controls.
When this box is unchecked, your music stops playing when you exit
the Music application.
NOTE:
NOTE: Background playback may affec t performance of some games. If you
NOTE:NOTE:
notice a decrease in performance while playing a game, try turning off music
while playing this game.
• Stop Music on Exit. Pause music playback each time you exit the
Music application. This option is available only when the Background
Playback option is on. To resume playback, tap the Music Controls icon
on the Status Bar and use the controls in the Music Controls dialog
box.
• Headphone Bass. Turn bass boost on and off. Tap the pick and choose
Normal or Boost as the bass level setting.
• Color Theme. Set the background color for the Music application. To
change the colors, tap the color box to open the Color Themes dialog
box, tap a color theme, and then tap OK.
TIP:
TIP: To create a custom color background, tap th e pick list in the lower-right
TIP:TIP:
corner of the Color Th emes dialog box and use th e Palette, RGB, or HS V settings
to create your own background.
4. Tap OK.
Using Your Zodiac Console 58
58
5858
Page 59

U
Using
sing PPPPhoto
UU
sing sing
Photos provides a way to view and manage JPEG pictures files on your
console.
Use Photos to:
• View individual pictures stored on your console or an expansion card.
• View pictures and create slide shows.
• Upload pictures from your computer to your console or an expansion
card.
• Update a picture list you created with the Photos component in Palm
Desktop software.
• Exchange pictures with friends and family. See the section that begins
on page 167 for details.
hotossss
hotohoto
5
Opening Photo s
Opening Photo s
Opening Photo sOpening Photos
1. Press the Home button .
2. Select the Media category .
3. Select the Photos icon .
Using Your Zodiac Console 59
59
5959
Page 60

Using Photos
Opening Photos
• Up . Select the thumbnail above the current picture, or display the
previous picture in the sequence.
• Down . Select the thumbnail below the current picture, or display
the next picture in the sequence.
• Left . Select the thumbnail to the left of the current picture, or
display the previous picture in the sequence.
• Right . Select the thumbnail to the right of the current picture, or
display the next picture in the sequence.
• Full-Screen . View a full-screen image of the selected picture. To
exit Full-Screen mode, tap the screen or press Center.
• Slide Show . Begin a slide show. The pictures appear in Full-Screen
mode in the same sequence as the picture list. The slide show
automatically advances to the next picture after a preset interval. You
can manually advance or rewind the slide show using the analog
controller, the Action buttons, or the Trigger buttons.
• Shuffle . Select Shuffle to create a randomly ordered picture list
and slide show. Deselect Shuffle to return the pictures to their prior
order.
• Console . Selec t console to display pictures stored in the internal
memory on your console. If there are no pictures in internal memory,
then the button is inactive. You can display pictures on your console
and expansion cards at the same time.
• Card 1 or Card 2 . Select one of the Card buttons to display
pictures stored on an expansion card that is seated in an expansion
slot. If there are no pictures on the card seated in the expansion slot,
then the button is inactive. You can display pictures on your console
and expansion cards at the same time.
• Picture List . Display thumbnail images of all the pictures in the
selected locations. View the order in which pictures will appear in a
slide show. You can drag and drop pictures to arrange them in a
particular order, or use the Photos application on your computer to
create a picture list, and then synchronize your console with your
computer. See the Palm Desktop Online Help for details.
Using Your Zodiac Console 60
60
6060
Page 61

Using Photos
Opening Photos
• Details . View the selected picture and the following information
and controls:
– Rotate controls . Rotate the picture in 90 degree
increments.
– Fit controls . Choose how the picture fits on the screen. If
the picture is smaller than your console’s screen (480x320 pixels), a
appears as a third fit control. You can use this extra control to
view a small image at its actual size.
– Title. View the name of the picture file.
– Date/Time. View the date and time the picture was taken. This may
be different from the date associated with the picture file.
– Location. View an icon that indicates where the picture is stored.
TIP:
TIP: You can scroll to the next or previous picture using the analog
TIP:TIP:
controller, the Action buttons, or the Trigger buttons.
Using Your Zodiac Console 61
61
6161
Page 62

Uploading pictur e s fr om your computer
Uploading pictur e s fr om your computer
Uploading pictur e s fr om your computerUploading pictur e s fr om your computer
Use the Photos application in Palm™ Desktop software to choose which
pictures you want to upload and to arrange them in the order in which you
want to view them on your console. During synchronization, Photos copies
the pictures from your computer to your console or to any available
expansion cards in the your console’s expansion slots.
1. Double-click the Palm Desktop icon on your computer desktop.
2. Click the Photos button on the left side of the screen.
3. Click Add File.
4. In the Open dialog box, locate and select a picture.
5. Click Open to add this picture to the list.
The picture title appears in the list, along with a HotSync “pending” icon.
6. Repeat steps 3 through 5 to add other pictures to the list.
Using Photos
Uploading pictures from your computer
7. For each picture, click the Location list and select Handheld or any
available expansion card to indicate where you want to upload the
picture.
8. Perform a HotSync operation to load the selected songs onto your
console. See page 144 for details.
TIP:
TIP: You can also use a card reade r and Windows Explorer to copy JPG fil es to an
TIP:TIP:
expansion card. On ce the pictures are on the car d simply insert the car d into one of
your console’s expansion slots and open Photos to view them on your console.
For additional information about uploading pictures and using the Photos
application on your computer, see the Palm Desktop Online Help.
Using Your Zodiac Console 62
62
6262
Page 63

SSSSetting Photos preferences
etting Photos preferences
etting Photos preferencesetting Photos preferences
1. From the list or detail view, tap the Menu icon .
2. From the Options menu, select Preferences.
3. In the Preferences dialog box, choose from the following settings:
• Slide Duration. Indicate how quickly the pictures in a slide show
change. Tap the pick list to select the interval unit: Seconds, Minutes,
or Hours. Then enter the interval length in the space next to the pick
list.
Using Photos
Setting Photos preferences
• Color Theme. Set the background color for the Photos application. To
change the colors, tap the color box to open the Color Themes dialog
box, tap a color theme, and then tap OK.
TIP:
TIP: To create a custom color background, tap th e pick list in the lower-right
TIP:TIP:
corner of the Color Th emes dialog box and use th e Palette, RGB, or HS V settings
to create your own background.
4. Tap OK.
Deleting pictures
Deleting pictures
Deleting picturesDeleting pictures
When you delete a picture, Photos removes the picture from your picture list
and deletes the file from your console or expansion card.
IMPORTANT:
IMPORTANT: If you also have a copy of the picture on your computer,
IMPORTANT:IMPORTANT:
deleting the picture from your con s ole does NOT delete the copy on
your computer.
Using Your Zodiac Console 63
63
6363
Page 64

Deleting a single picture
Deleting a single picture
Deleting a single pictureDeleting a single picture
1. From the list view, select the picture you want to delete.
2. Tap the Menu icon .
3. From the Image menu, select Delete Selected.
4. Tap Yes to confirm deletion.
Deleting multiple pictures
Deleting multiple pictures
Deleting multiple picturesDeleting multiple pictures
1. From the list or detail view, tap the Menu icon .
2. From the Image menu, select Delete.
Using Photos
Deleting pictures
3. Select the picture you want to delete.
4. Tap Delete.
5. Tap Yes to confirm deletion.
6. Repeat steps 3 - 5 to delete other pictures.
7. Tap Done.
Using Your Zodiac Console 64
64
6464
Page 65

Copying pictures
Copying pictures
Copying picturesCopying pictures
You can copy pictures between your console and an expansion card.
1. From the list or detail view, tap the Menu icon .
2. From the Image menu, select Copy.
Using Photos
Copying pictures
3. From the Copy From pick list, select the location where the picture
currently resides.
4. From the Copy To pick list, select the location where you want to place the
picture.
5. Select the picture you want to copy.
6. Tap Copy.
7. Repeat steps 3 - 6 to copy other pictures.
8. Tap Done.
Using Your Zodiac Console 65
65
6565
Page 66

Playing
Playing Games
Playing Playing
Your Zodiac console comes with these two great games:
• Stuntcar Extreme. Navigate hills, jumps and obstacles in this
outrageous racing game, with graphic acceleration. Select from
cockpit or behind the car view, and choose from a quick race or play an
entire season in our championship mode. You can even see your stats
track by track as you progress in the game.
For complete documentation on this game, look for the PDF file in the
Tapwave Extras\Bonus\Stuntcar Extreme\ folder on the Zodiac CD.
• Acid Solitaire. This addictive game offers the best of interactive
solitaire for your on-the-go lifestyle. Supporting features such as an
easy-to-use drag and drop interface, two play modes, an advanced
statistic tracking model that follows eleven different game stats, and a
sophisticated alert system that notifies you both when you are about
to run out of moves and when no moves are remaining. You can even
customize your background to have your own unique solitaire
experience.
Games
GamesGames
6
For complete documentation on this game, look for the PDF file in the
Tapwave Extras\Bonus\Acid Solitaire\ folder on the Zodiac CD.
For information about installing additional games, see page 4 9
playing games that are stored on expansion cards, see page 159.
IMPORTANT:
IMPORTANT: Some games require special installation tools. Check the README
IMPORTANT:IMPORTANT:
file for your game to see if you can use the Palm Install Tool or if you need a
special installation tool.
Using Your Zodiac Console 66
. T o learn about
66
6666
Page 67

PPPPlaying multi
laying multipppplayer games
laying multilaying multi
The built-in Bluetooth radio provides you with a wireless, multiplayer gaming
environment. When your console is within range of other Zodiac consoles or
other devices enabled with Bluetooth technology that support the game
software, you can initiate or join a multiplayer game session.
Yo u can initiate a session as follows:
1. Launch the game. See page 43 for details.
2. Select multiplayer mode as described in the game documentation.
This should initiate the discovery process on your console.
3. Instruct all players to quickly press and release the Bluetooth button to
make their consoles discoverable.
When a Zodiac console is in this state, the Bluetooth LED flashes.
4. When the Discovery Results screen appears, select the players you want
to include in the game, and then tap OK.
layer games
layer gameslayer game s
Playing Games
Playing multiplayer games
This should send an invitation message to the selected players’ consoles.
5. Instruct the players to tap Yes to join the game.
6. When the game is over, instruct all players to press and hold the
Bluetooth button to turn off the Bluetooth radio.
For additional information about using the Bluetooth features of your console
visit tapwave.com.
Using Your Zodiac Console 67
67
6767
Page 68

Using
Using CCCCloc
Using Using
Clock provides an easy-to-read time display, an alarm clock, a stopwatch, and
a timer.
Use Clock to:
• Set an alarm that is not related to a specific entry on your console.
• Determine how long it takes to complete a task or event.
• Receive a notification when the specified time period elapses.
Opening Clock
Opening Clock
Opening ClockOpening Clock
1. Press the Home button .
2. Select the My Stuff category .
lockkkk
locloc
7
3. Select the Clock icon .
Analog clock
TIP:
TIP: To set the time and date, select Set Time & Date from the Options menu.
TIP:TIP:
To change the time and date format, tap Home , select the Prefs category,
and then select F ormats.
Using Your Zodiac Console 68
68
6868
Page 69

Using Clock
Opening Clock
• Analog Clock. View the current time in analog format.
• Date. View the current date.
• Time/Alarm . View the time in digital format and access the
following alarm controls:
– Alarm On. Turn on the alarm and display the alarm controls.
– Alarm Off. Turn off the alarm and hide the alarm controls.
– Time. Set the time when you want the alarm to sound. When you
tap this box, a number pad appears. Tap the numbers to select the
time you want the alarm to sound, and then tap the Check button.
– Volume. Select the volume level for the alarm sound. The choices
are: Low, Medium, High, and Ascending. The Ascending setting
increases from low to high volume over a period of about 20
seconds.
– Wake To. Select the alarm sound. Options include Music or a list of
sample alarms. If you select Music, you can select a song from the
Music application.
• Timer/Stopwatch . Acce ss the following timer and stopwatch
controls:
Display
– Display. View the time remaining in timer mode, and the elapsed
time in stopwatch mode. The time displays in 1/100th of a second
increments.
– Start. Begin the timer or stopwatch. When you tap this button, it
changes to a Stop button.
Using Your Zodiac Console 69
69
6969
Page 70

Using Clock
TIP:
TIP: When the stopwatch is running, your con sole does not go to sleep .
TIP:TIP:
Make sure you sto p or pause the stopwatch wh en you’re not using it to avoid
accidentally draining the battery.
– Stop. Pause the timer or stopwatch. When you tap this button, it
changes to a Resume button and a Reset button appears next to
the Display. If you are done timing the current task, tap Reset to
return the display to all zeros.
– Resume. Restart the timer or stopwatch to continue timing a task.
When you tap this button it changes to a Stop button.
– Timer. Set a timer to notify you when a particular amount of time
has passed. To set the timer, tap the number pad to indicate the
time period you want to monitor, such as a 3-minute egg or a halfhour pizza delivery. When the time period elapses, the selected
alarm sound plays and a notification screen appears. You can set
the timer sound by selecting Preferences from the Options menu.
Opening Clock
TIP:
TIP: You can also stop or resume the timer or stopwatch by pressing the
TIP:TIP:
Right Trigger button.
Using Your Zodiac Console 70
70
7070
Page 71

Performing Common Tasks
Performing Common Tasks
Performing Common TasksPerforming Common Tasks
There are many tasks that are common to the applications found in the
Organizer category. These common tasks are described in this section. We use
the term records as a generic term that refers to an individual item in an
application, for example, a single Date Book event, an Address Book entry, a
To Do List item, or a Memo Pad memo.
Creating
Creating rrrrecords
Creating Creating
ecords
ecordsecords
You can use the following procedure to create a new record in Date Book,
Address Book, To Do List, and Memo Pad.
1. Open the application in which you want to create a record.
2. Tap New.
3. (Date Book only) Select start and end times for your appointment and
tap OK.
8
4. Enter text for the record.
NOTE:
NOTE: The console automatically capitalizes the first letter of each field
NOTE:NOTE:
(except numeric and e-mail fields).
5. (Optional) Tap Details to select attributes for the record.
6. (Address Book and Memo Pad only) Tap Done.
Your console saves the new record automatically.
Using Your Zodiac Console 71
71
7171
Page 72

Editing
Editing rrrrecords
Editing Editing
ecords
ecordsecords
After you create a record, you can change, delete, or add new information at
any time. When the screen is in edit mode, a blinking cursor appears within
the information, and the information appears on a dotted line called an edit
line. You can then enter text in any of the ways described in the chapter
beginning on page 32.
Cursor
Performing Common Tasks
Editing recor ds
Edit line
Selecting Text
Selecting Text
Selecting TextSelecting Text
Select the text you want to edit using one of the following techniques:
• Double-tap a word in a field to select the word.
• Triple-tap any word on a line to select the entire line.
• Drag across a line of text to select some or all of the information, or
drag down to select text across multiple lines.
Using the
Using the EEEEdit menu
Using the Using the
The Edit menu is available from any screen where you enter or edit text. As a
general rule, the Edit menu commands affect selected text. Any of the
following commands may appear in the Edit menu, depending on the
application you’re using:
dit menu
dit menudit menu
• Undo. Reverses the last action taken.
• Cut. Removes a selection from its current location to memory. You can
then paste the text into another area of the current application or into
a different application.
Using Your Zodiac Console 72
72
7272
Page 73

• Copy. Copies a selection and moves it to memory. You can paste the
selection into another area of the current application or into a different
application.
• Paste. Inserts a selection from memory into an area you select. Paste
produces no result if you have not used the Cut or Copy commands.
• Select All. Selects all the text in the current record or screen.
• Keyboard. Opens the onscreen keyboard. Tap Done to close the
keyboard.
• Graffiti2 Help. Opens the Graffiti 2 character stroke screen.
Deleting
Deleting rrrrecords
Deleting Deleting
ecords
ecordsecords
You can delete records in any of the Organizer applications.
1. Select the record you want to delete.
Performing Common Tasks
Deleting records
2. Do one of the following:
• From the Record menu, select Delete. The Delete command differs
depending on the application you’re using, for example, Delete Event
appears in the Record menu in Date Book, and Delete Item appears in
To Do List.
• In the Details dialog box of the application, tap Delete, and then tap
OK.
• Delete the text of the record.
NOTE:
NOTE: In Date Book, deleting the text of a repeating event deletes all
NOTE:NOTE:
instances of the event.
• In the Input Area, drag a diagonal line from the lower left to upper
right to display the Command toolbar; then tap the Delete icon or
draw a Graffiti2 D in the text area.
A confirmation dialog box appears.
Delete icon
Using Your Zodiac Console 73
73
7373
Page 74

3. To archive a copy of the deleted file on your PC during the next HotSync
operation, check the Save Archive box.
4. Tap OK to delete the record.
Purging
Purging rrrrecords
Purging Purging
ecords
ecordsecords
Over time, as you use Date Book and To Do List, you may accumulate records
that are no longer useful. For example, events that occurred months ago
remain in Date Book, and completed To Do List items remain in the list.
Outdated records take up memory on your console, so it’s a good idea to
remove them by using Purge. If you think Date Book or To Do List records
might prove useful later, you can purge them from your console and save
them in an archive file.
Purging is not available in Address Book or Memo Pad; delete records from
these applications manually.
Performing Common Tasks
Purging records
1. Open the application from which you want to purge records.
2. Tap the Menu icon .
3. From the Record menu, select Purge.
4. From the confirmation dialog box, do the following:
• Date Book. Select an option from the Delete Events Older Than pick
list —1 week, 2 weeks, 3 weeks or 1 month.
• Date Book and To Do list. Check the Save Archive Copy on PC box to
save a copy of purged records in an archive file on your desktop. The
records are transferred the next time you perform a HotSync
operation.
5. Tap OK.
Categorizing
Categorizing rrrrecords
Categorizing Categorizing
You can categorize records in Address Book, To Do List, and Memo Pad for
easy retrieval (Date Book does not have categories). When you create a record,
it is automatically assigned to the current category. For example, if you are in
the All category, the record goes in the Unfiled category. A record can remain
unfiled or it can be assigned to a category at any time.
ecords
ecordsecords
Using Your Zodiac Console 74
74
7474
Page 75

Performing Common Tasks
Categorizing records
Each application has a default set of categories:
• Address Book includes a Business, Personal, and QuickList category.
• To Do List includes a Business, Personal, and All category.
• Memo Pad includes a Business, Personal, and All category.
You can rename or delete the default categories, and you can create new
categories. Each application can have up to 15 categories.
Moving a record into a category
Moving a record into a category
Moving a record into a categoryMoving a record into a category
1. Select the record you want to categorize.
2. Tap Details (from the Address View screen, tap Edit first).
3. From the Category pick list, select the desired category.
4. Tap OK.
Displaying a category of records
Displaying a category of records
Displaying a category of recordsDisplaying a category of records
1. Open one of the following applications: Address Book, To Do List, or
Memo Pad application.
2. From the pick list in the upper-right corner, select the category you want
to display.
Tap pick list
Select a category
Using Your Zodiac Console 75
75
7575
Page 76

Performing Common Tasks
Categorizing records
Adding or edit
Adding or editing
Adding or editAdding or edit
1. In Address Book, To Do List, or Memo Pad application, choose from the
following options:
ing categories
categories
inging
categories categories
• From the pick list in the upper-right corner, select Edit Categories.
Edit Categories
• In Address Book, select a record, tap Edit, and then tap Details. From
the Category pick list, select Edit Categories.
• In Memo Pad and To Do List, select a record from the list, and tap
Details. From the Category pick list, select Edit Categories.
2. Select any of the following options:
• To create a new category, tap New, and enter a new name in the Input
Area. Tap OK.
• To rename a category, tap it in the list to select it. Tap Rename, enter a
new name in the Input Area, and tap OK.
Using Your Zodiac Console 76
76
7676
Page 77

TIP:
TIP: You can move records from multiple ca tegories into a single category
TIP:TIP:
by renaming all discrete categories with a single category name.
• To delete a category, tap it in the list to select it. Tap Delete.
3. Tap OK.
FFFFinding
inding rrrrecords
inding inding
ecords
ecords ecords
Your console provides several ways to find information:
• In all applications, starting with the current application, you can use
the Find dialog box to locate the selected text.
• In Date Book, To Do List, and Memo Pad, you can use Phone Lookup to
display the Address List screen and add the information from this list
to a record.
Performing Common Tasks
Finding records
• In Address Book, you can use the Look Up option to enter the first
letters of a name to scroll immediately to that name.
Finding Address Book records
Finding Address Book records
Finding Address Book recordsFinding Address Book records
1. Do one of the following:
• From the Address screen, enter the first few letters of the name you
want to locate.
Look Up line
• Move the analog controller to scroll to a name. Holding down the
analog controller accelerates scrolling.
Using Your Zodiac Console 77
77
7777
Page 78

Performing Common Tasks
Finding records
Using the Find dialog box
Using the Find dialog box
Using the Find dialog boxUsing the Find dialog box
The Find dialog box helps you locate text in any or all applications. For
example, if the text “dog” appears in Address Book and Date Book, the Find
dialog box displays both occurrences.
1. Tap the Find icon.
2. Enter the text you want to find; then tap OK.
Note that the Find option is not case sensitive; searching for "davidson"
also finds "Davidson."
TIP:
TIP: Select text in an application before tapping Find to automatically place
TIP:TIP:
the text in the Find dia lo g bo x.
Find searches for the text in all records and all notes within all applications.
As your console searches for the text, you can tap Stop to stop the search at
any time. To continue the search after tapping Stop, tap Find More.
NOTE:
NOTE: Find locates all matches that begin with the supplied text. It does not
NOTE:NOTE:
find words where the supplied text appears in the middle or at the end of a word.
Using Phone Lo
Using Phone Loooookup
Using Phone LoUsing Phone Lo
The Phone Lookup option lets you add a telephone number from the Address
list to an entry in another application. For example, you can add your dentist’s
telephone number to your dental appointment date in Date Book.
kup
kup kup
Using Your Zodiac Console 78
78
7878
Page 79

Performing Common Tasks
Sorting reco rds
1. In Date Book, To Do List, or Memo Pad, display the record in which you
want to insert a phone number.
2. Tap the Menu icon .
3. From the Options menu, select Phone Lookup.
4. Select a record or write the first few letters of the name you want to add.
Tap Add to add the information to the record.
NOTE:
NOTE: You can also search based on selected text. Drag to highligh t the text,
NOTE:NOTE:
then follow step 3 above. When the search is complete, the name and phone
number of the candid ate replaces the sel ected text.
Sorting
Sorting rrrrecords
Sorting Sorting
ecords
ecordsecords
Yo u can sort lists of records in various ways, depending on the application.
Sorting is available in applications that display lists—in Address Book, To Do
List, and Memo Pad.
Sorting To Do List records
Sorting To Do List records
Sorting To Do List recordsSorting To Do List records
1. Open the application to display the list screen.
2. Tap Show.
Using Your Zodiac Console 79
79
7979
Page 80

Performing Common Tasks
Sort By
pick list
3. From the Sort By pick list, select an option.
4. Tap OK.
Sorting Address Book and Memo Pad records
Sorting Address Book and Memo Pad records
Sorting Address Book and Memo Pad recordsSorting Address Book and Memo Pad records
Sorting reco rds
1. Open the application to display the list screen.
2. Tap the Menu icon .
3. From the Options menu, select Preferences.
4. In the Preferences dialog box, tap the option you want, and then tap OK
to sort the list.
TIP:
TIP: You can also manually arrange the Memo list by tapp ing an d dragging
TIP:TIP:
a memo to a new location in the list. To display the list of your memos on your
computer as you arranged them manually on your console, open Memo Pad
in Palm Desktop software, click List By, and select Order on Handheld.
Using Your Zodiac Console 80
80
8080
Page 81

Making
Making rrrrecord s priva te
Making Making
ecords private
ecords privateecords private
In most applications (except Mail), you can make individual records private.
Private records can be either masked or hidden. Private record s remain visible
and accessible until you select a security setting to Hide records. Private
record names are covered with a gray bar when the security setting is set to
Mask records.
If you assigned a password to your console, you must enter it before private
records are displayed. For more information, see page 151.
1. In your application, do one of the following:
• Create a new record and tap Edit, and then tap Details.
• Select an existing record, and tap Details.
2. Check the Private box. Tap OK.
Performing Common Tasks
Making records private
3. At the alert in the Private Records dialog box, tap OK.
HHHHiding private records
iding private records
iding private recordsiding private records
1. Do one of the following:
• Press the Home button , select the Utilities category, and then
select Security.
• From within an application, tap the Menu icon , and from the
Options menu, select Security.
• From within any application, draw the Menu command stroke to bring
up the Command Bar and tap the padlock icon.
2. From the Current Privacy pick list in the Change Security dialog box,
select Hide Records.
Using Your Zodiac Console 81
81
8181
Page 82

Performing Common Tasks
3. Tap OK.
DDDDisplaying private records
isplaying private records
isplaying private recordsisplaying private records
1. Do one of the following:
• Press the Home button , select the Utilities category, and then
select Security.
• From within an application, tap the Menu icon , and from the
Options menu, select Security.
Attaching notes
• From within any application, draw the Menu command stroke to bring
up the Command Bar and tap the padlock icon.
2. From the Current Privacy pick list, select Show Records.
3. If you assigned a password, enter it.
4. Tap OK.
Attaching
Attaching nnnnotes
Attaching Attaching
1. Display the entry to which you want to add a note.
2. (Address Book only) Tap Edit.
otes
otesotes
Y ou can attach notes to records in all the Organiz er applications except Memo
Pad. A note can be up to several thousand characters long.
3. Tap Details.
Using Your Zodiac Console 82
82
8282
Page 83

Performing Common Tasks
Attaching notes
4. Tap Note.
5. Enter the desired note.
6. Tap Done.
A note icon appears to the right of any item containing a note. To review or
edit a note, tap the note icon.
Deleting a note
Deleting a note
Deleting a noteDeleting a note
1. Tap the note icon.
2. Tap Delete.
3. Tap Yes.
Note icon
Using Your Zodiac Console 83
83
8383
Page 84

Choosing
Choosing ffffonts
Choosing Choosing
onts
ontsonts
You can change the font style in all the Organizer applications. You can also
choose a different font style for each application.
Performing Common Tasks
Choosing fonts
Small font
Large font
1. Open an application.
2. Tap the Menu icon .
3. From the Options menu, select Font.
Small LargeSmall bold
Small bold font
Large bold font
Large bold
4. Tap the font style you want.
5. Tap OK.
Using Your Zodiac Console 84
84
8484
Page 85

9
Using Address Boo
Using Address Bookkkk
Using Address BooUsing Address Boo
Address Book lets you keep names, addresses, telephone numbers, and other
information about your personal or business contacts.
Use Address Book to:
• Quickly enter, look up, or duplicate names, addresses, phone numbers,
and other information.
• Enter up to five phone numbers (home, work, fax, mobile, and so on) or
e-mail addresses for each name.
• Define which phone number appears in the Address List for each
Address Book entry.
• Attach a note to each Address Book entry, in which you can enter
additional information about the entry.
• Assign Address Book entries to categories so that you can organize
and view them in logical groups.
Opening
Opening AAAAddress Book
Opening Opening
ddress Book
ddress Bookddress Book
1. Press the Home button .
2. Select the Organizer category .
3. Select the Address icon .
Address Book opens to display the list of all your records.
Using Your Zodiac Console 85
85
8585
Page 86

Adding and using Address Book entries
Adding and using Address Book entries
Adding and using Address Book entriesAdding and using Address Book entries
Address Book stores name and address information about people or
businesses.
Using Address Book
Adding and using Address Book entries
Creating an
Creating an AAAAddress Book entry
Creating an Creating an
A record in Address Book is called an entry. You can create entries on your
console, or you can use Palm Desktop software to create entries on your
computer and then download them to your console with your next HotSync
operation.
Palm Desktop software also has data import capabilities that let you load
database files into Address Book on your console. See page 41 and Palm
Desktop online Help for more information.
1. Open Address Book.
2. Tap New.
ddress Book entry
ddress Book entryddress Book entry
Using Your Zodiac Console 86
86
8686
Page 87

Using Address Book
Adding and using Address Book entries
Cursor
at Last
name
3. Enter the last name of the person you want to add to your Address Book.
4. Tap the First Name field and enter the person’s first name.
5. Tap any field and enter any other information that you want to include in
the entry.
NOTE:
NOTE: If you plan to sort entries by company name, be su re to en ter a company name.
NOTE:NOTE:
6. Tap the scroll arrows to move to the next page of information.
7. To attach a note to an entry, tap Note. Enter the note, and then tap Done.
8. After you finish entering information, tap Done.
Tap here to assign
entry to a category
TIP:
TIP: To create an entry tha t al ways appears at the top of the Address List,
TIP:TIP:
begin the Last name or Company field with a symbol, as in *If Found Call.*
This entry can contain contact information in case you lose your console.
Using Your Zodiac Console 87
87
8787
Page 88

Viewing
Viewing aaaan address entry
Viewing Viewing
n address entry
n address entryn address entry
1. Tap the address entry in Address List view.
The entry appears in Address view.
Using Address Book
Viewing an address entry
2. Tap Done after you finish viewing the entry.
DDDDuplicating an entry
uplicating an entry
uplicating an entryuplicating an entry
Yo u can duplicate existing entries, which can be helpful when you want to
enter multiple people from a single organization. When you duplicate an
entry, the word Copy appears next to the name in the First Name field.
1. In Address Book, tap a name you want to duplicate.
2. Tap the Menu icon .
3. From the Record menu, select Duplicate Record.
4. Edit the record as necessary.
Selecting different
Selecting different ttttypes
Selecting different Selecting different
You can select the types of phone numbers or e-mail addresses that an
Address Book entry displays. An y ch anges y ou make apply only to the current
entry.
1. In the Address list, tap the entry you want to change.
ypes o
ypesypes
of
f pppphone numbers and addresses
o o
hone numbers and addresses
f f
hone numbers and addresseshone numbers and addresses
2. Tap Edit.
3. From the pick list next to any label you want to change, select a new label.
Using Your Zodiac Console 88
88
8888
Page 89

Editing Address Book
Editing Address Book eeeentries
Editing Address Book Editing Add r ess Book
You can change the type of information that appears in the Address List
screen, categorize an entry, and hide an entry for security reasons. You can
also delete entries.
ntries
ntriesntries
Using Address Book
Editing Address Book entries
1. Tap the entry that you want to change in the Address list.
2. Tap Edit.
3. Tap Details.
4. In the Address Entry Details dialog box, set any of the following:
• Show in List. Select which information you want to appear in the
Address List screen. Options are Work, Home, Fax, Other, and E-mail.
• Category. Select the category you want to assign to the entry.
• Private. Hide the entry when Security is turned on.
• Note. Attach a note, such as driving directions, to the entry.
5. Tap OK.
Using Your Zodiac Console 89
89
8989
Page 90

Changing
Changing AAAAddress Book display
Changing Changing
1. In the Address list or in Address view, tap the Menu icon .
2. From the Options menu, select Preferences.
ddress Book display
ddress Book displayddress Book display
Yo u can change how Address Book lists are sorted and you can add custom
fields for entering additional information, using preferences. You can also
have Address Book display the last category you selected each time you
return to the application.
.
Using Address Book
Changing Address Book display
3. From the Address Book Preferences dialog box, select from the following
options:
• Remember last category. Display the most recently viewed category
the next time you open Address Book.
• Last Name, First Name. Sort the Address list alphabetically by an
individual’s last name and then first name.
• Company, Last Name. Sort the Address list alphabetically by the
company name, and then an individual’s last name.
4. Tap OK.
Adding
Adding ccccustom fields at the end of Address Edit screens
Adding Adding
ustom fields at the end of Address Edit screens
ustom fields at the end of Address Edit screensustom fields at the end of Address Edit screens
1. In the Address list or in Address view, tap the Menu icon .
2. From the Options menu, select Rename Custom Fields.
Using Your Zodiac Console 90
90
9090
Page 91

Using Address Book
Adding custom fields at the end of Address Edit screens
3. In the Input Area, rename the fields to identify the information you’ll
enter in them. The names you give the custom fields appear in all entries,
at the end of the Address Edit screen.
4. Tap OK in the Rename Custom Fields dialog box.
5. Tap Done.
Using Your Zodiac Console 91
91
9191
Page 92

10
Using Date Boo
Using Date Bookkkk
Using Date BooUsing Date Boo
Date Book lets you quickly and easily schedule appointments or any activity
associated with a date or date and time. When you open Date Book, the
current date and a list of times for a standard business day are displayed.
Use Date Book to:
• Schedule events: timed events, which have both times and dates;
untimed events, for example, birthdays or anniversaries; repeating
events, such as a weekly meeting held on the same day at the same
time; continuous events, such as a vacation or three-day conference;
and all day events, which reflect the default hours of a day as set by the
user.
• Display your schedule in different ways: by Day, Week, Month, or
Agenda view.
• Set an alarm to sound minutes, hours, or days before a scheduled
appointment.
• Attach notes to events to describe or clarify Date Book entries.
• Rearrange or delete events from your schedule.
Opening
Opening DDDDate Book
Opening Opening
ate Book
ate Bookate Book
1. Press the Home button .
2. Select the Organizer category .
3. Select the Date Book icon .
Date Book opens to today’s schedule. The date appears in the top left corner
of the screen.
Using Your Zodiac Console 92
92
9292
Page 93

Scheduling
Scheduling eeeevents
Scheduling Scheduling
vents
ventsvents
An entry in Date Book is called an event. When you schedule an event, its
description appears on the time line, and its duration is set to 1 hour by
default. You can easily change the start time and duration for any event. You
can schedule the following types of events in Date Book:
Using Date Book
Scheduling events
• Timed events, such as meetings, that have a specific date and a specific
start and end time.
• Untimed events, such as birthdays, holidays, and anniversaries. These
events occur on a particular date but have no specific start or end
times; they appear at the top of the list of times marked with a
diamond. You can schedule more than one untimed event on the
same date.
• Repeating events, such as a weekly meeting that is held on the same
day at the same time each week.
• Continuous events, such as a vacation or three-day conference.
• All day events, which reflect the default length of the day.
Using Your Zodiac Console 93
93
9393
Page 94

Using Date Book
Scheduling events
Scheduling timed
Scheduling timed eeeevents for the current date
Scheduling timed Scheduling timed
1. Open Date Book to today’s schedule. The Day view displays the current
date and a list of times for a normal day.
2. With the current day selected, tap the line next to the time that
corresponds to the start of the event.
Enter text next
to event time
Time bar shows
default duration
vents for the current date
vents for the current datevents for the current date
3. Enter a description of the event, up to 255 characters in length.
4. Set the event’s duration:
• If the event is one hour long, skip to the end of this procedure.
• If the event is longer or shorter than an hour, tap directly on the time to
open the Set Time dialog box.
Tap the time to
display the Se t
Time dialog box
Using Your Zodiac Console 94
94
9494
Page 95

Using Date Book
Scheduling events
TIP:
TIP: You can open the Set Time dialog box (to select a start time) by making
TIP:TIP:
sure no event is selected, and then writing a number in the number portio n of
the Input Area.
5. Set the duration of the event in either of the following ways:
• Tap the time columns in the Set Time dialog box to set the Start Time;
Tap End Time; then tap the time columns to set the End Time.
• Tap All Day if the event lasts all day. The default hours of a standard
business day are set by the user, and may be changed using Date Book
Preferences. For details, see page 108.
Tap to scroll to
earlier hours
6. Tap OK.
Tap to change
hours
Tap to change
minutes
Tap to scroll to
later hours
Using Your Zodiac Console 95
95
9595
Page 96

Using Date Book
Scheduling events
Scheduling a timed event for another date
Scheduling a timed event for another date
Scheduling a timed event for another dateScheduling a timed event for another date
1. Select the date you want in one of the following ways:
• Tap the desired day of the week in the date bar at the top of the screen.
If necessary, tap the scroll arrows in the upper-right corner to move to
the next or previous week.
• Move the analog controller to scroll between days. Move Left to
display the previous day and Right to display the next day.
• Tap Go To at the bottom of the screen to open the Go to Date dialog
box. Select a date by tapping a year, month, and day in the calendar.
2. After locating the desired date, follow the steps for scheduling an event
for the current day.
Scheduling untimed
Scheduling untimed eeeevents
Scheduling untimed Scheduling untimed
You can schedule untimed events for any date. Untimed events appear at the
top of the list of times marked with a diamond.
vents
ventsvents
1. Select the event date you want (see page 93).
2. Tap New.
3. In the Set Time dialog box, tap No Time.
NOTE:
NOTE: You can tap OK inste ad but make sure nothing is ente red for start
NOTE:NOTE:
or end time.
Using Your Zodiac Console 96
96
9696
Page 97

Using Date Book
TIP:
TIP: You can create a new untimed event by making sure no event is selected
TIP:TIP:
and then writing letters in the Input Area. When you start writing, the untimed
event appears at th e top of the screen
4. Enter a description of the event.
Untimed
event
Scheduling events
5. Tap a blank area on the screen to deselect the untimed event.
NOTE:
NOTE: If you create a timed event and later want to make it an untimed event,
NOTE:NOTE:
tap directly on the event time in Date Book , tap No Time, and then tap OK.
Adding Address Book information to an event
Adding Address Book information to an event
Adding Address Book information to an eventAdding Address Book information to an event
You can add a name, address, and telephone number to an event using the
Phone Lookup option. For instructions, see page 78
Rescheduling events
Rescheduling events
Rescheduling eventsRescheduling events
Y ou reschedule events using the Details option in Date Book. You can also use
the Details option to convert untimed events into timed events.
1. Tap the event you want to reschedule.
2. Tap Details.
3. To change the time, tap the Time box, select a new time, and then tap OK.
4. To change the date, tap the Date box, select a new date, and then tap OK.
.
Using Your Zodiac Console 97
97
9797
Page 98

Using Date Book
Scheduling events
Scheduling repeating or continuous
Scheduling repeating or continuous eeeevents
Scheduling repeating or continuous Scheduling repeating or continuous
The Repeat function lets you schedule events that recur at regular intervals or
extend over a period of c onsecutive da ys. Repeating events include a birthday
and a weekly guitar lesson that falls on the same day of the week and the
same time of day. Continuous events might include a business trip or a
vacation.
1. T ap the ev ent (be sure to tap the e vent and not the time ne xt to the ev ent).
Typically, a continuous event is an untimed event.
2. Tap Details.
3. Tap the Repeat box to open the Change Repeat dialog box.
vents
vents vents
Tap the
Repeat
box
4. Tap Day, Week, Month, or Year to set how often the event repeats. For a
continuous event, tap Day.
5. Enter a number that corresponds to how often you want the event to
repeat on the Every line.
6. For example, if you select Month and enter the number 2, the event
repeats every other month.
7. To set an end date for the repeating or continuous event, select Choose
Date from the End On pick list. Use the date picker to select an end date.
8. Tap OK. An icon that represents a repeating event appears to the far right
on the event line.
Using Your Zodiac Console 98
98
9898
Page 99

Using Date Book
Scheduling events
Changing repeating or continuous events
Changing repeating or continuous events
Changing repeating or continuous eventsChanging repeating or continuous events
When changes are made to a repeating or continuous event you have the
option of applying the change to just the current event, the current event and
all future occurrences of this event, or all occurrences of this event—past,
present, and future.
1. Select the event you want to change and tap Details.
2. Change the event and tap OK. The Repeating Event screen opens.
3. Select one of the following options:
• Current. Edit a single occurrence of this event.
• Future. Edit the current event and all future occurrences of this event.
• All. Edit all past, current, and future occurrences of this event.
The event is changed and y ou ar e returned to the da y view where y ou started.
These steps apply to all changes and deletions you make to repeating or
continuous events.
Tips for scheduling repeating or continuous events
Keep the following in mind when scheduling repeating or continuous events:
• If you change the start date of a repeating event, your console
calculates the number of days you moved the event. Your console
then automatically changes the end date to maintain the duration of
the repeating event.
• If you change the repeat interval (e.g., daily to weekly) of a repeating
event, past occurrences (prior to the day on which you change the
setting) are not changed, and your console creates a new repeating
event.
Using Your Zodiac Console 99
99
9999
Page 100

• If you change the date of an occurrence of a repeating event (e.g., from
January 14 to January 15) and apply the change to all occurrences, the
new date becomes the start date of the repeating event. Your console
adjusts the end date to maintain the duration of the event.
• If you change other repeat settings (for example, time, alarm, private)
of a repeating event and apply the change to all occurrences, your
console creates a new event. The start date of this new event is the day
on which the setting is changed. Past occurrences (prior to the day of
the change) are not changed.
• If you apply a change to a single occurrence of a repeating event (e.g.,
time), that occurrence no longer shows the Repeat icon.
SSSSetting the
etting the aaaalarm
etting the etting the
larm
larmlarm
The Alarm setting lets you set an audible alarm for events in your Date Book,
and display a reminder message on-screen. For untimed events, only the
reminder message appears.
Using Date Book
Setting the alarm
Setting an alarm for an event
Setting an alarm for an event
Setting an alarm for an eventSetting an alarm for an event
You can set an alarm for minutes, hours, or days before an event. When you
set an alarm, an Alarm icon appears to the far right of the event with the
alarm.
You can also set a silent alarm for untimed events that displays a reminder
message on-screen before the day of the event. The alarm triggers at the
specified period of minutes, hours, or days before midnight of the day on
which the untimed event begins.
For example, you set a 5-minute alarm for an untimed event that occurs on
February 4. The reminder message appears at 11:55 p.m. on the night of
February 3. The reminder remains onscreen until you turn on your console
and tap OK to turn off the reminder.
1. Tap the event to which you want to assign an alarm.
2. Tap Details.
3. Check the Alarm box.
The default setting, 5 Minutes, appears.
Using Your Zodiac Console 100
100
100100
 Loading...