

Page 1

© 2009 Sprint. SPRINT and the logo are trademarks of Sprint. Other
marks are the property of their respective owners.
v. 1. 0, w ebOS 1. 2
Palm® PixiTM User Guide
www.sprint.com
Page 2

Intellectual Property Notices
© 2009 Palm, Inc. All rights reserved. Palm, Pixi,
Synergy, Touchstone, and the Palm and Pixi logos are
among the trademarks or registered trademarks owned
by or licensed to Palm, Inc. Microsoft and Outlook are
trademarks of the Microsoft group of companies.
Exchange ActiveSync Enabled. Facebook
®
is a
registered trademark of Facebook, Inc. Google and
Google Maps are trademarks of Google, Inc. Amazon,
Amazon MP3, and the Amazon MP3 logo are
trademarks of Amazon.com, Inc. or its affiliates. Doc
View and PDF View are provided by Documents To
®
, a product of DataViz, Inc. (dataviz.com). All other
Go
brand and product names are or may be trademarks
of, and are used to identify products or services of, their
respective owners.
Disclaimer and Limitation of Liability
Palm, Inc. and its suppliers assume no responsibility for
any damage or loss resulting from the use of this
guide. Palm, Inc. and its suppliers assume no
responsibility for any loss or claims by third parties that
may arise through the use of this software. Palm, Inc.
and its suppliers assume no responsibility for any
damage or loss caused by deletion of data as a result
of malfunction, dead battery, or repairs. Be sure to
make backup copies of all important data on other
media to protect against data loss.
Patent pending. This product also is licensed under
United States patent 6,058,304.
Use of this device requires providing a valid email
address, mobile phone number, and related
information for account setup and activation. A data
plan is also required. An unlimited usage data plan is
strongly recommended or additional data charges may
apply.
Open Source License Information
You can view the Open Source License terms on your
phone. Tap the center of the gesture area, and then tap
Launcher icon. Swipe left until the PDF View icon
the
appears. Tap
Information.pdf.
You can also view the file on your computer. Connect
your phone to your computer with the
your phone, tap
and double-click the
do the following for your operating system:
䢇 Windows Vista: Open Computer.
PDF View, then tap Open Source
USB cable. On
USB Drive. On your computer, locate
Palm Pixi drive. To locate the drive,
Page 3
䢇 Windows XP: Open My Computer.
䢇 Mac: Open Finder.
䢇 Linux (Ubuntu): The drive is displayed on the
desktop.
䢇 Other Linux distribution: The location of the drive may
vary by system.
After you open the
Open Source Information.pdf.
Palm Pixi drive, double-click the file
Recycling and disposal
This symbol indicates that Palm products
should be recycled and not be disposed of in
unsorted municipal waste. Palm products
should be sent to a facility that properly
recycles electrical and electronic equipment.
For information on environmental programs visit
palm.com/environment or recyclewirelesss.com/.
As part of Palm’s corporate commitment to be a good
steward of the environment, we strive to use
environmentally friendly materials, reduce waste, and
develop the highest standards in electronics recycling.
Important Privacy Message – Sprint’s policies often do
not apply to third-party applications. Third-party
applications may access your personal information
or require Sprint to disclose your customer
information to the third-party application provider. To
find out how a third-party application will collect,
access, use, or disclose your personal information,
check the application provider’s policies, which can
usually be found on their website. If you aren’t
comfortable with the third-party application’s
policies, don’t use the application.
Page 4

Page 5

Table of Contents
Welcome . . . . . . . . . . . . . . . . . . . . . . . . . . . . . . . . . . . . . . . 9
Your Palm® Pixi™ Phone . . . . . . . . . . . . . . . . . . . . . . . . . .9
About This User Guide . . . . . . . . . . . . . . . . . . . . . . . . . .10
Where Can I Learn More? . . . . . . . . . . . . . . . . . . . . . . .11
Section 1: Your Setup . . . . . . . . . . . . . . . . . . . . . . . . . 15
1A. Set Up Service . . . . . . . . . . . . . . . . . . . . . . . . . . 16
Set Up Your Phone . . . . . . . . . . . . . . . . . . . . . . . . . . . . .16
Turn the Phone On/Off . . . . . . . . . . . . . . . . . . . . . . . . . .18
Make Your First Call . . . . . . . . . . . . . . . . . . . . . . . . . . . .21
Set Up Your Voicemail . . . . . . . . . . . . . . . . . . . . . . . . . .22
Create Sprint Account Passwords . . . . . . . . . . . . . . . .23
Section 2: Your Palm® PixiTM Phone . . . . . . . . . . . . . 25
2A. Basics . . . . . . . . . . . . . . . . . . . . . . . . . . . . . . . . . 26
What’s in the Box? . . . . . . . . . . . . . . . . . . . . . . . . . . . . . .26
Get to Know Your Phone . . . . . . . . . . . . . . . . . . . . . . . .27
Charge the Battery . . . . . . . . . . . . . . . . . . . . . . . . . . . . .31
2B. Move Around on Your Phone . . . . . . . . . . . . 35
Use Gestures: Tap, Swipe, Drag, Flick, Pinch . . . . . . .35
Open Applications . . . . . . . . . . . . . . . . . . . . . . . . . . . . . .46
Work With Applications . . . . . . . . . . . . . . . . . . . . . . . . . 48
Enter and Save Information . . . . . . . . . . . . . . . . . . . . . . 53
Use the Menus . . . . . . . . . . . . . . . . . . . . . . . . . . . . . . . . 58
Search to Find Info and Make Calls . . . . . . . . . . . . . . 61
View and Respond to Notifications . . . . . . . . . . . . . . . 63
Update the Software on Your Phone . . . . . . . . . . . . . . 65
Copy Files Between Your Phone and Your Computer
73
2C. Transferring Data . . . . . . . . . . . . . . . . . . . . . . . . 76
Data Transfer Overview . . . . . . . . . . . . . . . . . . . . . . . . . 76
How Do I Get Data From My Old Phone? . . . . . . . . . 77
How Do I Get Data Off My Computer? . . . . . . . . . . . .77
I’m Already Using Google, Facebook, and/or Microsoft
Exchange . . . . . . . . . . . . . . . . . . . . . . . . . . . . . . . . . . . . . 80
I Want to Keep Using My Current Desktop App and
Sync With an Online Account on My Phone . . . . . . . 81
I Don’t Need to Sync, but I Do Want a Copy of My Data
Backed Up Somewhere Besides My Phone . . . . . . . 82
2D. Phone . . . . . . . . . . . . . . . . . . . . . . . . . . . . . . . . . . 83
Make Calls . . . . . . . . . . . . . . . . . . . . . . . . . . . . . . . . . . . . 83
Receive Calls . . . . . . . . . . . . . . . . . . . . . . . . . . . . . . . . . . 87
Use Voicemail . . . . . . . . . . . . . . . . . . . . . . . . . . . . . . . . . 89
What Can I Do During a Call? . . . . . . . . . . . . . . . . . . . 89
What’s My Number? . . . . . . . . . . . . . . . . . . . . . . . . . . . . 93
Page 6

View Your Call History . . . . . . . . . . . . . . . . . . . . . . . . . . 93
Save a Phone Number to Contacts . . . . . . . . . . . . . . 94
Use a Phone Headset . . . . . . . . . . . . . . . . . . . . . . . . . . 95
Customize Phone Settings . . . . . . . . . . . . . . . . . . . . . . 97
2E. Photos, Videos, and Music . . . . . . . . . . . . . .101
Camera . . . . . . . . . . . . . . . . . . . . . . . . . . . . . . . . . . . . . 101
Photos . . . . . . . . . . . . . . . . . . . . . . . . . . . . . . . . . . . . . . . 102
Videos . . . . . . . . . . . . . . . . . . . . . . . . . . . . . . . . . . . . . . . 108
YouTube . . . . . . . . . . . . . . . . . . . . . . . . . . . . . . . . . . . . 111
Music . . . . . . . . . . . . . . . . . . . . . . . . . . . . . . . . . . . . . . . 113
Amazon MP3 . . . . . . . . . . . . . . . . . . . . . . . . . . . . . . . . 117
2F. Personal Information . . . . . . . . . . . . . . . . . . .121
Contacts . . . . . . . . . . . . . . . . . . . . . . . . . . . . . . . . . . . . . 121
Calendar . . . . . . . . . . . . . . . . . . . . . . . . . . . . . . . . . . . . 135
Tasks . . . . . . . . . . . . . . . . . . . . . . . . . . . . . . . . . . . . . . . 145
Memos . . . . . . . . . . . . . . . . . . . . . . . . . . . . . . . . . . . . . . 150
Clock . . . . . . . . . . . . . . . . . . . . . . . . . . . . . . . . . . . . . . . . 152
Calculator . . . . . . . . . . . . . . . . . . . . . . . . . . . . . . . . . . . . 154
2G. Documents . . . . . . . . . . . . . . . . . . . . . . . . . . . .155
Doc View . . . . . . . . . . . . . . . . . . . . . . . . . . . . . . . . . . . . 155
PDF View . . . . . . . . . . . . . . . . . . . . . . . . . . . . . . . . . . . . 160
2H. Preferences . . . . . . . . . . . . . . . . . . . . . . . . . . .164
Backup . . . . . . . . . . . . . . . . . . . . . . . . . . . . . . . . . . . . . . 164
Date & Time . . . . . . . . . . . . . . . . . . . . . . . . . . . . . . . . . 170
Device Info . . . . . . . . . . . . . . . . . . . . . . . . . . . . . . . . . . 171
Regional Settings . . . . . . . . . . . . . . . . . . . . . . . . . . . . . 174
Screen & Lock . . . . . . . . . . . . . . . . . . . . . . . . . . . . . . . 175
Sounds & Ringtones . . . . . . . . . . . . . . . . . . . . . . . . . . 178
Section 3: Web and Data Services and Other Wire-
less Connections. . . . . . . . . . . . . . . . . . . . . . . . . . . . . 181
3A. Using Web and Data Services . . . . . . . . . . 182
Get Started With Data Services . . . . . . . . . . . . . . . . . 182
Access Data Services . . . . . . . . . . . . . . . . . . . . . . . . . 182
Use Sprint TV® . . . . . . . . . . . . . . . . . . . . . . . . . . . . . . . 183
NASCAR Sprint Cup MobileSM . . . . . . . . . . . . . . . . . . 184
NFL Mobile Live . . . . . . . . . . . . . . . . . . . . . . . . . . . . . . 184
3B. Email and Other Messages . . . . . . . . . . . . . 186
Email . . . . . . . . . . . . . . . . . . . . . . . . . . . . . . . . . . . . . . . 186
Messaging . . . . . . . . . . . . . . . . . . . . . . . . . . . . . . . . . . 202
3C. Web and Wireless Connections . . . . . . . . 214
Location Services . . . . . . . . . . . . . . . . . . . . . . . . . . . . 214
Web . . . . . . . . . . . . . . . . . . . . . . . . . . . . . . . . . . . . . . . . 215
Google Maps . . . . . . . . . . . . . . . . . . . . . . . . . . . . . . . . 223
Sprint Navigation . . . . . . . . . . . . . . . . . . . . . . . . . . . . . 224
Bluetooth® Wireless Technology . . . . . . . . . . . . . . . . 226
Page 7

Section 4: Your Resources . . . . . . . . . . . . . . . . . . . 231
4A. Troubleshooting . . . . . . . . . . . . . . . . . . . . . . . 232
For Users of Other Palm® Devices . . . . . . . . . . . . . . 232
Battery . . . . . . . . . . . . . . . . . . . . . . . . . . . . . . . . . . . . . . 233
Screen and Performance . . . . . . . . . . . . . . . . . . . . . . 242
Phone . . . . . . . . . . . . . . . . . . . . . . . . . . . . . . . . . . . . . . . 244
Hands-Free Devices . . . . . . . . . . . . . . . . . . . . . . . . . . 246
Synchronization . . . . . . . . . . . . . . . . . . . . . . . . . . . . . . 247
Sending and Receiving Data in Email, Messaging, and
Web . . . . . . . . . . . . . . . . . . . . . . . . . . . . . . . . . . . . . . . . 251
Email . . . . . . . . . . . . . . . . . . . . . . . . . . . . . . . . . . . . . . . 252
Messaging . . . . . . . . . . . . . . . . . . . . . . . . . . . . . . . . . . 254
Web . . . . . . . . . . . . . . . . . . . . . . . . . . . . . . . . . . . . . . . . 255
Calendar and Contacts . . . . . . . . . . . . . . . . . . . . . . . 256
Camera . . . . . . . . . . . . . . . . . . . . . . . . . . . . . . . . . . . . . 258
Amazon MP3 . . . . . . . . . . . . . . . . . . . . . . . . . . . . . . . . 258
Transferring Information From Your Computer . . . 259
Backing Up and Restoring Data . . . . . . . . . . . . . . . . 260
Updates . . . . . . . . . . . . . . . . . . . . . . . . . . . . . . . . . . . . . 261
Third-Party Applications . . . . . . . . . . . . . . . . . . . . . . . 261
Making Room on Your Phone . . . . . . . . . . . . . . . . . 262
4B. Glossary . . . . . . . . . . . . . . . . . . . . . . . . . . . . . . .264
Section 5: Your Safety and Specifications. . . . . 269
5A. Regulatory and Safety Information . . . . . . .270
FCC Statements . . . . . . . . . . . . . . . . . . . . . . . . . . . . . . 270
Antenna Care/Unauthorized Modifications . . . . . . . 271
Industry Canada . . . . . . . . . . . . . . . . . . . . . . . . . . . . . . 271
Radio Frequency (RF) Safety Exposure . . . . . . . . . .272
Hearing Aid Compatibility (HAC) . . . . . . . . . . . . . . . . 274
Battery Handling . . . . . . . . . . . . . . . . . . . . . . . . . . . . . .275
Protecting Your Battery . . . . . . . . . . . . . . . . . . . . . . . . 276
Power Specifications . . . . . . . . . . . . . . . . . . . . . . . . . . 277
Recycling and Disposal . . . . . . . . . . . . . . . . . . . . . . . .278
User Safety . . . . . . . . . . . . . . . . . . . . . . . . . . . . . . . . . . .279
Product Handling & Safety . . . . . . . . . . . . . . . . . . . . .282
Driving Safety . . . . . . . . . . . . . . . . . . . . . . . . . . . . . . . . .284
ESD Safety . . . . . . . . . . . . . . . . . . . . . . . . . . . . . . . . . . .287
5B. Specifications . . . . . . . . . . . . . . . . . . . . . . . . . .290
Specifications . . . . . . . . . . . . . . . . . . . . . . . . . . . . . . . . .290
Online Accounts Available for webOS Phones . . . .294
Index. . . . . . . . . . . . . . . . . . . . . . . . . . . . . . . . . . . . . . .296
Page 8

Page 9

Welcome
Your Palm® Pixi™ Phone
Your Palm® Pixi™ phone puts Palm’s multitasking,
gesture-based operating system, the Palm
platform, inside a small, beautiful device. Here are a few
highlights of your new phone.
Gestures: On your Pixi phone, you make calls, move
around, and manage your applications and info by
making simple gestures either on the touchscreen or in
the gesture area directly beneath the screen. For more
information, see “Use Gestures: Tap, Swipe, Drag, Flick,
Pinch” on page 35, and go to
palm.com/support to see
animations that demonstrate these gestures. The
introductory piece in your Pixi phone’s box has a
detachable gesture guide to put in a pocket and
consult when you need to—you won’t need it very long.
Multitasking: You can have many applications open at
once and easily move among them. Go to the
Launcher to open apps. See the lineup of your open
apps in Card view. Tap an app to bring it into the
®
webOS™
foreground and work with it. For more information, see
“Open Applications” on page 46.
The Palm
®
Synergy™ feature: The Palm® Synergy™
feature on your Pixi phone displays information from
several sources in a single view, so you can access
your info quickly, without having to remember where
you stored it.
For example, suppose you have a Google account for
personal email, contacts, and calendar events, and an
Exchange account for your corporate email, contacts,
and events. The Email, Contacts, and Calendar
applications on your Pixi phone all provide a kind of
view in which you can see information from both of
those accounts in one place—but even though the
information is brought into one view, the sources of that
information are kept separate. For more information,
read about linked contacts, layered calendars, and the
single inbox for your email in “Contacts” on page 121,
“Calendar” on page 135, and “Email” on page 186.
Note: See “Online Accounts Available for webOS Phones” on
page 294 for the current list of online accounts that you
can set up on your phone and for information about
the behavior of these accounts.
9
Page 10
Thanks also to the Synergy feature, in the Messaging
application, all your conversations with the same
person are grouped together in one chat-style view. If
you start an IM chat with Ed, for example, you can
continue the same conversation when Ed signs out of
IM by sending him a text message—and you can see it
all in the same view. For more information, see
“Messaging” on page 202.
Universal search: Need to call Ed? Just type ed on the
keyboard. If he’s listed in your Contacts, you can get his
numbers from the search results. Tap a number and
you’ve made the call. Search works just as fast when
you need to search the web. For more information, see
“Search to Find Info and Make Calls” on page 61.
Sync: Your Pixi phone gives you synchronization
without a cable. You can sync with online services that
Palm has partnered with so that you can store and
sync your info in online accounts. You can access your
data even when you are not able to make a connection
to the Web because a copy of your data is stored on
the device.
You r Palm profile: When you set up your phone, you
create a Palm profile. Your profile gives you access to
services like automatic updates and automatic,
10
frequent backups of any of your info that is stored only
on your phone and isn’t synchronized with an online
account.
WARNING: Please refer to “Regulatory and Safety
Information” on page 270 for information that
helps you safely use your phone. Failure to read
and follow the important safety information in this
guide may result in serious bodily injury, death, or
property damage.
About This User Guide
We know you’re eager to start using your Palm® Pixi™
phone right away, and the sections of this guide are
designed to help you do just that.
䢇 Section 1: Your Setup guides you through the
process of setting up your new phone and your
Sprint service.
䢇 Section 2: Your Palm
basics of your phone and service with quick,
easy-to-follow instructions. This section also
describes the call features on your phone and shows
you how to use Sprint service features such as
®
PixiTM Phone shows you the
Page 11
voicemail and call waiting. This section also shows
you how to use the camera and how to transfer and
listen to music files on your phone. Finally, it guides
you through the process of using the full-featured
organizer that gives you instant access to your
contacts, calendar, tasks, memos, and more.
䢇 Section 3: Web and Data Services and Other
Wireless Connections shows you how to use Web
browsing, messaging, and email. It also describes
Bluetooth
䢇 Section 4: Your Resources answers frequently asked
®
wireless technology.
questions and shows you what to do if something
goes wrong.
䢇 Section 5: Your Safety and Specifications outlines
recommended safety and maintenance guidelines
and lists the technical specifications for your Pixi
phone.
WARNING: Please refer to “Regulatory and Safety
Information” on page 270 for information that
helps you safely use your phone. Failure to read
and follow the important safety information in this
guide may result in serious bodily injury, death, or
property damage.
Where Can I Learn More?
While Using Your Phone
䢇 On-device Help: Read short how-tos and watch
animations on your new phone.
To view all Help: Open Help .
To view Help topics for a single application: Open the
application, open the application menu
Help.
䢇 Online Support from Sprint: Visit
sprint.com/palmpixisupport to access this User Guide,
how-to videos, tutorials, and helpful support
information.
䢇 Online support from Palm: Visit palm.com/support to
edit your Palm profile, watch how-to animations, learn
about transferring data, and read comprehensive
information about your phone.
, and tap
11
Page 12

If You Need More Information
Sprint Customer Service: For questions about your
account or features available on the network, contact
Sprint or visit
sprint.com for the latest information and
help.
Manage Your Account
Online: sprint.com
䢇 Access your account information.
䢇 Check minute usage (depending on your Sprint
service plan).
䢇 View and pay your bill.
䢇 Enroll in Sprint online billing and automatic payment.
䢇 Purchase accessories.
䢇 Shop for the latest Sprint phones.
䢇 View available Sprint service plans and options.
䢇 Learn more about data services and other great
products like games, ringtones, and more.
12
On your Palm® Pixi™ phone
䢇 Open Phone . and do any of the following:
䡲 Check minute usage and account balance: Enter *4
and tap .
䡲 Make a payment: Enter *3 and tap .
䡲 Access a summary of your Sprint service plan or get
answers to other questions: Enter *2 and tap .
From any other phone
䢇 Sprint Customer Service: 1-888-211-4727.
䢇 Business Customer Service: 1-800-927-2199.
Sprint 411
You have access to a variety of services and
information through Sprint 411, including residential,
business, and government listings; assistance with
local or long-distance calls; movie listings; and hotel,
restaurant, shopping, and major local event
information. There is a per-call charge and you are
billed for airtime.
䢇 Open Phone . Enter 411 and tap .
Page 13

Sprint Operator Services
Sprint Operator Services provides assistance with
placing collect calls or with placing calls billed to a
local telephone calling card or third party.
䢇 Open Phone . Enter 0 and tap .
To learn more and to see the latest in products and
services, visit Sprint online at
sprint.com.
13
Page 14

14
Page 15

Section 1
Your Setup
Page 16

1A. Set Up Service
⽧ Set Up Your Phone (page 16)
⽧ Turn the Phone On/Off (page 18)
⽧ Make Your First Call (page 21)
⽧ Set Up Your Voicemail (page 22)
⽧ Create Sprint Account Passwords (page 23)
Set Up Your Phone
Activate Your Phone
䢇 If you purchased your phone at a Sprint Store: It is
probably activated and ready to use.
䢇 If you received your phone in the mail, and it is a new
Sprint account or a new line of service: Your phone is
designed to activate automatically after you complete
setup (see “Complete Setup” on page 16).
䢇 If you received your phone in the mail and you are
activating a new phone for an existing number on your
16 1A. Set Up Service
account: Do not turn on your new phone yet. Wait
until your old phone is deactivated. After your old
phone is deactivated, you go online to activate the
number on your new phone. From your computer’s
Web browser, go to
sprint.com/activate and complete
the onscreen instructions to activate your phone.
If you have problems with activation, contact Sprint
Customer Service at 1-888-211-4727 from another
phone.
Complete Setup
1. Press and hold the power button on the
upper-left corner of your phone until you see the
®
logo on the screen (approximately five
Palm
seconds).
2. Follow the onscreen instructions to complete setup.
(To create a Palm profile, enter a working email
address (see “What Is a Palm Profile?” on
page 17). If you have a Palm profile from an old
webOS phone that you no longer use, you can
enter that profile email address and username to
download that profile information to your new
phone. But if you are still using the other phone,
you must create a new Palm profile for your Pixi
Page 17

phone—you can’t use the same profile on two
phones.)
3. Your phone is ready to use. (To learn how to make
your first call, see “Make Your First Call” on
page 21.)
Verify Your Profile
After you finish setup, look for an email on your
computer at the address you used for your Palm
profile. Click the link in the email to do the following:
䢇 Verify your Palm profile.
䢇 Select a security question and answer.
䢇 Follow a link to learn about getting data like contacts
and appointments onto your phone from your
desktop organizer software (see “How Do I Get Data
Off My Computer?” on page 77).
Tip: If you don’t see the confirmation email in your Inbox,
check your spam mail folder in your desktop email
program.
What Is a Palm Profile?
Your Palm profile gives you the following benefits:
䢇 Automatic system and software updates are sent to
your phone.
䢇 A Palm profile account is automatically created for
you on your phone. In this account you can store
Contacts and Calendar info that you don’t store in
online accounts like Google or Exchange.
Note: You cannot access Palm profile data on the profile
website—you can access the data on your phone only.
䢇 Info stored in your Palm profile account, as well as in
other sources of info on your phone (like Memos and
Tasks), is automatically backed up to servers
administered by Palm.
䢇 Should your phone be lost or stolen, you can do a
remote erase of the info on the phone.
Note: If you want to erase data on your phone while you are
still in possession of the phone—for example, before
you give it to someone else—don’t do a remote erase.
Instead, do a partial or full erase from the phone itself
(see “Erase Data and Reset Your Phone” on page 171).
1A. Set Up Service 17
Setup
Page 18

For detailed information about your Palm profile, see
“Backup” on page 164.
Setting up a Palm profile is different from setting up
email on your phone. To set up email, see “Set Up
Email” on page 187. To change your Palm profile
information after you have set it up, see “Update Your
Palm Profile Settings” on page 169.
Turn the Phone On/Off
Your Pixi phone’s screen can be turned on and off
separately from its wireless services (which are the
Phone app and Bluetooth app). This means
you can wake up the screen to use just the organizer
features of your device (Calendar, Contacts, Tasks,
Memos, and so on) without turning on the phone and
other wireless features. Also, when the screen is turned
off, the phone can be on and ready for you to receive
phone calls or messages.
18 1A. Set Up Service
Turn the Screen On/Off
Turn the screen on and leave the wireless services
turned off when you want to use only the organizer
features, for example, when you’re on a plane and you
must turn off all wireless services, but you want to look
at your calendar.
To turn the screen on, press
unlock the screen.
*Power
To turn the screen off, press power .
power . Drag up to
Page 19
To save power, the screen dims automatically after a
period of inactivity and then turns off. You can be on a
call when the screen dims and turns off—this does not
affect the call. To brighten the screen after it dims, tap
the screen.
Tip: You can set how long the screen stays on during a
period of inactivity (see “Set the Interval for Turning the
Screen Off Automatically” on page 175).
Turn Wireless Services Off (Airplane Mode)
When your phone is in airplane mode, the
mode icon appears at the top of every screen, and
Airplane Mode appears in the upper-left corner of the
screen in the
Launcher, Card view, and Phone. Your
airplane
phone is not connected to any mobile network.
Setup
Airplane mode turns off your phone as well as the
Bluetooth
®
wireless technology feature. Use airplane
mode when you are on a plane or anywhere else you
need to turn off all wireless services. You can’t browse
the Web, but you can still use apps like Calendar,
Contacts, Photos, Music, Doc View, and PDF View.
Do one of the following:
䢇 Tap the upper-right corner of any screen to open the
connection menu. Tap
䢇 Press and hold power and tap Airplane Mode.
Turn on Airplane Mode.
* These indicate that wireless services are off
(airplane mode).
1A. Set Up Service 19
Page 20

Tip: When your phone is in airplane mode, you can turn the
Bluetooth feature on individually (see “Turn the Bluetooth
Feature On/Off” on page 226). To turn your phone back
on, you must turn airplane mode off.
Turn Wireless Services On
When you turn on your phone, it connects to a mobile
network so that you can make and receive phone calls
and use other wireless services (if supported by the
local network).
䢇 Tap the upper-right corner of any screen to open the
connection menu. Tap Turn off Airplane Mode.
When your phone locates a signal,
the upper-left corner of the screen in the
Card view, and Phone, and the signal-strength icon
appears at the top of the screen.
20 1A. Set Up Service
Sprint appears in
Launcher,
* These indicate that wireless services are on.
When you are inside a phone coverage area, the bars
signal-strength icon are filled in. If you’re
on the
outside a coverage area, the bars in the signal-strength
icon appear dimmed with an X.
Page 21
Turn Everything (the Screen and Wireless Services) On/Off
Usually, turning your phone off and/or putting it in
airplane mode is sufficient for normal periods when
you have the phone with you but you’re not using it. On
rare occasions, however, you may want to put your
phone into deep sleep because you are not going to
use it for an extended period. At those times, do the
following:
Note: When you turn everything off, the phone’s alarms,
ringer, and notifications are also turned off.
䢇 To turn both the screen and wireless services off: Press
and hold
power and tap Tu rn Off .
䢇 To turn both the screen and wireless services back on:
Press and hold
power .
Make Your First Call
1. Press power . (This wakes up the screen.)
2. If necessary, drag up to unlock the screen.
3. Tap .
4. Tap numbers on the dial pad.
1A. Set Up Service 21
Setup
Page 22
Tip: Press the onscreen backspace icon to delete numbers
you’ve entered.
Tap to dial.
5.
6. Tap to end the call.
For more ways to make calls, see “Make Calls” on
page 83.
Adjust Call Volume
䢇 When you’re on a call, press the volume up or volume
down button on the side of your phone to adjust the
call volume.
22 1A. Set Up Service
1 Volume up
2 Volume down
Set Up Your Voicemail
Your phone automatically transfers all unanswered
calls to your voicemail, even if your phone is in use or
turned off. You should set up your Sprint voicemail and
personal greeting as soon as your phone is activated.
Always use a passcode to protect against unauthorized
access.
Page 23
To set up your voicemail:
1. Tap the center of the gesture area to display Card
view.
2. Press and hold 1 on the keyboard to dial the
Sprint voicemail system. (When the search results
screen appears, continue holding
Phone application appears.)
1 until the
3. Follow the voice prompts to do the following:
䡲 Create your password.
䡲 Record your name announcement.
䡲 Record your greeting.
Note: Voicemail Passcode: Sprint strongly recommends
that you create a passcode when setting up your
voicemail to protect against unauthorized access.
Without a passcode, anyone who has access to your
phone is able to access your voicemail messages.
For more information about using your voicemail, see
“Use Voicemail” on page 89.
Create Sprint Account Passwords
As a Sprint customer, you enjoy unlimited access to
your personal account information, your voicemail
account, and your data services account. To ensure
that no one else has access to your information, you
need to create passwords to protect your privacy.
Account Password
If you are the account owner, you create an account
username and password when you sign on to
sprint.com. (To get started, click Need to register for
access? in the sign-in area of the website.) If you are
not the account owner (if someone else receives the
bill for your Sprint service), you can get a subaccount
password at
Voicemail Password
You create your voicemail password when you set up
your voicemail. See “Set Up Your Voicemail” on
page 22.
sprint.com.
1A. Set Up Service 23
Setup
Page 24

Data Services Password
You can elect to set up an optional data services
password to control access and authorize Premium
Service purchases.
To learn more or to change your passwords, sign on to
sprint.com, or call Sprint Customer Service at
1-888-211-4727.
24 1A. Set Up Service
Page 25

Section 2
Your Palm® PixiTM Phone
Page 26

2A. Basics
⽧ What’s in the Box? (page 26)
⽧ Get to Know Your Phone (page 27)
⽧ Charge the Battery (page 31)
What’s in the Box?
All of the following items are in the phone box:
Printed Material
䢇 Get Started Guide.
䢇 Features Guide.
䢇 Palm warranty.
䢇 End User License Agreement.
26 2A. Basics
Hardware
®
䢇 Palm
Pixi™ phone.
䢇 USB cable.
䢇 AC charger.
Page 27
Get to Know Your Phone
Front View
1 Earpiece
2 Touchscreen: Tap and make other gestures
directly on the screen. See “Touchscreen” on
page 28.
3 Gesture area: Make the back gesture and begin
other gestures here.
4 Keyboard: See “Use the Keyboard” on page 53.
5 Microphone
6 Ringer switch: Slide to turn the ringer and
notification sounds on or off. (Red means off.) The
ringer switch does not affect music or video
playback sounds. By default, Clock alarms sound
when the ringer switch is off.
7 Volume up/down
8 Charger/microUSB connector
Basics
Important: Be careful not to scratch, crush, or apply too much
pressure on the touchscreen. Do not store your
phone in a place where other items might
damage it.
2A. Basics 27
Page 28

Keyboard
1 Option: Press to enter numbers, punctuation, and
symbols that appear above the letters on the keys.
See “Enter Alternate Keyboard Characters” on
page 54.
2 Shift: See “Enter Uppercase Letters” on page 53.
3 Space
4 Backspace
5 Enter: Press to enter a line return (for example, in
a memo or in an email message you are
composing) or to accept information you entered
in a field. See “Enter Information in a Field” on
page 56.
6 Sym: Press to enter symbols and accented
characters that don't appear on the keys. See
28 2A . Basics
“Enter Characters From the Symbols Table” on
page 54.
Touchscreen
1 Application name: Displays the name of the
currently open application. Tap the name to open
the application menu.
2 Launcher: See “Open an Application in the
Launcher” on page 47.
Page 29
3 Scroll arrow: Swipe up or down to see icons that
are on the page but hidden.
4 Quick Launch: See “Open an Application in Quick
Launch” on page 46.
5 Connection icons: Show the status of wireless
service connections and battery strength (see
“Icons in the Title Bar” on page 29). Tap the icons
to open the connection menu.
6 Page indicators: Show how many Launcher
pages are to the right or the left of the currently
displayed page. Swipe left or right on the screen
to see other pages.
7 Notification icons: Show missed calls, new
voicemail and email messages, and more. Tap the
bottom of the screen to view notification details
(see “View All Your Notifications” on page 64).
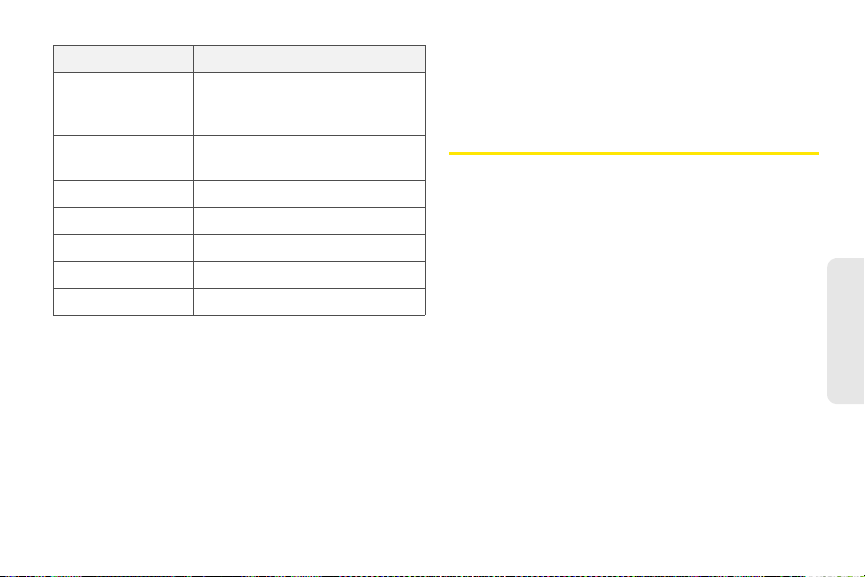
Icons in the Title Bar
You can monitor the status of several items using icons
in the area at the top of the phone screen:
Item Description
The battery is being charged.
Item Description
The battery is fully charged.
The battery is low. See “Charge the
Battery” on page 31.
Airplane mode is turned on. This means
that the phone and Bluetooth
technology feature are off (incoming calls
go to voicemail). See “Turn Wireless
Services Off (Airplane Mode)” on
page 19.
The phone is on. The number of filled-in
bars denotes signal strength. See “Turn
Wireless Services On” on page 20.
Your phone is connected to a 1x data
network. Data is not currently being
transmitted over the network. See “I Can’t
Tell If Data Services Are Available” on
page 251.
Your phone is connected to a 1x data
network and data is being transmitted
over the network.
®
wireless
2A. Basics 29
Basics
Page 30
Item Description
Your phone is connected to an EvDO
data network. Data is not currently being
transmitted over the network. See “I Can’t
Tell If Data Services Are Available” on
page 251.
Your phone is connected to an EvDO
data network and data is being
transmitted over the network.
Your phone is on and connected to the
Sprint network.
The phone is searching for the Sprint
network.
The Sprint network is not available.
Bluetooth
on. See “Bluetooth
on page 226.
A Bluetooth connection is in progress.
A Bluetooth connection has been made.
30 2A. Basics
®
wireless technology is turned
®
Wireless Technology”
Item Description
Your phone is performing a search on the
characters you entered. If you are in Card
view or the Launcher, your phone
conducts a universal search (see “Search
to Find Info and Make Calls” on page 61).
If you are in an application such as
Contacts or Memos, your phone
searches for items within the app that
match the search term you entered.
Your phone is in roaming coverage. See
“Set Roaming and Data Usage
Preferences” on page 98.
TTY is turned on. See “Enable TTY/TDD”
on page 99.
HAC is turned on. See “Enable HAC” on
page 99.
Page 31

Back View
1 Camera flash
2 Camera lens
3 Speaker
Top V i ew
1 3.5mm headset jack
2 Power: Press to wake up or turn off the screen.
Press and hold to turn your device and all wireless
services completely off and to turn your device
back on after having turned it completely off.
Basics
Charge the Battery
When the battery is very low, the battery icon in the
upper-right corner of the screen changes to red. When
the battery is fully charged, the icon appears full and
changes to green .
2A. Basics 31
Page 32

WARNING: Use only batteries and chargers that are
approved by Sprint and Palm with your phone.
Failure to use a battery or charger approved by
Sprint and Palm may increase the risk that your
phone will overheat, catch fire, or explode,
resulting in serious bodily injury, death, or
property damage. Use of unapproved third-party
power supply accessories may damage the
phone and void the Limited Warranty for the
product.
Although the battery may come with a sufficient charge
to complete the setup process, we recommend that
after setup you charge your phone until the
battery
icon in the upper-right corner of the screen is full to
ensure that the battery is fully charged.
See s for tips on making your battery’s power last
longer.
32 2A. Basics
1. On the right side of your phone, open the
charger/microUSB connector.
Page 33

2. Connect the small end of the USB cable to the
charger/microUSB connector.
3. Connect the other end of the USB cable to the AC
charger.
4. Plug the AC charger into a working outlet.
Tip: You can also charge your phone battery by connecting
your phone to your computer using the USB cable.
Charging this way takes much longer than using the AC
charger. Do not, however, connect the Palm
Touchstone
computer.
TM
charging dock (sold separately) to your
®
Maximizing Battery Life
Battery life depends on how you use your phone. You
can maximize the life of your battery by following a few
easy guidelines:
䢇 Charge your phone whenever you can. Charge it
overnight. The battery has a much longer useful life
when it is topped off frequently than when it is
charged after it is fully drained.
䢇 Set your screen to turn off automatically after a
shorter period of inactivity (see “Set the Interval for
Turning the Screen Off Automatically” on page 175).
䢇 Keep your battery away from direct sunlight and
other sources of heat. Temperatures over 45 degrees
Celsius can permanently reduce the capacity and life
span of any lithium-ion battery.
2A. Basics 33
Basics
Page 34

䢇 As with any mobile phone, if you are in an area with
no wireless coverage, your phone continues to
search for a signal, which consumes power. Turn off
your phone if you are outside a coverage area (see
“Turn Wireless Services Off (Airplane Mode)” on
page 19).
䢇 Turn off the Bluetooth (see “Bluetooth
®
Wireless
Technology” on page 226) and GPS (see “Location
Services” on page 214) features when you are not
using them.
䢇 If you set up an email account in the Email
application, set the interval to automatically
download email to every two hours or less frequently
(see “Enter Advanced Account Settings” on
page 191).
䢇 Lower the screen brightness (see “Change Screen
Brightness” on page 175).
䢇 Keep in mind that frequent use of instant messaging
(IM) can reduce battery life.
䢇 Turn the phone completely off if you won’t be using it
for an extended period of time (see “Turn Everything
(the Screen and Wireless Services) On/Off” on
page 21).
34 2A. Basics
䢇 You can buy an extra battery as a spare for long
plane trips or periods of heavy use. To purchase
batteries that are compatible with your phone, go to
palm.com/store.
Page 35

2B. Move Around on Your
Phone
⽧ Use Gestures: Tap, Swipe, Drag, Flick, Pinch (page 35)
⽧ Open Applications (page 46)
⽧ Work With Applications (page 48)
⽧ Enter and Save Information (page 53)
⽧ Use the Menus (page 58)
⽧ Search to Find Info and Make Calls (page 61)
⽧ View and Respond to Notifications (page 63)
⽧ Update the Software on Your Phone (page 65)
⽧ Copy Files Between Your Phone and Your
Computer (page 73)
Use Gestures: Tap, Swipe, Drag, Flick, Pinch
Gestures are an important, basic part of your phone.
They’re easy to learn, and they make working with the
phone fast. You make most gestures with one finger.
For a few, you need two. Make gestures with the tip of
your finger. Do not use your fingernail. Don’t bear
down.
To see short animations illustrating how to do gestures,
palm.com/support or tap Clips in Help on your
go to
phone (see “Open Applications” on page 46 for
information on how to open
Help).
You make gestures in two areas on your phone: the
touchscreen and the gesture area. The gesture area is
the black area extending along the bottom of the
screen.
* Gesture area
2B Move Around on Your Phone 35
Move Around
Page 36

Tap the center of the gesture area to minimize the app
and display Card view (see “Display All Open
Applications (Card View)” on page 49). When you’re
working in an application, the gesture area displays a
lighted bar in the center. The lighted bar also appears
when you tap the center of the gesture area to
maximize a card in Card view.
Basic Gestures
Tap : Tap with the tip of the finger—not the fingernail. Tap
fast and firmly, and then immediately lift your fingertip
off the screen. Don’t bear down on what you’re tapping.
Don’t wait for a response; the response comes after
you lift your finger. Don’t linger on the gesture; a tap
takes a split second to do.
36 2B Move Around on Your Phone
Tap the center of the gesture area to do the following:
䢇 When you’re working in an application, tap the
center of the gesture area to see
Card view. Card view
shows you all the applications that are currently
open, displayed as a series of cards (small active
windows).
䢇 When you’re in Card view, tap the center of the
gesture area to maximize the app in the center of the
view.
Page 37

Swipe: A swipe is most often a horizontal gesture, from
right to left or left to right. Do it fast, do it lightly. In a
swipe, your fingertip just skims the surface of the
touchscreen or gesture area.
writing a memo, make the back gesture to close and
save the memo and return to the display of all your
memos. When you make the back gesture in an
application and that’s the only screen of that app that’s
open, you minimize the app and go back to
Card view.
In Web, the back gesture performs the same function
as the back button on the browser, allowing you to
move back through previously viewed pages.
One kind of swipe you’ll use a lot:
Back. Make the back
gesture from right to left anywhere in the gesture area.
Back takes you up one level from a detailed view to a
more general view of the application you’re working in.
For example, when you finish reading an email
message, make the back gesture to close the message
and return to your list of messages. Or when you finish
Move Around
2B Move Around on Your Phone 37
Page 38

The forward gesture, which is a swipe from left to right
anywhere in the gesture area, allows you to move
forward through previously viewed Web pages.
Forward is available in Web only.
Drag: Drag is the gesture you make for a slow scroll up
and down a list. Slide your fingertip slowly along the
surface—no need to bear down.
38 2B Move Around on Your Phone
One kind of drag that you’ll use a lot brings up
Launch when you’re in an application. This drag
Quick
gesture begins in the gesture area and ends on the
touchscreen. As your fingertip slowly crosses the
border between the gesture area and the touchscreen,
it seems to drag
of the apps in
Quick Launch into view. To open one
Quick Launch, move your finger to its
icon. When you see the app name appear, lift your
finger. The application opens.
You also make the drag gesture as part of a drag and
drop.
Flick: As its name tells you, this is a quick gesture, great
for scrolling long lists. Do it fast, do it lightly; as with a
swipe, your fingertip just skims the surface. The faster
you flick, the faster and farther you scroll up or down a
list.
Page 39

To close an application in Card view, flick the card up
toward the top of the touchscreen. This is called
throwing the card off the top of the screen.
In some applications, such as Email and Messaging,
you can throw a list item off the side of the screen to
delete the item.
If an application is maximized, you can flick up from the
gesture area to the screen to minimize the app and
Card view. This is the up gesture. If you make
display
the up gesture when
Launcher.
the
Card view is displayed, you open
Scroll Gestures
Scroll slow: Drag the screen in the desired direction.
Move Around
2B Move Around on Your Phone 39
Page 40

Scroll fast: Flick the screen in the desired direction. Stop scrolling: Tap or drag the screen while scrolling.
40 2B Move Around on Your Phone
Page 41

Zoom Gestures
Zoom in/pinch out (to increase the size of items on the
screen in Email, Web, Photos, Doc View, PDF View,
Google Maps): Place two fingers on the screen and
spread them slowly apart.
Zoom out/pinch in (to decrease the size of items on the
screen in Email, Web, Photos, Doc View, PDF View,
Google Maps): Place two fingers on the screen and
bring them together.
Move Around
2B Move Around on Your Phone 41
Page 42

Zoom in or out a fixed amount (in Web, Photos, Doc
View, PDF View): Double-tap the screen.
42 2B Move Around on Your Phone
Text Selection Gestures
Tip: See “Cut, Copy, and Paste Information” on page 57 and
“Use the Copy All or Select All Feature” on page 58 for
information on working with text you’ve selected.
Insert the cursor in a text field: Tap the location.
Page 43

Move the cursor: Tap the location to insert the cursor.
Press and hold
Option . Place your finger anywhere
onscreen and drag your finger in the direction you want
to move the cursor.
Select text when you can see a cursor: Tap the location to
insert the cursor. Press and hold
Shift . Place your
finger anywhere onscreen and drag your finger in the
direction you want to select text. Tap the highlighted
text to deselect it.
2B Move Around on Your Phone 43
Move Around
Page 44

Select a paragraph of text: When you cannot insert a
cursor in the text—for example, on a Web page or in an
email message you received—the smallest amount of
text you can select is a whole paragraph. Press and
Shift , and then tap a paragraph. Tap an
hold
adjacent paragraph to add it to your selection (you
can't skip around). If you need to scroll down to select
the next paragraph, release
Shift , and tap the paragraph. Tapping any part of
Shift , scroll, press
the highlighted selection deselects it..
44 2B Move Around on Your Phone
Page 45

Drag and Drop
Tap and hold the item, drag it, and then lift your finger
to drop it. Sometimes you get a visual cue that the item
is ready to be dragged. For example, an icon in the
Launcher is ready to be dragged when you see a halo
around the icon. A card in
dragged when it changes size and becomes
transparent.
Card view is ready to be
Delete a List Item
Throw the item off the side of the screen. If prompted,
Delete to confirm the deletion.
tap
The delete gesture is available in applications such as
Email, Messaging, Tasks, Music, and Bluetooth. If you
can’t delete a list item by throwing it, open the item and
look in the application menu
for a delete command.
2B Move Around on Your Phone 45
Move Around
Page 46

Tip: To delete multiple list items, throw each one off the
screen. If you get the
throwing the first item, you don’t need to tap it—just throw
the second item, and the first deletion is confirmed
automatically.
Delete confirmation prompt after
Open Applications
You can have as many applications open at one time
as you like, limited only by the amount of memory
available on your phone at the time.
Open an Application in Quick Launch
Quick Launch is the bar of five icons that is always
available at the bottom of
To open an application from
icon.
46 2B Move Around on Your Phone
Card view and the Launcher.
Quick Launch, just tap the
Quick Launch can display no more than five icons. By
default it displays, from left to right,
Email, Calendar, and the Launcher. You can change the
order of icons (except the
Launch (see “Reorder Quick Launch Icons” on
Launcher icon) in Quick
Phone, Contacts,
page 52), or swap in whatever applications you like
(see “Change the Applications That Appear in Quick
Launch” on page 51).
When an application fills the whole screen, make the
following gesture to display
Quick Launch and open
one of its applications.
Page 47

1. Drag up slowly from the gesture area to the screen.
Note: Don’t confuse this “drag up” with the up gesture, which
is a flick up from the gesture area to the screen that
Card view.
displays
2. Move your finger to the application icon. (When
you see the app name appear, lift your finger. The
application opens.)
Open an Application in the Launcher
The Launcher displays all your applications that are not
Quick Launch. The Launcher includes multiple
on
pages, which you can organize to group apps the way
you want (see “Reorder Launcher Icons” on page 52).
1. Tap the center of the gesture area to open Card
view, and tap .
Move Around
Tip: You can also open the Launcher by flicking up twice
from the gesture area to the screen. If you are in
view
, just flick up once to open the Launcher.
Card
2B Move Around on Your Phone 47
Page 48

2.
To find the app you want, swipe up or down to see
all the icons on a page. (Swipe left or right to see
other pages.)
To close the
䢇 Tap the center of the gesture area.
䢇 Tap .
䢇 Make the up gesture: Flick up from the gesture area to
the screen.
Launcher, do one of the following:
Open an Application Using Search
1. Tap the center of the gesture area to open Card
view.
2. Enter the name of the application.
3. When the application icon appears in the search
results, tap it.
1 Arrow indicates that you can swipe up to see
partially or fully hidden icons.
2 Page indicators show that there are two Launcher
pages to the right—swipe right to left on the screen
to see them.
3. Tap the application icon.
48 2B Move Around on Your Phone
Work With Applications
Go Up One Level in an App (Back Gesture)
The back gesture takes you up one level from a
detailed level to a more general view of the application
Page 49

you're working in. For example, when you finish
reading an email message, make the back gesture to
close the message and return to your list of messages.
Or when you finish writing a memo, make the back
gesture to close and save the memo and return to the
display of all your memos. When you make the back
gesture in an application and that's the only screen of
that app that's open, you minimize the app and go
Card view.
back to
To make the back gesture, swipe right to left anywhere
in the gesture area.
Display All Open Applications (Card View)
Card view displays open applications as small cards, so
that you can easily scroll through them and drag them
to change their order.
When an application fills the screen and you want to
Card view, do one of the following:
go to
䢇 Tap the center of the gesture area.
䢇 Make the up gesture: Flick up from the gesture area to
the screen.
2B Move Around on Your Phone 49
Move Around
Page 50

Move Among Open Applications
1. In Card view (see “Display All Open Applications
(Card View)” on page 49), swipe left or right on the
screen to see other open apps.
2. Tap a card to maximize the application.
Tip: You can also maximize the center card in Card view by
flicking down from the screen to the gesture area.
Tip: You can set a preference to move among open apps
without first going to
Gestures On/Off” on page 176).
50 2B Move Around on Your Phone
Card view (see “Turn Advanced
Reorder Open Cards
1. In Card view (see “Display All Open Applications
(Card View)” on page 49), tap and hold a card to
further reduce the size of the cards.
Tip: You can also tap anywhere on the screen around the
cards to reduce the size of the cards.
2. Tap and hold a card, and after the card becomes
transparent, drag it to another position.
Page 51

Close an Application
䢇 In Card view (see “Display All Open Applications
(Card View)” on page 49), throw the card off the top
of the screen.
Change the Applications That Appear in Quick Launch
If Quick Launch contains five icons, you must remove
an application from
Quick Launch before you can add
another one. You can remove any application except
the Launcher.
1. Open the Launcher. (Quick Launch appears at the
bottom.)
2. Tap and hold a Quick Launch icon, and after the
halo appears around the icon, drag it onto the
Launcher.
Move Around
3. Tap and hold a Launcher icon, and after the halo
appears around the icon, drag the icon onto the
Quick Launch bar.
2B Move Around on Your Phone 51
Page 52

Reorder Quick Launch Icons
You can change the position of any Quick Launch icon
except the
1. In Card view, tap and hold a Quick Launch icon.
2. After a halo appears around the icon, drag it to
Launcher icon.
another location.
Reorder Launcher Icons
1. In the Launcher, tap and hold an icon.
52 2B Move Around on Your Phone
2. After the halo appears around the icon, drag it to
another location.
3. To move the icon to another page, drag it to the left
or right edge of the screen. (Don’t release the icon
until the new page appears.)
Delete an Application
You can delete applications that you have installed on
your phone.
Page 53
1. While pressing and holding Option , tap the app
icon.
2. Tap Delete.
Tip: You can also delete an application you installed by
opening the Launcher, opening the application menu
and tapping
hold an app name, and tap
List Apps. On the list of applications, tap and
Delete.
Enter and Save Information
1 Option: See “Enter Alternate Keyboard
Characters” on page 54.
2 Shift: See “Enter Uppercase Letters” on page 53.
3 Space
4 Backspace
,
5 Enter: Press to enter a line return (for example, in
a memo or in an email message you are
composing) or to accept information you entered
in a field. See “Enter Information in a Field” on
page 56.
6 Sym: See “Enter Characters From the Symbols
Table” on page 54.
Use the Keyboard
Enter Uppercase Letters
By default, the first letter of each sentence or field is
capitalized and the remaining text you enter is
lowercase. To enter other uppercase letters, do one of
the following:
䢇 Press Shift and press the letter key. The Shift
symbol appears: . You don’t need to hold down
Shift while you press the letter key.
䢇 Turn on Caps Lock: Press Shift twice. The Caps
Lock symbol appears: .
䢇 Turn off Caps Lock: Press Shift .
2B Move Around on Your Phone 53
Move Around
Page 54

Enter Alternate Keyboard Characters
Numbers, punctuation, and symbols appear above the
letters on the keys. To enter these characters, do one of
the following:
䢇 Press Option and press the key for the character.
The alternate character symbol appears: . You
don’t need to hold down
Option while pressing the
second key.
䢇 Enter a series of alternate characters: Press Option
twice to lock the alternate character feature. The
alternate character lock symbol appears: .
䢇 Turn off the alternate character feature: Press
Option .
Enter Passwords
You can see each character of a password only as you
enter it, so be careful. Be sure Caps Lock and alternate
character lock are off unless you need them. For
information on how to enter characters, see “Enter
Uppercase Letters” on page 53 and “Enter Alternate
Keyboard Characters” on page 54.
54 2B Move Around on Your Phone
Enter Characters From the Symbols Table
You can enter symbols and accented characters that
don't appear on the keys by using the symbols table.
See “Symbols and Accented Characters” on page 55
for a list of the available symbols and accented
characters.
1. Press Sym to display the symbols table.
2. Narrow the list by pressing the key that
corresponds to the character you want. (For
example, to enter an
below for a list of corresponding characters.)
Tip: The symbols and accented characters are grouped
according to their similarity to the corresponding key. In
some cases, the symbol is related to the alternate
character on the key, not the letter. For example, to type a
¢ or other currency symbol, press
Because the alternate character on the H key is $.
Tip: If you press the wrong key, press Backspace to return to
the full list of symbols and accented characters. You can
then press another key.
3. Scroll to find the character you want.
4. Tap the character to insert it.
é, press e. See the table
Sym + h. Why?
Page 55

Symbols and Accented Characters
Press Sym
and press…
a or A á à ä â ã å æ Á À Ä Â Ã Å Æ ª ~
b or B ~ \ ` • ÷ ^ [ ] { } < > « » Ø μ |
c or C © ç Ç ¢
d or D † ‡
e or E é è ë ê ? É È Ë Ê € ¹ ¼ ½
h or H ¢ € £ ¥ ƒ
i or I í ì ï î Í Ì Ï Î ÷ ‰
j or J ¡
k or K :-) :-( ;-)
l or L ` ‘ ’ ‚ "
m or M μ :-) :-( ;-)
n or N ñ Ñ ¿
to select…
\ ` • ÷ ^ [ ] { } < > « » Ø μ |
Press Sym
and press…
o or O ó ò ö ô œ õ ø Ó Ò Ö Ô Œ Õ Ø º
p or P ¶ ~ \ ` • ÷ ^ [ ] { } < > « » Ø μ |
q or Q \ ~ |
r or R ® ²
s or S ß š Š ~ \ ` • ÷ ^ [ ] { } < > « » Ø
t or T ™ ³ ¾
u or U ú ù ü û Ú Ù Ü Û [ ] { } < > « »
v or V ^
w or W ÷ ^ ±
x or X x ¤
y or Y ÿ ý Ÿ Ý ¥ [ ] { } < > « »
z? ? •
, or _ ~ \ ` • ÷ ^ [ ] { } < > « » Ø μ |
to select…
“ ” „ < > « »
|
2B Move Around on Your Phone 55
Move Around
Page 56

Press Sym
to select…
and press…
. … ~ \ ` • ÷ ^ [ ] { } < > « » Ø μ
|
@° • Ø
Enter Information in a Field
You can enter information in a field by typing or by
pasting previously copied information (see “Cut, Copy,
and Paste Information” on page 57).
Applications with text fields support the auto-correct
feature. If the app recognizes a common misspelling, it
auto-corrects the word. To cancel the auto-correction,
Backspace .
press
To accept the information you entered, do one of the
following:
䢇 Tap outside the field.
56 2B Move Around on Your Phone
䢇 Press Enter . If a screen contains multiple fields,
pressing Enter accepts the information you just
entered and jumps the cursor to the next field.
䢇 When you are done entering information on the
screen containing the field, make the back gesture to
accept the information and back out of the screen
(see “Go Up One Level in an App (Back Gesture)” on
page 48).
Select Items in a List
Lists enable you to select from a range of options. Lists
are different from menus (see “Use the Menus” on
page 58), which give you access to additional features.
Lists are hidden until you tap the currently displayed
option for that list.
1. Tap the currently displayed option to open the list.
(For example, when creating a new event in
Page 57

Calendar, tap 15 minutes before to display the list of
reminder options.)
2. Tap the list item you want.
Cut, Copy, and Paste Information
You can cut or copy any selectable text. This includes
text you can select by dragging the cursor and
paragraphs you can select by tapping them (see “Text
Selection Gestures” on page 42).
1. Select the text you want to cut or copy (see “Text
Selection Gestures” on page 42).
2B Move Around on Your Phone 57
Move Around
Page 58

2.
Open the application menu and tap Edit > Cut or
Copy.
3. Open the app and insert the cursor where you
want to paste the text (see “Text Selection
Gestures” on page 42).
4. Open the application menu and tap Edit > Paste.
Tip: You can also use keyboard shortcuts to cut, copy, and
paste. After selecting the text or inserting the cursor, press
and hold the gesture area until a light appears under the
surface of the gesture area, and press
A (copy/select all, in apps that support this
(paste), or
feature).
X (cut), C (copy), V
Use the Copy All or Select All Feature
Some applications offer a Copy All menu item. For
example, in Messaging, you can start or open a
conversation, open the application menu
Edit > Copy All. This saves the entire conversation as
plain text, which you can paste in a memo, email
message, and so on. The Copy All feature is also
available in Contacts on a contact’s details screen,
enabling you to copy the contents of that contact entry
as plain text.
58 2B Move Around on Your Phone
, and tap
Other apps offer a Select All menu item. For example,
in Memos, you can open a memo, open the
application menu
, and tap Edit > Select All. This
highlights the full memo text, which you can cut or
copy.
Save Information
䢇 On most screens, your information is saved
automatically. Just make the back gesture to close
the screen (see “Go Up One Level in an App (Back
Gesture)” on page 48), and your info is saved at the
same time.
䢇 On screens with a Done button, tap Done to save
your information.
Use the Menus
Most applications have an application menu hidden in
the upper-left corner, which provides access to
additional features. There is also a connection menu
hidden in the upper-right corner, which provides
access to wireless services.
Page 59

Some applications have additional menus. For
example, in
Photos, tap an open picture and tap to
display a menu of tasks you can do with the picture
(see “Photos” on page 102).
To get the most out of your phone, it’s a good idea to
familiarize yourself with the additional features available
through the menus in various applications.
Open the Application Menu
The application menu contains options for the
application you are working with, such as
Copy, Preferences, Help, and other application-specific
Cut and
commands.
1. Do one of the following:
䡲 Tap the application name in the upper-left corner
of the screen.
䡲 Drag down from the upper-left corner of the
phone (above the screen) onto the screen.
2. Tap a menu item to open it. (If a menu item
displays a right-pointing arrow , tap the item to
open a submenu of options for that item—for
example, tap the
submenu containing
Edit menu item to open a
Cut, Copy, and Paste options.
If the menu displays a downward-pointing arrow
at the bottom, it means that more options are
available. Scroll the menu to see the additional
options.)
2B Move Around on Your Phone 59
Move Around
Page 60

* Application menu
1. Do one of the following:
䡲 Tap the upper-right corner of the screen.
Open the Connection Menu
The connection menu lets you manage wireless
services—the phone and Bluetooth
technology.
Did You Know? The connection menu also displays the
current day and date and the battery charge
level.
60 2B Move Around on Your Phone
®
wireless
䡲 Drag down from the upper-right corner of the
phone (above the screen) onto the screen.
2. Tap a menu item to turn that wireless feature on or
off or to open a list of options for that feature (see
“Turn Wireless Services Off (Airplane Mode)” on
page 19 for more information). If the menu displays
a downward-pointing arrow at the bottom, it
means that more options are available. Scroll the
menu to see the additional options.)
Page 61

Search to Find Info and Make Calls
Use Universal Search
You can search for contacts and applications on your
phone, or search the Web.
1. Open Card view (see “Display All Open
Applications (Card View)” on page 49) or the
Launcher (see “Open an Application in the
Launcher” on page 47).
2. Begin typing a search term or keyword (see
“Universal Search Application Keywords” on
page 62). (As you type, search displays any
contact names and application names that match
the character or application names that are
associated with the keyword. As you continue
typing, the search results narrow.)
Tip: You can also start a search by copying text in another
application, opening the Launcher, and pasting the text.
The text appears at the top of the screen as the search
term. Note that you can’t paste text in Card view.
3. Do one of the following:
䡲 To look up or get in touch with someone: Tap a
contact name to open the person’s contact
information. Tap a phone number to dial it, an
email address to send a message, and so on. If
only the contact name is displayed, tap the name
to display ways to get in touch. You can also tap
2B Move Around on Your Phone 61
Move Around
Page 62
Add Reminder to add a reminder message to the
contact (see “Assign a Reminder Message to a
Contact” on page 129).
䡲 To perform a Web search: Tap the search term you
entered to open a list of Web search options, and
tap the option. If your search returns no contacts
or applications, the Web search options are
displayed automatically.
䡲 To open an application: Tap the application.
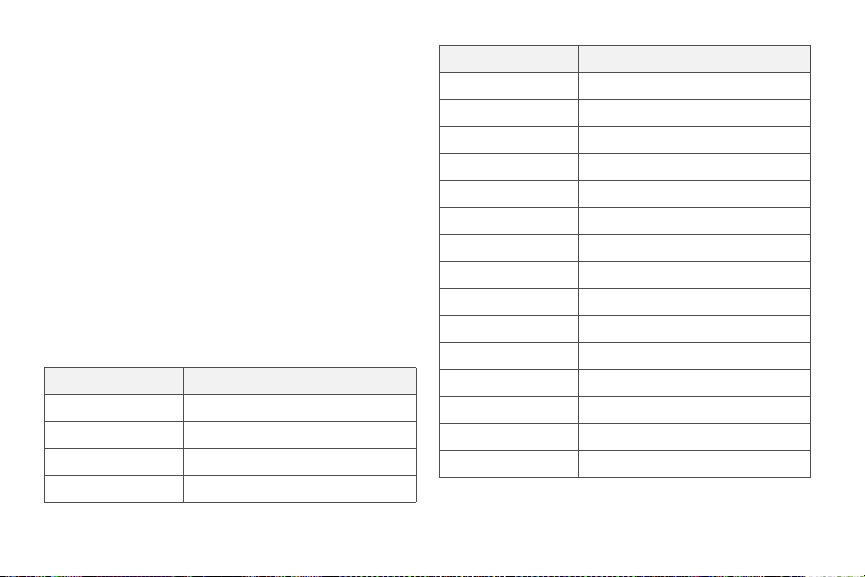
Universal Search Application Keywords
If you don’t know the name of the app you are
searching for, you can enter a keyword associated with
the app. This table shows the keywords you can use to
find an app on your phone.
Application Name Key words
App Catalog Store
Backup Settings, Preferences
Bluetooth Settings, Preferences, Wireless
Calendar Datebook, Meetings, Events
62 2B Move Around on Your Phone
Application Name Key wor ds
Clock Alarm, Time, Watch
Contacts Addresses, People
Date & Time Clock, Settings, Preferences
Device Info Settings, Preferences, Reset
Doc View Word, Excel, PowerPoint
Email Mail
Google Maps Maps
Location Services Settings, Preferences
Memos Notes, Stickies, Notepad
Messaging Text, SMS, MMS, IM, Instant Chat
Music Songs, Tunes, Audio
PDF View Acrobat
Phone Dial
Photos Pictures
Regional Settings Settings, Preferences
Page 63
Application Name Keyw ords
Screen & Lock Wallpaper, Security, Desktop,
Sounds &
Ringtones
Tasks To Do, Todos, Checklist
Updates Settings, Preferences
Videos Movies
Web Browser, Blazer, Internet
YouTube Videos, Movies
Brightness, Unlock, Gestures,
Settings, Preferences
Audio, Music, Volume, Vibrate,
Silent, Settings, Preferences
Search Within an Application
In applications such as Contacts, Memos, Doc View,
and PDF View, you can search for entries or files. From
the list view, enter the file name; a few words from a
memo; or a contact name, initials, address, or number.
See the individual application sections for details.
You can also enter a search term in the Help
application to search for help content related to the
term.
View and Respond to Notifications
Respond to a Notification
Notifications show up at the bottom of the screen to
notify you of new voicemail and messages, upcoming
appointments, missed calls, and more.
Move Around
2B Move Around on Your Phone 63
Page 64

Do one of the following:
䢇 Tap the notification to act on it.
䢇 For some types of notifications, throw the notification
off the side of the screen to dismiss it.
View All Your Notifications
For most types of notifications, if you do not tap a
notification after a few seconds, it becomes an icon in
the lower-right portion of the screen.
64 2B Move Around on Your Phone
1. Tap anywhere on the bottom of the screen to
display your notifications.
2. Tap a notification to act on it. (If a notification icon
has a number next to it, the number indicates how
many items are included in the notification—how
many voicemail or email messages you have, and
so on.)
Page 65

Reorder Notifications and Other Dashboard Items
The area that displays all of your notifications (see
“View All Your Notifications” on page 64) is called the
dashboard.
䢇 Tap and hold a dashboard item, and then drag it to a
different location.
䢇 Throw a dashboard item off the side of the screen to
dismiss it.
Update the Software on Your Phone
Palm continually provides updates to your phone’s
operating system. Update notifications are sent to your
phone automatically when a system update is available
(see “Respond to a System Software Notification” on
page 65). When you update your phone’s operating
system, your personal information and files are not
affected.
What’s more, both Palm and many application
developers make updates available for applications
you have installed on your phone. Update notifications
are sent to your phone automatically when an
application update is available (see “Respond to an
Application Update Notification” on page 66).
In addition to receiving update notifications, you can
manually check for software or application updates at
any time (see “Manually Check for Updates” on
page 67).
Respond to a System Software Notification
When you get a notification that a system update is
available, do one of the following:
䢇 Tap Install Now twice. When installation is complete
and the phone resets, tap
around 15 minutes.
䢇 Tap Install Later. The next time you charge your
phone, you receive another update notification. You
can again choose whether to install the update now
or later. If you do not tap
minutes of receiving the notification, installation
begins automatically.
2B Move Around on Your Phone 65
Done. Installation may take
Install Later within 10
Move Around
Page 66

Note: You can use your phone while updates are being
downloaded, but you cannot use your phone while
system updates are being installed—including making
emergency calls.
Important: Do not remove the battery while updates are being
installed.
Here is some additional information about system
updates:
䢇 Your phone automatically downloads the update
over Sprint’s network as long as the battery has at
least a 30% charge and you have an EvDO data
connection, as indicated by the icon at the top of
the screen. Your phone cannot download an update
over a 1xRTT data connection, as indicated by the
icon at the top of the screen.
䢇 If the battery has less than a 30% charge, you must
charge the battery before you can download or
install an update.
䢇 To avoid roaming charges, updates are not
downloaded if your phone is in roaming coverage.
66 2B Move Around on Your Phone
Respond to an Application Update Notification
When you get a notification that an update is available
for one or more applications, tap the notification and
then do one of the following:
䢇 Tap an individual application name to open App
Catalog. From App Catalog, you can view application
details and install that app (charges may apply; see
“Browse Applications in App Catalog” on page 68).
䢇 Tap Install Free to install only those applications that
you can download free of charge.
䢇 Tap Install All to install all applications available for
download (charges may apply).
Important: Do not remove the battery while updates are being
installed.
Page 67

Manually Check for Updates
1. Open Updates .
2. If a message appears stating that a system update
is available, do the following:
䡲 Tap Download Now.
䡲 When prompted, tap Install Now.
䡲 After installation has finished and the phone
resets, tap
Done.
3. If one or more application updates are available,
do one of the following:
䡲 Tap an individual application name to open App
Catalog. From App Catalog, you can view
application details and install that app (charges
may apply; see “Browse Applications in App
Catalog” on page 68).
2B Move Around on Your Phone 67
Move Around
Page 68

䡲 Tap Install Free to install only those updates that
you can download free of charge.
䡲 Tap Install All to install all updates available for
download (charges may apply).
Note: You cannot use your phone while updates are being
installed.
Important: Do not remove the battery while updates are being
installed.
Browse Applications in App Catalog
Use App Catalog to browse and download any of the
many applications available for your phone. App
Catalog contains both free apps and apps you can
buy.
Note: Applications you installed on your old Palm OS
ACCESS or Windows Mobile smartphone do not work
on your Pixi phone, because your Pixi phone uses the
®
webOS™ platform. Check App Catalog for
new Palm
a new version of your old favorites. Or purchase the
Classic app from App Catalog. Classic enables you to
run Palm OS applications on your Pixi phone.
68 2B Move Around on Your Phone
®
by
1. Open App Catalog .
2. The first time you open App Catalog, tap Accept.
3. Swipe right or left on the thumbnails to see
featured applications, or do one of the following:
䡲 To search by name: Tap Search, enter the search
term, and press
䡲 To search apps by category: Tap Explore. To view
Enter .
categories in an alphabetical list, tap . To view
them as a tag cloud .
Page 69

Did You Know? In a tag cloud, categories that have more
䡲 To find the most recently added apps: Tap Recent.
䡲 To find the most popular apps: Tap Popular.
items or more popular items appear in a
larger font size, giving you a visual clue as to
which categories you might want to explore.
4. (Optional) To sort the list of applications or your
browse results by date, name, rating, or price, tap
one of the icons at the bottom of the screen, and
tap a sort method.
5. When the app you want appears, tap the name to
display app details.
6. On the app details screen, do any of the following:
䡲 Tap a screenshot to see a larger view.
䡲 Tap Reviews to read all reviews.
䡲 Tap Share and then tap Email or Text Message to
send a link to the app.
䡲 Tap Developer Website to go to the app
developer’s home page.
䡲 If available, tap Support to go to the developer’s
product support page.
2B Move Around on Your Phone 69
Move Around
Page 70
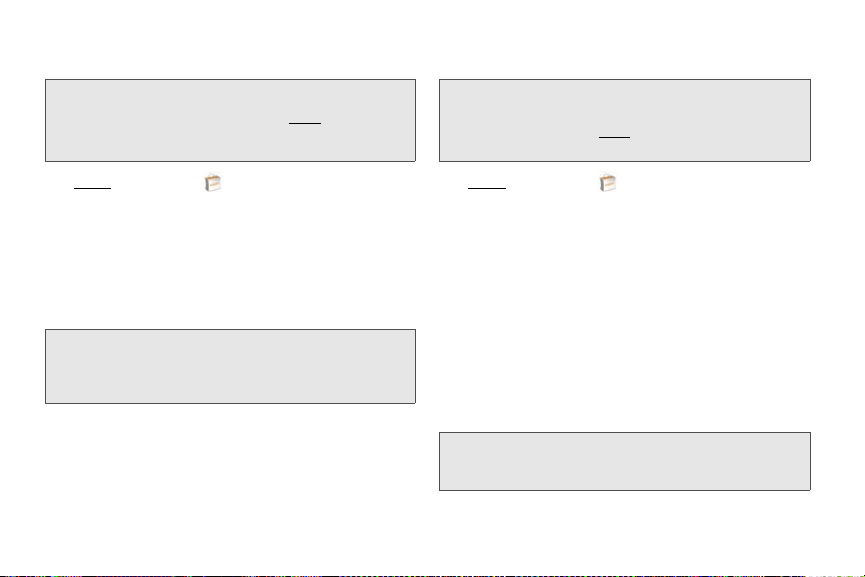
Download a Free Application
Buy an Application
Before You Begin: Before you download an app, make sure
you have enough storage space on your
phone to fit the app. Open
and look at the Available field under
Phone.
Device Info
1. Open App Catalog .
2. Browse to the app you want (see “Browse
Applications in App Catalog” on page 68).
3. Tap the app name, and then tap Download for free.
4. If the app uses Location Services, a notification is
displayed (see “Location Services” on page 214).
Continue.)
(Tap
Did You Know? After you download an application, you can
Reviews on the app details screen to see
tap
reviews from others. Or, on the Reviews
screen, tap
Review to write a review.
5. After you download an app, tap Tap to launch to
open it. (The app also now appears as an icon in
Launcher, so you can open it from the Launcher
the
as well.)
70 2B Move Around on Your Phone
Before You Begin: Before you purchase and download an
app, make sure you have enough
storage space on your phone to fit the
Device Info and look at the
app. Open
Available field under Phone.
1. Open App Catalog .
2. Browse to the app you want (see “Browse
Applications in App Catalog” on page 68).
3. Tap the app name, and then tap Download for
[amount].
4. If the app uses Location Services, a notification is
displayed (see “Location Services” on page 214).
Continue.)
(Tap
5. Do one of the following:
䡲 If you have set up a billing account: If prompted,
enter your Palm profile password to authorize the
purchase, and tap
Note: If you enter an incorrect Palm profile password three
times, a message appears that explains how you can
contact Palm support for help.
Continue.
Page 71

䡲 If you have not set up a billing account: Tap
Continue. Enter your Palm profile password, and
Continue. See “Set Up a Billing Account” on
tap
page 71.
6. Tap OK.
Did You Know? After you purchase an application, you can
tap
Reviews on the app details screen to see
reviews from others. Or, on the Reviews
screen, tap
Review to write a review.
7. After you download an app, tap Tap to launch to
open it. (The app also now appears as an icon in
Launcher, so you can open it from the Launcher
the
as well.)
Tip: If you delete a purchased application you can reinstall it
without paying for it again (see “Manage Applications” on
page 71).
Manage Applications
1. Open App Catalog .
2. Tap and tap Applications.
3. Tap the app name.
4. Do one of the following:
䡲 To report a problem with an application: Open the
application menu
䡲 To delete an application: Open the application
and tap Report A Problem.
menu, tap Delete Application, and then tap Delete.
䡲 To reinstall a deleted application: Browse to the
app (see “Browse Applications in App Catalog”
on page 68), tap the app name, and tap
Download. You do not need to buy the app again.
Update Downloaded Applications
1. Open App Catalog .
2. Tap .
3. Tap Updates. (The list displays any of your installed
apps that have updates available.)
4. Tap an app name, and tap Update Available.
5. To launch an updated app, tap Tap to Launch.
Set Up a Billing Account
1. Open App Catalog .
2B Move Around on Your Phone 71
Move Around
Page 72

2.
Do one of the following:
䡲 Tap an app you want to buy and tap Continue.
䡲 Open the application menu, tap Preferences &
Accounts, and tap Add Account.
3. Enter your Palm profile password and tap Continue.
Note: If you enter an incorrect Palm profile password three
times, a message appears that explains how you can
contact Palm support for help.
4. Tap the credit card type you want to use. (Enter
your credit card and billing address details, and
Submit.)
tap
Important: Your credit card details are not stored on your
phone. They are encrypted and stored in your Palm
profile.
5. Tap OK to verify your email address, or tap Change
This Address to enter a different one. (Purchase
receipts are sent to the address shown here.)
6. In Password is Required, select one of the following:
䡲 Once every 4 hours: You must enter your
password the first time you make a purchase. If
you make any other purchases within four hours,
you don’t need to enter your password again.
72 2B Move Around on Your Phone
After four hours, you enter your password again
for the first purchase, which starts a new
four-hour window.
䡲 Every Purchase: You must enter your password for
each purchase, regardless of the time interval.
Update or Delete a Billing Account
1. Open App Catalog .
2. Open the application menu and tap Preferences &
Accounts.
3. Tap your account name.
4. Enter your Palm profile password and tap Continue.
5. Do one of the following:
䡲 Edit the account information: Change the
information as needed and tap
䡲 Delete the account information from your phone:
Tap Remove Account.
Submit.
Page 73

Copy Files Between Your Phone and Your Computer
Copy iTunes Media Files From Your Computer to Your Phone
Use media sync to easily transfer pictures, videos,
podcasts, and DRM-free music files from iTunes on
your computer to your phone.
While you use media sync, you can’t make or receive
calls or use other wireless features such as email or the
Web.
Key Term: DRM-free: Describes a file that is not protected by
Did You Know? You can copy music files using USB Drive
Digital Rights Management. DRM-free music files
can be copied as many times as you like and can
be played on your Pixi phone. To learn more about
DRM-free music, go to
iTunes Plus.
mode as well (see “Copy Other Types of Files
Between Your Phone and Your Computer” on
page 74).
apple com and search on
1. Connect your phone to your computer with the
USB cable.
2. On your phone, tap Media Sync.
3. The first time you use Media Sync mode, an alert
warns you that you cannot make or receive calls or
text messages. (Tap
OK.)
4. Your phone is now in Media Sync mode. (On your
computer, iTunes opens automatically.)
Note: You can synchronize supported DRM-free music,
videos, TV shows, podcasts, and pictures, but you
cannot sync iTunes contacts, calendar events, or
games.
5. Follow the steps in iTunes to synchronize files to
your phone.
6. Disconnect the USB cable from the computer
when iTunes indicates that it is safe to do so.
Tip: Media sync is a one-way transfer only, from iTunes on
your computer to your phone. To transfer music files from
your phone to iTunes on your computer, you can
download the Palm Music Assistant. Go to
palm.com/music-assistant for information.
2B Move Around on Your Phone 73
Move Around
Page 74

Copy Other Types of Files Between Your Phone and Your Computer
You can copy any type of file from a computer to your
phone, and from your phone to your computer, by
putting your phone in USB Drive mode.
After you copy a file to your phone, you can open the
file if your phone has an application that supports the
file type. You can open many file formats for photos,
videos, and music; Microsoft Office files; and PDF files.
Important: All files that you store on the USB Drive of your
When your phone is in USB Drive mode, you can’t
make or receive calls or use other wireless features
such as email or the Web.
74 2B Move Around on Your Phone
phone are not backed up to your Palm profile, and
they cannot sync to any of your online accounts. So
be sure to keep a copy of all such files somewhere
besides your phone just in case you lose your
phone or you must do a full erase of the info on
your phone.
Before You Begin: Before you copy files from your computer,
make sure you have enough storage
space on your phone to fit the file. Open
Device Info and look at the Available field
Phone.
under
1. Connect your phone to your computer using the
USB cable.
2. On your phone, tap USB Drive. (On your computer,
your phone appears as a removable drive.)
3. On a Windows computer, if the Found New
Hardware wizard opens, click Cancel to close the
wizard.
4. Open My Computer (Windows XP), Computer
(Windows Vista), or the
Finder (Mac), double-click
the drive representing your phone, and drag and
drop files to your phone. (The drive displays folders
that you can use to organize the files you copy. You
can also create your own folders.)
5. On a Windows computer, to end the connection
safely, right-click the drive representing your phone
and click
Eject. (On a Mac computer, from your
desktop, drag the drive representing your phone to
Tra sh. Trash changes to Eject.)
the
Page 75

6. Disconnect the USB cable from the computer when
the USB Drive screen is no longer displayed on
your phone.
Move Around
2B Move Around on Your Phone 75
Page 76

2C. Transferring Data
⽧ Data Transfer Overview (page 76)
⽧ How Do I Get Data From My Old Phone? (page 77)
⽧ How Do I Get Data Off My Computer? (page 77)
⽧ I’m Already Using Google, Facebook, and/or Microsoft
Exchange (page 80)
⽧ I Want to Keep Using My Current Desktop App and Sync
With an Online Account on My Phone (page 81)
⽧ I Don’t Need to Sync, but I Do Want a Copy of My Data
Backed Up Somewhere Besides My Phone (page 82)
Data Transfer Overview
While you have many options for transferring data,
Palm recommends that you take advantage of the
®
Synergy™ feature by putting your data in an
Palm
online account—for example, if you don’t have a Google
account, we recommend that you create one and store
your data there (see “How Do I Add Names and Other
76 2C. Transferring Data
Info Into Contacts?” on page 121, “How Do I Get Events
Into Calendar?” on page 135, and “How Do I Send and
Receive Email on My Phone?” on page 186). If you
don’t want to do this, there are other ways to get data
on your phone.
Consider carefully whether you’ll want to be able to
access and change your data somewhere besides
your phone. If you do, do you prefer the other means of
access to be a website (for example, Google), or to be
software that is installed on your computer? In either
case, you can set things up so that you can
synchronize new or changed data between your phone
and the other data location.
You could also decide not to have a sync setup for
your data, in which case you can use your Palm profile
to back up your data (see “Backup” on page 164). You
can’t access this data anywhere but on your phone.
However, your data is backed up, and in an emergency
(such as a lost or stolen device), you can remove the
data on your lost or stolen phone and restore it to a
new Pixi phone.
Page 77

How Do I Get Data From My Old Phone?
3. Enter your username and password for the Google
or Exchange account.
Note: You don’t have to go to Calendar to set up your
account there—that’s done automatically using the
username and password you enter in Contacts.
4. Go to a Sprint store and ask a support agent for
help in transferring data from your old phone.
(When you're ready to transfer data from your old
phone, be sure to tell the agent which account to
transfer the data to.)
Do you want to sync your personal information
between your Pixi phone and Google or Exchange, but
first need to get your data out of an old phone that you
want to stop using? You can do a one-time, one-way
transfer of data to your Pixi phone, and then sync the
data to Google or Exchange.
1. On your computer, set up an account on the
Google website (go to
Exchange (speak to an IT person at your
company).
2. Open Contacts on your Pixi phone.
gmail.com) or with Microsoft
How Do I Get Data Off My Computer?
Data Transfer
2C. Transferring Data 77
Page 78

Do you want to sync your personal information
between your Pixi phone and Google or Exchange, but
first need to get the data out of a desktop app that you
want to stop using? You can do a one-time, one-way
transfer of data to your phone, and then if you choose
to, sync the data to Google or Exchange.
1. On your computer, set up an account on the
Google website (go to
gmail.com) or with Microsoft
Exchange (speak to an IT person at your
company).
2. Open Contacts on your Pixi phone.
3. Enter your username and password for the Google
or Exchange account.
Note: You don’t have to go to Calendar to set up your
account there—that’s done automatically using the
username and password you enter in Contacts.
78 2C. Transferring Data
4. To transfer data from a desktop app that you want
to stop using, go to
palm.com/migrate-pixi for more
information about the Data Transfer Assistant
(DTA)—it’s a free download from Palm.
About the Data Transfer Assistant
The DTA enables you to do a one-time, one-way export
of data from selected desktop apps to your Pixi phone
through the USB cable included with your phone. After
the data is on your phone, you can select the account
you want to import the data to.
Important: The DTA is not synchronization software. It is meant
to be used once per desktop app, to export your
info from the desktop app to an account on your
phone.
Page 79

These are the desktop apps that the DTA works with,
and what data the DTA transfers to your phone:
Desktop application Contacts Calendar Tasks Memos/Notes
Windows XP or Vista
®
Outlook 2003 or 2007 Yes Yes Yes Yes
Palm Desktop v6.2 Yes Yes Yes Yes
Mac OS 10.5 Address Book Yes No No No
iCal No Yes No No
Note the following:
䢇 Depending on the amount of data you are
transferring, it can take up to a few hours to transfer
data with the DTA.
䢇 On Vista, only Outlook 2007 is supported.
䢇 If you have an earlier version of Palm Desktop, you
can download version 6.2 for free from
palm.com/desktop. Install it, sync with your old Palm
device, and then use the DTA to transfer your data.
䢇 Do you use Palm Desktop on the Mac? Don’t worry,
you can export your contacts, calendar events, and
tasks into Address Book and iCal. Then use the DTA
to transfer your data. For more information, go to
palm.com/migrate-pixi.
Data Transfer
2C. Transferring Data 79
Page 80

I’m Already Using Google, Facebook, and/or Microsoft Exchange
If you are already using Google, Facebook, and/or
Exchange to manage your calendar and contacts, then
80 2C. Transferring Data
all you need to do is set up one or more of these
accounts on your phone.
Set up your Pixi
phone to
sync w ith...
Google Contacts and calendar events
Exchange Contacts, calendar events, and tasks
Facebook Contacts and calendar events
Note: Changes you make in your Facebook account on the
To sync this data...
Web show up on your phone. Contacts and calendar
events you add or change on your phone, however, do
not automatically update your Facebook account on
the Web.
1. Open Contacts .
2. Enter your account credentials for your Google,
Facebook, or Exchange account.
Note: You don’t have to go to Calendar to set up your
account there—that’s done automatically using the
credentials you entered in Contacts.
Page 81

I Want to Keep Using My Current Desktop App and Sync With an Online Account on My Phone
If you want to continue using a desktop app to store
your contacts, calendar events, and tasks—iCal and
Address Book on the Mac, or desktop Outlook
®
or
®
Palm
Desktop by ACCESS on Windows—consider
adopting this solution.
Download and install a third-party application (sold
separately) that can sync your desktop app to Google.
Your desktop app syncs with your Google account,
and your phone also syncs with Google.
1. On your computer, set up an account on the
Google website (go to
gmail.com).
2. Open Contacts on your Pixi phone.
3. Enter the account credentials for your Google
account.
Note: You don’t have to go to Calendar to set up your
account there—that’s done automatically using the
username and password you enter in Contacts.
4. Install a third-party application on your computer
that enables you to sync with Google. (Go to
palm.com/migrate-pixi to learn about available
third-party sync solutions.)
5. Follow the instructions of the third-party app to
sync the data in your desktop app with Google.
(The next time Google syncs with your phone, your
data appears on your phone.)
2C. Transferring Data 81
Data Transfer
Page 82

I Don’t Need to Sync, but I Do Want a Copy of My Data Backed Up Somewhere Besides My Phone
Use the Data Transfer Assistant to move your data into
your Palm profile account. For information on your
Palm profile account, see “Backup” on page 164.
82 2C. Transferring Data
Page 83

2D. Phone
⽧ Make Calls (page 83)
⽧ Receive Calls (page 87)
⽧ Use Voicemail (page 89)
⽧ What Can I Do During a Call? (page 89)
⽧ What’s My Number? (page 93)
⽧ View Your Call History (page 93)
⽧ Save a Phone Number to Contacts (page 94)
⽧ Use a Phone Headset (page 95)
⽧ Customize Phone Settings (page 97)
Make Calls
For information on turning the phone off and back on,
see “Turn the Phone On/Off” on page 18.
Phone
* These indicate that the phone is on.
2D. Phone 83
Page 84

1. Open Phone .
2. Tap the dial pad numbers to enter the number.
* These indicate that the phone is off (airplane
mode).
Dial Using the Onscreen Dial Pad
The onscreen dial pad is useful when you need to dial
numbers that are expressed as letters and when you
need large, brightly lit numbers that you can tap.
84 2D. Phone
3. Tap to dial.
Page 85

Tip: Press Backspace or tap the onscreen backspace icon
(to the right of the number you enter) to delete numbers
one at a time. Tap and hold the icon to delete all the
numbers.
Tip: You can paste numbers copied from other applications—
for example, from an email message or a memo—into the
dial pad.
Tip: To enter +, tap and hold 0 onscreen.
Dial by Contact Name Using Universal Search
1. Open Card view (see “Display All Open
Applications (Card View)” on page 49) or the
Launcher (see “Open an Application in the
Launcher” on page 47).
2. Begin typing the contact first or last name, or
initials.
3. Tap one of the contact’s phone numbers to dial it.
(If only the contact name appears, tap the name to
display the phone numbers for that contact, and
tap the number.)
Dial Using the Keyboard
1. In the Launcher or Card view, use the keyboard to
enter the number. (You do not need to press
Option to enter numbers, *, or #.)
2. When you finish entering the number, tap it to dial.
Tip: You can also enter a number with the keyboard when the
dial pad is displayed. After entering the number, tap the
onscreen dial icon to dial.
Tip: To enter +, press and hold the 0 key on the keyboard.
2D. Phone 85
Phone
Page 86

Dial Using a Speed Dial
See “Assign a Speed Dial to a Contact” on page 128
for instructions on creating a speed dial.
䢇 In the Launcher, Card view, or Phone, press and hold
the speed-dial key you assigned to the number.
Dial by Contact Name in the Phone Application
See “How Do I Add Names and Other Info Into
Contacts?” on page 121 for instructions on adding
contacts to your phone. You can also look up and dial
contacts using universal search (see “Dial by Contact
Name Using Universal Search” on page 85).
1. Open Phone .
2. Using the keyboard, enter a name or initials until
the contact you want appears.
86 2D. Phone
Did You Know? If you press E, R, or any other key that displays
Did You Know? If your company uses Microsoft Exchange
both a letter and a number, you see both
matching names and numbers onscreen.
Server with a Global Address List (GAL),
entering the contact search information
returns matching results from the GAL as well.
3. Tap the n umber.
Page 87

Tip: If you do not want contact matches to appear when you
type a number on the keyboard, you can turn off the
Show Contact Matches preference (see “Show Contact
Matches” on page 97). When this preference is off, you
can still dial by contact name in the Phone application.
After opening Phone, tap the contact list icon to the right
of “Enter name or number.” Type the contact name or
initials, and tap the number when it appears.
Redial the Last Number Dialed
1. Open Phone .
2. Tap . (When the contact name or number
appears at the top of the screen, tap again to
dial.)
Dial Your National Emergency Number
To dial 911, do the following:
1. Press power to wake up the screen.
2. Tap the center of the gesture area to display Card
view.
3. Enter the emergency number, and tap the number
to dial. (If the phone is turned off, a notification
appears prompting you to turn it on. You don't
have to press
Option to enter numbers.)
Dial From Another Application
If a phone number appears in another application as
an underlined link, you can begin dialing the number
directly from that application. For example, you can dial
phone numbers that appear in Web pages, in
messages (email, text, or multimedia), or in notes to
calendar events.
1. If a phone number appears as an underlined link,
tap the number. (This displays the dial pad with the
number already entered.)
2. Tap to dial.
Receive Calls
If you want to answer calls, your phone must be on.
This is different from having only the screen turned on
(see “Turn the Phone On/Off” on page 18). When your
phone is off, your calls go to voicemail.
2D. Phone 87
Phone
Page 88
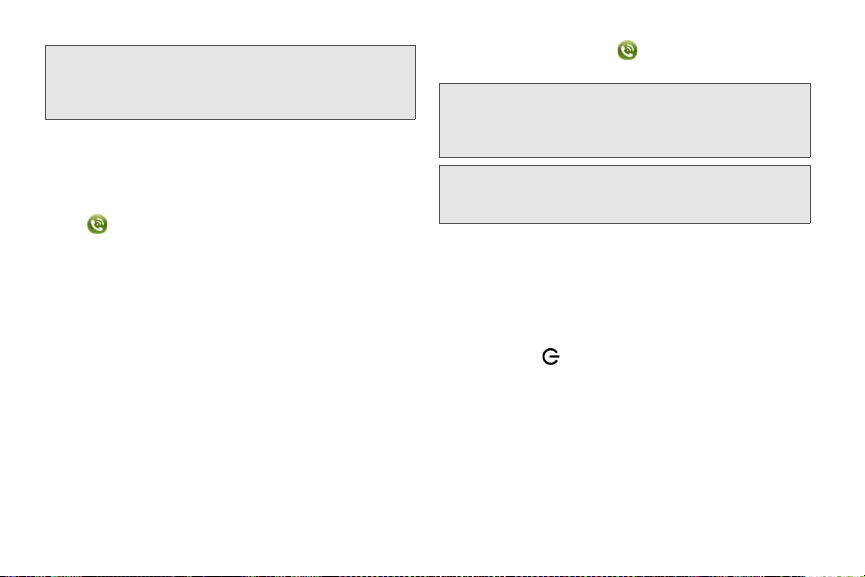
Tip: You can pick the ringtone for incoming calls (see “Select
the Ringtone for Incoming Calls” on page 179). You can
set a ringtone for individual contacts as well (see “Add a
Ringtone to a Contact” on page 128).
Answer a Call
Do one of the following:
䢇 If the screen is on when the phone starts ringing,
tap .
88 2D. Phone
䢇 If the screen is off, drag up to unlock the screen
and answer the call.
Did You Know? If you are playing music or a video on your
Tip: You can see a photo of the person calling you by
assigning a caller ID photo. See “Add a Photo to a
Contact” on page 127.
phone and a call arrives, playback pauses
automatically and resumes when you hang
up or ignore the call.
Silence the Ringer on an Incoming Call
When you silence the ringer on an incoming call, you
can answer the call or let it ring through to voicemail.
Do one of the following:
䢇 Press power .
䢇 Press volume up or volume down.
䢇 Slide the ringer switch off (red means off). This
silences the ringer and any notification sounds.
These sounds remain off until you slide the
switch back on. Other sounds, such as music and
video playback, are not affected by sliding the ringer
switch off.
ringer
Page 89

Ignore a Call
To send a call immediately to voicemail, do one of the
following:
䢇 Tap .
䢇 Press power twice.
To reply to a caller who is in your Contacts list after you
ignore a call, tap the ignored call notification. This
opens the caller’s contact entry, where you can select a
reply method. To reply to a caller who’s not in your
Contacts list, go to your call history (see “View Your
Call History” on page 93).
Use Voicemail
1. Do one of the following:
䡲 In the Launcher, Card view, or Phone, press and
1 .
hold
䡲 Tap a voicemail notification at the bottom of the
screen.
䡲 Open Phone . Then tap .
䡲 Open Phone . Then tap and hold 1 onscreen.
2. Follow the voice prompts to listen to your
messages.
What Can I Do During a Call?
Your phone offers many advanced telephone features,
including call waiting and three-way conferencing.
These features depend on your service plan. Contact
Sprint for more information.
While you’re on a call, info about the call appears on
the call screen. When you’re on a call, you can open
other applications and work in them, and you won’t
lose your call. See “Open Applications” on page 46.
If you created a reminder in the contact info of a caller,
the reminder appears as a notification when you make
a call to or receive a call from the person. See “Assign
a Reminder Message to a Contact” on page 129.
2D. Phone 89
Phone
Page 90
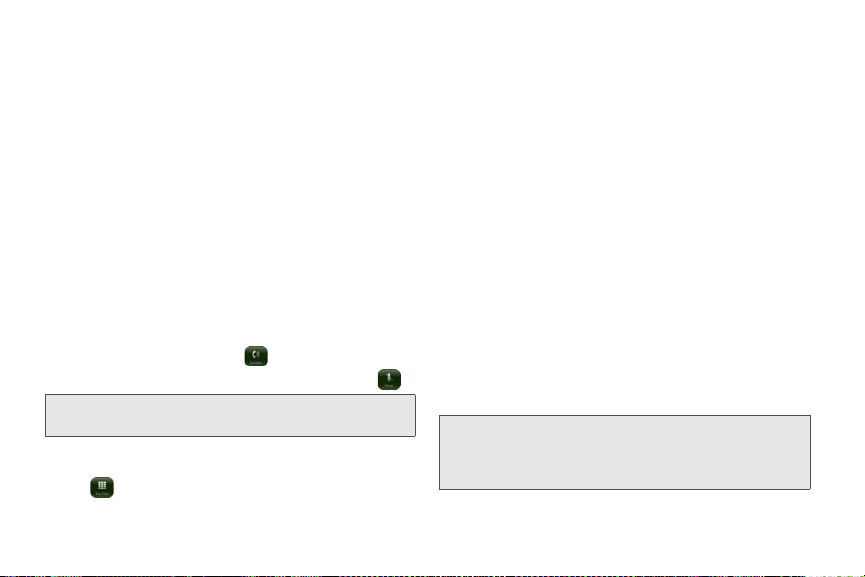
Manage a Call
Do any of the following:
䢇 Add a call: See “Make a Second Call” on page 91.
䢇 Adjust call volume: Press volume up or volume down.
䢇 Put the call on speaker: Tap .
䢇 Mute the microphone so you can’t be heard: Tap .
Tip: You don’t need an on-hold button to put a call on hold.
Just tap the mute icon to mute your end of the line.
䢇 Open the dial pad to enter numbers for navigating
phone trees, responding to prompts, and so on:
Tap .
90 2D. Phone
1 Volume up
2 Volume down
Did You Know? You can send and receive text messages
during a call. This is a great way to stay
connected with friends and colleagues during
a long call.
Page 91

End a Call
䊳 Tap .
Use Another Application While on a Call
While you’re on a call, you can use many other
applications on your phone, for example, the personal
information applications (Contacts, Calendar, and so
on). You can also send and receive text messages. But
you can use the network for only one activity at a time—
phone (which includes text messaging) or data—so you
cannot use the network to browse the Web, send and
receive email, or send and receive multimedia or
instant (IM) messages when you are on a call.
1. Open the Launcher or Quick Launch while on a call.
2. Tap the other application.
3. Tap the call notification at the bottom of the screen
to return to the call screen.
Phone
Make a Second Call
1. While on a call, tap .
2. Dial the second call.
Answer a Second Call (Call Waiting)
When a second call notification appears, tap . The
first call is put on hold.
2D. Phone 91
Page 92

Swap Between Two Calls
You can swap between calls only if the second call is
incoming.
䊳 Tap to put the active call on hold and switch to
the other caller.
Sprint for more information. Additional charges may
apply and minutes in your mobile account may be
deducted for each call you make.
1. While you’re on a call, make a second call. (This is
the limit of conference callers. Check your service
plan about conference calls.)
2. Tap to create the conference call.
Make a Conference Call
When you’re on a call, you can make a second call
and create a three-way conference call, provided that
the service is available in your area. Please contact
92 2D. Phone
3. Do one of the following:
䡲 Tap to end all calls.
Page 93

䡲 Ask one of the callers to hang up, so you can stay
connected to the other caller.
Look Up or Send a Message to a Contact
When you’re on a call with a contact, tap the contact
name to see the person’s information in Contacts. With
the contact entry open, you can do the following:
䢇 Tap to send the contact a text message. For
example, if the contact is on hold while you’re having
a long conversation with a second caller, you can
send the contact a text stating you’ll call him or her
back.
䢇 Tap Edit to edit the contact entry. For example, if a
contact gives you his or her new email address while
you’re talking, you can enter the address during the
call.
What’s My Number?
1. Open Phone .
2. Open the application menu and tap Preferences.
(Your phone number appears at the top of the
Phone Preferences screen.)
Phone
View Your Call History
1. Open Phone .
2. Tap .
2D. Phone 93
Page 94

3.
Do any of the following:
䡲 Switch the types of calls displayed: Tap All Calls or
Missed Calls.
䡲 Call a number: Tap the number.
䡲 Save the number to Contacts: Tap to the right
of the number (see “Save a Phone Number to
Contacts” on page 94).
䡲 View a contact entry: Tap or the contact
picture to the right of the number.
䡲 Delete a call history entry: Throw the entry off the
side of the screen. Tap
Delete to confirm.
94 2D. Phone
䡲 Clear the call history: Open the application menu
Did You Know? In the call history, outgoing calls are
and tap
Clear Call History.
designated by a right-pointing green arrow,
and incoming calls are designated by a
left-pointing blue arrow. Missed calls are
designated by a bent red arrow. Ignored calls
are designated by a red X.
Save a Phone Number to Contacts
You can save the number from an incoming or
outgoing call to an existing contact, or create a new
contact for the number. If an incoming call uses caller
ID blocking, you cannot save the number.
1. Do one of the following:
䡲 Before dialing a number you entered in the dial pad:
Add to Contacts.
Tap
䡲 During a call: Tap .
䡲 After a call: From the dial pad, tap . Tap to
the right of the number, and tap
Add To Contacts.
Page 95
2. Tap one of the following:
Save As New: Create a new contact for the phone
number.
Add To Existing: Tap the contact you want to add
the phone number to.
Use a Phone Headset
You can connect a 3.5 mm headset (sold separately)
for hands-free operation.
WARNING: If driving while using a phone is permitted in your
area, we recommend using a headset or
hands-free car kit (sold separately). However, be
aware that use of a headset that covers both ears
impairs your ability to hear other sounds. Use of
such a headset while operating a motor vehicle
or riding a bicycle may create a serious hazard to
you and others, and may be illegal. If you must
use a stereo headset while driving, place a
speaker in only one ear. Leave the other ear free
to hear outside noises, and use the headset only
if it is legal and you can do so safely.
Use a Wired Headset
Your phone works with headsets that have a 3.5mm
connector (look for three colored bands on the plug).
When in doubt, ask the third-party headset
manufacturer if the product is compatible with your
phone. If you hear a headset buzz or poor microphone
performance, your headset may be incompatible with
your phone.
1. Connect the headset. (While on a call, the
icon changes to .)
2. The headset button performs different actions
depending on the headset model and what’s
happening on the phone. Press the headset button
once to perform any of the following tasks
supported by your particular headset:
䡲 Answer an incoming call.
䡲 Respond to call waiting.
䡲 Hang up a single active call or all calls on a
conference call.
2D. Phone 95
Phone
Page 96
3.
If you want to stop using the headset, do any of the
following:
䡲 Switch from the headset to your phone’s speaker:
Tap and tap
䡲 Switch from the wired headset to a previously
paired Bluetooth® hands-free device: Tap and
Speaker.
tap the device name.
䡲 Use your phone without the headset: Disconnect
the headset.
Set Up and Use a Bluetooth® Hands-Free Device
Your phone is compatible with many headsets and car
kits (sold separately) enabled with Bluetooth
technology version 2.1, with EDR and stereo (with
AVRCP media controls) .
After you set up a connection with a Bluetooth headset
or hands-free car kit, you can communicate using that
device whenever it is within range and the Bluetooth
feature on your phone is turned on. The range varies
greatly, depending on environmental factors. The
maximum is about 10 meters.
96 2D. Phone
®
wireless
Note: You can use a stereo (A2DP-enabled) Bluetooth
headset or speakers to listen to music files on your
phone. You cannot, however, use a mono Bluetooth
headset to listen to music files.
1. Open Bluetooth .
2. If the Bluetooth setting at the top of the screen is
Off to switch the Bluetooth feature from Off
off, tap
to On.
3. Tap Add device and tap the device name.
4. To use a Bluetooth device with your phone, follow
the instructions that came with the Bluetooth
device.
5. To switch to another Bluetooth device while on a call:
Tap and tap the new device name. (You can
Handset or Speaker to use your phone
also tap
without the headset.)
Tip: If you make a Bluetooth connection with a car kit, you
might get a notification on your phone asking if you want
to upload contacts to the car kit. Tap
contacts. If you later want to delete the contacts from the
car kit, check the car kit documentation for instructions.
Allow to upload
Page 97

For more information on using the Bluetooth feature on
your phone, see “Bluetooth® Wireless Technology” on
page 226.
Customize Phone Settings
Use Phone Preferences to customize phone settings.
Show Contact Matches
By default, when you have the dial pad displayed but
you’re using the keyboard to enter a phone number,
both numbers and letters appear and your phone
performs a search of matching names in Contacts. If
you turn off this preference, typing on the keyboard with
the dial pad displayed enters numbers only, and no
search is done in Contacts.
1. Open Phone .
2. Open the application menu and tap Preferences.
3. In Show Contact Matches, tap On or Off.
Tip: If you turn off the Show Contact Matches preference,
you can still perform a contact search in the Phone
application. After opening
to the right of “Enter name or number.” Type the contact
name or initials, and tap the number when it appears.
Phone, tap the contact list icon
Use Dialing Tones
Dialing tones, also known as DTMF tones, are the tones
that play when you press a key to dial. A short tone
plays briefly and then stops, no matter how long you
2D. Phone 97
Phone
Page 98

press the key. A long tone plays until you release the
key.
1. Open Phone .
2. Open the application menu and tap Preferences.
3. In DTMF tones, tap Short or Long, and then tap the
option you want.
Use Dialing Shortcuts
Dialing shortcuts add a prefix at the beginning of a
number, so you can dial an extension instead of the
whole number.
1. Open Phone .
2. Open the application menu and tap Preferences.
3. Under Dialing Shortcuts, tap Add new number.
4. Set the following:
When I Dial: Tap this field and select the number of
digits you need to enter to have your phone add a
dialing shortcut.
Use This Dialing Prefix: Enter the prefix to be added
at the beginning of the dialed number. The
98 2D. Phone
combination of prefix and digits you enter must
add up to a complete phone number.
5. Tap Done.
Example: A complete phone number in your
company’s phone system has 11 numbers, for
example, 1-408-555-1122. When dialing from a phone
that’s part of the system, you need to dial only the last
five digits (51122). When you create a dialing shortcut
on your phone, you select “5 digit numbers” for
Dial and enter “140855” in Use This Dialing Prefix. So
when you dial your co-worker’s five-digit extension
(51122), your phone automatically dials the whole
number: 1-408-555-1122.
When I
Set Roaming and Data Usage Preferences
Use roaming and data usage preferences to set
options for using your phone in your home network
and while roaming. For example, you can set options to
prevent placing a call or making a data connection
while roaming, so that you avoid extra charges.
1. Open Phone .
2. Open the application menu and tap Preferences.
Page 99
3. Under Network, set any of the following:
Voice Network: Tap Sprint Only to allow phone calls
only when you are on the Sprint network, or tap
Automatic to allow roaming on other networks.
Data Roaming: Set whether to allow Web browsing,
email, multimedia messaging, and instant
messaging when you are roaming. This option
appears only if you have set
Automatic.
Data Usage: Set whether to turn data services—Web
browsing, email, multimedia messaging, and
instant messaging—on or off.
Voic e Ne twork to
Enable TTY/TDD
A TTY (also known as TDD or text telephone) is a
telecommunications device that allows people who are
deaf or hard of hearing, or who have speech or
language disabilities, to communicate by telephone.
Your phone is compatible with select TTY devices.
You can connect a TTY/TDD machine to your phone
using the headset jack. Check with the manufacturer of
your TTY device for connectivity information. Be sure
that the TTY device supports digital wireless
transmission.
Note: When TTY is enabled, you cannot use the headset jack
for anything else, and all audio modes are disabled on
your phone, including holding the phone up to your
ear and listening.
1. Connect a TTY/TDD device to your phone using
the headset jack.
2. Open Phone .
3. Open the application menu and tap Preferences.
4. In TTY/TDD, tap Off to switch TTY/TDD from Off to
On.
Enable HAC
To use your phone with a hearing aid, turn on the HAC
feature. This feature ensures that your phone can make
the necessary connection with a hearing aid.
1. Open Phone .
2. Open the application menu and tap Preferences.
3. In HAC, tap Off to switch HAC from Off to On.
2D. Phone 99
Phone
Page 100

Update Network Settings
The network settings on your phone may require
periodic updates. Contact Sprint for information on
recommended update frequency.
1. Open Phone .
2. Open the application menu and tap Preferences.
3. Tap Update Network Settings.
Update the Preferred Roaming List
The preferred roaming list contains information that
allows you to obtain the best possible service when
using your phone outside your home service area.
Contact Sprint for information on recommended
update frequency.
1. Open Phone .
2. Open the application menu and tap Preferences.
3. Tap Update PRL.
100 2D. Ph one
Reset the Voicemail Count
Occasionally you may continue to receive notifications
of new voicemail messages even after you have
listened to or deleted all your messages. If this
happens, use the Voicemail Count Reset preference to
stop the notifications.
1. Open Phone .
2. Open the application menu and tap Preferences.
3. Tap Reset Voicemail Count.
 Loading...