

Page 1

Handbook for the
Palm™ Mini Keyboard
Page 2

Copyright
Copyright © 2001-2002 Palm, Inc. All rights reserved. Graffiti, MultiMail, HotSync,
and Palm OS are registered trademarks of Palm, Inc. Palm and the Palm logo are
trademarks of Palm, Inc. Other product and brand names may be trademarks or
registered trademarks of their respective owners.
Disclaimer and Limitation of Liability
Palm, Inc. assumes no responsibility for any damage or loss resulting from the use
of this handbook.
Palm, Inc. assumes no responsibility for any loss or claims by third parties which
may arise through the use of this product. Palm, Inc. assumes no responsibility for
any damage or loss caused by deletion of data as a result of malfunction, dead
battery, or repairs. Be sure to make backup copies of all important data on other
media to protect against data loss.
IMPORTANT Please read the End User Software License Agreement with this product
before using the accompanying software program(s). Using any part of the software
indicates that you accept the terms of the End User Software License Agreement.
Page 3

Contents
Introducing the Palm™ Mini Keyboard . . . . . . . . . . . . . . . . . . . . . . . . . . . . . . 1
Installing the application. . . . . . . . . . . . . . . . . . . . . . . . . . . . . . . . . . . . . . . . . . . . 2
Attaching and removing the keyboard . . . . . . . . . . . . . . . . . . . . . . . . . . . . . . . . 3
Using the keyboard . . . . . . . . . . . . . . . . . . . . . . . . . . . . . . . . . . . . . . . . . . . . . . . . 4
Turning on and off your handheld . . . . . . . . . . . . . . . . . . . . . . . . . . . . . . . . 5
Function and caps keys. . . . . . . . . . . . . . . . . . . . . . . . . . . . . . . . . . . . . . . . . . 5
Application buttons. . . . . . . . . . . . . . . . . . . . . . . . . . . . . . . . . . . . . . . . . . . . . 5
International keyboard . . . . . . . . . . . . . . . . . . . . . . . . . . . . . . . . . . . . . . . . . . 5
Menu shortcuts. . . . . . . . . . . . . . . . . . . . . . . . . . . . . . . . . . . . . . . . . . . . . . . . . 6
Moving between fields . . . . . . . . . . . . . . . . . . . . . . . . . . . . . . . . . . . . . . . . . . 6
Onscreen buttons . . . . . . . . . . . . . . . . . . . . . . . . . . . . . . . . . . . . . . . . . . . . . . . 7
Product Regulatory and Safety Information . . . . . . . . . . . . . . . . . . . . . . . . . . 9
iii
Page 4

Contents
iv
Page 5
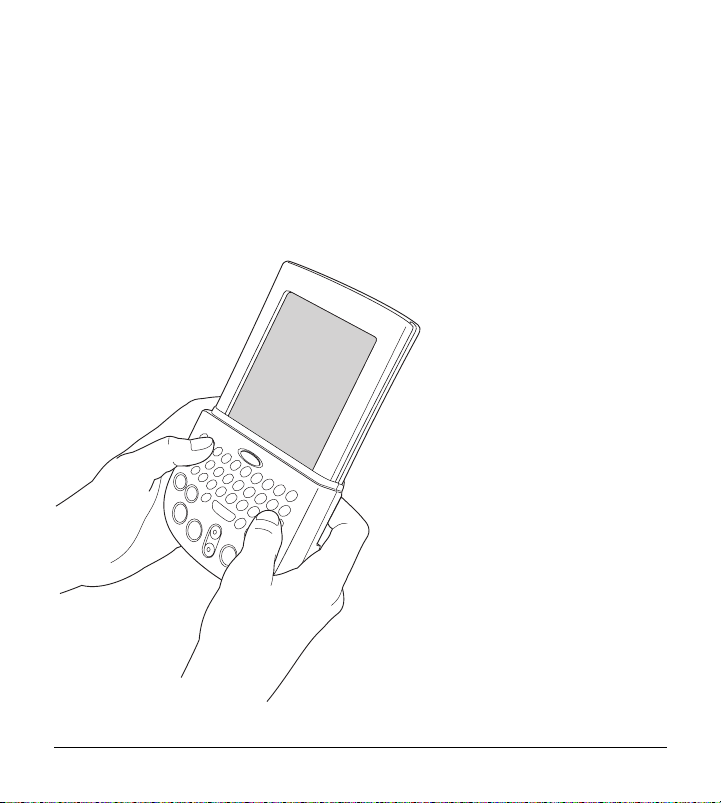
Introducing the Palm™ Mini Keyboard
The Palm™ Mini Keyboard is designed to make entering data easy. An alternative
to Graffiti® writing and the onscreen keyboard, the Palm Mini Keyboard allows
you to type e-mail and instant messages, and perform quick data-entry while
on-the-go.
1
Page 6

Installing the application
Installing the application
Before you install the Palm Mini Keyboard application on your handheld, it’s a
good idea to perform a HotSync
The application for the Palm Mini Keyboard controls the way the keyboard
interacts with your handheld. It’s a PRC file like most other applications for your
handheld, and you install it just like any other application.
NOTE The Palm Mini Keyboard application is a background application, so no icon will
appear in the Applications Launcher.
To load the keyboard application on a Windows computer:
1. Insert the CD-ROM into the CD-ROM drive, and then double-click the
CD-ROM drive icon.
2. Double-click the Mini Keyboard.prc file; this opens the Install Tool.
3. In the User drop-down list, select the name that corresponds to your handheld,
and then click OK.
4. Click Done, and when the confirmation message appears, click OK.
5. Perform a HotSync operation to install the keyboard application on your
handheld.
To load the keyboard application on a Mac computer:
1. Insert the CD-ROM into the CD-ROM drive.
2. In Palm™ Desktop software, from the HotSync menu, select Install Handheld
Files.
3. In the User pop-up menu, select the name that corresponds to your handheld.
4. Drag Mini Keyboard.prc to the Install Handheld Files dialog box.
5. Perform a HotSync operation to install the keyboard application on your
handheld.
®
operation to back up your data.
2
Page 7

Attaching and removing the keyboard
Now you’re ready to use your keyboard.
NOTE To find version and size information about the keyboard application, tap the
Applications icon , tap the Menu icon , and then tap Info.
Attaching and removing the keyboard
To attach the
keyboard, slide it
onto your handheld
until you feel a firm
click.
To remove the keyboard,
grasp the keyboard firmly
and slide it off your
handheld.
3
Page 8

Using the keyboard
Using the keyboard
Function key
Applications
Launcher
Menu
Date Book Address Book
* Depending on your model, some icons may be different than those shown
in the diagram.
Power button
Scroll buttons
Wireless
(or To Do List*)
Space key
Caps key
My Favorite
(or Calculator*)
Find
MultiMail
Deluxe
(or Note Pad*)
®
4
Page 9

Using the keyboard
Turning on and off your handheld
Press the power button at the top of the keyboard to turn your handheld on and
off. You can also turn on your handheld by pressing any of the application buttons.
Function and caps keys
To type numbers and symbols shown in blue on your Palm Mini Keyboard, such
as #, &, and !, use the blue function key . Press the function key once for a
temporary shift. The next key you type enters the symbol. Press the function key
twice to lock. Press the key once again to release the lock.
To type capital letters use the Caps key . Press this key once for a temporary
shift or twice for caps lock. Press the key again to release caps lock.
Application buttons
Press application buttons to open applications, just as you would on your
handheld. Pressing any of the application buttons also turns on your handheld.
International keyboard
To display the Palm OS® International keyboard, press the function key , and
then press the space key. This is equivalent to tapping “abc” in the Graffiti writing
area and then tapping “Int’l”.
5
Page 10

Using the keyboard
Menu shortcuts
You can use shortcuts on the
Palm Mini Keyboard to execute commands such
as the ones shown in the menu on the right.
To use a menu shortcut:
1. Press the function key .
2. Press the Caps key .
3. Press the key for the command you want to
execute.
For example, to delete an e-mail message in MultiMail Deluxe, press the function
key, then press the Caps key, and then press Y.
Moving between fields
To move between fields, press the function key , and then press either the up or
down scroll button. For example, to jump from the Last name field to the First
name field in a new Address Book entry, press the function key, and then press the
down scroll button.
6
Page 11

Using the keyboard
Onscreen buttons
Some of the buttons on your handheld screen can be selected using key
combinations.
New button. Press the function key , and then press the backspace key.
Done button. Press the function key , and then press the return key. This
command also selects the OK button and the Send button.
OK button. Press the function key , and then press the return key.
Send button. Press the function key , and then press the return key.
7
Page 12

Using the keyboard
8
Page 13

Product Regulatory and Safety Information
FCC Statement
This device complies with part 15 of the FCC rules. Operation is subject to the
following two conditions: (1) This device may not cause harmful interference, and
(2) this device must accept any interference received, including interference that
may cause undesired operation.
NOTE This equipment has been tested and found to comply with the limits for a Class
B digital device, pursuant to Part 15 of the FCC rules. These limits are designed to
provide reasonable protection against harmful interference in a residential installation
This equipment generates, uses, and can radiate radio frequency energy and if not
installed and used in accordance with the instructions, may cause harmful interference
to radio communications. However there is no guarantee that interference will not occur
in a particular installation. If this equipment does cause harmful interference to radio or
television reception, which can be determined by turning the equipment off and on, the
user is encouraged to try to correct the interference by one or more of the following
measures:
■ Reorient or relocate the receiving antenna.
■ Increase the separation between the equipment and receiver.
■ Connect the equipment into an outlet on a circuit different from that to which
the receiver is connected.
■ Consult the dealer or an experienced radio/TV technician for help.
The use of shielded I/O cables is required when connecting this equipment to any
and all optional peripheral or host devices. Failure to do so may violate FCC rules.
9
Page 14

Product Regulatory and Safety Information
CAUTION Changes or modifications not covered in this manual must be approved in
writing by the manufacturer’s Regulatory Engineering Department. Changes or
modifications made without written approval may void the user’s authority to operate
this equipment.
Responsible Party:
Northstar Systems
9400 Seventh Street, Bldg. A2
Rancho Cucamonga, CA 91730
Phone: 909-483-9900
Fax: 909-944-0464
Palm™ Mini Keyboard
Tested to Comply
With FCC Standards
FOR HOME OR OFFICE USE
For consumer inquiries, please contact Palm, Inc. at www.palm.com.
Safety Statement
WAR NI NG Prolonged or improper use of the keyboard may result in discomfort
or injury.
You should use the method of inputting data into your Palm OS® handheld that is
the most comfortable for you. You may use this keyboard or purchase any of
several shapes of styli from Palm, Inc. or third party accessory providers.
The keyboard is not intended for extended or intensive use. If discomfort
develops, consider changing your method of input or the manner in which you use
the keyboard or stylus. If discomfort or pain persists, either decrease usage or
consult a medical or ergonomics professional.
10
Page 15

Product Regulatory and Safety Information
11
Page 16

Palm, Inc.
5470 Great America Parkway
Santa Clara, California 95052
United States of America
www.palm.com
PN: 406-3935B-US
 Loading...