

Page 1

User Guide
Page 2

Copyright and Trademark
© 2005 palmOne, Inc. All rights reserved.
palmOne, Addit, Blazer, Graffiti, HotSync, LifeDrive, Palm, Palm Powered, Palm OS, the Palm logo, and
VersaMail are among the trademarks or registered trademarks owned by or licensed to palmOne, Inc. All
other brand and product names are or may be trademarks of, and are used to identify products or services of,
their respective owners.
palmOne, Inc. uses the Bluetooth wireless technology trademark under express license from Bluetooth SIG,
Inc. and uses the Wi-Fi wireless technology trademark under express license from the Wi-Fi Alliance. Pocket
Tunes is a trademark of NormSoft, Inc. WiFile is a trademark of Hands High Software, Inc. MPEG Layer-3
audio decoding technology is licensed from Fraunhofer IIS and Thomson. This product includes technology
owned by Microsoft Corporation and cannot be used or distributed without a license from Microsoft
Licensing, GP.
Disclaimer and Limitation of Liability
palmOne, Inc. assumes no responsibility for any damage or loss resulting from the use of this guide.
palmOne, Inc. assumes no responsibility for any loss or claims by third parties which may arise through the
use of this software. palmOne, Inc. assumes no responsibility for any damage or loss caused by deletion of
data as a result of malfunction, dead battery, or repairs. Be sure to make backup copies of all important data
on other media to protect against data loss.
[
! ]
IMPORTANT
accompanying software program(s). Using any part of the software indicates that you accept the terms of the
End User Software License Agreement.
Please read the End User Software License Agreement with this product before using the
Software Download Available
Palm®Desktop software is supplied on a CD. If you do not have access to a CD drive for your computer, you
can download Palm Desktop software from www.palmOne.com/lifedrive-userguide/
LifeDrive from palmOne ii
Page 3

Table of Contents
About This Guide .................................................................xxi
Tips for viewing this guide........................................................................xxi
What’s in this guide? ................................................................................xxii
Step-by-step instructions.................................................................. xxii
Links.................................................................................................... xxii
Sidebars....................................................................................................xxiii
Chapter 1: Setting Up Your Device and Your Computer ......1
What’s in the box? ........................................................................................2
System requirements ...................................................................................2
Step 1: Charging your device.......................................................................4
What you should know about your device’s battery .......................... 5
Step 2: Turning on your device for the first time .......................................6
Step 3: Installing your software...................................................................7
Step 4: Connecting your device to your computer ....................................8
Switching to another desktop software application ................................10
Using user profiles......................................................................................11
Creating a user profile .........................................................................12
Synchronizing with a user profile ......................................................14
Related topics..............................................................................................17
Chapter 2: Your Mobile Manager .........................................18
What’s on my device? ................................................................................19
Front ..................................................................................................... 19
Top........................................................................................................ 21
Side....................................................................................................... 22
Back ...................................................................................................... 23
Bottom.................................................................................................. 24
Using the power switch..............................................................................25
Using the status bar....................................................................................26
LifeDrive from palmOne iii
Page 4

Rotating the screen .....................................................................................27
What’s on the screen? ................................................................................28
Input area ............................................................................................. 28
Application controls ............................................................................ 29
What software is on my device?................................................................30
What’s on the CD? ......................................................................................32
Related topics..............................................................................................36
Chapter 3: Moving Around in Applications.........................38
Opening applications..................................................................................39
Using Favorites.................................................................................... 39
Using Applications .............................................................................. 40
Using Files............................................................................................ 41
Working with files and folders ........................................................... 43
Sorting Files ......................................................................................... 45
Opening files and folders from within an application ...................... 46
Switching between applications ........................................................ 46
Using the 5-way navigator .........................................................................47
Moving around with the 5-way .......................................................... 47
Moving around in Favorites View ...................................................... 49
Moving around in Applications View ................................................ 49
Moving around in list screens and entry screens............................. 50
Moving around in dialog boxes ......................................................... 50
Moving around in menus ................................................................... 51
Using menus ..............................................................................................52
Using the Command stroke................................................................ 53
Using the Command toolbar .............................................................. 53
Finding information ...................................................................................54
Related topics..............................................................................................55
Chapter 4: Entering Information on Your Device ................56
How can I enter information on my device?.............................................57
Entering information with Graffiti
Writing in the input area ..................................................................... 57
Using full-screen writing..................................................................... 58
LifeDrive from palmOne iv
®
2 writing ...........................................57
Page 5

Writing Graffiti 2 characters ...............................................................60
Graffiti 2 alphabet................................................................................ 62
Graffiti 2 numbers ............................................................................... 63
Graffiti 2 gestures ................................................................................ 67
Writing Graffiti 2 symbols and other special characters ..................68
Graffiti 2 symbols and special characters ......................................... 69
Writing Graffiti 2 ShortCuts ................................................................70
Graffiti 2 ShortCuts.............................................................................. 71
Entering information with the onscreen keyboard ..................................72
Entering info from Contacts into another application .............................74
Editing information.....................................................................................76
Selecting information.......................................................................... 76
Copying and pasting information ......................................................77
Deleting information ...........................................................................78
Related topics..............................................................................................79
Chapter 5: Moving and Managing Info Between
Your Device and Your Computer ...........................................80
Program memory and the hard drive .......................................................81
How can I work with information? ............................................................82
LifeDrive™ Manager and Drive Mode.......................................................83
LifeDrive Manager ............................................................................... 83
Drive Mode........................................................................................... 83
Using LifeDrive Manager ...........................................................................84
Transferring information using the LifeDrive Manager icon ...........85
Transferring information using the LifeDrive Manager window .....88
Renaming a file or folder ....................................................................91
Deleting a file or folder .......................................................................92
Deleting sync items from your computer when they are deleted
from your device ...........................................................................93
Using Drive Mode ......................................................................................94
Synchronizing information ........................................................................98
Doing a full sync ..................................................................................98
Synchronizing using the cable .........................................................100
Synchronizing using LifeDrive Manager ......................................... 101
LifeDrive from palmOne v
Page 6

Creating sync items ...........................................................................101
Doing a folder sync ...........................................................................102
Locating sync items on your computer ........................................... 103
Entering information using desktop software ................................ 104
Customizing your synchronization settings .................................... 107
Choosing how your computer responds to
synchronization requests ...........................................................108
Setting synchronization options ......................................................110
Choosing whether application information is updated ..................111
Installing applications to your device .............................................. 116
Using Quick Install .............................................................................117
Installing applications from a Mac computer ................................. 118
Using the Send To Handheld droplet .............................................. 118
Using commands in the HotSync menu ..........................................119
Other ways of managing information .....................................................120
Importing information from other applications .............................. 121
Restoring archived items on your computer .................................. 123
Installing the additional software from the CD ............................... 124
Checking space and version numbers .............................................125
Removing information .............................................................................127
Removing an application from your device .................................... 127
Removing Palm Desktop software from your computer ............... 128
Related topics............................................................................................130
Chapter 6: Managing Your Contacts ..................................131
Adding a contact ......................................................................................132
Entering additional contact information ..........................................135
Selecting contact field types .............................................................136
Defining custom fields ......................................................................137
Selecting a contact as your business card ......................................138
Copying contact information into multiple contacts ............................139
Locating a contact on your list ................................................................140
Deleting a contact ....................................................................................141
Customizing the Contacts list .................................................................142
Making connections from Contacts.........................................................144
LifeDrive from palmOne vi
Page 7

Using Quick Connect .........................................................................144
Customizing Quick Connect settings ...............................................146
Using Tap-to-Connect .......................................................................147
Working with Contacts on your computer..............................................149
Related topics............................................................................................150
Chapter 7: Managing Your Calendar ..................................151
Scheduling events ....................................................................................152
Scheduling an appointment .............................................................152
Scheduling an event without a start time .......................................154
Scheduling a repeating event—standard interval ..........................156
Scheduling a repeating event—unusual interval ............................157
Scheduling an event that is longer than a day ...............................159
Entering a location or a note for an event .......................................160
Scheduling an event with a time zone .............................................162
Color-coding your schedule.....................................................................163
Managing your color-codes ..............................................................164
Assigning a color code to an event ..................................................166
Setting an alarm .......................................................................................167
Rescheduling an event ............................................................................168
Deleting events .........................................................................................170
Deleting a specific event ...................................................................170
Deleting all your old events ..............................................................172
Checking your schedule ...........................................................................173
Viewing your appointments and tasks together .............................173
Viewing your daily schedule ............................................................175
Viewing your weekly schedule .........................................................177
Viewing your monthly schedule ......................................................178
Viewing a yearly calendar .................................................................179
Finding events that overlap .............................................................. 180
Customizing your calendar ......................................................................180
Customizing display options for your calendar ..............................181
Setting alarm and time options ........................................................184
Working with Calendar on your computer .............................................186
Related topics............................................................................................187
LifeDrive from palmOne vii
Page 8

Chapter 8: Your Microsoft Office Manager ........................188
Creating and managing Office files .........................................................189
Opening files from within Documents ....................................................190
Related topics............................................................................................191
Chapter 9: Viewing Your Photos and Videos ....................192
Reformatting files and copying supported file types.............................193
Viewing photos or videos .......................................................................194
Viewing a slide show ........................................................................ 198
Rotating a photo ................................................................................ 200
Viewing and editing photo or video details............................................202
Organizing photos and videos.................................................................205
Organizing photos or videos into albums .......................................205
Moving a photo or video within and between albums ..................207
Sorting photos and videos ............................................................... 209
Personalizing a photo ...............................................................................210
Drawing on a photo ...........................................................................210
Adding audio to a photo ...................................................................212
Copying a photo or video ........................................................................214
Deleting a photo or video ........................................................................215
Sharing photos and videos ......................................................................216
Related topics............................................................................................217
Chapter 10: Managing Your Camera Card Media..............218
Copying photos and videos from your camera card ............................219
Viewing photos or videos .......................................................................221
Related topics............................................................................................223
Chapter 11: Listening to Music...........................................224
Benefits ......................................................................................................224
Transferring music from a CD to your device using Rhapsody ...........230
Managing playlists....................................................................................233
Creating a playlist ..............................................................................233
Playing songs from a playlist ...........................................................235
Editing a playlist ................................................................................236
LifeDrive from palmOne viii
Page 9

Deleting a playlist ..............................................................................238
Customizing your player ..........................................................................239
Turning off the screen .......................................................................239
Setting background preferences ......................................................240
Flashing the LED when the pTunes console is turned off ..............241
Working with Rhapsody on your computer ...........................................242
Related topics............................................................................................243
Chapter 12: Managing Your Tasks ......................................244
Creating a task ..........................................................................................245
Setting an alarm ................................................................................246
Scheduling a repeating task—standard interval .............................247
Scheduling a repeating task—unusual interval ..............................249
Organizing your tasks ..............................................................................251
Marking a task as complete ....................................................................252
Deleting tasks ...........................................................................................253
Deleting a specific task ......................................................................253
Deleting all your completed tasks ....................................................254
Customizing your Tasks list ....................................................................255
Working with Tasks on your computer ...................................................257
Related topics............................................................................................258
Chapter 13: Writing Memos................................................259
Creating a memo .....................................................................................260
Viewing and editing a memo ..................................................................261
Moving memos in your memos list .......................................................262
Deleting a memo ......................................................................................263
Working with Memos on your computer................................................264
Related topics............................................................................................265
Chapter 14: Writing Notes in Note Pad..............................266
Creating a note .........................................................................................267
Choosing the pen and paper (background) colors .........................268
Setting an alarm ................................................................................269
Viewing and editing a note .....................................................................271
LifeDrive from palmOne ix
Page 10

Deleting a note .........................................................................................272
Working with Note Pad on your computer .............................................273
Related topics............................................................................................274
Chapter 15: Recording Voice Memos.................................275
Creating a voice memo ...........................................................................276
Creating a quick voice memo using the application button ..........276
Creating a longer voice memo using the pause control ................278
Listening to a voice memo ......................................................................281
Setting an alarm for a voice memo ........................................................283
Storing voice memos ..............................................................................285
Saving a voice memo to another location ......................................285
Automatically storing all voice memos on an expansion card .....287
Related topics............................................................................................288
Chapter 16: Making Wi-Fi® Wireless Connections ...........289
What can I do with the built-in Wi-Fi® wireless technology?................290
What types of connections can I make?..................................................290
Wi-Fi signal strength indicator.................................................................291
Setting up a Wi-Fi network connection ..................................................292
Setting up a connection for Wi-Fi synchronization ...............................298
Accessing email and the web with Wi-Fi ...............................................302
Setting up a Wi-Fi device-to-device network .........................................304
Related topics............................................................................................310
Chapter 17: Making Bluetooth® Wireless Connections ... 311
What can I do with the built-in Bluetooth® wireless technology? ........312
What types of connections can I make? .......................................... 312
What is device discovery? ................................................................ 313
Entering basic Bluetooth settings............................................................314
Setting up a Bluetooth phone connection .............................................315
Accessing email and the web with Bluetooth .......................................320
Setting up a connection for Bluetooth synchronization .......................322
Setting up a connection to a Bluetooth network ...................................327
Creating trusted devices ..........................................................................329
LifeDrive from palmOne x
Page 11

Setting advanced Bluetooth features .....................................................331
Storing recently found device names ..............................................331
Allowing your device to wake up when it is turned off ..................332
Related topics............................................................................................333
Chapter 18: Sending and Receiving Email Messages ......334
Upgrading an existing email account ....................................................335
About email accounts ...............................................................................336
Using an email provider ................................................................... 336
Using a corporate email account ..................................................... 337
VPNs ................................................................................................... 338
Connecting to a VPN .........................................................................339
Creating an account..................................................................................340
Transferring settings from an existing account ..............................341
Setting up an account on your computer: Common providers .....343
Setting up an account on your computer: Other providers ...........346
Entering advanced account settings on your computer ................349
Setting up an account on your device .............................................354
Setting advanced mail options on your device ..............................357
Testing your new account ................................................................ 358
Editing an account............................................................................. 359
Editing an account on your computer .............................................359
Editing an account on your device ...................................................360
Deleting an account ...........................................................................361
Adding ESMTP to an account ...........................................................362
Getting and reading messages ................................................................363
Auto Sync with notification .............................................................. 364
Scheduling Auto Sync .......................................................................365
Auto Sync notifications..................................................................... 366
Setting alert options ..........................................................................367
Viewing and using the Reminders screen ....................................... 368
Auto Sync retries ............................................................................... 369
Resource issues with Auto Sync ...................................................... 369
Inbox icons in the VersaMail application ........................................ 370
Setting preferences for getting messages ......................................370
LifeDrive from palmOne xi
Page 12

Reading email messages .................................................................. 373
Adding or updating a contact directly from a message................. 374
Sending an email message ......................................................................375
Entering an address using Smart Addressing ................................377
Entering an address directly in the To field ....................................378
Entering an address using Contacts ................................................379
Attaching a personal signature ........................................................380
Send retry ...........................................................................................381
Send retry notifications..................................................................... 381
Modifying messages in the Outbox................................................. 382
Outbox icons in the VersaMail applications.................................... 382
Working with email folders ......................................................................383
Viewing another folder .....................................................................383
Customizing the appearance of the message list ...........................384
Moving messages between folders .................................................386
Creating and editing mail folders .....................................................388
Working with email messages ................................................................389
Forwarding an email message .........................................................389
Replying to an email message .........................................................390
Setting reply preferences ..................................................................391
Working with URLs, email addresses, and phone numbers in a
message....................................................................................... 393
Deleting a message ...........................................................................393
Deleting old messages ......................................................................394
Emptying the trash ............................................................................396
Setting the trash to be emptied automatically ................................397
Marking messages as read or unread .............................................398
Working with attachments .......................................................................399
Working with a downloaded attachment ........................................400
Saving attachments ...........................................................................403
Attaching files to outgoing messages .............................................404
Advanced VersaMail application features ..............................................406
Creating and using filters.................................................................. 406
Turning filters on and off ..................................................................409
Editing or deleting a filter .................................................................411
LifeDrive from palmOne xii
Page 13

Setting connection preferences .......................................................412
Setting server preferences ................................................................413
Changing email header details......................................................... 415
Synchronizing IMAP mail folders wirelessly................................... 416
Prerequisites for wireless IMAP folder synchronization ................ 417
Turning IMAP folder synchronization on or off ..............................417
Synchronizing device and mail server IMAP folders from the
Options menu ..............................................................................418
Working with root folders................................................................. 418
Using Secure Sockets Layer (SSL) ................................................... 418
Working with Microsoft Exchange ActiveSync ......................................419
What do I need to use Microsoft Exchange ActiveSync?............... 419
How does a Microsoft Exchange ActiveSync email account differ
from other accounts?.................................................................. 420
Setting up a Microsoft Exchange ActiveSync account................... 420
Setting up a Microsoft Exchange ActiveSync account on your
computer .....................................................................................421
Setting up an account on your device .............................................424
Setting advanced mail options on your device ..............................427
Getting email messages ................................................................... 428
Sending messages ............................................................................ 429
Previewing attachments ................................................................... 430
Working with meeting invitations ....................................................430
Working with Calendar events ......................................................... 433
Synchronizing Calendar events using Microsoft Exchange
ActiveSync................................................................................... 434
Updating Calendar events when you delete a Microsoft Exchange
ActiveSync account .................................................................... 434
Related topics............................................................................................435
Chapter 19: Sending and Receiving Text Messages.........436
Creating and sending a text message ....................................................437
Receiving and viewing a text message ..................................................440
Editing a draft text message ...................................................................442
Setting advanced messaging features ...................................................443
Related Topics...........................................................................................445
LifeDrive from palmOne xiii
Page 14

Chapter 20: Browsing the Web...........................................446
Accessing a web page ..............................................................................447
Accessing a web page using the action bar ....................................447
Accessing a web page using the address field ...............................448
Using a password to access a web page .........................................449
Finding information on a web page .................................................450
Quickly jumping to a page .......................................................................451
Following a link.................................................................................. 451
Returning to your home page or a page you recently visited....... 451
Changing how you view a page .............................................................452
Bookmarking your favorite pages ...........................................................454
Adding a bookmark ...........................................................................454
Viewing a bookmarked or saved page ............................................455
Editing information about a bookmark or saved page ...................456
Arranging the bookmark list .............................................................457
Disconnecting from and connecting to the Internet ..............................459
Disconnecting from the Internet ......................................................459
Connecting to the Internet ................................................................460
Downloading files and pages ..................................................................461
Downloading a file ............................................................................461
Saving a web page ............................................................................462
Viewing a saved file ..........................................................................463
Communicating with other users ............................................................464
Sending email by means of an Internet email account ..................464
Changing your home and start pages.....................................................465
Changing your home page ...............................................................465
Changing your start page .................................................................467
Setting advanced browser options .........................................................468
Changing how images are downloaded ..........................................468
Setting whether to automatically complete web addresses and
form fields ...................................................................................469
Allowing websites to remember personal information .................470
Clear Cookies and cache preferences ..............................................471
Setting preferences for using a proxy server ..................................473
Setting whether to accept JavaScript ..............................................475
Related topics............................................................................................476
LifeDrive from palmOne xiv
Page 15

Chapter 21: Dialing Phone Numbers from Your Device ...477
Dialing a number .....................................................................................478
Entering a number .............................................................................478
Redialing the most recently used number ......................................479
Dialing a number from the Call History List ....................................480
Using speed dial ......................................................................................481
Adding a speed-dial entry .................................................................481
Dialing a number using speed dial ..................................................482
Editing a speed-dial entry .................................................................483
Related topics............................................................................................484
Chapter 22: Sharing Information........................................485
Using the Send command ......................................................................486
Sending information from within an application using
Bluetooth
Sending a category using Bluetooth technology ...........................488
Sending an application using Bluetooth technology .....................489
Using the Send command with the VersaMail
Using the Send command with SMS .............................................. 490
Beaming ....................................................................................................491
Beaming information from within an application ..........................491
Beaming a category ..........................................................................493
Beaming an application ....................................................................494
Other ways of sharing information .........................................................495
Related topics............................................................................................496
®
technology ...............................................................486
®
application ......... 490
Chapter 23: Managing Your Expenses ...............................497
Adding an expense ...................................................................................498
Choosing currency options ......................................................................500
Customizing the currency pick list ...................................................500
Presetting the currency symbol .......................................................501
Creating a currency symbol ..............................................................502
Deleting expenses.....................................................................................504
Deleting an individual expense ........................................................504
Deleting an entire category of expenses .........................................505
LifeDrive from palmOne xv
Page 16

Customizing the expense list ...................................................................506
Working with Expense on your computer ..............................................507
Related topics............................................................................................508
Chapter 24: Performing Calculations .................................509
Calculator buttons.....................................................................................510
Viewing recent calculations ....................................................................511
Accessing different calculators ...............................................................512
Related topics............................................................................................513
Chapter 25: Keeping Your Information Private..................514
Choosing a security level .........................................................................515
Marking information as private ...............................................................516
Setting the level of privacy ......................................................................517
Hiding or masking private entries ....................................................517
Viewing an entry that is masked ...................................................... 518
Using a password .....................................................................................518
Creating a password .........................................................................519
Changing a password .......................................................................520
Deleting a password.......................................................................... 522
Deleting a forgotten password .........................................................523
Locking your device..................................................................................524
Locking your device automatically ..................................................525
Locking your device manually ..........................................................527
Using Quick Unlock ..................................................................................528
Creating a Quick Unlock combination ............................................. 528
Deleting your Quick Unlock combination........................................ 530
Encrypting your information....................................................................531
Limiting the number of password attempts ...........................................533
Related topics............................................................................................536
Chapter 26: Using Categories to Organize Information ...537
Adding a category.....................................................................................538
Renaming a category ...............................................................................539
Deleting a category ..................................................................................540
LifeDrive from palmOne xvi
Page 17

Placing information in a category ...........................................................541
Placing an entry in a category ..........................................................541
Placing an application in a category ................................................543
Viewing information by category ...........................................................544
Related topics............................................................................................545
Chapter 27: Managing Clock Settings ...............................546
Checking the current date and time ........................................................547
Setting the primary location ....................................................................547
Setting the date and time for the primary location ........................548
Choosing secondary locations for other time zones .............................550
Modifying the locations list......................................................................551
Adding new locations .......................................................................551
Deleting a location .............................................................................553
Setting the alarm clock .............................................................................554
Responding to the alarm clock......................................................... 555
Changing the clock display ......................................................................556
Related topics............................................................................................557
Chapter 28: Customizing Your Device ...............................558
Customizing Favorites View ....................................................................559
Changing the background photo in Favorites View .......................559
Changing entries in Favorites ...........................................................560
Customizing Applications View ..............................................................563
Making the screen easier to read ............................................................565
Changing the screen fonts ................................................................565
Adjusting the brightness ...................................................................567
Changing screen colors ....................................................................568
Changing handedness orientation of the screen ............................569
Assigning a button to your frequently used applications ....................570
Setting the date and time ........................................................................572
Selecting a location ...........................................................................572
Resetting the date and time ..............................................................574
Selecting formats for dates, times, and numbers ..........................576
Customizing the way you enter information ..........................................578
LifeDrive from palmOne xvii
Page 18

Customizing the input area ...............................................................578
Customizing Graffiti
Setting up ShortCuts .........................................................................581
Changing ShortCuts ..........................................................................583
Correcting problems with tapping ...................................................584
Selecting sound settings .........................................................................585
Entering your owner information ...........................................................586
Conserving battery power .......................................................................587
Selecting power-saving settings ......................................................587
Connecting your device to other devices ...............................................589
Changing the preset connection settings ........................................589
Creating your own connection settings ...........................................592
Connecting your device to a mobile phone ....................................596
Customizing network settings .................................................................597
Setting up a service profile ...............................................................597
Connecting to your service ...............................................................600
Adding details to a service profile ...................................................601
Deleting a service profile ..................................................................603
Creating login scripts ........................................................................604
Adding plug-in applications .............................................................607
Setting up a VPN.......................................................................................608
Setting up a VPN account on your device .......................................608
Establishing a VPN connection ........................................................610
Ending a VPN connection .................................................................611
Related topics............................................................................................612
®
2 strokes ........................................................579
Chapter 29: Expanding Your Device...................................613
What type of expansion cards can I use? ...............................................614
How can expansion cards help me?........................................................614
Removing an expansion card .................................................................615
Inserting an expansion card ....................................................................616
Opening an application on an expansion card ......................................617
Opening files on an expansion card .......................................................618
Viewing card information.........................................................................619
Renaming a card ......................................................................................620
LifeDrive from palmOne xviii
Page 19

Copying applications to an expansion card ..........................................621
Removing all information from a card ...................................................622
Related topics............................................................................................623
Chapter 30: Maintaining Your Device ...............................624
Device do’s and don’ts .............................................................................624
Device do’s......................................................................................... 624
Device don’ts ..................................................................................... 625
Resetting your device ...............................................................................626
Doing a soft reset .............................................................................. 626
Doing a hard reset ............................................................................. 627
Restoring your information after a hard reset........................................630
Related topics............................................................................................632
Chapter 31: Common Questions .......................................633
Setup..........................................................................................................633
Device ........................................................................................................635
Moving around..........................................................................................639
Entering information ................................................................................639
Synchronizing ...........................................................................................641
LifeDrive™ Manager/Drive Mode ............................................................647
Calendar.....................................................................................................649
Memos .......................................................................................................650
Note Pad ....................................................................................................651
Media .........................................................................................................651
Camera Companion..................................................................................651
Pocket Tunes™..........................................................................................652
Tasks ..........................................................................................................653
Connecting wirelessly ..............................................................................653
The VersaMail® application.....................................................................655
Privacy .......................................................................................................658
Sharing ......................................................................................................659
Problems with incompatible applications ..............................................661
LifeDrive from palmOne xix
Page 20

Chapter 32: Getting Help ...................................................664
Self-help resources ...................................................................................664
Technical support .....................................................................................665
Product Regulatory Information .........................................666
Index ......................................................................................672
LifeDrive from palmOne xx
Page 21

About This Guide
This guide tells you everything you need to know about your device: the things
you’ll do every day, the advanced features that let you get the most out of your
device, and the things that make your device not only useful, but fun.
Tips for viewing this guide
Here are some helpful tips for making it easier to read and find information in this guide as you
view it in Adobe Reader:
• To magnify the page, click the magnifying glass , move the cursor (which is now a
magnifying glass) over the page, and click repeatedly. Click Previous View ( or depending
on your version of Reader) to return to the original view.
• Click an entry in the Table of Contents or Index to go directly to that section of the guide.
• If you click a link and go to a page, in the guide click Previous View ( or depending on your
version of Reader) to return to the page you were on before you clicked the link.
• If you click a link and go to a web page, the page may open in Adobe Reader instead of in your
web browser. To specify whether pages open in Reader or in your web browser, go to the Edit
menu in Reader, select Preferences, and then select Web Capture. In the Open Web Links dropdown list, select either In Acrobat or In Web Browser, and then click OK.
• When selecting the page(s) to print, be sure to use the file page number shown at the bottom of
your computer screen, not the printed page number. For example, to print the first page of
Chapter 2, “Your Mobile Manager,” select page 41 (the file page), not page 18 (the printed page).
LifeDrive from palmOne xxi
Page 22
What’s in this guide?
The info in this guide includes step-by-step instructions, links to cross-references, and sidebars.
Step-by-step instructions
Here you’ll find how-to information. Look for these cues in instructions:
Continued
Done
[
! ]
IMPORTANT
[ & ] OPTIONAL A step you might find useful.
NOTE
WINDOWS ONLY
MAC ONLY
Cue that means the procedure continues on the next page.
Cue that signals the end of the procedure. You’re done.
A step that you must follow; otherwise, you could experience an
error or even lose information.
Information that applies only in certain cases or that tells more about
a procedure step.
A procedure or text that applies to one platform only. In most cases,
if you see one heading check the following or preceding sections for
the other. Sometimes, there is no Mac counterpart for a Windows
procedure or text; this feature is not available to Mac users.
Links
Links that appear as underlined words in body text and in sidebars take you to other sections of
this guide. Links also appear in the following sections:
In this chapter Links on the first page of each chapter that send you to a specific section.
Related topics Links that send you to other topics in this guide to learn about more
things you can do with an application or feature.
LifeDrive from palmOne xxii
Page 23

Sidebars
[ ! ]
Before You Begin
Things you must complete before you can do the steps described in a procedure or group of
procedures.
Tip
A suggestion on how to use a feature more fully; a shortcut; a pointer to a related feature.
Did You Know?
An interesting fact about the topic being described; may include a link to more information.
Key Term
»
A technical term related to the topic being described. The term may appear in this guide or only
on your device.
Tips & Tricks
A pointer to a website where you can obtain general information about your device and learn
the latest tips, tricks, and more.
Support
A pointer to a website where you can find help if you experience problems with a specific
feature or with your device.
LifeDrive from palmOne xxiii
Page 24
CHAPTER 1
I
Setting Up Your Device and Your Computer
n this chapter
What’s in the box?
Congratulations on the purchase of
your new LifeDrive™ mobile manager
from palmOne! You’re about to
System requirements
Step 1: Charging your device
Step 2: Turning on your
device for the first time
Step 3: Installing your
software
Step 4: Connecting your
device to your computer
Switching to another
desktop software application
Using user profiles
Related topics
discover so many things about your
device that will help you better manage
your life and have fun, too. As you
become more familiar with your
device, you’ll probably personalize the
settings and add applications to make
it uniquely yours.
While you’re likely to get years of
enjoyment from your device, it takes
only four easy steps to get up and
running.
Benefits
• Start using your device right away
• Establish a link between your device
and your computer
• Set up your device for optimal use
LifeDrive from palmOne 1
Page 25
CHAPTER 1 Setting Up Your Device and Your Computer
Key Term
»
Palm Desktop software
The software that lets you
enter, update, review, and
synchronize information
on your computer.
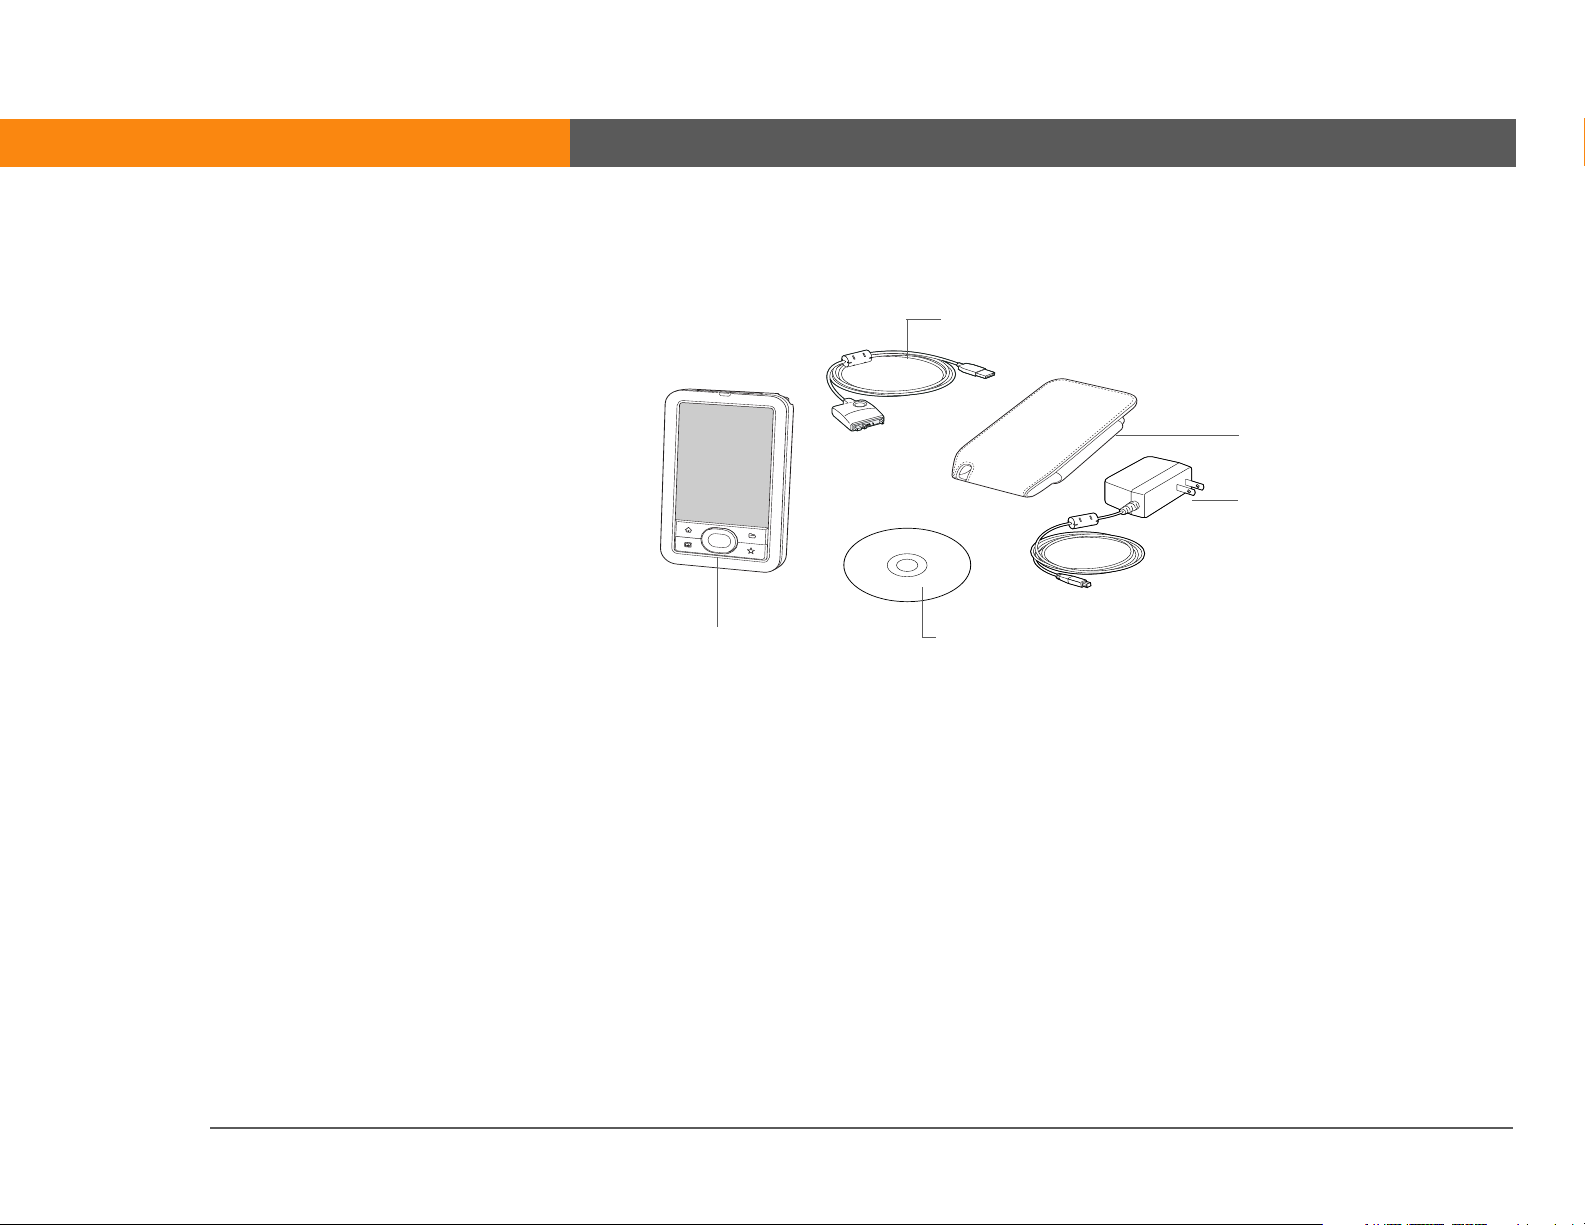
What’s in the box?
USB sync cable
Pouch
AC charger
LifeDrive™ mobile manager
from palmOne
Software installation CD
System requirements
The installation CD contains Palm®Desktop software and other applications you need to set up
and use your device. To use Palm Desktop software, your desktop computer must meet these
requirements:
WINDOWS ONLY
• A PC with a Pentium II processor or later, and one of the following operating systems:
• Windows 2000 (requires administrator rights to install Palm Desktop software)
• Windows XP (requires administrator rights to install Palm Desktop software)
• Internet Explorer 5.0 or later
• 32 megabyte (MB) available RAM (64MB recommended)
LifeDrive from palmOne 2
Page 26

CHAPTER 1 Setting Up Your Device and Your Computer
• 170MB available hard disk space
• One available USB port
• USB sync cable (included with your device)
• CD or DVD drive for installing Palm Desktop software from the CD that came with your device
MAC ONLY
• Mac computer or compatible with a PowerPC processor
• Mac OS X, version 10.2 or 10.3 (requires administrator rights to install Palm Desktop software)
• 128MB total RAM
• 190MB available hard disk space
• Monitor that supports screen resolution of 800 X 600 or better
• One available USB port
• USB sync cable (included with your device)
• CD or DVD drive for installing Palm Desktop software from the CD that came with your device
LifeDrive from palmOne 3
Page 27
CHAPTER 1 Setting Up Your Device and Your Computer
[ ! ]
Before You Begin
If you’re upgrading from
another Palm Powered™
device, synchronize your
old device with your old
desktop software.
Tip
After the initial charge,
charge your device at
least half an hour every
day.
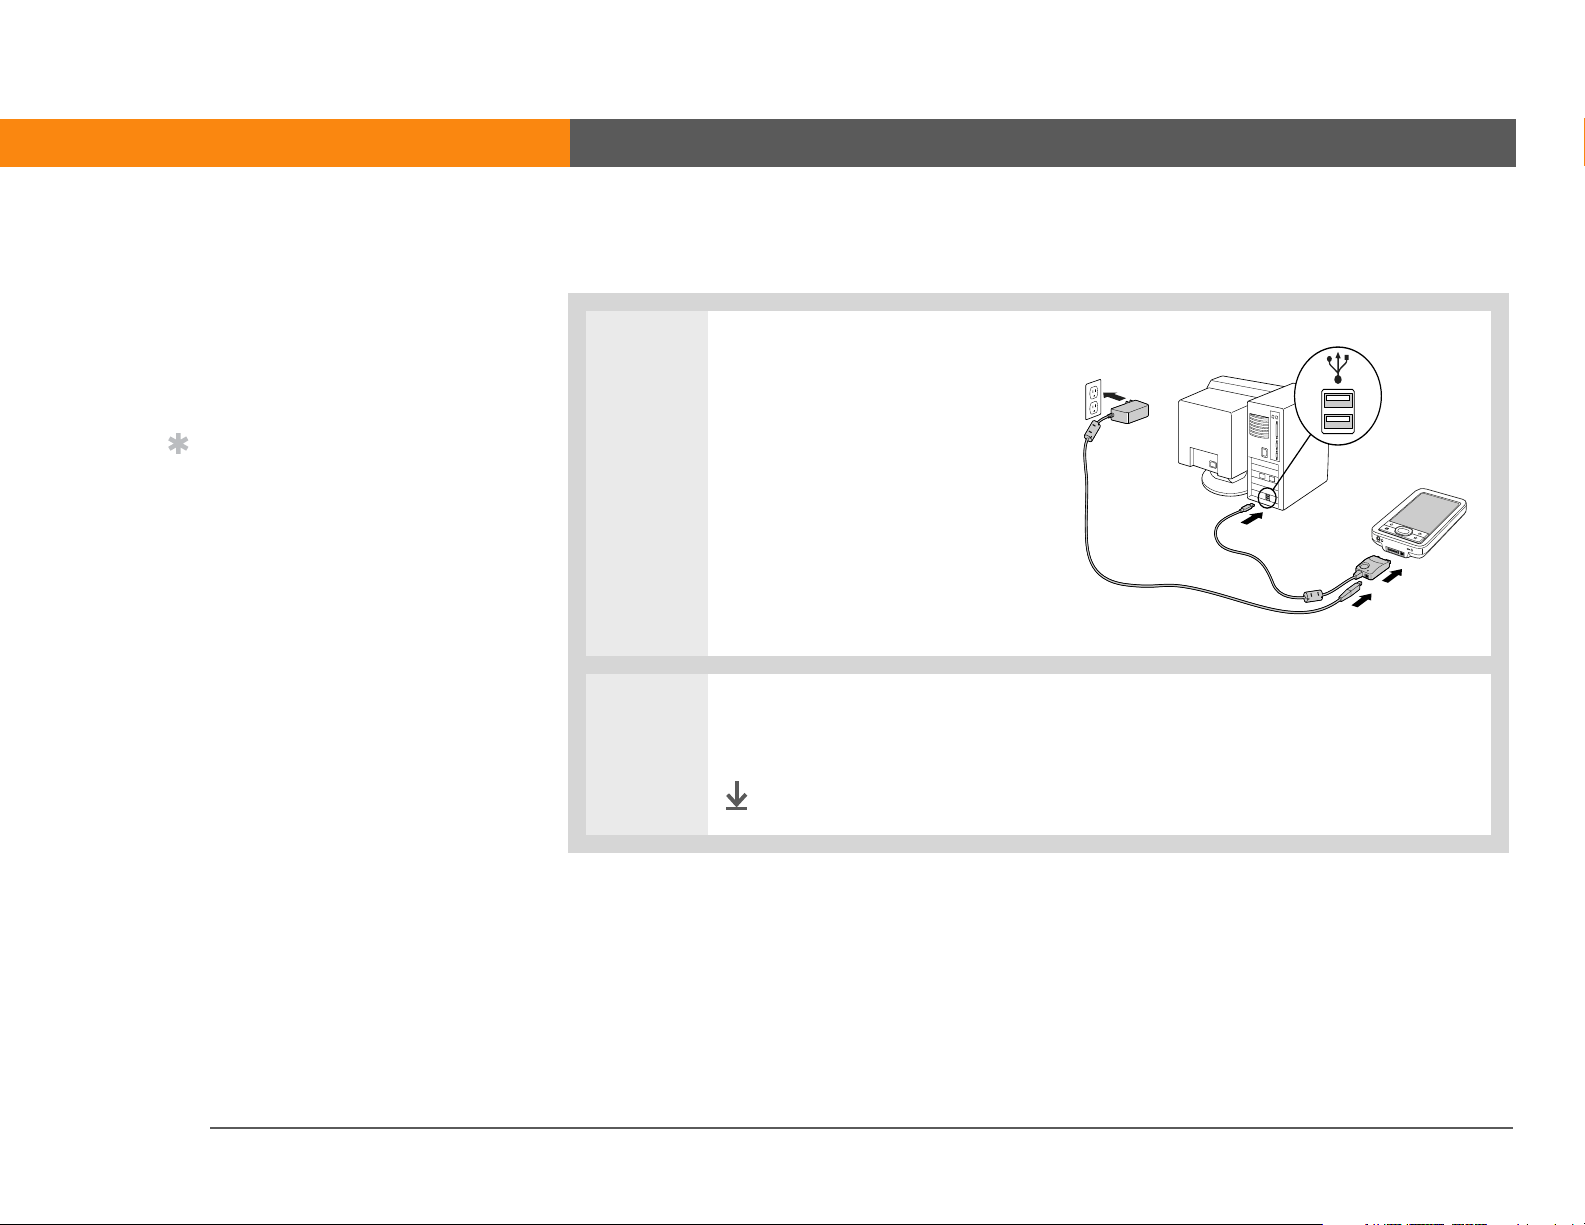
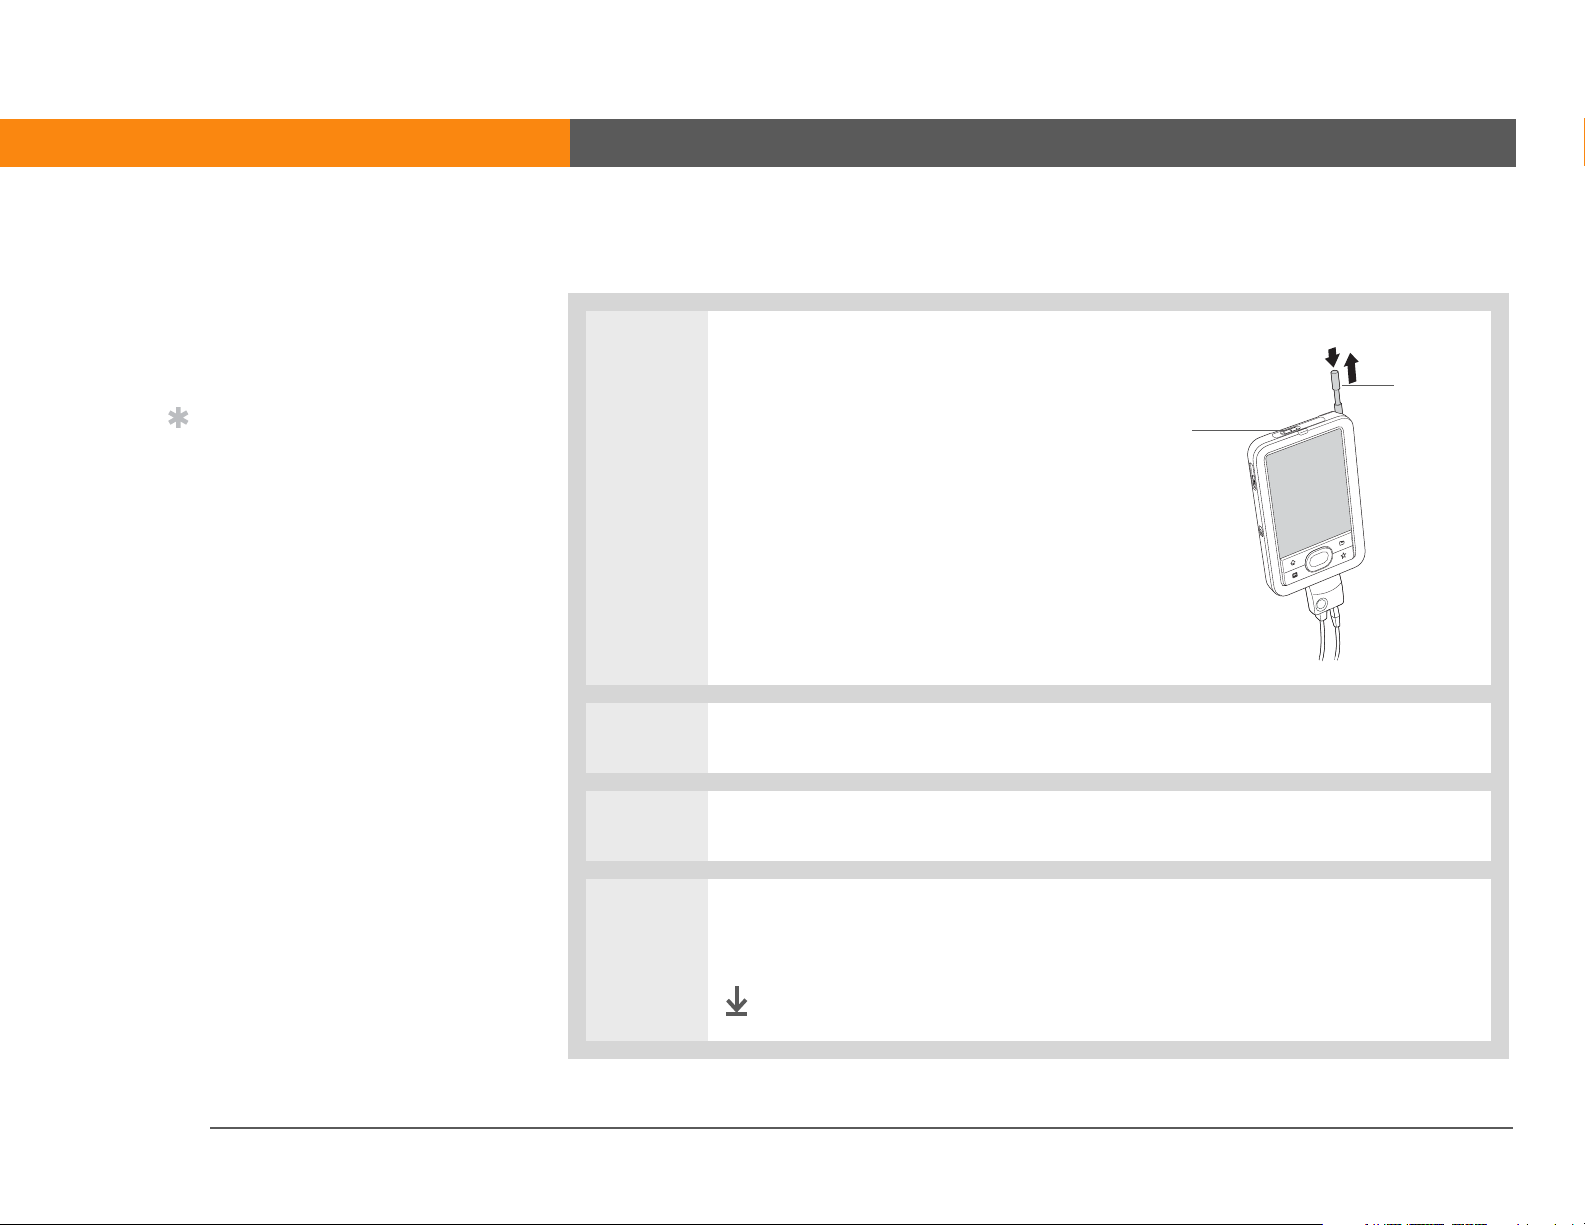
Step 1: Charging your device
0
1 Connect your device:
a. Plug the USB sync cable into
your device and into a USB
port on the back of your
computer.
b. Plug the AC charger into the
Multi-connector on the sync
cable and into an outlet.
2 Charge your device for three hours. Be sure your device is fully charged before
going on to Step 2.
Done
LifeDrive from palmOne 4
Page 28

CHAPTER 1 Setting Up Your Device and Your Computer
Tip
Also take a minute to
learn about proper care
and handling of your
device.
What you should know about your device’s battery
While your device is charging, take a minute to learn about the battery:
• If you see an alert on the screen warning you that the battery is low, recharge your device. Also
recharge your device if it doesn’t turn on when you press the power button. So that your battery
doesn’t drain completely, your device’s Wi-Fi
functionality are automatically turned off when you see a “Low battery” warning message, and
the Bluetooth
“Critically low battery” warning message.
NOTE
becomes drained to the point that you cannot turn on your device. When you recharge your
device, all of your existing information, both in program memory and on the hard drive, should
appear.
• Conserve battery life by doing any of the following:
• A
djust the screen brightness.
• Reduce the Auto-off setting
• U
se Keylock to prevent your device from turning on by accident.
•Stop music
• Keep your device connected to the AC charger plugged into a power outlet when using Drive
Mode or Camera Companion for an extended period of time.
• Respond to or cancel
• Turn off Bluetooth
• If using Auto Sync
or less often.
• Minimize use of the expansion
®
wireless technology and infrared (IR) functionality are turned off when you see a
The memory on your device is designed to store your information even if the battery
.
or video playback when not in use.
alerts promptly.
wireless technology and Wi-Fi functionality when not in use.
to automatically retrieve email messages, set the time interval to one hour
card slot.
®
functionality and expansion card slot
LifeDrive from palmOne 5
Page 29
CHAPTER 1 Setting Up Your Device and Your Computer
[ ! ]
Before You Begin
Be sure to fully charge
your device, as described
in the preceding
procedure.
Tip
After you set up your
device, review the Quick
Tour on your device and
take the tutorial on the
software installation CD
to learn the basics.
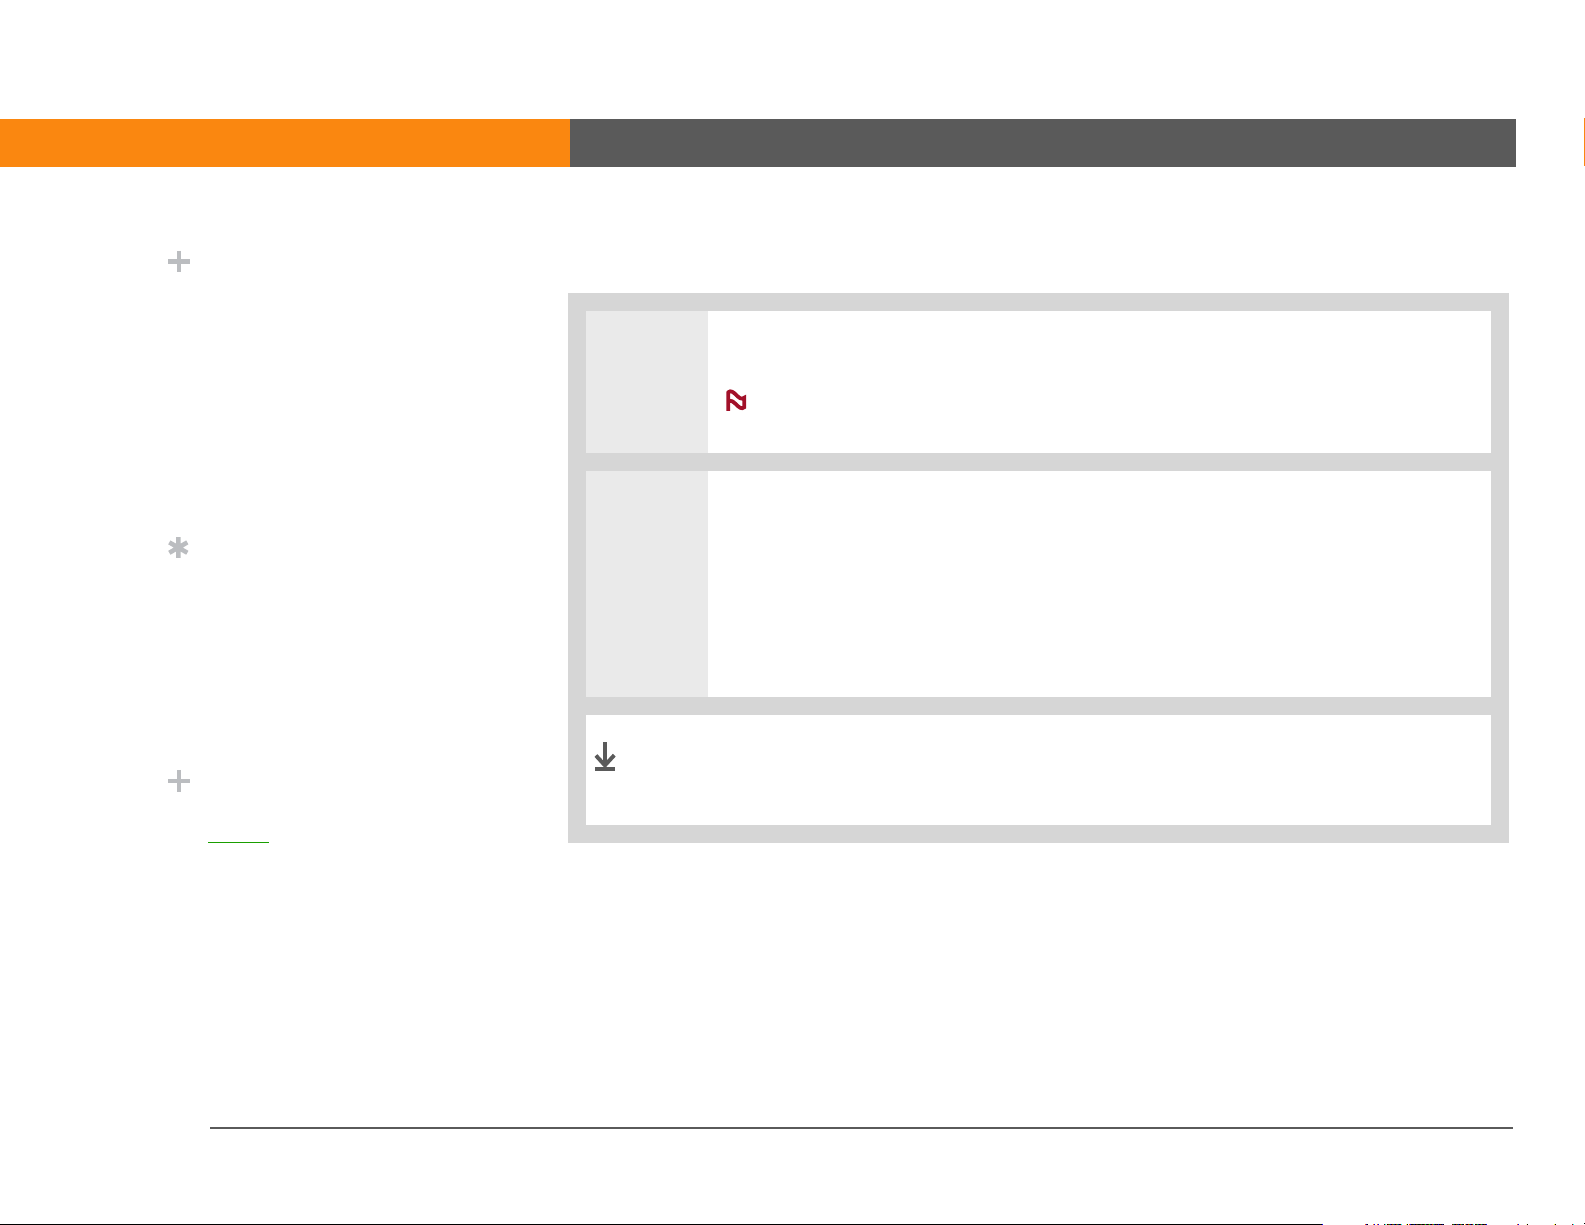
Step 2: Turning on your device for the first time
0
1 Unplug the USB sync cable from
your device.
Power switch
2 Slide the power switch to the right.
3 Press and release the stylus, and then slide it out of the slot.
Stylus
4 Hold the stylus as you would hold a pen, and follow the onscreen instructions
to set up your device.
Done
LifeDrive from palmOne 6
Page 30
CHAPTER 1 Setting Up Your Device and Your Computer
Did You Know?
When you upgrade,
there’s no need to delete
the old desktop software
first. When you install the
new Palm Desktop
software, all of your
information transfers
automatically to the new
software.
Tip
Take the interactive
tutorial on the CD to learn
how to create an
appointment; set up your
device’s features for
photos, video, and music;
and more.
Did You Know?
IT managers can set up a
profile
install the same set of
information on several
devices.
if they want to
Step 3: Installing your software
0
1 Insert the CD into your computer.
NOTE
computer running Windows 2000/XP or Mac OS X.
You need administrator rights to install Palm Desktop software on a
2 WINDOWS ONLY
Follow the onscreen instructions. If you’re upgrading, select the username that
you assigned to your old device.
MAC ONLY
Double-click the CD icon, and then double-click palmOneSoftware.pkg.
Done
During installation, you’re asked to connect your computer to your
device. See Step 4.
LifeDrive from palmOne 7
Page 31

CHAPTER 1 Setting Up Your Device and Your Computer
Tip
If the Select User dialog
box appears during
synchronization, select
the username of the
device you want to
synchronize, and click OK.
Key Term
»
Third-party application
A software program that
runs on a Palm
Powered™ device but is
not created or supported
by palmOne, Inc.
Tip
If you have problems with
your new device after you
synchronize, you may
need to update your
third-party applications.
Step 4: Connecting your device to your computer
During installation, you connect your device to your computer and do a full sync for the first time.
Synchronizing simply means that any information you enter in one place (your device or
computer) is automatically updated in the other.
[
! ]
IMPORTANT
you always have an up-to-date backup copy of this info on your computer.
0
Be sure to do a full sync of the info on your device at least once a day so that
1 Connect your device to your
computer:
a. Plug the USB sync cable into a
USB port on the back of your
computer.
b. Plug the cable into your
device.
Continued
LifeDrive from palmOne 8
Page 32

CHAPTER 1 Setting Up Your Device and Your Computer
2 Slide the power switch to the right to turn on your device.
3 Continue with the onscreen instructions. Do a full sync by pressing the sync
button on the USB sync cable.
Done
LifeDrive from palmOne 9
Page 33

CHAPTER 1 Setting Up Your Device and Your Computer
Switching to another desktop software application
WINDOWS ONLY
During installation, you chose a desktop software application to synchronize with your device. You
may have chosen Palm Desktop software at that time. But if Microsoft Outlook already contains all
of your contacts, appointments, tasks, and notes, you can change your synchronization method so
that your device synchronizes with Outlook instead. You can also change from Outlook to
Palm Desktop software.
NOTE
Memos is synchronized with the corresponding application in Outlook. (Memos is called Notes in
Outlook.) You can also set up the VersaMail
email in Outlook. Other info, such as voice memos and notes, is synchronized with info in
Palm Desktop software.
0
If you choose to synchronize with Outlook, info from Contacts, Calendar, Tasks, and
®
application to synchronize email on your device with
1 Insert the CD into your computer.
2 From the screen that appears, select Change your synchronization method.
3 Follow the onscreen instructions for the desktop software you want to use.
Done
LifeDrive from palmOne 10
Page 34

CHAPTER 1 Setting Up Your Device and Your Computer
Using user profiles
SKIP
Only IT managers may need to use user profiles for their company. If you are not an IT
manager, you can skip this section.
Suppose your sales organization wants to distribute two dozen devices that all have a common
company phone list, a set of memos, and several key applications. A user profile can be created to
install this information before the devices are distributed to employees. When the employees
synchronize for the first time, this common information becomes part of their user-specific
information.
A user profile enables you to install the same information onto multiple devices before each
device is individualized with a unique username and user-specific information. A device that has a
user profile installed can be given to anyone, because the device is not yet identified by a unique
username. When the new user synchronizes for the first time, he or she gives the device a unique
username.
NOTE
never been synchronized or devices that have had their usernames and information removed by a
hard reset
LifeDrive from palmOne 11
Devices that are synchronized with a user profile must be either new devices that have
.
Page 35

CHAPTER 1 Setting Up Your Device and Your Computer
Tip
Save time by importing to
quickly add information
to a profile.
Creating a user profile
WINDOWS ONLY
0
1 Open the New Profile screen:
a. Open Palm Desktop software.
b. From the Tools menu, select Users.
c. Click Profiles, and then click New.
2
Enter a unique name for the profile, and click OK twice.
3 Select the profile from the User
list, and create the info in
Palm Desktop software for the
profile.
Done
LifeDrive from palmOne 12
Page 36

CHAPTER 1 Setting Up Your Device and Your Computer
MAC ONLY
0
1
Open the New Profile screen:
a. Open Palm Desktop software.
b. From the User pop-up menu, select Edit Users.
c. Click New Profile.
2 Create the profile:
a. Enter a unique name for the profile, and click OK.
b. Close the Users window.
Continued
LifeDrive from palmOne 13
Page 37

CHAPTER 1 Setting Up Your Device and Your Computer
3 Select the profile from the User pop-up menu, and create the info in
Palm Desktop software for the profile.
4 Set the profile’s conduit settings:
a. From the HotSync
b. Select the conduit settings
Done
®
menu, select Conduit Settings.
Synchronizing with a user profile
WINDOWS ONLY
0
1 Begin synchronization:
a. Connect the USB sync cable to the USB port on the back of your computer,
and then insert the other end into the Multi-connector on your device.
b. Press the sync button on the USB sync cable.
Continued
for the profile.
LifeDrive from palmOne 14
Page 38

CHAPTER 1 Setting Up Your Device and Your Computer
2 Transfer the profile information:
a. Click Profiles.
b. Select the profile you want to
load on the device, and click
OK.
c. Click Yes.
Done
The next time you or a user synchronizes that device,
Palm Desktop software prompts you or the user to assign a
username to the device.
LifeDrive from palmOne 15
Page 39

CHAPTER 1 Setting Up Your Device and Your Computer
MAC ONLY
0
1 Begin synchronization:
a. Connect the USB sync cable to the USB port on the back of your computer,
and then insert the other end into the Multi-connector on your device.
b. Press the sync button on the USB sync cable.
2 Select the profile you want to
load on the device, and click OK.
Done
The next time you or a user synchronizes that device,
Palm Desktop software prompts you or the user to assign a
username to the device.
LifeDrive from palmOne 16
Page 40

CHAPTER 1 Setting Up Your Device and Your Computer
Tips & Tricks
Make your device uniquely
yours. For great tips,
software, accessories, and
more, visit
www.palmOne.com/
mylifedrive.
Support
If you’re having problems
with setup or anything else
on your device, go to
www.palmOne.com/
support.
Related topics
Click a link below to learn about these related topics:
Y
our Mobile
Manager
anaging Info • Synchronizing your device with Palm Desktop software or Microsoft
M
Keeping your device from turning on accidentally
Outlook on your computer
• Synchronizing wirelessly using the built-in Bluetooth technology or
Wi-Fi capabilities on your device
• Using your company’s network to synchronize information
• Choosing whether or not to synchronize information for a specific
application
• Adding applications to and deleting applications from your device
• Installing additional software from the CD
• Viewing application information
Customizing
Common
Questions
LifeDrive from palmOne 17
• Adjusting the screen display
• Reducing the Auto-off setting
Answers to frequently asked questions about setup
Page 41

CHAPTER 2
I
Your Mobile Manager
n this chapter
What’s on my device?
Your new LifeDrive™ mobile manager
from palmOne takes mobile computing
to a whole new level. As always, it
Using the power switch
Using the status bar
Rotating the screen
helps you keep track of your schedule,
your business and personal contacts,
your to-do list, and even your
Microsoft Office and multimedia files.
What’s on the screen?
What software is on my
device?
What’s on the CD?
Related topics
But the device offers much more—like
a 4GB hard drive that lets you carry all
your crucial Office files, plus hours of
your favorite music, photos, and
videos. Transfer information in real
time between your device and your
computer and, on a Windows
computer, select which files and
folders to synchronize. Import photos
and videos from your digital camera’s
Benefits
• Carry files and folders on an internal
hard drive containing nearly 4GB of
storage, and work with them on the
go
• Save time and stay organized
• Travel light
• Never lose important information
• Stay in touch using wireless
connectivity
memory card, or connect wirelessly to
a Wi-Fi® network.
LifeDrive from palmOne 18
Page 42

CHAPTER 2 Your Mobile Manager
What’s on my device?
Front
Indicator light
Screen
5-way navigator
Home
Media
Quick buttons
Files
Star
Indicator light Notifies you of various functions. A solid amber light indicates that the
device is charging; a solid green light indicates that the device is fully
charged.
A flashing amber light indicates that the device’s hard drive is currently
processing information—opening a file, saving changes, and so on. Be
especially careful not to drop, bang, or otherwise cause a strong
impact to your device while the indicator light is blinking; you may
damage the hard drive.
LifeDrive from palmOne 19
Page 43

CHAPTER 2 Your Mobile Manager
Tip
The Favorites application
offers four pages of
favorites. Pressing Home
once opens the first page
of Favorites; use the
buttons in the upper-right
corner of the Favorites
screen to go to the other
pages.
Screen Displays the applications and information on your device. The screen
is touch-sensitive.
Display the input area by tapping the Input icon on the status bar
Use the input area to enter info with Graffiti® 2 writing
keyboard.
5-way navigator Helps you move around and select info to display on the screen.
Quick buttons Turn on your device and open the corresponding application. Press the
Home button once to open Favorites, twice to open Applications. The
Star button opens the Pocket Tunes™ music application by default, but
you can customize it
to open any application you choose.
or the onscreen
.
LifeDrive from palmOne 20
Page 44

CHAPTER 2 Your Mobile Manager
Key Term
»
IR Short for infrared.
Beaming uses infrared
technology to send
information between two
IR ports that are within a
few feet of each other.
To p
Did You Know?
Beaming lets you quickly
share appointments,
addresses, phone
numbers, files, photos,
and more.
Stylus
IR port
Expansion card slot
IR port Beams information to and receives beamed information from other
Three-position
power switch
devices that have an IR port.
Power switch Turns your device on or off and lets you turn Keylock
displayed on the switch when Keylock is on.
Stylus Lets you enter information on your device by writing or tapping. To
remove the stylus from its slot, press down on the top, release to let it
pop out of the slot, and then slide it out. Hold the stylus as you would a
pen or pencil. Using your fingertip instead of the stylus is OK, but don’t
use your fingernail, a real pen, or any other sharp object to touch the
screen.
Expansion card
slot
LifeDrive from palmOne 21
Lets you insert an expansion card (sold separately) to back up info and
add memory, applications, and accessories to your device.
on. A red indicator is
Page 45

CHAPTER 2 Your Mobile Manager
Side
Microphone
Voice Memo
button
Screen rotation button
0
Screen rotation
Rotates the screen between portrait and landscape views.
button
Voice Memo
button
Opens the Voice Memo application when you press and release the
button. Records a voice memo when you press and hold the button.
Microphone Lets you record sound to create a voice memo.
LifeDrive from palmOne 22
Page 46

CHAPTER 2 Your Mobile Manager
Back
Speaker
Hard drive (internal) Provides 4GB of storage to carry and manage all of your crucial work
Bluetooth radio
(internal)
Wi-Fi radio (internal)
Hard drive
(internal)
information, music and media files, and more.
Speaker Lets you listen to alarms, game and system sounds, music, and
voice memos.
Bluetooth
(internal)
Wi-Fi radio (internal) Enables your device to connect to a Wi-Fi network
®
radio
Enables your device to connect with other devices (sold separately)
that use Bluetooth wireless technology
.
to wirelessly
access email, browse the web, and synchronize.
LifeDrive from palmOne 23
Page 47

CHAPTER 2 Your Mobile Manager
Key Term
»
Bottom
USB The type of
connector or cable that’s
commonly used to
connect accessories to a
computer.
Did You Know?
You can purchase a cradle
accessory that lets you
connect external
speakers (sold
separately) to hear audio
from your device through
the Multi-connector. Visit
www.palmOne.com/
mylifedrive and click the
Accessories link.
Tip
It takes a little while for
your device to reset when
you press the reset
button. During the reset,
you see a progress bar,
then a screen with the
Palm Powered™ logo.
Resetting is done when
the Date & Time
Preferences screen
appears.
Headphone
jack
Reset
button
Connector
port
Multi-connector
AC charger
Reset button Resets your device if it freezes (stops responding).
Multi-connector Lets you connect a USB sync cable (included) or a cradle (sold
separately) to your computer so you can synchronize
or exchange
information. You can also charge your device by connecting it to
your computer using the USB sync cable.
The Multi-connector also lets you connect the AC charger to your
device—either directly to the connector or through the USB sync
cable—so you can charge it.
NOTE
Be sure to plug in the sync cable with the arrow on the
cable connector facing the front of the device.
Headphone jack Lets you connect standard 3.5mm stereo headphones (sold
separately) to your device so you can listen to music and other audio
applications.
LifeDrive from palmOne 24
Page 48

CHAPTER 2 Your Mobile Manager
Did You Know?
A red indicator is
displayed on the power
switch when Keylock is
on.
Using the power switch
Your device’s power switch turns your device on and off, and also lets you lock your device so that
it does not respond to taps, 5-way presses, or presses on the buttons on the front and side of your
device.
Front of device
Use the power switch for the following actions:
• To turn on your device, slide the switch to the right and let it return to the center. To turn your
device off, slide the switch to the right again.
• If your device is off, slide the switch to the left to lock your device. Your device does not respond
to button presses, taps, or 5-way presses and cannot turn on until you slide the switch to the
center position. Locking your device when it is off is useful if you carry your device in a bag and
want to prevent it from turning on accidentally when something presses against it.
• If your device is on, slide the switch to the left to lock your device at the current screen. Your
device does not respond to button presses, taps, or 5-way presses, and the current screen
cannot be changed until you slide the switch to the center position. Locking your device at a
current screen is useful, for example, if you want to pass your device around to show a photo to
a group of people and you do not want someone to accidentally tap or press something that
causes the photo to disappear.
Keylock
On/Off
LifeDrive from palmOne 25
Page 49

CHAPTER 2 Your Mobile Manager
Tip
Use the Find dialog box to
locate specific items of
information in your
device’s program
memory—for example, a
name or a phone number.
Did You Know?
The System info icon
shows the current time on
the status bar.
In the System info dialog
box, both the hard drive
and the program memory
are labeled Device. The
hard drive is indicated by
the larger available
memory size.
Did You Know?
When Wi-Fi is on, the
signal strength indicator
shows an alert symbol
when the device is not
connected to a network,
and an arrow symbol
when the device is
connected. The number
of bars indicates the
signal strength when
connected.
Using the status bar
The status bar at the bottom of the device screen gives you access to valuable tools and is
accessible in all views.
Home
Find
Menu
System info
Alert
Bluetooth controls
Wi-Fi controls
Full-screen writing
Input
0
Home Tap once to open Applications, twice to open Favorites.
Find Tap to open the Find dialog box
Menu Tap t o open the menu
System
info
Tap to open the System information dialog box. The dialog box shows the date and
time, available memory, and battery level, and allows you to turn system sounds
for the current screen.
on and off and to adjust screen brightness.
Alert When the icon is blinking, tap to display the Reminders screen
Bluetooth
controls
Tap to display the Bluetooth
turned on and off and you can connect to another Bluetooth device. The icon color
changes from blue to white when your device’s Bluetooth functionality is turned on.
Wi-Fi
controls
Tap to display the Wi-Fi
dialog box, where you can make a wireless connection to a
Wi-Fi network. The icon displays “Wi-Fi” when Wi-Fi is turned off, and a signal
strength indicator when Wi-Fi is turned on.
NOTE
Tap anywhere outside of the Wi-Fi dialog box to close the box and return
to the screen you were viewing.
Fullscreen
writing
Tap to turn full-screen writing
characters anywhere onscreen. The icon color changes from blue to white when
full-screen writing is turned on.
Input Tap to switch between showing and hiding the input area
the input area selection menu.
.
.
dialog box, where Bluetooth functionality can be
on and off. When it is on, you can write Graffiti® 2
. Tap and hold to display
LifeDrive from palmOne 26
Page 50

CHAPTER 2 Your Mobile Manager
Did You Know?
You can customize which
way the screen rotates in
landscape mode by
choosing right- or lefthanded rotation.
Rotating the screen
You can switch between landscape and portrait views by pressing the screen rotation button on
the side of your device. Landscape view is useful for viewing spreadsheets, email, web pages, and
photos.
Screen rotation button
LifeDrive from palmOne 27
Page 51

CHAPTER 2 Your Mobile Manager
Tip
You can select an input
area that does not display
the application icons.
Tip
If you use another
application frequently,
customize the input area
to display that
application’s icon. Tap
and hold any of the four
application icons, and
select the new application
you want from the list.
The new application’s
icon replaces the icon you
tapped.
What’s on the screen?
Your device includes many features that make it easy to use. Among them are the input area and
the common elements that appear on the screen in each of the applications. Once you learn how
to use them in one application you can easily use them in all the others.
Input area
By default, the input area is displayed. To hide the input area, tap Input on the status bar. To
display the input area if it is hidden, tap Input again. Tapping the icons in the input area opens
the following applications:
Calendar icon
Memos icon
Application
icons: Calendar,
Contacts,
Memos, Tasks
Letter keyboard
Icon
Number keyboard
Icon
Open the corresponding application.
Contacts icon
Tasks icon
Letter keyboard
Opens the alphabetic keyboard
.
icon
Number
Opens the numeric keyboard
.
keyboard icon
NOTE
You cannot display the input area in the main Favorites View
. However, if you perform a
task such as adding or deleting a favorite, you can display the input area.
LifeDrive from palmOne 28
Page 52

CHAPTER 2 Your Mobile Manager
Key Term
»
Application controls
Slider The solid area on
the scroll bar. The slider
Previous/next arrows
moves to indicate the
relative position within
the entry or list.
Tip
You can also use the
5-way navigator to select
an item from a pick list
and to select some
command buttons.
Command button
Scroll bar
Tips icon
Entry box
Pick list
Box
Previous/next
arrows
Select the left and right arrows to view the previous and next entry; where
up and down arrows appear, select them to view the previous and next
screens of information.
Scroll bar Drag the slider, or tap the top or bottom arrow, to scroll the display one line
at a time. To scroll to the previous screen, tap the scroll bar just above the
slider. To scroll to the next screen, tap the scroll bar just below the slider.
Command
button
Select a button, such as OK, Cancel, or Details, to perform a command or to
open a dialog box. Command buttons appear at the bottom of dialog boxes
and application screens.
Tips icon Tap the Tips icon to view shortcuts and other useful information for the
screen where the icon is located. When you have finished viewing the tip,
select Done.
Entry box Tap an entry box to open a dialog box where you can enter info for that field.
Pick list Select the arrow to display a list of choices, and then select an item in the
list.
Box Check or uncheck a box to select or deselect it. When a box is checked, the
corresponding option is selected and active. When a box is unchecked, the
corresponding option is deselected and inactive.
LifeDrive from palmOne 29
Page 53

CHAPTER 2 Your Mobile Manager
Tip
Can’t find some of these
applications? Press the
Home button twice and
use the Category pick list
to view more applications
in Applications View
.
What software is on my device?
Your device comes with many applications preinstalled and ready to use.
0
Favorites Customize a list of your favorite applications, files, and folders so that you can
locate and open them quickly.
Files View, organize, and open files and folders on your device’s drive.
Drive Mode Connect your device as a USB removable drive on another computer. Open files
stored on your device on the computer, and move, copy, and work with files
between your device and the computer.
Calendar Manage your schedule from single entries, like lunch with a friend, to repeating
and extended events, like weekly meetings and holidays. Even color-code your
schedule by category.
Contacts Store names and addresses, phone numbers, email and website addresses; even
add a birthday alarm or a contact’s photo.
Documents Create, view, and edit Microsoft Word and Excel files. View and manage
PowerPoint files.
®
Wi-Fi
controls Set up wireless connections to a Wi-Fi network for sending and receiving
information. Access these controls from the status bar
.
Bluetooth
controls
®
Set up wireless connections to a mobile phone, network, or computer for sending
and receiving information. Access these controls from the status bar
.
Media View, share, and organize photos and videos.
Camera
Companion
Import photos and videos from your digital camera’s memory card, open them
and work with them on your device, or copy them to your computer. After
importing items, delete them from the card to make room there for more photos
and videos. This icon is named Companion in Applications View
.
LifeDrive from palmOne 30
Page 54

CHAPTER 2 Your Mobile Manager
Pocket Tunes™ Carry music, create playlists, and listen to music on your device. This application
works with the Real Rhapsody desktop application that you can install from the
software installation CD (Windows only). Both Mac and Windows users can use
Pocket Tunes on the device.
VersaMail
®
Send, receive, and manage email messages wirelessly using your device’s
wireless capabilities or by synchronizing it with your Windows computer.
Web Browse your favorite sites on the web using your device’s wireless capabilities.
SMS Send and receive short text (SMS) messages using your device’s wireless
capabilities.
Ta s k s Stay on top of your to-do list. Enter things you need to do, prioritize them, set
alarms, and then monitor your deadlines.
Voice Memo Record short voice clips using the built-in microphone.
Memos Capture information such as meeting notes, lists of books to read, movies to see,
recipes, and anything else you need to write down.
Note Pad Write on the screen in your own handwriting or draw a quick sketch.
Addit™ Receive notifications of upgrades and patches and then install them onto your
device; obtain personalized news and other information as well as user tips at a
glance; preview, try, and buy software for your device. (Windows only for
downloads using the sync cable; both Windows and Mac users can download
software using your device’s wireless capabilities. Internet connection required.)
Calculator Do basic math calculations such as splitting restaurant bills and figuring tips.
Quick Tour Learn about your device and how to enter information.
Card Info View information about your device’s drive or about an expansion card seated in
the expansion card slot.
HotSync
®
Synchronize info on your device with the info on your computer.
LifeDrive from palmOne 31
Page 55

CHAPTER 2 Your Mobile Manager
Tip
To learn how to install the
desktop software from
the CD, see Step 3:
Installing your software.
Tip
To learn how to install
additional device
software from the CD, see
Installing the additional
software from the CD.
Prefs Customize your device’s sound levels, colors, security, and more.
Handmark
Solitaire
World Clock Set the time in your home city and two other locations, and set an alarm to wake
Dialer Dial phone numbers directly from your device.
Expense Track business or travel expenses and print expense reports after you
Enjoy hours of entertainment with this solitaire game.
you up.
synchronize your device with your computer.
What’s on the CD?
The LifeDrive™ software installation CD includes desktop software for your computer and
additional software for your device.
The desktop software lets you use your computer to view, enter, and manage info for many of the
applications on your device. Make sure you install the desktop software so that you can back up
and save the info on your device onto your computer.
The additional device software lets you do more things with your device. When you set up your
device you may install some (or all) of these applications. You can install any of the applications at
any time after you set up your device, as well.
The software installation CD includes titles such as the following.
LifeDrive from palmOne 32
Page 56

CHAPTER 2 Your Mobile Manager
Tip
After you install an app
and discover how
valuable it is, be sure to
add it to Favorites
. Assign
your most important
application to the Star
button so that you can
open it with one press.
Did You Know?
You can categorize
applications in
Applications View
. Some
apps are automatically
assigned to a category
when you install them;
others are assigned to the
Unfiled category. Apps
from all categories
appear in the All
category. Assign an
application to a category
in Applications by
selecting Category in the
App menu. Select the pick
list next to the
application’s name; then
select a category.
0
Palm®Desktop software View, enter, manage, and back up info for Calendar, Contacts, Tasks,
Memos, Expense, and Voice Memo on your computer (Expense is
Windows only). You can also view, manage, and back up info for Note
Pad. When you synchronize your device with your computer
, this info
is updated in both places.
Palm Desktop includes HotSync
®
Manager software, which allows you
to customize the settings for synchronization. You can access HotSync
Manager by selecting its icon in the task bar at the bottom of your
computer screen.
HotSync Manager
On a Windows computer, use Quick Install within Palm Desktop
software to install applications (PRC) to your device or to an expansion
card that is seated in the expansion card slot.
Palm Desktop is installed automatically during the initial CD
installation process.
NOTE
During installation, you can choose to synchronize your
device with Microsoft Outlook on your computer (Windows only). If
you do, information from Contacts, Calendar, Tasks, and Memos is
synchronized with info in the corresponding application in Outlook.
(Memos is called Notes in Outlook.) Information for Expense, Note
Pad, and Voice Memo is still synchronized with the corresponding info
in Palm Desktop software.
Send To Handheld droplet
(Mac only)
Install applications from your Mac computer to your device or to an
expansion card that is seated in the expansion card slot for use on your
device. The Send To Handheld droplet is installed automatically during
the initial CD installation process.
LifeDrive from palmOne 33
Page 57

CHAPTER 2 Your Mobile Manager
Tip
Be sure to use the
Enterprise Software link
to check for new software
available from the
palmOne enterprise
website, such as
upcoming software that
provides robust security
for Wi-Fi authentication
and connection to a
network.
LifeDrive™ Manager
(Windows only)
Install applications and transfer folders and files from your Windows
computer to the hard drive
on your device or to an expansion card,
synchronize files and folders, and convert photos and videos for
viewing on your device. LifeDrive Manager is installed automatically
during the initial CD installation process.
Manual Install a version of the Getting Started guide on your device. On
Windows, you can also access the full Acrobat version (PDF) of Getting
Started from the Help menu of Palm Desktop software and from the
Start Programs menu of your Windows desktop. On a Mac, access
Getting Started from the Palm/Documentation folder.
WiFile™ Access your wireless network so that you can open photos, music files,
and documents that are located in shared folders on a networked
computer.
Adobe
for Palm OS
®
Reader
®
View PDF files that are tailored to fit your device’s screen.
Power by Hand eReader Purchase and download eBooks from the web so you can read them
when you want, where you want.
Enterprise Software link Access the palmOne enterprise website, where you can purchase
software to create a secure wireless connection to your corporate
network in order to safely send and receive email messages and
access the corporate intranet with a VPN client. You can also purchase
software to encrypt individual files and folders to protect your critical
information (download requires Internet connection; additional fees
may apply).
AudiblePlayer Listen to newspapers, books, public radio, language instruction, and
more (Windows only; download requires Internet connection;
additional fees may apply).
LifeDrive from palmOne 34
Page 58

CHAPTER 2 Your Mobile Manager
Did You Know?
You can categorize
applications in
Applications View
apps are automatically
assigned to a category
when you install them;
others are assigned to the
Unfiled category. Apps
from all categories
appear in the All
category. Assign an
application to a category
in Applications by
selecting Category in the
App menu. Select the pick
list next to the
application’s name; then
select a category.
. Some
Documents To Go Companion desktop software for the Documents application on your
device. Lets you move or copy Microsoft Word, Excel, and PowerPoint
files to the Documents folder on your device’s drive, as well as create
and edit files.
Handmark Express Download current news as well as information on the weather, stocks,
sports, movies, and more (download requires Internet connection and
subscription to service with Handmark).
RealRhapsody Transfer MP3 music files from your computer to your device or to an
expansion card (sold separately), and copy music from your CDs to
your computer. This is the desktop companion for the Pocket Tunes
music application on your device (Windows only).
Windows Media Player
link/Direct X
Windows Media Player
plug-in
Required to prepare videos for playback on your device (Windows
only).
NOTE
Direct X software from the CD, even if you already have Windows
Media Player on your computer. The version on the CD contains all of
the components needed to prepare videos for playback on your device.
Works with Windows Media Player to convert music files for playback
using the Pocket Tunes application on your device.
We recommend that you install the Windows Media Player/
QuickTime Required for preparing videos in certain formats for viewing on your
device.
NOTE
only. For Mac computers, QuickTime is included in OS X.
Tu t o r i a l Learn to use the popular features of your device. The Tutorial includes
a tour of your device and step-by-step instructions. Access it from the
Discover your device screen on the software installation CD.
LifeDrive from palmOne 35
QuickTime is included on the CD for Windows computers
Page 59

CHAPTER 2 Your Mobile Manager
Tips & Tricks
Make your device uniquely
yours. For great tips,
software, accessories, and
more, visit
www.palmOne.com/
mylifedrive.
Support
If you’re having problems
with your device, go to
www.palmOne.com/
support.
Related topics
Click a link below to learn about these related topics:
Setup
Entering
Information
Moving
Around
Managing Info
Sharing
Installing the desktop software from the CD
• Entering information with Graffiti 2 characters and shortcuts
• Entering information with the onscreen letter and number keyboards
• Opening applications and using menus
• Finding information
• Synchronizing your device with your computer
• Using LifeDrive Manager and Drive Mode to work with information
between your device and your computer
• Installing additional software from the CD
• Beaming information and applications to other Palm Powered™ devices
• Sending information and applications to other Bluetooth devices by using
Bluetooth technology on your device
World Clock
Customizing
LifeDrive from palmOne 36
Viewing the current date and time
• Setting the current date and time
• Adjusting the brightness of the display
Page 60

CHAPTER 2 Your Mobile Manager
Maintaining
Common
Questions
• Caring for your device
• Resetting your device
Answers to frequently asked questions about your device
LifeDrive from palmOne 37
Page 61

CHAPTER 3
I
Moving Around in Applications
n this chapter
Opening applications
Using the 5-way navigator
Using menus
Finding information
Related topics
Have you ever been to a new city and
felt a bit lost until you figured out that
the numbered streets run north/south
and the avenues run east/west?
Learning to move around on your
device is similar. Most Palm OS®
applications use the same set of
application controls. So once you learn
how to use these standard controls,
you’ll be driving all over town and you
won’t even need a map.
Benefits
• Find and open applications quickly
• Access extra features with menus
• Move around in applications with one
hand, using the 5-way navigator
• Locate information in any application
with the Find feature
LifeDrive from palmOne 38
Page 62

CHAPTER 3 Moving Around in Applications
Tip
Press Home once to open
Favorites; press Home
twice to open
Applications. Switch
between Favorites and
Applications by pressing
Home.
Did You Know?
You can use a favorite
photo as the background
for your Favorites or
Applications View.
Tip
Customize Favorites to
display folders—for
example, a project folder
that you access often.
Select the folder to view
its contents.
Opening applications
You can open applications from Favorites View or Applications View, or by using the Files
application.
NOTE
example, the Photos & Videos entry in Favorites opens the Media application, which is listed as
Media in Applications View. The application icons are similar in both Favorites and Applications.
Using Favorites
Favorites View contains up to 32 items—four pages of eight items each—and can include
applications, specific files, folders, and even links to the web. Certain items are included in
Favorites by default, but you can customize the list
To access an item from Favorites, press Home and select an item from the list. Use the 5-way
navigator or tap the buttons in the upper-right corner of the screen to move to another page of
favorites.
Some applications are listed differently in Favorites and Applications views. For
to contain any items you want.
Tap to move to other pages of favorites
Home
LifeDrive from palmOne 39
Page 63

CHAPTER 3 Moving Around in Applications
Tip
Also open Applications
by tapping the Home icon
on the status bar
.
Tip
You can also open a
specific application using
one of the quick buttons
on the front of your
device.
Tip
When no item is selected,
press Right or Left on the
5-way
to scroll through
application categories.
Did You Know?
Applications View
displays an icon for
opening Favorites.
Favorites View contains
an entry for opening
Applications.
Using Applications
Applications View shows all of the applications on your device, except those that are accessed
using the status bar
applications by category or to see all applications. From the pick list, you can also select to view
the contents of your device’s hard drive
card (it’s called Card1 or whatever you’ve named the card) if one is inserted into the expansion
slot.
To access an item from Applications, press Home twice and select an icon. When you press
Home twice, it displays the same category of applications that was displayed the last time
Applications was open. Use the category pick list to view another category or to see all
applications, the contents of the hard drive, or the contents of an expansion card.
Home
. Use the category pick list in the upper-right corner of the screen to view
(it’s called LifeDrive on the pick list) or of an expansion
Category pick list
LifeDrive from palmOne 40
Page 64

CHAPTER 3 Moving Around in Applications
Tip
You can also open Files
by selecting Files in
Applications View.
Tip
If you have an expansion
card (sold separately)
inserted into your
device’s expansion slot,
select the card icon in
Files to view the contents
of the card.
Using Files
The Files application enables you to easily open, view, and move among the files and folders on
your device’s hard drive
To open Files, press Files on the front of your device.
or on an expansion card inserted into your device’s expansion slot.
Card
icon
Files
LifeDrive from palmOne 41
Page 65

CHAPTER 3 Moving Around in Applications
Did You Know?
If you select a file from
within Files, it
automatically opens in
the correct application on
your device. If there is no
application for that file, a
beep alert sounds.
Tip
Tap and hold the stylus
on a file or folder to open
a menu of actions you
can do with that item—
copy, delete, and so on.
Navigate within Files by doing any of the following:
Folder up Folder pick list
Top-level folder
Select folder
• Select a file or folder to open it. The file opens in the corresponding application—for example,
Documents for Word, Excel, or PowerPoint files.
NOTE
If your device contains an application that can open a file, a file-specific icon appears to
the left of the file name in the Files list. If a generic icon appears to the left of a file name, you
cannot open the file on your device.
• Select the Folder Up icon to move up one level of folders.
• Select the pick list at the top of the files screen to view and jump to the top-level folder and any
subfolders.
• Select the top-level folder on the files screen to move up one level of folders.
NOTE
Files always displays these five folders at the top of the folder list: Applications,
Documents, Music, Photos & Videos, and VersaMail Attachments. Place your applications and files
in the correct folder so that you can easily locate them.
LifeDrive from palmOne 42
Page 66

CHAPTER 3 Moving Around in Applications
Did You Know?
If you select Open With,
only applications that can
open the file you have
selected are displayed.
You can select one of the
applications displayed to
make it the default
application for opening
this file type. If no
application appears, that
means there is no
application on your
device that can open the
selected file.
Tip
You can also highlight a
file or folder and then
press Right on the 5-way
to open the menu of
tasks.
Working with files and folders
You can work with the files and folders in the Files application—create new folders; copy, beam,
and delete files and folders; and more. You can work with one file or folder at a time.
0
1 Open Files.
2 Navigate to the file or folder you want.
3 Work with the file or folder:
a. Tap and hold the item name to
open a menu that lets you
perform any of the following
tasks:
Open With Select the application
to use to open a file.
Rename Rename the selected item.
Details View details such as name, including extension for files; location on
the hard drive or expansion card; last date modified; and, for files only, size.
Check the box to make the selected item read-only, meaning that it cannot be
changed by a user. You can rename or delete a file or folder from the Details
dialog box.
Continued
LifeDrive from palmOne 43
Page 67

CHAPTER 3 Moving Around in Applications
Did You Know?
If you select Delete, you
get a message asking you
to confirm the deletion.
Cont’d.
Copy Copy the item to another location on the drive or an expansion card.
Move Move the item to another location on the drive or an expansion card.
Delete Delete the current file or folder.
Beam Beam
Send Send
wireless technology or as an attachment to a text message or email message.
b. Select the task you want to perform on the file or folder, and follow any
onscreen instructions.
Done
the file or folder.
the current file or folder using your device’s built-in Bluetooth®
LifeDrive from palmOne 44
Page 68

CHAPTER 3 Moving Around in Applications
Sorting Files
You can sort your files and folders by icon, name, date, or size.
0
1 Open Files.
2 Select your sort options:
Sort display Select the column
you want to sort by. From the left
side of the screen, the columns
are icon, name, and size/date.
Sort in ascending or descending
order Select the column you
want to sort by to switch
between ascending and
descending sort order.
Switch between sorting by date
or by size Tap and hold the
rightmost column until the
heading you want appears.
Done
Sort by
icon
Sort by name
Sort by
date or
size
LifeDrive from palmOne 45
Page 69

CHAPTER 3 Moving Around in Applications
Did You Know?
If you use a command to
open a file from within an
application, only files that
can be opened by that
application are displayed.
For example, in Pocket
Tunes, only music files
such as MP3 files are
displayed.
Tip
You must use the stylus
to tap icons in the input
area or on the status bar.
Opening files and folders from within an application
In certain applications—for example, Documents, Media, and Pocket Tunes™—you can open a file
or folder directly from within the application. The application automatically displays files located
in the appropriate folder on your device’s hard drive—for example, when you open the Pocket
Tunes application, files in the Music folder on the drive are displayed—but you can browse for files
located elsewhere on the drive. See the application chapters for information on opening files.
Switching between applications
You can switch between applications at any time. Just press Home and select an icon from
Favorites
the current application and switches to the other application.
or Applications, or press a quick button. Your device automatically saves your work in
LifeDrive from palmOne 46
Page 70

CHAPTER 3 Moving Around in Applications
Tip
In landscape view, not
only does screen
orientation change, but
so does the orientation of
the 5-way. For example,
in right-handed
landscape view, what was
Up in portrait view
becomes Right in
landscape view.
Using the 5-way navigator
The 5-way navigator, located at the bottom of the front panel, lets you access information quickly
with one hand and without the stylus. To use the 5-way, press Up, Down, Right, Left, or Center.
The 5-way does various things based on which type of screen you’re viewing.
Up
Left
Down
Portrait view
Center
Right
Up
Center
Left
Right
Down
Right-handed
landscape view
Moving around with the 5-way
On most screens, one item—a button, a list entry, or an entire screen—is highlighted by default.
The highlight identifies what element will be affected by your next action. On any screen, only one
item can be highlighted at a time. Use the 5-way to move the highlight from one item to another
onscreen.
LifeDrive from palmOne 47
Page 71

CHAPTER 3 Moving Around in Applications
Tip
When an entire screen is
highlighted, only the top
and bottom borders
acquire the glow; the
right and left borders do
not show the highlight.
Tip
A few onscreen elements
of your device can only
be activated by tapping
them with your stylus, for
example, icons in the
input area
and the view
icons in the lower-left
corner of Day View
in
Calendar.
The highlight can take one of three forms, depending on what is highlighted:
NOTE
Individual applications may contain application-specific elements that can also be
highlighted by the 5-way, for example, the Quick Connect icon in a contact.
Blue glow This highlights elements of the user
interface like command buttons, pick lists, and
arrows.
Button
highlighted
with blue
glow
Reverse type (white text on a dark background)
This highlights an entry on a list screen or a phone
number, email address, or web link on a web page
or in a message.
Contact list
entry
highlighted
with reverse
type
Blinking cursor The blinking cursor tells you that
you can enter text at that point.
Blinking
cursor
LifeDrive from palmOne 48
Page 72

CHAPTER 3 Moving Around in Applications
Tip
In Applications View, to
remove the selection
highlight without making
a selection, scroll to the
first icon (in the upper-left
corner) and then press
Left on the 5-way, or enter
the Backspace character
using Graffiti
® 2 writing.
Moving around in Favorites View
Up or Down Scrolls to the next favorite in the
corresponding direction.
Right or Left Displays the next or previous page of
favorites.
Center Opens the selected item.
Moving around in Applications View
Up or Down Scrolls up or down in Applications View.
Pages of favorites
Category
Right or Left Scrolls to the next or previous application
category.
Center Inserts the highlight. When the selection
highlight is present:
Up, Down, Right, or Left Scrolls to the next
item in the corresponding direction.
Center Opens the selected item.
LifeDrive from palmOne 49
Page 73

CHAPTER 3 Moving Around in Applications
Moving around in list screens and entry screens
In list screens, use the 5-way to select and move between entries such as notes, memos, contacts,
or photos. In individual entry screens—such as a single photo or email message—use the 5-way to
move among the items on the screen or to move to another entry.
The behavior of the 5-way for list screens and entry screens varies according to application.
Follow the guidelines for moving around with the 5-way
with each application, learning the specific behavior of the 5-way is easy.
Moving around in dialog boxes
Dialog boxes appear when you select a button or option that requires you to provide additional
information. In dialog boxes, use the 5-way to select a button or to make a selection from items
such as boxes and pick lists.
for general tips; as you become familiar
Up, Down,
Right, or Left
Center • If highlight is on a box: Checks or
[
! ]
IMPORTANT
action or delete information.
LifeDrive from palmOne 50
Highlights the next item in the dialog box
(pick list, box, button) in the corresponding
direction.
unchecks the box.
• If highlight is on a pick list: Opens the pick
list. When a pick list is open:
Up or Down Scrolls to the previous or
next entry.
Center Selects the highlighted entry.
• If highlight is on a button: Activates the
button, and then closes the dialog box.
Read dialog boxes carefully. Selecting a button such as OK or Yes may cancel an
Pick list
Button with
highlight
Box
Page 74

CHAPTER 3 Moving Around in Applications
Moving around in menus
After you open the menus you can use the 5-way to move between menus and to select menu
items:
Up or Down Scrolls within the current menu list.
Right or Left Scrolls to the next or previous menu on the
menu bar.
Center Selects the highlighted menu item.
LifeDrive from palmOne 51
Page 75

CHAPTER 3 Moving Around in Applications
Tip
You can also open the
device menus by tapping
the application title in the
upper-left corner of the
screen.
Tip
When the menus are
open, you can use the
5-way to select menus
and menu items.
Using menus
Menus let you access additional features and settings. They are easy to use, and once you master
them in one application, you know how to use them in all your applications.
0
1 Open an application.
2 Tap Menu on the status bar.
.
Application
title
Menu
Menu
item
3 Select an item from the leftmost menu, or use the 5-way to highlight and select
a different menu, and then select a menu item.
Done
LifeDrive from palmOne 52
Page 76

CHAPTER 3 Moving Around in Applications
C
C
Tip
Command mode is active
for just a few seconds, so
write the menu shortcut
or tap an icon on the
Command toolbar
quickly.
Using the Command stroke
Most menu items also have a menu shortcut, which is similar to the keyboard shortcuts used on
computers. The menu shortcut appears to the right of the menu item.
To use a menu shortcut, first write the Graffiti
or the full screen
, and then write the shortcut letter. For example, to select Paste from the Edit
®
2 Command stroke on the left side of the input area
menu, write the Command stroke, followed by the letter p. You do not have to open a menu to use
the Command stroke.
ommand
stroke
NOTE
When you write the Command stroke, the Command toolbar appears. See the next
Menu items
Menu shortcuts
section for info on using the Command toolbar.
Using the Command toolbar
The Command toolbar displays different icons based on the active screen. For example, if you
have text selected, the icons might be Cut, Copy, and Paste. If no text is selected, the icons might
be Beam, Undo, and Delete.
To use the Command toolbar, write the Command stroke to display the Command toolbar, and
then tap an icon to select its command.
ommand
stroke
Cut
LifeDrive from palmOne 53
UndoCopy Paste Beam Delete
Page 77

CHAPTER 3 Moving Around in Applications
Tip
If you select text in an
application before you
tap Find, the selected text
automatically appears in
the Find dialog box.
Tip
Open an application
before you tap Find to
display results from that
application at the top of
the results list.
Tip
Want to stop searching?
Select Stop at any time
during a search. To
continue the search,
select Find More.
Did You Know?
If you select a result that
is a file located on the
hard drive or on an
expansion card, the Files
application opens,
displaying the selected
file. Select the file name
to open it.
Finding information
You can use Find to locate any word or phrase—either as part of a file name or within a file—in any
application in your device’s program memory
(not within a file) on your device’s hard drive
Find locates any words that begin with the text you enter and is not case-sensitive. For example,
searching for “plane” finds “planet” but not “airplane.” Searching for “bell” also finds “Bell.”
0
. Find also locates words that begin a file name only
or on an expansion card.
1 Tap Find on the status bar.
2 Enter the text that you want to find, and then select OK.
3 Select the text that you want to review.
Done
LifeDrive from palmOne 54
Page 78

CHAPTER 3 Moving Around in Applications
Tips & Tricks
Make your device uniquely
yours. For great tips,
software, accessories, and
more, visit
www.palmOne.com/
mylifedrive.
Support
If you’re having problems
with your device, go to
www.palmOne.com/
support.
Related topics
Click a link below to learn about these related topics:
Your
Mobile
Manager
Entering
Information
Sharing
Privacy
Categories
Managing
Info
• Locating the controls on your device
• Discovering the built-in software on your device and the additional
software on the CD
• Getting familiar with the input area and onscreen application controls
• Entering information with Graffiti 2 characters and shortcuts
• Entering contact information in other applications
• Beaming information and applications to other Palm Powered™ devices
• Sending information and applications to other Bluetooth
using Bluetooth technology on your device
Keeping information private by turning on security options
Creating categories and organizing your applications and information
• Adding and deleting applications on your device
• Viewing application information
®
devices by
Customizing
Maintaining
Common
Questions
LifeDrive from palmOne 55
• Using a photo as the background for Applications and Favorites views
• Displaying Applications View in list format
Caring for your device
Answers to frequently asked questions about using your device and its
applications
Page 79

CHAPTER 4
I
Entering Information on Your Device
n this chapter
How can I enter information
on my device?
Entering information with
Graffiti® 2 writing
Entering information with
the onscreen keyboard
Entering info from Contacts
into another application
Editing information
Related topics
Whether you’re scheduling a meeting
with your daughter’s teacher or adding
a new restaurant to your Contacts list,
you need to get that information into
your device. There are several ways to
do this.
You may find that you prefer one
method if you’re entering a small
amount of information, while another
works best for large amounts. Choose
the one that fits your situation.
Benefits
• Quickly enter important information
• Choose the method that works best
for your situation
LifeDrive from palmOne 56
Page 80

CHAPTER 4 Entering Information on Your Device
Tip
A blinking cursor on your
device screen indicates
where the information
you enter will appear. Tap
or use the 5-way to move
the cursor to the location
you want. In most cases,
if you do not see a
blinking cursor, you
cannot enter information
on that screen.
How can I enter information on my device?
• Graffiti® 2 writing
• The onscreen keyboard
• Phone Lookup
• Note Pad
• An accessory keyboard (sold separately; visit www.palmOne.com/mylifedrive and click the
Accessories link)
The most popular methods are using Graffiti 2 writing and the onscreen keyboard.
NOTE
information between your device and your computer. Or you can send and receive information
from other devices, using beaming
Wi-Fi® capabilities
You can also enter information on your computer and move and
or your device’s built-in Bluetooth® wireless technology or
.
work with the
Entering information with Graffiti® 2 writing
You can enter info directly on your device with Graffiti 2 writing. Graffiti 2 writing includes any
character you can type on a standard keyboard. Entering these characters on your device is very
similar to the way you naturally write letters, numbers, and symbols. But instead of using a pen
and paper, you use the stylus and the input area on your device. With only a few minutes of
practice, you can learn to use Graffiti 2 writing.
Writing in the input area
You can write Graffiti 2 characters in the input area, or you can turn on full-screen writing and use
the entire screen to enter characters.
LifeDrive from palmOne 57
Page 81

CHAPTER 4 Entering Information on Your Device
Tip
Select the top icon to
open the onscreen
keyboard.
Tip
You can choose whether
the Graffiti 2 strokes you
enter appear as white
characters in the input
area.
Your device has two different layouts—classic and wide—for the input area that you can use to
enter Graffiti 2 characters. To open them, tap and hold Input on the status bar, and then select
the icon of the input area you want.
Classic Wide
Numerals
Select
middle icon
Select
bottom icon
Lowercase letters
Uppercase letters
Numerals
Uppercase letters
straddling line
Lowercase letters
In either layout, write lowercase letters, uppercase letters, and numbers in the sections shown. If
you write characters in the wrong area, they are not recognized correctly and an incorrect
character is written.
Using full-screen writing
When full-screen writing is turned on, you can write anywhere on the screen. When full-screen
writing is turned off, you must write character strokes in the Graffiti 2 input area for your device to
recognize them.
LifeDrive from palmOne 58
Page 82

CHAPTER 4 Entering Information on Your Device
Wri
You can write letters or characters in the following areas:
Left side of the screen Write letters or characters that are assigned to the abc input area.
Right side of the screen Write numbers or characters that are assigned to the 123 input area.
Middle of the screen straddling the imaginary dividing line between the left and right sides
Write uppercase letters.
NOTE
For a brief period of time after writing a character, a quick tap on the screen is
interpreted as a period character. Wait a second to tap buttons or place the cursor so that the
action is not interpreted as a period character.
Turn full-screen writing on and off by tapping full-screen writing on the status bar. When
full-screen writing is on, the icon turns from gray to white.
te capital or uppercase
letters in the middle
Write letters on
the left side
Write numerals on
the right side
Full-screen writing
LifeDrive from palmOne 59
Page 83

CHAPTER 4 Entering Information on Your Device
Did You Know?
Graffiti 2 writing
automatically capitalizes
the first letter of a
sentence or a new entry.
Writing Graffiti 2 characters
0
1
Open an application you use to enter information, like Calendar.
2 Tap the screen where you want your character to appear.
3 Position the stylus in the correct part of the input area, if selected, or in the
correct part of the screen if full-screen writing is on.
4 Write the characters exactly as shown in the tables that follow these steps. Be
sure to start each stroke at the heavy dot.
5 Lift the stylus at the end of the stroke.
Done
LifeDrive from palmOne 60
When you lift the stylus from the screen, your device recognizes
the stroke immediately and prints the character at the insertion
point on the screen.
Page 84

CHAPTER 4 Entering Information on Your Device
Did You Know?
Graffiti 2 characters made
with two strokes are
recognized after the
second stroke. Make the
second stroke quickly
after the first so that the
correct character is
recognized.
Did You Know?
Write uppercase letters
the same way you write
lowercase ones. The only
difference is where you
write them.
Tip
Your device has tables
displaying all of the
Graffiti 2 characters, short
cuts, and commands.
Customize your device
you can display these
tables by drawing a line
from the bottom of the
screen to the top.
so
Keys to success with Graffiti 2 writing
Keep these guidelines in mind when using Graffiti 2 writing:
• Write the characters exactly as shown in the following tables. Don’t write the dot. It’s only there
to show you where to begin writing the character.
• The Graffiti 2 writing area, whether the input area or the full screen, has two sections. Write
lowercase letters on the left, numbers on the right, and capital letters across the middle.
• Write at a natural speed, and do not write on a slant.
• Press firmly.
• Write large characters.
If you’re already familiar with Graffiti writing from an older Palm Powered™ device, Graffiti 2
writing will be easy to master. Characters are entered in exactly the same way, except for i, t, k,
and the number 4. These letters are now made with two strokes, just the way you would write
them if you were using a pen and paper.
Also, you no longer have to use the Punctuation Shift stroke for common punctuation like periods
and commas or for @. Just write these characters on the correct side of the input area and your
device immediately recognizes them.
LifeDrive from palmOne 61
Page 85

CHAPTER 4 Entering Information on Your Device
Tip
You can select alternate
ways to write some
Graffiti 2 characters.
Choose the method that’s
most natural for you.
Graffiti 2 alphabet
0
Write lowercase letters on LEFT side,
and capital letters across MIDDLE of input area
Letter Stroke Letter Stroke Letter Stroke Letter Stroke
ABCD
EFGH
IJKL
MNO P
QRST
UVWX
YZ
LifeDrive from palmOne 62
Page 86

CHAPTER 4 Entering Information on Your Device
Graffiti 2 numbers
0
Write numbers on RIGHT side of input area
Number Stroke Number Stroke
01
23
45
67
89
LifeDrive from palmOne 63
Page 87

CHAPTER 4 Entering Information on Your Device
Graffiti 2 punctuation marks
0
Write these marks on LEFT side of input area
Mark Stroke Mark Stroke
Period
Ampersand
.
Comma
,
Apostrophe
‘
Space Quotation mark
Question mark
?
Exclamation
point
!
0
&
Carriage
return
At
@
“
Ta b
LifeDrive from palmOne 64
Page 88

CHAPTER 4 Entering Information on Your Device
Tip
Having trouble with the
plus sign or asterisk
symbol? Use the
Punctuation Shift stroke
first and then make the
character.
0
Write these marks on RIGHT side of input area
Mark Stroke Mark Stroke
Period
.
Comma
,
Tilde
ñ
Backslash
\
Slash
/
Left
parenthesis
(
Dash
–
Right
parenthesis
)
Plus
+
Equal sign
=
Asterisk
*
LifeDrive from palmOne 65
Page 89

CHAPTER 4 Entering Information on Your Device
Tip
Having trouble accenting
characters? You can
always open the onscreen
keyboard, tap int., and
then tap the character you
need.
Tip
Get help writing any of
the Graffiti 2 characters in
most applications. Open
the Edit menu and select
Graffiti 2 Help.
Graffiti 2 accented characters
For accented characters, write the letter on the left side of the input area, and then write the accent
on the right side of the input area.
0
Write these marks on RIGHT side of input area
Accent Stroke Accent Stroke
Acute
á
Grave
à
Tilde
ã
Dieresis
ä
Circumflex
â
Ring
å
LifeDrive from palmOne 66
Page 90

CHAPTER 4 Entering Information on Your Device
Graffiti 2 gestures
0
Write gestures on LEFT side,
or across the middle of input area
Gesture Stroke Gesture Stroke
Cut Paste
Copy Undo
LifeDrive from palmOne 67
Page 91

CHAPTER 4 Entering Information on Your Device
Tip
If you accidentally enter
the Punctuation Shift
stroke, enter it again to
cancel it, or wait a
moment and it
automatically disappears.
Did You Know?
Writing two Punctuation
Shift strokes cancels the
automatic capitalization
of the first letter of a new
entry or sentence.
Writing Graffiti 2 symbols and other special characters
Symbols and other special characters can be written on either side of the input area, using the
Punctuation Shift stroke.
0
0
1
Enter the Punctuation Shift
stroke.
When Punctuation Shift is active,
an indicator appears in the lowerright corner of the screen.
Punctuation
Shift indicator
2 Write the symbol or other special character shown in the following table.
You can write a symbol or special character anywhere in the input area.
3 Enter another Punctuation Shift stroke to finish the character and to make it
appear more quickly.
Done
LifeDrive from palmOne 68
Once the Punctuation Shift indicator disappears, you see the
character.
Page 92

CHAPTER 4 Entering Information on Your Device
Graffiti 2 symbols and special characters
0
Write symbols on EITHER side of input area
LifeDrive from palmOne 69
Page 93

CHAPTER 4 Entering Information on Your Device
Writing Graffiti 2 ShortCuts
Graffiti 2 contains several ShortCuts to make entering common information easier. For example,
when you write the ShortCut stroke followed by dts, you automatically enter the current date and
time. You can also create your own ShortCuts
0
0
1 Write the ShortCut stroke .
This stroke appears at the
insertion point.
.
2 Write the ShortCut character from the following table.
You can write ShortCuts on the left side of the input area, or across the middle.
Done
LifeDrive from palmOne 70
The ShortCut stroke is replaced by the text the character
represents.
Page 94

CHAPTER 4 Entering Information on Your Device
Graffiti 2 ShortCuts
0
Write ShortCuts on LEFT side, or across MIDDLE of input area
Entry ShortCut Entry ShortCut
Date stamp ds Time stamp ts
Date/time stamp dts Meeting me
Breakfast br Lunch lu
Dinner di
LifeDrive from palmOne 71
Page 95

CHAPTER 4 Entering Information on Your Device
Key Term
»
Entry An item in an
application such as a
contact in Contacts or an
appointment in Calendar.
Entering information with the onscreen keyboard
You can use the onscreen keyboard in any application where you need to enter text, numbers, or
symbols on your device.
0
Tip
You can enter text
whenever you see a
blinking cursor on the
screen.
1
Open an entry:
a. Open an application
b. Select an entry or select New.
.
2 Tap Input on the status bar to open the input area.
3 Tap abc or 123 to open the
alphabetic or numeric keyboard,
respectively.
Continued
Tap to open keyboards
LifeDrive from palmOne 72
Page 96

CHAPTER 4 Entering Information on Your Device
Tip
When a keyboard is open,
you can tap abc, 123, or
int. to open any of the
other keyboards. Tap the
icon in the lower right
corner (to the right of 123)
to return to the Graffiti 2
input area.
4
[ & ] OPTIONAL Select from among five different keyboards.
Tab
Caps shift
abc - lowercase
Backspace
Carriage return
Tap here to display
lowercase keyboard
ABC - uppercase int. - international
Tap here to display
uppercase keyboard
NOTE
5
LifeDrive from palmOne 73
Tap the characters to enter text, numbers, and symbols.
Tap int. and then ABC to open the international uppercase keyboard.
Done
123 - numeric
Tap here to display
numeric keyboard
Tap here to display
international keyboard
Page 97

CHAPTER 4 Entering Information on Your Device
Entering info from Contacts into another application
Having lunch with someone whose info you have in Contacts? Use Phone Lookup to quickly enter
the person’s name and primary contact info into the appointment you create in Calendar. This
feature is available in Calendar, Memos, Tasks, and Expense.
0
1 Open an entry:
a. Open an application
b. Select an entry or select New.
In Expense only: Select Details, and then select Attendees.
.
2 Add the contact from Phone Lookup:
a. Tap where you want to enter the contact.
b. Open the menus
c. Select Options, and then select Phone Lookup.
Continued
.
LifeDrive from palmOne 74
Page 98

CHAPTER 4 Entering Information on Your Device
Tip
You can also enter the
first few letters of the
contact’s name, and the
open Phone Lookup. The
first contact name
matching the letters you
entered is highlighted.
Cont’d.
d. Select the contact, and then select Add.
3 [ & ] OPTIONAL To add another contact, repeat step 2.
Done
The name and phone number of the contact are automatically
entered.
LifeDrive from palmOne 75
Page 99

CHAPTER 4 Entering Information on Your Device
Editing information
Editing information on your device is similar to editing with word-processing applications on your
computer. Select the information, and then apply the correct command.
Selecting information
There are several ways to select information that you want to edit or delete.
Selecting text Place the cursor before or after the text you want to select, and drag
the cursor over all the text you want to select.
Selecting a word Tap twice on a word to select it.
Selecting a line Tap three times anywhere in a line to select it. This selects the final
return character or space as well as any text.
LifeDrive from palmOne 76
Page 100

CHAPTER 4 Entering Information on Your Device
Tip
There are even faster
ways to copy and paste
information:
• Use Graffiti 2 gestures
•Use the Graffiti 2
Command stroke and the
menu shortcut for cut,
copy, or paste (/X, /C, /P).
• Select the text, write the
command stroke, and
then tap the icon for cut
or copy from the
command toolbar that
appears.
Copying and pasting information
Copying and pasting information on your device is similar to editing with word-processing
applications on your computer.
0
.
1 Select the information you want to copy.
2 Copy the information:
a. Open the menus
b. Select Edit, and then select Copy.
.
3 Tap where you want to paste the information.
4 Select Edit, and then select Paste.
Done
LifeDrive from palmOne 77
 Loading...