

Page 1

Handbook
for the
Palm IIIc™ Organizer
Page 2

Copyright
Copyright © 1998-19 99 Palm Computing, Inc. or its subsidiaries. All rig hts reserved.
Graffiti, HotSync, Palm Computing, PalmConnect, PalmModem, and Palm OS are registered tra demark s, and the HotSy nc logo , Palm, Palm II I, Palm IIIc, and the Palm IIIc
logo are trademarks of Palm Computing, Inc. or its subsidiaries. Other product and
brand names may be trademarks or registered trademarks of their respective owners.
Disclaimer and Limitation of Liability
Palm Computing, Inc. and its subsid iarie s assu me no respon si bility for any da mage or
loss resulting from the use of this handbook.
Palm Computing, Inc. and its subsidiaries assume no responsibility for any loss or
claims by third parties which may arise thro ugh the us e of this sof tware. Palm Co mput ing, Inc. and it subsidiari es ass ume no respon sibi lity for any dama ge or l oss caused by
deletion of data as a result of malfunction, dead bat tery, or repairs. Be sure to make
backup copies of all important data on other media to protect against data loss.
Important: Please read the End User Software License Agreement with this product before using the accompanying software program(s). Using any part of the software indicates that you accept the terms of the End User Software License Agreement.
3.5" Softw are Diskettes Available
Palm™ Desktop software is supplied on a CD-ROM disc. If you do not have access to a
CD-ROM drive for your computer, you may download the Palm Desktop software from
http://www.palm.co m . Alternatively, you can order 3.5" diskettes by completing and mailing the diskette orde r card suppli ed in the Palm IIIc™ organizer produc t package, or
call to order the diskettes. See the Worldwide Customer Support card for the appropriate phone number.
P/N: 406-12 43-0 1
A/N: 423-1243-01
Page ii
Page 3

Contents
About This Book
Chapter 1: Introduction to Your Palm IIIc™ Organizer
Getting to know your Palm IIIc organizer.........................................3
What is a Palm IIIc organizer? ........................................................3
System requir e ments .................. ....................................... ...............4
Upgra de I nf o rmation ................................... .....................................4
Palm IIIc components .......................................................................6
Recharging the battery ...................................................................11
Palm Desktop organizer software ................................................12
Using your organizer with another PIM .....................................14
Tapp in g and typing ....... .......... ....................................... ....................1 5
Tap with the stylus to get things done .........................................15
Elements of the organizer interface ..............................................16
Opening applications .....................................................................17
Using menus ....................................................................................18
Four ways to enter data ..................................................................21
Customizing your organizer..............................................................24
Chapter 2: Entering Data in Your Palm IIIc™ Organizer
Using Graffiti writing to enter data..................................................27
Writi ng G ra f f iti characters ............ .......... ...................................... .27
Graffiti tips .......................................................................................29
The Graffiti alphabet .......................................................................30
Writing capital letters .....................................................................30
Writi ng nu m b e rs .... .. .. .......... ................................ ...........................3 1
Graffiti numbers ..............................................................................32
Writing punctuation marks ...........................................................32
Additi o na l Gr a f fi ti p un ct u a t ion ... .. ....................................... ........33
Writing symbols and extended characters ..................................33
Writing accented characters ..........................................................34
Accen t st rokes .... ............................... ................................ ...............34
Additional non-English characters ...............................................34
Navigation strokes ..........................................................................35
Graffiti ShortCuts ............................................................................35
Using the onscreen keyboard ............................................................36
Using your computer keyboard........................................................37
Impo rt in g da ta................... ....................................... ...........................37
......................................................................................... 1
Contents Page iii
Page 4

Chapter 3: Managing Your Applications
Using the Applications Launcher..................................................... 39
Selecting applications ..................................................................... 39
Switching between applications ................................................... 39
Categorizing applications ..............................................................39
Changing the Applications Launcher display ............................ 40
Choosing preferences......................................................................... 41
Installing and removing applications ..............................................42
Installing add-on app licat ions ......................................................42
Installing games ..............................................................................44
Removing applications .................................................................. 45
Removing Palm Desktop software ...............................................45
Security................................................................................................. 46
Assig ning a pa ss w or d .... .. ......................... ..................................... 46
Changing or deleting a password ................................................ 47
Locking your organizer .................................................................47
Recovering from a forgotten password ....................................... 48
Chapter 4: Using Your Basic Applications
Overview of basic applications.........................................................50
Date Book ......................................................................................... 50
Addr ess Book ... ... .. ....................................... ...................................51
To Do List .........................................................................................52
Memo Pa d .................................. ....................................... ............... 53
Calcu lat or . ..... .... ..... ... ..... .... ..... ... ..... .... ..... ..... ... .... ..... ..... ..... .. ..... ..... .53
Expense ............................................................................................ 54
Comm o n ta s ks......... ............................... ....................................... ...... 55
Creating records .............................................................................. 55
Editi ng re c or d s .... .. ................................ ....................................... ...55
Deleting records ..............................................................................57
Purging records ............................................................................... 58
Exchanging and updating data: HotSync operations ...............58
Categorizing records ...................................................................... 61
Finding records ............................................................................... 64
Sorting lists of records ....................................................................69
Making records private ..................................................................70
Attaching notes ............................................................................... 72
Choosing fonts ................................................................................ 73
Application-specific tasks.................................................................. 74
Date Book ......................................................................................... 74
Addr ess Book ... ... .. ....................................... ...................................88
To Do List .........................................................................................93
Memo Pa d .................................. ....................................... ............... 98
Page iv Handbook for the Palm IIIc™ Org an izer
Page 5

Calculator .......................................................................................101
Expen se ....... ........ ......... .......... .......... .......... ....... .......... ......... .......... .103
Chapter 5: Comm uni cat ing Using Your Organizer
Managing desktop E-Mail away from your desk.........................115
Setting up Mail on the desktop ...................................................116
Synchronizing Mail with your E-Mail application ..................118
Opening the Mail application on your organizer .....................118
Viewing e-mail items ....................................................................118
Creating e-mail items ....................................................................119
Looking up an address .................................................................122
Adding details to e-mail items ....................................................123
Stori ng e -ma i l to b e s en t la te r .... ................................ ..................126
Editi ng un s e nt e - ma il ... .. ... ................. ............................... ...........126
Draf t e-m a i l .................... ............................... ................................ .127
Filing e-mail ...................................................................................128
Delet in g e - m ail .... ... .. ........................ ................................ .............12 9
Removing e-mail from the Deleted folder .................................129
Purging deleted e-mail .................................................................130
Message list options ......................................................................130
HotSync options ............................................................................132
Creating special filters ..................................................................133
Truncating e-mail items ...............................................................137
Mail menus .....................................................................................138
Beaming information ........................................................................139
Chapter 6: Advanced HotSync® Operations
Selecting HotSync setup options.....................................................143
Customizing HotSync application settings ...................................146
IR HotS ync oper a tions..................................... .................................148
Preparing your computer for infrared communication ..........148
Configuring HotSync Manager for infrared comm unication .151
Performing an IR HotSync operation .........................................152
Returning to cradle HotSync operations ...................................152
Conducting a HotSync operation via modem...............................153
Preparing your computer ............................................................153
Preparing your organizer .............................................................155
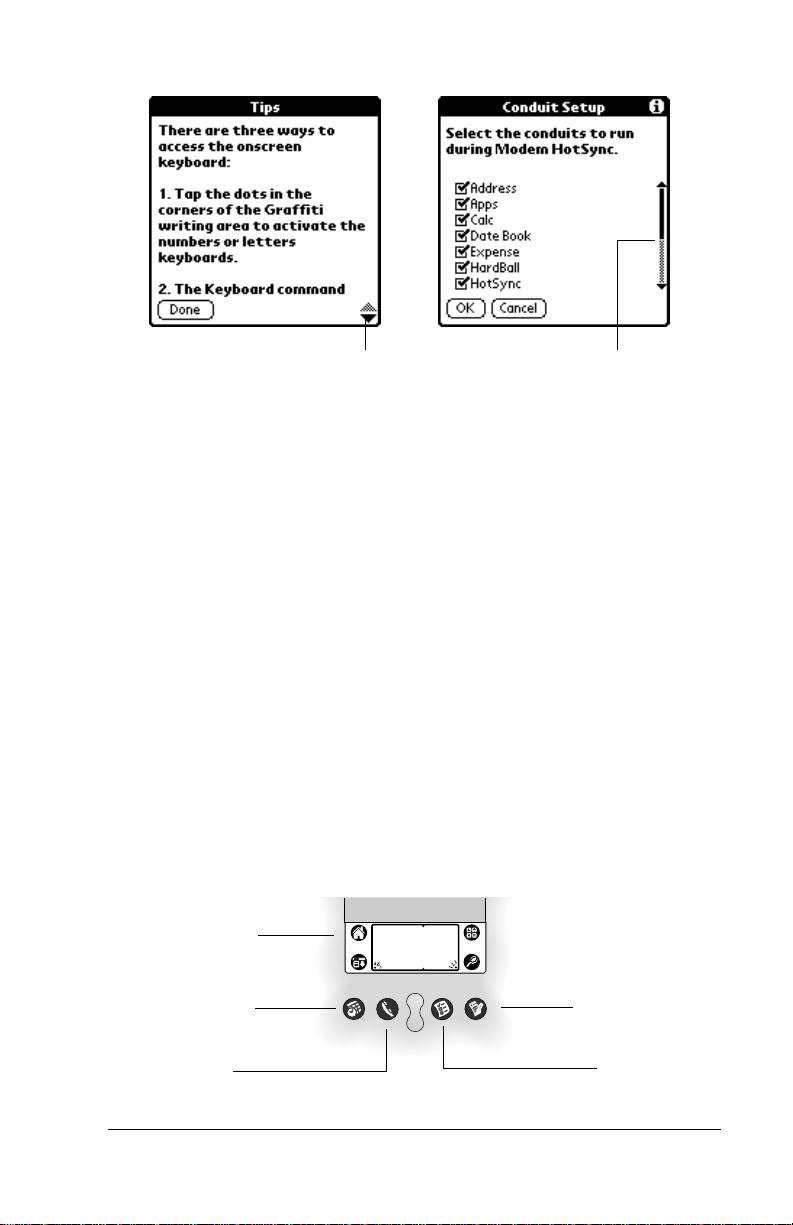
Selecting the conduits for a modem HotSync operation .........156
Performing a HotSync operation via a modem ........................157
Conducting a HotSync operation via a network ..........................158
Connecting to your company’s dial-in server ...........................158
Performing a network HotSync operation ................................161
Using File Link...................................................................................161
Creating a user profile ......................................................................162
Contents Page v
Page 6

Chapter 7: Setting Preferences for Your Organizer
Viewing preferences.........................................................................165
Buttons preferences ..........................................................................166
Pen preferences .............................................................................166
HotSync buttons preferences ......................................................168
Digitizer preferences ........................................................................ 168
Formats preferences ......................................................................... 168
Coun t ry def a u lt .............................. ...................................... ......... 169
Time, date, week start, and numbers formats ..........................169
General preferences.......................................................................... 170
Auto-off delay ............................................................................... 170
Cradle settings ...............................................................................170
System, alarm, and game sounds ............................................... 171
Beam Receive .................................................................................171
Conn ection pr ef e re nces. ... ........................ ....................................... . 172
Sample connection for remote IR HotSync operations ...........173
Network preferences and TCP/IP software.................................175
Selecting a service .........................................................................175
Entering a user name ...................................................................176
Entering a password ....................................................................177
Selecting a connection ..................................................................177
Addi ng te le p hone set t i ng s ........... ...................................... ......... 178
Connecting to your service ..........................................................180
Creating additional service templates ....................................... 181
Adding detailed information to a service template ................. 181
Login scripts ..................................................................................184
Creating a login script on your organizer ................................. 185
Plug-in applications .....................................................................187
Deleting a service template .........................................................187
Network preferences menu commands ....................................187
TCP/IP troubleshooting .............................................................. 188
Owner preferences............................................................................ 189
Shor tCuts pre f e re nces ... ........................ ................................ ...........1 90
Creat i ng a S ho rtCut . ................. ....................................... .............190
Editing a ShortCut ........................................................................ 191
Deleting a ShortCut ......................................................................191
Appendix A: Maintaining Your Organizer
Caring for your organizer................................................................ 193
Batt ery co n s ideratio n s.......... ... ....................................... ..................1 9 5
Rese tt in g y o u r o rg a ni z e r ... ................. ....................................... ......195
Performing a soft reset .................................................................195
Performing a hard reset ...............................................................196
Page vi Handbook for the Palm IIIc™ Org an izer
Page 7

Appendix B: Frequently Asked Questions
Software installation problems........................................................200
Opera t in g problem s ............ ....................................... .......................201
Tapping and writing problems .......................................................202
Application problems .......................................................................203
HotSync problems .............................................................................204
Beaming problems.............................................................................210
Recharging problems........................................................................210
Password problems...........................................................................211
Techn i ca l su p p o r t ....... .. .. .......... ....................................... ..................212
Appendix C: Creating a Custom Expense Report
About mapping tables ......................................................................213
Customizing existing sample templates ........................................214
Determining the layout of the Expense Report.............................215
Labels ..............................................................................................215
Sections ...........................................................................................216
Analyzing your custom Expense Report .......................................217
Programming the mapping table....................................................218
Using applications other than Microsoft Excel.............................222
Expense file details............................................................................222
Appendix D: Non-ASCII Characters for Login Scripts
Use of ^ char ... ....................................... ....................................... ......22 3
Carriage return and line feed ..........................................................223
Literal characters ...............................................................................224
Product Regul ato ry Informatio n
FCC Sta t e me nt .................................... ....................................... ........225
Canadian ICES-003 Statement.........................................................226
CE Com p li a nce State me nt............ ....................................... .............2 2 6
Batt ery Wa rning .... ............................... ................................ .............2 2 6
Index
....... .. ... ............................... ....................................... ...................... 229
Contents Page vii
Page 8

Page viii Handbook for the Palm IIIc™ Org an izer
Page 9

About This Book
Welcome to the Palm IIIc™ connected organize r. This handboo k is
designed to help you get up and running quickly on your organizer.
It describes all you need to know about how to use your Palm IIIc
organizer and the applications that come with it.
It walks you through:
■
Loca ti ng all the p a rt s of y o u r or g a n izer
■
Viewing and entering data
■
Using your organizer with your computer
■
Personalizing your organizer wi th your own preference set t ings
After you become familiar with the basic functionality of your
organize r, y ou can u se the res t of thi s han dbook as a r efer en ce fo r le ss
common tasks, for maintain ing your organ izer, and also as a source of
information if you have problems operating it.
About This Bo ok Page 1
Page 10

Page 2 About This Book
Page 11

Chapter 1
Introduction to Your
Palm IIIc
This chapter explains the physical buttons and controls on your
Palm IIIc™ connected o rg anizer, how to use your organiz e r for the
first time , and how to use HotSync
organizer and Palm™ Desktop orga nizer softwar e .
Getting to know your Palm IIIc organizer
What is a Palm IIIc organizer?
With your Palm IIIc organizer, you will no longer have trouble getting
to meetings and appointments on time, remembering people’s names
and personal details, or tracking all the items on your To Do list. Your
organizer can help you improve your track record in all these areas,
both at work and at home.
You can enter all you r scheduled events in Date Book, and set an
alarm to remind you of important meetings. You can view scheduled
events by the day, week, or month, and you also have an agenda view
for displaying current events and To Do items at the same time. Keep
all your contact names, addresses, phone numbers, and other details
in Address Book , so you c an find th em as soo n as you nee d them. Add
your tasks to To Do List, prioritize them so you don’t over look them,
and assign them a due date.
™
Organizer
®
technolog y to synchronize your
To make sure you d on’t lose any of this important information, you
can synchronize your data with Palm Desktop software on your
computer so you always have a backup copy. You can set different
levels of sec urity for your organizer so una uthorized ey es cannot view
your data.
When you are out of the office, track your expenses for your expense
reports; then transfer the data to your computer to print it out. You can
write, edit, and view your e-mail, and then synchronize your e-mail
with your desktop E-Ma il application when yo u return to your office.
Chapter 1 Page 3
Page 12

System requirements
To install and operate Palm Desktop software, your computer system
must meet the following requirements:
Minimum requirements
■
Windows 95, Windows 98, or Windows NT 4.0
■
IBM-compatible 486 computer or higher
■
8 MB RAM (memory)
16 MB recommended
■
20 MB available hard dis k spa c e
■
VGA monitor or better
■
CD-ROM drive (you can also download the P alm Desktop
software f rom htt p://www .palm.c om, or order 3. 5" di skette s from
Palm Computing)
■
Mouse
■
One available serial port or USB port (PalmConnect® USB Kit sold
separately)
Option al equipment
■
Modem (such as a PalmModem® accessory )
■
Windows-compatible printer
■
Infrared communication device
minimum,
Macintosh compatibility
You can connect your organizer to your Macintosh using the
PalmConnect
®
Serial Kit or PalmConnect USB Kit (sold s e p a rately).
Upgrade Information
If you already own a Palm Computing® handheld, w e recomm end
that you install the version of Palm Desktop software that comes with
your new Palm IIIc organizer into the same folder as your current
Palm Desktop software. When you install the new version in the same
folder as the previous version, all your data is preserved. If you use
another personal information manager (PIM), you still need to install
Palm De sktop so f tw a r e in order to add Hot Sync Man a g e r , c o nd u it
software, and other features of Palm Desktop software to your
computer.
You perform HotSync operations in exactly the same way, so you can
quickly synch ronize your old data with your new organizer.
Page 4 Introduction to Your Palm IIIc™ O rg an izer
Page 13

To upgrade:
1. Read the Getting Started guide for an overview of the complete
installation process.
2. Sy nchronize yo u r old org a ni z e r wi t h y o u r ol d Palm D e sktop
software. This ensures that the latest information from your
organizer is on your desktop computer.
3. (Optional) To ensure against any data loss, go to the folder that
stores Palm Desktop software, copy the folder and al l its conte nts,
rename it (for example, Palm Backup), and store the copy outside
the Palm Desktop software folder.
4. Follow the installation instructions in “Installing Palm Desktop
software” later in this chapter. Be su re to install the new software
in the same folder as the old software.
5. To prepare for the first HotSync operation that synchronizes your
new organizer with your new Palm Desktop software, go to the
HotSync Manager and choose Custom.
Note:
Be sure your username appears in the box at the top of the
Custom dialog box. If not, select your username.
6. For all conduits, click Change and select the option Desktop
overwrites handheld. Then click Done. See “Customizing Hot Sync
application setti ngs ” in Chapt er 6 for more info rma tion.
7. Place your new organizer in the cradle an d pr ess th e Hot Sync
button. If the Se lect U ser dial og box appears, se lect your username.
Note:
If you customized the modem setup on your old
organ i z er , y o u must re-ent e r th e mo d e m i ni t str in g .
Any passwords you se t on your old organi ze r are not
restored during this HotSync operation. Records you
previously marked Private are still marked Private, but
you need to reenter a password on your new organizer.
Each orga nizer must h ave a unique name
After you comp lete the upgrade process descri b e d above, you have
two or ganizers with th e same name. Th is is an undesirable situat i o n.
Each organizer must have a unique nam e in order to prevent
unexpected results during HotSync operations and other
complications.
We strongly recommend that you perform a hard reset on your old
organizer. See “Performing a hard reset” in Appendix A for details.
Chapter 1 Page 5
Page 14
A hard reset not only erases all data from the old organizer; it also
erases the name and makes that or g anizer a clean slate, ready to
receive a new name. The next time you perform a HotSync operation
with this old organizer, you are asked to give it a name. Be sure to give
it a unique name.
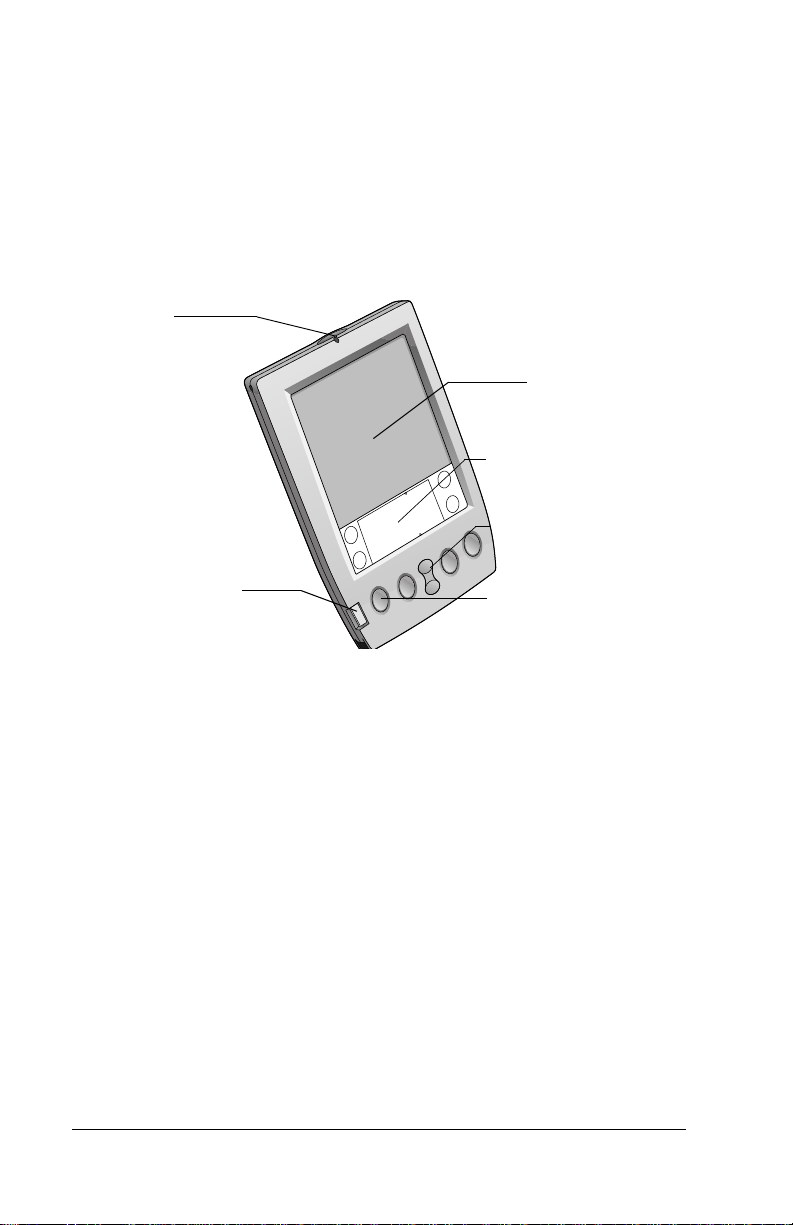
Palm IIIc comp o n e n ts
Locating front panel controls
Battery
charg e light
Screen
Graffiti writing area
Scroll button
Power button/
Brightness control
Power
button/
Brightness
control
Turns your organizer on or of f and controls the
brightn e ss.
If your organizer is turned off, pressing the power
button turns the organizer on and retu rns you to the
Applic a tion but tons
last screen you viewed. Press the power button to
turn the organizer off.
If you have difficulty seeing the information
onscreen, use the brightness control to adjust the
screen depending on the lighting conditions where
you use your organizer. Press the power button and
hold it down for about two seconds to access the
Brightness dialog box. You can conserve battery life
by reduci ng the brig htness level of the display.
Battery
charge light
Illumin ates when the orga nize r is in the cradle and
the battery is charging. When the battery is fully
charged, the light turns off.
Page 6 Introduction to Your Palm IIIc™ O rg an izer
Page 15

Organizer
screen
®
Graffiti
writing
area
Displays the applications and information stored in
your organizer. It is touch-sensitive and responds to
the stylus.
The area where you write letters and numbers using
®
the Graffiti
alphabet. See Chapter 2 to learn how to
write Graffiti characters.
Scroll
button
Displays te xt and ot h e r in f o rm ation th a t e xt e n ds
beyond the area of the organizer screen. Pressi ng t h e
lower half of the scroll button scrolls down to view
information below the viewing area, and press ing the
upper half of the button scrolls up to view the
information above the viewing area.
Application
buttons
Activates th e individual organizer applications that
correspond to the icons on the buttons: Date Book,
Address Book, To Do List, and Memo Pad. See
“Buttons prefe rences” in Chapter 7 for details on
reassigning these button s to activate any app lication
on your organizer.
Tip:
If your organizer is turned off, pressing any
application button activates the organizer and
opens the corresponding application.
Using the onscreen brightness control
You may need to make adjustments by changing the amount of
brightness on the screen.
To adjust the brightness:
1. Press the power button and hold it down for about two seconds.
2. Do one of the fo l lowing :
To change the brightness in small incr e ments, tap to the left or
right of the slider.
To change the brightness in larger increments, drag the slider to
the left or right.
Tip:
You can also pre ss the scroll bu tton to move the slider
incrementally.
3. Tap Done.
Chapter 1 Page 7
Page 16
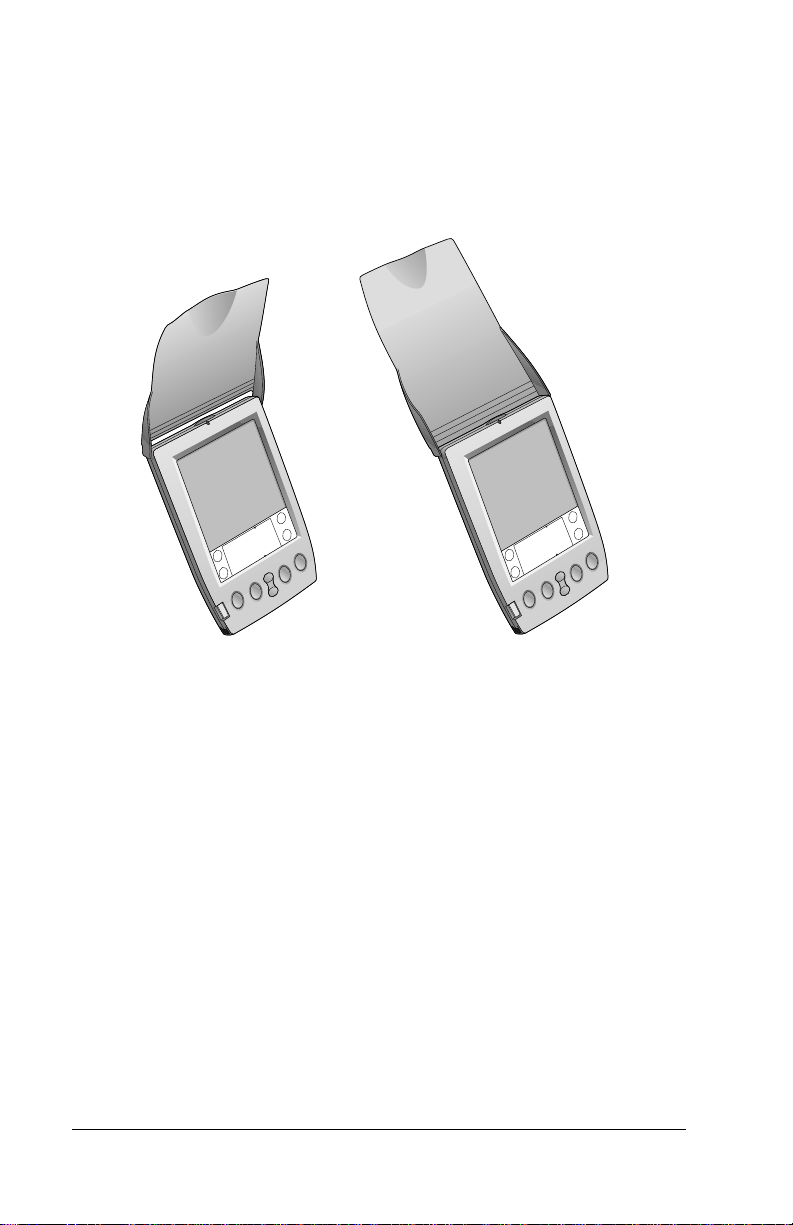
Protective flip co ver
The cover protects the organizer screen when it is not in use and helps
reduce glare while you use your organizer. You can open the co ver so
that it is at an angle, open it fully, or remove it altogether by pulling
the cover o ut of th e hol es on t he sid es o f the org ani zer. To reat tac h the
cover, reinsert the p egs in the holes.
Page 8 Introduction to Your Palm IIIc™ O rg an izer
Page 17
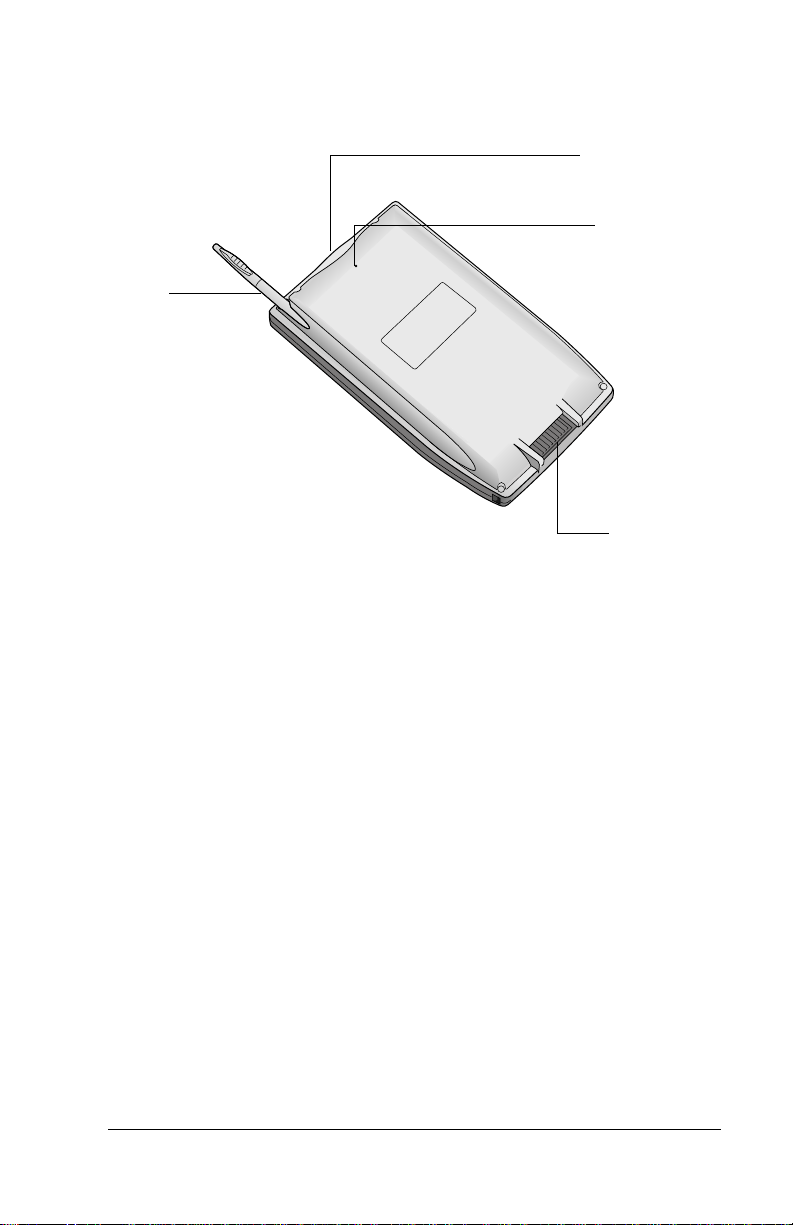
Locating back panel components
Stylus
IR port
Reset
button
Serial
connector
Stylus
Slides in and out of the slot in the back panel of
the organizer. To use the stylus, remove it from
the slot and hold it as you would a pen or pencil.
IR port
Uses infrared tec hnolo gy to tran smit data to and
receive data from other Palm Computing
®
platform handhelds , and to perform HotS ync
operations. See “Beaming information” in
Chapter 5 and “IR HotSync operations” i n
Chapter 6 for more information.
Reset butto n
Under normal us e, you should not h a ve to use
the reset button. See Appendix A for information
about when and how to use the reset button.
Chapter 1 Page 9
Page 18
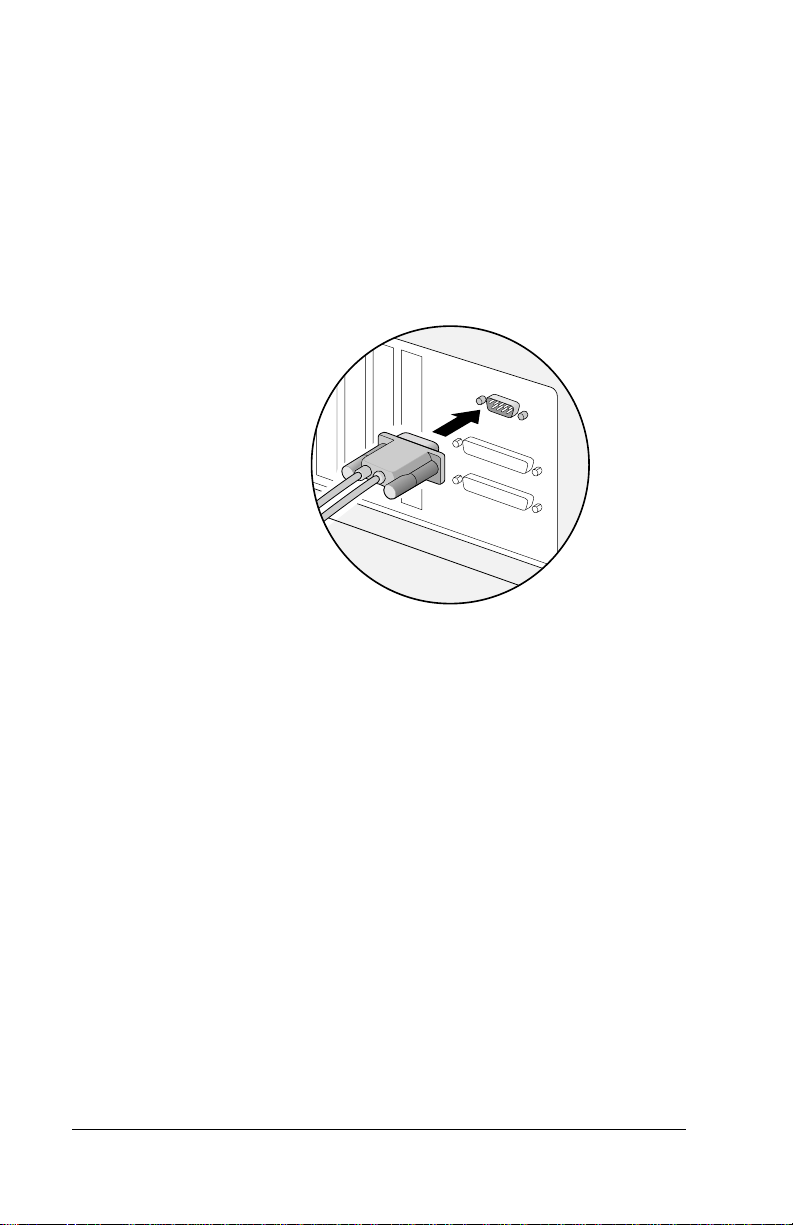
Serial connector
Connects your organizer to the cradle, which in
turn connects to th e b a ck of y o u r co mputer an d
through the AC adapter to the wall current. This
allows you to rechar ge your organizer as well as
upda te th e in f o rmatio n b e tween y o u r or g a n izer
and computer using HotSync technology.
Note:
The cradle must be plugged into the
serial (COM) port at the back of your
computer.
Your organizer requires a dedicated port. It
cannot share a port with an internal modem or
other device. If you are unsure about the exact
location of the seri al port on you r comp uter, ref er
to the user ’s manu al s uppli ed wit h th e c ompute r.
Important:
Only use the AC adapter that came
with your organizer. Other adapters
could dam ag e your o rga nize r and
will void the warranty.
Page 10 Introduction to Your Palm IIIc™ O rg an izer
Page 19
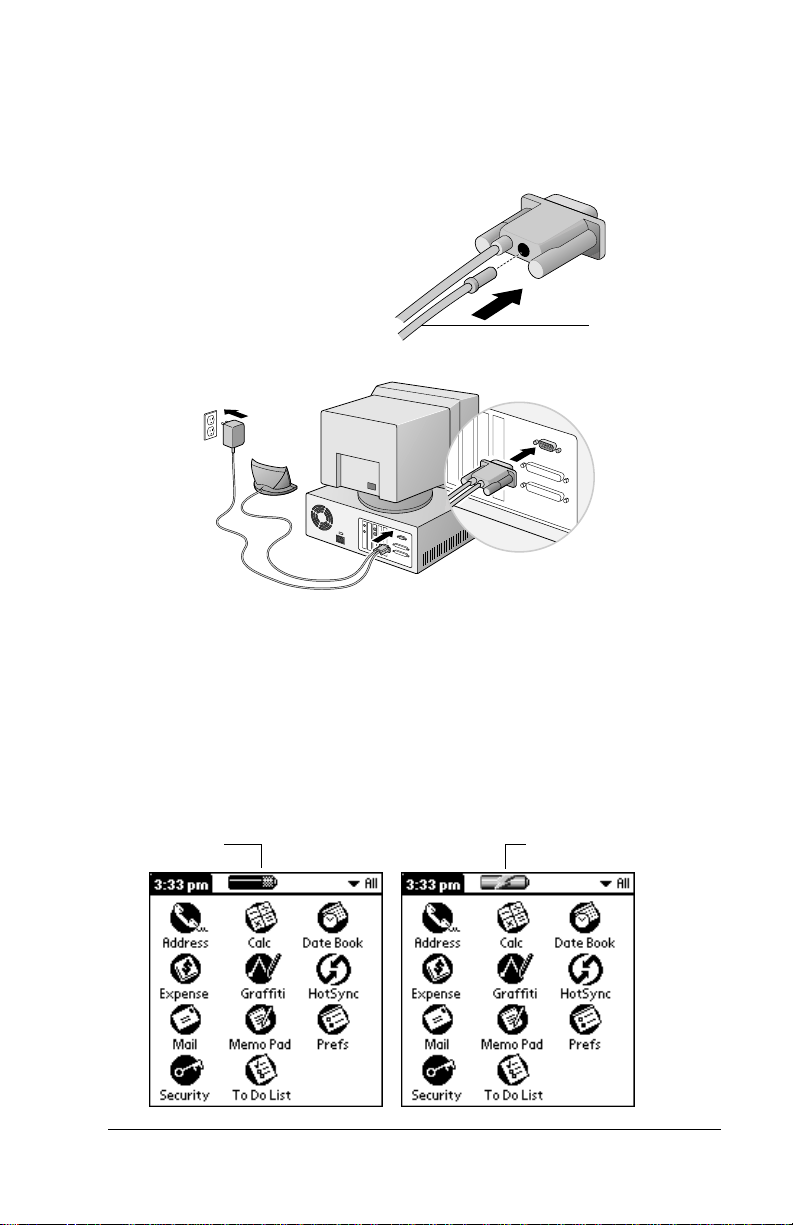
An additional connection is made from the back
of the c radle ’s se ri al (CO M) p ort c onnec to r to t he
AC adapter which plugs into any AC current
outlet.
AC adapter
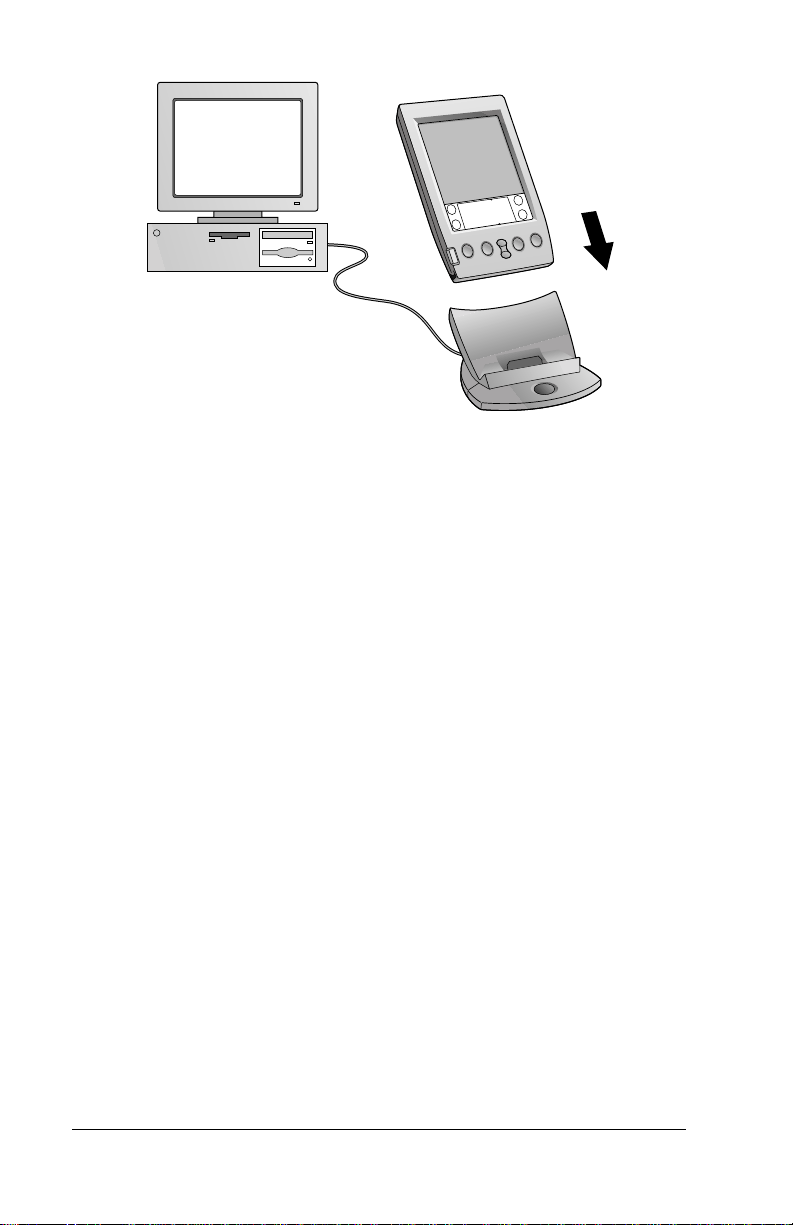
Recharging the battery
Your organizer contains a Lithium-ion battery that is recharged each
time you place the organizer in the cradle. Just place your organizer in
the cradle for approximately four hours for an initial charge before
you use it. Then place it in the c radle for m inutes each d ay to rechar ge
the batte ry to full capa city. A full char ge will last up to two weeks with
normal use. When you charge the battery, the battery icon on your
organizer changes to a battery charging icon.
Battery icon
Chapter 1 Page 11
Battery charging icon
Page 20

As the battery gets low, th e battery icon indi cates a low charg e. Befor e
the battery drains completely, perf orm a HotS ync operation and then
recharge the battery as soon as possible. If your organizer shuts down
before recharging, you still have about a week to recharge the battery
before you lose th e data on your organize r.
Viewing data while in the cradle
You can set a preference so that you can continue to view data while
your organizer is in the cradle and while the battery is being
recharged. See “General preferences” in Chapter 7 for more
informatio n.
Note:
Turn your organizer off to fully recharge the battery.
Palm Desktop organizer software
Palm Desktop software extends many of the functions of your
organizer to your computer and serves to back up your data. Viewing
and editing your data using Palm Desk top software is optional.
However, when you use it with your organizer and the built-in
HotSync technolo gy, you can fully synchroniz e the inform ation on
your organizer with th e in f ormation on you r computer.
It is a good idea to back up your data in case something happens to t he
data on your organizer. Changes you make on your organizer or Palm
Desktop software appear in both places after you synchronize.
With Palm Desktop software, you can do the following:
■
Work with you r or g a n iz e r a p pl ica tions on y our computer. Pal m
Desktop software duplicates the Da te Book, Address Book, To Do
List, and Memo Pad applications on your organizer, so you can
view, enter, and modify any data stored on you r organizer.
■
Back up the data stored on you r organizer wi th HotSync
technology an d synchronize the data on your Palm Desk top
software. Synchronization is a one-step procedure that ensures
your data is always safe and up-to-date. See “Exchanging and
updating data: HotSync operations ” in Chapt er 4 for more
information.
■
Import and export data, so you can easi ly transf e r data from other
desktop applications into any of your main applications. See
“Importing data” in Chapter 2 for more information.
■
Print your Date Book, Addres s Book, To Do List, and Memo Pad
information on any print er.
Page 12 Introduction to Your Palm IIIc™ O rg an izer
Page 21

Installing Palm Des kto p softw are
The following instructions guide you through installing Palm
Desktop software. After installation, refer to the online Help in Palm
Desktop sof tware for information about how to use the software.
To ensure a safe and uninterrupted installation of Palm Desktop
software, please do the follow ing be for e insta lling:
■
Turn off your comp uter and connect the cradle to it.
■
If you are installing from diskettes (rather than the CD-ROM
included in th e b ox), make sure the original Palm Desktop
software diskettes are write-protected, and then make backup
copies of them. When you finish, use the copies to install the
software, and store the original diskettes in a safe place. Refer to
your computer’s manual or op e rating system documentati on if
you need information ab out locking o r copying dis ket tes.
■
not
Do
simply copy the Palm Desktop software files to your
computer ’s hard disk. You mu st use the installer to place th e files
in the ir p roper locations and to de compre s s the file s .
To install Palm Desktop software:
1. Exit any open programs, including those that run automatically at
startup such as Microsoft Office, and disable any virus-scanning
software.
2. Insert the Palm Desktop software CD-ROM into the computer’s
CD-ROM drive (or insert the diskette labeled Setup into the
diskette drive).
3. When the Palm Desktop Installer Menu appears, click the Install
button to begin the installation procedure.
4. Follow the onscre en instr uctio ns to comp lete the installat io n.
During installation y ou will be as ked to insert your organi zer into
the cradle.
Chapter 1 Page 13
Page 22
Using your organizer with another PIM
If you prefer to use another personal information manager (PIM), such
as Microsoft Outlook, y ou still need to install Palm Desktop software
in order t o add HotSy nc M anag er, the c on nect io n soft war e, and othe r
features of Palm Desktop software to your computer. The connection
software , ca lled a condui t, let s yo u synchr onize t he da ta betwee n you r
organizer and your PIM.
If the i nstall ation program d etects that y ou have M icrosof t Outlook on
your computer, the p rog ram lets you choose between installing Palm
Desktop software or installing the conduit for Outlook so that you can
use that application as your PIM.
For information on the availa bility of conduit software for the PIM
you use, con ta c t th e ve ndor of y o u r P I M or vi sit the web site
http://www.palm.com.
Page 14 Introduction to Your Palm IIIc™ O rg an izer
Page 23

Tapping and typing
Tap with the stylus to get things done
Like using a mouse to click elements on a computer screen, using the
stylus to tap e lem ents on y our organ izer sc ree n is the ba si c acti on th at
gets things done on your organizer.
The first time you start you r organizer, setup instr u ctions appear on
the screen. These instructions include a calibration screen, or digitizer.
Calibrati on aligns the internal circuitry of you r organizer with its
touch-sensitive screen so that when you tap an element on the screen,
the organizer can detect exactly which task you want to perform.
Important
With your org anizer turned on, you can tap th e organize r scree n to do
many operations, such as the foll owing:
■
Open applications
■
Choose menu commands
■
Initiate a global Find oper ation
■
Select options in dialog boxes
■
Open the onscreen keyboards
:
Always use the point of the stylus for tapping or making
strokes on the organizer screen. Never use an ac tual pen ,
pencil, or other sharp object to write on the org anizer
screen.
Just as you can drag the mouse to select text or move objects on your
computer , you can also drag the styl u s to select text. You can also use
the stylus to drag the slider of an y sc roll bar.
Chapter 1 Page 15
Page 24
Elements of the organizer interface
Menu bar
Command
buttons
Icons
Menu
bar
Check
box
Icons
Pick list
Command
buttons
A set of command s that are specifi c to the applic ation.
Not all applications have a menu bar.
Tap a button to p e rform a command. Command
buttons appear in dialog boxes and at the bottom of
application screens.
Tap the icons to op e n applicati ons , menus ,
Calculator , and to fi nd text anywhere in your data
.
abc
With the cu rsor in an input fie ld, tap the dot to
activate the alphabetic keyboard.
123
With the cu rsor in an input fie ld, tap the dot to
activa te the numeri c ke y b o ar d .
Check box
When a check mark appears in a check box, the
corresponding option is active. If a check box is
empty, tapping it inserts a check mark. If a check box
is checked, tapping it removes the check mark.
Pick list
Tap the arrow to d isplay a list o f choic es, and then tap
an item in the list to select it.
Page 16 Introduction to Your Palm IIIc™ O rg an izer
Page 25
Previous/next
arrows
Scroll
bar
Scroll bar
Drag the slide r, or ta p th e to p or botto m arrow, to
scroll the di sp lay one line at a time . To scroll to the
previous page, tap the scroll bar just a bove the slider.
To scroll to the next page, tap the scroll bar just below
the slider.
You can also scroll t o the previous and next pages by
pressing the upper and lower portions of the scroll
button on the fron t p a nel of the organi ze r.
Next/
previous
arrows
Tap the up and down arrows to display t h e previous
and next page of information; tap the left and right
arrows to display the previous and next record.
Opening applications
You can use the Applications Launcher to open any application
installed on your organizer. You can also open the four main
applications — Date Book , Address Book, To Do List, and Memo Pad
— with the application buttons on the front panel of your organizer.
Applications
Launcher
Date
Book
Memo
Pad
Address
Book
Chapter 1 Page 17
To Do
List
Page 26
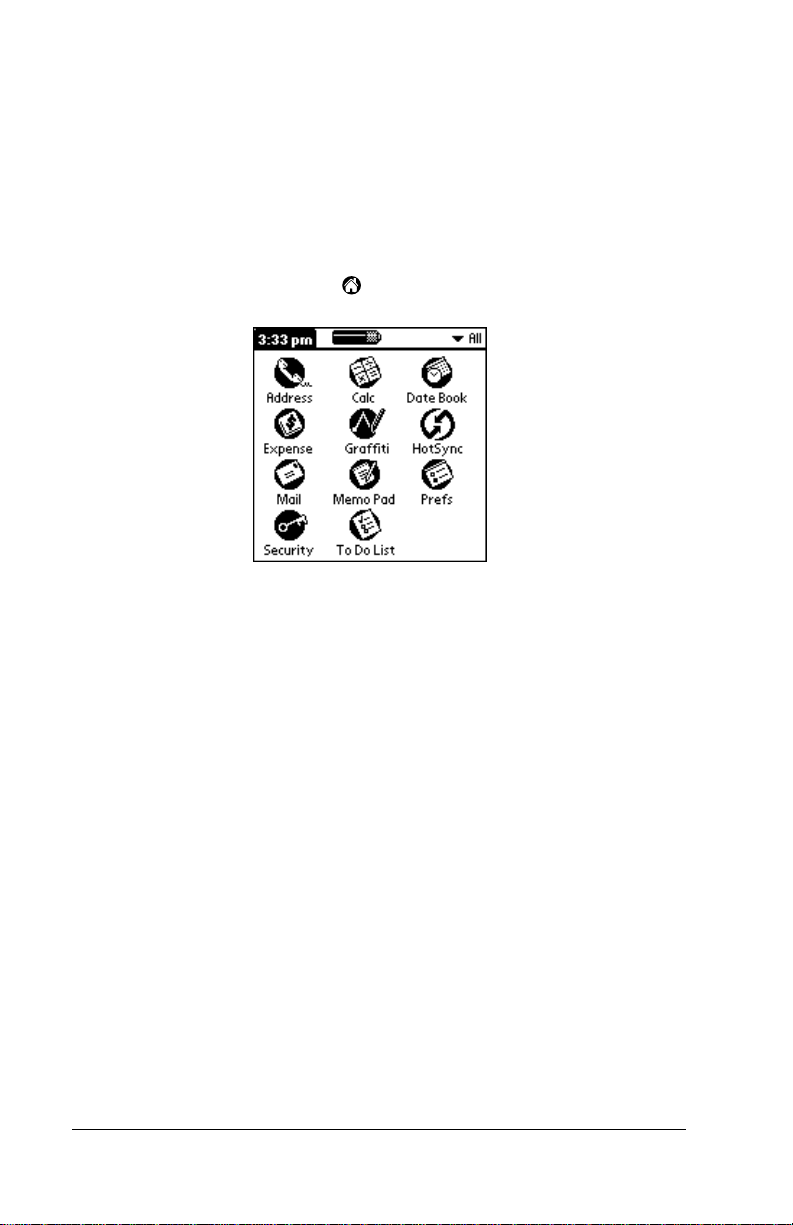
Tip:
In addition to providing a way for you to open applications, the
Applications Launcher displays the current time, battery level, and
application catego ry.
To open an application:
1. Tap the Applications icon .
2. Tap the icon of the application that you want to open. If you have
When you press an application button on the front panel, you
have instant access to t he selec ted appli cation. You don’t ev en
need to turn on your organizer first.
many applic ation s inst al led on y our orga nize r, ta p t he scro ll bar t o
see all of your applications.
Tip:
To find an application quickly, you can write the Graffiti
character for the first letter of its na me. The Applications
Launcher scrolls to the fi rst application with a nam e that
begins with that letter. You can also assign application
icons to different categories. See “Categorizing
applications” in Chapter 3.
Using menus
Menus on your organizer are easy to use. Once you have mastered
them in one application, you can use them the same way in all other
applications.
The menus of each applicat ion are illustra ted in the section on that
application in Chapter 4. The Edit menu is described in “Editing
record s ” in Cha pt e r 4.
Page 18 Introduction to Your Palm IIIc™ O rg an izer
Page 27
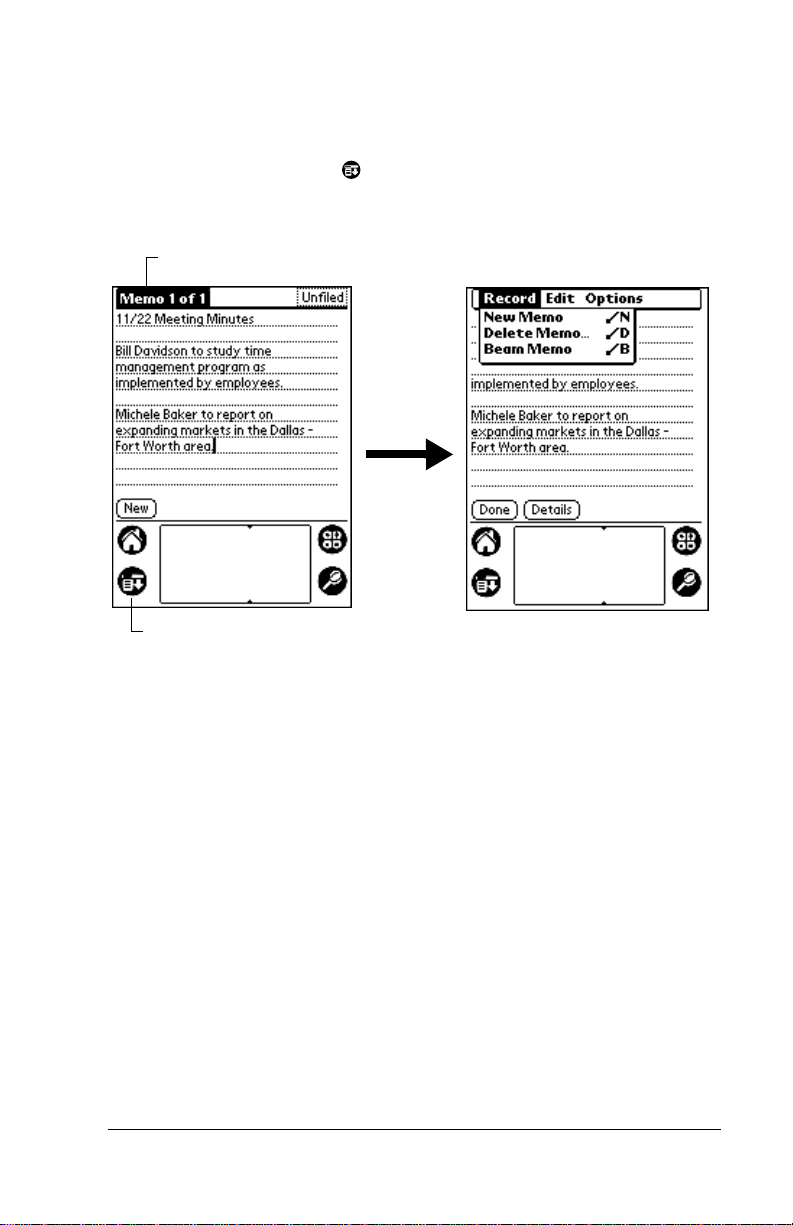
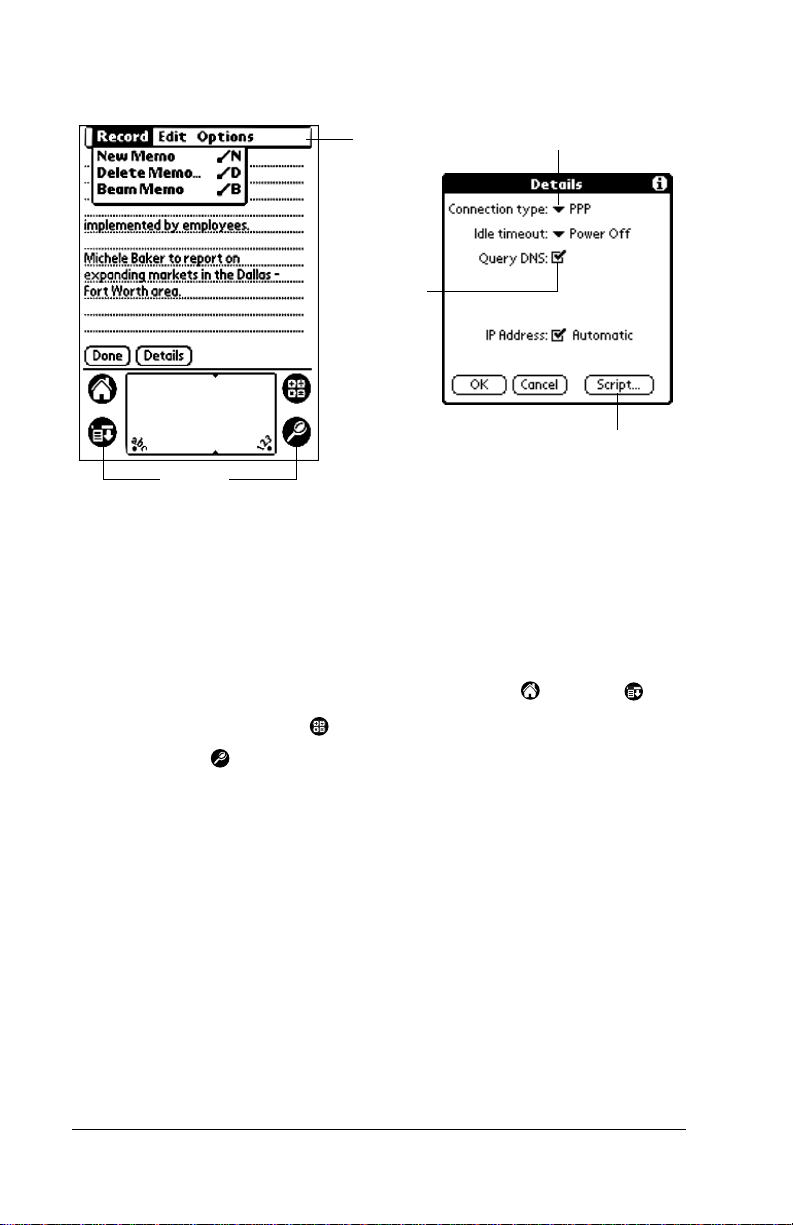
To open the menu bar:
1. Open an application (such as Memo Pad).
2. Do one of the fo l lowing :
Tap the Menu icon .
Tap on the inverted title area at the top of the screen.
Tap the title area
Tap the Menu icon
In this example, three menus are available: Record, Edit, and Options.
The Recor d menu i s sel ected a nd co ntain s the comma nds N ew Memo,
Delete Memo, and Beam Memo.
Choosing a menu
After you open the menu bar for an application, tap the menu that
contai ns the comma nd you want to use.
The menus and menu commands that are available depend on the
application that is currently open. Also, the menus and menu
commands vary depending on
which part
of the application you’re
currently using. For example, in Memo Pad, the menus are different
for the Memo list sc reen and the Memo screen.
Graffiti menu commands
Most menu commands have an equivalent G raffiti Command stroke,
which is similar to the keyboard shortcuts used to execute commands
on computers. The comman d l e tters appear to the right of the
command names.
Chapter 1 Page 19
Page 28

Menu commands
Command letters
Draw the Command stroke anywhere in the Graffiti area. When you
draw the Command stroke, the Command toolbar appears just above
the Graffiti writing area to indicate that you are in Command mode.
Command
CutUndo Copy Paste Beam Delete
The command tool bar di splays con text sensit ive men u command s for
the current screen. For example, if text is selected the menu icons
displayed may be undo, cut, copy, and paste. Tap on an icon to select
the command, or immediately write the corresponding command
letter for an appropriate command in the Graffiti writing area.
For example, to choose Select All in the Edit menu, draw the
Command stroke, followed by the letter “s.”
Note:
Command mode is only act ive for a short time, so you must
tap an icon or wri te the command let ter immediat ely to choose
the menu command.
Displaying onli ne tips
Many of the dialog boxes that appear on your organizer contain an
online Tips icon in the upper-right corner. Online tips anticipate
questions you have in a dialog box, provide shortcuts for using the
dialog box, or give you other usefu l information.
Page 20 Introduction to Your Palm IIIc™ O rg an izer
Page 29

To display an online tip:
1. Tap the Tips icon .
2. After you review the tip, tap Done.
Four ways to enter data
There are four ways to enter data into your organizer:
■
Using the on screen keyboard
■
Using Graffiti writing
■
Entering or importing data in Palm Desktop software and then
synchronizing with your or ganizer
■
Using an external keyboard
Onscreen keyboard
When you create or edit a record in an application such as Add res s
Book, you can open the onscreen alphabetic and numeric keyboards
to enter data.
Tap here for
alphabetic keyboard
Tap here for numeric
keyboard
After a keyboard is open, you can tap to op e n any of the other
keyboards, including the international keyboard. See “Using the
onscreen keyboard” in Chapter 2 for more information.
Note:
You cannot enter Graffiti characters while using the onscreen
keyboard.
Chapter 1 Page 21
Page 30
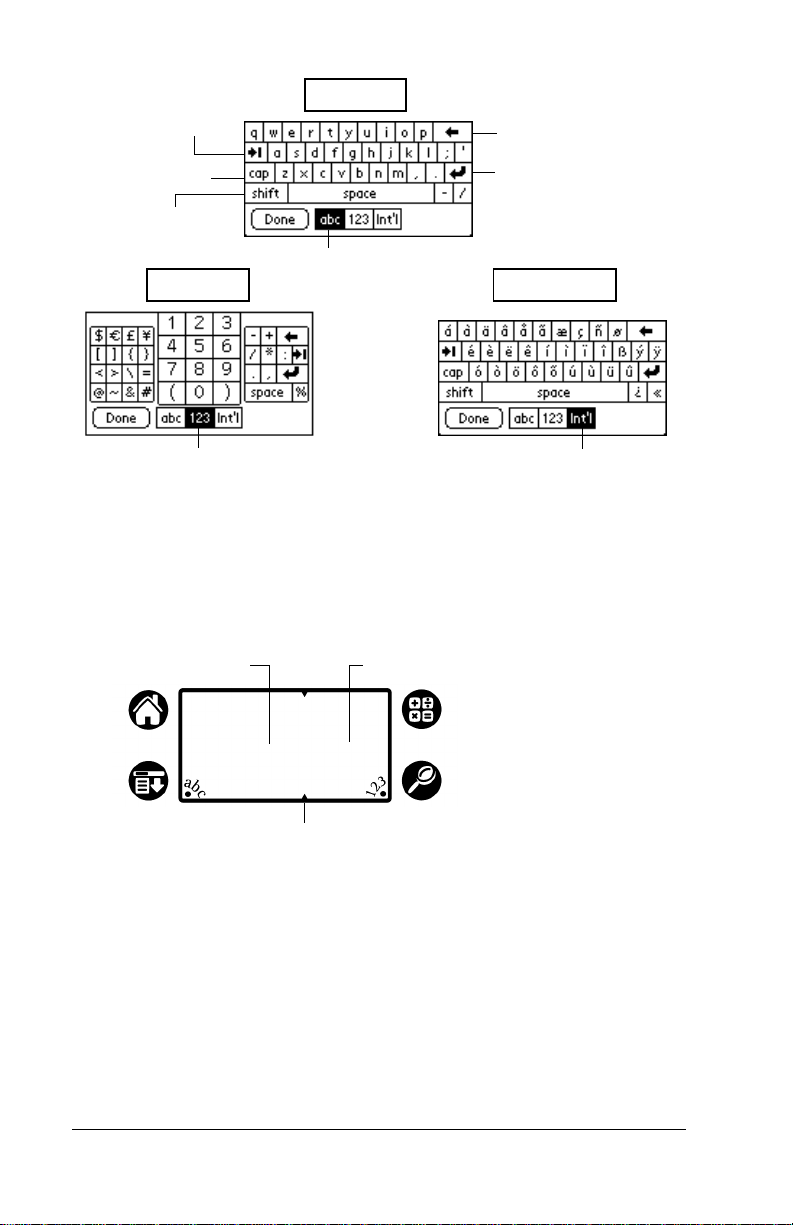
Tab
Alpha
Backspace
Caps lo ck
Caps shift
Numeric
Tap here to display
numeric keyboard
Tap here to display
alphabetic keyboard
Carria g e return
International
Tap here to displ a y
international keyboard
Graffiti writing
Your organ izer includes Graffiti writing software as the primary
system for enteri ng tex t and nu mbers. With Graff iti writi ng, you w rite
simple strok e s with the stylus an d they are instantly recognized as
letters or numb e rs.
Write le tters here Write number s here
Division marks
The Palm Desktop software CD-ROM includes Giraffe, a game you
can use to practice Graffiti writing. See “Installing and removing
applications” in Chapter 3 for installation instructions. The Memo Pad
application is ideal for practicing Graffiti writing. This section
explains how to open Memo Pad and use it to practice Graffiti writing.
Page 22 Introduction to Your Palm IIIc™ O rg an izer
Page 31

To open Memo Pad:
1. Press the Memo Pad application button .
2. Tap New.
Note:
A blinking cursor appears on the first line of the new
memo to indicate where new text will appear.
New
memo
cursor
Tap
New
Write in Graffiti area
See “Using Graffiti writi n g to ent e r data” in Chapter 2 for details.
Using Palm Desktop software
If you have new reco rds you want to add to your organizer and pref er
to use the computer keyboard rather than Graffiti writing or the
onscreen keyboard, enter the data in Palm Desktop software or the
PIM you have installed to use with your organizer.
After the i nformat ion is i n Palm Desktop softwar e, perfo rm a HotSy nc
operation to synchronize yo ur organizer with your computer. See
“Exchanging and updatin g data: HotSync operati ons” in Chapter 4 for
more information.
Chapter 1 Page 23
Page 32

Importing data
If you already have data in a database on your computer, you can
import it into Palm Desktop software. You can import data stored in
computer applications suc h as spreadsheets and databases, or f rom
another Palm Computing platfor m handheld. When you import d ata,
you transfer the records to your organizer without having to enter
them manually. See “Importing data” in Chapter 2 for more
informatio n.
External keybo a rd
You can connect an optional keyboard accessory to the serial
connector on your organize r so you can type dat a di rectly into y o u r
organizer. External keybo a rds are very helpful whe n you need to
enter larg e amounts of data quickly and accurately while you are
away from your computer.
Customizing yo ur organizer
You can customize your organizer by using the Preferences
application. You can enter personal information such as your name
and address; change the time and date; view different date and time
formats wh e n yo u tr avel; tu rn of f so u n d s; and configu re y o u r
organizer to work with a modem or network. See Chapter 7 for more
information on customi zing your organ izer.
To open the Preferences screens:
1. Tap the Applications icon .
2. Tap the Preferences icon .
3. Tap the category pick list in the upper-right corner of the screen.
4. Tap the Preferences category you want to view.
The following procedures for setting the time and date give you an
example of how to cu stomize your organizer.
You make changes to th e time and date in General preferenc e s.
Page 24 Introduction to Your Palm IIIc™ O rg an izer
Page 33

To set the current time:
1. Tap the Set Time box.
Tap here
2. Tap the up or down arrows to change the hour.
3. Tap each number of the minute, an d then t ap the arrows t o change
them.
4. Tap AM or PM.
Note:
Your organizer can also display time based on a 24-hour
clock. See “Formats preferences” in Chapter 7 for more
informatio n.
5. Tap OK.
To set the current date:
1. Tap the Set Date box.
2. Tap the arrows to se lect the cur rent year.
Tap arrows to select year
Tap to select month
Tap to select date
3. Tap a month.
4. Tap the current date.
Chapter 1 Page 25
Page 34

Page 26 Introduction to Your Palm IIIc™ O rg an izer
Page 35

Chapter 2
Enteri n g D a ta in Your
Palm IIIc
This chapter explains how to enter data into your Palm IIIc™
organizer by writing with the stylus in the Graffiti
using the onscreen keyboard, by using the computer keyboard, or by
importing data from anoth er appl ica tion .
Using Graffiti writing to enter data
Chapter 1 introduced Graffiti writing and briefly described how to use
it to enter text in your applications. In this section, you learn the
procedures for creating letters, numbers, punctuation, and symbols,
as we ll as so me Graff i ti tips an d tr i ck s .
Writing Graffiti characters
Most people find they can enter text quickly and accurately with only
minutes of practice. Graffiti writing includes any character yo u can
type on a stand ard keyboar d. The Gra ffiti stroke s closel y resemb le the
uppercase letters of the regular alphabet, which makes Graffiti writing
easy to learn .
™
Organizer
®
writing area, by
There are four basic concepts for success with Graffiti writing:
■
If you draw the character shape exactly as shown in the tables later
in this chapter (like the shapes shown in the following diagram),
you achieve 100% accuracy.
■
The heavy dot on each shape shows where to begin the stroke.
Certain characters have similar shapes, but different beginning
and end points. Always begin the stroke at the heavy dot (you
should not create the heavy dot; i t is only there to show you where
to begin the stroke).
Chapter 2 Page 27
Page 36

■
Most characters require only a single strok e . Whe n you lift the
stylus fr om the Graffiti writing area, your org a nizer recog nizes
and displays t he text character i mmedi ately. To accompli sh single
strokes, some Graffit i strokes are portions of the regular alphabe t
equivalents.
■
The Graffiti writing area is divided into two parts: one for writing
the letters of the alphabet and one for writin g numbers. The smal l
marks at the top an d bottom of the Graff iti writin g area indica te the
two areas.
Write le tters here Write number s here
Division marks
To write Graffiti letters:
1. Tap the screen where you want your text to go.
Note:
You need to tap above the Graffiti writin g area, and must
see a blinking cursor before you write the text.
2. Use the tables on the following pages to find the stroke shape for
the letter you want to creat e. For example, the stroke s hown below
creates the l e tt e r “ n .”
Note:
There are two different stroke shapes available for some
letters. For these letters, choose the one that’s easiest for
you.
Lift stylus
here
Start stroke
at heavy dot
As you’ll see l ater, you use th e same shape to creat e bo th the
uppercase and lowercase version of a letter.
3. Position t he st ylus i n the l eft- hand sid e of t he Gra ffi ti wr itin g ar ea.
Page 28 Entering Data in Your Palm IIIc™ Organizer
Page 37

4. Start your stroke at the heavy dot and draw the stroke shape as it
appears in the tables.
5. Lift the stylus from the screen at the end of the stroke shape.
That’s all th e re is to it! When you lift the stylus from the screen, you r
organizer recognizes your stroke immediately and prints the letter at
the insertion point on the screen.
As soon as you lift the stylus from the sc reen, you can begin the stroke
for the next character you want to write.
Important:
You must begin the character strokes in the Graffiti
writing ar e a . If you do not make Gr af fiti stroke s in the
Graffiti writing area, your organizer does not recognize
them as text characters.
Graf fiti ti ps
When using Graffiti writing, keep these tips in mind:
■
Accu ra cy improves whe n yo u wr ite large cha racte rs . Yo u should
draw strokes that nearly fill the Graffiti writing area.
■
To delete characters, simply set the insertion point to the right of
the character you want to dele te and make the backspac e stroke
(a line from right to left) in the Graffiti writing area.
■
Write at natural speed. Writing too slowly can generate
recognition errors.
■
Do not write on a slant. Vertical strokes should be parallel to the
sides of the Graffiti writin g are a.
■
Press firmly.
Chapter 2 Page 29
Page 38

The Graffiti alphabet
Letter Strokes Letter Strokes
AN
B
O
CP
D
Q
ER
F
G
S
T
HU
IV
JW
KX
LY
M
Z
Space Back Space
Carriage
Period
tap twice
Return
Page 30 Entering Data in Your Palm IIIc™ Organizer
Page 39

Writing capital letters
You make capit a l letters with the same strok e shapes as the basic
alphabet characters. T o make capital letters, you must first “shift” to
caps — just as you press the Sh ift key on a keyboard — and then write
the character strokes.
Note:
To draw the first letter of a word as a capital letter:
■
Graffiti writing includes a feature that automatically
capitalizes the first letter when you create a new sentence or a
new record (by tapping New or a blank line).
Use the Caps Shift stroke:
Caps
Shift
Tip:
When Caps Shift is active, an “up arrow” symbol appears
in the lower-right corner of the organizer screen. If you
accidentally activate Caps Shift, backspace will cancel it.
Caps Shift
To enter only capital letters (Caps Lock):
■
Use the Caps Lock stroke:
Caps
Lock
Tip:
When Caps Lock is active, an underlined “up arrow”
symbol appears in the lower-right corner of the organizer
screen. To return to lowercase, make the Caps Shift
stroke.
Caps Loc k
Writing numbers
Writing numbers with Gra ffiti writi ng is similar to writing letters of
the alphabet, except that you make the character strokes on the righthand side (nu mbers side) of the Graffiti wr iting area.
Chapter 2 Page 31
Page 40

Graffiti numbers
Number Strokes Number Strokes
0
5
1
27
38
4
6
9
Writin g punctuat io n ma rk s
Graffiti wr i ting c an cre ate an y punc tuat ion sym bol th at you can ente r
from a standard ke yboar d. All p unctuat ion marks b egin with a sin gle
tap on the Graffiti writing area. When you make this tap, you activate
Punctuation Shift and a dot appears to show it is active. The next
stroke you make with the stylus creates a punctuation mark.
Punctuati on shi ft
Note:
When Punctuation Shift is active, you can make a symbol
stroke anywhere in the Graff iti writing area (the let te rs or
numbers side ) .
Page 32 Entering Data in Your Palm IIIc™ Organizer
Page 41

Symbol Stroke Symbol Stroke
Period
.
Dash
—
Comma
,
Apostrophe
'
Question
?
Exclamation
!
Left Paren
(
Right Paren
)
Slash
/
Dollar
$
Additional Graffiti punctuation
@ # % ^ & * < > + = |
\ { } [ ] ~ ` ; : " tab
—
Writing symbols and extended characters
All symbols and exte nded characte rs begin with th e stroke in the
Graffiti writing area of yo ur organizer:
Symbol
Shift
When the Symbol Shift is active, a slanted shift symbol appears in the
lower-r ight corner of th e screen. The next str oke that you make crea tes
the symbol or extended char acter.
Symbol Sh i f t
Chapter 2 Page 33
Page 42

•
,
,
,
,
,
,
°
+
—
X
==c
:
!
ƒ
Y
∅
?
Writing accented characters
To create accented characters, draw the stroke normally used to creat e
the letter, followed by an accent stroke. Graffiti writing then adds the
accent to the l e tter.
For example, the following diagram shows the strokes required to
draw an accented “e.”
= e
Accent strokes
a a a a a a
Using these accent strokes, you can write the following accented
letters:
à á â ã ä å è é ê ì í î ï ò ó ô õ ö ù ú û ü ÿ ý ñ
Additional non-English characters
You can write the following characters without any special
punctuation or sh ifting:
c
a
e
Note:
Page 34 Entering Data in Your Palm IIIc™ Organizer
You must wri te these non- Engl ish char acte rs i n t h e le ft side of
the Graffiti writing area.
Page 43

Navigation strokes
In addition to character symbols, Graffiti writing includes special
stro k es that you ca n u s e to navigat e wi t h in te x t or field s i n y our
applications.
Command Stroke
Move cursor right
Move cursor left
Previous field
(Address Book only)
Next Fiel d
(Address Book only)
Open Address Record
(Address Book only)
Graffiti ShortCuts
Graffiti ShortCuts make e ntering commonly used words or phrases
quick and easy. ShortCuts are similar to the Glossary or Autotext
features of some word processors.
Graffiti writing comes with several predefined ShortCuts, and you can
also create your ow n. Each Sh ortCut c an re present u p to 45 c haracters.
For example, you might create a ShortCut for your name, or for the
header of a memo. See “ShortCuts preferences” in Chapter 7 to learn
about creating your own ShortCuts.
To use a ShortC ut, draw t he Short Cut stroke follo wed by the Sh ortCut
character s. Wh en yo u draw th e Shor tCu t st roke , t he Sho rtCut s ymb ol
appears at the insertion point to show th at you ar e i n ShortC ut mo de.
ShortCut
Chapter 2 Page 35
Page 44

Your organizer includes the following predefined Graffiti ShortCuts:
Entry ShortCut
Date st a mp
Time stamp
Date / time stamp
Meeting
Breakfast
Lunch
Dinner
ds
ts
dts
me
br
lu
di
Using the onscreen keyboard
You can open the onscreen keyboard anytime you need to enter text
or numbers on your organizer. Note that you cannot enter Graffiti
characte rs while using the onscreen keyboard.
To use the onscreen keyboard:
1. Open any application (such as Memo Pad).
2. Tap any record, or tap New.
3. Tap “abc” to open the alphabetic keyboard, or tap “123” to open
the numeric keyboard.
Tap here for alpha
keyboard
Tap here for numeric
keyboard
4. Tap the characters to enter text and numbers.
Note:
The onscreen keyboard also includes a dialog box for
international characters. You can switch among the three
dialogs at any time to enter the exac t te xt you need.
5. After you finish, tap Done to close the onscreen keyboard and
place the text in the record.
Page 36 Entering Data in Your Palm IIIc™ Organizer
Page 45

Using your compu ter keyboard
If you have a lot of data to enter, or prefer to use th e computer
keyboard, you can use Palm™ Desktop software or any supported
PIM to enter information. You can then perform a HotSync
®
operation
to synchronize the information on your computer with the
information on your organiz er. All the main applica tio ns on your
organizer are also avail able in Palm Desktop software and in most
PIMs, so you don’t need to learn different applications.
Refer to Palm Desktop online Help for more information on entering
data on your com puter.
Importing data
If you have d ata stor ed in com puter ap plicatio ns such as s preadsh eets
and databases, or if you want to import data from another organizer,
you can transfe r the data to your org anizer with out havi ng to key it in
manually. Save the data in one of the file formats listed below, import
it into Palm Desktop software, and then perfor m a HotSync operat ion
to transfer the data to your organizer.
Palm Desktop software can import data in the following fi le formats:
■
Comma delim ited (.cs v, .txt) : Addres s Book an d M em o Pad on ly
■
Tab delimi te d (.tab, .tsv, .txt): Address Book and Memo Pad onl y
■
CSV (Lotus Organi ze r 2.x/97 Mapping): Address Book only
■
Date Book archive (.dba)
■
Address Book archive (.aba)
■
To Do archive (.tda)
■
Memo Pad archive (.mpa)
Archive formats can only be used with Pal m D e sktop softw a re . Use
the archive file formats to share information with other people who
use a Palm Computing
®
platform handheld or to create a copy of your
important Palm Desktop information.
To import data:
1. Open Palm Desktop software.
2. Click the application into which you want to import data.
3. If you are importing records that contain a field with cat e g ory
names, do the f ollowing:
Chapter 2 Page 37
Page 46

Select All in the Category b ox.
Be sure that the same categories that appear i n the imported file
also exist in the applicat ion. If the ca tegori es do not exist, create
them now; otherwise, the records are imported into the Unfiled
catego ry.
4. From the File menu, choose Import.
5. Select the file you want to import .
6. Click Open.
7. To import data into the correct Palm Desktop field s, drag fields in
the left-hand column so that they are opposite the corresponding
imported field on the right.
8. If you do not wa nt to im port a fie ld , desel ec t the c he ck box for that
field.
9. Click OK.
The imported data is highlighted in the application.
10.To add the imported data to your organizer, perform a HotSync
operation.
See Palm Desktop online Help for more information on importing and
exporting data.
Page 38 Entering Data in Your Palm IIIc™ Organizer
Page 47

Chapter 3
Managing Your Applications
This chapter explains how to switch between applications on your
Palm IIIc™ organize r, how to chang e applic ation settin gs so they are
personalized to your work methods, and how to categorize
applications so you view them in related groups.
Using the Applications Launcher
To open the Applications Launcher, tap the Applications icon .
Selecting applications
Your organizer is equipp ed with a varie ty of applicatio ns. All the
applications installed on your organizer appear in the Applications
Launcher. See “Opening applicatio ns ” in Chapter 1 for details.
Switching between applications
When working in any application, tap the Applications icon or
press an application button on the fron t panel of your organize r to
switch to another applic ation. Your org a nizer automati cally saves
your work in the current application and displays it when you return
to that application.
Categorizing applications
The category feature enables you to manage the number of application
icons that appear onscreen in the Applications Launcher. You can
assign an application to a category and then display a single cat egory
or all your applications.
Chapter 3 Page 39
Page 48

To categorize an application:
1. Tap the Applications icon .
2. Tap the Menu icon .
3. Tap App, and then tap Category.
4. Tap the pick list next to each application to select a category.
Tip:
5. Tap Done.
To display applications by category:
1. Tap the Applications icon .
2. Do one of the following:
To create a new category, tap Edit Categories from the
pick list. Tap New, enter the category name, and then tap
OK to add the category . Tap OK.
Tap the Applications icon repeatedly to cycle through all your
categories.
Tap the pick list in the upper-right corner of the screen and
selec t the ca tegor y y ou w ant to display .
Changing the Applications Launcher display
By default, the Applications L auncher dis plays each applicat ion as an
icon. As an alternative, you can choose to show a list of applications.
You can also choose to view the sa me category of applications e a ch
time you open the Applications Launcher.
Page 40 Managing Your Applications
Page 49

To change the Applications Launcher display:
1. Tap the Applications icon .
2. Tap the Menu icon .
3. Tap Options, and then tap Preferences.
4. Tap the View By pick list and select List.
5. Tap OK.
To open the Applications Launcher to the last opened category:
1. Tap the Applications icon .
2. Tap the Menu icon .
3. Tap Options, and then tap Preferences.
4. Tap the Remembe r Last Category chec k box to select it.
5. Tap OK.
Choosing preferences
You can set opti ons that affect an entire application in the
application’s Preferences dialog box.
To change preferences for an application:
1. Open an application.
2. Tap the Menu icon .
3. Tap Options, and then tap Preferences.
Note:
4. M ake changes to th e se t t i n gs.
5. Tap OK.
Chapter 3 Page 41
Not all applications have a Preferences command.
Page 50

Installing and removi ng applicatio ns
This section explains how to install and remove applications on your
organizer and how to remove Palm™ Desk top software f rom your
computer .
Installing add-on applications
Your organizer comes with the Date Book, Addr ess Book, To Do List,
Memo Pad, Expense, Calculator, and Mail applications installed and
ready to use.
You can also install addi tional appli cations on your o rganizer, such as
games and other software. The Install Tool makes it easy to install
®
software on your org ani zer du rin g a HotSync
variety of third-party applications available for your organizer. To
learn more about these applications, go to the web site:
http://www.palm.com.
Note:
To install add-on software on your organizer:
1. On your computer, copy or download the application you want to
Any game or application that you install on your organizer
resides in RAM mem ory; you can del e te them at any time.
install into the add-on folde r in your Palm Desk top direc tor y on
your computer.
operation. There are a
Note:
2. Double-click the Palm Desktop icon on your desktop.
Page 42 Managing Your Applications
If the software you download is compressed, you need to
decompress i t into this folder. If you prefer to place t he
application into another folder, you need to navigate to
that folder before you complete step 5.
Page 51

3. Click Install.
Tip:
You can also access the Install Tool di alog by selecting
Install Too l from t he Palm Des ktop p rogr am group o r by
double-clicking any file w ith a PRC, PDB, or PNC fil e
extension.
Chapter 3 Page 43
Page 52

4. In the User drop- down list, se lect the name that corresp onds to
your or ga ni z er.
5. Click Add.
6. Select the app licat ion( s) th at yo u want to inst all on your or ganizer .
7. Click Open.
Note:
Review the list of applications you selected in the Install
Tool dialog box. If you do not want to install an
application, select it, and then click Remove. (This does
not remove the application from your computer; it simply
removes it from the list of applications to install.)
8. Perform a HotSync operation to install the application(s) you
selected in step 6. See “Exchanging and updating data: HotSync
operations ” in Chapt er 4 for details.
Installing games
The CD-ROM also i nc lude s g am es t hat you can ins tall wi t h the Inst al l
Tool, such as Giraffe. Giraffe is a fun, easy way for you to practice
Graffiti
After you install and start a game, the instructi ons appear in the Game
menu. Depending on the game, the Game menu may also contain
commands to show high scores, to start a new game, or to set
preferences for the game.
®
writing.
Page 44 Managing Your Applications
Page 53

Removing applications
In the event that you run out of memory or decide that you no longer
need an application you installed, you can remove applications from
your organizer. You can remove only add-on applications, patches,
and extensions that you install; you cannot remove the applications
that reside in the ROM portion of your organizer.
To remove an add-on application:
1. Tap the App licatio ns icon .
2. Tap the Menu icon .
3. Tap App, and then tap Delete.
4. Tap the application that you want to rem ove.
5. Tap Delete.
6. Tap Yes.
7. Tap Done.
Removing Palm Desktop software
If you no longe r want to use Pa lm Desktop softwa re, you can remove
it from your computer.
To remove Palm Desktop software:
1. From the Windows Start menu, choose Settings, and t hen Control
Panel.
2. Double-cl ick the Add/Re move Programs ic on.
3. On the Install/Uninstall tab, select Palm Desktop software.
4. Click Add/Remove.
Note:
Chapter 3 Page 45
You need to in stall the Hot Sync Manage r from the installa tion
CD if you want to synchronize data with another PIM.
Page 54

Security
Your organizer comes with a Securi ty application so that
unauthorize d users cannot view the entr ies you wish to protect.
In Security, you can do the following:
■
Lock and tu rn off your organizer so that it does n ot op erate until
you enter the correct password.
■
Mask all records that you mark as private so the information
appears greyed out.
■
Hide all records that you mark as priv ate so they do n ot appear on
any screen.
You can mask and hide private records with or without a password.
Without a password, private records are hidden or masked until you
set the Securi ty appli cation to show them . With a pass word, you mus t
enter the password to view the private entries. See “Making records
private” in Chapte r 4 for inform a tion on making rec ords privat e.
Assigning a password
You can assign a password to protec t your pri vate records and to lock
your organizer.
To assign a password:
1. Tap the Applications icon .
2. Tap the Securi ty icon.
3. Tap the Password b ox.
4. Enter a password.
Tap here
5. Tap OK.
6. Enter the
Page 46 Managing Your Applications
same
password a second time, and tap OK.
Page 55

Changing or deleting a password
Once you define a password for your organizer, you can change or
delete it at any ti me. You must e nter the cur rent pas swor d before you
can chang e or delete it .
To change or delete your password:
1. Tap the Password box.
2. Enter the current password.
Tap here
3. Tap OK.
4. Do one of the fo l lowing :
To change the password, enter the new password, and tap OK.
To delete the password, tap Delete.
Locking your organizer
You ca n als o l o ck y o u r organizer so tha t yo u ne e d to enter yo u r
password to operate it.
Important:
Chapter 3 Page 47
If you lo ck y o u r or g a ni z e r, yo u must ente r the exac t
password to re-activate your organizer. If you forget the
password, you must perf orm a hard reset to res ume using
your organizer. Performing a hard reset deletes all the
records in your organizer; however, you can restore all
synchronized data at the next HotSy nc operation. See
“Resetting your organizer” in Appendix A for more
information.
Page 56

To lock your organizer with a password:
1. Perform a HotSync operation to synchronize the data between
your organizer and your computer. See “Exchanging and updating
data: HotSync operations” in Chapter 4 for informati on on
synchronizing your data.
2. Assign a password.
3. Tap Lock & Turn Off .
Tap Lo ck
and Turn
Off
4. Tap Off & Lock.
5. To start your org anizer, turn it on and then enter the passwor d.
Recovering from a forgotten password
If you did not activate the Off & Lock feature and you forget your
password, you can delete the pas sword fro m your organizer . Dele ting
a forgotten password also deletes all entries and files marked as
Private.
Important:
If you syn chronize with your computer b e f o re deleting a
forgotten passw or d, you r or ganize r r est ores your pri vate
entr i es the nex t time you p e rf o rm a Ho tSync o p e ra tion,
but it does not restore the password.
To delete a forgotten password:
1. Tap Lost Password.
2. Tap Yes.
Page 48 Managing Your Applications
Page 57

Chapter 4
Using Your Basic Applications
Your Palm IIIc™ organizer includes these basic applications:
■
Date Book
■
Addres s Book
■
To Do List
■
Memo Pad
■
Calculator
■
Expense
This chapter is divided into three sections:
■
“Overview of basic applications” briefly describes each application
and explains how to open it.
■
“Common tasks” g ives instructions on how to do tasks that you
can do in most or all of the basic applications. It’s easy to transfe r
what you learn in one application to the others because the
structure and behavior of all the applications are quite similar.
■
“Application-specific tasks” is organized by application and gives
instruct ions on how to d o tasks that are specif ic to each appl icati on.
Chapter 4 Page 49
Page 58

Overview of basic applic ations
Date Book
Date Book lets you quickly and easily schedule appointments
or any kind of activity associated with a time and date.
In Date Book, you can do the following:
■
Enter a description of your appointmen t and assign it to a specif ic
time an d date.
■
Display a chart of your appoi ntments for an entire week. T he Week
View makes it easy to spot available times and any potential
scheduling overlaps or conflicts.
■
Display a monthly calendar to quickly spot days where you have
morning, lunch, or afternoon appointments.
■
Display an agenda showing appoin tme nts, untimed events, and
your To Do items for the day.
■
Set an alarm to sound prior to the scheduled act ivity.
■
Create reminders for events that are based on a particular date,
rather than time of day. Birth days an d anniversaries are easy to
track with you r organizer .
■
Attach notes to individual events for a description or clarification
of the entry in your D ate Book.
To open Date Book:
■
Press the Date Book application button on the front panel of your
organizer. D ate Book opens to today ’s schedule.
Date Bo ok button
Note:
Press the Date Book application button repeatedly to cycle
through the Day, Week, Month and Agenda views.
Page 50 Using Your Basic Applications
Page 59

Address Book
Address Book enab les you to keep names, addresses, phone
numbers, and ot her informati on about your person a l or
business co ntacts.
In Address Book, you can do the following:
■
Quickly lo ok up or enter names, addresses, phone numbers , and
other information.
■
Enter up to five phone numbers (home, work, fax, car, etc.) or
e-mail addresses for each name.
■
Define which phone number appears in the Address list for each
Address Book entry.
■
Attach a note to each Address Book entry, in which you can enter
additional infor mati on about the entry.
■
Assign Addre ss Book e ntries t o categ ories s o that y ou can or ganiz e
and view them in logical groups .
To open Address Book:
■
Press the Addr e ss Book application button on the front panel of
your organizer. Address Book op e ns to display the l ist of all your
records.
Addr e s s Book bu tton
Note:
Press the Address Book application button repeatedly to cycle
through th e categori es in which you have records.
Chapter 4 Page 51
Page 60

To Do List
To Do List is a convenient place to create reminders and
prioriti ze the thing s that you have to do.
In To Do List, you can do the following:
■
Make a quick and convenient list of things to do.
■
Assign a priori ty level to each ta sk.
■
Assign a due date for any or all of your To Do List items.
■
Assign To Do List it ems to c ateg ori es so th at you ca n organ ize an d
view them in logical groups.
■
Sort your To Do List items either by due date, priority level, or
category.
■
Attach notes to individual To Do Li st items for a description or
clarification of the task.
To open To Do List:
■
Press the To Do List application button on the front panel of your
organizer. To Do List opens to dis p lay the category of items you
last viewed.
To Do List button
Note:
Press the To Do List application button repeatedly to cycle
through the categories in which you have items.
Page 52 Using Your Basic Applications
Page 61

Memo Pad
Memo Pad provides a plac e to take notes that ar e not associat ed
with records in Date Book, Ad dress Book, or To Do List.
In Memo Pad, you can do the following:
■
Take notes or write any kind of me ssage on your orga nizer.
■
Drag and drop memos into popular computer applications like
Micr os oft Word when y o u sy nchronize us i ng P al m ™ D e sktop
software and Hot Sync
■
Assign memos to categories so that you can organize and view
them in logical groups.
■
Write down phone numbers and other types of information. Later,
you can copy and paste this information to othe r applic atio ns.
To open Memo Pad:
■
Press the Me mo Pad applic ation button on the front panel of your
organizer. Memo Pad opens to display the last Memo Pad screen
that you viewed.
®
technolog y.
Memo P a d button
Note:
Press the Memo Pad application button repeatedly to cycle
through th e categori es in which you have memos.
Calculator
Calculator enables you to perform addition , subtraction,
multiplicatio n, and div is ion.
In Calculator, you can do the following:
■
Perform basic calculations.
■
Store and retrieve values.
■
Display the last series of calculations, which is useful for
confirming a series of “chain ” calculations.
Chapter 4 Page 53
Page 62

To open Calculator:
■
Tap the Calculator icon next to the Graffiti® writing area.
Expense
Expense lets you keep track of your expenses and then t ransfer
the information to a spreadsheet on your computer.
In Expense, you can do the following:
■
Record dates, types of expenses, amount spent, payment method,
and other detail s associated with any money that you sp e nd.
■
Assign expens e items to categori e s so that you can organize and
view them in logical groups.
■
Keep track of vendors (companies) and peo ple involved wi th each
particular expense.
■
Log miles traveled for a particular date or expense category.
■
Sort your expenses by date or expense type.
■
Transfer your ex p e nse information to a Microsoft Excel
spreadsheet ( version 5.0 or la te r) on your computer . (Microsoft
Excel is
not
included in the Palm IIIc organizer package.)
To open Expens e:
1. Tap the Applications icon .
2. Tap the Expense icon .
Page 54 Using Your Basic Applications
Page 63

Common tasks
The tasks described in this section use the term “records” to refer to an
individual item in any of the basic applications: a single Date Book
event, Address Book entry, To Do List item, Memo Pad memo, or
Expense item.
Creating records
You can use the following procedure to create a new record in Date
Book, A ddress Book, To Do List, Memo Pad, and Expense.
To create a record:
1. Select the application in which you want to create a record.
2. Tap New.
3. In Date Book only: Select start an d end times for your appoi ntment
and tap OK.
4. Enter text for the record.
5. (Optional) Tap Details to select attributes for the record.
6. In Addr ess Boo k a nd Me m o Pad o nly: Ta p Do ne.
There’s no need to save the rec ord because your organizer saves it
automatical ly.
Editing records
After you create a record, you can change, delete, or enter new text at
any time. Two screen features tell you when your organizer is in editing
mode:
■
A blinking cursor
■
One or more edit lines
Blinking cursor
Edit line
Chapter 4 Page 55
Page 64

Entering text
For information on how to enter text using Graffiti writing, the
onscreen keyboard, or the keyboard attached to your compu te r, see
Chapter 2.
Edit menu
The Edit menu is available with any screen where you enter or edit
text. In general, commands available in the Edit menu apply to text
that you
To select text in an application:
select
in an application.
1. Tap the beginni ng of the text that you wan t to select.
2. Drag the stylus ove r the text to high light it (in black).
Note:
You can also doub le tap to select a word, or tripl e tap to
select a line of text.
You can also drag
words, or drag
across
the text to select additional
down
to select a group of lines.
The following commands may appear in an Edit menu:
Undo
Reverses the action of the
last edi t
command. For
example, if you used Cut to remove text, Undo
restores the text you removed. Undo also
reverse s de letions don e by using back space.
Cut
Removes the selected text and stores it
temporarily in the memory of your organizer.
You can paste t he text y ou cut int o anoth er area
of the current application or into a different
application.
Copy
Copies the selected text and stores it
temporarily in the memory of your organizer.
You can paste the text that you copy into
another ar e a of the current applicatio n or into a
different application.
Paste
Inserts th e te xt that you cut or cop ied at the
selected point in a record. The text you paste
replaces any selected text. If you did not
previously cut or copy text, Paste does nothing.
Page 56 Using Your Basic Applications
Page 65

Select All
Selects all of the text in th e cu rrent record or
screen. This enables you to cut or copy all of t he
text and paste it elsewhere.
Keyboard
Opens the onscreen keyboard. When you finish
with the onscreen keyboard, tap Don e .
Graffiti Help
Opens screens that show all the Graffiti
chara ct e r st ro k e s . Us e thi s com mand an y t ime
you forget a stroke for a character.
Dele ting records
To delete a record in any of the basic applications:
1. Select the record you want to delete.
2. Tap the Menu icon .
3. Tap Record, and then tap the Delete command:
Date Book: Delete Event
Address Book: Delete Address
To Do List: Delete Item
Memo Pad: Delete Memo
Expense: Dele te Item
A confirmation dialog box appears. If you want to save a copy of the
deleted it em to an ar chive file i n Palm Desk top soft ware, be sure th at the
check box is checked. If you don’t want to save a copy, tap the check box
to remo ve the check .
4. Tap OK.
If you choose to sa ve a cop y of the selec ted item, you r or ganize r t ransf e rs it
to the archive file on your desktop the next time you perform a HotSync
operation.
Other ways to delete records
You ca n als o de l e t e re co rds in the f ollowing way s:
■
In the Details dialog box of the application, tap Delete, and then tap OK.
■
Delet e th e te x t of th e re c ord.
Note:
In Date Book, you can choose to delete the text of the current
repeating event, current and future events, or all instances of
that event.
Chapter 4 Page 57
Page 66

Purging records
Over time, as you use Date Book, To Do List, and Expense, you’ll
accumulate records in these applications that have outlived t heir
usefulness. For example, events that occurred months ago remain in
the Date Book, an d To Do List items that you marked as completed
remain in the list, as do Expense items.
All these ou tdated records take u p memory on your organizer, so it’s
a good i dea to r emov e t he m by usi ng Purg e. If you thi nk D ate Book or
To Do Li st re cor ds mig ht p rov e u sefu l l a ter , yo u ca n purg e t he m fr om
your organizer and save them in an archive file.
Purging is also available in Mail. See Chapter 5 for more information.
Purging is not availa ble in Addr e ss Book or Me mo Pa d, so delet e
outdated records from thes e ap p lication s.
To purge records:
1. Open the application.
2. Tap the Menu icon .
3. Tap Record, and then tap Purge.
A confirmation dialog box appears.
Date Book
to be purged. Purge deletes r epeating events if the last of the series ends before the date that you purge records.
Date Book, To Do List
records to an archive file on your desktop, be sure that the check
box is checked. If you don’t want to save a copy, tap the check
box to re m o ve th e ch e c k box.
4. Tap OK.
If you chose to save a copy of the purged records, your organizer
transfers them to an archive file on your desktop the next time you
perform a HotSync operation.
Note:
Purging does not happen automatically. You must tap the
command to make it happen.
: Tap the pick list and select how old a record must be
: If you want to save a copy of the purged
Exchanging and updating data: HotSync operations
The HotSync process automatic ally sy nchronize s — that i s, exch anges
and updates — data be twe e n your organiz e r and Palm Desktop
software. Changes you make on your organizer or Palm Desktop
Page 58 Using Your Basic Applications
Page 67

software appear in both places after a HotSync operation. HotSync
technolo gy synchroniz e s only the neede d po rtions of fi les, thus
reducing synchron izatio n time.
You can synchronize your data either direc tly or indirect ly. Direct
methods inc lude pl acing y our organ izer in th e cradl e attach ed to your
computer, or using infrared communications. Indirect methods
include using a modem, or via a network us ing the network HotSync
technology. See Chapter 6 for information about performing HotSync
operations via a modem, network, or IR port.
Performing a HotSync operation for the first time
The first time you synchronize your data, you need to enter user
information on both the organizer and Palm Desktop software. After
you enter this information and synchronize, the HotSync Manager
recognizes your organizer and doesn’t ask for this information again.
If you are a System Administrator preparing several connected
organizers for a group of users, you may want to create a user profile.
See “Creating a user profile” in Chapter 6 before performing the
following steps.
Important:
You must perform your
first
HotSync oper ation with a
local , direct co nnection, rather than using a modem.
The following steps assume that you have already installed the Palm
Desktop software. If you have not installed this software, see
“Insta lling Palm Desk to p so f tw a re ” in Cha p t e r 1 fo r in st ruction s.
To perform a local HotSync operation:
1. Insert your organizer into the cradle.
Tip:
The bottom edge of the organizer should align smoothly
with the cradle when it is inserted properly.
Chapter 4 Page 59
Page 68

2. If the HotSync Manager is not ru nning, star t it: On the Windo ws
desktop, click Start, and then choose Programs. Navigate to the
Palm Desktop software program group and choose HotS y nc
Manager. Alt ernatively, you can start the Palm Desktop software
which automatically opens the HotSync Manager.
3. Press the HotSync button
Important:
The first time you perform a HotSync operation, you
on the cradle.
must enter a user name in the New User dialog box and
click OK. Every organizer should have a unique name. To
prevent loss of a user’s records, never try to synchroni ze
more than one organizer to the same user name.
The HotSync Progress dialog box appears and synchroni zation
begins.
4. Wait for a mes sage on y our o rgan izer in dicati ng tha t the pr oce ss i s
complete.
After the HotSync process is complete, you can remove your
organizer from the cradle.
Page 60 Using Your Basic Applications
Page 69

Categorizing records
Categorize records in the Ad dress Book, To D o Li st, Memo Pad, and
Expense applications so that they are grouped logically and are easy
to review. ( You can also categor ize applications. See “Using the
Applicatio ns Laun cher ” in Chapt er 3 f or more inf o rma tion. )
When you create a record, your organizer automatically places it in
the category that is currently displayed. If the category is All, your
organizer assigns it to the Unfiled category. You can leave an entry as
Unfiled or assign it to a category at any time.
System-defined and user-defined categories
By default, your organizer includes system-de fined categori es, such as
All and Unfiled, and user-defined categories, such as Business and
Personal.
You cannot modify the system-defined categories, but you can
rename and delete the user-defined categories. In addition, you can
create your own user-defined categories. Yo u can have a maximum of
15 user-defined categories in each application.
Address Book contains the QuickList user-defined category, in which
you can store the names, addresses, and phone numbers you might
need in emergencies (doctor, fire department, lawyer, etc.).
Expense contains two user-defined categor ies, New York and Paris, to
show how you might sort your expenses accordi ng to different
business trips.
Note:
The illustrations in this section come from Address B ook, but
you can use these procedures in all the applications in which
categories are available.
To move a record into a category:
1. Se le ct the rec ord you wa nt to categorize.
2. In Addre ss Book on ly: Tap Ed it.
3. Tap Details.
4. Tap the Category pick list to display the list of available categories.
Chapter 4 Page 61
Page 70

5. Se le c t the categ o ry f or the re co rd.
6. Tap OK.
Note:
In Addre s s Edit and Memo y o u ca n tap the category name in
the upper-right corner of the screen and select a new category
for the item.
To display a category of records:
1. Tap the category pick list in the upper-right corner of the list
screen.
Tap here
Note:
In the Date Book Agenda view, the pick list is in t he upper
right of the To D o li st.
2. Select the category you want to view.
The lis t screen now displays only the re cords assigne d to that
catego ry.
Tip:
Pressing an application button on the front panel of the
organizer toggles throu gh all the categories of that
application.
Page 62 Using Your Basic Applications
Page 71

To define a new category:
1. Tap the category pick list in the upper-ri ght corner of t he screen or
list.
Tap here
2. Tap Edit Categories.
3. Tap New.
4. E nte r the nam e of th e ne w categ o ry , and then ta p OK .
5. Tap OK.
You can assign any of your records to the new category.
Chapter 4 Page 63
Page 72

To rename a category:
1. Tap the category pick list in the upper-right corner of the screen o r list.
2. Tap Edit Categ o ries.
3. Select the category that you want to rename, and then tap Rename.
4. Enter the new na me f o r the catego ry, and then tap OK.
5. Tap OK.
Tip:
You can group the records in two or more categories into one
category by giving the categories the same name. For example, if
you change the name of the Personal cate gory to Business, all
records formerly in the Personal category appear in the Business
catego ry.
Finding records
Your organizer offers se veral ways to find info rmation quickly:
■ All applications
with the current application.
■ Date Book , To Do List , Mem o Pad
screen and lets you add the information that appears in this list to a
record.
■ Address Book
to scroll imme diately to that name.
■ Expense
data in the Company field. You can add th e se names to a list of
attendees as sociated with an Exp e nse record.
Page 64 Using Your Basic Applications
: Find locates any text that you specify, always starting
: Phone Lookup displays the Address list
: The Look Up line lets yo u enter the fi rst l etters of a name
: Lookup displays the names in your Address Book that have
Page 73

Looking up Address Book records
When working with Address Book, the scrol l button on the front pane l
of the organizer makes it easy to naviga te among your address e ntries.
■
In the Address list scre e n, the scro ll button moves up or down an
entire screen of records. If you hold down the scroll button, you
accelerate the scrolling and display every third screen.
■
In the Addres s view screen, the scroll butto n moves to the prev ious
or next address record.
You can also use the Address list Look Up feature to qui ck ly scroll to
any of your Address Book entries.
To look up an Address Book record:
1. Display the Addr ess list scree n.
2. E n te r th e first le tt e r of th e name yo u wa n t to f i nd .
Look Up line
The li st scrolls to the first entr y th a t be g ins with that letter. If
you write another letter, the list scroll s to the first entry that
starts with those
two
letters. For example, writing an “s” scrolls
to “Sands,” and writ ing “sm” scrolls further to “Smith.” If you
sort the li st b y company name, the Look Up feature scrolls to
the firs t letter of the company name.
3. Tap the record to view its contents.
Chapter 4 Page 65
Page 74

Using Find
You can use Find to locate any text that you specify, in any
application.
To use Find:
1. Tap the Find icon .
Tip:
If you select text in an applicat ion before you tap Find, the
selected text automatically appears in the Find dialog box.
2. Enter the text that you want to fin d.
Find is
not
case-sen sitive. For example, searching for th e name
“davidson” also finds “Davi dson.”
Find locat e s any words that begin with the text you enter. For
example, searching for “plane” finds “pl an e t,” but not “airplane.”
3. Tap OK.
Find se a r ch e s for the text in al l re co rds and al l no t e s.
As your organi zer se arch es f or th e tex t, y ou c an tap St op at any
time. You may want to do this if the entry you want appears before your organizer finishes the search. To con tinue the sear ch
after you tap Stop, tap Find More.
4. Tap the text that y ou want to review.
Using Phone Lookup
Phone Lookup displays the Address list screen and lets you add the
information that appears in this list to a record.
Page 66 Using Your Basic Applications
Page 75

To use Phone Lookup:
1. Display the record in which you want to insert a phone number .
The record can be in Date Book, To Do List, or Memo Pad .
2. Tap the Menu icon .
3. Tap Options, and then tap Phone Lookup .
4. Begin to spel l the last name of the name you want to find.
The li st scrolls to the first record in the li s t th a t sta rts wit h th e
first le tte r y ou en ter . Co nti nue to s pel l the name yo u’r e look in g
for, or when you see the name, tap it.
5. Tap Add.
The name you selected, along with the other i nformation associated
with it, is pasted into the record you selected in step 1.
Phone Lookup tips
Write the Gr affiti Command stroke “/L” to act ivate the P hone Lookup
feature. You ca n a l so ac ti v a te i t in th e f ollowi ng circ um s t a n ce s :
■ While enteri ng text
: For example, to insert the full name and phone
number for someone with the last name “Williams,” write the
Graffiti c haract ers for “Wi” an d then th e Phone Lo okup Comman d
stroke “/L.”
Assuming you have only one Address Book record that begins
with “Wi,” your organizer inserts the full name “Fred Williams”
(and its associated information). If you have mor e than one name
that begins with “Wi,” the Phone Lookup screen appears and
highlig hts the first record that b e gins with “Wi .”
■ For selected text
: Drag to highlight the text, and then write the Phone
Lookup Command stroke “/L.” Your organizer replaces the
selected text and adds the name and its associated information.
Chapter 4 Page 67
Page 76

Looking up names to add to expense records
In Expense, Looku p di splays the names in your Address Book that
have data in the Com p any field. You can add these names to a list of
attendees as sociated with an Exp e nse record.
To add names to an Expense record:
1. Tap the Expense record to which you want to a dd names.
2. Tap Details.
3. Tap Who.
Tap here
4. Tap Lookup.
The Attendees Lookup screen displ ays all the names i n you r
Address Book that have data in the Company field.
5. Select the name you want to add, and then tap Add.
The name appears in the Attendees screen.
6. Repeat steps 4 and 5 to add more names.
7. Tap Done.
8. Tap OK.
Page 68 Using Your Basic Applications
Page 77

Sorting lists of records
You can sort lists of records in various ways, depending on the
application. Sorting is available in applications that have list screens:
Address Book, To Do List, Memo Pad, and Expense.
Note:
To sort records in To Do List and Expense:
1. Open the app licat ion to display th e list screen.
2. Tap Show.
3. Tap the Sort by pick list and select an option .
4. Tap OK.
To sort records in Address Book an d Memo Pad:
1. Open the app licat ion to display th e list screen.
2. Tap the Menu icon .
3. Tap Options, and then tap Preferences.
You can also assign records to categories. See “Cate gorizing
records” ear li er in this cha p t e r.
Address Book
Memo Pad
:
:
4. Do one of the fo l lowing :
Address Book
Memo Pad
: Tap the setting you want.
: Tap the Sort by pick list and select Alphabetic or Man-
ual.
5. Tap OK.
To sort the Memo list manu ally, tap and drag a memo to a new location
in the list.
Chapter 4 Page 69
Page 78

Note:
To make the list of your memos appear in Palm Desktop software
as you manually sorted it on your or ganizer, ope n Memo Pad in
Palm Desktop software and click List by. Then select Order on
handheld.
Making records private
In all basic applications except Expense and Mail, you can make
individual records private. Private records remain visible and accessible,
however, until you select the Security setting to hide or mask all private
records. See “Se curity” in Chapte r 3 for more information.
Hiding or masking private records
You can hide or mask all records that you mark as private. Masked
records appear as grey placeholders in the same position they would
appear if they were not mask ed, and are marked with a l ock icon. Hidden
records disappear completely from the screen. If you define a password
for you r organiz e r, yo u must ente r it to di s p la y pr iva t e re co rds.
To hide all private records:
1. Tap the Applications icon .
2. Tap Security.
3. Tap the Current Privacy pick list and select Hide Records.
Tap Hide
Records
4. Tap OK to confirm tha t you want to hi de private records.
Page 70 Using Your Basic Applications
Page 79

To mask all private records:
1. Tap the Applications icon .
2. Tap Security.
3. Tap the Current Privacy pick list and select Mask Re cords.
Tap Mask
Records
4. Tap OK to confirm that you want to mask private records.
To display private records:
1. Do one of the fo l lowing :
Tap a masked record.
Tap the Applicati on s icon , tap Security, then tap the Cur-
rent Privacy pick list and select Show Rec ords.
If you d o not have a password, hidden and masked records be-
come visible.
If you have a password, the Show Private Records dialog box
appears. Go to step 2.
Tap Show
Records
2. Enter your password, and then tap OK.
To make a record private:
1. Display the entry that you want to make private.
2. Tap Details.
Chapter 4 Page 71
Page 80

3. Tap the Private check box to select it.
4. Tap OK.
Attaching notes
In all basic appl ications exc e p t Memo Pad, you can attach a note to a
record. A no te can be up to severa l thousand characters long. For
example, for an appointment in Date Book, you can attach a note with
dire c tions to the location.
To attach a note to a record:
1. Display the entry to which you want to add a note.
2. In Address Book only: Tap Edit.
3. Tap Details.
4. Tap Note.
5. Enter your note.
6. Tap Done.
A small note icon appears at the right sid e of any item that has a note.
Note icon
To review or edit a note:
1. Tap the Note icon .
To delete a note:
1. Tap the Note icon .
2. Tap Delete.
3. Tap Yes.
Page 72 Using Your Basic Applications
Page 81

Choosing fonts
In all basic applications except Expense, you can change the font style
to make text easier to read. You can choose a different font style for
each application.
Small font Large font
Bold font
To change the font style:
1. Open an application.
2. Tap the Menu icon .
3. Tap Options, and then tap Font.
4. Tap the font style you want to use.
Tap here for bold font
Tap here for large font
Tap here for small f ont
5. Tap OK.
Chapter 4 Page 73
Page 82

Application-specific tasks
Date Book
When you open Date Book, the screen shows the current date and a
list of times for a normal business day.
Scheduling an event
A record in Date Book is called an “event.” An event can be any kind
of activity that you asso ciate with a day. You can enter a new event on
any of the available time lines.
When you schedule an event, its description appears on the time line,
and its duration is automatically set to one hour. You can easily
change the start time and duration for any event.
Note:
You can also sch e dule events in yo ur Date Book that occ ur on a
particular date but have no specific start or end times, such as
birthdays, holidays, and anniversaries. These are referred to as
“untimed events.” Untimed events appear at the top of the list of
times, ma rked with a di amond . Yo u can h ave m ore than one u ntime d
event on a particular date.
It’s possible to schedu le events that overlap, but Date Bo ok
makes it easy to fi nd such conflicts. See “Spotting event
conflicts” later in this chapter.
You can also schedule a repeating event, such as a weekly meeting,
and continuous events, such as a three-day conference or a vacation.
To schedule an event for the current day:
1. Tap the time line that corresponds to the beginning of the event.
Tap a time
line
Time bar
shows
duration
Enter event
2. Enter a description of the event. You can en ter up to 255 characters.
Page 74 Using Your Basic Applications
Page 83

3. If the event is one hour long, skip to step 5. If the event is longe r or
shorter t han an hou r, t ap t he ti me o f t he eve nt to open th e Se t Time
dialog box.
Tap the
time of an
event
Tip:
You can also open th e Se t Ti me dialog (to sele ct a start
time) by making sure no event is selected, and then
writing a number on the number side of the Graffiti
writing area.
4. Do one of the fo l lowing :
Tap the time column s on the right sid e of the Set Time dial og to
set the Start Time, then tap the End Time box and tap the time
columns to se t the End Time.
Tap All Day to automatically insert the start and end time of the
event as defined in your Date Book preferences.
Start Time
highlighted
Tap to automatically
fill the start and end
times
Tap to scroll to
earlier hours
Tap to change
hours
Tap to change
minutes
Tap to scroll to
later hours
5. Tap OK.
Chapter 4 Page 75
Page 84

6. Tap a blank area of the screen to desel ect the event. A vertical lin e
appears next to the time, indicating the duration of the event.
Note:
If an event has the same start and en d ti me , the time is
only displayed once.
To schedule an event for another day:
1. Se l e c t the date yo u wa nt for the eve nt by doi ng one of the
following:
■
Tap the day of the week that you want i n the d ate bar at the top of
the screen. If necessary, tap the Previous week or Next week scroll
arro w s to mo ve to anoth e r w e e k .
Previous
week
Tip:
You can also use the scroll butto n on the front panel of
Next
week
Tap to select a day of
the current week
your organizer to move forward or backwar d one day at
a time.
■
Tap Go To at the bottom of the screen t o open the Go to Date dialo g
box. Select a date by tapping a year, month, and day in the
calendar.
Previous year Next year
Tap to select a
month
Tap to select a
day
Tap to select
current date
Tip:
In the Go to Date dialog box, you can also use the scroll
button on the fron t panel of the organ izer to move
forward or backward one month at a time.
2. After you locate the date, follow the steps for scheduling an event
for th e cu rrent day.
Page 76 Using Your Basic Applications
Page 85

To schedule an untimed event:
1. Select the date that you want for the event as described in “To
schedule an event for another day.”
2. Tap New.
3. Tap No Tim e , so that no start or end times are defined for the new
event.
Tip:
You can also create a new untimed event by ma king sure
no event is selecte d and th en writing l etters in the Gr affiti
writing area.
4. E nte r a descriptio n of the event.
New
untimed
event
No time
selected
5. Tap a blank area on the screen to deselect the untimed event.
Note:
If you create an event and decide later that there is no
particular start or end time, you can easily change it to an
untimed eve nt. Tap the time of the even t i n th e D a te Bo ok
screen, tap No Time, and then tap OK.
Chapter 4 Page 77
Page 86

Rescheduling an event
You ca n ea s i ly ma ke ch a nges to y our schedu le with you r or g a ni z er.
To reschedule an event:
1. Tap the event you want to reschedule.
2. Tap Details.
3. To change the time, tap the Time box and select a new time.
4. To change the dat e , tap the Date box and sel e ct a new date.
5. Tap OK.
Setting an alarm for an event
The Alarm setting enables you to set an audible alarm for events in
your Date Book. You can set an alar m to sound minutes , hours, or
days before an event. The default Alarm setting is 5 minutes before the
time of the event, but you can change th is to any number of mi nutes,
hours, or day s.
When you set an alarm, this icon appears to the far right of the
event with the alarm. When the alarm tone sounds, a reminder
message also appears onscreen.
To set an alarm for an event:
1. Tap the event to which you wan t to assign an alarm.
2. Tap Details.
3. Tap the Alarm check box to select it.
The default setting, 5 Minutes, appears.
4. Tap the pick list to select Minute s, Hours, or Days.
5. Select the 5 and enter any number from 0 to 99 (inclusive) as the
number of time u nits.
Enter number of
time units here
Tap here to
select unit of time
6. Tap OK.
Page 78 Using Your Basic Applications
Page 87

7. When the reminder message appears on screen, do one of the
following:
Tap OK to permanently dismiss the reminder and return to the
current screen.
Tap Snooze to dismiss the reminder and return to the current
screen. The reminder message appears again fiv e minutes after
you ta p Snooze .
Alarm for unti med events
: You can set a sil ent al arm for an untimed event.
In this case, the alarm triggers at the specified period of minutes,
hours, or da ys befo re mi dni ght (be gin ni ng) of the day of the unt imed
event. No audible alarm sounds for an untimed event; instead, the
reminder message appears onscreen.
For example, you set an alarm for an untimed event that occurs on
February 4t h. If the alarm is se t for 5 minutes, the reminder message
appears at 11:55 PM on the night of February 3rd. The reminder
remai ns onsc re e n u n t il you tu r n on y o u r organiz e r a n d ta p OK to
dismiss it.
Scheduling repe atin g or continuou s even ts
The Repeat function lets you schedule events that recur at regular
intervals or extend over a period of consecutive days.
A birthday is a good example of an event that repeats annually.
Another example is a weekly guitar lesson that falls on the same day
of the week and the same time of day.
A business trip or a vacation is an example of a continuous event.
Chapter 4 Page 79
Page 88

To schedule a repeating or continuous event:
1. Tap the event.
Typically, a continuous event is an untimed event.
2. Tap Details.
3. Tap the Repeat box to open the Change Repeat dialog box.
Tap the
Repeat
box
4. Tap Day, Week, Month, or Year to set how often event repeats.
For a continuous event, tap Day.
5. Enter a n u mber that corresponds to how often you want the ev e nt
to repeat on the Every line.
For example, if you select Month and enter the number 2, the
event repeats every other month.
6. To specify an end date for the repeating or continuous event, tap
the End on pick list and tap Choose Date. Use the date picker to
select an en d date.
7. Tap OK.
After you schedule a repeating or continuous event, this icon
appears to the far right of the event.
Changing repeating or continuous eve nts
When you make changes to a repeating or continuous event, such as
deleting or adding notes, or changing the ti me of an event, you can
decide which of the events you want to change; all events in the ser ies,
just the current event, or the current and future events.
To delete repeat ing events:
1. Select the record you want to delete.
2. Tap the Menu icon .
Page 80 Using Your Basic Applications
Page 89

3. Tap Record, and then tap Delete Event.
4. Do one of the fo l lowing :
Tap Current to delete only the current event item.
Tap Future to delete the current and all future event items and
reset the end date of the repeating event to the last shown d ate.
Tap All to delete all occurrences of the repeating event.
5. Tap OK.
Consid era t ions f or rep ea ting o r c ont in uou s ev ent s
: Keep the following points
in mind.
■
If you change the start date of a repeating event, your organizer
calculates the number of days you moved the event. Your
organizer then automatically changes the end date to maintain the
duration of the repeating event.
■
If you change the repeat interval (e.g., daily to weekly) of a
repeating event, past occurrences (prior to the day on which you
change the setting) are not changed, and your organizer creates a
new repeating event.
■
If you change the date of an occurrence of a repeating event (e.g.,
from January 14th to January 15th) and apply the change to all
occurrences, the new date becomes the start date of the repeating
event. Your organizer ad justs the end d ate to maint ain the durati on
of the event. If you apply the change to current and future
occurrences, past occurrences are not changed.
■
If you change other repeat settings (e.g., time, alarm, private) of a
repeating event and apply the change to all occurrences, your
organizer creates a new e ve nt. The sta rt date of this new event is
the day on whi ch t he se tting is ch ang ed. P ast occu rrenc es (pr i or to
the day of the chan ge) are not changed.
■
If you apply a change to a single occurrence of a repeating event
(e.g., time), that occurrence no longer shows the Repeat icon .
Chapter 4 Page 81
Page 90

Changing the Date Book view
In addition to di sp laying the time list for a specif ic day, you can also
display a whole week, a month, or an agen da. You can also dis play the
current time.
To cycle through Day, Week, Month, and Agenda views:
■
Press the Date Book application button repeatedly to display the
next v iew.
■
Tap on the appropriate view icon in the lower-left corner of Date
Book.
Working in Week View
Week View shows the calendar of your events for an entire week. This
view lets you quickly review your appointments and available time
slots. In addition, the graphical display helps you spot overlaps and
conflicts in your schedule .
To display the Week View:
1. Tap the Week View button.
Week View
2. Tap the navigation controls to move forward or backward a week
at a time, or tap on a column to display details of an event.
Note:
The Week View also shows untimed events and events
that are before and after the range of times shown.
Previous
week
Page 82 Using Your Basic Applications
Next
week
Tap for that day
Bar indicates earlier event
Dot indicates untimed event
Bar indicates later event
Page 91

3. Tap an event to show a description of the event.
Event details
Tap to show even t de ta ils
Tips for using Week View
■
To reschedule an event, tap and drag the event to a different time
: Keep the following points in mind.
or day.
■
Tap a blank time on a ny day to move to that da y and have the ti me
selected for a new event.
■
Tap any day or date that appears at the top of the Week View to
move directly to that day wi thout selecti ng an event.
■
The Week View shows the time span defined by the Start Time
and End Time in the Date Book Preferences settings. If you have
an event before or after this time span, a bar appears at the top
or bottom of t hat day's column. Use the onscreen scrol l arrows
to scroll to the event.
Chapter 4 Page 83
Page 92

Spotting event conflicts
With the ability to define specific start and end times for any event, it’s
possible to sch e dule events that overlap (an event that starts before a
previous event finishes).
An event conflict (time overlap) appears in the Week View as
overlapping bars. The Day View displays overlapping brackets to the
left of the con f licting times.
Event
conflicts
Working in Month View
The Month View screen shows which days have events scheduled.
Dots and lines in the Month View indicate events, repeating events,
and untimed events.
Previous/next month
Dashed line indicates continuous event
Dashes on right side indicate events
Crosses below date indicate untimed events
Month View button
You can control the dots and lines tha t appear in the Month View. See
“Options menu” later in this chapter.
Tips for usi ng Month View
■
Tap a day in the Month View to display that day in the Day View.
■
Tap the scroll arrows in the upper-right corner to move forward or
: Keep the following points in mind.
backward a month.
Page 84 Using Your Basic Applications
Page 93

■
Tap Go to to open the date se lector and sel e ct a different month.
■
Use the scroll button on the front panel of your organizer to move
between months. Press the upper half of the button to display the
previous month, the lower half to display the next month.
Working in Agenda View
The Agenda view shows you your untimed events, appointments, and
To Do items in one screen. When you tap on an untimed event or
appointment in the Agenda view, the Day view appears so you can see
more detai led information about the event. You can tap the check box
next to a To Do item to mark it as completed. When you tap on a To Do
item, your To Do list appears.
Note:
The To Do items that appear and how you can change them
depends on the settings in your To Do preferences. See “To Do
Show Op t i ons” late r i n th is chapt e r f or more informati o n .
To display the Agenda View:
1. Tap the Agenda View button.
Agenda View
2. Tap the navigati on controls to mo ve forward or backwar d a day at a
time, or to di sp lay more events and To Do items.
Note:
You can also change the category of To Do items shown.
Click on the pick list to ch oose another category .
See “To Do List” for more information on working wi th To
Do items.
Chapter 4 Page 85
Page 94

Date Book menus, preferences, and display options
Date Book menus are shown here for y our reference, and Date Book
features that are not explained elsewhere in this book are described
here.
See “Using menus” in Chapter 1 for information about choosing menu
commands .
Record menu
Options menu
Display Op t ions
Allows you to change Date Book’s appearance
and which events display.
■ Show Time Bars.
Activates the time bars that
appear in the Day View. The time bars show
the duration of an event and illus trate event
conflicts.
Page 86 Using Your Basic Applications
Page 95

Preferences
■ Compress Day View.
Controls how times appear
in the Day View. When Compress Day View is
off, all time slots display. When it is on, start
and end times display for each event, but
blank time slots toward the b ottom of the
screen disappear to minimize scrolling.
■ Month View settings.
These check boxes apply to
the Month View of the Date Book. You can
activate any or all of these se ttings to show
that you have Timed, Untimed, or Daily
Repeating events in the Month View
only.
■ Start/End Tim e.
Defines the start and end times
for Date Book screens . If the time slots you
select do not fit on one screen, you can tap the
scrol l arrows to scroll up and down.
■ Alarm Preset.
Automati cally set s a n alarm for
each new event. The silent alarm for untimed
even ts is de f in e d by minu te s, days , or hour s
before midn ight of the date of the event.
■ Alarm Sound.
■ Remind Me.
Sets the tone of the alarm.
Defines how many times the ala rm
sounds. The choices are Once, Twice, 3 Times,
5 Times, and 10 Times.
■ Play Eve ry.
Defines how of te n the alar m soun ds.
The choices are Minute,
5 minutes, 10 minutes, and 30 minutes.
About Date
Shows version informa tion for Date Book.
Book
Chapter 4 Page 87
Page 96

Address Book
Address Book is the appli c ation in whic h y ou s tore n ame and addr ess
information about people or business e s .
Creating an Address Book entry
A record in Address Book is called an “entry.” You can create entries
on your organizer, or you can use Palm Desktop software to create
entries on your computer and then download the entries to your
organizer with your next HotSync operation.
Palm Desktop softwa re also has data impo r t capabilit ies tha t enable
you to load database files into Address Book on your organizer.
See “Importing data” in Chapter 2 and Palm Desktop online Help for
more in f o rm a tio n .
To create a new Addres s Book entry:
1. Press the Address Book application button on the front of your
organizer to display the Address list.
2. Tap New.
Cursor
at Last
name
Tap New
3. Enter the last name of the person you want to add to your
Address Book.
Note:
The organizer automatically capitalizes the first letter of
each field (except numeric and e-mail fields). You do not
have to use th e Graff iti capit al str oke to cap italiz e the f irst
letter of th e name.
Page 88 Using Your Basic Applications
Page 97

4. Use the Next Field Graffiti stroke to move to the First Name field.
Tip:
Next Field
You can also move to any field by tapping it directly.
5. Enter the person's first name in the First Name field.
6. Enter the other information that you wa nt to include in this entry.
Note:
As you enter letters in the Title, Company, City, and State
fields, text appears for the first logical match that exists in
your Addres s Book. As you enter more letters , a closer
match appears. For example, you may already have
Sacramento and San F rancisco in your Addres s Book. As
you enter “S” Sacramento appears, and as you continue
entering “a” and “n” San Francisco replaces Sacramento.
As soon as the word you want appears, tap in the next
field to accept the word.
7. Tap the scroll arrows to move to the next page of i nformation.
8. After you finish entering information, tap Done.
Tap Do ne
Tip:
To create an entry that always appears at the top of the
Address list, begin the L ast name or Company f ield with a
symbol, as in *If Found Call*. This entry can contain contact
information in case you lose your organizer.
Selecting types of phone numbers
You can select the types of phone numbe rs or e-mail addr e sse s that
you associate with an Address Book entry. Any changes you make
apply only to the current entry.
Chapter 4 Page 89
Page 98

To select other types of phone numbers in an entry:
1. Tap the entry that you want to change.
2. Tap Edit.
3. Tap the pick list next to the label you want to change.
Tap
triangle
4. Select a new label.
Changing Address Entry details
The Address Entry Details dialog box provides a variety of options
that you can associate with an entry.
To open the Ad dress Entry Details dialog box:
1. Tap the entry whose details you want to change.
2. Tap Edit.
3. Tap Details.
4. Select any of the following settings:
Page 90 Using Your Basic Applications
Page 99

Show in List
Select which type of phone or other information
appears in the Address list screen. Your options
are Wor k, Home, Fax, Other, E-mail, Main, Pager ,
and Mobile. The identifying letters W, H, F, O, E,
M, or P appear next to the record in the Address
list, depending on which information is displayed.
If the E-mail or Other fields end in a letter, the
identifying letters are not displa yed .
Category
Private
Assign the en try to a category .
Hide this entry when Security is turned on.
Address Book menus
Address Book menus are shown here for your reference, and Address
Book features that are not explained elsewhere in this book are
described here.
See “Using menus” in Chapter 1 for informatio n about choosing menu
commands.
The Record and Options menus differ depending on whether you’re
displaying the Address list screen or the Address view screen.
Record menus
Address list
Address view
Duplicate Addre ss
Makes a copy of th e cu rrent record and displays
the copy in Address Edit so you can make
changes to the copied record. The copy has the
same cate gory and attached notes as the original
record.
Chapter 4 Page 91
Page 100

Options menus
Address list
Preferences
Address view
Rename Custom
Fields
About Address
Book
■ Remember last category.
Determines how
Address Book appears when you return to it
from an other ap p l ic a t ion. If yo u se l e c t th is
check box, A dd re ss Book shows the last
category you selected. If you clear it, Address
Book display s the All categ ory.
These custom fields appear at the end of the
Address Edit screen. Rename them to identify the
kind of information you enter in them. The names
you give the custom fields appear in all entries.
Shows version informatio n for Address Book.
Page 92 Using Your Basic Applications
 Loading...