

Page 1

Read This First
Getting Started
Page 2
Charge your Palm IIIc™connected organizer
Before you use your new Palm IIIc™ organizer, you need to connect the cables and
charge it for approximately four hours. Afterwards, charging for just minutes a day
keeps your organizer powered. A full charge lasts for up to two weeks with normal use.
Important upgrade information
If you are upgrading from another Palm Computing®platform handheld, refer to the
upgrade instructions in your organizer handbook before following the steps in this guide.
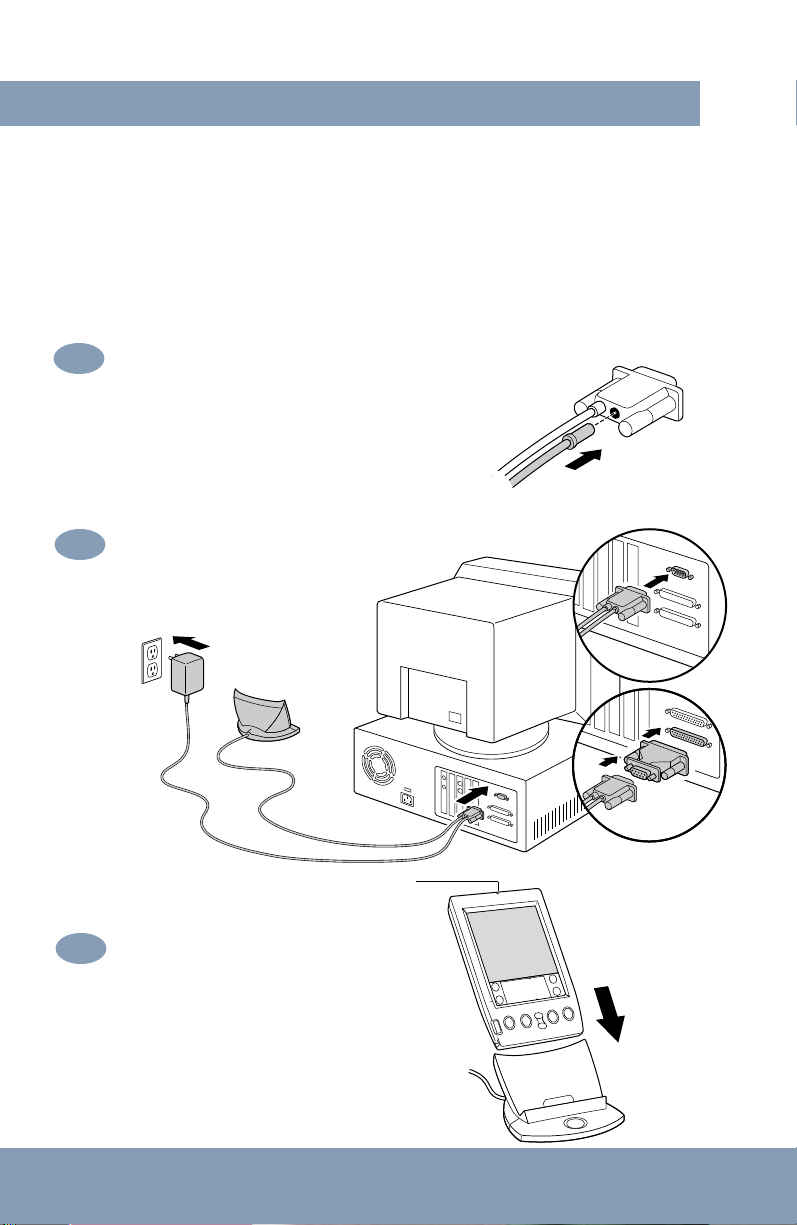
Insert the AC adapter cable
1.
into the back of the cradle connector, and then turn
off your computer.
Important: Use only the Palm IIIc AC adapter.
Using other AC adapters may damage your
organizer and void the warranty.
2.
Connect the cradle to a COM (serial) port
on your computer, and then plug the
AC adapter into a wall outlet.
3.
Charge your organizer by placing it
in the cradle and making sure the charge
indicator is on. As your organizer charges,
you can continue with the set up process.
Note: The charge indicator turns off when
your organizer is fully charged.
Charge indicator
If necessary, use the included
serial port adapter.
Page 3

Install your Palm
Palm™ Desktop software includes the same main applications as your Palm IIIc™
organizer: Address Book, Date Book, To Do List, Memo Pad, Expense, and desktop
e-mail connectivity. You can use the HotSync®Manager feature of this software to
back up and exchange data between your organizer and your computer.
Note: If you are using Microsoft Outlook or other organizer software instead
of Palm Desktop software, you still need to complete this process to
install HotSync Manager, conduit software, and other features of Palm
Desktop software.
4.
Insert the Palm Desktop CD-ROM into your CD-ROM drive. When the menu
appears, click the Install button and follow the instructions on the screen.
5.
Explore the software by double-clicking the Palm Desktop icon on your desktop.
When the screen below appears, click an application icon. Then click the New button
and enter your data. For example, try clicking the Address icon and entering your own
name and address.
Tip: You can also select Import from the File menu to import data from
another application.
™
Desktop organizer software
Application icons
Page 4
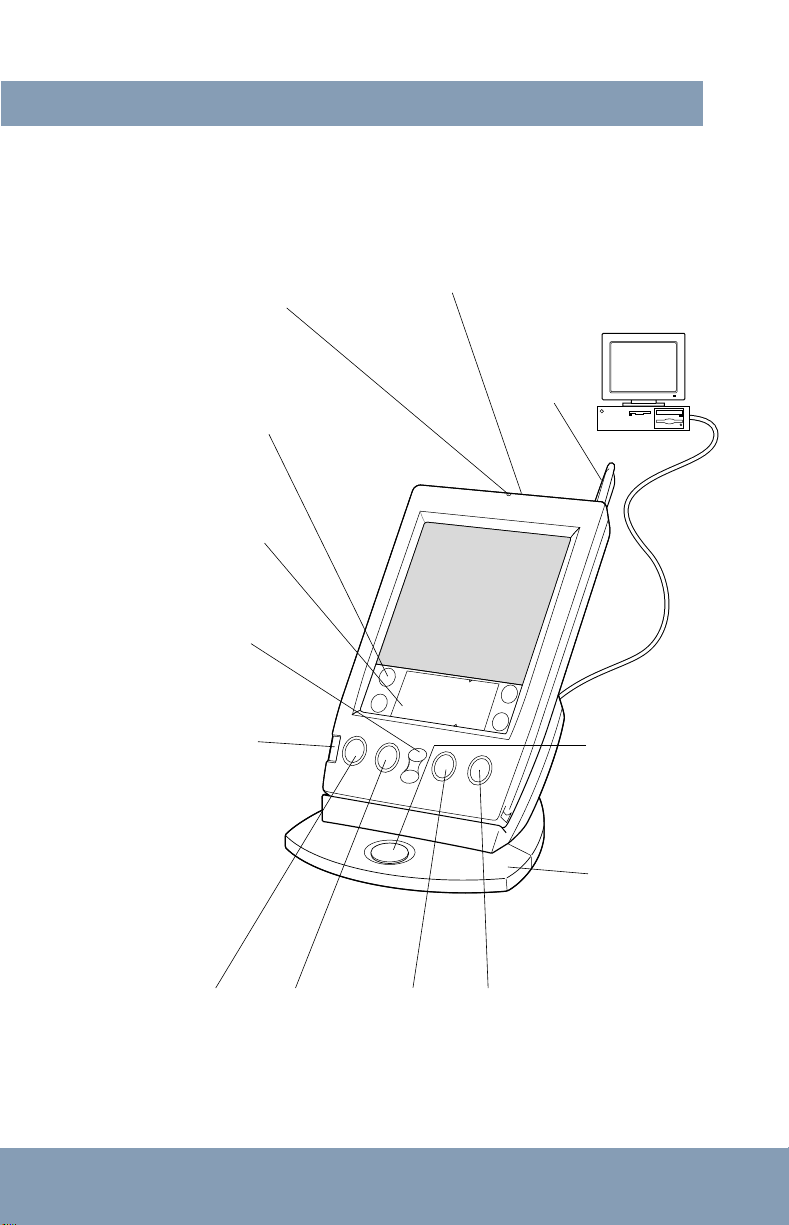
Explore your new Palm IIIc™organizer
IR Port
Exchange data and applications
with any infrared-enabled
Palm Computing®platform
handheld that’s nearby.
Charge Indicator
Applications Launcher
Tap the Applications icon to see
all your applications.
Graffiti®Writing Area
Use the stylus to enter Graffiti
®
text and numbers here, or to
access the onscreen keyboard.
Scroll Buttons
Press the top button to scroll
up and the bottom button to
scroll down.
Power Button/Brightness
Control
Press here to turn your organizer
on and off. Hold it down for a
few seconds to display the
brightness control. Note that
you can conserve battery life by
reducing the brightness level.
Stylus
®
HotSync
Press the HotSync
Button
®
button to exchange data
between your organizer
and computer.
HotSync®Cradle
Connect the cradle to
your computer and a
power source. Then
place your organizer in
the cradle to charge it.
Date Book Address Book
To Do List Memo Pad
Applications Buttons
Press these buttons to turn on your organizer and
immediately access your main applications.
Page 5

Four ways to enter data into your Palm IIIc™organizer
After your Palm IIIc™ organizer completes its initial charge, remove the plastic sheet
from the screen, turn it on, and follow the setup instructions on the screen.
Hint: If your organizer does not turn on, see Troubleshooting and Contacts on the
back of this guide.
Using your computer keyboard
1.
Type information in your Palm™ Desktop software, and then place your organizer in
the cradle and press the HotSync®button to exchange data between your organizer
and computer.
Note: The first time you exchange data, you must enter a unique user name and
then click OK.
2.
Using the onscreen keyboard
Tap the text or a blank line on the organizer screen. (The cursor should blink to
indicate you’re in edit mode.) Tap the dot under “abc” for the letter keyboard or the
dot under “123” for the number keyboard. Tap the characters and then tap Done.
Tip:
Tap abc , 123 , or Int’l to
See back to learn more
switch keyboards.
Page 6

Four ways to enter data into your Palm IIIc™organizer(continued)
3.
Using Graffiti®power writing software
Graffiti®characters are similar to uppercase letters that are formed with a single stroke.
Your writing turns into text wherever the blinking cursor appears on the organizer
screen. Graffiti writing is easy, fun, accurate, and fast (up to 30 words per minute).
It’s worth taking a few minutes to learn. Just remember to write BIG and press firmly.
Write letters here
Write numbers here
4.
Using a keyboard accessory
You can connect an optional keyboard accessory to the serial connector on your
organizer and type data directly into your organizer. This accessory is particularly
helpful if you need to enter large amounts of data quickly and accurately while you
are away from your computer.
Congratulations!
You’ve connected your organizer to your computer, installed the Palm™ Desktop
software, and learned how to enter data on your Palm IIIc™ organizer.
Copyright © 1999 Palm Computing, Inc. or its subsidiaries. All rights reserved. Palm Computing, HotSync, and Graffiti are registered
trademarks, Palm, Palm IIIc, the Palm Computing Platform logo, and the Palm IIIc logo are trademarks of Palm Computing, Inc. or its
subsidiaries. Other product and brand names may be trademarks or registered trademarks of their respective owners.
Printed in U.S.A. P/N: 405-1241-01
Page 7
Explore add-on software for your Palm IIIc™organizer
Your Palm IIIc™ organizer supports much more than just the applications that come
with it. You can easily expand your organizer’s software capabilities by downloading
any of the thousands of applications available on the Internet including a wide variety
of freeware, shareware, and commercial applications. Just follow these steps:
1.
Download applications from www.palm.com (or any add-on software web site)
to the add-on folder in the Palm™ Desktop software folder (e.g., c:\palm\add-on).
2.
Unzip the application if it is a zipped file.
3.
Select the application you want to install by:
• Running Instapp.exe from the Palm Desktop software folder,
— or —
• Opening Palm Desktop software, and clicking Install.
Next click Add and select the application you want to install, click Open, and then
click Done.
Transfer your new applications to your organizer by placing your organizer in
4.
the cradle and pressing the HotSync®button on the cradle.
Page 8

Troubleshooting and Contacts
Before calling technical support, try this:
• Charge your organizer as described earlier in this guide. Make sure all the
connections are secure and the charge indicator is on.
• Perform a soft reset by unscrewing the top of your stylus and using the pin inside
to gently press the reset button on the back of your organizer.
• If your organizer still doesn’t turn on, perform a hard reset by holding down the
power button while doing a soft reset. Wait for the Palm Computing
logo to appear, then release the power button.
Important: A hard reset erases all records and entries stored in your organizer.
For technical support, service or repair, contact Palm Computing:
• Web Access http://www.palm.com
• E-mail support@palm.com
• Telephone (847) 262-PALM (7256) 7am-9pm CST, Mon-Fri
10am-5pm CST, Sat-Sun
• Fax (847) 262-4329
Note: There are thousands of third-party applications available for the Palm
Computingplatform. For questions and support, please contact the
software developer directly.
®
Platform
T o order Palm Computing products and accessories, contact Palm Computing:
• Online orders http://www.palm.com
• U.S. (800) 881-7256
• Canada (800) 891-6342
• Elsewhere (801) 431-1536
For country-specific telephone numbers, please refer to the Worldwide
Customer Support card or the International page on www.palm.com.
Palm Computing, Inc.
5400 Bayfront Plaza
Santa Clara, California 95054
United States of America
 Loading...