

Page 1

PalmModem® Connectivity Kit
Handbook
Page 2

Copyright
Copyright © 1997-2001 Palm, Inc. or its subsidiaries. All rights reserved. HotSync,
Palm OS, and PalmModem are registered trademarks of Palm, Inc. or its subsidiaries.
The HotSync logo, Palm, and the Palm logo are trademarks of Palm, Inc. or its subsidiaries. Other product and brand names may be trademarks or registered trademarks of
their respective owners.
Disclaimer
Palm, Inc. and its subsidiaries assume no responsibility for any damage or loss resulting
from the use of this handbook.
Palm, Inc. and its subsidiaries assume no responsibility for any loss or claims by third
parties which may arise through the use of this product. Palm, Inc. and its subsidiaries
assume no responsibility for any damage or loss caused by deletion of data as a result
of malfunction, dead battery, or repairs. Be sure to make backup copies of all important
data on other media to protect against data loss.
P/N: 406-3157-01
A/N: 423-3157-01
Page ii PalmModem® Connectivity Kit Handbook
Page 3

Contents
Chapter 1: Introduction ...................................................... 1
What can I do with my PalmModem connectivity kit? .................. 2
Chapter 2: Setting Up Your PalmModem®
Connectivity Kit................................................................... 5
Installing the batteries ......................................................................... 5
Replacing batteries............................................................................ 5
Configuring your computer................................................................ 6
Configuring your handheld................................................................ 7
Selecting conduits for a modem HotSync operation ................. 11
Installing applications on your handheld....................................... 12
Chapter 3: Using Your PalmModem® Connectivity Kit .... 15
Attaching PalmModem connectivity kit and cables ..................... 15
Performing a remote HotSync operation........................................ 16
Detaching your PalmModem connectivity kit............................... 17
Product Regulatory Information ........................................ 19
Contents Page iii
Page 4

Page iv PalmModem® Connectivity Kit Handbook
Page 5
Chapter 1
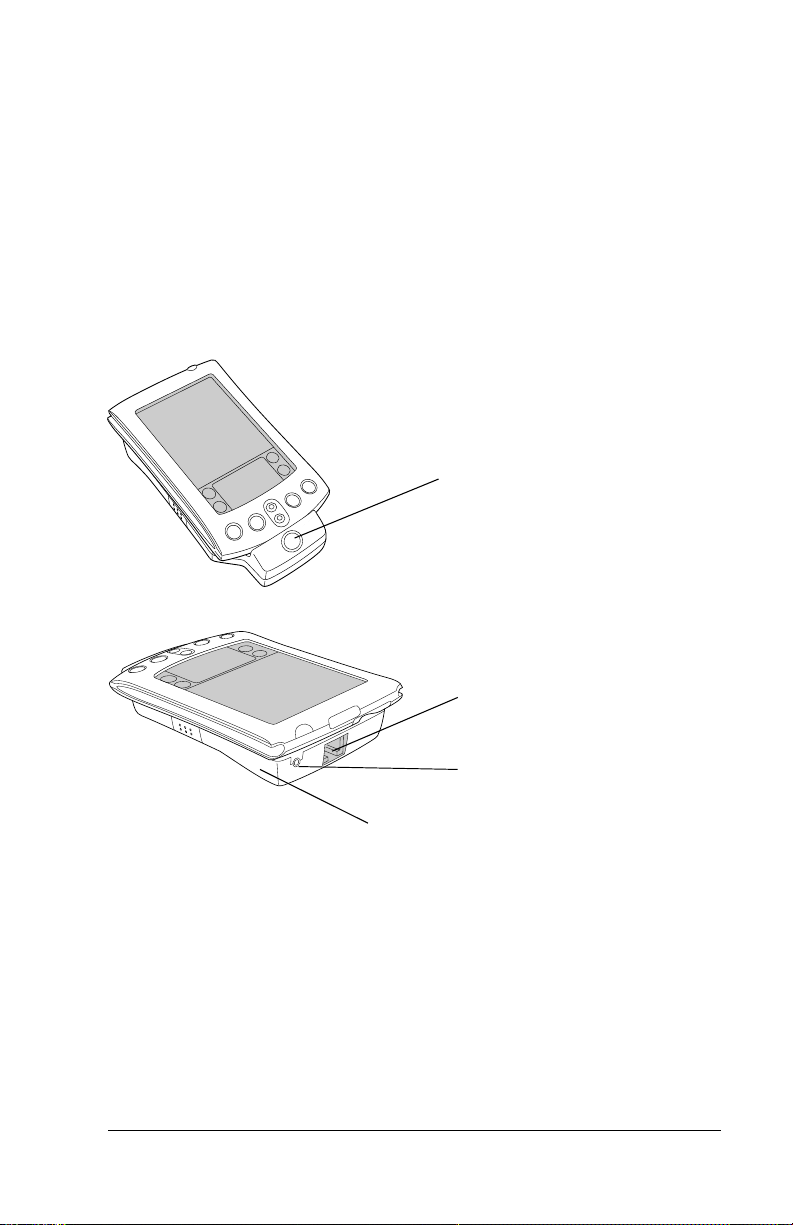
HotSync®
button
Introduction
Your PalmModem® connectivity kit enables you to use your handheld
to send and receive data at your convenience. You don’t have to
connect your handheld directly to your computer or laptop to update
your data.
Phone
connector
AC adapter
connector
(US only*)
Modem
*Use only UL listed PalmModem AC adapter #10202U with an input of +3V/250mA or
the equivalent UL listed adapter.
Chapter 1 Page 1
Page 6

What can I do with my PalmModem connectivity kit?
From remote locations, with your modem and handheld you can:
■
Send and receive e-mail using an Internet Service Provider.
■
Synchronize your data with one touch using any of the following:
™
–Palm
– Server-based applications (such as corporate e-mail, phone
– Third-party personal information managers (PIMs), such as
■
Use web clipping applications installed on your handheld to
quickly and simply retrieve information from the Internet.
To increase your productivity, software applications have been
bundled with your modem.
Contact the vendors below for more information about some of the
software applications you can use with your handheld and modem.
Desktop organizer software via a PC modem using
®
HotSync
technology, or via your company’s remote access
server (RAS) using network HotSync technology and TCP/IP.
book, expense, and intranet web pages) via your company’s
®
RAS using Palm HotSync
http://www.palm.com
Server software (go to the web site
for more information).
Lotus Organizer, Symantec ACT, and Microsoft Outlook using
HotSync technology (third-party software required).
Use Application Description Vendor
E-mail Network
Page 2 Introduction
HotSync
MultiMail®Pro
and
MultiMail
AOL Mail Supports AOL e-mail America Online, Inc.
One Touch Supports SMTP and
Palm eta M ail Supp orts Ne tscape Ma il
®
Supports remote access
to your e-mail and
™
Palm
software using either
your company’s
existing LAN or dial-in
(RAS) server
Supports SMTP, POP3,
and IMAP4 protocols
SE
POP3 e-mail protocols
or any MAPI e-mail
system
Desktop
Palm, Inc.
www.palm.com
Palm, Inc.
www.palm.com
www.aol.com/anywh er e
JP Systems
www.jpsystems.com
Palmeta Software
www.palmeta.com
Page 7

Remote
synchronization
Internet
access
Desktop To Go Supports Microsoft
EasySync for
Lotus Notes
EasySync for
Lotus Organizer
Outlook
Supports Lotus Notes Lotus
Supports Lotus
Organizer
Intellisync Supports Microsoft
Outlook, Symantec
ACT, GoldMine, Lotus
Notes, Lotus Organizer ,
and Meeting Maker
Now
Synchronize
PocketMirror Supports Microsoft
Supports Now
Up-to-Date
Outlook
Web Clipping Supports retrieving
information from the
Internet
DataViz
www.dataviz.com
www.lotus.com
Lotus
www.lotus.com
Tele-Support Software
www.pumatech.com
Power On Software
www.poweronsoftware.com
Chapura, Inc.
www.chapura.com
Palm, Inc.
www.palm.com
Chapter 1 Page 3
Page 8

Page 4 Introduction
Page 9

Chapter 2
Setting Up Your
®
PalmModem
Connectivity Kit
Before you use your PalmModem® connectivity kit, you must:
■
Install the batteries
■
Configure your computer
■
Configure your handheld
You might also want to install appplications, such as e-mail, on your
handheld.
Installing the batteries
To use your modem, you must first
install two AAA alkaline batteries.
The batteries fit in the compartment
behind the battery door on the back
of the modem. Make sure to click
the door into place after installing
the batteries.
Note:
A diagram in the interior of
the battery compartment
shows the orientation of the
positive (+) and negative (-)
ends of the batteries. When
correctly installed, the clips
in the battery compartment
secure the batteries in place.
Replacing batteries
Under normal conditions, the AAA batteries provide approximately
two and a half hours of continuous use. When your modem has
approximately 15% of battery life remaining it will sound three short
beeps, which repeat every five minutes until the batteries are drained.
Replace the batteries as soon as possible.
Chapter 2 Page 5
Page 10

Configuring your computer
Important:
You do not need to configure your computer to connect to
your ISP and download mail. If this is the only operation
you want to perform with your modem, skip to
“Configuring your handheld” later in this chapter.
To use your modem to perform remote operations with your desktop
computer, you must first complete the following steps:
■
Make sure Palm™ Desktop organizer software settings are correct
■
Leave your computer running and ready to receive a call
®
A network HotSync
operation requires the following (consult your
System Administrator for assistance):
■
Your computer has TCP/IP support installed.
■
Both your company’s network system and its remote access server
support TCP/IP.
■
You have a remote access account.
■
Your computer has Palm Desktop software version 4.0 or later
installed.
Everything you need to connect to your company’s dial-in server
(network modem) is included with Palm Desktop software version 4.0
or later and your Palm OS handheld software version 4.0 or later. You
need to activate the feature, however, on both Palm Desktop software
and your handheld.
To set up your Windows computer for a remote HotSync operation:
1. Click the HotSync Manager icon in the system tray (bottomright corner of the taskbar) to open the HotSync Manager menu.
2. In the HotSync Manager menu, make sure Modem is checked.
Or, if you want to synchronize using the network HotSync
application, make sure Network is checked, and then skip to
“Configuring your handheld” later in this chapter.
3. From the HotSync Manager menu, choose Setup.
4. Click the Modem tab and adjust the options as needed. See
“Conducting a HotSync operation via modem” in your handheld
handbook for additional information.
5. Click OK.
Page 6 Setting Up Your PalmModem® Connectivity Kit
Page 11

To set up your Macintosh for a remote HotSync operation:
1. Click the HotSync Manager icon from the Instant Palm Desktop
menu (upper-right corner of your screen).
2. From the HotSync menu, select HotSync Setup, and on the Serial
Port Settings tab make sure Modem is checked.
3. Adjust the Modem Setup options as needed.
4. From the File menu, choose Quit.
Configuring your handheld
Before you use your PalmModem connectivity kit, you must configure
your handheld to communicate with it.
To prepare your handheld for a modem HotSync operation:
1. Tap the Applications icon .
2. Tap the HotSync icon .
3. Tap Modem.
Tap here
4. Tap the pick list below the icon and select a modem configuration.
Select a modem configuration
Chapter 2 Page 7
Page 12

5. Tap the Enter phone # box.
Tap here
Note:
If you plan to connect to your company’s dial-in server
(network modem) instead of a computer modem, see “To
prepare your handheld for a network HotSync operation:”
later in this chapter.
6. Enter the telephone number to access the modem connected to
your computer.
7. If needed, enter a dial prefix (such as “9”) to access an outside line,
and then tap the Dial Prefix check box.
Tip:
To add a “pause” in the dialing sequence, enter a comma in
the field. Each comma equals a two second pause.
8. If the phone line you’re using for the handheld has Call Waiting,
select the Disable call waiting check box to avoid an interruption
during the modem HotSync operation.
9. If you want to use a calling card to place the call, select the check
box and enter the calling card number.
10. Tap OK.
To select Connection Preferences for a modem HotSync operation:
1. Tap the Applications icon .
2. Tap the Preferences icon .
3. Tap the pick list in the upper-right corner and select Connection.
4. Tap the configuration you want to use.
Page 8 Setting Up Your PalmModem® Connectivity Kit
Page 13

5. Tap Edit.
6. Tap the Connect to pick list and select Modem.
7. Tap the Via pick list and select Cradle/Cable.
8. Adjust the other options as needed.
Dialing
Select the Rotary setting only if you are certain
that your telephone service does not support
TouchTone dialing.
Note:
When dialing from Europe, the modem
supports TouchTone dialing only. Rotary
and pulse dialing are not supported in
Europe.
Volume
Chapter 2 Page 9
Controls the modem speaker volume.
Page 14

Details
Provides access to the following optional settings:
■ Speed.
Determines the modem speed for
downloading data.
■ Country.
Determines the country settings that
are used.
■ Flow Ctl.
Regulates the data sent to your
modem. If your modem receives more data
than its buffer can hold, the modem uses flow
control to temporarily stop data transmission.
■ Init String.
This field is used for standard AT
commands that enable the modem to perform
special functions.
9. Tap OK to save the settings.
To prepare your handheld for a network HotSync operation:
1. Tap the Applications icon .
2. Tap the HotSync icon .
3. Tap the Menu icon .
4. Tap Options, then tap Modem Sync Prefs.
5. Tap Network.
6. Tap OK.
7. Tap Select Service.
Page 10 Setting Up Your PalmModem® Connectivity Kit
Page 15

Tap here
Note:
See “Network preferences and TCP/IP software” in your
handheld handbook for information on creating a network
connection.
8. Tap Service and select a service.
Tap here
9. Tap Done.
Note:
Before performing a network HotSync operation, you must
enable the network HotSync technology and perform a local
HotSync operation. Contact your System Administrator to set
up the network HotSync technology, and for additional
information, go to this web site:
http://www.palm.com
.
Selecting conduits for a modem HotSync operation
The Conduit Setup dialog box on your handheld enables you to define
which files and/or applications synchronize during a modem
HotSync operation. You can use these settings to minimize the time
required to synchronize data with a modem.
Chapter 2 Page 11
Page 16

To change conduits for a modem HotSync operation:
1. Tap the Applications icon .
2. Tap the HotSync icon .
3. Tap the Menu icon .
4. Tap Options, and then tap Conduit Setup.
5. Tap the check boxes to deselect the files and applications that you
not
do
want to synchronize during a modem HotSync operation.
The default setting is to synchronize all files.
Note:
6. Tap OK.
Applications that do not have a database (such as games)
do not synchronize — even if you select the item in the
Conduit Setup dialog box.
Installing applications on your handheld
Before you install any applications, such as e-mail, on your handheld,
it’s a good idea to perform a HotSync operation to back up your data.
To install an application from a Windows computer:
1. Insert the CD-ROM into the CD-ROM drive.
Note:
2. If prompted, choose a language.
3. From the CD menu, choose the application you want to install.
Page 12 Setting Up Your PalmModem® Connectivity Kit
If installation does not begin, click the Windows Start
button, choose Run, enter D:/autorun.exe, and then click
OK. If necessary, replace D: with the drive letter assigned to
your CD-ROM drive.
Page 17

4. Click Install.
5. Perform a HotSync operation to install the application on your
handheld.
To install an application from a Macintosh:
1. Insert the CD-ROM into the CD-ROM drive and double-click the
CD folder on your desktop.
2. Double-click the folder for the application you want to use.
3. Double-click the HotSync Manager icon in the Palm folder.
4. Choose Install Handheld Files from the HotSync menu.
5. Drag the PRC file from the CD-ROM to the Install Handheld Files
window.
6. Perform a HotSync operation to install the application on your
handheld.
Chapter 2 Page 13
Page 18

Page 14 Setting Up Your PalmModem® Connectivity Kit
Page 19

Chapter 3
Using Your
®
PalmModem
Connectivity Kit
After you prepare your computer and your handheld, and select your
Conduit Setup options, you are ready to perform a modem or network
HotSync
Now when you leave the office, you can use your PalmModem
connectivity kit and your handheld to stay connected with your
computer or network.
Attaching PalmModem connectivity kit and cables
Your modem has a 16-pin connector that slides into the grooves on
your handheld’s universal connector. Make sure your modem snaps
into place on the handheld. Use a standard RJ11 cable to connect to an
analog phone line.
®
operation.
®
Slide into connector Snap into place
Chapter 3 Page 15
Page 20

Insert phone cable
Note:
It is important to use a standard analog phone line, such as
those used in homes. If you use your modem in an office or
hotel, make sure it is connected to a phone line with a data
port, a fax line, or a modem line. If you accidentally use a
digital phone line, your modem will respond as though there
is no dial tone.
Performing a remote HotSync operation
After you connect your modem to your handheld, you can use your
modem to perform remote HotSync operations by dialing your PC
modem or network server.
Important:
To perform a modem or network HotSync operation:
■
Press the HotSync button on the front of your modem to initiate
remote HotSync operations.
Remember to leave your computer running so you can
perform remote operations.
If you have any problems conducting a successful HotSync operation,
see “Frequently Asked Questions” in your handheld handbook.
Page 16 Using Your PalmModem® Connectivity Kit
Page 21

Detaching your PalmModem
connectivity kit
After you complete your modem operations, press the buttons on both
sides of the modem, then rotate the handheld away from the modem.
Pull handheld
Press buttons
from modem
Chapter 3 Page 17
Page 22

Page 18 Using Your PalmModem® Connectivity Kit
Page 23

Product Regulatory Information
FCC-15
This device complies with Part 15 of the FCC rules. Operation is subject to the following
two conditions: 1.This device may not cause harmful interference, and 2.This device
must accept any interference received, including interference that may cause undesired
operation.
Note: This equipment has been tested and found to comply with the limits for a Class
B digital device, pursuant to Part 15 of the FCC Rules. These limits are designed
to provide reasonable protection against harmful interference in a residential
installation. This equipment generates, uses, and can radiate radio frequency
energy and, if not installed and used in accordance with the instructions, may
cause harmful interference to radio communications. However, there is no
guarantee that interference will not occur in a particular installation. If this
equipment does cause harmful interference to radio or television reception,
which can be determined by turning the equipment off and on, the user is
encouraged to try to correct the interference by one or more of the following
measures:
■ Reorient or relocate the receiving antenna.
■ Increase the separation between the equipment and receiver.
■ Connect the equipment into an outlet on a circuit different from that to which the
receiver is connected.
■ Consult the dealer or an experienced radio/TV technician for help.
The use of shielded I/O cables is required when connecting this equipment to any and
all optional peripheral or host devices. Failure to do so may violate FCC rules.
Caution: Changes or modifications not covered in this manual must be approved in
Responsible Party:
Geoffrey Lin
8400 NW 25th Street, Suite 110
Miami, FA 33162
United States of America
(305) 468-9250
Product Regulatory Information Page 19
writing by the manufacturer’s Regulatory Engineering Department.
Changes or modifications made without prior written approval may void
the user's authority to operate this equipment.
PalmModem® Connectivity Kit
Tested to Comply
With FCC Standards
FOR HOME OR OFFICE USE
Page 24

Canadian ICES-003 Statement
This Class B digital apparatus meets all requirements of the Canadian InterferenceCausing Equipment Regulations.
Cet appareil numérique de la classe B respecte toutes les exigences du Réglement sur le
matériel brouilleur du Canada.
FCC-68
This equipment complies with Part 68 of the FCC rules. A label is affixed to the equipment that contains, among other things, the FCC registration number, USOC and Ringer Equivalency Number (REN) for this equipment. If these numbers are requested,
provide this information to your telephone company.
The REN is useful to determine the quantity of devices you may connect to your telephone line and still have those devices ring when your number is called. In most, but
not all areas, the sum of the RENs of all devices should not exceed five (5.0). To be certain of the number of devices you may connect to your line, as determined by the REN,
you should call your local telephone company to determine the maximum REN for your
calling area.
If the equipment causes harm to the telephone network, the telephone company may
discontinue your service temporarily. If possible, they will notify you in advance; if advance notice is not practical, you will be notified as soon as possible. You will be advised
of your right to file a complaint with the FCC.
Your telephone company may make changes in its facilities, equipment, operations, or
procedures that could affect the proper operation of your equipment. If they do, you
will be given advance notice to give you an opportunity to maintain uninterrupted service.
If you experience trouble with this product, contact your Authorized Reseller, or call
Palm, Inc. at (408) 326-9000. You may be required to present proof of purchase.
The telephone company may ask you to disconnect the equipment from the network
until the problem has been corrected, or until you are sure the equipment is not malfunctioning.
No customer repairs are possible to the equipment. If you experience trouble with the
equipment, contact your Authorized Reseller.
This equipment may not be used on coin service provided by the telephone company.
Connection to party lines is subject to state tariffs. Contact your state public utility commission or corporation commission for information.
When ordering network interface (NI) service from the local Exchange Carrier, specify
service arrangement USOC RJ11C.
FAX Branding: This device complies with the FAX branding requirements of the
Telephone Consumer Protection Act of 1991. Please refer to the fax modem software
manual for instructions on how to program this device.
Page 20 Product Regulatory Information
Page 25

Industry Canada (CS-03)
The Canadian Department of Communications label identifies certified equipment.
This certification means that the equipment meets certain telecommunications network
protective, operational, and safety requirements. The Department does not guarantee
the equipment will operate to the user's satisfaction.
Before installing this equipment, users should ensure that it is permissible to be connected to the facilities of the local telecommunications company. The equipment must also
be installed using an acceptable method of connection. In some cases, the company's inside wiring associated with a single line individual service may be extended by means
of a certified connector assembly (telephone extension cord). The customer should be
aware that compliance with the above conditions may not prevent degradation of service in some situations.
Repairs to certified equipment should be made by an authorized Canadian maintenance
facility designated by the supplier. Any repairs or alterations made by the user to this
equipment, or equipment malfunctions, may give the telecommunications company
cause to request the user to disconnect the equipment.
Users should ensure for their own protection that the electrical ground connections of
the power utility, telephone lines, and internal metallic water pipe system, if present,
are connected together. This precaution may be particularly important in rural areas.
CAUTION: Users should not attempt to make such connections themselves, but
should contact the appropriate electric inspection authority, or electrician, as appropriate.
NOTICE: The LOAD NUMBER (LN) assigned to each terminal device denotes the per-
centage of the total load to be connected to a telephone loop which is used by the device,
to prevent overloading. The termination on a loop may consist of any combination of
devices subject only to the requirement that the sum of the LOAD NUMBERS of all the
devices does not exceed 100.
The telephone connector to be used for this equipment is an RJ11/CA11A.
CE Mark Declaration of Conformity
This modem is designed to be compatible with the European PSTN networks, and is in
conformity with the following European Union Directives:
■ R&TTE Directive 1999/5/EC
■ Low Voltage Directive 73/23/EEC
■ EMC Directive 89/336/EEC
Product Regulatory Information Page 21
Page 26

This is a Class B product based on the standard of the Voluntary Control Council for Interference from Information Technology Equipment (VCCI). If this is used near a radio
or television receiver in a domestic environment, it may cause radio interference. Install
and use the equipment according to the instruction manual.
Page 22 Product Regulatory Information
 Loading...