

Page 1

Quick Reference
Référence Rapide
Page 2

Page 3

Contents
English. . . . . . . . . . . . . . . . . . . . . . . . . . . . . . . . . . . . . . . . . . . . . . . . . . . . . . . . . . . . . . . . 5
Français . . . . . . . . . . . . . . . . . . . . . . . . . . . . . . . . . . . . . . . . . . . . . . . . . . . . . . . . . . . . . . 97
Page 4

Page 5

Quick Reference
Page 6

Intellectual property notices
© 2005–2008 Palm, Inc. All rights reser ved. Blazer, HotSync, Palm,
Palm Desktop, Palm OS, Centro, VersaMail, and the Palm and Centro
logos are among the trademarks or registered trademarks owned by
or licensed to Palm, Inc. Facebook is a registered trademark of
Facebook, Inc. Documents To Go is a trademark or registered
trademark of DataViz, Inc. Adobe and Acrobat are either registered
trademarks or trademarks of Adobe Systems Incorporated in the
United States and/or other countries. Microsoft, ActiveSync, Excel,
Outlook, PowerPoint and Vista are either registered trademarks or
trademarks of Microsoft Corporation in the United States and/or
other countries. All other brand and product names are or may be
trademarks of, and are used to identify products or services of, their
respective owners.
This product is protected by one or more of the following United
States patents:
6,976,226; 6,975,304; 6,965,375; 6,961,567; 6,961,029; 6,957,397;
6,952,571; 6,950,988; 6,947,975; 6,947,017; 6,943,667; 6,940,490;
6,924,752; 6,907,233; 6,906,701; 6,906,741; 6,901,276; 6,850,780;
6,845,408; 6,842,628; 6,842,335; 6,831,662; 6,819,552; 6,804,699;
6,795,710; 6,788,285; 6,781,824; 6,781,575; 6,766,490; 6,745,047;
6,744,451; 6,738,852; 6,732,105; 6,724,720; 6,721,892; 6,712,638;
6,708,280; 6,697,639; 6,687,839; 6,685,328; 6,665,803; 6,618,044;
6,590,588; 6,539,476; 6,532,148; 6,523,124; 6,519,141; 6,516,202;
6,490,155; 6,480,146; 6,457,134; 6,456,247; 6,442,637; 6,441,824;
6,437,543; 6,429,625; 6,425,087; 6,389,572; 6,388,877; 6,381,650;
6,363,082; 6,344,848; 6,317,085; 6,241,537; 6,222,857; 6,185,423;
6,147,314; 6,115,248; 6,064,342; D421,251; D429,252; D466,128;
D478,091. Patent pending.
This product also is licensed under United States patent 6,058,304.
This product is protected by certain intellectual property rights of
Microsoft Corporation. Use or distribution of such technology outside
of this product is prohibited without a license from Microsoft or an
authorized Microsoft subsidiary.
This product contains ACCESS Co., Ltd.’s NetFront 3.0 Internet
browser software. © 1996-2007 ACCESS Co., Ltd. and ACCESS
Systems America, Inc. NetFront is the trademark or registered
trademark of ACCESS Co., Ltd. in Japan and in other countries except
the United States of America. NetFront is a registered trademark of
NetFront Communications, Inc. in the United States of America and
is used under a license. A portion of this software includes software
modules developed by the Independent JPEG Group.
Disclaimer and limitation of liability
Palm, Inc. and its suppliers assume no responsibility for any damage
or loss resulting from the use of this guide. Palm, Inc. and its
suppliers assume no responsibility for any loss or claims by third
parties that may arise through the use of this software. Palm, Inc. and
its suppliers assume no responsibility for any damage or loss caused
by deletion of data as a result of malfunction, dead battery, or repairs.
Be sure to make backup copies of all important data on other media
to protect against data loss.
Palm Take Back Recycling Program
This symbol indicates that Palm products should be
recycled and not be disposed of in unsorted municipal
waste. Palm products should be sent to a facility that
properly recycles electrical and electronic equipment.
For information on environmental programs visit:
alm.com/environment.
p
As part of Palm’s corporate commitment to be a good steward of the
environment, we strive to use environmentally friendly materials,
reduce waste, and develop the highest standards in electronics
recycling. Our recycling program keeps Palm handheld devices,
smartphones, and mobile companions out of landfills through
evaluation and disposition for reuse and recycling. Palm customers
may participate in the recycling program free of charge. Visit
palm.com/recycle
you can help reduce electronic waste.
PN: 406-11520-00
v. 1.0
for additional details and information about how
Page 7

Contents
Chapter 1: Welcome . . . . . . . . . . . . . . . . . . . . . . . . . . . . . . . . . . . . . . . . . . . . . . . . . . . . 9
What do I need to get started? . . . . . . . . . . . . . . . . . . . . . . . . . . . . . . . . . . . . . . . . . . 9
Where can I learn more? . . . . . . . . . . . . . . . . . . . . . . . . . . . . . . . . . . . . . . . . . . . . . . . 9
®
Centro™ smartphone overview . . . . . . . . . . . . . . . . . . . . . . . . . . . . . . . . . . . . 11
Palm
Upgrading from another Palm OS
Chapter 2: Moving around on your smartphone . . . . . . . . . . . . . . . . . . . . . . . . . . . . . . 17
Using the keyboard . . . . . . . . . . . . . . . . . . . . . . . . . . . . . . . . . . . . . . . . . . . . . . . . . . 20
Opening applications . . . . . . . . . . . . . . . . . . . . . . . . . . . . . . . . . . . . . . . . . . . . . . . . . 22
Synchronizing information—the basics . . . . . . . . . . . . . . . . . . . . . . . . . . . . . . . . . . . 24
Maximizing battery life . . . . . . . . . . . . . . . . . . . . . . . . . . . . . . . . . . . . . . . . . . . . . . . . 26
Charging the battery . . . . . . . . . . . . . . . . . . . . . . . . . . . . . . . . . . . . . . . . . . . . . . . . . . 27
Chapter 3: Your phone . . . . . . . . . . . . . . . . . . . . . . . . . . . . . . . . . . . . . . . . . . . . . . . . . . 31
Turning your smartphone on and off . . . . . . . . . . . . . . . . . . . . . . . . . . . . . . . . . . . . . 31
Making calls . . . . . . . . . . . . . . . . . . . . . . . . . . . . . . . . . . . . . . . . . . . . . . . . . . . . . . . . 33
Receiving calls . . . . . . . . . . . . . . . . . . . . . . . . . . . . . . . . . . . . . . . . . . . . . . . . . . . . . . 36
Using voicemail . . . . . . . . . . . . . . . . . . . . . . . . . . . . . . . . . . . . . . . . . . . . . . . . . . . . . 37
What can I do when I’m on a call? . . . . . . . . . . . . . . . . . . . . . . . . . . . . . . . . . . . . . . . 38
Creating a speed-dial favorite button . . . . . . . . . . . . . . . . . . . . . . . . . . . . . . . . . . . . . 43
Using a hands-free device . . . . . . . . . . . . . . . . . . . . . . . . . . . . . . . . . . . . . . . . . . . . . 44
Customizing ringer settings . . . . . . . . . . . . . . . . . . . . . . . . . . . . . . . . . . . . . . . . . . . . 46
What are all those icons? . . . . . . . . . . . . . . . . . . . . . . . . . . . . . . . . . . . . . . . . . . . . . . 48
Chapter 4: Your email, messages, web browser, and Bluetooth . . . . . . . . . . . . . . . . . 51
Email on your smartphone . . . . . . . . . . . . . . . . . . . . . . . . . . . . . . . . . . . . . . . . . . . . . 51
Messaging . . . . . . . . . . . . . . . . . . . . . . . . . . . . . . . . . . . . . . . . . . . . . . . . . . . . . . . . . 56
Web browser . . . . . . . . . . . . . . . . . . . . . . . . . . . . . . . . . . . . . . . . . . . . . . . . . . . . . . . 57
®
by ACCESS device . . . . . . . . . . . . . . . . . . . . . . . 13
vii
Page 8

Connecting with Bluetooth® devices . . . . . . . . . . . . . . . . . . . . . . . . . . . . . . . . . . . . . 61
Sending information with Bluetooth
®
wireless technology . . . . . . . . . . . . . . . . . . . . 64
Chapter 5: Your contacts, calendar, and documents . . . . . . . . . . . . . . . . . . . . . . . . . . . 67
Contacts . . . . . . . . . . . . . . . . . . . . . . . . . . . . . . . . . . . . . . . . . . . . . . . . . . . . . . . . . . . 67
Calendar . . . . . . . . . . . . . . . . . . . . . . . . . . . . . . . . . . . . . . . . . . . . . . . . . . . . . . . . . . . 70
Documents . . . . . . . . . . . . . . . . . . . . . . . . . . . . . . . . . . . . . . . . . . . . . . . . . . . . . . . . . 73
Installing Applications . . . . . . . . . . . . . . . . . . . . . . . . . . . . . . . . . . . . . . . . . . . . . . . . . 73
®
Chapter 6: Your pictures, music, and Facebook
Camera . . . . . . . . . . . . . . . . . . . . . . . . . . . . . . . . . . . . . . . . . . . . . . . . . . . . . . . . . . . . 77
Pocket Tunes
Facebook
™
. . . . . . . . . . . . . . . . . . . . . . . . . . . . . . . . . . . . . . . . . . . . . . . . . . . . . . 78
®
for Palm . . . . . . . . . . . . . . . . . . . . . . . . . . . . . . . . . . . . . . . . . . . . . . . . . . 83
for Palm . . . . . . . . . . . . . . . . . . . . . . 77
Chapter 7: Check out these features . . . . . . . . . . . . . . . . . . . . . . . . . . . . . . . . . . . . . . 85
Important safety and legal information . . . . . . . . . . . . . . . . . . . . . . . . . . . . . . . . . . . . . 87
Index . . . . . . . . . . . . . . . . . . . . . . . . . . . . . . . . . . . . . . . . . . . . . . . . . . . . . . . . . . . . . . . . 91
viii
Page 9
Welcome
CHAPTER
1
What do I need to get started?
This guide helps you set up your
smartphone and quickly learn to use it. To
get started, you need all the items that
came in the box, plus the following:
• Appropriate service contracts. Phone
and text messaging services require a
service contract with a wireless service
provider. Web and email messaging
services require a service contract and
data services from a wireless service
provider. Data speeds vary based on
network availability and capacity.
Contact your wireless service provider
for details about your data service
options.
• A location where you are within
coverage of your network.
• An electrical outlet.
• The computer with which you want to
synchronize your personal information.
Where can I learn more?
Whether you’re on the go or at your
computer, there are several ways to learn
more about using your smartphone.
For a quick introduction
Quick Tour: You can open this short
introduction to your smartphone anytime.
WHAT DO I NEED TO GET STARTED?
9
Page 10
1
WELCOME
CHAPTER
Press Applications , and then select
Quick Tour .
Tu t o r i a l : The tutorial explains how to make
calls, browse the web, and send and
receive email. Find the tutorial on the web
at http://www.palm.com/support/
.
Many dialog boxes have a Tips icon in
the upper-right corner. Select the Tips icon
to learn about the tasks you can perform in
that dialog box.
Online support from Palm: For up-to-date
downloads, troubleshooting, and support
information, go to http://www.palm.com/
While using your smartphone
On-device User Guide: A specially
formatted copy of the User Guide is on
your smartphone. To view the guide,
press Applications and then select
My Centro select the Support tab,
and then select User Guide.
Tips: Some applications include helpful
tips for getting the most out of your
smartphone. To view these tips, open an
application, press Menu , select
Options, and then select Tips.
support/.
If you need more information
Books: Many books on Palm OS
®
devices
are available from local or online book
retailers (look in the computers section), or
visit http://www.palm.com/support/
.
Online forums: Consult online user
discussion groups to swap smartphone
information and learn about Centro topics
you may find nowhere else. Visit http://
www.palm.com/support/ for details.
WHERE CAN I LEARN MORE?
10
Page 11
WELCOME
2
3
5
4
6
1
7
8
11
13
9
10
12
1
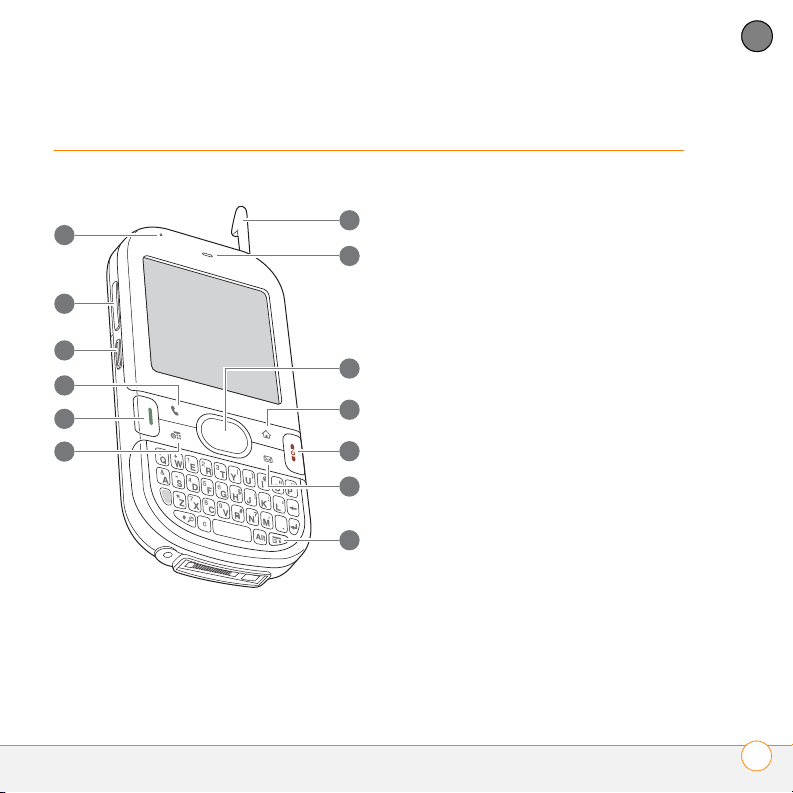
Palm®Centro™ smartphone overview
1 Charge indicator light
2 Vol ume
3 Side button
4 Phone
5 Send (for making calls)
6 Calendar
7 Stylus
8 Earpiece
9 5-way navigator and Center button
10 Applications (access all applications)
11 Power /End
12 Messaging (email application)
13 Menu
Front view
CHAPTER
®
PALM
CENTRO™ SMARTPHONE OVERVIEW
11
Page 12
1
3
4
5
1
6
7
2
8
9
10
11
WELCOME
CHAPTER
Back view
IMPORTANT The Palm
®
Centro™
smartphone speaker includes a large
magnet, so be sure to keep your
smartphone away from credit cards or
other items that could be demagnetized.
3 IR (infrared) port
4 MicroSD expansion card slot
5 Lanyard connector
6 Power connector
7 Microphone
8 Speaker
9 Battery door
10 Headset jack (headset purchased separately)
11 Sync connector
To p vie w
* Ringer switch
DID YOU KNOW
sounds at once, so you don’t need to hunt for
Off buttons all over the device.
?
The Ringer switch silences all
1 Self-portrait mirror
2 Camera lens
12
®
PALM
CENTRO™ SMARTPHONE OVERVIEW
Page 13
WELCOME
1
Upgrading from
®
another Palm OS
by
ACCESS device
NOTE If you’re setting up your first Palm
®
OS
device, skip this section.
You can transfer all compatible apps and
info from your previous Palm OS device to
your new Palm Centro smartphone. This
includes your calendar events, contacts,
memos, and tasks, as well as your app
settings, any compatible third-party apps,
and any files that are compatible with the
Palm OS software version 6x on your new
Centro smartphone.
Incompatible files are quarantined.
Quarantined files are not installed on your
smartphone; they are placed in a new
folder on your computer: C:\Program
Files\Palm\device name\PalmOS5
Incompatible Apps. (On some systems
Palm may be replaced with palmOne or
Handspring.)
NOTE We do not recommend using
third-party utilities that back up your old
device’s information onto a microSD
expansion card and then transfer the info to
your smartphone. Such methods transfer
all applications to your smartphone,
including those that are not designed to
work with Palm OS version 6x.
1 Calculate how much space your apps
and info occupy on your previous Palm
OS device:
• Press Applications .
• Press Menu .
• Select Info on the App menu.
• At the bottom of the screen, select
Size.
• Look at the numbers on the Free
Space line and subtract the number
on the left from the number on the
right to calculate the space used. For
example, on the device shown on the
next page, 22.4 – 17.5 = 4.9. This
means that the space used on this
device is 4.9MB.
CHAPTER
UPGRADING FROM ANOTHER PALM OS
®
BY ACCESS DEVICE
13
Page 14

1
WELCOME
CHAPTER
3 Sync your previous device with your
previous desktop software to back up
your info one last time.
4 Install the desktop synchronization
software from your new Palm Desktop
Software Installation CD (see the Read
This First booklet).
IMPORTANT Do not sync your new Palm
2 If the space used on your previous
device is 120MB or less, go to step 3.
If the space used is greater than
120MB, do any of the following to
reduce the space used before going to
the next step:
• Delete any third-party apps that you
no longer use.
• Move large files, such as eBooks and
images, to a microSD expansion card.
• Move third-party apps to a microSD
expansion card.
• Purge old info in apps such as
Calendar (Date Book), Tasks (To Do),
and email. For instructions, see the
documentation that came with your
previous device.
Centro smartphone with any previous
versions of Palm
®
Desktop software.
5 When prompted, do the following
during the installation process:
• Connect your new smartphone to
your computer (see the Read This
First booklet).
• Indicate whether you want to sync
only the info in your PIM apps
(Calendar, Contacts, Memos, and
Tasks) or all info and apps (excluding
apps known to be incompatible).
• Select a device name for your new
smartphone; be sure to select the
same name that you used for your old
device. (This is the name that appears
in the User list in Palm Desktop
software.)
UPGRADING FROM ANOTHER PALM OS
14
®
BY ACCESS DEVICE
Page 15

WELCOME
1
MAC ONLY If you have pictures on your
previous device, copy them from your
previous device to a microSD expansion
card or beam them to your new Palm
Centro smartphone.
6 If you plan to continue using your
previous device, perform a hard reset to
remove its device name. (See the
documentation that came with your
previous device for hard reset
instructions.) The next time you sync
your previous device with your
computer, assign it a new name.
If any third-party apps are quarantined
during the installation, do not manually
install them. Contact the developer for
software updates and info about
compatibility with your new smartphone.
CHAPTER
UPGRADING FROM ANOTHER PALM OS
®
BY ACCESS DEVICE
15
Page 16

1
CHAPTER
WELCOME
UPGRADING FROM ANOTHER PALM OS
16
®
BY ACCESS DEVICE
Page 17
Moving around on your smartphone
CHAPTER
2
To move around your smartphone screen,
you can use the 5-way navigator for
one-handed navigation, or you can tap
items on the screen with the stylus. With
use, you will find your own favorite way to
scroll, highlight, and select menu items.
TIP
Some third-party applications may not
work with the 5-way navigator, and you must
use the stylus instead.
DID YOU KNOW
icons to indicate directions on the 5-way.
These are different from any onscreen arrows
that you tap with your stylus or select with the
5-way to display pick lists.
?
In this guide, we use arrow
The 5-way includes the following buttons:
5
4 2
1 Up
2 Right
3 Down
4 Left
5 Center
1
3
17
Page 18
MOVING AROUND ON YOUR SMARTPHONE
2
CHAPTER
Highlighting and selecting items
On most screens, one item—a button, a
list entry, or a check box—is highlighted by
default. The highlight identifies which item
is affected by your next action. Use Left ,
Right , Up , and Down on the
5-way to move the highlight from one item
to another.
TIP
If the item you want doesn’t appear on the
screen, try tapping the onscreen scroll arrows
to view more info.
• Colored background: When text, a
phone number, an email address, a web
link, or an item in a list is highlighted,
the item is displayed as white text
Learn to recognize the highlight. It can take
against a colored background.
two forms:
• Border glow: When an entire screen,
an onscreen button (such as Done,
New, or OK), or a pick list is highlighted,
a glow appears around its border. If an
entire list screen is highlighted, the
glow appears at the top and bottom of
the screen only; to highlight the first
item in the list, press Center .
After highlighting an item, you can select
(activate) it by pressing Center , or by
tapping the item with the stylus.
Highlighting text
You can use the stylus to highlight text on
the screen.
• Tap and drag the stylus across the text
you want to highlight.
18
Page 19
MOVING AROUND ON YOUR SMARTPHONE
*
2
• To highlight a word, double-tap it.
• To highlight a paragraph, triple-tap it.
Accessing command buttons
In most applications, command buttons
such as New, OK, and Details appear at the
bottom of the screen. In many cases, you
can jump directly to these buttons instead
of scrolling to them.
• From a list screen, such as the Memos
list, press Right to jump to the first
button.
• From a screen where you create or edit
entries, such as Contact Edit, press
Center to jump to the first button.
• From a dialog box, such as Edit
Categories, press Up or Down to
scroll to the buttons.
Selecting menu items
Many applications have menus to give you
access to additional features. These menus
are usually hidden from view, but they
appear when you press the Menu key
in the lower-right corner of the keyboard.
1 Press Menu to display an
application’s menus.
* Menu shortcut
2 Press Right and Left to switch
between menus.
3 Press Up and Down to highlight
a menu item.
4 Press Center to select the menu
item, or press Menu to close the
menu and cancel your selection.
TIP
Most menu items have a shortcut. To use
a menu shortcut, press Menu + the shortcut
letter. You don’t have to open a menu to use a
menu shortcut. For example, in Calendar, you
can press Menu + N to create a new event.
CHAPTER
19
Page 20
MOVING AROUND ON YOUR SMARTPHONE
2
1
3
5
6
4
7
8
2
CHAPTER
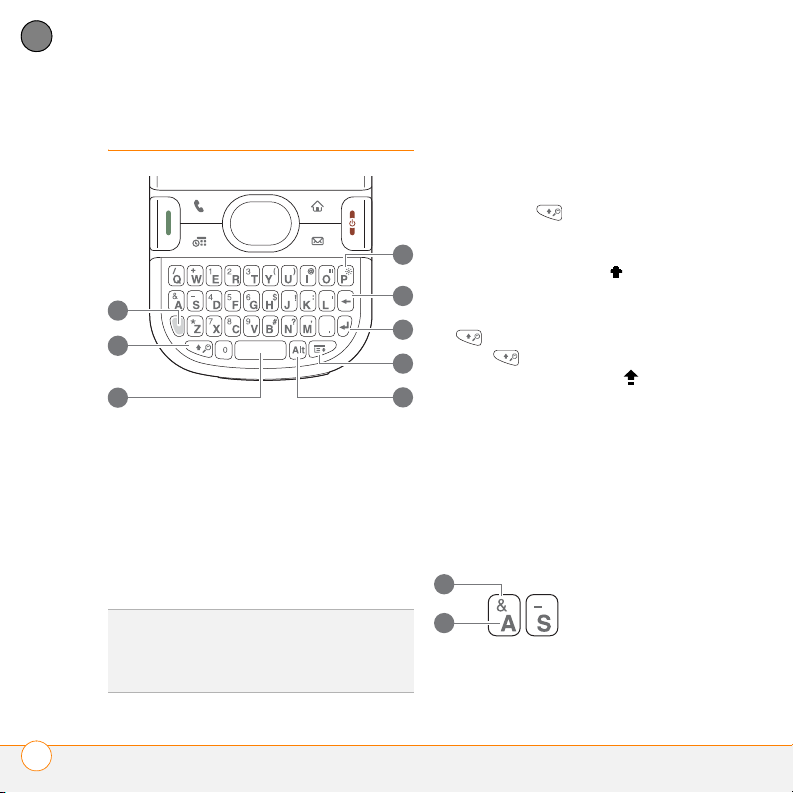
Using the keyboard
Entering lowercase and uppercase letters
• To enter lowercase letters, press the
desired keys.
• To enter an uppercase letter, press
Shift/Find and then press a letter
key. You don’t need to press and hold
Shift while entering a letter. When Shift
is active, an up arrow appears in the
lower-right corner of the screen.
• To turn Caps Lock on, press Shift/Find
twice. To turn it off, press Shift/
Find once. When Caps Lock is on,
an underlined up arrow appears in
the lower-right corner of the screen.
1 Option
2 Shift/Find
3 Space
4 Backlight
5 Backspace
6 Return
7 Menu
8 Alt
Entering numbers, punctuation, and symbols
Numbers, punctuation, and symbols
appear above the letters on the keys.
To enter these characters, do one of
the following:
1
TIP
When using the keyboard, most people
find it easiest to hold the Centro smartphone
with two hands and use the tips of both
thumbs to press the keys.
2
1 Symbol
2 Letter
USING THE KEYBOARD
20
Page 21
MOVING AROUND ON YOUR SMARTPHONE
2
• Press Option , and then press the
key with the desired character shown
above the letter. You don’t need to press
and hold Option while pressing the
second key. When Option is active, the
symbol appears in the lower-right
corner of the screen.
• To turn Option Lock on, press
Option twice. To turn it off, press
Option once. When Option Lock is
on, the symbol appears in the
lower-right corner of the screen.
DID YOU KNOW
automatically default to Option Lock, such as
the Dial Pad View in the Phone application or
the Calculator. In this case, you do not need
to press Option to enter numbers.
?
Some application views
Entering other symbols and accented characters
Symbols and accented characters that do
not appear on the keyboard are sometimes
called alternate characters because you
enter them using the Alt key.
1 Enter the character that corresponds to
the symbol or accented character you
want. See the table that follows.
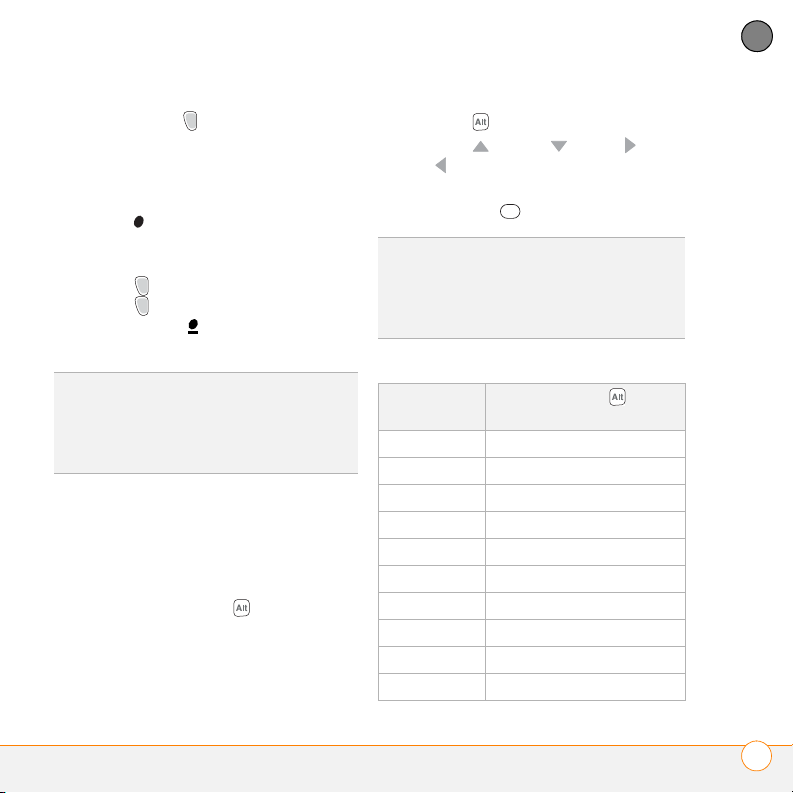
2 Press Alt .
3 Press Up , Down , Right , or
Left to highlight the desired
character.
4 Press Center to insert the character.
DID YOU KNOW
grouped by their similarity to the base key. For
example, when you press Alt + E you can
access the following alternate characters:
e é, è, ë, and ê.
?
Alternate characters are
Symbols and accented characters
Enter… Then press Alt to
select…
a á à ä â ã å æ
A Á À Ä Â Ã Å Æ
b or B ß
cç ¢ ©
CÇ ¢ ©
e é è ë ê
EÉ È Ë Ê
i í ì ï î
I Í Ì Ï Î
l or L £
CHAPTER
USING THE KEYBOARD
21
Page 22
MOVING AROUND ON YOUR SMARTPHONE
2
CHAPTER
Enter… Then press Alt to
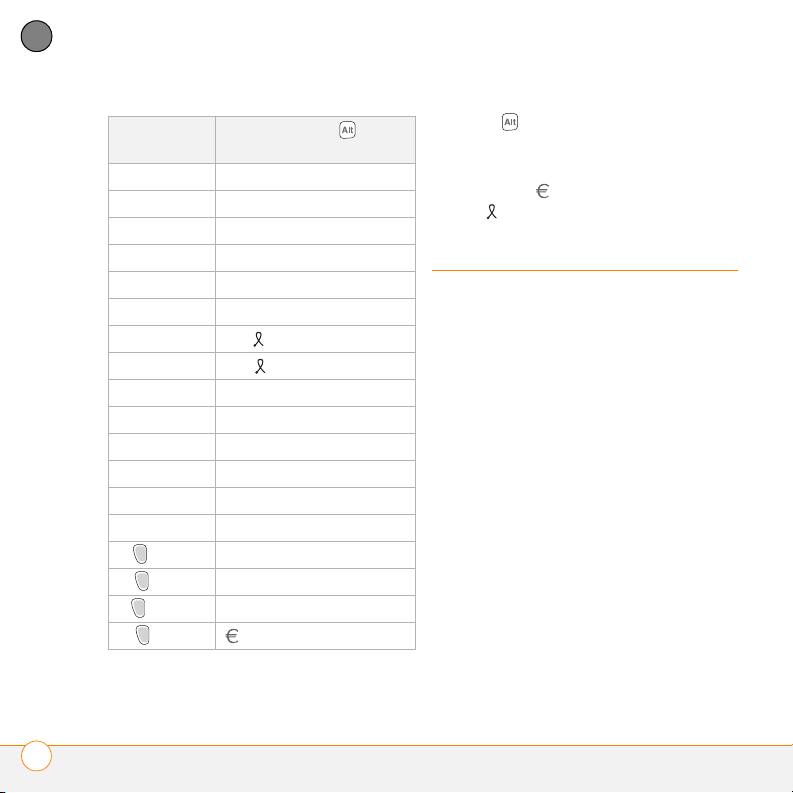
select…
nñ
NÑ
o ó ò ö ô œ õ
O Ó Ò Ö Ô Œ Õ
p or P 
r or R ®
sß š
Sß Š
t or T ™
u ú ù ü û
UÚ Ù Ü Û
x or X x ¤
y ý ÿ
Y Ý Ÿ
! ( + J) ¡
? ( + N) ¿
: ( + K) :-) :-( ;-)
$ ( + H) £ ¥ ¢
Press Alt by itself, after a space or at
the beginning or end of a line, to select
these characters:
; _ • \ % = ° ÷ £ ¥ ¢ [ ] { } < > « » © ® ™
~ ^ ø |
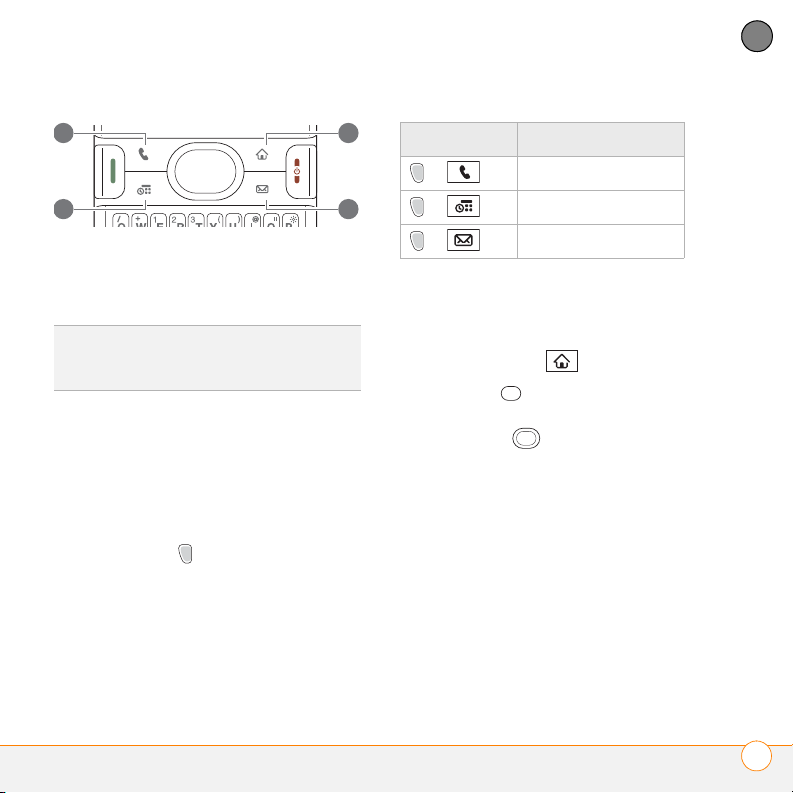
Opening applications
When you open an application using either
Applications View or an application button,
you automatically close the application you
were previously using.
Using the quick buttons
The front of your smartphone has three
quick buttons—Phone, Calendar, and
Messaging—that open applications. The
fourth button opens Applications View,
which opens a view showing the icons of
the applications installed on your
smartphone.
OPENING APPLICATIONS
22
Page 23
MOVING AROUND ON YOUR SMARTPHONE
1
2
3
4
2
1 Phone
2 Calendar
3 Applications
4 Messaging
TIP
You can open a button’s secondary
application by pressing Option and then
pressing the quick button.
Each quick button opens two applications:
• Simply press a button to turn on your
smartphone and open the button’s
primary application (see the preceding
illustration).
• Turn on your smartphone, and then
press Option and a quick button to
open the button’s secondary application
Buttons Secondary app
CHAPTER
+ Web
+ Memos
+ Email
Using Applications View
You can access all available applications
through Applications View.
1 Press Applications .
2 Press Center on the 5-way to turn
off Keyguard.
3 Use the 5-way to highlight the
application you want to use.
OPENING APPLICATIONS
23
Page 24
MOVING AROUND ON YOUR SMARTPHONE
21
2
CHAPTER
4 Press Center to open the selected
application.
TIP
Enter the first few letters of an app name
to highlight it. For example, if you press P, it
highlights Phone; if you then press R, it
highlights Prefs. If you pause and then press
R, it highlights the first app that starts with R.
TIP
Press Applications repeatedly to cycle
through the various categories of apps.
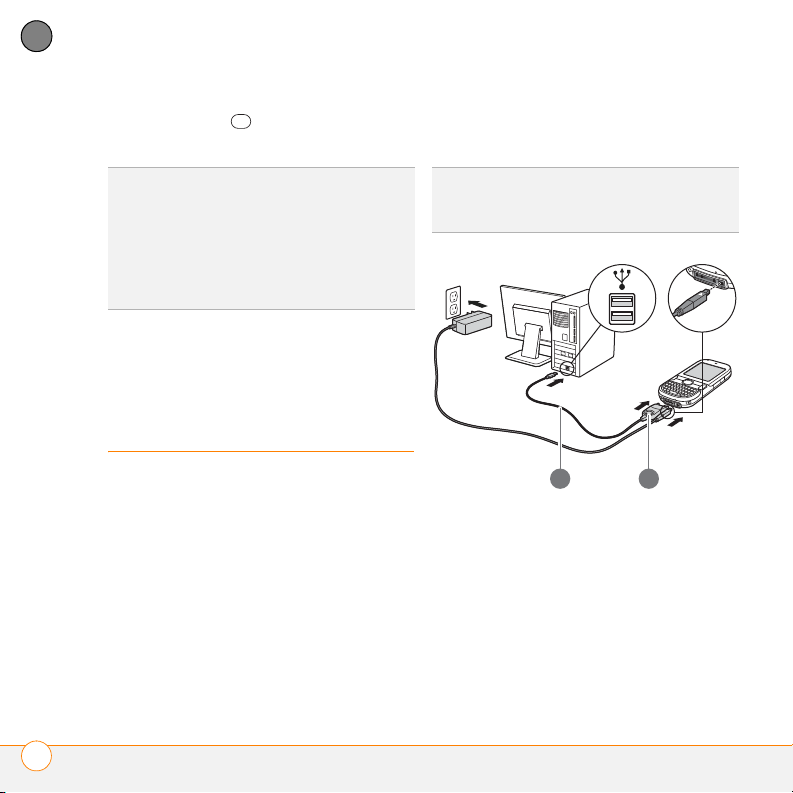
1 Connect your smartphone to your
computer.
TIP
If you’re performing initial setup, your
device should already be connected to your
computer.
Synchronizing information—the basics
BEFORE YOU BEGIN To sync your info,
you must install Palm Desktop
softwarefrom the Palm Desktop Software
Installation CD that came with your
smartphone—even if you sync with
Outlook or another third-party application.
1 Sync cable
2 Sync button
2 Press the sync button on the sync
cable.
SYNCHRONIZING INFORMATION—THE BASICS
24
Page 25
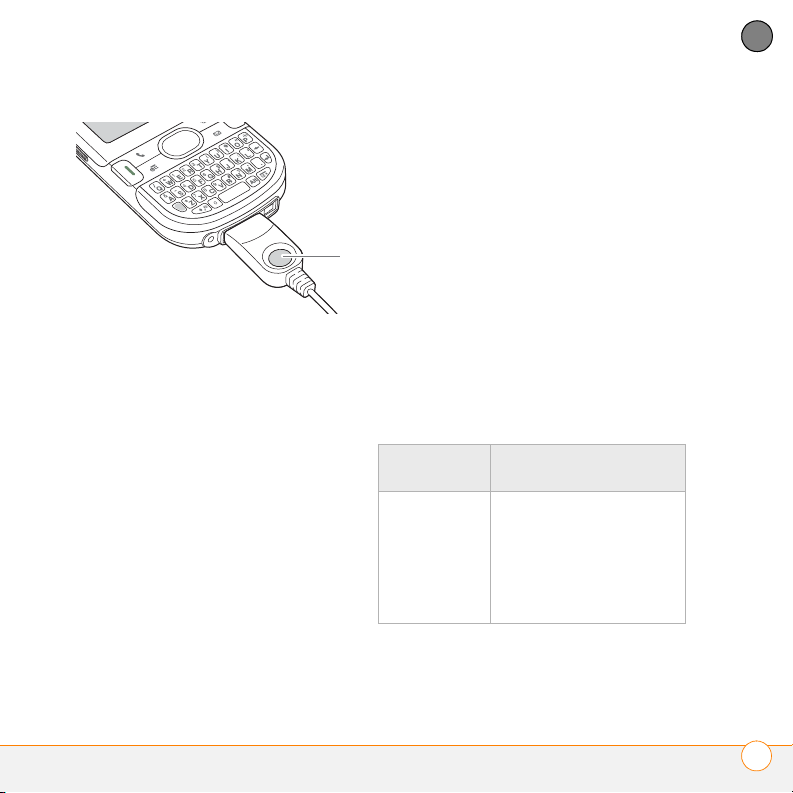
MOVING AROUND ON YOUR SMARTPHONE
*
2
* Sync button
Messages on both your computer and
your smartphone indicate that
synchronization is in progress.
3 Wait until you see the message on your
smartphone that the HotSync operation
is complete; then disconnect the sync
cable. Do not disconnect the sync cable
until you see this message.
Why synchronize?
Synchronizing means that info that has
been entered or updated in one place—
your smartphone, your computer, or your
corporate server—is automatically updated
in the other. There’s no need to enter the
info twice. We strongly recommend that
you sync your smartphone with your
computer or corporate server frequently to
keep your info up-to-date (and backed up) in
both locations.
The info from all the following applications
is updated by default each time you sync
your smartphone with your desktop
software:
How each application syncs depends on
your computer type and the desktop
software you are using, as follows:
Computer/
What syncs and where
application
Windows/
Outlook
• Calendar, Contacts,
Memos, and Tasks
sync with Outlook.
• Pics&Videos syncs
with Palm Desktop
software.
CHAPTER
SYNCHRONIZING INFORMATION—THE BASICS
25
Page 26
MOVING AROUND ON YOUR SMARTPHONE
2
CHAPTER
Computer/
What syncs and where
Maximizing battery
application
Windows/
Palm
Desktop
software
Mac/
Palm
Desktop
software
All applications sync with
Palm Desktop.
All applications sync with
Palm Desktop.
life
To learn how to insert and remove the
battery from your smartphone, see the
Read This First setup poster included with
your smartphone package.
Battery life depends on how you use your
smartphone. You can maximize the life of
your battery by following a few easy
If you’re finishing your initial setup, you
guidelines:
now have the option to install bonus
software. If you choose to install some of
the bonus software, you need to sync
again to install the software on your
smartphone.
TIP
Problems synchronizing? See your
®
Palm
Centro™ smartphone User Guide for
troubleshooting suggestions.
TIP
You can buy an extra battery as a spare for
long airplane trips or periods of heavy use. To
purchase batteries that are compatible with
your smartphone, go to http://
www.palm.com/support/.
• Charge your smartphone whenever
you’re at your desk, or charge it
overnight. The lithium-ion battery has a
much longer useful life when it is
topped off frequently, versus charging it
after it is fully drained.
• Your smartphone’s wireless features
(phone, email, messaging, and web)
MAXIMIZING BATTERY LIFE
26
Page 27
MOVING AROUND ON YOUR SMARTPHONE
2
and media features (camera, media
players, eBooks, and games) consume
more power than its organizer features.
If you spend a lot of time using the
wireless and media features, keep an
eye on the battery icon and charge
when necessary.
• If you don’t plan to use the wireless
features on your smartphone for a
while, turn off your phone (see “Turning
your phone on and off” on page 32) and
let all calls be picked up by voicemail.
• As with any mobile phone, if you are in
an area with no wireless coverage, your
smartphone searches for a signal, which
consumes power. If you cannot move to
an area of better coverage, temporarily
turn off your phone. While your phone is
off, you can continue to use your
smartphone’s nonwireless features.
• Turn down the screen brightness.
• Decrease the settings in Power
Preferences and turn off Beam Receive.
• Turn off the Bluetooth
®
feature if you’re
not using it.
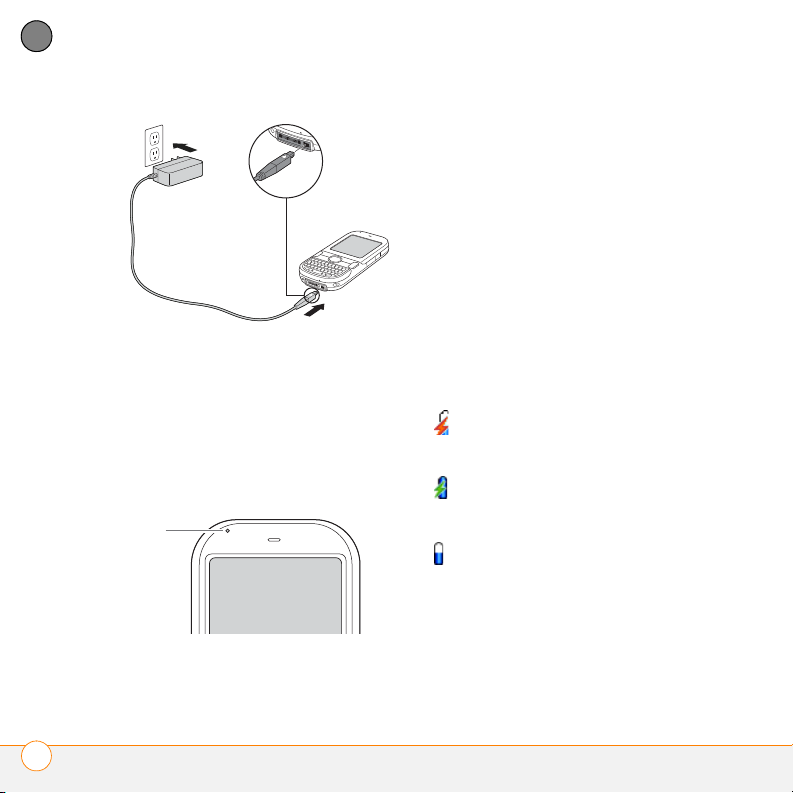
Charging the battery
The battery comes with enough of a charge
that you can complete the setup process
and activate your phone. After activation,
we recommend charging your smartphone
for three hours (or until the indicator light is
solid green) to give it a full charge.
TIP
To avoid draining the battery, charge your
smartphone every day, especially if you use
your phone often.
DID YOU KNOW
fully drained, your info is still stored safely on
your smartphone until you connect it to a
power source and charge the battery.
1 Plug the AC charger into a wall outlet.
2 Connect the charger cable to the
bottom of your smartphone. Make sure
the arrow on the connector is facing up,
toward the screen.
?
If your battery ever becomes
CHAPTER
CHARGING THE BATTERY
27
Page 28
MOVING AROUND ON YOUR SMARTPHONE
*
2
CHAPTER
If the battery is fully drained, it may
take a few moments for the indicator
light to turn on when you begin
charging.
If the indicator light does not turn on
when you connect your smartphone to
the AC charger, double-check the cable
connection and the electrical outlet to
which it is connected.
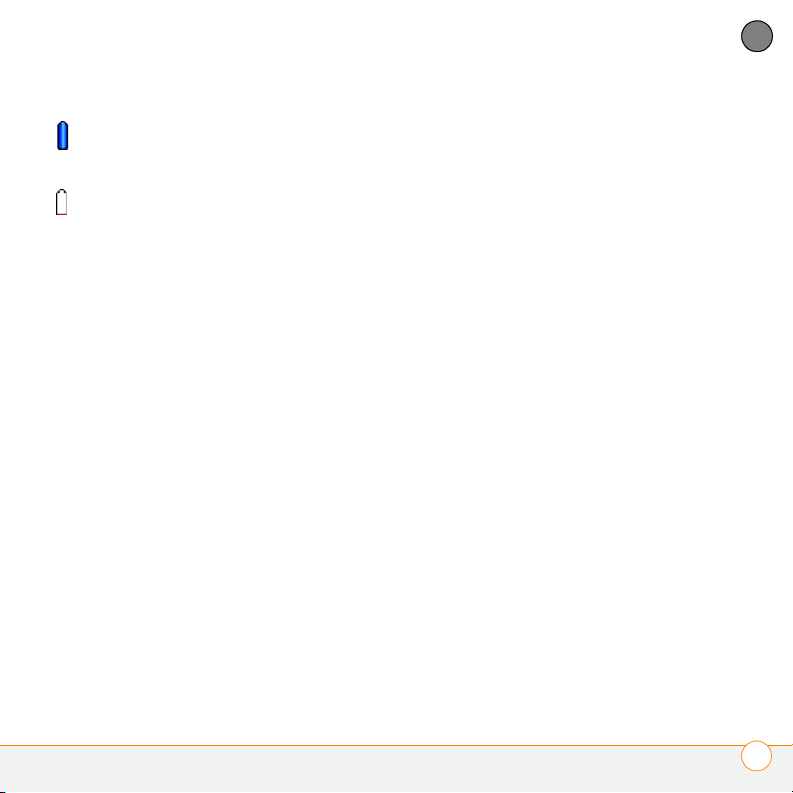
When your smartphone is on (see “Turning
3 To confirm that your smartphone is
being charged, check the indicator light
on your smartphone.
• Solid red indicates that your
smartphone is being charged.
• Solid green indicates that your
smartphone is fully charged.
your smartphone on and off” on page 31),
the onscreen battery icon displays the
charging status:
A red lightning bolt indicates that the
battery is connected to an electrical
outlet and is being charged.
A green lightning bolt indicates that
the battery is connected to an
electrical outlet and is fully charged.
A partial battery without a lightning
bolt indicates that the battery is not
connected to an electrical outlet and
it has some power.
* Indicator light
CHARGING THE BATTERY
28
Page 29
MOVING AROUND ON YOUR SMARTPHONE
2
Your battery is fully charged and your
smartphone is not connected to the
charger.
An almost empty battery that is red
at the bottom indicates that you
need to charge the battery
immediately. You can tap this icon to
see the remaining battery power.
CHAPTER
CHARGING THE BATTERY
29
Page 30

MOVING AROUND ON YOUR SMARTPHONE
2
CHAPTER
CHARGING THE BATTERY
30
Page 31

Your phone
1
2
CHAPTER
3
Turning your smartphone on and off
NOTE In this guide the term smartphone
describes your device and its physical
aspects. The term phone describes the
feature of your Palm
that lets you connect to your wireless
service provider’s network to make and
receive calls and transmit data.
The phone and the screen of your
smartphone can be turned off and on
separately.
®
Centro™ smartphone
Waking up the screen
Wake up the screen and leave the phone
off to use only the organizer features, for
example, when you’re on an airplane and
want to look at your calendar.
1 Press and release Power/End to
wake up the screen.
1 Center
2 Power/End
TURNING YOUR SMARTPHONE ON AND OFF
31
Page 32

YOUR PHONE
3
CHAPTER
2 Press Center to turn off Keyguard.
3 Press and release Power/End to turn
off the screen and lock the keyboard.
TIP
You can also press any of the quick buttons
or the Applications button to wake up your
smartphone screen.
TIP
You can set how long the screen stays on.
Press Applications, select Preferences,
select Power, and then adjust the Auto -off
after setting.
Turning your phone on and off
When your phone is on, it is connected to
your wireless service provider’s network (if
you are in a coverage area) so that you can
make and answer phone calls and use
1 Wake up the screen.
2 Press and hold Power/End to turn on
your phone.
You know your phone is on and that
you’re inside a coverage area when you
see the signal-strength icon at the
top of the Main View in the Phone app.
TIP
If you’re outside a coverage area, No
Service appears in the upper-left corner.
3 Press and hold Power/End again to
turn off your phone.
You know your phone is off when you
see Phone Off at the top of the Main
View in the Phone application.
wireless services, such as email,
messaging, and the web browser.
During initial setup, your phone is
automatically turned on, so you can use
wireless services right away. If you turn off
Opening the Phone application
• Press Phone to open the Main
View in the Phone application.
your phone, you can still use the organizer
and media features such as Contacts and
the Pocket Tunes™ application.
TURNING YOUR SMARTPHONE ON AND OFF
32
Page 33

YOUR PHONE
1
2
3
3
CHAPTER
1 Status icons
2 Dial Pad
3 Favorite buttons (scroll down to see more)
Making calls
There are several ways to make a call. Try
them all to find out which way you like
best.
Dialing using the onscreen Dial Pad
1 Press Phone .
2 Enter the phone number by tapping the
onscreen Dial Pad with the stylus.
3 Tap Dial or press Send to make the
call.
TIP
If you swapped out the Dial Pad for
wallpaper in the Phone application’s Main
View, you can still access the Dial Pad. From
the Phone application’s Main View, press
Send, and then select Dial Pad.
DID YOU KNOW
directly into the Dial Pad. Copy a number from
another application and press Phone to switch
to the Dial Pad. Open the Edit menu and
select Paste. Press Send to dial.
?
You can paste numbers
Dialing using the keyboard 1 Dialing using the keyboard 2 Press Phone .
MAKING CALLS
33
Page 34

YOUR PHONE
3
CHAPTER
3 Press the numbered keys to enter the
phone number. (You don’t need to press
Option.)
For example, entering SM displays Smilla
Anderson, John Smith, and Sally Martin.
Entering JSM finds only John Smith.
4 Press Send to make the call.
TIP
After you enter a phone number, you can
also press Center on the 5-way to select
whether to make a phone call or send a text
message to that number.
*
Dialing by contact name
BEFORE YOU BEGIN Create some
contacts (see “Contacts” on page 67).
1 Press Phone .
2 Select the Contacts favorite button, just
below the Dial Pad in Main View.
3 Use the keyboard to start entering one
of the following for the contact you
* Text appears here as you enter it
4 Select the number you want to dial.
5 Press Send to dial.
TIP
To see more info for a contact, highlight
the name and press Center on the 5-way to
view the address, company, and other details.
want to call:
• First name (JOH for John)
• Last name (SMI for Smith)
• First initial and last name (JSM for
John Smith)
Voice Dialing
You can use the Voice Dialing application to
call people in your Contacts list by saying
their name or number. If the person you are
calling has more than one phone number,
you can specify which number to call.
MAKING CALLS
34
Page 35

YOUR PHONE
3
1 Press Applications .
2 Select Voi c e Di a l .
A voice prompts you to “say a
command.”
3 Do one of the following:
To call a person in your contact list by
saying their name: Say, “Call [name],”
for example, “Call John Doe.” To specify
which one of a contact's numbers you
want to call, say, “Call [name] Home,”
for example, “Call John Doe Home.”
To call a number by saying the
individual digits: Say, “Call [number],”
for example, “Call 408-555-1234.”
TIP
For more information about what you can
do with Voice Dialing, refer to the Voi ce
Dialing by Voice Signal User Guide. The guide
is available on the Palm Desktop Software
Installation CD.
Dialing with a speed-dial favorite button
You can create your own speed-dial
favorites. See “Creating a speed-dial
favorite button” on page 43.
1 Press Phone .
2 Press Down to access Favorites.
TIP
Tap the numbers at the bottom of the
screen to go to more pages of favorite
buttons. You can also press Down or Right on
the 5-way to move through favorites.
3 Select a speed-dial favorite (Voicemail,
shown in the following illustration, is a
speed-dial favorite).
4 Press Send or Center to make
the call.
DID YOU KNOW
your Contacts list when you create a
speed-dial favorite, you can see all the
numbers for that contact. Highlight that
contact’s speed-dial favorite button, and
press Space on the keyboard.
?
If you select a contact from
CHAPTER
MAKING CALLS
35
Page 36

YOUR PHONE
3
CHAPTER
Redialing a recently called number
To dial the last number you called: Fr om
the Main View in the Phone app, press and
hold Send .
To select from your most recently dialed
numbers: From the Main View in the
Phone app, press Send to open the
Redial list, select the number you want to
call, and then press Send to dial.
Receiving calls
To receive calls, your phone must be on.
When your phone is off, your calls go to
voicemail.
To select from a chronological list of
calls: Select the Call Log favorite button.
RECEIVING CALLS
36
Page 37
YOUR PHONE
3
Answering calls
To answer a call, do one of the following:
• Press Send .
• Select Answer.
• Press the headset button (if a headset
is attached).
Ignoring calls
To ignore a call, do one of the following:
Send the call to voicemail: Press Power/
End or select Ignore.
Send the caller a text message: Select
Ignore with Text. This option sends the
call to voicemail and opens a text message
addressed to the caller.
NOTE Sending text messages to land-line
phones may not be supported.
Silencing the ringer
To silence the phone while it is ringing, do
one of the following:
• Press any key on your smartphone
except Send, Power/End, or the 5-way.
• Slide the Ringer switch to Sound Off
.
DID YOU KNOW
while it is ringing, you can either answer the
call or let it ring through to voicemail.
?
When you silence the ringer
Using voicemail
Your wireless service provider’s service
includes voicemail. Keep in mind that
airtime and other charges apply when
using voicemail from your smartphone.
Setting up voicemail
1 Make sure your phone is turned on (see
“Turning your phone on and off” on
page 32).
2 Press Phone .
3 Press and hold 1 or select the
Voicemail favorite button to dial your
wireless service provider’s automated
voicemail system.
Follow the prompts to set up your voicemail.
4
CHAPTER
USING VOICEMAIL
37
Page 38

YOUR PHONE
1
2
3
CHAPTER
Voicemail notification
When you have a new voicemail message,
you are notified with an Alert dialog box.
• To dismiss the Alert dialog box, select
OK.
• To play the message, select Listen.
When you have messages that you have
3 Enter your voicemail password using
the keyboard.
DID YOU KNOW
the Voicemail favorite button (see “Creating a
speed-dial favorite button” on page 43 for
details), you can select this button to enter
your password.
?
If you defined Extra Digits for
not listened to, a Voicemail icon also
appears in the title bar in the Phone
application. You can select this icon to
listen to your voicemail.
What can I do when I’m on a call?
When you make or receive a call, Active
Call View appears.
Listening to voicemail messages
1 Press Phone .
2 Press and hold 1 to dial the voicemail
system, or select the Voicemail favorite
button.
1 Call duration
2 Caller’s name and number
WHAT CAN I DO WHEN I’M ON A CALL?
38
Page 39

YOUR PHONE
3
TIP
If the screen dims during a call, press any
key except Power/End to restore the screen
brightness.
Use the 5-way or stylus to select the
onscreen buttons:
Ends the call immediately. You
can also press the headset
button (if a headset is attached).
Turns on the speakerphone so
you can check your calendar,
look up contact info, and use
other features during a call.
Turns off the speakerphone
when it is on.
Replaces the Spkr-phone button
when a Bluetooth
®
headset is
attached. Select this button to
transfer the call from the
Bluetooth headset to the built-in
earpiece.
Places the current call on hold.
Lets you make another call while
the first call is on hold. For info
on handling a second incoming
call, see “Making a second call”
on page 41.
Opens the Dial Pad so you can
manually dial additional
numbers, such as an extension
or a response to a voice prompt.
Dials any extra digits (such as a
password or an extension) that
you assigned to a favorite
button. See “Creating a
speed-dial favorite button” on
page 43 for info on defining
extra digits.
Mutes the microphone so that
you cannot be heard.
Ending a call
Do one of the following:
• Press Power/End .
• Select Hang Up All.
• Press the button on the headset (if a
headset is attached).
CHAPTER
WHAT CAN I DO WHEN I’M ON A CALL?
39
Page 40

YOUR PHONE
2
1
3
CHAPTER
Adjusting call volume
While a call is in progress, press the
Vo lu me button on the side of your
smartphone to adjust the call volume.
• To increase the volume, press the upper
half of the Volume button.
• To decrease the volume, press the
lower half of the Vol um e button.
• Press the Side button to confirm your
volume choice.
Switching applications during a call
You can use other apps on your
smartphone during a phone conversation,
including the organizer and text messaging
features. You cannot, however, make a data
connection while on a call. This means that
you cannot browse the web or send and
receive email messages while on a call.
1 (Optional) If you want to continue
talking while viewing another
application, select Spkr-phone or
connect a headset.
2 Press Applications .
3 Select the icon for the application you
want to open.
4 When you’re ready to leave the app,
press Phone to return to Active
Call View.
TIP
You can also press Phone to toggle
between Active Call View and the Main View
1 Vol ume b utton
2 Side button
in the Phone app, so you can access a favorite
during a call.
WHAT CAN I DO WHEN I’M ON A CALL?
40
Page 41

YOUR PHONE
3
Making a second call
You can make a second call while your first
call is on hold.
1 Dial the first number and wait until the
person answers.
2 Select Hold.
3 Select Add Call.
4 Dial the second number using any of
the methods described in “Making
calls” on page 33.
5 When the Dial another call prompt
appears, select Ye s .
When two calls are active, Active Call View
displays two status lines, each
representing one of the calls.
DID YOU KNOW
outgoing call, you can conference the two
calls, but you cannot swap between them.
When the second call is an incoming call, you
can swap between the two calls, but you
cannot conference them.
When two calls are active and you press
Power/End, you hang up both calls. If the
second call is an outgoing call, you can return
to the first call by waiting for the person on
the second call to hang up. If you accidentally
hang up both calls, your smartphone
automatically dials the number that was on
hold.
?
When the second call is an
Receiving a second call (call waiting)
When you are on a call, you can receive a
second call and have separate
conversations with each caller. When the
second call comes in, you hear a call
waiting tone and the Call Waiting dialog
box appears. You can do any of the
following to handle the second call:
• To place the current call on hold and
answer the new call, press Send or
select Answer.
CHAPTER
WHAT CAN I DO WHEN I’M ON A CALL?
41
Page 42

YOUR PHONE
3
CHAPTER
• To send the new call to voicemail, select
Ignore.
• To send the new call to voicemail and
2 Select Conf. This joins the two active
calls in a conference session.
send the caller a text message, select
Ignore with Text.
NOTE Sending text messages to land-line
phones may not be supported.
• To hang up the current call and answer
the new call, press Power/End .
When the incoming call message
reappears, select Answer or press
Send .
After you answer a second call, you can
switch between the original call and the
second call by selecting Swap.
Making a conference call
When you place a second outgoing call,
you can join the two calls in a conference
call. Please contact your wireless service
provider for availability and rate
3 To end the conference, press Power/
End to end all the calls.
information.
1 Make a second call.
WHAT CAN I DO WHEN I’M ON A CALL?
42
Page 43

YOUR PHONE
3
Creating a speed-dial favorite button
1 Press Phone .
2 Press down on the 5-way to scroll
and find a blank favorite select a button.
Select a blank button.
TIP
No more blank favorite buttons on the first
page? Press Right on the 5-way to go to
another Favorites page (there are five of
them).
3 Enter a label for the favorite:
• If the entry is for an existing contact,
select Lookup. Start entering the last
name of the contact, and select the
phone number of the contact when it
appears in the list.
• If the entry is for a new contact, enter
the label, press Down , and enter
the number.
CHAPTER
4 (Optional) Enter a Quick Key, which
you can press and hold from the Main
View in the Phone application to
instantly dial this speed-dial number.
5 (Optional) Select More, and then select
advanced options:
Extra Digits: Defines additional digits
to dial, such as a password or
extension. To enter a one-second
pause, insert a comma between digits.
To add a longer pause, enter more
commas.
Dial Extra Digits Automatically: Dials
predefined extra digits immediately
after dialing the phone number, when
checked.
6 Select OK.
CREATING A SPEED-DIAL FAVORITE BUTTON
43
Page 44

YOUR PHONE
3
CHAPTER
DID YOU KNOW
buttons for other tasks, such as opening an
application, accessing a web page, addressing
a text or email message, and more. See your
Palm
details.
?
You can also create favorite
®
Centro™ smartphone User Guide for
IMPORTANT If driving while using a
smartphone is permitted in your area, we
recommend using a headset or hands-free
car kit (both sold separately). However, be
aware that use of a headset that covers
both ears impairs your ability to hear other
sounds. Use of a headset while operating a
motor vehicle or riding a bicycle may create
Using a hands-free device
a serious hazard to you and others, and
may be illegal. If you must use a stereo
headset while driving, place a speaker in
only one ear. Leave the other ear free to
hear outside noises, and do so only if it is
You can connect a phone headset or car kit
legal and you can do so safely.
for hands-free operation. You can use the
wired stereo headset included with your
smartphone or one of the following types
Connecting to a Bluetooth
device
®
hands-free
of compatible hands-free devices that are
sold separately:
• Wired headsets with a 2.5mm
connector (3-pin or 4-pin)
• Wireless headsets and car kits enabled
with Bluetooth 1.1 or 1.2 wireless
technology
To find compatible hands-free devices, go
to http://www.palm.com/support/
.
KEY TERM
Partnership Two devices—for
example, your smartphone and a hands-free
device—that can connect because each
device finds the same passkey on the other
device. Once you form a partnership with a
device, you don’t need to enter a passkey to
connect with that device again. Partnership is
also known as paired relationship, pairing,
trusted device, and trusted pair.
USING A HANDS-FREE DEVICE
44
Page 45

YOUR PHONE
3
Once you set up a partnership with a
Bluetooth hands-free device, you can
communicate with that device whenever it
is turned on and within range. Bluetooth
range is up to 30 feet (10 meters) in
optimum environmental conditions.
Performance and range may be reduced by
physical obstacles, radio interference from
nearby electronic equipment, and other
factors.
TIP
If you hear a headset buzz or experience
poor microphone performance, your headset
may be incompatible with your smartphone.
BEFORE YOU BEGIN Prepare your
hands-free device to accept a Bluetooth
connection. See the documentation that
came with your hands-free device for
instructions.
1 Press Applications and select
Bluetooth or tap the Bluetooth
icon in the title bar.
2 Select Bluetooth On.
NOTE The Bluetooth icon changes from
gray to blue to let you know that Bluetooth
technology is turned on.
CHAPTER
3 (Optional) Enter a device name that
identifies your smartphone when it is
discovered by other Bluetooth devices.
NOTE Use the same device name for all
your Bluetooth connections. If you change
the device name, you need to re-create any
partnerships you have already created.
4 Select Setup Devices.
5 Select Hands-free Setup.
USING A HANDS-FREE DEVICE
45
Page 46

YOUR PHONE
3
CHAPTER
6 Follow the onscreen instructions to
create a partnership with the specific
hands-free device. When prompted,
enter a passkey.
IMPORTANT Some hands-free devices
have a predefined passkey. If your device
has a predefined passkey, you can find it in
the documentation for that device. Other
devices provide a screen where you enter
a passkey that you make up. In either case,
you must use the same passkey on both
your smartphone and your hands-free
device. We recommend that, where
possible, you make up a passkey of 16
alphanumeric characters (letters and
numerals only) to improve the security of
your smartphone. The longer the passkey,
the more difficult it is for the passkey to be
deciphered.
7 After you finish setting up the device,
select Done to return to Trusted
Devices View.
NOTE For some car kits, you need to
initiate a Bluetooth connection from your
smartphone to complete the partnership
process. To do this, highlight the car kit in
Trusted Devices View, press Menu ,
and then select Connect.
8 (Optional) Enable advanced hands-free
features by pressing the multifunction
button (MFB) on the hands-free device.
You can tell that the connection is
successful when you see a light-blue
headset icon in the title bar of the Main
View on your smartphone’s Phone
application. You can now use your
smartphone with the Bluetooth hands-free
device.
Customizing ringer settings
Selecting ringtones
You can set various tones for various types
of incoming calls.
1 Press Phone .
2 Press Menu .
CUSTOMIZING RINGER SETTINGS
46
Page 47

YOUR PHONE
3
3 Select Options, and then select Sound
Preferences.
4 Select the Application pick list and
select Ring Tones.
5 Select the Vol ume pick list and select
the volume level.
6 Select the Vibrate pick list and select
how you want your smartphone to
vibrate when there’s an incoming call.
7 (Optional) Uncheck the Escalate ring
tone volume box if you want the ring to
remain at the same volume regardless
of how long it rings.
8 Select ringtones from the following pick
lists:
Known Caller: An incoming call from
someone in your Contacts or Favorites.
Unknown Caller: An incoming call
from someone identified by caller
ID who is not in your Contacts or
Favorites.
Roaming: A special tone for incoming
calls when you’re outside your home
mobile network.
9 Select Done.
Adjusting ringer volume
When a call is not in progress and music is
not playing, press the Vo lu me button on
the side of your Centro smartphone to
adjust the ringer volume, and then press
the Side button to confirm your selection.
CHAPTER
CUSTOMIZING RINGER SETTINGS
47
Page 48

YOUR PHONE
3
CHAPTER
What are all those icons?
You can monitor several items by looking at
the icons in the title bar in the Phone app:
Wireless
Service
Name
Your phone is on and you’re in
your wireless service provider’s
coverage area. If you’re in an
area without any coverage, No
Service appears instead. When
you turn off your phone, Phone
Off appears.
You’re outside your wireless
service provider’s coverage area
and are roaming on another
wireless service provider’s
network. The word Roaming
also appears. The icon may flash
if the provider is not on your
wireless service provider’s
preferred roaming list.
You are in an area that supports
1xRTT data services.
Your phone is on and is
connected to a 1xRTT network,
but you’re not transmitting data.
You can still make and answer
calls.
Your phone is on and is
connected to a 1xRTT network,
but you’re not transmitting data.
You can still make and answer
calls.
Your phone is on and you’re
transmitting data over a 1xRTT
network. You can still make
calls, but you can’t answer calls
(incoming calls go to voicemail).
You are in an area that supports
EVDO data services.
Your phone is on. The stronger
the signal, the more bars that
appear. If you’re outside a
coverage area, no bars appear.
Your phone is on and is
connected to an EVDO network,
but you’re not transmitting data.
You can still make and answer
calls.
WHAT ARE ALL THOSE ICONS?
48
Page 49

YOUR PHONE
3
Your phone is on and you’re
transmitting data over an EVDO
network. You can still make or
answer calls. When you make or
answer a call, the transmission
is interrupted, and then it
resumes when you end the call.
You have new voicemail
messages. You can select this
icon to retrieve your messages.
You have a new alert, such as a
Calendar alarm or a new text
message. To view the alert,
press and hold Center .
TTY/TDD Mode is active. Use
this mode to communicate by
telephone if you have hearing,
speech, or language disabilities.
The Location setting is on and
your longitude and latitude info
is available to the network and
third-party apps. When this icon
appears with a red slash, your
location is available only during
emergency calls.
The Bluetooth® wireless
technology icon appears in gray
when this feature is off, in blue
when this feature is on, and in
reverse blue when your
smartphone is communicating
with another Bluetooth device.
You can tap this icon to turn
Bluetooth features on and off.
This icon replaces the Bluetooth
icon when your smartphone is
connected to a Bluetooth
hands-free device. This icon is
dark blue during a call and light
blue when you’re not on a call.
You have new text messages.
The numbers next to the icon
indicate the number of unread
messages. You can select this
icon to retrieve your messages.
You have new email messages.
You can select this icon to
retrieve your messages.
CHAPTER
WHAT ARE ALL THOSE ICONS?
49
Page 50

YOUR PHONE
3
CHAPTER
This icon indicates the current
(or next) event from the
Calendar app. If you have an
event conflict during this time
period, a red bar appears next to
the event. To jump to the event
in the Calendar app, select this
line.
KEY TERM
1xRTT (Single-carrier [1x] radio
transmission technology): A wireless
technology that can provide fast data transfer
and Internet access with average speeds of
60–80Kbps and bursts of up to 144Kbps.
KEY TERM
EVDO (Evolution Data Optimized):
A wireless broadband technology that is
designed for very high-speed data transfer
with average download speeds of 400–
700Kbps and is capable of reaching speeds up
to 1.8Mbps and upload speeds up to 156Kbps.
WHAT ARE ALL THOSE ICONS?
50
Page 51
Your email, messages, web browser, and Bluetooth
CHAPTER
4
Email on your smartphone
Your smartphone includes the VersaMail®
application (called Email in Applications
view). You can also access web-based
email, like Yahoo! Mail or Hotmail, from the
web browser on your smartphone.
BEFORE YOU BEGIN The VersaMail
application for email comes installed on
your smartphone, but before you can use
email, you must activate data services on
your wireless service account.
®
The VersaMail
for the VersaMail
on the Palm Desktop Software Installation
CD that came with your smartphone
application and User Guide
®
Application are included
®
package. If you ever need to re-install
VersaMail, see “Installing bonus software
from My Centro on your device” on
page 73.
KEY TERM
Email provider The service you
use to send and receive email. Your email
provider’s name appears between the @
symbol and the dot in your email address.
Gmail, for example, is an email provider; so
are AOL and Earthlink.
KEY TERM
Email application It’s not an
email provider, but an application on your
smartphone, that gives you a way to view and
manage email. An email application like
VersaMail just transfers messages from an
account that you have already set up with a
provider.
EMAIL ON YOUR SMARTPHONE
51
Page 52

YOUR EMAIL, MESSAGES, WEB BROWSER, AND BLUETOOTH
4
CHAPTER
The VersaMail® application
®
The VersaMail
application (called Email in
Applications View), lets you access your
corporate, personal, and fee-based Internet
email.
BEFORE YOU BEGIN You must activate
data services on your wireless service
provider’s account before you can use
email on your smartphone.
1 If either of the following is true, skip this
procedure and see the User Guide for
the VersaMail
®
Application for setup
instructions:
• You used VersaMail on your previous
Palm OS
®
device, and you want to
transfer those settings to your
smartphone.
• You plan to use VersaMail to access
an email account on a Microsoft
Exchange server, a Lotus Notes
TIP
To access web-based email, like Yahoo!
Mail or Hotmail, use the web browser.
server, or a Microsoft MAPI server.
2 Press Applications and select
Email to open the VersaMail
You can find additional information on using
and customizing VersaMail in the User
Guide for the VersaMail
®
Application that is
included on the Palm Desktop Software
Installation CD.
Before you can use VersaMail, you need to
enter your email account settings. If you
have multiple email accounts, you must
enter settings for each email account.
application.
3 If the Initial Setup dialog box appears,
select Continue.
4 Make up a name that describes this
account and enter it in the Account
Name field. For example, Work Email.
5 Select the Mail Service pick list, select
your email provider, such as Earthlink,
and then select Next.
EMAIL ON YOUR SMARTPHONE
52
Page 53

YOUR EMAIL, MESSAGES, WEB BROWSER, AND BLUETOOTH
4
If your email provider’s name is not
listed, select Other and then manually
enter your provider’s settings. Ask your
system administrator or ISP to provide
you with the following info:
• Mail protocol: POP or IMAP
• Incoming and outgoing mail server
names, such as mail.myisp.com
• Incoming and outgoing mail server
port numbers, such as 110 (incoming
POP), 143 (incoming IMAP), or 25
(outgoing POP or IMAP)
• (If necessary) Security settings: APOP,
ESMTP, SSL
6 Enter the username for your email
account. Your username usually appears
before the @ symbol in your email
address.
NOTE For some email providers, such as
Gmail, your username is your entire email
address. If you’re not sure what to enter as
your username, ask your provider.
7 Select the Password box, enter your
email account password, select OK, and
then select Next.
8 Select Next, and then select Done.
Creating and sending messages
1 From the Inbox, select New.
2 Begin entering one of the following for
the addressee:
• Email address
• First name
• Last name
TIP
If you enter info that matches your
contacts, VersaMail displays the matching
contacts. To accept a suggestion, select the
contact. To send to a different address, keep
entering the email address or name.
3 Enter the subject and message text.
CHAPTER
EMAIL ON YOUR SMARTPHONE
53
Page 54

YOUR EMAIL, MESSAGES, WEB BROWSER, AND BLUETOOTH
4
TIP
CHAPTER
To move between fields, press Up or
Down on the 5-way.
Adding attachments to your messages
You can attach several types of files to your
email messages.
4 Select one of the following:
Send: Connects and sends all
messages immediately. If for any
reason the message cannot be sent,
the message is stored in your Outbox.
Outbox: Stores the message to be sent
later.
Drafts: Saves the message so you can
continue working on it at another time.
1 Create the message to which you want
to attach the item.
2 On the New Message screen, select
the red paper clip icon in the
upper-right corner.
3 From the Ty p e pick list, select the type
of file to attach.
4 Select the item you want from the list in
the Ty p e box, or follow other onscreen
prompts.
5 Select Done.
TIP
To remove an attachment, select the file in
the Attachments box and then select Delete.
Receiving and viewing messages
r
om any mailbox, select Get or Get &
1 F
Send.
2 From the Inbox, select the message you
want to view.
EMAIL ON YOUR SMARTPHONE
54
Page 55

YOUR EMAIL, MESSAGES, WEB BROWSER, AND BLUETOOTH
4
3 If a large incoming message is
truncated, select More .
TIP
When viewing a message, tap the scroll
arrows at the top of the screen to view the
previous or next message.
4 Select Done.
Viewing attachments
There are a number of attachment types
you can open with the built-in software
on your smartphone (for example,
Microsoft Word, Excel, and PowerPoint
files; PDF files; ringtones; and photos).
1 From any folder, open the message with
the attachment you want to view.
Messages with downloaded
attachments appear with a paper clip
on the message icon.
TIP
If an attachment is not downloaded
because it is larger than your maximum
message size, the paper clip icon does not
appear and the attachment is not displayed at
the bottom of the message screen. Select
More to download and view any attachments.
2 Tap the attachment name at the bottom
of the message screen to view it in the
default viewer on your smartphone.
TIP
You can also tap the folder icon to the left
of the attachment name to open a menu of
tasks you can do with the attachment.
3 When you have finished with the
attachment, select Done.
CHAPTER
EMAIL ON YOUR SMARTPHONE
55
Page 56

YOUR EMAIL, MESSAGES, WEB BROWSER, AND BLUETOOTH
4
CHAPTER
NOTE If there is no Done button, press
Applications and select Email
Messaging
to return to the account’s Inbox.
Messaging lets you exchange brief text
Managing your messages
The status icons that appear near the
messages in your Inbox indicate the
following:
The message is unread when the
subject appears in bold.
The message includes an
attachment.
The message includes a meeting
invitation.
This message has high priority.
messages (SMS) with other devices and
email addresses that support this form of
messaging. Refer to your service plan for
pricing and availability of messaging
services.
NOTE Each text message can have up to
140 characters. You can send a message of
more than 140 characters, but the
message may be split into several
messages. If you send a text message to
an email address, the email address is
deducted from the 140-character count.
1 Press Applications and select
You can rearrange the message list to
e it easier to find and vie
mak
• In the Inbox, select Sort, and then
w messages.
select one of the following: Sort by
Date, Sort by Name, Sort by Subject.
• To quickly switch between folders in the
list view, select the folder pick list at the
top of the screen and select the desired
Messaging.
2 Select New.
3 Select the To field and do one of the
following to address the message:
• Enter the first initial and last name (no
spaces), and then select the
recipient’s phone number or email
address from your Contacts list.
folder.
56
MESSAGING
Page 57

YOUR EMAIL, MESSAGES, WEB BROWSER, AND BLUETOOTH
4
• Enter the recipient’s phone number or
email address.
• Press Center and select the
recipient’s name from the list of
recent addresses.
TIP
If you see numbers instead of letters (or
the reverse), you need to turn Option Lock on
by pressing Option twice or turn it off by
pressing Option once.
4 Enter your message. You can optionally
do any of the following:
• Insert predefined phrases by selecting
QuickText .
• Insert emoticons by selecting .
• Mark the message as urgent. Press
Menu and then select High
Priority from the Compose menu.
5 Select Send.
TIP
To save a draft of the message without
sending it, press Menu and select Save as
Draft.
To access the draft, select the
pick list in the title bar and select Drafts.
category
Web browser
Viewing a web page
®
The Blazer
pages into a single column and resizes
images. In this format—called Optimized
Mode—you can see most content without
scrolling left or right.
web browser reformats web
CHAPTER
WEB BROWSER
57
Page 58

YOUR EMAIL, MESSAGES, WEB BROWSER, AND BLUETOOTH
4
CHAPTER
BEFORE YOU BEGIN You must activate
data services on your wireless service
provider’s account.
• Scroll through the page: In Optimized
Mode (the default format, which is
optimized for your smartphone screen),
press Up or Down . In Wide Page
1 Press Applications and select
Web to open the Blazer web
browser. If necessary, select Ye s to turn
on your phone, and Ye s to connect to
the Internet.
If you do not see either the 1xRTT or
EVDO icon in the title bar of the
Phone application, data services are not
available in your current location and you
cannot connect to the Internet.
2 Enter a web page address (URL) in the
Address Bar and select Go.
NOTE If you browse to a secure web
page, a lock icon appears in the Address
Bar.
3 Do any of the following to navigate
within the web page:
• View a page in wide layout format (as
on your computer): Press Menu ,
select Options, and then select Wide
Mode, press Up , Down , Left ,
or Right to scroll in all directions.
• Follow a link to another web page: In
Optimized Mode, highlight the link by
pressing Left or Right and then
pressing Center to go to the
selected page. In Wide Page Mode, use
the stylus to select a link.
Submit a form: Enter the info and then
select the onscreen button to submit
the form. If the form doesn’t have an
onscreen button, press Return .
4 To get to the address bar and the icons
in the title bar above it, press Space and
then use the 5-way :
Goes to the previous web page.
Goes to the next web page.
Refreshes the page with the
latest content from the Internet.
Page Mode.
WEB BROWSER
58
Page 59

YOUR EMAIL, MESSAGES, WEB BROWSER, AND BLUETOOTH
4
Opens a list where you can
select Fast Mode (no images or
style sheets) or Normal Mode
(with images and style sheets).
Opens a dialog box where you
can enter a web address you
want to go to or view a list of
recently viewed web pages.
Goes to your home page.
Displays Bookmarks View so you
can select a bookmark or saved
page you want to view.
TIP
To find a recent page or search, select the
Address Bar pick list and select the item from
the list.
TIP
To select a commands from the menus,
just press Menu and select a command.
TIP
To adjust the font size, open the Options
menu and select Font. To fit more text on the
screen, select Small. To make the text easier
to read, select Large.
TIP
To pop up a list of sites you’ve visited, tap
and hold the Back or Forward buttons or
select these buttons with the 5-way.
Creating a bookmark
With bookmarks you can instantly access
up to one hundred of your favorite web
pages without entering the address every
time.
1 Go to the page you want to bookmark.
2 Press Menu .
3 Select Add Bookmark from the Page
menu.
4 (Optional) Change the entries in the
Name and Description fields.
5 Select OK, and then select OK again.
Downloading files from a web page
When you download a file to your
smartphone, you can open it in an app that
recognizes the file. For example, download
an MP3 file to listen to it later in the Pocket
CHAPTER
WEB BROWSER
59
Page 60
YOUR EMAIL, MESSAGES, WEB BROWSER, AND BLUETOOTH
4
CHAPTER
Tunes™ application. If a file isn’t recognized
by an app on your smartphone, you can
download the file to a microSD expansion
card, but you can’t open it on your
smartphone.
Streaming files from a web page
The web browser lets you stream files that
are recognized by one of the applications
on your smartphone. For example, you can
choose to play music and video files in
many popular formats (MP3, WMA, WMV).
Item Supported File Types
Pictures JPG, WBMP, GIF, PNG
Videos MP4, 3G2, ASF, WMV
Ringtones MIDI, AAC, AAC+, MP3
1 When the web browser recognizes
streamed content on a web page, it
displays a Play icon. To view or
listen to the streamed content, select
Play .
Music MP3, WMA
TIP
1 Go to the page with the link to the file
you want to download.
If the content is not supported by any of
the apps on your smartphone, a Media type
not supported message appears.
2 Press Left or Right to highlight
the link to the file, and then press
Center .
3 If prompted, select what you want to do
with the file: Play, Save To Device, or
Save To Card.
4 Select Ye s .
TIP
You can also save an image from a web
page by tapping and holding it with the stylus.
2 Once streaming begins, playback starts
automatically. Use the following
controls when viewing or listening:
• Select to return to the web page
containing the streamed content.
• Select or press Center to
pause playback.
• Select or press Center to
resume playback after pausing.
WEB BROWSER
60
Page 61

YOUR EMAIL, MESSAGES, WEB BROWSER, AND BLUETOOTH
4
• A few seconds after playback begins,
the toolbar is hidden and you can view
the content on the full screen. Press
Up or Down to display the
toolbar; press Up or Down
again to hide the toolbar again.
• Press the Vol um e button on the side
of your smartphone to adjust the
volume.
Connecting with Bluetooth® devices
With the built-in Bluetooth wireless
technology on your smartphone, you can
connect to a number of Bluetooth devices,
including a hands-free device such as a
headset or car kit, a printer, or a GPS
receiver, as well as to other smartphones
and handhelds that are equipped with
Bluetooth wireless technology. If your
computer is enabled with Bluetooth
wireless technology, you can also
synchronize wirelessly or use your phone
to connect your computer to the Internet.
You can create a list of Bluetooth devices
that you trust to communicate with your
smartphone. When communicating with
trusted devices, your smartphone skips the
discovery process and creates a secure link
as long as the device is within range.
Bluetooth range is up to 30 feet
(10 meters), depending on environmental
conditions, including obstacles, radio
interference from nearby electronic
equipment, and other factors.
When you configure a hands-free device,
as described in“Connecting with
Bluetooth
®
devices” on page 61, the
hands-free device automatically appears in
your Trusted Devices list. Follow the steps
in this section to add other devices to your
Trusted Devices list, such as a friend’s
handheld.
Requesting a connection with another Bluetooth device
1 Press Applications and select
Bluetooth .
2 Select Bluetooth On.
CHAPTER
CONNECTING WITH BLUETOOTH
®
DEVICES
61
Page 62

YOUR EMAIL, MESSAGES, WEB BROWSER, AND BLUETOOTH
4
CHAPTER
6 Select Add Device. The Discovery icon
appears, indicating that the discovery
process is active.
7 Select the Show pick list and select
Nearby devices.
8 If the device you want to add doesn’t
appear on the Discovery Results list,
make sure that the other device is ready
to receive a connection request (see the
3 (Optional) Enter a device name that
identifies your smartphone when it is
discovered by other Bluetooth devices.
NOTE Use the same device name for all
your Bluetooth connections. If you change
the device name, you need to re-create any
partnerships you’ve already created.
device’s documentation), and then
select Find More on your smartphone
to search again.
9 Enter the same passkey on your
smartphone and on the Bluetooth
device, and select OK.
IMPORTANT Some Bluetooth devices
have a predefined passkey. If your device
4 Select Setup Devices.
5 Select Tru s te d D ev ic e s.
has a predefined passkey, you can find it in
the documentation for that device. Other
devices provide a screen where you enter
a passkey that you make up. In either case,
you must use the same passkey on both
your smartphone and the other Bluetooth
device. We recommend that, where
possible, you make up a passkey of 16
alphanumeric characters (letters and
numerals only) to improve the security of
your smartphone. The longer the passkey,
CONNECTING WITH BLUETOOTH
62
®
DEVICES
Page 63

YOUR EMAIL, MESSAGES, WEB BROWSER, AND BLUETOOTH
4
the more difficult it is for the passkey to be
deciphered.
10 Select Done.
Accepting a connection from another Bluetooth device
TIP
For the smartphone to be visible to
Bluetooth devices, the Bluetooth setting must
be set to On and visibility must be set to
Visible or Temporary.
1 Press Applications and select
Bluetooth .
2 Select Bluetooth On.
3 (Optional) Enter a device name that
identifies your smartphone when it is
discovered by other Bluetooth devices.
NOTE Use the same device name for all
your Bluetooth connections. If you change
the device name, you need to re-create any
partnerships you’ve already created.
4 Select the Visibility pick list and select
one of the following:
Visible: Enables Bluetooth devices that
are not on your Trusted Devices list to
request a connection with your
smartphone. Your smartphone remains
accessible to other devices until you
turn this option off. After you’ve finished
using this setting, remember to change
it back to Hidden.
TIP
Use the Visible option only when you need
your smartphone to be accessible for an
extended period of time. For short-term
accessibility, use the Temporary option.
Temporary: Enables Bluetooth devices
that are not on your Trusted Devices list
to request a connection with your
smartphone during the next two
minutes. Your smartphone reverts to
the Hidden setting and becomes
inaccessible to other devices after two
minutes.
CHAPTER
CONNECTING WITH BLUETOOTH
®
DEVICES
63
Page 64

YOUR EMAIL, MESSAGES, WEB BROWSER, AND BLUETOOTH
4
CHAPTER
Hidden: Allows only devices with which
you have previously formed a
partnership to request a connection
with your smartphone. New devices
cannot request a connection.
5 Enter the same passkey on your
smartphone and on the Bluetooth
device.
IMPORTANT Some Bluetooth devices,
such as headsets and GPS receivers, have
a predefined passkey. If your device has a
predefined passkey, you can find it in the
documentation for that device. Other
devices provide a screen where you enter
a passkey that you make up. In either case,
you must use the same passkey on both
your smartphone and the other Bluetooth
device. We recommend that, where
possible, you make up a passkey of 16
alphanumeric characters (letters and
numerals only) to improve the security of
your smartphone. The longer the passkey,
the more difficult it is for the passkey to be
deciphered.
6 (Optional) Check the Add to trusted
device list box if you want to form a
partnership with the requesting device.
7 Select OK.
Sending information
®
with Bluetooth
wireless technology
The range of Bluetooth® wireless
technology is up to 30 feet (10 meters) in
optimum environmental conditions.
Performance and range may be affected by
physical obstacles, radio interference from
nearby electronic equipment, and other
factors.
TIP
Check your battery level before
establishing a Bluetooth wireless connection.
If the battery level is very low, you can’t make
a Bluetooth wireless connection.
®
Sending info over a Bluetooth
connection
In most applications, you can send an
individual entry or item such as a contact or
a picture. You can also send all the entries
wireless
SENDING INFORMATION WITH BLUETOOTH
64
®
WIRELESS TECHNOLOGY
Page 65

YOUR EMAIL, MESSAGES, WEB BROWSER, AND BLUETOOTH
4
in a category, such as all contacts in the
Business category.
1 Press Applications and select
Bluetooth .
2 Select Bluetooth On.
3 Open an application.
4 Select the entry or category you want to
send. You cannot send an item that has
a lock next to it.
5 Press Menu .
6 Select Send from the leftmost menu.
7 Select Bluetooth and then select OK.
8 Select the receiving device(s) from
the Discovery Results list, and then
select OK.
9 Wait for a message to indicate that the
transfer is complete before you
continue using your smartphone.
Sending an application over a Bluetooth wireless connection
1 Press Applications and select
Bluetooth .
2 Select Bluetooth On.
3 Press Applications .
4 Press Menu .
5 Select Send from the App menu.
6 Select the Send From pick list and
select the location of the app you want
to send: Phone or <card name>.
7 Select the application you want to
transfer. You cannot send an item that
has a lock next to it.
8 Select Send.
9 Select Bluetooth and then select OK.
10 Select the receiving device(s) from
the Discovery Results list, and then
select OK.
11 Wait for a message to indicate that the
transfer is complete before you
continue using your smartphone.
Receiving info over a Bluetooth wireless connection
ress Applications and select
1 P
Bluetooth .
2 Select Bluetooth On.
3 Select the Visibility pick list and select
one of the following:
Visible: Enables Bluetooth devices that
are not on your Trusted Devices list to
CHAPTER
SENDING INFORMATION WITH BLUETOOTH
®
WIRELESS TECHNOLOGY
65
Page 66

YOUR EMAIL, MESSAGES, WEB BROWSER, AND BLUETOOTH
4
CHAPTER
request a connection with your
smartphone. Your smartphone remains
accessible to other devices until you
turn this option off. After you’ve finished
using this setting, remember to change
it back to Hidden.
Te m p o r a r y : Enables Bluetooth devices
that are not on your Trusted Devices list
to request a connection with your
smartphone during the next two
minutes. Your smartphone reverts to
the Hidden setting and becomes
inaccessible to other devices after two
minutes.
4 Use the other device to discover your
smartphone and send information to it:
• See the other device’s documentation
to learn how to discover and send
information over a Bluetooth wireless
connection.
• If the Ringer switch is set to Sound
On, your smartphone beeps to notify
you of the connection and then
prompts you to accept the info. Select
a category or expansion card to file
the item(s). If you don’t select a
category, the item(s) goes into the
Unfiled category.
5 Select Ye s to receive the information or
No to refuse it.
SENDING INFORMATION WITH BLUETOOTH
66
®
WIRELESS TECHNOLOGY
Page 67

Your contacts, calendar, and documents
TIP
Contacts
Contacts is where you enter info about the
people you want to stay in contact with.
You can get to this info from the Phone,
Messaging, and email applications.
DID YOU KNOW
of contacts is to enter them in your desktop
software and then sync to transfer them to
your smartphone (see “Synchronizing
information—the basics” on page 24).
Adding a contact
1 Press Phone .
2 Select the Contacts favorite button.
?
The fastest way to enter lots
You can also open Contacts from
Applications View. Press Applications and
select Contacts.
3 Select New Contact.
4 Use the 5-way to move between
fields as you enter info.
CHAPTER
5
CONTACTS
67
Page 68

YOUR CONTACTS, CALENDAR, AND DOCUMENTS
5
CHAPTER
DID YOU KNOW
beginning of a contact’s last name, such as
#Smith, the contact appears at the top of your
contact list.
?
If you add a symbol at the
6 (Optional) Many fields on the Contact
Edit screen have arrows next to their
names, indicating pick lists from which
you can select a different name. For
example, if you want to list a person's
5 Do any of the following:
Add a caller ID photo: Select the
Picture box. (See “Assigning a caller ID
photo” on page 68 for more info.)
home phone number in the first field,
highlight Work, press Left , and
select Home.
7 After you enter all the information,
select Done.
Add a caller ID ringtone: Select the
Ringtone pick list. (See “Assigning a
caller ID ringtone” on page 69 for more
info.)
Place the entry in a category or mark
it private: Select Details.
Add a note to an entry: Select
Assigning a caller ID photo
1 Press Phone .
2 Select the Contacts favorite button.
3 Open the contact to whom you want to
give a caller ID photo.
4 Select Edit.
Note .
Display additional fields for this
contact: Select Plus .
68
CONTACTS
Page 69

YOUR CONTACTS, CALENDAR, AND DOCUMENTS
5
5 Select the Picture box and do one of
the following:
• Select Camera to take a photo and
add it to this contact entry when you
save the photo.
• Select Photos and select an existing
photo that you want to assign to this
contact.
6 Select Done.
DID YOU KNOW
contacts in Microsoft Outlook (sold
separately) or Palm
you install the desktop software from the
Palm Desktop Software Installation CD, the
pictures are automatically added to your
contact entries on your smartphone when you
sync. If you use third-party synchronization
software, picture sync may not be supported.
Check with the software vendor for
information.
?
If you assign pictures to your
®
Desktop software and
Assigning a caller ID ringtone
Caller ID ringtones can let you know who is
calling before you even look at your
smartphone. This is a great way to identify
calls from important people in your life and
to screen calls that you’d prefer not to
answer.
1 Press Phone .
2 Select the Contacts favorite button.
3 Open the contact to whom you want to
give a caller ID ringtone.
4 Select Edit.
5 Select the Ringtone pick list and select
a tone for this contact entry.
6 Select OK.
TIP
You can assign a ringtone to an entire
category of contacts. For example, use a
special ringtone for categories such as Family,
Work, or Golf Buddies. Select the category
pick list in the upper-right corner and select
Edit Categories. Select the category, and
then select the ringtone on the Edit Category
screen.
CHAPTER
CONTACTS
69
Page 70

YOUR CONTACTS, CALENDAR, AND DOCUMENTS
5
CHAPTER
Viewing or changing contact information
1 In the Contacts list, begin entering one
of the following for the contact you
want to view or edit:
• First name (JOH for John)
• Last name (SMI for Smith)
• First initial and last name (JSM for
John Smith)
2 Select the name of the entry you want
to open.
3 Select Edit, make changes to the entry
as necessary, and then select Done.
Deleting a contact
1 Open the contact you want to delete.
2 Press Menu .
3 Select Delete Contact from the Record
menu, and then select OK.
Displaying your calendar
Press Calendar repeatedly to cycle
through the various views:
Agenda View: Shows your daily schedule,
the number of unread email messages,
and any items on your Tasks list that are
overdue or due today. If there’s room,
Agenda View also lists events on future
dates.
Day View: Shows your daily schedule one
day at a time.
Week View: Shows your schedule for an
entire week. The time frames are based on
the Start Time and End Time settings in
Calendar Preferences.
Month View: Shows your schedule for a
whole month.
In most Calendar views, you can do the
following:
Calendar
• Open the Options menu and select
Year View to view a calendar for an
entire year.
Calendar helps you manage your schedule.
You can view your calendar by day, week,
or month, or as an agenda list.
• Use Left or Right to go to another
day, week, month, or year—based on
70
CALENDAR
Page 71

YOUR CONTACTS, CALENDAR, AND DOCUMENTS
5
the current view. (Not available in
Agenda View.)
• Select Go To and then select a date
from the calendar. (Not available in
Agenda View.)
Creating an event
1 Press Calendar until Day View
appears.
2 Select Go To and then select the
desired day.
1
2
1 Selected date in Day View
2 Selected day
3 Select New.
4 Using the keyboard, enter a starting
hour and minute for the event, such as
545 for 5:45.
5 Select the End Time box and enter the
ending hour and minute for the event.
6 To assign a time zone to the event,
select the Time Zone pick list and
select a city in the time zone you want.
IMPORTANT If you sync with Palm
Desktop software, do not add time zones
to your events. Palm Desktop does not
support time zones. If you sync with
Microsoft Outlook, see the User Guide for
more information about assigning a time
zone to an event.
7 Select OK.
8 Enter a description for the event.
Scheduling a repeating event
TIP
To enter a birthday or anniversary, add this
info to the person’s Contacts entry and it
automatically appears in your Calendar.
However, if you synchronize calendar events
with your computer, any birthdays that you
import from Contacts on your smartphone do
not appear in Calendar on your computer.
TIP
To enter a holiday, create an untimed
event. Then, from the Details screen, select
Every year as the repeat interval.
CHAPTER
CALENDAR
71
Page 72

YOUR CONTACTS, CALENDAR, AND DOCUMENTS
*
5
CHAPTER
1 Create an event, and then select it.
2 Select Details.
3 Select the Repeat pick list, and then
select a repeat interval. If the interval
you need doesn’t appear on the list,
DID YOU KNOW
Outlook and your events include other people,
a With field appears in the Details dialog box
and your attendee info appears in this field
after you sync.
?
If you sync with Microsoft
select Other to define a custom
interval.
Changing or deleting an event
1 Select the event you want to edit or
delete.
2 Select Details.
3 In addition to the settings covered
earlier in this chapter, you can also
change any of the following settings:
Date and Time: Displays when the
event takes place. Change these
4 Select OK.
settings to reschedule the event.
Location: Provides a description of
where the event takes place.
Category: Sets the color-coded
category for this event.
Note : Provides space for you to
enter additional text.
Delete: Removes the event from your
* Icon indicates a repeating event
calendar.
4 Select OK.
72
CALENDAR
Page 73

YOUR CONTACTS, CALENDAR, AND DOCUMENTS
5
TIP
To save memory, you can purge your old
events. Open the Record menu and select
Purge. Select the Delete events older than
pick list and select a time frame. Select OK.
Documents
Documents lets you create, view, and edit
Microsoft Word and Excel files on your
smartphone or on a microSD expansion
card that is inserted into the expansion
slot. You can also view PowerPoint and
PDF files.
1 Press Applications and select
Documents .
2 Select the document you want from the
list.
Installing Applications
Your smartphone comes with several
built-in and ready-to-use applications. You
can also install additional applications, such
as business software, games, and more.
The Palm Desktop Software Installation CD
includes several bonus software apps and
you can purchase other third-party
Palm OS
Installing bonus software from My Centro on your device
My Centro lets you download and install
software that you can use on your
smartphone. If the software has a desktop
component in addition to a smartphone
component, you need to download the
software to your computer first. See
“Installing bonus software from your
computer” on page 74 for info on installing
software that includes a desktop
component.
®
by ACCESS apps as well.
CHAPTER
DOCUMENTS
73
Page 74
YOUR CONTACTS, CALENDAR, AND DOCUMENTS
5
CHAPTER
1 Press Applications and select My
Centro .
2 Select the Bonus tab.
3 Select the Install link below the name
of the application you want to install.
Repeat step 3 to install additional
applications.
Installing applications from the Internet
You can use the web browser on your
smartphone to install Palm OS files (PRC or
PDB) directly from the Internet. When you
download a PRC or PDB file, it is
automatically installed on your
smartphone. If a file is compressed (for
example, as a ZIP or SIT file), you need to
download it to your computer, expand the
file, and then synchronize to transfer the
expanded file to your smartphone.
NOTE Make sure the application you
download is compatible with your device.
1 Open the web browser (see “Viewing a
web page” on page 57).
2 Go to the page that contains the link to
the application you want to download.
3 Press Left or Right to highlight the
link to the file, and then press
Center to initiate the download
process.
4 Follow the onscreen instructions to
accept and install the application.
Installing bonus software from your computer
1 On your computer, go to http://
www.palm.com/support/.
2 Follow the onscreen instructions to
download the application(s) that you
want to install.
3 When prompted to select either Save or
Run, select Run to place the
application(s) in the install queue.
4 Synchronize your smartphone with your
computer to install the application(s) on
your smartphone.
Installing other third-party applications from a computer
When you download an application to your
computer, it is probably in a compressed
format such as a ZIP or SIT file. If the file is
compressed, you need to use a
INSTALLING APPLICATIONS
74
Page 75

YOUR CONTACTS, CALENDAR, AND DOCUMENTS
5
decompression utility on your computer,
such as WinZip or Allume Stuffit Expander,
before you install the application on your
smartphone.
BEFORE YOU BEGIN To install an app
from your computer to your smartphone,
you must first install Palm
®
Desktop
software on your computer.
1 On your computer, open Palm
Desktop.
2 Be sure your device name is identified
as the current User of Palm Desktop
software. Select your device name from
the User list, and then click OK.
3 Click the Install icon to open the Install
Tool.
4 Windows: Drag and drop the file(s) into
the file list.
Mac: Drag and drop the file(s) onto the
Send To Device droplet in the Palm
folder.
5 Synchronize your smartphone with your
computer to install the application(s) on
your smartphone.
CHAPTER
INSTALLING APPLICATIONS
75
Page 76

YOUR CONTACTS, CALENDAR, AND DOCUMENTS
5
CHAPTER
INSTALLING APPLICATIONS
76
Page 77
Your pictures, music, and Facebook® for Palm
CHAPTER
6
Camera
Your smartphone comes with a built-in,
1.3-megapixel camera with 2x digital zoom.
You can use the camera to take pictures
and send them to your friends and family.
1 Press Applications and select
Camera .
2 By default, Camera stores your pictures
in the Palm folder on your smartphone.
To store a picture in a different location,
select one of the following:
<Album name>: Stores the picture in
the selected album. The storage
location is based on the location of the
album (smartphone or microSD
expansion card).
New Albums: Opens a dialog box
where you can enter an album name
and select the storage location
(smartphone or microSD expansion
card).
3 Find your subject in the screen on your
smartphone. (The lens is on the back of
your smartphone.)
CAMERA
77
Page 78

YOUR PICTURES, MUSIC, AND FACEBOOK
6
® for Palm
CHAPTER
4 (Optional) To get a close-up of your
subject, press Up to select 2x. Press
Pocket Tunes™
Down to return to 1x.
5 Press Center to capture the picture.
6 Select any of the following:
You can listen to music through the
speaker on the back of your smartphone or
through a stereo headset (purchased
separately). (If you want to use stereo
headphones with a 3.5mm connector, then
a 2.5mm stereo adapter is required, sold
separately.) To listen to music on your
smartphone, you need to convert the
music files into MP3 format using
Windows Media Player (Windows
computers) or iTunes (Mac computers) and
then transfer the music files to your
Saves the picture in the location
you selected in step 2.
Deletes the picture.
Opens a dialog box where you
can choose to attach the picture
to an email message or send it to
another Bluetooth
®
device.
Lets you add a voice caption.
smartphone or a microSD expansion card.
After you transfer the music files, you can
™
play them using the Pocket Tunes
application on your smartphone.
BEFORE YOU BEGIN Mac You need a
microSD expansion card (sold separately)
to listen to music on your smartphone. You
cannot transfer MP3 files from your Mac
directly onto your smartphone.
POCKET TUNES
78
™
Page 79

YOUR PICTURES, MUSIC, AND FACEBOOK
1
2
® for Palm
6
TIP
You can upgrade Pocket Tunes to a version
that supports more music file formats (such
as WMA), supports subscription music, and
includes additional features. For more info,
visit www pocket-tunes com/palm
Setting up Windows Media Player for MP3
On a Windows computer, you need to set
Windows Media Player to save your music
files in MP3 format in order for the files to
be compatible with Pocket Tunes.
1 Connect your smartphone to your
computer with the sync cable.
2 Press Applications and select
pTunes .
3 On your computer, open Windows
Media Player, and then click the
full-screen icon in the upper-right corner
to maximize the window.
4 Click To o l s , and then click Options.
5 Click the Rip Music tab, click the
Format pick list, and then select mp3.
Click OK.
6 Click To o l s , and then click Options.
7 Click the Devices tab, select Palm
Handheld from the Devices list, and
then click Properties.
1 Select your smartphone
2 Click Properties
8 Click the Quality tab and uncheck the
Convert files as required by this
handheld (recommended) box. Click
Apply.
CHAPTER
POCKET TUNES
™
79
Page 80

YOUR PICTURES, MUSIC, AND FACEBOOK
*
6
® for Palm
CHAPTER
3 Click the Advanced button at the top of
the window, and then click Importing.
4 Click the Import Using pop-up menu
and select MP3 Encoder.
5 (Optional) Click the Setting pop-up
menu and select Good Quality.
Transferring MP3 files from your computer
If a microSD expansion card is inserted into
the smartphone, Windows Media Player
copies the MP3 files to the microSD
* Unchecked box
9 Click OK, and then click OK again.
Windows Media Player is ready to transfer
MP3 files to Pocket Tunes.
expansion card. If you don’t have a
microSD expansion card inserted, the MP3
files are copied to your smartphone’s
memory.
IMPORTANT You must sync your
smartphone with your computer at least
Setting up iTunes for MP3
On a Mac, use iTunes to convert music
from a CD to MP3 format. For info on
using the iTunes software, see the
documentation that came with your Mac.
1 On your Mac, open iTunes.
2 Select Preferences.
once before you can transfer MP3 files
from your computer.
1 Connect your smartphone to your
computer with the USB sync cable.
2 On your smartphone, press
Applications and select
pTunes .
POCKET TUNES
80
™
Page 81

YOUR PICTURES, MUSIC, AND FACEBOOK
® for Palm
6
3 If you are transferring MP3 files from a
Mac, insert a microSD expansion card
into your smartphone. This step is
optional for Windows users.
4 Do one of the following:
WINDOWS ONLY Open Windows
Media Player on your computer. Select
the Sync tab, and then select Palm
Handheld from the drop-down list.
Select Start Sync. The files are
transferred to your smartphone.
NOTE Do not press the sync button on
your cable. Windows Media Player
transfers the files, so there’s no need to do
anything.
MAC ONLY Drag and
drop the MP3 files onto
the Send To Handheld
droplet in the Palm folder.
Select your device name, the file name,
and the destination (card). Click OK.
Synchronize your smartphone with your
computer. Be patient; transferring music
to a microSD expansion card can take
several minutes.
DID YOU KNOW
accessory (sold separately) to transfer MP3
files from your computer to your microSD
expansion card. Create a Music_Audio folder
in the root directory of the card, and store
your MP3 files in this folder.
?
You can also use a card reader
Transferring music from a CD to your smartphone
If your songs are on a CD, you need to
convert them to MP3 format before you
transfer the files to your smartphone.
WINDOWS ONLY
1 On your computer, open Windows
Media Player.
2 Insert the music CD into your
computer’s CD drive.
3 Select the Rip tab.
4 Select the tracks you want to convert to
MP3.
5 Select Rip Music.
6 Transfer the MP3 files to your
smartphone as described in
“Transferring MP3 files from your
computer” on page 80.
CHAPTER
POCKET TUNES
™
81
Page 82

YOUR PICTURES, MUSIC, AND FACEBOOK
6
® for Palm
CHAPTER
MAC ONLY
1 On your Mac, open iTunes.
2 Insert the music CD into the CD drive
on your Mac.
3 Check the boxes next to the tracks you
want to convert to MP3.
4 Click the Import button in the
upper-right corner of the iTunes window.
5 When the songs have finished
importing, click the Eject Disk button in
the lower-right corner of the iTunes
window.
6 Transfer the MP3 files to your
smartphone as described in
“Transferring MP3 files from your
computer” on page 80.
1 Make sure the Ringer switch is set to
Sound On .
2 Press Applications and select
pTunes .
3 Do any of the following:
• To play or resume playback of the
current song, select Play .
• To play the next song, select Next
song .
• To play the previous song, select
Previous song .
• To play a different song, select
Choose song and select a
song from the list.
• To adjust the volume during playback,
press the Volum e button on the side
of your smartphone.
Listening to music on your smartphone
CAUTION Protect your hearing. Listening
to this device at full volume for a long
period of time can damage your hearing.
• To pause playback, select Pause .
DID YOU KNOW
pause and resume playback, as well as use
the 5-way to navigate among songs or pause
and resume playback.
?
You can also press Space to
POCKET TUNES
82
™
Page 83

YOUR PICTURES, MUSIC, AND FACEBOOK
® for Palm
6
1
2
3
5
6
4
1 Progress indicator
2 Choose song
3 Previous song
4 Play/Pause
5 Vol ume
6 Next song
Pocket Tunes continues playing until it
reaches the end of your list or until you
select Pause . Music continues to play
even if you switch to another application or
turn off your screen.
TIP
If you want to stop playing music when
you exit Pocket Tunes, open the Background
Prefs menu and uncheck the Enable
background play box, and then select OK.
Facebook® for Palm
Facebook for Palm is a social utility that
connects you with the people around you.
Use Facebook to keep up with friends and
family, share photos and videos, and
reconnect with old classmates.
Opening Facebook for Palm
BEFORE YOU BEGIN Before you can use
Facebook for Palm, you must already have
a Facebook account. If you don’t already
have a Facebook account, go to
www.facebook.com
1 Press Applications and select
Facebook.
2 Enter your Facebook username and
password.
3 Select Login.
DID YOU KNOW
through Facebook for Palm, the application
remembers your login information so that you
don’t have to log in every time.
and sign up.
?
After you log in to Facebook
CHAPTER
FACEBOOK® FOR PALM
83
Page 84

YOUR PICTURES, MUSIC, AND FACEBOOK
6
® for Palm
CHAPTER
For complete information, see the
Facebook for Palm User Guide, available at
http://www.palm.com/support/
.
FACEBOOK® FOR PALM
84
Page 85

Important safety and legal information
FCC Notice
This equipment has been tested and found to comply with the limits
for a Class B digital device, pursuant to part 15 of the FCC Rules.
These limits are designed to provide reasonable protection against
harmful interference in a residential installation. This equipment
generates, uses and can radiate radio frequency energy and, if not
installed and used in accordance with the instructions, may cause
harmful interference to radio communications. However, there is no
guarantee that interference will not occur in a parti cular installation. If
this equipment does cause harmful interference to radio or television
reception, which can be determined by turning the equipment off and
on, the user is encouraged to try to correct the interference by one or
more of the following measures:
• Reorient or relocate the receiving antenna.
• Increase the separation between the equipment and receiver.
• Connect the equipment into an outlet on a circuit different from
that to which the receiver is connected.
• Consult the dealer or an experienced radio/TV technician for help.
Antenna Care/Unauthorized Modifications
Use only the supplied integral antenna. Unauthorized antenna
modifications or attachments could damage the unit and may violate
FCC regulations. Any changes or modifications not expressly
approved by the party responsible for compliance could void the
user's authority to operate the equipment.
FCC RF Safety Statement
In order to comply with FCC RF exposure safety guidelines, users
MUST use one of the following types of bodyworn accessories.
™
brand body-worn accessory that has been tested for
•A Palm
SAR compliance and is intended for use with this product.
• An accessory that contains NO metal (snaps, clips, etc.) and
provides AT LEAST 1.5 cm of separation bet ween the users body
and the unit.
Do NOT use the device in a manner such that it is in direct contact
with the body (i.e., on the lap or in a breast pocket). Such use will
likely exceed FCC RF safety exposure limits See www.fcc.gov/oet/
rfsafety/ for more information on RF exposure safety.
The highest reported (FCC) SAR values of the Palm
smartphone, by Palm are:
Maximum SAR
Values
Held to Ear 1.07 (W/1Kg) 1.46 (W/1Kg)
Body - Worn 0.89 (W/1Kg) 0.33 (W/1Kg)
Cellular PCS
®
Centro™
FCC Radiofrequency Emission
This smartphone meets the FCC Radiofrequency Emission
Guidelines and is certified with the FCC as:
FCC ID number: O8F-895.
More information on the smartphone's SAR can be found from the
following FCC Website:
https://fjallfoss fcc gov/oetcf/eas/reports/GenericSearch cfm
FCC Hearing Aid Compatibility Your smartphone is compliant with
the FCC Hearing Aid Compatibilit y (HAC) requirements. For additional
HAC information, including the HAC rating of this product, please
refer to www.palm.com/treoHAC
.
Static Electricity, ESD, and Your Palm® Device
Electrostatic discharge (ESD) can cause damag e to electronic devices
if discharged into the device, so you should take steps to avoid such
an occurrence.
Description of ESD Static electricity is an electrical charge caused
by the buildup of excess electrons on the surface of a material. To
most people, static electricity and ESD are nothing more than
annoyances. For example, after walking over a carpet while scuffing
IMPORTANT SAFETY AND LEGAL INFORMATION
85
Page 86

your feet, building up electrons on your body, you may get a shock—
the discharge event—when you touch a metal doorknob. This little
shock discharges the built-up static electricity.
ESD-susceptible equipment Even a small amount of ESD can harm
circuitry, so when working with electronic devices, take measures to
help protect your electronic devices, including your Palm
from ESD harm. While Palm has built protections against ESD into its
products, ESD unfortunately exists and, unless neutralized, could
build up to levels that could harm your equipment. Any electronic
device that contains an external entry point for pluggin g in anything
from cables to docking stations is susceptible to entry of ESD.
Devices that you carry with you, such as your smartphone, build up
ESD in a unique way because the static electricity that may have built
up on your body is automatically passed to the device. Then, when
the device is connected to another device such as a docking station, a
discharge event can occur.
Precautions against ESD Make sure to discharge any built-up static
electricity from yourself and your electronic devices before touching
an electronic device or connecting one device to another. The
recommendation from Palm is that you take this precaution before
connecting your device to your computer, placing the device in a
cradle, or connecting it to any other device. You can do this in many
ways, including the following:
• Ground yourself when you’re holding your mobile device by
simultaneously touching a metal surface that is at earth ground.
For example, if your computer has a metal case and is plugged
into a standard three-prong grounded outlet, touching the case
should discharge the ESD on your body.
• Increase the relative humidity of your environment.
• Install ESD-specific prevention items, such as grounding mats.
Conditions that enhance ESD occurrences Conditions that can
contribute to the buildup of static electricity in the environment
include the following:
• Low relative humidity.
• Material type. (The type of material gathering the charge. For
example, synthetics are more prone to st atic buildup than natural
fibers like cotton.)
®
device,
• The rapidity with which you touch, connect, or disconnect
electronic devices.
While you should always take appropriate precautions to discharge
static electricity, if you are in an environment where you notice ESD
events, you may want to take extra precautions to protect your
electronic equipment against ESD.
Battery safety information
• Do not disassemble or open, crush, bend or deform, puncture or
shred.
• Do not modify or remanufacture, attempt to insert foreign objects
into the battery, immerse or expose to water or other liquids,
expose to fire, explosion or other hazard.
• Only use the battery for the system for which it is specified.
• Only use the battery with a charging system that has been
qualified with the system per this standard. Use of an unqualified
battery or charger may present a risk of fire, explosion, leakage,
or other hazard.
• Do not short circuit a battery or allow metal lic conductive objects
to contact battery terminals.
• Replace the battery only with another battery that has been
qualified with the system per this standard, IEEE-Std-1725-200x.
Use of an unqualified battery may present a risk of fire, explosion,
leakage or other hazard.
• Promptly dispose of used batteries in accordance with local
regulations.
• Battery usage by children should be supervised.
• Avoid dropping the phone or battery. If the phone or battery is
dropped, especially on a hard surface, and the user suspects
damage, take it to a service center for inspection.
• Improper battery use may result in a fire, explosion or other
hazard.
IMPORTANT SAFETY AND LEGAL INFORMATION
86
Page 87

Precaution against hearing loss
Protect your hearing. Listening to thi s device at full volume for a long
period of time can damage your hearing.
A pleine puissance, l'écoute prolongée du baladeur peut
endommager l'oreille de l'utilisateur. Consultez notre site web
www.palm.com/fr
pour plus d'informations.
Précautions d'usage de votre téléphone mobile
Le taux de DAS(1) (Débit d’Absorption Spécifique) de votre Palm
Centro smartphone est 0,896 w/kg
Conseils d'utilisation pour réduire le niveau d'exposition aux
rayonnements: Utiliser le plus souvent possible les kits piétons
(oreillettes), notamment en cas d'usage fréquent ou prolongé du
téléphone mobile Ils apportent en outre un plus grand confort
d’utilisation.
Eloigner le téléphone mobile de certaines zones sensibles telles que
le ventre chez les femmes enceintes ou le bas-ventre chez les
adolescents, plus particulièrement lors d’une communication.
Utiliser votre téléphone mobile dans de bonnes conditions de
réception. Celle-ci est indiquée sur l’écran de votre téléphone par la
matérialisation de barrettes. 3 ou 4 barrettes, la réception est de
bonne qualité pour passer vos communications. Ce n'est pas
toujours le cas dans certaines zones ou situations, notamment les
parking souterrains, les ascenseurs, en train ou en voiture ou tout
simplement dans un secteur mal couvert par le réseau.
Mesures touchant à la sécurité: Dans certains lieux ou situations,
tels que les avions, les hôpitaux, les stations-service et les garages
professionnels, l'usage du téléphone est interdit. Il es t donc impératif
de respecter strictement les consignes de sécurité propres à
chacune de ces situations et d’éteindre votre téléphone lorsque cela
est requis.
Par ailleurs pour éviter les risques d’interférences, les personnes
porteuses d’implants électroniques (stimulateurs cardiaques,
pompes à insuline, neurostimulateurs.) doivent conserver une
distance de 15 cm entre le mobile et l’implant et ne l’utiliser que du
côté opposé au côté où celui-ci est situé.
Téléphoner en conduisant, même avec des équipements qui ne sont
pas interdits par la réglementation, est dangereux car il augmente
potentiellement le risque d’accident provenant de la distraction créée
par la conversation elle même. Aussi, est-il recommandé de ne
jamais téléphoner en conduisant et de considérer que l’utilisation
d’un kit mains-libres n’est pas une solution.
(1) Valeur DAS la plus élevée pour ce modèle de téléphone et pour
une utilisation à l’oreille, communiquée par le constructeur. Le DAS,
exprimé en w/kg, quantifie le niveau d’exposition aux ondes
électromagnétiques et permet de vérifier la conformité des mobil es à
la réglementation française et européenne qui impose que celui-ci
soit inférieur à 2w/kg.
IMPORTANT SAFETY AND LEGAL INFORMATION
87
Page 88

IMPORTANT SAFETY AND LEGAL INFORMATION
88
Page 89

Index
NUMERICS
1xRTT technology 50
5-way navigator 17
A
accented characters 21
accessing
alternate characters 21
application menus 19
applications 23
Dial Pad 33
email 51
favorite buttons 40, 43
Palm online support 10
web pages 58, 59
Account Setup dialog box 52
accounts
customer support for 10
phone services and 9
text messages and 9
activating items on screen 18
Active Call View 38, 40, 41
Add Call button 41
Add Favorites dialog box 43
adding
caller IDs 68–69
contacts 67
events 71
partnerships 46, 64
passkeys 62
Address Bar (web browser)
58, 59
addressing email 53
addressing text messages 56
agenda lists 70
Agenda View 70
Alert dialog box 38
alerts 38, 49
alternate characters 21
answering phone 41
antenna 87
ations
applic
See also specific built-in
applications
caution for installing 15
closing 22
displaying menus for 19
getting help with 10
highlighting 23
installing 73–75
opening 22, 40
selecting 23
sending over Bluetooth
devices 65
synchronizing 25
transferring 13
Applications button 22, 32
Applications View 23
arrow icons 17
attachments 54, 55, 78
attendee information 72
Auto-off after setting 32
B
backing up information 25
battery 26
charging 27–29
viewing status of 28
battery icon 28
beaming 27
Blazer web browser 57
See also web browser
Bluetooth application 27, 45,
85
Bluetooth devices 39, 49
See also hands-free
devices
connecting to 61–64
enabling or disabling
timal range for 64
op
receiving info and 65–66
sending over 64–65
visibility options for 63, 65
Bluetooth icon 45
65
89
Page 90

bonus software 26, 73
bookmarks 59
Bookmarks View 59
border glow (highlight) 18
buttons 43
accessing command 19
buzz 45
C
calculating free space 13, 17
Calculator application 21, 85
calendar
adding events 71
deleting events 72
displaying 70
synchronizing 25
Calendar application 70
updating information in 25
Calendar button 22, 70
calendar views 70
Call Log dialog box 36
call waiting 41
Call Waiting dialog box 41
caller IDs 68–69
Camcorder application 85
camera 77
Camera application 77–78
canceling menu selection 19
Caps Lock 20
car kits 44
Card Info application 85
card readers 81
Centro smartphone. See
smartphone
changing
calendar views 70
contact information 70
events
72
character entr
y 20–21
charge indicator 28
charging smartphone 26
charging the battery 27–29
Choose song button 82
clock 86
colored backgrounds 18
command buttons 19
Compose dialog box 56
compressed files 74
computers
installing from 75
conference calls 42
connections 40, 58
adding Bluetooth devices
and 45, 61
receiving or sending over
wireless 64, 65
conserving battery 26
Contact Edit screen 68, 69
contact names 35
contacts
adding 67
adding ringtones for 69
assigning caller IDs to 68–
69
categorizing 68
changing info for 70
creating 67
creating speed-dial
buttons for 43
deleting 70
entering info for 67
looking up 34, 43
marking as private 68
searching for 70
selecting 35
sorting 68
onizing 25
synchr
Contacts application 25, 67
Contacts button 67
Contacts list 35, 68
copying
phone numbers 33
copying music files 80–82
coverage area 27, 48
creating
contacts 67
events 71
90
Page 91

partnerships 46, 64
customer service (Palm) 10
D
data service options 9
data services 51, 52, 58
data transfers 50
dates
See also calendar
changing event 72
Day View 70
decompression utilities 75
Delete Contact command 70
Delete events older than pick
list 73
deleting
attachments 54
contacts 70
device names 15
events 72
pictures 78
device names 14
Bluetooth devices and 45,
62
devices 13, 15, 44
See also Bluetooth
devices; smartphone
Dial Pad 21, 33, 39
dialog boxes 10, 19
discovery 61, 62, 66
Discovery icon 62
Discovery Results list 62
discussion groups 10
displaying
Dial Pad 33
documentation 10
email messages 70
favorites buttons 35
tasks 70
documentation 10, 17, 31,
85
Documents applicat
ion 73
downloading
attachments 55
files 59, 74
Palm info and updates 10
ringtones 60
third-party software 74
drained battery icon 29
draining the battery 27, 28
E
earpiece 39
Edit Categories screen 69
edit screens 19
email 49, 52–56, 78
accessing 51
checking 70
Email application 52
Email application. See
VersaMail application
email applications 51
email messaging services 9
email providers 51, 52
emergency phone calls 49
emoticons 57
empty battery icon 29
EVDO technology 50
Event Details dialog box 72
events 50, 70
changing 72
creating 71
deleting 72
scheduling repeating 71
synchronizing 25
Excel spreadsheets 73
expansion cards, microSD
73, 78, 80
extra digits (phone)
38, 39,
43
F
book for Palm 83
Face
favorite buttons 40, 43
files
accessing 73
attaching to email 54, 55
91
Page 92

converting music 79, 80
copying music 80–82
downloading 59, 74
transferring 13
finding
contacts 70
folders (Inbox) 56
fonts 59
forums 10
Free Space information 13
full charge (battery) 27
G
getting started 85
GPS receivers 64
H
hands-free devices 44, 49
connecting to 44–46, 61
entering passkeys for 46
finding compatible 45
Hands-free Setup button 45
hard resets 15
headset button 39
headsets 39, 44, 64, 78
help 9, 10
highlighting
applications 23
items on screen 18
text 18
web links 58
home page 59
HotSync application 86
HotSync technology
See also synchronization
I
image files 60
images 59
downloading 60
Inbox 54, 56
incompatible files and
tions 13
applica
indicator light 28
information
backing up 25
entering 20–21
receiving 65
synchronizing 14, 25
transferring 13
updating 25
installation 14
installing
applications 73–75
bonus software 26, 73
third-party software 74
Internet 58
Internet email 51
iTunes 78, 80, 82
K
keyboard 20–21, 32
dialing from 33
entering alternate
characters from 21
keyboard buttons 20
Keyguard 32
L
LED light 28
liability ii
lightning bolts 28
list screens 19
location information 72
Location setting 49
M
Mac systems
installing from 75
synchronizing and 26
media features 27, 32
Media Player 78, 79, 81
memory
saving
73
os application 25, 86
Mem
opening 23
Menu key 19
menus 19
92
Page 93

messages. See email; text
messages
Messaging application 56
opening 23
Messaging button 22
messaging services 9
microphone 39, 45
Month View 70
music
adjusting volume 82
converting for smartphone
79, 80
downloading 60
listening to 78, 82
selecting 82
stopping 83
transferring 80–82
music files 60, 80, 81
music formats 79
music subscriptions 79
Music_Audio folder 81
mute button 39
My Centro application 85
N
naming
photo albums 77
smartphone device 14
navigator buttons 17
New Bookmark dialog box 59
New Message dialog box 53,
54
notes 68, 72
numbers 20
O
on-device documentation 10
online forums 10
online support (Palm) 10
opening
application menus 19
applications
achments 55
att
22, 40
Call Log 36
Dial Pad 39
web browser 23, 58
opening Memos application
23
opening Messaging
application 23
Option key 21, 23
Option Lock 21, 57
organizer features 27, 32
Outlook
adding caller IDs to 69
synchronizing with 25
overdue tasks 70
P
Palm Desktop software
adding caller IDs to 69
synchronizing with 25, 26
Palm online support 10
Palm OS devices 13
partnerships 46, 61, 64
passkeys 44, 46, 62
passwords 38, 39, 53
pasting
phone numbers 33
PDF files 73
phone
adjusting volume for 40
answering 36, 37, 41
creating speed-dial
buttons for 43
dialing 33–36, 39, 41
documentation,
conventions for 31
hanging up 39, 41
holding calls 39, 41
opening apps and 40
selecting ringtones for 46
silencing
37
g on and off 31, 32
turnin
viewing Call Log for 36
Phone application 32, 40, 48
Phone button 22
93
Page 94

phone buttons (Active Call
View) 39
phone calls
making 33–36
receiving 41
switching between 42
phone headsets 44
phone numbers
copying 33
pasting into Dial Pad 33
phone services 9
phone status icons 48
photo albums 77
photos
adding to contacts 68, 69
downloading 60
Pics & Videos app 25
Pics&Videos application 86
pictures
See also images; photos
attaching to email 78
saving 77, 78
synchronizing 25
taking 77
Play button (Pocket Tunes)
82
Play icon (web browser) 60
Pocket Tunes 78, 79, 82
power preferences 27
Power/End button 31, 32
PowerPoint files 73
precautions 88
Prefs application 86
preset passkeys 46, 62, 64
primary applications 23
priority settings 57
Purge command 73
Q
quarantined files 13, 15
quick buttons 22–23, 32
eys 43
Quick K
Quick Tour 9, 85
QuickText phrases 57
R
radio frequency emissions 87
range (Bluetooth) 64
recurring events 71
Redial list 36
refreshing web pages 58
Regulatory Information 87
repeat intervals (events) 71
repeating events 71
replacing battery 26
rescheduling events 72
resets 15
RF emissions 87
ringer 37, 47
Ringer switch 12
ringtone file types 60
Ringtone pick list 69
ringtones 46–47
adding to caller IDs 69
downloading 60
roaming 47, 48
S
saving
pictures 77, 78
text messages 57
web page images 60
schedules. See Calendar
application
scheduling events 71
screen
conserving battery and 27
highlighting and selecting
items on 18–19
moving around on
brightness 39
restoring
17
selecting items 19
turning on or off 31
searching for
contacts 70
secondary applications 23
security 46
94
Page 95

Security application 86
Send command 65
Send To Device droplet 81
sending
items over Bluetooth 64–
65
service contracts. See
accounts
Setup Devices dialog box 45,
62
Shift/Find key 20
signal-strength icon 32
SIT files 74
smartphone
additional documentation
for 85
calculating free space on
13, 17
charging 26, 27–29
defined 31
devices compatible with
44
features illustrated 11–12
getting help with 9, 10
getting started with 9
naming 14
personalizing 86
storing 12
troubleshooting 10
upgrading 13–15
software
purchasing 73
synchronizing information
and 25
sorting
contacts 68
sorting email messages 56
sound preferences 47
Sounds application 86
speakerphone 39
special characters 20, 21
speed-dial buttons
43
spreadsheets 73
tus icons (email) 56
sta
status icons (phone) 48
stereo headsets and
adapters 78
style sheets 59
stylus 17, 18
support (Palm) 10
symbols 20, 21, 68
sync button 24
sync cable 25
synchronization
Bluetooth devices and 61
getting started with 24
overview 25
synchronizing information 14
T
taking pictures 77
tapping 17, 18
tasks
displaying 70
synchronizing 25
Tasks application 25, 86
Tasks list 70
technical support (Palm) 10
text 20, 59
highlighting 18
selecting 18
text messages 37, 49, 56–57
text messaging services 9
third-party applications 15
5-way navigator and 17
installing 74
time
scheduling events and 71,
72
Time Zone pick list 71
Tips icon
10
screen. See screen
touch
troubleshooting 10
Trusted Devices list 61, 63,
64, 65
tutorial 10
95
Page 96

U
Unfiled category 66
unread messages 49, 56, 70
untimed events 71
updating
information 25
upgrades 13–15, 79
URLs. See web addresses;
web links
user discussion groups 10
User Guide 10
usernames 53
V
VersaMail application 51, 52–
56
sending email and 51
Vibrate pick list 47
video files 60
videos
downloading 60
synchronizing 25
Visibility pick list 63, 65
voice captions 78
Voice Dial icon 35
Voice Dialing application 34
Voice Memo application 86
voicemail 36, 37–38, 49
Voicemail icon 38
Volume button 40, 47, 82
Volume pick list 47
W
waking up screen 31
web addresses 58, 59
See also web links
web browser
accessing email and 51
changing fonts for 59
creating bookmarks for 59
displaying toolbar for 61
downloading from
ening 23, 58
op
59
resizing text for 59
streaming content and 60
web browser application 57,
61
web browser icons 58
web forms 58
web links 58
web pages 57–61
web-based email 51
websites 59
downloading from 74
installing apps from 74
Week View 70
Windows systems
installing from 75
wireless connections 64, 65
wireless features 26
Word documents 73
World Clock 86
Y
Year View 70
Z
ZIP files 74
zoom settings (camera) 78
96
Page 97

Référence rapide
Page 98

Propriété intellectuelle
© 2005-2008 Palm, Inc. Tous droits réservés. Blazer, HotSync, Palm,
Palm Desktop, Palm OS, Centro, VersaMail et les logos Palm et
Centro sont des marques appartenant ou co ncédées sous licence à
Palm, Inc. Facebook est une marque déposée de Facebook, Inc.
Documents To Go est une marque commerciale ou une marque
déposée de DataViz, Inc. Adobe et Acrobat sont des marques
déposées ou des marques commerciales d'Adobe Systems
Incorporated aux États-Unis et dans d'autres pays. Microsoft,
ActiveSync, Excel, Outlook, PowerPoint et Vista sont des marques
déposées ou des marques commerciales de Microsoft Corporation
aux États-Unis et/ou dans d'autres pays. Les autres marques et noms
de produits sont ou peuvent être des marques commerciales de leurs
détenteurs respectifs et sont utilisés pour iden tifier les produits et
services de ces mêmes détenteurs.
Ce produit est protégé par un ou plusieurs des brevets américains
suivants :
6,976,226 ; 6,975,304 ; 6,965,375 ; 6,961,567 ; 6,9 61,029 ; 6,957,397 ;
6,952,571 ; 6,950,988 ; 6,947,975 ; 6,947,017 ; 6,943,667 ; 6,940,490 ;
6,924,752 ; 6,907,233 ; 6,906,701 ; 6,906,741 ; 6,901,276 ; 6,850,780 ;
6,845,408 ; 6,842,628 ; 6,842,335 ; 6,831,662 ; 6,819,552 ; 6,804,699 ;
6,795,710 ; 6,788,285 ; 6,781,824 ; 6,781,575 ; 6,766,490 ; 6,745,047 ;
6,744,451 ; 6,738,852 ; 6,732,105 ; 6,724,720 ; 6,721,892 ; 6,712,638 ;
6,708,280 ; 6,697,639 ; 6,687,839 ; 6,685,328 ; 6, 665,803 ; 6,618,044 ;
6,590,588 ; 6,539,476 ; 6,532,148 ; 6,523,124 ; 6,519,141 ; 6,516,202 ;
6,490,155 ; 6,480,146 ; 6,457,134 ; 6,456,247 ; 6,442,637 ; 6,441,824 ;
6,437,543 ; 6,429,625 ; 6,425,087 ; 6,389,5 72 ; 6,388,877 ; 6,381,650 ;
6,363,082 ; 6,344,848 ; 6,317,085 ; 6,241,537 ; 6,222,857 ; 6, 185,423 ;
6,147,314 ; 6,115,248 ; 6,064,342 ; D421,251 ; D429,252 ; D466,128 ;
D478,091. Brevet en instance.
Ce produit est également concédé sous licence d 'après le brevet
américain 6,058,304.
Ce produit est protégé par des droits de propriété intellectuelle de
Microsoft Corporation. L'utilisation ou la distribution de ladite
technologie en dehors de ce produit est interdite sans l'obtention
d'une licence auprès de Microsoft.
Ce produit est doté du navigateur Internet NetFront 3.0 d'ACCESS
Co., Ltd. © 1996-2007 ACCESS Co., Ltd. et ACCESS Systems
America, Inc. NetFront est la marque commerciale ou la marque
déposée d'ACCESS Co., Ltd. au Japon et dans d'autres pays à
l'exception des États-Unis. NetFront est une marque déposée de
NetFront Communications, Inc. aux États-Unis et est utilisée sous
licence. Une partie de ce logiciel inclut des modules logiciels
développés par l'Independent JPEG Group.
Clause de non-responsabilité
Palm, Inc. et ses fournisseurs déclinent toute responsabilité en cas
de dommage ou de perte résultant de l'utilisation de ce guide. Palm,
Inc. et ses fournisseurs déclinent toute responsa bilité en cas de perte
ou de plainte de tiers pouvant résulter de l'utilisation de ce logiciel.
Palm, Inc. et ses fournisseurs déclinent toute responsabilité en cas
de dommage ou de perte faisant suite à un effacement des données
dû à une défaillance technique, à l'usure de la batterie ou à des
réparations. Veillez à effectuer des copies de sauvegarde de
l'intégralité des données importantes sur d'autres supports, afin
qu'elles ne soient pas perdues.
Programme de reprise et de recyclage de Palm
Ce symbole indique que les produits Palm doivent être
recyclés. Vous ne pouvez pas vous en débarrasser dans
une décharge municipale n'effectuant pas le tri sélectif.
Les produits Palm doivent être envoyés dans un
établissement prenant en charge le recyclage des
appareils électriques et élect roniques. Pour plus
d'informations sur les progr ammes de protection de l'environnement,
consultez le site www.palm.com/environment
Dans le cadre de la politique globale de Palm de respect de
l'environnement, nous nous efforçons d'utiliser des matériaux
écologiques, de limiter les déchets et de développer les normes les plus
rigoureuses en matière de recyclage des appareils électroniques. Notre
programme de recyclage contribue à éviter que les ordinateurs de poche,
les smartphones et les compagnons mobiles de Palm ne se retrouvent
dans des décharges grâce à leur évaluation et aux dispositions prises
pour leur réutilisation et leur recyclage. Les clients Palm peuvent
participer gratuitement au programme de recyclage. Consultez le site
palm.com/recycle
réduction des déchets électroniques.
R f. : 406-11520-00
v. 1.0
pour obtenir des informations supplémentaires sur la
.
Page 99

Sommaire
Chapitre 1: Bienvenue . . . . . . . . . . . . . . . . . . . . . . . . . . . . . . . . . . . . . . . . . . . . . . . . . 101
De quoi ai-je besoin pour démarrer ? . . . . . . . . . . . . . . . . . . . . . . . . . . . . . . . . . . . . 101
Où puis-je obtenir d'autres informations ? . . . . . . . . . . . . . . . . . . . . . . . . . . . . . . . . 102
Présentation du smartphone Palm
Mise à niveau à partir d'un autre appareil Palm OS
Chapitre 2: Navigation sur votre smartphone . . . . . . . . . . . . . . . . . . . . . . . . . . . . . . . 109
Utilisation du clavier . . . . . . . . . . . . . . . . . . . . . . . . . . . . . . . . . . . . . . . . . . . . . . . . . 112
Ouverture des applications . . . . . . . . . . . . . . . . . . . . . . . . . . . . . . . . . . . . . . . . . . . . 115
Synchronisation d'informations : les bases . . . . . . . . . . . . . . . . . . . . . . . . . . . . . . . 117
Optimisation de l'autonomie de la batterie . . . . . . . . . . . . . . . . . . . . . . . . . . . . . . . 119
Charge de la batterie . . . . . . . . . . . . . . . . . . . . . . . . . . . . . . . . . . . . . . . . . . . . . . . . 120
Chapitre 3: Votre téléphone . . . . . . . . . . . . . . . . . . . . . . . . . . . . . . . . . . . . . . . . . . . . . 123
Activation et désactivation de votre smartphone . . . . . . . . . . . . . . . . . . . . . . . . . . . 123
Passer des appels . . . . . . . . . . . . . . . . . . . . . . . . . . . . . . . . . . . . . . . . . . . . . . . . . . 125
Réception d'appels . . . . . . . . . . . . . . . . . . . . . . . . . . . . . . . . . . . . . . . . . . . . . . . . . . 129
Utilisation de la boîte vocale . . . . . . . . . . . . . . . . . . . . . . . . . . . . . . . . . . . . . . . . . . . 130
Que puis-je faire durant un appel ? . . . . . . . . . . . . . . . . . . . . . . . . . . . . . . . . . . . . . . 131
Création d'un numéro abrégé via un bouton Favoris . . . . . . . . . . . . . . . . . . . . . . . . 136
Utilisation d'un appareil mains libres . . . . . . . . . . . . . . . . . . . . . . . . . . . . . . . . . . . . 138
Personnalisation des paramètres de la sonnerie . . . . . . . . . . . . . . . . . . . . . . . . . . . 141
À quoi correspondent toutes ces icônes ? . . . . . . . . . . . . . . . . . . . . . . . . . . . . . . . . 142
Chapitre 4: Vos e-mails, messages, navigateur Web et Bluetooth . . . . . . . . . . . . . . . 147
Messagerie électronique sur votre smartphone . . . . . . . . . . . . . . . . . . . . . . . . . . . 147
Messagerie . . . . . . . . . . . . . . . . . . . . . . . . . . . . . . . . . . . . . . . . . . . . . . . . . . . . . . . . 152
Navigateur Web . . . . . . . . . . . . . . . . . . . . . . . . . . . . . . . . . . . . . . . . . . . . . . . . . . . . 154
®
Centro™ . . . . . . . . . . . . . . . . . . . . . . . . . . . . . . 103
®
par ACCESS . . . . . . . . . . . . . . 105
Page 100

Connexion aux appareils Bluetooth® . . . . . . . . . . . . . . . . . . . . . . . . . . . . . . . . . . . . 158
Envoi d'informations à l'aide de la technologie sans fil Bluetooth
®
. . . . . . . . . . . . . 162
Chapitre 5: Vos contacts, calendrier et documents . . . . . . . . . . . . . . . . . . . . . . . . . . . 165
Contacts . . . . . . . . . . . . . . . . . . . . . . . . . . . . . . . . . . . . . . . . . . . . . . . . . . . . . . . . . . 165
Calendrier . . . . . . . . . . . . . . . . . . . . . . . . . . . . . . . . . . . . . . . . . . . . . . . . . . . . . . . . . 168
Documents . . . . . . . . . . . . . . . . . . . . . . . . . . . . . . . . . . . . . . . . . . . . . . . . . . . . . . . . 171
Installation d'applications . . . . . . . . . . . . . . . . . . . . . . . . . . . . . . . . . . . . . . . . . . . . . 172
®
Chapitre 6: Vos photos, votre musique et Facebook
Appareil photo . . . . . . . . . . . . . . . . . . . . . . . . . . . . . . . . . . . . . . . . . . . . . . . . . . . . . 175
Pocket Tunes
Facebook
™
. . . . . . . . . . . . . . . . . . . . . . . . . . . . . . . . . . . . . . . . . . . . . . . . . . . . . 176
®
pour Palm . . . . . . . . . . . . . . . . . . . . . . . . . . . . . . . . . . . . . . . . . . . . . . . . 181
pour Palm . . . . . . . . . . . . . . . . 175
Chapitre 7: Découverte des nouvelles fonctionnalités . . . . . . . . . . . . . . . . . . . . . . . . 183
Informations importantes relatives à la réglementation et à la sécurité . . . . . . . . . . . 185
Index . . . . . . . . . . . . . . . . . . . . . . . . . . . . . . . . . . . . . . . . . . . . . . . . . . . . . . . . . . . . . . . 189
 Loading...