

Page 1

®
Palm
™
Palm
VersaMail
™
i705 Handhelds
™
Handbook
for
Page 2

Copyright
© 2002 Palm, Inc. All rights reserved. Graffiti, HotSync, MultiMail, the Palm logo, PalmModem, Palm.Net,
and Palm OS are registered trademarks of Palm, Inc. The HotSync logo, Palm, and VersaMail are
trademarks of Palm, Inc. Palm, Inc. uses the Bluetooth trademarks under express license from Bluetooth
SIG, Inc. U.S.A. All other brands are trademarks or registered trademarks of their respective owners.
Disclaimer and Limitation of Liability
Palm, Inc. assumes no responsibility for any damage or loss resulting from the use of this handbook.
Palm, Inc. assumes no responsibility for any loss or claims by third parties which may arise through the use
of this software. Palm, Inc. assumes no responsibility for any damage or loss caused by deletion of data as
a result of malfunction, dead battery, or repairs. Be sure to make backup copies of all important data on
other media to protect against data loss.
IMPORTANT Please read the End User Software License Agreement with this product before using the
accompanying software program(s). Using any part of the software indicates that you accept the terms of the
End User Software License Agreement.
PN: 406-4555A-US
Page 3

Contents
About This Book . . . . . . . . . . . . . . . . . . . . . . . . . . . . . . . . . . . . . . . . . . . . . . . . 1
Chapter 1: Getting Started with Palm™ VersaMail™
Personal E-mail Software . . . . . . . . . . . . . . . . . . . . . . . . . . . . . . . . . . . . . . . . . 3
Upgrading to the VersaMail application . . . . . . . . . . . . . . . . . . . . . . . . . . . . . . . . 3
What’s new . . . . . . . . . . . . . . . . . . . . . . . . . . . . . . . . . . . . . . . . . . . . . . . . . . . . . . 3
Installing the VersaMail application . . . . . . . . . . . . . . . . . . . . . . . . . . . . . . . . . 4
Synchronizing an existing username . . . . . . . . . . . . . . . . . . . . . . . . . . . . . . . . . . . 7
Upgrading a MultiMail database . . . . . . . . . . . . . . . . . . . . . . . . . . . . . . . . . . . . . . 8
Getting and installing Documents To Go . . . . . . . . . . . . . . . . . . . . . . . . . . . . . . . 8
Chapter 2: Using Your Palm™ Wireless E-Mail Account . . . . . . . . . . . . . . . 9
What is a Palm Wireless e-mail account? . . . . . . . . . . . . . . . . . . . . . . . . . . . . . . . 9
Viewing your Palm.com Inbox on your handheld . . . . . . . . . . . . . . . . . . . . . . 10
Receiving e-mail notification . . . . . . . . . . . . . . . . . . . . . . . . . . . . . . . . . . . . . . 11
Viewing and using the Reminders list . . . . . . . . . . . . . . . . . . . . . . . . . . . . . . 11
Setting notification options for your Palm.com account . . . . . . . . . . . . . . . 13
Changing the notification sound . . . . . . . . . . . . . . . . . . . . . . . . . . . . . . . . . . . 13
Making your handheld buzz or blink when you get new e-mail . . . . . . . 14
Creating a notification filter for e-mail you receive
in your Palm.com account . . . . . . . . . . . . . . . . . . . . . . . . . . . . . . . . . . . . . . . . 15
Viewing your Palm.com e-mail on the Internet . . . . . . . . . . . . . . . . . . . . . . . . . 16
Working with your Palm.com mailbox limit . . . . . . . . . . . . . . . . . . . . . . . . . . . 16
Deleting messages from your Palm.com account . . . . . . . . . . . . . . . . . . . . . . . . 17
Viewing Palm.com e-mail through Microsoft Outlook . . . . . . . . . . . . . . . . . . . 18
Collecting e-mail from other POP3 accounts into your Palm.com account . . 19
Forwarding e-mail from another e-mail account . . . . . . . . . . . . . . . . . . . . . . . . 20
Chapter 3: Setting Up and Managing Other E-Mail Accounts . . . . . . . . . . 21
Choosing a connection type . . . . . . . . . . . . . . . . . . . . . . . . . . . . . . . . . . . . . . . . . . 21
Creating an e-mail account using the Palm Wireless connection . . . . . . . . . . 22
Entering the account username and password . . . . . . . . . . . . . . . . . . . . . . . 23
Entering the name of the incoming and outgoing mail server . . . . . . . . . . 24
Setting mail retrieval options for a POP or IMAP account . . . . . . . . . . . . . 25
iii
Page 4

Contents
Setting outgoing mail options . . . . . . . . . . . . . . . . . . . . . . . . . . . . . . . . . . . . . 26
Adding a signature . . . . . . . . . . . . . . . . . . . . . . . . . . . . . . . . . . . . . . . . . . . . . . 27
Testing your new account . . . . . . . . . . . . . . . . . . . . . . . . . . . . . . . . . . . . . . . . . 27
Editing e-mail accounts . . . . . . . . . . . . . . . . . . . . . . . . . . . . . . . . . . . . . . . . . . . . . 27
Changing the account username and password . . . . . . . . . . . . . . . . . . . . . . 29
Editing the name of the incoming and outgoing mail server . . . . . . . . . . . 29
Editing mail retrieval options for a POP or IMAP account . . . . . . . . . . . . . 30
Editing outgoing mail options . . . . . . . . . . . . . . . . . . . . . . . . . . . . . . . . . . . . . 31
Editing a signature . . . . . . . . . . . . . . . . . . . . . . . . . . . . . . . . . . . . . . . . . . . . . . . 32
Deleting an e-mail account . . . . . . . . . . . . . . . . . . . . . . . . . . . . . . . . . . . . . . . . . . . 33
Chapter 4: Getting, Sending, and Managing E-Mail . . . . . . . . . . . . . . . . . . 35
Getting and reading e-mail . . . . . . . . . . . . . . . . . . . . . . . . . . . . . . . . . . . . . . . . . . 35
Choosing the e-mail account and displaying the Inbox . . . . . . . . . . . . . . . . 35
Getting e-mail by subject or getting the entire message . . . . . . . . . . . . . . . . 36
Icons in Palm™ VersaMail™ personal e-mail software . . . . . . . . . . . . . . . . 38
Reading e-mail . . . . . . . . . . . . . . . . . . . . . . . . . . . . . . . . . . . . . . . . . . . . . . . . . . 38
Viewing other folders . . . . . . . . . . . . . . . . . . . . . . . . . . . . . . . . . . . . . . . . . . . . 40
Managing columns in the folder’s list view . . . . . . . . . . . . . . . . . . . . . . . . . . 40
Moving e-mail between folders . . . . . . . . . . . . . . . . . . . . . . . . . . . . . . . . . . . . 41
Creating and editing mail folders . . . . . . . . . . . . . . . . . . . . . . . . . . . . . . . . . . 43
Creating and sending new e-mail . . . . . . . . . . . . . . . . . . . . . . . . . . . . . . . . . . . . . 46
Addressing a message by typing the address . . . . . . . . . . . . . . . . . . . . . . . . 47
Addressing a message using Address Book . . . . . . . . . . . . . . . . . . . . . . . . . 47
Using Smart Addressing to address a message . . . . . . . . . . . . . . . . . . . . . . . 48
Composing and sending e-mail . . . . . . . . . . . . . . . . . . . . . . . . . . . . . . . . . . . . 49
Completing drafts . . . . . . . . . . . . . . . . . . . . . . . . . . . . . . . . . . . . . . . . . . . . . . . 50
Attaching a personal signature . . . . . . . . . . . . . . . . . . . . . . . . . . . . . . . . . . . . 50
Forwarding e-mail . . . . . . . . . . . . . . . . . . . . . . . . . . . . . . . . . . . . . . . . . . . . . . . 51
Replying to e-mail . . . . . . . . . . . . . . . . . . . . . . . . . . . . . . . . . . . . . . . . . . . . . . . 52
Working with attachments . . . . . . . . . . . . . . . . . . . . . . . . . . . . . . . . . . . . . . . . . . . 54
Viewing attachments on your handheld . . . . . . . . . . . . . . . . . . . . . . . . . . . . 54
Saving attachments to an expansion card . . . . . . . . . . . . . . . . . . . . . . . . . . . 57
Attaching files to e-mail . . . . . . . . . . . . . . . . . . . . . . . . . . . . . . . . . . . . . . . . . . 57
Uploading attachments from an expansion card . . . . . . . . . . . . . . . . . . . . . 59
Forwarding an attachment . . . . . . . . . . . . . . . . . . . . . . . . . . . . . . . . . . . . . . . . 61
Deleting messages . . . . . . . . . . . . . . . . . . . . . . . . . . . . . . . . . . . . . . . . . . . . . . . . . . 61
Emptying the trash . . . . . . . . . . . . . . . . . . . . . . . . . . . . . . . . . . . . . . . . . . . . . . . . . 64
Marking messages as read or unread . . . . . . . . . . . . . . . . . . . . . . . . . . . . . . . . . . 65
iv
Page 5

Contents
Setting preferences for getting and deleting mail . . . . . . . . . . . . . . . . . . . . . . . 67
Adding or updating an Address Book entry directly from a message . . . . . . 68
Chapter 5: Synchronizing E-Mail Between
the Handheld and the Desktop . . . . . . . . . . . . . . . . . . . . . . . . . . . . . . . . . . . 71
Configuring an account in HotSync Manager . . . . . . . . . . . . . . . . . . . . . . . . . . 71
Setting synchronization options and account settings . . . . . . . . . . . . . . . . . . . 72
Verifying handheld account settings before synchronizing accounts . . . . 77
Configuring Microsoft Outlook . . . . . . . . . . . . . . . . . . . . . . . . . . . . . . . . . . . . 78
Configuring Microsoft Outlook Express . . . . . . . . . . . . . . . . . . . . . . . . . . . . 78
Configuring Eudora . . . . . . . . . . . . . . . . . . . . . . . . . . . . . . . . . . . . . . . . . . . . . . 79
Converting attached files . . . . . . . . . . . . . . . . . . . . . . . . . . . . . . . . . . . . . . . . . . . . 80
Synchronizing an account . . . . . . . . . . . . . . . . . . . . . . . . . . . . . . . . . . . . . . . . . . . 82
Chapter 6: Going Beyond the Basics . . . . . . . . . . . . . . . . . . . . . . . . . . . . . . 83
Managing mail filters . . . . . . . . . . . . . . . . . . . . . . . . . . . . . . . . . . . . . . . . . . . . . . . 84
Creating mail filters . . . . . . . . . . . . . . . . . . . . . . . . . . . . . . . . . . . . . . . . . . . . . . 84
Turning filters on and off . . . . . . . . . . . . . . . . . . . . . . . . . . . . . . . . . . . . . . . . . 86
Editing or deleting a filter . . . . . . . . . . . . . . . . . . . . . . . . . . . . . . . . . . . . . . . . . 87
Creating a synchronize-only account . . . . . . . . . . . . . . . . . . . . . . . . . . . . . . . . . . 87
Entering the account username and password . . . . . . . . . . . . . . . . . . . . . . . 89
Entering the name of the incoming and outgoing mail server . . . . . . . . . . 90
Setting mail retrieval options for a POP or IMAP account . . . . . . . . . . . . . 91
Adding a signature . . . . . . . . . . . . . . . . . . . . . . . . . . . . . . . . . . . . . . . . . . . . . . 93
Configuring your synchronize-only account . . . . . . . . . . . . . . . . . . . . . . . . . 93
Setting up an account with a network connection . . . . . . . . . . . . . . . . . . . . . . . 93
Creating a network e-mail account . . . . . . . . . . . . . . . . . . . . . . . . . . . . . . . . . . . . 94
Entering the account username and password . . . . . . . . . . . . . . . . . . . . . . . 96
Entering the name of the incoming and outgoing mail server . . . . . . . . . . 96
Setting mail retrieval options for a POP or IMAP account . . . . . . . . . . . . . 97
Setting outgoing mail options . . . . . . . . . . . . . . . . . . . . . . . . . . . . . . . . . . . . . 98
Adding a signature . . . . . . . . . . . . . . . . . . . . . . . . . . . . . . . . . . . . . . . . . . . . . . 99
Setting VersaMail connection preferences . . . . . . . . . . . . . . . . . . . . . . . . . . 100
Testing your new account . . . . . . . . . . . . . . . . . . . . . . . . . . . . . . . . . . . . . . . . 101
Setting network and connection preferences . . . . . . . . . . . . . . . . . . . . . . . . . . 101
Setting network preferences . . . . . . . . . . . . . . . . . . . . . . . . . . . . . . . . . . . . . . 101
Setting connection preferences . . . . . . . . . . . . . . . . . . . . . . . . . . . . . . . . . . . . 107
Selecting a different service for a given e-mail account . . . . . . . . . . . . . . . . . 108
Managing mail settings . . . . . . . . . . . . . . . . . . . . . . . . . . . . . . . . . . . . . . . . . . . . 110
Adding APOP to an account . . . . . . . . . . . . . . . . . . . . . . . . . . . . . . . . . . . . . . . . 117
v
Page 6

Contents
Adding ESMTP to an account . . . . . . . . . . . . . . . . . . . . . . . . . . . . . . . . . . . . . . . 119
Copying text from an e-mail message for use in other applications . . . . . . . 120
Using the command bar . . . . . . . . . . . . . . . . . . . . . . . . . . . . . . . . . . . . . . . . . . . . 120
E-mail header details . . . . . . . . . . . . . . . . . . . . . . . . . . . . . . . . . . . . . . . . . . . . . . 121
Backing up mail databases . . . . . . . . . . . . . . . . . . . . . . . . . . . . . . . . . . . . . . . . . . 122
Using wireless IMAP folder synchronization . . . . . . . . . . . . . . . . . . . . . . . . . . 123
Accessing corporate e-mail . . . . . . . . . . . . . . . . . . . . . . . . . . . . . . . . . . . . . . . . . 124
Using Palm Desktop Link . . . . . . . . . . . . . . . . . . . . . . . . . . . . . . . . . . . . . . . . . . 124
Appendix A: Keyboard Shortcuts . . . . . . . . . . . . . . . . . . . . . . . . . . . . . . . . 125
Index . . . . . . . . . . . . . . . . . . . . . . . . . . . . . . . . . . . . . . . . . . . . . . . . . . . . . . . . 127
vi
Page 7

About This Book
With Palm™ VersaMail™ personal e-mail software, you can send, receive, and
manage e-mail on your handheld. Palm™ VersaMail™ Handbook for Palm™ i705
Handhelds shows you how to install version 2.0 of the VersaMail application,
describes the various mail accounts, and explains how to use the many e-mail
features in the VersaMail application.
This book assumes that you know how to do the following:
■ Use the basic functions of your Palm™ i705 handheld, such as the basic
applications and the HotSync
■ Use Microsoft Windows or Macintosh OS X
For more information about using your Palm i705 handheld, please consult the
documentation that came with the handheld.
®
Manager
1
Page 8

About This Book
2
Page 9

CHAPTER 1
Getting Started with Palm™ VersaMail
™
Personal E-mail Software
Palm™ VersaMail™ personal e-mail software is the newest offering in the line of
Palm personal e-mail software applications. Formerly known as MultiMail
software, the VersaMail application contains new features that make sending and
receiving e-mail messages and managing e-mail accounts easier than ever.
You can quickly and easily install version 2.0 of the VersaMail application on your
Palm™ i705 handheld, and then begin using its many features. You can upgrade
any version of MultiMail SE or MultiMail Deluxe to the VersaMail application
version 2.0.
This chapter describes the following:
■ Downloading and installing the VersaMail application
■ Synchronizing an existing username
■ Upgrading an existing MultiMail database for use with the VersaMail
application
®
■ Downloading and installing DataViz Documents To Go
Upgrading to the VersaMail application
Your Palm i705 handheld came with MultiMail Deluxe 1.0, and you may have
upgraded to version 1.2. To take advantage of the many new features, you should
install version 2.0 of the VersaMail application.
What’s new
The VersaMail application offers improved product performance, bug fixes, and
new features that enable you to do the following:
■ Set up and edit e-mail accounts quickly and easily through a streamlined setup
process
■ Create a new Address Book entry directly from the body of an e-mail message
■ Quickly forward e-mail messages, using a streamlined interface
■ Save attachments to an expansion card (sold separately), and upload
attachments from an expansion card for sending
3
Page 10
Chapter 1 Getting Started with Palm™ VersaMail™ Personal E-mail Software
Installing the VersaMail application
To install the VersaMail application on your handheld, you must have activated
your Palm i705 handheld. If your handheld has not been activated, see the
Handbook for the Palm i705 Series Handheld before continuing. You will need the
following to install the VersaMail application:
■ Activated Palm i705 handheld
■ Active subscription to consumer Palm.Net
■ 750 kilobytes (KB) of RAM available on your handheld
■ A Pentium-class computer running Windows 98/2000/NT 4.0/XP or a Mac
®
service
computer running OS X
To install the VersaMail application (Windows users):
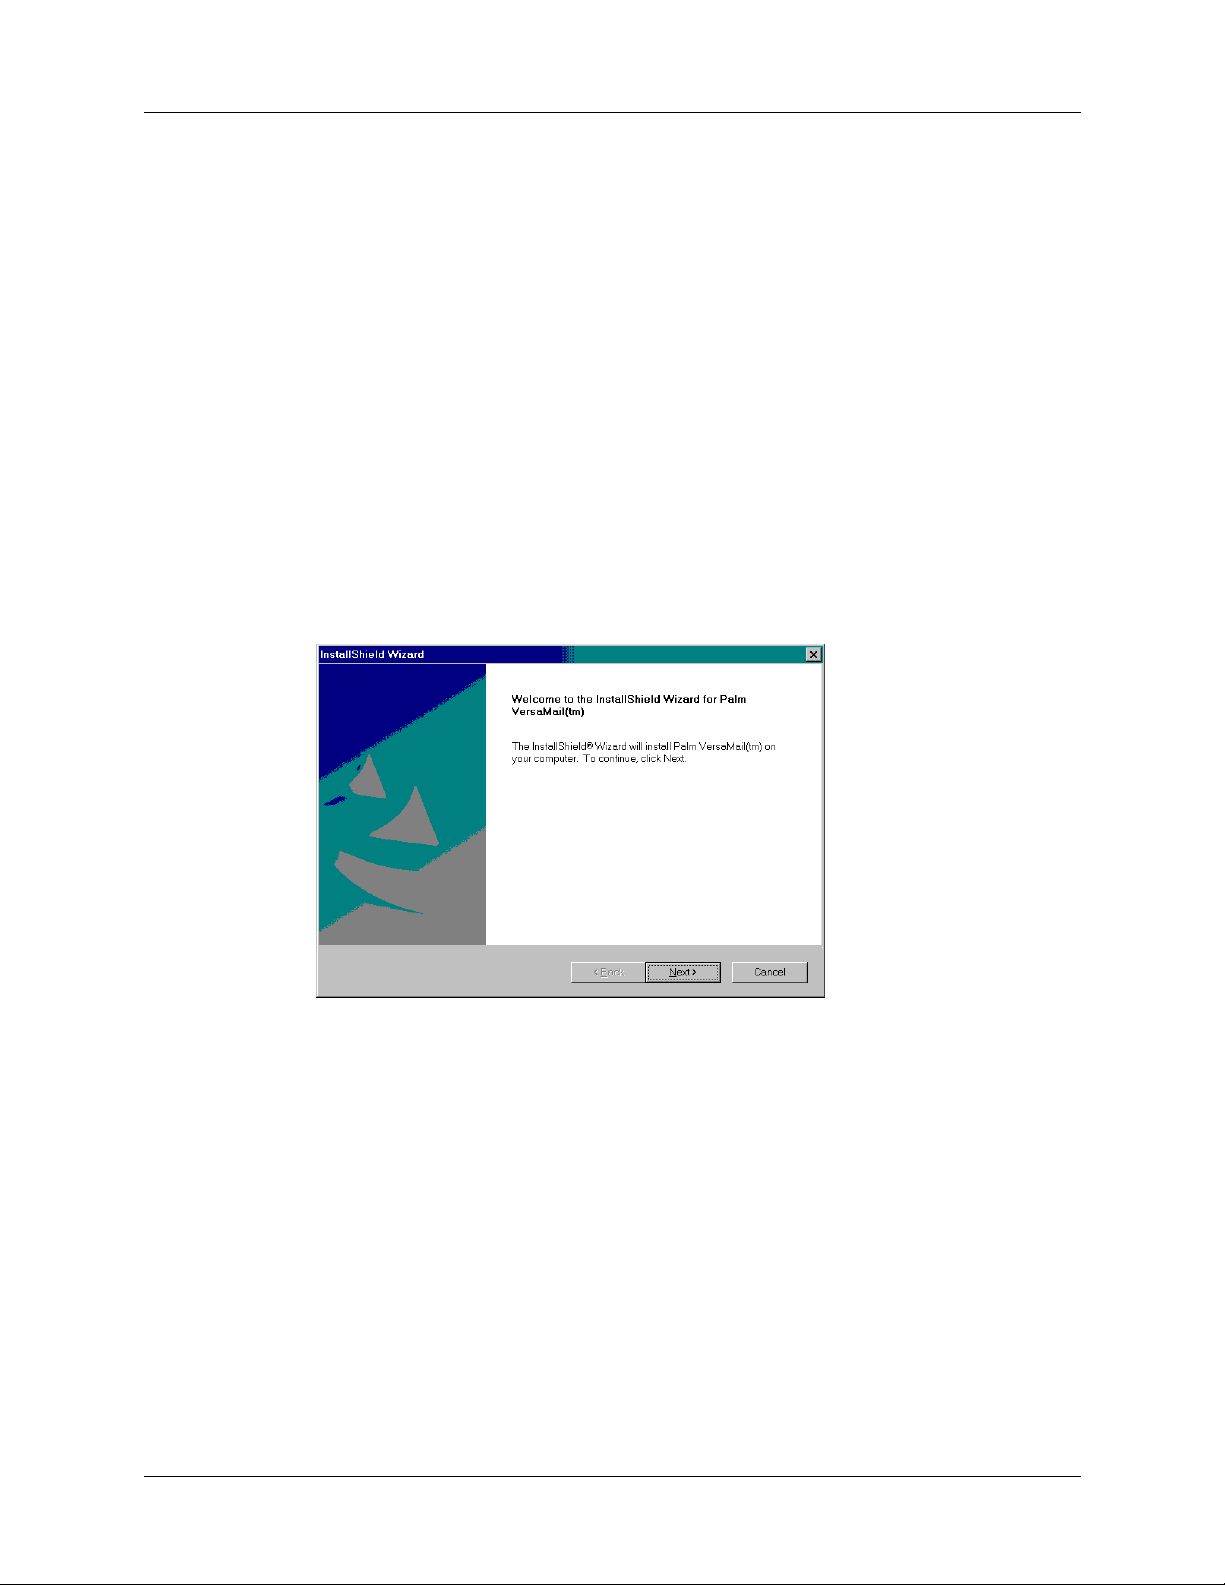
1. In Windows Explorer, locate and double-click the file “i705_install.exe.”
2. Click Next.
4
Page 11
Upgrading to the VersaMail application
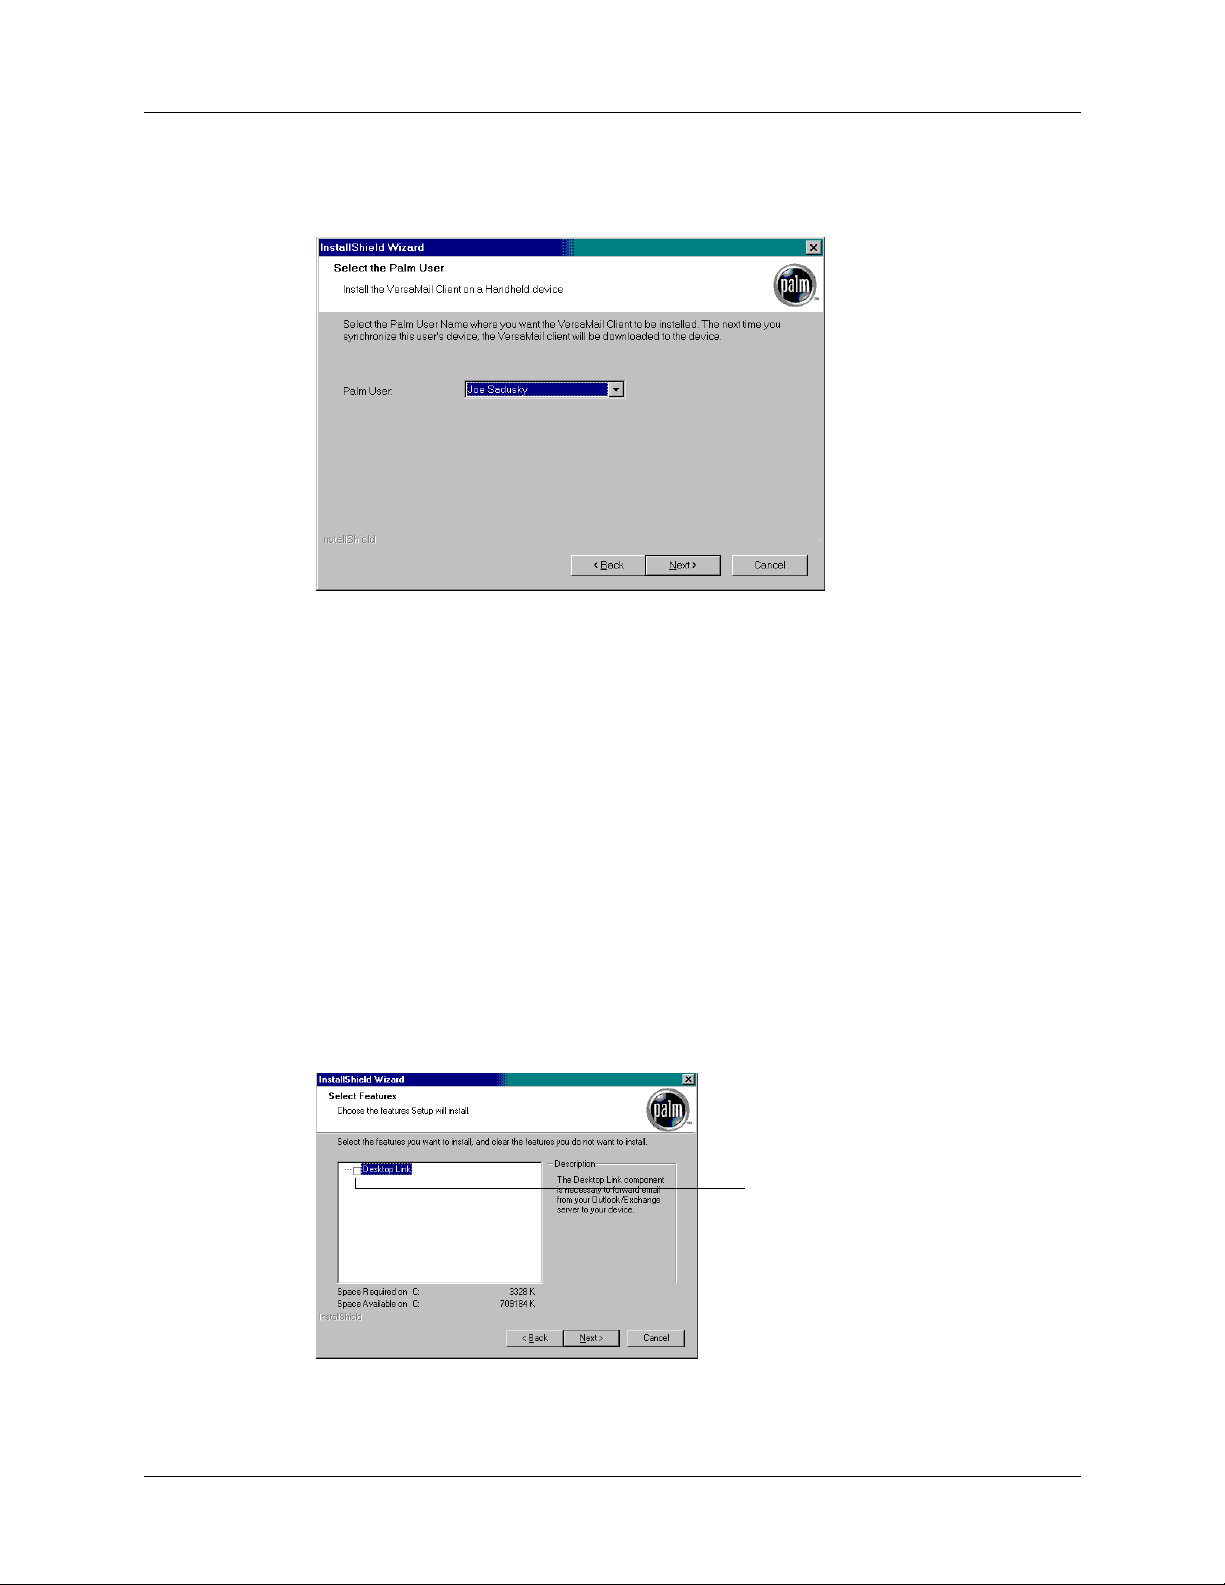
3. When prompted, select username of the handheld to which you want to install
the VersaMail application.
4. Click Next.
5. (Optional) Select the Palm Desktop Link 1.2 check box. If you are using
Microsoft Outlook to access an Exchange corporate e-mail account and want to
securely access your business e-mail wirelessly from your handheld, you can
use Palm Desktop Link. Activating Desktop Link on your desktop computer
automatically creates a Business e-mail account on your handheld. See the
Palm™ Desktop Link Handbook for more information.
If Desktop Link 1.1 is already installed on your desktop computer, you must
install version 1.2 to continue accessing your business e-mail. If you are
installing Palm Desktop Link for the first time, you can install the VersaMail
application and Desktop Link 1.2 at the same time.
NOTE
a Windows computer and are using Microsoft Outlook to access an Exchange
corporate e-mail account. Otherwise, Desktop Link will not work.
6. Click Next.
You should only select the Palm Desktop Link 1.2 check box if you have
Select this check box only
if you want to install Palm
Desktop Link
5
Page 12
Chapter 1 Getting Started with Palm™ VersaMail™ Personal E-mail Software
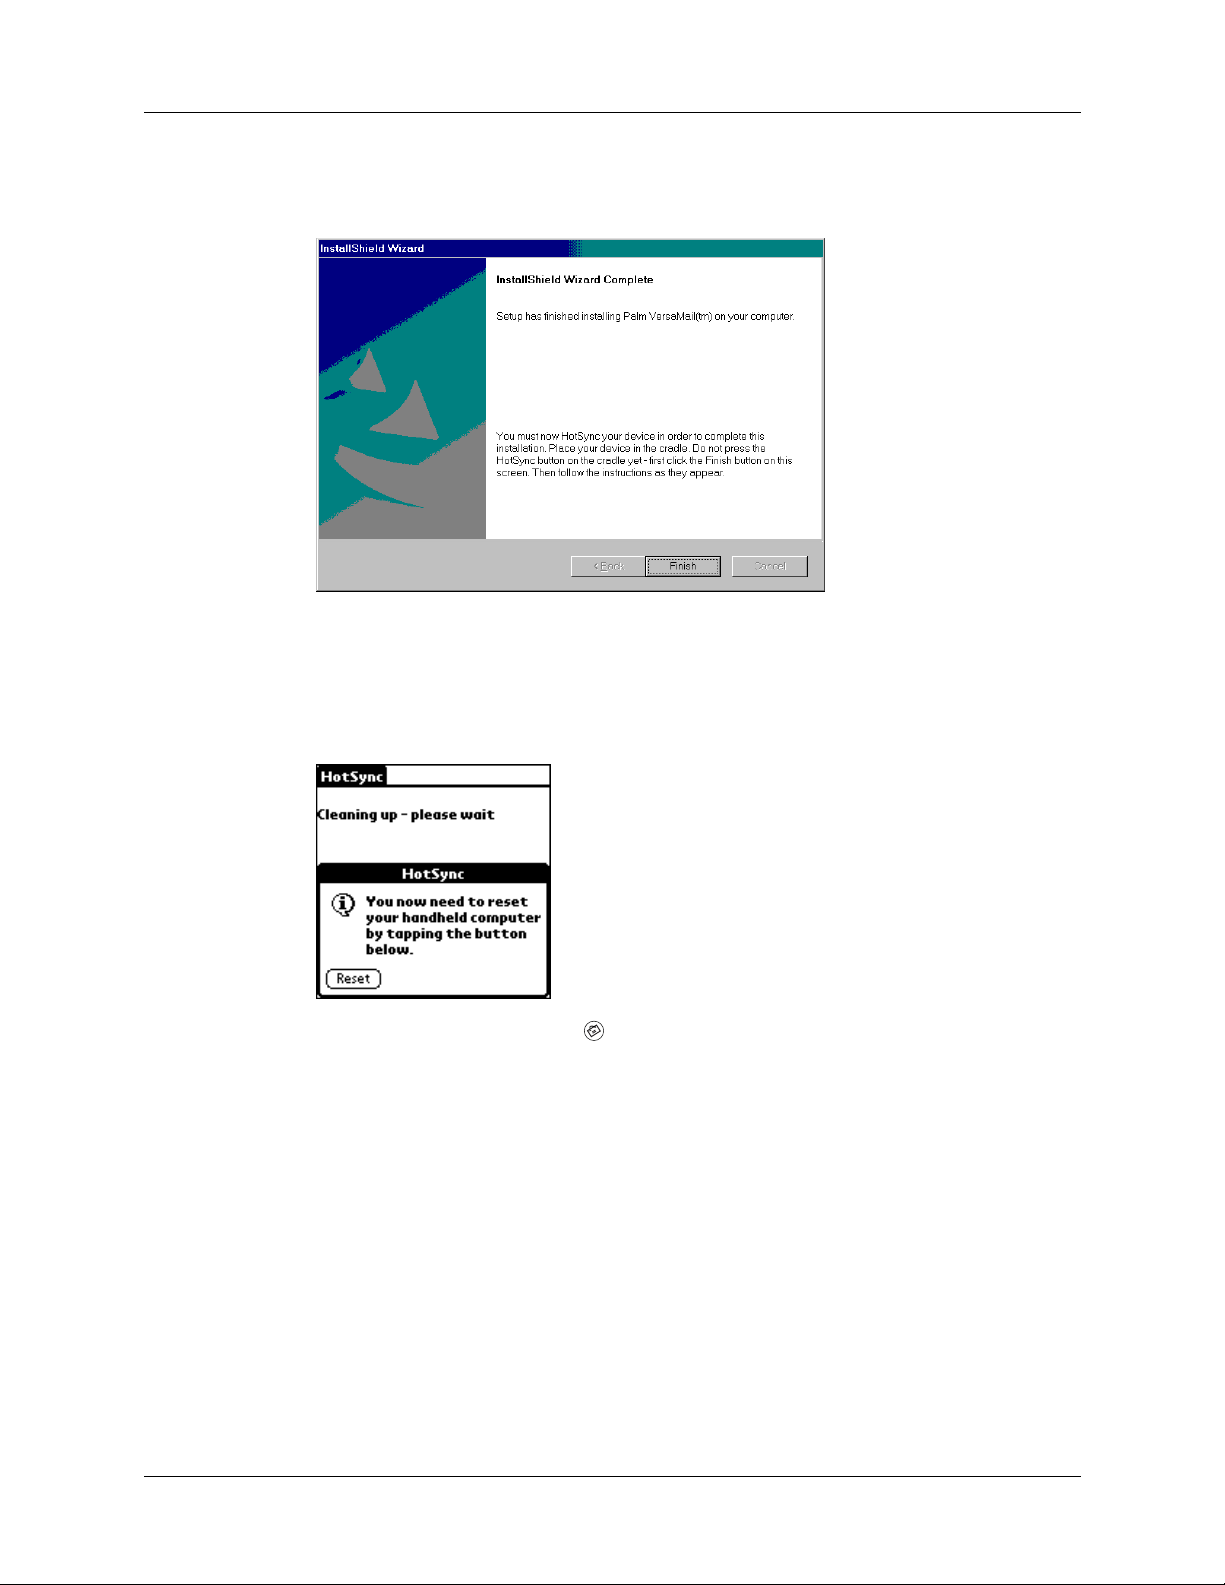
7. Be sure that the handheld is in the cradle and that the cable is properly attached
to your computer, and then click Finish.
8. Follow the onscreen instructions for performing an initial HotSync
The HotSync operation updates the VersaMail application files on your
handheld.
9. Tap Reset.
10. Press the VersaMail button on your handheld.
11. Tap Yes to update the files on your handheld.
NOTE
You cannot continue using the VersaMail application until you tap Yes.
®
operation.
6
Page 13
Synchronizing an existing username
To install the VersaMail application (Mac users):
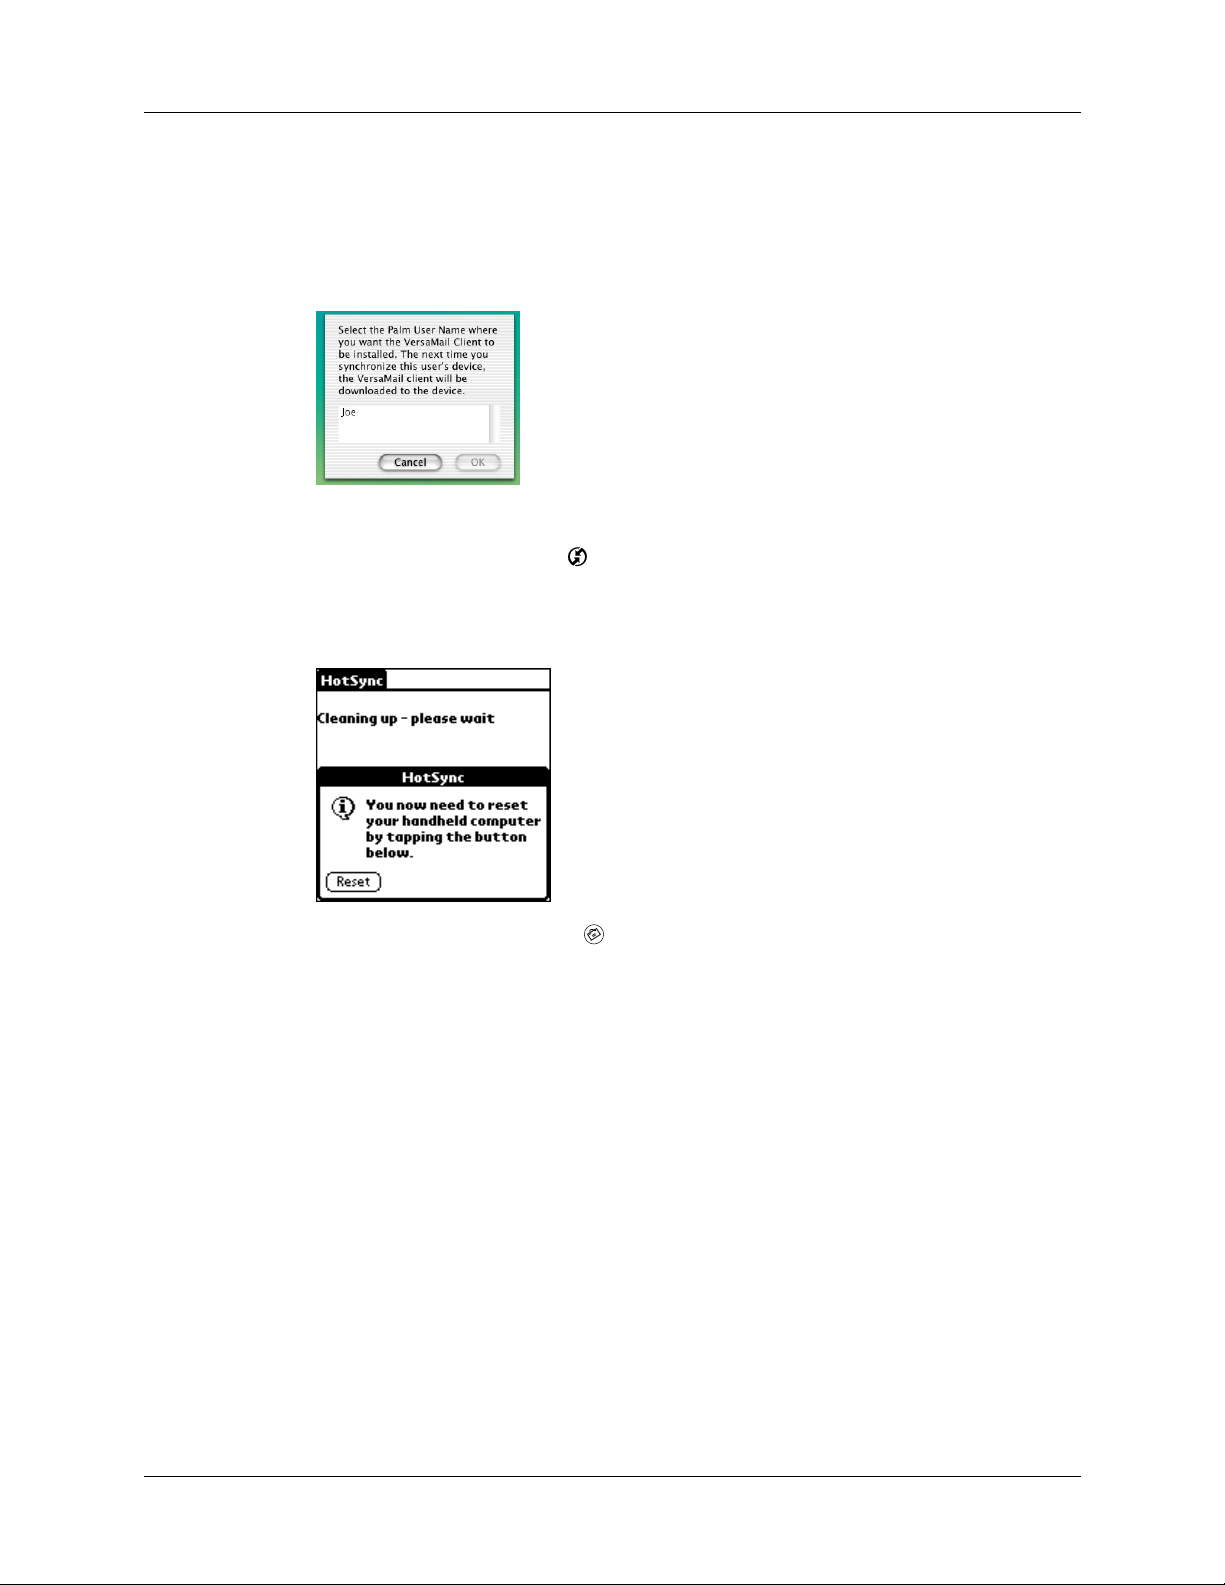
1. Locate and double-click the file “versamail_i705_mac.”
2. When prompted, select username of the handheld to which you want to install
the VersaMail application.
3. Click OK.
4. Press the HotSync button ™ on your handheld to perform an initial HotSync
operation.
5. Tap Reset.
6. Press the VersaMail button on your handheld.
7. Tap Yes to update the files on your handheld.
NOTE
You cannot continue using the VersaMail application until you tap Yes.
Synchronizing an existing username
If you plan to synchronize your handheld with an existing username by
performing a HotSync operation, you must do so before you enter your e-mail
account information in the VersaMail application. If you enter the e-mail account
information first and then synchronize your handheld to an existing username, the
username information overwrites the e-mail account information you entered.
7
Page 14

Chapter 1 Getting Started with Palm™ VersaMail™ Personal E-mail Software
Upgrading a MultiMail database
You can upgrade any mail database that you created in an earlier version of the
MultiMail application in order to use the database with the VersaMail application.
To upgrade an existing e-mail database for use with the VersaMail application:
1. Perform a HotSync operation with a user profile that contains the existing
e-mail database. To do so, place your handheld in the cradle, press the HotSync
button , and then select a profile that contains the e-mail database from the
displayed list of users on the desktop.
2. Tap the Home icon , and then tap the VersaMail icon .
3. Tap Yes to accept the upgrade.
NOTE
You cannot continue using the VersaMail application until you tap Yes.
Getting and installing Documents To Go
NOTE
Windows computers only.
DataViz Documents To Go attachment conversion plug-ins are automatically
configured to work with the VersaMail application. To use the latest Documents To
Go features with the VersaMail application, you must download Documents To Go
version 4.004 or later from the DataViz web site,
must install Documents To Go version 4.004 on both your desktop computer and
your handheld for the conversion to work properly.
Palm i705 handheld users can download a free update to the Documents To Go
version 4.0 that was included on the Palm i705 CD-ROM. You must register as a
Palm i705 handheld user to obtain a registration number and activation key.
Documents To Go integration with VersaMail synchronization is available for
www.dataviz.com/i705 news
. You
8
Page 15

CHAPTER 2
Using Your Palm
™
Wireless
E-Mail Account
After you have installed Palm™ VersaMail™ personal e-mail software version 2.0
on your Palm™ i705 handheld, you are ready to use the many wireless e-mail
features. As part of your paid subscription to consumer Palm.Net
service, a wireless e-mail account is created for you when you activate your
handheld. This account is active as long as your Palm.Net subscription is active.
NOTE This wireless e-mail account is not provided if your company has activated
your handheld using a group or corporate discounted Palm.Net service plan.
This chapter describes the following:
■ What features and advantages your Palm Wireless e-mail account offers
■ How to view your Palm Wireless e-mail account on your handheld as well as on
the Internet
®
wireless
■ How to set up wireless notification for new e-mail messages
■ How to collect mail from other e-mail accounts into your Palm.com account for
centralized access to all your mail
What is a Palm Wireless e-mail account?
When you register for your Palm Wireless service and activate your handheld, you
receive a 5 megabyte (MB) Palm Wireless e-mail account, either a Palm.com or a
Palm.Net account. Most users are given a Palm.com address, such as
“jsmith@palm.com.” If you have upgraded wireless service from a
Palm™ VII/VIIx handheld, you will retain a Palm.Net address, such as
“jsmith@Palm.net.”
NOTE Although this handbook refers to your Palm.com address, it can be used
interchangeably with a Palm.Net address.
Access your Palm.com account using the VersaMail application on your handheld,
view it on the Internet, or view it on a desktop computer with an active Internet
connection using any POP (Post Office Protocol) e-mail client application. As with
a Yahoo, AOL, Hotmail, or other personal e-mail account, you can send and receive
e-mail messages, create folders, and forward messages.
9
Page 16
Chapter 2 Using Your Palm™ Wireless E-Mail Account
Your wireless e-mail account features push e-mail. E-mail messages received into
your Palm Wireless account are pushed to your handheld, so that they are ready for
you to read them. Your handheld notifies you of new messages by blinking an
indicator light, beeping, or vibrating. The handheld also displays a visual list of
notifications, called the Reminders list.
You can view your Palm.com Inbox in three ways:
■ Using the VersaMail application on your handheld (this is the easiest way to
access your account)
■ Using a web browser to view your account on the Internet
■ Using a POP e-mail application, such as Microsoft Outlook, while connected to
the Internet
Viewing your Palm.com Inbox on your handheld
When you open the VersaMail application, your messages appear in the mailbox
that you last used. If you don’t see any messages, tap Get Mail to retrieve your
e-mail messages.
To access your Palm.com account on your handheld and view the Inbox:
1. Press the VersaMail button on your handheld.
Holding down the button for two seconds initiates wireless message
TIP
retrieval.
If you need to switch from another e-mail account to your Palm.com account,
continue with steps 2 and 3.
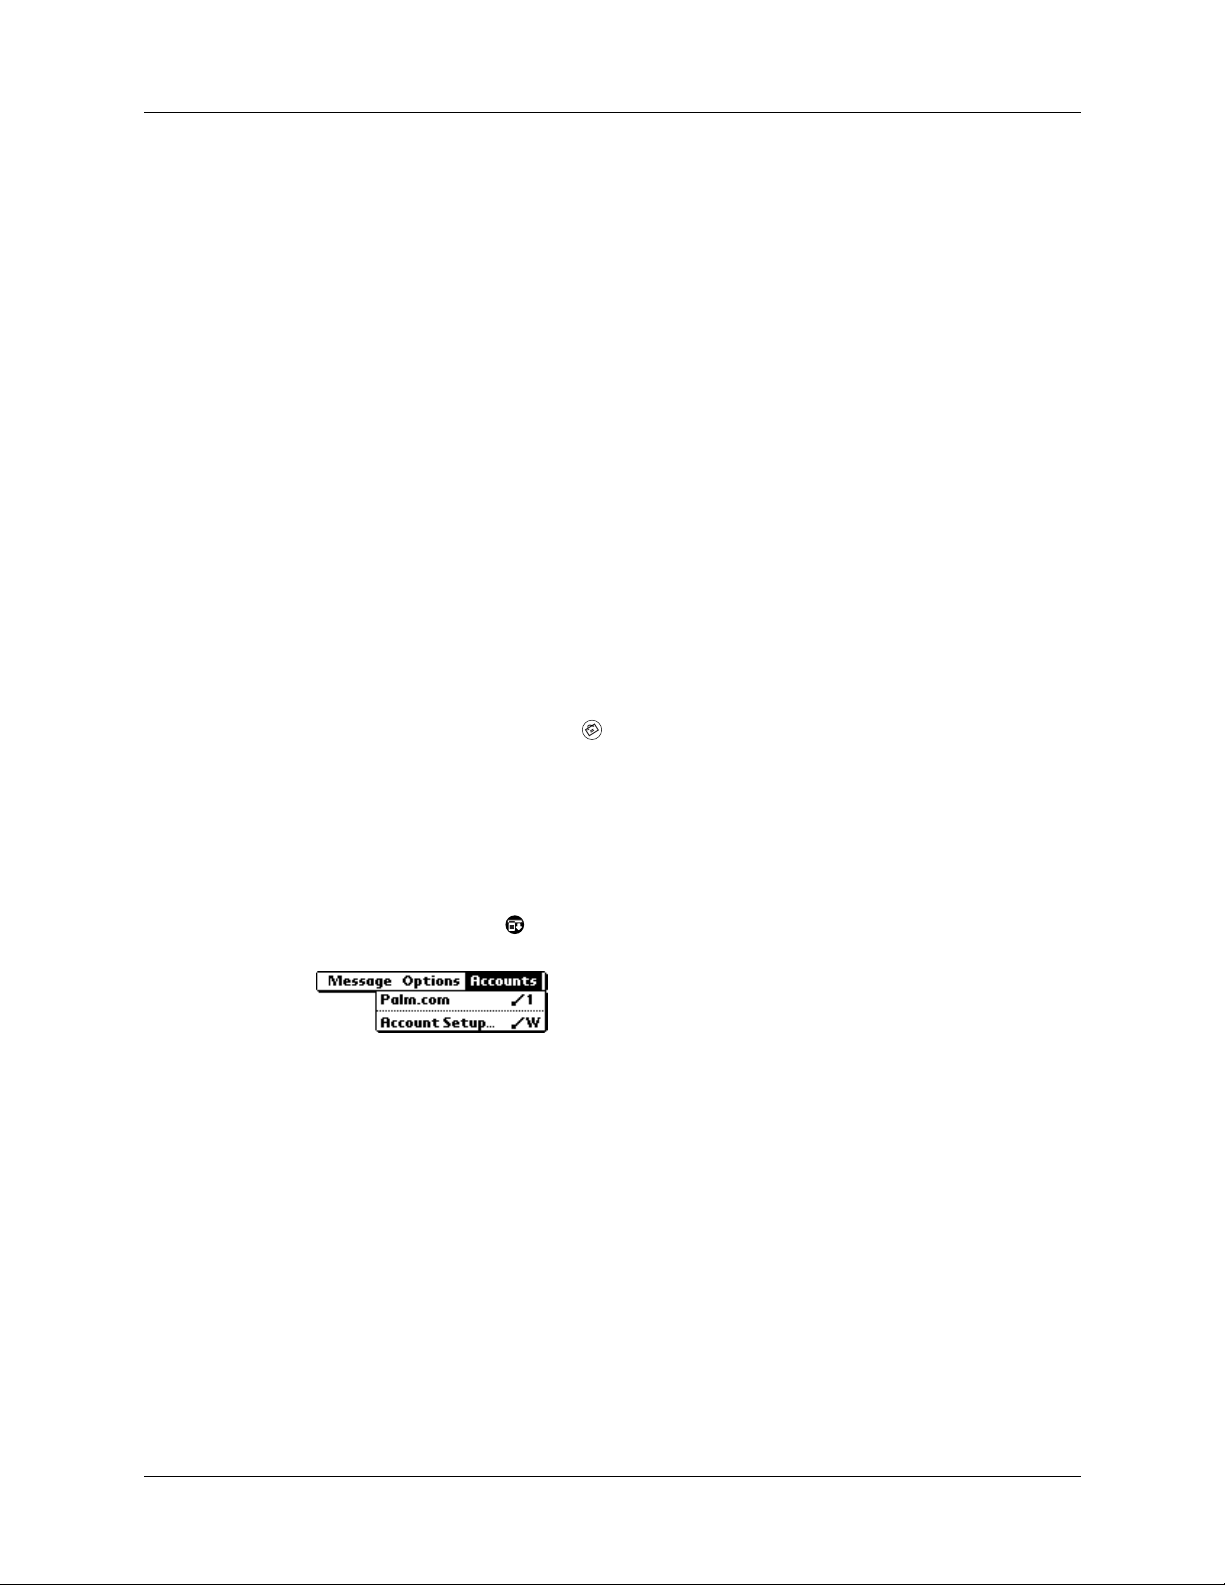
2. Tap the Menu icon , and then tap Accounts.
3. Tap Palm.com.
10
Page 17

Viewing your Palm.com Inbox on your handheld
4. Tap the e-mail’s subject to read the message.
Tap this icon to see the
Reminders list
Tap the bullet next to
an icon to select a
message. The bullet
becomes a checkmark
when messages are
selected
Tap an icon to open a
pop-up menu that
allows you to delete
or move selected
messages
You can change which columns appear in the Inbox and how messages are
TIP
sorted. See “Managing columns in the folder’s list view” in Chapter 4 for more
information.
Receiving e-mail notification
When a new message arrives in your Palm.com or Business account, by default
your handheld beeps and notifies you of the new e-mail’s arrival. The beep or alert
sound your hear is called a notification. Your handheld also notifies you of a new
message’s arrival by blinking an indicator light or vibrating if the right preferences
are turned on. For more information, see “Making your handheld buzz or blink
when you get new e-mail” later in this chapter. You can set notification options
only for the Palm.com or Palm Desktop Link Business account.
Shows unread/total
messages
Unread messages
appear in bold text.
Read messages
appear in plain text
NOTE
The Notification option is turned on by default. If the handheld does not notify
you when new messages are received, check whether the Notification option is
turned on. See “Setting notification options for your Palm.com account” later in this
chapter for more information.
Viewing and using the Reminders list
The handheld also displays a Reminders list that shows summary information
about new e-mail messages and alerts from other applications, such as alerts to
remind you of Date Book appointments.
11
Page 18

Chapter 2 Using Your Palm™ Wireless E-Mail Account
To view the Reminders list:
■ Tap the blinking asterisk in the upper-left corner of any screen.
Tap the check box to
remove a single
reminder from the
list
The mail icon tells
you that this
reminder is for an
e-mail message
Tap the text to open
the e-mail message
If you are using the VersaMail application and you receive new e-mail messages,
they filter into the Inbox. As you work with e-mail messages in the Inbox, the
Reminders list doesn’t display a reminder for any new messages that arrive
because the messages are already displayed in the Inbox.
NOTE
successfully downloaded. To retrieve the e-mail, you can either tap the reminder in
the Reminders list or tap Get Mail in the VersaMail application.
A broken envelope icon appears next to a message when an e-mail was not
To respond to the reminders, do one of the following:
■ Tap the check box to clear a reminder from the list.
NOTE
delete the message from the VersaMail application.
Clearing a reminder only removes it from the Reminders list. It does not
■ Tap the reminder (either the mail icon or the text description) to open and read
the e-mail message in the appropriate account’s Inbox. If you tap a notification
for a message in the Palm.com account, then the Palm.com Inbox is displayed.
■ Tap Done to close the Reminders list and return to whatever you were doing on
your handheld before the Reminders list appeared.
■ Tap Snooze to see the list again in five minutes.
■ Tap Clear All to dismiss all reminders in the Reminders list.
Although your handheld notifies you only of new messages received in your
Palm.com or Business account, you can set up e-mail forwarding from another
e-mail account to your Palm.com account. You can also collect e-mail from other
accounts into your Palm.com account by setting POP mail collection options.
When e-mail forwarded or collected from other accounts is received into your
Palm.com account, it is pushed to your handheld and you are notified of its arrival.
12
Page 19
Viewing your Palm.com Inbox on your handheld
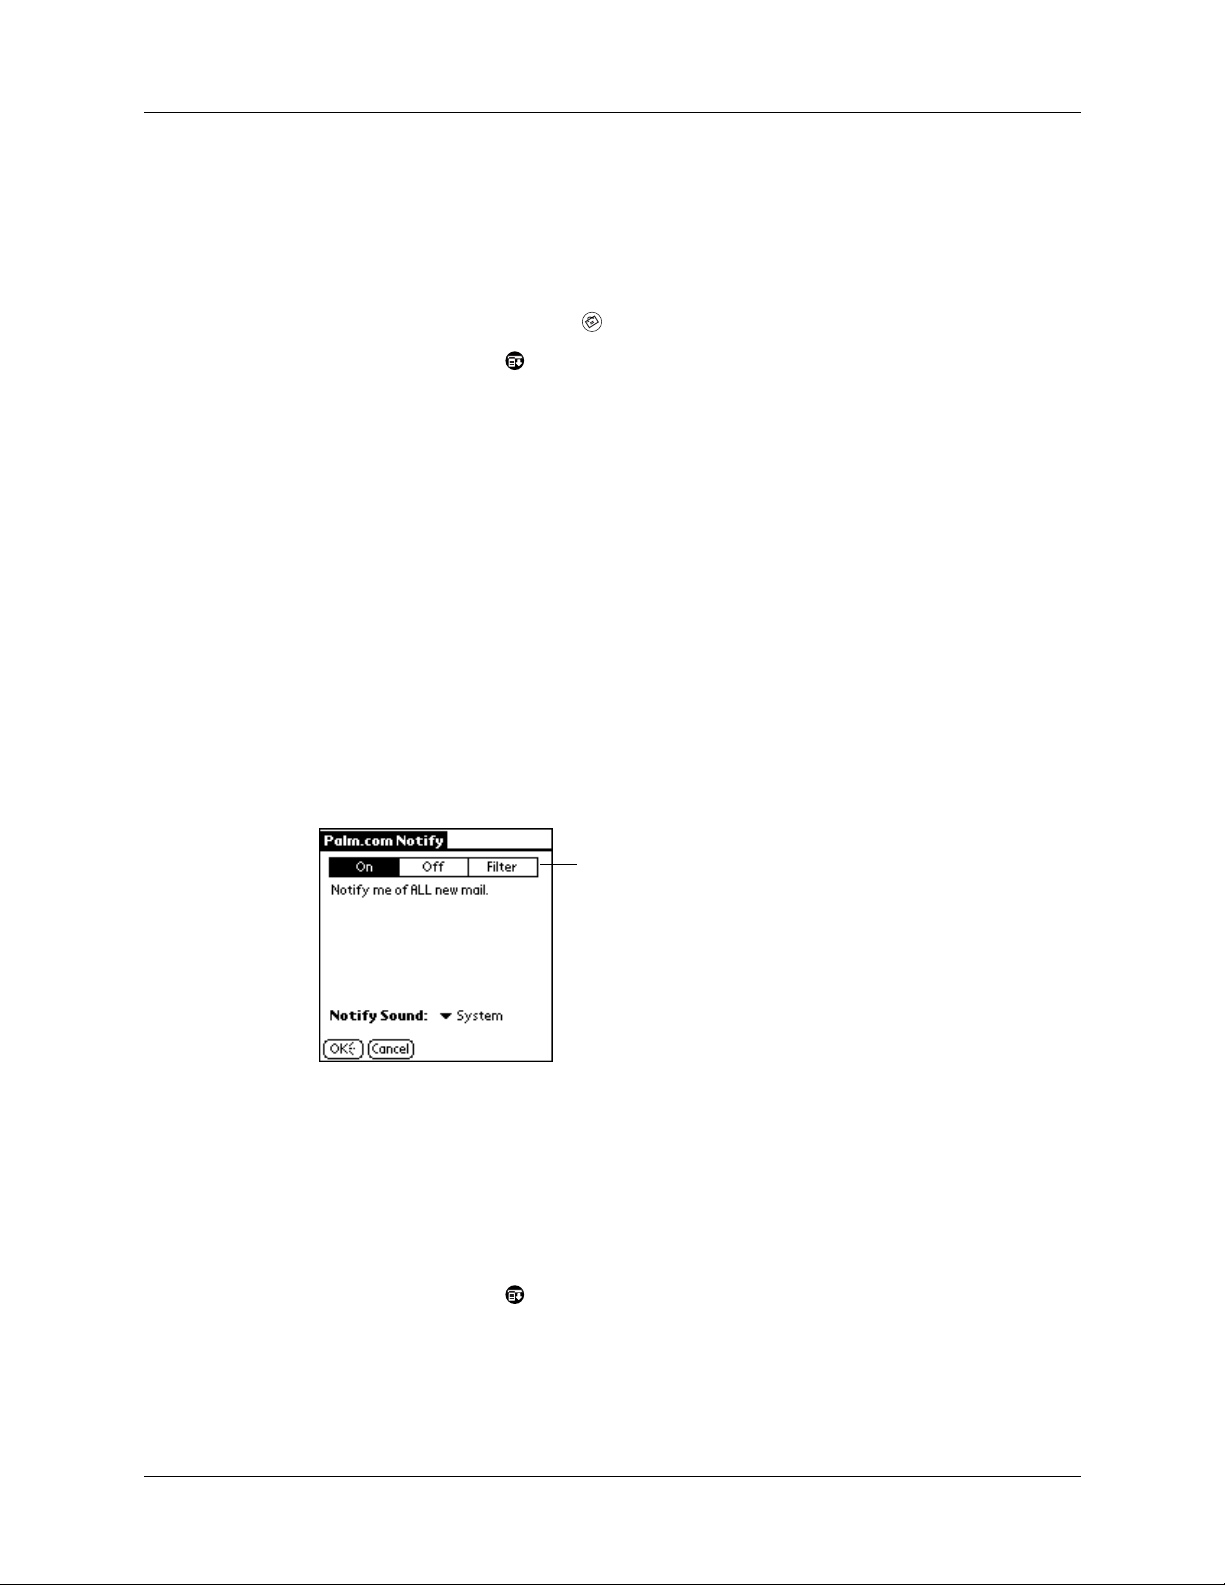
Setting notification options for your Palm.com account
For your Palm.com account, you can turn the notification sound on or off to
determine which messages trigger an alert.
To set notification options:
1. Press the VersaMail button on your handheld.
2. Tap the Menu icon .
3. Tap Options.
4. Tap Notification.
5. Select one of the following options:
On
Off
Filter
6. Tap OK.
You are notified of all new e-mail whenever wireless coverage is
enabled. This is the default.
You receive no notifications.
You can create a notification filter that determines which e-mail
messages trigger an alert. You can create a notification filter only for
your Palm.com account. See “Creating a notification filter for e-mail
you receive in your Palm.com account” later in this chapter for more
information.
Filter mail
for your
Palm.com
account
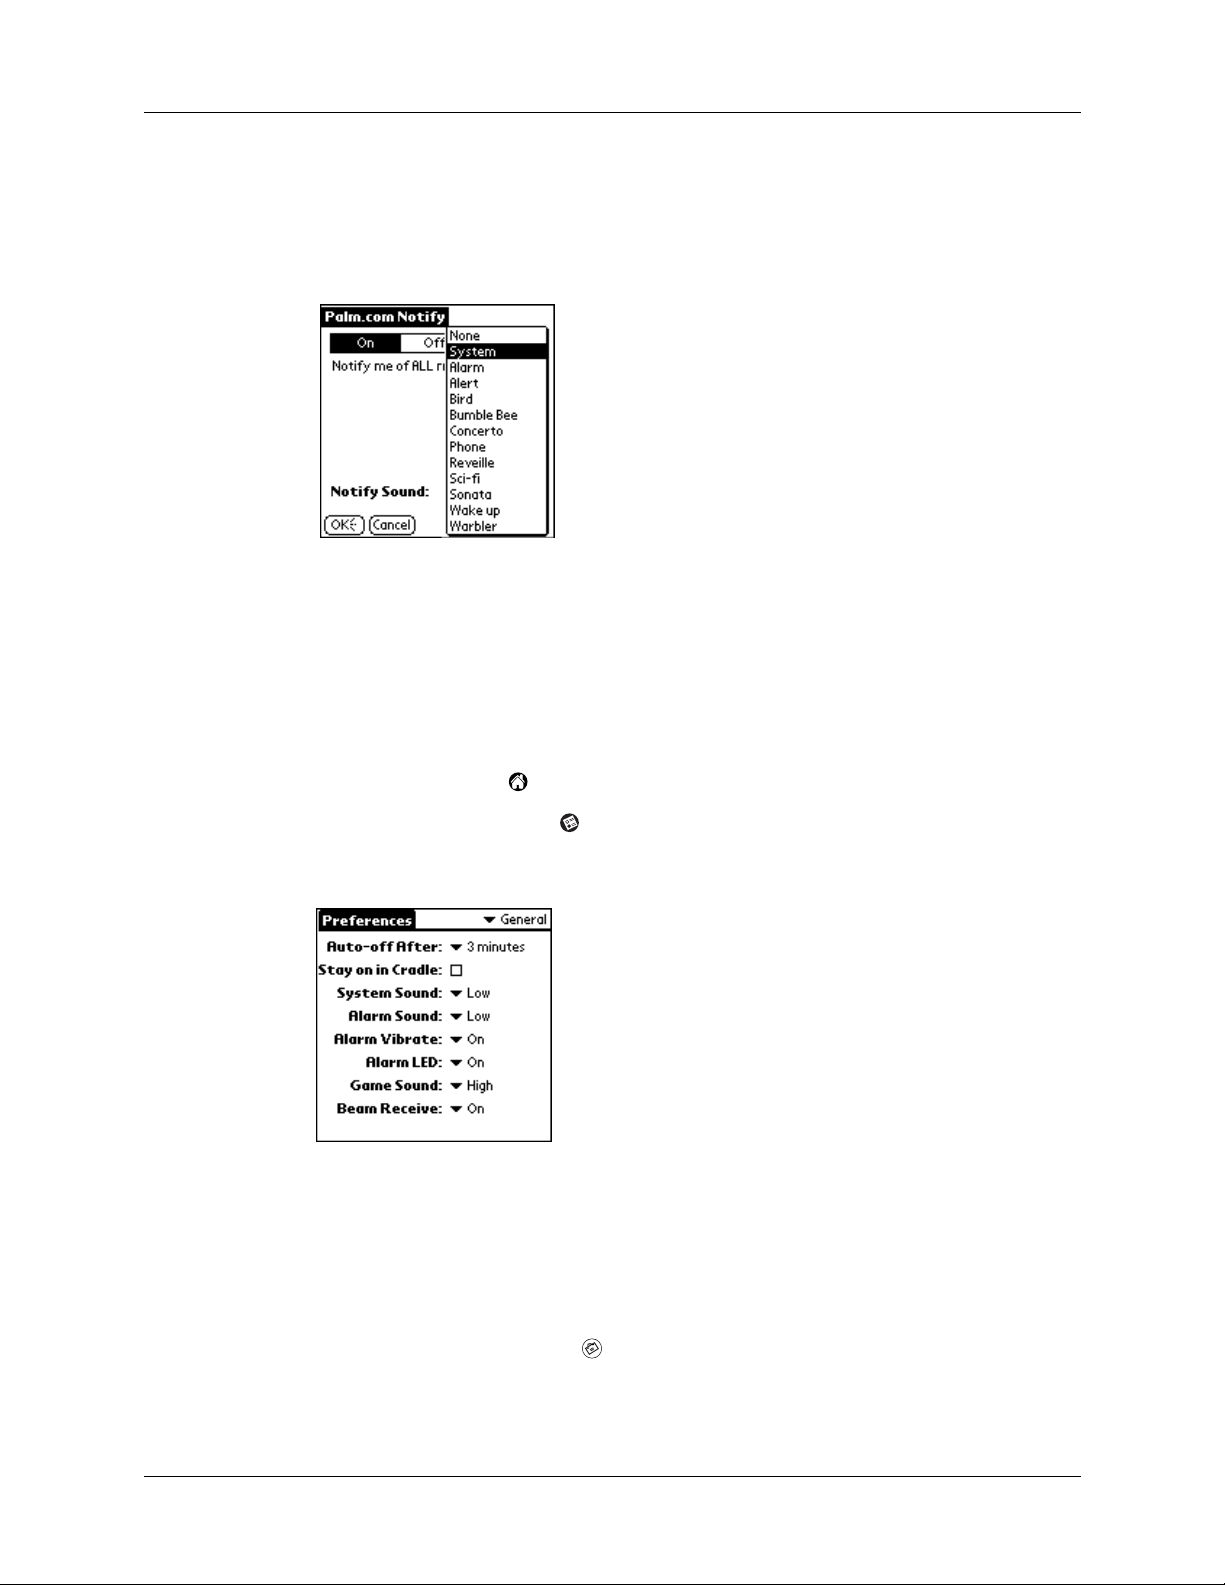
Changing the notification sound
You can choose from a variety of sounds, such as birds, bumble bees, or simply an
alarm, to notify you when new e-mail is received in your Palm.com or Business
account.
1. Tap the Menu icon .
2. Tap Options.
3. Tap Notification.
13
Page 20
Chapter 2 Using Your Palm™ Wireless E-Mail Account
4. Tap the Notify Sound pick list and select a sound. The handheld plays a brief
demonstration of the sound.
With the sound turned off, the indicator light goes on or the handheld vibrates
if you selected one of those options (see the next section).
5. Tap OK.
Making your handheld buzz or blink when you get new e-mail
You can select how your handheld notifies you of new e-mail by setting the Alarm
preferences. These preferences are set in your handheld’s General preferences.
To make your handheld buzz or blink when you get new e-mail:
1. Tap the Home icon .
2. Tap the Preferences icon .
3. Tap the Preferences pick list in the upper-right corner, and then tap General.
4. Do either or both of the following:
– To change the volume of the Alarm Sound, tap the Alarm Sound pick list,
and then tap Low, Medium, High, or Off.
14
– To change whether or not the handheld vibrates when you receive new
e-mail, tap the Alarm Vibrate pick list, and then tap On or Off.
5. Press the VersaMail button on your handheld.
Page 21
Viewing your Palm.com Inbox on your handheld
Creating a notification filter for e-mail you receive in your Palm.com account
For your Palm.com wireless e-mail account only, you can create and use a
notification filter to limit the e-mail messages that trigger an alert from your
handheld. The notification filter doesn’t filter the e-mail messages themselves, just
the notification—all messages are still delivered.
For example, when you travel you may want to be alerted only to e-mail regarding
a specific project. You can create a notification filter that alerts you when e-mail
that meets these conditions arrives in your Palm.com account.
NOTE
criteria arrives, all other e-mail messages are also received into your Palm.com
account. You don’t receive a notification for other messages, however. If you want to
receive only specific e-mail messages in your Palm.com Inbox, you can create mail
filters. See “Creating mail filters” in Chapter 6 for more information.
Although the notification filter alerts you when e-mail that meets the filter
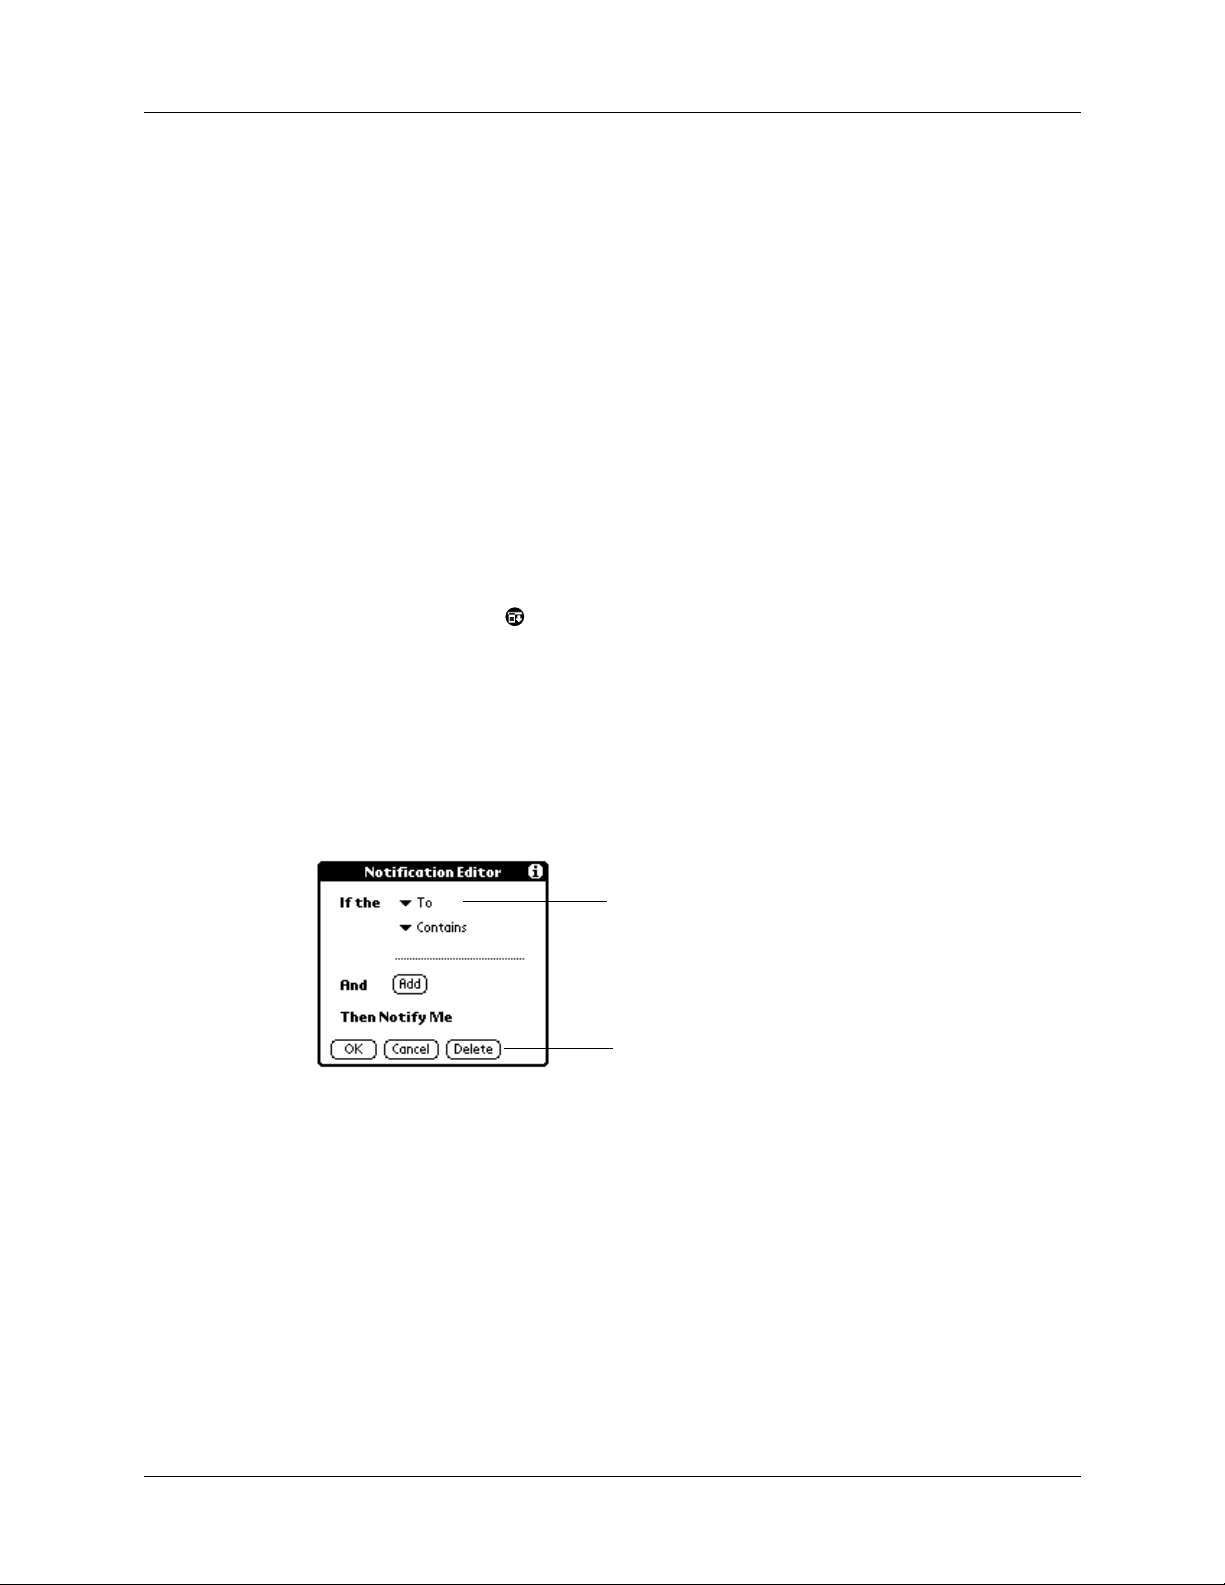
To create or edit a notification filter:
1. Tap the Menu icon .
2. Tap Options.
3. Tap Notification.
4. Tap Filter.
5. Tap Edit.
6. Use the pick lists to create criteria for the notification filter.
Set the filter criteria
Tap to remove the current
notification filter
The two pick lists and the edit line combine to create a statement that identifies
the type of e-mail that triggers notification. For example, a filter might read, “If
the [From] [Contains] mweston@example.com, Then Notify Me.”
You can also use the And button to create a more complex statement, such as “If
the [From] [Contains] mweston@example.com, And if the [Subject] [Starts with]
Apollo Project, Then Notify Me.”
15
Page 22

Chapter 2 Using Your Palm™ Wireless E-Mail Account
When you use this notification filter, only e-mail matching these conditions
prompts a notification alert on your handheld.
To
Select the header field with the information contained in the
edit line: To, From, Subject.
Contains
Edit line
Select a filter action: Contains, Starts with, Does not contain.
Enter the text that must be found in the header field. For
example, if you want to be notified only of e-mail where the
Subject is the Apollo Project, enter “Apollo Project.”
Add
Use to further refine the notification criteria by linking two
conditions together. Tap Add, and then select criteria from the
To and Contains pick lists. Enter the text that must be found in
the header field in the Edit line.
7. Tap OK.
Viewing your Palm.com e-mail on the Internet
You can access your Palm.com e-mail on any desktop computer with a web
browser.
To access your Palm.com account on the Internet:
1. Go to
http://my.palm.com
.
2. Click Web-based E-mail Inbox.
3. Enter your Palm Wireless service username and password.
4. If you have a Palm.Net e-mail address, select the My email address is
“username@palm.net” check box. If you have a Palm.com e-mail address, go to
step 5.
5. Click Login.
Your e-mail Inbox appears.
Working with your Palm.com mailbox limit
Your Palm.com account can store 5MB of e-mail messages, which is plenty of space
for many messages. If you receive a large volume of mail or many messages with
attachments, your mailbox limit may be reached. When you exceed the limit,
messages addressed or forwarded to your Palm.com account are returned to the
sender. To keep this from happening, you should routinely delete messages on the
server for your Palm.com account.
16
Page 23

Deleting messages from your Palm.com account
Deleting messages from your Palm.com account
The Delete Msgs on Server setting in the Preferences ensures that messages are
deleted from the server after you empty the trash on your handheld. If you do not
use this setting, you should occasionally access your Palm.com e-mail account on
the Internet and clear your Inbox on the server. See “Emptying the trash” in
Chapter 4 for more information about manually and automatically emptying the
trash.
To delete messages from your Palm.com account on the Internet:
1. Go to
2. Click Web-based E-mail Inbox.
3. Enter your Palm Wireless service username and password.
4. If you have a Palm.Net e-mail address, select the check box below the password.
5. Click Login.
http://my.palm.com
.
If you have a Palm.com e-mail address, go to step 5.
Your e-mail box appears.
6. Select messages you want to delete, select Trash from the Move Selected To
drop-down list, and then click Move Selected To.
Select Trash from drop-down list and click Move
Selected To to delete messages
You can automatically delete messages on the server when you delete the
TIP
message on the handheld or empty the trash. See “Deleting messages” in Chapter 4
for more information.
17
Page 24

Chapter 2 Using Your Palm™ Wireless E-Mail Account
Viewing Palm.com e-mail through Microsoft Outlook
Your Palm.com e-mail account is a POP account. You can access it from a desktop
computer with Microsoft Outlook and an active Internet connection.
NOTE
such as Microsoft Outlook Express or Eudora. Refer to the documentation for those
e-mail programs to set up POP mail collection.
Your Palm.com e-mail can also be viewed through other e-mail applications,
To access your Palm.com account with Microsoft Outlook:
1. Start Microsoft Outlook.
2. From the Tools menu, select Services.
3. Click Internet E-mail.
4. Click Add.
5. Click OK.
6. Complete the following settings on the General tab:
– Enter a name to describe this e-mail account, such as “Palm e-mail.”
– (Optional) Enter a name or organization in the Useful Info field.
– Enter your complete username, such as username@palm.com or
username@palm.net in the E-mail Address field. The address must include
palm.com or palm.net after your username.
– (Optional) To reply to messages that are received at this account with your
Palm Wireless e-mail address, enter your Palm.com or Palm.Net address in
the Reply Address field.
18
7. Complete the following settings on the Server tab:
– Enter pop.palm.com or pop.palm.net (depending on your Palm Wireless
e-mail address) in the Incoming Mail field.
– Enter in the Outgoing Mail field the name of the SMTP server your outgoing
mail will use. For example, if you use Earthlink as your home Internet
service provider, your outgoing server might be smtp.earthlink.net. Check
with your e-mail service provider to find the name of the SMTP server.
– Enter your Palm Wireless service username and password in the Incoming
Mail Server field. You must enter your complete username, such as
username@palm.com or username@palm.net in this field.
8. Click OK twice.
Now you can use Microsoft Outlook to access your e-mail from your Palm.com
account.
Page 25
Collecting e-mail from other POP3 accounts into your Palm.com account
Collecting e-mail from other POP3 accounts into your Palm.com account
You can collect e-mail from your other mail accounts, such as Yahoo or Earthlink,
into your Palm.com account, so that you have access to all your e-mail in one
account.
To collect e-mail from another account, it must be POP3 compliant. Many popular
e-mail providers offer accounts that are POP3 compliant, including accounts from
Yahoo, Earthlink, and Mindspring. Other e-mail accounts, such as those offered by
America Online and Hotmail, are not POP3 compliant. If you aren’t sure if an
e-mail account is POP3 compliant, check with your e-mail service provider.
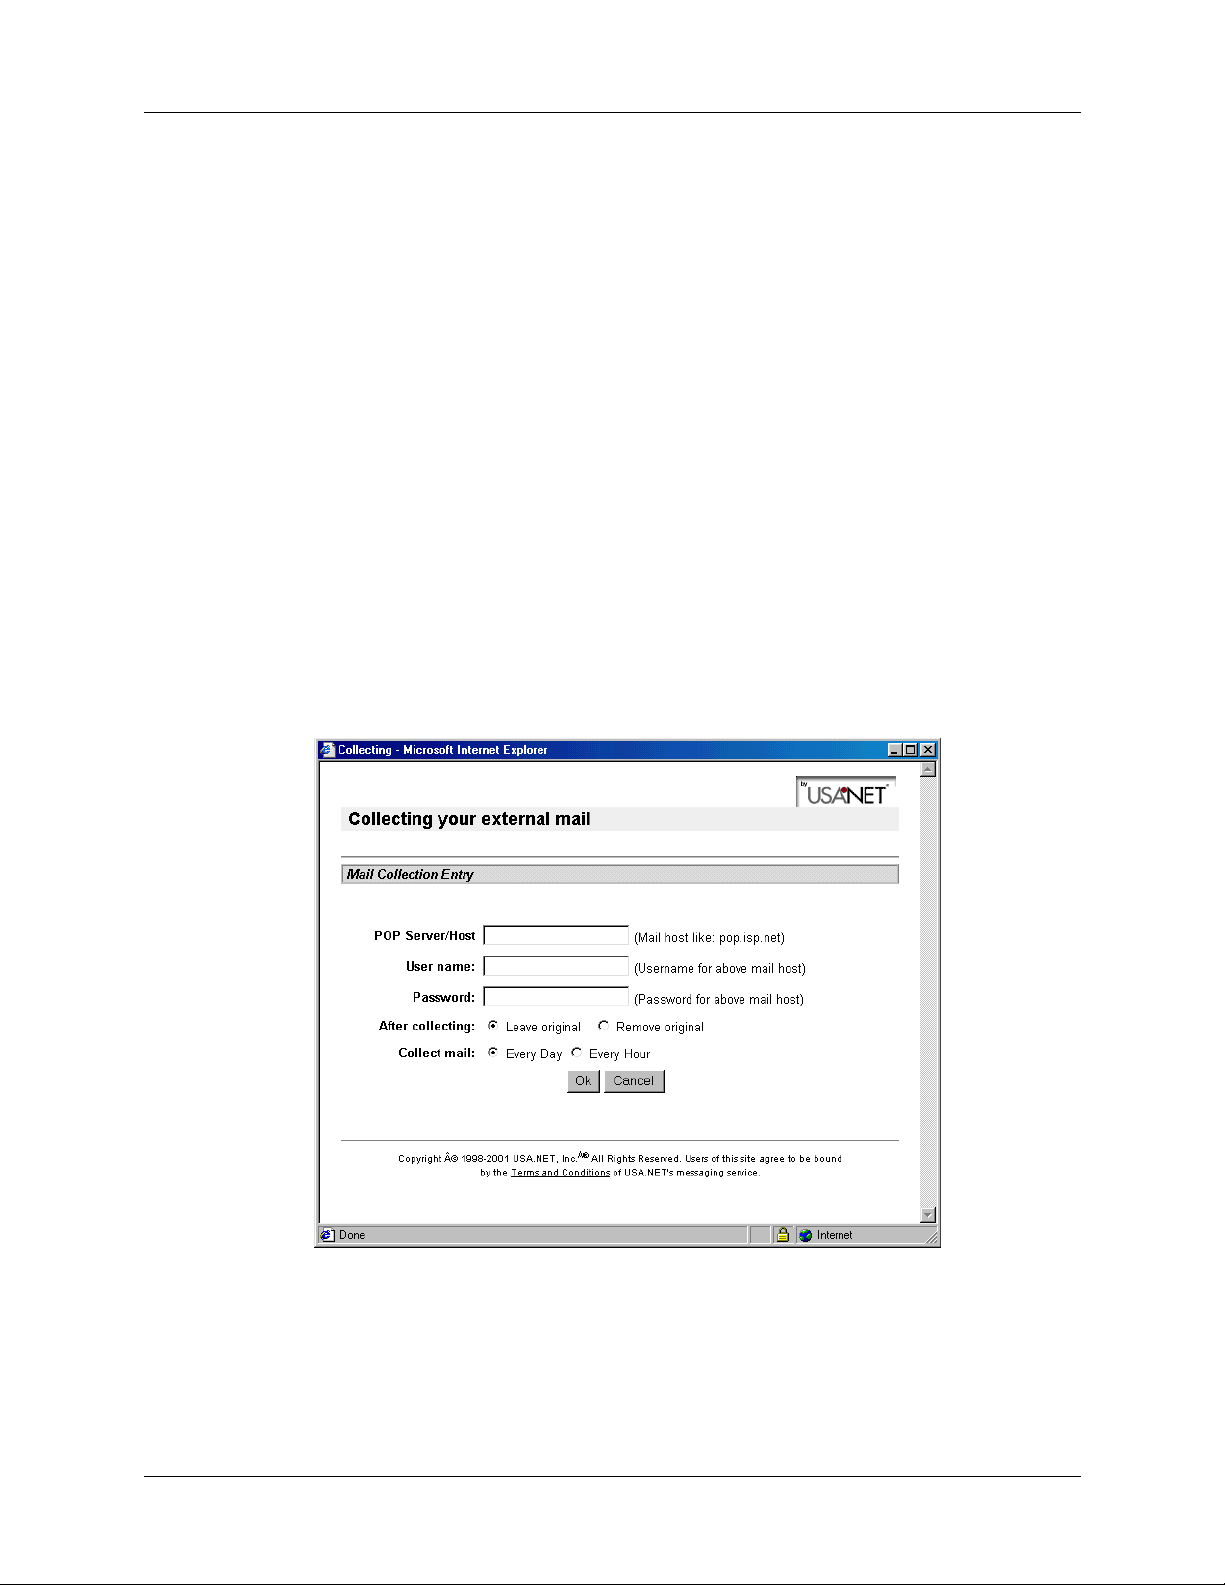
To set POP mail collection options:
1. Go to
2. Click Web-based E-mail Inbox.
3. Log in using your Palm Wireless service username and password.
4. Click the plus (+) mark next to Services.
5. Click Mail Collection.
http://my.palm.com
.
6. Click New.
7. In the POP Server/Host field, enter the mail host from which you are
forwarding e-mail, such as pop.mail.yahoo.com.
8. Enter the username and password that you use for the e-mail account from
which you are forwarding e-mail.
19
Page 26

Chapter 2 Using Your Palm™ Wireless E-Mail Account
9. (Optional) Set an option to specify that the original e-mail is deleted from your
POP account after it is collected.
10. Specify how often e-mail should be collected from this POP account: daily,
hourly, every 15 minutes, or every 5 minutes.
11. Click OK.
Forwarding e-mail from another e-mail account
You can automatically forward your e-mail from another e-mail account, such as
your Yahoo e-mail account, to your Palm.com account. Most popular e-mail
providers, such as Yahoo, and many DSL and cable e-mail providers, such as
Verizon DSL or Bell South DSL, allow you to set up e-mail forwarding.
If you forward e-mail, specify your Palm.com address as the recipient address.
Consult the documentation or Help files for the e-mail provider from which you
want to forward mail for more information.
NOTE
Check with your e-mail provider to see if there is a charge for forwarding mail.
20
Page 27

CHAPTER 3
Setting Up and Managing
Other E-Mail Accounts
With Palm™ VersaMail™ personal e-mail software, you can access e-mail accounts
from other e-mail providers, such as Earthlink or Yahoo. Some companies may
also allow access to corporate e-mail with the appropriate mail server
configuration; see “Accessing corporate e-mail” in Chapter 6 for information.
You can add up to eight other e-mail accounts to send and receive e-mail by using
your Palm™ Wireless connection (requires Palm.Net
connection with a different network service provider (for example, using an
external modem accessory, sold separately), or synchronizing to a desktop e-mail
application. For example, if you have a Yahoo e-mail account, you can create a new
account in the VersaMail application and name that new account Yahoo, so that
you can send and receive mail from your Yahoo account using your handheld.
®
service), setting up a
This chapter describes the following:
■ Choosing a connection type
■ Setting up and configuring e-mail accounts that use the Palm Wireless
connection
■ Editing e-mail accounts
■ Deleting e-mail accounts
Choosing a connection type
When you set up a new account in the VersaMail application, you choose the
method for connecting to your e-mail account. You can choose from the following
connection types:
Palm Wireless (default):
■
modem that is built into your Palm™ i705 handheld. This type of connection
requires Palm.Net service activation.
Synchronize-only (Windows computers only):
■
between your handheld and a desktop e-mail application, such as Microsoft
Outlook, by performing a HotSync
send and receive messages wirelessly or with a modem for any account of this
type. See “Creating a synchronize-only account” in Chapter 6 for more
information.
You can access an account wirelessly using the wireless
You can view and manage e-mail
®
operation using the cradle/cable. You can’t
21
Page 28
Chapter 3 Setting Up and Managing Other E-Mail Accounts
■ Network: You choose this connection method if you want to create a connection
to an e-mail provider without using Palm Wireless—for example, if you will
send and receive e-mail messages from your handheld using an external
modem that is connected to a phone jack on the wall. See “Setting up an account
with a network connection” in Chapter 6.
Creating an e-mail account using the Palm Wireless connection
If you are setting up a new e-mail account that will use the Palm Wireless
connection and you have a well-known Internet service provider (ISP) such as
Earthlink or Mindspring, the VersaMail application automatically configures
many of the required settings during the account setup.
For other ISPs, you need the following information:
■ The protocol used for incoming mail, such as POP or IMAP
■ The name of the incoming mail server
■ The name of the outgoing mail (SMTP) server
■ Whether your e-mail account requires any encryption, such as APOP
■ Your e-mail address and password
■ The login script (if any) you need for connecting to your ISP or mail server
NOTE
Information about your e-mail account is available from the e-mail provider.
Depending on the type of e-mail service you have, you may obtain this information
by accessing the e-mail provider’s web site or by contacting the provider's customer
support.
To create an e-mail account using the Palm Wireless connection:
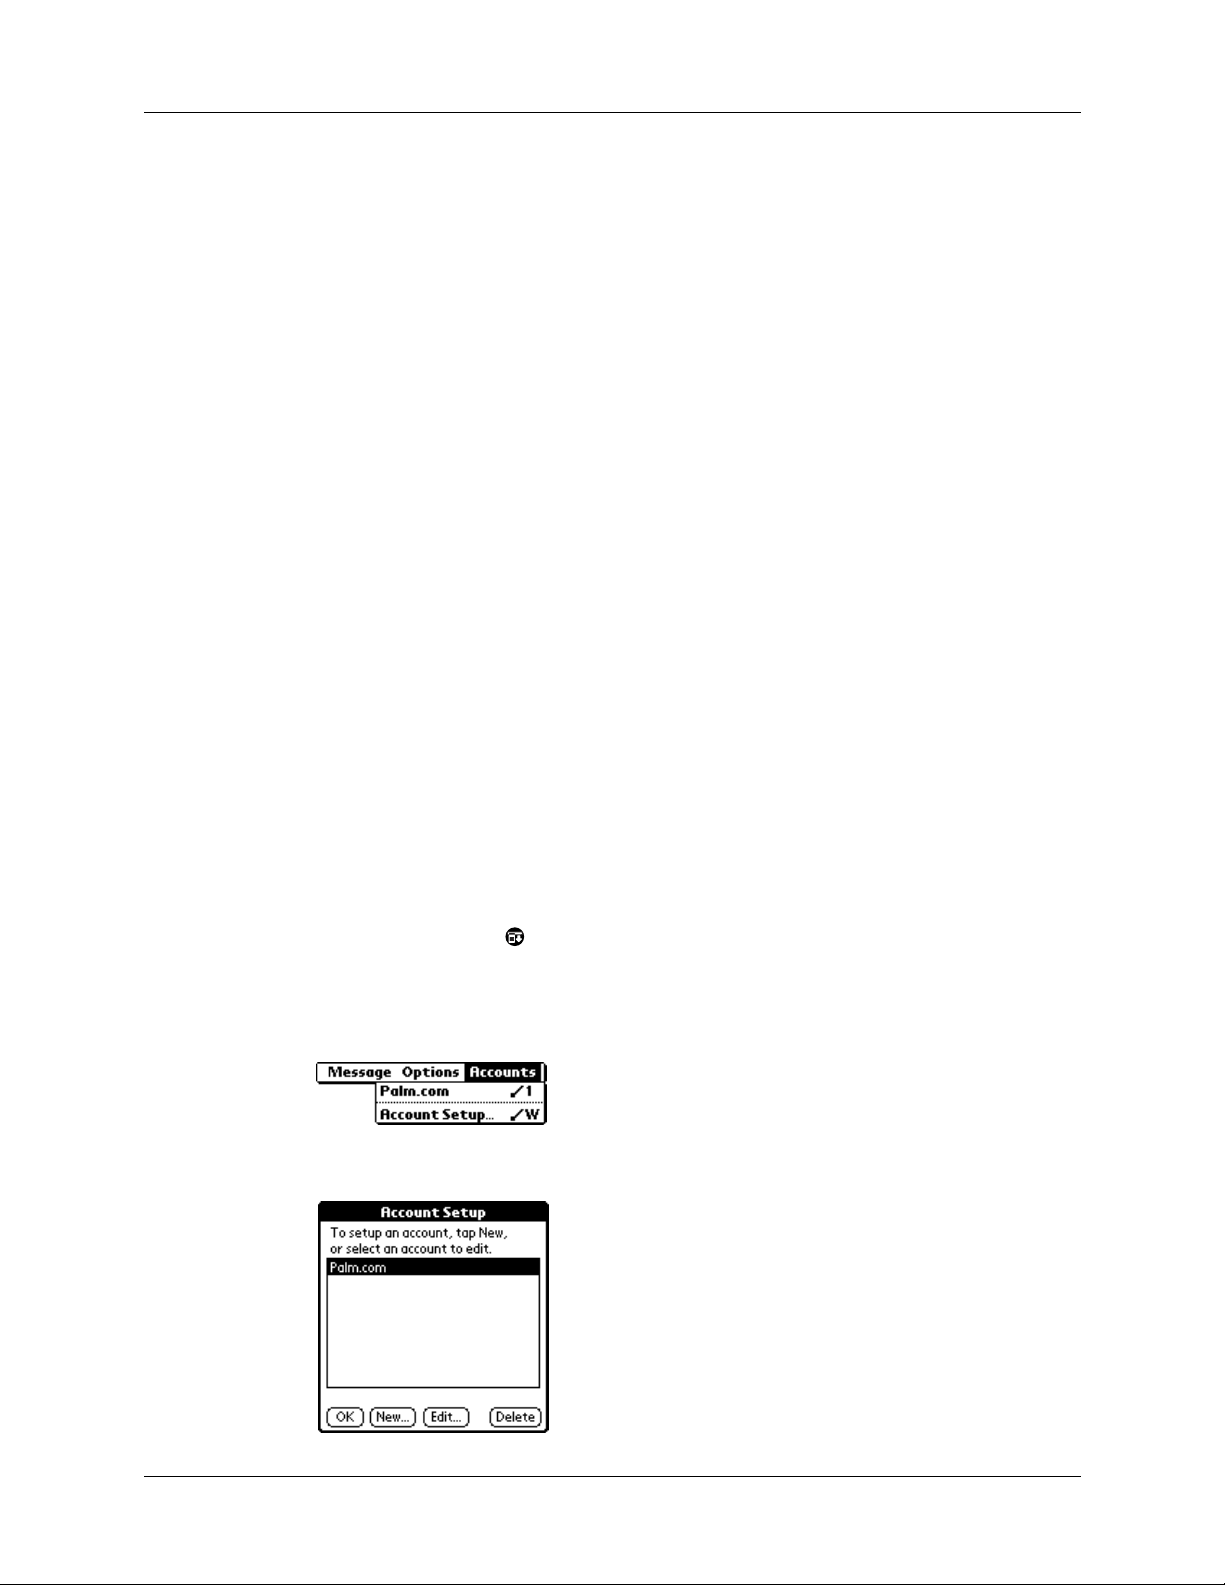
1. Tap the Menu icon .
2. Tap A cc ou nt s.
3. Select Account Setup.
4. Tap N ew.
22
Page 29
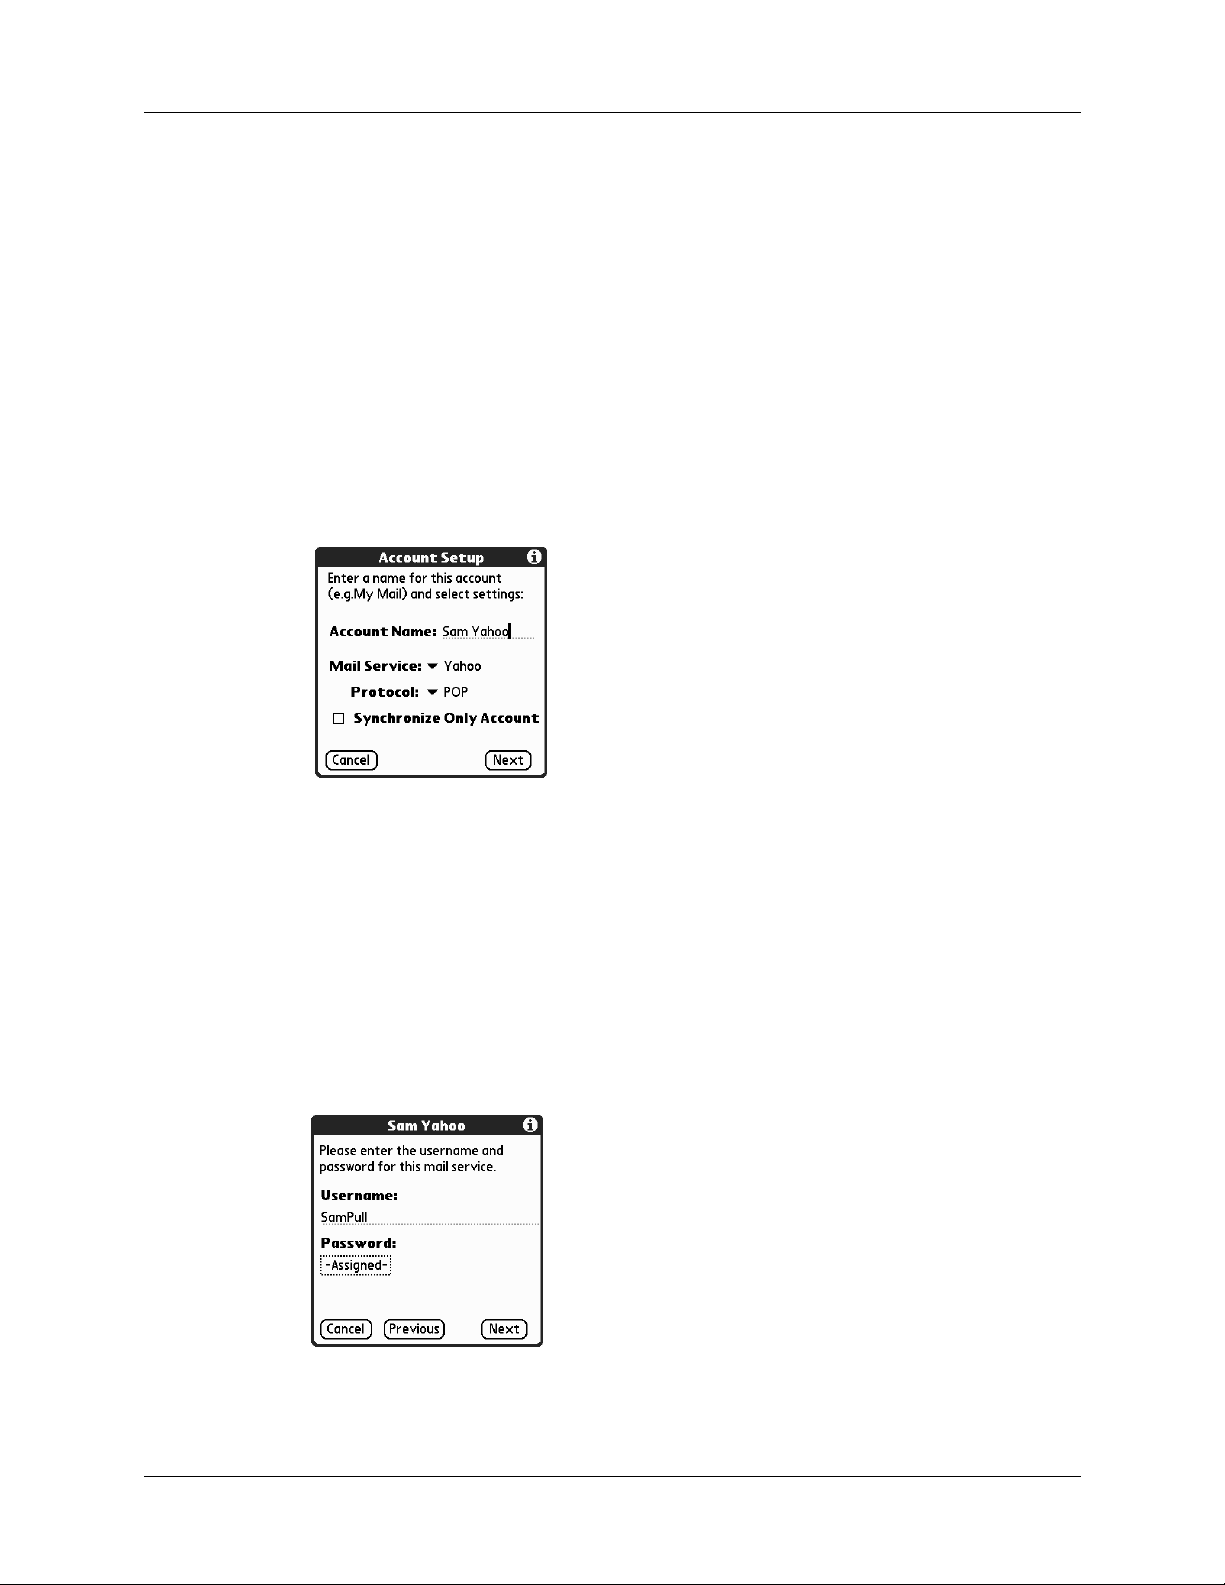
5. Do the following:
Creating an e-mail account using the Palm Wireless connection
Account Name
Enter a descriptive name for this account, such as “My
Yahoo.”
Mail Service
Tap the Mail Service pick list and select the provider to
which you are connecting. Select Other if your ISP is not
listed.
Protocol
Tap the Protocol pick list and select POP or IMAP. (Most mail
providers use the POP protocol.)
If the VersaMail application knows the protocol for the mail service you
selected, it displays the correct protocol.
6. Tap N ex t.
Entering the account username and password
In the next part of the VersaMail Account Setup, you enter the username and
password for this account.
To enter the account username and password:
1. Enter the username you use to access your e-mail. This is generally the part of
your e-mail address that appears before the @ symbol; it is usually not your
entire e-mail address.
23
Page 30
Chapter 3 Setting Up and Managing Other E-Mail Accounts
2. Tap the Password box, and then enter your password. The Password box
displays the word “Assigned” to indicate that a password has been entered.
3. Tap OK .
4. Tap N ex t.
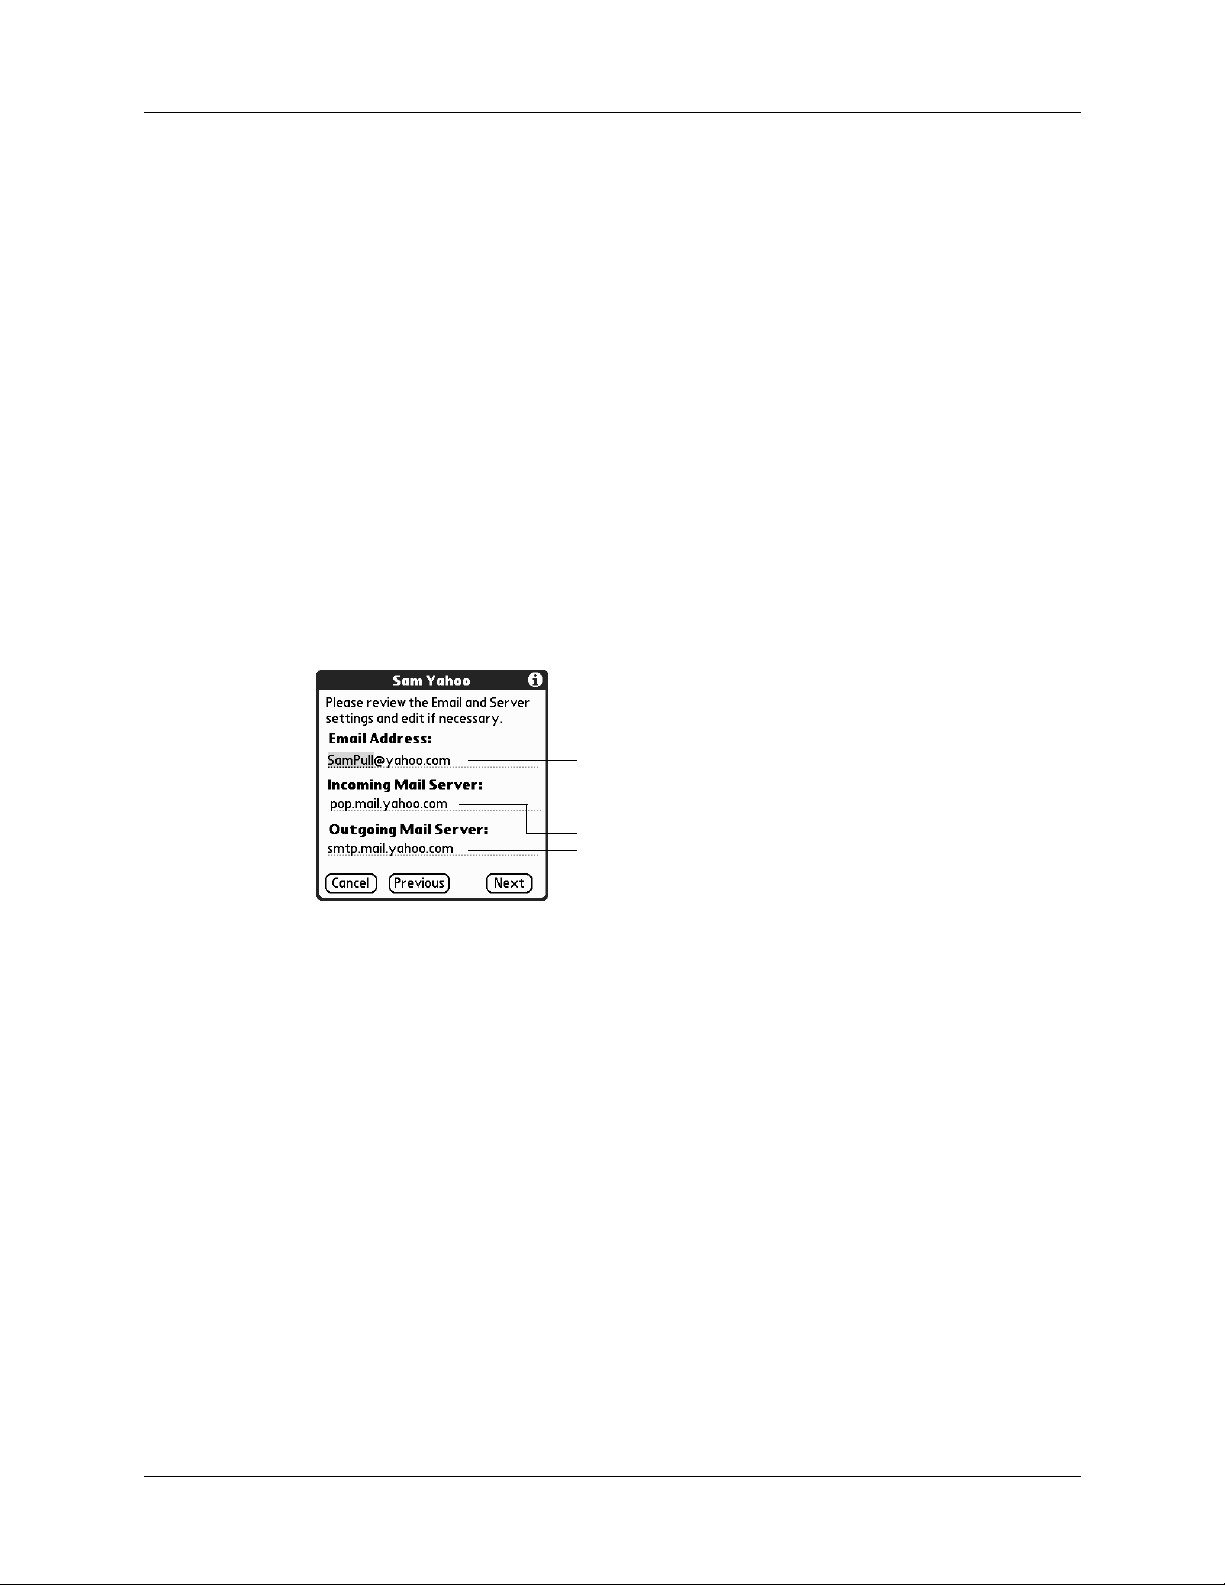
Entering the name of the incoming and outgoing mail server
You need to enter your e-mail address for the account you are accessing, as well as
the name of the incoming and outgoing mail servers.
To enter mail server settings:
1. If you chose a preconfigured service from the Mail Services pick list on the
Account Setup screen, the e-mail address field is completed automatically
based on the username and mail service you entered. Check the address to
verify that it is correct, and edit it if necessary.
If you chose Other from the Mail Services pick list on the Account Setup screen,
enter the e-mail address for your account.
E-mail address will be filled in
automatically if you chose a
preconfigured mail service
Mail servers will be filled in
automatically if the VersaMail
application knows the names based
on the mail service you chose
2. Enter the name of your incoming (POP) mail server, such as
pop.mail.yahoo.com.
If the VersaMail application knows the incoming mail server name based on the
mail service you selected, the correct server name is displayed.
3. Enter the name of your outgoing (SMTP) mail server, such as
smtp.mail.yahoo.com.
If the VersaMail application knows the outgoing mail server name based on the
mail service you selected, the correct server name is displayed.
4. Tap N ex t.
24
Page 31

Creating an e-mail account using the Palm Wireless connection
5. Do one of the following:
– To accept these mail options and begin using the VersaMail application, tap
Done. This takes you to the Inbox of the account you just set up. See
Chapter 4 for information on getting and sending e-mail.
– To set up additional mail options, tap Next. Continue with the next set of
procedures.
Setting mail retrieval options for a POP or IMAP account
The next VersaMail Setup screen displays different options, depending on whether
your mail service uses a POP or IMAP protocol.
To set mail retrieval server options for a POP or IMAP account:
1. (Optional) Do any of the following:
– Select Get unread mail ONLY to download only unread e-mail to your
handheld. If you don’t choose this option and you tap Get & Send, all your
e-mail messages on your provider’s mail server are downloaded to your
Inbox, including messages you have already read. To get all e-mail
(including e-mail you have already read) and not just unread e-mail, deselect
Get unread mail ONLY.
– To delete messages on your provider’s mail server when they are deleted in
the VersaMail application, select the Delete messages on the server when
they are deleted in VersaMail check box.
– (POP account only) To get e-mail on your handheld but also leave it on the
server so you can view it later on your desktop, select the Leave mail on
server check box. For example, if you create an account to receive e-mail from
your Yahoo account and select this option, your old Yahoo e-mail is still
visible the next time you visit Yahoo.com to access your Yahoo e-mail Inbox.
– To limit the maximum size of an incoming e-mail message, enter the size in
kilobytes (KB) for the Maximum Message Size. The maximum size of an
incoming message is 5KB by default, but you can enter a smaller size. The
maximum message size that you can retrieve using a Palm Wireless
connection is 60KB for the body text and any attachments.
25
Page 32

Chapter 3 Setting Up and Managing Other E-Mail Accounts
POP accounts IMAP accounts
2. Tap Next.
Setting outgoing mail options
Outgoing mail options are the same for POP and IMAP accounts.
To set outgoing mail options:
1. (Optional) Do any of the following:
Display Name
Reply To Address
BCC
Enter the name you want to appear on your outgoing
messages, such as “Joe Smith.”
Enter the e-mail address that you want recipients to see and
reply to on your e-mail messages, only if it is different from
the e-mail address from which you are sending the message.
For example, if you are sending a message from
me@yahoo.com but you want recipients to reply to
me@earthlink.net, enter the reply-to address here. Reply To
Address makes it look like the e-mail came from the address
you entered.
Select the BCC check box to send a blind copy of any e-mail
message you send to another e-mail address. The blind copy
e-mail address is not seen by the other recipients of the
message. For example, if you want a copy of all messages you
send from your handheld to be sent to your desktop
e-mail account, enter that e-mail address.
26
2. Tap N ex t.
Page 33

Adding a signature
If you want, you can add a signature to each e-mail message you send. For
example, you can enter your name and telephone number so that they appear in
each message you send.
To add a personal signature:
1. Tap the Attach Signature to messages check box, and then enter the text of the
signature.
This signature will be attached to all your outgoing e-mail.
Editing e-mail accounts
2. Tap OK .
Testing your new account
When you have finished setting up a new e-mail account, the VersaMail
application displays the account’s Inbox. You can test whether the e-mail account
is set up and working properly by tapping Get Mail. See “Getting e-mail by subject
or getting the entire message” in Chapter 4 for more information.
Editing e-mail accounts
From time to time you may need to edit information about one of the e-mail
accounts you set up.
To select the account to edit:
1. Tap the Menu icon .
2. Tap A cc ou nt s.
27
Page 34

Chapter 3 Setting Up and Managing Other E-Mail Accounts
3. Select Account Setup.
4. Tap the name of the account to edit, and then tap Edit.
To edit an account:
1. On the Account Setup screen, change any of the following:
Account Name
Enter a descriptive name for this account, such as “My
Yahoo.”
Mail Service
Tap the Mail Service pick list and select the provider to
which you are connecting. Select Other if your ISP is not
listed.
Protocol
Tap the Protocol pick list and select POP or IMAP. (Most mail
providers use the POP protocol.)
If the VersaMail application knows the protocol for the mail service you
selected, it displays the correct protocol.
28
2. Tap N ex t.
Page 35

Changing the account username and password
In the next part of VersaMail Account Setup, you can change the username and/or
password for this account.
To edit the account username and password:
1. (Optional) Enter a new username for accessing your e-mail. This is generally the
part of your e-mail address that appears before the @ symbol; it is usually not
your entire e-mail address.
Editing e-mail accounts
2. (Optional) Tap the Password box, and then enter a new password. The
Password box displays the word “Assigned” to indicate that a password has
been entered.
3. Tap OK .
4. Tap N ex t.
Editing the name of the incoming and outgoing mail server
If your e-mail address or the name of the incoming and outgoing mail servers has
changed or has been entered incorrectly, you can edit the address or server name.
To edit mail server settings:
1. (Optional) Enter a new e-mail address for the account you are accessing, such
as examplename@yahoo.com.
2. (Optional) Enter the new or correct name of your incoming (POP) mail server,
such as pop.mail.yahoo.com.
29
Page 36

Chapter 3 Setting Up and Managing Other E-Mail Accounts
If the VersaMail application knows the incoming mail server name based on the
mail service you selected, the correct server name is displayed.
3. (Optional) Enter the new or correct name of your outgoing (SMTP) mail server,
such as smtp.mail.yahoo.com.
If the VersaMail application knows the outgoing mail server name based on the
mail service you selected, the correct server name is displayed.
4. Tap N ex t.
5. Do one of the following:
– To accept these mail options and begin using the VersaMail application, tap
Done. This takes you to the Inbox of the account you just set up. See
Chapter 4 for information on getting and sending e-mail.
– To edit additional mail options, tap Next. Continue with the next set of
procedures.
Editing mail retrieval options for a POP or IMAP account
The next VersaMail Setup screen displays different options, depending on whether
your mail service uses a POP or IMAP protocol.
To edit mail retrieval server options for a POP or IMAP account:
1. (Optional) Change any of the following:
– Select Get unread mail ONLY to download only unread e-mail to your
handheld. If you don’t choose this option and you tap Get & Send, all your
e-mail messages on your provider’s mail server are downloaded to your
Inbox, including messages you have already read. To get all e-mail
(including e-mail you have already read) and not just unread e-mail, deselect
Get unread mail ONLY.
– To delete messages on your provider’s mail server when they are deleted in
the VersaMail application, select the Delete messages on the server when
they are deleted in VersaMail check box.
30
Page 37

Editing e-mail accounts
– (POP account only) To get e-mail on your handheld but also leave it on the
server so you can view it later on your desktop, select the Leave mail on
server check box. For example, if you create an account to receive e-mail from
your Yahoo account and select this option, your old Yahoo e-mail is still
visible the next time you visit Yahoo.com to access your Yahoo e-mail Inbox.
– To limit the maximum size of an incoming e-mail message, enter the size in
kilobytes (KB) for the Maximum Message Size. The maximum size of an
incoming message is 5KB by default, but you can enter a smaller size. The
maximum message size that you can retrieve using a Palm Wireless
connection is 60KB for the body text and any attachments. The maximum
message size that you can retrieve using a network connection is 60KB for
the body text and 2MB total, including attachments.
POP accounts IMAP accounts
2. Tap Next.
Editing outgoing mail options
Outgoing mail options are the same for POP and IMAP accounts.
To edit outgoing mail options:
1. (Optional) Change any of the following:
Display Name
Reply To Address
Enter the name you want to appear on your outgoing
messages, such as “Joe Smith.”
Enter the e-mail address that you want recipients to see and
reply to on your e-mail messages, only if it is different from
the e-mail address from which you are sending the message.
For example, if you are sending a message from
me@yahoo.com but you want recipients to reply to
me@earthlink.net, enter the reply-to address here. Reply To
Address makes it look as though the e-mail came from the
address you entered.
31
Page 38

Chapter 3 Setting Up and Managing Other E-Mail Accounts
2. Tap N ex t.
Editing a signature
If you added a signature to the e-mail messages you send, you can edit the
signature. For example, you can change your name or the telephone number that
appears in each message you send.
BCC
Select the BCC check box to send a blind copy of any e-mail
message you send to another e-mail address. The blind copy
e-mail address is not seen by the other recipients of the
message. For example, if you want a copy of all messages
you send from your handheld to be sent to your corporate
e-mail account, enter that e-mail address.
To add a personal signature:
1. Tap the Attach Signature to messages check box, and then edit the text of the
signature.
32
Page 39

This signature is attached to all your outgoing e-mail. For Palm.com accounts
only, the following default signature is included with all outgoing messages:
You can use this default signature, add additional text to this signature, or
delete it and enter your own signature information.
2. Tap OK .
Deleting an e-mail account
Deleting an e-mail account
When you delete an account in the VersaMail application, the account is removed
from your handheld. The account still exists on the server. For example, deleting
your Yahoo account from the VersaMail application deletes the account from your
handheld. Your e-mail account still exists at Yahoo.com.
To delete an account:
1. Tap the Menu icon .
2. Tap A cc ou nt s.
3. Tap Account Setup.
4. Tap the name of the account you want to delete, and then tap Delete.
33
Page 40

Chapter 3 Setting Up and Managing Other E-Mail Accounts
5. Tap Yes in the Delete Confirmation dialog box to delete the account and all
associated e-mail messages.
6. Tap OK .
After you perform the next HotSync
account is released.
operation, the memory associated with an
34
Page 41

Getting, Sending, and Managing E-Mail
Getting and sending mail on your handheld is easy and helps you keep your
business and personal life organized. You can get and send mail by simply tapping
one button on the handheld.
You can manage the messages in your mail accounts by moving messages between
folders, deleting old mail individually or in groups, and marking messages as read
or unread.
This chapter describes how to do the following:
■ Get mail for your mail accounts
■ Work with e-mail attachments such as text or Microsoft Word documents
Getting and reading e-mail
CHAPTER 4
You can choose to get e-mail by subject only, which means getting the message size
and author as well as the subject, or you can get entire messages immediately. If
you choose to get messages by subject only and you want to read a full message,
you can get more of that message.
Choosing the e-mail account and displaying the Inbox
To view the e-mail in an account, you must switch to that account, and then get the
mail. For example, if you want to collect and view mail from your Yahoo account,
switch to the account created to retrieve mail from your Yahoo account.
To display an account and its Inbox:
1. Tap the Menu icon .
2. Tap A cc ou nt s.
3. Tap the name of the account.
4. Tap the folders pick list, and tap Inbox if the Inbox is not displayed.
35
Page 42

Chapter 4 Getting, Sending, and Managing E-Mail
Getting e-mail by subject or getting the entire message
When you get e-mail messages, you can choose to get the subject only or to get the
entire message. You can also use the Details dialog box to select options for getting
unread e-mail only, downloading attachments, and using filters.
To get e-mail messages:
1. Tap Get Mail.
If you have e-mail stored in your Outbox, tap Get & Send.
2. In the Get Mail dialog box, tap Subjects Only to download subjects only, or tap
Messages to download entire messages.
You can turn off the Get Mail dialog box in VersaMail Preferences. See
TIP
“Setting preferences for getting and deleting mail” later in this chapter for
details.
3. (Optional) Tap Details and set options for retrieving unread e-mail,
downloading attachments, using filters, using auto-disconnect, specifying
maximum download size, and specifying the default connection type for this
account. Tap OK.
NOTE
connection service other than the Palm™ Wireless service. You will only see
the default connection type option for accounts other than your Palm.com
account.
See “Creating mail filters” in Chapter 6 for information on filters. See “Setting
VersaMail connection preferences” in Chapter 6 for information on the
auto-disconnect feature. See “Selecting a different service for a given e-mail
account” in Chapter 6 for information on setting a default connection type.
You will only see the auto-disconnect option for accounts that use a
36
Page 43

Getting and reading e-mail
NOTE
The maximum size of an incoming message is 5KB by default. The
maximum message size that you can retrieve using a Palm Wireless
connection is 60KB for the body text and any attachments. The maximum
message size that you can retrieve using a network connection is 60KB for the
body text and 2MB total, including attachments.
4. Tap OK .
The Getting Messages dialog box shows updates as your e-mail is downloaded.
When the Getting Messages dialog box disappears, a new dialog box displays
the number of new e-mail messages.
5. Tap OK.
A list of your e-mail appears in the Inbox.
Shows unread/total
messages
Icons indicate
whether a message
or subject has been
downloaded or has
attachments
For your Palm.com or Business account, you can set up Notification options to
TIP
notify you when new messages arrive. You can choose how you are notified—for
example, by a special sound or by the handheld’s blinking indicator light.
See “Setting notification options for your Palm.com account” in Chapter 2 for more
information.
Displays the time for
messages received today and
the date for all other
messages
37
Page 44

Chapter 4 Getting, Sending, and Managing E-Mail
Icons in Palm™ VersaMail™ personal e-mail software
The icons to the left of a message in the Inbox indicate the message’s status.
Only the subject header information is downloaded.
Only the subject header and attachment information are downloaded.
Part or all of the message text is downloaded.
Part or all of the message text and attachment information are
downloaded.
Reading e-mail
To read e-mail, tap the e-mail message in the Inbox or the folder where the message
is located.
Ta p t o r e a d
How the message appears depends on whether you are using a Palm Wireless
connection or a network connection, and whether you chose to get messages by
subject only or to get the entire message.
Reading messages with a Palm Wireless connection
If you chose to get messages by subject only, tap the More button to view the
body of the e-mail message, plus any attachments. See “Getting e-mail by subject
or getting the entire message” earlier in this chapter.
If you chose to get entire messages, or after you tap the More button if you chose
to get messages by subject only, you see all or part of the body of the message. The
amount of the message you see is equal to the maximum message size you set
(default is 5KB). See “Setting mail retrieval options for a POP or IMAP account” in
Chapter 3 for more information on setting maximum message size.
38
For example, if your maximum message size is 5KB (the default), you will see the
first 5KB of the body of the message. If the message is 5KB or smaller, you will see
the entire message.
Page 45

Getting and reading e-mail
If the downloaded message exceeds your maximum message size, only a partial
message is displayed. Tap the More button to see another portion of the message
equal to your maximum message size. Continue tapping the More button until you
see the entire body of the message.
For example, if your maximum message size is 5KB, and the total message size is
8KB, the first 5KB is displayed when you view the message. Tap the More button
once to display the remaining 3KB of the message.
However, if the total message size is 20KB, you need to tap the More button three
times to view the entire message, Each time you tap the More button, another 5KB
of the message is displayed.
Tap More to view an additional
portion of the message
Reading messages with a network connection
If you chose to get messages by subject only, tap the More button to view the
body of the e-mail message, plus any attachments. See “Getting e-mail by subject
or getting the entire message” earlier in this chapter.
If you chose to get entire messages, the body of the e-mail message is displayed.
However, if the downloaded message exceeds your maximum message size, only
a partial message is displayed. Tap the More button to view the entire message.
Tap More to view the entire
message
39
Page 46

Chapter 4 Getting, Sending, and Managing E-Mail
Viewing other folders
You can easily switch from the current folder to view messages in other folders.
To view other folders:
1. Tap the folders pick list in the upper-right corner of the screen.
2. Tap the folder you want to view.
Available folders
Managing columns in the folder’s list view
The columns in each folder contain various types of information, such as the
subject, date, or size of a message. You can display or hide specific columns or
change the width of the columns in the folder’s list view.
To display or hide a column in a folder’s list view:
1. Tap Show.
2. Tap the check box for each column that you want to show.
NOTE
messages received today—that is, any message received after 12:01 A.M.
Otherwise, the Date column shows the date the message was received.
If you select Date, the Date column displays the message
time
for any
40
3. Tap the Font letter to display information in a larger or smaller font size.
To change the sort order:
1. Tap the Sort By pick list, and then tap the column name.
2. Tap Descend or Ascend to change the sort order.
Page 47

To change the size of a column in the folder’s list view:
1. Tap and hold the stylus on the column divider.
2. Drag the column divider to change the width of the column.
Moving e-mail between folders
You can move one or more e-mail messages between folders.
Getting and reading e-mail
Drag the column
divider left or right to
make the column
larger or smaller
To move one e-mail:
1. Tap the folders pick list in the upper-right corner of the screen, and then tap the
name of the folder containing the message you want to move.
2. Tap the icon to the left of the message you want to move, and then tap Move To
from the pop-up menu.
The folders pick list appears.
41
Page 48

Chapter 4 Getting, Sending, and Managing E-Mail
3. Select the destination folder from the list.
You can also move a single e-mail message from within the body of the message
TIP
by making the command bar stroke in the Graffiti
icon, and selecting the destination folder from the pick list. See “Using the command
bar” in Chapter 6 for more information on the command bar.
To move multiple e-mail messages:
1. Tap the folder that contains the e-mail messages you want to move.
®
writing area, tapping the folder
2. Select the messages you want to move by tapping the bullets to the left of each
message icon.
To select a group of messages, drag the stylus to the left of the message
TIP
icons.
A checkmark appears next to each selected message.
42
Page 49

Getting and reading e-mail
M
M
3. Do one of the following:
– Tap the Menu icon , and then tap Move To on the Message menu.
– Tap the message icon next to any one of the selected messages, and then tap
Move To on the pick list.
essage menu
4. Select a destination folder from the folder pick list.
essage menu
Pick list
Pick list
5. If you are moving the messages using the menu, tap OK. If you are using the
pick list, the messages move automatically.
Creating and editing mail folders
The VersaMail application has certain default folders, such as Inbox, Outbox,
Drafts, and Trash. You can create new folders so that you can store e-mail messages
by subject, person, or project. You can also edit default or created folders.
The procedure for creating and editing folders varies for accounts that use a Palm
Wireless connection and accounts that use a network connection.
43
Page 50

Chapter 4 Getting, Sending, and Managing E-Mail
Creating and editing folders with a Palm Wireless connection
For accounts that use a Palm Wireless connection, the procedure for creating and
editing folders is identical for POP and IMAP e-mail accounts.
To create and edit e-mail folders for a Palm Wireless connection:
1. Tap the folders pick list in the upper-right corner of the screen, and then tap Edit
Folders.
2. On the Edit Folders screen, do any of the following:
– To create a new folder, tap New and then enter the new folder name (called
“category name” on the screen). When you have finished, tap OK.
– To rename a folder, tap the folder name from the list on the screen, tap
Rename, and then enter the new folder name (called “category name” on the
screen). When you have finished, tap OK.
– To delete a folder, tap the folder name from the list on the screen and then tap
Delete.
44
Page 51

Getting and reading e-mail
Creating and editing folders with a network connection
For accounts that use a network connection, the procedure for creating and editing
folders varies slightly between POP and IMAP e-mail accounts.
To create and edit e-mail folders for a Palm Wireless connection:
1. Tap the folders pick list in the upper-right corner of the screen, and then tap Edit
Folders.
2. On the Edit Folders or Edit IMAP Folders screen, do any of the following:
POP accounts IMAP accounts
– To create a new folder, tap New and then enter the new folder name (called
“category name” on the screen for POP accounts). For IMAP accounts only,
select the check box if you also want to create the folder on your e-mail
provider’s mail server. When you have finished, tap OK.
POP accounts IMAP accounts
– To rename a folder, tap the folder name from the list on the screen, tap
Rename, and then enter the new folder name (called “category name” on the
screen for POP accounts). For IMAP accounts only, select the check box if you
also want to rename the folder on your e-mail provider’s mail server. When
you have finished, tap OK.
POP accounts IMAP accounts
45
Page 52

Chapter 4 Getting, Sending, and Managing E-Mail
– To delete a folder, tap the folder name from the list on the screen and then tap
Delete. For IMAP accounts only, select the check box if you also want to
delete the folder on your e-mail provider’s mail server, and then tap OK. For
POP accounts, the folder is deleted immediately and you will not see a
confirmation screen.
Creating and sending new e-mail
When you create a new e-mail message, you can enter the recipient’s e-mail
address or use the Lookup screen to find the address.
To create a new e-mail message:
1. Tap N ew.
Delete confirmation
appears for IMAP
accounts only
46
Ta p Ne w
2. Enter the recipient’s name using one of the methods described in the next
procedures.
NOTE
names on the To list because the list is truncated on the To line. If you tap To, a dialog
box lists all recipients for the current message.
When you address a message to several recipients, you do not see all their
Page 53

Addressing a message by typing the address
You can address a message by entering the complete address.
To enter the address:
1. In the New Message screen, tap To and enter the address.
For multiple recipients, type a semicolon (;) and then a space between recipient
names.
Creating and sending new e-mail
NOTE
to a semicolon. If you enter a space with no punctuation between names,
semicolons are not inserted and the e-mail message is improperly addressed.
If you enter a comma instead of a semicolon, it is automatically changed
If you want to edit an e-mail address that is longer than the line provided in the
New Message screen, tap To and edit the address.
2. To send copies, tap cc: or bcc: and enter the recipient’s address.
Copies (cc:) allow recipients see the addresses of the other recipients, but
addresses in the blind copies (bcc:) field are hidden from all other recipients.
To automatically fill in the address as you type, see “Using Smart
TIP
Addressing to address a message” later in this chapter.
Addressing a message using Address Book
You can enter a recipient’s address by using the Lookup screen to select the
address. The names and addresses in the Lookup screen come from Address Book.
To use an address from Address Book:
1. In the New Message screen, tap To.
2. Tap Lookup.
47
Page 54

Chapter 4 Getting, Sending, and Managing E-Mail
3. Tap the address you want, and then tap Add.
4. Repeat steps 2 and 3 to add more addresses.
5. Tap Do n e.
6. To enter an address in the cc: or the bcc: field, tap the field name and follow the
steps given for the To field.
Using Smart Addressing to address a message
Smart Addressing types ahead and completes a recognized e-mail address. Smart
addressing automatically fills in fields when the recipient’s name and e-mail
address are in your Address Book.
By default, Smart Addressing is selected in VersaMail Preferences.
To use Smart Addressing to address a message:
1. In the New Message screen, tap To.
2. Start entering the person’s name, such as Joe Smith.
Once the name is recognized from your Address Book, the name and e-mail
address are automatically completed on the recipient list. For example, if you
have a Joe Smith and a Joan Smith in your Address Book (and no other names
starting with J), once you enter “Joe,” the entry “Joe Smith” is completed with
the correct e-mail address.
Turning Smart Addressing on or off
You can turn Smart Addressing on or off in VersaMail Preferences.
To turn Smart Addressing on or off in VersaMail Preferences:
1. In the Inbox, tap the Menu icon .
2. Tap Options.
48
3. Tap Preferences.
Page 55

4. Tap Advanced.
5. Tap the Enable Smart Addressing check box to turn Smart Addressing on or off.
A checkmark means it is turned on.
6. Tap OK .
Composing and sending e-mail
Creating and sending new e-mail
After you enter your recipient addresses, you can compose the rest of the e-mail
message.
To compose the rest of the e-mail and send it:
1. Tap the Subject field and enter the subject of your message.
2. Tap the area below the Subject line and enter the text of your message.
49
Page 56

Chapter 4 Getting, Sending, and Managing E-Mail
To access the editing features available on the Edit menu, tap the Menu icon .
The first character of each sentence is automatically capitalized for you.
3. (Optional) Tap the Menu icon , tap Options, and then select Add
Attachments. See “Attaching files to e-mail” later in this chapter.
4. Tap one of the following to send the e-mail message:
Send
Outbox
You can also tap the Menu icon , tap Options, and then tap Save To
TIP
Drafts to save this message in the Drafts folder rather than send it.
Completing drafts
If you are composing an e-mail message and you exit the VersaMail application
before tapping Outbox, Send, or Cancel, the message automatically moves to the
Drafts folder. To finish editing the message, tap the folders pick list and select
Drafts. Select the e-mail message you want to complete or edit, and tap Edit. You
can also delete the message in the Drafts folder.
Attaching a personal signature
You can include a personal signature, such as your name, e-mail address, and
telephone number, to each e-mail message you send.
Sends the message immediately.
Stores e-mail in the Outbox so you can compose e-mail offline
and then send all e-mail during one connection with the server.
To send your e-mail later, go to the Outbox and tap Get & Send.
The connection to the mail server is initiated, and all the e-mail
in the Outbox is delivered.
50
To create a personal signature:
1. Tap the Menu icon .
2. Tap Options.
3. Tap Preferences.
4. Tap Signature.
Page 57

Creating and sending new e-mail
5. Tap the Attach Signature check box to select it.
6. Enter your signature information. For Palm.com accounts only, the following
default signature is included with all outgoing messages:
7. Tap OK.
Forwarding e-mail
You can quickly forward an e-mail message from any folder other than the Outbox
folder.
To forward an e-mail message:
1. Tap the folders pick list and select the folder that contains the e-mail message.
2. Tap the e-mail message to display it.
You can use this default signature, add additional text to this signature, or delete
it and enter your own signature information.
51
Page 58

Chapter 4 Getting, Sending, and Managing E-Mail
3. Tap the Forward button (labeled Fwd).
4. Tap To.
5. Enter or look up the recipient address. See the procedure for creating new e-mail
earlier in this chapter for more information on addressing messages.
6. (Optional) Enter some text describing the forwarded message.
Ta p Fo rw a r d
7. Tap Send to send the message, or tap Outbox to store it in the Outbox.
Replying to e-mail
You can reply to an e-mail message as you are reading it, or start the reply when
viewing messages in the folders list view.
To reply to a message that you are reading:
1. Tap the e-mail message that you want to reply to.
2. Tap Reply.
52
Page 59

Creating and sending new e-mail
3. In the Reply Options dialog box, select choices for replying to the sender only
or to all e-mail recipients, and for including original message text.
4. Tap OK .
5. Enter a reply.
6. Tap Send to send the message now, or tap Outbox to send it later.
To reply to an e-mail message from the folders list:
1. Tap the folders pick list and select the folder that contains the e-mail message to
which you want to reply.
2. Tap the envelope icon next to the message, and then tap Reply on the pick list.
3. In the Reply Options dialog box, select choices for replying to the sender only
or to all e-mail recipients, and for including original message text.
53
Page 60

Chapter 4 Getting, Sending, and Managing E-Mail
4. Tap OK .
The e-mail is addressed.
5. Enter a reply.
6. Tap Send to send the message now, or tap Outbox to send it later.
Working with attachments
You can easily download, view, save, and send attachments with e-mail messages.
Viewing attachments on your handheld
At times e-mail contains attached files, such as Microsoft Word or text files, that
you want to view on your handheld. You can view the following types of attached
files:
vCard (.vcf)
vCal (.vcs)
Text (.txt)
HTML (.html or
.htm)
This is an address.
This is usually a calendar appointment or a To Do task.
This is usually a memo or another plain text file.
This is usually a web page or a formatted text file. By default, the
VersaMail application strips the formatting and shows only the
text of most HTML attachments. However, some browsers allow
other applications to pass them a file for viewing in full HTML.
If your browser supports this function, you can view HTML
attachments with all formatting intact. You do not need to do
anything different in the steps for downloading and viewing
attachments; the attachment is automatically opened in the
correct format for your handheld (text only or full HTML), based
on the applications you have installed.
54
Microsoft Word
(.doc)
The formatting is stripped and the text of most Microsoft Word
documents is shown.
Page 61

Working with attachments
Other application
files (such as
graphics files)
For other types of application files, your handheld may contain
a viewer that allows other applications to pass it a file for
viewing. For example, your handheld may contain an image
viewer that allows another application to pass it a JPEG or GIF
attachment for viewing. You do not need to do anything
different in the steps for downloading and viewing attachments;
if your handheld contains such a viewer, the attachment is
automatically opened. If your handheld does not contain such a
viewer, you cannot view the attachment.
PRC (.prc)
This is a Palm OS® application that you can install and run on
your handheld.
PDB (.pdb)
This is a file that works with specific Palm™ applications.
Among the types of attachments you can receive are the following handheld
application files:
■ Address Book entries
■ Date Book appointments
■ To Do list items
■ Memos
NOTE
The maximum message size that you can retrieve using a Palm Wireless
connection is 60KB for the body text and any attachments. The maximum message
size that you can retrieve using a network connection is 60KB for the body text and
2MB total, including attachments.
To view an attachment:
1. In the Inbox, tap the message that has an attached file.
A paper clip icon appears on the message’s icon if there is an attachment.
Envelope with
paper clip icon
indicates
attachment
If you choose to get messages by subject only, you must tap More for each
downloaded message, so that you can view the body of the e-mail message plus
any attachments.
55
Page 62

Chapter 4 Getting, Sending, and Managing E-Mail
2. Click the paper clip icon in the upper-right corner. If Download Attachments is
selected in VersaMail Preferences, any attachments that do not cause the
message to exceed the maximum message size are downloaded. For example, if
the maximum message size is 5KB and you download a message whose body
text size is 2KB, then any attachment under 3KB is also downloaded and any
attachment over 3KB is not.
3. If the message was downloaded, tap the name of the attachment you want to
view, and then tap View.
Tap paper clip icon to view
attachment
If the message or messages were not downloaded because they exceeded the
maximum message size, select the message or messages to download from the
Download Attachments screen, and tap Download.
When downloading is complete, tap the name of the attachment you want to
view, and then tap View.
4. When you have finished viewing the attachment, tap Done. This returns you to
the Attachments dialog box, where you can select another attachment to view if
you want to.
5. When you have finished viewing all attachments, tap Done in the Attachments
dialog box. This returns you to the Message screen.
56
Page 63

Saving attachments to an expansion card
If you have purchased an expansion card that provides extra memory, you can save
downloaded attachments to the expansion card.
To save an attachment to an expansion card:
1. Insert the expansion card into the slot on your handheld.
2. Follow the procedure for downloading attachments described earlier in this
chapter.
3. On the Attachments screen, tap Save to Card.
4. Tap OK .
Working with attachments
Attaching files to e-mail
You can attach files on your handheld to e-mail messages you send. For example,
you can attach files from the various handheld applications, such as any Date Book
appointment (.vcs), To Do List task (.vcs), or memo (.txt).
NOTE
connection is 60KB for the body text and any attachments. The maximum message
size that you can retrieve using a network connection is 60KB for the body text and
2MB total, including attachments.
You can attach the following types of files:
■ vCard (.vcf)
■ vCal (.vcs)
■ Memo/text (.txt)
■ PRC (.prc)
■ PDB (.pdb)
NOTE
text and any attachments, which is smaller than the Palm.com account maximum
message size. The VersaMail application adds encryption information to every
message for the Business account, so the messages are automatically larger.
The maximum message size that you can retrieve using a Palm Wireless
The maximum message size for the Business account is 56KB for the body
57
Page 64

Chapter 4 Getting, Sending, and Managing E-Mail
To attach a file to a message:
1. Tap the Menu icon .
2. Tap Options.
3. Tap Add Attachment.
4. Tap the Type pick list and select the file type.
All files of the selected type appear in the Type box. For example, if you select
Appointments (.vcs), you can tap Date Book to see a list of appointments from
a particular date that you can attach, or you can tap To Do to see To Do List
tasks.
5. Tap the file that you want to attach, and then tap Add.
58
Page 65

The selected file appears in the Attachments box.
6. Repeat steps 4 and 5 for each attachment you want to add, and then tap Done.
To delete an attachment from an e-mail message, tap the attached file in
TIP
the Attachments box and then tap Delete.
7. Tap Send or Outbox.
Uploading attachments from an expansion card
Working with attachments
If you have purchased an expansion card and have saved files to the card, you can
upload files to attach to an e-mail message you are sending.
To upload an attachment from an expansion card:
1. Insert the expansion card into the slot on your handheld.
2. On the New Message screen, tap the Menu icon .
3. Tap Options.
4. Tap Add Attachment.
5. Tap the From pick list and select Files on Card.
59
Page 66

Chapter 4 Getting, Sending, and Managing E-Mail
6. Tap the Type pick list and select the file type.
Only file types that correspond to the types of files on the card will be displayed
on the list. For example, if he card contains only Word docs and Address Book
entries, only the file types “doc” and “vCard” will be listed. You can select a
particular file type, or select All Files to view all files on the card.
7. Tap the file that you want to attach, and then tap Add.
60
The selected file appears in the Attachments box.
8. Repeat steps 6 and 7 for each attachment you want to add, and then tap Done.
To delete an attachment from an e-mail message, tap the attached file in
TIP
the Attachments box and then tap Delete.
9. Tap Send or Outbox.
Page 67

Forwarding an attachment
You can include attachments on any message you forward, up to the maximum
message size.
To forward a message with an attachment:
1. Tap the folders pick list and select the folder that contains the e-mail message
you want to forward.
2. Tap the e-mail message to display it.
3. Tap the Forward button (labeled Fwd).
4. Tap To. On the Recipient List screen, enter or look up the recipient address. See
the procedure for creating e-mail, presented earlier in this chapter, for more
information on addressing messages.
5. Follow the procedure for attaching files presented earlier in this chapter.
Deleting messages
Deleting messages
You can delete one or more e-mail messages from any folder. For example, you can
delete old messages in the Inbox or messages that you were working on in the
Drafts folder. When you delete a message it is placed in the Trash folder. See
“Emptying the trash” later in this chapter.
To delete messages on the server when you empty the trash on your handheld, you
can select the Delete Msgs on Server setting in VersaMail Preferences. It is
important to delete messages on the server because your Palm.com account is
limited to 5MB. If you don’t periodically empty the trash and delete messages on
the server, new e-mail messages may “bounce” back to the sender. See “Setting
preferences for getting and deleting mail” later in this chapter.
IMPORTANT
occasionally access your Palm.com account on the Internet to clear messages from
your e-mail account on the server. See “Deleting messages from your Palm.com
account” in Chapter 2.
If you don’t select the Delete Msgs on Server setting, you should
61
Page 68

Chapter 4 Getting, Sending, and Managing E-Mail
To delete one or more messages:
1. Tap the folders pick list and select the folder that contains the messages you
want to delete.
2. Do one of the following:
Item to delete Action
One message Tap the bullet next to the message’s icon.
Multiple
messages
A group of
adjacent
messages
3. Do one of the following:
Tap the bullet next to each message’s icon that you want to
delete.
Drag the stylus along the left of the message icons. To select
another group, lift the stylus and select the next group of
messages.
– Tap the message icon next to a selected e-mail message, and then tap Delete.
– Tap the Menu icon , and then tap Delete.
4. Tap OK .
5. (Optional) Tap Also delete message(s) on server if you want to delete the
message from the server now.
62
If you selected the setting
Delete Msgs on Server in the
Preferences, this check box is
selected
The selected messages move to the Trash folder and are deleted from your
handheld when you empty the trash. If you set the preference to automatically
empty the trash, the messages are deleted when the trash is emptied. See
“Emptying the trash” later in this chapter for more information.
IMPORTANT
again later.
If you delete a message on the server, you cannot retrieve it and view it
Page 69

Deleting messages
To delete messages before a certain date:
1. Tap the Menu icon .
2. Tap Delete Old.
3. Tap the Folder pick list and select the folder that contains the messages you
want to delete.
Displays the current
folder for deleting
messages
4. Tap the Older than pick list, and then tap One Week, One Month, or Choose
Date.
If you tap Choose Date, select a date from the calendar.
Tap a date to select
it, or tap Today
5. Tap Delete.
63
Page 70

Chapter 4 Getting, Sending, and Managing E-Mail
6. (Optional) Tap Also delete message(s) on server if you want to delete the
messages from the server at the time they are deleted from your handheld.
7. Tap OK.
Emptying the trash
Deleted e-mail accumulates in the Trash folder and takes up space on your
handheld. To increase memory, you should empty the trash regularly. If you want
to automatically empty the trash, you can set a preference to empty mail
immediately or to empty any mail older than a certain number of days.
To empty the trash:
1. Tap the Menu icon .
2. Tap Empty Trash.
NOTE
message asks if you want to delete the trash.
3. (Optional) Tap Details to see how many messages are in the trash, and whether
If Auto-Empty Mail from Trash is selected in VersaMail Preferences, a
the messages are set to be deleted on the server.
4. If you want to delete messages from the handheld as well as from the server, tap
Both. A message asks if you want to update the server now.
64
To delete the message from only the handheld now, tap Handheld.
Page 71

Marking messages as read or unread
NOTE
server because the server stores only a maximum of 5MB. Many other e-mail
providers, such as Yahoo, have size restrictions for mail storage. If your mailbox on
the server becomes full, new incoming messages are returned to the senders.
For your Palm.com account, you should routinely delete messages on the
To have the trash emptied automatically:
1. Tap the Menu icon .
2. Tap Options, and then tap Preferences.
3. Tap Advanced.
Auto-Empty Mail from Trash is selected by default.
4. Tap the pick list, and select how often you want the e-mail messages
automatically emptied from the trash:
– Immediately
– Older Than 1 Day
– Older Than 3 Days
– Older Than 1 Week
– Older Than 1 Month
5. Tap OK.
Marking messages as read or unread
You can mark messages as read or unread. When you tap a message to read it, it is
automatically marked as read.
NOTE
message is in bold or regular typeface for POP accounts on the handheld, but you
can’t connect with the server to change the message state.
To mark messages as read or unread:
1. Tap the folders pick list and select the folder you want.
Because POP servers do not support the read or unread message feature, the
2. Tap the icon next to each message you want to mark.
65
Page 72

Chapter 4 Getting, Sending, and Managing E-Mail
3. Tap Mark Read or tap Mark Unread.
To mark multiple messages, tap the bullets next to the messages you want
TIP
to mark, tap the Menu icon , and then tap Mark Read or Mark Unread.
4. Tap Handheld to mark the messages now as read on your handheld. Tap Both
to mark the messages on both the handheld and the server.
If you tap Both, this message appears.
Tap OK to connect with the server and immediately mark the messages as read
or unread on the server. This action also processes any other pending actions on
the server, such as deleting messages not yet deleted.
®
Tap Cancel if you want the messages marked during the next HotSync
operation or the next wireless connection.
66
Read messages appear in plain text; unread messages appear in bold text.
Page 73

Setting preferences for getting and deleting mail
Setting preferences for getting and deleting mail
VersaMail Preferences determine how the VersaMail application gets, sends, and
deletes e-mail.
To set mail preferences:
1. Tap the Menu icon .
2. Tap Options.
3. Select Preferences.
4. Choose preferences:
Get
Enables you to retrieve messages by subject only or to
retrieve the entire message.
Ask Every Time
Displays a dialog box for choosing subjects only or entire
messages each time you retrieve e-mail. If this preference is
not selected, messages are always retrieved using the option
you select in the Get pick list.
Confirm
Deletions
Delete Msgs on
Server
Displays a confirmation dialog before deleting e-mail.
Automatically deletes messages on the server that you have
deleted on your handheld. If this preference is not selected,
you are asked each time you delete messages on your
handheld whether you want to also delete them on the
server. Because mailboxes on the server usually have size
restrictions, we recommend periodically deleting messages
on the server.
Download
Attachments
Causes files attached to e-mail to be automatically
downloaded to your handheld. Attachments that exceed the
maximum message size are not downloaded. See “Working
with attachments” earlier in this chapter for more
information.
Signature
Enables you to attach a default signature to all your outgoing
messages. See “Attaching a personal signature” earlier in
this chapter for more information.
67
Page 74

Chapter 4 Getting, Sending, and Managing E-Mail
Adding or updating an Address Book entry directly from a message
You can add or update an e-mail address in the Address Book directly from the
body of a received e-mail message.
To add a new Address Book entry:
1. On the Message screen, tap the Menu icon .
2. Tap Options.
3. Tap Add To Address Book.
A dialog box appears with the “From” address displayed. If a display name
(that is, a first and last name that appears in the To field) exists for this Address
Book entry, the Last name and First name fields show the display name.
68
4. (Optional) If the Last name and First name fields are blank, enter the first and
last name associated with the “From” e-mail address.
5. Tap OK to add the e-mail address to the Address Book, and then tap OK in the
confirmation dialog box.
If you receive an e-mail message from someone whose name and e-mail address
appear in your Address Book, but the e-mail address on the message is different
from the one in your Address Book, you can either update your existing Address
Book entry with the new e-mail address, or create a second Address Book entry for
the name containing the new e-mail address.
The procedure is the same as for adding a new Address Book entry. If you tap Add
to Address Book from the body of an e-mail message and an entry already exists
for the recipient name—but the e-mail address on the message is different from the
one in your Address Book—you are prompted to either update the e-mail address
for the sender or create a new entry for the sender.
Page 75

Adding or updating an Address Book entry directly from a message
NOTE
You are prompted to either update an existing Address Book entry or create a
new one only if the e-mail address you are attempting to enter into your Address
Book is different from the one already in the Address Book for the sender’s name. If
the name and e-mail address on the message are identical to the ones in your
Address Book, you see only a notification message that an Address Book entry
already exists for this sender.
69
Page 76

Chapter 4 Getting, Sending, and Managing E-Mail
70
Page 77

CHAPTER 5
Synchronizing E-Mail Between the
Handheld and the Desktop
To manage your e-mail on your desktop as well as on your handheld, you can
synchronize an e-mail account on the handheld with an e-mail application on the
desktop. You can use many popular e-mail applications, called clients, such as
Microsoft Outlook, Eudora, Lotus Notes, Outlook Express, or any other e-mail
clients that use Messaging Application Program Interface (MAPI).
NOTE Synchronizing e-mail works on Windows computers only.
This chapter describes the following:
■ Starting the Palm™ VersaMail™ HotSync
■ Configuring and activating accounts in the HotSync Manager
■ Synchronizing e-mail on the handheld with a desktop e-mail application
■ Converting attached files using attachment conversion plug-ins, such as those
for DataViz Documents To Go
Configuring an account in HotSync Manager
Before synchronizing an e-mail account, you configure the account’s settings in the
Palm VersaMail HotSync Conduit. The settings have to be specified only once
unless you need to make changes.
NOTE The only account you cannot synchronize is your Palm.com account.
To start Palm VersaMail HotSync Conduit
1. Click the HotSync Manager icon
2. Select Custom.
:
™
®
Conduit
in the Windows system tray.
71
Page 78

Chapter 5 Synchronizing E-Mail Between the Handheld and the Desktop
3. Select VersaMail in the Conduit list.
4. Click Change.
5. Select Synchronize Active Accounts, and then select the Set As Default check
box.
NOTE
Synchronize Active Accounts each time you perform a HotSync operation.
If you do not select the Set As Default check box, you will need to select
Setting synchronization options and account settings
Next, you must configure each mail account’s general synchronization settings.
For example, if you created an Earthlink e-mail account on the handheld and want
to synchronize that with the desktop, set the synchronization options for the
Earthlink account. During a HotSync operation, the Earthlink account on the
handheld and the e-mail application specified in the conduit are synchronized.
To configure an account and set the synchronization options:
1. In the HotSync Action For VersaMail dialog box, click Configure Accounts.
2. (Optional) Select the Enable Informational Logging check box if you want the
HotSync log to record information, such as errors encountered, about the
conduit during a HotSync operation.
72
Page 79

Setting synchronization options and account settings
3. Select the account to configure from the Accounts drop-down list.
Select the account to
configure and synchronize
The tab with the account’s name and settings, such as Business Settings or
Yahoo Settings, is displayed.
4. Select the option Check this box to synchronize this mail account when you
perform a HotSync operation; otherwise, the account will not be synchronized.
Enter the message
size and the number
of days before today
that synchronization
occurs
Check here for helpful notes when
configuring an e-mail client
5. (Optional) If you are configuring your Business account, you can enter the
number of days before the security key expires and the VersaMail application
generates a new security key.
Select Enable Key Expiration, and then enter a value between 0 and 999.
73
Page 80

Chapter 5 Synchronizing E-Mail Between the Handheld and the Desktop
A 0 value generates a security key during the next and each subsequent
HotSync operation.
Select the key expiration, and then
enter the number of days to
regenerate the security key
Shows when a security
key was last created
Before selecting Enable Key Expiration, you should get all messages on your
handheld. When you enable key expiration, the next HotSync operation creates
additional security. If you do not get all messages, you will not be able to access
any message information that is on your mail server when you perform the next
HotSync operation.
For example, if there are messages on the mail server for which you have not
received a notification on your handheld, you will not be able to retrieve those
messages after the next HotSync operation. Of, if you choose to receive
messages by subject only, you will not be able to retrieve the body of the
messages from the server after the next HotSync operation. By getting all
messages before you select Enable Key Expiration, you can be sure that you are
retrieving all message information from the server.
6. In the Connection Information box, select the desktop e-mail application, such
as Microsoft Exchange 5.0 or later, Outlook Express, or Eudora, that you are
synchronizing the account with, and specify any necessary settings.
If your e-mail application is compatible with Extended MAPI, try Microsoft
TIP
Exchange 5.0 or later as a choice for the Mail Client option. If your e-mail
application is compatible with Simple MAPI, try Microsoft Outlook Express as
a choice for the Mail Client option. Although Netscape uses SMAPI (Simple
MAPI), Netscape is not supported.
74
Page 81

Mail Client Action
Setting synchronization options and account settings
Microsoft
Exchange 5.0 or
later
Microsoft
Outlook 97 or
later
Select a MAPI profile to access the mail server. The conduit
checks for any existing MAPI profiles and displays them in the
list. Enter your password for Exchange.
Select the MAPI profile to access the mail server. The conduit
checks for any existing MAPI profiles and displays them in the
list. Enter your password for Outlook. See “Configuring
Microsoft Outlook” later in this chapter for the changes you
need to make in Outlook.
Microsoft
Outlook Express
5.5 or later
If you select Microsoft Outlook Express, enter the password for
your mail account. See “Configuring Microsoft Outlook
Express” later in this chapter for details.
Lotus Notes Click Browse to locate your Notes ID, and then enter your
password.
Eudora 5.0 or
later
Direct POP
connection to
server
See “Configuring Eudora” later in this chapter for more
information about the settings to make in Eudora.
Select this option to synchronize an account by connecting
directly with a POP server. You must enter the information
about the server in the VersaMail application on your
handheld when you create the e-mail account to access the
server. You will enter information about the incoming (POP)
server, the outgoing (SMTP) server, your e-mail username,
your password, and your e-mail address.
During the HotSync operation, the conduit reads the settings
you made. If the settings do not exist or all server information
is wrong, an error is reported in the HotSync.log file. However,
if the incoming server (POP) is correct, the Inbox is
synchronized if the option to synchronize the Inbox is selected.
If the outgoing server (SMTP) is correct, the Outbox is
synchronized (send e-mail) if you selected the option to
synchronize the Outbox. If neither is correct, then nothing
happens.
If you want to synchronize e-mail for an account that requires
APOP authentication, you must select the option to use APOP
on your handheld. See “Adding APOP to an account” in
Chapter 6 for details.
If you want to synchronize e-mail for an account that requires
ESMTP authentication (for example, Yahoo accounts require
ESMTP authentication), you must select the option to use
ESMTP on your handheld. See “Adding ESMTP to an account”
in Chapter 6 for details.
75
Page 82

Chapter 5 Synchronizing E-Mail Between the Handheld and the Desktop
Mail Client Action
Direct IMAP
connection to
server
Other e-mail
applications
Select this option to synchronize an account by connecting
directly with an IMAP server. You must enter the information
about the server in the VersaMail application on your
handheld when you create the e-mail account to access the
server. You will enter information about the incoming (IMAP)
server, the outgoing (SMTP) server, your e-mail username,
your password, and your e-mail address.
During the HotSync operation, the conduit reads the settings
you made. If the settings do not exist or all server information
is wrong, an error is reported in the HotSync.log file. However,
if the incoming server (IMAP) is correct, the Inbox is
synchronized if the option to synchronize the Inbox is selected.
If the outgoing server (SMTP) is correct, the Outbox is
synchronized (send e-mail) if you selected the option to
synchronize the Outbox. If neither is correct, then nothing
happens.
If you want to synchronize e-mail for an account that requires
ESMTP authentication (for example, Yahoo accounts require
ESMTP authentication), you must select the option to use
ESMTP on your handheld. See “Adding ESMTP to an account”
in Chapter 6 for details.
Select Microsoft Exchange 5.0 or later as the choice for the
Mail Client option if your e-mail application is compatible with
extended MAPI. If your e-mail application is compatible with
SMAPI, select Microsoft Outlook Express as the choice for the
Mail Client option.
76
NOTE
incoming e-mail, your personal address book, and other information services
that you can use. The profile may be MS Exchange Settings, your name, or
something different. For more information on profiles, see your e-mail
application’s documentation.
7. Enter the Sync Mail Restrictions you want:
Days in Which to
Synchronize Mail
A profile contains configuration information, such as the location of
Set how many days of e-mail, between 0 and 999, should be
synchronized. A value of 0 synchronizes all e-mail in the
Inbox during the next HotSync operation. For other values,
the conduit synchronizes e-mail for today and the number of
days preceding today. For example, if you enter a value of 2,
e-mail is synchronized for today and yesterday; if you enter
3, e-mail is synchronized for today, yesterday, and the day
before.
Page 83

Setting synchronization options and account settings
Maximum
Message Size (KB)
for HotSync
Operation
Enter the maximum message size, from 1 to 2048KB. If the
message exceeds the maximum size, the conduit truncates
the message. For example, the maximum message size might
be 50KB, and the message might have the following:
■ Message header: 1KB
■ Body: 20KB
■ Attachment 1: 40KB
■ Attachment 2: 20KB
In this case the conduit puts the message header, body, and
Attachment 2—totaling 41KB—on the handheld.
Attachment 1 is removed because adding it to the message
causes the message to exceed the maximum.
Synchronize
Unread Messages
Only
Select whether to synchronize all e-mail between your
desktop and your handheld, or unread e-mail only. By
default, the check box is deselected, meaning that all e-mail
will be synchronized.
8. Select the folder synchronization you want:
– Select the Synchronize the Inbox check box to synchronize the Inbox during
the next HotSync operation.
– Select the Synchronize the Outbox check box to send any e-mail in the
handheld’s Outbox during the next HotSync operation.
9. Click Apply.
Verifying handheld account settings before synchronizing accounts
Certain settings you configure on your handheld for a given e-mail account must
be set correctly for the synchronization process as well. Before configuring an
e-mail client on your desktop for synchronization, be sure to verify the following
settings on your handheld:
APOP and ESMTP
If you want to synchronize e-mail for an account that requires
either APOP or ESMTP authentication (for example, Yahoo
accounts require ESMTP authentication), you must select the
option to use APOP or ESMTP on your handheld. See “Adding
APOP to an account” and “Adding ESMTP to an account” in
Chapter 6 for details.
77
Page 84

Chapter 5 Synchronizing E-Mail Between the Handheld and the Desktop
Mail filters
Configuring Microsoft Outlook
You can synchronize Microsoft Outlook 97/98/2000/XP with an e-mail account in
the VersaMail application, but you must set Microsoft Outlook as the default mail
handler. You must check your username and password.
To configure Microsoft Outlook:
1. In the Control Panel, click Internet Options.
NOTE
Internet Options.
For Windows XP, click Network and Internet Connections, and then click
Any mail filters you have configured for a given e-mail account
on your handheld apply also during the synchronization
process. For example, if you have set filters to accept only e-mail
containing the subject words “Current Software Project,” only
those same messages are synchronized between your desktop
and your handheld. Be sure to turn mail filters off if you want
to synchronize all messages between your desktop and your
handheld. See “Turning filters on and off” in Chapter 6 for
details.
2. Click the Programs tab.
3. Select Microsoft Outlook as the default e-mail program.
4. Click OK.
NOTE
Outlook.
Make sure your username and password are set up correctly within Microsoft
Configuring Microsoft Outlook Express
You can synchronize an e-mail account in the VersaMail application with Microsoft
Outlook Express 5.5 or 6.0, but you must set Outlook Express as the default mail
handler.
NOTE
Express.
To configure Outlook Express:
1. In the Control Panel, click Internet Options.
Make sure your username and password are set up correctly within Outlook
NOTE
Internet Options.
For Windows XP, click Network and Internet Connections, and then click
78
2. Click the Programs tab.
Page 85

Setting synchronization options and account settings
3. Select Outlook Express as the default e-mail program.
4. Click OK.
You can also make Outlook Express the default mail handler within the e-mail
TIP
application. From the Tools menu, select Options. Click the General tab, and then click
Make Default.
IMPORTANT
operation. If you have multiple profiles in Outlook Express, the VersaMail application
synchronizes with the dominant profile. To synchronize a different profile, you must
set it as your dominant profile.
Configuring Eudora
If you are using Eudora as your e-mail application, you must set up MAPI in
Eudora.
To set up MAPI in Eudora:
1. From the Eudora Tools menu, choose Options.
2. Do one of the following:
3. Ensure that your username and password are set up correctly within Eudora.
Outlook Express must be running in order for you to perform a HotSync
– If Eudora is the only e-mail application that you use, select Always as the
MAPI setting.
– If you use more than one e-mail application, select When Eudora is running
as the MAPI setting.
You need this information to log in to Eudora to retrieve and synchronize your
e-mail.
IMPORTANT
operation. The VersaMail application synchronizes with your Dominant Personality in
Eudora 5.1 or later. To synchronize a different profile, you must set it as your
Dominant Personality.
Eudora must be running in order for you to perform a HotSync
79
Page 86

Chapter 5 Synchronizing E-Mail Between the Handheld and the Desktop
Converting attached files
You can use attachment conversion plug-ins to convert attached files that you are
sending or receiving. Documents To Go plug-ins are automatically configured; you
must install Documents To Go on your desktop computer and on your handheld
for attachments to be converted properly. You must have version 4.004 or later of
Documents To Go to work properly with the VersaMail application. You can
download version 4.004 or later from the DataViz web site,
www.dataviz.com/i705 news
If you installed Documents To Go version 4.0, which was included free on the
Palm™ i705 CD-ROM, you can download a free update from the DataViz web site.
You must register as a Palm i705 user to obtain a registration number and
activation key. Go to
www.dataviz.com/i705 news
When you receive a message with an attachment on your handheld, the file is
converted to the DataViz format on the handheld when you perform a HotSync
operation. You can then read and edit the file in Documents To Go on the handheld.
In the Palm VersaMail HotSync Conduit, you can turn off DataViz Documents To
Go plug-ins or select other plug-ins.
.
for more information.
To turn off attachment conversion plug-ins:
1. Click the HotSync Manager icon in the Windows system tray.
2. Select Custom.
3. Select VersaMail in the Conduit list.
4. Click Change.
5. Click Configure Accounts.
80
Page 87

Converting attached files
6. Click the Attachment Conversion tab.
Documents To Go
plug-ins are configured
automatically
7. Plug-in types are listed in the left column. If the plug-in is selected, the right
column shows the name of the company supplying the plug-in. If a plug-in is
not selected, the right column reads Not Selected.
NOTE
The drop-down lists in the right column display only the companies
currently supplying plug-ins for a particular type. If more than one company
supplies a plug-in of a particular type (for example, Word doc), then multiple
company names appear on the list. If no company is currently supplying a
plug-in of a particular type, then the only option that appears on the list is Not
Selected.
Do one of the following:
Item Action
To deselect a plug-in Click the right column next to the plug-in type name, and
then select Not Selected from the drop-down list.
To select a plug-in Click the right column next to the plug-in type name, and
then select the name of the company supplying the
plug-in from the drop-down list.
To change the
company supplying a
plug-in of a particular
type
8. Click OK.
Click the right column next to the plug-in type name, and
then select the name of the company you want to supply
the plug-in from the drop-down list.
81
Page 88

Chapter 5 Synchronizing E-Mail Between the Handheld and the Desktop
Synchronizing an account
To synchronize accounts, you must set the HotSync action for VersaMail in the
HotSync Manager. You can, however, exclude e-mail accounts from a HotSync
operation.
If you don’t want an account synchronized, deselect the check box Select this
TIP
check box to synchronize this e-mail account when you perform a HotSync operation.
To select which accounts are synchronized during a HotSync operation:
1. Click the HotSync Manager icon in the Windows system tray.
2. Select Custom.
3. Select VersaMail in the Conduit list.
4. Click Change.
5. Select one of the following:
Synchronize
Active Accounts
Select this option to include active accounts in the next
HotSync operation. For an account to be synchronized, you
must have selected the option Check this box to synchronize
this mail account when you perform a HotSync operation.
Do Nothing
Select this option to exclude e-mail accounts from the next
HotSync operation.
6. (Optional) Select Set As Default to apply the options you selected to all
subsequent HotSync operations. Otherwise, the settings apply to the next
HotSync operation only.
82
7. Click OK.
8. Perform a HotSync operation.
Page 89

CHAPTER 6
Going Beyond the Basics
You use many Palm™ VersaMail™ personal e-mail software features, such as
getting and sending e-mail, daily. Other features are used less frequently but are
especially valuable in certain situations. For example, filtering e-mail is helpful if
you are traveling and want to receive messages only from certain people or about
specific subjects. Filters and other special features are discussed in this chapter.
This chapter describes the following:
■ Creating and using filters to determine which mail you actually view
■ Creating a synchronize-only e-mail account
■ Creating an e-mail account that uses a network connection to send and receive
mail
■ Setting network and connection preferences on your handheld
■ Selecting a different connection service for a given e-mail account
■ Managing mail settings
■ Adding APOP to an account
■ Adding ESMTP to an account
■ Copying text from an e-mail message for use in other applications
■ Using the command bar
■ Viewing e-mail header details
■ Backing up your mail databases
■ Synchronizing IMAP folders wirelessly
■ Accessing corporate e-mail
■ Learning about Palm™ Desktop Link to manage your mail in Microsoft
Outlook
83
Page 90

Chapter 6 Going Beyond the Basics
Managing mail filters
Filters provide efficient ways to manage e-mail retrieval and storage. When you
tap Get Mail or Get & Send, filters determine which e-mail messages are
downloaded to your handheld and in which folder the downloaded messages are
stored.
For example, you may want to file e-mail about sales meetings in a Sales folder.
You can create a filter that automates this action, so that whenever you receive an
e-mail message about sales meetings, it is immediately sent to the Sales folder,
which you created in the filters screen.
Creating mail filters
To create a mail filter, you select various criteria, such as To, From, and Contains.
This information makes up the filter statement.
For example, if you want stock quotes from your online brokerage service sent to
a specific folder, you can filter those mail messages and store them in the Inbox
folder. The filter statement, which is displayed in the Filter Editor, is shown in the
following figure.
84
To create a filter:
1. Tap the Menu icon .
2. Tap Options, and then tap Filters.
3. Tap N ew.
4. Enter a short description of the filter in the Name field.
Page 91

Managing mail filters
5. Use the If the pick lists to create criteria for the filter.
The three pick lists and the edit line combine to create a statement that identifies
the type of e-mail and where you want the e-mail stored. For example, a filter
might read, “If the [Subject] [Contains] sales meeting, Then get mail and move
to [Sales].” When you use this filter to sort incoming e-mail, any e-mail
containing “sales meetings” in the subject line is filed in the Sales folder.
To pick list
Select the message header field with the information
contained in the edit line: To, From, Subject, cc, Date, Size.
For example, you might select Date to download only
messages that are less than a certain number of days old.
Contains pick
list
Edit line
Select a filter action: Contains, Starts with, Does NOT
Contain.
Enter the text that must be found in the header field. For
example, if you want to sort e-mail with the subject Sales,
enter “Sales.” If you enter more than one criteria, separate
each with a comma—for example, “Sales, New York.”
Then get mail
and move to
pick list
Select the folder or mailbox into which you want your
filtered e-mail to go. You can also create a new folder for
storing the incoming e-mail. Tap Edit Folders, and then
create a new folder or delete and rename existing ones.
6. Tap OK .
The filter appears in the Filters list.
Tap the icon and then
move the filter up or down
in the list
Selected filters execute in the order in which they appear on the list. Move filters
up and down the list to ensure that they execute in the correct order.
NOTE
See “Synchronizing an account” in Chapter 5 for more information.
Filters created on the handheld apply also to mail synchronization.
85
Page 92

Chapter 6 Going Beyond the Basics
Turning filters on and off
By default, a filter that is turned on or that is selected affects all subsequent
downloads of e-mail until you deselect it. More than one filter can be in effect at
once. Before you download e-mail, be sure to turn on the filters you want and turn
off those you don’t want.
To turn a filter on or off:
1. Tap the Menu icon .
2. Tap Options, and then tap Filters.
The Filters dialog box appears with the filters you created.
Filters with a checkmark are
turned on
3. Tap the pick list in the upper-left corner, and select Connected or Synchronize.
– Connected applies a filter to a wireless or network transaction.
®
– Synchronize applies a filter to a HotSync
4. Tap the filter check boxes to select the filters you want to use for a subsequent
operation.
e-mail transactions.
IMPORTANT
is also deselected under Synchronize.
If you deselect a filter listed under Connected, be sure that the filter
86
5. Tap OK .
Page 93

Editing or deleting a filter
You can edit a filter and change its name or the criteria in the filter.
To edit or delete a filter:
1. Tap the Menu icon .
2. Tap Options, and then tap Filters.
3. Tap the name of the filter.
4. Do one of the following:
– To edit the filter, revise your entry in the Name field and/or your selections
in the pick lists, and revise the text in the edit line. Tap OK.
– To delete the filter, tap Delete and then tap Yes to confirm the deletion.
5. Tap OK .
Creating a synchronize-only account
Creating a synchronize-only account
A synchronize-only e-mail account enables you to download, view, and manage
e-mail between the handheld and a desktop e-mail application, such as Microsoft
Outlook, by performing a HotSync operation with the cradle/cable. You can’t send
and receive messages wirelessly or with a modem for any account of this type.
NOTE
You can create a synchronize-only account only on a Windows computer.
If you are setting up a synchronize-only e-mail account and have a well-known ISP
such as Earthlink or Mindspring, many of the required settings are automatically
configured during the account setup.
For other ISPs, you need the following information:
■ The protocol used for incoming e-mail, such as POP or IMAP
■ The name of the incoming mail server
■ The name of the outgoing mail (SMTP) server
■ Whether your e-mail account requires any encryption, such as APOP or ESMTP
■ Your e-mail address and password
NOTE
Depending on the type of e-mail service you have, you may be able to access this
information by going to the e-mail provider’s web site or by contacting the provider’s
customer support.
Information about your e-mail account is available from the e-mail provider.
See “Editing e-mail accounts” in Chapter 3 for information about editing
e-mail accounts.
87
Page 94

Chapter 6 Going Beyond the Basics
To create a synchronize-only e-mail account:
1. Tap the Menu icon .
2. Tap A cc ou nt s.
3. Select Account Setup.
4. Tap N ew.
5. Do all of the following:
Account Name
Enter a descriptive name for this account, such as “My
Yahoo.”
Mail Service
Tap the Mail Service pick list, and select the provider to
which you are connecting. Select Other if your ISP is not
listed.
Protocol
Tap the Protocol pick list and select POP or IMAP. (Most
e-mail providers use the POP protocol.)
If the VersaMail application knows the protocol for the mail
service you selected, it displays the correct protocol.
88
Page 95

6. On the same screen, select the Synchronize Only Account check box.
7. Tap N ex t.
Entering the account username and password
In the next part of the VersaMail Account Setup, you enter the username and
password for this account.
To enter the account username and password:
1. Enter the username you use to access your e-mail. This is generally the part of
your e-mail address that appears before the @ symbol; it is usually not your
entire e-mail address.
Creating a synchronize-only account
2. Tap the Password box, and then enter your password. The Password box
displays the word “Assigned” to indicate that a password has been entered.
3. Tap OK .
4. Tap N ex t.
89
Page 96

Chapter 6 Going Beyond the Basics
Entering the name of the incoming and outgoing mail server
You need to enter your e-mail address for the account you are accessing, as well as
the name of the incoming and outgoing mail servers.
To enter mail server settings:
1. If you chose a preconfigured service from the Mail Services pick list on the
Account Setup screen, the e-mail address field is completed automatically
based on the username and mail service you entered. Check the address to
verify that it is correct, and edit it if necessary.
If you chose Other from the Mail Services pick list on the Account Setup screen,
enter the e-mail address for your account.
E-mail address will be filled in
automatically if you chose a
preconfigured mail service
Mail servers will be filled in
automatically if the VersaMail
application knows the names, based
on the mail service you chose
2. Enter the name of your incoming (POP) mail server, such as
pop.mail.yahoo.com.
If the VersaMail application knows the incoming mail server name based on the
mail service you selected, the correct server name is displayed.
3. Enter the name of your outgoing (SMTP) mail server, such as
smtp.mail.yahoo.com.
If the VersaMail application knows the outgoing mail server name based on the
mail service you selected, the correct server name is displayed.
4. Tap N ex t.
5. Do one of the following:
– To accept these e-mail options and begin using the VersaMail application, tap
Done. This takes you to the Inbox of the account you just set up. After you
finish setting up a synchronize-only e-mail account, you need to configure
this account on your desktop. See “Configuring an account in HotSync
Manager” in Chapter 5 for information. You will not be able to synchronize
e-mail between your handheld and your desktop until you configure the
account on your desktop.
– To set up additional e-mail options, tap Next. Continue with the next set of
procedures.
90
Page 97

Setting mail retrieval options for a POP or IMAP account
The next VersaMail Setup screen displays different options, depending on whether
your mail service uses a POP or IMAP protocol.
To set mail retrieval server options for a POP or IMAP account:
1. (Optional) Select any of the following:
– Select Get unread mail ONLY to download only unread e-mail to your
handheld. If you don’t choose this option and you tap Get & Send, all your
e-mail messages on your provider’s mail server are downloaded to your
Inbox, including messages you have already read. To get all e-mail
(including e-mail you have already read) and not just unread e-mail, deselect
Get unread mail ONLY.
– To delete messages on your provider’s mail server when they are deleted in
the VersaMail application, select the Delete messages on the server when
they are deleted in VersaMail check box.
– (POP account only) To get e-mail on your handheld but also leave it on the
server so you can view it later on your desktop, select the Leave mail on
server check box. For example, if you create an account to receive e-mail from
your Yahoo account and you select this option, your old Yahoo e-mail is still
visible the next time you visit Yahoo.com to access your Yahoo e-mail Inbox.
Creating a synchronize-only account
– To limit the maximum size of an incoming e-mail message, enter the size in
kilobytes (KB) for the Maximum Message Size. The maximum size of an
incoming message is 5KB by default, but you can enter a smaller size. The
maximum message size that you can retrieve is 60KB for the body text and
2MB total, including attachments.
POP accounts IMAP accounts
2. Tap Next.
91
Page 98

Chapter 6 Going Beyond the Basics
Setting outgoing mail options
Outgoing mail options are the same for POP and IMAP accounts.
To set outgoing mail options:
1. (Optional) Do any of the following:
Display Name
Reply To Address
BCC
Enter the name you want to appear on your outgoing
messages, such as “Joe Smith.”
Enter the e-mail address that you want recipients to see and
reply to on your e-mail messages, only if it is different from
the e-mail address from which you are sending the message.
For example, if you are sending a message from
me@yahoo.com but you want recipients to reply to
me@earthlink.net, enter the reply-to address here. Reply To
Address makes it look as though the e-mail came from the
address you entered.
Select the BCC check box to send a blind copy of any e-mail
message you send to another e-mail address. The blind copy
e-mail address is not seen by the other recipients of the
message. For example, if you want a copy of all messages
you send from your handheld to be sent to your corporate
e-mail account, enter that e-mail address.
92
2. Tap N ex t.
Page 99

Adding a signature
If you want, you can add a signature to each e-mail message you send. For
example, you can enter your name and telephone number so that they appear in
each message you send.
To add a personal signature:
1. Tap the Attach Signature to messages check box, and then enter the text of the
signature.
This signature will be attached to all your outgoing e-mail.
Setting up an account with a network connection
2. Tap OK .
Configuring your synchronize-only account
After you finish setting up a synchronize-only e-mail account, you need to
configure this account on your desktop. See “Configuring an account in HotSync
Manager” in Chapter 5 for information. You will not be able to synchronize e-mail
between your handheld and your desktop until you configure the account on your
desktop.
Setting up an account with a network connection
If you want to send and receive e-mail with a handheld using an external
PalmModem
wall, you can create a connection with a network provider. You can also create a
network connection to send e-mail from your handheld by using any sort of
wireless sled, such as an 802.11 sled; by using the IR (infrared) port on your
handheld to connect with an IR phone; by using a physical cable to connect to a
wireless phone; or by using an expansion card and a wireless phone, both enabled
with Bluetooth technology (both are sold separately).
Because your Palm™ i705 handheld’s Palm.Net
areas of the United States with good Mobitex coverage, you might want to use an
accessory (sold separately) to send and receive mail using a network connection in
areas with poor coverage or in other countries.
®
accessory (sold separately) that is connected to a phone jack on the
®
wireless service works only in
93
Page 100

Chapter 6 Going Beyond the Basics
Before you can set up a network e-mail account, you must do the following:
■ Establish the account with a network provider: Common network providers
include Internet service providers (ISPs) such as Earthlink and Prodigy.
A provider can also be a wireless GSM or GPRS carrier such as VoiceStream,
Cingular, or VodaFone. You will need to set up an account with a GSM or GPRS
carrier if you will be sending and receiving e-mail using the Palm Bluetooth
Card with your GSM- or GPRS-enabled mobile phone serving as a modem.
■ Configure the settings for this account on your handheld: You do this using your
handheld’s Network Preferences and Connection Preferences panels. See
“Setting network and connection preferences” later in this chapter.
If you are setting up a new e-mail account and have a well-known ISP such as
Earthlink or Mindspring, many of the required settings are automatically
configured during the account setup.
For other ISPs, you need the following information:
■ The protocol used for incoming e-mail, such as POP or IMAP
■ The name of the incoming mail server
■ The name of the outgoing mail (SMTP) server
■ Whether your e-mail account requires any encryption, such as APOP or ESMTP
■ Your e-mail address and password
■ The login script (if any) you need for connecting to your ISP or mail server
NOTE
Information about your e-mail account is available from the e-mail provider.
Depending on the type of e-mail service you have, you may be able to access this
information by going to the e-mail provider’s web site or by contacting the provider’s
customer support.
Creating a network e-mail account
You create a network e-mail account in Account Setup, which guides you through
the process.
NOTE
e-mail accounts.
To create a network e-mail account:
1. Tap the Menu icon .
See “Editing e-mail accounts” in Chapter 3 for information about editing
94
2. Tap A cc ou nt s.
 Loading...