

PagePac V-5323006, 6 User Manual
®
PagePac
by
PAGEPAC 6
V-5323006
INTRODUCTION
PagePac 6 is a compact, 6 Watt, voice-paging system that
integrates single-zone paging capability to your telephone
system.
Dimensions/Weight
• 6.00”W x 2.50”H x 3.30”D
(15.2cm x 6.4cm x 8.3cm)
• 2.0lbs. (0.9 kg)
ISSUE 3
SPECIFICATIONS
FEATURES
• Connects to telephone system through standard modular telephone cords.
• Connects to voice coil speakers or horns.
• Provides a 6-Watt, voice coil output.
• Controls background music provided from a line level source.
• Includes 12VAC power supply that plugs into any standard 120VAC, 60 Hz outlet.
• Connects directly to telephone system page port (Page port must provide a dry
contact closure).
• Requires separately purchased adapters for telephone systems without page port
connections (Trunk Adapter & Page Pal).
INSTALLATION
There are several ways to connect PagePac 6 to your telephone system.
• For telephone systems equipped with a page port that has a contact closure, the
PagePac 6 connects directly to the page port (see Figure 1).
NOTE: For those telephone systems not equipped with a page port, a choice of adapters
is available.
1 947176
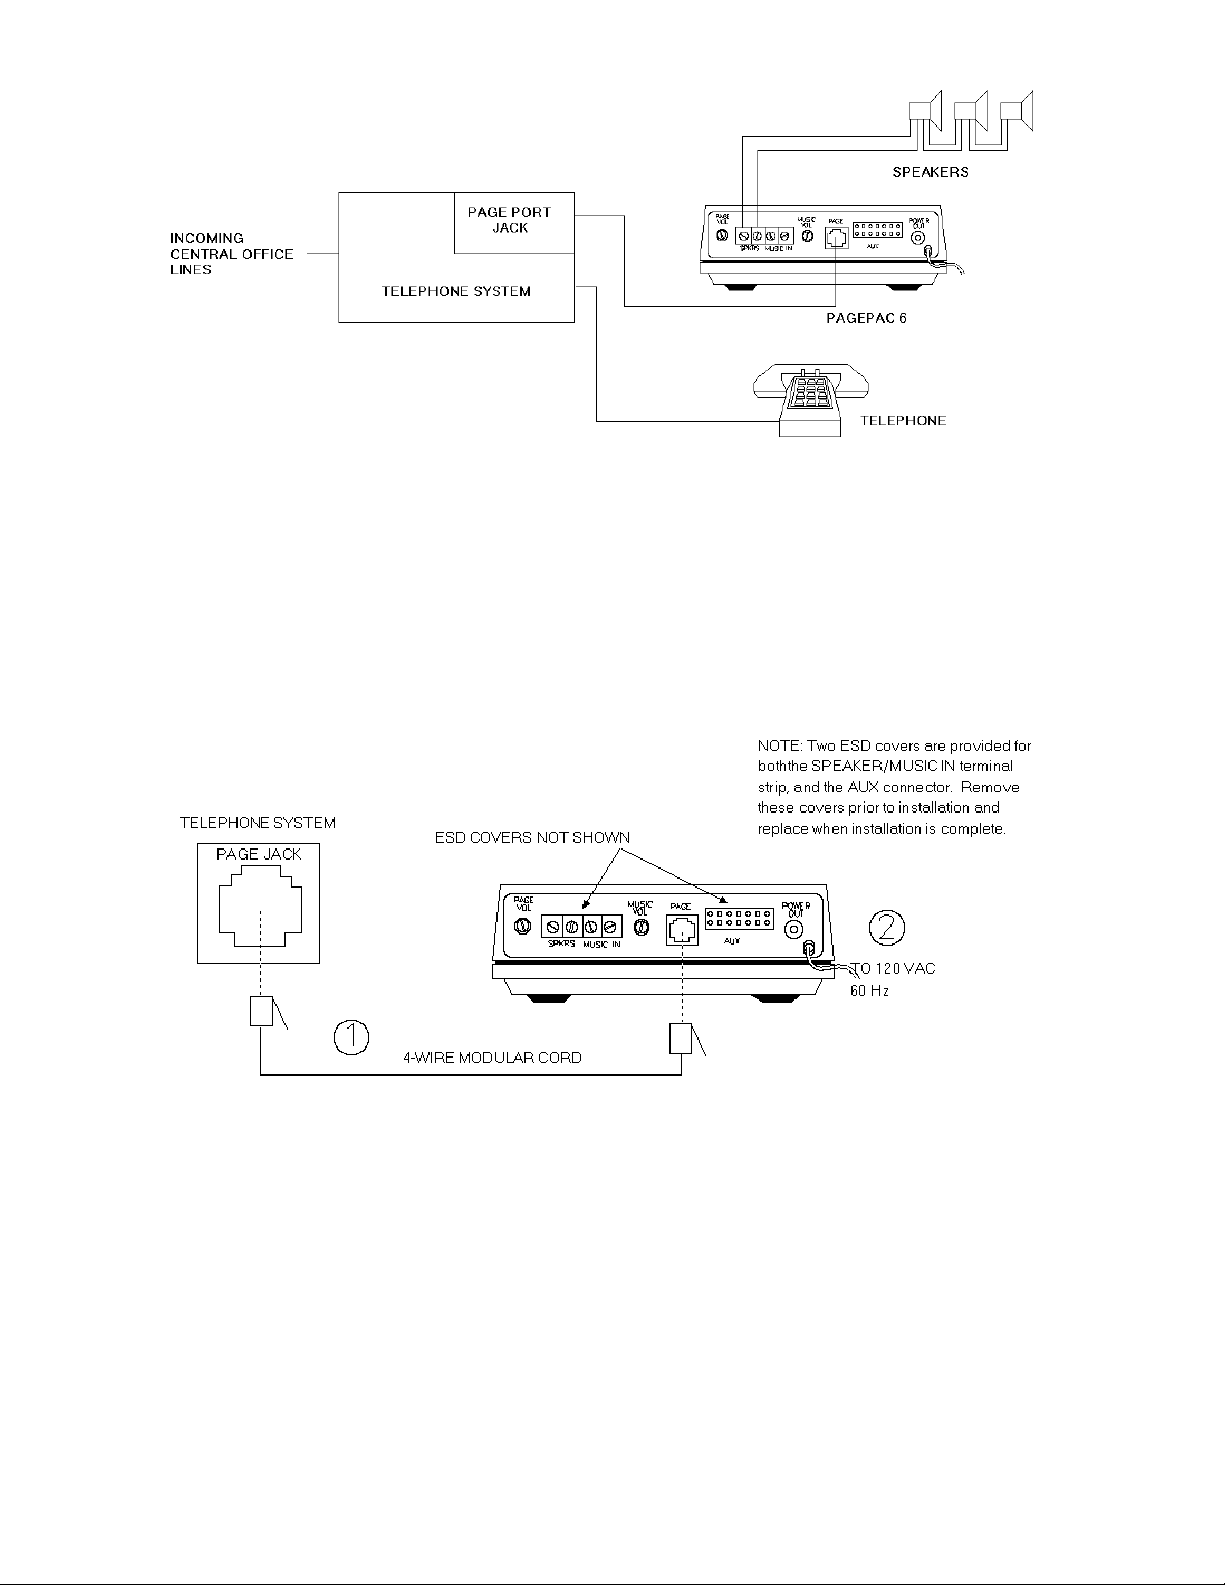
Figure 1. PagePac® 6 Connections to Telephone System Equipped with Page
Page Port and a Contact Closure
CONNECTING PAGEPAC® 6 TO A PAGE PORT WITH A CONTACT CLOSURE
INSTALLATION PROCEDURE
• PagePac 6 can be placed on a desk or shelf or wall-mounted using the keyhole slot in the
bottom of the unit.
• Circled numbers in Figure 2 correspond to the steps in the following installation procedures.
Figure 2. Connections to a Page Port with RJ-11 Jack
After selecting a convenient location:
• Connect the page jack on the Page Pac 6 to the telephone system page jack with a modular
cord.
Note: If the page port has screw-type connections, use a half-modular cord to connect to
the page port. The modular end of the cord connects to the PagePac 6 PAGE jack.
On the other end of the cord, the green lead to page tip, and the red lead connects
to page ring. The black and yellow leads are control leads that connect to a dry
contact closure provided by the page port.
Plug the PagePac 6 power cord into a standard AC wall outlet.
2
Note: The Canadian equivalent to the RJ-11C connector is CA-11A. Where applicable, CA-11A
is to be understood for other references to RJ-11C in the manual.
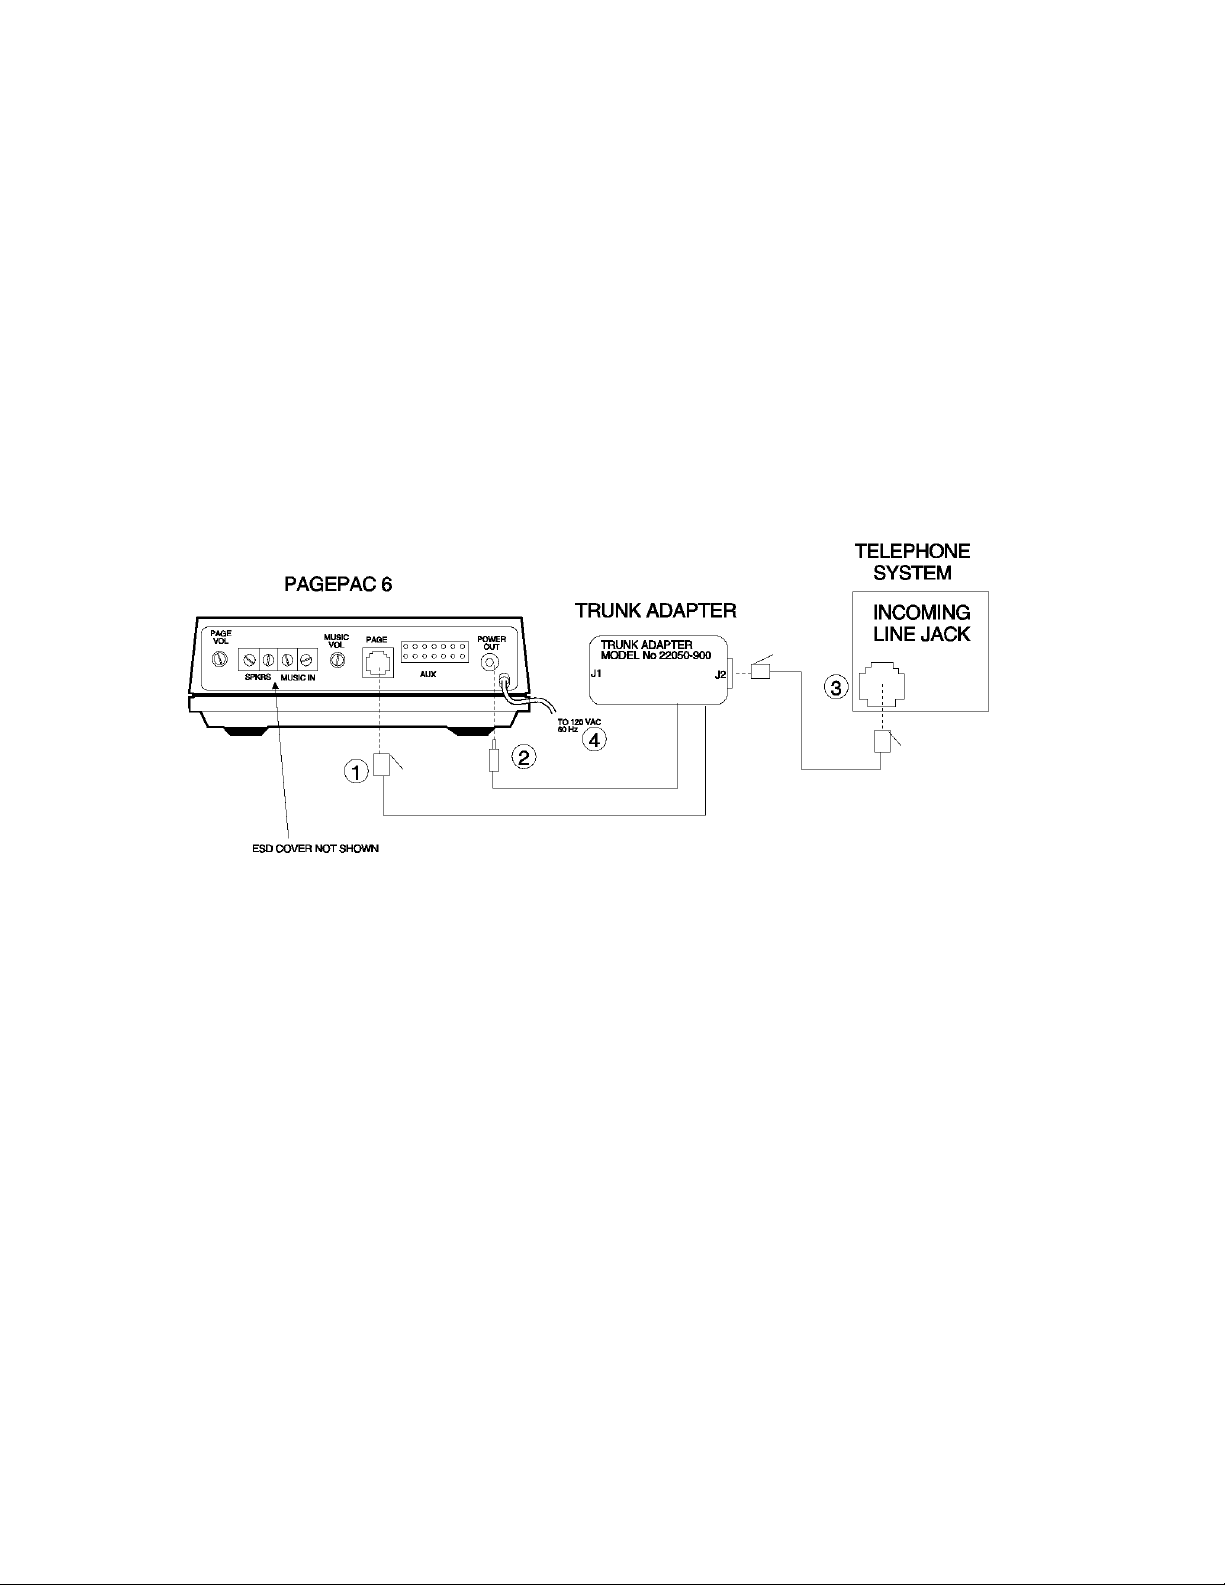
CONNECTING PAGEPAC 6 USING A PAGEPAC TRUNK ADAPTER
INSTALLATION PROCEDURE
After selecting a convenient location:
NOTE: Trunk Adapter connects PagePac 6 to vacant CO line port of telephone system.
Circled numbers in Figure 3 correspond to the steps in the installation procedure.Note:
1. Connect the Trunk Adapter modular cord to the PagePac 6 PAGE jack.
2. Connect the Trunk Adapter power cord to the PagePac 6 POWER OUT jack.
3. Connect the Trunk Adapter jack J2 to the telephone system trunk line jack (the jack which will
be dedicated for paging) with a standard modular cord.
4. Plug the PagePac 6 power cord into a standard AC wall outlet.
Figure 3. Connections to a Line Jack Using the PagePac Trunk Adapter
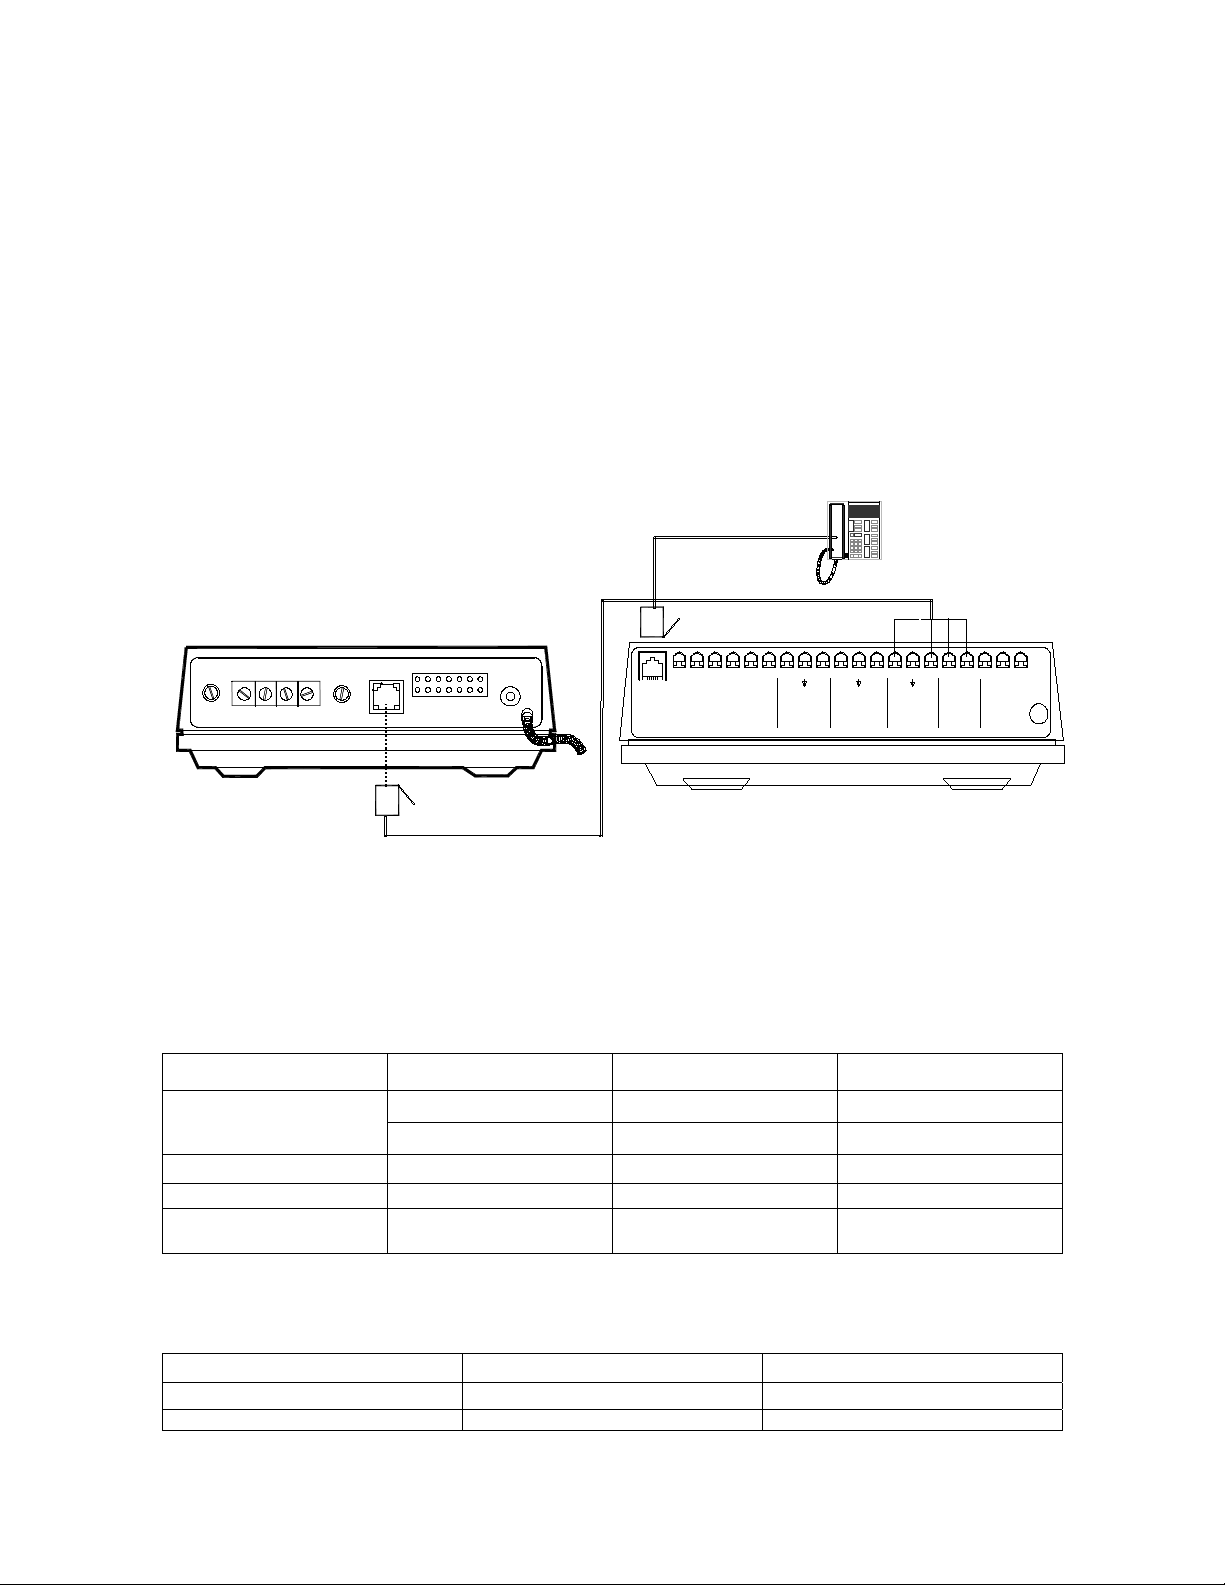
CONNECTING PAGEPAC 6 USING A PAGEPAL
INSTALLATION PROCEDURE
After selecting a convenient location:
Note: Add PagePal to PagePac 6 installation for Override page access, alert tones, CO
port or Station port access, or night bell.
1. Connect terminal 13 of PagePal to green (pin 4) of PagePac 6.
2. Connect terminal 15 of PagePal to red (pin 3) of PagePac 6.
3. Connect terminal 16 of PagePal to yellow (pin 5) of PagePac 6.
4. Connect terminal 17 of PagePal to black (pin 2) of PagePac 6.
3
Phone System
PAGE
VOL
SPKRS
MUSIC IN
PagePac 6
MUSIC
PAGE
VOL
AUX
POWER
OUT
1 2 3 4 5 6 7 8 9 10 11 12 13 14 15 16 17 18 19 20
G
T
N
P
A
T
T
C
I
P
PHONE SYSTEM
A
C
R
R
T
C
1
I
T
O
C
N
E
E
U
G
N
S
N
D
S
D
A
N
T
N
T
O
O
R
O
O
O
N
N
E
N
C
P
-
E
E
E
A
O
R
2
1
N
E
N
C
S
N
-
F
I
H
A
R
C
I
I
R
N
E
M
T
M
N
N
O
E
C
O
N
R
E
ATTENDANT
INPUT
600 OHM
+10dB MAX
+ -+ -
MUSIC INPUT
100k OHM
2.5 VMAX
RGYB
NORMALLY
+ -
OUTPUT
600OHM
OPEN
CONTACTS
for
REMOTE
AMP CONTROL
C
A
O
C
/
M
D
M
C
O
N
NIGHT BELL INPUT
R
I
N
G
E
R
PagePal
Figure 4. Connections to a PagePac 6 Using a PagePal
CONNECTING SPEAKERS TO PAGEPAC 6
Both standard speakers (indoor cone-type) and horn speakers may be used with PagePac 6. For
best performance, use only the type speaker recommended for your situation (see Table 1) and do
not exceed the number of speakers or speaker run length maximums shown in Table 2.
Table 1. Recommended Speakers
Paging Area Mounting Location Speaker Type Valcom Order No.
On Wall or Ceiling Universal Cabinet V-5330105Open or Closed Office
Areas, Conference
Rooms Etc..
Hallways On Wall or Ceiling Universal Cabinet V-5330105
Private Office Placed on Desk or Wall Desktop or Wall V-5330110
Open Industrial Area or
Outdoors
Above the Ceiling Recessed Ceiling V-5330115
On Wall or Pole at Least
1 Watt Horn` V-5330010
15 Ft. Above Ground
Table 2. Speaker Limitations
Standard Indoor Speakers Horn Speakers
Total Speakers 24 at ¼ Watt 6 at 1 Watt
Speakers Per Run 5 1
4
 Loading...