

Page 1

Viseo203DX
Quick Guide
*MU.BRV00.001*
MU.D2V00.004
Q41G20M178662A
Page 2
Regulations and safety notices
FCC notices
Notice: Shielded cables
Notice: Peripheral devices
Caution
Operation conditions
Notice: Canadian users
Disposal of waste equipment by user in private household in the European Union
/Exit
CE declaration of conformity
Packard Bell LCD Monitor Quick Start Guide (QSG)
Important safety instructions
Please read the following instructions carefully.
1. To clean the LCD monitor screen:
Turn off the LCD monitor and unplug the power cord.
Spray a non-solvent cleaning solution onto a rag and clean the screen gently.
2. Do not place the LCD monitor near a window. Exposing the monitor to rain, moisture or sunlight can severely
damage it.
3. Do not apply pressure to the LCD screen. Excessive pressure may cause permanent damage to the display.
4. Do not remove the cover or attempt to service this unit yourself. An authorized technician should perform
servicing of any nature.
5. Store the LCD monitor in a room with a temperature of -20° to 60° C (-4° to140° F). Storing the LCD monitor
outside this range may result in permanent damage.
6. Immediately unplug your monitor and call an authorized technician if any of the following circumstances
occur:
Monitor-to-PC signal cable is frayed or damaged.
Liquid spills onto the LCD monitor or the monitor is exposed to rain.
The LCD monitor or case is damaged.
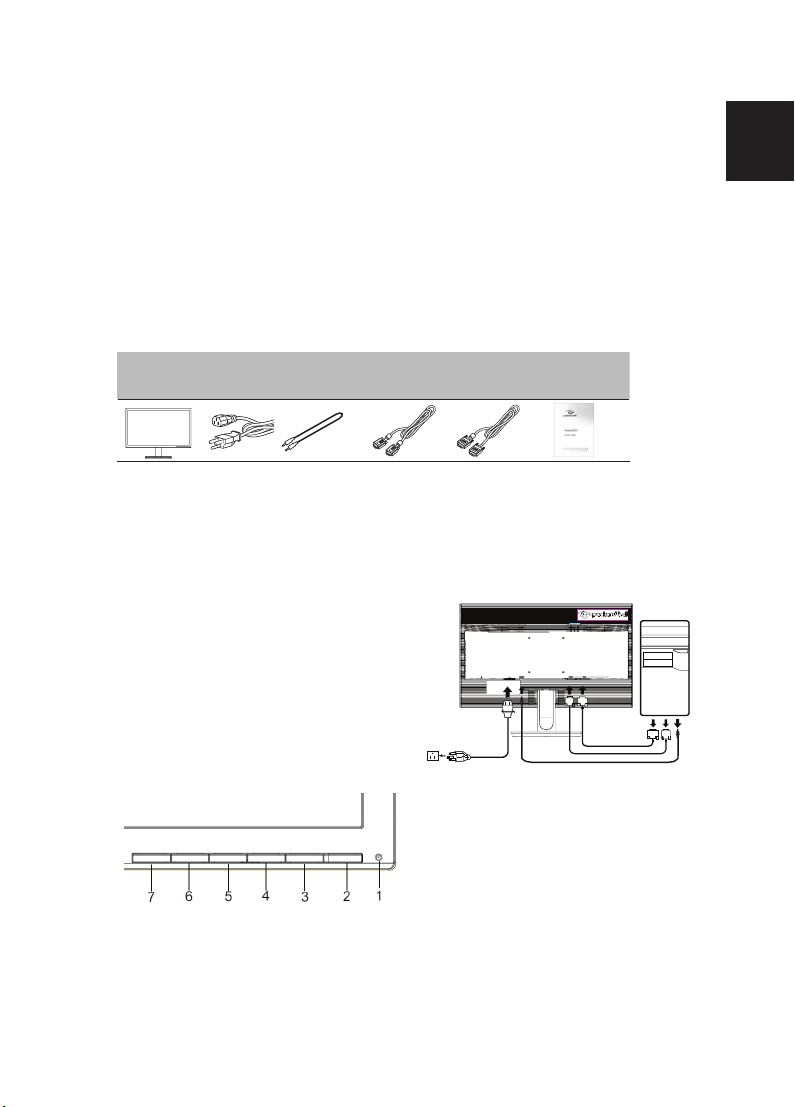
Package contents
LCD
monitor
Attaching the monitor to the base
Attaching the monitor to the base
Attaching the monitor to the base
1 Remove the monitor base from the packaging and place it on a stable and level workspace.
2 Remove the monitor from the packaging.
3 Align the release button at the buttom of the monitor with the corresponding slot at the bottom of
the base. A clicking sound signifies that the monitor has been securely attached to the base.
Connecting your monitor to a computer
1. Turn off your computer and unplug your computer's power
cord.
2. Connect the signal cable to the VGA and/or DVI-D (optional)
input socket of the monitor, and
output socket of the graphics card on the computer. Then
tighten the thumbscrews on the signal cable connector.
3. Optional: Connect the audio input socket (AUDIO IN) of the
LCD monitor and the line-out port on the computer with
the audio cable.
4. Insert the monitor power cable into the power port at the
back of the monitor.
5. Plug the power cords of your computer and your monitor
into a nearby electrical outlet.
Power cord
Audio
cable
(optional)
the VGA and/or DVI-D (optional)
VGA cable
(optional)
DVI cable Quick start
(optional) guide
DVI D-SUB
English
Page 3

External controls
1&2 Power button Turns the monitor on/off. White indicates power on. Blinking white
3&4 </> Minus / Plus If the OSD is active, press the Minus or Plus buttons to toggle between
English
5 Menu OSD functions Press to view the OSD. Press again to enter a selection in the OSD.
6 Auto Auto If the OSD is active, press Auto to exit the OSD. Once the OSD is inactive,
Empowering
7
Key
indicates standby/ power saving mode.
the OSD options. If the OSD is inactive, press the Minus or Plus buttons to
adjust the volume. (Optional)
press Auto and the monitor will automatically optimize the display
position, focus, and clock of your display.
a. When the OSD menu is active, this button will act as the exit key ( exit
OSD menu).
b. When the OSD menu is inactive, press this button to select scenario
mode.
Regulations and safety notices
CE declaration of conformity
Hereby, Acer Inc., declares that this LCD monitor is in compliance with the essential
requirements and other relevant provisions of EMC Directive 2004/108/EC, Low Voltage Directive
2006/95/EC, and RoHS Directive 2011/65/EU and Directive 2009/125/EC with regard to establishing
a framework for the setting of ecodesign requirements for energy-related product.
Notice: Shielded cables
All connections to other computing devices must be made using shielded cables to maintain
compliance with EMC regulations.
Notice: Peripheral devices
Only peripherals (input/output devices, terminals, printers, etc.) certified to comply with the Class
B limits may be attached to this equipment. Operation with non-certified peripherals is likely to
result in interference to radio and TV reception.
Caution
Changes or modifications not expressly approved by the manufacturer could void the user
authority, which is granted by the Federal Communications Commission, to operate this product.
Page 4

Regulations and safety notices
FCC notices
Notice: Shielded cables
Notice: Peripheral devices
Caution
Operation conditions
Notice: Canadian users
Disposal of waste equipment by user in private household in the European Union
/Exit
CE declaration of conformity
Disposal of waste equipment by user in private household in the European Union
This symbol on the product or on its packaging indicates that this product
must not be disposed of with your other household waste. Instead, it is your
responsibility to dispose of your waste equipment by handing it over to a
designated collection point for the recycling of waste electrical and electronic
equipment. The separate collection and recycling of your waste equipment at
the time of disposal will help to conserve natural resources and ensure that it
is recycled in a manner that protects human health and the environment. For
more information ab ut where you can drop off your waste equipment for
recycling, please contact your local city office, your household waste disposal
service or the shop where you purchased the product.
English
Information for your safety and
comfort
Safety instructions
Read these instructions carefully. Keep this document for future reference.
Follow all warnings and instructions marked on the product.
Cleaning your monitor
Please carefully follow these guidelines when cleaning the monitor:
•
Always unplug the monitor before cleaning.
Use a soft cloth to wipe the screen and cabinet front and sides.
•
Connecting/disconnecting the device
Observe the following guidelines when connecting and disconnecting power
from the LCD monitor:
Make sure the monitor is attached to its base before connecting the power
•
cord to the AC power outlet.
•
Make sure both the LCD monitor and the computer are turned off before
connecting any cable or unplugging the power cord.
•
If the system has multiple sources of power, disconnect power from the
system by unplugging all power cords from the power supplies.
Accessibility
Be sure that the power outlet you plug the power cord into is easily accessible
and located as close to the equipment operator as possible. When you need to
disconnect power from the equipment, be sure to unplug the power cord from
the electrical outlet.
Page 5

Safe listening
To protect your hearing, follow these instructions.
Gradually increase the volume until you can hear it clearly and comfortably
•
and without distortion.
After setting the volume level, do not increase it after your ears have
•
English
adjusted.
Limit the amount of time listening to music at high volume.
•
Avoid turning up the volume to block out noisy surroundings.
•
Turn the volume down if you can't hear people speaking near you.
•
Warnings
Do not use this product near water.
•
•
Do not place this product on an unstable cart, stand or table. If the product
falls, it could be seriously damaged.
Slots and openings are provided for ventilation to ensure reliable
•
operation of the product and to protect it from overheating. These
openings must not be blocked or covered. The openings should never be
blocked by placing the product on a bed, sofa, rug or other similar surface.
This product should never be placed near or over a radiator or heat
register, or in a built-in installation unless proper ventilation is provided.
•
Never push objects of any kind into this product through cabinet slots as
they may touch dangerous voltage points or short-out parts that could
result in a fire or electric shock. Never spill liquid of any kind onto or into
the product.
To avoid damage of internal components and to prevent battery leakage,
•
do not place the product on a vibrating surface.
Never use it under sporting, exercising, or any vibrating environment
•
which will probably cause unexpected short current or damage internal
devices.
Using electrical power
This product should be operated from the type of power indicated on the
•
marking label. If you are not sure of the type of power available, consult
your dealer or local power company.
• Do not allow anything to rest on the power cord. Do not locate this
product where people will walk on the cord.
• If an extension cord is used with this product, make sure that the total
ampere rating of the equipment plugged into the extension cord does not
exceed the extension cord ampere rating. Also, make sure that the total
rating of all products plugged into the wall outlet does not exceed the fuse
rating.
Page 6

Do not overload a power outlet, strip or receptacle by plugging in too
•
many devices. The overall system load must not exceed 80% of the branch
circuit rating. If power strips are used, the load should not exceed 80% of
the power strip's input rating.
• This product's power cord is equipped with a three-wire grounded plug.
The plug only fits in a grounded power outlet. Make sure the power outlet
is properly grounded before inserting the power cord plug. Do not insert
the plug into a non-grounded power outlet. Contact your electrician for
details.
Warning! The grounding pin is a safety feature. Using a power
outlet that is not properly grounded may result in electric shock
and/or injury.
Note: The grounding pin also provides good protection from
unexpected noise produced by other nearby electrical devices that
may interfere with the performance of this product.
Use the product only with the supplied power supply cord set. If you need
•
to replace the power cord set, make sure that the new power cord meets
the following requirements: detachable type, UL listed/CSA certified, type
SPT-2, rated 7 A 125 V minimum, VDE approved or its equivalent, 4.5
meters (15 feet) maximum length.
English
Page 7

Attaching
the Base
--------------------------------------------------------------------
Note: Remove the monitor and monitor base from its packaging.
English
Carefully place the monitor face-down on a stable surface -- use a
cloth to avoid scratching the screen.
①①①①
②②②②
Remove: Reverse the steps to remove the base.
Screen position adjustment
To optimize the viewing position, you can adjust the monitor tilt by using
both of your hands to hold the edges of the monitor as shown below.
The monitor can be adjusted to 25 degrees up or 5 degrees down.
25
Page 8

SPECIFICATION
Driving system TFT Color LCD
Size
Pixel pitch 0.27mm(H) x 0.27mm(V)
LCD Panel
Display Colors 16.7M Colors
Dot Clock 180MHz
Max. Resolution 1600 x 900@60Hz
Plug & Play VESA DDCCI/DDC2B
Power consumption
2
@200cd/m
Input Connector
Input Video Signal
Speakers
Maximum Screen Size
Power Source 100-240V~, 50/60Hz
Environmental
Considerations
Dimensions 463.40 (W) x 362.25(H) x 191.49(D)mm
Weight (N. W.)
Mechanism spec
External
Controls:
* All specifications are subject to change without notice.
Regulatory Compliance
Brightness 200cd/m
Contrast 100,000,000:1Max. (ACM)
Viewable angle 90° (H) 65° (V) (CR=10),
Response time 5ms (on/off)
Panel Type TN
Video R, G, B Analog Interface
H-Frequency 30KHz – 80KHz
V-Frequency 55-75Hz
ON Mode
Sleep Mode 0.45W(typ.)
Off Mode 0.35W(typ.)
Switch / Buttons
Functions
19.5"W
FP
49
2
(Typical)
110° (H) 85° (V) (CR=5)
16.2W(typ.)
D-Sub
DVI-D 24pin (Only Dual-Input Model)
Analog:0.7Vp-p(standard), 75 OHM, Positive
Digital signal (Only Dual-Input Model)
1W x 2(Only Audio-Input Model)
Horizontal:432.0mm
Vertical:239.76mm
Operating Temp: 5° to 35°C
Storage Temp: -20° to 60°C
Operating Humidity: 10% to 85%
2.9kg Unit (net)
Tilt: -5° to +25°
Swivel: No
Heightadjustment: No
Pivot: No
Detachable foot stand: Yes (by Release button)
Power Button
Left(<) /Right(>)
MENU/ENTER
Contrast
Brightness
ACM On\Off
Focus
Clock
H. Position
V. Position
(Warm) Color
(Cool) Color
Auto/ Exit
E(Empowering) Key
RGB Color temperature
Language
OSD position. timeout
Auto configuration (only Analog input model)
Input signal Selection (only Dual input model)
DDCCI On/Off
Display information
Reset
Exit
English
Find manuals and other documents for your Packard Bell
support website.
ME61
product on the official Packard Bell
 Loading...