


RecordNow
User Guide
™
December 2002

Copyright
Copyright © 2000-2002 VERITAS Software Corp. All Rights Reserved.

Table of Contents
Chapter 1. Introduction . . . . . . . . . . . . . . . . . . . . . . . . . . . . . . . . . . . . . . . . . . . . . . . . . .7
System Requirements . . . . . . . . . . . . . . . . . . . . . . . . . . . . . . . . . . . . . . . . . . . . . . . . . . . . . . .7
For Windows 98 and Windows NT 4.0 . . . . . . . . . . . . . . . . . . . . . . . . . . . . . . . . . . . . . .7
For Windows 2000 and Windows Millennium . . . . . . . . . . . . . . . . . . . . . . . . . . . . . . .8
For Windows XP Home and Professional . . . . . . . . . . . . . . . . . . . . . . . . . . . . . . . . . . . 8
Installation Instructions . . . . . . . . . . . . . . . . . . . . . . . . . . . . . . . . . . . . . . . . . . . . . . . . . . . . .9
Accessibility . . . . . . . . . . . . . . . . . . . . . . . . . . . . . . . . . . . . . . . . . . . . . . . . . . . . . . . . . . . . . . .9
Navigation and Keyboard Shortcuts . . . . . . . . . . . . . . . . . . . . . . . . . . . . . . . . . . . . . . .10
Navigation . . . . . . . . . . . . . . . . . . . . . . . . . . . . . . . . . . . . . . . . . . . . . . . . . . . . . . . . . . 10
Keyboard Shortcuts . . . . . . . . . . . . . . . . . . . . . . . . . . . . . . . . . . . . . . . . . . . . . . . . . . 10
Removing RecordNow . . . . . . . . . . . . . . . . . . . . . . . . . . . . . . . . . . . . . . . . . . . . . . . . . . . . . . 11
Chapter 2. Frequently Asked Questions . . . . . . . . . . . . . . . . . . . . . . . . . . . . . . . . . . .13
What Is a Music Disc? . . . . . . . . . . . . . . . . . . . . . . . . . . . . . . . . . . . . . . . . . . . . . . . . . . . . . .13
What Is a Data Disc? . . . . . . . . . . . . . . . . . . . . . . . . . . . . . . . . . . . . . . . . . . . . . . . . . . . . . . . 13
What Are the Different Types of Disc Media? . . . . . . . . . . . . . . . . . . . . . . . . . . . . . . . . . .14
How Much Information Can I Record onto a Single Disc? . . . . . . . . . . . . . . . . . . . . . . .14
What Is an Optical Recorder? . . . . . . . . . . . . . . . . . . . . . . . . . . . . . . . . . . . . . . . . . . . . . . . . 15
What Does Burning a Disc Mean? . . . . . . . . . . . . . . . . . . . . . . . . . . . . . . . . . . . . . . . . . . . .15
What Is Disc Layout? . . . . . . . . . . . . . . . . . . . . . . . . . . . . . . . . . . . . . . . . . . . . . . . . . . . . . . . 15
What Should I Know about Recording Speeds? . . . . . . . . . . . . . . . . . . . . . . . . . . . . . . . . 15
Understanding Speed . . . . . . . . . . . . . . . . . . . . . . . . . . . . . . . . . . . . . . . . . . . . . . . .15
Chapter 3. Using the Reco rdNow Wizard . . . . . . . . . . . . . . . . . . . . . . . . . . . . . . . . . .17
iii

Making an Exact Copy of a Disc with RecordNow Wizard . . . . . . . . . . . . . . . . . . . . . . . . 18
Making a Data Disc with RecordNow Wizard . . . . . . . . . . . . . . . . . . . . . . . . . . . . . . . . . . . 19
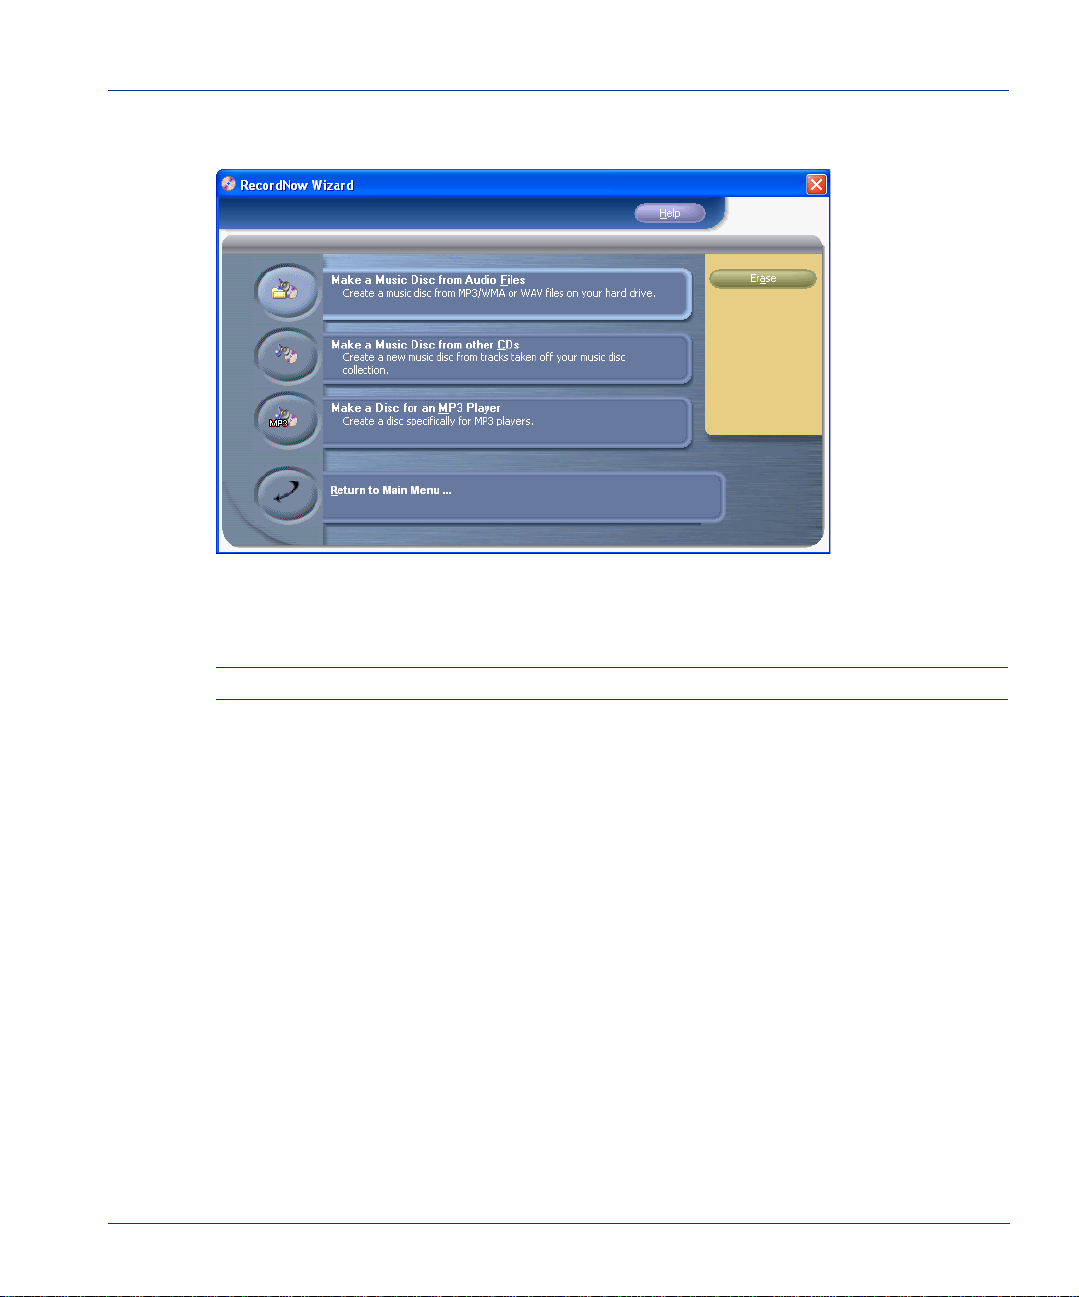
Making a Music Disc from Audio Files with RecordNow Wizard . . . . . . . . . . . . . . . . . . 22
Making a Music Disc from Other CDs with RecordNow Wizard . . . . . . . . . . . . . . . . . . . 25
Making a Disc for an MP3 Player with RecordNow Wizard . . . . . . . . . . . . . . . . . . . . . . . 28
Additional Features of RecordNow Wizard . . . . . . . . . . . . . . . . . . . . . . . . . . . . . . . . . . . . . 31
Using the Erase Button . . . . . . . . . . . . . . . . . . . . . . . . . . . . . . . . . . . . . . . . . . . . . . . . . . 31
CDDB . . . . . . . . . . . . . . . . . . . . . . . . . . . . . . . . . . . . . . . . . . . . . . . . . . . . . . . . . . . . . . . . 31
Chapter 4. Using RecordNow . . . . . . . . . . . . . . . . . . . . . . . . . . . . . . . . . . . . . . . . . . . 33
Recording with RecordNow . . . . . . . . . . . . . . . . . . . . . . . . . . . . . . . . . . . . . . . . . . . . . . . . . 34
The RecordNow Workspace . . . . . . . . . . . . . . . . . . . . . . . . . . . . . . . . . . . . . . . . . . . . . . . 34
Shortcuts . . . . . . . . . . . . . . . . . . . . . . . . . . . . . . . . . . . . . . . . . . . . . . . . . . . . . . . . . . . 36
Creating a Disc-to-Disc Copy with RecordNow . . . . . . . . . . . . . . . . . . . . . . . . . . . . . . . . . 37
Creating a Global-Image File with RecordNow . . . . . . . . . . . . . . . . . . . . . . . . . . . . . . . . . 39
Creating a Data Disc with RecordNow . . . . . . . . . . . . . . . . . . . . . . . . . . . . . . . . . . . . . . . . 42
Creating an Audio Disc with RecordNow . . . . . . . . . . . . . . . . . . . . . . . . . . . . . . . . . . . . . . 44
CD Text . . . . . . . . . . . . . . . . . . . . . . . . . . . . . . . . . . . . . . . . . . . . . . . . . . . . . . . . . . . . . . . 46
Adding CD Text . . . . . . . . . . . . . . . . . . . . . . . . . . . . . . . . . . . . . . . . . . . . . . . . . . . . . 47
Creating a Video CD with RecordNow . . . . . . . . . . . . . . . . . . . . . . . . . . . . . . . . . . . . . . . . 47
Creating a Mixed-Mode or CD Extra disc with RecordNow . . . . . . . . . . . . . . . . . . . . . . 49
Chapter 5. Options . . . . . . . . . . . . . . . . . . . . . . . . . . . . . . . . . . . . . . . . . . . . . . . . . . . . 53
Recording Options... . . . . . . . . . . . . . . . . . . . . . . . . . . . . . . . . . . . . . . . . . . . . . . . . . . . . . . . 53
Data Job Recording Options . . . . . . . . . . . . . . . . . . . . . . . . . . . . . . . . . . . . . . . . . . . . . 54
Audio Job Recording Options . . . . . . . . . . . . . . . . . . . . . . . . . . . . . . . . . . . . . . . . . . . . 56
Disc Image Job Recording Options . . . . . . . . . . . . . . . . . . . . . . . . . . . . . . . . . . . . . . . . 57
RecordNow Options Dialog . . . . . . . . . . . . . . . . . . . . . . . . . . . . . . . . . . . . . . . . . . . . . . . . . . 58
General Panel . . . . . . . . . . . . . . . . . . . . . . . . . . . . . . . . . . . . . . . . . . . . . . . . . . . . . . . . . . 58
View Panel . . . . . . . . . . . . . . . . . . . . . . . . . . . . . . . . . . . . . . . . . . . . . . . . . . . . . . . . . . . . 60
Data Disc Panel . . . . . . . . . . . . . . . . . . . . . . . . . . . . . . . . . . . . . . . . . . . . . . . . . . . . . . . . 61
iv Using RecordNow

Audio Disc Panel . . . . . . . . . . . . . . . . . . . . . . . . . . . . . . . . . . . . . . . . . . . . . . . . . . . . . . .63
Temporary Panel . . . . . . . . . . . . . . . . . . . . . . . . . . . . . . . . . . . . . . . . . . . . . . . . . . . . . . . 64
Blank Size Panel . . . . . . . . . . . . . . . . . . . . . . . . . . . . . . . . . . . . . . . . . . . . . . . . . . . . . . . .65
Job/Round Panel . . . . . . . . . . . . . . . . . . . . . . . . . . . . . . . . . . . . . . . . . . . . . . . . . . . . . . . 67
Advanced Panel . . . . . . . . . . . . . . . . . . . . . . . . . . . . . . . . . . . . . . . . . . . . . . . . . . . . . . . .68
Wizard Panel . . . . . . . . . . . . . . . . . . . . . . . . . . . . . . . . . . . . . . . . . . . . . . . . . . . . . . . . . . . 70
Wizard Panel — DVD options . . . . . . . . . . . . . . . . . . . . . . . . . . . . . . . . . . . . . . . . .71
CDDB Panel . . . . . . . . . . . . . . . . . . . . . . . . . . . . . . . . . . . . . . . . . . . . . . . . . . . . . . . . . . .72
Chapter 6. Tools . . . . . . . . . . . . . . . . . . . . . . . . . . . . . . . . . . . . . . . . . . . . . . . . . . . . . .75
The File Finder . . . . . . . . . . . . . . . . . . . . . . . . . . . . . . . . . . . . . . . . . . . . . . . . . . . . . . . . . . . . 75
Disc Explorer and Drive Properties . . . . . . . . . . . . . . . . . . . . . . . . . . . . . . . . . . . . . . . . . .76
Extracting Audio Files to WAV or MP3 . . . . . . . . . . . . . . . . . . . . . . . . . . . . . . . . . . . .77
Extracting Data Files to Create ISO Images . . . . . . . . . . . . . . . . . . . . . . . . . . . . . . . . .78
Testing Data Extraction Speed . . . . . . . . . . . . . . . . . . . . . . . . . . . . . . . . . . . . . . . . . . . .79
Testing Audio Extraction Speed . . . . . . . . . . . . . . . . . . . . . . . . . . . . . . . . . . . . . . . . . .80
Combining Jobs into a Workspace . . . . . . . . . . . . . . . . . . . . . . . . . . . . . . . . . . . . . . . . . . . . .80
Running Concurrent Recording Jobs . . . . . . . . . . . . . . . . . . . . . . . . . . . . . . . . . . . . . . . . .81
The Activity Log . . . . . . . . . . . . . . . . . . . . . . . . . . . . . . . . . . . . . . . . . . . . . . . . . . . . . . . . . . .81
Using DJ-Burn . . . . . . . . . . . . . . . . . . . . . . . . . . . . . . . . . . . . . . . . . . . . . . . . . . . . . . . . . . . . 82
Chapter 7. Troubleshooting . . . . . . . . . . . . . . . . . . . . . . . . . . . . . . . . . . . . . . . . . . . . .85
Recordings Fail . . . . . . . . . . . . . . . . . . . . . . . . . . . . . . . . . . . . . . . . . . . . . . . . . . . . . . . . . . . . 85
Can’t Add Data Files to a Music Disc . . . . . . . . . . . . . . . . . . . . . . . . . . . . . . . . . . . . . . . . .86
Unreadable Media . . . . . . . . . . . . . . . . . . . . . . . . . . . . . . . . . . . . . . . . . . . . . . . . . . . . . . . . .86
Optical Drive Unavailable . . . . . . . . . . . . . . . . . . . . . . . . . . . . . . . . . . . . . . . . . . . . . . . . . . 86
Drive Error Codes . . . . . . . . . . . . . . . . . . . . . . . . . . . . . . . . . . . . . . . . . . . . . . . . . . . . . . . . . 87
Index . . . . . . . . . . . . . . . . . . . . . . . . . . . . . . . . . . . . . . . . . . . . . . . . . . . . . . . . . . . . . . .107
Table of Contents v

vi Using RecordNow

Introduction
RecordNow is the ideal disc-mastering software application for performing a wide range of
data and audio recording tasks. Recording enthusiasts of all levels of experience will
appreciate the ease of use and control RecordNow offers. Features such as the RecordNow
Wizard guide users through the basic recording functions in just a few simple step s. Some
of RecordNow’s advanced features include: simultaneous or sequential recording jobs,
detailed activity logs, customized drive settings, and the ability to save jobs for future use.
Other recording features include:
◆ Audio mastering from WAV, MP3, or WMA files that are playable on your stereo,
CD-ROM drive (using a program such as Windows Media Player), or MP3 player.
◆ Data disc creation for archiving and sharing.
◆ Exact copies of your disc media retaining all disc layout informatio n (i.e., a
Disc-at-Once disc remains Disc-at-Once, keeping the exact track and gap layout).
◆ Global-Image files that can be stored on your hard drive and used to create copies at a
later time or sent across a network to your business colleagues.
◆ Advanced job, workspace, and log features that allow you to open several jobs at once,
queue jobs to run sequentially, save groups of jobs as a workspace, and view a
detailed ac t i v i ty log so you can track exac t l y what is happening with your recordi n gs.
◆ RecordNow Wizard — the easiest way to make data, audio, MP3 discs, or exact copies
of a disc.
1
System Requirements
The system requirements will vary depending on the operating system used and the
speed of the recorder. This section details the various requirements.
For Windows 98 and Windows NT 4.0
◆ Hard drive with at l east 10 MB of free space for instal lation
7

System Requirements
◆ 32 MB RAM, or more
◆ Internet Explorer 4.0 or greater for reading Help files
◆ CD or DVD drive capable of reading and writing to media
◆ For 8x speed recorders, or slower :
- 133 MHz processor, or faster
- Bus-mastering EIDE controller
- DMA enabled on the hard drive
◆ For 8x speed recorders, or higher:
- 300 MHz processor, or faster
- Bus-mastering EIDE controller
- DMA enabled on the hard drive
For Windows 2000 and Windows Millennium
◆ Hard drive with at least 10 MB of free space for installation
◆ 64 MB RAM, or more
◆ Internet Explorer 4.0 or greater for reading Help files
◆ CD or DVD drive capable of reading and writing to media
◆ For 8x speed recorders, or slower:
- 150 MHz processor, or faster
- Bus-mastering EIDE controller
- DMA enabled on the hard drive
◆ For 8x speed recorders, or higher:
- 300 MHz or faster proce ssor
- Bus-mastering EIDE controller
- DMA enabled on the hard drive
For Windows XP Home and Professional
◆ Hard drive with at least 10 MB of free space for installation
◆ 128 MB RAM, or more (256MB or more for double-byte language systems)
8 Using RecordNow

◆ Internet Explorer 4.0 or greater for reading Help files
◆ CD or DVD drive capable of reading and writing to media
◆ For 8x speed recorders, or slower:
- 233 MHz processor, or faster
- Bus-mastering EIDE controller
- DMA enabled on the hard drive
◆ For 8x speed recorders, or higher:
- 300 MHz or faster proce ssor
- Bus-mastering EIDE controller
- DMA enabled on the hard drive
Installation Instructions
▼ To install RecordNow:
1. Place the RecordNow disc into your CD-ROM drive.
Installation Instruc tions
If the Install Wizard does not appear, select Run... from the Windows Start menu.
Click Browse... and navigate to your CD-ROM drive. Select the Setup.exe file and
click Open. Click OK.
2. Follow the instructions on your screen to install RecordNow.
Accessibility
RecordNow has been designed with a commitment to access ibility. It is compatible with
Microsoft's accessibility utilities an d many third-party assistance products. Keyboard
shortcuts are available for all major operatio ns and menu items. In addition, all help
screens and document ation have been pr ovid ed in HTML or PDF formats that can be read
by standard text readers.
Note Some graphic elements used in this program are not handled correctly by all
screen readers. Setting your screen reader to ignore graphics may improve
performance.
Chapter 1, Introduction 9

Accessibility
Navigation and Keyboard Shor tcu ts
Program functions and menu items can be accessed from the keyboard without using a
mouse. RecordNow follows standard Microsoft navigation techniques and keyboard
shortcuts.
Navigation
Screen navigation from the keyboard is typically achieved using the Tab key to move
from function to function, the arrow keys to select options within a function, and the
Enter key to activate your selection.
The current active area of the screen is enclosed with a rectangle formed by dotted lines.
Pressing the Tab key moves the rectangle to the next active area.
Tip Holding down the Shift key and pressing the Tab key reverses the tabbing order,
making it easy to return to the last active area of the screen.
Keyboard Shortcuts
Operations available from the program menus can also be accessed from the keyboard.
Routine functions such as opening a file, saving a file, and printing a file can be performed
using standard Microsoft keyboard shortcuts. For instance, Control+S saves your wo rk in
most programs.
There are many more menu items that are unique to RecordNow. These can be reached
using the standard system of accelerator or “hot” keys.
▼ To open a menu from the keyboard:
1. Begin by noting that every menu item has a single letter underlined. The underlined
letter is the key to accessing most menu items. If the underlines are not v isible, press
the Alt key.
2. Hold down the Alt key and press the letter on the keyboard that is underlined in the
menu item you wish to access. To open the File menu, for instance, you would press
Alt+F.
3. The menu is now open. It may have many options a nd pe rhaps se ve ral submenus.
The name of each option or submenu will have one underlined letter. Press the
corresponding letter on the keyboard to access the desired menu item.
4. When the desired menu item is reached, press Enter.
10 Using RecordNow

Removing RecordNow
If the menu closes before you have a chance to make your final select ion, you will
have to repeat the process from the beginning.
Tip Not all menu items in all programs have accelerator key access. You can also choose
secondary menu items by opening the main menu and pressing the Up or Down
arrow key until the desired item is highlighted. Press Enter to activate your choice,
or the Right arrow key to open the next submenu.
The following table lists some of the keyboard shortcuts frequently used with RecordNow:
Frequently used keyboard shortcuts
To do this ... Press these keys ...
Open Help
Duplicate a mouse click Use the Tab and arrow
Duplicate a right-click of the mouse Use the Tab and arrow
Open the Start menu Windows logo key
Open Windows Explorer Windows logo key + E
Removing RecordNow
▼ To remove RecordNow:
F1
keys to reach the
desired function or
menu item then press
Enter.
keys to reach the
desired program
function or menu item
then press
F10
Shift +
.
❖ Select RecordNow from the Add/Remove Programs option under the Control Panel.
Windows will remove all files associated with RecordNow from your computer. For
additional information on removing RecordNow, please see your Windows
documentation for removing programs from your computer.
Chapter 1, Introduction 11

Removing RecordNow
12 Using RecordNow

Frequently Asked Questions
This section contains answ ers to commonly asked questio ns regarding the recording
process and media used for recording. It may be helpful to become familiar with some of
these concepts before using this software.
What Is a Music Disc?
A music disc is a compact disc (CD) that is readable on any CD player. RecordNow can
make music disc s from the most common audio formats—WAV or MP3 or Windows
Media
facts about music discs:
◆ Music discs can be played on your home or car stereo and on most modern
Note Some DVD players cannot read CD-R media and some CD players cannot read
◆ Music discs typically hold up to 74 minutes of music and up to 99 tracks, although
◆ Music discs created with RecordNow Wizard are closed session CDs. This means that
TM
formatted (i.e., .wma)—or directly from another disc. Here are some interesting
computers.
CD-RW media.
with some CD media, these numbers may vary.
once the recording is complete, no more information can be written to that disc. This
prevents accidentally overwriting the music on your disc.
2
What Is a Data Disc?
A data disc (CD or DVD) is used to store electronic data, such as the files and applications
that reside on your computer’s hard drive. Data discs cannot be played on your home or
car stereo—even if audio files are on the disc.
Because of its portability, a data disc is useful for sharing your personal or
business-critical data files, such as: multi-media presentations, graphics, reports,
spreadsheet and word-processing files.
13

What Are the Different Types of Disc Media?
You can append information to a rewritable data disc created w ith RecordNow. RecordNow
offers you the choice of appending or erasing and rewriting your di sc.
What Are the Different Types of Disc Media?
There are many different types of disc media. The format you use will depend on the
hardware you have available and how you plan to use the information on the disc. The
following table compares the different types of disc media.
Media Types
Function CD-R CD-RW DVD Recordable DVD Rewritable
Can be written to only once Yes No Yes No
Can be written to repeatedly No Yes No Yes
Can be read by any CD-ROM,
CD-R, CD-RW drive, or any home
or car stereo
Can be read by most DVD players No Yes Yes Yes
Can be read by most DVD-ROM
drives
Yes No No No
Yes Yes Yes Yes
How Much Information Can I Record onto a Single Disc?
Because the technologies used to create compact discs (CDs) and digital versatile discs
(DVDs) are different, the amount of information you can store on a given type of media
varies dramat ically.
CD-R and CD-RW medi a are most commonly available i n 650 MB data / 74 minute audio
capacities, though some brands of CD media can hold 700 MB of data or 80 minutes of
music. DVD media can hold up to 4.7 GB of information.
14 Using RecordNow

What Is an Optical Recorder?
An optical recorder is a hardware device that uses a laser to optically write information to
disc media (either CD or DVD). There are distinct types of recorders, however, and you
should be aware of the differences. The following table describes some of these
differences.
Device type Function
What Is an Optical Recorder?
CD rewritable recorder
DVD recorder Can read and write to CD-R, CD-RW, and appropriate DVD
Can read or write to either CD-R or CD-RW media.
media.
What Does Burning a Disc Mean?
Burning is an industry term used to describe the recording of information to a disc media.
Optical recording involves using a laser beam to place information onto the media, thus
the term “burning.”
What Is Disc Layout?
Disc layout is the physical arrangement of information recorded onto your disc. For
example, when creating a music disc, RecordNow allows you to customize the sequence, or
order, of your tr ac ks.
What Should I Know about Recording Speeds?
Many things can influence the speed of your recordings. This topic provides a brief
overview of the subject and includes tips that will help you achieve the best results with
RecordNow.
Unders t anding Speed
Recorder drives are rated by the maximum amount of data they can successfully transfer
per second. This rating usually appears as a multiplier: 1x, 2x, 4x, 48x, etc. A larger
number generally means a faster drive.
Chapter 2, Frequently Asked Questions 15

What Should I Know about Recording Speeds?
Unfortunately, it’s not that simple. Today there many types of drives. Some allow you to
record to both DVD and CD discs. Some drives support write-once media, some support
rewritable media, and some support both. And for each variation a drive supports, there
may be a maximum read, write, and rewrite speed.
In addition, CD and DVD discs have their own speed ratings. These ratings usually
appear as a range of drive speeds the disc can support. Put a fast disc in a slow drive and
your recording may fail.
Here are some simple suggestions and reminders that will help you navigate this maze
and achieve the best possible results from your recorder drive and RecordNow:
◆ Make sure the discs you buy are compatible with your drive. Double-check the disc
format and the disc speed.
◆ Each time you make a recording, RecordNow will select the optimum recording speed
for your drive and the disc you are using. If you experience a recording failure, you
may be able to resolve the problem by manually selecting a slow er recording speed.
◆ With RecordNow it may be possible to manually select a recording speed that is higher
than the rated speed of your disc. If RecordNow detects such a conflict, it will
automatically adjust the recording speed downward to match the best speed for your
disc.
◆ Upgrade your USB connection. If your new, external USB 2.0 drive is connected to a
USB 1.1 port on an older computer, you will not be able to achieve top recording
speeds. Upgrade kits are widely available.
16 Using RecordNow

Using the RecordNow Wizard
The RecordNow Wizard is the easiest way to record to your media. The Wizard offers a
simple method to create data, music and MP3 discs, or to create exact copies of a disc —
retaining all of the source’s disc layout properties. Once you have decided on the type of
recording you want to perform, the RecordNow Wizard guides you through the necessary
steps to complete your recording.
Use RecordNow, not the RecordNow Wizard if you plan to use feat ur es such as simult aneous
recordings, DJ Burn, Video CDs, mixed mode CDs and bootable CDs. For more
information, see “Recording with RecordNow” on page 34.
When you launch RecordNow, the RecordNow Wizard may automatically become the active
window — while the full-featured RecordNow program appears in the background. You
can use either application to perform your recording jobs, however; you must clos e the
RecordNow Wizard to begin usin g RecordNow.
You can customize the settings so tha t the RecordNow Wizard does not open automatically
when you open the RecordNow program.
▼ To hide the RecordNow Wizard when the application begins:
1. From the Tools menu, select Options.
2. Select General from the panel list on the left.
3
3. Remove the check mark beside the Show the Wizar d when the application begins
option.
4. Click OK.
▼ To open the RecordNow Wizard from the full-featured application
❖ Click RecordNow Wizard from the File menu or click the Wizard button on the
Toolbar.
17
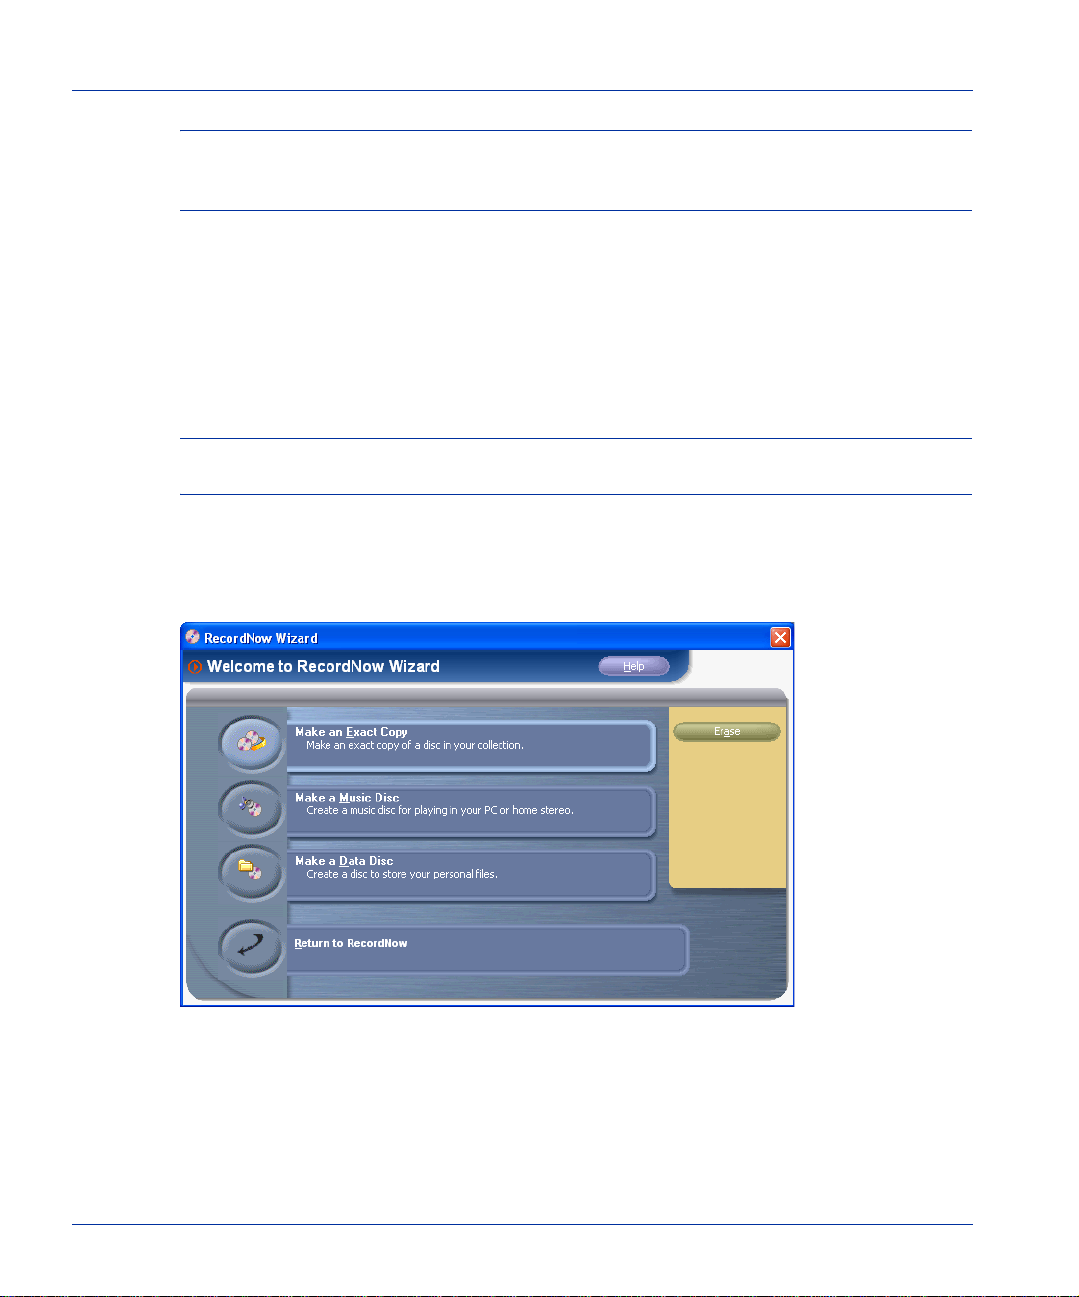
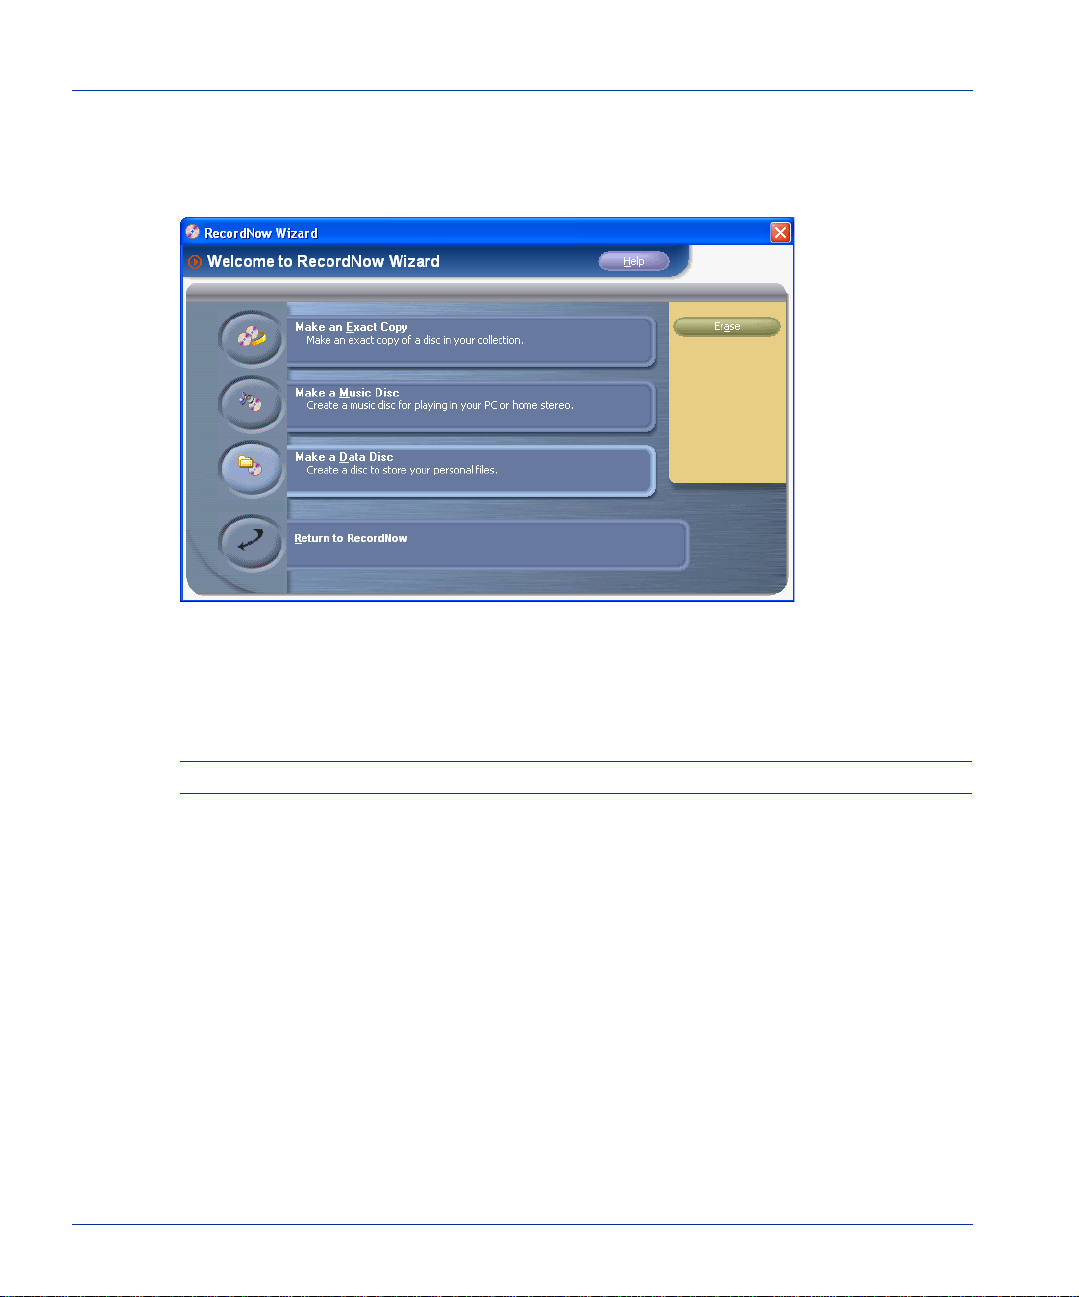
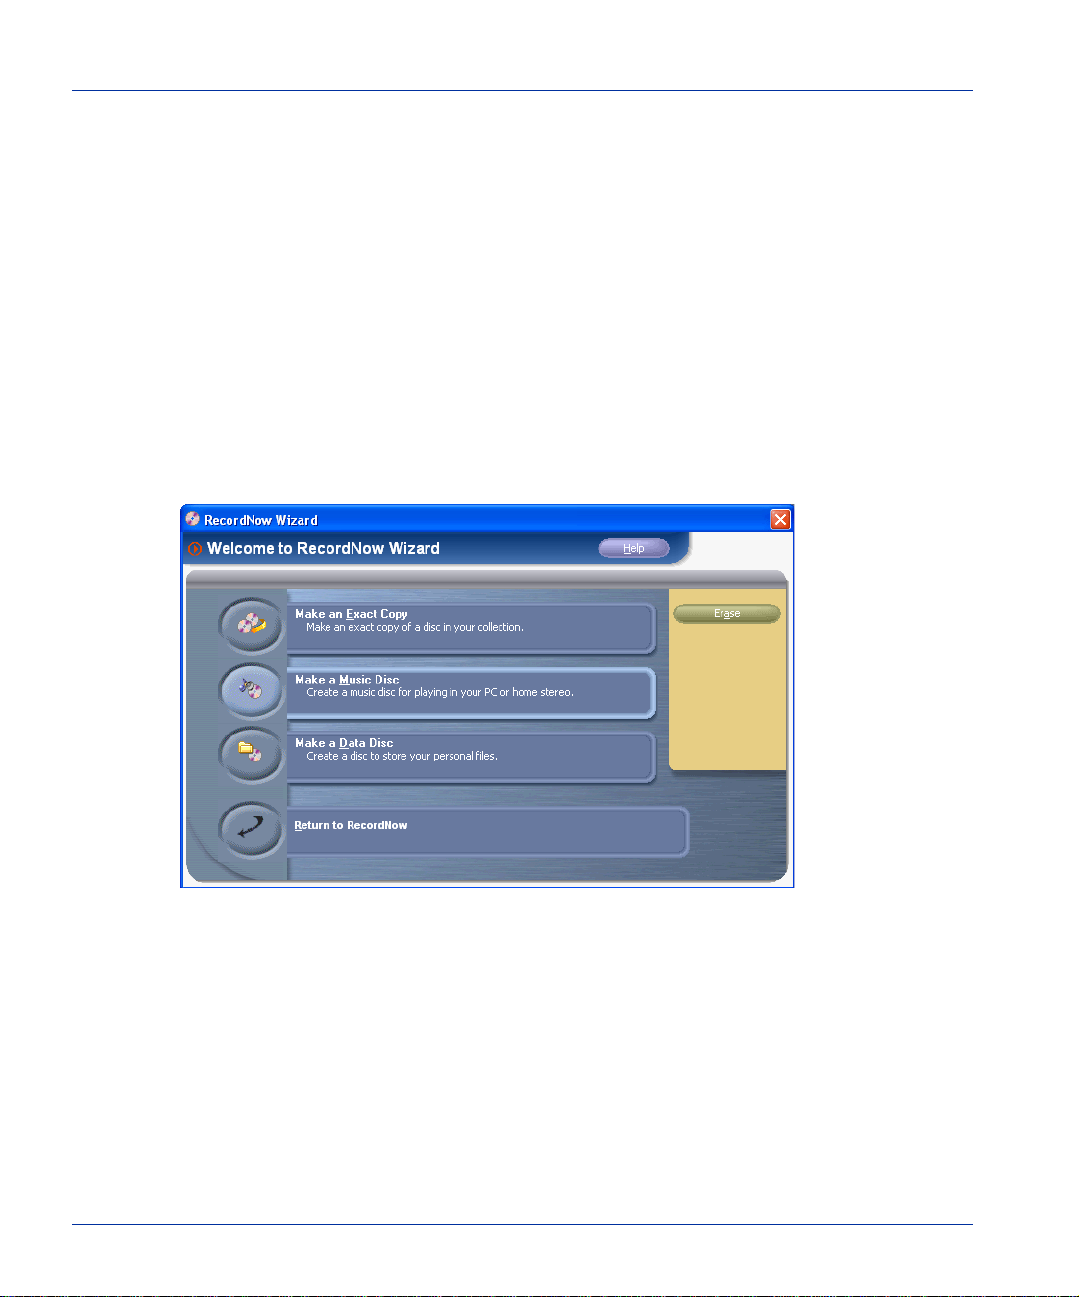
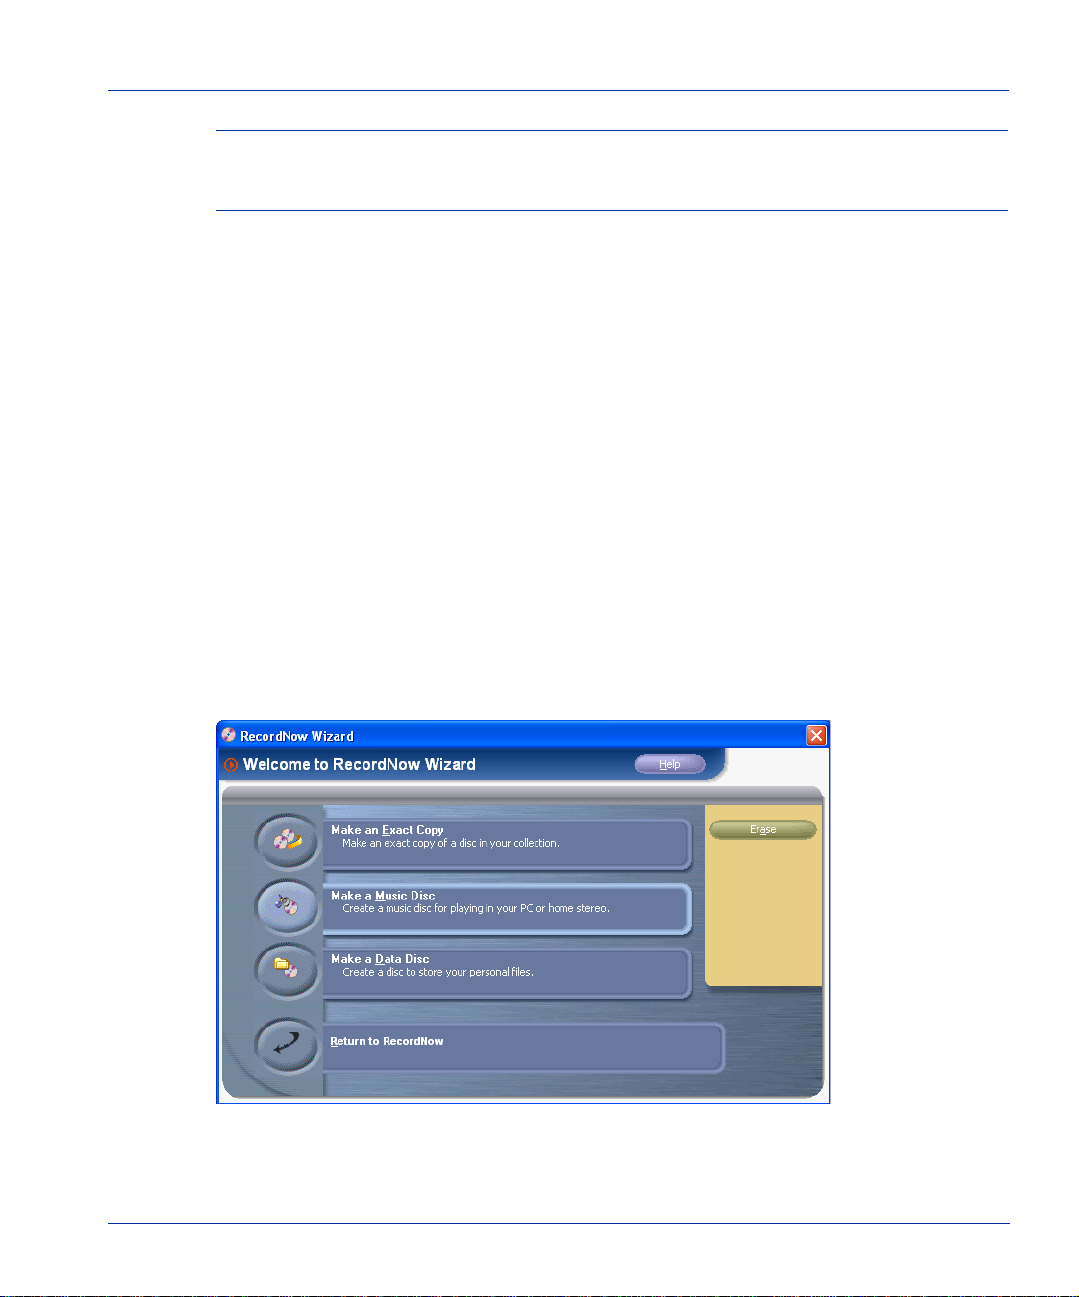
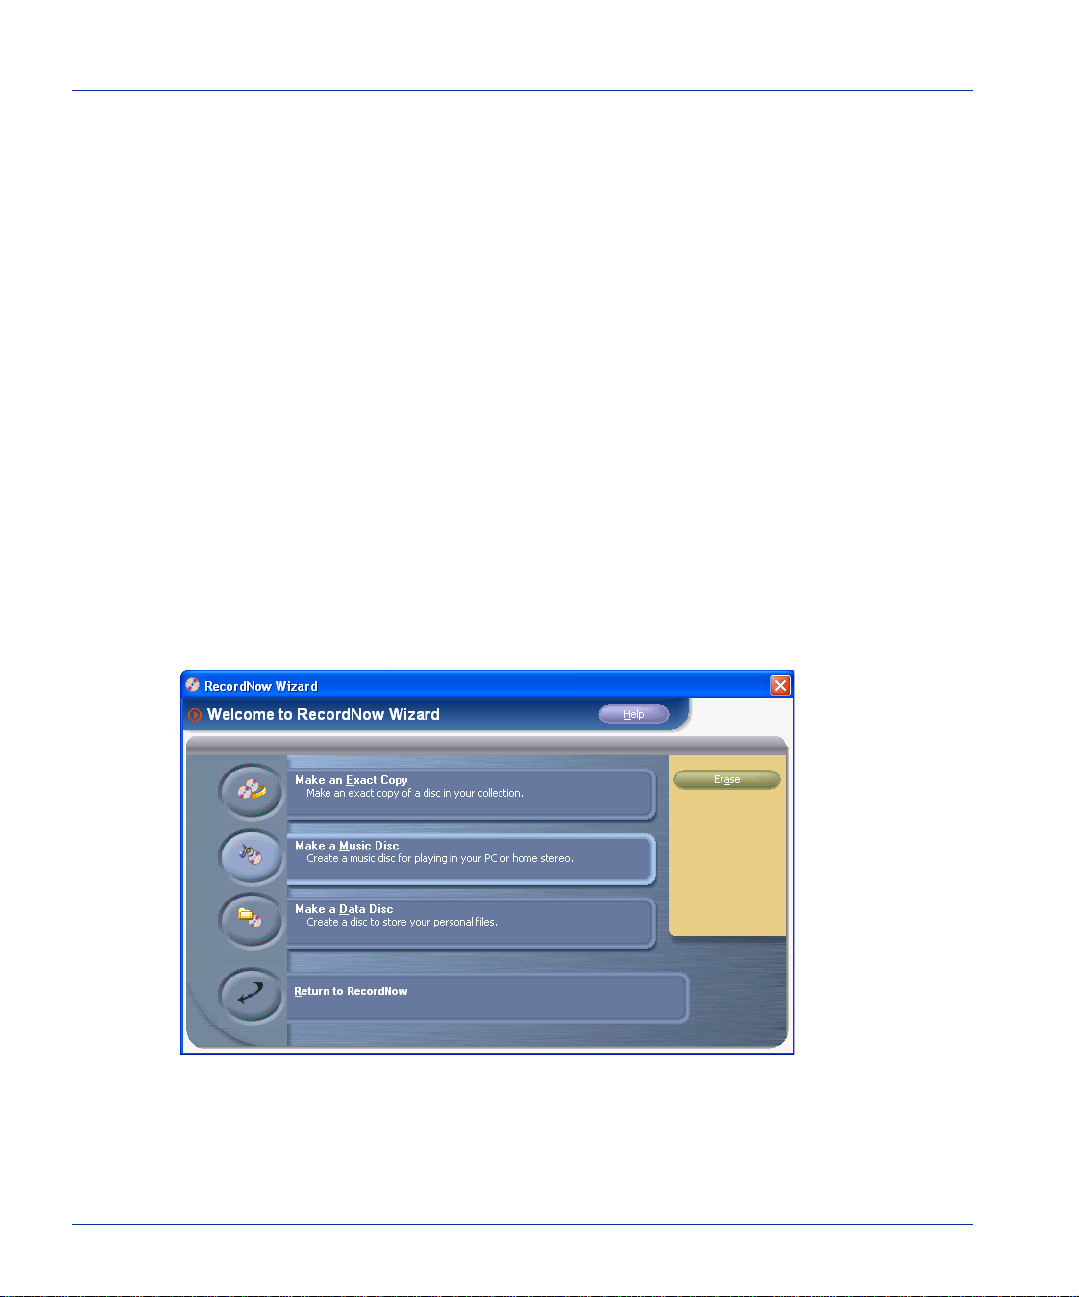
Making an Exact Copy of a Disc with RecordNow Wizard
Tip The Options dialog box available from the Tools menu also features a Wizard panel
that allows you to customize the RecordNow Wizard. To learn more about these
options, see “Wizard Panel” on page 70.
Making an Exact Copy of a Disc with RecordNow Wizard
The Exact Copy feature makes a duplicate of your master disc, transferring the disc layout
of the original disc to your CD-R, CD-RW, or DVD media. For example, a Disc-at-Once
source disc will copy as a Disc-at-Once, retaining the track and gap l ayo ut of the original
disc.
Note Some CDs and DVDs are created with copy-protection features and cannot be
copied.
▼ To make an exact copy of a disc:
1. Click Make an Exact Copy from the Main Menu.
Making an exact copy of a disc.
RecordNow Wizard automatica lly opens your disc drive.
2. Insert the disc you wish to make a copy of into the drive tray.
18 Using RecordNow

Making a Data Disc with RecordNow Wizard
Note If you wish to use a different disc drive to read your disc, click Change.
3. Click Next.
RecordNow Wizard will read the contents o f your d isc.
4. Insert a blank disc into your recorder and click Next.
RecordNow Wizard will create a copy of your master disc and inform you when the
process is complete.
5. If you wish to make another copy of the master disc at this time, remove the newly
recorded disc from your recorder and repl ace it with a blank, rewritable disc then
click Make Another.
6. Click Done when you are finished recording. Remove the discs from your drives and
store them in a safe place.
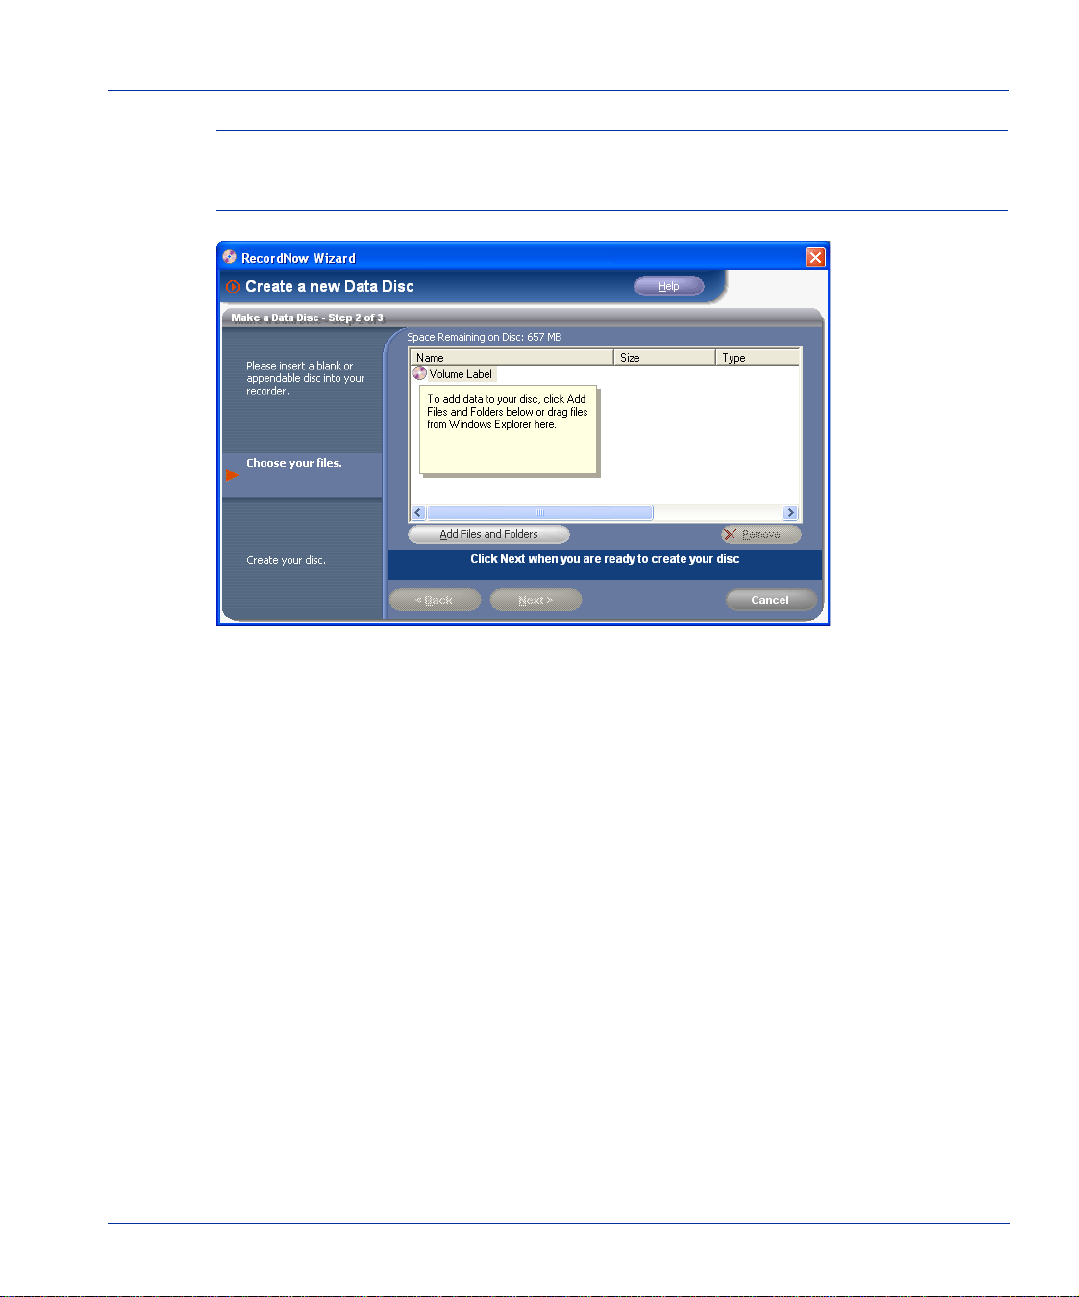
Making a Data Disc with RecordNow Wizard
Use the Data Disc recording feature to record data from your hard disk to either a CD or
DVD.
Chapter 3, Using the RecordNow Wizard 19
Making a Data Disc with RecordNow Wizard
▼ To create a data disc:
1. Click Make a Data Disc from the Main Menu.
Making a data disc.
RecordNow Wizard automatica lly opens your recorder drive.
2. Insert a blank or appendable disc into your recorder.
Note If you wish to use a different disc drive to read your disc, click Change.
20 Using RecordNow
Making a Data Disc with RecordNow Wizard
Caution Problems can occur when adding a file 4GB or larger to a disc that already
contains data. Always start with a blank DVD disc when copyin g fi les 4 GB or
larger.
Selecting files to copy to your disc.
3. Select the files you wish to copy to your disc by one of the foll owing methods:
- Click Add Files or Folders, highlight the files you want to copy, then click the
Add button.
- Drag and drop files or folders directly from Windows Explorer to the
RecordNow Wizard screen.
If you wish to remove any files from your list of files to record, highlight the file then
click Remove. Removing files from your copy job will not remove these files from
your hard drive.
If you would like to add a volume label to you r di sc, single click twice on the Volume
Label text next to the disc icon in the Create a new Data Disc window, then type a
new label for your disc.
4. Once you have selected the files to record, click Next. RecordNow Wizard begins
recording data to yo ur disc.
5. If you want another copy of your file list, remove the newly recorded disc, insert
another blank or appendable disc into your recorder, then click Make Another.
Chapter 3, Using the RecordNow Wizard 21
Making a Music Disc from Audio Files with RecordNow Wizard
6. Click Done when you are finished recording. Remove the discs from your drives and
store them in a safe place.
Making a Music Disc from Audio Files with
RecordNow Wizard
RecordNow Wizard easil y creates custom music discs from the WAV, MP3, and WMA files
on your hard drive. Plus, the CDDB feature can automatically tag your files with such
track inform ation as artist , album, and genre to h elp you sort through your collection.
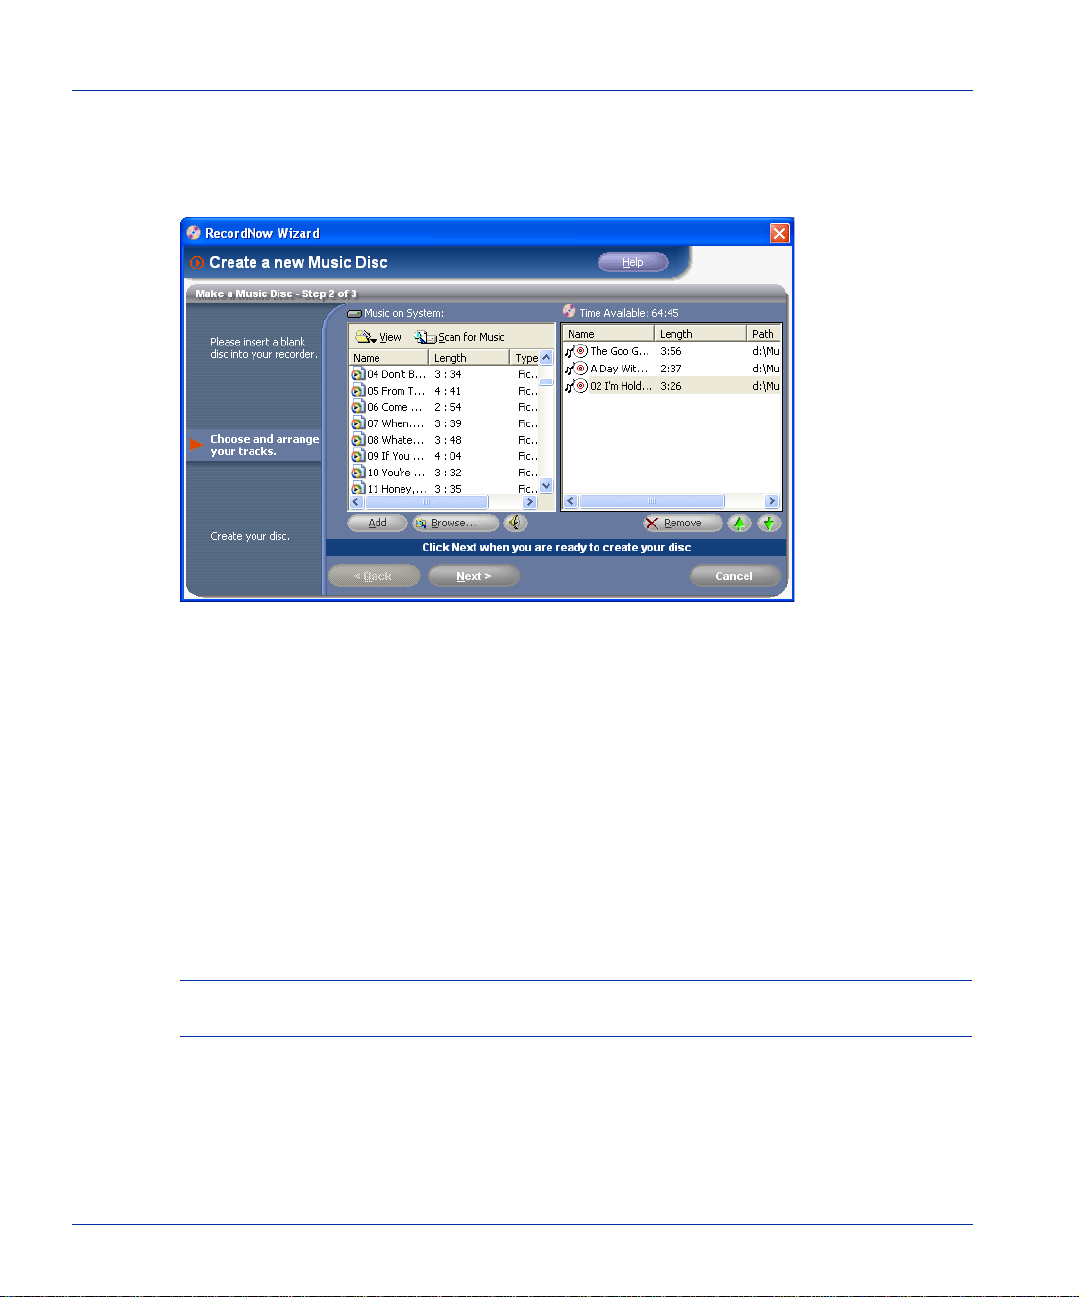
▼ To make a music disc from audio files:
1. Click Make a Music Disc from th e Main Menu.
Making a Music Disc.
22 Using RecordNow
Making a Music Disc from Audio Files with RecordNow Wizard
2. Click Make a Music Disc from Audio Files from the Main Menu.
Making a Music Disc from Audio Files.
RecordNow Wizard automatica lly opens your recorder drive.
Note If you wish to use a different disc drive to read your disc, click Change.
3. Insert a blank disc, then click Next.
4. Click Scan for Music to have RecordNow Wizard automatically search your hard drive
for valid music files.
Chapter 3, Using the RecordNow Wizard 23

Making a Music Disc from Audio Files with RecordNow Wizard
5. When RecordNow Wizard has located all of the valid music files on your system, you
can sort your music tracks by selecting a category from the View drop-down menu in
the Music on System section.
Sorting your music tracks.
6. Select the trac ks you want to add to your music disc using one of the following
methods:
- Select the tracks you want from the Music on Sy st em window and click the Add
button.
- Click the Browse... button, navigate to the tracks you wish to record, select them,
then click the Add button.
- Drag-and-drop tracks from the Music on System window on the left to the
playlist window on the right.
- Drag-and-drop tracks directly from Windows Explorer onto the
RecordNow Wizard playlist window.
Note Clicking Remove deletes the highlighted track from your list but does not affect
any files on your hard drive.
7. Arrange the order of the tracks in your playlist window by either:
- Selecting a track then using the green up or down arrows
or
- Selecting a track and dragging it to the new positi on.
24 Using RecordNow
Making a Music Disc from Other CDs with RecordNow Wizard
Tip You can rename any track in the playlist window by selecting the track and clicking
once on the track name (or pressing F2). You will then be able to type a new name. If
your CD recorder supports CD text, your tracks will show the new names.
8. Click Next to begin recording your tracks.
9. Once the disc has been created, if you would like to make another disc with the same
track list, replace the newly recorded CD with a blank disc then click Make Another.
10. Click Done when you are finished re cording. Remove the discs from your drives and
store them in a safe place.
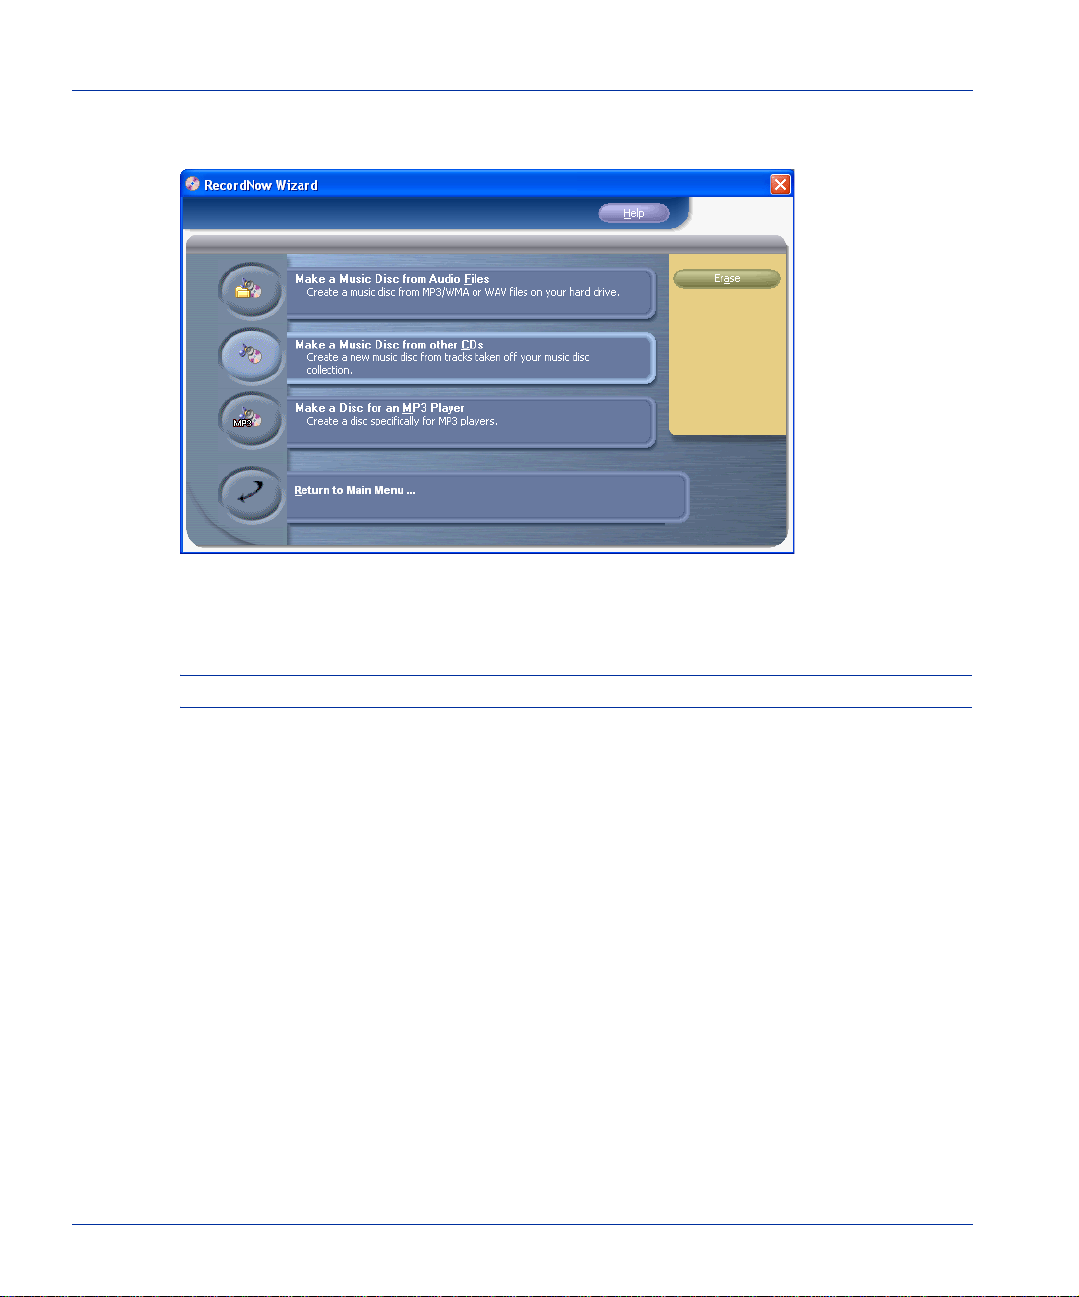
Making a Music Disc from Other CDs with
RecordNow Wizard
RecordNow Wizard can record tracks from various CDs in your collection to a single disc.
This is ideal for creating “Best Of” CDs.
▼ To make a music disc from existing CDs:
1. Click Make a Music Disc from the Main Menu.
Making a Music Disc.
2. Click Make a Music Disc from other CDs.
Chapter 3, Using the RecordNow Wizard 25
Making a Music Disc from Other CDs with RecordNow Wizard
RecordNow Wizard automatica lly opens your recorder drive.
Making a Music Disc from other CDs.
3. Insert the CD you wish to copy songs from then click Next.
Note If you wish to use a different disc drive to read your disc, click Change.
26 Using RecordNow
Making a Music Disc from Other CDs with RecordNow Wizard
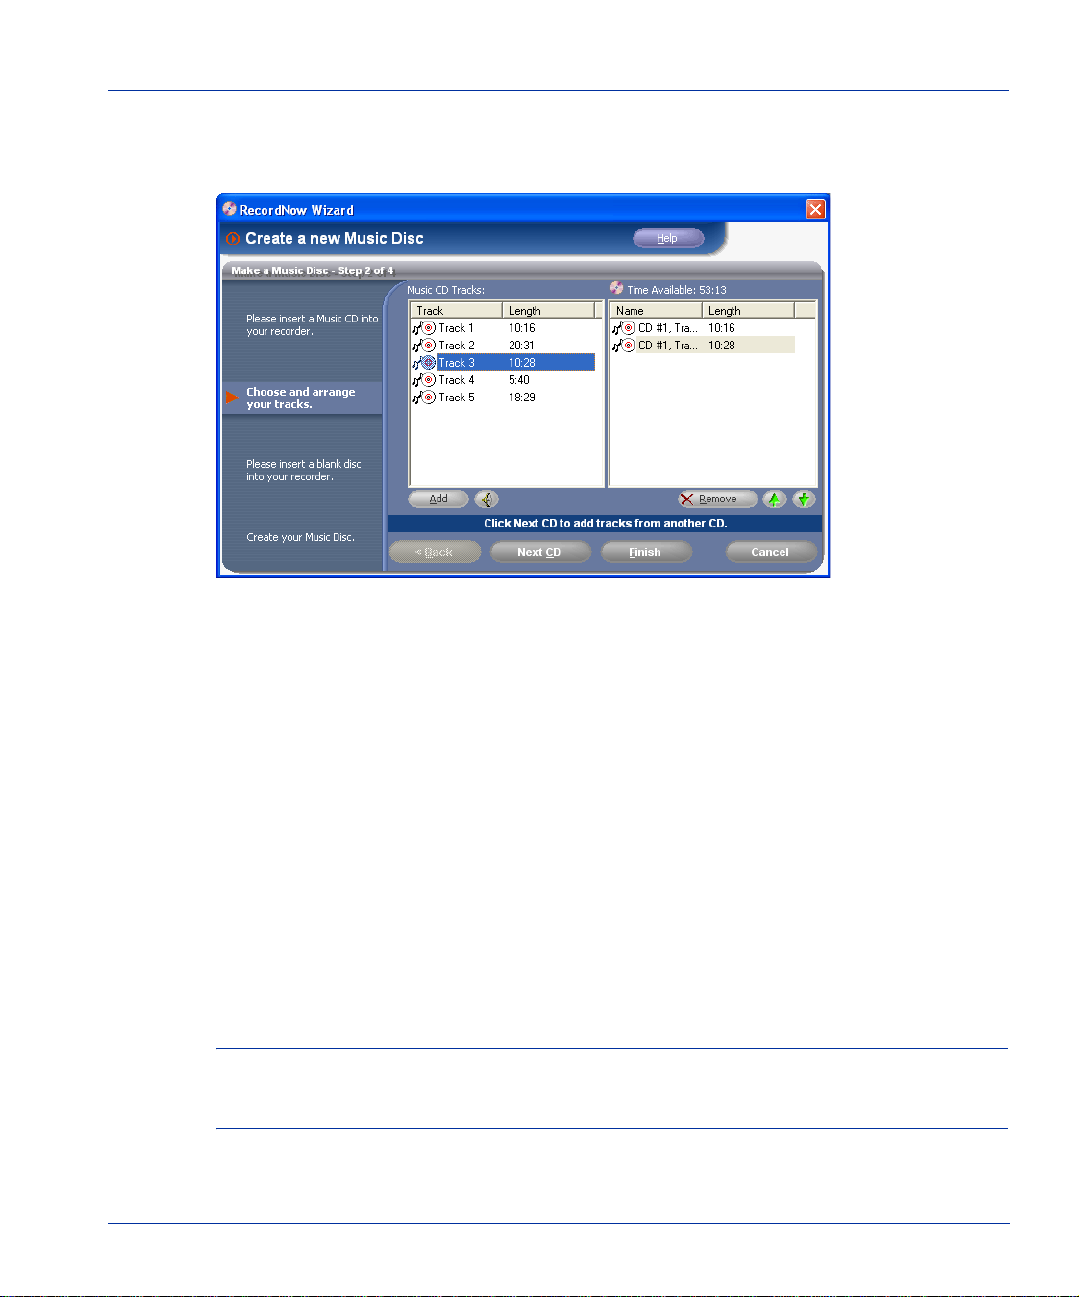
4. Add the track s you would like to copy to the disc by selecting them from the Music
CD Tracks window on the left, then clicking Add.
Arranging your music tracks.
The selected tracks appear in the playlist window on the right.
5. Click Next CD to add tracks from other CDs.
RecordNow Wizard prepare s your tracks and then prompts you to insert another CD.
6. Insert the next CD you wish to copy tracks from.
7. Repeat steps 4-6 until all the tracks you wish to copy are displayed in the playlist
window on the right.
8. Arrange the order of the tracks in your playlist window by either:
- Selecting a track then using the green up or down arrows
or
- Selecting a track and dragging it to the new positi on.
Tip You can rename any track in the playlist win dow by selecting the track, clicking
once on the track name (or pressing F2), then typing the new name. If your CD
recorder supports CD text, your tracks will show the new names.
9. Click the Finish button.
Chapter 3, Using the RecordNow Wizard 27
Making a Disc for an MP3 Player with RecordNow Wizard
RecordNow Wizard prepares your track list and then prompts you to insert a blank
disc.
10. Insert a blank disc and click Next.
RecordNow Wizard records your tracks to your blank disc.
11. If you would like to make another CD with the same track list remove the newly
recorded CD, replace it with a blank disc, then click Make Another.
12. Click Done when you are finished re cording. Remove the discs from your drives and
store them in a safe place.
Making a Disc for an MP3 Player with RecordNow Wizard
RecordNow Wizard can create a disc of your MP3 files that you can play on your MP3
player.
▼ To make a music disc for an MP3 player:
1. Click Make a Music Disc from the Main Menu.
Making a Music Disc.
2. Click Make a Disc for an MP3 player.
28 Using RecordNow

Making a Disc for an MP3 Player with Reco rdNow Wizard
RecordNow Wizard automatically opens your recorder drive.
Making a Music Disc for an MP3 Player.
Note If you wish to use a different disc drive to read your disc, click Change.
3. Insert a blank disc, then click Next.
4. Click Scan for Music to have RecordNow Wizard automatically search your hard drive
for valid music files.
Chapter 3, Using the RecordNow Wizard 29
Making a Disc for an MP3 Player with RecordNow Wizard
5. When RecordNow Wizard has located all of the valid music files on your system, you
can sort your music tracks by selecting a category from the View dr op-dow n menu, in
the Music on System section.
Sorting your music tracks.
6. Select the trac ks you want to add to your music disc using one of the following
methods:
- Select the tracks you want from the Music on Sy st em window and click the Add
button.
- Click the Browse... button, navigate to the tracks you wish to record, select them,
then click the Add button.
- Drag-and-drop tracks from the Music on System window on the left to the
playlist window on the right.
- Drag-and-drop tracks directly from Windows Explorer onto the
RecordNow Wizard playlist window.
Note Clicking Remove deletes the highlighted track from your list but does not affect
any files on your hard drive.
7. Arrange the order of the tracks in your playlist window by either:
- Highlighting a track then using the green up or down arrows
or
- Highlighting a track and dragging it to the new position.
30 Using RecordNow

Additional Features of RecordNow Wizard
8. Click Next to begin recording your tracks.
9. Once the disc has been created, if you would like to make another disc with the same
track list, replace the newly recorded CD with a blank disc then click Make Another.
10. Click Done when you are finished re cording. Remove the discs from your drives and
store them in a safe place.
Additional Features of RecordNow Wizard
Though the RecordNow Wizard is the easiest way to complete your disc recordings, you
can still control many aspects of how it handles your recording jobs.
Using the Erase Button
The Erase button on the main RecordNow Wizard screen provides an easy way to
completely remove all data from an erasable disc. Keep in mind that once a disc is erased,
the data that was on it cannot be recovered. You may wi sh to review the contents of your
discs before erasing them.
▼ To erase a disc:
❖ Insert an erasable disc int o your re corde r drive, and pr ess the Erase button. If the disc
cannot be erased, it will be automatically ejected and a message asking you to insert
another disc will be displayed on your computer screen.
CDDB
RecordNow Wizard’s CDDB feature gathers ar tist, album an d genr e informatio n about your
audio files. This can be helpful in sorting through your WAV, MP3, or WMA file collection
for your favorite songs or artists.
If RecordNow Wizard is configured to use CDDB, whenever RecordNow Wizard finds a new
or changed file, it will attempt to connect to CDDB via the Internet, to download
information relevant to your new music file(s). RecordNow Wizard then uses this
information to sort your collection by artist, album, or genre.
Since this database is constantly growing, every time you access CDDB, your files are
updated with the latest information for that track.
Chapter 3, Using the RecordNow Wizard 31

Additional Features of RecordNow Wizard
32 Using RecordNow

Using RecordNow
RecordNow offers a variety of ad vanced recording features that allow you total control
over your recording jobs. You can use the full-featured RecordNow application to create
data, audio, and MP3 discs, and exact copies of discs. However, RecordNow also lets you
create video, mixed-mode, and CD Extra discs. You will also find a wide variety of tools to
help you get the maximum performance from your recorder drive.
When you launch RecordNow, the RecordNow Wizard may automatically become the active
window — while the full-featured RecordNow program appears in the background. You
can use either application to perform your recording jobs, however; you must clos e the
RecordNow Wizard to begin using RecordNow.
You can customize the settings so that the RecordNow Wizard does not open automatically
when you open the RecordNow program.
▼ To hide the Rec ordNow W izard when the application begins:
1. From the Tools menu, click Options.
2. Click General from the panel list on the left.
3. Remove the check mark beside the Show the Wizard when the application begins
option, then click OK.
4
Tip To open the RecordNow Wizard from the full-featured application, click the Wizard
button on the toolbar.
▼ The following topics are included in this section:
◆ “Creating a Disc-to-Disc Copy with RecordNow” on page 37
◆ “Creating a Global-Image File with RecordNow” on page 39
◆ “Creating a Data Disc with RecordNow” on page 42
◆ “Creating an Audio Disc with RecordNow” on page 44
◆ “Creating a Video CD with RecordNow” on page 47
33

Recording with RecordNow
◆ “Creating a Mixed-Mode or CD Extra disc with RecordNow” on page 49
Recording with RecordNow
This section provides step-by-step instructions on performin g all of the recording
functions using RecordNow. For basic recording needs, you may wish to use the RecordNow
Wizard, which provides some, but not all, of the advanced recording options that the main
application offers (see “Using the RecordNow Wizard” on page 17 for more inform at i on).
Use the main application, not the RecordNow Wizard if you plan to use features such as
simultaneous recordings, DJ Burn, Video CDs, mixed mode CDs and bootable CDs.
The RecordNow Workspace
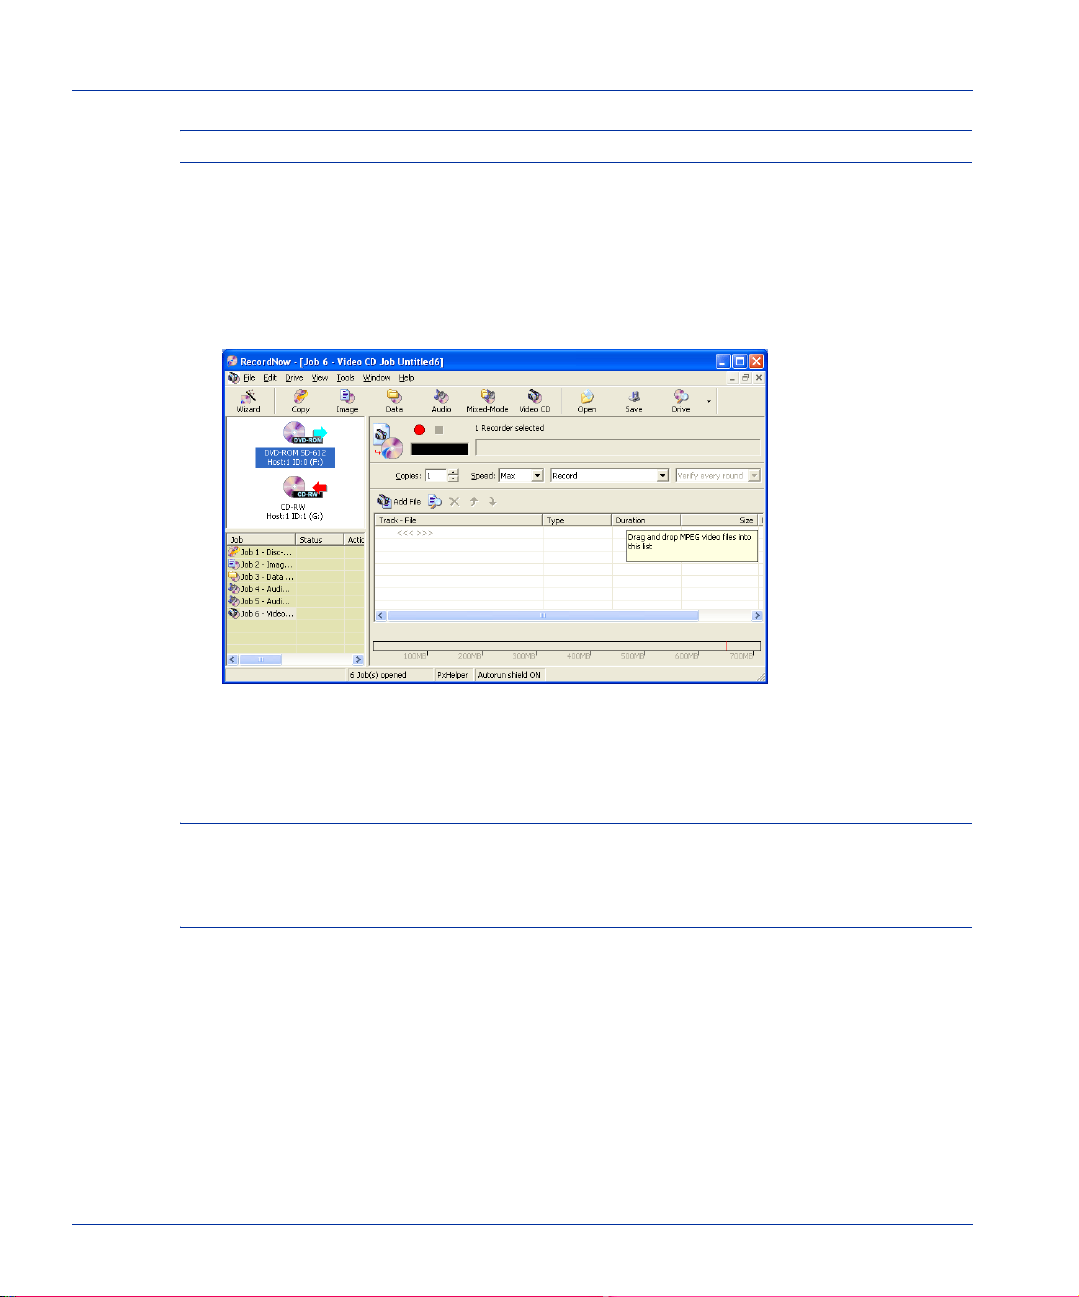
RecordNow’s basic workspace consists of five pane ls:
◆ Main menu — A typical program menu that provides easy access to most of
RecordNow’s tools and options.
◆ Toolbar — A series of shortcut buttons that let you create and save recording jobs or
launch the RecordNow Wizard without having to access the Main Menu.
◆ Drive Status panel — Lists information about your CD and DVD drives. Arrows
indicate the drives currently selected to read and record data.
◆ Job Setup panel — The appearance of this panel changes dependin g on the type of
recording selected. This is where you will add files and folders, adjust recording
options, and start your recordings using the red Record button.
34 Using RecordNow

Recording with RecordNow
◆ Job List panel — The name and status of all current jobs are listed. Click on a job name
to display its Job Setup panel.
Main menu
Toolbar
Drive Status panel
Job Setup panel
Job List panel
Drag this divider right to reveal more details about
your drives and Job List.
This illustration shows the five panels that make up the RecordNow workspace. The Job Setup
panel changes depending on the type of recording selected. This is the Job Setup panel for a Data
Job.
Chapter 4, Using RecordNow 35

Recording with RecordNow
Shortcuts
RecordNow has been designed to make it easy for you to access frequently used options
and features. Nearly all features can be accessed from the Main Menu. Recording Jobs can
be created and saved using the Toolbar. In addition, each Job Setup panel includes a
variety of shortcut buttons. The table below describes their functio ns . You can also
right-click on many of the program panels to bring up a menu of related shortcuts.
RecordNow Shortcut Buttons
Button Button function
Starts a recording
Stops a recording
Adds files to th e current job
Removes selected files from the current job
Adds files and folders to the current data job
Adds audio tracks to the current job
Moves a selected track up on the playlist
Moves a selected track down on the playlist
View the RecordNow Options dialog. See “Options”
on page 53 for a listing of program options.
36 Using RecordNow

RecordNow Shortcut Buttons
Button Button function
View Audio Options. See “Audio Job Recording
Options” on page 56 for a listing of audio job
options.
View Data Options. See “Data Job Record ing
Options” on page 54 for a listing of data job
options.
Search for files using the File Finder. See “The File
Finder” on page 75 for more information.
Add CD Text. See “CD Text” on page 46 for more
information.
Set the pre-gap for the selected audio file
Modify the directory structure on your disc. See
“Creating a Data Disc with RecordNow” on page 42
for more information about th is feat u r e.
Creating a Disc-to-Disc Copy with RecordNow
Creating a Disc-to-Disc Copy with RecordNow
This section explains how to make an exa c t copy of a disc retaining all the file format and
disc layout information of the original d isc. You can use either a CD-ROM or an unused
recorder drive for the master copy. If you do not want to copy directly, because a reliable
and fast reader drive is not available, or if you prefer to build an image file (complete with
disc geometry), please refer to “Creating a Global-Image File with RecordNow” on
page 39.
Chapter 4, Using RecordNow 37

Creating a Disc-to-Disc Copy with RecordNow
▼ To create an exact copy of a disc:
1. From the File menu, point to New Job, then click Disc-to-Disc Copy or click Copy
from the toolbar.
An untitled Disc-to-Disc Copy job appears in the Job Setup panel.
The Job Setup panel for a Disc-to-Disc Copy.
In the Drive Status panel, your read-only drive should automatically be set as a reader
(blue arrow pointing away from the icon) and your CD or DVD recorder should be set
as a recorder (red arrow pointing to it). To change these drive settings, select a drive
from the Drive Status panel, then click Select/Deselect as Reader from the Drive
menu.
2. Place the source disc to be copied into the reader drive.
3. Place a blank disc to be recorded into the recorder drive.
4. Select how many copies you would like to make of the source disc by typing the
number in the Copies text box.
5. Set the recorder speed by selecting an option from the Speed drop-down menu.
The default setting is Max, which uses the maximum speed your recorder will allow
for the current recording job.
6. Choose the type of recording operation you would like to perform, by selecting one of
the following options from the drop-down me nu:
38 Using RecordNow

Creating a Global-Image File with RecordN ow
- Test only — Performs a test run, but does not record.
- Test and if OK, Record — Performs a test run before actually recording, so that
you can troubleshoot any problems and not waste media. If no errors are found
during the test, RecordNow will begin recording your job.
- Record (default) — Records without testing or verification.
- Test, Record and Verify — First performs a test run, records, then verifies that
the contents of the disc is readable.
- Record and Verify — Records, then verifies that the contents of the disc is
readable.
- Only V eri fy — Only verifies that the contents of the disc will be readable once the
recording is complete.
Note Not a ll options are available for all drives or operating systems.
7. Select a verify option (i.e., Verify every 3 rounds) from the drop-down menu.
8. Place a check mark beside the Make a temporary image on the hard disk first
option if you want RecordNow to create a temporary image of your disc on your hard
drive and use that as your reading drive.
9. From the File menu, click Save to save the settings for your recording job, or click
Save from the toolbar.
10. Click Record from the File menu or click the Record button .
Creating a Global-Image File with RecordNow
RecordNow can create a Global-Image file of a disc and store that file on your hard disk. You
can then copy that image directly from your hard drive to your disc media. This is useful
when you need to make several copies of the same disc but do not want to read from the
source drive every time, or if you want to use your recorder to both read and write to your
discs.
By having the image file stored on your hard drive, you free up the source disc for other
uses. You can also send the image file across a network so other people can record their
own copies.
Chapter 4, Using RecordNow 39

Creating a Global-Image File with Reco rd Now
▼ To create a Global-Image file:
1. Insert the source disc into your reader drive.
2. From the Drive Status panel, select the drive containing your source disc. For
information on this panel, see “The RecordNow Workspace” on page 34.
3. From the Drive menu, click Disc Explorer and Drive Properties.
The Disc Explorer and Drive Properties dialog box appears.
Viewing the Disc Explorer and Drive Properties dialog box.
For information on the various options available on this dialog box, see “Disc
Explorer and Drive Properties” on page 76.
4. Click the Global-Image button.
5. In the Global-Image text box, type the full pathname describing where you want the
Global-Image file to reside. The pathname should include a file name of your choice.
Here’s an example of a pathname, where the image file has been named Music.gi:
C:\My Documents\My Music\New Songs\Music.gi
Or, click the browse button beside the text box to navigate to the desired destination.
Give the image file a name, and click Save.
6. The pathname and file name are now displayed in the Disc Explorer and Drive
Properties dialog box. Click Build.
40 Using RecordNow

Creating a Global-Image File with RecordN ow
The progress status bar will display the status of the Global-Image file creation. When
the operation is complete, RecordNow will inform you whether or not the operation
was successful.
▼ To record an existing Global-Image file:
1. From the File menu, point to New Job, then click Global-Image or Other Image or
click the Image button in the toolba r.
A Global-Image job appears in the Job Setup panel.
Creating a Global-Image job.
2. Select the drive(s) you want to use to record your disc(s) from the Drive Status panel,
then click Select/Deselect as Recorder from the Drive menu. A red arrow next to
the drive indicates it is selected as a recording drive.
3. Type the full pathname of the image file you wish to copy into the Disc Image file text
box, or click the Add File button to navigate to the file.
Tip You can also use the File Finder fea ture to locate all the image files on your
computer. Click Ad d with File Finder fr om the Edit menu. For more information on
this option, see “The File Finder” on page 75.
4. Set the recording option s in the job setup window:
- Number of copies
- Recorder speed
- Recording options (Record, Test Only; Test and if OK, Record; etc.)
Chapter 4, Using RecordNow 41

Creating a Data Disc with RecordNow
- Verify options (i.e. Verify every 3 rounds)
Note Not a ll options are available for all drives or operating systems.
5. From the File m enu, click Save to save the settings for your recording job, or click
Save from the toolbar.
6. Click Record from the File menu or click the Record button .
Creating a Data Disc with RecordNow
RecordNow can create a disc from the data on your hard drive. Use this feature to archive
important files or transport data to other computers.
For information on some of the advanced data disc features, see “Data Job Recording
Options” on page 54.
▼ To create a data disc using RecordNow:
1. From the File menu, point to New Job, then click Data Disc or click the Data button
on the toolbar.
An untitled data disc job appears in the Job Setup panel.
Creating a Data Disc job.
2. From the Edit menu, click Add Files and Folders... to navigate to the files or folders
you want to copy. Select the files or folders you would like to add to your data disc,
then click Add.
42 Using RecordNow

Creating a Data Disc with RecordNow
Tip You can also drag-and-drop files directly from My Computer or Windows Explorer
onto the Files and Folders list of your data recording job.
The files and folders are listed in the Job Setup panel. Along with the file and folder
names, your Data Job will also list the following information in the column headings:
- Source — Displays the path of the selected file or folder.
- Folders — Displays the number of folders within the selected folder.
- Files — Displays the number of files included with in the selected object.
- Size on Disc — Displays the amount of space each selected object will occupy on
the media.
Below the list box, RecordNow will also list a job summary, including the total amount
of space your data will occupy on the media.
3. If you would lik e to change the destination location of a file or folder in the Job Setup
panel, double-click the file or folder.
The Modify Destination on Disc dialog box appears.
Modifying the destina tion on the disc.
4. Change the settings within the Modify Destination on Disc dialog box if you would like
to specify an alternate directory struc ture on your data disc:
- Click the \ (root) button to record files or folders to the root directory of the
media.
- Click Partial Path to record files or folders to a shortened path, relative to the
original directory structure.
- Click Original Full Path to record files or folders with the same relative directory
structure as it exists on the hard drive.
5. Click OK.
Chapter 4, Using RecordNow 43

Creating an Audio Disc with RecordNow
6. You can modify the type of data disc you want to record, although the default settings
will satisfy most mastering needs. Select Recording Options from the Edit menu to
make all appropriate changes or click the Options button on the Job Setup panel. See
“Data Job Recording Options” on page 54 for more information on this.
7. Select the drive(s) you want to use to record your disc(s) from the Drive Status panel,
then click Select/Deselect as Recorder from the Drive menu. A red arrow next to
the drive indicates it is selected as a recording drive.
8. Set the recording options in th e Job Setup panel:
- Number of copies
- Recorder speed
- Recording options (Test Only; Test and if OK, Record; Record and Verify, etc.)
- Verify options (i.e., Verify every 3 rounds)
- Volume label (optional)
- Multi-session setting
9. Click Recording Options from the Edit menu if you would like to modify the default
settings for your data recording job. See “Data Job Recor ding Options” on page 54 for
information on modifyin g your recording options for creating a data disc.
10. Fr om the File menu, click Save to save the settings for your recording job.
11. Click Record from the File menu or click the Record button .
Creating an Audio Disc with RecordNow
This section explains how to use RecordNow to create audio discs from the files located on
your hard drive. If you would like to create a disc playable on an MP3 player, see “Making
a Disc for an MP3 Player with RecordNow Wizard” on page 28 for instructions.
44 Using RecordNow

Creating an Audio Disc with RecordNow
▼ To create an audio disc using RecordNow:
1. From the File menu, point to New Job, then click Audio Disc or click the Audio
button on the toolbar.
An untitled audio job appears in the Job Setup panel.
Creating an Audio Disc Job.
2. From the Edit menu, click Add Audio Track, or click Add Track from CD... if the
track you would like to record is currently on an audio CD.
Tip You can also drag-and-drop appropriately formatted audio files directly from My
Computer or Windows Explorer onto the Track - File list of your recording job.
(WAV and MP3 must be recorded as 16 bit stereo files using a 22 or 44.1KHz
sampling rate. WMA files must be recorded using a 44.1 KHz sampling rate.)
The files and folders are listed in the Job Setup panel. Along with the file and folder
names, your audio job will also list the following information in the column headings:
- Track/File name — Displays the path and track name of the selected file.
- Type — Displays the type of audio file selected for recording.
- Pre-gap — Displays the am ount of silence time between tracks.
- Start — Displays the time at which the track on the disc will begin pla ying.
- Length — Displays the length of time (minutes:seconds) the track will play for.
- ISRC — Displays a unique code for the audio disc (International Standard
Recording Code).
- Path — Displays the origina l location of each file in your audio job.
Chapter 4, Using RecordNow 45

Creating an Audio Disc with RecordNow
Below the list box, RecordNow will also list a job summary, including the total amount
of space your data will occupy on the media.
3. Adjust the order of your playlist by selecting a track and using the up and down
arrow buttons ( , ).
4. Select the drive(s) you want to use to record your disc(s) from the Drive Status panel,
then click Select/Deselect as Recorder from the Drive menu. A red arrow next to
the drive indicates it is selected as a recording drive.
5. Set the recording option s in the job setup window:
- Number of copies
- Recorder speed
- Recording options (Record; Test only; Test and if OK, Record; etc.)
- Verify options (i.e., Verify every 3 rounds)
Note Not a ll options are available for all drives or operating systems.
6. Click Recording Options from the Edit menu if you would like to modify the default
settings for your audio recording job. See “Audio Job Recording Options” on page 56
for information on modifying your recording options for creating an audio disc.
7. From the File m enu, click Save to save the settings for your recording job.
8. Click Record from the File menu or click the Record button .
CD Text
CD Text allows you to enter the names of songs, performers, and composers for each track
recorded in y our Audio Disc Job.
During playback on a compatible player, this information will be displayed instead of the
usual “Track 1, Track 2”, etc.
Note To use CD Text, your CD recorder must support this function.
46 Using RecordNow

Creating a Video CD with RecordNow
▼ To find out if your drive supports CD Tex t:
1. Select Disc Explorer and Drive Proper t ies from the Drive menu.
2. Choose a recorder drive from the drop-down list on the Disc Explorer and Drive
Properties dialog box .
If the recorder can write CD Text, the words CD Text read/write will appear in the top
section of the window.
Adding CD Text
Discs recorded with CD Text will only display CD Text information when played back in
players that display the CD Text logo. The audio will play on a non-CD Text player, but
the CD Text information will not be displayed.
▼ To add CD Text:
1. Make sure your Audio Disc job is open and is the active window in the Job Setup
panel.
2. Click CD Text Information... from the Edit menu.
3. Select the disc or track yo u want to add CD Text to, then click the Edit button.
4. Type the disc or track information in the appropriate text boxes (Title and Performer
information is required).
5. If you want this information to be used for all the tracks, click the appropriate
checkboxes.
6. Click OK.
7. Repeat these steps, if necessary, for each track in the compilation.
Creating a Video CD with RecordNow
RecordNow can create a video disc from correctly formatted video files. These video discs
will be playab le in your appropriat e DVD or Video CD players.
A video DVD is made using a data disc job. Add your mastered video files and the
AUDIO_TS and VIDEO_TS folders to the data disc job and create as normal. See
“Creating a Data Disc with RecordNow” on page 42 for more information.
Chapter 4, Using RecordNow 47
Creating a Video CD with RecordNow
Note This feature may not be available in all versions of this product.
▼ To create a video CD using RecordNow:
1. From the File menu, point to New Job, then click Video CD or click the Video CD
button in the toolbar.
An untitled video job appears in the Job Setup panel.
Creating a Video CD Jo b.
2. From the Edit menu, click Add File, navigate to the file(s) you want to record, then
click Open.
Tip You can also drag-and-drop appropriately formatted video files directly from My
Computer or Windows Explorer onto the Track - File list of your recording job.
RecordNow supports NTSC or PAL MPEG files formatted to the Video CD
specification.
The files and folders are listed in the Job Setup panel. Along with the file and folder
names, your video job will also list the following information in the column headings:
- Track/File name — Lists the path and track name of the selected file.
- Type — Lists the type of audio file selected for recording.
- Duration — Lists the length of time required to play the selected file.
- Size — Lists the size of the selected file.
- Path — Displays the origina l location of each file in your audio job.
48 Using RecordNow

Creating a Mixed-Mode or CD Extra disc with RecordNow
Below the list box, RecordNow will also list a job summary, including the total amount
of space your data will occupy on the media.
3. Adjust the order of your playlist by selecting a track and using the up and down
arrow buttons ( , ).
4. Select the drive(s) you want to use to record your disc(s) from the Drive Status panel,
then click Select/Deselect as Recorder from the Drive menu. A red arrow next to
the drive indicates it is selected as a recording drive.
5. Set the recording option s in the job setup window:
- Number of copies
- Recorder speed
- Recording options (Record; Test Only; Test and if OK, Record; etc.)
- Verify options (i.e. Verify every 3 rounds)
Note Not a ll options are available for all drives or operating systems.
6. From the File menu, click Save to save the settings for your recording job.
7. Click Record from the File menu or click the Record button .
Creating a Mixed-Mode or CD Extra disc with RecordNow
RecordNow offers the ability to record both audio files and data files to the same disc. You
can create a mixed-mode disc which contains a data session followed by an audio session.
This type of disc is useful when you want to have a data disc that contains playable audio
files—a game with sound files, for example.
You can also create a CD Extra (also called Enhanced CD) which is a special audio disc
containing an audio session followed by a data session. This type of disc is useful when
you want a regular music disc that also contains data files—a video of the music artist, for
example. When you insert the disc on a consumer audio player it plays the audio tracks
without seeing the data in the second session. Or, if you put the disc on a computer, its
CD-ROM detects the second session and defaults there, reading the data as it normally
would.
Chapter 4, Using RecordNow 49

Creating a Mixed-Mode or CD Extra disc with RecordNow
▼ To create a mixed-mode or CD Extra disc:
1. From the File m enu, point to New Job, then click Mixed-mode or CD Extra.
An untitled mixed-mode or CD Extra job appears in the Job Setup panel.
Creating a Mixed-mode or CD Extra Job.
2. From the Type drop-down menu, select either Classic Mixed-mode or CD Extra.
The recording job’s setup changes accordingly. The data disc job section appears on
top when Mixed-mode is selected, and the audio disc job section appears on top
when CD Extra is selected.
Caution Although a mixed-mode disc will play on a consumer audio player, playing the
data track could damage your speakers. Create a CD Extra disc if you want to
play the disc on your home or car stereo.
3. Click Add File and Folders... from the Edit menu to select the data items you would
like to record to your media.
The files and folders appear in the data disc job portion of the Mixed-mode or
CD-Extra recording job.
4. Click Add Audio Track... from the Edit menu to select the audio tracks you would
like to record to your media.
50 Using RecordNow

Creating a Mixed-Mode or CD Extra disc with RecordNow
The audio tracks appear in the audio disc job portion of the Mixed-m ode or CD- Extra
recording job.
Tip You can also drag-and-drop files directly from My Computer or Windows Explorer
onto the Audio Tracks or Files and Folders lists of your recording job.
Below the list box, RecordNow will also list a job summary, including the total amount
of space your data will occupy on the media.
5. Adjust the order of your audio tracks playlist in the audio disc job section by selecting
a track and using the up and down arrow buttons ( , ).
6. Select the drive(s) you want to use to record your disc(s) from the Drive Status panel,
then click Select/Deselect as Recorder from the Drive menu. A red arrow next to
the drive indicates it is selected as a recording drive.
7. Set the recording option s in the job setup window:
- Number of copies
- Recorder speed
- Recording options (Record, Test only, Test and if OK, Record, etc.)
- Verify options (i.e. Verify every 3 rounds)
- Volume label (optional)
Note Not a ll options are available for all drives or operating systems.
8. Make sure you have selected the correct disc type (Classic Mixed-mode or CD Extra)
from the Type drop-down menu.
9. Point to Recording Options on the Edit menu and then click on Data Options... or
Audio Options... if you would like to modify the default settings for your
Mixed-mode or CD Extra r ecor di ng job. Se e “ Data Job Re cor din g Opti ons ” on page 54
or “Audio Job Recording Options” on page 56 for information on modifying your
recording options.
10. From the File menu, click Save to save the settings for your recording job.
11. Click Record from the File menu or click the Record button .
Chapter 4, Using RecordNow 51

Creating a Mixed-Mode or CD Extra disc with RecordNow
52 Using RecordNow

Options
RecordNow can be customized to meet your most demanding needs. This chapter
describes options that will help you work as efficiently as possible.
The settings for most program options can be found in one of two locations:
◆ Select Recording Options... from the Edit menu to customize settings for data,
music, image, and mixed-mode jobs. For more information, see “Recording
Options...” on page 53.
or
◆ Select Options... from the Tools menu to access a wide range of preference settings.
For more information, see “RecordNow Options Dialog” on page 58.
Recording Options...
Each type of recording job has options you can control by selecting Recording Options...
from the Edit menu. The default settings are usually fine for most recording jobs. In some
cases, RecordNow automatically selects the settin gs that are most appropriate for your
media, drive, or recording job.
If Recording Options... is selected while a data job is open, you will be presented with
options suitable for a d ata job. If Recording Options... is selected while an audio job is
open, you will be presented with options suitable for a audio job. If Recording Options...
is selected while a mixed-mode or CD Extra job is open, you will be able to choose either
data or audio options.
5
Tip Recording Options... can also be reached by clicking the Options button found on
most job setup panels.
53

Recording Options...
Data Job Recording Options
▼ To customize recording options for a data disc job:
1. Open a data disc, mixed-mode, or CD Extra recording job (see “Creating a Data Disc
with RecordNow” on page 42 or “Creating a Mixed-Mode or CD Extra disc with
RecordNow” on page 49 for information).
2. From the Edit menu, click Recording Options... . If necessary, select Data from the
submenu.
The Data Job Options d ialog box appears.
The Data Job Options dialog box.
Select from the following options:
◆ Pre-mastering Cache — If the project is going to contain thousands of small files,
then it's a good idea to have a cache enabled. The default is to cache files smaller than
16KB. You can choose No Cache, Cache all files or Cache files smaller than..., in
which case you can determine what size files you will cache. Generally, if there are
going to be thousands of small files (und er 1 kil obyte), set it to Cache files smaller
than 1KB.
◆ File Date and Time — Displays the original date and time the files and folders in
your project were created, or sets all the dates and times to be the same.
◆ When loading a track, if a file exists, substitute only if newer — With this option
selected, RecordNow will replace an existing older file of the sa me name.
54 Using RecordNow

Recording Options...
◆ Recording Type — RecordNow supports all major recording modes, but not all disc
recorders will support these options. The default is Track-at-Once (TAO), Not
Closed which creates a Multisession, appendable disc. If you wi sh to make a Single
Session Disc, select Disc-at-Once Closed or Track-at-Once Closed if your drive
does not support Disc-at-Once.
- Single Session means that the disc is recorded to just once and is then “closed.”
No additional files can be added after the disc is closed.
- Files can be added to Multisession disc s until the disc is full. By default, the Load
last track option is selected in the Job Setup Panel, which means the disc is
“appended” so that all the sessions that have been recorded are seen as one
logical disc by Windows. When you view or explore a multisession disc that has
been appended, you will see all the files and folders that have been added to the
disc. You can choose the New Volume option if you only want the data recorded
in the most recent session.
◆ Mode — RecordNow can record in standard Mode1 or Mode2 XA. Mode1 is used in
almost every circumstance except advanced format discs such as CD Extra or Video
CD. Unless you're sure you want to make a Mode2 disc, it’s best to leave this setting
alone.
◆ CD File System types — The default setting is Microsoft Joliet. If you are going to
be making a disc that will be played back within Windows, you do not need to change
this setting.
- Microsoft Joliet has been used since Windows 95. This system can handle file
names up to 106 characters.
- Choose ISO Level 1 if you want to make a disc readable on a Macintosh
computer. Keep in mind that this won't make a Windows application run in a
Macintosh environment, but the files/folders will be readable.
- Use ISO Level 2 or ISO Level 2 Long only if you are familiar with these file
system types.
- UDF is the file system most commonly used for DVDs.
◆ DVD File System types — The default setting is UDF with Joliet. If you are going to
make a disc that will be played back within Windows, you do not need to change this
setting.
◆ Publisher ID — Type your name/company name, etc. in this text box (optional).
◆ Data Preparer — Type your name/compan y na me, etc. in this text box (optional).
◆ Application ID — Type your Application ID, etc. in this text box (optional).
◆ Bootable CD (CD Only) — Allows you to create a bootable CD. (This option is only
available for data disc and mixed-mode CDs.)
Chapter 5, Options 55

Recording Options...
- Choose Boot floppy to create a bootable CD from an existing boot image on a
- Choose Boot image to locate the boot image files required to create a Bootable
Note The bootable CD option must be supported in both the system’s BIOS and the
3. Click OK to sa ve the current settings.
Audio Job Recording Options
▼ To customize recording options for an audio disc or mixed-mode job:
1. Open an audio disc or mixed-mode job (see “Creating an Audio Disc with
RecordNow” on page 44 for information).
2. From the Edit menu, click Recording Options... . If necessary, select Audio from the
submenu.
floppy disk.
CD. Choose Create Image... if you would like to first create the boot image files
on a floppy disk.
drive into which the CD is inserted. For informatio n on bootable CD support,
contact your BIOS manufacturer and drive vendor.
The Audio Job Options dialog box appears.
The Audio Job Options dialog box.
Select from the following options:
◆ Recording Type — RecordNow supports all major recording modes, but not all CD
recorders will support these options. The default is Disc-at-Once (DAO), Closed.
◆ UPC — (Universal Product Code) Type the UPC, or bar code number for the disc you
are creating in the UPC text box.
- Pre-Emphasis — Raises the recording level of higher audio frequencies as part of
a noise reduction technique.
56 Using RecordNow

Recording Options...
◆ Normalization — This option sets the volume of tracks in an audio job to a consistent
level. The level is set by selecting the Enable Normalization checkbox and moving
the slider left or right. A setting of 90 percent, for example, sets the volume of all
tracks in the current recording to 90 percent of the loudest track. Normalization is
turned off by default.
3. Click OK to sa ve the current settings.
Disc Image Job Recording Options
Recording Options are available for image types (ISO images, for example) that require
special formatting to be successfully recorded. These options are not needed to record
Global Images files, which conta in all the required formatting information within the
image.
▼ To customize recording options for an image disc job:
1. Open an image disc job (see “Creating an Audio Disc with RecordNow” on page 44
for information).
2. From the Edit menu, click Recording Options.
The Disck Image Options dialog box appears.
The Disc Image Options dialog box.
Note If Recording Options is dimmed in the Edit menu, these options are not available
for the type of image file you are recording.
Select from the following opt ions:
◆ Recording Type — The default is Disc-at-Once (DAO), Closed.
◆ Mode — RecordNow automatically selects the most appropriate mode for your image
file. If the recording fails, you may wish to select a different mode from the
drop-down me n u.
◆ Check for Post-Gap and add 150 zeroed blocks if needed — A two-seco nd gap is
required between some data files. RecordNow will automatically add th is gap, if
necessary, when this option is selected.
Chapter 5, Options 57

RecordNow Options Dialog
3. Click OK to sa ve the current settings.
RecordNow Options Dialog
The RecordNow Options dialog allows you to customize program settings to help you work
as efficiently as possible.
▼ To open the Options dialog box:
❖ From the Tools menu, click Options.
The RecordNow options dialog box appears, containing the following panels:
◆ “General Panel” on page 58
◆ “View Panel” on page 60
◆ “Data Disc Panel” on page 61
◆ “Audio Disc Panel” on page63
◆ “Temporary Panel” on page 64
◆ “Blank Size Pa nel” on page 65
◆ “Job/Round Panel” on page67
◆ “Advanced Panel” on page 68
◆ “Wizard Panel” on page 70
◆ “CDDB Panel” on page 72
▼ To display an option panel:
❖ Select one of the panels listed on the left side of the Options dialog box.
General Panel
Use the General panel to tell RecordNow to use the same settings as your last recording
job, select Recorder and Reader options, and specify whether or not you would like the
RecordNow Wizard to appear when you start the application.
▼ To open the General panel:
1. From the Tools menu, click Options.
2. Select General from the panel list on the left.
58 Using RecordNow

The General panel appears.
The General Panel of the Options dialog.
RecordNow Options Dialog
Select from the following opt ions:
◆ Defaults Creating a New Job
- Remember settings from the last time you started a job — Place a check mark
in this box to use the settings from your last recording job. Remove the check
mark to manually select the default settings for the following options:
- Maximum speed of the recorder
- Recording options (e.g., Test and Record, Record only, Test only, etc.)
- Verification frequency
- Always select similar Recorders and last selected Reader — This setting is
helpful when using multiple recorders and readers.
- Re-select the last selected Recorder and Reader — This option automatically
selects the recorder and reader used during the last recording job.
- Do not select any Recorder or Reader — Thi s option allows you to manually
select the recorder and reader you wish to use for your recording job.
◆ Test reading speed before copying directly from a disc — This option
automatically tests your recorder speed to help avoid buffer underrun errors.
◆ Play sounds — This option causes sounds to occur during v arious stages of the job
setup and recording process.
Chapter 5, Options 59
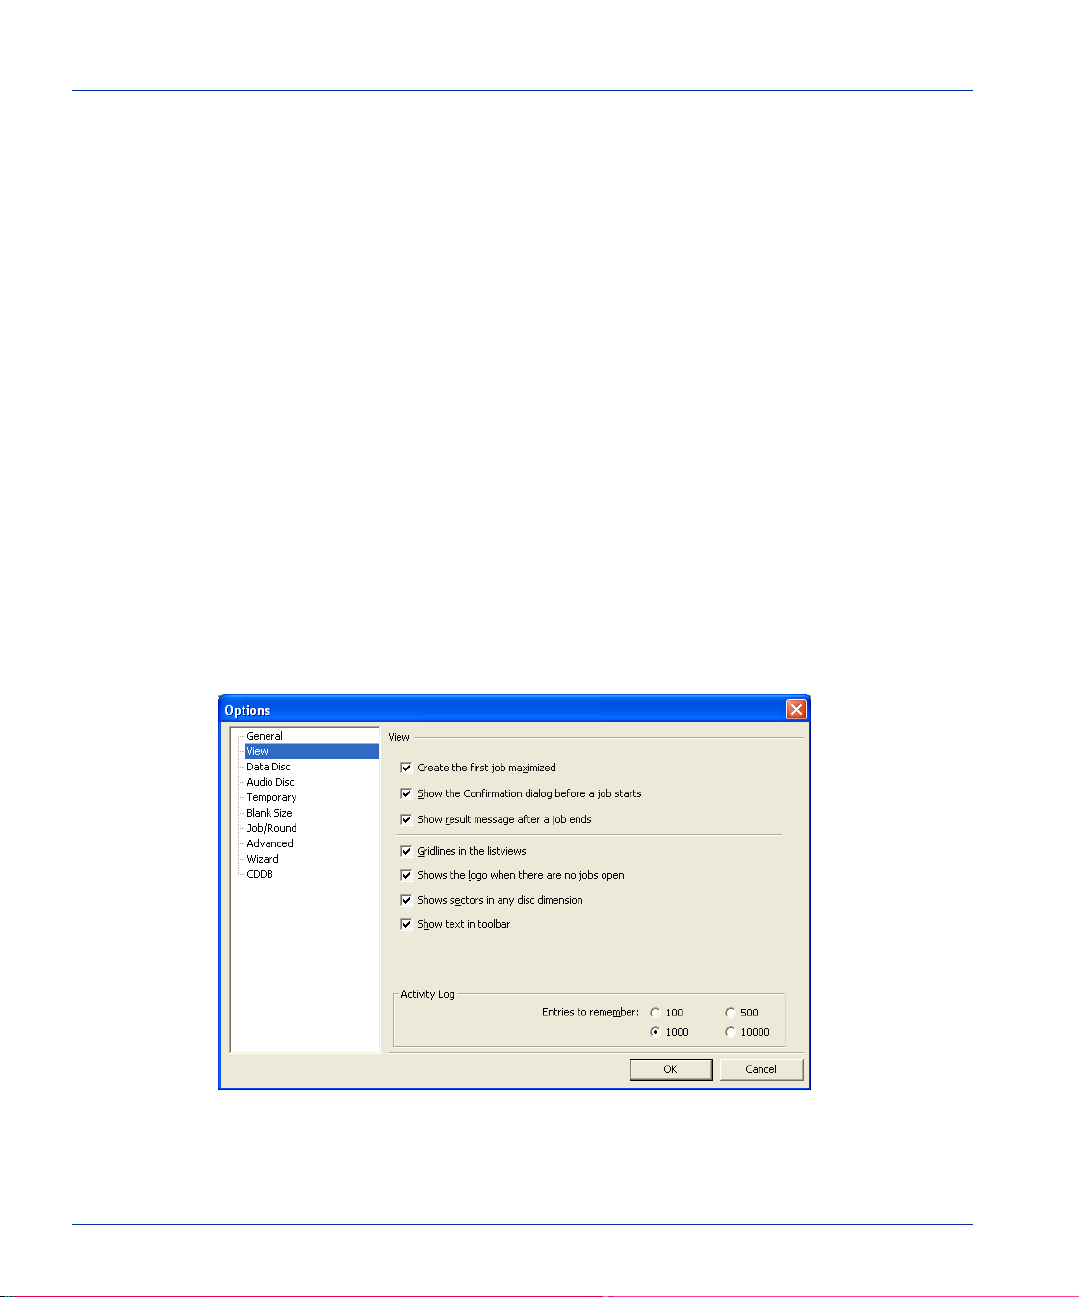
RecordNow Options Dialog
◆ Autorun shield (Disable Auto Insert Notification when this application is open)
— This option prevents other applications from automatically launching when music
and video discs are placed in your recorder.
◆ Show the Wizard when the application begins — Place a check mark in this box to
open directly to the RecordNow Wizard on startup. Remove the check mark to open
directly to the full-featured application.
3. Click OK.
View Panel
Use the View panel to control the appearance of your recording jobs, dialogs, result
messages, and the text that appears on the RecordNow to olbar buttons. The View panel
also allows you to change the number of items that will be displayed in the Activity L og.
▼ To open the View panel:
1. From the Tools menu, click Options.
2. Select View from the panel list on the left.
The View panel appears.
The View Panel of the Options dialog.
60 Using RecordNow

RecordNow Options Dialog
Select from the following opt ions:
◆ Create the first job maximized — Maximize s a new recording job’s window in the
Job Setup panel.
◆ Show the Confirmation dialog before a job starts — Displays a dialog before a job
starts, asking you to confirm that yo u would like to begin recording.
◆ Show result message after a job ends — Displays results of your recording job,
such as whether or not the recording job completed successfully, and any errors that
may have occurred.
◆ Gridlines in the listviews — Displays vertical and horizontal lines to separate items
in the Job Setup panel and Job Status panel.
◆ Shows the logo when there are no jobs open — Displays the RecordNow logo in the
Job Setup panel when no recording jobs are open.
◆ Shows sectors in any disc dimension — Displays sector information when viewing
the Disc Explorer and Drive Properties dialog for an audio CD. The sectors appear in
parentheses under the Start and Length column headings.
◆ Show text in toolbar — Displays text for the buttons on the RecordNow toolbar.
◆ Activity Log — Sets the maximum nu mber of entri es that appear when you open the
Activity Log from the View menu.
3. Click OK.
Data Disc Panel
Use the Data Disc panel to change the settings for file and folder paths on the data disc,
and to specify how you would like RecordNow to handle certain files and folders.
▼ To open the Data Disc panel:
1. From the Tools menu, click Options.
2. Select Data Disc from the panel list on the left.
Chapter 5, Options 61
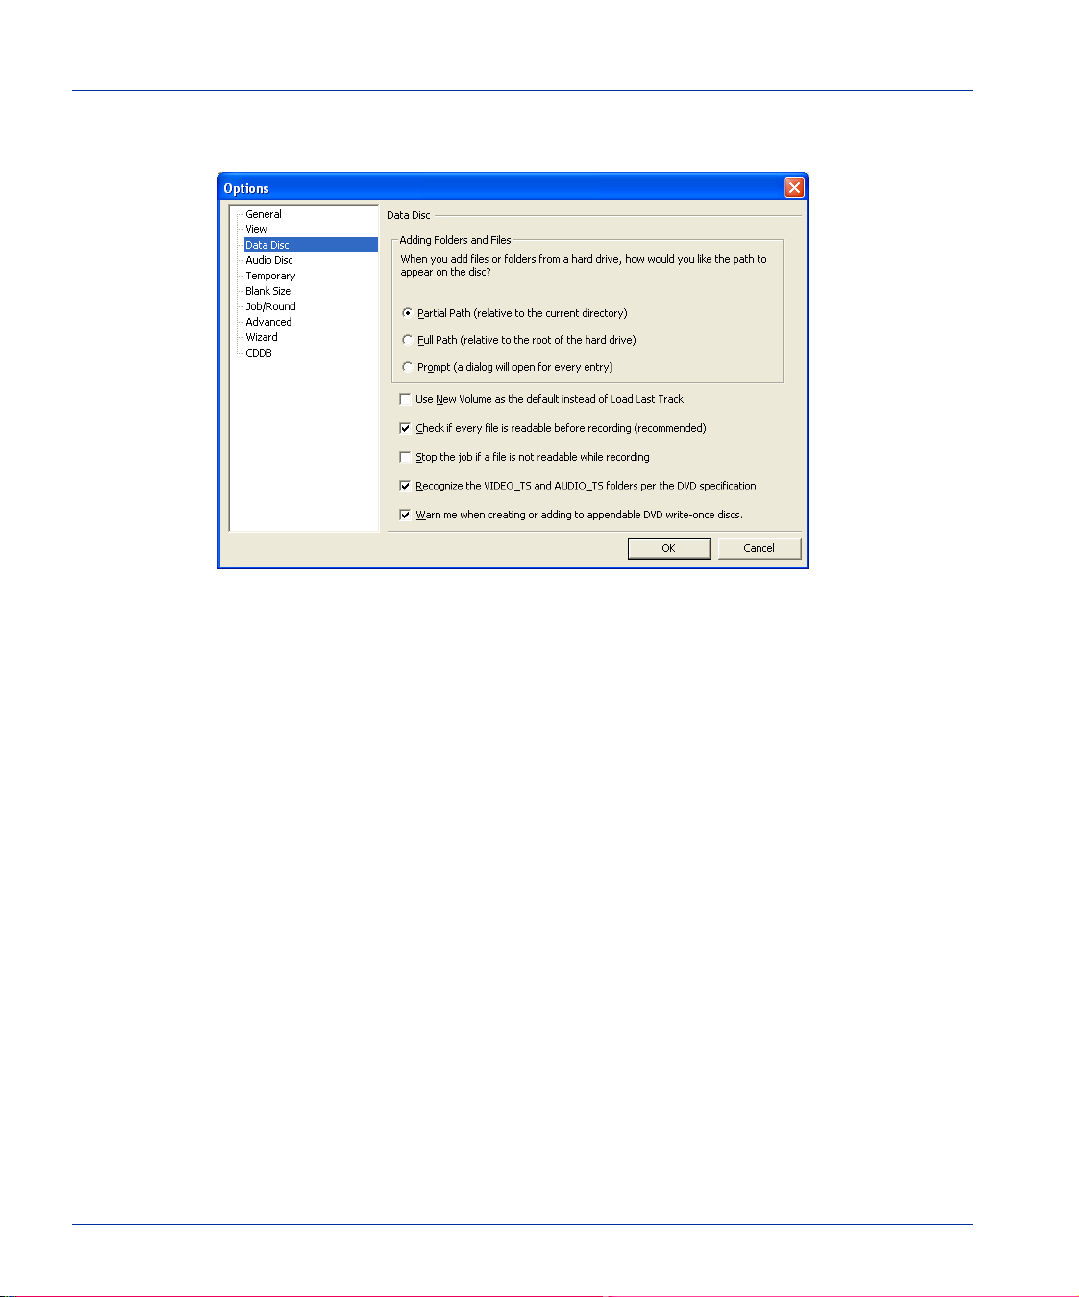
RecordNow Options Dialog
The Data Disc panel appears.
The Data Disc Panel of the Options dialog.
Select from the following options:
◆ Adding Folders and Files
- Partial Path (relative to the current directory) — Folders are recorded with a
shortened directory structure. In dividual fil es are recorded without any directory
structure.
- Full Path (relative to the root of th e hard drive) — Files and folders are
recorded with the full directory structure that exists on the hard drive.
- Prompt (a dialog will open for every entry) — Displays a dialog asking you to
select an option for the directory path you would like to record to the media.
◆ Use New Volume as the default instead of Load Last Track — By default, the Load
Last Track option is selected in the Job Se tup panel, allowing Windows to read all the
files on a multisession disc. If you choose the New Volume option, Windows will only
be able to read data recorded during the most recent session.
◆ Check if every file is readable before recording (recommended) — Performs a test
read of each file before recording.
◆ Stop the job if a file is not readable while recording — Interrupts the recording job
if an unreadable file is discovered. If this option is not selected, unreadable files are
skipped.
62 Using RecordNow

RecordNow Options Dialog
◆ Recognize the VIDEO_TS and AUDIO_TS folders per the DVD specification —
Allows RecordNow to recognize DVD video content and creates a video DVD instead
of a data DVD.
◆ Warn me when creating or adding to appendable DVD write-once discs — When
this option is selected, RecordNow will display a message reminding you that
appendable DVD discs may not be compatible with all DVD-ROM driv es.
3. Click OK.
Audio Disc Panel
Use the Audio Dis c panel to specify how you would like RecordNow to handle pre-gaps
and product code information.
▼ To open the Audio Disc panel:
1. From the Tools menu, click Options.
2. Select Audio Disc from the panel list on the left.
The Audio Disc panel appears.
The Audio Disc Panel of the Options dialog.
Chapter 5, Options 63

RecordNow Options Dialog
Select from the following options:
◆ Pre-Gaps
- Show pre-gaps in the Disc Explorer — Displays the audio gaps between tracks
on the disc, when viewing the Disc Explorer and Drive Properties for an audio
CD.
- Calculate and copy pre-gaps when copying a disc or creating a
Global-Image — Ensures your copy is identical to the master disc or
Global-Image file, including ga p layout.
◆ UPC and ISRC
- Show UPC and ISRC in the Disc Explorer — Displays Unive r sal Product Code
(UPC) and International Standard Recording Code (ISRC) information when
viewing the Disc Explorer and Drive Properties for an audio CD.
- Copy UPC and ISRC when copying a disc or creating a Global-Image —
Ensures your disc is copied identically to the master disc or Global-Image file,
including UPC and ISRC info rmation.
3. Click OK.
Temporary Panel
Use the Temporary panel to select the dir ectory RecordNow uses when creating temporary
files or images.
▼ To open the Temporary panel:
1. From the Tools menu, click Options.
2. Select Temporary from the panel list on the left.
64 Using RecordNow

RecordNow Options Dialog
The Temporary panel appears.
The Temporary Panel of the Options Dialog.
3. Click the Browse button ( ) to change the directory in which RecordNow places
temporary files during certain types of recording jobs.
Or,
Type the preferred path for the temporary folder in the text box.
Or,
Click the Default button to restore the path to the default Temp folder used by your
Windows operating system.
4. Click OK.
Blank Size Panel
Use the Blank Size panel to set the default size of your blank recordable media. To ensure
the recording does not continue past the end of the disc when using mixed brands of
media, set the size of the smallest brand of media used.
Chapter 5, Options 65

RecordNow Options Dialog
▼ To open the Blank Size panel:
1. From the Tools menu, click Options.
2. Select Blank Size from the panel list on the left.
The Blank Size panel appears.
The Blank Size Panel of the Options dialog.
Select from the following options:
◆ Use the exact dimension reported b y the dis c — Uses the data reported by the disc
to determine whether the recording will fit on the disc.
◆ Overburn for the following amount — Overburn is a technique some CD recorder
manufacturers utilize to squeeze a bit more data onto a CD-R disc. RecordNow
implements this feature on supported recorders. Set the desired amount to be
overburned by typing the number into the Overburn (in sectors): textbox.
◆ Use the following blank disc arbitrary dimension — Allows you to input the
default size of your blank disc by typing the number into the Blank dimension (in
sectors): textbox. If you use several different types of disc, be sure to enter the
smallest disc size.
3. Click OK.
66 Using RecordNow

RecordNow Options Dialog
Job/Round Panel
Use the Job/Round panel to set options relating to the use of multiple recording drives on
your system.
▼ To open the Job/Round panel:
1. From the Tools menu, click Options.
2. Select Job/Round from the panel list on the left.
The Job/Round panel appears.
The Job/Round Panel of the Options dialog.
Select from the following opt ions:
◆ When computing the discs still to go, count only the good ones — Performs a
count of the number of discs still to be recorded, when making multiple copies o f a
recording.
◆ Start of Round
- Manual (wait for the user to close the trays) — Allows you to close the trays
manually, before recording.
- Automatically close the trays after (seconds) — Closes the trays after a
specified amount of time, in seconds.
◆ End of Round
Chapter 5, Options 67

RecordNow Options Dialog
- Automatically pause at the end of each round — Select this option if you
would like RecordNow to pause after each round of recording completes.
- Do not open any tray (mandatory pa use) — Select this option if you would
- Open all trays, regar dless if the discs are good or bad — Select this option
- Open the trays for good discs only — Select this option if you would like
3. Click OK.
Advanced Panel
Use the Advanced panel to set options that control the memory cache for recording jobs,
drive selections for simultaneous recording, and how RecordNow reports errors.
▼ To open the Advanced panel:
like to manually open trays when each round of recording is complete.
if you would like RecordNow to open all disc trays when each round of
recording is complete.
RecordNow to on ly open those trays that contain discs that were successfully
recorded.
1. From the Tools menu, click Options.
2. Select Advanced from the panel list on the left.
68 Using RecordNow

The Advanced panel appears.
The Advanced Panel of the Options dialog.
RecordNow Options Dialog
Select from the following opt ions:
◆ Job Recording Memory Cache
- Number of buffers — The default is 256 (9.4 MB). In most cases, you do not need
to change this setting. Increasing the buffers can help prevent underrun problems,
but only on computers with 512 MB or more of RAM. Drives with buffer
underrun technology do not benefit from changes to this setting.
◆ Drive Error Report
- Complete Command (12 bytes) and Sense (14 bytes) — Reports complete
error information.
- Only Command, Sense, ASC and ASCQ — Reports minimal error information.
◆ Drive Selection for Simultaneous Recording
- Mix any drive — Uses any available drive for simltaneous recording (not
recommended).
- Same model — Uses the same drive mo del.
- Same model and firmware version (recommended) — Uses the same drive
model and firmware version.
◆ When data does not read correctly while Copying or Extracting
Chapter 5, Options 69

RecordNow Options Dialog
- Return the error — When encountering a read error, an error will be reported,
and the job interrupted.
- Insert blank data or silence and continue — Ignores read errors a nd continues
with the recording without reporting any issues.
3. Click OK.
Wizard Panel
Use the Wizard panel to control settings for the RecordNow Wizard (see “Using the
RecordNow Wizard” on page 17). These settings only affect the Wizard and will n ot af fect
recordings made with the main RecordNow application.
▼ To open the Wizard panel:
1. From the Tools menu, click Options.
2. Select Wizard from the panel list on the left.
The Wizard panel appears.
The Wizard Panel of the Options dialog.
70 Using RecordNow

RecordNow Options Dialog
Select from the following opt ions:
◆ Limit the maximum recorder speed to — Specifies a recording speed from the
drop-down menu. Use this option if your recorder speed is faster than the drive you
are using to read your source disc. If you experience errors during recording, try
reducing the maximum recorder speed.
◆ Remind me to shut down my programs before a disc is created — Displays a
reminder to close all other applications before beginning a recording session. This
includes any screen savers or anti-virus software that may be running during a
recording job.
◆ Music Options
- Warn me if I can’t create a full Music Disc — Displays a warning if there is not
enough free space on your hard disk to stage the audio tracks. This option applies
when making a music disc from other CDs. RecordNow Wizard uses this hard disk
space to make a temporary copy of your tracks from your music CDs. If there is
not enough space on your hard disk, RecordNow Wizard will still allow you to
record to your disc, however; some of your tracks may not be recorded.
- Hide audio files shorter than (in seconds) — Searches only for audio files that
are longer than the number of seconds you specify. This number can be between 1
and 999 seconds. This feature speeds up the search process by eliminating short
audio files, such as the ones you hear when Windows starts up or encounters a
program error.
◆ Data Options
- Warn me when appending to a data disc — Displays a warning when you add
data to a disc that already has information written to it.
3. Click OK.
Wizard Panel — DVD options
Some users will notice that the Options panel list includes a DVD subpanel directly below
the Wizard panel. This only appears if you have a DVD recorder and use Windows NT,
Windows 2000, or Windows XP as your computer’s operating system.
▼ To open the DVD panel:
1. From the Tools menu, click Options.
2. Select DVD from the panel list on the left.
The DVD panel appears.
Chapter 5, Options 71

RecordNow Options Dialog
Select from the following options:
◆ Write-Once DVD Compatibility: Before recording to a write-once DVD disc, you
should consider whether you want the disc left “open” (appendable) or “closed”
(nonappendable) at the end of a recording session. Each time you use a new, blank
disc, you may change this setting. Once you have recorded to a disc, the setting for
that disc cannot be changed.
- To leave your disc open, choose the option that reads: “I would like to use discs
for more than one recording.” You will be able to record multiple times to a
single disc, but fewer drives will be able to read the disc. This is a good choice if
you expect to make many, small recordings on high-capacity DVD discs or don’t
need to share your discs.
- To close your disc at the end of a recording, choose the option that reads: “I only
need to use discs f or one r ecording.” You will only be able to record to the disc
once, but the disc will be compatible with a larger number of drives. Thi s is a
good choice if you typically fill your discs during a single recording session or
need to use a disc on more than one computer.
CDDB Panel
Use the CDDB panel to specify how you would like the RecordNow Wizard to download
song information from the Internet. The CDDB feature gathers artist, album and genre
information about your audio fil es . T his can be helpful in sorting through your MP3 or
WAV file collection for your favorite songs or artists.
Since this database is constantly growing, every time you access CDDB, your files are
updated with the latest information for that track.
Note When using the CDDB feature to download song information, no d ata f rom your
system will be shared or uploaded.
▼ To open the CDDB panel:
1. From the Tools menu, click Options.
2. Select CDDB from the panel list on the left.
72 Using RecordNow

The CDDB panel appears.
The CDDB Panel of the Options dialog.
RecordNow Options Dialog
Select from the following opt ions:
◆ Song Information Do wnload
- Prompt before downloading information — Use this option if you would like
the RecordNow Wizard to prompt you before accessing Gracenote/CDDB to
download song information.
- Always download information — Use this option if you would like the
RecordNow Wizard to automatically access Gracenote/CDDB to download so ng
information.
- Never download information — Use this option if you do not want th e
RecordNow Wizard to access Gracenote/CDDB to download song information.
◆ Proxy server
- Use a proxy server — Select this option if you use a proxy server to access the
Internet. (Proxy servers are computers used to connect local networks to the
Internet.)
- Address — Type the computer address of your proxy server.
- Port — Type the port connection of your proxy server.
- My proxy server requires login — Use this option if you would like RecordNow
Wizard to remember the login information (if any) of your proxy server.
Chapter 5, Options 73

RecordNow Options Dialog
- Username — Type the name you use to log on to your proxy server.
- Password — Type the pa ssword you use to log on to your proxy server.
3. Click OK.
74 Using RecordNow

Tools
This section describes some of the features and tools that give you the flexibility to
customize your recording jobs.
▼ See the following topics for more information:
◆ “The File Finder” on page 75
◆ “Disc Explorer and Drive Properties” on page 76
◆ “Extracting Audio Files to WAV or MP3” on page 77
◆ “Extracting Data Files to Create ISO Images” on page 78
◆ “Combining Jobs into a Workspace” on page 80
◆ “Running Concurrent Recording Jobs” on page 81
◆ “The Activity Log” on page 81
◆ “Using DJ-Burn” on page 82
The File Finder
Depending on the type of recording job you are creating, RecordNow can search your hard
drives for all the appropriate files for that job. For example, if you are creating an audio
disc, RecordNow will find all the properly formatted audio files on your computer.
6
▼ To use the File Finder feature:
1. Open an audio, video, or image job (for information on opening a new recording job,
see “Recording with RecordNow” on page 34).
2. From the Edit menu, click Add with File Finder.
RecordNow automatically searches your computer for all appropriate files.
3. Select the files yo u want for your recording job, then click Select.
RecordNow adds the selected files to your recording job.
75

Disc Explorer and Drive Properties
Disc Explorer and Drive Properties
The Disc Explorer and Drive Properties feature pr ovides detailed information about a disc
and allows you to perform validity tests on the data stored on that disc. The Disc Explorer
and Drive Properties feature also displays drive information in detail and has many
functions that are essential for advanced mastering operations.
In addition to displaying disc a nd drive pr operties, the Disc Explo rer and D rive Pr operties
dialog box allows you to build Global Images, extract audio tracks as WAV or MP3 files,
test the audio and data extraction speed, perform a CD recorder self test, and download
song information from the Internet (CDDB).
▼ To view disc information using the Disc Explorer and Drive Properties dialog box:
1. Insert a disc into your optical drive, then select that drive from the Drive Status panel.
2. From the Drive menu, click Disc Explorer and Drive Properties...
RecordNow analyzes the disc in the drive and displays the following disc and drive
information:
- Drive properties (displayed at the top of the screen)
- Visual diagram of the disc (for information on the disc diagram, click Disc
Representation Color Legend from the Help menu)
- CD text information (only available with CD text capable recorders—see your CD
recorder’s User Guide for more information).
- Disc, Sessions and Tracks list
76 Using RecordNow

Disc Explorer and Drive Properties
Note If the Disc Explorer and Drive Properties screen does not analyze your disc
automatically within a f e w seconds, click the Force Refresh button ( ). This
step can be avoided by placing a check mark beside the Auto Refresh option.
Viewing the Disc Explorer and Drive Properties dialog box.
Extracting Audio Files to WAV or MP3
Use the Disc Explorer and Drive Properties dialog box to extract audio information from
CDs to create WAV or MP3 audio files.
Note Not a ll versions of this product allow you to extract to MP3 format.
▼ To extract audio files to WAV or MP3:
1. Insert the audio CD containing the track(s) you wou ld like to extract into your
recorder drive.
2. From the Drive menu, click Extract Trac k(s)...
The Disc Explorer and Drive Properties dialog box appears, displaying the audio
tracks on the CD.
Note If the correct disc information is no t being displayed, you may need to select the
appropriate drive from the Drive drop-down menu.
Chapter 6, Tools 77

Disc Explorer and Drive Properties
3. Select the track(s) you w ould like to extract.
Tip Select multiple tracks by holding down the <Ctrl> or <Shift> key on your
keyboard, then highlighting the files you would like to extract.
4. To download song information (i.e., artist, album and genre) for the selected tracks,
click CDDB.
If you are connected to the Internet, RecordNow will download available song
information and add it to the selected tra c ks.
5. Select a location on the hard drive where you would like to extract the files to, by
typing it into the Path text box (i.e., C:\My Documents\MP3).
Or,
Click the browse button to navigate to the desired location, then click OK.
6. Ensure the proper settings have been selected in the Reading Speed and Type
drop-down me n us .
7. Click Extract to begin extracting your audio files.
Extracting Data Files to Create ISO Images
Use the Disc Explorer and Drive Properties dialog box to extract data files from discs and
save that data as an image using the format known as ISO 9660. These images or “data
snapshots” can be shared later by recording them to a blank disc or transferring them
using a computer network or e-mail.
Global-Image or ISO 9660?
RecordNow lets you save image files in two formats, RecordNow’s proprietary format,
called Global-Image, and the more commonly used ISO 9660.
The Global-Image format does a better job preserving the disc formatting needed to
recreate individual data files, but can only be read by computers with RecordNow
installed. ISO 9660 images can be read by a wide range of computers, but offer less
flexibility. For instance, with an ISO image, it’s usually necessary to restore every file in
the order it was created on the original disc.
For more information on creating Global-Ima ge fi les, see “Creating a Global-Image File
with RecordNow” on page 39.
78 Using RecordNow

Disc Explorer and Drive Properties
▼ To extract data files in the ISO 9660 format
1. Insert the disc conta ining the data you would like to extract into your recorder drive.
2. From the Drive menu, click Extract Trac k(s)...
The Disc Explorer and Drive Properties dialog box appears, displaying the audio
tracks on the disc.
Note If the correct disc information is no t being displayed, you may need to select the
appropriate drive from the Drive drop-down menu.
3. Select the files you would like to extract.
4. Select a location on the hard drive where you would like to extract the files to, by
typing it into the Path text box (i.e., C:\My Documents\Image_Files).
Or,
Click the browse button to navigate to the desired location, then click OK.
5. Make a selection from the Reading Speed drop-down menu.
6. Click Extract to begin extracting your data files.
Testing Data Extraction Speed
With Disc Explorer and Drive Properties you can measure the data extraction speed of a
CD recorder or CD-ROM drive you have selected. Yo u'l l be able to find out the real
extraction speed of your source drive, which is helpful if you're having difficulty
performing the Di sc-to-Disc Copy job.
▼ To test data extraction speed:
1. Insert any data disc in to the drive you want to test.
2. From the Drive menu, click Disc Explorer and Drive Properties...
3. Click the Data Extraction Speed Test button.
RecordNow tes ts the information on the disc and displays the extraction speed results
in a message box.
4. Click OK.
Chapter 6, Tools 79

Combining Jobs into a Workspace
Testing Audio Extraction Speed
With Disc Explorer an d Drive Pro perties you can measure the audio extraction speed and
accuracy of a CD recorder or CD-ROM drive you have selected. Yo u'll be able to find out
the real extraction speed and accuracy of your source drive, which is helpful if you're
having difficulty performing the Disc-to-Disc Copy job.
▼ To test audio extraction speed:
1. Insert an y audio disc into the drive you want to test.
2. From the Drive menu, click Disc Explorer and Drive Properties...
3. Click the Audio Extraction Speed Test button.
RecordNow tes ts the information on the disc and displays the extraction speed results
in a message box.
4. Click OK.
Combining Jobs into a Workspace
Since you can have many jobs open simultaneously, you may want to save a set of jobs as
a single unit. RecordNow accomplishes this by grouping individual jobs into a Workspace.
Note This feature is not available in all versions of this product.
▼ To save a group of jobs as a Workspace:
1. Open the individual recording jobs you want to save as a workspace.
2. From the File menu, point to Save W orkspace, then select a number to assign to your
workspace. If any of the individual jobs in the workspace have not been saved, you
will be asked to save them before the Workspace is created.
▼ To open a saved Workspace:
1. From the File m enu, click Load Workspace.
2. Select the nu mber of the Workspace you wish to load into the Job Setup panel.
All of the jobs in the selected workspace open at o nce.
80 Using RecordNow

Running Concurrent Recording Jobs
If you have multiple optical drives attached to your system, you can run jobs
simultaneously . You can also queue jobs to run sequentially if only one recorder is selected
for multiple recording jobs. The number of jobs that may run at any one time is dependent
on what hardware is available and how the jobs are set up.
▼ To queue multiple jobs for a single recorder:
1. Open the jobs you would like to record, ensuring that the same recorder device is
selected for the multiple recording jobs (if you have not yet created the jobs, see
“Recording with RecordNow” on page 34 for instructions on creating your recording
jobs).
The jobs appear in the Job Status panel in the order in which they will be recorded.
2. If you would like to change the current order of the jobs in the Job Status panel, select
the job that you want to change the priority on.
3. From the File menu, click either Move Up or Move Down to place the jobs in their
appropriate order.
▼ To run jobs concurrently:
Running Concurrent Recording Jobs
1. Open the recording jobs you would like to record.
2. Ensure that no jobs have the same recorder device selected, then record the jobs as
usual (see “Recording with RecordNow” on page 34 for instructions on creating your
recording jobs).
Tip For optimum performance, make sure that each concurrent recording job has at
least one dedicated SCSI host adapter.
The Activity Log
The activity log records all user actions and system responses during the recording process
and logs them by time of occurrence. This information can provide details of errors that
might not otherwise be available.
Note This feature is not available in all versions of this product.
Chapter 6, Tools 81

Using DJ-Burn
▼ To use the activity log:
1. From the View me nu, click Show log.
The Activity Log appears, displaying a list of the recent activity on all recording jobs.
Viewing the Activity Log.
2. If you wish to type a note into your log, click Add Note to Log... from the Edit menu.
A dialog box appears with space to type your note.
3. The log is automatically saved each time it is closed, but if you prefer to save the log to
a file, choose Save Log to File... from the File menu.
Note To remove all listed entries from the Activity Log, click Clear from the Edit menu.
Using DJ-Burn
DJ-Burn allows you to create an audio disc from different audio file sources: MP3, WAV,
WMA files, or from audio files on another audio CD. You can even record live, using a
microphone attached to your computer (sound card required).
DJ-Burn also allows you to add tracks over a period of time so that you do not have to
record all of the tracks in one recording session. The finished disc will be playable in your
computer’s CD-ROM or DVD-ROM drive after the f irst track is recorded; although it will
not be playable in a consumer CD player until the disc is finalized.
Many consumer CD players cannot read CD-RW media, so it is recommended that you
use CD-R media when creating an audio disc.
82 Using RecordNow

Note This feature is not available in all versions of this product.
▼ To use DJ-Burn:
1. From the Tools menu, click DJ-Burn...
The DJ-Burn dialog box appears.
Viewing the DJ-Burn Dialog Box.
Using DJ-Burn
2. Insert a blank CD-R o r CD-RW disc into your recorder drive if you would like to
record so me audio tr acks now, and plan to record more trac ks at a later time.
Or,
If you would like to add additional tracks to an unfin ished audi o dis c, i nsert tha t disc
into your recorder drive.
3. Click the Browse button to locate the audio files you would like to record to your
disc, select the files you would like to record, then click Open to begin recording.
Or,
Click the Add with File Finder button to perform a search for valid audio files on
your hard drive, select the files you would like to record, then click Select to begin
recording.
RecordNow records the selected files to the disc then adds them to the playlist in the
DJ-Burn dialog box.
4. Click the Record Audio Tracks from Other CD button if you woul d li ke to record
audio tracks from an audio CD.
Or,
Chapter 6, Tools 83

Using DJ-Burn
Click the Record Live button if you would li ke to create your own audio file, using a
microphone attached to your computer (sound card required).
RecordNow records the selected files to the disc then adds them to the playlist in the
DJ-Burn dialog box.
5. Click the Finalize button if you are done recording and do not want to add any more
tracks to the disc.
Note Once a disc has been finalized, you can no longer add audio files to the disc.
6. Click Close when you are done recording with DJ-Burn.
84 Using RecordNow

Troubleshooting
This chapter provides troubleshooting tips to help you solve the most common issues
when recording discs using RecordNow.
Related Topics:
◆ “Recordings Fail”
◆ “Can’t Add Data Files to a Music Disc”
◆ “Unreadable Media”
◆ “Optical Drive Unavailable”
◆ “Drive Error Codes”
Recordings Fail
Disc recording is a resource-sensitive process. Having other applications running while
recording to a disc can deprive your system of required resources and cause the recording
to fail.
Most of these errors can be avoided by following these steps:
◆ Enable Direct Memory Access (DMA) on your system. See your operating system’s
documentation for information on en abling DMA.
7
◆ Close all other applications during the recording process. This includes any screen
savers and anti-virus software that may be running on your computer.
◆ Reduce your maximum recorder speed.
◆ Use your recorder to both read your source disc and to write to your blank disc.
RecordNow will create a temporary image of the source disc on your hard drive, which
may read faster than your computer’s read-only drive. See “Creating a Global-Imag e
File with RecordNow” on page 39 for information on this.
◆ Avoid storing or recording files over a network connection.
85

Can’t Add Data Files to a Music Disc
Storing temporary files or copying files across a network connection can be slower
than using your computer’s hard drive. This delay can cause buffer underruns. Try
recording files from your local hard drive and avoid setting the location of temporary
files to a network drive. See “Temporary Panel” on page 64 for more information on
setting file locations.
Can’t Add Data Files to a Music Disc
When a music disc is created it becomes a closed disc which means it cannot have any
more information added to it. However, if you create either a Mixed-Mode disc or a CD
Extra disc, you can create a disc with both audio and data tracks written to it.
See “Creating a Mixed-Mode or CD Extra disc with RecordNow” on page 49 for more
information on creating a disc with both audio and data tracks.
Unreadable Media
Your optical drive uses a laser beam to read the information on your disc. Fingerprints,
scratches, or any kind of dirt on your disc can cause the drive to misread your disc.
To avoid this, be s u re your disc is clean by taking a clean cloth and wip i ng off any dirt or
fingerprints. Also be sure to take care when handling your disc to avoid touching the
shiny surface.
Optical Drive Unavailable
There are two basic types of optical drives: a read-only drive, and a recorder drive. Though
a recorder drive can be used to read read-only media, a read-only drive cannot be used to
record to med ia.
Check to make sure that your recording device is properly attached to your system and
that it is functional, then try your recording again.
86 Using RecordNow

Drive Error Codes
The following table includes a list of error codes that may hel p you resolve any problems
you have encountered with RecordNow. Y ou may wish to consult this table if you intend to
contact Te chnical Support to resolve issues relating to this product. Doing so may facilitate
the support process, so that you may continue with yo ur recording jobs as quickly as
possible.
Drive Error Codes
Sense ASC ASCQ Description
0 0000No Additional Sense Information
0 0001Filemark Detected
0 00 02 End-Of-Partition/Medium Detected
0 0003Setmark Detected
0 00 04 Beginning-Of-Partition/Medium
Drive Error Codes
Detected
0 00 05 End-Of-Data Detected
0 00 11 Audio Play Operation In Progress
Audio Play
0 00 12 Audio Play Operation Paused Audio
Play
0 00 13 Audio Play Operation Successfully
Completed Audio Play
0 00 14 Audio Play Operation Stopped Due To
Error Audio Play
0 0015No Current Audio Status To Return
Audio Play
0 0016Operation In Progress
10B00Warning
1 0B 01 Warning - Specified Temperature
Exceeded
Chapter 7, Troubleshooting 87

Drive Error Codes
Drive Error Codes
1 0B 02 Warning - Enclosure Degraded
1 0C 0A Write Error - Padding Blocks Added
1 17 00 Recovered Data With No Error
1 17 01 Recovered Data With Retries
1 17 02 Recovered Data With Positive Head
1 17 03 Recovered Data With Negative Head
1 17 04 Recovered Data With Retries And/Or
1 17 05 Recovered Data Using Previous Sector
1 17 06 Recovered Data Without Ecc - Data
Correction Applied
Offset
Offset
Circ Applied
Id
Auto-Reallocated
1 17 07 Recovered Data Without Ecc -
Recommend Reassignment
1 17 08 Recovered Data Without Ecc -
Recommend Rewrite
1 17 09 Recovered Data Without Ecc - Data
Rewritten
1 18 00 Recovered Data With Error Correction
Applied
1 18 01 Recovered Data With Error Corr. &
Retries Applied
1 18 02 Recovered Data - Data
Auto-Reallocated
1 18 03 Recovered Data With Circ
1 18 04 Recovered Data With L-Ec
88 Using RecordNow

Drive Error Codes
1 18 05 Recovered Data - Recommend
Reassignment
1 18 06 Recovered Data - Recommend Rewrite
1 18 07 Recovered Data With Ecc - Data
Rewritten
1 18 08 Recovered Data With Linking
1 1E 00 Recovered Id With Ecc Correction
1 3700Rounded Parameter
1 5D 00 Failure Pr ediction Threshold Exceeded -
Predicted Logical Unit Failure
1 5D 01 Failure Pr ediction Threshold Exceeded -
Predicted Media Failure
1 5D FF Failure Prediction Threshold Exceeded
(False)
Drive Error Codes
16A00Informational, Refer To Log
1 73 01 Power Calibration Area Almost Full
1 7306PROGRAM MEMORY AREA/PMA IS
(Almost) FULL
2 0400Logical Unit Not Ready, Cause Not
Reportable
2 04 01 Logical Unit Is In Process Of Becoming
Ready
2 04 02 Logical Unit Not Ready, Initializing
Cmd. Required
2 04 03 Logical Unit Not Ready, Manual
Intervention Required
2 04 04 Logical Unit Not Ready, Format In
Progress
Chapter 7, Troubleshooting 89

Drive Error Codes
Drive Error Codes
2 04 05 Logical Unit Not Ready, Rebuild In
2 0406Logical Unit Not Ready, Recalculation
2 04 07 Logical Unit Not Ready, Operation In
2 04 08 Logical Unit Not Ready, Long Write In
2 0500Logical Unit Does Not Respond To
2 0600NO REFERENCE POSITION FOUND
2 30 00 Incompatible Medium Installed
2 3001Cannot Read Medium - Unknown
Progress
In Progress
Progress
Progress
Selection
(Medium May Be Upside Down)
Format
2 30 02 Cannot Read Medium - Incompatible
Format
2 30 03 Cleaning Cartridge Installed
2 30 04 Cannot write medium unknown format
2 30 05 Cannot write medium incompatible
format
2 30 07 Cleaning Failure
2 35 02 Enclosure Services Unavailable
2 3A 00 Medium Not Present
2 3A 01 Medium Not Present - Tray Closed
2 3A 02 Medium Not Present - Tray Open
2 3E 00 Logical Unit Has Not Self-Configured
Yet
90 Using RecordNow

Drive Error Codes
2 53 00 Medium Load/Eject Failed
2 53 02 Medium Removal Prevented
2 5700Unable to recover TOC
2 68 00 Logical Unit Not Configured
3 00 14 Audio play op. Stopped due error
(Plextor)
3 0200No Seek Complete
3 02 80 Servo Seek Error (Plextor)
3 02 81 Servo Seek Error Sync error(Plextor)
3 02 82 Servo Seek Error Header error(Plextor)
3 02 83 Servo Seek Error Target not met
(Plextor)
Drive Error Codes
3 03 00 Peripheral Device Write Fault
3 0301No Write Current
3 0302Excessive Write Errors
3 0600No reference position found
30C00Write Error
3 0C 01 Write Error - Recovered With Auto
Reallocation
3 0C 02 Write Error - Auto Reallocation Failed
3 0C 03 Write Error - Recommend
Reassignment
3 0C 04 Compression Check Miscompare Error
3 0C 05 Data Expansion Occurred During
Compression
Chapter 7, Troubleshooting 91

Drive Error Codes
Drive Error Codes
3 0C 06 Block Not Compressible
3 0C 07 Write Error - Recovery Needed
3 0C 08 Write Error - Recovery Failed
3 0C 09 Write Error - Loss Of Streaming
3 0C 0A Write Error - Padding blocks added
3 1 0 00 Id Crc Or Ecc Error
3 11 00 Unrecovered Read Error
3 11 01 Read Retries Exhausted
3 11 02 Error Too Long To Correct
3 11 03 Multiple Re ad Errors
3 11 04 Unrecovered Read Error - Auto
Reallocate Failed
3 11 05 L-Ec Uncorrectable Error
3 11 06 Circ Unrecovered Error
3 11 07 Re-Synchronization Error
3 11 08 Incomplete Block
3 11 09 No Gap Found
3 11 0A Miscorrected Error
3 11 0B Unrecovered Read Error - Recommend
Reassignment
3 11 0C Unrecovered Read Error - Recommend
Rewrite The Data
3 11 0D De-Compression Crc Error
92 Using RecordNow

Drive Error Codes
3 11 0E Cannot Decompress Using Declared
Algorithm
3 11 0F Error Reading Upc/Ean Number
3 11 10 Error Reading Isrc Number
3 12 00 Address Mark Not Found For Id Field
3 13 00 Address Mark Not Found For Data
Field
3 14 00 Recorded Entity Not Found
3 1401Record Not Found
3 14 02 Filemark Or Setmark Not Found
3 14 03 End-Of-Data Not Found
3 1404Block Sequence Error
Drive Error Codes
3 14 05 Record Not Found - Recommend
Reassignment
3 1406Record Not Found - Data
Auto-Reallocated
3 1500Random Positioning Error
3 1501Mechanical Positioning Error
3 15 02 Positioning Error Detected By Read Of
Medium
3 16 00 Data Synchronization Mark Error
3 1601Data Sync Error - Data Rewritten
3 1602Data Sync Error - Recommend Rewrite
3 1603Data Sync Error - Data
Auto-Reallocated
Chapter 7, Troubleshooting 93

Drive Error Codes
Drive Error Codes
3 1604Data Sync Error - Recommend
3 1900Defect List Error
3 1901Defect List Not Available
3 19 02 Defect List Error In Primary List
3 1903Defect List Error In Grown List
3 1F 00 Partial Defect List Transfer
3 2D 00 Overwrite Error On Update In Place
3 30 00 Incompatible medium installed
3 31 00 Medium Format Corrupted
3 31 01 Format Command Failed Formattable
Reassignment
3 31 02 Zoned Formatting Failed Due To Spare
Linking Formattable
3 32 00 No Defect Spare Location Available
3 3201Defect List Update Failure
3 3300Tape Length Error
3 3600Ribbon, Ink, Or Toner Failure
3 3B 00 Sequential Positioning Error
3 3B 01 Tape Position Error At
Beginning-Of-Medium
3 3B 02 Tap e Position Err or At End-Of-Mediu m
3 3B 03 Tape Or Electronic Vertical Forms Unit
Not Ready
3 3B 06 Failed To Sense Top-Of-Form
94 Using RecordNow

Drive Error Codes
Drive Error Codes
3 3B 07 Failed To Sense Bottom-Of-Form
3 3B 08 Reposition Error
3 3B 09 Read Past End Of Medium
3 3B 0A Read Past Beginning Of Medium
3 3B 0B Position Past End Of Medium
3 3B 0C Position Past Beginning Of Medium
3 5100Erase Failure
3 5200Cartridge Fault
3 5700Unable To Recover Table-Of-Contents
3 5C 02 Spindles Not Synchronized
3 61 00 Video Acquisition Error
3 6101Unable To Acquire Video
3 6102Out Of Focus
3 6C 00 Rebuild Failure Occurred
3 6D 00 Recalculate Failure Occurred
3 70 NN Decompression Exception Short
Algorithm Id Of Nn
3 71 00 Decompression Exception Long
Algorithm Id
3 7200Session Fixation Error
3 72 01 Session Fixation Error Writing Lead-in
3 72 02 Session Fixation Error Writing Lead-out
3 73 00 Cd Control Error
Chapter 7, Troubleshooting 95

Drive Error Codes
Drive Error Codes
3 7302Power Calibration Area Is Full
3 7303Power Calibration Area Error
3 7304Program Memory Area/Rma Update
3 7305Program Memory Area/Rma Is Full
4 0017Cleaning Requested
4 0100No Index/Sector Signal
4 05 00 Logical unit does not respond to
4 08 00 Logical Unit Communication Failure
4 08 01 Logica l Uni t Communication Time-Out
4 08 02 Logi cal Unit Communication Parity
Failure
selection
Error
4 08 03 Logical Unit Communication Crc Error
(Ultra-Dma/32)
4 09 00 Track Following Error
4 09 01 Tracking Servo Failure
4 0902Focus Servo Failure
4 09 03 Spindle Servo Failure
4 0904Head Select Fault
4 1B 00 Synchronous Data Transfer Error
41C00Defect List Not Found
4 1C 01 Primary Defect List Not Found
41C02Grown Defect List Not Found
96 Using RecordNow

Drive Error Codes
Drive Error Codes
4 34 00 Enclosure Failure
4 35 00 Enclosure Services Failure
4 35 03 Enclosure Services Transfer Failure
4 3B 04 Slew Failure
43B05Paper Jam
4 3B 16 Mechanical Position ing Or Changer
Error Load
4 3E 01 Logical Unit Failure
4 3E 02 Timeout On Logical Unit
4 4000Ram Failure (Should Use 40 Nn)
4 40 NN Diagnostic Failure On Component Nn
(80h-Ffh)
4 41 00 Data Path Failure (Sh ould Use 40 Nn)
4 42 00 Power-On Or Self-Test Failure (Should
Use 40 Nn)
4 4400Internal Target Failure
4 4600Unsuccessful Soft Reset
4 4700Scsi Parity Error
4 4A 00 Command Phase Error
4 4 B 00 D ata Phase Error
4 4C 00 Logical Unit Failed Self-Configuration
4 53 00 Media Load Or Eject Failed Load
4 54 00 Scsi T o Host System Interface Failure
4 6000Lamp Failure
Chapter 7, Troubleshooting 97

Drive Error Codes
Drive Error Codes
4 6200Scan Head Positioning Error
4 6500Voltage Fault
4 66 00 Automatic Document Feeder Cover Up
4 66 01 Automatic Document Feeder Lift Up
4 66 02 Document Jam In Automatic Document
4 66 03 Document Miss Feed Automatic In
4 6700Configuration Failure
4 67 01 Configuration Of Incapable Logical
4 67 02 Add Logical Unit Failed
Feeder
Document Feeder
Units Failed
4 67 03 Modification Of Logical Unit Failed
4 67 04 Exchange Of Logical Unit Failed
4 67 05 Remove Of Logical Unit Failed
4 6706Attachment Of Logical Unit Failed
4 67 07 Creation Of Logical Unit Failed
4 69 01 Multiple Logical Unit Failures
4 6902A Parity/ Data Mismatch N/ A
4 6E 00 Command To Logical Unit Failed
4 B6 00 Media load mechanism failed (Plextor)
5 00 11 Audio Play Operation in progress
5 07 00 Multipl e Peripheral Devices Selected
5 1A 00 Parameter List Length Error
98 Using RecordNow

Drive Error Codes
Drive Error Codes
5 20 00 Invalid Command Operation Code
5 21 00 Logical Block Address Out Of Range
5 21 01 Invalid Element Address
5 21 02 Invalid Address For Write Incremental
5 22 00 Illegal Function (Use 20 00, 24 00, Or 26
00)
5 24 00 Invalid Field In Cdb
5 2500Logical Unit Not Supported
5 26 00 Invalid Field In Parameter List
5 26 01 Parameter Not Supported
5 26 02 Parameter Value Invalid
5 2603Threshold Parameters Not Supported
5 26 04 Invalid Release Of Active Persistent
Reservation
5 2700Write protected
5 27 01 Hardware Wr it e Pro tected
5 27 02 Logical Unit Software Write Protected
5 27 03 Associated Write Protect
5 27 04 Persistent Write Protect
5 27 05 Permanent Write Protect
5 2B 00 Copy Cannot Execute Since Host
Cannot Disconnect
5 2C 00 Command Sequenc e Error
5 2C 01 Too Many Windows Specified
Chapter 7, Troubleshooting 99

Drive Error Codes
Drive Error Codes
5 2C 02 Invalid Combination Of Window s
5 2C 03 Current Program Area Is Not Empty
5 2C 04 Current Program Area Is Empty
5 30 00 Incompatible medium installed
5 30 02 Cannot Read Medium - Incompatible
5 3004Cannot Write Medium - Unknown
5 30 05 Cannot Write Medium - Incompatible
5 3006Cannot Format Medium - Incompatible
5 30 08 Cannot Write - Application Code
Specified
Format
Format
Format
Medium
Mismatch
5 3009Current Session Not Fixated For
Append
5 3501Unsupported Enclosure Function
5 35 04 Enclosure Services Transfer Refused
5 3800Reserved
5 3900Saving Parameters Not Supported
5 3D 00 Invalid Bits In Identify Message
5 4300Message Error
5 53 02 Medium Removal Prevented
5 55 00 System Resource Failure
5 63 00 End Of User Area Encountered On This
Track
100 Using RecordNow
 Loading...