

Page 1

Quick Start Guide
Packard Bell EasyNote TS
TABLE OF CONTENTS
Starting your computer 3
Wireless connection........................................... 3
Registration........................................................ 3
Software installation........................................... 4
Recovery............................................................ 4
Having trouble?.................................................. 4
Getting to know your computer 5
Top view - display .............................................. 5
Top view - keyboard .......................................... 6
Special keys ............................................... 7
Touchpad.................................................... 8
Front view .......................................................... 9
Rear view........................................................... 9
Left view ............................................................ 9
Right view........................................................ 10
Base view........................................................ 11
Recovery 12
Packard Bell Recovery Management.............. 12
Creating recovery discs ........................... 12
Recovering your system.................................. 13
Types of recovery .................................... 14
Regulatory information 18
Environment 23
Software license 24
Table of Contents - 1
Page 2

Copyright © 2011.
V
All Rights Reserved.
Packard Bell EasyNote TS Quick Guide
Original Issue: 2 May 2011
Work Great with Microsoft® Office 2010 - Express your ideas, solve
problems and simplify everyday projects with Office 2010.
Photo editing - Easily edit and print your photos with Windows Live Photo
Gallery. Then share them on Facebook, YouTube™ or Windows Live.
Search & Decide with Bing™ - Find and organize the answers you need
using Bing™, so you can make faster, more informed decisions.
Please use this space to write down important information about
your computer.
Product name: . . . . . . . . . . . . . . . . . . . . . . . . . . . . . .
Serial Number: . . . . . . . . . . . . . . . . . . . . . . . . . . . . . . .
Date of purchase: . . . . . . . . . . . . . . . . . . . . . . . . . . . .
Place of purchase: . . . . . . . . . . . . . . . . . . . . . . . . . . . .
isit registration.packardbell.com and discover the benefits of being a customer of
Packard Bell.
Remark: All images are for reference purposes only. Actual configuration may vary.
2 - Quick start guide
Page 3

STARTING YOUR COMPUTER
Thank you for purchasing this Packard Bell computer!
This guide has been designed to introduce you to the features of your
computer and assist in your computing experience.
After setting up and starting your computer, as shown in the setup
instructions, it will ask you questions that will help you connect to the
Internet. Your computer will then configure installed software.
WIRELESS CONNECTION
To connect to a wireless network, first check the wireless features of your
computer are on, and that the router or modem you want to connect to is
also correctly configured.
• If wireless is not on, press the communication key ( ) to open the
Launch Manager and make sure Wi-Fi is On.
• Your computer will detect and display any available networks, select
your network and enter the password, if required.
• After a short delay, your computer should connect to the Internet.
If your network is not detected, or your computer does not connect to the
Internet, please refer to your ISP or router’s documentation. After your
computer starts and you can use it, open Internet Explorer and follow the
instructions.
Alternatively, use a network cable to connect directly to a network port
on your router. Please refer to your ISP or router’s guide.
REGISTRATION
When using your computer for the first time, it is recommended that you
register it. This gives you access to some useful benefits, such as:
• Faster service from our trained representatives.
• Membership in the Packard Bell community: receive promotions and
participate in customer surveys.
• The latest news from Packard Bell.
How to register
During the initial startup of your computer, a window will invite you to
register. Please fill in the information and click Next. The second window
you'll see contains optional fields that will help us to provide you with a
more personable customer service experience.
Another option
Another way to register your Packard Bell product is to visit our website at
registration.packardbell.com. Choose your country and follow the
simple instructions.
Starting your computer - 3
Page 4

After registering, you will be sent a confirmation email with important
information that you should keep in a safe place.
SOFTWARE INSTALLATION
Your computer will automatically install software and prepare your
computer for use. This may take some time, please do not turn off your
computer; wait until the installation has finished.
RECOVERY
You should create recovery discs as soon as you are able. The Packard
Bell Recovery Management program allow you to create recovery discs
and then to restore or reinstall applications and drivers provided by
Packard Bell. You will need a pack of writable DVDs.
HAVING TROUBLE?
Packard Bell provides several options to support your purchase.
Packard Bell support
Make sure you write down your computer serial number, date and place of
purchase and model name on the area provided in this guide; save your
proof of purchase. Before you call us, please write down any error
message that accompanies the problem, and have the computer in front of
you and switched on if possible. Having these items to hand when
contacting us will ensure better and quicker service.
Packard Bell website
Remember to visit www.packardbell.com - Check out the support section
for up-to-date information, help, drivers and downloads.
Warranty and contact information
You can find information about the warranty for your computer and how to
contact technical support in your computer’s Warranty.
4 - Quick start guide
Page 5

GETTING TO KNOW YOUR
COMPUTER
After setting up your computer, as illustrated in the setup instructions, let
us show you around your new Packard Bell computer.
Packard Bell EasyNote TS
TOP VIEW - DISPLAY
1
# Icon Item Description
1 Webcam Web camera for video communication.
2 Microphone Internal microphone for sound recording.
3 Display screen
Also called Liquid-Crystal Display (LCD),
displays computer output.
Getting to know your computer - 5
2
3
Page 6

TOP VIEW - KEYBOARD
4
5
6
9
7
# Icon Item Description
4
5 Keyboard
6 Touchpad
7
8
Power button /
indicator
Power indicator Indicates the computer's power status.
Battery indicator
HDD indicator Indicates when the hard disk drive is active.
Communication
indicator
Click buttons (left
and right)
Turns the computer on and off. Indicates the
computer's power status.
For entering data into your computer.
- Special keys are described on page 7.
Touch-sensitive pointing device which
functions like a computer mouse.
Indicates the computer's battery status.
- Charging: The light shows amber when the
battery is charging.
- Fully charged: The light shows blue when in
AC mode.
Indicates the computer’s wireless connectivity
device status.
The left and right side of the button function as
left and right selection buttons.
8
9 Speakers Deliver stereo audio output.
- Note: The front panel indicators are visible even when the computer cover is closed.
6 - Quick start guide
Page 7

Special keys
Your computer’s keyboard includes keys that activate special functions.
The function of each key is clearly marked with an icon.
Icon Function Description
Hotkey for second
Fn
function
Help Opens the help menu.
Packard Bell
MyBackup
Activates a second function on certain keys.
E.g. press the Fn key to activate the F1 to F12 keys.
Allows you to create backup copies of your computer;
either the entire system or only selected files and
folders. Create a regular schedule or make copies
whenever you want.
Communication
Display toggle
Screen blank
Touchpad toggle Turns the internal touchpad on and off.
Play/Pause Play or pause a selected media file.
Stop Stop playing the selected media file.
Previous Return to the previous media file.
Next Jump to the next media file.
Brightness down Decreases the screen brightness.
Brightness up Increases the screen brightness.
Social Networking
Volume up Increases the sound volume.
Enables/disables the computer’s communication
devices.
Switches display output between the display screen,
external monitor (if connected) and both.
Turns the display screen backlight off to save power.
Press any key to return.
Opens the Social Networks application.
- If this application is not installed, the key will start
your instant messenging application.
Volume down Decreases the sound volume.
Speaker toggle Turns the speakers on and off.
Getting to know your computer - 7
Page 8

Hotkeys
The computer uses hotkeys (key combinations) to access function keys
and navigation commands.
To activate hotkeys, press and hold the Fn key (bottom left) before
pressing the other key in the hotkey combination.
Hotkey Function Description
Fn + Special keys
(see page 7)
Fn + Home Scrolls to the beginning of a document.
Fn + End Scrolls to the end of a document.
Fn + Page up Scrolls up a page in a document.
Fn + Page Down Scrolls down a page in a document.
- Note: It is not necessary to press the Fn key to use the F1 to F12 function keys when
starting your computer or when using the BIOS.
To swap the hotkey and special function of the F1 to F12 keys, change the function
key setting in the BIOS (to open the BIOS press F2 when starting your computer,
then select the Main menu and change Function key behavior to Function keys).
Function keys Activates the F1 to F12 keys.
Touchpad
The touchpad controls the arrow on the screen; called the pointer or
the cursor. When you slide your finger across the touch-sensitive pad,
the pointer will follow this movement.
Multi-gesture
The touchpad supports Multi-gesture commands; it can recognise patterns
that use more than one finger. This allows you to control applications with
a few simple gestures, such as:
• Pinch: Quickly zoom in and out of
photos, maps and documents with a
simple finger-thumb gesture.
• Flip: Browse photos, websites or
documents by sliding two fingers horizontally.
• Rotate: Rotate photos or PDF files in 90° steps with a two-finger pivot
motion.
• Scroll: Swiftly navigate web pages, documents and music playlists up
or down by moving two fingers vertically.
8 - Quick start guide
Page 9
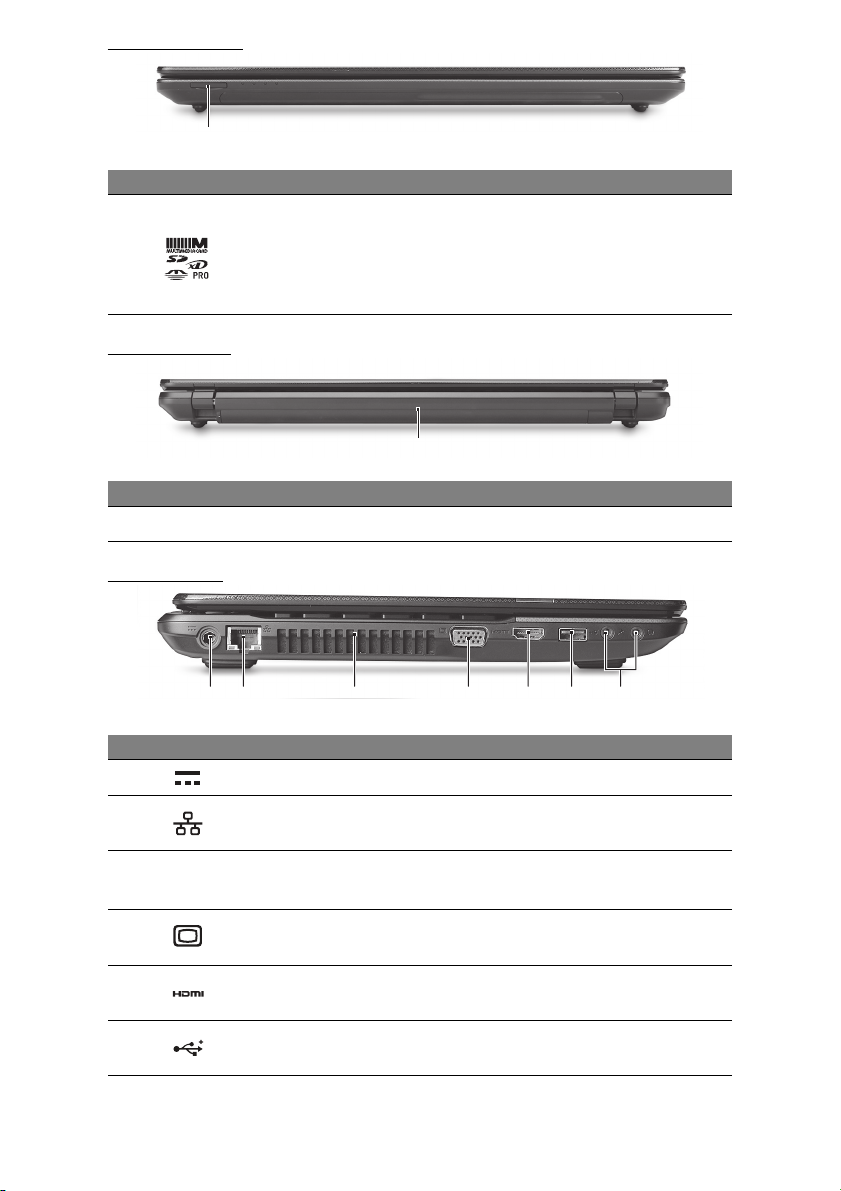
FRONT VIEW
1
# Icon Item Description
Accepts Secure Digital (SD), MultiMediaCard
(MMC), Memory Stick PRO (MS PRO), xD-
1 Multi-in-1 card reader
Picture Card (xD).
- Push to remove/install the card. Only one
card can operate at any given time.
REAR VIEW
1
# Icon Item Description
1 Battery bay Houses the computer's battery pack.
LEFT VIEW
2134567
# Icon Item Description
1 DC-in jack Connects to your computer’s AC adapter.
2 Ethernet (RJ-45) port
3
4
5 HDMI port
6 USB port
Ventilation and
cooling fan
External display
(VGA) port
Connects to an Ethernet 10/100/1000-based
network.
Allows the computer to stay cool.
- Do not cover or obstruct the openings.
Connects to a display device (e.g., external
monitor, LCD projector).
Supports high-definition digital video
connections.
Connect to USB devices (e.g., USB mouse,
USB camera).
Getting to know your computer - 9
Page 10
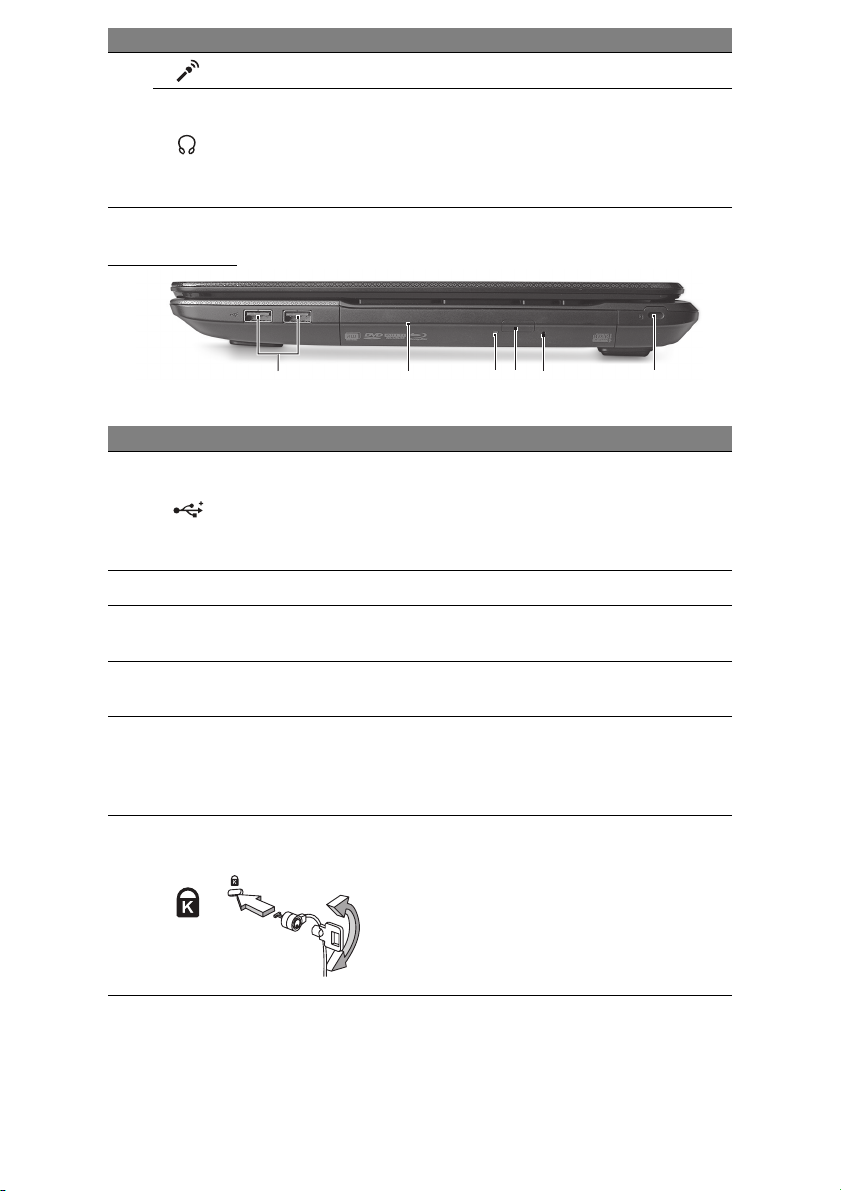
# Icon Item Description
Microphone jack Accepts inputs from external microphones.
Connects to audio line-out devices (e.g.,
7
Headphones /
speaker jack
speakers, headphones).
- Supports compatible 3.5 mm headsets with
built-in microphone (e.g. Acer smart
handheld headsets).
RIGHT VIEW
213456
# Icon Item Description
Connect to USB devices (e.g., USB mouse,
USB camera).
1 USB port
2 Optical drive Internal optical drive; accepts CDs or DVDs.
- If a port is black, it is USB 2.0 compatible, if
a port is blue (optional) it is also USB 3.0
compatible.
3
4
5
6
Optical disk access
indicator
Optical drive eject
button
Emergency eject
hole
Kensington lock slot
10 - Quick start guide
Lights up when the optical drive is active.
Ejects the optical disk from the drive.
Ejects the optical drive tray when the computer
is turned off.
- Carefully insert a straightened paper clip to
eject the optical drive tray.
Connects to a Kensington-compatible
computer security lock.
- Wrap the computer security lock cable
around an immovable object such as a table
or handle of a locked drawer.
Insert the lock into the notch and turn the key
to secure the lock.
Some keyless models are also available.
Page 11
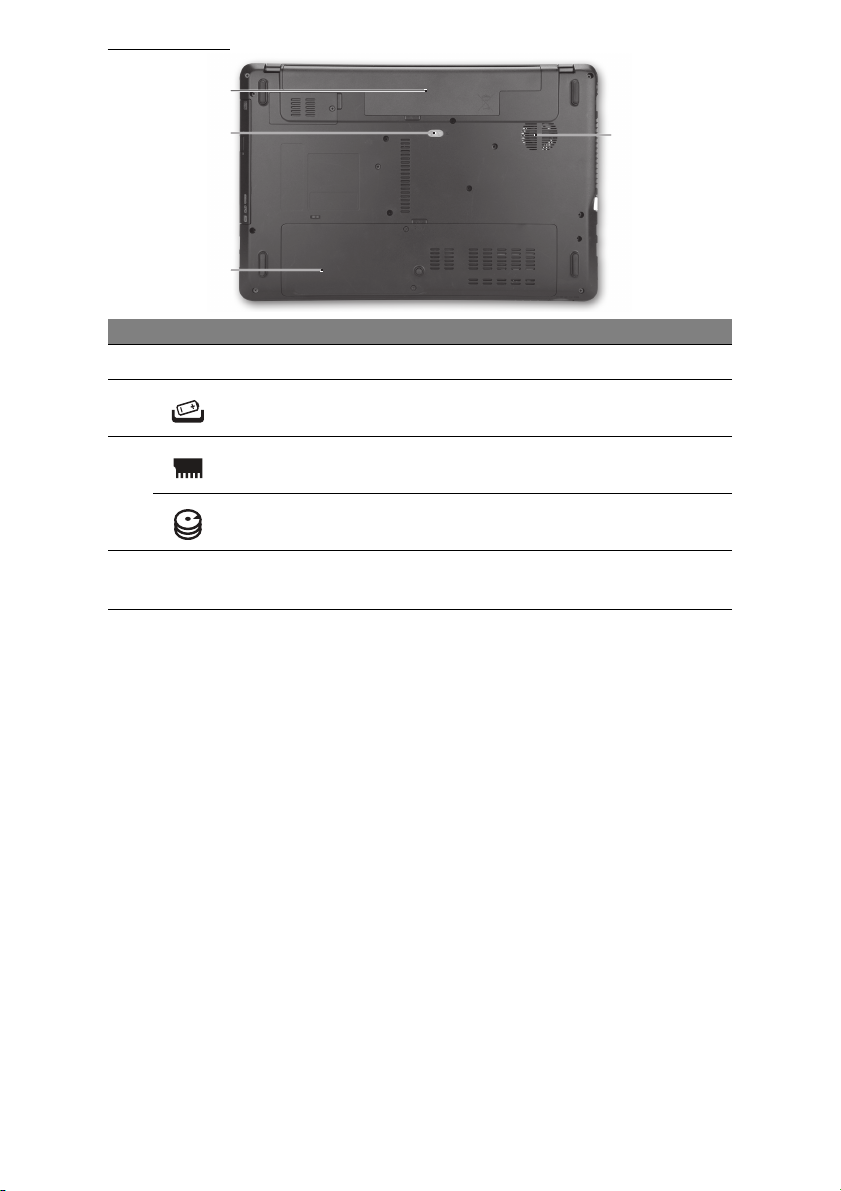
BASE VIEW
1
2
4
3
# Icon Item Description
1 Battery bay Houses the computer's battery pack.
2 Battery release latch
Memory
3
4
compartment
Hard disk bay
Ventilation and
cooling fan
Releases the battery for removal. Insert a
suitable tool and slide to release.
Houses the computer's main memory.
Houses the computer's hard disk (secured with
screws).
Allows the computer to stay cool.
- Do not cover or obstruct the openings.
Getting to know your computer - 11
Page 12
RECOVERY
PACKARD BELL RECOVERY MANAGEMENT
Note: Packard Bell Recovery Management is only available with a
preinstalled Windows operating system.
If your computer experiences problems that are not recoverable by other
methods, you may need to reinstall the Windows operating system and
factory-loaded software and drivers. To ensure you can recover your
computer when needed, you should create a recovery backup as soon as
possible.
Creating recovery discs
To reinstall using discs, you must create a set of recovery discs
beforehand. Throughout the process, you will be guided by on-screen
instructions. Please read them carefully!
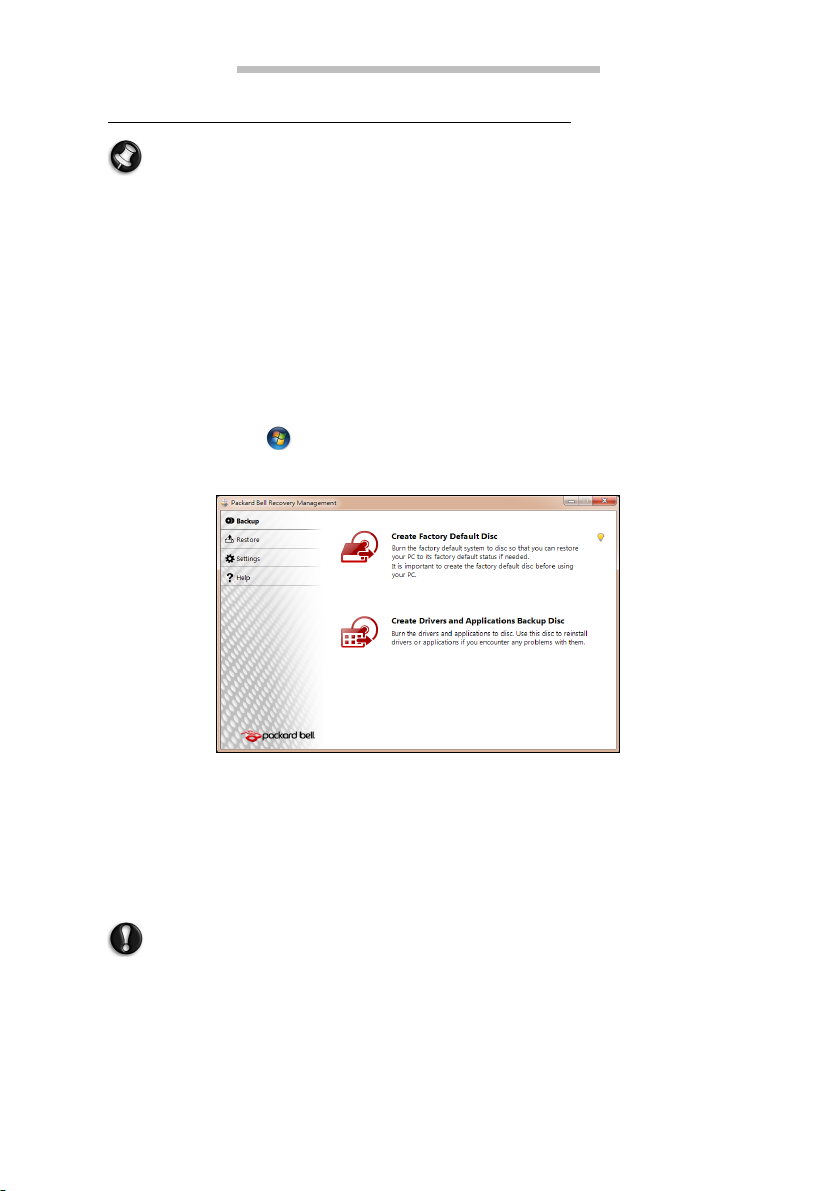
1. Click on Start > All Programs > Packard Bell, then click on
Packard Bell Recovery Management.
2. To create recovery discs for the hard drive’s entire original contents,
including Windows and all factory-loaded software and drivers, click
Create Factory Default Disc.
- OR -
To create recovery discs for only the factory-loaded software and drivers,
click Create Drivers and Applications Backup Disc.
Important: We recommend that you create each type of recovery
disc as soon as possible.
12 - Quick start guide
Page 13
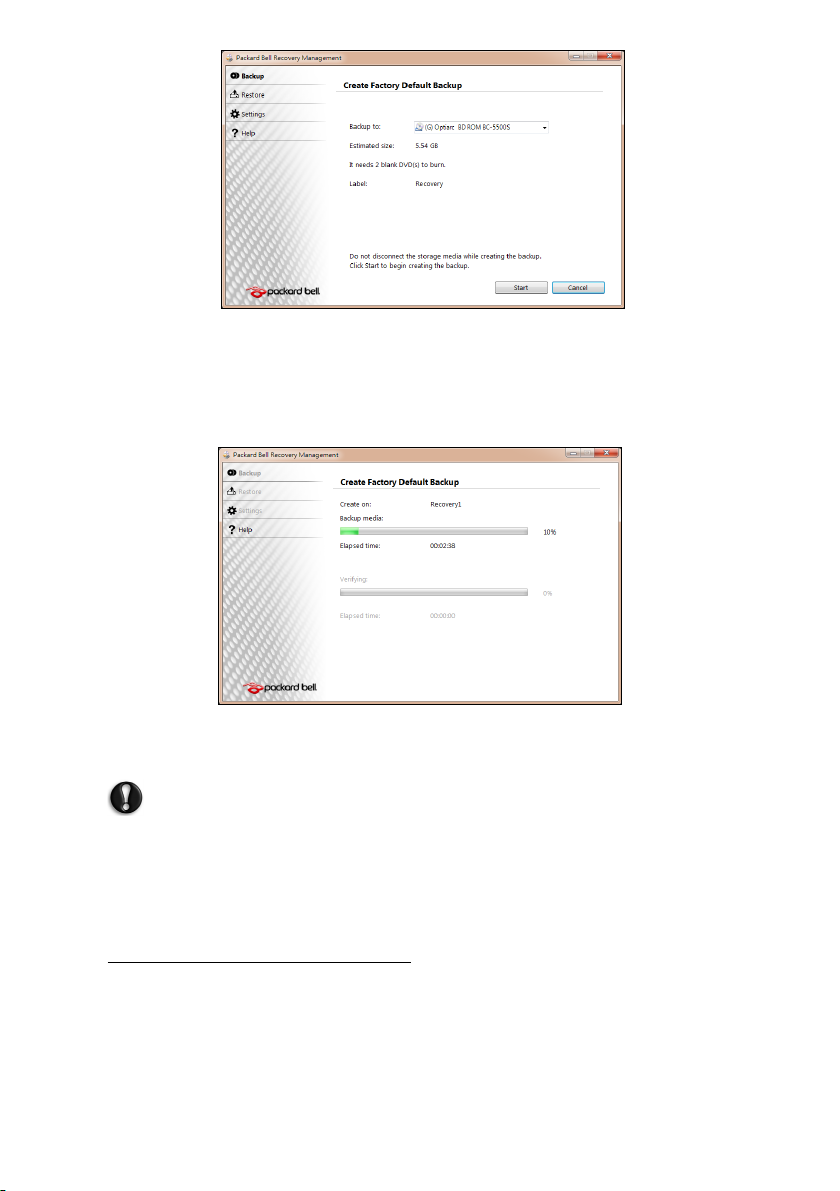
The Create Factory Default Backup dialog box opens.
This dialog box tells you the number of blank, recordable discs you will
need to complete the recovery discs. Make sure that you have the
required number of identical, blank discs ready before continuing.
3. Insert a blank disc into the drive indicated in the Backup to list, then click
Next. You will be shown the backup progress on the screen.
The drive ejects each disc as it completes burning it.
4. Remove the disc from the drive and mark it with a permanent marker.
Important: Write a unique, descriptive label on each disc, such as
‘Windows Recovery Disc 1 of 2’ or ‘Apps/Drivers Recovery disc’.
Make sure you keep the discs in a safe place that you will
remember.
5. If multiple discs are required, insert a new disc when prompted, then
click OK. Continue until the process is complete.
RECOVERING YOUR SYSTEM
If Packard Bell support did not help fix your problem, you can use the
Packard Bell Recovery Management program. This will restore your
computer to the same state as when you purchased it, while giving you an
option to retain all settings and personal data for later retrieval.
Recovery - 13
Page 14

To recover your system:
1. Perform minor fixes.
If only one or two items of software or hardware have stopped working
correctly, the problem may be solved by reinstalling the software or the
device drivers.
To recover software and drivers that were pre-installed at the factory, see
“Recovering pre-installed software and drivers” on page 14.
For instructions on reinstalling software and drivers that were not preinstalled, see that product’s documentation or technical support Web
site.
2. Revert to a previous system condition.
If reinstalling software or drivers does not help, then the problem may be
solved by returning your system to a previous state when everything was
working correctly.
For instructions, see “Returning to a previous system condition” on page
15.
3. Reset your system to its factory condition.
If nothing else has solved the problem and you want to reset your system
to factory condition, see “Returning your system to its factory condition”
on page 15.
Types of recovery
Recovering pre-installed software and drivers
As a troubleshooting step, you may need to reinstall the software and
device drivers that came pre-installed on your computer from the factory.
You can recover using either your hard drive or the backup you have
created.
• New software - If you need to recover software that did not come preinstalled on your computer, you need to follow that software’s
installation instructions.
• New device drivers - If you need to recover device drivers that did not
come pre-installed on your computer, follow the instructions provided
with the device.
To recover your pre-installed software and drivers:
1. Click on Start > All Programs > Packard Bell, then click on
Packard Bell Recovery Management. Packard Bell Recovery
Management opens.
- OR -
If you are recovering from your driver and application recovery backup,
insert it into the disc drive, then go to Step 3 after the Packard Bell
Application Recovery main menu opens.
2. Click on the Restore tab, then click Reinstall Drivers or Applications.
The Packard Bell Application Recovery main menu opens.
14 - Quick start guide
Page 15
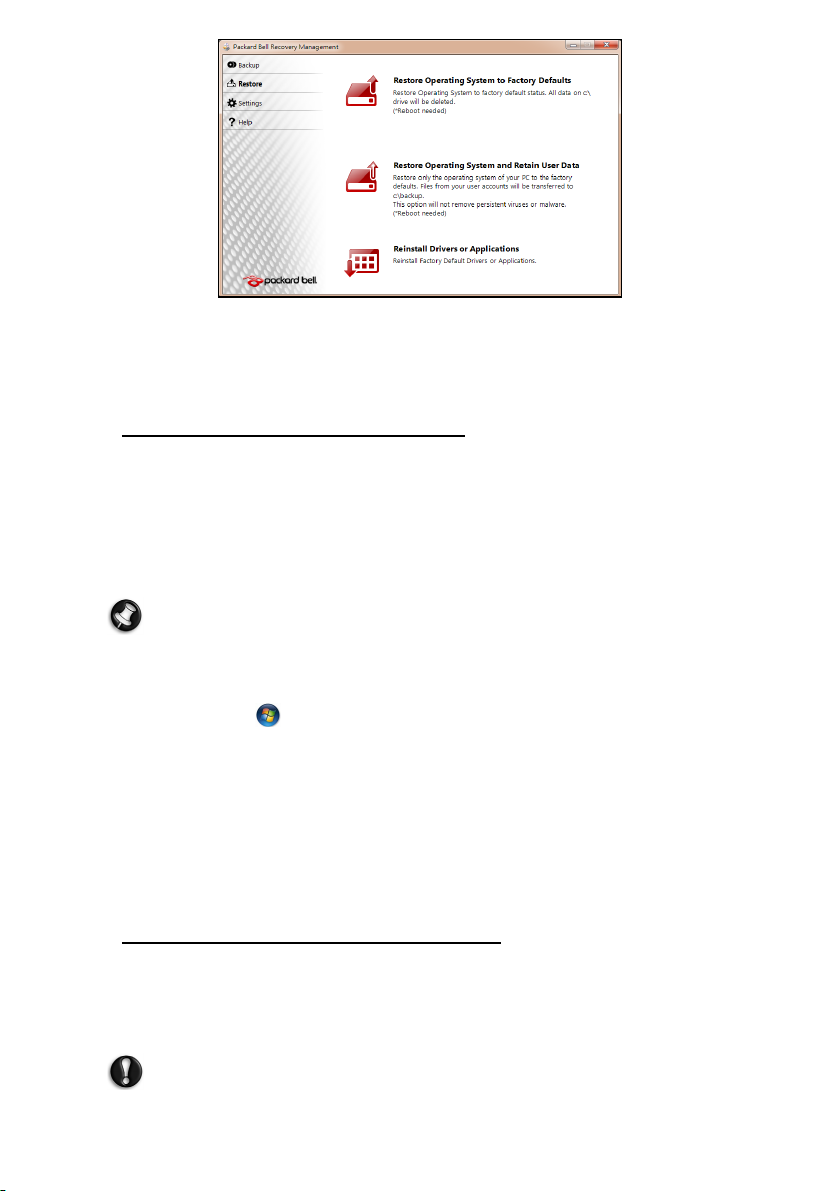
3. Click on Contents. A list of software and device drivers opens.
4. Click on the install icon for the item you want to install, then follow the
on-screen prompts to complete the installation. Repeat this step for
each item you want to reinstall.
Returning to a previous system condition
Microsoft System Restore periodically takes ’snapshots’ of your system
settings and saves them as restore points. In most cases of hard-toresolve software problems, you can return to one of these restore points to
get your system running again.
Windows automatically creates an additional restore point each day, and
also each time you install software or device drivers.
Help: For more information about using Microsoft System Restore,
click Start, then click Help and Support. Type windows system
restore in the Search Help box, then press Enter.
To return to a restore point:
1. Click on Start > Control Panel > System and Security > Action
Center, then click on Recovery.
2. Click on Open System Restore, then Next.
3. Click on he restore point you want, click on Next, then Finish. A
confirmation message box appears.
4. Click on Yes. Your system is restored using the restore point you
specified. This process may take several minutes, and may restart your
computer.
Returning your system to its factory condition
If your computer experiences problems that are not recoverable by other
methods, you may need to reinstall everything to return your system to its
factory condition. You can reinstall using either your hard drive or the
recovery discs you have created.
Caution: This complete recovery deletes everything on your hard
drive, then reinstalls Windows and all software and drivers that
were pre-installed on your system. If you can access important
Recovery - 15
Page 16

files on your hard drive, back them up now.
• If you can still run Windows, see “Recovering from within Windows”
below.
• If you cannot run Windows and your original hard drive is still working,
see “Recovering from the hard drive during startup” on page 16.
• If you cannot run Windows and your original hard drive has been
completely re-formatted or you have installed a replacement hard drive,
see “Recovering from your recovery discs” on page 17.
Recovering from within Windows
To reinstall Windows and all pre-installed software and drivers:
1. Click on Start > All Programs > Packard Bell, then click on
Packard Bell Recovery Management. Packard Bell Recovery
Management opens.
2. Click on the Restore tab, then Restore system to factory default. The
Confirm Restoration dialog box opens.
3. Click on Yes, then Start. A dialog box displays information about the
hard drive that the operating system will be recovered to.
Caution: Continuing the process will erase all files on your hard
drive.
4. Click on OK. The recovery process begins by restarting your computer,
then continues by copying files to your hard drive. This process may
take a while, but a Packard Bell Recovery Management screen shows
you its progress.
When the recovery has finished, a dialog box prompts you to restart your
computer.
5. Click on OK. Your computer restarts.
6. Follow the on-screen prompts for first-time system setup.
Recovering from the hard drive during startup
To reinstall Windows and all pre-installed software and drivers:
1. Turn on your computer, then press Alt+F10 during startup. Packard Bell
Recovery Management opens.
2. Click on Restore system from factory default.
Caution: Continuing the process will erase all files on your hard
drive.
3. Click on Next. Your hard drive’s original, factory-loaded contents are
recovered. This process will take several minutes.
16 - Quick start guide
Page 17

Recovering from your recovery discs
To reinstall Windows and all pre-installed software and drivers:
1. Turn on your computer, insert the first system recovery disc into your
optical disc drive, then restart your computer.
Caution: Continuing the process will erase all files on your hard
drive.
2. If it is not already enabled, you must enable the F12 Boot Menu:
1. Press F2 when starting your computer.
2. Use the left or right arrow keys to select the Main menu.
3. Press the down key until F12 Boot Menu is selected, press F5 to
change this setting to Enabled.
4. Use the left or right arrow keys to select the Exit menu.
5. Select Save Changes and Exit and press Enter. Select OK to
confirm.
6. Your computer will restart.
3. During startup, press F12 to open the boot menu. The boot menu allows
you to select which device to start from, such as the hard drive or an
optical disc.
4. Use your arrow keys to select the line CDROM/DVD (this line may start
with ’IDE 1...’), then press Enter. Windows installs from the recovery
disc you inserted.
5. Insert the second recovery disc when prompted, then follow the on-screen
prompts to complete the recovery.
Recovery - 17
Page 18

REGULATORY INFORMATION
PREVENTION OF HEARING LOSS
- Caution: Permanent hearing loss may occur if earphones or headphones are used
at high volume for prolonged periods of time.
This device have been tested to comply with the Sound Pressure Level
requirement laid down in the applicable EN 50332-1 and/or EN 50332-2 standards.
- Note: For France, mobile headphones or earphones for this device have
been tested to comply with the Sound Pressure requirement laid down in the
applicable NF EN 50332-1:2000 and/or NF EN 50332-2:2003 standards as required
by French Article L. 5232-1.
- A pleine puissance, l’écoute prolongée du baladeur peut endommager l’oreille de
l’utilisateur.
CAUTION when listening
To protect your hearing, follow these instructions.
- Increase the volume gradually until you can hear clearly and comfortably.
- Do not increase the volume level after your ears have adjusted.
- Do not listen to music at high volumes for extended periods.
- Do not increase the volume to block out noisy surroundings.
- Decrease the volume if you can’t hear people speaking near you.
RADIO DEVICE REGULATORY NOTICE
- Note: Regulatory information below is for models with wireless LAN and/or Bluetooth
only.
General
This product complies with the radio frequency and safety standards of any country or
region in which it has been approved for wireless use. Depending on configuration, this
product may or may not contain wireless radio devices (such as wireless LAN and/or
Bluetooth modules). Information below is for products with such devices.
Wireless operation channels for different domains
N. America 2.412-2.462 GHz Ch01 through Ch11
Japan 2.412-2.484 GHz Ch01 through Ch14
Europe ETSI 2.412-2.472 GHz Ch01 through Ch13
This equipment is in compliance with the essential requirements and other relevant
provisions of Directive 1999/5/EC.
France: Restricted wireless frequency bands
Some areas of France have a restricted frequency band. The worst case maximum
authorized power indoors is:
- 10 mW for the entire 2.4 GHz band (2400 MHz - 2483.5 MHz)
- 100 mW for frequencies between 2446.5 MHz and 2483.5 MHz
- Note: Channels 10 through 13 inclusive operate in the band 2446.6 MHz to 2483.5 MHz.
There are few possibilities for outdoor use: On private property or on the private property
of public persons, use is subject to a preliminary authorization procedure by the Ministry
of Defense, with maximum authorized power of 100 mW in the 2446.5 - 2483.5 MHz band.
Use outdoors on public property is not permitted.
In the departments listed below, for the entire 2.4 GHz band:
- Maximum authorized power indoors is 100 mW
18 - Quick start guide
Page 19
- Maximum authorized power outdoors is 10 mW
Departments in which the use of the 2400 - 2483.5 MHz band is permitted with an EIRP
of less than 100 mW indoors and less than 10 mW outdoors:
01 Ain Orientales
02 Aisne
03 Allier
05 Hautes Alpes
08 Ardennes
09 Ariege
11 Aude
12 Aveyron
16 Charente
24 Dordogne
25 Doubs
26 Drome
32 Gers
36 Indre
37 Indre et Loire
41 Loir et Cher
45 Loret
50 Manche
55 Meuse
58 Nievre
59 Nord
60 Oise
61 Orne
63 Puy Du Dome
64 Pyrenees Atlantique
66 Pyrenees
67 Bas Rhin
68 Haut Rhin
70 Haute Saone
71 Saone et Loire
75 Paris
82 Tarn et Garonne
84 Vaucluse
88 Vosges
89 Yonne
90 Territoire de Belfort
94 Val de Marne
This requirement is likely to change over time, allowing you to use your wireless LAN card
in more areas within France.
Please check with ART for the latest information (www.art-telecom.fr).
- Note: Your WLAN Card transmits less than 100 mW, but more than 10 mW.
List of National Codes
This equipment may be operated in the following countries:
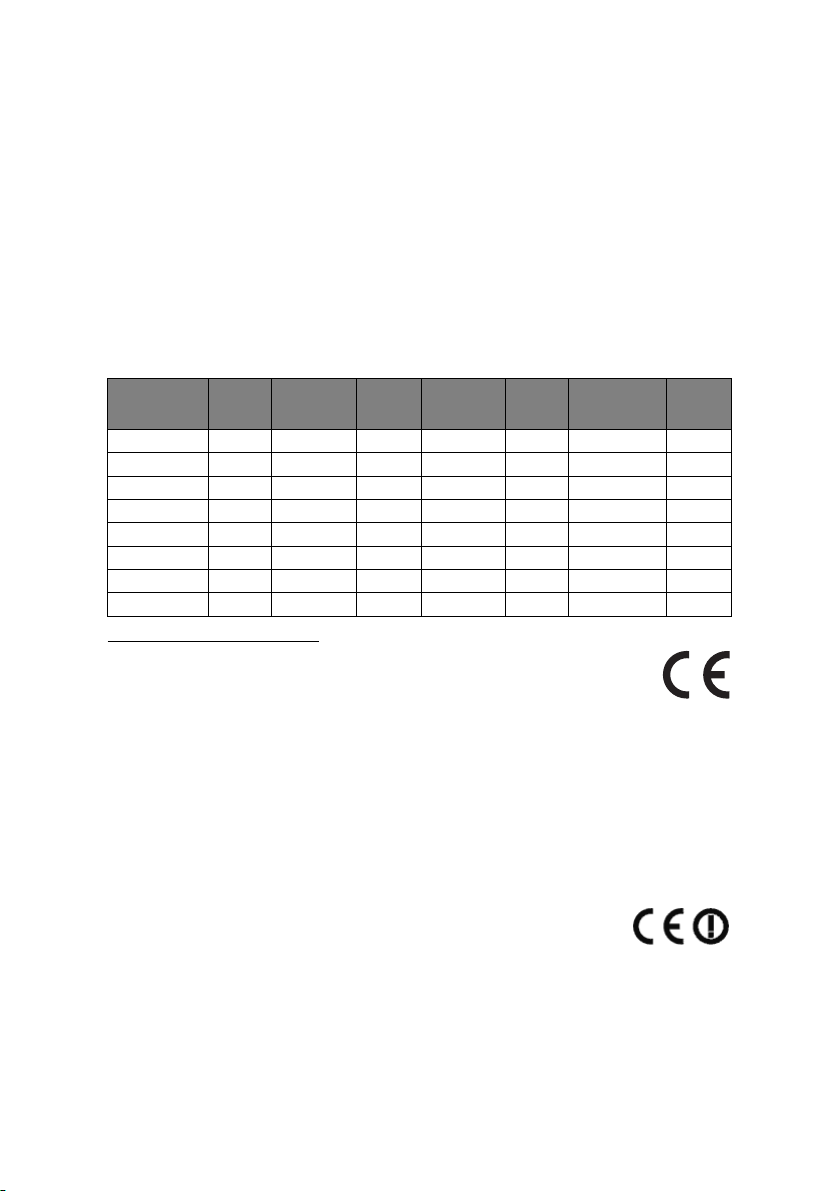
Country
Austria AT Germany DE Malta MT United Kingdom GB
Belgium BE Greece GR Netherlands NT Iceland IS
Cyprus CY Hungary HU Poland PL Liechtenstein LI
Czech Republic CZ Ireland IE Portugal PT Norway NO
Denmark DK Italy IT Slovakia SK Switzerland CH
Estonia EE Latvia LV Slovenia SL Bulgaria BG
Finland FI Lithuania LT Spain ES Romania RO
France FR Luxembourg LU Sweden SE Turkey TR
ISO 3166
2 letter
code
Country
ISO 3166
2 letter
code
Country
ISO 3166
2 letter
code
Country
ISO 3166
2 letter
code
CE COMPLIANCE REQUIREMENT
Products with the CE marking comply with both the Electromagnetic
Compatibility Directive (2004/108/EC) and the Low Voltage Directive (2006/
95/EC) issued by the Council of the European Communities.
Compliance with these directives implies conformity to the following European Standards:
EN55022: Radio disturbance characteristics
EN55024: Immunity characteristics
EN61000-3-2: Limitation of harmonic current emissions
EN61000-3-3: Limitation of voltage fluctuation and flicker in low-voltage supply system
EN60950-1: Product Safety. If your computer includes a telecommunication network board,
the input/output socket is classified as Telecommunication Network Voltage (TNV-3).
Note for computers equipped with wireless controllers and wired modems:
Hereby, Packard Bell, declares that the wireless devices provided with
this computer include a low power radio transmitter in full compliance with
the essential requirements and other relevant provisions of Directive
1999/05/EC for Low Voltage, EMC and RF of the R&TTE.
EN300328 - Electromagnetic compatibility and Radio spectrum Matters (ERM).
EN301489-1/-7/-17/-24 - EMC standard for radio equipment and services, common
technical requirements.
Regulatory information - 19
Page 20

EN301893 - Broadband Radio Access Network, 5GHz high performance RLAN,
harmonized EN covering essential requirements of article 3.2 of R&TTE directive.
EN62311 - Generic standard to demonstrate the compliance of low power electronic and
electrical apparatus with the basic restrictions related to human exposure to
electromagnetic fields.
List of applicable countries
This product must be used in strict accordance with the regulations and constraints in the
country of use. For further information, contact the local office in the country of use.
Please see http://ec.europa.eu/enterprise/rtte/implem.htm for the latest country list.
MODIFICATIONS TO THE PRODUCT
CE Marking
Packard Bell cannot be held responsible for unauthorized modifications made by the user and
the consequences thereof, which may alter the conformity of the product with the CE Marking.
Radio frequency interference
The manufacturer is not responsible for any radio or TV interference caused by
unauthorised modifications to this equipment.
CONNECTIONS AND REMOTE EARTHS
PELV (Protected Extra Low Voltage)
To ensure the extra-low voltage integrity of the equipment, only connect equipment with
mains-protected electrically-compatible circuits to the external ports.
SELV (Safety Extra Low Voltage)
Every input and output of this product is classified as Safety Extra Low Voltage.
Remote earths
To prevent electrical shock, connect all local (individual office) computers and computer
support equipment to the same electrical circuit of the building wiring. If you are unsure,
check the building wiring to avoid remote earth conditions.
Building supply
Only connect the equipment to a building supply that is in accordance with current wiring
regulations in your country. In the U.K., these are the IEE regulations.
POWER SUPPLY AND CABLES
Power supply
The power supply socket-inlet and socket-outlet (if equipped) are classified as Hazardous
Voltage.
You must unplug the power supply cord and remove the battery to disconnect the
equipment from the power supply. In that aim, the socket-outlet should be installed near
to the equipment and should be easily accessible.
Input rating: Refer to the rating label on the bottom of the computer and ensure that your
power adapter complies with the specified rating.
Under no circumstances should the user attempt to disassemble the power supply. The
power supply has no user-replaceable parts. Inside the power supply are hazardous
voltages that can cause serious personal injury.
A defective power supply must be returned to your dealer.
Power cables and plug
This Product requires a three-wire grounded power cord and plug. The plug only fits in a
grounded power outlet. Make sure the power outlet is properly grounded before inserting
the plug. Do not insert the plug into a non-grounded power outlet. Contact your electrician
for details.
20 - Quick start guide
Page 21

The cord length must not exceed 2.5 metres. To prevent electrical hazards, do not remove
or disable the ground contact on the power cord. Replace the power cord if it gets damaged.
Contact your dealer for an exact replacement. In Europe, the plug must be rated for 250
VAC, 10 amp minimum. The plug must display an international agency approval marking.
The cord must be suitable for use in the end-user country. Consult your dealer or the local
electrical authorities if you are unsure of the type of power cord to use in your country.
Cables
For cables which are not delivered with the Product in the computer's packaging:
The EMC performance of the system is guaranteed only if the cable and interface use
efficient shielding.
The use of shielded interface cable is required for USB, IEEE1394, serial, printer, game,
analog or digital audio/ video, PS2, TV or FM antennas, and generally all high-speed
cable interfaces.
Use only UL Listed No. 26AWG or larger telecommunication cords.
Only Ethernet LAN or RTC modem cable can have length exceeding 3 metres.
Packard Bell recommends that you add a ferrite core round clip to each cable connecting
your computer to a hardware device that was not included with your computer.
- Ferrite reference: 28A-2029 from Steward (two loops)
During product certification, Packard Bell used the following cable quality:
- USB2.0 Certified Cables from Hama 46778
- IEEE1394 shielded FireWire from Hama 50011
- RCA-RCA shielded Audio/Video Cables from Thomson KHC001M, KHC012M,
KHC028M
- Stereo Jack shielded Audio cables from Hama 43330H, 42714H
Heat Build-up and Portable Computers
The AC adapter and the underside of the computer can become hot after prolonged use.
Sustained physical contact with either should be avoided.
CHASSIS COVER REMOVAL AND REPLACEMENT
Before removing the chassis cover to service or modify the equipment, you must
disconnect all power and modem cords, and remove or disable the battery.
Caution: Some components inside the computer can become hot after
prolonged use.
You then must close the chassis before you plug in and switch on the equipment.
LASER COMPLIANCE STATEMENT
The optical devices are tested and certified to be compliant with International
Electrotechnical Commission IEC60825-1 and European EN60825-1 standards for Class
1 laser products.
Class 1 laser products are not considered hazardous. The optical devices are designed
such that there is never human access to laser radiation above a Class 1 level during
normal operation or prescribed maintenance conditions.
The optical devices installed in your computer are designed for use solely as components of
such electronic product and therefore do not comply with the appropriate requirements of
Code of Federal Regulation Sec. 1040.10 and Sec. 1040.11 for COMPLETE laser products.
Because exposure to laser radiation is extremely hazardous, under no circumstances
should the user attempt to disassemble the laser device.
Regulatory information - 21
Page 22

PACKAGING
The packaging of this product is compliant with the European Environmental Directive 94/
62/EC from December 20 th 1994 and its equivalent in the French Legislation by the
Decree 98-638 from july 20 th 1998.
COMPLIANT WITH RUSSIAN REGULATORY CERTIFICATION
22 - Quick start guide
Page 23
ENVIRONMENT
OUR COMMITMENT TO ENVIRONMENTAL PROTECTION
Environment has been at the heart of our products.
Packard Bell is committed to limit the environmental impact of its products during product
life cycle.
Starting at design phase, with a very strict procurement policy, maximum attention is given
to electronic components in order to limit their weight in heavy metals such as lead,
cadmium, chromium, mercury, etc. Suppliers are asked, for each part of any product, to
respect all regulations.
As far as end-of-life products are concerned, measures have been taken to anticipate and
facilitate the recycling of all our products. Thus, all plastic parts heavier than 25 grams
used in Packard Bell products are labelled ISO 11469. This label allows a quick
recognition of the material and eases its valorisation. Likewise, desktop computers are
designed to be easily dismantled, with screws being replaced by clips.
PRODUCT DISPOSAL
The 2002/96/EC Directive, known as Waste Electrical and Electronic
Equipment (WEEE) Directive, requires that used electrical and electronic
products must be disposed of separately from normal household waste in
order to promote reuse, recycling and other forms of recovery and to
reduce the quantity of waste to be eliminated with a view to reducing
landfill and incineration. The crossed-out dustbin logo is there to remind
you that these products must be sorted separately for disposal. These
rules concern all Packard Bell products and also all accessories, such as keyboard,
mouse, speakers, remote control, etc. When you have to dispose of such products, make
sure that they are correctly recycled by checking with your local authority, or by returning
your old equipment to your retailer if you are replacing it. For information, visit
www.packardbell.com/recycling.
Battery disposal (when applicable)
Before disposing of your equipment ensure that you have removed any batteries that may
be fitted in the equipment. European law states that batteries must be collected for
disposal separately from household waste. Do not throw your used batteries in the
dustbin. Dispose of your used batteries via a battery collection scheme where available,
or ask your distributor or local authority what infrastructures you can use. Your efforts will
enable the safe collection, recycling and destruction of used batteries and will help protect
the environment and reduce health hazards.
Caution: Risk of explosion if battery is replaced by an incorrect type. Dispose
of used batteries according to the instructions.
Mercury advisory
For electronic products containing a non-LED-backlit LCD/CRT monitor or
display: Lamp(s) inside this product contain mercury and must be recycled or
disposed of according to local, state or federal laws. For more information,
contact the Electronic Industries Alliance at www.eiae.org. for lamp-specific
disposal information, check www.lamprecycle.org.
Environment - 23
Page 24

SOFTWARE LICENSE
Note: Most of the software applications are already preinstalled on your Packard
Bell computer. They are ready to use or to set up. However, some titles require a
CD or DVD to run. You will find these discs in your computer's packaging.
Packard Bell License Agreement (CD and/or DVD Products). This copy of the original is
your proof of license. Please treat it as valuable property.
Important!
Read carefully before installing the software.
The following License Agreement applies to you. This is a legal agreement between you
(either individual or an entity) and Packard Bell By installing the software you are agreeing
to be bound by the terms of this Agreement. If you do not agree to the terms of this
Agreement, promptly return your entire computer system, the unopened software
packet(s), if any, as well as the accompanying terms (including written materials or other
container(s)) in the place you obtained them for a full refund.
PACKARD BELL SOFTWARE LICENSE
1. Grant of License
This Packard Bell License Agreement (“License”) permits you to use one copy of the
specified version of the Packard Bell SOFTWARE identified above (which may include at
least one CD or DVD disc) on any single computer, provided the SOFTWARE is in use on
only one computer at any time. If you have multiple Licenses for the SOFTWARE, then at
any time you may have as many copies of the SOFTWARE in use as you have Licenses.
The SOFTWARE is “in use” on a computer when it is loaded into the temporary memory
(i.e. RAM) or installed in the permanent memory (e.g. hard disk, CD and/or DVD, or other
storage device of that computer, except that a copy installed on a network server for the
sole purpose of distribution of other computer is not “in use.” If the anticipated number of
users of the SOFTWARE will exceed the number of applicable Licenses, then you must
have a reasonable mechanism or process in place to assure that the number of persons
using the SOFTWARE concurrently does no exceed the number of Licenses. If the
SOFTWARE is permanently installed on the hard disk or the storage device of a computer
(other than a network server) and one person uses that computer more than 80% of the
time it is in use, then that person may also use the SOFTWARE on a portable or home
computer.
2. Copyright
The SOFTWARE is owned by Packard Bell or its suppliers and is protected by United
States copyright laws and international treaty provision. Therefore, you must treat the
SOFTWARE like any other copyrighted material (e.g. a book or musical recording) except
that you may transfer the CD and/or DVD disc portion of the SOFTWARE, if any, to a
single hard disk provided you keep the original solely for backup or archival purposes. You
may not copy the CD and/or DVD disc portion of the SOFTWARE or the written materials
accompanying the SOFTWARE.
3. Other restrictions
You may not rent or lease the SOFTWARE, but you may transfer the SOFTWARE and
accompanying written materials on a permanent basis provided you retain no copies and
the recipient agrees to the terms of this Agreement. You may not reverse engineer,
decompile or disassemble the SOFTWARE. Any transfer of the SOFTWARE must include
the most recent update and all prior versions.
24 - Quick start guide
Page 25

THIRD PARTY SOFTWARE OR FREE SOFTWARE LICENSE INFORMATION
Software pre-loaded, embedded or otherwise distributed with the products provided by
Packard Bell does contain free or third party software programs (the “Free Software”),
which are licensed under the terms GNU General Public License (the “GPL”). The Free
Software is marked as such. Your copying, distribution and/or modification of the Free
Software shall be subject to the terms of the GPL.
The Free Software is distributed in the hope that, but it will be useful WITHOUT ANY
WARRANTY; without even the implied warranty of MERCHANTABILITY or FITNESS
FOR A PARTICULAR PURPOSE. The provisions of the GNU General Public License
shall always apply. You may access http://www.gnu.org directly to obtain a copy of the
GPL or write to the free Software Foundation, Inc. and request a copy. The address of the
Free Software Foundation, Inc is: 59 Temple Place - Suite 330, Boston, MA, 02111-1307,
USA.
For a period of three (3) years as commencing from your receipt of this software, you may
obtain a complete machine-readable copy of the source code for the Free Software under
the terms of the GPL without charge except for the cost of media, shipping, and handling,
upon a written request to us.
Contact us if you have any further questions. Our mailing address is 8F, 88, Sec. 1, Hsin
Tai Wu Rd., Hsichih, Taipei Hsien 221, Taiwan.
Software license - 25
 Loading...