

Page 1

PACKARD BELL EASY HDD RECORDER
ENGLISH . . . . . . . . . . 4
FRANÇAIS . . . . . . . . 36
DEUTSCH . . . . . . . . . 72
ESPAÑOL . . . . . . . . 108
NEDERLANDS . . . . . 142
ITALIANO . . . . . . . . 176
-
Page 2

2 - -4 -
Page 3

Page 4
ENGLISH
PACKARD BELL EASY HDD RECORDER USER'S GUIDE
Copyright © 2005 NEC Computers International BV. All Rights Reserved. No part of this manual may be reproduced
or transmitted, in any form or by any means, whether electronic, chemical, manual or otherwise, including but not
limited to photocopying, recording, or information storage and retrieval systems, for any purpose without prior
written permission of NEC Computers International B.V.
DISCLAIMER
NEC Computers International BV specifically disclaims all warranties, either express or implied, including, but not
limited to, implied warranties of merchantability and fitness for a particular purpose with respect to this product and
documentation. Updates to hardware components are made regularly. Therefore some of the instructions, specifications and pictures in this documentation may differ slightly from your particular situation. All items described in this
guide are for illustration purposes only and may not apply to your particular situation. No legal rights or entitlements
may be obtained from descriptions made in this manual.
NEC Computers International BV reserves the right to revise or make changes or improvements to this product or
documentation at any time without obligation to notify any person of such revisions or improvements. In no event
shall NEC Computers International BV be liable for any consequential or incidental damages, including but not
limited to loss of business profits or any other commercial damages, arising out of the use of this product.
TRADEMARKS
Packard Bell is a registered trademark of NEC Computers International BV. All other company or product names are
trademarks, registered trademarks or service marks of their respective owners.
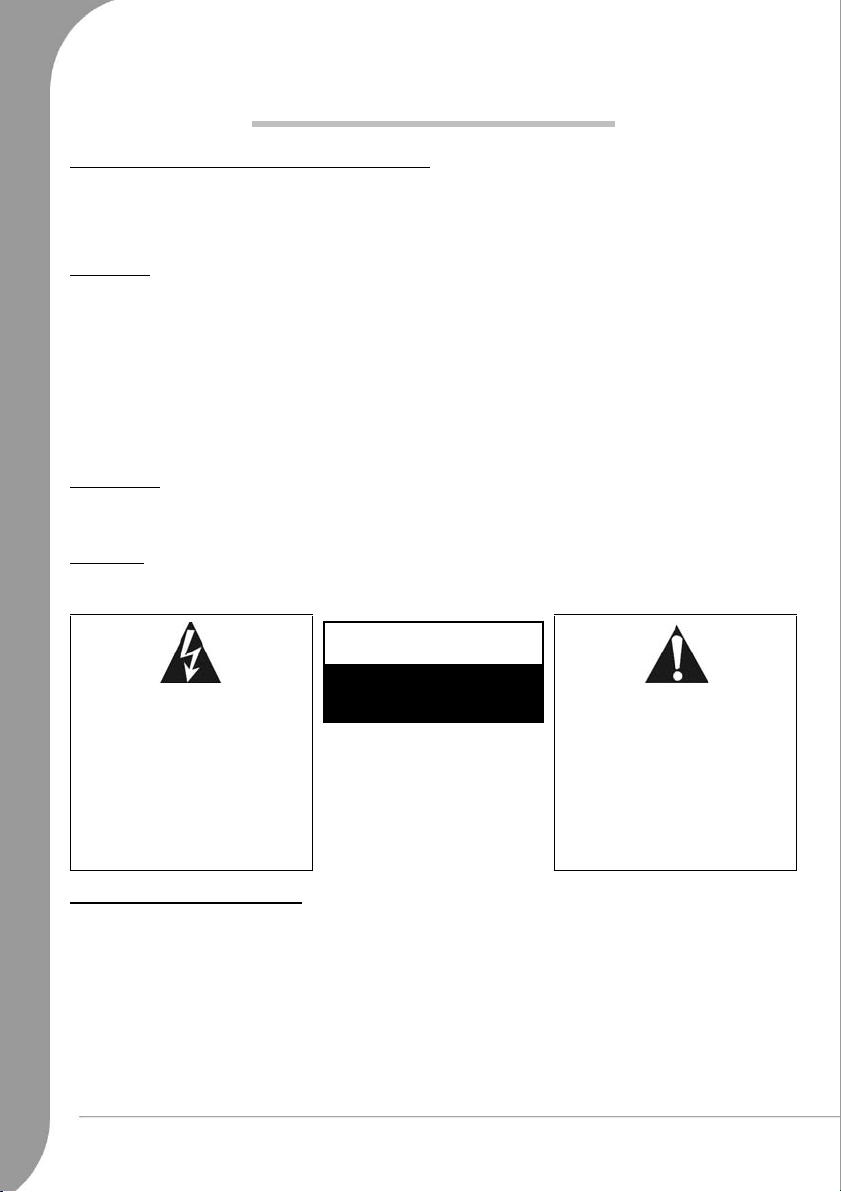
WARNING
To prevent fire or shock hazard, do not use the plug with an extension cord, receptacle or other outlet unless the plug
can be fully inserted. Do not expose this appliance to rain or moisture.
WARNING
The lightning flash with
arrowhead symbol within a
triangle is intended to alert the
user to the presence of uninsulated dangerous voltage within
the product's enclosure that may
be of sufficient magnitude to
constitute a risk of electric shock
to persons.
RISK OF ELECTRIC SHOCK.
DO NOT OPEN
WARNING: TO REDUCE THE
RISK OF ELECTRIC SHOCK, DO
NOT REMOVE THE COVER (OR
BACK). NO USER SERVICEABLE
PARTS INSIDE, REFER SERVICING TO QUALIFIED SERVICE
PERSONNEL
The exclamation point within a
triangle is intended to alert the
user to the presence of important
operating and maintenance
(servicing) instructions in the
literature accompanying the
appliance.
IMPORTANT SAFETY PRECAUTIONS
• Read these instructions.
• Keep these instructions.
• Heed all warnings.
• Follow all instructions.
• Do not use this apparatus near water.
• Clean only with a dry cloth.
• Do not block any ventilation openings. Install in accordance with the manufacturer's instructions.
Packard Bell Easy HDD Recorder User's Guide
Page 5
• Do not install near any heat sources such as radiators, heat registers, stoves or other apparatus (including amplifiers) that produce heat.
• Do not defeat the safety purpose of the polarised or grounding-type plug. A polarised plug has two blades with
one wider than the other. A grounding type plug has two blades and a third grounding prong. The wide blade
or the third prong is provided for your safety. If the provided plug does not fit into your outlet, consult an electrician for replacement of the obsolete outlet.
• Protect the power cord from being walked on and from pinching.
• Only use attachments/accessories specified by the manufacturer.
• Unplug this apparatus during lightning storms or when unused for long periods of time. Please note that the
product warranty does not apply if damage to the product is the result of a lightning strike.
• Refer all servicing to qualified service personnel. Servicing is required when the apparatus has been damaged in
any way, has been exposed to rain or moisture, does not operate normally or has been dropped.
• You must unplug the power supply cord to disconnect the apparatus from the power supply. With this in mind,
the socket-outlet should be located close to the apparatus and should also be readily accessible.
PRODUCT DISPOSAL
The Waste Electrical and Electronic Equipment (WEEE) Directive requires that the used electrical
and electronic products must be disposed of separately from normal households waste in order to
promote reuse, recycling and other forms of recovery and to reduce the quantity of waste to be
eliminated with a view to reducing landfill. This includes accessories such as a remote control,
power cords, etc. When you dispose of such products, please follow the guidance of your municipal authority and/or ask your retailer when purchasing a new product.
English -
5
Page 6

CONTENTS
Easy HDD Recorder Features .............................................................................................................................. 7
Main Features .............................................................................................................................................. 7
Additional features....................................................................................................................................... 8
Getting Started - Controls.................................................................................................................................... 8
Preparing the Remote Control ...................................................................................................................... 8
Remote Control Buttons............................................................................................................................... 9
Front panel controls and features................................................................................................................ 10
Rear panel diagram .................................................................................................................................... 10
Getting Started - Connecting............................................................................................................................. 11
Connecting to a Television......................................................................................................................... 11
Connecting To A 5.1 Channel Dolby Digital Audio Amplifier ...................................................................... 12
Connecting to a Dolby Digital Decoder Amplifier........................................................................................ 12
Connecting USB devices ............................................................................................................................ 14
Navigation Mode ....................................................................................................................................... 14
Scan for TV channels ................................................................................................................................. 15
Disc Types ........................................................................................................................................................ 16
DVDs ........................................................................................................................................................ 16
SVCD/VCD/AUDIO CDs .......................................................................................................................... 16
MP3 /JPEG/DivX (Audio/Image/Video files)............................................................................................. 16
Playable And Writable Discs ....................................................................................................................... 17
Playable Discs ............................................................................................................................................ 17
Unplayable Disc Types ............................................................................................................................... 17
Playback Mode ................................................................................................................................................. 17
DVD Playback............................................................................................................................................ 17
VCD Playback............................................................................................................................................ 18
General Playback Options .......................................................................................................................... 19
JPEG/MP3 Playback .................................................................................................................................. 20
DivX Playback............................................................................................................................................ 21
Parental Lock............................................................................................................................................. 21
Recording/Time Shifting ................................................................................................................................... 21
To Record using Time Shifting.................................................................................................................... 21
Recording To DVD..................................................................................................................................... 24
Recording Quality ...................................................................................................................................... 24
Chapter Markers........................................................................................................................................ 25
Timer Recording ............................................................................................................................................... 25
Setting The Clock ...................................................................................................................................... 25
Scheduled RECORDING ............................................................................................................................ 26
System Time Adjustment ........................................................................................................................... 26
Hdd Title List............................................................................................................................................. 27
Dubbing .................................................................................................................................................... 27
Editing HDD Titles ........................................................................................................................................... 28
Editing DVD+RW Titles............................................................................................................................. 29
Editing A DVD+RW Disc ........................................................................................................................... 30
Editing A DVD+R Disc............................................................................................................................... 30
Troubleshooting................................................................................................................................................ 32
Specifications .................................................................................................................................................... 33
6 -
Packard Bell Easy HDD Recorder User's Guide
Page 7

EASY HDD RECORDER FEATURES
The Packard Bell Easy HDD Recorder can encode TV signals, AV signals from external devices or digital
signals from IEEE 1394 devices, and can record on DVD+RW or DVD+R discs for the facility of storage. The
Easy HDD Recorder is also compatible with all functions of ordinary DVD players.
Main Features
• Embedded HDD (Hard Disk Drive), supports functions such as Time Shifting and Direct Digital Dub.
• Plays pre-recorded Movie DVDs and Audio CDs.
• MP3 support.
• DivX codec support (short for DivX compression/decompression).
• Dolby Digital sound for a total of 6 (‘5.1’) discrete channels (front-left, front-middle, front-right, rear-left,
rear-right and subwoofer).
Time Shifting
Simultaneous video recording and playback.
• Pause and resume live TV broadcasts. Fast forward, fast rewind and jump to any point in the recording.
• Instant replay.
• Play a previously recorded program while another program is being simultaneously recorded.
DVD/CD Player
• 16:9 and 4:3 TV screen aspect ratio support.
• Playback functions including Program, Repeat, Fast Forward/Reverse, Zoom, etc.
• Supports various audio languages, subtitle languages and disc menu languages. Supports viewing angles,
as well as other normal DVD playback features.
• Compatible with DVD, Super VCD, VCD, CD, CD-R discs, can play MP3, JPEG and Picture CD.
• Copy protection technology from Macrovision.
Program Recording
• Record from TV tuner or analogue AV input in MPEG-2 format.
• Play a previously recorded program from the HDD while recording another program.
• Programmable timer for recording a single or recurring TV program.
• Set up to 20 time-recording events with three options: "Once", "Daily" and "Weekly".
• OTR quick-record; record TV at the press of a button.
DVD Archiving (‘dubbing’)
• Archive recordings on the HDD (Hard Disk Drive) to DVD+RW or DVD+R discs.
• DVDs recorded using the Easy HDD Recorder can be played on most current and future DVD players.
Personal Video Archiving
• Transfer videos from a VCR, analog camcorder or digital (DV) camcorder to DVD with Direct Digital
Dub™.
Connectors
• Digital input (DV) connector for digital video cameras; audio and video signals are transmitted via the
same cable.
• Standard video out (CVBS), S-video out, SCART IN/OUT jacks, and component video out (Y, Cb/Pb,
Cr/Pr) out jacks.
English -
7
Page 8

• Coaxial digital audio out jack.
• Interfaces with USB flash drives, USB memory card readers and USB cameras (The mass storage device
must be FAT32 formatted).
• Signal pass-through with SCART and TV aerial connectors.
Additional features
• Parental Lock Level control system.
• Screensaver program for screen protection.
• Progressive Scan creates a picture with twice the scan lines of traditional Component Video. This results
in reduced picture flickering and motion artifacts as well as a sharper image on large screens.
This product contains copy protection technology, which is protected by US
Patent and other intellectual property rights. Use of this copy protection tech-
nology from Macrovision Corporation requires the approval of Macrovision. It is
intended exclusively for home use and other limited pay-per-view applications, unless Macrovision approves
some other use in writing. Modifications to the equipment, removal of components and reverse engineering
are prohibited.
GETTING STARTED - CONTROLS
Preparing the Remote Control
The remote control and batteries are individually packed. Before you use the remote control you must put
the batteries into the remote control:
1. Take the remote control and two AAA batteries.
2. Remove the battery cover on the remote control, insert the batteries (with the correct orientation) and
then put the cover back.
Note: When operating the Easy HDD Recorder, remember to point the remote control directly at the Recorder,
not the TV set!
8 -
Packard Bell Easy HDD Recorder User's Guide
Page 9
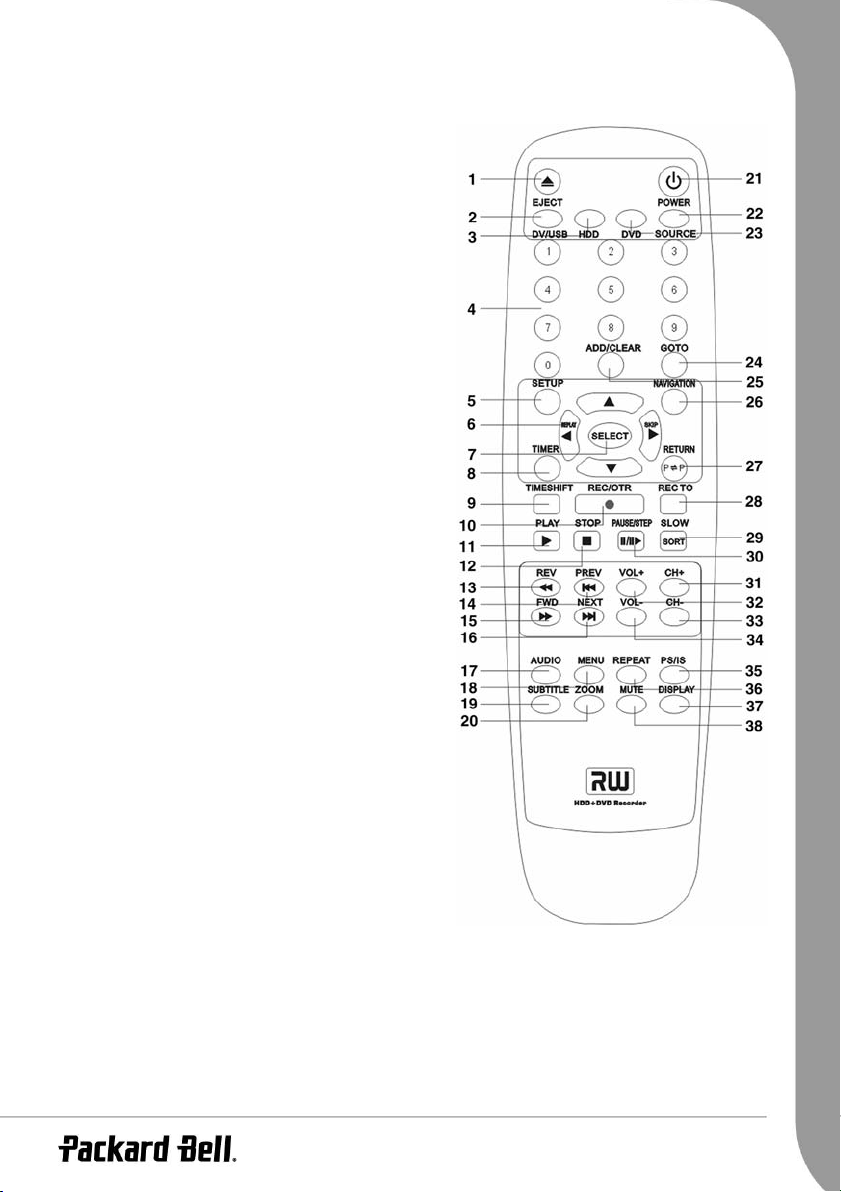
Remote Control Buttons
Please refer to the relevant chapters for detailed
descriptions of these buttons:
1. EJECT button
2. DV/USB button
3. HDD button
4. NUMBERS (0-9) button
5. SETUP button
6. LEFT/REPLAY, UP, DOWN, RIGHT/SKIP buttons
7. SELECT button
8. TIMER button
9. TIME SHIFT button
10. REC/OTR button (RECORD/ONE-TOUCH RECORD)
11. PLAY button
12. STOP button
13. REV (Reverse) button
14. PREV (Previous) button
15. FWD (Forward) button
16. NEXT button
17. AUDIO button
18. MENU button
19. SUBTITLE button
20. ZOOM button
21. POWER button
22. SOURCE button
23. DVD button
24. GOTO button
25. ADD/CLEAR button
26. NAVIGATION button
27. RETURN button
28. REC TO button
29. SLOW/SORT button
30. PAUSE/STEP button
31. CHANNEL+ button
32. VOLUME+ button
33. CHANNEL- button
34. VOLUME- button
35. PS/IS (PROGRESSIVE/ INTERLACE SCAN)*
36. REPEAT button
37. DISPLAY button
38. MUTE button
WARNING: If the PS/IS button is pressed while the unit is connected to a non Progressive Scan compatible
TV the screen will turn black and access to all menus will be lost. If this happens, press the PS/IS button once
more to return to normal.
English -
9
Page 10

Front panel controls and features
1. STANDBY/ON BUTTON
2. STANDBY LED
3. IR (REMOTE SENSOR)
4. DVD DOOR
5. VFD DISPLAY
6. OPEN/CLOSE BUTTON
7. SOURCE BUTTON
8. PLAY BUTTON
9. STOP BUTTON
10. RECORD BUTTON
11. COMPOSITE VIDEO INPUT(FRONT)
12. AUDIO INPUT (FRONT RIGHT)
13. AUDIO INPUT (FRONT LEFT)
14. USB INPUT
15. DIGITAL VIDICON INPUT
Rear panel diagram
1. RF SIGNAL INPUT
2. RF SIGNAL OUTPUT
3. COMPOSITE VIDEO INPUT(REAR)
4. S-VIDEO INPUT
5. AUDIO INPUT (REAR LEFT/RIGHT)
6. 5.1CH AUDIO OUTPUT (L, R, SL, SR, C, SW)
7. COMPOSITE VIDEO OUTPUT
8. S-VIDEO OUTPUT(REAR)
9. DIGITAL AUDIO- OPTICAL OUTPUT
10. DIGITAL AUDIO-COAXIAL OUTPUT
11. COMPONENT VIDEOS OUTPUT (Y, Cr/Pr, Cb/Pb)
10 -
Packard Bell Easy HDD Recorder User's Guide
Page 11
12. SCART INPUT
13. SCART OUTPUT
GETTING STARTED - CONNECTING
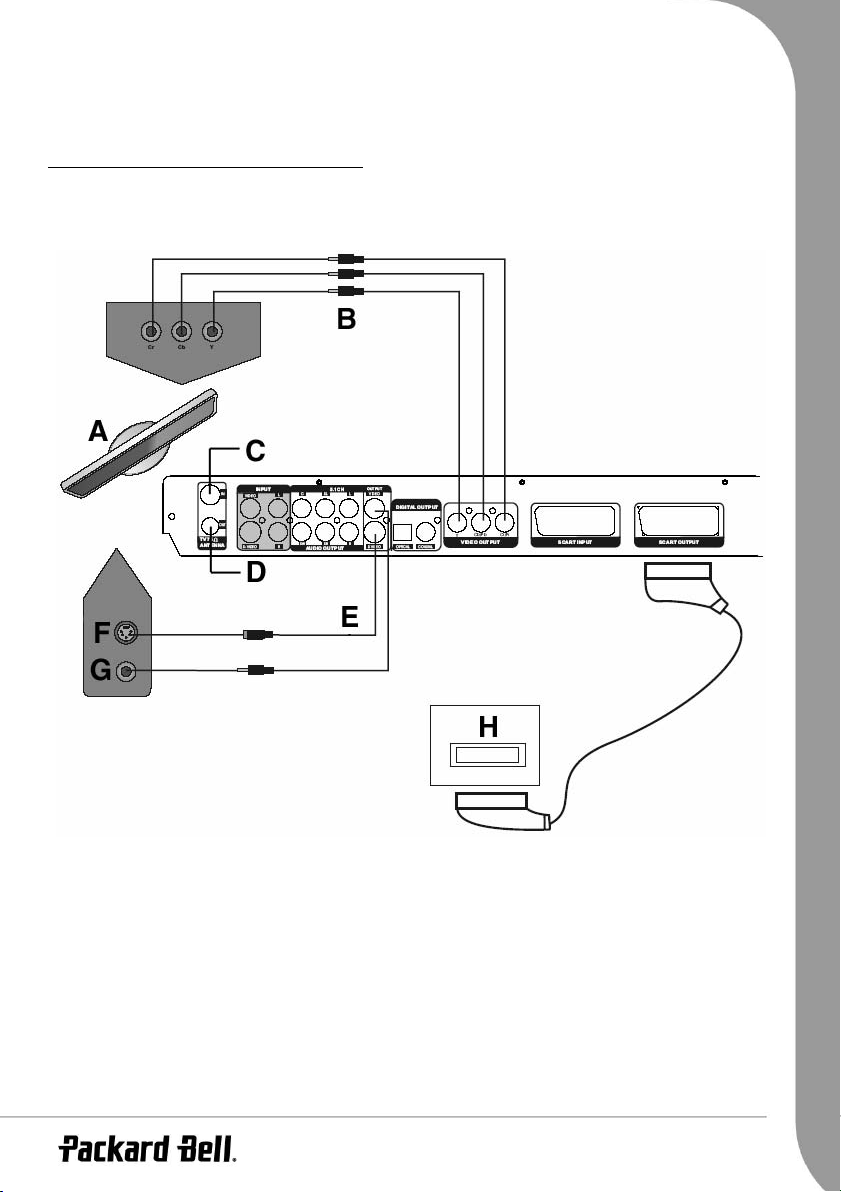
Connecting to a Television
A. TV
B Component video output
C RF antenna input
D RF antenna output
E S-Video output
F S-video input
G Video input
HSCART input
There are three kinds of video outputs available, namely Component Video, S-Video and Composite Video.
In terms of picture quality, Component Video is the best; S-Video comes next, while the Composite Video is
less satisfying. There is a scart output available also. A Composite Video (CVBS), a Component Video (RGB)
English -
11
Page 12
and audio (L & R) outputs are built into the scart output. When the scart output is used, none of the abovementioned cables is needed for connection.
Note: For Digital Cable and Satellite TV users please connect your decoder’s output to this unit’s input.
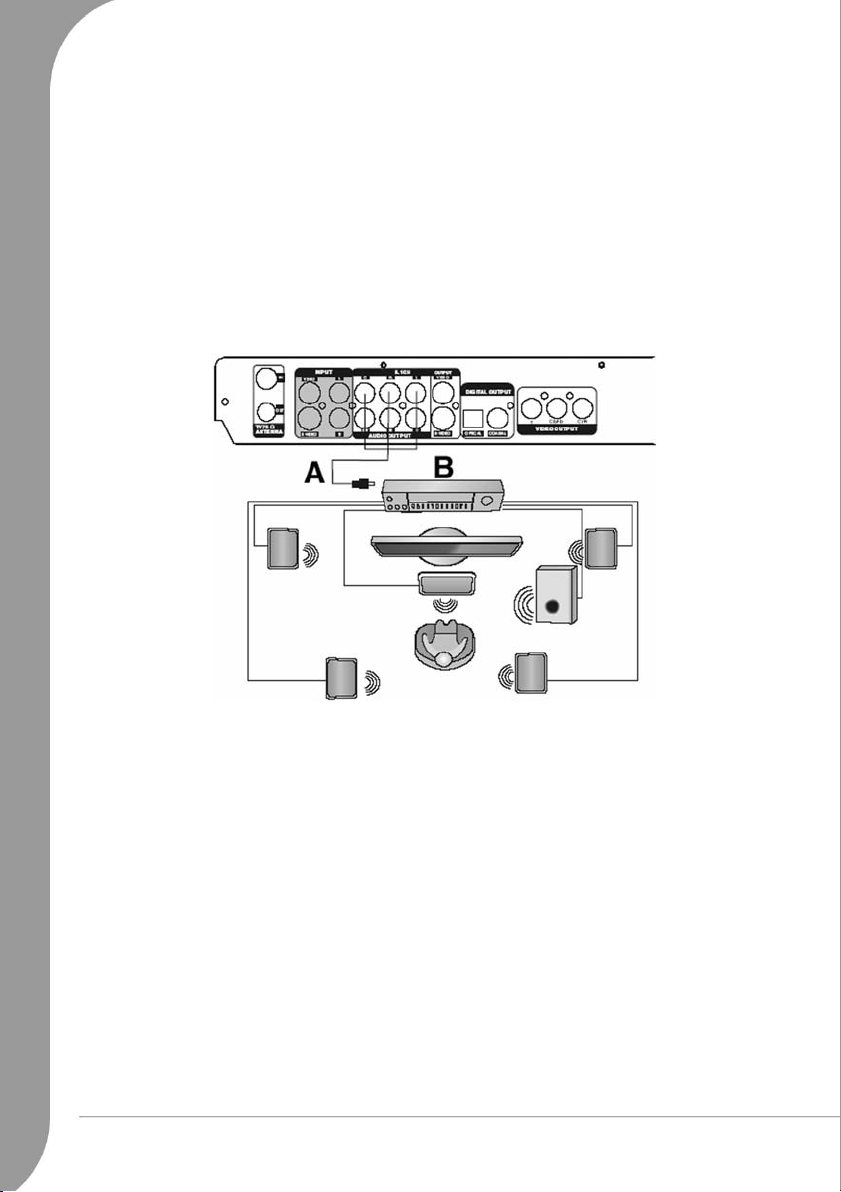
Connecting To A 5.1 Channel Dolby Digital Audio Amplifier
You can enjoy 5.1-channel Dolby Digital audio by connecting the recorder to an amplifier-and-speakers
system with 5.1 Channel Dolby Digital Audio. Dolby Digital programs can deliver surround sound with up to
five discrete full-range channels, Left, Centre, Right, Left Surround, Right Surround—plus a sixth channel for
powerful low-frequency effects (LFE). As it needs only about one-tenth the bandwidth of the others, the LFE
channel is referred to as a ".1" channel (and sometimes erroneously as the "subwoofer" channel).
A Ordinary Cable (Analog Output)
B 5.1 Channel Amplifier
Connecting to a Dolby Digital Decoder Amplifier
You can enjoy the completely-reproduced 5.1-channel Dolby Digital audio effect by connecting the recorder
to an amplifier-and-speakers system with Dolby Digital decoder via a coaxial or optical cable.
12 -
Packard Bell Easy HDD Recorder User's Guide
Page 13
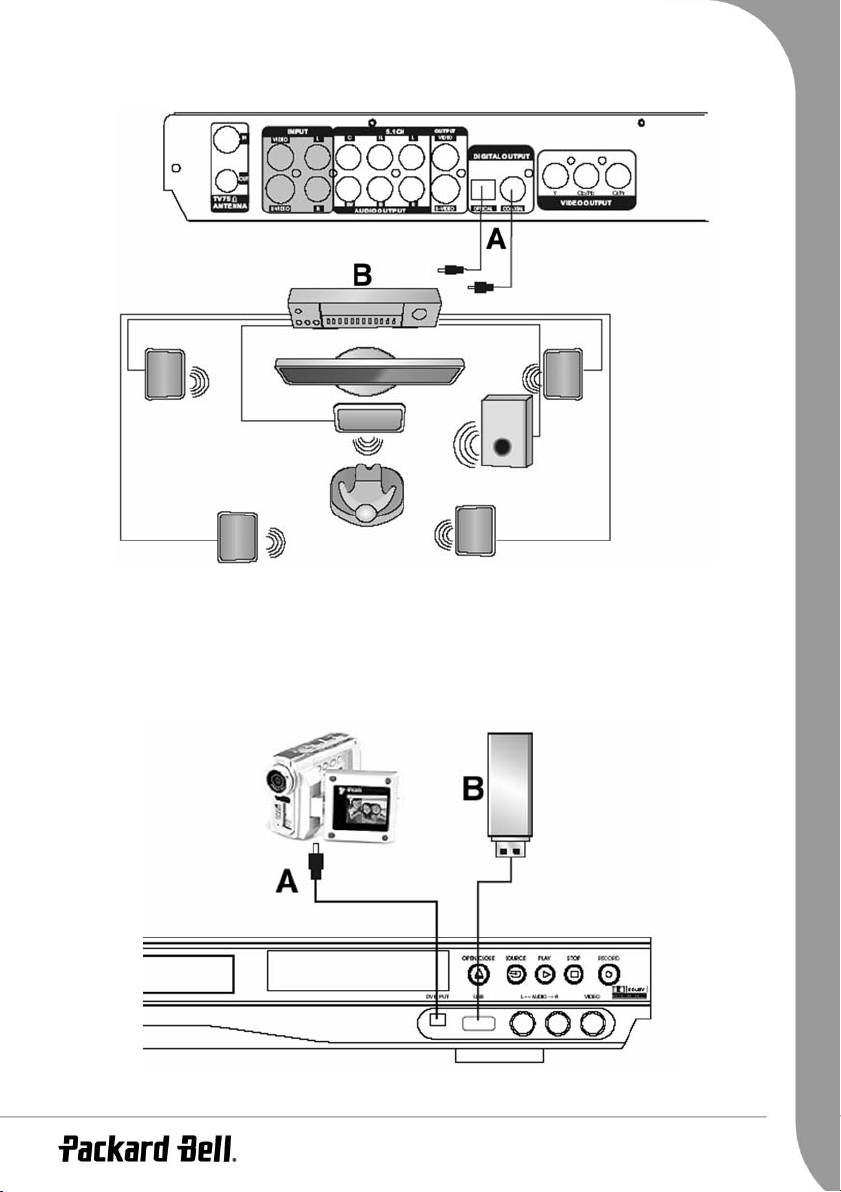
A Coaxial or Optical audio cable. See your amplifier’s user guide for which type to use.
B Amplifier
• In Audio Setup, set the Digital Output Mode to RAW Output.
Connecting an external device for recording via the FRONT panel
English -
13
Page 14
A. Digital Vidicon
B USB storage device
NOTE - Refer to the manual of the connected system. Turn off the power and unplug both units before
setting up any connections.
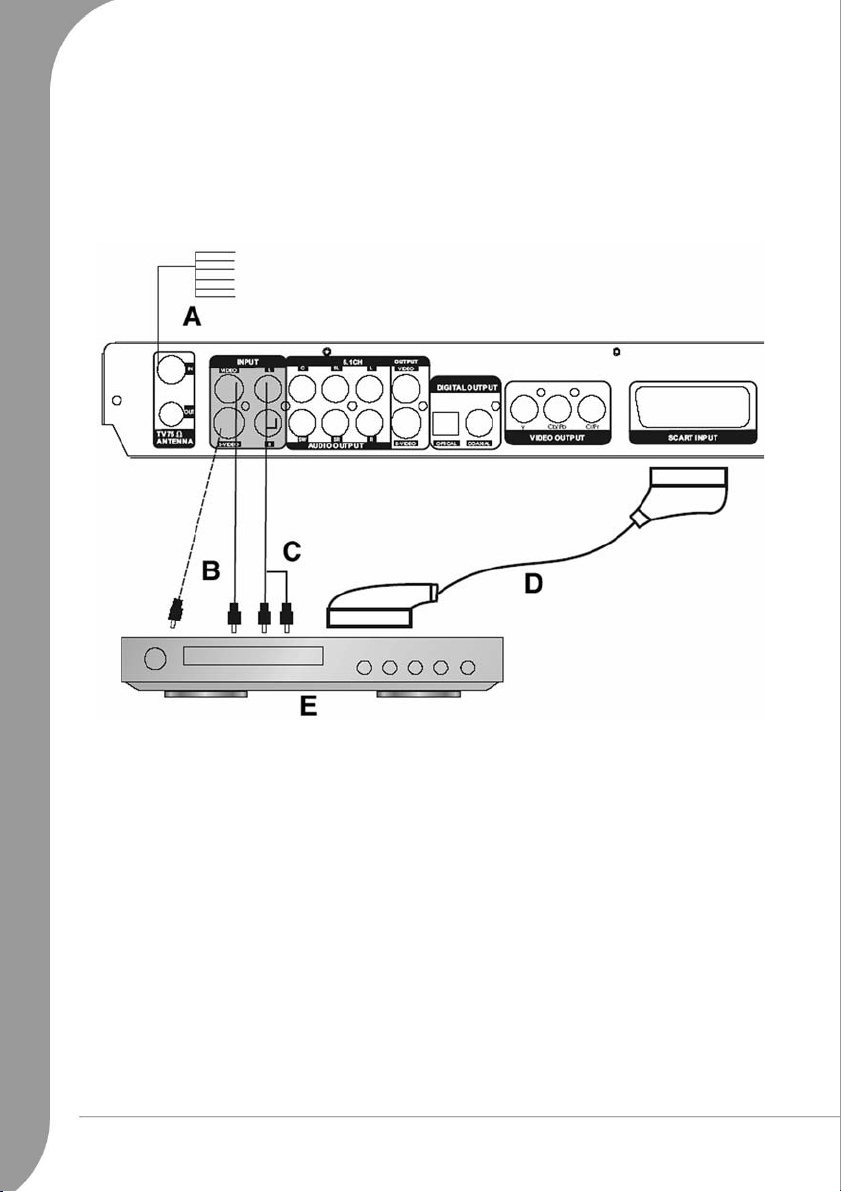
Connecting an external device for recording via the REAR panel
A. RF Input
B Video lnput (Video or S-Video)
CAudio Input
DSCART Input
EDVD Player
Connecting USB devices
The Easy HDD Recorder may interface with USB flash drives, USB memory card readers and USB cameras
that are compatible with the Mass Storage Class.
You can view one or many JPEG pictures in sequence.
Once the USB device is connected to the USB port, press the DV/USB button twice to switch to USB mode.
This will bring up the file selection menu. You can browse the content of the USB device using the Up,
Down or Select buttons.
Note: It may take a few seconds for a USB device to be recognised.
Note: The mass storage device must be FAT32 formatted.
Navigation Mode
The Navigation Mode can realise all functions of the unit.
14 -
Packard Bell Easy HDD Recorder User's Guide
Page 15
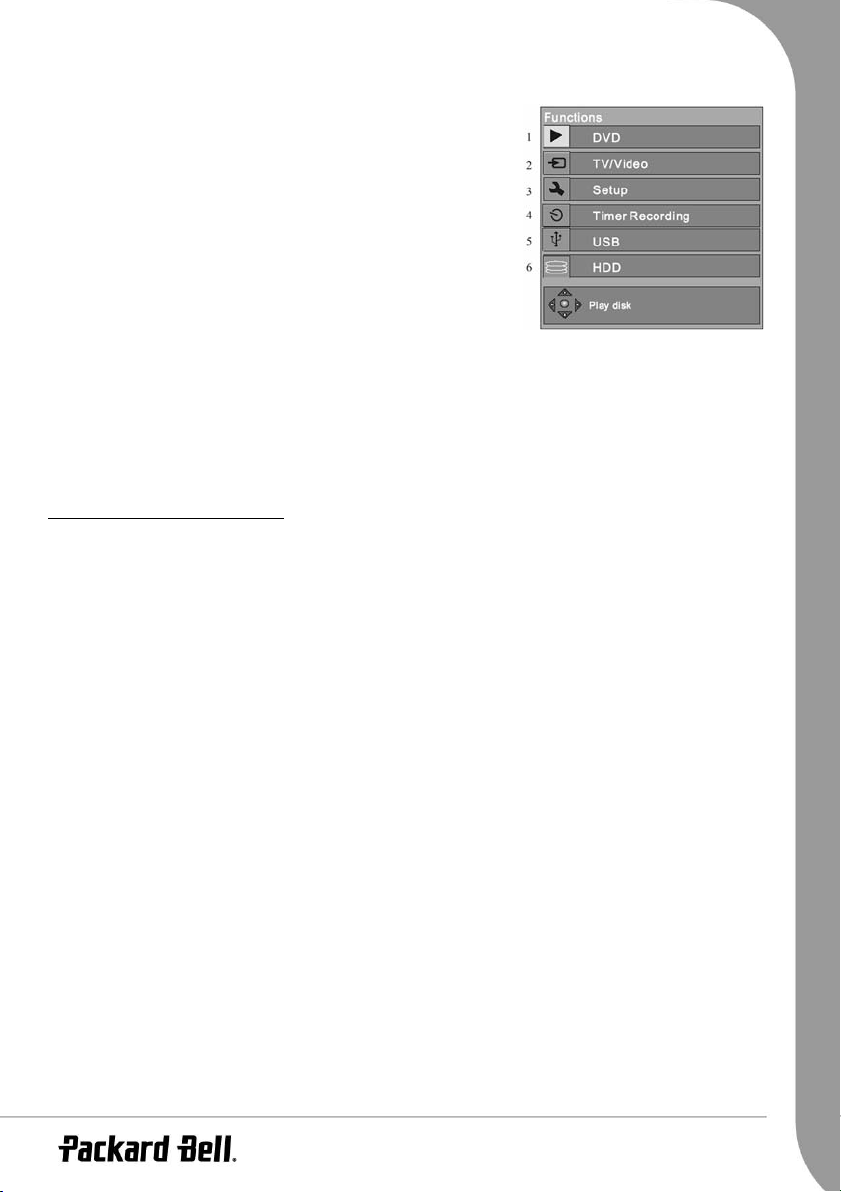
Press the Navigation button of the remote control to display the screen on the right.
1. Switch to DVD Playback Mode.
2. Switch to TV/VIDEO Mode.
3. Switch to System Setup Mode.
4. Switch to Timer Record Mode.
5. Switch to USB Playback Mode.
6. Switch to HDD Playback Mode.
Scan for TV channels
If you want to watch or record TV programs, you must first perform a
TV channel scan:
• Press the Setup button to access the system menu when the playback is stopped.
• In the Recording section use the arrow buttons (Up/Down) to highlight the
then press the Select button to view the country list.
• Choose your country from the list and press the Select button.
APS
• Use the arrow buttons (Up/Down) to highlight
• Use the arrow buttons (Up/Down) to highlight
Channel Edit
the
menu.
and press the Select button to start scanning.
Modify channel
, and press the Select button to access
Country Selection
icon, and
Note: If you are using the Time Shifting features, turn Time Shifting off before continuing.
Modify Channel Information Menu
Program Number: The number of the current channel, this item can not be modified.
Name: Use the arrow buttons (Up/Down/Left/Right) to select and edit channel name.
Standard: The transmission standard of the current channel. You should choose the correct standard
according to the local TV signal.
Search type: Use the arrow buttons (Up/Down/Left/Right) to select scan mode. There are two modes:
Frequency
Band: The band of this channel. You can select
Channel: Use the arrow buttons (Up/Down/Left/Right) to select and edit channel name.
Fine tune: Fine tune current channel.
Delete: To delete the current channel from the channel list.
OK: Confirm the settings for the current channel and save.
Cancel: Discard current settings and exit the menu.
• Use the arrow buttons (Up/Down) to select
channels.
• Use the arrow buttons (Up/Down) to select the channel you want to sort, press the Right button to confirm your selection. The selected channel will be temporarily moved to the panel on the right. Use the
Up/Down buttons to move the selected channel to the desired position and press the Left button to
insert it into the channel list.
and
Channel
. In Frequency mode, the Band item will not be displayed.
Standard
or
Cable
Program Table
, and press the Select button to sort the TV
.
English -
15
Page 16
• Change the system date and time with the arrow buttons.
DISC TYPES
DVDs
The whole disc is divided up into smaller, more manageable sections so that you can find specific content
more easily. DVD discs are divided into one or more titles. Each title may be further divided into several
chapters. Occasionally, a chapter may contain index points, effectively dividing the chapter up into several
parts, too.
Multi-Angle
You can view scenes from different camera angles when watching movies or other media with multiple angle
playback available.
Multiple Audio Languages
You can select the expected language on when watching movies or discs that have multiple languages and/
or audio soundtracks recorded on them.
Multi-Language Subtitles
You can select the expected subtitle language or turn subtitles off when watching movies or discs that have
multi-language subtitles recorded on them.
SVCD/VCD/AUDIO CDs
SVCD/VCD/AUDIO CD are divided into a number of tracks. A track may contain a number of index points
occasionally, which effectively divides the track up into several parts.
MP3 /JPEG/DivX (Audio/Image/Video files)
MP3 is a compressed audio file format that uses the file extension “mp3” or “.MP3”. JPEG is a compressed
image file format that uses the file extension “.jpg” or “.JPG”. DivX is a compressed video file format that
uses the file extension “.avi” or “.AVI”.
NOTE: The Easy HDD Recorder may take a long time to display the list of disc contents if the disc contains
many songs/pictures or very long songs or large pictures.
16 -
Packard Bell Easy HDD Recorder User's Guide
Page 17

Playable And Writable Discs
DVD+RW (rewritable DVD discs)
DVD+RW is an erasable format. DVD+RW discs can be rewritten more than 1,000 times.
*DVD+R (write-once DVD discs)
DVD+R (write-once DVD discs) DVD+R discs can only be written once. Several recordings can be made on
the same disc as long as the disc is not finalised or full.
Note: If the disc is finalised, you can not edit or record on the disc, even though unused capacity may still be
available.
Should you wish to play a DVD+R created with your Easy HDD Recorder on another player, please make sure
it has been finalised. Likewise, you must use the "make compatible" option if you want to play a DVD+RW or
disc on another player.
Playable Discs
DVD Video (Digital Versatile Disc)
DVD-R and DVD+R (write-once DVD)
DVD-RW and DVD+RW (rewritable DVD)
DVD-RW discs must be recorded in video mode to be played by the Easy HDD Recorder.
Audio CD (digital audio disc)
Super Audio CD (only plays the CD layer of a hybrid SACD disc)
VCD (format 1.0, 1.1 and 2.0)
Super VCD
Audio CD-R (write-once CD) / MP3 Compressed Music
Audio CD-RW (rewritable CD) / MP3 Compressed Music
Unplayable Disc Types
• Unfinalised discs from other DVD/CD recorders.
• Not all CD-R, CD-RW, DVD-R, DVD-RW, DVD+R, DVD+RW discs are supported due to the type of disc
or the condition of the recording.
PLAYBACK MODE
DVD Playback
Playing ‘Ordinary’ DVD Discs (e.g. a DVD Movie)
1. Make sure all connections are correct, then plug the power cord into a wall outlet. Press the Standby/On
button on the front panel or the POWER button on the remote control to power on the Easy DVD
Recorder.
2. Insert a DVD disc. If the DVD picture does not appear on the screen, press the DVD button on the
remote control to switch to the DVD mode.
3. Use the arrow buttons to select the desired title.
4. Press the Select button. The selected title will start playing.
5. Press the Select button during the process of playback to display playback information.
English -
17
Page 18
6. Press the Select button again to view the playback control menu below. Press the LEFT arrow button to
shut down the menu.
7. To remove the disc, press the OPEN/CLOSE button on the front panel.
Playing Recordable DVD Discs (DVD+RW, DVD-RW, DVD+R or DVD-R)
1. Power on the Easy HDD Recorder.
2. Insert a recordable DVD disc.
3. If the DVD Index screen does not appear, press the DVD button on the remote control to switch to the
DVD mode.
4. Use the Arrow buttons (Up/Down) to highlight the desired title. Press the Select buttons to start playing.
5. Press the Stop button to stop playback, press the Play button to resume playback from the stop point.
Screen display
Press the Select button during playback to display the following information:
Playing Title - Playing Chapter - Audio Language - Elapsed Time
Disc menu
Press the DVD button to show the disc menu. The contents of this menu depends on the disc being viewed.
Use the arrow buttons to select your desired title, and press the Select button to play it.
Press a number button to play the desired title.
VCD Playback
VCD Disc Menu
Press the DVD button to show the disc menu (PBC ON).
Press a number button to play the desired title.
NOTE: Only for VCD 2.0 and above versions. When the disc is being played, number buttons will trigger no
action.
Playing in sequence
Press the MENU button to switch between VCD DISC MENU (PBC ON) mode and PLAY IN SEQUENCE
(PBC OFF) mode.
For VCD 1.0, 1.1 discs, the player will enter PLAY IN SEQUENCE mode after the disc is loaded. (These
types of discs can only be played in this mode.) In this mode, you can press the number buttons to select a
title to play. And the number buttons will also respond when the disc is being played. Some discs will start to
play automatically.
NOTE: Only for VCD and SVCD discs.
18 -
Packard Bell Easy HDD Recorder User's Guide
Page 19
General Playback Options
System menu
• Press the Setup button to show the system menu.
• Use arrow buttons to select your desired item, press the Select button to confirm your selection.
• Press the Setup button again to exit the menu.
Fast forward and fast reverse
Press the >> (Fast Forward) button to activate fast forward, press the << (Fast Reverse) button to activate
fast reverse. Press repeatedly to toggle through 4 different playback speeds.
NOTE: Press Play to resume normal playback.
Play
Press the Select button on the remote control or the Play button on the front panel to start playback.
Pause
Press the Pause button on the remote control to pause.
Skip
Press the >>| (Skip Forward) button to skip to the next title/chapter, press the |<< (Skip Reverse) button to
skip to the previous title/chapter.
Repeat
1. A-B Repeat
• Press the Select button twice to access the setup menu during playback.
•Use the Up/Down arrow buttons to highlight the Mode submenu, and press the Select button.
•Use the Up/Down arrow buttons to highlight the A-B REPEAT item, press the Select button to mark the
start point (A); press the Select button again to display the A-B REPEAT item and then press the Select
button for the third time to mark the end point (B). Then the section between the start point and end
point will be repeatedly played.
• Press the left arrow button to exit the setup menu.
2. Title/chapter repeat - Repeatedly press the Repeat button during playback to repeat title/chapter.
3. Repeatedly press the Repeat button until normal playback resumes.
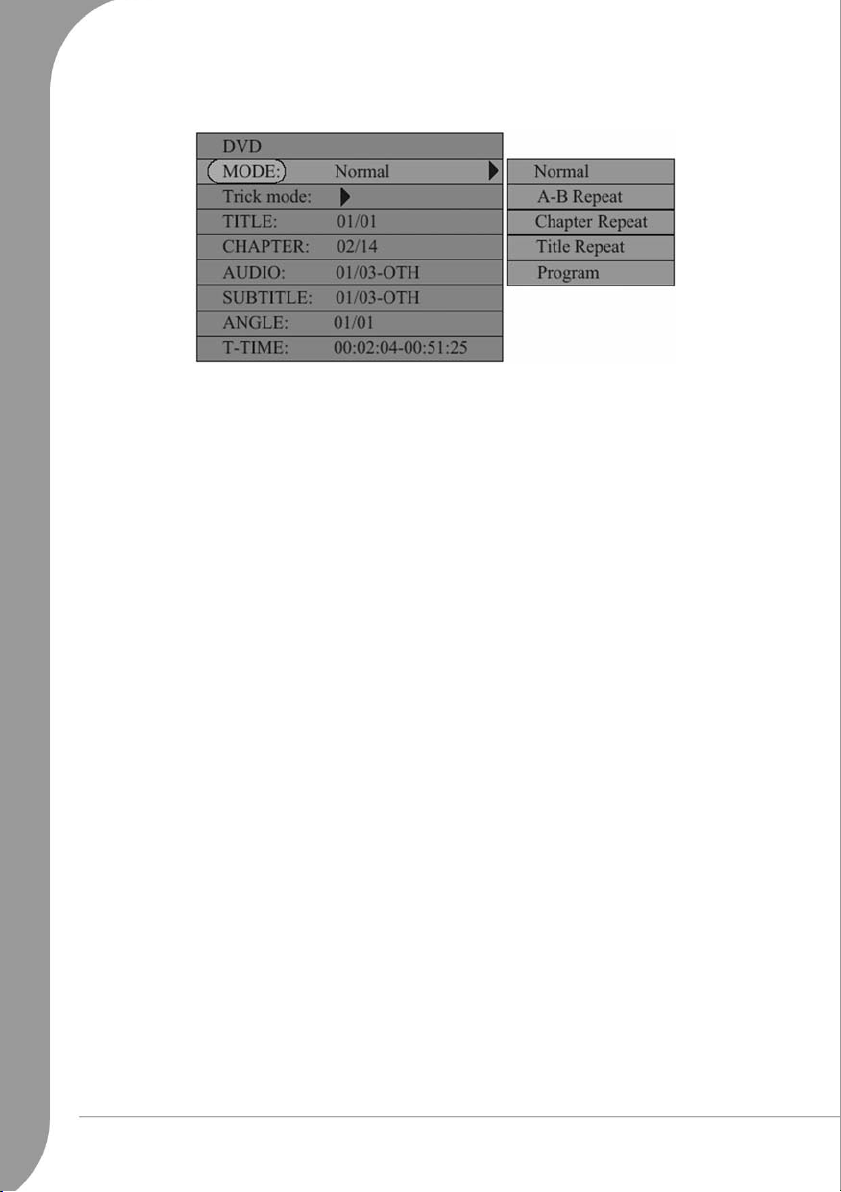
Controlling Playback with the Playback Menu
1. Press the Select button to show the control menu and select a submenu:
MODE: Set the playback mode, e.g.: Repeat, Program, etc.
TRICK: Set the playback status, e.g.: Stop, F.F., F.R., etc.
English -
19
Page 20
TITLE: Press the Select button and then enter the desired title number to jump to a title.
CHAPTER: Enter the desired chapter number to jump to the chapter.
AUDIO: Select the audio language you want to use, e.g.: FRE (French), ENG (English), etc.
SUBTITLE: Select the subtitle language.
ANGLE: Select the camera angle (must be supported by the disc).
T-TIME: Display the elapsed time and remain time.
2. Press the Left arrow button to exit the control menu.
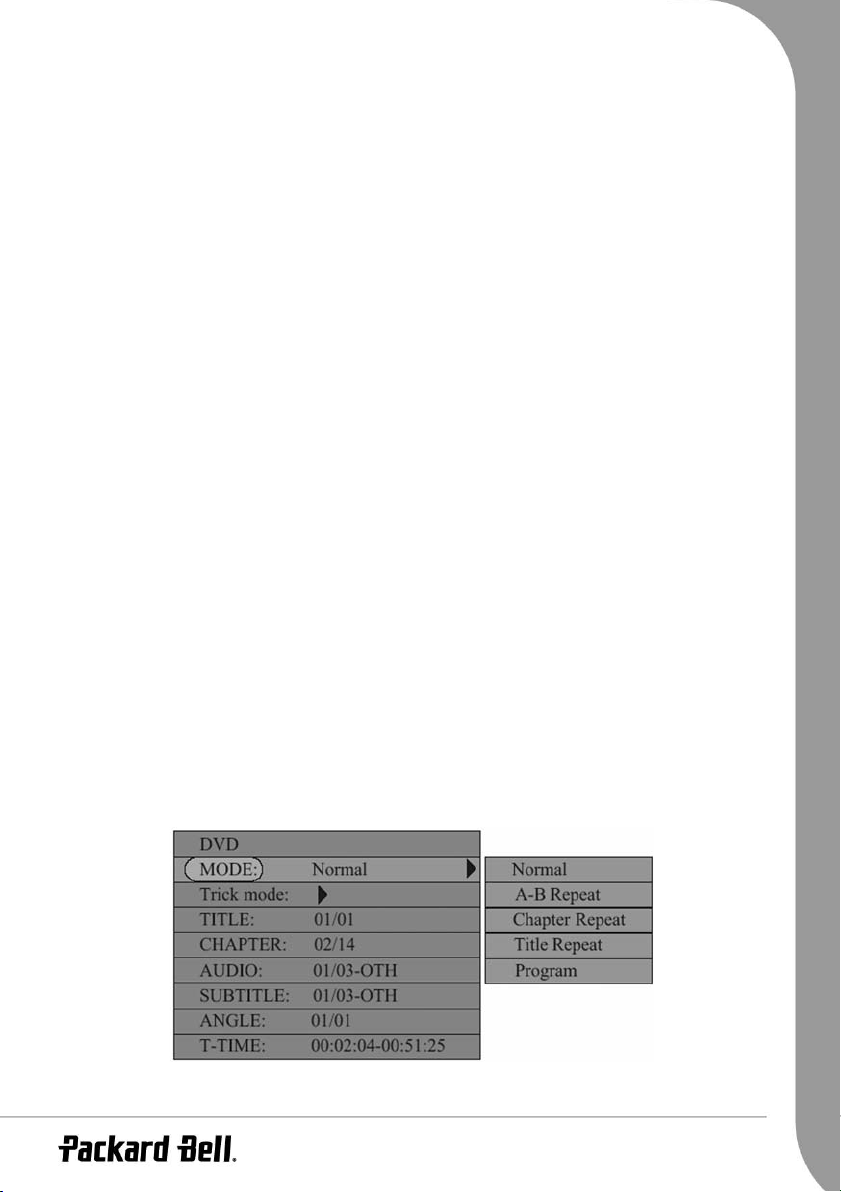
Programmed playing order
Access the playback control menu (as above).
Program
Select the Mode menu, then select
• Use the arrow buttons to highlight the title or chapter you want to program. Press the ADD/CLEAR button to add the title or chapter name to the right panel. Add as many of your favourite titles or chapters as
you wish.
• Press the Right arrow button to move the cursor into the right panel, press the ADD/CLEAR button to
remove title or chapter from the list.
• Press the Select button to start program playback.
• To exit program playback, press the Stop button or press the Select button to access the playback control menu and select
Normal
.
.
Audio language
Press the AUDIO button repeatedly to toggle between up to 8 audio languages or sound when the disc is
recorded with multi-languages.
For Karaoke discs, press the AUDIO button to switch between the accompanying music and vocal.
NOTE: Only for DVD/SVCD discs.
Subtitle language
Press the SUBTITLE button repeatedly to toggle between up to 32 subtitle languages when the disc is
recorded with multi-subtitles.
NOTE: Only for DVD/SVCD discs.
JPEG/MP3 Playback
1. Insert the disc. The file folder menu appears on the screen.
2. Use the arrow and Select buttons to select folders and Mp3/JPEG files for playback.
20 -
Packard Bell Easy HDD Recorder User's Guide
Page 21

3. If a disc contains JPEG and MP3 contents, the user can enjoy the pictures and music at the same time:
For JPEG/MP3 Simultaneous Slideshow, select the MP3 file then select the JPEG file. The MP3 and
JPEG files will playback in the order selected.
4. Press the Stop button to stop playback. For JPEG/MP3 Simultaneous Slideshow, press the Stop button
twice.
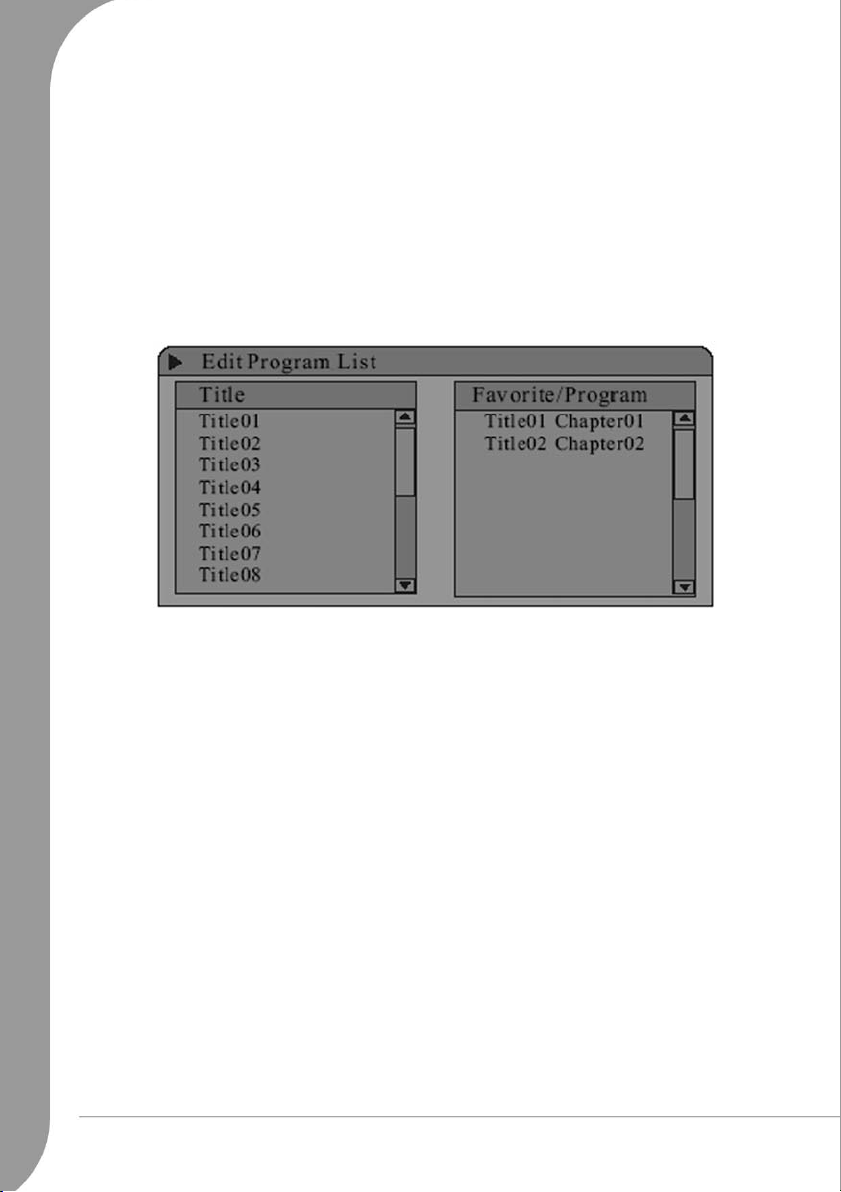
DivX Playback
If a disc contains DivX files, a playlist window will be displayed when the disc is loaded.
1. Use the Up/Down arrow buttons to select your desired file and press the Select button to play it.
2. Use the ADD/CLEAR button and the Up/Down buttons to make a favourite playlist in the right panel
and play files in your desired sequence (refer to Programmed Playing order).
Parental lock
Parental lock is a password protecting system. It enables the user to prohibit the Easy HDD Recorder from
playing some discs according to the information the disc carries.
To set parental lock:
1. Press the Stop button twice during playback.
2. Press the Setup button to access the system setup menu.
3. Press the Up/Down arrow buttons to highlight the
the selection.
4. Press the Up/Down arrow buttons to highlight the
5. Press the Select button on the remote control to display the level list.
6. Use the Up/Down arrow buttons to highlight the desired control level and press the Select button.
7. Press the number buttons to enter the password (the master password is 3308) and press the Select button.
8. Press the Setup button to exit.
Preferences
Parental Level
item. Press the Select button to confirm
item and press the Select button.
Changing the password
1. Repeat steps 1 to 3 as described above.
2. Use the Up/Down buttons to highlight
trol.
3. Enter the old password in the first block (the master password is 3308); and then enter the new password in the second block and again in the confirming block. Press the Select button to save the new password.
4. Press the Setup button to exit the setup menu.
Change Password
and press the Select button on the remote con-
RECORDING/TIME SHIFTING
When the Easy HDD Recorder is on or you press the SOURCE button to switch to TV mode, the last viewed
TV channel will be displayed and Time Shifting starts automatically. Time Shifting allows a live TV broadcast
to be paused for up to
to play the recording. If the system is paused until reaching the time limit, it will automatically resume TV
viewing.
To Record using Time Shifting
180 minutes. Press the Pause button to pause the broadcast, and press the Play button
English -
21
Page 22

1. Press the HDD button followed by the SOURCE button.
2. During the recording you can press the REC/OTR button repeatedly to increase the length of the program you are saving by 30 minutes. If the scheduled time exceeds the recordable time of the disc, normal
recording mode will restore.
Recording source
You can select which video source that the recorder should use for Time Shifting. The following video
sources are available:
Rear CVBS (Composite)
Rear S-Video
Tuner
Front CVBS (Composite)
DV Input
Press the SOURCE button repeatedly to select a video source.
Note: Time Shifting cannot be used with a DV (Digital Video) source.
You can navigate in Time Shifting mode and control the audio output by using the following remote control
buttons:
Button Result
Change the channel
CH+/-
By default, changing the channel will erase all Time Shifting stored for the current channel.
This option can be reset in the Setup->TimeShift->Time shift buffer mode -> Preserve.
0-9 Change the channel.
FWD Forward. Press to cycle through 4X, 8X, 32X speeds.
REV Reverse. Press to cycle through 4X, 8X, 32X speeds.
V+/- Increase/decrease volume.
Replay Jump back 10 seconds. (Left arrow button)
Skip Jump forward 10 seconds. (Right arrow button)
Mute Audio On/Off.
If you are using the default value of SETUP->TimeShift->TimeShift buffer mode->Refresh, and change Channels, the Time Shifting buffer data will be lost. No message will be provided prior to doing so. However, if you
set SETUP->TimeShift->TimeShift buffer mode->Preserve, and change channels, the Time Shifting buffer data
will be maintained.
Note: If you change the source of video, the Time Shifting buffer data will be erased.
Note: During Time Shifting, a Timer recording may be displayed. As you cannot watch one program in Time
Shifting and record another channel, the recorder will prompt you to confirm if you want to keep the current
channel or proceed with Timer recording. If there is no response, the recorder assumes Timer recording should
be started. The message will appear 2 minutes before the Timer recording is due. After the recording time limit
22 -
Packard Bell Easy HDD Recorder User's Guide
Page 23
has been reached, the buffer will be progressively overwritten. If you need to keep the video contained in this
buffer for future usage, you can save all or part of the buffer.
Save
To save video data in Time Shifting buffer:
While viewing a program, press the REC/OTR button. This will start saving the segment your are watching.
You can navigate forward. During the saving operation, by pressing the REC/OTR button, you will increase
the length of the program you are saving by 30 minutes. Press Stop to indicate the end of the saving
operation. The saved part of the time shifting buffer will be displayed in red.
Note: You cannot change the channel or the source if a recording is active (if the end of the recording segment
has not been entered, or in the case of long recording, it has not been reached). If you attempt to change the
channel or source, the Easy HDD Recorder will prompt you to stop recording. The segment will be saved on
HDD and then the channel or source will be changed.
Note: Only one segment in the Time Shifting buffer can be identified for saving. It is not possible to identify
multiple segments. Once the segment has been saved and registered on HDD Title list, then this segment (and
any recording before the segment) will be removed from the Time Shifting buffer.
Note: If you are using SETUP->TimeShift->Time shift buffer mode->Preserve, you can only save a segment
from the a single source or channel - you cannot save a sequence of channels. In this case, saved programs will
be removed from the Time Shifting buffer when Stop is pressed. The Easy HDD Recorder will SAVE the Time
Shifted programs immediately if the system is powered down.
While in Time Shifting mode, you can use the following buttons for other operations:
Button Result Note
HDD HDD title list Recording continues
DVD Play disc Recording continues unless you want to record to DVD
EJECT Open/close the tray Recording continues
POWER Power off
Setup Bring up SETUP menu Recording continues
SOURCE Change the video source
Note: (option: SETUP->TimeShift->Space Management->Automatically). If no more space is available on the
HDD before a recording is stopped, the Easy HDD Recorder will erase the oldest (un-protected) titles on the
HDD. It will not erase titles that are selected to be copied to DVD. If despite this procedure, there is no space
on the HDD to record, the recorder will stop recording and display a prompt to erase some titles and make
more room on the HDD.
Note: (option: SETUP->TimeShift->Space Management->Manually). If no more space is available on the HDD
before a recording is stopped, the recorder will stop recording and display a prompt to erase some titles and
make more room on the HDD.
You can use the SETUP->TimeShift->Empty hard disk option to erase all contents on the HDD. Please
proceed with caution, as this process is irreversible. The recorder confirm that you want to erase all contents.
English -
23
Page 24

Recording to DVD
Press the TIMESHIFT button once to switch to manual recording mode, and press the REC TO button to
switch to DVD record source.
If there is a recordable media in the disc tray, press the REC/OTR button and start recording (OTR) to DVD.
Press the STOP button to finish recording.
Note: The Recorder will continue to record until the disc is full. To set the Recorder to record for 30 minutes
only, press the REC/OTR button after recording has started. A message will be displayed on the screen indicating that the Recorder will record for 30 minutes. Each time the REC/OTR button is pressed, an additional
30 minutes will be added to the record time. To pause the recording, press the PAUSE button on the remote
control. Press the PAUSE button or the REC/OTR button to resume recording. Recording will continue until
the STOP button on the remote control or the Recorder front panel is pressed. Press the remote control
Timeshift button once, turn on Timeshift mode, press the Timeshift button twice, switch to manual
recording mode to display the chart below.
Note: In the display chart, you may press the REC TO button to switch between HDD or DVD Record
source.
Recording quality
Seven different record qualities can be set for recording. Higher quality will consume more space on HDD or
DVD disc, reducing the overall time that may be recorded.
Record Quality Recording Time
(4.7GB, DVD)
HQ (High Quality) 1 hour Approx. 17 hours Best
SP (Standard Play) 2 hours Approx. 34 hours Very Good
SP+ (Standard Play) 3 hours Approx. 51 hours Good
EP (Extended Play) 4 hours Approx. 68 hours Normal
LP (Long Play) 5 hours Approx. 85 hours Moderate
SLP (Super Long
Play)
6 hours Approx. 102 hours Low
Recording Time
(80GB, HDD)
Video Quality
Note: Choose the record quality carefully to ensure that there will be enough space available for your recording
on the HDD or DVD. If the recording is too big to place on a DVD it can be divided into smaller parts, see the
Dubbing section for more information.
24 -
Packard Bell Easy HDD Recorder User's Guide
Page 25

Chapter markers
You can set up the recorder to automatically insert chapter markers into each program recording to allow
faster navigation during playback. This feature automatically inserts markers at 10 minute intervals during
recording. The interval can be changed in the Setup menu: OFF (no marker), 5 min., 10 min., 20 min. or 30
min.
• Press the Setup button on the remote control.
• Highlight the
• Highlight
• Select an item in the list and press the Select button.
Recording
Auto Chapter Marker
menu and press the Select button.
item and press the Select button.
TIMER RECORDING
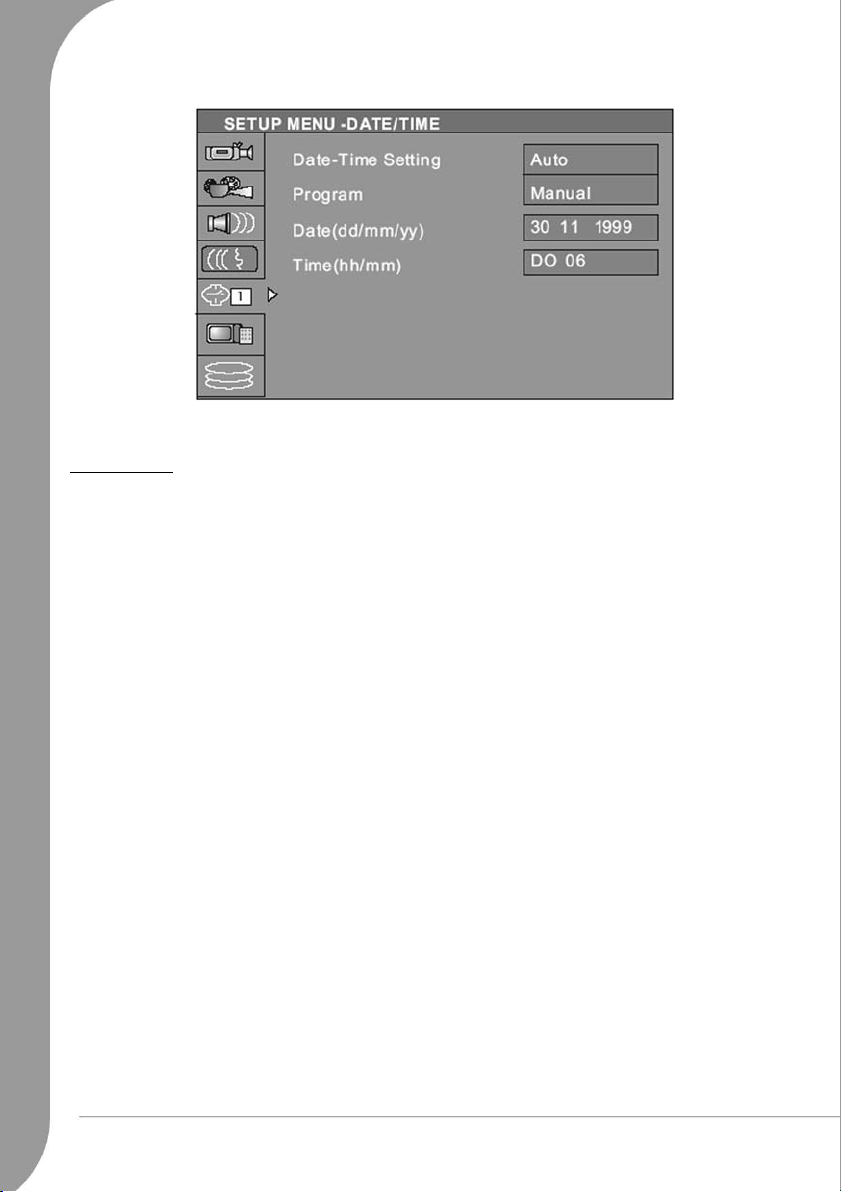
Setting the clock
1. Press the Setup button to access the setup menu.
2. Use the arrow buttons to highlight the
3. Change the system date and time with the arrow buttons.
Date/Time
icon, and press the Select button.
English -
25
Page 26
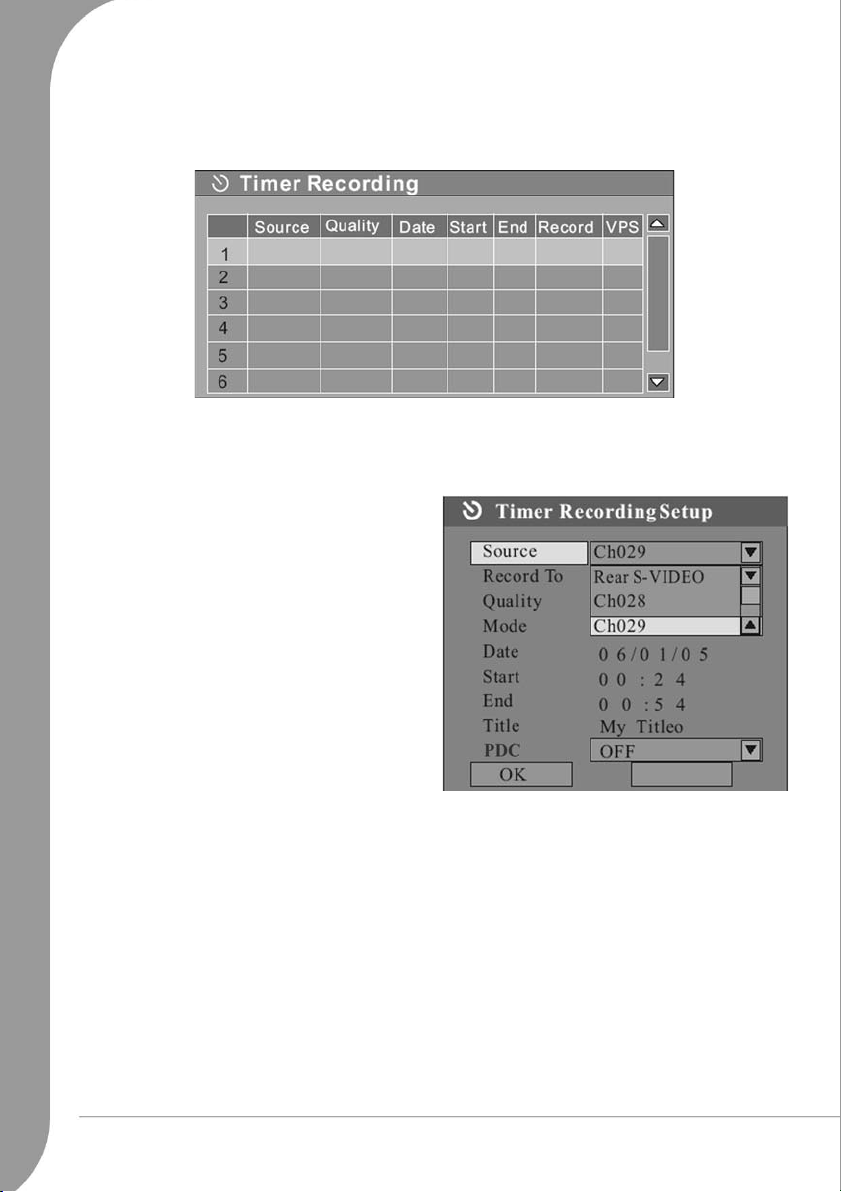
Scheduled recording
1. Make sure the clock is set accurately to your local time.
2. Press the Timer button to display the record scheduler.
NOTE: To delete a programmed event, use the Up/Down arrow buttons to highlight it and press the ADD/
CLEAR button.
3. Use the
4. The following are descriptions of the items in the
5. Move cursor to the
6. Several minutes before the time recording event begins, a dialogue box will appear on your TV screen
Up/Down
logue box will appear.
dialogue box:
Source: Select your input source.
Record To: Choose between HDD or DVD.
Quality: Select the record quality.
Mode: Select the record mode (once, daily or
weekly).
Start: Select the start time of time recording
event.
End: Select the end time of time recording event.
Title: Input a title for the recording.
PDC: When this function is on, the system will
track down and record the TV signals automatically according to the starting time. It can also
pause or stop recording automatically according
to the information given by the TV signals.
prompting you to confirm or cancel the event. If you do not make any selection, the timer recording will
proceed as scheduled.
arrow buttons to highlight an event and press the Select button. The Item Editor dia-
OK
button and press the Select button to save your settings.
NOTE:
• If the recorder is in standby status, it will automatically power on two minutes before the start of the
time recording event.
System time adjustment
The Easy HDD Recorder can automatically adjust the system time according to the time code it receives from
the television station. Only the time code integrated in the first TV channel can be used by the appliance.
The TV signal must incorporate a time code for this function to work.
26 -
Packard Bell Easy HDD Recorder User's Guide
Page 27

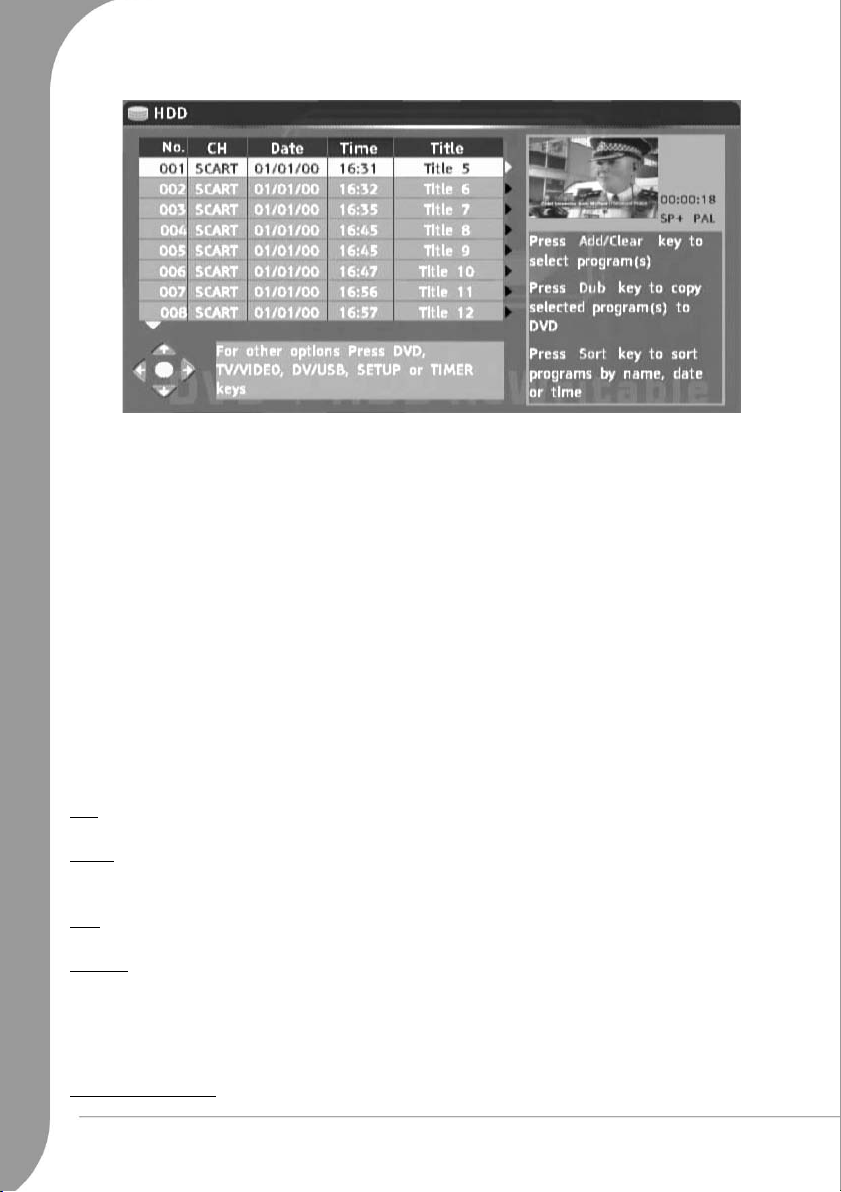
HDD title list
Press the HDD button to show the HDD title list.
The title list presents a list of all the programs you have saved on the HDD. The list includes the duration, a
thumbnail picture and the recording mode (HQ, SP etc.) for each program. The list also shows if a program is
protected or locked. The title list also allows you to select title(s) for ‘dubbing’ to DVD (see below), play a
program or to edit a program.
Dubbing
Before selecting programs for dubbing, insert a recordable disc into the disc tray. If this is the first time the
disc has been used the Easy HDD Recorder may take a few seconds to format the disc, determine compatibility and free recordable space. During this time you will see the
The percentage of available disc space is displayed in the lower right corner of the HDD title list screen. You
may select one or more programs from the HDD title list screen, which will be copied to the optical disc. Use
the arrow buttons to navigate the list and press ADD/CLEAR to select the highlighted program for dubbing.
Once a program is selected for dubbing, an icon will appear next to the title name. You can press the ADD/
CLEAR button again to remove the selection. As you select or deselect programs, the disc capacity information will be updated. If the program you selected is larger than the space available on the disc, the
recorder will display a warning message.
Loading
logo.
If the recording is too big to place on the DVD it can be split into smaller parts:
1. Select the title to be split in the HDD menu.
2. Press the Right arrow button on the remote control to open the sub menu.
3. Use the Up/Down arrow buttons to highlight
4. During the subsequent playback, use either the Skip,
point in the recording to split from and press the Select to split.
5. Press the Select button again to confirm the split.
6. The original file will now be divided into two separate files accessible from the HDD menu.
Split
and press the Select button.
Fast forward or Fast reverse buttons to navigate to a
Note: You may want to rename the new file to associate it with the original.
Note: If the disc is replaced or removed prior to dubbing, all dubbing selections will be cleared.
Note: Locked titles cannot be dubbed to DVD.
English -
27
Page 28
Press the HDD button to start dubbing. Dubbing will copy the title(s) selected to the recordable DVD,
including properties such as title name, duration, index picture or chapter marks. Once dubbing starts the
recorder returns to Time Shifting mode. It is possible to press the HDD button and play any title on the HDD
while dubbing is in progress., however editing is not possible until the dubbing has finished. Once dubbing is
finished the HDD title list will be rest.
Note: If the writing to DVD fails at any point during this operation, a warning message will appear and the
HDD title list will be reset.
Editing HDD Titles
1. Press the HDD button to open the HDD title menu.
2. Use Up/Down arrow buttons to highlight the title you want to edit. If there are more than 8 titles, press
the Down arrow button to view the other titles.
3. Press the Right arrow button to open the sub menu.
4. Use the Up/Down arrow buttons to highlight one of the following options (explained below) and press
the Select button.
Play
Plays the selected title.
Delete
If a title is not Protected or Locked, you can select this option to delete it. You should take extra care confirm
the operation (as it is irreversible).
Split
This option brings up the Split screen. (see
Dubbing
section for more information)
Segment
This option brings up the Segment screen. You can navigate the program (similar to Playback screen) and
mark a location for the beginning of a segment followed by a location for the end of a segment. The segments
will not be visible if the title is played back. Also the segments will not be copied to DVD if the segmented
title is selected for Dubbing. If you re-enter the segment screen for the same title, you can see the identified
segments.
Change Index Picture
28 -
Packard Bell Easy HDD Recorder User's Guide
Page 29
This option brings up the Change Index Picture screen. You can navigate the program (similar to Playback
screen) and when the desired picture is display on the screen press the Select button to change the Index
picture.
Note: This operation is available only if the title is not protected or locked
Rename
This option brings up the on-screen keyboard. You can type in the title name for the title. Use the Arrow
buttons to highlight the desired key, and the Select button to select.
Note: This operation is available only if the title is not protected or locked
Lock
Lock or unlock the selected title.
Protect
Protect (Playback only, no editing possible) or Unprotect the selected title.
Editing DVD+RW Titles
The following instructions are only for DVD+RW discs. Because DVD+R discs cannot be repeatedly recorded
or edited, the operations mentioned below do not work on these discs.
1. Insert a DVD+RW disc with recorded contents into the disc tray. The DVD Index Screen appears (if the
screen does not appear, press the DVD button.)
2. Use Up/Down arrow buttons to highlight the title you want to edit. If there are more than 3 titles, press
the Down arrow button to view the other titles.
3. Use the Up/Down arrow buttons to highlight the item you want to select, and press the Select button to
confirm your selection.
Play title - Play current title.
Edit title - Edit current title. e.g. add chapter markers, hide or unhide a chapter, replace the index picture
of a title, or split one title into two titles, etc.
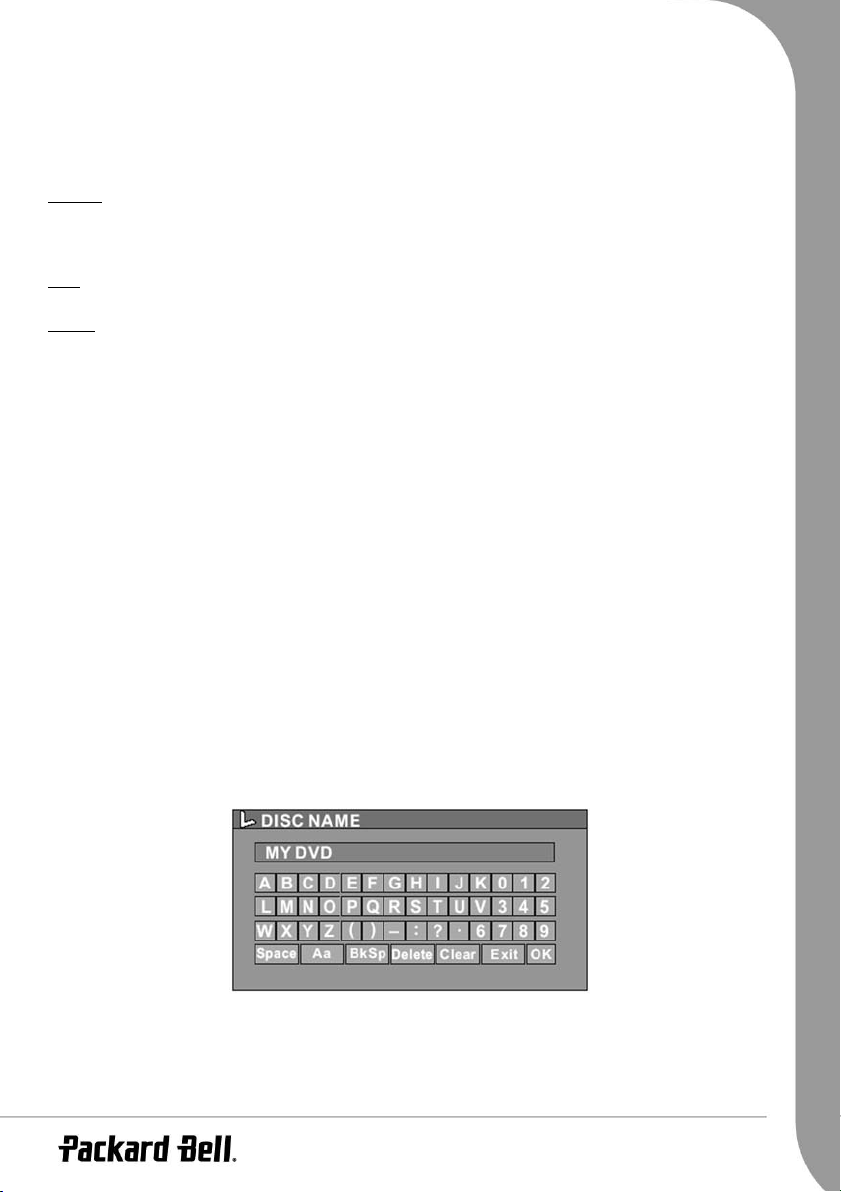
Rename title - Rename current title. Press the Select button on this item, a virtual keyboard will appear on
your TV screen.
Use the arrow buttons to highlight the letter or character you want to input, and press the Select button
to confirm it.
OK
Select
and press the Select button to save the name.
NOTE: The maximum length of a title name is 9 characters.
Overwrite title - To replace a previously dubbed session with newly recorded contents, overwriting the
session. If the new session is shorter than the original session, the remainder of the original session will
remain on the disk, as a new title. If the length of the new session is longer than the original title, the
recording process will automatically stop when it reaches the end of the original title.
Erase title - Erase current title.
English -
29
Page 30
Overwrite disc - The newly recorded contents will overwrite the whole disc, erasing all titles.
Append title - (This item only appears if you are editing the last title on the disc) Add a new title after the
last title on the disc.
Note:
• When you select Overwrite title/Append title/Overwrite disc, and press the Select button to confirm,
the signal source will be automatically return to the signal source used before starting the disc editing
operation was started. Use the SOURCE button to change the signal source and press the Select button
to directly go to the DVD disc title menu.
• The recording process will not start after you have selected Overwrite title/Append title/Overwrite disc
item, you have to press the REC/OTR button on the front panel or the remote control to start recording.
Editing a DVD+RW disc
1. Insert a DVD+RW disc into the disc tray.
2. Use the Up arrow button to highlight the top of the disc recording information bar.
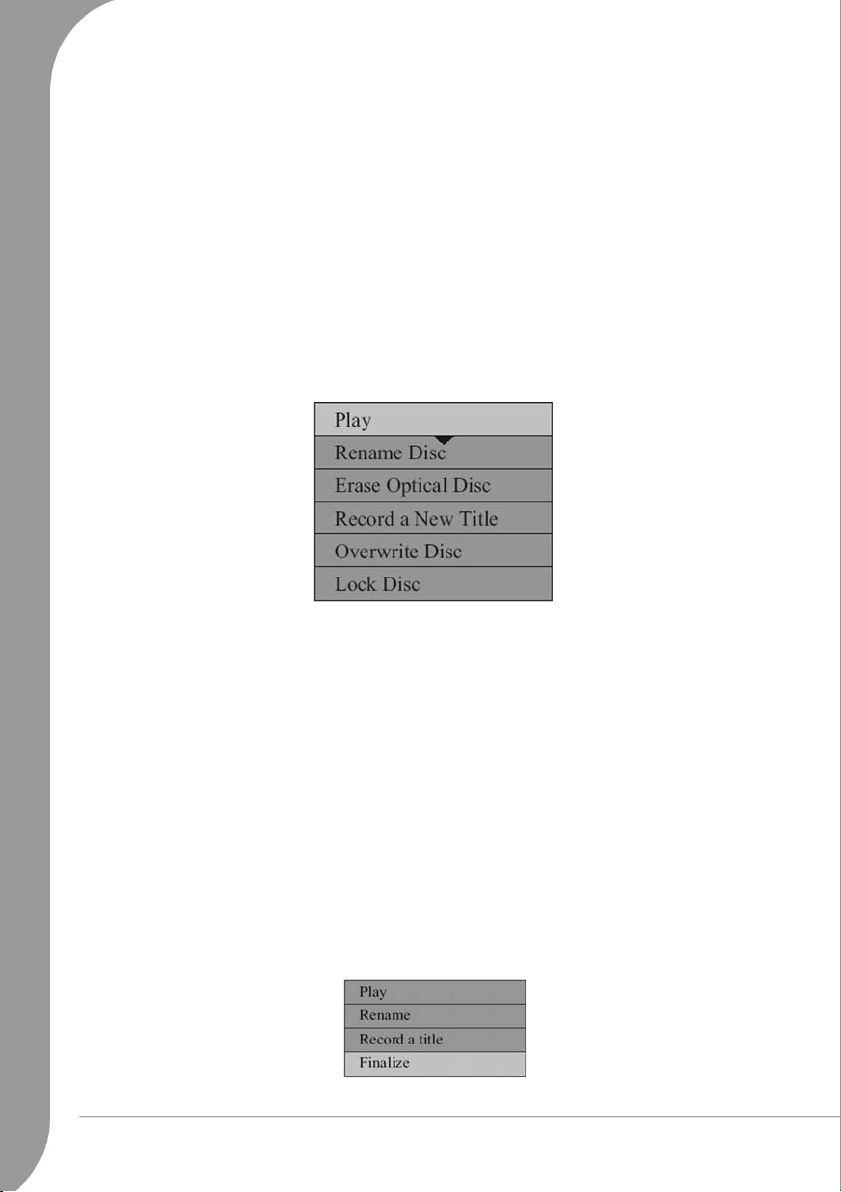
3. Press the Right arrow button to show the disc menu. Use the Up/Down arrow buttons to highlight one
of the items shown above (Play, Rename disc, Erase disc, Record a new title, etc.) and press the Select
button.
Operations:
• Play: Play recorded titles in sequence.
• Erase disc: Erase all contents on the disc.
• Rename disc: Rename the disc. Please refer to Rename title (above).
• Record a new title: Record new contents in a new title.
• Overwrite disc: Overwrite the whole disc from the start with new contents to be recorded.
Note: Refer to Editing DVD+RW Titles portion for New title and Overwrite disc operations.
• Lock disc: Lock the current disc to protect the data on it. The locked disc cannot be erased or recorded
till it is unlocked.
Editing a DVD+R disc
1. Insert a DVD+R disc into the disc tray.
2. Press the Up button to display the disc editing menu.
Operations:
30 -
Packard Bell Easy HDD Recorder User's Guide
Page 31

• Play: Play recorded titles in sequence.
• Rename disc: Rename the disc. Please refer to Rename title (above).
• Record a new title: Record new contents in a new title. This title will be the last title on the disc.
• Finalise disc: Finalise a DVD+R disc. Before a disc can be played in other DVD players, it must be finalised in the Easy HDD Recorder. Once this process is completed, no further recordings can be added.
English -
31
Page 32

TROUBLESHOOTING
Problem Solution
• Connect the audio cables into the connectors securely.
• Verify the connection from the HDD recorder audio output to the TV or
No sound
• Refer to your audio amplifier owners manual.
receiver audio input. Make sure the correct AUDIO input is selected on your
TV or amplifier.
No picture
(Black screen)
No response
Remote control
does not work
Cannot play disc
Poor playing
quality (distorted
picture/sound)
• The scan mode of video output is incorrectly set. Press the PS/IS button on
the remote control to switch to correct mode.
• Connect the power plug into the wall outlet securely.
• Timer recording is active. Press Power or Stop to cancel time recording.
• The appliance might have encountered a technical failure. Unplug the power
supply and wait for 30 seconds before connecting it to the wall outlet again. If
it still doesn't work, try to restore the Easy HDD Recorder to its factory settings.
• The remote control is not pointing at the Easy HDD Recorder. Please aim at
the Easy HDD Recorder.
• Batteries are flat, replace batteries.
• The appliance might have encountered a technical failure. Unload batteries,
wait for 30 seconds before place them back into the remote control.
• Blank disc, replace the disc.
• Incompatible disc: please refer to the list of supported disc types.
• The disc is loaded with label side down. Make sure to load the disc with label
side up.
• Wrong region code. The region code does not match the region setting of the
Easy HDD Recorder.
• Parental lock is on. Unlock the parental lock. Default password is 3308.
• Choose channel number on the TV set. Choose a correct channel number.
• The connection between the Easy HDD Recorder and TV set is loose. Check
the connection.
• The TV set is not adjusted to the best status.
• The disc is dirty, clean the disc.
• Interference may also make the picture distorted.
32 -
Packard Bell Easy HDD Recorder User's Guide
Page 33

Cannot record
Time recording
does not work
• The TV channel you want to record is not saved yet, or you have chosen
wrong channel number. Please check the saved channels.
• The disc is write protected. Remove the written protection or change a disc.
• The disc is a closed DVD+R disc. Change a disc.
• TV system mismatch. Please make sure the disc has not been recorded in different video format (e.g. PAL or NTSC). The Easy HDD Recorder does not
support recordings of different video format on the same DVD+R/RW disc.
• The disc you use may not conform to the DVD+R/RW standards.
• The recorder does not record to CD-R/RW, DVD-RAM or DVD-R/RW discs.
• Please make sure the disc has not been used in a computer before.
• The date or time is not correctly set, please check the date and time.
• The time schedule is not correctly set, please check the time schedule.
• The disc is locked. Unlock the disc.
• The disc is a closed DVD+R disc. Change the disc.
DVD±RW disc
cannot be edited
TV signal has
picture or sound
interference
Distorted picture
or black and
white picture
No digital audio
output
• The disc is locked. Press the DVD button on the remote control and select
Unlock Disc to unlock the disc.
• Check the aerial.
• Check the selected TV system in the system menu. In mainland Europe, the
TV system should be PAL or SECAM.
• The disc's colour system does not match the TV's colour system.
• The signal is not a colour signal.
• Check whether the digital input connectors match the external instruments'
output connectors.
SPECIFICATIONS
Power supply AC110-240V 50Hz
Power consumption 40W
Power consumption (standby) 3W
Size (mm) 430 x 48 x 308
Weight approximately 4.0 kg
Humidity 15~75%
English -
33
Page 34

34 -
Packard Bell Easy HDD Recorder User's Guide
Page 35

English -
35
Page 36

FRANÇAIS
GUIDE DE L'UTILISATEUR DE L'EASY HDD RECORDER DE PACKARD BELL
Copyright © 2005 NEC Computers International BV. Tous droits réservés. Aucune partie du présent manuel ne peut
être reproduite ou transmise sous quelque forme ou par quelque moyen que ce soit, qu'il soit électronique, chimique,
manuel ou autre, y compris, sans que cette liste soit exhaustive, les systèmes de photocopie, d'enregistrement, de
stockage ou d'extraction de données, et ce quel qu'en soit le motif, sans l'accord préalable écrit de NEC Computers
International B.V.
DÉNI DE RESPONSABILITÉ
NEC Computers International BV n'offre aucune garantie explicite ou implicite, notamment (sans que cette liste soit
exhaustive) des garanties sur la valeur marchande ou l'adéquation de ce produit et de sa documentation pour un usage
spécifique. Les composants matériels sont régulièrement actualisés. Par conséquent, certaines des instructions, des
spécifications et des illustrations fournies dans cette documentation peuvent légèrement différer de votre situation.
Tous les éléments décrits dans ce guide ne sont fournis qu'à titre d'illustration et peuvent ne pas vous concerner.
Aucun droit statutaire ou autre ne peut être obtenu des descriptions figurant dans ce manuel.
NEC Computers International BV se réserve le droit de réviser, de modifier ou d'améliorer ce produit ou sa
documentation quand bon lui semble, sans en aviser quiconque. En aucun cas, NEC Computers International BV ne
pourra être tenu responsable des dommages indirects ou accessoires pouvant résulter de l'utilisation de ce produit, y
compris, sans que cette liste soit exhaustive, le manque à gagner ou tout autre dommage commercial.
MARQUES COMMERCIALES
Packard Bell est une marque déposée de NEC Computers International BV. Tous les autres noms de société ou de
produit cités sont les marques commerciales, les marques déposées ou les marques de service de leurs détenteurs
respectifs.
AVERTISSEMENT
Pour prévenir les risques d'incendie ou d'électrocution, ne branchez pas la fiche sur une rallonge, une prise électrique
ou tout autre connecteur de sortie, excepté si la fiche peut y être entièrement insérée. N'exposez pas cet appareil à
la pluie ou à l'humidité.
AVERTISSEMENT
RISQUES D'ÉLECTROCUTION.
NE PAS OUVRIR.
Le symbole en forme d'éclair
fléché placé dans un triangle
équilatéral informe l'utilisateur
de la présence de tensions
dangereuses non isolées au sein
du boîtier du produit qui sont
susceptibles de l'électrocuter.
AVERTISSEMENT : POUR
LIMITER LES RISQUES
D'ÉLECTROCUTION, NE
RETIREZ PAS LE CAPOT (NI LE
PANNEAU ARRIÈRE). LE
PRODUIT NE CONTENANT
AUCUNE PIÈCE REMPLAÇABLE
PAR L'UTILISATEUR, CONFIEZ
SA MAINTENANCE À DES
TECHNICIENS QUALIFIÉS.
CONSIGNES DE SÉCURITÉ IMPORTANTES
• Lisez ces instructions.
• Conservez ces instructions.
• Tenez compte de tous les avertissements.
• Suivez toutes les instructions.
• N'utilisez pas cet appareil près d'une source d'humidité.
36 -
Guide de l'utilisateur de l'Easy HDD Recorder de Packard Bell
Le point d'exclamation placé
dans un triangle équilatéral
informe l'utilisateur que des
instructions d'utilisation et de
maintenance (entretien)
importantes sont fournies dans la
documentation qui accompagne
le produit.
Page 37

• Nettoyez-le au moyen d'un chiffon sec.
• N'obstruez aucun des orifices d'aération. Installez cet appareil conformément aux instructions du fabricant.
• N'installez pas ce produit près de sources de chaleur, notamment des radiateurs, des bouches de chauffage, des
poêles ou d'autres appareils générant de la chaleur (y compris des amplificateurs).
• Ne retirez pas le dispositif de sécurité de la fiche polarisée ou de la fiche de terre. Les fiches polarisées sont
pourvues de deux lames, l'une étant plus large que l'autre. Les fiches de terre sont constituées de deux lames
et d'une broche de terre. La lame la plus large ou la broche de terre permet de garantir votre sécurité. Si la fiche
fournie ne s'insère pas dans votre prise, contactez un électricien pour qu'il remplace la prise obsolète.
• Installez le cordon d'alimentation de sorte que personne ne puisse marcher dessus et qu'il ne soit pas comprimé.
• N'utilisez que les fixations/accessoires spécifiés par le fabricant.
• Débranchez cet appareil en cas d'orage ou lorsque vous ne l'utilisez pas pendant de longues périodes. Veuillez
noter que la garantie de ce produit ne couvre pas les dommages résultant de la foudre.
• La maintenance de cet appareil doit être effectuée par des techniciens qualifiés lorsqu'il a été endommagé de
quelque façon que ce soit, qu'il a été exposé à la pluie ou à l'humidité, qu'il ne fonctionne pas normalement ou
qu'il est tombé.
• Vous devez débrancher le cordon d'alimentation pour couper l'alimentation de l'appareil. Il est donc impératif
que la prise de courant soit située tout près de l'appareil et qu'elle soit facilement accessible.
MISE AU REBUT DU PRODUIT
Conformément aux exigences de la directive DEEE (Déchets d'Équipements Électriques et
Électroniques), les produits électriques et électroniques usagés doivent être détruits séparément
des ordures ménagères normales afin de promouvoir la réutilisation, le recyclage et d'autres formes
de récupération, ainsi que de limiter la quantité de déchets devant être éliminés et de réduire du
même coup les décharges. Cela comprend des accessoires tels que les télécommandes, les cordons
d'alimentation, etc. Lorsque vous vous débarrassez de tels produits, veuillez vous conformer aux
consignes des autorités municipales et/ou vous renseigner auprès de votre revendeur lors de
l'achat d'un nouveau produit.
Français -
37
Page 38

TABLE DES MATIÈRES
Caractéristiques de l'Easy HDD Recorder........................................................................................................... 39
Principales caractéristiques ......................................................................................................................... 39
Caractéristiques supplémentaires ................................................................................................................ 40
Premiers pas - Commandes ............................................................................................................................... 40
Préparation de la télécommande................................................................................................................. 40
Boutons de la télécommande...................................................................................................................... 41
Commandes et caractéristiques du panneau avant ...................................................................................... 42
Diagramme du panneau arrière .................................................................................................................. 42
Premiers pas - Branchement .............................................................................................................................. 44
Branchement sur un téléviseur................................................................................................................... 44
Branchement sur un amplificateur audio Dolby Digital 5.1.......................................................................... 45
Branchement sur un amplificateur avec décodeur Dolby Digital .................................................................. 45
Branchement de périphériques USB............................................................................................................ 47
Mode Navigation ....................................................................................................................................... 48
Recherche des chaînes TV .......................................................................................................................... 48
Types de disque ................................................................................................................................................ 49
DVD.......................................................................................................................................................... 49
SVCD/VCD/CD AUDIO ........................................................................................................................... 49
MP3 /JPEG/DivX (fichiers audio/image/vidéo) ......................................................................................... 49
Disques lisibles et inscriptibles .................................................................................................................... 50
Disques lisibles........................................................................................................................................... 50
Disques non lisibles.................................................................................................................................... 50
Mode Lecture ................................................................................................................................................... 50
Lecture de DVD......................................................................................................................................... 50
Lecture de VCD......................................................................................................................................... 51
Options de lecture générales ...................................................................................................................... 51
Lecture de Fichiers JPEG/MP3 .................................................................................................................. 53
Lecture de DivX......................................................................................................................................... 54
Verrouillage Parental.................................................................................................................................. 54
Enregistrement/Time Shifting ........................................................................................................................... 54
Enregistrement au moyen de la fonction Time Shifting................................................................................ 54
Enregistrement Sur DVD............................................................................................................................ 57
Qualité D'enregistrement ........................................................................................................................... 57
Signets De Chapitre ................................................................................................................................... 59
Programme d'enregistrement ............................................................................................................................ 59
Configuration De L'horloge ........................................................................................................................ 59
Enregistrement Programmé ........................................................................................................................ 60
Réglage De L'heure Du Système................................................................................................................. 61
Liste Des Titles Sur Le Disque Dur ............................................................................................................. 62
Montage .................................................................................................................................................... 62
Édition de titres sur disque dur.......................................................................................................................... 63
Édition de titres sur DVD+RW ................................................................................................................... 63
Édition d'un DVD+RW .............................................................................................................................. 64
Édition d'un DVD+R.................................................................................................................................. 65
Dépannage ....................................................................................................................................................... 66
Spécifications .................................................................................................................................................... 68
38 -
Guide de l'utilisateur de l'Easy HDD Recorder de Packard Bell
Page 39

CARACTÉRISTIQUES DE L'EASY HDD RECORDER
L'Easy HDD Recorder de Packard Bell peut coder des signaux TV, les signaux AV émanant de périphériques
externes ou les signaux numériques issus de périphériques IEEE 1394. De plus, il peut enregistrer des
données sur DVD+RW ou DVD+R à des fins de stockage. L'Easy HDD Recorder est également compatible
avec toutes les fonctions des lecteurs de DVD standard.
Principales caractéristiques
• Disque dur intégré et prise en charge de fonctions telles que le Time Shifting et la technologie Direct
Digital Dub.
• Lecture des DVD pré-enregistrés et des CD audio.
• Prise en charge du format MP3.
• Codec DivX pris en charge (abréviation de compression/décompression DivX).
• Son Dolby Digital pour un total de 6 canaux discrets ('5.1') (avant gauche, avant centre, avant droit,
arrière gauche, arrière et subwoofer).
Mode Time Shifting
Enregistrement et lecture simultanés de vidéos.
• Mise en pause et reprise de programmes TV en direct. Avance rapide, retour rapide et saut jusqu'à un
point quel qu'il soit de l'enregistrement.
• Relecture instantanée.
• Lecture d'un enregistrement préalablement enregistré tandis qu'un autre programme est enregistré.
Lecteur de DVD/CD
• Prise en charge des formats d'image TV 16:9 et 4:3.
• Fonctions de lecture parmi lesquelles Programme, Répétition, Avance/Retour rapide, Zoom, etc.
• Prise en charge de diverses langues pour la bande son, les sous-titres et le menu du disque. Prise en
charge de plusieurs angles de vue, ainsi que d'autres fonctions de lecture de DVD standard.
• Solution compatible avec les DVD, Super VCD, VCD, CD et CD-R et capable de lire des CD MP3, JPEG
et image.
• Technologie de protection contre les copies de Macrovision.
Enregistrement de programmes
• Enregistrement depuis un tuner TV ou une entrée AV analogique au format MPEG-2.
• Lecteur d'un programme préalablement enregistré depuis le disque dur tout en enregistrant un autre
programme.
• Minuterie programmable pour l'enregistrement d'un seul programme TV ou d'une émission télévisée
récurrente.
• Enregistrement temporel de 20 événements configurable au moyen de trois options : 'Une fois', 'Tous les
jours' et 'Toutes les semaines'.
• Enregistrement OTR rapide, enregistrement de programmes TV sur simple pression d'un bouton.
Archivage sur DVD ('montage')
• Archivage d'enregistrements hébergés sur le disque dur sur DVD+RW ou DVD+R.
• DVD enregistrés au moyen de l'Easy HDD Recorder compatibles avec la plupart des lecteurs de DVD
présents et futurs.
Français -
39
Page 40

Archivage de vidéos personnelles
• Transfert de vidéos d'un magnétoscope, d'un caméscope analogique ou d'un caméscope numérique (DV)
sur DVD au moyen de la technologie Direct Digital Dub™.
Connecteurs
• Connecteur d'entrée numérique (DV) pour les caméras vidéo numériques (les signaux audio et vidéo
sont transmis par le même câble).
• Connecteurs jack de sortie vidéo (CVBS), de sortie S-Video, d'ENTRÉE/SORTIE PÉRITEL et de sortie
vidéo en composantes (Y, Cb/Pb, Cr/Pr).
• Connecteur jack de sortie audio numérique coaxial.
• Interface avec les lecteurs flash USB, les lecteurs de cartes mémoire USB et les appareils photo USB (le
périphérique de stockage doit être formaté conformément au système FAT32).
• Transit des signaux par les connecteurs PÉRITEL et Antenne TV.
Caractéristiques supplémentaires
• Système de contrôle Niveau de verrouillage parental.
• Économiseur d'écran permettant de protéger l'écran.
• Balayage progressif créant une image présentant deux fois plus de lignes de balayage que la vidéo en
composantes traditionnelle, réduisant ainsi les papillotements de l'image et les artéfacts de mouvement
tout en améliorant la netteté de l'image sur les écrans de grande taille.
Ce produit intègre une technologie de protection contre les copies qui est
protégée par un brevet américain et d'autres droits de propriété intellectuelle.
Macrovision Corporation nécessite l'accord de Macrovision. Elle est exclusivement destinée aux utilisations
domestiques et autres applications Pay-Per-View limitées, sauf accord contraire de Macrovision autorisation
son utilisation dans le cadre d'applications d'écriture. L'apport de modifications au produit, le retrait de
composants et la rétro-ingénierie sont interdits.
L'utilisation de cette technologie de protection contre les copies développée par
PREMIERS PAS - COMMANDES
Préparation de la télécommande
La télécommande et les piles sont emballées séparément. Avant d'utiliser la télécommande, vous devez y
insérer les piles :
1. Munissez-vous de la télécommande et de deux piles AAA.
2. Retirez le cache du compartiment des piles sur la télécommande, insérez-y les piles (en respectant
l'orientation) puis réinstallez le cache.
Remarque : Lorsque vous utilisez l'Easy HDD Recorder, n'oubliez pas d'orienter la télécommande directement
vers l'enregistreur, et non vers le téléviseur !
40 -
Guide de l'utilisateur de l'Easy HDD Recorder de Packard Bell
Page 41

Boutons de la télécommande
Veuillez vous reporter aux chapitres appropriés pour une
description détaillée de ces boutons :
1. Bouton EJECT (éjecter)
2. Bouton DV/USB
3. Bouton HDD (disque dur)
4. Boutons NUMÉROTÉS (0-9)
5. Bouton SETUP (configuration)
6. Boutons GAUCHE/REPLAY (relire), HAUT, BAS,
DROIT/SKIP (sauter)
7. Bouton SELECT (sélectionner)
8. Bouton TIMER (minuterie)
9. Bouton TIME SHIFT
10. Bouton REC/OTR (ENREGISTRER/
ENREGISTREMENT IMMÉDIAT)
11. Bouton PLAY (lire)
12. Bouton STOP
13. Bouton REV (retour)
14. Bouton PREV (précédent)
15. Bouton FWD (avance)
16. Bouton NEXT (suivant)
17. Bouton AUDIO
18. Bouton MENU
19. Bouton SUBTITLE (sous-titres)
20. Bouton ZOOM
21. Bouton POWER (marche/arrêt)
22. Button SOURCE
23. Bouton DVD
24. Bouton GOTO (aller à)
25. Bouton ADD/CLEAR (ajouter/effacer)
26. Bouton NAVIGATION
27. Bouton RETURN (retour)
28. Bouton REC TO (enregistrer sur)
29. Bouton SLOW/SORT (lent/trier)
30. Bouton PAUSE/STEP (pause/image par image)
31. Bouton CHANNEL+ (chaîne+)
32. Bouton VOLUME+
33. Bouton CHANNEL- (chaîne-)
34. Bouton VOLUME-
35. PS/IS (BALAYAGE PROGRESSIF/ENTRELACÉ)*
36. Bouton REPEAT (répéter)
37. Bouton DISPLAY (affichage)
38. Bouton MUTE (sourdine)
Français -
41
Page 42

AVERTISSEMENT : Si vous appuyez sur le bouton PS/IS lorsque l'unité est branchée sur un téléviseur non
compatible avec le balayage progressif, l'écran devient noir, vous empêchant ainsi d'accéder aux différents
menus. Le cas échéant, appuyez de nouveau sur le bouton PS/IS pour revenir en mode de fonctionnement
normal.
Commandes et caractéristiques du panneau avant
1. BOUTON DU MODE VEILLE/DE MISE SOUS TENSION
2. TÉMOIN DE VEILLE
3. IR (CAPTEUR)
4. PLATEAU DU LECTEUR DE DVD
5. AFFICHAGE VFD
6. BOUTON D'OUVERTURE/DE FERMETURE
7. BOUTON SOURCE
8. BOUTON DE LECTURE
9. BOUTON D'ARRÊT
10. BOUTON D'ENREGISTREMENT
11. ENTRÉE VIDÉO COMPOSITE (AVANT)
12. ENTRÉE AUDIO (AVANT DROIT)
13. ENTRÉE AUDIO (AVANT GAUCHE)
14. ENTRÉE USB
15. ENTRÉE POUR VIDICON NUMÉRIQUE
Diagramme du panneau arrière
1. ENTRÉE DU SIGNAL RF
2. SORTIE DU SIGNAL RF
3. ENTRÉE VIDÉO COMPOSITE (ARRIÈRE)
4. ENTRÉE S-VIDEO
5. ENTRÉE AUDIO (ARRIÈRE GAUCHE/DROIT)
6. SORTIE AUDIO 5.1 (G, D, SG, SD, C, SW)
42 -
Guide de l'utilisateur de l'Easy HDD Recorder de Packard Bell
Page 43

7. SORTIE VIDÉO COMPOSITE
8. SORTIE S-VIDEO (ARRIÈRE)
9. SORTIE AUDIO NUMÉRIQUE-OPTIQUE
10. SORTIE AUDIO NUMÉRIQUE-COAXIALE
11. SORTIE VIDÉO EN COMPOSANTES (Y, Cr/Pr, Cb/Pb)
12. ENTRÉE PÉRITEL
13. SORTIE PÉRITEL
Français -
43
Page 44

PREMIERS PAS - BRANCHEMENT
Branchement sur un téléviseur
A. TV
B Sortie vidéo en composantes
C Entrée d'antenne RF
D Sortie d'antenne RF
E Sortie S-Video
F ENTRÉE S-VIDEO
G Entrée video
H Entrée PÉRITEL
Trois types de sorties vidéo sont disponibles : vidéo en composantes, S-Video et vidéo composite. En termes
de qualité d'image, la sortie vidéo en composantes est la meilleure. La sortie S-Video vient en second tandis
que la sortie vidéo composite est la moins satisfaisante. Une sortie Péritel est également disponible. Des
sorties vidéo composite (CVBS), vidéo en composantes (RVB) et audio (G & D) sont intégrées au connecteur
de sortie Péritel. Lorsque vous utilisez la sortie Péritel, aucun des câbles susmentionnés n'est nécessaire pour
effectuer les branchements.
44 -
Guide de l'utilisateur de l'Easy HDD Recorder de Packard Bell
Page 45

Remarque : Si vous recevez la télévision numérique par câble ou la télévision par satellite, veuillez brancher
la sortie de votre décodeur sur cette entrée de l'unité.
Branchement sur un amplificateur audio Dolby Digital 5.1
Vous pouvez tirer profit de l'effet audio Dolby Digital 5.1 en branchant l'enregistreur sur un système
amplificateur et haut-parleurs Dolby Digital 5.1. Les programmes Dolby Digital utilisent cinq canaux discrets
à gamme étendue (Gauche, Centre, Droit, Surround gauche et Surround droit) et un sixième canal dédié aux
effets basse fréquence (LFE) pour diffuser un son ambiophonique. Le canal LFE n'utilisant qu'un dixième de
la bande passante des autres canaux, il est appelé canal '.1' (et parfois à tort canal 'subwoofer').
A Câble ordinaire (sortie analogique)
B Amplificateur 5.1
Branchement sur un amplificateur avec décodeur Dolby Digital
Vous pouvez tirer profit de l'effet audio Dolby Digital 5.1 entièrement reproduit en branchant l'enregistreur
sur un système amplificateur et haut-parleurs avec décodeur Dolby Digital au moyen d'un câble coaxial ou
optique.
Français -
45
Page 46

A Câble audio coaxial ou optique. Reportez-vous au guide de l'utilisateur de votre amplificateur pour savoir
quel type de câble utiliser.
B Amplificateur
• Dans la fenêtre Configuration audio, configurez le mode de sortie numérique sur Sortie RAW.
Branchement d'un périphérique externe pour enregistrement via le panneau AVANT
46 -
Guide de l'utilisateur de l'Easy HDD Recorder de Packard Bell
Page 47

A. Vidicon numérique
B Périphérique de stockage USB.
REMARQUE - Consultez le manuel du système branché. Coupez l'alimentation et débranchez les deux
unités avant d'effectuer le moindre branchement.
Branchement d'un périphérique externe pour enregistrement via le panneau ARRIÈRE
A. Entrée RF
B Entrée vidéo (vidéo ou S-Video)
C Entrée audio
DEntrée PÉRITEL
ELecteur de DVD
Branchement de périphériques USB
L'Easy HDD Recorder peut s'interfacer avec des lecteurs flash USB, des lecteurs de cartes mémoire USB et
des appareils photo USB compatibles Mass Storage.
Vous pouvez visionner une ou plusieurs images JPEG en séquence.
Une fois le périphérique USB branché au port USB, appuyez deux fois sur le bouton DV/USB pour passer en
mode USB. Le menu de sélection de fichiers s'affiche. Parcourez le contenu du périphérique USB au moyen
des boutons Haut, Bas ou Select.
Remarque : La reconnaissance d'un périphérique USB peut prendre quelques secondes.
Remarque : Le périphérique de stockage doit être formaté conformément au système FAT32.
Français -
47
Page 48

Mode Navigation
Le mode Navigation permet d'exécuter toutes les fonctions de l'unité.
Appuyez sur le bouton Navigation de la télécommande pour que la fenêtre appropriée s'affiche.
1. Passez en mode Lecture de DVD.
2. Passez en mode TV/VIDÉO.
3. Passez en mode Configuration du système.
4. Passez en mode Enregistrement programmé.
5. Passez en mode Lecture USB.
6. Passez en mode Lecture du disque dur.
Recherche des chaînes TV
Si vous voulez regarder ou enregistrer des programmes TV, vous devez tout d'abord rechercher les chaînes
TV :
• Une fois la lecture arrêtée, appuyez sur le bouton Setup pour accéder au menu du système.
• Dans la section Enregistrement, utilisez sur les boutons fléchés (Haut/Bas) pour sélectionner l'icône
Sélection du pays
• Sélectionnez le pays dans lequel vous résidez dans la liste affichée et appuyez sur le boutonSelect.
• Utilisez sur les boutons fléchés (Haut/Bas) pour sélectionner
lancer la recherche.
• Utilisez sur les boutons fléchés (Haut/Bas) pour sélectionner
Select pour accéder au menu
et appuyez sur le bouton Select pour afficher la liste des pays.
APS
et appuyez sur le bouton Select pour
Modifier chaîne
Édition des chaînes
.
et appuyez sur le bouton
Remarque : Si vous utilisez la fonction Time Shifting, désactivez-la avant de continuer.
Menu Éditer les informations sur la chaîne
Numéro de programme : Le numéro de la chaîne sélectionnée. Cette option ne peut être modifiée.
Nom : Utilisez les boutons fléchés (Haut/Bas/Gauche/Droit) pour sélectionner et modifier le nom de la
chaîne.
Standard : Le standard de transmission de la chaîne sélectionnée. Vous pouvez choisir le standard
approprié en fonction du signal TV local.
Type de recherche : Utilisez les boutons fléchés (Haut/Bas/Gauche/Droit) pour sélectionner le mode de
recherche. Deux modes vous sont proposés :
n'est pas affichée.
Bande : La bande de la chaîne sélectionnée. Vous pouvez sélectionner
Chaîne : Utilisez les boutons fléchés (Haut/Bas/Gauche/Droit) pour sélectionner et modifier le nom de
la chaîne.
Réglage de précision : Réglage de précision de la chaîne sélectionnée.
Supprimer : Cette option vous permet de supprimer la chaîne sélectionnée de la liste des chaînes.
OK : Cette option vous permet de confirmer les paramètres de la chaîne sélectionnée et de les enregistrer.
Annuler : Cette option vous permet de quitter le menu sans enregistrer les paramètres actuels.
• Utilisez sur les boutons fléchés (Haut/Bas) pour sélectionner
bouton Select pour trier les chaînes TV.
• Utilisez les boutons fléchés (Haut/Bas) pour sélectionner la chaîne que vous voulez trier et appuyez sur
le bouton Droit pour confirmer votre sélection. La chaîne sélectionnée est temporairement déplacée vers
le volet de droite. Utilisez les boutons Haut/Bas pour déplacer la chaîne sélectionnée jusqu'à la position
de votre choix et appuyez sur le bouton Gauche pour l'insérer dans la liste des chaînes.
Fréquence
et
Chaîne
. En mode Fréquence, l'option Bande
Table des programmes
Standard
ou
Câble
.
et appuyez sur le
48 -
Guide de l'utilisateur de l'Easy HDD Recorder de Packard Bell
Page 49

• Modifiez la date et l'heure du système au moyen des boutons fléchés.
TYPES DE DISQUE
DVD
Le disque est divisé en sections plus petites et plus facilement gérables, vous permettant ainsi de trouver plus
facilement un contenu spécifique. Les DVD regroupent un ou plusieurs titres, chaque titre pouvant être
divisé en plusieurs chapitres. Un chapitre peut parfois contenir des points d'index permettant également de le
diviser en plusieurs sections.
Angles multiples
Vous pouvez visionner des scènes selon différents angles de prise de vue lors de la lecture de films ou
d'autres supports prenant en charge la lecture multi-angle.
Langues audio multiples
Vous pouvez sélectionner la langue de votre choix lorsque vous visionnez des films ou que vous lisez des
disques sur lesquels sont proposées plusieurs langues et/ou sont enregistrées plusieurs bandes son.
Langues multiples pour les sous-titres
Vous pouvez sélectionner la langue de votre choix pour les sous-titres ou désactiver l'affichage de ces
derniers lorsque vous visionnez des films ou que vous lisez des disques sur lesquels sont proposées plusieurs
langues pour les sous-titres.
SVCD/VCD/CD AUDIO
Les SVCD/VCD/CD AUDIO sont divisés en plusieurs pistes. Une piste peut parfois contenir un certain
nombre de points d'index permettant de la diviser en plusieurs sections.
MP3 /JPEG/DivX (fichiers audio/image/vidéo)
MP3 est un format de fichier audio compressé utilisant l'extension '.mp3' ou '.MP3'. JPEG est un format de
fichier image compressé utilisant l'extension '.jpg' ou '.JPG'. DivX est un format de fichier vidéo compressé
utilisant l'extension '.avi' ou '.AVI'.
REMARQUE : L'affichage du contenu du disque sur l'Easy HDD Recorder peut être relativement long si le
disque contient de nombreuses chansons/images, des chansons extrêmement longues ou des images
volumineuses.
Français -
49
Page 50

Disques lisibles et inscriptibles
DVD+RW (DVD réinscriptibles)
Le format DVD+RW est effaçable. Les DVD+RW peuvent être gravés plus de 1 000 fois.
*DVD+R (DVD non effaçables)
Les DVD+R (DVD non effaçables) ne peuvent être gravés qu'une seule fois. Plusieurs enregistrements
peuvent être effectués sur le même disque tant que ce dernier n'est pas finalisé ou plein.
Remarque : Une fois le disque finalisé, vous ne pouvez pas l'éditer ou y enregistrer des données, et ce même
en cas d'espace disponible sur le disque.
Si vous voulez lire un DVD+R créé au moyen de l'Easy HDD Recorder sur un autre lecteur, veuillez vous
assurer qu'il est finalisé. De même, vous devez utiliser l'option 'Rendre compatible' pour pouvoir lire un
DVD+RW ou un disque sur un autre lecteur.
Disques lisibles
DVD (Digital Versatile Disc) vidéo
DVD-R et DVD+R (DVD non effaçables)
DVD-RW et DVD+RW (DVD réinscriptibles)
Les DVD-RW doivent être enregistrés en mode vidéo pour être lus par l'Easy HDD Recorder.
CD Audio (disques audio numériques)
Super Audio CD (seule la couche CD d'un SACD hybride est lue)
VCD (formats 1.0, 1.1 et 2.0)
Super VCD
CD-R audio (CD non effaçables)/musique compressée au format MP3
CD-RW audio (CD réinscriptibles)/musique compressée au format MP3
Disques non lisibles
• Disques non finalisés créés au moyen d'autres graveurs de DVD/CD.
• Selon le type de disque ou les conditions d'enregistrement, il n'est pas systématiquement possible de lire
des CD-R, CD-RW, DVD-R, DVD-RW, DVD+R et DVD+RW.
MODE LECTURE
Lecture de DVD
Lecture de DVD 'ordinaires' (film sur DVD, par exemple)
1. Assurez-vous que tous les branchements ont été correctement effectués et branchez le cordon
d'alimentation dans une prise murale. Appuyez sur le bouton Standby/On situé sur le panneau avant ou
sur le bouton POWER de la télécommande pour allumer l'Easy DVD Recorder.
2. Si l'image du DVD ne s'affiche pas sur l'écran, appuyez sur le bouton DVD de la télécommande pour
passer en mode DVD.
3. Sélectionnez le titre de votre choix au moyen des boutons fléchés.
4. Appuyez sur le bouton Select. La lecture du titre sélectionné s'initialise.
5. Appuyez sur le bouton Select lors d'une lecture pour afficher des informations sur la lecture.
6. Appuyez de nouveau sur le bouton Select pour ouvrir le menu de contrôle de la lecture ci-dessous.
Appuyez sur le bouton fléché GAUCHE pour fermer le menu.
7. Pour retirer le disque, appuyez sur le bouton OPEN/CLOSE situé sur le panneau avant.
50 -
Guide de l'utilisateur de l'Easy HDD Recorder de Packard Bell
Page 51

Lecture de DVD inscriptibles (DVD+RW, DVD-RW, DVD+R ou DVD-R)
1. Allumez l'Easy HDD Recorder.
2. Insérez un DVD inscriptible.
3. Si l'index du DVD ne s'affiche pas, appuyez sur le bouton DVD de la télécommande pour passer en mode
DVD.
4. Sélectionnez le titre de votre choix au moyen des boutons fléchés (Haut/Bas). Appuyez sur le bouton
Select pour lancer la lecture.
5. Appuyez sur Stop pour arrêter la lecture et sur le bouton Play pour la reprendre au point auquel vous
l'avez arrêtée.
affichage
Appuyez sur le bouton Select lors d'une lecture pour afficher les informations suivantes :
Titre lu - Chapitre lu - Langue audio - Temps écoulé
menu du disque
Appuyez sur le bouton DVD pour accéder au menu du disque. Le contenu de ce menu dépend du disque lu.
Utilisez les boutons fléchés pour sélectionner le titre de votre choix et appuyez sur le bouton Select pour le
lire.
Appuyez sur un bouton numéroté pour lire le titre de votre choix.
Lecture de VCD
Menu du disque VCD
Appuyez sur le bouton DVD pour accéder au menu du disque (PBC ACTIVÉ).
Appuyez sur un bouton numéroté pour lire le titre de votre choix.
REMARQUE : Uniquement pour les VCD versions 2.0 et ultérieures. Lors de la lecture du disque, les boutons
numérotés n'ont aucune fonction.
lecture en séquence
Appuyez sur le bouton MENU pour naviguer entre les modes MENU DU VCD (PBC ACTIVÉ) et LECTURE
EN SÉQUENCE (PBC DÉSACTIVÉ).
Pour les VCD 1.0 et 1.1, le lecteur passe en mode LECTURE EN SÉQUENCE après chargement du disque
(les disques de ce type ne peuvent être lus que sous ce mode). Sous ce mode, vous pouvez appuyer sur les
boutons numérotés pour sélectionner un titre. De plus, les boutons numérotés répondent lors de la lecture
du disque. La lecture de certains disques s'initialise automatiquement.
REMARQUE : Uniquement pour les VCD et les SVCD.
Options de lecture générales
menu du système
• Appuyez sur le bouton Setup pour ouvrir le menu du système.
• Utilisez les boutons fléchés pour sélectionner l'option de votre choix et appuyez sur le bouton Select
pour confirmer votre sélection.
• Appuyez de nouveau sur le bouton Setup pour quitter le menu.
avance et retour rapides
Appuyez sur le bouton >> (Avance rapide) pour activer l'avance rapide et sur le bouton << (Retour rapide)
pour activer le retour rapide. Appuyez plusieurs fois dessus pour faire défiler les quatre vitesses de lecture
disponibles.
REMARQUE : Appuyez sur le bouton Play pour revenir en lecture normale.
Français -
51
Page 52

lecture
Appuyez sur le bouton Select de la télécommande ou sur le bouton Play situé sur le panneau avant pour
lancer la lecture.
Pause
Appuyez sur le bouton Pause de la télécommande pour mettre la lecture en pause.
saut
Appuyez sur le bouton >>| (Saut avant) pour passer au titre/chapitre suivant et sur le bouton |<< (Saut
arrière) pour passer au titre/chapitre précédent.
répétition
1. Répéter A-B
• Appuyez deux fois sur le bouton Select pour ouvrir le menu de configuration lors d'une lecture.
• Utilisez les boutons fléchés Haut/Bas pour sélectionner le sous-menu Mode puis appuyez sur le bouton
Select.
• Utilisez les boutons fléchés Haut/Bas pour sélectionner l'option RÉPÉTER A-B et appuyez sur le bouton
Select pour définir le point de départ (A). Appuyez de nouveau sur le bouton Select pour afficher l'option
RÉPÉTER A-B et appuyez pour la troisième fois sur le bouton Select pour définir le point de fin (B). La
section entre les points de départ et de fin est relue indéfiniment.
• Appuyez sur le bouton fléché gauche pour quitter le menu de configuration.
2. Répétition du titre/chapitre/disque - Appuyez plusieurs fois sur le bouton Repeat lors d'une lecture pour
répéter le titre/chapitre.
3. Appuyez plusieurs fois sur le bouton Repeat pour revenir en lecture normale.
Contrôle de la lecture via le menu Lecture
1. Appuyez sur le bouton Select pour ouvrir le menu de contrôle et sélectionner un sous-menu :
MODE : Ce sous-menu vous permet de configurer le mode de lecture (Répétition, Programme, etc.).
TRICK : Ce sous-menu vous permet de configurer l'état de la lecture (Stop, Avance rapide, Retour rapide,
etc.).
TITRE : Appuyez sur le bouton Select et entrez le numéro du titre de votre choix pour y sauter.
CHAPITRE : Entrez le numéro du chapitre de votre choix pour y sauter.
AUDIO : Sélectionnez la langue audio de votre choix (Français, Anglais, etc.).
SOUS-TITRES : Sélectionnez la langue des sous-titres.
ANGLE : Sélectionnez l'angle de prise de vue (cette fonction doit être prise en charge par le disque).
T-TIME : Cette option vous permet d'afficher le temps écoulé et le temps restant.
2. Appuyez sur le bouton fléché Gauche pour quitter le menu de contrôle.
52 -
Guide de l'utilisateur de l'Easy HDD Recorder de Packard Bell
Page 53

Ordre de lecture programmé
Ouvrez le menu de contrôle de la lecture (tel qu'expliqué ci-dessus).
Sélectionnez le menu Mode puis
• Utilisez les boutons fléchés pour sélectionner le titre ou le chapitre que vous souhaitez programmer.
Appuyez sur le bouton ADD/CLEAR pour ajouter le nom du titre ou du chapitre au volet de droite.
Ajoutez autant de titres ou de chapitres que vous le souhaitez.
• Appuyez sur le bouton fléché Droit pour déplacer le curseur dans le volet de droite et sur le bouton
ADD/CLEAR pour supprimer un titre ou un chapitre de la liste.
• Appuyez sur le bouton Select pour lancer la lecture du programme.
• Appuyez sur le bouton
accéder au menu de contrôle de la lecture et sélectionnez Normal.
Programme
Stop
pour arrêter la lecture du programme ou appuyez sur le bouton Select pour
.
langue audio
Appuyez plusieurs fois sur le bouton AUDIO pour faire défiler jusqu'à huit langues audio ou bandes-son, sous
réserve que plusieurs langues soient enregistrées sur le disque.
Pour les disques Karaoké, appuyez sur le bouton AUDIO pour naviguer entre l'accompagnement musical et
l'accompagnement vocal.
REMARQUE : Uniquement pour les DVD/SVCD.
langue des sous-titres
Appuyez plusieurs fois sur le bouton SOUS-TITRES pour faire défiler jusqu'à 32 langues pour sous-titres, sous
réserve que plusieurs sous-titres soient enregistrés sur le disque.
REMARQUE : Uniquement pour les DVD/SVCD.
LECTURE DE FICHIERS jpeg/mp3
1. Insérez le disque. L'arborescence des dossiers s'affiche.
2. Utilisez les boutons fléchés et le bouton Select pour sélectionner des dossiers et des fichiers MP3/JPEG
en vue de les lire.
3. Si le disque héberge des contenus JPEG et MP3, vous pouvez visionner des images et écouter de la
musique simultanément : Pour le diaporama JPEG/MP3 simultané, sélectionnez un fichier MP3 puis un
fichier JPEG. Les fichiers MP3 et JPEG sont lus dans l'ordre sélectionné.
4. Appuyez sur le bouton Stop pour arrêter la lecture. Pour le diaporama JPEG/MP3 simultané, appuyez
deux fois sur le bouton Stop.
Français -
53
Page 54

LECTURE DE divx
Si un disque contient des fichiers DivX, une fenêtre contenant une liste de lecture s'affiche après chargement
du disque.
1. Utilisez les boutons fléchés Haut/Bas pour sélectionner le fichier de votre choix et appuyez sur le bouton
Select pour le lire.
2. Utilisez le bouton ADD/CLEAR et les boutons fléchés Haut/Bas pour créer une liste de favoris dans le
volet de droite et lire les fichiers dans l'ordre de votre choix (consultez la section Ordre de lecture
programmé).
verrouillage parental
Le verrouillage parental est un système de protection par mot de passe. Il vous permet d'empêcher la lecture
de certains disques par l'Easy HDD Recorder selon les informations qu'ils contiennent.
Pour configurer le verrouillage parental, procédez comme suit :
1. Appuyez deux fois sur le bouton Stop lors d'une lecture.
2. Appuyez sur le bouton Setup pour accéder au menu de configuration du système.
3. Appuyez sur les boutons fléchés Haut/Bas pour sélectionner l'option
Select pour confirmer votre sélection.
4. Appuyez sur les boutons fléchés Haut/Bas pour sélectionner l'option
bouton Select.
5. Appuyez sur le bouton Select de la télécommande pour afficher la liste des niveaux.
6. Utilisez sur les boutons fléchés Haut/Bas pour sélectionner le niveau de contrôle de votre choix puis
appuyez sur le bouton Select.
7. Appuyez sur les boutons numérotés pour entrer le mot de passe (le mot de passe principal est 3308) puis
sur le bouton Select.
8. Appuyez sur le bouton Setup pour quitter.
Préférences
. Appuyez sur le bouton
Niveau parental
puis appuyez sur le
modification du mot de passe
1. Répétez les étapes 1-3 décrites ci-dessus.
2. Utilisez sur les boutons fléchés Haut/Bas pour sélectionner
bouton Select de la télécommande.
3. Entrez l'ancien mot de passe dans le premier bloc (le mot de passe principal est 3308) puis saisissez le
nouveau mot de passe dans le deuxième bloc et dans le bloc de confirmation. Appuyez sur le bouton
Select pour enregistrer le nouveau mot de passe.
4. Appuyez sur le bouton Setup pour quitter le menu de configuration.
Changer de mot de passe
et appuyez sur le
ENREGISTREMENT/TIME SHIFTING
Lorsque l'Easy HDD Recorder est sous tension ou que vous appuyez sur le bouton SOURCE pour passer en
mode TV, la dernier chaîne TV regardée s'affiche et la fonction Time Shifting s'initialise automatiquement.
Cette fonction permet de mettre en pause un programme TV en direct, et ce pendant
sur le bouton Pause pour mettre le programme en pause et sur le bouton Play pour lire l'enregistrement. Si
vous mettez le système en pause jusqu'au temps limite, la reprise se fait automatiquement.
Enregistrement au moyen de la fonction Time Shifting
54 -
Guide de l'utilisateur de l'Easy HDD Recorder de Packard Bell
180 minutes. Appuyez
Page 55

1. Appuyez sur le bouton HDD puis sur le bouton SOURCE.
2. Lors de l'enregistrement, appuyez plusieurs fois sur le bouton REC/OTR pour augmenter la durée du
programme que vous enregistrez de 30 minutes. Si la durée programmée excède la durée enregistrable
du disque, le mode d'enregistrement normal est restauré.
source d'enregistrement
Vous pouvez sélectionner la source d'enregistrement qui doit être utilisée par l'enregistreur aux fins du Time
Shifting. Les sources vidéo suivantes sont disponibles :
CVBS arrière (composite)
S-Video arrière
Tuner
CVBS avant (composite)
Entrée DV
Appuyez plusieurs fois sur le bouton SOURCE pour sélectionner une source vidéo.
Remarque : La fonction Time Shifting ne peut être utilisée avec une source DV (Digital Video).
En mode Time Shifting, vous pouvez naviguer et contrôler la sortie audio au moyen des boutons suivants de
la télécommande :
Bouton Résultat
Changement de chaîne.
CH+/-
Par défaut, le changement de chaîne efface toutes séquences enregistrées en mode Time
Shifting pour la chaîne actuelle. Cette option peut être réinitialisée en sélectionnant
Configuration -> TimeShift -> Mémoire tampon -> Préserver.
0-9 Changement de chaîne.
FWD Avance. Appuyez sur ce bouton pour faire défiler les vitesses 4X, 8X et 32X.
REV Retour. Appuyez sur ce bouton pour faire défiler les vitesses 4X, 8X et 32X.
V+/- Augmentation/réduction du volume.
Replay Retour de 10 secondes (bouton fléché gauche).
Skip Avance de 10 secondes (bouton fléché droit).
Mute Audio activé/désactivé.
Si vous utilisez la valeur par défaut du paramètre CONFIGURATION->TimeShift->Mémoire tampon>Actualiser et que vous changez de chaîne, les données hébergées dans la mémoire tampon Time Shifting
seront perdues. Aucun message ne s'affichera avant l'opération. Cependant, si vous configurez le paramètre
sur CONFIGURATION->TimeShift->Mémoire tampon->Préserver et que vous changez de chaîne, les données
hébergées dans la mémoire tampon Time Shifting seront conservées.
Remarque : Si vous changez de source vidéo, les données situées dans le tampon Time Shifting seront effacées.
Remarque : Lors d'un Time Shifting, un enregistrement programmé peut s'afficher. Étant donné qu'en mode
Time Shifting il est impossible de visionner un programme et d'en enregistrer un autre, l'enregistreur vous
demande de confirmer si vous souhaitez conserver la chaîne en cours ou poursuivre l'enregistrement
Français -
55
Page 56

programmé. En l'absence de réponse, l'enregistreur estime que l'enregistrement programmé doit être initialisé.
Le message s'affiche pendant 2 minutes avant l'initialisation de l'enregistrement programmé. Lorsque la durée
limite d'enregistrement est atteinte, la mémoire tampon est progressivement écrasée. Si vous devez conserver
les séquences vidéo stockées dans cette mémoire tampon en vue de les utiliser ultérieurement, vous pouvez
enregistrer tout ou partie de la mémoire tampon.
Enregistrement
Pour enregistrer les données vidéo stockées dans la mémoire tampon Time Shifting :
Lorsque vous visionnez un programme, appuyez sur le bouton REC/OTR. L'enregistrement du segment que
vous visionnez s'initialise. Vous pouvez y naviguer en avançant. Lors de l'opération d'enregistrement,
appuyez sur le bouton REC/OTR pour augmenter la durée du programme que vous enregistrez de 30
minutes. Appuyez sur le bouton Stop pour indiquer la fin de l'opération d'enregistrement. La partie
enregistrée du tampon Time Shifting apparaît en rouge.
Remarque : Vous ne pouvez pas changer de chaîne ou de source si un enregistrement est actif (si la fin d'un
enregistrement n'a pas été spécifiée ou qu'elle n'a pas été atteinte en cas d'enregistrement longue durée). Si
vous essayez de changer de chaîne ou de source, l'Easy HDD Recorder vous propose d'arrêter l'enregistrement.
Le segment est enregistré sur le disque dur et la chaîne ou la source changée.
Remarque : Seul un segment du tampon Time Shifting peut être identifié à des fins d'enregistrement. Il est
impossible d'identifier plusieurs segments. Une fois le segment enregistré et consigné dans la liste des titres
enregistrés sur le disque dur, ledit segment est supprimé du tampon Time Shifting (ainsi que les enregistrement
qui le précèdent).
Remarque : Si vous utilisez l'option CONFIGURATION->TimeShift->Mémoire tampon->Préserver, vous ne
pouvez enregistrer qu'un segment d'une source ou d'une chaîne - vous ne pouvez pas enregistrer une séquence
de chaînes. Le cas échéant, les programmes enregistrés sont supprimés de la mémoire tampon Time Shifting
lorsque vous appuyez sur le bouton Stop. L'Easy HDD Recorder ENREGISTRE les programmes Time Shifting
immédiatement si le système est mis hors tension.
En mode Time Shifting, vous pouvez utiliser les boutons suivants pour exécuter d'autres opérations :
Bouton Résultat Remarque
HDD
DVD Lecture du disque
EJECT
POWER Mise hors tension
Setup
SOURCE
56 -
Guide de l'utilisateur de l'Easy HDD Recorder de Packard Bell
Liste des titres hébergés
sur le DD
Ouverture/fermeture du
plateau
Menu
CONFIGURATION
Changement de source
vidéo
L'enregistrement se poursuit.
L'enregistrement se poursuit, excepté si vous voulez
effectuer un enregistrement sur DVD.
L'enregistrement se poursuit.
L'enregistrement se poursuit.
Page 57

Remarque : (option : CONFIGURATION->TimeShift->Gestion de l'espace->Automatiquement). Si il n'y a
plus d'espace disponible sur le disque dur avant la fin d'un enregistrement, l'Easy HDD Recorder efface les
titres (non protégés) les plus anciens parmi ceux hébergés sur le disque dur. Il ne supprimer pas les titres
sélectionnés pour être copiés sur DVD. Si, malgré cette procédure, l'espace sur le disque dur est insuffisant
pour effectuer l'enregistrement, l'enregistreur arrête l'enregistrement et affiche un message vous demandant
d'effacer certains titres et de libérer davantage d'espace sur le disque dur.
Remarque : (option : CONFIGURATION->TimeShift->Gestion de l'espace->Manuellement). Si il n'y a plus
d'espace disponible sur le disque dur avant la fin d'un enregistrement, l'enregistreur arrête l'enregistrement et
affiche un message vous demandant d'effacer certains titres et de libérer davantage d'espace sur le disque dur.
Vous pouvez utiliser l'option CONFIGURATION->TimeShift->Vider le disque dur pour effacer l'ensemble
des données hébergées sur le disque dur. Procédez avec prudence, ce processus étant irréversible.
L'enregistreur confirme que vous voulez tout effacer.
enregistrement sur DVD
Appuyez une fois sur le bouton TIMESHIFT pour passer en mode d'enregistrement manuel et appuyez sur le
bouton REC TO pour sélectionner la source d'enregistrement sur DVD.
Si aucun disque inscriptible n'est inséré dans la plateau, appuyez sur le bouton REC/OTR et lancez
l'enregistrement (OTR) sur DVD. Appuyez sur le bouton STOP pour arrêter l'enregistrement.
Remarque : L'enregistreur poursuit l'enregistrement jusqu'à ce que le disque soit plein. Pour configurer
l'enregistreur de sorte qu'il effectue un enregistrement de 30 minutes seulement, appuyez sur le bouton
REC/OTR après le début de l'enregistrement. Un message indiquant que l'enregistreur effectuera un
enregistrement de 30 minutes s'affiche sur l'écran. Chaque fois que vous appuyez sur le bouton REC/OTR,
30 minutes supplémentaires sont ajoutées au temps d'enregistrement. Pour mettre l'enregistrement en
pause, appuyez sur le bouton PAUSE de la télécommande. Appuyez sur le bouton PAUSE ou REC/OTR pour
reprendre l'enregistrement. L'enregistrement se poursuit jusqu'à ce que vous appuyiez sur le bouton STOP
de la télécommande ou du panneau avant de l'enregistreur. Appuyez une fois sur le bouton Timeshift de la
télécommande, passez en mode Timeshift , appuyez deux fois sur le bouton et passez en mode
d'enregistrement manuel. Le tableau suivant s'affiche.
Remarque : Dans le tableau, vous pouvez appuyer sur le bouton REC TO pour naviguer entre les sources
d'enregistrement Disque dur et DVD.
qualité d'enregistrement
Sept qualités d'enregistrement distinctes peuvent être définies pour l'enregistrement. Plus la qualité est
élevée, plus l'espace requis sur le disque dur ou le DVD est important, ce qui réduit la durée totale de
l'enregistrement.
Qualité
d'enregistrement
Durée
d'enregistremen
t (4,7 Go, DVD)
Durée
d'enregistrement
(80 Go, disque
Qualité de la
vidéo
dur)
HQ (High Quality) 1 heure Environ 17 heures Optimale
SP (Standard Play) 2 heures Environ 34 heures Excellente
SP+ (Standard Play) 3 heures Environ 51 heures Bonne
Français -
57
Page 58

EP (Extended Play) 4 heures Environ 68 heures Normale
LP (Long Play) 5 heures Environ 85 heures Moyenne
SLP (Super Long
Play)
6 heures
Environ 102
heures
Médiocre
Remarque : Sélectionnez la qualité d'enregistrement avec soin de sorte qu'il y ait suffisamment d'espace
disponible pour votre enregistrement sur le disque dur ou le DVD. Si l'enregistrement est trop volumineux
pour être stocké sur DVD, il peut être scindé en segments plus petits (consultez la section Montage pour de
plus amples informations).
58 -
Guide de l'utilisateur de l'Easy HDD Recorder de Packard Bell
Page 59

signets de chapitre
Vous pouvez configurer l'enregistreur de sorte qu'il insère automatiquement des signets de chapitre dans
chaque enregistrement programmé. Vous naviguerez ainsi plus rapidement lors de la lecture de vos
enregistrements. Cette fonction insère automatiquement des signets toutes les 10 minutes lors d'un
enregistrement. Cet intervalle peut être modifié dans le menu Configuration : DÉSACTIVÉ (pas de signet), 5
minutes, 10 minutes, 20 minutes ou 30 minutes.
• Appuyez sur le bouton Setup de la télécommande.
• Sélectionnez le menu
• Sélectionnez l'option
• Sélectionnez une option dans la liste qui s'affiche et appuyez sur le bouton Select.
Enregistrement
Signet de chapitre automatique
et appuyez sur le bouton Select.
et appuyez sur le bouton Select.
PROGRAMME D'ENREGISTREMENT
configuration de l'horloge
1. Appuyez sur le bouton Setup pour accéder au menu de configuration.
2. Utilisez sur les boutons fléchés pour sélectionner l'icône
3. Modifiez la date et l'heure du système au moyen des boutons fléchés.
Date/heure
et appuyez sur le bouton Select.
Français -
59
Page 60

Enregistrement programmé
1. Assurez-vous que l'horloge est réglée avec exactitude sur la date et l'heure locales.
2. Appuyez sur le bouton Timer pour ouvrir le programmateur d'enregistrements.
REMARQUE : Pour supprimer un événement programmé, utilisez sur les boutons fléchés Haut/Bas pour le
sélectionner et appuyez sur le bouton ADD/CLEAR.
3. Utilisez sur les boutons fléchés
Select. La boîte de dialogue Éditeur d'éléments s'ouvre.
4. Vous trouverez ci-après une description des
options de cette boîte de dialogue :
Source : Sélectionnez la source d'entrée.
Enregistrer sur : Vous pouvez sélectionner le
disque dur ou le DVD.
Qualité : Sélectionnez la qualité
d'enregistrement.
Mode : Sélectionnez le mode
d'enregistrement (une fois, tous les jours ou
toutes les semaines).
Début : Sélectionnez l'heure de début de
l'enregistrement.
Fin : Sélectionnez l'heure de fin de
l'enregistrement.
Titre : Nommez l'enregistrement.
PDC : Lorsque cette fonction est activée, le
système suit et enregistre automatiquement
les signaux TV en fonction de l'heure de début. Il peut également mettre en pause ou arrêter
automatiquement l'enregistrement conformément aux informations fournies par les signaux TV.
5. Déplacez le curseur jusqu'au bouton
6. Plusieurs minutes avant le début de l'enregistrement, une boîte de dialogue vous demande de confirmer
ou d'annuler l'événement s'affiche sur l'écran de votre téléviseur. En l'absence de sélection, le
programme d'enregistrement lance l'enregistrement comme prévu.
Haut/Bas
pour sélectionner un événement et appuyez sur le bouton
OK
et appuyez sur Select pour enregistrer vos paramètres.
REMARQUE :
• Si l'enregistreur est en mode Veille, il s'allume automatiquement deux minutes avant le début de
l'enregistrement programmé.
60 -
Guide de l'utilisateur de l'Easy HDD Recorder de Packard Bell
Page 61

réglage de l'heure du système
L'Easy HDD Recorder peut régler automatiquement l'heure du système en fonction du code horaire qu'il
reçoit de la station de télévision. Seul le code horaire au niveau de la première chaîne TV peut être utilisé par
cet appareil. Le signal TV doit intégrer un code horaire pour que cette fonction soit opérationnelle.
Français -
61
Page 62

LISTE des titles sur le disque dur
Appuyez sur le bouton HDD pour afficher la liste des titres hébergés sur le disque dur.
Cette dernière répertorie tous les programmes enregistrés sur le disque dur et contient la durée, une image
miniature et le mode d'enregistrement (HQ, SP, etc.) de chaque programme. La liste indique également si un
programme est protégé ou verrouillé. Enfin, la liste des titres vous permet de sélectionner le(s) titre(s) que
vous voulez 'monter' sur DVD (voir ci-dessous), de lire un programme ou d'en éditer un.
montage
Avant de sélectionner des programmes en vue de les mixer, insérer un disque inscriptible dans le plateau. Si
c'est la première fois que vous utilisez ce disque, il est possible que l'Easy HDD Recorder prenne quelques
secondes pour le formater, définir son niveau de compatibilité et déterminer son espace enregistrable libre.
Le logo
Chargement
Le pourcentage d'espace disque disponible s'affiche dans le coin inférieur droit de l'écran contenant la liste
des titres sur le disque dur. Vous pouvez sélectionner un ou plusieurs programmes depuis cet écran en vue
de les copier sur le disque optique. Utilisez les boutons fléchés pour parcourir la liste et appuyez sur le
bouton ADD/CLEAR pour sélectionner le programme en surbrillance. Une fois le programme sélectionné
pour montage, une icône apparaît près du nom du titre. Appuyez une deuxième fois sur le bouton ADD/
CLEAR pour annuler votre sélection. Chaque fois que vous sélectionnez ou que vous désélectionnez des
programmes, les informations sur la capacité du disque sont actualisées. Si l'espace disponible sur le disque
est insuffisant pour recevoir le programme que vous sélectionnez, l'enregistreur affiche un message
d'avertissement.
s'affiche sur l'écran pendant cette opération.
Si l'enregistrement est trop volumineux pour être stocké sur DVD, il peut être scindé en segments plus petits
:
1. Sélectionnez le titre devant être scindé dans le menu DD.
2. Appuyez sur le bouton fléché Droit de la télécommande pour ouvrir le sous-menu.
3. Utilisez sur les boutons fléchés Haut/Bas pour sélectionner
4. Lors de la lecture qui suit, utilisez les boutons
jusqu'au point a de l'enregistrement au niveau duquel vous souhaitez scinder ce dernier et appuyez sur le
bouton Select pour lancer l'opération.
5. Appuyez de nouveau sur le bouton Select pour confirmer votre intention de scinder l'enregistrement.
6. Le fichier d'origine est alors scindé en deux fichiers distincts accessibles depuis le menu DD.
SKIP,
Scinder
et appuyez sur le bouton Select.
Avance rapide ou Retour rapide pour naviguer
Remarque : Si vous le souhaitez, vous pouvez renommer le nouveau fichier en vue de l'associer au fichier
d'origine.
Remarque : Si vous remplacez ou que vous retirez le disque avant le montage, toutes vos sélections seront
annulées.
Remarque : Les titres verrouillés ne peuvent être montés sur DVD.
Appuyez sur le bouton HDD pour lancer le montage. Cette opération copie le(s) titre(s) sélectionné(s) sur le
DVD inscriptible, y compris les propriétés (nom du titre, durée, image d'index ou signets de chapitre). Une
fois le montage lancé, l'enregistreur retourne en mode Time Shifting. Vous pouvez appuyer sur le bouton
HDD et lire n'importe quel titre hébergé sur le disque dur au cours du montage. Il est cependant impossible
d'éditer des données avant la fin du montage. Une fois le montage terminé, la liste des titres hébergés sur le
disque dur est réinitialisée.
Remarque : En cas d'échec de l'opération de gravure du DVD, un message d'avertissement s'affiche et la liste
des titres hébergés sur le disque dur est réinitialisée.
62 -
Guide de l'utilisateur de l'Easy HDD Recorder de Packard Bell
Page 63

Édition de titres sur disque dur
1. Appuyez sur le bouton HDD pour ouvrir le menu Titres du DD.
2. Utilisez sur les boutons fléchés Haut/Bas pour sélectionner le titre que vous voulez éditer. Si vous
souhaitez éditer plus de huit titres, appuyez sur le bouton fléché Bas pour afficher les autres titres.
3. Appuyez sur le bouton fléché Droit pour ouvrir le sous-menu.
4. Utilisez sur les boutons fléchés Haut/Bas pour sélectionner l'une des options suivantes (expliquée cidessous) et appuyez sur le bouton Select.
Lire
Cette option permet de lire le titre sélectionné.
Supprimer
Si un titre n'est pas protégé ou verrouillé, vous pouvez sélectionner cette option pour le supprimer. Faites
particulièrement attention lorsque vous confirmez l'opération (elle est irréversible).
Scinder
Cette option appelle l'écran Scinder (consultez la section
Montage
pour de plus amples informations).
Segment
Cette option appelle l'écran Segment. Vous pouvez parcourir le programme (similaire à l'écran Lecture) et
indiquer les emplacements marquant le début et la fin du segment. Les segments ne sont pas visibles lors de
la lecture du titre. De plus, les segments ne sont pas copiés sur DVD si le titre segmenté est sélectionné à des
fins de montage. Si vous ouvrez de nouveau l'écran Segment pour le même titre, les segments identifiés
s'affichent.
Changement d'image d'index
Cette option appelle l'écran Changer image d'index. Vous pouvez parcourir le programme (similaire à l'écran
Lecture) et, lorsque l'image de votre choix s'affiche, appuyer sur le bouton Select pour changer d'image
d'index.
Remarque : Vous ne pouvez exécuter cette opération que si le titre n'est pas protégé ou verrouillé.
Renommer
Cette option appelle le clavier virtuel. Vous pouvez l'utiliser pour saisir le nom du titre. Utilisez les boutons
fléchés pour mettre la touche de votre choix en surbrillance et appuyez sur le bouton Select pour la
sélectionner.
Remarque : Vous ne pouvez exécuter cette opération que si le titre n'est pas protégé ou verrouillé.
Verrouiller
Cette option permet de verrouiller ou de déverrouiller le titre sélectionné.
Protéger
Cette option permet de protéger le titre sélectionné (lecture seule, édition impossible) ou de désactiver sa
protection.
Édition de titres sur DVD+RW
Les instructions suivantes ne s'appliquent qu'aux DVD+RW. Les DVD+R ne pouvant être gravés ou édités
indéfiniment, les opérations mentionnées ci-dessous ne peuvent leur être appliquées.
1. Insérez un DVD+RW hébergeant des contenus dans le plateau. L'index du DVD s'affiche (dans le cas
contraire, appuyez sur le bouton DVD).
2. Utilisez sur les boutons fléchés Haut/Bas pour sélectionner le titre que vous voulez éditer. Si vous
souhaitez éditer plus de trois titres, appuyez sur le bouton fléché Bas pour afficher les autres titres.
Français -
63
Page 64

3. Utilisez sur les boutons fléchés Haut/Bas pour sélectionner l'élément de votre choix et appuyez sur le
bouton Select pour confirmer votre sélection.
Lire titre - Permet de lire le titre sélectionné.
Éditer titre - Permet d'éditer le titre sélectionné en y ajoutant des signets de chapitre, en masquant ou en
affichant un chapitre, en remplaçant l'image d'index ou en scindant le titre en deux titres, par exemple.
Renommer titre - Permet de renommer le titre sélectionné. Appuyez sur le bouton Select une fois cet
élément sélectionné. Un clavier virtuel s'affiche sur l'écran de votre téléviseur.
Utilisez sur les boutons fléchés pour sélectionner la lettre ou le caractère de votre choix et appuyez sur le
bouton Select pour confirmer votre sélection.
Sélectionnez OK et appuyez sur le bouton Select pour enregistrer le nom.
REMARQUE : Un nom de titre peut contenir 9 caractères maximum.
Écraser titre - Permet de remplacer une session préalablement mixée par des contenus nouvellement
enregistrés, écrasant ainsi la session. Si la nouvelle session est plus courte que la session d'origine, la partie
restante de la session d'origine est conservée et apparaît sur le disque sous la forme d'un nouveau titre. Si
la nouvelle session est plus longue que le titre d'origine, le processus d'enregistrement s'arrête
automatiquement lorsqu'il atteint la fin du titre d'origine.
Effacer titre - Permet d'effacer le titre sélectionné.
Écraser disque - Les contenus nouvellement enregistrés écrasent le disque, effaçant ainsi tous les titres qu'il
contient.
Ajouter titre - (Cette option n'est disponible que si vous éditez le dernier titre du disque) Permet d'ajouter
un nouveau titre après le dernier titre du disque.
Remarque :
• Lorsque vous sélectionnez Écraser titre/Ajouter titre/Écraser disque et que vous appuyez sur le bouton
Select pour confirmer votre sélection, la source de signal utilisée avant le début de l'opération d'édition
disque est automatiquement restaurée. Utilisez le bouton SOURCE pour changer de source de signal et
appuyez sur le bouton Select pour accéder directement au menu du titre stocké sur le DVD.
• Le processus d'enregistrement ne s'initialise pas après avoir sélectionné Écraser titre/Ajouter titre/
Écraser disque. Vous devez appuyer sur le bouton REC/OTR situé sur le panneau avant ou la
télécommande pour lancer l'enregistrement.
édition d'un DVD+RW
1. Insérez un DVD+RW dans le plateau.
2. Utilisez le bouton fléché Haut pour sélectionner la partie supérieure de la barre d'information
d'enregistrement du disque.
64 -
Guide de l'utilisateur de l'Easy HDD Recorder de Packard Bell
Page 65

3. Appuyez sur le bouton fléché Droit pour accéder au menu du disque. Utilisez sur les boutons fléchés
Haut/Bas pour sélectionner l'un des éléments ci-dessous (Lecture, Renommer disque, Effacer disque,
Enregistrer un nouveau titre, etc.) et appuyez sur le bouton Select.
Opérations :
• Lecture :Permet de lire les titres enregistrés en séquence.
• Effacer disque : Permet d'effacer le contenu du disque.
• Renommer disque : Permet de renommer le disque. Veuillez consulter la section Renommer titre (cidessus).
• Enregistrer un nouveau titre : Permet d'enregistrer de nouveaux contenus dans un titre.
• Écraser disque : Permet d'écraser l'ensemble du disque par de nouveaux contenus, et ce depuis le début.
Remarque : Consultez la section Édition de titres sur DVD+RW pour les opérations Nouveau titre et Écraser
disque.
• Verrouiller disque : Permet de verrouiller le disque inséré en vue de protéger les données qu'il contient.
Le disque verrouillé ne peut être effacé ou gravé jusqu'à ce qu'il soit déverrouillé.
édition d'un DVD+R
1. Insérez un DVD+R dans le plateau.
2. Appuyez sur le bouton Haut pour accéder au menu d'édition du disque.
Opérations :
• Lecture : Permet de lire les titres enregistrés en séquence.
• Renommer disque : Permet de renommer le disque. Veuillez consulter la section Renommer titre (cidessus).
• Enregistrer un nouveau titre : Permet d'enregistrer de nouveaux contenus dans un titre. Ce titre sera le
dernier du disque.
• Finaliser disque : Avant de pouvoir lire un disque avec d'autres lecteurs de DVD, vous devez le finaliser
dans l'Easy HDD Recorder. Une fois cette procédure terminée, aucun autre enregistrement ne peut être
ajouté.
Français -
65
Page 66

DÉPANNAGE
Problème Solution
• Branchez les câbles audio aux connecteurs.
• Vérifiez le branchement entre la sortie audio de l'Easy HDD Recorder et
Pas de son
• Reportez-vous au manuel de l'utilisateur de votre amplificateur audio.
l'entrée audio du téléviseur ou du récepteur. Assurez-vous d'avoir sélectionné
l'entrée AUDIO appropriée sur le téléviseur ou l'amplificateur.
Pas d'image
(écran vierge)
Aucune réponse
Dysfonctionnem
ent de la
télécommande
Lecture du
disque
impossible
• Le mode de balayage de la sortie vidéo n'est pas correctement configuré.
Appuyez sur le bouton PS/IS pour sélectionner le mode approprié.
• Branchez la fiche d'alimentation dans la prise murale.
• Un enregistrement programmé est actif. Appuyez sur Power ou Stop pour
annuler l'enregistrement programmé.
• Il est possible que l'appareil présente une défaillance technique. Débranchez
l'alimentation et attendez 30 secondes avant de la rebrancher dans la prise
murale. Si malgré tout le problème persiste, essayez de restaurer les
paramètres usine par défaut de l'Easy HDD Recorder.
• La télécommande n'est pas orientée vers l'Easy HDD Recorder. Veuillez la
diriger vers l'Easy HDD Recorder.
• Les piles sont épuisées. Remplacez-les.
• Il est possible que l'appareil présente une défaillance technique. Retirez les
piles et attendez 30 secondes avant de les réinstaller dans la télécommande.
• Le disque est vierge. Remplacez-le.
• Le disque est incompatible avec l'appareil. Veuillez consulter la liste des types
de disque pris en charge.
• Le disque est chargé face vers le bas. Assurez-vous de charger le disque face
vers le haut.
• Code régional erroné. Le code régional ne correspond pas aux paramètres
régionaux de l'Easy HDD Recorder.
• Le verrouillage parental est activé. Désactivez-le. Le mot de passe par défaut
est 3308.
• Choisissez un numéro de chaîne sur le téléviseur. Sélectionnez un numéro de
chaîne approprié.
• Le branchement entre l'Easy HDD Recorder et le téléviseur est lâche. Vérifiez
le branchement.
Qualité de
lecture médiocre
(images/sons
déformés)
66 -
Guide de l'utilisateur de l'Easy HDD Recorder de Packard Bell
• Le téléviseur n'est pas réglé sur des paramètres optimaux.
• Le disque est sale. Nettoyez-le.
• Des interférences peuvent également déformer l'image.
Page 67

Enregistrement
impossible
Dysfonctionnem
ent de
l'enregistrement
programmé
• La chaîne TV que vous voulez enregistrer n'est pas encore enregistrée ou vous
avez choisi un numéro de chaîne incorrect. Veuillez vérifier les chaînes
enregistrées.
• Le disque est protégé en écriture. Désactivez la protection en écriture ou
changez de disque.
• Le disque est un DVD+R fermé. Changez de disque.
• Le système TV n'est pas compatible. Veuillez vous assurer que le disque n'a
pas été enregistré sous un format vidéo distinct (PAL ou NTSC, par exemple).
L'Easy HDD Recorder ne prend pas en charge les enregistrements sous
différents formats vidéo sur un même DVD+R/RW.
• Il est possible que le disque que vous utilisez ne soit pas conforme aux
standards DVD+R/RW.
• L'enregistreur n'effectue pas d'enregistrements sur CD-R/RW, DVD-RAM ou
DVD-R/RW.
• Veuillez vous assurer que le disque n'a pas été utilisé sur un ordinateur au
préalable.
• La date ou l'heure n'est pas correctement définie. Veuillez vérifier la date et
l'heure.
• La grille horaire n'est pas correctement définie. Veuillez vérifier la grille
horaire.
• Le disque est verrouillé. Déverrouillez-le.
• Le disque est un DVD+R fermé. Changez de disque.
Impossible
d'éditer un
DVD±RW
Interférences
vidéo ou audio
au niveau du
signal TV
Image déformée
ou noir et blanc
Pas de sortie
audio
• Le disque est verrouillé. Appuyez sur le bouton DVD de la télécommande et
sélectionnez Déverrouiller disque pour déverrouiller le disque.
• Vérifiez l'antenne.
• Vérifiez le système TV sélectionné dans le menu du système. En Europe
continentale, le système TV doit être défini sur PAL ou SECAM.
• Le système couleur du disque n'est pas compatible avec celui du téléviseur.
• Le signal n'est pas un signal en couleur.
• Assurez-vous que les connecteurs d'entrée numérique sont conformes aux
connecteurs de sortie des périphériques externes.
Français -
67
Page 68

SPÉCIFICATIONS
Alimentation 110-240 Vca, 50 Hz
Consommation électrique 40 W
Consommation électrique (veille) 3 W
Taille (mm) 430 x 48 x 308
Poids Environ 4,0 kg
Humidité 15~75%
68 -
Guide de l'utilisateur de l'Easy HDD Recorder de Packard Bell
Page 69

Français -
69
Page 70

70 -
Guide de l'utilisateur de l'Easy HDD Recorder de Packard Bell
Page 71

Français -
71
Page 72

DEUTSCH
PACKARD BELL EASY HDD RECORDER – BENUTZERHANDBUCH
Copyright ©2005 NEC Computers International BV. Alle Rechte vorbehalten. Dieses Handbuch darf, auf welche
Weise und mit welchen Mitteln auch immer, ob elektronisch, chemisch, manuell oder sonst wie, einschließlich, aber
nicht darauf beschränkt, Fotokopien, Aufzeichnungen oder Datenbanksysteme, weder ganz noch teilweise
vervielfältigt oder übertragen werden, ohne dass hierfür die schriftliche Genehmigung von NEC Computers
International B.V. vorliegt.
HAFTUNGSAUSSCHLUSS
NEC Computers International BV macht keine Zusicherungen und übernimmt keine Haftung in Bezug auf den Inhalt
dieser Dokumentation und schließt insbesondere jegliche gesetzliche Gewährleistung der handelsüblichen Qualität
oder der Eignung für einen bestimmten Zweck aus. Die Hardwarekomponenten werden regelmäßig aktualisiert.
Daher kann es sein, dass einige der Anweisungen, technischen Daten und Abbildungen in dieser Dokumentation
nicht ganz auf Ihre spezielle Situation zutreffen. Alle in diesem Handbuch beschriebenen Elemente dienen lediglich
der Veranschaulichung und treffen unter Umständen nicht auf Ihren speziellen Fall zu. Aus den Beschreibungen in
diesem Handbuch können keine Rechte oder Berechtigungen hergeleitet werden.
NEC Computers International BV behält sich das Recht vor, diese Veröffentlichung zu revidieren und ihren Inhalt
gelegentlich zu ändern, ohne dadurch in irgendeiner Form Dritten gegenüber verpflichtet zu sein, derartige
Überarbeitungen oder Änderungen mitzuteilen. In keinem Fall haftet NEC Computers International BV für
Folgeschäden oder Unfallschäden jeglicher Art, einschließlich, jedoch nicht hierauf beschränkt, entgangenem
Gewinn oder jeglichen sonstigen geschäftlichen Schäden, die sich unmittelbar durch das Produkt oder infolge der
Benutzung des Produktes ergeben.
WARENZEICHEN
Packard Bell ist ein eingetragenes Warenzeichen von NEC Computers International BV. Alle anderen in diesem
Handbuch erwähnten Firmen- oder Produktnamen sind Warenzeichen, eingetragene Warenzeichen oder
Dienstleistungsnamen der jeweiligen Rechteinhaber.
WARNUNG
Zur Vermeidung eines Brandes oder Stromschlags darf der Stecker nur mit einem Verlängerungskabel, einer
Steckdose oder einem anderen Anschluss verwendet werden, wenn er sich vollständig hineinstecken lässt. Dieses
Gerät darf weder Regen noch Feuchtigkeit ausgesetzt werden.
WARNUNG
STROMSCHLAGGEFAHR.
NICHT ÖFFNEN.
Das Symbol eines Blitzpfeils in
einem gleichschenkligen Dreieck
soll den Benutzer auf eine
innerhalb des Produktgehäuses
vorhandene nichtisolierte
gefährliche Spannung hinweisen,
die ausreicht, um für Personen
die Gefahr eines Stromschlags
darzustellen.
WARNUNG: UM DAS RISIKO
EINES STROMSCHLAGS ZU
VERRINGERN, DARF DIE
ABDECKUNG (ODER
RÜCKSEITE) NICHT ENTFERNT
WERDEN. KEINE
BENUTZERSEITIG ZU
WARTENDEN TEILE IM
INNEREN.
WARTUNGSARBEITEN
QUALIFIZIERTEM
SERVICEPERSONAL
ÜBERLASSEN.
WICHTIGE SICHERHEITSHINWEISE
• Lesen Sie diese Anweisungen.
72 -
Packard Bell Easy HDD Recorder – Benutzerhandbuch
Das Ausrufezeichen in einem
gleichschenkligen Dreieck soll
den Benutzer auf wichtige
Betriebs- und
Wartungs(Service)anweisungen
in der Begleitdokumentation
zum Gerät hinweisen.
Page 73

• Bewahren Sie diese Anweisungen auf.
• Beachten Sie alle Warnhinweise.
• Befolgen Sie alle Anweisungen.
• Benutzen Sie das Gerät nicht in der Nähe von Wasser.
• Reinigen Sie das Gerät nur mit einem trockenen Tuch.
• Blockieren Sie keine der Lüftungsöffnungen. Befolgen Sie die Installationsanweisungen des Herstellers.
• Installieren Sie das Gerät nicht in der Nähe von Wärmequellen wie Heizungen, Öfen oder anderen Geräten
(einschließlich Verstärker).
• Nehmen Sie keine Veränderungen an der Sicherheitsvorrichtung des polarisierten oder geerdeten Steckers vor.
Ein polarisierter Stecker hat zwei unterschiedlich breite Klingen. Ein geerdeter Stecker hat zwei Klingen und
einen dritten Erdungsstift. Die breite Klinge bzw. der dritte Stift dient Ihrer Sicherheit. Sollte der mitgelieferte
Stecker nicht in Ihre Steckdose passen, wenden Sie sich zwecks Unterstützung bitte an einen Elektriker.
• Achten Sie darauf, dass das Netzkabel weder gequetscht noch abgeklemmt wird.
• Verwenden Sie ausschließlich vom Hersteller spezifizierte Zusatzgeräte/Zubehörteile.
• Trennen Sie dieses Gerät bei Gewitter oder bei längerer Nichtbenutzung von der Stromversorgung ab. Beachten
Sie bitte, dass sich die Produktgarantie nicht auf Schäden am Produkt infolge eines Blitzschlags erstreckt.
• Überlassen Sie sämtliche Servicearbeiten qualifiziertem Personal. Servicearbeiten sind erforderlich, wenn das
Gerät in irgendeiner Weise beschädigt wurde, Regen oder Feuchtigkeit ausgesetzt war, nicht mehr normal
funktioniert oder fallengelassen wurde.
• Um das Gerät von der Stromversorgung zu trennen, muss der Netzstecker gezogen werden. Aus diesem Grund
sollte sich die Steckdose möglichst dicht am Gerät befinden und leicht zugänglich sein.
PRODUKTENTSORGUNG
Gemäß der WEEE (Waste Electrical and Electronic Equipment)-Richtlinie müssen elektrische und
elektronische Produkte getrennt vom normalen Hausmüll entsorgt werden, um die
Wiederbenutzung, Weiterverwertung und andere Formen der Wiedergewinnung zu fördern und
die Menge des zu beseitigenden Mülls und im Hinblick auf eine verringerte Deponielagerung zu
reduzieren. Dazu gehören Zubehörteile wie Fernbedienung, Netzkabel usw. Befolgen Sie bei der
Entsorgung solcher Produkte bitte die Anweisungen Ihrer zuständigen Behörde und/oder fragen
Sie beim Kauf neuer Produkte den Händler.
Deutsch -
73
Page 74

INHALT
Easy HDD Recorder - Funktionen ...................................................................................................................... 75
Hauptmerkmale......................................................................................................................................... 75
Zusätzliche Merkmale................................................................................................................................ 76
Erste Schritte – Bedienelemente........................................................................................................................ 76
Vorbereiten der Fernbedienung .................................................................................................................. 76
Fernbedienungstasten ................................................................................................................................ 77
Bedienelemente und Merkmale auf der Vorderseite.................................................................................... 78
Abbildung der Rückseite ............................................................................................................................ 78
Erste Schritte – Anschließen.............................................................................................................................. 80
Anschließen an ein Fernsehgerät ................................................................................................................ 80
Anschließen an einen A 5.1 Channel Dolby Digital Audio-Verstärker .......................................................... 81
Anschließen an einen Verstärker mit Dolby-Digital-Decoder ........................................................................ 81
Anschließen von USB-Geräten.................................................................................................................... 84
Navigationsmodus...................................................................................................................................... 84
Suchen nach Fernsehkanälen ..................................................................................................................... 85
Disc-Medien ..................................................................................................................................................... 86
DVDs ........................................................................................................................................................ 86
SVCD/VCD/AUDIO-CDs .......................................................................................................................... 86
MP3 /JPEG/DivX (Audio-/Bild-/Videodateien) .......................................................................................... 86
Abspielbare und beschreibbare Disc-Medien ............................................................................................... 87
Abspielbare Disc-Medien............................................................................................................................ 87
Nicht abspielbare Disc-Medien ................................................................................................................... 87
Wiedergabemodus ............................................................................................................................................ 87
DVD-Wiedergabe....................................................................................................................................... 87
VCD-Wiedergabe ....................................................................................................................................... 88
Allgemeine Wiedergabeoptionen ................................................................................................................ 89
JPEG/MP3-Wiedergabe ............................................................................................................................. 91
DivX-Wiedergabe ....................................................................................................................................... 91
Kindersicherung......................................................................................................................................... 91
Aufnahme/Time Shifting .................................................................................................................................. 92
Aufnehmen mit Time Shifting .................................................................................................................... 92
Aufnehmen auf DVD ................................................................................................................................. 94
Aufnahmequelle......................................................................................................................................... 95
Kapitelmarker ............................................................................................................................................ 96
Timer-Aufnahme............................................................................................................................................... 96
Einstellen der Uhr...................................................................................................................................... 96
Programmierte Aufnahme .......................................................................................................................... 97
Abgleichen der Systemzeit ......................................................................................................................... 98
HDD-Titelliste............................................................................................................................................ 99
DUBBING ................................................................................................................................................. 99
Bearbeiten von HDD-Titeln............................................................................................................................. 100
Bearbeiten von DVD+RW-Titeln .............................................................................................................. 101
Bearbeiten einer DVD+RW ...................................................................................................................... 102
Bearbeiten einer DVD+R.......................................................................................................................... 103
Störungsbeseitigung ........................................................................................................................................ 104
Technische Daten ........................................................................................................................................... 106
74 -
Packard Bell Easy HDD Recorder – Benutzerhandbuch
Page 75

EASY HDD RECORDER - FUNKTIONEN
Der Packard Bell Easy HDD Recorder kann Fernsehsignale, AV-Signale von externen Geräten oder digitale
Signale von IEEE 1394-Geräten codieren und Daten zwecks Speicherung auf DVD+RWs oder DVD+Rs,
aufnehmen. Der Easy HDD Recorder ist zudem mit sämtlichen Funktionen eines normalen DVD-Players
kompatibel.
Hauptmerkmale
• Ein integriertes Festplattenlaufwerk (HDD; Hard Disk Drive) unterstützt Funktionen wie Time Shifting
und Direct Digital Dub
• Spielt kommerzielle Film-DVDs und Audio-CDs
• MP3-Unterstützung
• DivX Codec-Unterstützung (kurz für DivX Compression/decompression).
• Dolby Digital-Sound für insgesamt sechs (‘5.1’) diskrete Kanäle (vorn links, vorn mittig, vorn rechts,
hinten links, hinten rechts und Subwoofer)
Time Shifting
Simultane Videoaufnahme und -wiedergabe
• Pause und Wiederaufnahme von Live-Sendungen. Schnell vor, schnell zurück und Direktsprung zu einer
beliebigen Stelle in der Aufzeichnung.
• Sofortwiedergabe
• Gibt ein zuvor aufgezeichnetes Programm wieder, während gleichzeitig ein anderes Programm
aufgenommen wird
DVD/CD-Player
• Unterstützt Bildschirmformate 16:9 und 4:3
• Wiedergabefunktionen, einschließlich Programmieren, Wiederholen, Schnell vor/zurück, Zoom usw.
• Unterstützt verschiedene Audio-, Unterstitel- und Menüsprachen Unterstützt sowohl verschiedene
Blickwinkel als auch andere normale DVD-Wiedergabefunktionen
• Kompatibel mit DVDs, Super-VCDs, VCDs, CDs und CD-Rs und kann MP3, JPEG und Bild-CDs
abspielen
• Kopierschutztechnologie von Macrovision
Aufnahmeprogrammierung
• Aufnahme vom TV-Tuner oder einem analogen AV-Eingang im MPEG-2-Format
• Gibt ein zuvor aufgezeichnetes Programm von der Festplatte wieder, während ein anderes Programm
aufgezeichnet wird
• Programmierbarer Timer zum Aufnehmen von Einzelsendungen oder Fernsehserien
• Bis zu 20 Zeitaufnahmeereignisse mit drei Optionen: „Einmalig“, „Täglich“ und „Wöchentlich“
• OTR-Schnellaufnahme; nimmt Fernsehsendungen per Tastendruck auf
DVD-Archivierung („Dubbing“)
• Archiviert auf der Festplatte gespeicherte Aufzeichnungen auf DVD+RWs oder DVD+Rs.
• Mit dem Easy HDD Recorder aufgenommene DVDs können mit den meisten heutigen und zukünftigen
DVD-Playern abgespielt werden
Deutsch -
75
Page 76

Persönliche Videoarchivierung
• Überträgt Videos von einem VCR, analogen Camcorder oder digitalen (DV) Camcorder mit Direct Digital
Dub™ auf DVD
Anschlüsse
• Digitaler Eingang (DV) für digitale Videokameras; Audio- und Videosignale werden über dasselbe Kabel
übertragen
• Standardmäßiger Videoausgang (CVBS), S-Video-Ausgang, SCART EIN/AUS-Buchsen und Component
Video-Ausgänge (Y, Cb/Pb, Cr/Pr)
• Koaxiale digitale Audioausgangsbuchse
• Schnittstellen mit USB-Flash-Laufwerken, USB-Speicherkartenlesegeräte und USB-Kameras (das
Massenspeichergerät muss FAT32-formatiert sein)
• Signaldurchleitung mit SCART- und TV-Antennenanschlüssen
Zusätzliche Merkmale
• Alterstufenkontrollsystem
• Bildschirmschonerprogramm als Bildschirmschutz
• Progressive Scan erzeugt ein Bild mit der doppelten Anzahl von Abtastzeilen als beim herkömmlichen
Component Video. Dies bedeutet sowohl geringeres Bildflimmern und weniger Bewegungsartefakte als
auch ein schärferes Bild auf großen Bildschirmen.
Dieses Gerät verwendet ein Kopierschutzverfahren, das durch ein US-Patent und
andere gewerbliche Schutzrechte geschützt ist. Die Benutzung dieses
Genehmigung durch Macrovision. Soweit Macrovision schriftlich keine andere Nutzung genehmigt, ist es
ausschließlich für die private Nutzung und andere eingeschränkte „Pay-per-view“-Anwendungen
vorgesehen. Modifikationen am Gerät, das Entfernen von Komponenten und das Zurückentwickeln sind
untersagt.
Kopierschutzverfahrens von Macrovision Corporation unterliegt der
ERSTE SCHRITTE – BEDIENELEMENTE
Vorbereiten der Fernbedienung
Die Fernbedienung und die Batterien sind einzeln verpackt. Vor dem Benutzen der Fernbedienung, müssen
Sie zunächst die Batterien einsetzen:
1. Nehmen Sie die Fernbedienung und zwei AAA-Batterien.
2. Entfernen Sie den Batteriefachdeckel an der Fernbedienung, setzen Sie die Batterien (in der korrekten
Ausrichtung) ein und bringen Sie den Deckel wieder an.
Hinweis: Achten Sie beim Benutzen des Easy HDD Recorders darauf, die Fernbedienung direkt auf den
Recorder und nicht auf das Fernsehgerät zu richten!
76 -
Packard Bell Easy HDD Recorder – Benutzerhandbuch
Page 77

Fernbedienungstasten
Eine ausführliche Beschreibung dieser Tasten finden Sie im
jeweiligen Kapitel:
1. Taste AUSWERFEN
2. Taste DV/USB
3. Taste HDD
4. Zifferntasten (0-9)
5. Taste EINSTELLUNG
6. Tasten LINKS/WIEDERHOLEN, OBEN, UNTEN,
RECHTS/ÜBERSPRINGEN
7. Taste AUSWAHL
8. Taste TIMER
9. Taste TIME SHIFT
10. Taste REC/OTR (RECORD/ONE-TOUCH RECORD)
11. Taste WIEDERGABE
12. Taste STOPP
13. Taste REV (Zurück)
14. Taste PREV (Voriger)
15. Taste FWD (Vor)
16. Taste NEXT (Nächster)
17. Taste AUDIO
18. Taste MENÜ
19. Taste UNTERTITEL
20. Taste ZOOM
21. Taste EIN/AUS
22. Taste QUELLE
23. Taste DVD
24. Taste GEHE ZU
25. Taste HINZU/LÖSCHEN
26. Taste NAVIGATION
27. Taste ZURÜCK
28. Taste AUFNEHMEN AUF
29. Taste LANGSAM/SORTIEREN
30. Taste PAUSE/SCHRITT
31. Taste KANAL+
32. Taste LAUTER
33. Taste KANAL-
34. Taste LEISER
35. PS/IS (PROGRESSIVE/ INTERLACE SCAN)*
36. Taste WIEDERHOLEN
37. Taste ANZEIGEN
38. Taste TON AUS
Deutsch -
77
Page 78

WARNUNG: Wenn die Taste PS/IS gedrückt wird, während das Gerät an einem nicht Progressive Scankompatiblen Fernsehgerät angeschlossen ist, wird der Bildschirm schwarz und sämtliche Menüs sind nicht
mehr zugänglich. Drücken Sie in diesem Fall die Taste PS/IS erneut, um zum Normalbetrieb zurückzukehren.
Bedienelemente und Merkmale auf der Vorderseite
1. STANDBY/EIN/AUS-TASTE
2. STANDBY-LED
3. IR (INFRAROTSENSOR)
4. DVD-FACH
5. VFD-ANZEIGE
6. ÖFFNEN/SCHLIEßEN-TASTE
7. QUELLE
8. WIEDERGABE
9. STOPP
10. AUFNAHME
11. COMPOSITE VIDEO-EINGANG (VORN)
12. AUDIOEINGANG (VORN RECHTS)
13. AUDIOEINGANG (VORN LINKS)
14. USB-EINGANG
15. DIGITAL VIDICON-EINGANG
Abbildung der Rückseite
1. HF-SIGNALEINGANG
2. HF-SIGNALAUSGANG
3. COMPOSITE VIDEO-EINGANG (HINTEN)
4. S-VIDEOEINGANG
5. AUDIOEINGANG (HINTEN LINKS/RECHTS)
6. 5.1CH AUDIO-AUSGANG (L, R, SL, SR, M, SW)
7. COMPOSITE VIDEO-AUSGANG
78 -
Packard Bell Easy HDD Recorder – Benutzerhandbuch
Page 79

8. S-VIDEO-AUSGANG (HINTEN)
9. DIGITAL AUDIO-LWL-AUSGANG
10. DIGITAL AUDIO-KOAXIALAUSGANG
11. COMPONENT VIDEO-AUSGANG (Y, Cr/Pr, Cb/Pb)
12. SCART-EINGANG
13. SCART-AUSGANG
Deutsch -
79
Page 80

ERSTE SCHRITTE – ANSCHLIEßEN
Anschließen an ein Fernsehgerät
A. TV
B Component Video-Ausgang
C HF-Antenneneingang
DHF-Antennenausgang
E S-Video-Ausgang
F S-Video-Eingang
G Video-Eingang
H SCART-Eingang
Es gibt drei Arten von Videoausgängen: Component Video, S-Video und Composite Video. Hinsichtlich
Bildqualität ist Component Video der Beste, gefolgt von S-Video, während Composite Video weniger
zufriedenstellend ist. Darüber hinaus ist auch ein Scart-Ausgang vorhanden. In diesem Scart-Ausgang sind
ein Composite Video (CVBS)- und ein Component Video (RGB)-Ausgang sowie Audio (L + R)-Ausgänge
integriert. Wenn der Scart-Ausgang benutzt wird, wird für den Anschluss keines der oben erwähnten Kabel
benötigt.
80 -
Packard Bell Easy HDD Recorder – Benutzerhandbuch
Page 81

Hinweis: Benutzer von Digitalkabel- und Satelliten-TV verbinden den Ausgang Ihres Decoders mit diesem
Geräteeingang.
Anschließen an einen A 5.1 Channel Dolby Digital Audio-Verstärker
Für ein Hörerlebnis mit 5.1-Channel Dolby Digital schließen Sie den Recorder an ein VerstärkerLautsprecher-System mit 5.1 Channel Dolby Digital Audio an. Dolby Digital-Programme können SurroundSound mit bis zu fünf diskretenVollbereichskanälen liefern: Links, Mitte, Rechts, Links Surround, Rchts
Surround, sowie einen sechsten Kanal für leistungsstarke Niederfrequenzeffekte (Low-Frequency Effects;
LFE). Da er im Vergleich mit anderen nur ein Zehntel der Bandbreite benötigt, wird der LFE-Kanal als ein
„.1“-Kanal bezeichnet (und manchmal fälschlicherweise als „Subwoofer“-Kanal).
A Normales Kabel (Analogausgang)
B 5.1 Channel-Verstärker
Anschließen an einen Verstärker mit Dolby-Digital-Decoder
Für eine vollständig reproduzierte 5.1-Kanal Dolby Digital-Audioausgabe schließen Sie den Recorder über ein
Koaxialkabel oder ein Glasfaserkabel an ein Verstärker-Lautsprecher-System mit einem Dolby DigitalDecoder an.
Deutsch -
81
Page 82

A Koaxial- oder Glasfaserkabel. Informieren Sie sich im Benutzerhandbuch zu Ihrem Verstärker über den
jeweils erforderlichen Kabeltyp.
BVerstärker
• Wählen Sie in den Audioeinstellungen unter „Digital Output Mode“ (Digitaler Ausgabemodus) die
Option „RAW Output“ (RAW-Ausgang).
82 -
Packard Bell Easy HDD Recorder – Benutzerhandbuch
Page 83

Anschließen eines externen Aufnahmegerätes an der Vorderseite
A. Digital Vidicon
B USB-Speichergerät
HINWEIS – Informieren Sie sich im Handbuch für das angeschlossene System. Schalten Sie beide Geräte aus
und ziehen Sie die Netzstecker, bevor Sie irgendwelche Anschlüsse vornehmen.
Deutsch -
83
Page 84

Anschließen eines externen Aufnahmegerätes an der Rückseite
A. HF-Eingang
B Videoeingang (Video oder S-Video)
CAudioeingang
D SCART-Eingang
E DVD-Player
Anschließen von USB-Geräten
Der Easy HDD Recorder kann mit USB-Flash-Laufwerken, USB-Speicherkartenlesegeräten und USB-Kameras
verbunden werden, die Mass Storage Class-kompatibel sind.
Sie können ein oder mehrere aufeinanderfolgende JPEG-Bilder betrachten.
Nachdem ein USB-Gerät am USB-Port angeschlossen wurde, drücken Sie die Taste DV/USB zweimal, um in
den USB-Modus zu wechseln. Daraufhin erscheint das Dateiauswahlmenü. Mit Hilfe der Tasten „Oben/
Unten“ oder „Select“ können Sie den Inhalt des USB-Gerätes durchsehen.
Hinweis: Es kann einige Sekunden dauern, bis ein USB-Gerät erkannt wird.
Hinweis: Das Massenspeichergerät muss FAT32-formatiert sein.
Navigationsmodus
Im Navigationsmodus stehen sämtliche Gerätefunktionen zur Verfügung.
84 -
Packard Bell Easy HDD Recorder – Benutzerhandbuch
Page 85

Drücken Sie die Navigationstaste an der Fernbedienung, um den
Bildschirm rechts aufzurufen.
1. Wechseln zum DVD-Wiedergabemodus.
2. Wechseln zum TV/VIDEO-Modus.
3. Wechseln zum Systemeinstellungsmodus.
4. Wechseln zum Timer-Aufnahmemodus.
5. Wechseln zum USB-Wiedergabemodus.
6. Wechseln zum HDD-Wiedergabemodus.
Suchen nach Fernsehkanälen
Bevor Sie Fernsehprogramme aufrufen oder aufzeichnen können,
müssen Sie zunächst eine Kanalsuche durchführen:
• Drücken Sie dazu nach dem Stoppen der Wiedergabe auf Setup, um das Systemmenü aufzurufen.
• Markieren Sie im Abschnitt „Recording“ (Aufnehmen) mit Hilfe der Pfeiltasten (Oben/Unten) das
Symbol
Länderauswahl
• Wählen Sie in der Liste Ihr Land, und drücken Sie dann auf Select.
• Markieren Sie mit Hilfe der Pfeiltasten (Oben/Unten) die Option
Select, um den Suchvorgang zu starten.
• Markieren Sie mit Hilfe der Pfeiltasten (Oben/Unten) die Option
drücken Sie dann die Taste Select, um das Menü
, und drücken Sie dann auf Select, um die Länderliste aufzurufen.
APS
, und drücken Sie dann die Taste
Channel Edit
Modify channel
(Kanal bearbeiten) aufzurufen.
(Kanal ändern), und
Hinweis: Falls Sie die Time Shifting-Funktionen benutzen, müssen Sie Time Shifting deaktivieren, bevor Sie
fortfahren.
Das Menü „Modify Channel Information“ (Kanalinformationen ändern)
Program Number (Programmnummer): Die Nummer des aktuellen Kanals; dies kann nicht verändert
werden.
Name: Benutzen Sie die Pfeiltasten (Oben/Unten/Links/Rechts), um einen Kanalnamen auszuwählen
und zu bearbeiten.
Standard: Der Übertragungsstandard des aktuellen Kanals. Wählen Sie den korrekten Standard
entsprechend des lokalen Fernsehsignals.
Search type (Suchart): Benutzen Sie die Pfeiltasten (Oben/Unten/Links/Rechts), um den Suchmodus
auszuwählen. Es gibt zwei Modi:
der Eintrag „Band“ nicht angezeigt.
Band: Das Band dieses Kanals. Sie können zwischen
Channel (Kanal): Benutzen Sie die Pfeiltasten (Oben/Unten/Links/Rechts), um einen Kanalnamen
auszuwählen und zu bearbeiten.
Fine tune (Feinabstimmung): Feinabstimmung des aktuellen Kanals.
Delete (Löschen): Löscht den aktuellen Kanal von der Kanalliste.
OK: Bestätigt und speichert die Einstellungen für den aktuellen Kanal.
Cancel (Abbrechen): Verwirft die aktuellen Einstellungen und beendet das Menü.
• Markieren Sie mit Hilfe der Pfeiltasten (Oben/Unten) die Option
drücken Sie dann die Taste Select, um die Fernsehkanäle zu sortieren.
• Wählen Sie mit Hilfe der Pfeiltasten (Oben/Unten) den zu sortierenden Kanal, und drücken Sie dann die
Taste Rechts, um Ihre Auswahl zu bestätigen. Der ausgewählte Kanal wird daraufhin vorübergehend in
das rechte Fenster verschoben. Bringen Sie den ausgewählten Kanal mit Hilfe der Tasten Oben/Unten in
die gewünschte Position, und drücken Sie dann die Taste Links, um ihn in die Kanalliste einzufügen.
Frequency (Frequenz)
Standard
und
Channel (Kanal)
und
. Im Frequenzmodus wird
Cable (Kabel)
Program Table
wählen.
(Programmtabelle), und
Deutsch -
85
Page 86

• Ändern Sie Systemdatum und -zeit mit Hilfe der Pfeiltasten.
DISC-MEDIEN
DVDs
Das gesamte Disc-Medium ist in kleinere, übersichtlichere Abschnitte unterteilt, so dass sich bestimmte
Inhalte leichter auffinden lassen. DVDs sind in einen oder mehrere Titel unterteilt. Jeder Titel kann
wiederum verschiedene Kapitel aufweisen. Gelegentlich kann ein Kapitel Indexpunkte enthalten, die das
Kapitel gewissermaßen auch in verschiedene Bereiche aufteilen.
Mehrfachwinkel
Beim Betrachten von Filmen oder andere Medien mit Mehrwinkelwiedergabe können Sie sich Szenen aus
verschiedenen Kamerawinkeln ansehen.
Mehrere Audiosprachen
Beim Betrachten von Filmen oder Disc-Medien, auf denen mehrere Sprachen und/oder Musiktitel
aufgenommen sind, können Sie die gewünschte Sprache wählen.
Mehrere Untertitelsprachen
Beim Betrachten von Filmen oder Disc-Medien, auf denen sich Untertitel in mehreren Sprachen befinden,
können Sie die gewünschte Untertitelsprache wählen.
SVCD/VCD/AUDIO-CDs
SVCD/VCD/AUDIO-CDs sind in mehrere Spuren unterteilt. Eine Spur kann gelegentlich eine Reihe von
Indexpunkten enthalten, die die Spur gewissermaßen in verschiedene Bereiche aufteilt.
MP3 /JPEG/DivX (Audio-/Bild-/Videodateien)
MP3 ist ein komprimiertes Audiodateiformat, das die Dateierweiterung „mp3“ oder „.MP3“ verwendet.
JPEG ist ein komprimiertes Bilddateiformat, das die Dateierweiterung „.jpg“ oder „.JPG“ verwendet. DivX ist
ein komprimiertes Videodateiformat, das die Dateierweiterung „.avi“ oder „.AVI“ verwendet.
HINWEIS: Der Easy HDD Recorder kann einige Zeit brauchen, um die Inhaltsliste eines Disc-Mediums
anzuzeigen, falls das Medium viele Musiktitel oder Bilder oder sehr lange Titel oder große Bilder enthält.
86 -
Packard Bell Easy HDD Recorder – Benutzerhandbuch
Page 87

Abspielbare und beschreibbare Disc-Medien
DVD+RW (beschreibbare DVDs)
DVD+RW ist ein löschbares Format. DVD+RWs können mehr als 1.000-mal beschrieben werden.
*DVD+R (einmal beschreibbare DVDs)
DVD+Rs können nur einmal beschrieben werden. Solange die Disc nicht fertig gestellt ist, können auf ihr
mehrere Aufnahmen vorgenommen werden.
Hinweis: Nachdem ein Disc-Medium einmal fertig gestellt ist, können Sie es auch dann nicht mehr bearbeiten
oder darauf aufnehmen, wenn noch ungenutzte Kapazität verfügbar ist.
Falls Sie eine mit Ihrem Easy HDD Recorder erstellte DVD+R auf einem anderen Player abspielen wollen,
stellen Sie bitte sicher, dass sie vollständig fertig gestellt wurde. In ähnlicher Form müssen Sie die Option
„Kompatibel machen“ benutzen, falls Sie eine DVD+RW oder ein Disc-Medium auf einem anderen Player
abspielen möchten.
Abspielbare Disc-Medien
DVD-Video (Digital Versatile Disc)
DVD-R und DVD+R (einmal beschreibbare DVDs)
DVD-RW und DVD-RW (wiederbeschreibbare DVDs)
DVD-RWs müssen im Videomodus aufgenommen werden, um sie mit dem Easy HDD Recorder abspielen zu
können.
Audio-CD (digitales Audio-Disc-Medium)
Super-Audio-CD (spielt nur die CD-Schicht eines Hybrid-SACD-Disc-Mediums ab)
VCD (Format 1.0, 1.1 und 2.0)
Super-VCD
Audio-CD-R (einmal beschreibbare CD) / MP3-komprimierte Musik
Audio-CD-RW (wiederbeschreibbare CD) / MP3-komprimierte Musik
Nicht abspielbare Disc-Medien
• Nicht abgeschlossene Disc-Medien von anderen DVD/CD-Recordern.
• Aufgrund des Medientyps oder der Aufnahmebedingungen kann es sein, dass sich CD-Rs, CD-RWs,
DVD-Rs, DVD-RWs, DVD+Rs oder DVD+RWs nicht immer abspielen lassen.
WIEDERGABEMODUS
DVD-Wiedergabe
Abspielen „normaler“ DVDs (z.B. ein DVD-Film)
1. Stellen Sie sicher, dass alle Anschlüsse korrekt vorgenommen wurden, und schließen Sie dann das
Netzkabel an einer Steckdose an. Press the Standby/On button on the front panel or the POWER button
on the remote control to power on the Easy DVD Recorder.
2. Legen Sie eine DVD ein. Sollte das DVD-Bild nicht auf dem Bildschirm erscheinen, drücken Sie die Taste
DVD auf der Fernbedienung, um in den DVD-Modus zu wechseln.
3. Wählen Sie mit Hilfe der Pfeiltasten den gewünschten Titel.
4. Drücken Sie die Taste Select. Der gewählte Titel wird nun wiedergegeben.
5. Drücken Sie während der Wiedergabe die Taste Select, um Wiedergabeinformationen anzuzeigen.
Deutsch -
87
Page 88

6. Drücken Sie die Taste Select erneut, um das Wiedergabesteuerungsmenü unten aufzurufen. Drücken Sie
die Taste Links, um das Menü wieder zu schließen.
7. Um das Disc-Medium zu entfernen, drücken Sie die OPEN/CLOSE auf der Gerätevorderseite.
Abspielen beschreibbarer DVDs (DVD+RW, DVD-RW, DVD+R oder DVD-R)
1. Schalten Sie den Easy HDD Recorder ein.
2. Legen Sie eine beschreibbare DVD ein.
3. Sollte der DVD-Indexbildschirm nicht erscheinen, drücken Sie die Taste DVD auf der Fernbedienung,
um in den DVD-Modus zu wechseln.
4. Wählen Sie mit Hilfe der Pfeiltasten (Oben/Unten) den gewünschten Titel. Drücken Sie auf Select, um
die Wiedergabe zu starten.
5. Drücken Sie auf Stop, um die Wiedergabe zu stoppen, und erneut auf Play, um sie wieder fortzusetzen.
Screen display (bildschirmanzeige)
Drücken Sie während der Wiedergabe die Taste Select, um folgende Informationen aufzurufen.
Aktueller Titel – Aktuelles Kapitel – Audiosprache – Verstrichene Zeit
Disc menu (disc-menü)
Drücken Sie die Taste DVD, um das Disc-Menü aufzurufen. Der Inhalt dieses Menüs ist vom jeweiligen
Disc-Medium abhängig.
Wählen Sie mit Hilfe der Pfeiltasten den gewünschten Titel, und drücken Sie dann auf Select, um ihn
abzuspielen.
Drücken Sie eine Zifferntaste, um den gewünschten Titel abzuspielen.
VCD-Wiedergabe
VCD-Disc-Menü
Drücken Sie die Taste DVD, um das Disc-Menü (PBC ON) aufzurufen.
Drücken Sie eine Zifferntaste, um den gewünschten Titel abzuspielen.
HINWEIS: Nur bei Version VCD 2.0 und höher. Während das Disc-Medium wiedergegeben wird, sind die
Zifferntasten funktionslos.
Playing in sequence (sequenzwiedergabe)
Drücken Sie die Taste MENU, um zwischen den Modi VCD DISC MENU (PBC ON) und PLAY IN
SEQUENCE (PBC OFF) umzuschalten.
Bei VCDs der Versionen 1.0 und 1.1 wechselt der Player nach dem Laden des Disc-Mediums in den
Sequenzwiedergabemodus. (Diese Disc-Medien können nur in diesem Modus abgespielt werden.) In diesem
Modus können Sie auch über die Zifferntasten einen Titel auswählen. Ferner reagieren die Zifferntasten auch
88 -
Packard Bell Easy HDD Recorder – Benutzerhandbuch
Page 89

während der Wiedergabe eines Disc-Mediums. Bei manchen Disc-Medien startet die Wiedergabe
automatisch.
HINWEIS: Nur bei VCDs und SVCDs.
Allgemeine Wiedergabeoptionen
System menu (systemmenü)
• Drücken Sie die Taste Setup, um das Systemmenü aufzurufen.
• Wählen Sie mit Hilfe der Pfeiltasten die gewünschte Option, und drücken Sie dann die Taste Select, um
Ihre Auswahl zu bestätigen.
• Drücken Sie erneut auf Setup, um das Menü wieder zu verlassen.
Fast forward and fast reverse (schnell vor/zurück)
Drücken Sie die Taste >> (Schnell vor), um den schnellen Vorlauf zu aktivieren, und die Taste << (Schnell
zurück), um den schnellen Rücklauf zu aktivieren. Durch wiederholtes Drücken können Sie zwischen vier
verschiedenen Geschwindigkeiten wechseln.
HINWEIS: Drücken Sie auf Play, um zur normalen Wiedergabe zurückzukehren.
Play (wiedergabe)
Wählen Sie die Taste Select auf der Fernbedienung oder die Taste Play vorn am Gerät, um die Wiedergabe
zu starten.
Pause (pause)
Drücken Sie die Pause auf der Fernbedienung, um die Wiedergabe anzuhalten.
Skip (überspringen)
Drücken Sie die Taste >>| (Vorwärts springen), um zum nächsten Titel/Kapitel weiterzugehen, und die
Taste |<< (Zurück springen), um zum vorherigen Titel/Kapitel zurückzugehen.
Repeat (wiederholen)
1. A-B Wiederholen
• Drücken Sie die Taste Select während der Wiedergabe zweimal, um das Setup-Menü aufzurufen.
• Markieren Sie mit Hilfe der Pfeiltasten Oben/Unten die Option
Select.
• Markieren Sie mit Hilfe der Pfeiltasten Oben/Unten die Option „A-B Wiederholen“, und drücken Sie die
Taste Select, um den Startpunkt (A) festzulegen; drücken Sie die Taste Select erneut, um die Option „AB Wiederholen“ anzuzeigen, und dann die Taste Select ein drittes Mal, um den Endpunkt (B)
festzulegen. Der Abschnitt zwischen Start- und Endpunkt wird nun wiederholt abgespielt.
• Drücken Sie die Pfeiltaste Links, um das Setup-Menü wieder zu verlassen.
2. Titel/Kapitel Wiederholen - Drücken Sie während der Wiedergabe wiederholt die Taste Repeat, um
einen Titel oder ein Kapitel zu wiederholen.
3. Drücken Sie wiederholt die Taste Repeat, bis Sie zur normalen Wiedergabe zurückkehren.
Modus
, und drücken Sie dann die Taste
Deutsch -
89
Page 90

Wiedergabesteuerung mit dem Wiedergabemenü
1. Drücken Sie die Taste Select, um das Steuerungsmenü aufzurufen und ein Untermenü auszuwählen:
MODE (Modus): Stellen Sie den Wiedergabemodus ein (z.B. Repeat (Wiederholen), Program
(Programmieren) usw.).
TRICK (Trick): Stellen Sie den Wiedergabemodus ein (z.B. Stop (Stopp), F.F. (Schnell vor), F.R. (Schnell
zurück) usw.).
TITLE (Titel): Drücken Sie auf Select und geben Sie die gewünschte Titelnummer ein, um zu einem Titel
zu gelangen.
CHAPTER (Kapitel): Geben Sie die gewünschte Kapitelnummer ein, um zu einem Kapitel zu gelangen.
AUDIO (Audio): Wählen Sie die gewünschte Audiosprache (z.B. FRE (Französisch), ENG (Englisch) usw.).
SUBTITLE (Untertitel): Wählt die gewünschte Untertitelsprache.
ANGLE (Winkel): Wählt den gewünschten Kamerawinkel (muss vom Disc-Medium unterstützt werden).
T-TIME (T-Zeit): Zeigt die verstrichene und die verbleibende Zeit an.
2. Drücken Sie die Pfeiltaste Links, um das Steuerungsmenü wieder zu verlassen.
Programmierte wiedergabefolge
Rufen Sie das Steuerungsmenü auf (siehe oben).
Program
Wählen Sie das Menü „Modus“ und anschließend
• Markieren Sie mit Hilfe der Pfeiltasten den Titel oder das Kapitel für die Programmwiedergabe. Drücken
Sie die Taste ADD/CLEAR, um den Titel- oder Kapitelnamen zum rechten Feld hinzuzufügen. Sie
können beliebig viele Titel oder Kapitel als Favoriten hinzufügen.
90 -
Packard Bell Easy HDD Recorder – Benutzerhandbuch
.
Page 91

• Drücken Sie die Pfeiltaste Rechts, um den Cursor in das rechte Feld zu bewegen, und dann die Taste
ADD/CLEAR, um einen Titel oder ein Kapitel aus der Liste zu entfernen.
• Drücken Sie die Taste Select, um die Programmwiedergabe zu starten.
• Um die Programmwiedergabe zu beenden, drücken Sie die Taste Stop oder die Taste Select, um das
Wiedergabesteuerungsmenü aufzurufen, und wählen dann
Normal
.
Audio language (audiosprache)
Sofern ein Disc-Medium mehrsprachig aufgenommen wurde, können Sie mit der Option AUDIO zwischen
bis zu acht Audiosprachen oder Sound wechseln.
Bei Karaoke-Disc-Medien können Sie mit AUDIO zwischen Musik und Gesang wechseln.
HINWEIS: Nur bei DVDs und SVCDs.
Subtitle language (untertitelsprache)
Sofern ein Disc-Medium mit mehreren Untertiteln aufgenommen wurde, können Sie mit der Option
SUBTITLE zwischen bis zu 32 Untertitelsprachen wechseln.
HINWEIS: Nur bei DVDs und SVCDs.
JPEG/MP3 Playback (jpeg/mp3-wiedergabe)
1. Legen Sie das Disc-Medium ein. Daraufhin erscheint das Ordnermenü auf dem Bildschirm.
2. Benutzen Sie die Pfeiltasten und die Taste Select, um Ordner und MP3-/JPEG-Dateien für die
Wiedergabe auszuwählen.
3. Wenn ein Ordner JPEG- und MP3-Dateien enthält, können Sie Bilder und Musik gleichzeitig genießen:
Für eine JPEG/MP3-Simultan-Diashow wählen Sie die MP3-Datei und dann die JPEG-Datei. Die MP3und JPEG-Dateien werden in der ausgewählten Reihenfolge wiedergegeben.
4. Drücken Sie auf Stop, um die Wiedergabe zu stoppen. Bei einer JPEG/MP3-Simultan-Diashow drücken
Sie Taste Stop zweimal.
DivX Playback (divx-wiedergabe)
Wenn ein Disc-Medium DivX-Dateien enthält, wird beim Laden des Disc-Mediums ein Fenster mit einer
Wiedergabeliste eingeblendet.
1. Wählen Sie mit Hilfe der Pfeiltasten Oben/Unten den gewünschten Titel, und drücken Sie dann auf
Select, um ihn abzuspielen.
2. Erstellen Sie mit Hilfe der Tasten ADD/CLEAR und “Oben/Unten” im rechten Feld eine FavoritenAbspielliste, und spielen Sie die Dateien in der gewünschten Reihenfolge ab (siehe Programmierte
Wiedergabefolge).
Parental lock (kindersicherung)
Die Kindersicherung ist ein kennwortgeschütztes Sicherungssystem. Damit können Sie verhindern, dass der
Easy HDD Recorder einige Disc-Medien entsprechend den darauf vorhandenen Informationen abspielt.
So stellen Sie die Kindersicherung ein:
1. Drücken Sie während der Wiedergabe auf zweimal Stop.
2. Drücken Sie die Taste Setup, um das System-Setup-Menü aufzurufen.
3. Markieren Sie mit Hilfe der Tasten Oben/Unten die Option
Ihre Auswahl mit der Taste Select.
4. Markieren Sie mit Hilfe der Pfeiltasten Oben/Unten die Option
drücken Sie dann die Taste
5. Drücken Sie auf der Fernbedienung die Taste Select, um die Ebenenliste aufzurufen.
6. Markieren Sie mit Hilfe der Pfeiltasten Oben/Unten die gewünschte Kontrollebene, und drücken Sie
dann die Taste
Select
Select
.
.
Preferences
(Präferenzen). Bestätigen Sie
Parental Level
(Elternebene), und
Deutsch -
91
Page 92

7. Geben Sie mit Hilfe der Zifferntasten das Kennwort ein (das Masterkennwort lautet 3308), und drücken
Sie dann die Taste Select.
8. Drücken Sie auf die Taste Setup, um den Bildschirm zu schließen.
Changing the password (kennwort ändern)
1. Wiederholen Sie die Schritte 1 bis 3 wie oben beschrieben.
2. Markieren Sie mit Hilfe der Pfeiltasten (Oben/Unten) die Option
und drücken Sie dann auf der Fernbedienung die Taste Select.
3. Geben Sie im ersten Block das alte Kennwort (das Masterkennwort lautet 3308) ein. Anschließend
geben Sie im zweiten Block das neue Kennwort und wiederholen es im Bestätigungsblock. Drücken Sie
die Taste Select, um das neue Kennwort zu speichern.
4. Drücken Sie die Taste Setup, um das Setup-Menü zu verlassen.
Change Password
(Kennwort ändern),
AUFNAHME/TIME SHIFTING
Wenn der Easy HDD Recorder eingeschaltet ist oder Sie mit der Taste SOURCE in den Fernsehmodus
wechseln, wird der zuletzt eingeschaltete Kanal angezeigt und automatisch die Time Shifting-Funktion
gestartet. Mit Time Shifting können Sie eine Live-Übertragung bis zu
Taste Pause, um die Übertragung anzuhalten, und dann die Taste Play, um die Aufzeichnung abzuspielen.
Nach dem Erreichen des Zeitlimits fährt das System automatisch mit der Fernsehübertragung fort.
Aufnehmen mit Time Shifting
1. Drücken Sie die Taste HDD und anschließend die Taste SOURCE.
2. Während der Aufzeichnung können Sie durch wiederholtes Betätigen der Taste REC/OTR die Länge des
Programms, das Sie speichern, um 30 Minuten verlängern. Wenn die geplante Aufnahmedauer die
verfügbare Aufnahmezeit des Disc-Mediums überschreitet, wird der normale Aufnahmemodus
wiederhergestellt.
180 Minuten anhalten. Drücken Sie die
Recording source (aufnahmequelle)
Sie können wählen, welche Videoquelle der Recorder für Time Shifting-Aufnahmen benutzen soll. Folgende
Videoquellen stehen zur Verfügung:
CVBS hinten (Composite)
S-Video hinten
Tuner
CVBS vorn (Composite)
DV-Eingang
Drücken Sie wiederholt die Taste SOURCE, um eine Videoquelle zu wählen.
Hinweis: Time Shifting kann nicht in Verbindung mit einer DV (Digital Video)-Quelle benutzt werden.
Mit Hilfe folgender Tasten auf der Fernbedienung können Sie im Time Shifting-Modus navigieren und die
Audioausgabe kontrollieren:
Taste Ergebnis
92 -
Packard Bell Easy HDD Recorder – Benutzerhandbuch
Page 93

Kanal wechseln
CH +/-
Standardmäßig werden beim Wechseln des Kanals alle für den aktuellen Kanal gespeicherten
Time Shifting-Vorgänge gelöscht. Diese Option kann unter „Setup->Time Shift->Time Shift
Buffer Mode -> Preserve“ zurückgesetzt werden.
0-9 Kanal ändern
FWD Vor. Drücken, um zwischen den Geschwindigkeiten 4X, 8X, und32X zu wechseln.
REV Zurück. Drücken, um zwischen den Geschwindigkeiten 4X, 8X, und32X zu wechseln.
V+/- Lauter/Leiser
Replay Um 10 Sekunden zurückspringen (Pfeiltaste Links)
Skip Um 10 Sekunden vorspringen (Pfeiltaste Rechts)
Mute Ton ein/aus
Falls Sie unter SETUP->TimeShift->TimeShift buffer mode->Refresh den Standardwert verwenden und Kanäle
ändern, gehen die Daten im Time Shifting-Pufferspeicher verloren. Diesem Vorgang geht kein Hinweis voraus.
Wenn Sie jedoch unter SETUP->TimeShift->TimeShift buffer mode->Preserve wählen und Kanäle ändern,
bleiben die Daten im Time Shifting-Pufferspeicher erhalten.
Hinweis: Wenn Sie die Videoquelle ändern, werden die Daten im Time Shifting-Pufferspeicher gelöscht.
Hinweis: Während des Time Shifting-Modus wird eventuell eine Timer-Aufzeichnung angezeigt. Da Sie nicht
ein Programm im Time Shifting-Modus ansehen und einen anderen Kanal aufnehmen können, fragt der
Recorder, ob er den aktuellen Kanal beibehalten oder mit der Timer-Aufzeichnung fortfahren soll. Falls er
keine Antwort erhält, geht der Recorder davon aus, dass die Timer-Aufzeichnung gestartet werden soll. Die
Meldung erscheint zwei Minuten vor Beginn der Timer-Aufzeichnung. Wenn das Aufnahmezeitlimit
überschritten ist, wird der Pufferspeicher fortschreitend überschrieben. Falls Sie die Videodaten im
Pufferspeicher für zukünftige Zwecke behalten möchten, können Sie sie den Inhalt vollständig oder teilweise
speichern.
Speichern
So speichern Sie Videodaten im Time Shifting-Pufferspeicher:
Drücken Sie während das Programm läuft die Taste REC/OTR. Dadurch speichern Sie das Segment, das Sie
sich gerade ansehen. Sie können auch vorwärts gehen. Während der Speicherung können Sie durch
wiederholtes Betätigen der Taste REC/OTR die Länge des Programms, das Sie speichern, um 30 Minuten
verlängern. Drücken Sie auf Stop, um den Speichervorgang zu beenden. Der gespeicherte Teil des Time
Shifting-Pufferspeichers wird rot angezeigt.
Hinweis: Sie können nicht den Kanal oder die Quelle ändern, solange eine Aufnahme läuft (falls das Ende des
Aufzeichnungssegments nicht eingegeben oder, im Falle von Langzeitaufnahmen, noch nicht erreicht wurde).
Wenn Sie versuchen, den Kanal oder die Quelle zu ändern, erhalten Sie vom Easy HDD Recorder die
Aufforderung, die Aufzeichnung zu stoppen. Das Segment wird auf der Festplatte gespeichert und der Kanal
oder die Quelle geändert.
Deutsch -
93
Page 94

Hinweis: Nur ein Segment im Time Shifting-Pufferspeicher kann zur Speicherung angegeben werden. Es ist
nicht möglich, mehrere Segmente anzugeben. Nachdem das Segment gespeichert und in der HDD-Titelliste
registriert wurde, wird es (und alle früheren Aufzeichnungen darin) aus dem Time Shifting-Pufferspeicher
entfernt.
Hinweis: Wenn Sie die Einstellung SETUP->TimeShift->Time shift buffer mode->Preserve verwenden,
können Sie nur ein Segment einer einzelnen Quelle oder eines Kanals speichern, nicht jedoch keine Sequenz
von Kanälen. In diesem Fall werden die gespeicherten Programme aus dem Time Shifting-Pufferspeicher
entfernt, wenn auf Stop gedrückt wird. Der Easy HDD Recorder SPEICHERT die Time Shifting-Programme
sofort, wenn das System ausgeschaltet wird.
Im Time Shifting-Modus können Sie folgende Tasten für andere Funktionen benutzen:
Taste Ergebnis Hinweis
HDD HDD-Titelliste Die Aufnahme wird fortgesetzt.
DVD Disc-Wiedergabe
EJECT
POWER Ausschalten
Setup SETUP-Menü aufrufen Die Aufnahme wird fortgesetzt.
SOURCE Die Videoquelle ändern.
Hinweis: (Option: SETUP->TimeShift->Space Management->Automatically). Falls kein Platz mehr auf der
Festplatte verfügbar ist, bevor eine Aufzeichnung gestoppt wird, löscht der Easy HDD Recorder die ältesten
(nicht geschützten) Titel auf der Festplatte. Es werden keine Titel gelöscht, die zum Kopieren auf DVD
ausgewählt wurden. Sollte trotz dieses Verfahrens kein Platz mehr auf der Festplatte vorhanden sein, stoppt
der Recorder die Aufzeichnung und zeigt den Hinweis an, dass einige Titel gelöscht werden, um Platz zu
schaffen.
Disc-Schlitten öffnen/
schließen
Die Aufnahme wird fortgesetzt, es sei denn, Sie wollen
auf einer DVD aufnehmen.
Die Aufnahme wird fortgesetzt.
Hinweis: (Option: SETUP->TimeShift->Space Management->Manually). Falls kein Platz mehr auf der
Festplatte verfügbar ist, bevor eine Aufzeichnung gestoppt wird, stoppt der Recorder die Aufzeichnung und
zeigt an, dass einige Titel gelöscht werden sollten, um mehr Platz zu schaffen.
Mit der Option SETUP->TimeShift->Empty hard disk können Sie die gesamte Festplatte löschen. Denken Sie
jedoch daran, dass dieser Vorgang unwiderruflich ist. Der Recorder bestätigt, dass Sie den gesamten Inhalt
löschen wollen.
Recording to DVD (Aufnehmen auf DVD)
Drücken Sie die Taste TIMESHIFT einmal, um in den manuellen Aufnahmemodus zu gelangen, und
drücken Sie dann die Taste REC TO, um zur DVD-Aufnahmequelle zu wechseln.
Wenn ein beschreibbares Medium eingelegt ist, drücken Sie die Taste REC/OTR und starten die
Aufzeichnung (OTR) auf der DVD. Drücken Sie auf STOP, um die Aufzeichnung zu stoppen.
Hinweis: Der Recorder setzt die Aufzeichnung fort, bis das Disc-Medium voll ist. Damit der Recorder nur 30
Minuten lang aufnimmt, drücken Sie die Taste REC/OTR, nachdem die Aufzeichnung gestartet wurde.
Daraufhin erscheint auf dem Bildschirm der Hinweis, dass der Recorder 30 Minuten lang aufnehmen wird.
94 -
Packard Bell Easy HDD Recorder – Benutzerhandbuch
Page 95

Mit jedem Drücken der Taste REC/OTR werden weitere 30 Minuten zur Aufzeichnungsdauer hinzugefügt.
Um die Aufzeichnung anzuhalten, drücken Sie die Taste PAUSE auf der Fernbedienung. Um die
Aufzeichnung wieder fortzusetzen, drücken Sie die Taste PAUSE oder die Taste REC/OTR. Die
Aufzeichnung wird so lange fortgesetzt, bis die Taste STOP auf der Fernbedienung oder an der Vorderseite
des Recorders gedrückt wird. Drücken Sie die Taste Timeshift auf der Fernbedienung einmal, um den
Timeshift-Modus zu aktivieren; drücken Sie die Taste zweimal, um in den manuellen Aufzeichnungsmodus
zu wechseln und die Tabelle unten aufzurufen.
Hinweis: In der Tabelle können Sie durch Drücken der Taste REC TO zwischen HDD oder DVD als
Aufzeichnungsquelle umschalten.
Recording source (aufnahmequelle)
Sieben verschiedene Aufnahmequalitäten stehen zur Auswahl. Eine höhere Qualität verbraucht mehr Platz
auf der Festplatte oder DVD und verringert die zur Verfügung stehende Gesamtzeit.
Aufnahmequalität Aufnahmezeit
(4,7 GB, DVD)
HQ (High Quality) 1 Stunde ca. . 17 Stunden Maximal
SP (Standard Play) 2 Stunden ca. . 34 Stunden Sehr gut
SP+ (Standard Play) 3 Stunden ca. . 51 Stunden Gut
EP (Extended Play) 4 Stunden ca. . 68 Stunden Normal
LP (Long Play) 5 Stunden ca. . 85 Stunden Mittel
SLP (Super Long
Play)
6 Stunden ca. . 102 Stunden Gering
Aufnahmezeit
(80 GB, HDD)
Videoqualität
Hinweis: Wählen Sie die Aufnahmequalität mit Bedacht, um sicherzugehen, dass ausreichend Platz für Ihre
Aufzeichnung auf der Festplatte oder DVD vorhanden ist. Wenn die Aufzeichnung zu lang für eine DVD ist,
können Sie sie in kleinere Teile unterteilen. Mehr Informationen hierzu im Abschnitt Dubbing.
Deutsch -
95
Page 96

Chapter markers (kapitelmarker)
Sie können den Recorder so einstellen, dass er in jedes aufgezeichnete Programm automatisch Kapitelmarker
einfügt, die eine schnellere Navigation während der Wiedergabe ermöglichen. Mit dieser Funktion werden
beim Aufnehmen alle 10 Minuten automatisch Marker gesetzt. Das Intervall kann im Menü Setup geändert
werden: OFF (no marker), 5 min., 10 min., 20 min. or 30 min.
• Drücken Sie die Taste Setup auf der Fernbedienung.
• Markieren Sie das Menü
• Markieren Sie die Option
• Wählen Sie in der Liste eine Option, und drücken Sie dann die Taste Select.
Recording
Auto Chapter Marker
, und drücken Sie die Taste Select.
, und drücken Sie die Taste Select.
TIMER-AUFNAHME
Setting the clock (einstellen der uhr)
1. Drücken Sie die Taste Setup, um das Setup-Menü aufzurufen.
2. Markieren Sie mit Hilfe der Pfeiltasten das Symbol
3. Ändern Sie Systemdatum und -zeit mit Hilfe der Pfeiltasten.
96 -
Packard Bell Easy HDD Recorder – Benutzerhandbuch
Datum/Uhrzeit
, und drücken Sie die Taste
Select
.
Page 97

Scheduled recording (programmierte aufnahme
1. Achten Sie darauf, dass die Uhr exakt auf Ihre Ortszeit eingestellt ist.
2. Drücken Sie die Taste Timer, um die Aufnahmezeitplanung aufzurufen.
HINWEIS: Um eine Programmierung zu löschen, markieren Sie sie mit Hilfe der Pfeiltasten Oben/Unten und
drücken dann die Taste ADD/CLEAR.
3. Markieren Sie mit Hilfe der Pfeiltasten
Daraufhin wird erscheint Dialogfeld für die Aufnahmebearbeitung.
4. Nachfolgend werden die Optionen im
Dialogfeld beschrieben:
Source (Quelle): Wählen Sie die
Eingangsquelle.
Record To (Aufnehmen auf): Wählen Sie
zwischen HDD oder DVD.
Quality (Qualität): Wählen Sie die
Aufnahmequalität.
Mode (Modus): Wählen Sie den
Aufnahmemodus (Einmalig, Täglich oder
Wöchentlich).
Start (Anfang): Wählen Sie die Anfangszeit
für die Aufnahme.
End (Ende): Wählen Sie die Endzeit für die
Aufnahme.
Title (Titel): Geben Sie einen Titel für die
Aufnahme ein.
PDC: Wenn diese Funktion aktiviert ist, zeichnet das System nacheinander das Fernsehsignal aller
vorgefundenen Anfangszeiten auf. Entsprechend der Informationen des Fernsehsignals kann die
Aufzeichnung auch automatisch angehalten oder gestoppt werden.
5. Stellen Sie den Cursor auf die Schaltfläche
zu speichern.
6. Einige Minuten vor Beginn der Aufnahmezeit erscheint ein Dialogfeld auf Ihrem Fernsehbildschirm mit
der Aufforderung, die Programmierung zu stornieren oder zu bestätigen. Wenn Sie keine Auswahl
treffen, erfolgt die Aufnahme gemäß Zeitplanung.
Oben/Unten
OK
ein Ereignis, und drücken Sie dann auf Select.
und drücken Sie die Taste Select, um Ihre Einstellungen
HINWEIS:
• Wenn sich der Recorder im Stand-By-Modus befindet, schaltet er sich zwei Minuten vor Beginn der
Aufnahmezeit automatisch ein.
Deutsch -
97
Page 98

System time adjustment (abgleichen der systemzeit
Der Easy HDD Recorder kann die Systemzeit automatisch mit der von der Sendestation empfangenen
Zeitcodierung abgleichen. Nur der Zeitcode des ersten Fernsehkanals kann vom Gerät benutzt werden.
Damit diese Funktion funktioniert, muss das Fernsehsignal einen Zeitcode enthalten.
98 -
Packard Bell Easy HDD Recorder – Benutzerhandbuch
Page 99

HDD title list (hdd-titelliste)
Drücken Sie die Taste HDD, um die HDD-Titelliste aufzurufen.
In der Titelliste werden sämtliche Programme aufgeführt, die Sie auf der Festplatte gespeichert haben. Sie
enthält die Aufzeichnungszeit, eine Miniatur und den modusA(HQ, SP usw.) für jedes Programm. Außerdem
gibt sie an, ob ein Programm geschützt oder gesperrt ist. Ferner können Sie darüber einen oder mehrere Titel
für das „Dubbing“ auf DVD (siehe unten) auswählen sowie ein Programm abspielen oder bearbeiten.
Dubbing („dubbing“)
Bevor Sie ein Sie Programme für das „Dubbing“ auswählen, legen Sie ein beschreibbares Disc-Medium ein.
Falls das Disc-Medium zum ersten Mal benutzt wird, kann der Easy HDD Recorder ein paar Sekunden
brauchen, um es zu formatieren und die Kompatibilität sowie den freien Speicherplatz zu ermitteln.
Während dieser Zeit ist das
Der prozentual verfügbar Speicherplatz auf dem Disc-Medium wird in der rechten unteren Ecke auf dem
Bildschirm mit der HDD-Titelliste angezeigt. Sie können ein oder mehrere Programme auf der HDD-Titelliste
auswählen, die auf das optische Disc-Medium kopiert werden. Markieren Sie mit Hilfe der Pfeiltasten das
gewünschte Programm und drücken Sie dann die Taste ADD/CLEAR. Nachdem ein Programm für das
„Dubbing“ ausgewählt wurde, erscheint neben dem Titelnamen ein Symbol. Um eine Auswahl aufzuheben,
drücken Sie die Taste ADD/CLEAR erneut. Jedes Mal, wenn Sie ein Programm hinzufügen oder entfernen,
wird die Disc-Kapazität aktualisiert. Falls ein ausgewähltes Programm größer als der verfügbare Platz auf dem
Disc-Medium ist, erscheint eine Warnung.
Laden
-Logo zu sehen.
Sollte eine Aufzeichnung zu groß für die DVD sein, kann man sie in kleinere Abschnitte unterteilen:
1. Wählen Sie den aufzuteilenden Titel im HDD-Menü aus.
2. Drücken Sie die Taste Rechts auf der Fernbedienung, um das Untermenü zu öffnen.
Split
3. Markieren Sie mit Hilfe der Pfeiltasten Oben/Unten die Option
auf Select.
4. Während der folgenden Wiedergabe gehen Sie entweder mit der Taste Skip, Fast forward oder Fast
reverse zu einer stelle in der aufzeichnung, an der sie unterteilt werden soll, und drücken dann auf
Select, um die Teilung vorzunehmen.
5. Drücken Sie die Taste Select erneut, um diesen Vorgang zu bestätigen.
6. Die Originaldatei wird nun in zwei separate, über das HDD-Menü zugängliche Dateien aufgeteilt.
(Unterteilen), und drücken Sie dann
Hinweis: Sie können die neue Datei umbenennen, um sie mit der Originaldatei zu verknüpfen.
Deutsch -
99
Page 100

Hinweis: Wenn das Disc-Medium vor dem „Dubbing“ ausgewechselt oder entfernt wird, werden sämtliche
Auswahlen gelöscht.
Hinweis: Gesperrte Titel können nicht mittels „Dubbing“ auf eine DVD kopiert werden.
Drücken Sie die Taste HDD, um den Dubbing-Vorgang zu starten. Beim „Dubbing“ werden der oder die
ausgewählten Titel auf eine beschreibbare DVD kopiert, einschließlich solcher Eigenschaften wie Titelname,
Dauer, Indexbild oder Kapitelmarker. Nach dem Starten des Dubbing-Vorgangs kehrt der Recorder in den
Time Shifting-Modus zurück. Während es Dubbing-Vorgangs können Sie die Taste HDD drücken und einen
Titel auf der Festplatte abspielen. Ein Bearbeiten ist jedoch erst wieder möglich, wenn der Vorgang
abgeschlossen ist. Nachdem der Dubbing-Vorgang beendet ist, wird die HDD-Titelliste zurückgesetzt.
Hinweis: Sollte während des Beschreibens der DVD ein Fehler auftreten, erscheint eine Warnung und die
HDD-Titelliste wird zurückgesetzt.
Bearbeiten von HDD-Titeln
1. Drücken Sie die Taste HDD, um das HDD-Titelmenü aufzurufen.
2. Markieren Sie mit Hilfe der Pfeiltasten Oben/Unten den zu bearbeitenden Titel. Falls mehr als acht Titel
vorhanden sind, drücken Sie die Taste Unten, um sich weitere Titel anzeigen zu lassen.
3. Drücken Sie die Taste Rechts, um das Disc-Menü aufzurufen.
4. Markieren Sie mit Hilfe der Pfeiltasten Oben/Unten eine der folgenden Optionen (unten erläutert), und
drücken Sie auf Select.
Play (Wiedergabe)
Spielt den ausgewählten Titel.
Delete (Löschen)
Sofern ein Titel nicht geschützt oder gesperrt ist, können Sie ihn mit Hilfe dieser Option löschen. Gehen Sie
hierbei behutsam vor, weil dieser Vorgang unwiderruflich ist.
Split (Teilen)
Diese Option ruft den Teilungsbildschirm auf. (Zu Einzelheiten siehe den Abschnitt
Dubbing
.)
Segment (Segmentieren)
Diese Option ruft den Segmentierungsbildschirm auf. Hier können Sie ähnlich wie im Wiedergabebildschirm
navigieren und einen Stelle als Anfang eines Segments und eine als Ende eines Segments markieren. Bei der
100 -
Packard Bell Easy HDD Recorder – Benutzerhandbuch
 Loading...