

Page 1

User's Guide……………………………….
Guide de l'utilisateur……………………..
Guía del usuario…………………………..
Gebruikershandleiding…………………..
Guida Utente………………………………
Benutzerhandbuch………………………..
01
43
89
133
175
217
Page 2

Page 3

Table of Contents
I. Notices..................................................................................2
II. Precautions............................................................................3
Safety and operating precautions..........................................3
Disc care............................................................................. 3
III. Specifications.........................................................................4
Easy DVD Recorder specifications.........................................4
Disc specifications................................................................ 5
Special features ................................................................... 7
IV. Getting Familiar.....................................................................8
ENGLISH
Remote Control....................................................................8
Features of your Easy DVD Recorder...................................10
V. Setting up............................................................................12
Connecting to TV ...............................................................12
Watching TV via the Easy DVD Recorder.............................13
Connecting to an amplifier .................................................14
Connecting Input AV signal using SCART IN........................16
Connecting Input AV or DV signal.......................................17
VI. Using your
Playing Discs.....................................................................18
Controlling playback..........................................................20
Parental lock .....................................................................24
System menu .....................................................................25
TV channel setting..............................................................26
Recording .........................................................................28
Time settings...................................................................... 30
Editing DVD+R / DVD+RW discs........................................32
Easy DVD Recorder
..............................................18
VII. Troubleshooting ...................................................................37
VIII. Standards and Certifications..................................................39
1
Page 4

Easy DVD Recorder User's Guide
COPYRIGHT NOTICE
I. Notices
Packard Bell
B.V. All Rights Reserved. No part of this manual may be reproduced or transmitted, in any form or
by any means, whether electronic, chemical, manual or otherwise, including but not limited to
photocopying, recording, or information storage and retrieval systems, for any purpose without
prior written permission of NEC Computers International B.V.
Easy DVD Recorder
User’s Guide. Copyright© 2004 NEC Computers International
DISCLAIMER
NEC Computers International B.V. specifically disclaims all warranties, either express or
implied, including, but not limited to, implied warranties of merchantability and fitness for a
particular purpose with respect to this product and documentation.
Updates to software and hardware components are made regularly. Therefore some of the
instructions, specifications and pictures in this documentation may differ slightly from your
particular situation. All items described in the documentation supplied with the product are for
illustration purposes only and may not apply to your particular situation. No legal rights or
entitlements may be obtained from descriptions made in the documentation. NEC Computers
International B.V. reserves the right to revise or make changes or improvements to this product
or documentation at any time without obligation to notify any person of such revisions or
improvements.
In no event shall NEC Computers International B.V. be liable for any consequential or
incidental damages, including but not limited to loss of business profits or any other
commercial damages, arising out of the use of this product.
TRADEMARKS
Packard Bell is a registered trademark of NEC Computers International B.V. All other company
or product names are trademarks, registered trademarks or service marks of their respective
owners.
Manufactured under license from Dolby Laboratories. “Dolby”, "Pro Logic", and the double-D
symbol are trademarks of Dolby Laboratories. Manufactured under license from Digital Theater
Systems, Inc.
DTS and DTS Digital Surround are trademarks of Digital Theater Systems, Inc. protected by
U.S. and other world-wide patents issued and pending.
2
Page 5

Easy DVD Recorder User's Guide
II. Precautions
Safety and operating precautions
Power requirement for this device is AC 220-240V, 50/60 Hz. Please ensure the power
supply to your home is in this range.
The temperature of the top cover and rear panel of the recorder may be high after playing
for a long period of time. This is normal.
When the recorder is not in use, please remove the disc and turn the power off.
Malfunctions may occur if the recorder has not been used for a long period of time. For
best results, turn it on occasionally.
Some kinds of discs may cause the unit to hang or freeze. Please restart the unit when
this occurs. Wait at least 10 seconds before restarting to extend the life of the recorder.
This DVD recorder is a device of high technology and high precision. The image quality
may be impaired when the laser head or the disc driving parts are dirty or damaged.
Do not use the
damage the disc and inner parts of the recorder.
Place the device in a location with adequate ventilation to prevent internal heat build up.
Use a soft and dry cloth for cleaning. For the stains that cannot be removed easily, apply
some diluted neutral detergent to a cloth, wring the cloth dry and wipe the stains away,
then use a dry cloth to clean. Do not use any solvents such as thinner or benzene; as this
may damage the
Easy DVD Recorder
Easy DVD Recorder
where condensation may form easily, as this may
.
Disc care
Periodically clean the disc to remove any dust or fingerprints. Use a soft, scratch-free
cloth or a commercial disc cleaner.
To keep the disc free of fingerprints, hold the disc with your fingers on the outer edge or
with a finger in the inner circle and a finger on the outer edge.
Always return the disc to its protective case or sleeve when you have finished using it.
Keep the disc tray closed whenever you are not using the drive.
3
Page 6

Easy DVD Recorder User's Guide
III. Specifications
Easy DVD Recorder
Power supply 220-240V AC 50/60 Hz
Power consumption 28W
Power consumption (stand by) < 4W
Size (mm) 430 x 53 x 320 (L xH x D)
Weight approximately 4.0kg
Environment temperature 15~35°C
Humidity 25~75%
This device adopts LSI's new generation encode-decode integrative single chip solution,
which enables to encode the TV RF signal, AV input signal from external equipments or
digital signal from iEEE1394 equipment in MPEG-2 format, and record on DVD+RW or
DVD+R discs. It also adopts LSI' unique DominoFX image processing technology,
providing excellent image quality.
specifications
Compatible with all functions of ordinary DVD players.
Compatible with DVD, Super VCD, VCD, CD, CD-R discs, MP3 and Picture CD.
Discs recorded with the
Programs recorded on DVD+RW discs are editable (to change a title, change title index
picture, divide a single title into smaller parts, and hide titles).
OTR mode, for quick capture and record.
Supports 8 audio languages, 32 subtitle languages, and 9 viewing angles, as well as other
full functional DVD playback features.
Parental Lock Level control system.
Screensaver program for screen protection.
Coaxial digital audio out jack.
Standard video out (CVBS), S-video out, SCART IN/OUT, and component video out (Y,
Cb/Pb, Cr/Pr) jacks. 16:9 and 4:3 TV screen aspect ratio support.
Can receive and record TV signal, as well as monitor its output.
Automatic time recording of AV signal or TV signal from external signal sources.
iEEE1394 DV in jack for video camera to record digital signal.
Up to 20 time-recording events, with three options: "Once", "Daily" and "Weekly".
Intelligent software update.
Easy DVD Recorder
are compatible with other DVD players.
4
Page 7
Easy DVD Recorder User's Guide
Disc specifications
DVD+RW (rewritable DVD discs)
DVD+RW is an erasable format based on CD-RW technology.
DVD+RW discs can be rewritten more than 1,000 times.
DVD+R (write-once DVD discs)
Should you wish to play a DVD+R created with your
player, please make sure it has been finalized. Likewise, you must use the "make
compatible" option if you want to play a DVD+RW disc on another player. You can
access these functions from the DVD+R and DVD+RW Edit menus by pressing the
PLAYABLE AND WRITABLE
DISK-OP button on your remote control.
CAUTION: Finalizing a disc consists in closing the recording session and to prevent
further recordings.
DVD+R discs can only be written once. All the capacity of the disc does not
need to be filled in one single recording. You can add new contents later.
Easy DVD Recorder
DVD-R (write-once DVD)
Only the DVD-R discs recorded in video mode that have been finalized
can be played by the
DVD-RW (rewritable DVD)
Only the DVD-RW discs recorded in video mode that have been made
compatible can be played by the
Audio CD-R (write-once CD) / MP3 Compressed Music
Audio CD-RW (rewritable CD) / MP3 Compressed Music
Easy DVD Recorder
Easy DVD Recorder
.
.
on another
DVD Video (Digital Versatile Disc)
Audio CD (digital audio disc)
PLAYABLE-ONLY DISCS
Super Audio CD (only plays the CD layer of a hybrid SACD )
VCD (Video CD - format 1.0, 1.1 and 2.0)
Super VCD
5
Page 8

Easy DVD Recorder User's Guide
Discs composition
DVD
A DVD disc is divided into sections (titles, chapters) so that you can find specific content more
easily.
SVCD/VCD/AUDIO CD
SVCD/VCD/AUDIO CDs are divided into a number of tracks, which may contain index points
to divide the track into several parts.
MP3 /JPEG/MP4(DivX)
MP3 (".mp3", for music), JPEG (".jpg", for pictures), and DivX (".avi", for videos) are
compressed file formats.
It may be longer for the Easy DVD Recorder to display the content of some discs because of the
large file size or number of songs/pictures they contain.
6
Page 9
Easy DVD Recorder User's Guide
v
Special features
The digital input connector, known as 'firewire' or 'IEEE1394', is used to
transmit digital broadband signals. The audio and video signals are
transmitted via the same cable.
MP3 files are highly compressed music files, which compress standard CD
audio files to ~1/10 of their original size. As a result, up to 10 hours of music
can be stored on a single CD.
Ordinary the video is recorded at the current position of the disc. This is like
the tape recorder, the user can start recording at the middle of the tape. For
DVD+R discs, new video segment is always appended to the existing video
segments. The
CDs. DVDs recorded using this DVD recorder can be played on most current
and future DVD players.
Easy DVD Recorder
can play both pre-recorded DVDs and
Dolby Digital is a standard developed by Dolby Laboratories for transmitting
from 1 to 5 full-range channels as well as a low frequency (.1) channel for a
total of 5.1 discrete channels. The loudspeakers are arranged as follows: front
left, front right, middle, rear left and rear right. Dolby Digital is currently the
most common system and is often used in cinemas.
This product contains copy protection technology, which is protected by US
Patent and other intellectual property rights. Use of this copy protection
technology from Macrovision Corporation requires the approval of
Macrovision. It is intended exclusively for home use and other limited payper-
iew applications, unless Macrovision approves some other use in writing.
Modifications to the equipment, removal of components and reverse
engineering are prohibited.
DivX is a codec (short for compression/decompression) - a piece of software
that compresses video from virtually any source down to a size that is
transportable over the Internet without reducing the original video's visual
quality. Currently the highest DivX version supported by the
Recorder
please make sure you register.
is DivX5.2. To rent or purchase videos using DivX® technology,
Easy DVD
7
Page 10

Easy DVD Recorder User's Guide
IV. Getting Familiar
Remote Control
First remove the battery cover of the remote control and insert two AAA batteries (supplied).
For battery replacement and disposal, please refer to the Standards and Certifications chapter.
8
Page 11
Easy DVD Recorder User's Guide
RECORD
Record TV or AV signal from external source. While recording, every pressing
on this button will add 30 minutes recording time.
Edit Access the title editing menu.
TIMER
POWER
Set/change the schedule of time recording.
Switch on/off.
0---9 Number buttons.
title Access the title menu.
s-title Change subtitle language.
disk-op Manage DVD+R/RW discs.
clear Select current item, or clear the time recording event.
zoom Zoom in/out current picture.
OK Confirm current selection or input.
MENU Access disc menu.
SETUP Access system setup menu.
pscan Switch the scanning mode of video output (Progressive/Interlace).
audio Change audio language.
angle Change camera angle.
repeat Set repeat functions.
goto Go to desired title/chapter/time and play it.
SOURCE
Eject
Select external signal source.
Open/close the disc tray.
display Show and adjust the playback status.
random Switch the playback sequence between Normal and Random mode.
STOP/RETURN
Press once to stop playback/recording, press again to return to root menu(only
for VCD discs).
MUTE
Press once to turn off the sound, press it again or press the "V+/V-" button to
resume the sound.
Slow Slow forward (1/2, 1/4, 1/8).
V-/V+
PLAY/PAUSE
P+/P-
Adjust the audio output volume, or move the cursor leftward/rightward.
Start playback, or stop playing/recording temporarily.
Select TV channel, or move the cursor upward/downward.
Previous/next title or chapter.
Fast reverse/forward (2X, 4X, 16X, 32X).
9
Page 12
Easy DVD Recorder User's Guide
Features of your
Front Panel
POWER
EJECT
REC
PLAY/PAUSE
STOP
SOURCE
Easy DVD Recorder
Power on/off.
Open/close the disc tray.
Record current TV program, AV or DV signals from external signal
sources.
Press to start playback or suspend playback.
Stop playing/recording.
Switch input signal source.
Front connections
To access these connectors, open the flap-door on the right side of the Easy DVD Recorder.
S-VIDEO
VIDEO
The signal from S-VIDEO input jack has higher priority than the signal from VIDEO input jack.
L-AUDIO-R Audio input jacks, use to connect to video camera or VCR.
DV
S-Video input jack, use to connect to a SVHS/Hi8 video camera or
SVHS/Hi8 VCR.
Video input jack, use to connect to a SVHS/Hi8 video camera or
SVHS/Hi8 VCR.
i-LINK/DV input jack ( iEEE1394), use to connect digital video camera
or other digital equipments.
10
Page 13
Easy DVD Recorder User's Guide
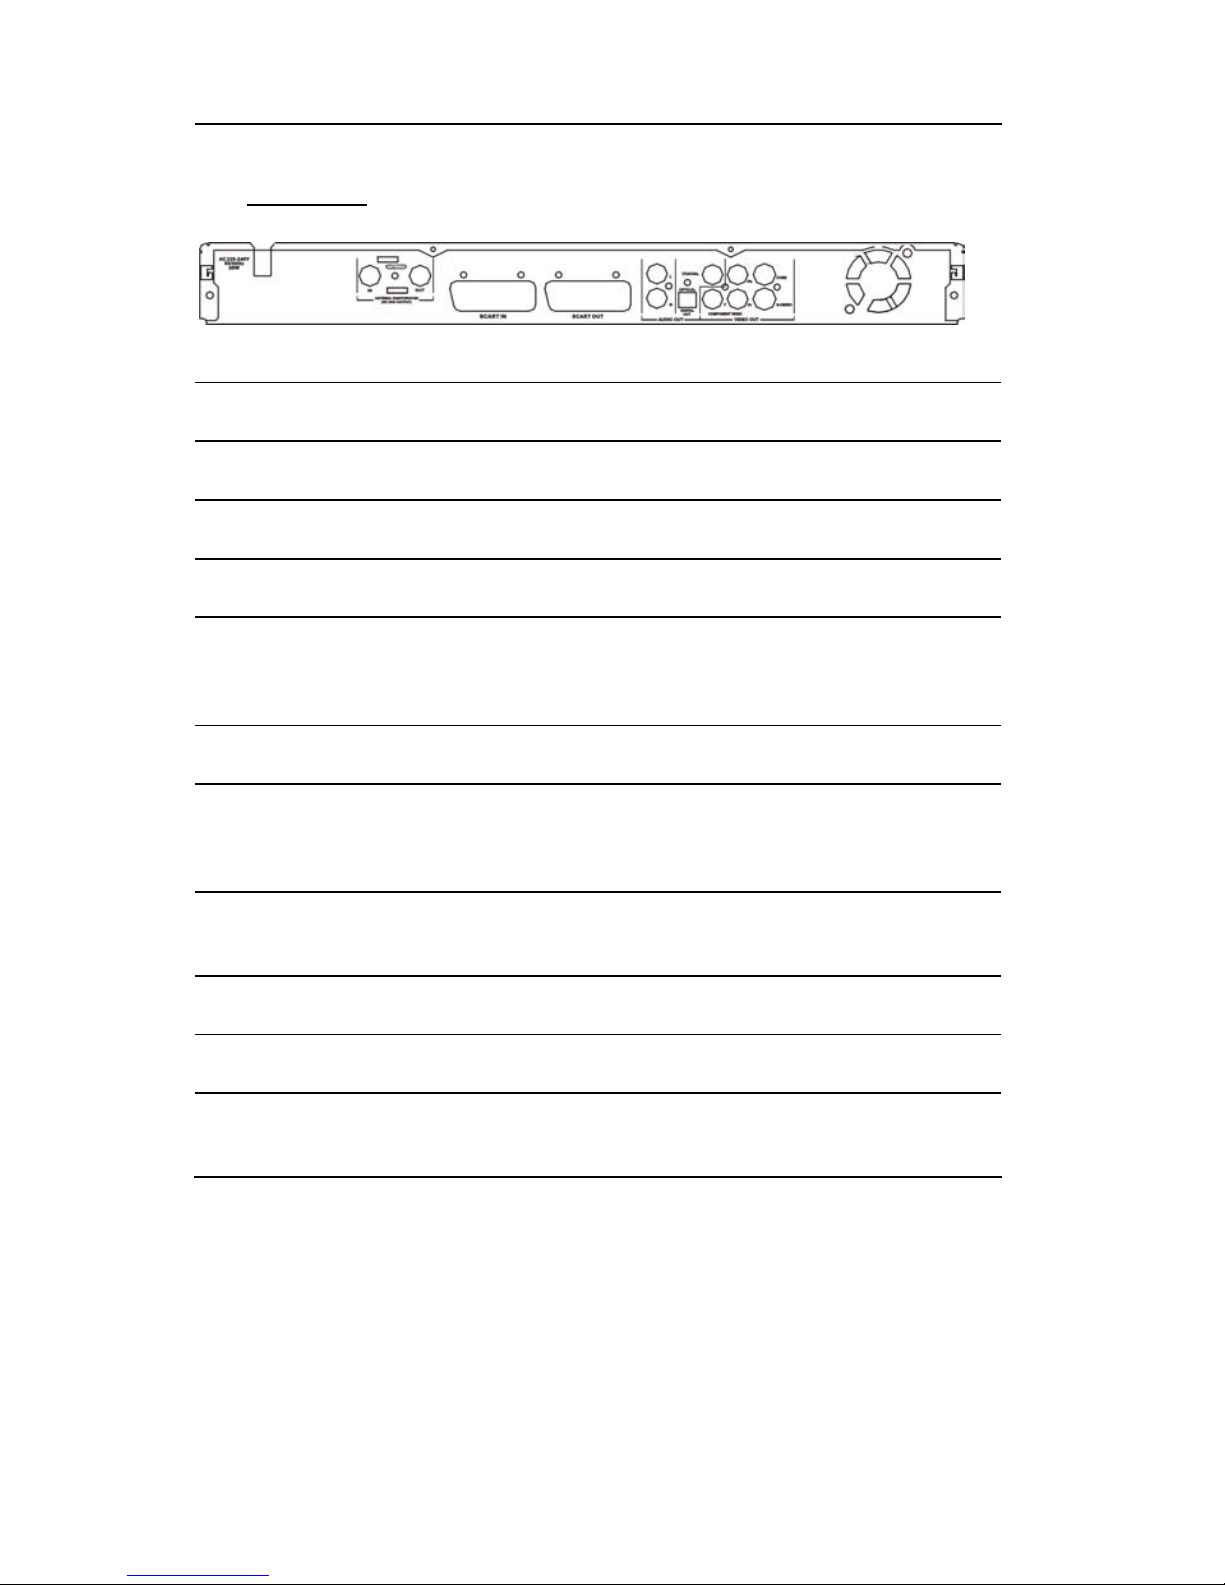
Rear Panel
AC IN ~ AC IN power cord connector to 220-240V, 50/60Hz mains supply.
ANTENNA in Use to connect to antenna/cable TV.
ANTENNA out Use to output TV signal to TV set.
Audio output L/R Analog audio output (left and right).
Coaxial output Use to output digital audio recorded on discs by connecting to the
coaxial digital audio input on an AV amplifier or receiver with digital
audio input capability.
CVBS Use to connect to TV set with video (CVBS) input jack.
Optical output Use to output digital audio recorded on discs by connecting to the
optical digital audio input jack on an AV amplifier or receiver with
digital audio input capability.
SCART IN Use to connect to digital AV equipments with SCART OUTPUT
capability. (E.g. DVD player with SCART output jack).
SCART OUT Use to connect to TV set or other equipments with SCART in jack.
S-Video Use to connect to TV set with S-VIDEO input jack.
Y Cb/Pb Cr/Pr Use to connect to TV set with Y Cb/Pb Cr/Pr input jacks. The output
mode can be set as progressive or interlace
11
Page 14
Easy DVD Recorder User's Guide
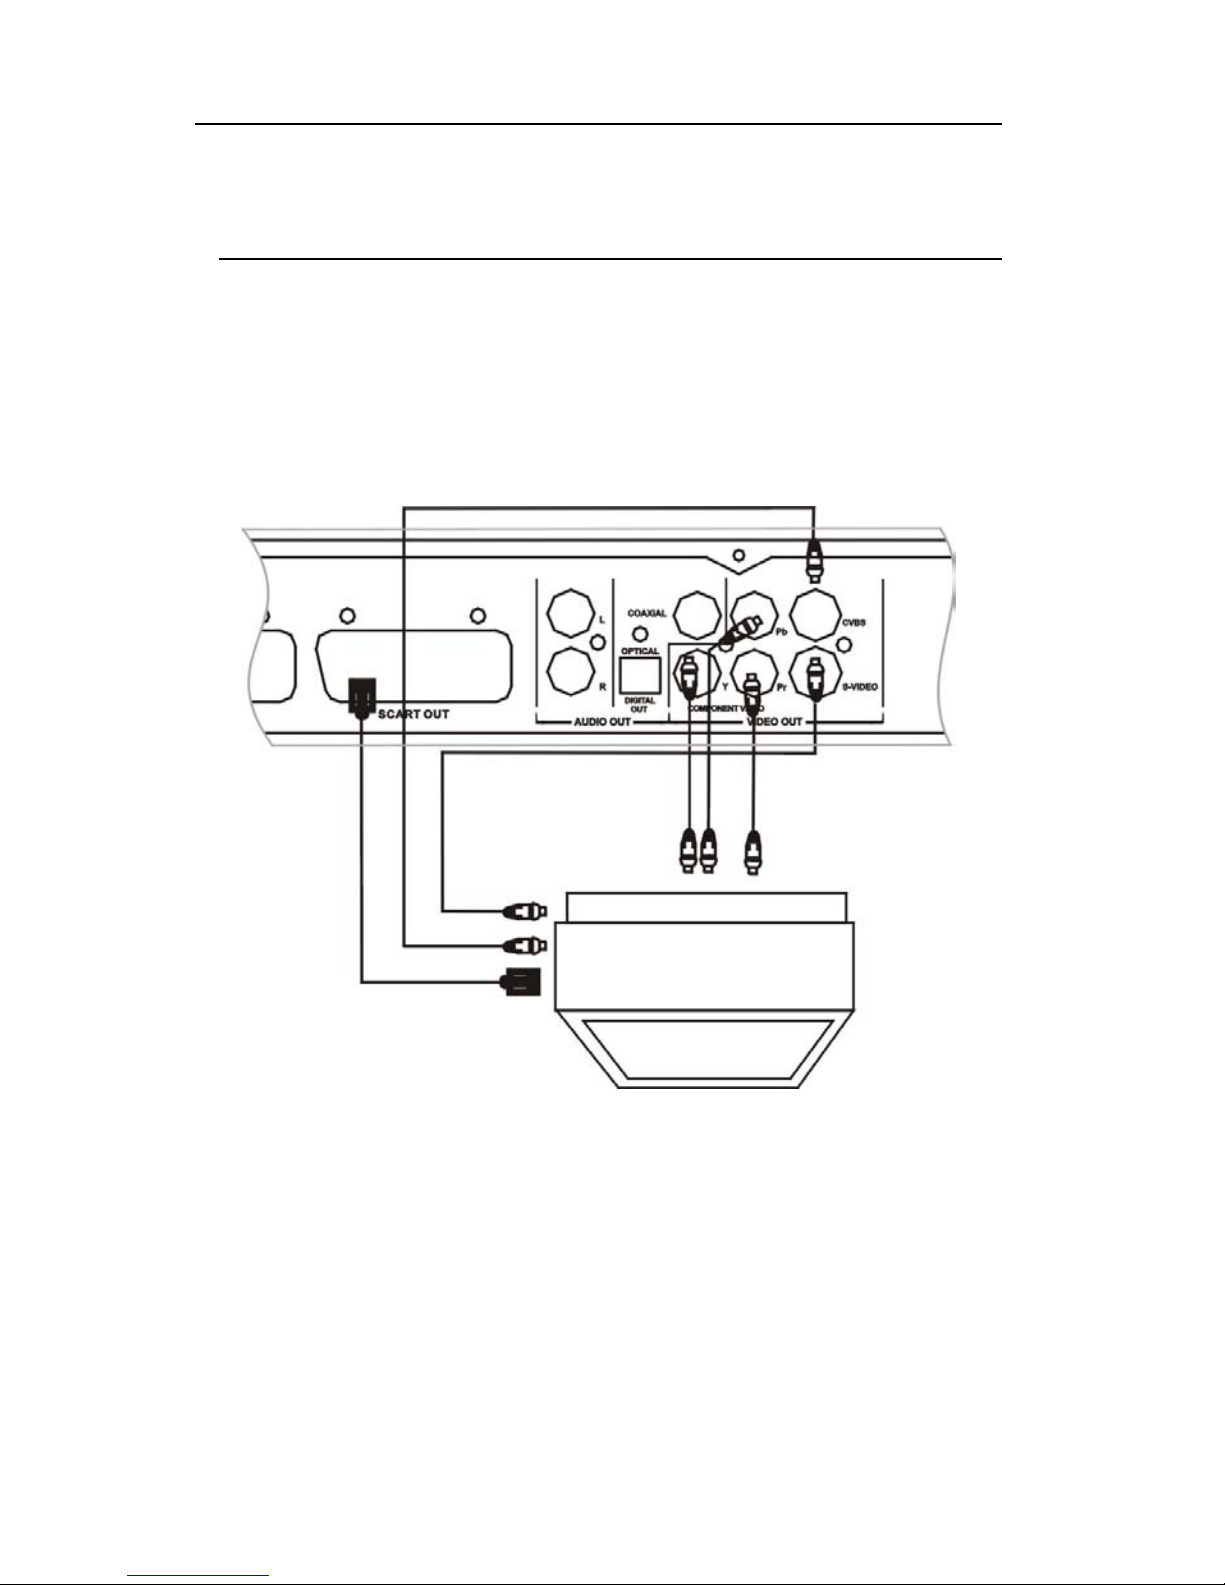
V. Setting up
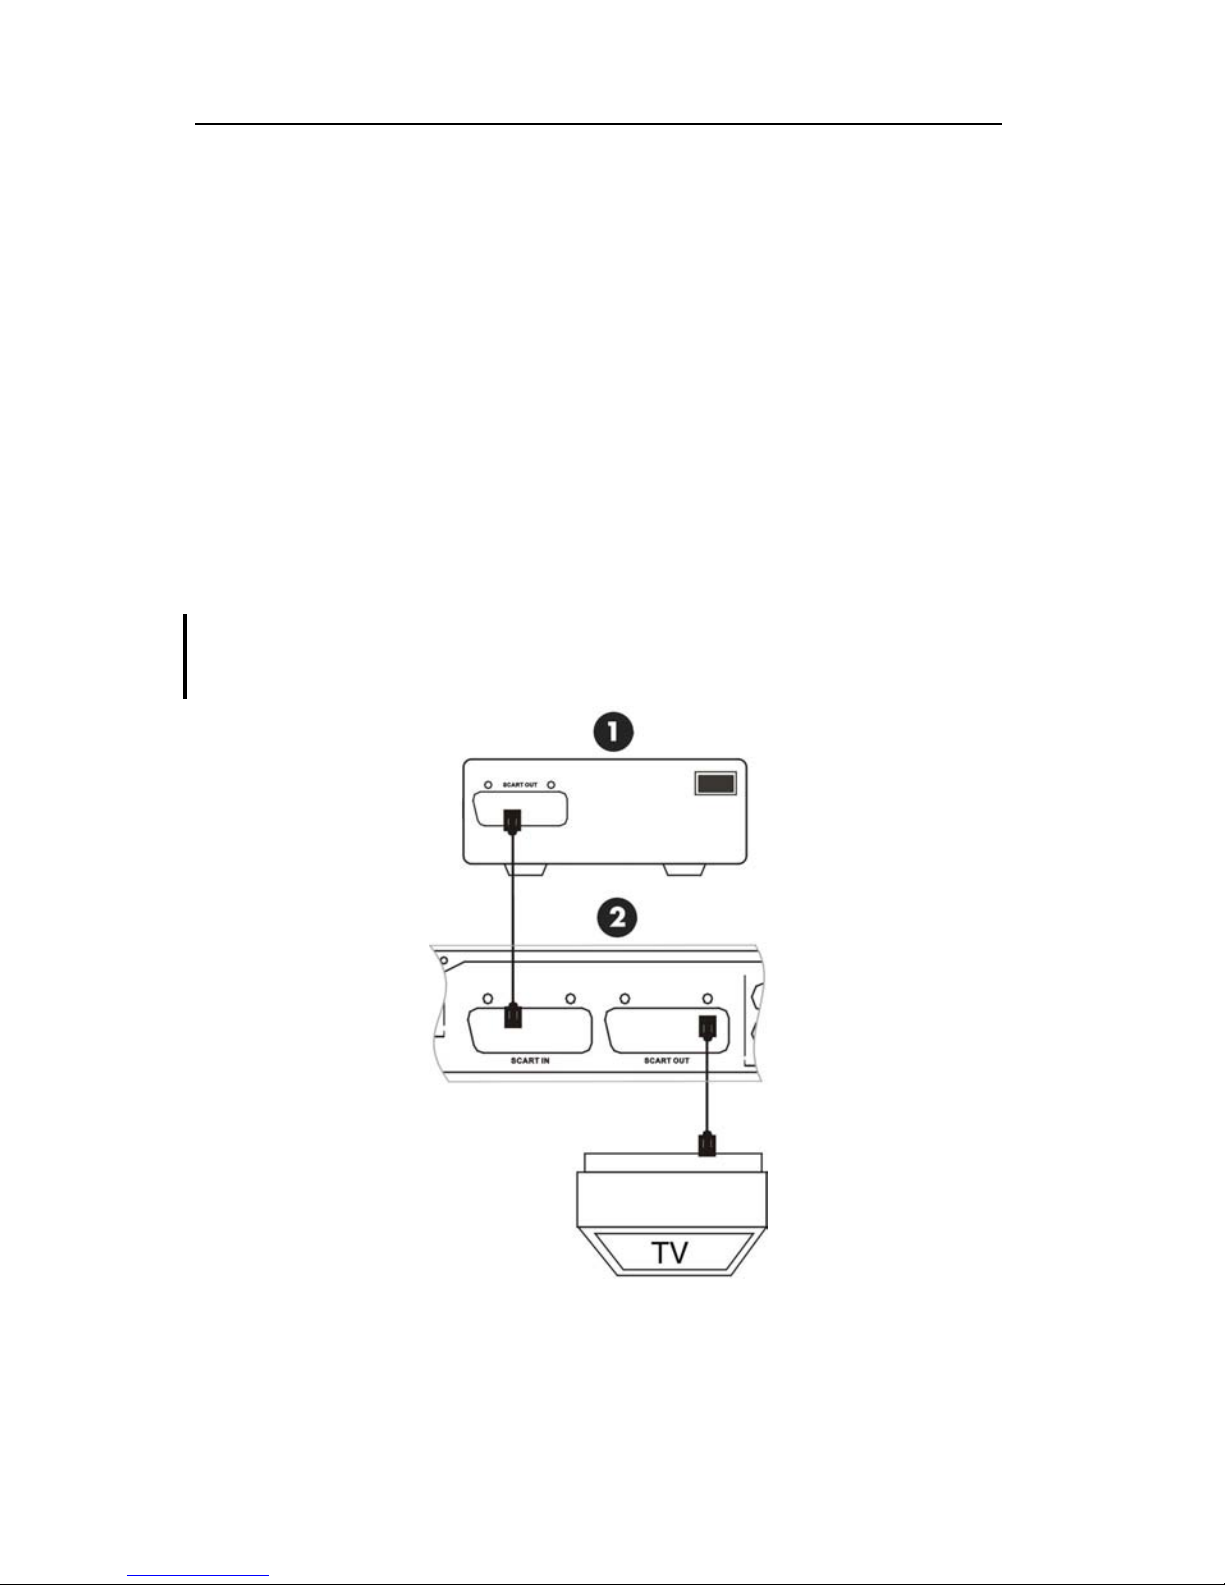
Connecting to TV
Your
Easy DVD Recorder
component video, and SCART. Connect the audio/video cables depending on the
specifications of your TV.
supports video connections through composite video, S-Video,
If the TV has COMPONENT VIDEO IN jacks (Y, Cb/Pb, Cr/Pr), connect them to the
corresponding jacks on the
If the TV has an S-VIDEO IN jack, connect it to the S-VIDEO jack on the
Recorder.
If the TV has SCART IN jack, connect it to the SCART OUT jack on the
Recorder.
Connect the LEFT and RIGHT audio out jacks on the
input jacks that belong to the same jacks group as the video input jack on the TV set (if
applicable).
Easy DVD Recorder
(recommended).
Easy DVD Recorder
Easy DVD
Easy DVD
to the audio
12
Page 15

Easy DVD Recorder User's Guide
Watching TV via the
Press SOURCE on the remote control to switch to TV mode and start to auto scan channels.
The TV signal output jack is only a loop-through of the inputted signal.
Easy DVD Recorder
1.
2.
3.
4.
5.
6.
Easy DVD Recorder
Audio
Video
Signal input
Antenna (or cable TV)
Signal output (can be used to output TV signal to another TV set's RF signal input
jack).
13
Page 16
Easy DVD Recorder User's Guide
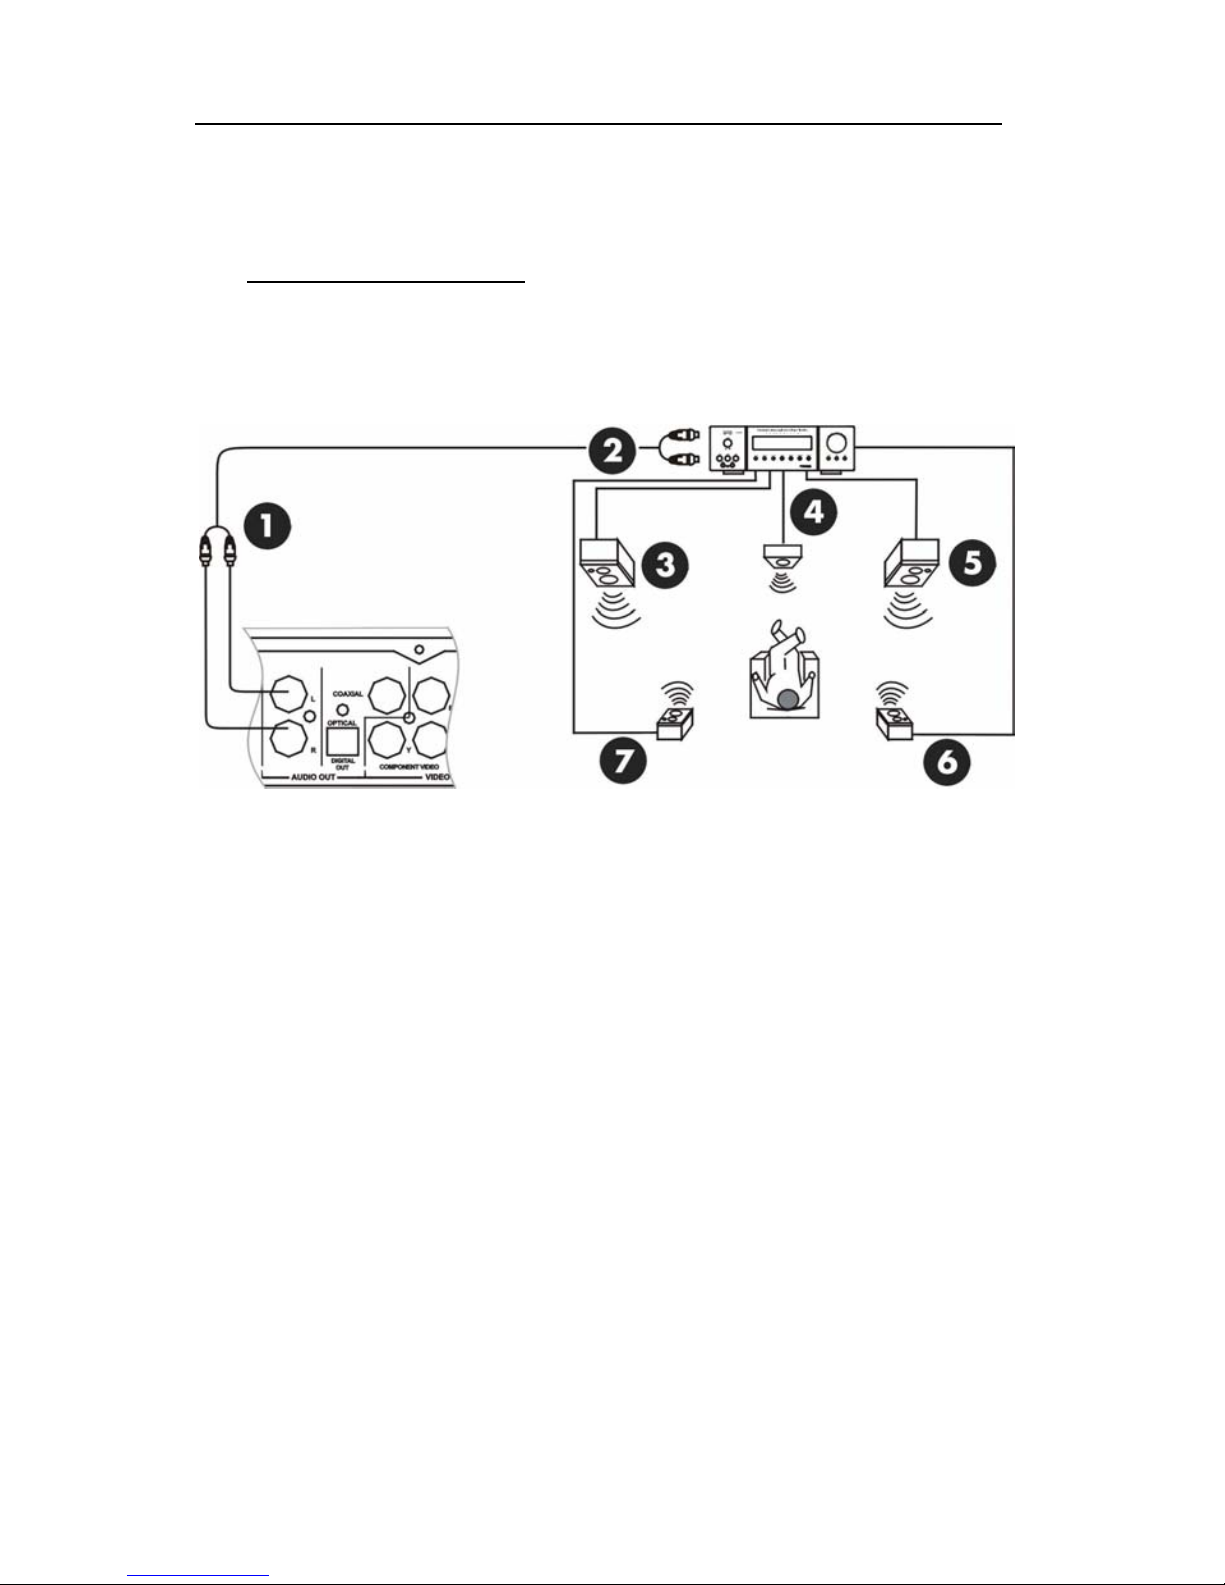
Connecting to an amplifier
Dolby Pro Logic Decoder
You can enjoy the Dolby Surround audio effect by connecting the recorder to an amplifier-andspeakers system with Dolby Pro Logic decoder.
1.
2.
3.
4.
5.
6.
7.
To AUDIO OUT (LEFT/RIGHT) jacks
To AUDIO IN jacks
FRONT LEFT
CENTER
FRONT RIGHT
SURROUND RIGHT
SURROUND LEFT
14
Page 17
Easy DVD Recorder User's Guide
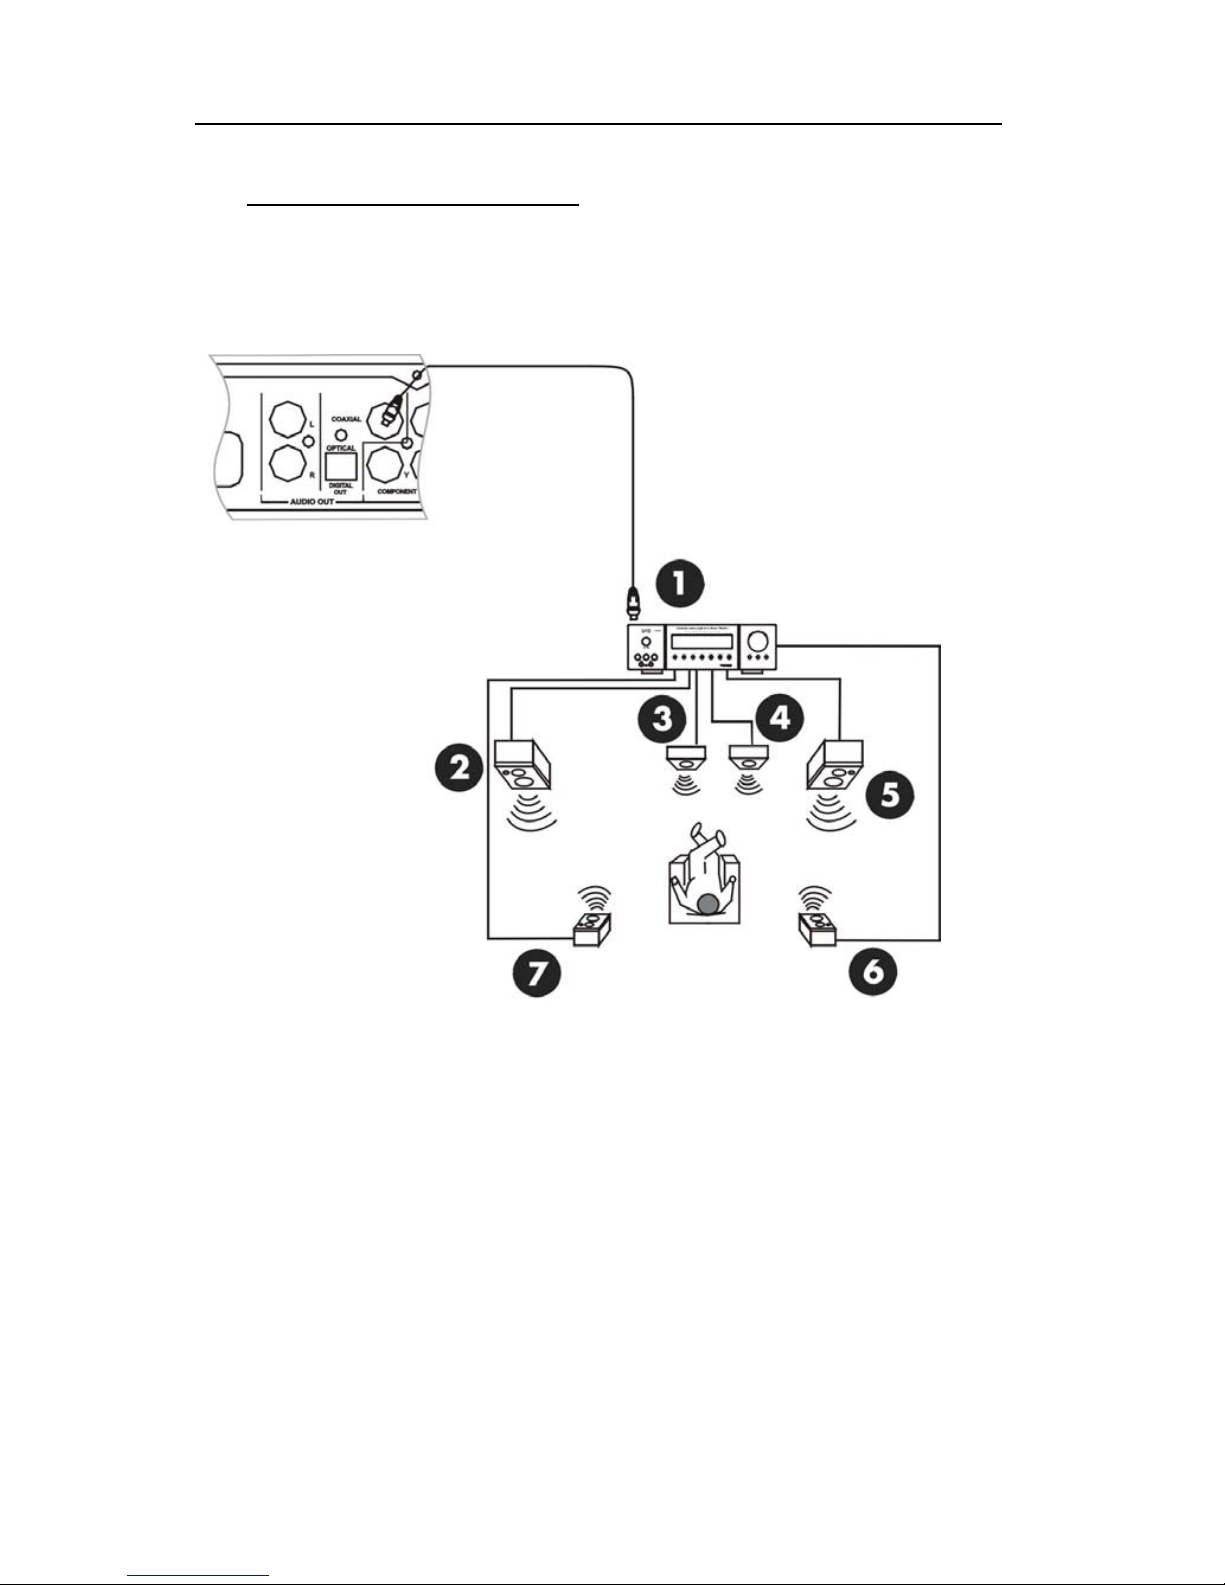
Dolby Digital or DTS Decoder
You can enjoy reproduced 5.1-channel Dolby Digital audio or Digital Theatre Systems audio
effect by connecting the recorder to an amplifier-and-speakers system with Dolby Digital
decoder or DTS decoder via a coaxial cable.
1.
2.
3.
4.
5.
6.
7.
AMPLIFIER with DOLBY DIGITAL or DTS decoder
FRONT LEFT
CENTER
SUBWOOFER
FRONT RIGHT
SURROUND RIGHT
SURROUND LEFT
15
Page 18
Easy DVD Recorder User's Guide
Connecting Input AV signal using SCART IN
The SCART IN connector included on your
device, such as a DVD player or a VCR. However, when this device is in use, or simply turned
on, you must turn it off before watching TV channels (using the
To display or record video inputted via the SCART IN connector (e.g, the AV signal from a
DVD player or a VCR with SCART OUT connector), press SOURCE on the remote control and
select SCART mode.
If the SCART IN device you want to connect is a CANAL+ analog decoder, you must configure
the
Easy DVD Recorder
General Setup screen and select ON for the “CANAL+ Analog Decoder” option. In this way,
when you select a CANAL+ scrambled signal, the CANAL+ decoder will automatically start
and the
change to any other channel, the CANAL+ decoder will automatically shut down.
Easy DVD Recorder
accordingly. Press SETUP on your remote control to access the
will automatically send unscrambled signal to the TV. If you
Easy DVD Recorder
allows you to connect a video
Easy DVD Recorder
tuner).
Even when the DVD recorder is in STAND-BY status, the AV signal from the external AV signal
source can be normally played on the TV set via the SCART IN and SCART OUT connectors on
the DVD recorder.
1.
2.
External AV signal source (e.g. DVD player, VCR, CANAL+ decoder, etc.)
Easy DVD Recorder
16
Page 19
Easy DVD Recorder User's Guide
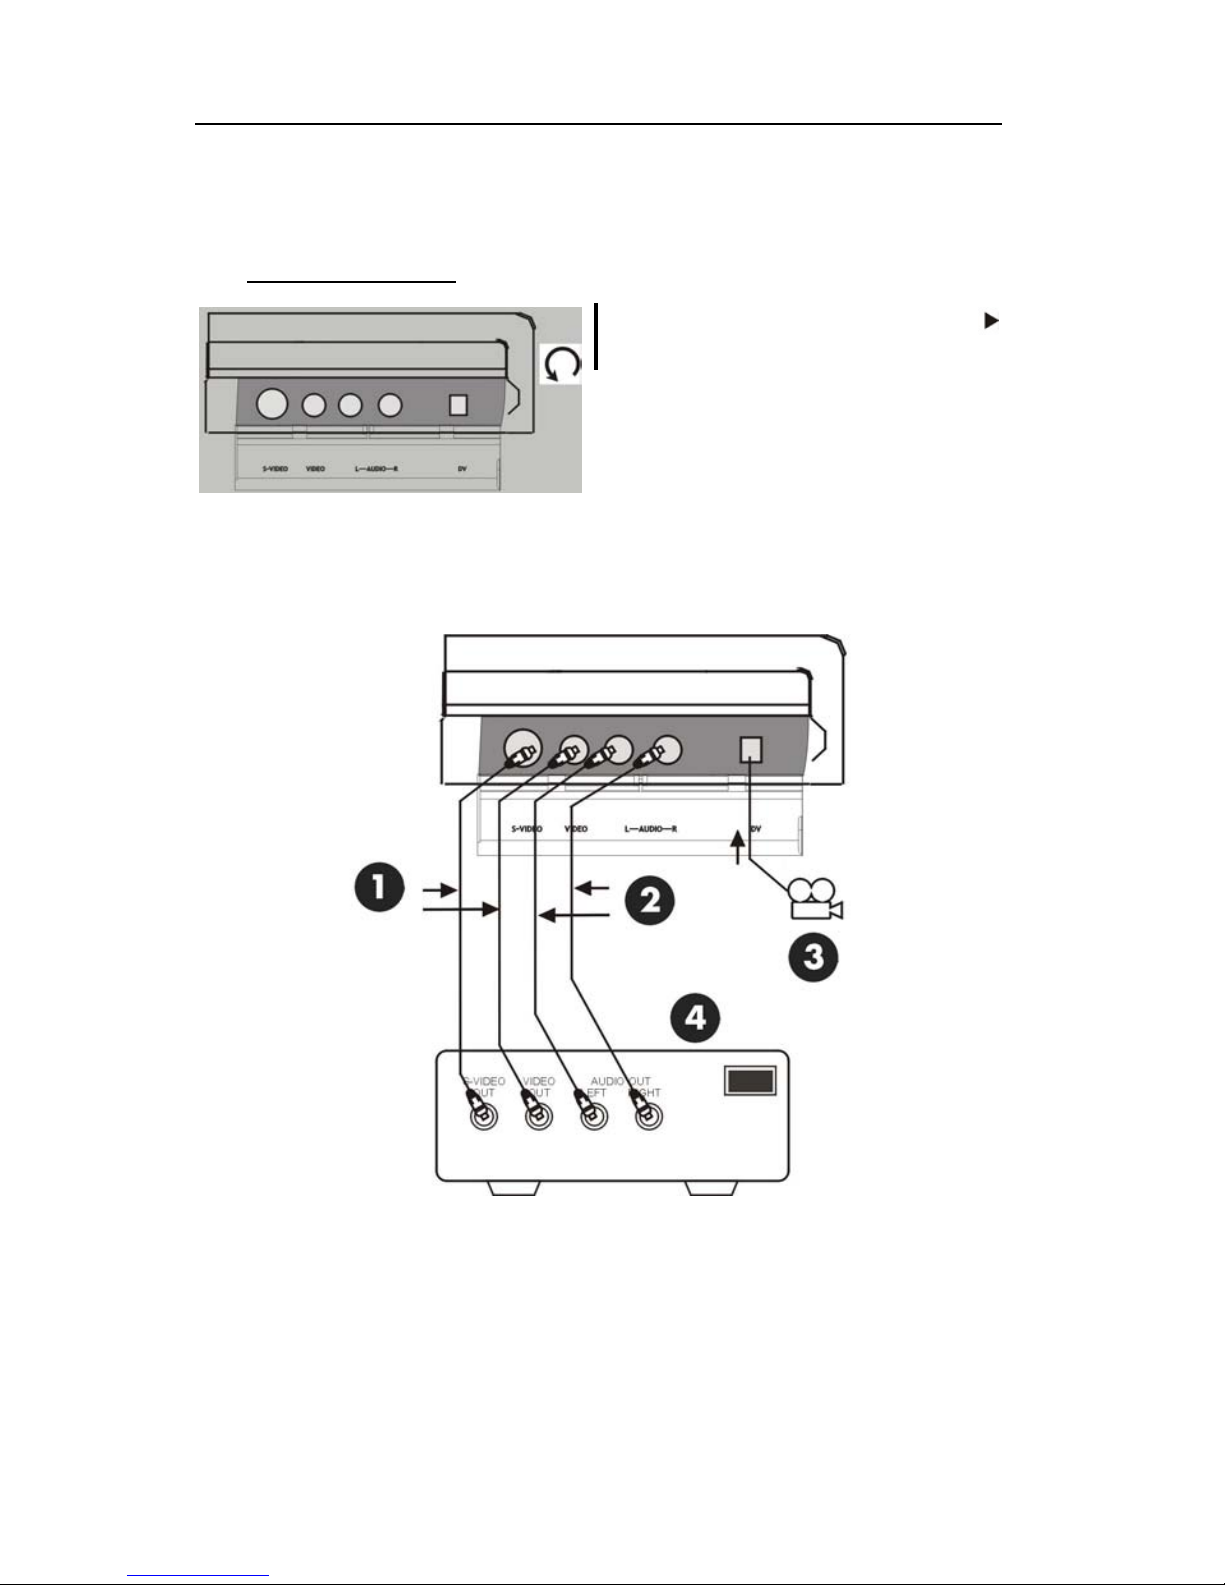
Connecting Input AV or DV signal
Via the front panel
Flip down the door as indicated by the
OPEN label.
Select the correct AV signal input by pressing the SOURCE button on your remote control. If
the signal source is connected via the S-VIDEO jack, press SOURCE to select FRONT S-VIDEO
INPUT. If the signal source is connected via the DV jack, press SOURCE to select DV INPUT.
1.
2.
3.
4.
Use S-Video jack or composite video jack
Audio input jack
iEEE 1394 jack
External AV Signal
17
Page 20
Easy DVD Recorder User's Guide
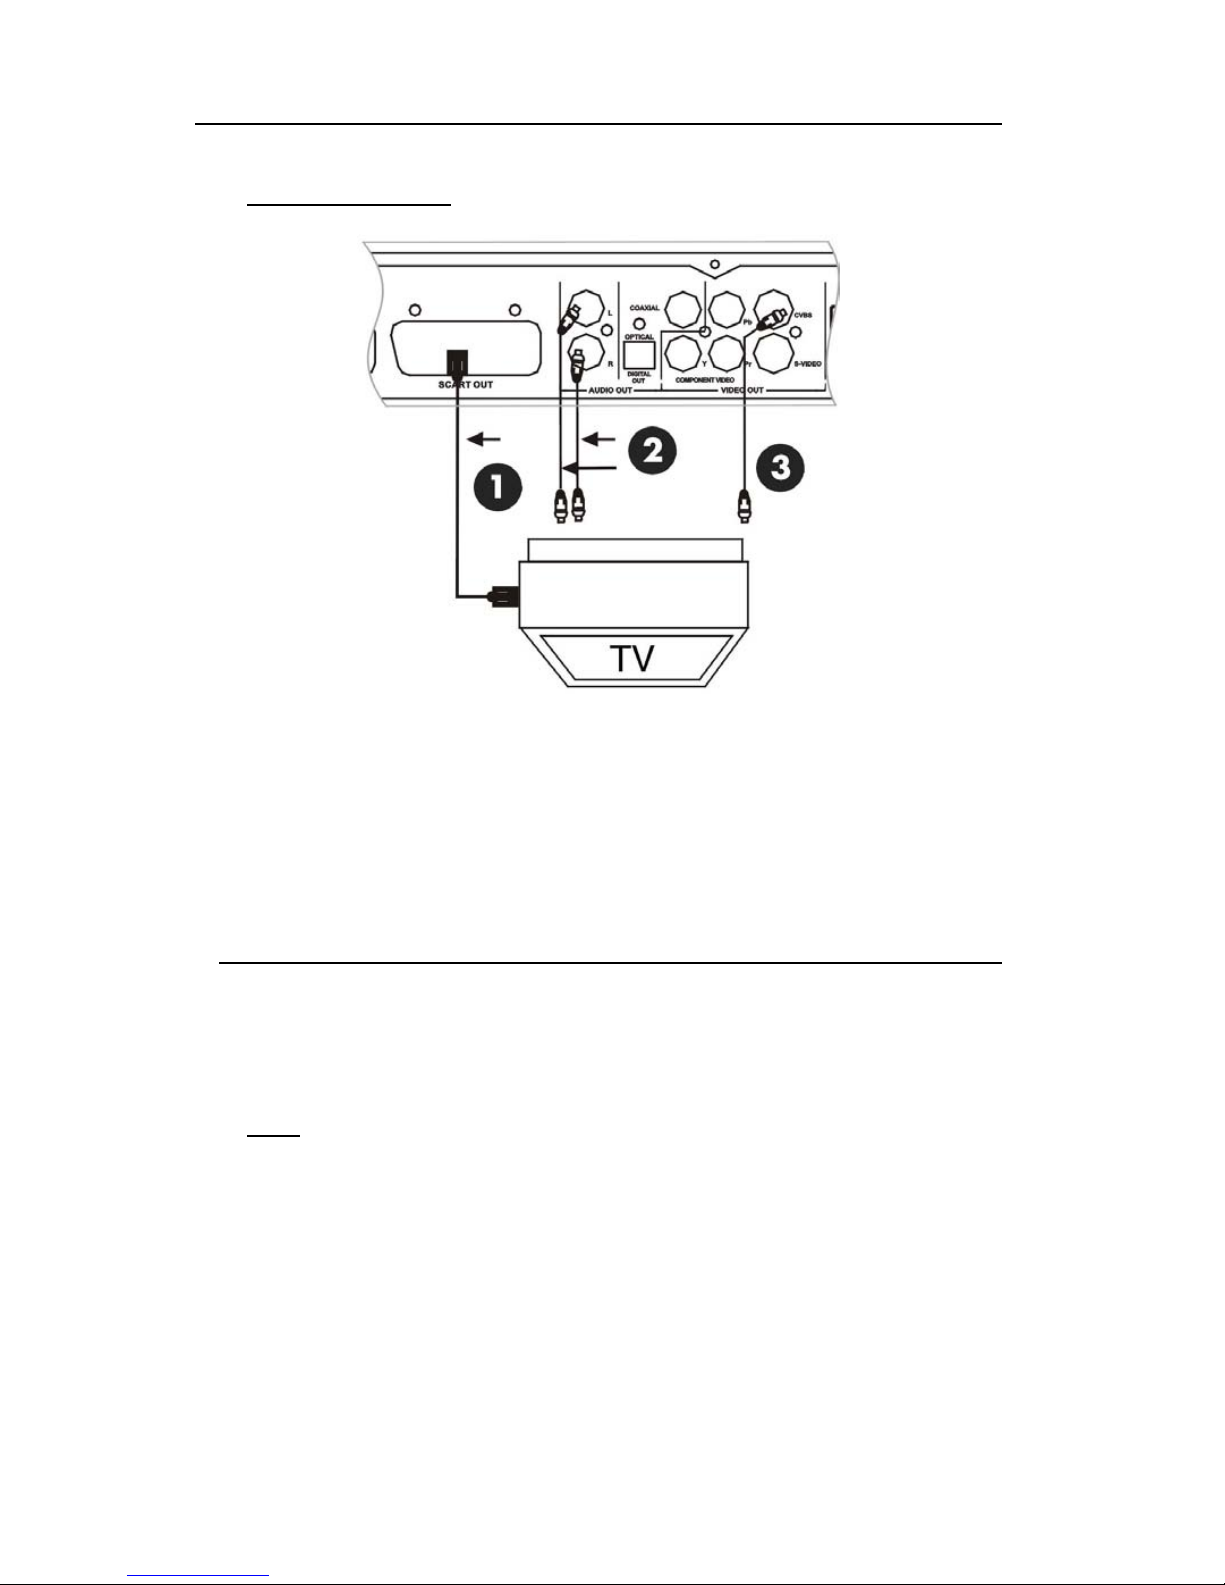
Via the rear panel
1.
2.
3.
Signal output
Audio cable
Video cable
VI. Using your Easy DVD Recorder
Playing Discs
DVD
1. Make sure all connections are correct, then plug the power cord into a wall outlet.
2. Press the POWER button on the front panel or remote control to power on your
Recorder
3. Insert a DVD disc when LOAD displays.
.
Easy DVD
4. Use the arrow keys to select the desired title.
5. Press OK or PLAY/PAUSE. The selected title will start playing.
6. Press DISPLAY during playback to display playback information.
18
Page 21
Easy DVD Recorder User's Guide
T01/05 C01/24 AU01/02 00 02 35
Current Title/
Total Titles
Current Chapter/
Total Chapters
Current Audio
Elapsed Time
Language/Total Audio
Languages
7. Press DISPLAY again, the playback control menu shows as below. Press DISPLAY to shut
down the menu.
8. To remove the disc, press the EJECT button on the front panel.
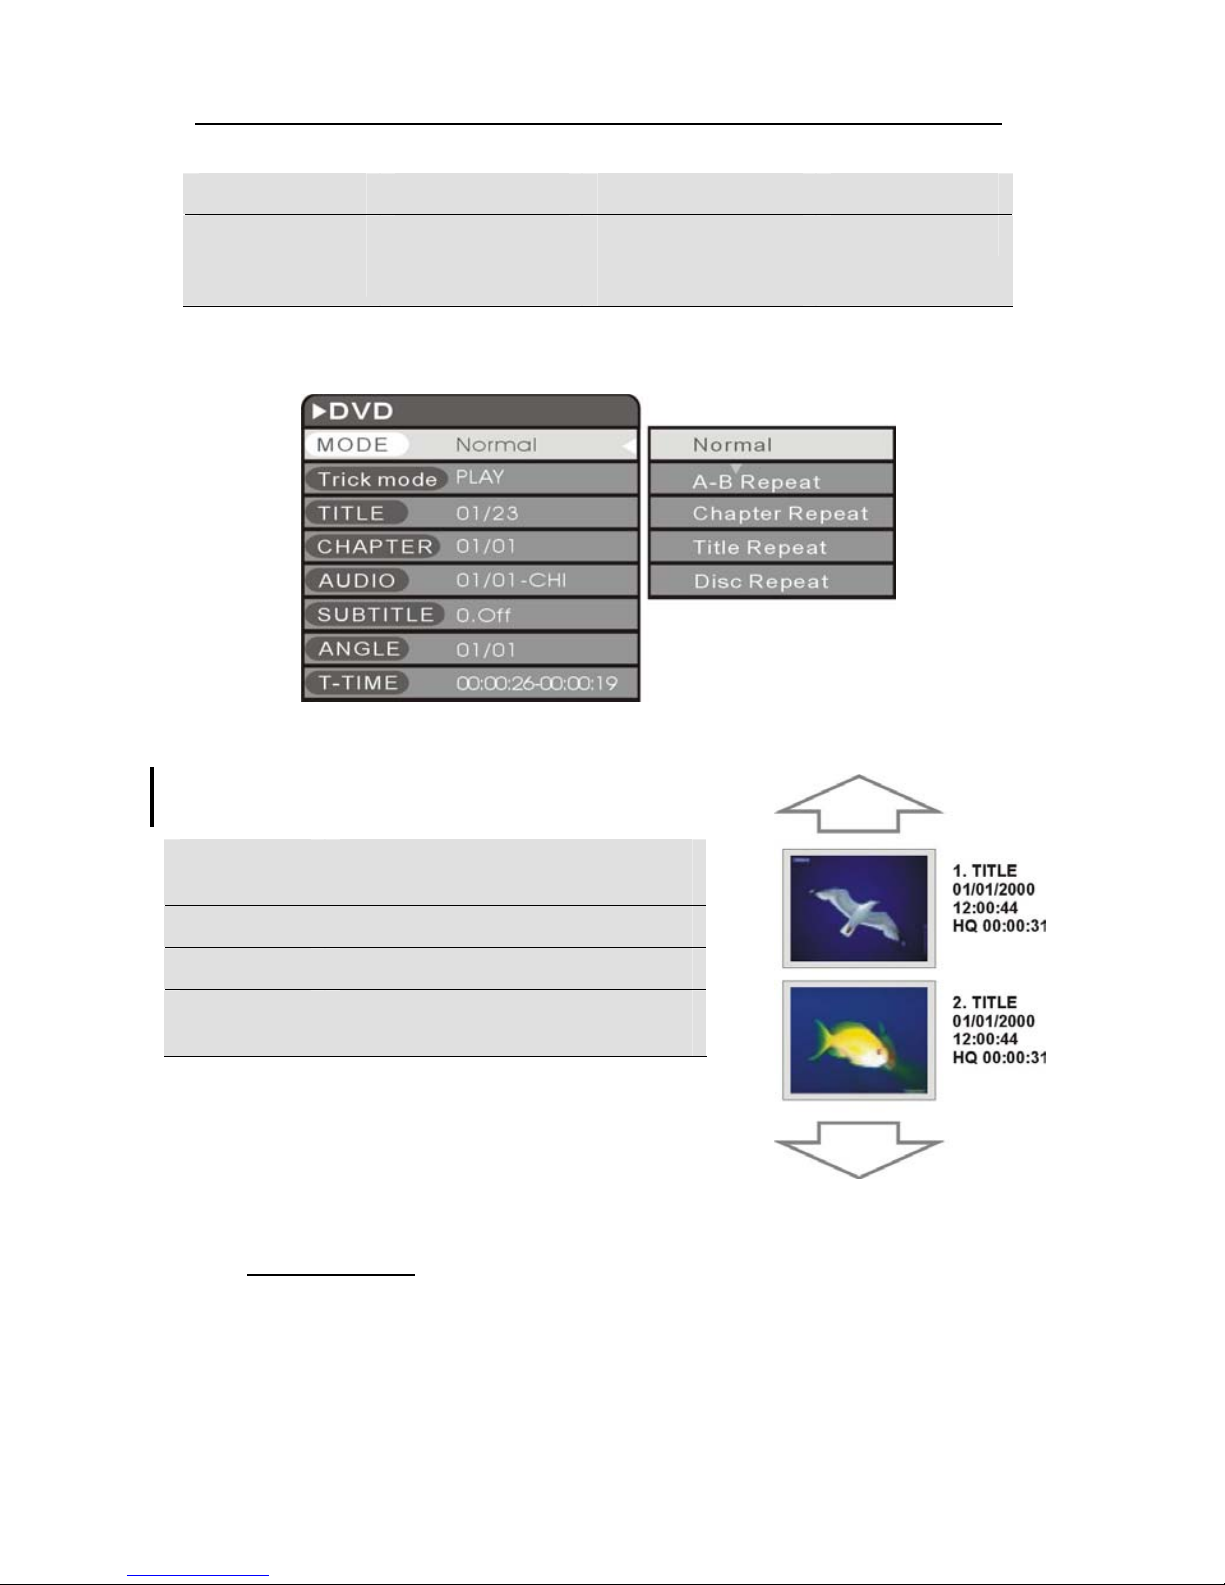
When using a DVD+RW or DVD+R, browse the DVD Index
Screen and use the ARROW keys to select the desired title.
1. TITLE Name of the recording (the default name
is "TITLE").
01/01/2000 Recording date.
12:00:44 Recording time.
HQ 00:00:31 Quality setting and length of the
recording.
JPG/ MP3 files
If a disc contains both JPEG and MP3 files, you can play pictures and music simultaneously.
1. Use the arrow and OK buttons to select the MP3 and JPEG folders and files for playback.
2. Press STOP to stop playback.
19
Page 22
Easy DVD Recorder User's Guide
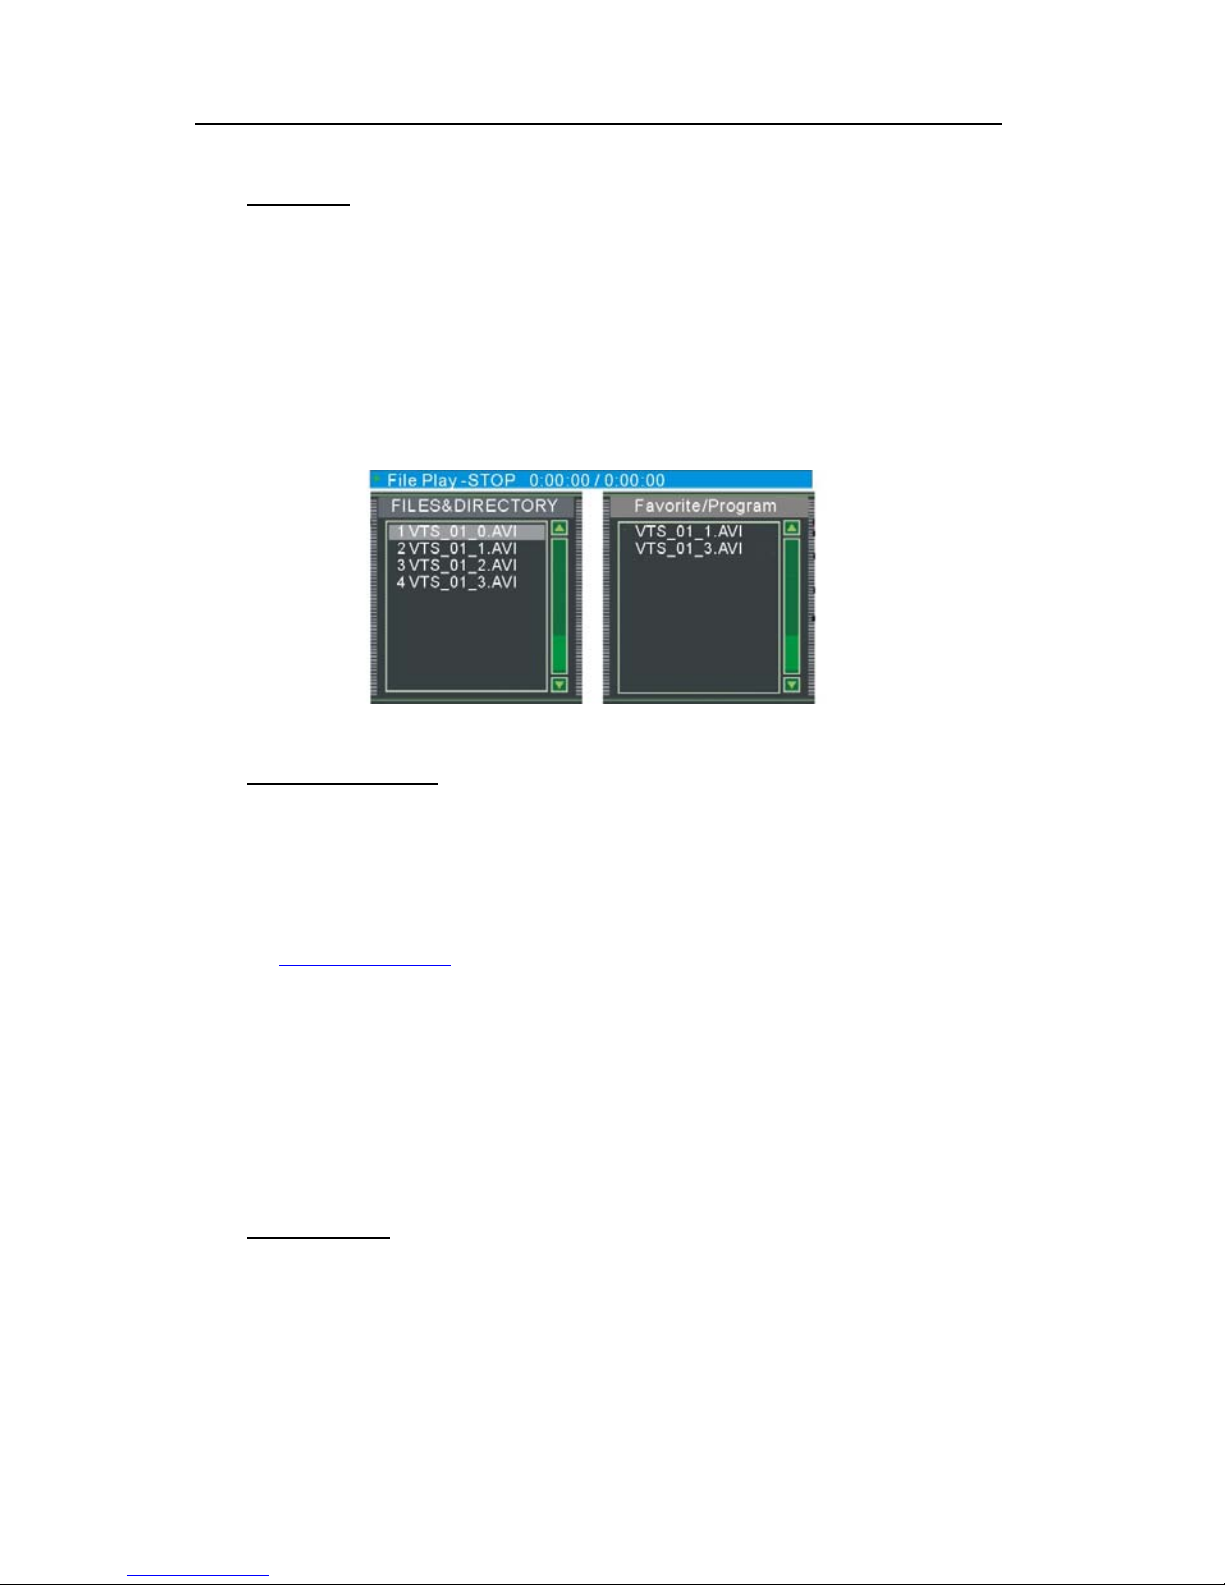
DivX files
If a disc contains DivX files, a playlist window will automatically display when the disc is
loaded.
1. Use the arrow buttons to select your file and press OK to play it.
2. Use the CLEAR and UP/DOWN buttons to create a playlist in the right panel and play files
in your desired sequence.
3. Press DISPLAY to view/hide the playlist window during playback.
DivX Registration
To rent or purchase videos using Divx® technology, you need to register your
Recorder.
1. Press SETUP and find a 16 bit Characters registration code in DivX folder of the setup menu.
2. Use this code to create a new DivX VOD account on its official web page, please check in
details at www.divx.com/vod
3. To create a new DivX VOD account, press OK to generate new registration code and repeat
the above steps.
.
Easy DVD
Controlling playback
Using menus
Press DISPLAY to show the control menu during playback and press DISPLAY again to exit.
20
Page 23
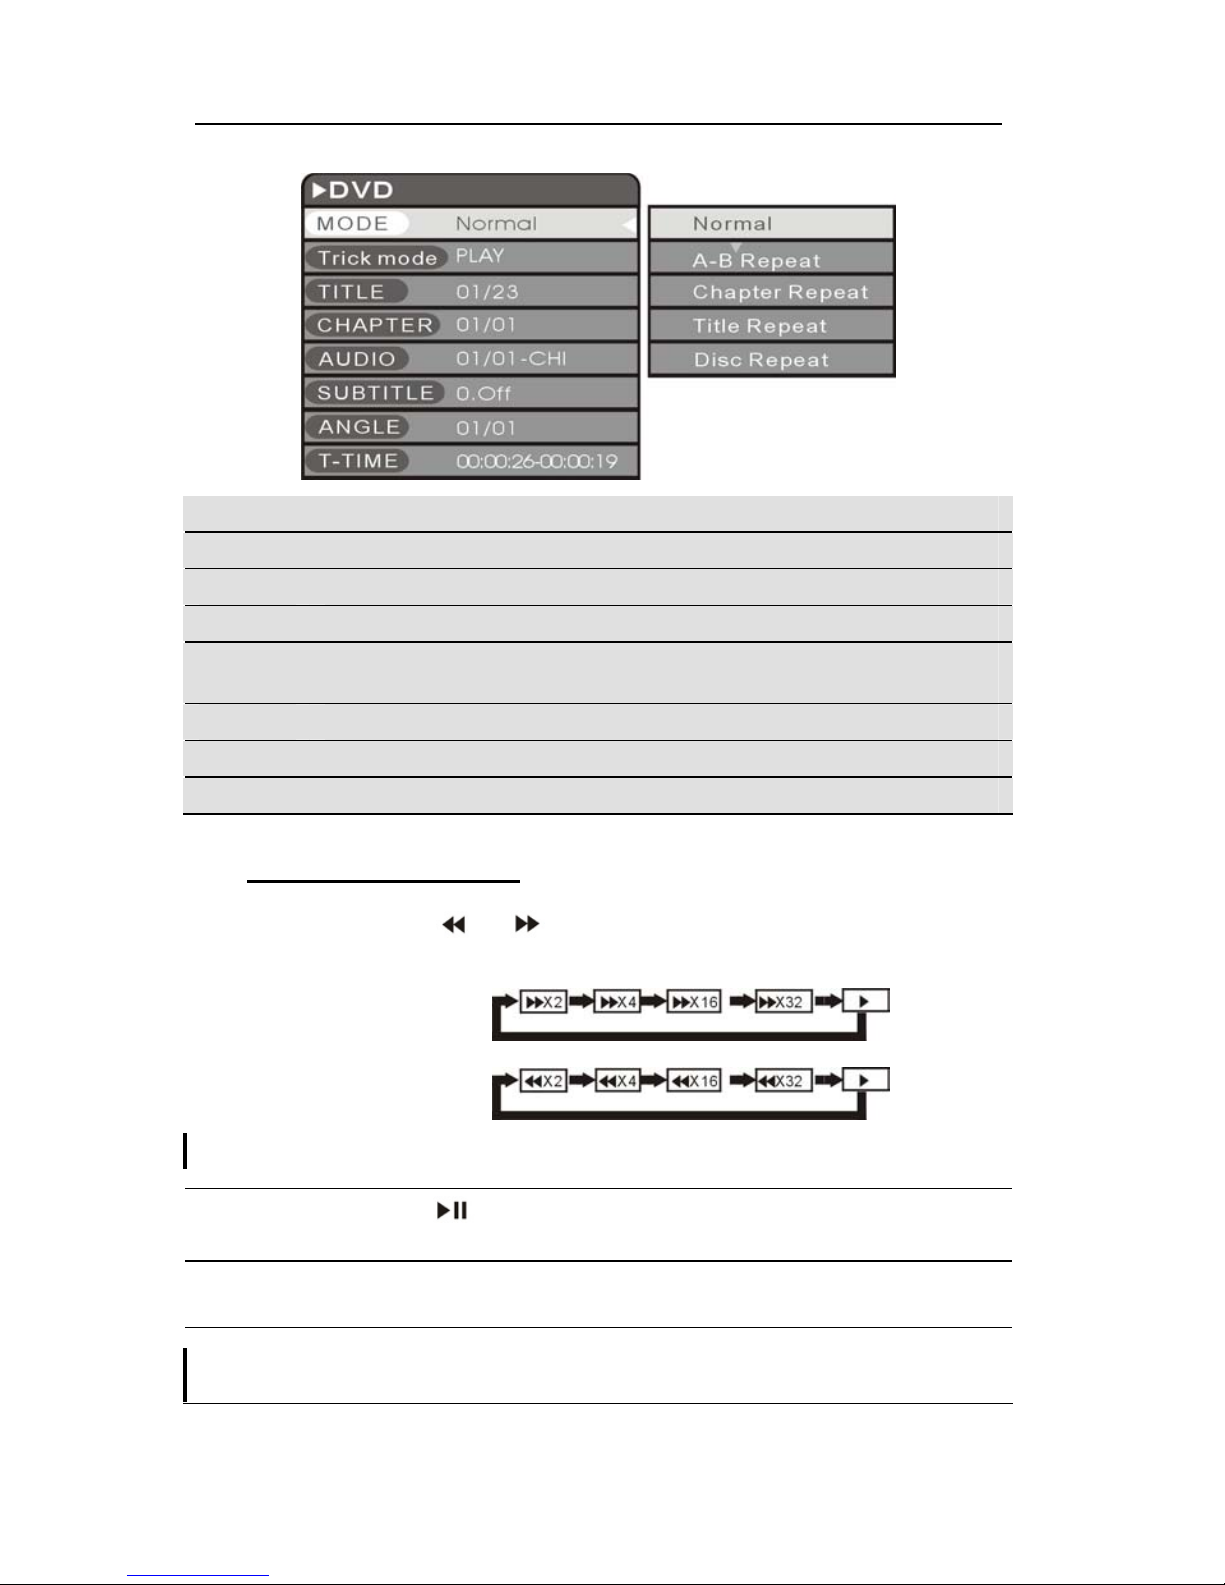
Easy DVD Recorder User's Guide
MODE Set the playback mode, e.g.: Repeat, Program, Random, etc.
TRICK Set the playback status, e.g.: Stop, F.F., F.R., S.F., etc.
TITLE Press OK then access the desired title and play it.
CHAPTER Enter the desired chapter number and play it.
AUDIO Select the audio language you want to use, e.g.: CHI (Chinese), ENG (English),
etc.
SUBTITLE Select the subtitle language.
ANGLE Select the camera angle (must be supported by the disc).
T-TIME Display the elapsed and remaining time.
Using the remote control
Fast Forward/
Fast Reverse
Press PLAY/PAUSE to resume normal playback.
Play / Pause
Slow Forward Press SLOW during playback to slow forward at three different speeds:
Press PLAY/PAUSE to resume normal playback. Playback may differ depending on the disc
used.
Press
or repeatedly to fast reverse or forward at 4 different
speeds.
Press
on the remote control or on the front panel to start playback
or pause.
SF1/2, SF1/4, SF 1/8 and SF1/16.
21
Page 24
Easy DVD Recorder User's Guide
Search Press GOTO to access the search menu (press GOTO repeatedly to
access the three modes: title, chapter or time).
Use the number buttons to select a title, and press OK to play.
Some DVD discs may not support time searching mode.
Skip
Repeat
Press
A-B Repeat
or to skip to the previous / next title or chapter.
1. Press DISPLAY twice to access the setup menu during playback.
2. Use the UP/DOWN arrow buttons to highlight the MODE item, and
press OK.
3. Use the UP/DOWN arrow buttons to highlight the A-B REPEAT item,
press OK to mark the start point (A); press OK again to display the A-B
REPEAT item, and press OK for the third time to mark the end point (B).
The section between the start and end points will be played repeatedly.
4. Press DISPLAY to exit the menu.
Title/chapter/disc repeat
Repeatedly press REPEAT during playback to repeat title/chapter/disc,
and to resume normal playback.
Disc menu 1. Press MENU to show the disc menu.
2. Use the arrow buttons to select a title, and press OK to start playback.
Alternatively, use the number buttons to play a selected title directly.
For VCD discs, press STOP to access the upper menu (PBC ON). For VCDs 2.0 and above,
pressing the number buttons during playback will trigger no action.
Playing in
sequence
Press MENU to switch between playback control (PBC ON) and PLAY
IN SEQUENCE (PBC OFF) mode.
For SVCDs and VCDs 1.0, 1.1, the player will enter the PLAY IN SEQUENCE mode after the
disc is loaded. In this mode, you can press number buttons to select a title, including during
playback. Some discs will start to play automatically.
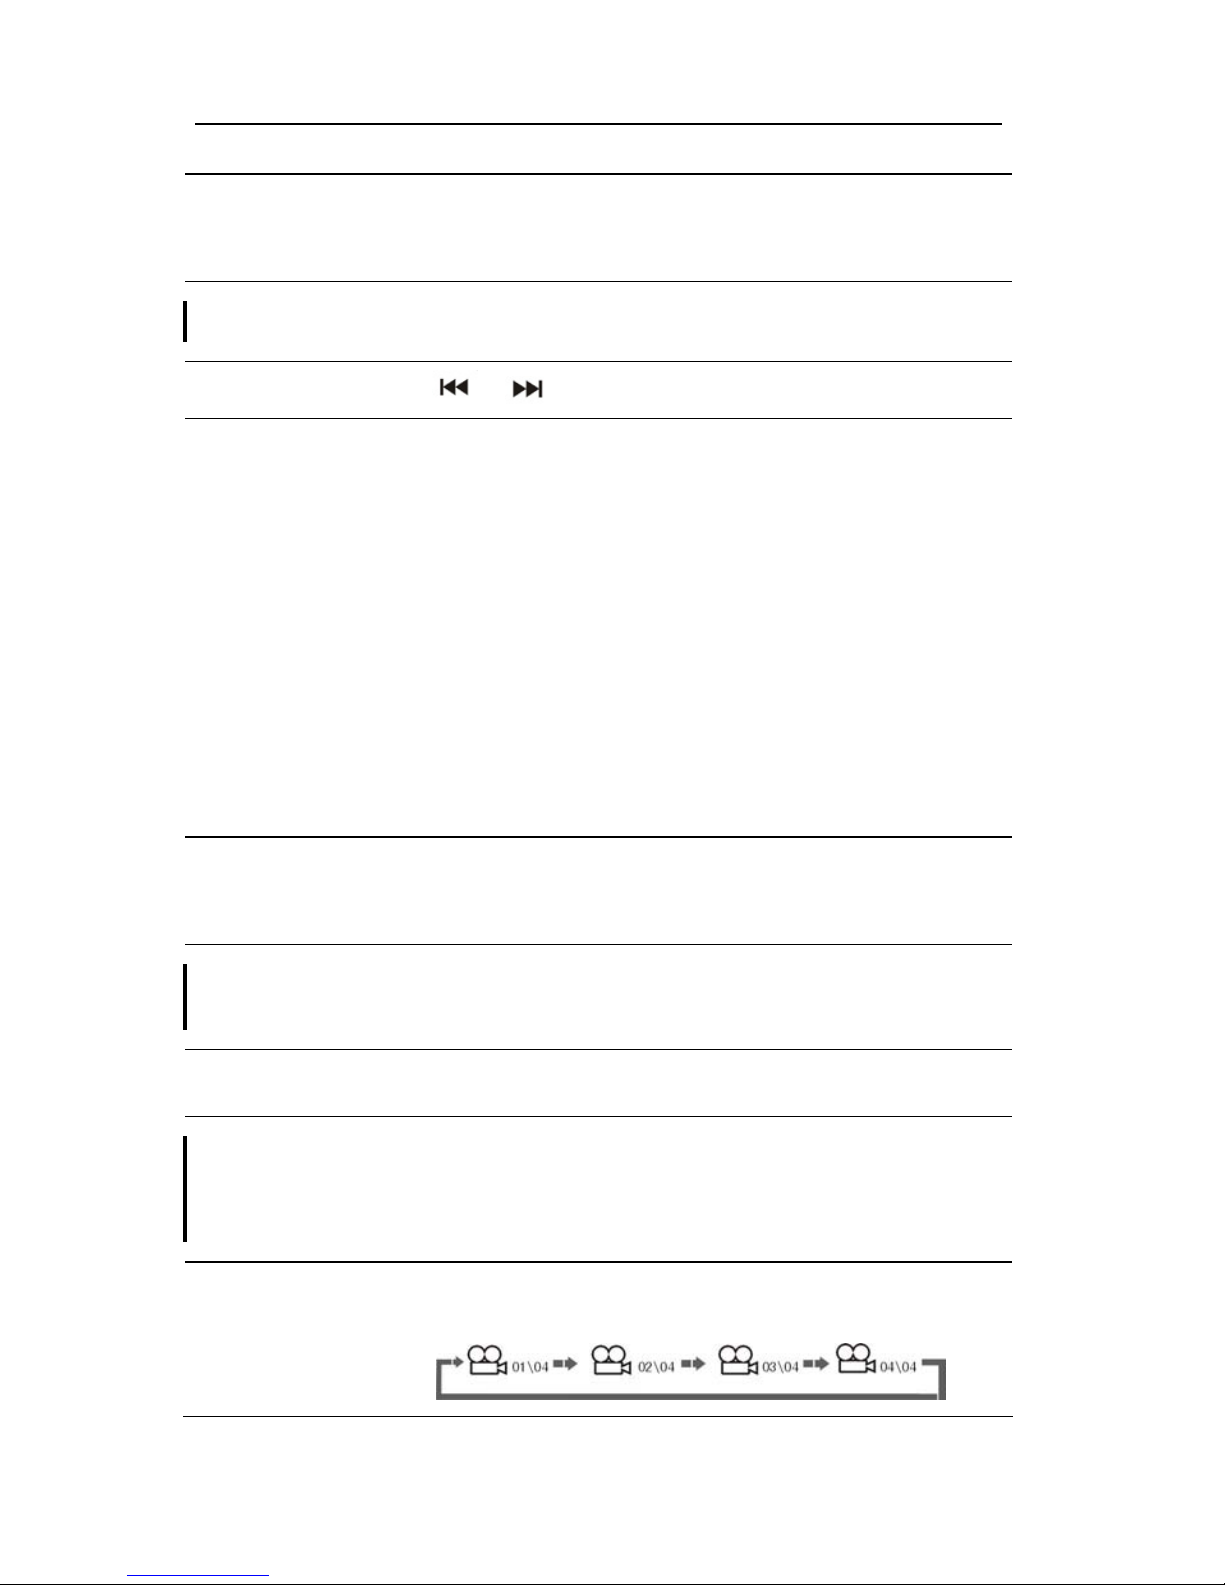
Viewing angle When playing a DVD, press ANGLE repeatedly to toggle between up to 9
viewing angles.
22
Page 25

Easy DVD Recorder User's Guide
Audio language For DVD/SVCD discs, press AUDIO repeatedly to toggle between up to
8 audio languages or sound when the disc is recorded with multilanguages.
Example: 1 / 4 ENG DOLBY
1: first audio language
4: 4 languages are available
ENG: the first audio language is ENGLISH
For Karaoke discs, press AUDIO to switch between the accompanying music and vocal.
Subtitle language For DVD/SVCD discs, press S-TITLE repeatedly to toggle between up to
32 subtitle languages when the disc is recorded with multi-subtitles.
03: third subtitle
Example: SUBTITLE: 03 / 08 CHI
08: 8 subtitles are available
CHI: the third subtitle is CHINESE
Screen display Press DISPLAY during playback, the following information shows:
Example: NORMAL PLAY T01/01 C01/10 AU01/02 00:01:41
NORMAL: DVD disc
PLAY: Playing
T01/01: Title
C01/10: Chapter
AU01/02: Audio language
00:01:41: Elapsed time
Press DISPLAY again during playback, the playback control menu
displays. Press DISPLAY to exit the control menu.
The information displayed is related to the settings and disc contents.
Program playing 1. Press DISPLAY twice to access the playback control menu.
2. Select "Program" in the "Mode" submenu, the following window
displays:
23
Page 26

Easy DVD Recorder User's Guide
3. Use the arrow buttons to highlight the title or chapter you want to
program play.
4. Press CLEAR, the title or chapter name will be added into the right
panel. Use this method to add all your favourite titles or chapters.
5. Press the RIGHT arrow button to move the cursor into the right panel,
and press CLEAR to remove a title or chapter from the list.
6. Press OK to start program playback.
To exit, press STOP, or press OK to access the control menu and select
the NORMAL status.
Parental lock
Parental lock is a password protecting system. It enables you to prevent this equipment from
playing some discs according to their rating.
1. Press STOP twice during playback.
2. Press SETUP to access the system setup menu.
3. Press the UP/DOWN arrow buttons to highlight an item and press OK to confirm the
selection. Proceed likewise to set the parental control.
5. Use the number buttons to enter your password (the default password is 3308) and press OK
to confirm.
6. Press OK again to display the level list, and use the UP/DOWN arrow buttons to highlight
the level you want to set. Press OK to confirm.
7. Press SETUP to exit.
Changing password
1. Repeat step 1 to step 5 as described above.
2. Use the UP/DOWN buttons to select 'NEW' and press OK.
3. Enter new password in the first box; and enter it again in the confirming box.
4. Press OK to save the new password and press SETUP to exit the menu.
24
Page 27
Easy DVD Recorder User's Guide
System menu
MAIN SCREEN
GENERAL
OSD language
SCART output
Video output format
Progressive/Interlace
Restore factory settings
PLAYBACK
Menu language
Subtitle language
Audio language
TV aspect ratio
Parental control
Digital audio output
RECORD
Auto chapter marker
Default source
Default quality
Î
Î
Î
GENERAL
Î
CANAL+ Analog
Decoder
PLAYBACK
RECORD
Î
Î
Î
Î
Î
Î
Î
Î
Î
Î
Î
Î
Î
Î
English / French / Spanish / German /
Dutch …
ON / OFF
YUV / RGB
NTSC / PAL
Progressive/Interlace
French / Hindi / Hungarian …
French / Hindi / Hungarian …
French / Hindi / Hungarian …
16:9 / Pan Scan / Letter box
OFF / 1: Kid Safe…
RAW/LPCM
ON / OFF
Tuner / Front CVBS / Front S-VIDEO / DV
/ SCART
HQ / SP / EP / SLP
OK
CHANNEL
SCAN
Country
Scan channels
Sort channel order
CLOCK
Date (mm/dd/yy)
Time (hh:mm:ss)
Î
Î
CHANNEL SCAN
Î
Î
Modify channel
information
CLOCK
Î
Î
Î
Î
See next page
01/01/04
01:15:01
25
Page 28
Easy DVD Recorder User's Guide
1. Press SETUP when
the playback is stopped
to show the system
menu.
2. Use the arrow
buttons to select an
item, press OK to
confirm.
3. Press SETUP again
to exit the menu.
TV channel setting
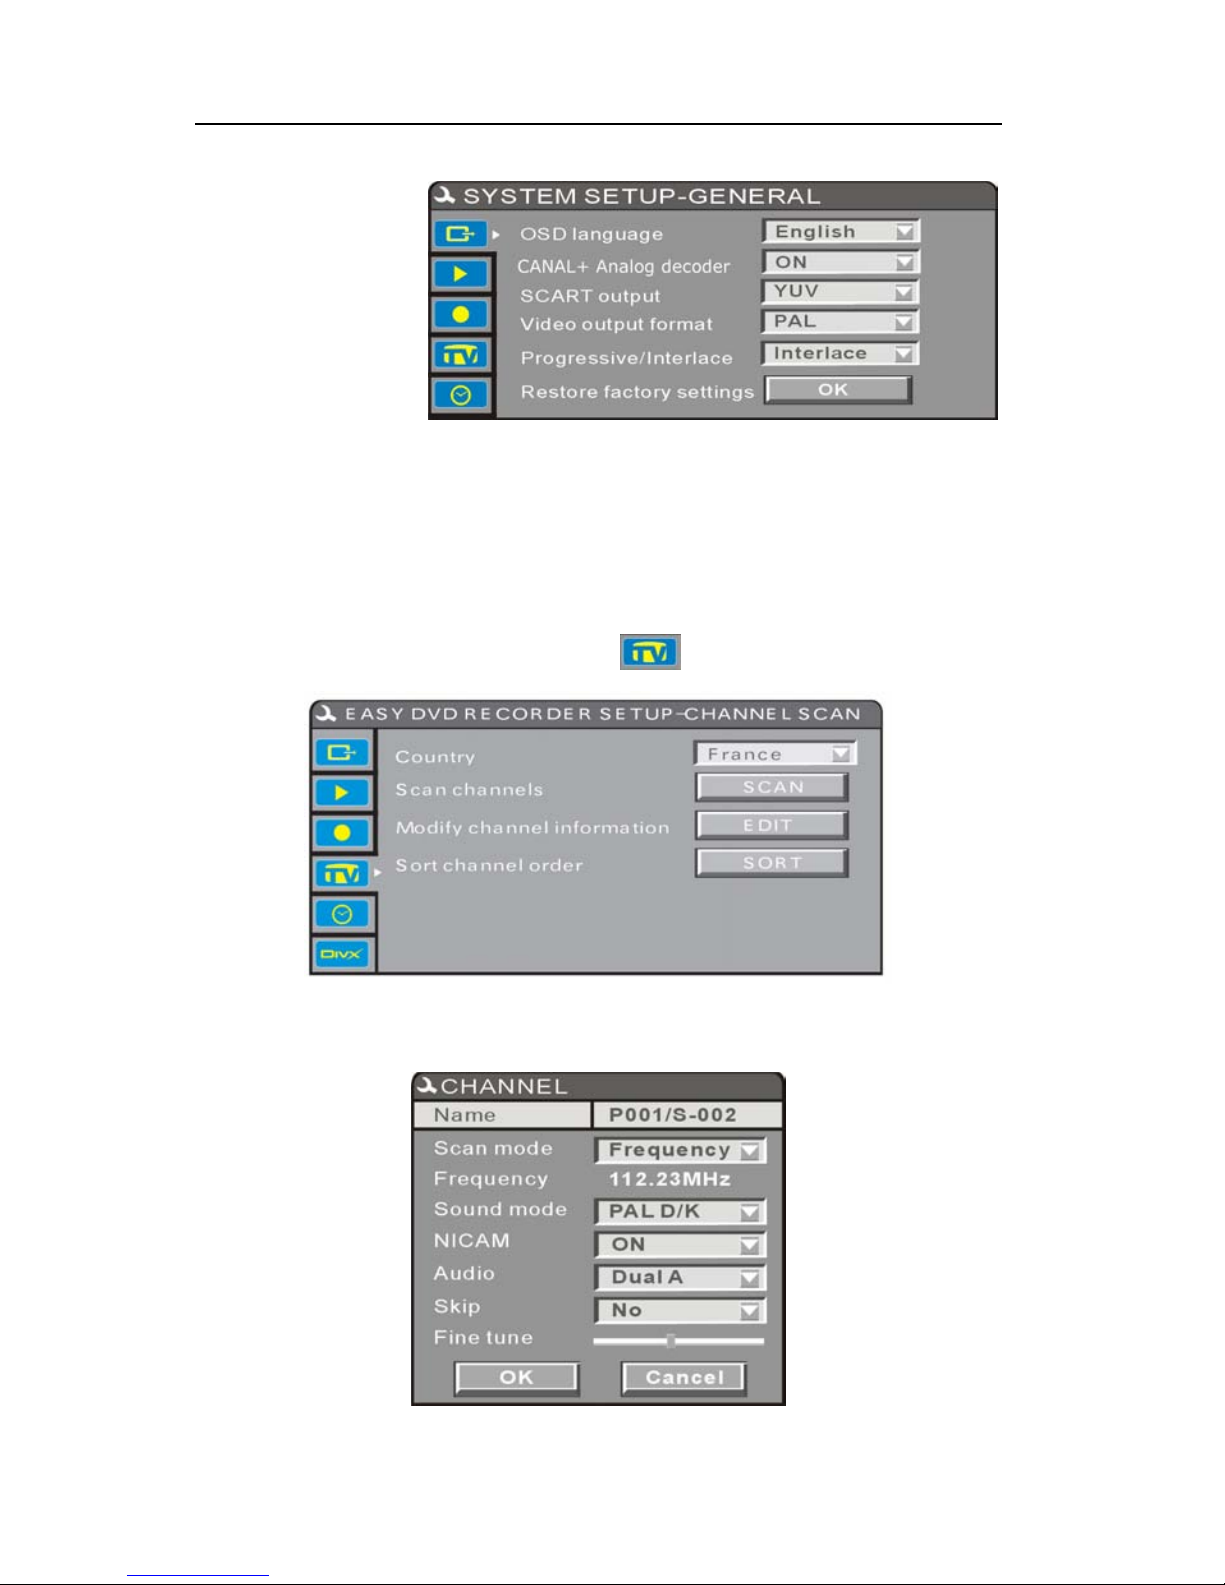
To record TV programs, you must make sure that you have performed TV channel scanning:
1. Press SETUP to access the system menu when the playback is stopped.
2. Use the UP/DOWN arrow buttons to highlight
3. Use the UP/DOWN arrow buttons to highlight "Scan channels" and press OK. Proceed
likewise to highlight "Modify channel information".
and press OK.
26
Page 29
Easy DVD Recorder User's Guide
Name
Use the arrow buttons to select and edit channel name.
Scan mode Use the UP/DOWN arrow buttons to select a scan mode (Frequency, Channel,
S-Channel).
Frequency Frequency of current channel. This item may be displayed as Channel or S-
Channel due to the setting of the second item. Press the LEFT/RIGHT arrow
buttons to search the next channel downward/ upward in Frequency
(Channel/S-Channel) sequence.
Sound mode Select TV system of the current channel.
NICAM Turn on/off the NICAM option.
Audio Change audio option. There are two options: DUAL A and DUAL B.
Skip Decide whether to skip this channel when using CH +/- buttons to navigate
between channels.
Fine tune Fine tune current channel.
OK Confirm current channel's settings and save.
Cancel Discard current settings and exit the menu.
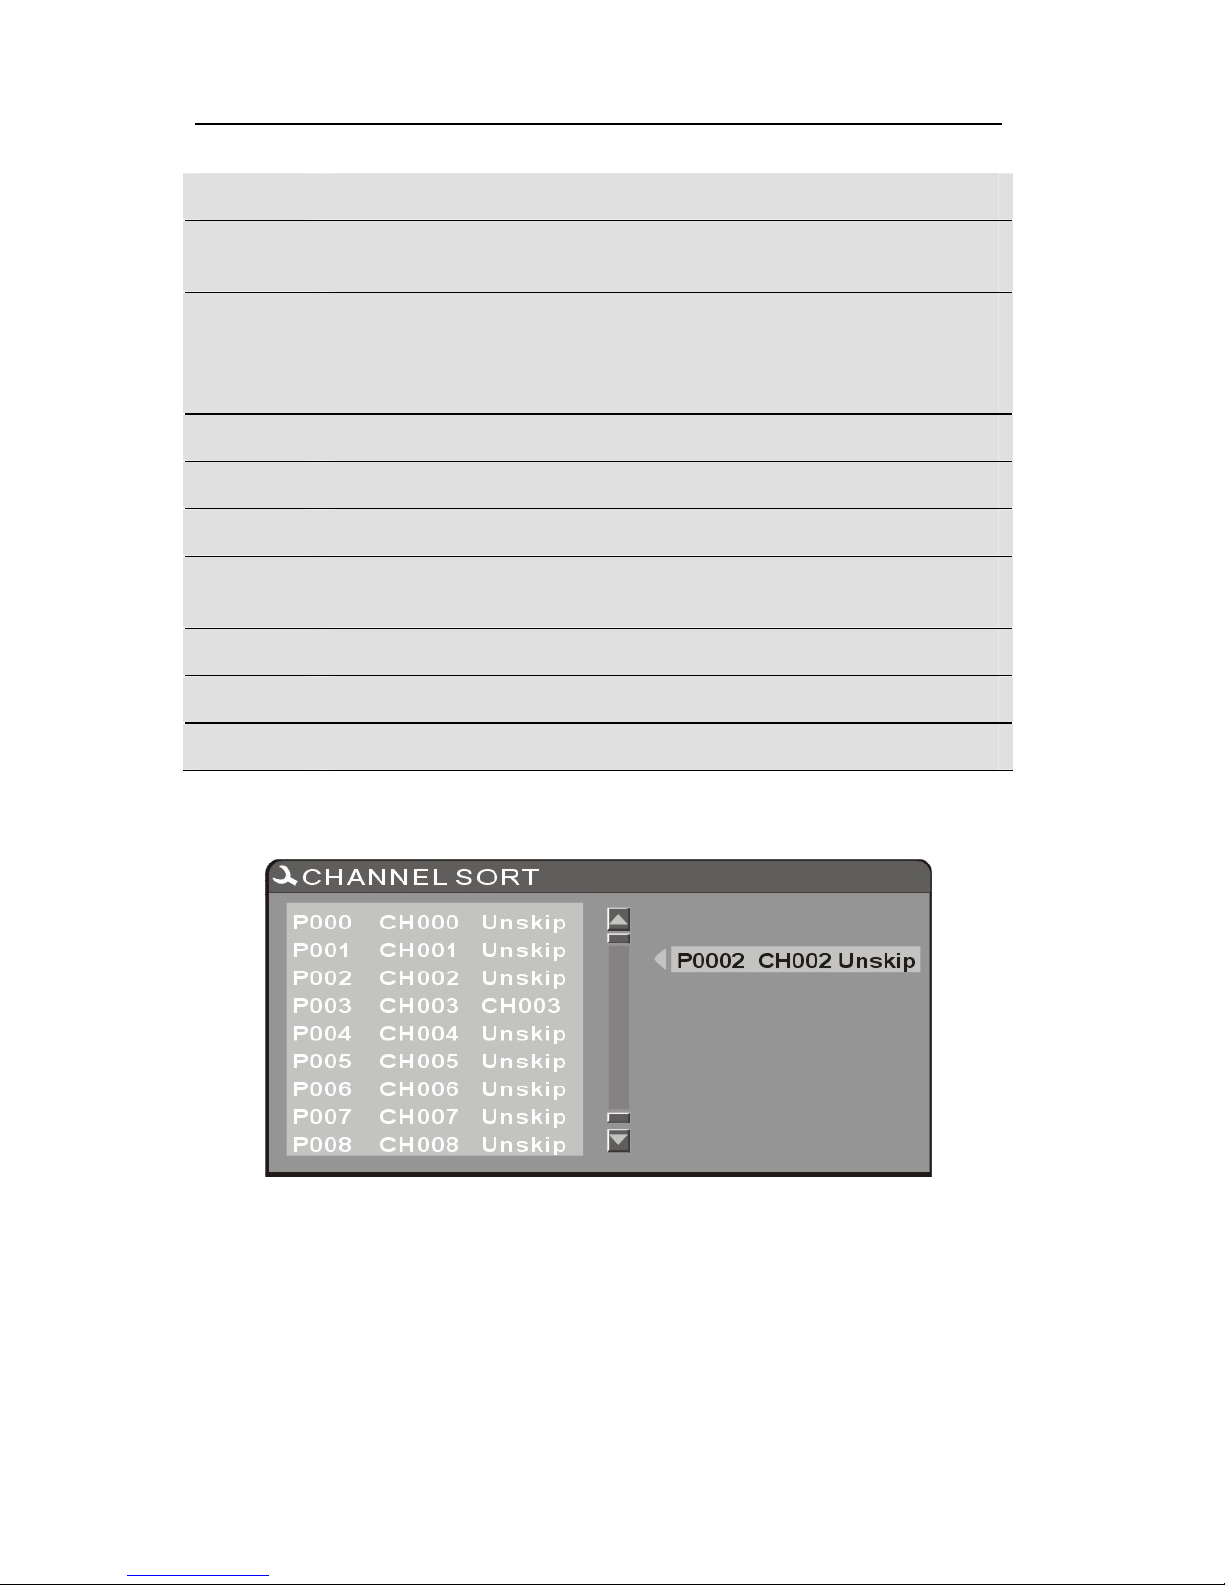
1. Use the UP/DOWN arrow buttons to select "Sort channel order", and press OK.
2. Use the UP/DOWN arrow buttons to select the channel you want to sort, and press OK or
the RIGHT button to confirm.
3. The selected channel will be moved to the right panel temporarily.
4. Press the UP/DOWN arrow button, the selected channel moves along with the cursor.
Move the cursor to your desired position, and press the LEFT button to insert it into the left
list.
27
Page 30
Easy DVD Recorder User's Guide
Recording
Should you wish to play a DVD+R created with your Easy DVD Recorder on another player,
please make sure it has been finalized. Likewise, you must use the "make compatible" option if
you want to play a DVD+RW disc on another player. You can access these functions from the
DVD+R and DVD+RW Edit menus by pressing the disk-op button on your remote control.
CAUTION: Finalizing a disc consists in closing the recording session and to prevent further
recordings.
When recording is stopped, press SOURCE to return to playback mode.
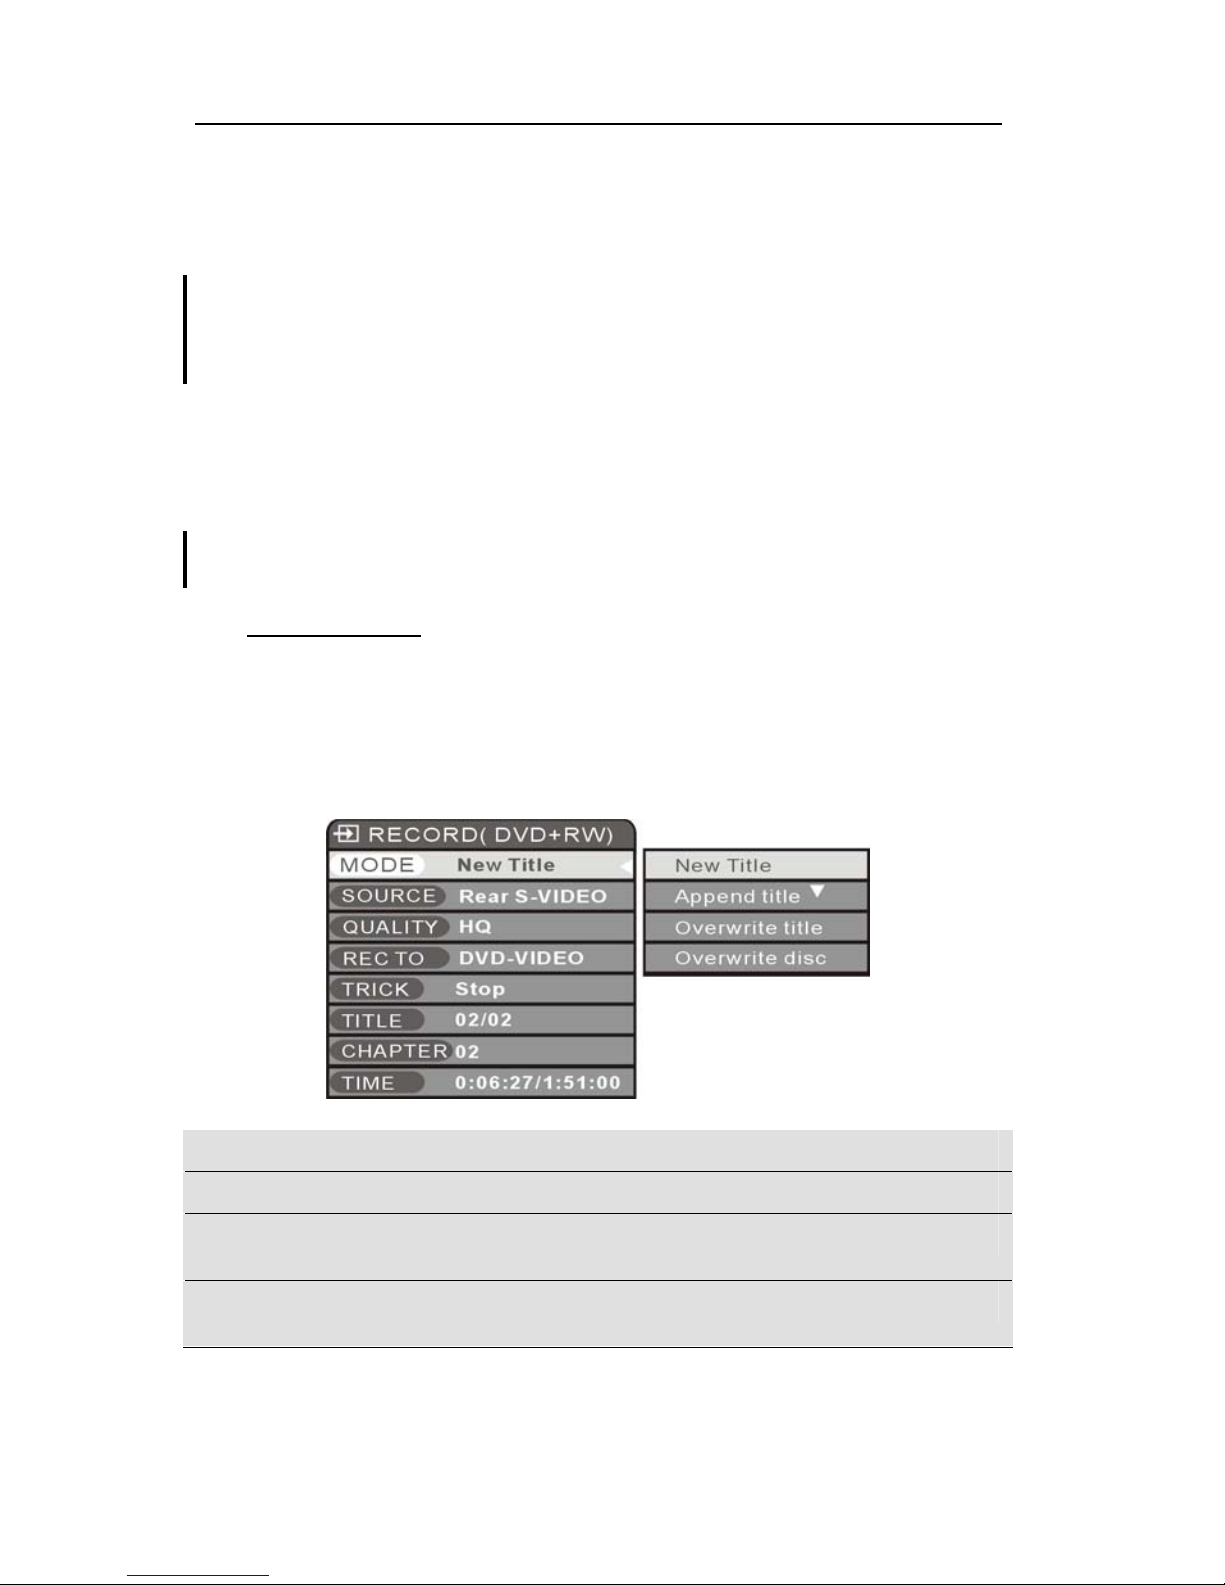
Basic recording
1. Insert a recordable DVD+RW or DVD+R.
3. Press SOURCE to select signal source for recording.
4. Press DISPLAY to display the current status. Press DISPLAY again to access the recording
control menu.
New title Newly recorded content will be saved as a new title.
Append title Newly recorded content will be appended to the last title on the disc.
Overwrite
title
The current title will be overwritten by newly recorded content.
Overwrite
disc
The whole disc will be overwritten by newly recorded content.
28
Page 31

Easy DVD Recorder User's Guide
SIGNAL SOURCE: Use the UP/DOWN arrow buttons to select the SOURCE item, and press
OK to select a signal source.
Front CVBS Front Audio/Video Input (front panel)
Front S-VIDEO Front S-Video Input (front panel)
DV DV Input (front panel)
SCART SCART Input (rear panel)
Tuner TV program
QUALITY: defines recording time on blank disc.
HQ High quality, nearly 60 minutes.
SP Standard Playback quality, nearly 120 minutes.
EP Extended Playback, nearly 240 minutes.
SLP Standard Long Playback, nearly 360 minutes.
TRICK :
STOP Stop recording.
PAUSE Suspend recording.
RECORD Start recording.
29
Page 32

Easy DVD Recorder User's Guide
TITLE: current title name.
CHAPTER: current chapter name.
TIME: current recording time position on the disc.
You can record up to 124 chapters and 99 titles on a disc.
OTR ( One Touch Recording)
1. Press RECORD: the
Easy DVD Recorder
will start recording in the set recording mode.
2. While recording, press the RECORD button on the front panel or on the remote control: it
will automatically record for 30 minutes. Each pressing on the RECORD button will add 30minutes recording.
The length of the recording time is determined by disc capacity and recording quality. If the
recording time you set exceeds the capacity of the disc, OTR will be cancelled and the unit will
automatically switch to normal recording status.
3. To stop recording, press STOP.
Before starting your recording, press CLEAR if you want to change the recording quality.
Time settings
Setting the clock
1. While playback is stopped, press SETUP to display the system menu.
2. Use the UP/DOWN arrow buttons to highlight the CLOCK icon and press OK.
3. Use the UP/DOWN arrow buttons to highlight the Date or Time and press OK.
4. Use the 0-9 keys to enter the information and press OK to confirm.
30
Page 33

Easy DVD Recorder User's Guide
System time adjustment
If your TV integrates time code, the
time. Only the time code integrated in the first TV channel can be used by the
Recorder
.
Easy DVD Recorder
can automatically adjust the system
Easy DVD
Time recording
1. Make sure the clock is set accurately to your local time.
2. Press the TIMER button to display the record scheduler.
To delete a programmed event, use the UP/DOWN arrow buttons to highlight it and press
CLEAR.
3. Use the UP/DOWN arrow buttons to highlight an event and press OK. The Item Editor
dialogue box displays.
31
Page 34

Easy DVD Recorder User's Guide
Source Select your input source
Quality Select the record quality
Mode Select the record mode (once, daily
or weekly)
Date Select the date of time recoding
event
Start Select the start time of time
recording event
End Select the end time of time
recording event
5. Move cursor to the OK button and press OK to save your settings.
6. Several minutes before the time recording event begins, a dialogue box will appear on your
TV screen prompting you to confirm or cancel the event. If you do not make any selection, the
time recording will proceed as scheduled.
If the recorder is in standby status, it will power on automatically two minutes before the start
of the time recording event.
A DVD+RW/DVD+R disc can record 360 minutes of programs. These programs can be divided
into 48 titles.
Editing DVD+R / DVD+RW discs
Editing a DVD+R disc
1. Insert a DVD+R disc into the disc tray.
2. Press DISK-OP to display the disc editing menu.
32
Page 35

Easy DVD Recorder User's Guide
Play Play recorded titles in sequence.
Rename disc Rename the disc.
Finalize disc Finalize a DVD+R disc.
Before this disc can be played in other DVD players, it must be finalized in the DVD recorder.
Once this process is completed, no further recordings can be added
New title Record new contents in a new title. This title will be the last title on the
disc.
Editing a DVD+RW title
1. Insert a DVD+RW disc with recorded contents into the disc tray. The Index Screen appears.
2. Use the UP/DOWN arrow buttons to highlight the title you want to edit. Use the arrow
keys to scroll the title list. If there are more than 3 titles, press the DOWN arrow button to
view the other titles.
3. Press EDIT to display the title edit menu. Use the UP/DOWN arrow buttons to highlight the
target item, and press OK. Then use the UP/DOWN and OK buttons to make selection.
Title: view current title number / total number of titles.
Chapter: view current chapter number / total number of chapters.
Play: current playback status.
Chapter marker: select to add or delete chapter markers.
33
Page 36

Easy DVD Recorder User's Guide
Hide chapter: select to hide or unhide the current chapter.
If a chapter is hidden, it will be skipped during playback. If you want to play this chapter, you
need to access the "EDIT MODE" menu, and select the "Unhide chapter" item. Press OK to
confirm your selection, and then press EDIT to exit.
Index picture: select to set the current image as the title's icon.
Split title: select to divide current title into 2 separate titles at current point.
4. Press EDIT to exit the menu.
Editing DVD+RW titles
1. Insert a DVD+RW disc with recorded contents into the disc tray. The Index Screen appears.
2. Use the UP/DOWN arrow buttons to highlight the title you want to edit and press RIGHT
arrow key to show the edit menu.
3. Use the UP/DOWN arrow buttons to highlight the item you want to select and press OK to
confirm your selection.
Play title Play current title.
Erase title Erase current title.
Edit title Edit current title (
Rename
title
Rename current title.
1. Press OK on this item, a keyboard displays on your TV screen.
see previous section
).
34
Page 37

Easy DVD Recorder User's Guide
2. Use the ARROW buttons to highlight the letter or character you want to
input and press OK to confirm.
3. Select OK and press PK to save the name.
The maximum length of a title name is 9 characters.
Overwrite
title
To set the newly recorded contents be recorded from the start of current title
and overwrite the title.
If the time length of newly recorded contents is shorter than the length of original title, the
remainder of the original title will be saved as a new title on the disc.
If the time length of newly recorded contents is longer than the length of the original title, the
recording process will be automatically stopped when it exceeds the end of the original title.
Append Append a new title after the last title on the disc (this item appears only if you
are editing the last title on the disc).
Overwrite
disc
The newly recorded contents will overwrite the whole disc from the start of
the disc.
When you select Overwrite title/Append/Overwrite disc, and press OK to confirm, the signal
source will be automatically changed to the previous signal source (before the disc editing). If
you press SOURCE and select Rear AV Æ Rear S-Video Æ DV Æ DVD, and then start the disc
editing, the Easy DVD Recorder will automatically switch to DV input. You can use the
SOURCE button to change it to other signal source. You can use the SOURCE button to select
the signal source, and press PLAY/PAUSE to directly go to the DVD disc title menu.
If you select Overwrite title/Append/Overwrite disc, you have to press the RECORD button
on the front panel or the remote control to start recording.
35
Page 38

Easy DVD Recorder User's Guide
Editing a DVD+RW disc
1. Insert a DVD+RW disc into the disc tray.
2. Use the UP arrow button to move the highlight to the top of the disc recording information
bar.
3. Press the RIGHT arrow button to show the disc menu. Use the UP/DOWN arrow buttons
to select an item, and press OK.
You can also press the DISK-OP button to perform steps 2 and 3.
Play Play recorded titles in sequence.
Erase disc Erase all contents on the disc.
Rename disc Rename the disc.
Make compatible If you have edited the DVD+RW disc, it must be made compatible to be
played by other DVD players.
New title Record new contents in a new title. This title will be saved as the last
title.
Overwrite disc Overwrite the whole disc from the start with new contents to be
recorded (
Lock disc Lock current disc to protect the data it contains. The locked disc cannot
be erased or recorded until it is unlocked.
see "Editing DVD+RW Titles"
).
If a DVD+RW disc displays a different menu, press DISK-OP to erase the disc first, then you
may make a new recording.
36
Page 39

Easy DVD Recorder User's Guide
VII. Troubleshooting
Problem Solution
No sound Connect the audio cables into the jacks securely.
Verify the connection from the DVD audio output to the TV or
receiver audio input. Make sure the correct audio input is
selected on your TV or amplifier.
Refer to your audio amplifier documentation.
Only sound, no
picture
No response Connect the power plug into the wall outlet securely.
Remote control does
not work
Cannot play disc The disc is blank, replace it.
The scan mode of video output is incorrectly set. Press PSCAN
on the remote control to switch to correct mode.
Time recording is proceeding. Press STOP to cancel time
recording.
The device might encounter a technical failure. Unplug the
power cord and wait for 30 seconds before connecting it to the
wall outlet again. If it still doesn't work, try to reset the
DVD Recorder
The remote control is not pointing to the
Please aim at the
Batteries are low, replace them.
The unit might encounter a technical failure. Unload batteries,
wait for 30 seconds before placing them back into the remote
control.
Incompatible disc: please check the "
guide.
to factory settings.
Easy DVD Recorder
Easy DVD Recorder.
.
Disc specifications
Easy
" in this
The disc is loaded with label side down. Load the disc with label
The region code does not match the region setting of the
Parental lock is on, unlock it. Default password is 3308.
Choose channel number on the TV set. Choose a correct
The connection between the DVD recorder and TV set is loose.
side up.
DVD Recorder.
channel number.
Check the connection.
Easy
37
Page 40

Easy DVD Recorder User's Guide
Poor playing quality
(distorted
picture/sound)
The TV set is not properly adjusted.
The disc is dirty, clean it.
Interference may also make the picture distorted.
Cannot record Wrong channel number. Please check the saved channels.
The disc is write-protected. Remove the written protection or
change a disc.
The disc is a closed DVD+R disc. Change disc.
TV system mismatch. Please make sure the disc has not been
recorded in different video format (e.g. PAL or NTSC). The
DVD Recorder
does not support recordings of different video
format on the same DVD+R/RW disc.
The disc you use may not conform to the DVD+R/RW standard.
Make sure it is a DVD+R (DVD plus R) or DVD+RW (DVD plus
'RW') disc.
The
Easy DVD Recorder
does not record on CD-R/RW, DVD-R,
DVD-RW or DVD-RAM disc.
Please make sure the disc has not been used in a computer
before.
Easy
Time recording does
not work
DVD+RW disc
cannot be edited
TV signal has picture
or sound
interference
Distorted picture or
black-and-white
picture
No digital audio
output
The date or time is not correctly set, check them.
The time schedule is not correctly set, check it.
The disc is locked, unlock it.
The disc is a closed DVD+R disc. Change disc.
The disc is locked. Press DISC OP. on the remote control and
select Unlock Disc.
Check the antenna.
Check the selected TV system in the system menu.
The disc's colour system does not match the TV's colour system.
The signal is not a colour signal.
Check whether the digital input jacks match the external
equipments' output jacks.
38
Page 41

Easy DVD Recorder User's Guide
VIII. Standards and Certifications
European notice
Products with the CE marking comply with both the Electromagnetic Compatibility Directive
(89/336/EEC) and the Low Voltage Directive (73/23/EEC) modified by the Directive
93/68/EEC issued by the Council of the European Communities.
Modifications to the Product
CE marking
NEC Computers International BV cannot be held responsible for unauthorised modifications
made by the user and the consequences thereof, which may alter the conformity of the product
with the CE Marking.
Radio frequency interference
The manufacturer is not responsible for any radio or TV interference caused by unauthorised
modifications to this equipment.
Power Supply and Cables
Power supply
The power supply socket-inlet is classified as Hazardous Voltage.
You must unplug the power supply cord to disconnect the equipment from the power supply.
In that aim, the socket-outlet should be installed near to the equipment and should be easily
accessible.
Under no circumstances should the user attempt to disassemble the power supply. The power
supply has no user-replaceable parts. Inside the power supply are hazardous voltages that can
cause serious personal injury.
A defective power supply must be returned to your dealer.
39
Page 42

Easy DVD Recorder User's Guide
Power cables
This equipment requires a 2-wire power cord. The cord length must not exceed 2.5 metres.
Replace the power cord if it gets damaged. Contact your dealer for an exact replacement. In
Europe, the plug must be rated for 250 VAC, 10 amp minimum. The plug must display an
international agency approval marking. The cord must be suitable for use in the end-user
country. Consult your dealer or the local electrical authorities if you are unsure of the type of
power cord to use in your country.
Batteries
Replacing Batteries
When replacing the batteries, use two batteries of the same type and manufacturer. Replace the
two batteries at the same time. Do not mix the use of old and new batteries.
When not using the battery for a long period (more than one month), remove the batteries to
prevent damage from battery corrosion.
In case the battery leaks, clean the liquid and install new batteries.
Battery Disposal
Ultimate disposal of the batteries should be handled according to all national laws and
regulations. Do not place used batteries in your regular waste: the incineration, landfilling or
mixing of batteries with the municipal solid waste stream is prohibited by law in most
countries. Contact your local waste management officials for other information regarding the
environmentally sound collection, recycling, and disposal of the batteries.
Chassis Cover Removal and Replacement
Before removing the chassis cover to service or modify the equipment, you must disconnect all
power cords. You then must close the chassis before you plug in and switch on the equipment.
Laser Compliance Statement
The optical devices are tested and certified to be compliant with International Electrotechnical
Commission IEC60825 and European EN60825 standards for Class 1 laser products.
Class 1 laser products are not considered hazardous. The optical devices are designed such that
there is never human access to laser radiation above a Class 1 level during normal operation or
prescribed maintenance conditions.
The optical devices installed in your product are designed for use solely as components of such
electronic product and therefore do not comply with the appropriate requirements of Code of
Federal Regulation Sec. 1040.10 and Sec. 1040.11 for COMPLETE laser products.
Because exposure to laser radiation is extremely hazardous, under no circumstances should the
user attempt to disassemble the laser device.
40
Page 43

Easy DVD Recorder User's Guide
Products with progressive scan outputs (525p/625p) notice
requirements
(From the 525p/625p Addendum to the DVD License Agreement). Licensee will incorporate
the following wording, as appropriate, together with the applicable list of Licensee’s high
definition television sets, in all product manuals or the like applicable to any DVD Player with a
YUV progressive scan output:
For DVD Players with 525p, but not 625p, progressive scan output:
Please note that not all high definition television sets are fully compatible with this product and
may cause artefacts to be displayed in the picture. In case of 525p progressive scan picture
problems, it is recommended to switch the connection to the "standard definition" output. For
any question regarding your TV set compatibility with this 525p DVD player, please contact
our customer service.
For DVD Players with 625p, but not 525p, progressive scan output:
Please note that not all high definition television sets are fully compatible with this product and
may cause artefacts to be displayed in the picture. In case of 625p progressive scan picture
problems, it is recommended to switch the connection to the "standard definition" output. For
any question regarding your TV set compatibility with this 625p DVD player, please contact
our customer service.
For DVD Players with both 525p and 625p progressive scan outputs:
Please note that not all high definition television sets are fully compatible with this product and
may cause artefacts to be displayed in the picture. In case of 525p or 625p progressive scan
picture problems, it is recommended to switch the connection to the "standard definition"
output. For any question regarding your TV set compatibility with this 525p or 625p DVD
player, please contact our customer service.
41
Page 44

Page 45

Table des Matières
I. Avis................................................................... 44
II. Précautions......................................................... 45
Consignes de sécurité et d'utilisation ....................... 45
Entretien des disques .......................................... 45
III. Spécifications...................................................... 46
Spécifications de l'Easy DVD Recorder....................... 46
Spécifications des disques..................................... 48
Fonctions spéciales ............................................. 50
IV. Découverte de votre Easy DVD Recorder.................... 51
Télécommande .................................................. 51
FRANÇAIS
Caractéristiques de votre Easy DVD Recorder.............. 53
V. Installation......................................................... 55
Branchement sur un téléviseur ............................... 55
Utiliser l'Easy DVD Recorder pour regarder la télévision. 56
Branchement sur un amplificateur........................... 57
Branchement d'une source d'entrée AV avec le Péritel... 59
Branchement d'une source d'entrée AV ou DV.............. 60
VI. Utilisation de l'Easy DVD Recorder............................ 61
Lecture de disques.............................................. 61
Contrôle de la lecture.......................................... 64
Verrouillage parental .......................................... 68
Menu du système................................................ 69
Réglage des chaînes TV......................................... 71
Enregistrement.................................................. 73
Réglage de l'heure .............................................. 76
Éditez vos disques DVD+R/RW. ............................... 78
VII. Dépannage.......................................................... 83
VIII. Normes et Certifications......................................... 86
43
Page 46

Guide de l'utilisateur Easy DVD Recorder
COPYRIGHT
I. Avis
Guide de l'utilisateur
International B.V. Tous droits réservés. Aucune partie du présent manuel ne peut être
reproduite ou transmise sous quelque forme ou par quelque moyen que ce soit, qu’il soit
électronique, chimique, manuel ou autre, y compris, sans que cette liste soit exhaustive, les
systèmes de photocopie, d’enregistrement, de stockage ou d’extraction de données, et ce quel
qu’en soit le motif, sans accord préalable écrit de NEC Computers International B.V.
Easy DVD Recorder
de Packard Bell. Copyright© 2004 NEC Computers
DÉNI DE RESPONSABILITÉ
NEC Computers International B.V. n’offre aucune garantie explicite ou implicite, notamment,
sans que cette liste soit exhaustive, des garanties implicites sur la valeur marchande ou
l’adéquation de ce produit et de sa documentation pour un usage spécifique.
Les composants logiciels et matériels sont régulièrement actualisés. Par conséquent, certaines
des instructions, des spécifications et des illustrations fournies dans cette documentation
peuvent légèrement différer de votre situation. Tous les éléments décrits dans la
documentation fournie avec le produit le sont uniquement à titre d'illustration et sont
susceptibles de ne pas s'appliquer à votre situation. Aucun droit ou titre reconnu par la loi ne
peut être obtenu à partir des descriptions faites dans la documentation. NEC Computers
International B.V. se réserve le droit de réviser, de modifier ou d’améliorer ce produit ou sa
documentation quand bon lui semble, sans en aviser quiconque.
NEC Computers International B.V. ne pourra en aucun cas être tenu responsable des
dommages indirects ou accessoires résultant de l’utilisation de ce produit, y compris, sans que
cette liste soit exhaustive, le manque à gagner ou tout autre dommage commercial.
MARQUES COMMERCIALES
Packard Bell est une marque déposée de NEC Computers International B.V. Tous les autres
noms de société ou de produit cités sont les marques commerciales, les marques déposées ou
les marques de service de leurs détenteurs respectifs.
Fabriqué sous licence des Laboratoires Dolby. “Dolby”, "Pro Logic" ainsi que le logo double-D
sont des marques déposées par “Dolby Laboratories".
Fabriqué sous licence de Digital Theater Systems, Inc.
DTS et DTS Digital Surround sont des marques déposées par Digital Theater Systems, Inc.,
protégées par des brevets américains et internationaux déposés et en instance.
44
Page 47

Guide de l'utilisateur Easy DVD Recorder
II. Précautions
Consignes de sécurité et d'utilisation
Les exigences électriques de cet appareil sont de 220-240V CA, 50/60 Hz. Assurez-vous
que le courant électrique de votre habitation est compris entre ces mesures.
La température du capot et du panneau arrière de l'appareil peut être élevée lorsque vous
l'utilisez pendant une longue période. C'est parfaitement normal.
Lorsque vous n'utilisez pas l'appareil, veuillez retirer le disque et le mettre hors tension.
Certains dysfonctionnements risquent de se produire si l'appareil est resté inutilisé
pendant une longue période. Pour de meilleurs résultats, il est conseillé de le mettre
périodiquement hors tension.
Certains types de disques peuvent provoquer des erreurs sur l'appareil, ou le bloquer. Si
cela se produit, redémarrez l'appareil. Pour prolonger la durée de vie de l'appareil,
attendez au moins 10 secondes avant de le remettre sous tension.
Cet enregistreur de DVD est un appareil de haute technologie et de haute précision. La
qualité de l'image peut être détériorée si la tête de gravure laser et les composants
internes du lecteur sont sales ou endommagés.
N'utilisez pas l'
condensation, car cela risque d'endommager le disque et les composants internes de
l'enregistreur.
Placez l'appareil dans un endroit suffisamment ventilé afin d'empêcher que la chaleur ne
s'accumule à l'intérieur de celui-ci.
Utilisez un chiffon doux et sec pour nettoyer votre appareil. Pour les taches difficiles à enlever,
appliquez un détergent neutre dilué sur un chiffon que vous essorerez ensuite. Nettoyez les
taches à l'aide de ce chiffon, puis essuyez avec un chiffon doux. N'utilisez aucun solvant de
type diluant ou benzène, car ils risquent d'endommager l'
Easy DVD Recorder
dans des endroits propices à la formation de
Easy DVD Recorder.
Entretien des disques
Nettoyez régulièrement vos disques afin d’en retirer la poussière ou les traces de doigt.
Vous pouvez utiliser pour ce faire un chiffon doux ou un nettoyant pour disques.
Pour éviter d’apposer des traces de doigt sur vos disques, tenez-les par les bords. Vous
pouvez également placer l’un de vos doigts au centre du disque et un autre, sur le bord
extérieur de ce dernier.
Remettez systématiquement vos disques dans leur boîtier ou leur pochette de protection
une fois que vous avez fini de les utiliser.
Fermez le plateau lorsque vous n'utilisez pas le lecteur.
45
Page 48

Guide de l'utilisateur Easy DVD Recorder
III. Spécifications
Spécifications de l'
Alimentation 220-240V AC 50/60 Hz
Consommation électrique 28W
Consommation électrique (mode veille) < 4W
Dimension (mm) 430 x 53 x 320 (L x H x P)
Poids environ 4 kg
Température ambiante 15~35°C
Humidité 25~75%
Cet appareil comprend une puce LSI de nouvelle génération intégrant des fonctions
d'encodage et de décodage, ce qui permet d'encoder le signal RF du téléviseur, le signal
d'entrée AV de périphériques externes, ou le signal numérique d'appareils iEEE1394 en
format MPEG-2, et de les enregistrer sur des disques DVD+RW ou DVD+R. Il intègre
également la technologie exceptionnelle de traitement des images DominoFX de LSI, qui
permet d'obtenir des images d'excellente qualité.
Easy DVD Recorder
Compatible avec toutes les fonctions des lecteurs DVD standard.
Lecture des DVD, Super VCD, VCD, CD, CD-R, CD-RW, CD d'images et formats MP3.
Les disques enregistrés avec l'
DVD.
Les programmes enregistrés sur des disques DVD+RW sont éditables (vous pouvez
modifier les titres, les images d'index, diviser un titre en plusieurs parties, ou masquer des
titres).
Mode "Enregistrement immédiat" ("OTR"), pour des enregistrements et acquisitions
rapides.
Prise en charge de 8 langues audio, 32 langues de sous-titrage, et 9 angles de prises de
vues, ainsi que de nombreuses autres fonctionnalités propres à la lecture de DVD.
Système de contrôle du niveau de verrouillage parental.
Programme d'économiseur d'écran pour la protection de l'écran.
Easy DVD Recorder
sont compatibles avec d'autres lecteurs
46
Page 49

Guide de l'utilisateur Easy DVD Recorder
Connecteur de sortie audio numérique coaxial.
Sortie vidéo standard (CVBS), sortie S-vidéo, prises péritel (SCART) d'entrée/de sortie, et
connecteurs de sortie vidéo composante (Y, Cb/Pb, Cr/Pr). Prise en charge des formats
d'écran TV 16:9 et 4:3.
Réception et enregistrement du signal TV avec contrôle du rendu.
Enregistrement programmable automatique pour les signaux AV ou TV à partir de sources
externes. Connecteur d'entrée DV iEEE1394 pour enregistrer des signaux numériques à
partir d'un caméscope.
Jusqu'à 20 enregistrements programmables, avec trois options de périodicité : "Une seule
fois", "journalier" et "hebdomadaire".
Mise à niveau "intelligente" du logiciel.
47
Page 50

Guide de l'utilisateur Easy DVD Recorder
z
z
n
Spécifications des disques
DVD+RW (disques DVD réinscriptibles)
Le DVD+RW est un format effaçable basé sur la technologie du CD-
RW. Les disques DVD+RW peuvent être enregistrés plus de 1000 fois.
DVD+R (disques DVD enregistrables)
Les disques DVD+R ne peuvent être enregistrés qu'une seule fois. Il
n'est pas nécessaire de remplir la totalité du disque en un seul
enregistrement. Vous pouvez ajouter du contenu ultérieurement.
Si vous souhaitez lire un DVD+R créé avec votre Easy DVD Recorder sur un autre
lecteur, assurez-vous qu'il est bien finalisé. De même, pour les DVD+RW utilise
l’option « Rendre compatible » pour pouvoir les lire sur d'autres lecteurs. Vous pouve
accéder à ces fonctions à partir des menus d'édition de disques DVD+R et DVD+RW e
appuyant sur le bouton disk-op de votre télécommande.
LECTURE ET ENREGISTREMENT
ATTENTION : Finaliser un disque consiste à fermer sa session et à interdire des
enregistrements ultérieurs.
DVD-R (DVD enregistrables)
Seuls les disques DVD-R enregistrés en mode vidéo et ayant été finalisés
peuvent être lus par l'
DVD-RW (DVD réinscriptibles)
Seuls les disques DVD-RW enregistrés en mode vidéo et ayant été
rendus compatibles peuvent être lus par l'
CD-R audio (CD enregistrables)/Musique compressée au format MP3
CD-RW audio (CD réinscriptibles)/Musique compressée au format
MP3
DVD Vidéo (Digital Versatile Disc –
Easy DVD Recorder.
Easy DVD Recorder.
disque numérique polyvalent
)
LECTURE SEULE
CD Audio (disque audio numérique)
Super Audio CD (lit uniquement la couche CD d'un SACD hybride)
VCD (CD Vidéo - format 1.0, 1.1 et 2.0)
Super VCD
48
Page 51

Guide de l'utilisateur Easy DVD Recorder
Composition des disques
DVD
Un disque DVD est divisé en plusieurs sections (titres, chapitres), afin d'accéder plus facilement
à son contenu.
SVCD/VCD/CD AUDIO
Les SVCD/VCD/CD AUDIO sont divisés en plusieurs pistes, qui peuvent chacune contenir des
points-index afin de diviser la piste en plusieurs parties.
MP3/JPEG/MP4 (DivX)
MP3 (".mp3", pour la musique), JPEG (".jpg", pour les images), et DivX (".avi", pour les vidéos)
sont des formats de fichiers compressés.
L'Easy DVD Recorder peut être plus long à afficher le contenu de certains disques lorsqu'ils
contiennent des fichiers volumineux ou un grand nombre de fichiers photo ou audio.
49
Page 52

Guide de l'utilisateur Easy DVD Recorder
v
Fonctions spéciales
Le connecteur d'entrée numérique, appelé "Firewire" ou "IEEE1394", s'utilise
pour transmettre des signaux numériques à haut débit. Les signaux audio et
vidéo sont transmis par le même câble.
Les fichiers MP3 sont des fichiers audio extrêmement compressés. Ils
compressent des fichiers extraits de CD audio standard à environ 1/10 de
leur taille d'origine. Cela vous permet ainsi de stocker jusqu'à 10 heures de
musique sur un seul CD.
La vidéo s'enregistre normalement à partir de l'endroit où le disque est calé.
Vous pouvez commencer votre enregistrement au milieu d'un disque,
exactement comme sur une cassette de magnétoscope. Pour les disques
DVD+R, un nouveau segment vidéo s'ajoute toujours aux segments existants.
L'
Easy DVD Recorder
DVD enregistrés avec cet appareil peuvent être lus sur la plupart des lecteurs
DVD actuels et futurs.
peut lire à la fois les CD et DVD pré-enregistrés. Les
Dolby Digital est un standard mis au point par les Laboratoires Dolby qui
permet de transmettre de 1 à 5 canaux à pleine portée ainsi qu' en basse
fréquence (.1) pour un total de 5.1 canaux discrets. Les haut-parleurs sont
disposés de la façon suivante : avant gauche, arrière gauche, central avant,
avant droit, arrière droit. Dolby Digital est actuellement le système le plus
courant, et on le retrouve souvent dans les salles de cinéma.
Ce produit intègre une technologie de protection de la copie protégée par des
brevets américains et autres droits de propriété intellectuelle. Cette
technologie de protection de la copie de Macrovision Corporation ne peut
être utilisée sans l'accord de Macrovision. Son utilisation est consentie pour le
seul usage domestique et certains autres usages limités de visionnage, comme
notamment les services de télévision à la carte, sauf autorisation écrite
spéciale de Macrovision. Toute rétrotechnique, tout démontage de ce
dispositif ou autre modification sont strictement interdits.
DivX est un codec (abréviation de compression/décompression). Il s'agit d'un
programme permettant de compresser la vidéo à partir de pratiquement tout
type de source afin de la réduire à un volume aisément transférable par
Internet, sans pour autant en détériorer la qualité visuelle d'origine. La
ersion 5.2 est actuellement la version DivX la plus élevée prise en charge par
l'
Easy DVD Recorder.
vous devez vous enregistrer.
Pour louer ou acheter des vidéos au format DivX®,
50
Page 53

Guide de l'utilisateur Easy DVD Recorder
IV. Découverte de votre
Recorder
Easy DVD
Télécommande
Retirez tout d'abord le cache du compartiment des piles de la télécommande, puis insérez deux
piles AAA (fournies).
Pour obtenir des informations concernant le remplacement et la destruction des batteries,
reportez-vous au chapitre Normes et Certifications.
51
Page 54

Guide de l'utilisateur Easy DVD Recorder
ENREGISTREMENT
Enregistrez un signal AV ou TV à partir d'une source externe. En cours
d'enregistrement, chaque pression sur ce bouton prolongera l'enregistrement de
30 minutes.
Edit Accédez au menu d'édition.
MINUTERIE
MISE SOUS/HORS
TENSION
Programmez/modifiez l'heure d'enregistrement.
Allumez et éteignez l'appareil.
0---9 Touches numériques.
title (titre) Accédez au menu des titres.
s-title (sous-titres) Modifiez la langue des sous-titres.
disk-op (opération) Gérez vos disques DVD+R/RW.
clear (effacer) Sélectionnez l'élément en cours ou effacez l'enregistrement programmé.
zoom Pour faire un zoom avant ou arrière sur l'image affichée.
OK Confirmez la sélection ou l'entrée en cours.
MENU Accédez au menu du disque.
SETUP (Réglages) Accédez au menu de configuration du système.
pscan Changez le mode de balayage de rendu vidéo (progressif/Entrelacé).
audio Changez la langue audio.
angle Changez l'angle de la caméra.
repeat (répéter) Définissez les fonctions de répétition.
goto (atteindre) Atteignez le titre/chapitre/horaire désiré et lancez la lecture.
SOURCE
Eject
Sélectionnez la source de signal externe.
Ouvrez/fermez le plateau du disque.
display (affichage) Affichez et réglez l'état de lecture.
random (aléatoire) Basculer la séquence de lecture entre le mode Normal et Aléatoire.
STOP/RETOUR
Appuyez une fois pour arrêter la lecture ou l'enregistrement. Appuyez une
deuxième fois pour retourner au menu racine (uniquement pour les disques
VCD).
MUET
Appuyez une fois pour couper le son. Appuyez à nouveau, ou utilisez les
boutons "V+/V- pour rétablir le son.
Slow (lent) Avance lente (1/2, 1/4, 1/8).
V-/V+
LECTURE/PAUSE
Réglez le volume sonore, ou déplacez le curseur vers la gauche ou vers la
droite.
Lancez la lecture, ou arrêtez provisoirement la lecture/l'enregistrement.
P+/P-
Sélectionnez la chaîne TV, ou déplacez le curseur vers le haut ou vers le bas.
Titre ou chapitre précédant/suivant.
Retour/Avance rapide (2X, 4X, 16X, 32X).
52
Page 55

Guide de l'utilisateur Easy DVD Recorder
Caractéristiques de votre
Panneau avant
ALIMENTATION
ÉJECTION
ENR.
LECTURE/PAUSE
STOP
SOURCE
Connecteurs du panneau avant
Mise sous/hors tension.
Ouverture/fermeture du plateau.
Enregistrement du programme TV en cours ou des signaux
AV ou DV émanant de sources externes.
Bouton permettant de lancer ou de suspendre la lecture.
Arrêt de la lecture/de l'enregistrement.
Sélection de la source d'entrée.
Easy DVD Recorder
Pour accéder aux connecteurs du panneau avant, ouvrez le volet rabattant situé sur le côté
droit de l'Easy DVD Recorder.
S-VIDÉO Connecteur d'entrée S-Vidéo utilisé pour brancher une caméra vidéo
SVHS/Hi8 ou un magnétoscope SVHS/Hi8.
VIDÉO Connecteur d'entrée vidéo utilisé pour brancher une caméra vidéo
SVHS/Hi8 ou un magnétoscope SVHS/Hi8.
Le signal émanant du connecteur d'entrée S-VIDÉO présente un niveau de priorité plus élevé
que le signal issu du connecteur d'entrée VIDEO.
L-AUDIO-R Connecteurs d'entrée audio utilisés pour brancher une caméra vidéo ou
un magnétoscope.
DV Connecteur d'entrée i-LINK/DV (IEEE1394) utilisé pour brancher une
caméra vidéo numérique ou d'autres équipements numériques.
53
Page 56

Guide de l'utilisateur Easy DVD Recorder
Panneau arrière
AC IN ~ (Entrée CA ~) Connecteur pour cordon d'alimentation CA qui doit être branché sur
une alimentation secteur de 220-240 V, 50/60 Hz.
ANTENNA in (Entrée
d'antenne)
ANTENNA out (Sortie
d'antenne)
Audio output L/R
(Sorties audio G/D)
Coaxial output (Sortie
coaxiale)
CVBS Connecteur pour téléviseur équipé d'un connecteur d'entrée vidéo
Optical output (Sortie
optique)
Connecteur pour antenne/télévision par câble.
Connecteur utilisé pour acheminer le signal TV jusqu'au téléviseur.
Sorties audio analogiques (gauche et droite).
Connecteur utilisé pour diffuser les pistes audio numériques
enregistrées sur des disques en branchant l'entrée audio numérique
coaxiale sur un amplificateur ou un récepteur AV avec entrée audio
numérique.
(CVBS).
Connecteur utilisé pour diffuser les pistes audio numériques
enregistrées sur des disques en branchant le connecteur d'entrée
audio numérique optique sur un amplificateur ou un récepteur AV
avec entrée audio numérique.
SCART IN (Entrée
péritel)
SCART OUT (Sortie
péritel)
S-Vidéo Connecteur pour téléviseur équipé d'un connecteur d'entrée S-
Y Cb/Pb Cr/Pr Connecteur pour téléviseur équipé de connecteurs d'entrée Y Cb/Pb
Connecteur utilisé pour brancher des équipements AV numériques
avec sortie PÉRITEL) (un lecteur de DVD équipé d'un connecteur de
sortie PÉRITEL, par exemple).
Connecteur utilisé pour brancher un téléviseur ou d'autres
équipements pourvus d'un connecteur d'entrée PÉRITEL.
VIDÉO.
Cr/Pr. Le mode de sortie peut être progressif ou entrelacé.
54
Page 57

Guide de l'utilisateur Easy DVD Recorder
V. Installation
Branchement sur un téléviseur
Votre
Easy DVD Recorder
composante et Péritel dédiés aux connexions vidéo. Branchez les câbles audio/vidéo en
fonction des spécifications de votre téléviseur.
intègre des connecteurs vidéo composite, S-Vidéo, vidéo en
Si le téléviseur est équipé de connecteurs d'ENTRÉE VIDÉO EN COMPOSANTE (Y,
Cb/Pb, Cr/Pr), raccordez-les aux connecteurs correspondants de l'
(recommandé).
Si le téléviseur est pourvu d'un connecteur d'ENTRÉE S-VIDÉO, raccordez-le au
connecteur S-VIDÉO de l'
Si le téléviseur est équipé d'un connecteur d'ENTRÉE PÉRITEL, raccordez-le au
connecteur de SCART OUT (SORTIE PÉRITEL) de l
Raccordez les connecteurs de sortie audio GAUCHE et DROITE de l'
a
ux connecteurs d'entrée audio appartenant au même groupe de connecteurs que le
connecteur d'entrée vidéo du téléviseur (le cas échéant).
Easy DVD Recorder.
'Easy DVD Recorder.
Easy DVD Recorder
Easy DVD Recorder
55
Page 58

Guide de l'utilisateur Easy DVD Recorder
Utiliser l'
Easy DVD Recorder
pour regarder la
télévision
Appuyez sur le bouton SOURCE de la télécommande pour passer en mode TV et initialiser la
recherche automatique des chaînes. Le connecteur de sortie du signal TV n'est qu'une boucle
du signal entré.
1.
2.
3.
4.
5.
6.
Easy DVD Recorder
Audio
Vidéo
Entrée du signal
Antenne (ou télévision par câble)
Sortie du signal (peut être utilisée pour acheminer le signal TV vers le connecteur
d'entrée RF d'un autre téléviseur).
56
Page 59

Guide de l'utilisateur Easy DVD Recorder
Branchement sur un amplificateur
Décodeur Dolby Pro Logic
Vous pouvez bénéficier des effets audio Dolby Surround en branchant le graveur sur un
système amplificateur et haut-parleurs avec décodeur Dolby Pro Logic.
1.
2.
3.
4.
5.
6.
7.
Vers les connecteurs de SORTIE AUDIO (GAUCHE/DROITE))
Vers les connecteurs d'ENTRÉE AUDIO
Haut-parleur AVANT GAUCHE
Haut-parleur CENTRAL
Haut-parleur AVANT DROIT
Haut-parleur d'AMBIANCE DROIT
Haut-parleur d'AMBIANCE GAUCHE
57
Page 60

Guide de l'utilisateur Easy DVD Recorder
Décodeur Dolby Digital ou DTS
Vous pouvez bénéficier des effets audio Dolby Digital 5.1 ou Digital Theatre Systems en
branchant
Dolby Digital ou DTS au moyen d'un câble coaxial.
l'Easy DVD Recorder
sur un système amplificateur et haut-parleurs avec décodeur
1.
2.
3.
4.
5.
6.
7.
AMPLIFICATEUR avec décodeur DOLBY DIGITAL ou DTS
Haut-parleur AVANT GAUCHE
Haut-parleur CENTRAL
SUBWOOFER
Haut-parleur AVANT DROIT
Haut-parleur d'AMBIANCE DROIT
Haut-parleur d'AMBIANCE GAUCHE
58
Page 61

Guide de l'utilisateur Easy DVD Recorder
Branchement d'une source d'entrée AV avec
le connecteur Péritel
Votre
Easy DVD Recorder
brancher un appareil tel qu'un lecteur de DVD ou un magnétoscope. Toutefois, si ce dernier est
en cours de lecture ou tout simplement sous tension, vous devez impérativement l'éteindre si
vous souhaitez regarder les chaînes de télévision (à partir du tuner de l'
Pour afficher ou enregistrer le signal vidéo d’entrée via le connecteur Péritel (émanant d’un
lecteur DVD ou d’un magnétoscope équipés de sortie Péritel, par exemple), appuyez sur le
bouton SOURCE de votre télécommande et sélectionnez le mode PÉRITEL.
Si l’appareil que vous souhaitez brancher sur l’entrée Péritel est un décodeur CANAL+
analogique, vous devez configurer votre
bouton SETUP de la télécommande pour accéder à l’écran de Configuration Générale, puis
sélectionnez ACTIVÉ pour l’option « Décodeur CANAL+ analogique ». Ainsi, lorsque vous
sélectionnez un signal crypté CANAL+, le décodeur CANAL+ s’allumera automatiquement et
l’
Easy DVD Recorder
changez de chaîne, le décodeur CANAL+ s’éteindra automatiquement.
est équipé d'un connecteur d'entrée Péritel vous permettant de
Easy DVD Recorder
Easy DVD Recorder
transmettra automatiquement le signal décrypté au téléviseur. Si vous
en conséquence. Appuyez sur le
).
Même lorsque l'enregistreur de DVD est en mode VEILLE, le signal AV émanant de la source
AV externe peut être lu sur le téléviseur via les connecteurs d'entrée et de sortie PÉRITEL du
graveur de DVD.
1.
2.
Source AV externe (lecteur DVD, magnétoscope, décodeur CANAL+, etc.)
Easy DVD Recorder
59
Page 62

Guide de l'utilisateur Easy DVD Recorder
Branchement d'une source d'entrée AV ou DV
Via le panneau avant
Abaissez le volet tel qu'indiqué par la
languette OPEN .
Sélectionnez l'entrée AV appropriée en appuyant sur le bouton SOURCE de la télécommande.
Si la source du signal est branchée via le connecteur S-VIDÉO, appuyez sur le bouton SOURCE
pour sélectionner l'ENTRÉE S-VIDÉO AVANT. Si la source du signal est branchée via le
connecteur DV, appuyez sur le bouton SOURCE pour sélectionner l'ENTRÉE DV.
1.
2.
3.
4.
Connecteur S-Vidéo ou connecteur vidéo composite utilisé
Connecteur d'entrée audio
Connecteur IEEE 1394
Signal AV externe
60
Page 63

Guide de l'utilisateur Easy DVD Recorder
Via le panneau arrière
1.
2.
3.
Sortie du signal
Câble audio
Câble vidéo
VI. Utilisation de l'Easy DVD Recorder
Lecture de disques
DVD
1. Assurez-vous que tous les branchements sont corrects et branchez le cordon d'alimentation
dans une prise murale.
2. Appuyez sur le bouton d'alimentation situé sur le panneau avant ou la télécommande pour
allumer l'
3. Insérez un DVD lorsque le message LOAD (Chargement) s'affiche.
Easy DVD Recorder.
61
Page 64

Guide de l'utilisateur Easy DVD Recorder
4. Utilisez les touches fléchées pour sélectionner le titre de votre choix.
5. Appuyez sur OK ou sur LECTURE/PAUSE. La lecture du titre sélectionné s'initialise.
6. Appuyez sur DISPLAY au cours de la lecture pour afficher les informations correspondantes.
T01/05 C01/24 AU01/02 00 02 35
Titre lu/
Chapitre lu/
Langue audio
Temps écoulé
appliquée /
Nombre total de
titres
Nombre total de
chapitres
Nombre total de
langues audio
7. Appuyez de nouveau sur DISPLAY : le menu de contrôle de la lecture s'affiche tel que
représenté ci-dessous. Appuyez sur DISPLAY pour fermer le menu.
8. Pour retirer le disque, appuyez sur le bouton d'éjection situé sur le panneau avant.
Si vous utilisez un DVD+RW ou un DVD+R, parcourez l'écran
d'index du DVD et utilisez les touches FLÉCHÉES pour
sélectionner le titre de votre choix.
1. TITRE Nom de l'enregistrement (le nom par
défaut est 'TITLE').
01/01/2000 Date de l'enregistrement.
12:00:44 Heure de l'enregistrement.
HQ 00:00:31 Qualité et durée du l'enregistrement.
62
Page 65

Guide de l'utilisateur Easy DVD Recorder
Fichiers JPG/MP3
Si un disque contient des fichiers JPEG et MP3, vous pouvez visionner les images et lire la
musique simultanément.
1. Utilisez les touches fléchées et le bouton OK pour sélectionner les dossiers et les fichiers
MP3 et JPEG que vous souhaitez lire.
2. Appuyez sur DISPLAY pour arrêter la lecture du fichier JPEG ou MP3.
Fichiers DivX
Si un disque héberge des fichiers DivX, une fenêtre contenant une liste d'écoute s'affiche
automatiquement au chargement du disque.
1. Utilidez les touches fléchées pour sélectionner le fichier de votre choix et appuyez sur OK
pour le lire.
2. Utilisez les boutons CLEAR et HAUT/BAS pour créer une liste d'écoute dans le volet de
droite et lire les fichiers dans l'ordre de votre choix.
3. Appuyez sur DISPLAY pour afficher/masquer la fenêtre de la liste d'écoute lors de la lecture.
Enregistrement DivX
Pour louer ou acheter des vidéos au moyen de la technologie Divx®, vous devez enregistrer
l'
Easy DVD Recorder.
1. Appuyez sur SETUP et recherchez le code d'enregistrement 16 bits dans le dossier DivX du
menu de configuration.
2. Utilisez ce code pour créer un nouveau compte Vidéo à la demande DivX sur sa page Web
officielle. Pour plus de détails, veuillez visiter le site www.divx.com/vod
.
3. Pour créer un nouveau compte Vidéo à la demande DivX, générez un nouveau code
d'enregistrement en appuyant sur OK et répétez les étapes susmentionnées.
63
Page 66

Guide de l'utilisateur Easy DVD Recorder
Contrôle de la lecture
Au moyen des menus
Appuyez sur DISPLAY pour afficher le menu de contrôle en cours de lecture et appuyez à
nouveau sur DISPLAY pour le quitter.
MODE Vous permet de configurer le mode de lecture (répétition, programme, lecture
aléatoire, etc.).
MODE Vous permet de définir l'état de la lecture (arrêt, avance rapide, retour rapide,
avance lente, etc.).
TITRE Appuyez sur OK pour accéder au titre de votre choix et le lire.
CHAPITRE Entrez le numéro du chapitre de votre choix et lisez-le.
AUDIO Vous permet de sélectionner la langue audio que vous souhaitez utiliser (CHI
(Chinois), ENG (Anglais), etc.).
S-TITRE Vous permet de sélectionner la langue des sous-titres.
ANGLE Vous permet de sélectionner l'angle de la caméra (cette fonction doit être prise
en charge par le disque).
T-TOTAL Vous permet d'afficher le temps écoulé et le temps restant.
64
Page 67

Guide de l'utilisateur Easy DVD Recorder
Utilisation de la télécommande
Retour/Avance
rapide
Appuyez plusieurs fois sur
ou pour effectuer un retour ou une
avance rapide selon 4 vitesses différentes.
Appuyez sur LECTURE/PAUSE pour reprendre la lecture normale.
Lecture/pause
Appuyez sur le bouton
sur la télécommande ou sur le panneau
avant pour démarrer la lecture ou mettre sur pause.
Avance lente Appuyez sur SLOW au cours de la lecture pour effectuer une avance
lente à l'une des trois vitesses suivantes : SF1/2, SF1/4, SF1/8 et
SF1/16.
Appuyez sur LECTURE/PAUSE pour reprendre la lecture normale. La lecture peut varier en
fonction du type de disque utilisé.
Recherche Appuyez sur le bouton GOTO pour accéder au menu de recherche
(appuyez plusieurs fois sur GOTO pour accéder aux trois modes : titre,
chapitre ou heure).
Utilisez les touches numériques (0 à 9) pour sélectionner un titre, puis
appuyez sur OK pour démarrer la lecture.
Il est possible que certains disques DVD ne prennent pas en charge la fonction de recherche par
délimiteur de temps.
Saut
Appuyez sur
ou pour passer au titre ou au chapitre
précédant/suivant.
Répétition
Répéter A-B
1. Appuyez deux fois sur DISPLAY pour accéder au menu de
configuration en cours de lecture.
2. Utilisez les boutons fléchés HAUT/BAS pour sélectionner MODE, puis
appuyez sur OK.
3. Utilisez les boutons fléchés HAUT/BAS pour sélectionner RÉPÉTER A-
65
Page 68

Guide de l'utilisateur Easy DVD Recorder
B, puis appuyez sur OK pour définir le point de départ (A). Appuyez à
nouveau sur OK pour afficher le menu RÉPÉTER A-B, et appuyez une
troisième fois sur OK pour définir la limite (B). La séquence ainsi
délimitée sera lue en continue.
4. Appuyez sur DISPLAY pour quitter le menu.
Titre/chapitre/répéter disque
Appuyez plusieurs fois sur le bouton REPEAT au cours de la lecture pour
répéter un titre, un chapitre, un disque, et pour reprendre la lecture
normale.
Menu du disque 1. Appuyez sur MENU pour afficher le menu du disque.
2. Utilisez les boutons fléchés pour sélectionner un titre, puis appuyez
sur OK pour démarrer la lecture. Vous pouvez également utiliser les
touches numériques pour sélectionner un titre et lancer directement la
lecture.
Pour les disques VCD, appuyez sur STOP pour ouvrir le menu supérieur (PBC activé). Pour les
disques VCD version 2.0 et supérieures, cette touche n'aura aucun effet.
Lecture en
séquence
Appuyez sur MENU pour choisir entre les différents modes de lecture
(PBC activé) et la lecture en séquence (PBC désactivé).
Pour les disques SVCD et VCD 1.0 et 1.1, le lecteur déclenchera le mode LECTURE EN
SÉQUENCE une fois que le disque est chargé. Lorsque ce mode est activé, vous pouvez
sélectionner un titre à l'aide des touches numériques, y compris au cours de la lecture. La
lecture de certains disques commencera automatiquement.
Angle de la
caméra
Lors de la lecture d'un DVD, appuyez plusieurs fois sur ANGLE pour
choisir un angle de prise de vue différent, parmi un maximum de neuf.
Langue audio Pour les disques SVCD et les DVD, appuyez plusieurs fois sur AUDIO
pour choisir parmi un maximum de 8 bandes sons ou langues audio
lorsque le disque est enregistré en multilingue.
Exemple : 1/4 ENG DOLBY
1: première langue audio
4: 4 langues sont disponibles
ENG: la première langue audio est l'anglais
66
Page 69

Guide de l'utilisateur Easy DVD Recorder
Pour les disques karaoké, appuyez sur AUDIO pour basculer entre la musique
d'accompagnement et le chant.
Langue des soustitres.
03: troisième sous-titre
08: 8 sous-titres sont disponibles
CHI: le troisième sous-titre est en chinois
Affichage à l'écran
Exemple : NORMAL LECTURE T01/01 C01/10 AU01/02 00:01:41
NORMAL: Disque DVD
LECTURE: Lecture en cours
T01/01: Titre
C01/10: Chapitre
Pour les disques SVCD et les DVD, appuyez plusieurs fois sur S-TITLE
pour choisir parmi un maximum de 32 langues de sous-titres lorsque le
disque est enregistré avec plusieurs sous-titres.
Exemple : SOUS-TITRE : 03/08 CHI
Lorsque vous appuyez sur DISPLAY au cours de la lecture, les
informations suivantes s'affichent :
AU01/02: Langue audio
00:01:41: Temps écoulé
Appuyez à nouveau sur DISPLAY au cours de la lecture, le menu de
contrôle de la lecture s'affiche. Appuyez sur DISPLAY pour quitter le
menu.
L'information affichée correspond au contenu du disque et aux options de configuration
choisies.
Lecture des
programmes
1. Appuyez deux fois sur DISPLAY pour accéder au menu de contrôle de
la lecture.
2. Sélectionnez "Programme" dans le sous-menu "Mode", la fenêtre
suivante s'affiche :
67
Page 70

Guide de l'utilisateur Easy DVD Recorder
3. Utilisez les boutons fléchés pour sélectionner le titre ou le chapitre que
vous souhaitez visionner.
4. Appuyez sur CLEAR pour ajouter le titre ou le chapitre choisi dans le
panneau de droite. Procédez de cette façon pour ajouter tous vos titres
ou chapitres préférés.
5. Appuyez sur le bouton fléché DROIT pour déplacer le curseur vers le
panneau droit, et appuyez sur CLEAR pour supprimer un titre ou un
chapitre de la liste.
6. Appuyez sur OK pour démarrer la lecture du programme.
Pour quitter, appuyez sur STOP, ou appuyez sur OK pour accéder au
menu de contrôle et sélectionner le mode NORMAL.
Verrouillage parental
Le verrouillage parental est un système de protection avec mot de passe. Grâce à ce système,
vous pouvez empêcher la lecture de certains disques sur cet appareil en fonction de leur
classification.
1. Appuyez deux fois sur STOP pendant la lecture.
2. Appuyez sur SETUP pour accéder au menu de configuration.
3. Utilisez les boutons fléchés HAUT/BAS pour sélectionner un élément, puis appuyez sur OK
pour confirmer. Procédez de la même manière pour sélectionner le contrôle parental.
5. Utilisez les touches numériques pour saisir votre mot de passe (celui par défaut est 3308) et
appuyez sur OK pour confirmer.
6. Appuyez à nouveau sur OK pour afficher la liste des différentes classifications, et utilisez les
boutons fléchés HAUT/BAS pour sélectionner le niveau que vous souhaitez définir. Appuyez
sur OK pour confirmer.
7. Appuyez sur SETUP pour quitter.
68
Page 71

Guide de l'utilisateur Easy DVD Recorder
Changer le mot de passe
1. Répétez les étapes 1 à 5 tel que décrit précédemment.
2. Utilisez les boutons HAUT/BAS pour sélectionner NOUVEAU, puis appuyez sur OK.
3. Saisissez votre nouveau mot de passe dans la première case, puis saisissez-le à nouveau dans
la case de confirmation.
4. Appuyez sur OK pour enregistrer votre nouveau mot de passe, puis appuyez sur SETUP pour
quitter le menu.
Menu du système
1. Appuyez sur SETUP quand vous n'êtes pas en mode lecture afin d'afficher le menu du
système.
2. Utilisez les boutons fléchés pour sélectionner un élément, puis appuyez sur OK pour
confirmer.
3. Appuyez de nouveau sur SETUP pour quitter le menu.
69
Page 72

Guide de l'utilisateur Easy DVD Recorder
ÉCRAN PRINCIPAL
GÉNÉRAL
LECTURE
ENREGISTRE
MENT
RECHERCHE
DES
CANAUX
HORLOGE
Æ
Æ
Æ
Æ
Æ
GÉNÉRAL
Langue de l'affichage à
l'écran (OSD)
Décodeur CANAL+
Analogique
Sortie péritel
Format de sortie vidéo
Progressif/Entrelacé
Restaurer les paramètres
usine
LECTURE
Langue des menus
Langue des sous-titres
Langue audio
Format d'écran TV
Contrôle parental
Sortie audio numérique
ENREGISTREMENT
Signet de chapitre
automatique
Source par défaut
Qualité par défaut
RECHERCHE DES
CANAUX
Pays
Rechercher canaux
Modifier les informations
sur le canal
Trier ordre des canaux
HORLOGE
Date (mm/jj/aa)
Heure (hh:mm:ss)
Æ
Anglais/Français/Espagnol/Allemand/Néer
landais …
Æ
Æ
Æ
Æ
Æ
Æ
Æ
Æ
Æ
Æ
Æ
Æ
Æ
Activé/Désactivé
YUV/RGB
NTSC/PAL
Progressif/Entrelacé
OK
Français/Hindi/Hongrois …
Français/Hindi/Hongrois …
Français/Hindi/Hongrois …
16:9/Pan Scan/4:3
DÉSACTIVÉ / 1: Enfants…
BRUT/LPCM
Activé/Désactivé
Tuner/CVBS avant/ S-VIDÉO
avant/DV/Péritel
Æ
HQ/SP/EP/SLP
Æ
Æ
Æ
Voir page suivante
Æ
Æ
Æ
01/01/04
01:15:01
70
Page 73

Guide de l'utilisateur Easy DVD Recorder
Réglage des chaînes TV
Pour enregistrer des programmes TV, vous devez au préalable avoir recherché les canaux TV :
1. Appuyez sur SETUP quand vous n'êtes pas en mode lecture afin d'afficher le menu du
système.
2. Utilisez les boutons fléchés HAUT/BAS pour sélectionner
3. Utilisez les boutons fléchés HAUT/BAS pour sélectionner "Rechercher canaux", puis
appuyez sur OK. Procédez de la même manière pour sélectionner "Modifier informations sur le
canal".
puis appuyez sur OK.
Nom
Recherche Utilisez les boutons fléchés HAUT/BAS pour sélectionner un mode de
Utilisez les boutons fléchés pour sélectionner et éditer un canal.
Recherche (Fréquence, Canal, S-Canal).
71
Page 74

Guide de l'utilisateur Easy DVD Recorder
Fréquence Fréquence du canal sélectionné. Ce dernier peut s'afficher comme Canal ou S-
Canal, selon la configuration du deuxième élément. Utilisez les boutons fléchés
DROIT/GAUCHE pour trouver le canal suivant /précédant dans la séquence
de Fréquence (Canal/S-Canal).
Mode audio Sélectionnez le système TV du canal en cours.
NICAM Activez/désactivez l'option NICAM.
Audio Modifiez l'option audio. Vous avez le choix entre DUAL A et DUAL B.
Ignorer Décidez si vous voulez passer ce canal au moyen des boutons CH +/- lorsque
vous parcourez les chaînes.
Réglage
Effectuez un réglage précis sur le canal sélectionné.
précis
OK Confirmez le réglage du canal sélectionné et sauvegardez-le.
Annuler Annulez les réglages actuels et quittez le menu.
1. Utilisez les boutons fléchés HAUT/BAS pour sélectionner "Trier ordre des canaux", puis
appuyez sur OK.
2. Utilisez les boutons fléchés HAUT/BAS pour sélectionner le canal que vous souhaitez
déplacer, puis appuyez sur OK ou sur le bouton DROIT pour confirmer.
3. Le canal sélectionné sera provisoirement déplacé vers le panneau de droite.
4. Appuyez sur les boutons fléchés HAUT/BAS pour déplacer les canaux sélectionnés avec le
curseur. Déplacez le curseur à l'endroit désiré, et appuyez sur le bouton GAUCHE pour insérer
le canal dans la liste de gauche.
72
Page 75

Guide de l'utilisateur Easy DVD Recorder
Enregistrement
Si vous souhaitez lire un DVD+R créé avec votre Easy DVD Recorder sur un autre lecteur,
assurez-vous qu'il est bien finalisé. De même, pour les DVD+RW utilisez l’option « Rendre
compatible » pour pouvoir les lire sur d'autres lecteurs. Vous pouvez accéder à ces fonctions à
partir des menus d'édition de disques DVD+R et DVD+RW en appuyant sur le bouton disk-op
de votre télécommande.
ATTENTION : Finaliser un disque consiste à fermer sa session et à interdire tout
enregistrement ultérieur.
Lorsque l'enregistrement est arrêté, appuyez sur SOURCE pour reprendre la lecture.
Enregistrement simple
1. Insérez un disque enregistrable DVD+RW ou DVD+R.
2. Appuyez sur SOURCE pour sélectionner la source du signal utilisée pour l'enregistrement.
3. Appuyez sur DISPLAY pour afficher l'état en cours. Appuyez de nouveau sur DISPLAY pour
accéder au menu de contrôle de l'enregistrement.
Nouveau
Votre nouvel enregistrement sera sauvegardé sous la forme d'un nouveau titre.
titre
Ajouter titre Votre nouvel enregistrement sera ajouté au dernier titre présent sur le disque.
Écraser titre le titre en cours sera supprimé et remplacé par le nouvel enregistrement.
Écraser
disque
La totalité du contenu du disque sera supprimée et remplacée par le nouvel
enregistrement.
73
Page 76

Guide de l'utilisateur Easy DVD Recorder
SOURCE DU SIGNAL : Utilisez les boutons fléchés HAUT/BAS pour sélectionner la SOURCE,
puis appuyez sur OK pour choisir la source du signal.
Vidéo avant Entrée Audio/vidéo sur le panneau avant
S-VIDÉO avant Entrée S-vidéo sur le panneau avant
DV Entrée DV sur le panneau avant
SCART Entrée Péritel (SCART) sur le panneau arrière
Tuner Programme TV
QUALITÉ : définit le temps d'enregistrement sur un disque vierge.
HQ Haute qualité, environ 60 minutes.
SP Qualité de lecture standard, environ 120 minutes.
EP Lecture étendue, environ 240 minutes.
SLP Lecture longue standard, environ 360 minutes.
74
Page 77

Guide de l'utilisateur Easy DVD Recorder
TRICK :
STOP Arrêter l'enregistrement.
PAUSE Suspendre l'enregistrement.
ENREGISTREMENT Démarrer l'enregistrement.
TITRE : Nom du titre en cours.
CHAPITRE : Nom du chapitre en cours.
TEMPS : Position du temps d'enregistrement en cours sur le disque.
Vous pouvez enregistrer jusqu'à 124 chapitres et 99 titres sur un disque.
Enregistrement immédiat (OTR)
1. Appuyez sur ENREGISTREMENT : l'
Easy DVD Recorder
démarre l'enregistrement dans le
mode prédéfini.
2. Au cours de l'enregistrement, appuyez sur le bouton ENREGISTREMENT situé sur la
télécommande ou le panneau avant : cela déclenchera automatiquement l'enregistrement
pendant 30 minutes. Chaque pression sur le bouton ENREGISTREMENT permet d'ajouter 30
minutes au temps d'enregistrement.
La durée d'enregistrement possible est déterminée par la capacité du disque et par la qualité de
l'enregistrement. Si la durée d'enregistrement que vous déterminez dépasse la capacité du
disque, l'enregistrement immédiat sera annulé et l'appareil basculera automatiquement en
mode d'enregistrement classique.
3. Pour arrêter l'enregistrement, appuyez sur STOP.
Avant de commencer votre enregistrement, appuyez sur CLEAR si vous souhaitez changer la
qualité d’enregistrement.
75
Page 78

Guide de l'utilisateur Easy DVD Recorder
Réglage de l'heure
Réglage de l'horloge
1. Appuyez sur SETUP quand vous n'êtes pas en mode lecture afin d'afficher le menu du
système.
2. Utilisez les boutons fléchés HAUT/BAS pour sélectionner l'icône de l'HORLOGE, puis
appuyez sur OK.
3. Utilisez les boutons fléchés HAUT/BAS pour sélectionner la date ou l'heure, puis appuyez
sur OK.
4. Utilisez les touches numériques de 0 à 9 pour saisir l'information et appuyez sur OK pour
confirmer.
Réglage de l'heure du système
Si votre téléviseur intègre un code temporel, l'
automatiquement. Seul le code temporel intégré dans le premier canal TV peut être utilisé par
l'
Easy DVD Recorder.
Easy DVD Recorder
peut régler l'heure
Programmation des enregistrements
1. Assurez-vous que l'horloge est réglée précisément sur votre heure locale.
2. Appuyez sur le bouton de la MINUTERIE pour afficher le planificateur d'enregistrement.
Pour supprimer un enregistrement, utilisez les boutons fléchés HAUT/BAS pour le
sélectionner, puis appuyez sur CLEAR.
3. Utilisez les boutons fléchés HAUT/BAS pour sélectionner un élément, puis appuyez sur OK.
La fenêtre de l'Éditeur d'éléments s'affiche.
76
Page 79

Guide de l'utilisateur Easy DVD Recorder
Source Choisissez votre source d'entrée.
Qualité Sélectionnez la qualité
d'enregistrement.
Mode Sélectionnez la fréquence
d'enregistrement (une fois, tous les
jours, hebdomadaire).
Date Sélectionnez la date et l'heure de
l'enregistrement.
Début Sélectionnez l'heure à laquelle
l'enregistrement programmé démarre.
Fin Sélectionnez l'heure à laquelle
l'enregistrement programmé se
termine.
5. Déplacez le curseur sur le bouton OK, et appuyez sur OK pour sauvegarder vos réglages.
6. Quelques minutes avant le début de l'enregistrement programmé, une boite de dialogue
s'affichera sur l'écran de votre téléviseur et vous demandera de le confirmer ou de l'annuler. SI
vous ne faites rien, l'enregistrement programmé démarrera à l'heure convenue.
Si l'Easy DVD Recorder est en mode veille, il se mettra automatiquement sous tension deux
minutes avant le début de l'enregistrement programmé.
Vous pouvez enregistrer 360 minutes de programmes sur une disque DVD+RW/DVD+R. Ces
programmes peuvent être divisés en 48 titres.
77
Page 80

Guide de l'utilisateur Easy DVD Recorder
Éditez vos disques DVD+R/RW.
Édition d'un disque DVD+R
1. Insérez un disque DVD+R dans le lecteur.
2. Appuyez sur la touche disk-op pour afficher le menu d'édition du disque.
Lire Lecture en séquence des titres enregistrés.
Renommer disque Renommez le disque.
Finaliser disque Finalisez un disque DVD+R.
Pour pouvoir lire ce disque avec d'autres lecteurs de DVD, il doit impérativement être finalisé
avec l'Easy DVD Recorder. Une fois que ce processus est terminé, vous ne pourrez plus ajouter
d'autres enregistrements.
Nouveau titre Effectuez un nouvel enregistrement et attribuez lui un nouveau titre. Ce
titre sera le dernier présent sur le disque.
Édition d'un titre sur DVD+RW
1. Insérez un disque DVD+RW déjà enregistré dans le lecteur. L'écran d'indexage s'affiche.
2. Utilisez les boutons fléchés HAUT/BAS pour sélectionner le titre que vous souhaitez éditer.
Faites défiler la liste des titres à l'aide des boutons fléchés. Si le disque contient plus de 3 titres,
appuyez sur le bouton BAS pour visualiser les autres titres.
3. Appuyez sur EDIT pour afficher le menu d'édition du titre. Utilisez les boutons fléchés
HAUT/BAS pour sélectionner l'élément que vous souhaitez atteindre, puis appuyez sur OK.
Utilisez ensuite les boutons fléchés HAUT/BAS et OK pour faire votre sélection.
78
Page 81

Guide de l'utilisateur Easy DVD Recorder
Titre : affichez le numéro du titre en cours/le nombre total de titres.
Chapitre : affichez le numéro du chapitre en cours/le nombre total de
chapitres.
Lire : affichez l'état de lecture en cours.
Chapitre : sélectionnez cet élément pour ajouter ou supprimer des signets de
chapitres.
Masquer chapitre : sélectionnez cet élément pour masquer ou afficher le
chapitre en cours.
Si un chapitre est masqué, le lecteur ne le lira pas et passera au chapitre suivant. Si vous voulez
lire ce chapitre, vous devez accéder au menu "MODE ÉDITION" et sélectionner "Ne plus
masquer chapitre". Appuyez sur OK pour confirmer votre sélection, puis sur EDIT pour quitter.
Image d'index : sélectionnez cet élément pour définir l'image affichée comme
icône du titre.
Scinder titre : sélectionnez cet élément pour scinder le titre en deux au point
indiqué.
4. Appuyez sur EDIT pour quitter le menu.
Édition de titres sur DVD+RW
1. Insérez un disque DVD+RW déjà enregistré dans le lecteur. L'écran d'indexage s'affiche.
2. Utilisez les boutons fléchés HAUT/BAS pour sélectionner le titre que vous souhaitez éditer,
puis appuyez sur le bouton fléché DROIT pour afficher le menu d'édition.
79
Page 82

Guide de l'utilisateur Easy DVD Recorder
3. Utilisez les boutons fléchés HAUT/BAS pour sélectionner un élément, puis appuyez sur OK
pour confirmer.
Lire titre Lancez la lecture du titre sélectionné.
Effacer titre Effacez le titre sélectionné.
Éditer titre Éditez le titre sélectionné
Renommer
titre
Renommez le titre sélectionné.
1. Appuyez sur OK lorsque le titre est en surbrillance : un clavier s'affiche sur
l'écran du téléviseur.
2. Utilisez les boutons fléchés pour sélectionner la lettre ou le caractère que
vous souhaitez entrer, puis appuyez sur OK pour confirmer.
3. Appuyez sur OK, puis sur PK pour sauvegarder le nom.
(voir section précédente)
.
Le nom d'un titre ne doit pas excéder 9 caractères.
Écraser titre Effectuez un nouvel enregistrement qui écrasera le titre sélectionné depuis le
début.
80
Page 83

Guide de l'utilisateur Easy DVD Recorder
Si la durée du nouvel enregistrement est plus courte que celle du titre initial, l'excédant du titre
initial sera sauvegardé comme nouveau titre sur le disque.
Si la durée du nouvel enregistrement est plus longue que celle du titre initial, le processus
d'enregistrement s'arrêtera automatiquement lorsqu'il dépassera la fin du titre initial.
Ajouter Ajouter un nouveau titre après le dernier titre présent sur le disque (cet
élément ne s'affiche que lorsque vous éditez le dernier titre du disque).
Écraser
disque
Le nouvel enregistrement écrasera le disque en totalité, depuis le début.
Lorsque vous sélectionnez Écraser titre /Ajouter /Écraser disque, et appuyez sur OK pour
confirmer, la source du signal se calera automatiquement sur la source du signal précédant
(avant l'édition du disque).
Si vous appuyez sur SOURCE et que vous choisissez AV arrière Æ S-Vidéo arrière Æ DV Æ
DVD, puis commencez l'édition du disque, l'Easy DVD Recorder se positionnera
automatiquement sur l'entrée DV. Pour choisir une autre source de signal, utilisez le bouton
SOURCE. Si vous sélectionnez la source de signal à l'aide du bouton SOURCE, vous pouvez
accéder directement au menu des titres du DVD en appuyant sur LECTURE/PAUSE.
Si vous sélectionnez Écraser titre /Ajouter /Écraser disque, vous devrez appuyer sur le bouton
ENREGISTREMENT de la télécommande ou du panneau avant pour démarrer
l'enregistrement.
Édition d'un disque DVD+RW
1. Insérez un disque DVD+RW dans le lecteur.
2. Déplacez le curseur vers le haut de la barre d'information à l'aide du bouton fléché HAUT.
3. Appuyez sur le bouton fléché BAS pour afficher le menu du disque. Utilisez les boutons
fléchés HAUT/BAS pour sélectionner un élément, puis appuyez sur OK.
Vous pouvez également effectuer les étapes 2 et 3 au moyen de la touche disk-op.
81
Page 84

Guide de l'utilisateur Easy DVD Recorder
Lire Lecture en séquence des titres enregistrés.
Effacer disque Effacez toutes les données hébergées sur le disque.
Renommer disque Renommez le disque.
Rendre
compatible
Nouveau titre Effectuez un nouvel enregistrement et attribuez lui un nouveau titre. Ce
Écraser disque Supprimez la totalité des données hébergées sur le disque et remplacez-
Verrouiller disque Verrouillez le disque inséré dans le lecteur afin d'en protéger le contenu.
Si vous avez édité le disque DVD+RW, vous devez le rendre compatible
pour pouvoir le lire sur d'autres lecteurs de DVD.
titre sera le dernier présent sur le disque.
les par de nouveaux enregistrements (
DVD+RW"
Une fois verrouillé, le disque ne peut pas être effacé ou enregistré avant
d'être déverrouillé.
).
voir "Édition de titres sur
Si un disque DVD+RW affiche un menu différent, appuyez sur disk-op pour d'abord effacer son
contenu, puis effectuer un nouvel enregistrement.
82
Page 85

Guide de l'utilisateur Easy DVD Recorder
VII. Dépannage
Problème Solution
Aucun son Branchez fermement les câbles audio dans les prises
correspondantes.
Vérifiez les branchements entre la sortie audio de l'enregistreur
de DVD et l'entrée audio du téléviseur ou du récepteur. Vérifiez
que vous vous avez sélectionné la bonne entrée audio sur votre
téléviseur ou amplificateur.
Consultez la documentation de votre amplificateur.
Aucune image,
seulement du son
Aucune réponse Branchez fermement la fiche d'alimentation dans la prise murale.
La télécommande ne
fonctionne pas
Le mode de Recherche de la sortie vidéo n'est pas configuré
correctement. Appuyez sur le bouton PSCAN de la
télécommande pour sélectionner le mode approprié.
L'enregistrement programmé est en cours. Appuyez sur le
bouton STOP pour annuler l'enregistrement programmé.
L'appareil rencontre peut-être des difficultés techniques.
Débranchez le câble d'alimentation et patientez 30 secondes
avant de le rebrancher sur la prise murale. Si l'appareil ne
fonctionne toujours pas, essayez de restaurer les paramètres
d'usine de l'
La télécommande n'est pas orientée vers l'
Vous devez viser l'
Les batteries sont faibles, remplacez-les.
La télécommande rencontre peut-être des difficultés techniques.
Retirez les batteries et patientez 30 secondes avant de les
remettre en place dans la télécommande.
Easy DVD Recorder.
Easy DVD Recorder.
Easy DVD Recorder.
Impossible de lire le
disque
Le disque est vierge, remplacez-le.
Le disque n'est pas compatible : Consultez la section
"
Spécifications des disques
" de ce guide.
83
Page 86

Guide de l'utilisateur Easy DVD Recorder
Le disque est chargé face imprimée vers le bas. Positionnez-le
face imprimée vers le haut.
Le code région ne correspond pas aux paramètres régionaux de
l'Easy DVD Recorder.
Le verrouillage parental est activé, désactivez-le. Le mot de passe
par défaut est : 3308.
Choisissez un numéro de chaîne sur le téléviseur. Assurez-vous
que ce numéro est correct.
Les câbles entre l'enregistreur de DVD et le téléviseur sont mal
fixés. Vérifiez les branchements.
Qualité de lecture
médiocre (distorsion
des images/du son)
Impossible
d'enregistrer
Le téléviseur est mal réglé.
Le disque est sale, nettoyez-le.
Les interférences peuvent également provoquer la distorsion des
images.
Le numéro de la chaîne est incorrect. Veuillez vérifier les
numéros des chaînes présélectionnées.
Le disque est protégé en écriture. Retirez la protection en
écriture ou insérez un nouveau disque.
Le disque que vous avez inséré est un DVD+R dont la session est
fermée. Changez de disque.
Discordance de système TV. Assurez-vous que le disque n'a pas
été enregistré dans un format vidéo différent (PAL ou NTSC).
Easy DVD Recorder
L'
ne prend pas en charge les
enregistrements effectués dans des formats vidéo différents sur
un même disque DVD+R/RW.
Le disque que vous utilisez n'est peut-être pas conforme aux
Vérifiez qu'il s'agit bien d'un disque DVD+R (DVD plus R) ou
L'
standards DVD+R/RW.
DVD+RW (DVD plus 'RW').
Easy DVD Recorder
ne peut pas enregistrer sur les disques CD-
R/RW, DVD-R, DVD-RW ou DVD-RAM.
84
Page 87

Guide de l'utilisateur Easy DVD Recorder
Assurez-vous que le disque n'a pas été utilisé auparavant sur un
ordinateur.
L'enregistrement
programmé ne
fonctionne pas
Impossible d'éditer
un DVD+RW
L'image/le son du
signal TV est parasité
par des interférences
Image déformée ou
en noir et blanc
La date ou l'heure ne sont pas réglés correctement, vérifiez-les.
L'enregistrement n'est pas programmé correctement, vérifiez le
planificateur d'enregistrement.
Le disque est verrouillé, déverrouillez-le.
Le disque que vous avez inséré est un DVD+R dont la session est
fermée. Changez de disque.
Le disque est verrouillé. Appuyez sur le bouton DISK OP de la
télécommande et sélectionnez Déverrouiller disque.
Vérifiez l'antenne.
Accédez au menu du système et vérifiez que vous avez
sélectionné le bon système TV.
Le système de couleur utilisé par le disque n'est pas le même que
celui du téléviseur.
Le signal est en noir et blanc.
La sortie audio
numérique ne
fonctionne pas
Vérifiez que les connecteurs d'entrée numérique correspondent à
ceux de sortie de l'appareil que vous voulez brancher.
85
Page 88

Guide de l'utilisateur Easy DVD Recorder
VIII. Normes et Certifications
Avis aux utilisateurs européens
Les produits sur lesquels est apposé le logo CE sont conformes aux directives 89/336/EEC et
72/23/EEC (cette dernière ayant été modifiée par la directive 93/68/ECC) de la Commission
européenne qui portent respectivement sur la compatibilité électromagnétique et les basses
tensions.
Modifications apportées au produit
Homologation CE
NEC Computers International B.V. ne peut être tenu responsable des modifications apportées
par l’utilisateur, et des conséquences qui en découlent pouvant nuire à la conformité du
produit à la norme CE.
Interférences radioélectriques
Le fabricant décline toute responsabilité en cas d'interférences radioélectriques ou TV résultant
de modifications non autorisées apportées au produit.
Câbles et alimentation
Alimentation
Tous les connecteurs d’entrée/sortie (le cas échéant) renferment des tensions dangereuses.
Vous devez débrancher le cordon d’alimentation pour couper l’alimentation de l’appareil. Il est
donc impératif que la prise de courant soit située tout près de l'équipement et facilement
accessible.
Vous ne devez en aucun cas tenter de démonter le bloc d’alimentation. Il ne contient aucune
pièce que vous pouvez remplacer. Le bloc d’alimentation renferme des tensions dangereuses
pouvant présenter des risques de blessures physiques.
Tout bloc d’alimentation défectueux doit être retourné au revendeur.
Câbles d’alimentation
Cet équipement nécessite l’utilisation d’un cordon d’alimentation bifilaire. Ce dernier ne doit
pas excéder 2,5 mètres. Remplacez le cordon s'il est endommagé et contactez votre revendeur
pour un remplacement à l’identique. En Europe, la fiche doit supporter 250 Vca, 10 A
minimum. La fiche doit comporter une mention indiquant qu’elle est homologuée par un
organisme international. En outre, le cordon doit pouvoir s’utiliser dans le pays de l’utilisateur
86
Page 89

Guide de l'utilisateur Easy DVD Recorder
final. Si vous ne savez pas quel type de cordon utiliser dans votre pays, contactez votre
revendeur ou les autorités compétentes.
Batteries
Remplacement des batteries
Lorsque vous remplacez les batteries, utilisez deux batteries du même type et du même
fabricant. Remplacez les deux piles en même temps. N'utilisez pas de batteries usagées avec
des batteries neuves.
Si vous n'utilisez pas les batteries pendant une longue période (au-delà d'un mois), retirez-les
afin de protéger le produit contre la corrosion des batteries.
Si les batteries coulent, nettoyez le liquide et installez de nouvelles batteries.
Destruction des batteries
Débarrassez-vous des batteries conformément aux lois et règlements en la matière en vigueur
dans votre pays. Ne jetez pas les batteries usagées dans votre poubelle : dans la plupart des
pays, il est interdit par la loi de les incinérer, de les enfouir ou de les jeter dans des décharges
publiques. Veuillez contacter les autorités compétentes pour de plus amples informations sur
les mesures prises dans votre pays pour collecter, recycler et détruire les batteries usagées.
Retrait et remise en place du capot
Avant de retirer le capot du châssis pour intervenir sur l’équipement, vous devez débrancher le
cordon d’alimentation. Vous devez ensuite refermer le châssis avant de brancher l’équipement
et de le mettre sous tension.
Avis sur la compatibilité laser
Les périphériques optiques ont été testés et certifiés conformes à la norme IEC60825 de la
Commission Internationale Électrotechnique et à la directive européenne EN60825 ciblant les
produits laser de classe 1.
Les produits laser de classe 1 ne sont pas considérés comme dangereux. Les périphériques
optiques sont conçus de telle sorte que les utilisateurs ne peuvent être soumis au rayon laser
au-delà d’un niveau de classe 1 lorsqu’ils fonctionnent normalement ou qu’ils font l’objet
d’opérations de maintenance autorisées.
Les périphériques optiques installés sur votre ordinateur ne sont conçus que pour être utilisés
en tant que composants de ce type de produit électronique et ne répondent pas aux exigences
des standards Code of Federal Regulation Sec. 1040.10 et Sec. 1040.11 pour TOUS les
produits laser.
S'exposer aux rayons laser étant extrêmement dangereux, vous ne devez en aucun cas tenter
de démonter le périphérique laser.
87
Page 90

Guide de l'utilisateur Easy DVD Recorder
Exigences concernant les produits avec sortie à balayage
progressif (525p/625p)
(extrait de l'addendum à l'Accord de Licence du lecteur DVD concernant le 525p/625p). Le
détenteur de la licence devra prendre en compte les éléments ci-dessous, en fonction de sa
situation particulière, conjointement à la liste des postes de télévision haute définition
compatibles, dans toute documentation accompagnant tout lecteur de DVD avec sortie à
balayage progressif YUV.
Lecteurs DVD avec sortie à balayage progressif de 525p, et non 625p :
Veuillez noter que tous les téléviseurs haute définition ne sont pas entièrement compatibles
avec ce produit et risquent de provoquer des artefacts dans l'image. En cas de problèmes liés
au balayage progressif de l'image de 525 lignes, nous vous conseillons d'utiliser un
branchement de sortie en "définition standard". Pour toute question concernant la compatibilité
de votre téléviseur avec ce lecteur DVD 525p, veuillez contacter notre service client.
Lecteurs DVD avec sortie à balayage progressif de 625p, et non 525p :
Veuillez noter que tous les téléviseurs haute définition ne sont pas entièrement compatibles
avec ce produit et risquent de provoquer des artefacts dans l'image. En cas de problèmes liés au
balayage progressif de l'image de 625 lignes, nous vous conseillons d'utiliser un branchement
de sortie en "définition standard". Pour toute question concernant la compatibilité de votre
téléviseur avec ce lecteur DVD 625p, veuillez contacter notre service client.
Lecteurs DVD avec sorties à balayage progressif de 525p et 625p :
Veuillez noter que tous les téléviseurs haute définition ne sont pas entièrement compatibles
avec ce produit et risquent de provoquer des artefacts dans l'image. En cas de problèmes liés au
balayage progressif de l'image de 525 ou 625 lignes, nous vous conseillons d'utiliser un
branchement de sortie en "définition standard". Pour toute question concernant la compatibilité
de votre téléviseur avec ce lecteur DVD 525p ou 625p, veuillez contacter notre service client.
88
Page 91

ÍNDICE
I. Avisos................................................................ 90
II. Precauciones....................................................... 91
Precauciones de seguridad y de funcionamiento .......... 91
Cuidados del disco .............................................. 91
III. Especificaciones................................................... 92
Especificaciones de Easy DVD Recorder ..................... 92
Especificaciones de discos ..................................... 93
Características especiales ..................................... 96
IV. Descripción del producto........................................ 97
Mando a distancia............................................... 97
Características de Easy DVD Recorder....................... 99
V. Preparación...................................................... 101
Conexión al TV..................................................101
Ver TV a través de Easy DVD Recorder .....................102
Conexión a un amplificador .................................. 103
ESPAÑOL
Conexión utilizando un conector SCART IN ................105
Conexión de la señal de entrada AV o DV..................106
VI. Uso de Easy DVD Recorder.................................... 107
Reproducción de discos ....................................... 107
Control de la reproducción...................................110
Control de reproducción......................................114
Menú del sistema...............................................114
Configuración del canal de TV...............................116
Grabación........................................................118
Configuración de la hora......................................120
Edición de discos DVD+R / DVD+RW.........................122
VII. Solución de problemas......................................... 127
VIII. Estándares y certificaciones.................................. 129
89
Page 92

Guía del usuario de Easy DVD Recorder
AVISO DE COPYRIGHT
I. Avisos
Guía del usuario de
Easy DVD Recorder
. Copyright © 2004 NEC Computers International BV.
Reservados todos los derechos. Ninguna parte de este manual se puede reproducir o transmitir,
en forma o medio alguno, tanto electrónico, químico, manual o de otro tipo, incluido pero no
limitado al fotocopiado, grabación o almacenamiento de información y sistema de recuperación
para cualquier fin sin la autorización previa por escrito de NEC Computers International BV.
RENUNCIA
NEC Computers International BV renuncia específicamente a toda garantía, explícita o
implícita, incluida pero no limitada a cualquier garantía implícita de comerciabilidad e
idoneidad para un fin determinado en relación con este producto y su documentación. Los
componentes de software y hardware del ordenador se actualizan con regularidad. Por lo tanto,
algunas de las instrucciones, especificaciones e imágenes de esta documentación pueden variar
ligeramente respecto a su sistema. Todos los elementos descritos en esta guía son meramente
ilustrativos y puede que no sean aplicables a su situación concreta. No se pueden obtener
derechos de las descripciones realizadas en este manual. NEC Computers International BV se
reserva el derecho a revisar o realizar cambios o mejoras a este producto o la documentación
sin estar obligado a notificar dichos cambios. En ningún caso NEC Computers International BV
será responsable de daños directos o indirectos, incluido pero no limitado a la pérdida de
beneficios comerciales o cualquier otro perjuicio comercial, que se originen como consecuencia
de la utilización de este producto.
MARCAS COMERCIALES
Packard Bell es una marca comercial registrada de NEC Computers International BV. Los
restantes nombres de empresas y productos son marcas comerciales, marcas comerciales
registradas o marcas de servicios de sus respectivos propietarios.
Fabricado con licencia de Dolby Laboratories. “Dolby”, "Pro Logic" y el símbolo de la doble D
son marcas comerciales de Dolby Laboratories. Fabricado con licencia de Digital Theater
Systems, Inc. DTS y DTS Digital Surround son marcas comerciales de Digital Theater Systems,
Inc. protegidas por patentes concedidas y en tramitación de EE.U.U. y de otros países.
90
Page 93

Guía del usuario de Easy DVD Recorder
II. Precauciones
Precauciones de seguridad y de
funcionamiento
Los requisitos de energía de este aparato son 220-240 V CA, 50/60 Hz. Asegúrese de que
su instalación eléctrica está dentro de este rango.
Es posible que la tapa superior y el panel posterior de la grabadora estén calientes después
de una reproducción de larga duración. Esto es normal.
Cuando no esté utilizando la grabadora, extraiga el disco y apáguela.
Si no se ha utilizado la grabadora durante un largo periodo de tiempo, es posible que no
funcione correctamente. Para obtener los mejores resultados, enciéndala de vez en
cuando.
Algunos tipos de discos pueden hacer que la unidad se detenga o se bloquee. Reinicie la
unidad cuando esto ocurra. Espere al menos 10 segundos antes de reiniciar para
aumentar la vida de la grabadora.
Esta grabadora de DVD es un dispositivo de alta tecnología y precisión. Es posible que la
calidad de la imagen se vea afectada cuando el cabezal de láser o las piezas que mueven
el disco estén sucias o dañadas.
No utilice
piezas internas de la grabadora.
Coloque el aparato en una ubicación que disponga de la ventilación adecuada para evitar
el sobrecalentamiento interno. 5 cm.
Utilice un paño suave y seco para limpiarla. Para las manchas de difícil limpieza, aplique
unas gotas de detergente neutro diluido en un paño, escúrralo bien y páselo por las
manchas. A continuación, utilice un paño seco para limpiarlas. No utilice disolventes,
como diluyentes o benceno, ya que podría dañar la unidad
Easy DVD Recorder
en lugares húmedos, ya que podría dañar el disco y las
Easy DVD Recorder
.
Cuidados del disco
Limpie el disco periódicamente para eliminar el polvo o las huellas dactilares. Utilice un
paño suave o un limpiador comercial de discos ópticos.
Para mantener los discos sin huellas digitales, sostenga el disco por su borde externo o
con un dedo en el círculo interno y otro en el borde externo.
Vuelva a poner el disco en su caja o funda cuando termine de utilizarlo.
Mantenga la bandeja cerrada siempre que no utilice la unidad.
91
Page 94

Guía del usuario de Easy DVD Recorder
III. Especificaciones
Especificaciones de
Fuente de alimentación 220-240 V CA 50/60 Hz
Consumo de energía 28 W
Consumo de energía (en modo de espera) < 4 W
Dimensiones (mm) 430 x 53 x 320 (L xA x P)
Peso 4,0 Kg aproximadamente
Temperatura ambiente 15~35°C
Humedad 25~75%
Este aparato adopta la solución de un único chip integrado de codificación y
descodificación de última generación de LSI, lo que permite codificar la señal RF de TV, la
señal de entrada AV de equipos externos o la señal digital del equipo iEEE1394 en
formato MPEG-2 y grabar discos DVD+RW o DVD+R. Además, adopta la tecnología
exclusiva de procesamiento de imagen DominoFX de LSI, proporcionando una excelente
calidad de imagen.
Easy DVD Recorder
Compatible con todas las funciones de los reproductores de DVD normales.
Es compatible con discos DVD, Super VCD, VCD, CD y CD-R, y reproduce MP3 Y
Picture CD.
Los discos grabados con
DVD.
Los programas grabados en discos DVD+RW son editables (para cambiar un título,
cambiar la imagen del índice del título, dividir un título en pequeños fragmentos u ocultar
títulos).
Modo rápido OTR, que permite una captura y grabación rápidas.
Admite audio en 8 idiomas, subtítulos en 32 idiomas y ofrece 9 ángulos de visión, así
como otras características de reproducción de DVD completamente funcionales.
Sistema de control de nivel de restricción.
Programa de protección de pantalla.
Conector coaxial de salida de audio digital.
Easy DVD Recorder
son compatibles con otros reproductores de
92
Page 95

Guía del usuario de Easy DVD Recorder
Conectores estándar de salida de vídeo (CSB), salida de S-video, SCART IN/OUT y salida
de vídeo por componentes (Y, Cb/Pb, Cr/Pr). Admite una relación de aspecto de pantalla
de TV de 16:9 y de 4:3.
Recibe y graba la señal de TV y controla su salida.
Grabación por tiempo automática de la señal AV o de la señal de TV proveniente de
fuentes de señal externas. Conector de entrada iEEE1394 DV para grabar la señal digital
procedente de una cámara de vídeo.
Hasta 20 eventos de grabación por tiempo, con tres opciones: "Una vez", "Diaria" y
"Semanal".
Actualización inteligente de software.
Especificaciones de discos
DVD+RW (discos DVD regrabables)
El DVD+RW es un formato borrable basado en la tecnología CD-RW.
Los discos DVD+RW se pueden regrabar más de 1.000 veces.
DVD+R (discos DVD grabables una sola vez)
Si desea reproducir un DVD+R creado con Easy DVD Recorder en otro reproductor,
asegúrese de que ha sido finalizado. Igualmente, debe utilizar la opción "hacer
compatible" si desea reproducir un disco DVD+RW en otro reproductor. Puede acceder
a estas funciones desde los menús de edición de discos DVD+R y DVD+RW pulsando el
REPRODUCCIÓN Y GRABACIÓN
botón disk-op del mando a distancia.
PRECAUCIÓN: Finalizar un disco consiste en cerrar la sesión de grabación para impedir
nuevas grabaciones.
Los discos DVD+R solo se pueden grabar una vez. No es necesario
ocupar toda la capacidad del disco en una sola grabación. Puede agregar
nuevos contenidos posteriormente.
93
Page 96

Guía del usuario de Easy DVD Recorder
DVD-R (DVD grabable una sola vez)
Easy DVD Recorder
solo puede reproducir discos DVD-R grabados en
modo vídeo que hayan sido finalizados.
DVD-RW (DVD regrabable)
Easy DVD Recorder
solo puede reproducir discos DVD-RW grabados en
modo vídeo que se hayan hecho compatibles.
CD-R de audio (CD grabable una sola vez) / Música comprimida en
MP3
CD-RW de audio (CD regrabable) / Música comprimida en MP3
DVD de vídeo (Disco digital versátil)
CD de audio (disco de audio digital)
DISCOS DE SOLO REPRODUCCIÓN
Super Audio CD (sólo se reproduce la capa CD de un SACD híbrido)
VCD (formato 1.0, 1.1 y 2.0)
Super VCD
94
Page 97

Guía del usuario de Easy DVD Recorder
Composición de los discos
DVD
Un disco DVD está dividido en secciones (títulos, capítulos) para que pueda encontrar más
fácilmente un contenido específico.
CD de SVCD/VCD/AUDIO
Los CD de SVCD/VCD/AUDIO están divididos en pistas que pueden contener puntos de
índice para dividir la pista en varias partes.
MP3/JPEG/MP4(DivX)
MP3 (".mp3", para música), JPEG (".jpg", para imágenes) y DivX (".avi", para vídeo) son
formatos de archivo comprimido.
Es posible que Easy DVD Recorder tarde más tiempo en mostrar el contenido de algunos discos
debido al tamaño del archivo o al número de canciones / imágenes que contiene.
95
Page 98

Guía del usuario de Easy DVD Recorder
Características especiales
El conector de entrada digital, conocido como 'firewire' o 'IEEE1394', se
utiliza para transmitir señales digitales de banda ancha. Las señales de audio y
de vídeo se transmiten a través del mismo cable.
Los archivos MP3 son archivos de música muy comprimidos que reducen los
archivos de audio de CD estándar a un 1/10 de su tamaño original. Así, un
solo CD puede almacenar hasta 10 horas de música.
Normalmente, el vídeo se graba en la posición actual del disco. Es igual que
una grabadora de cintas. El usuario puede empezar a grabar a mitad de la
cinta. En los discos DVD+R, el segmento nuevo de vídeo se añade siempre a
los segmentos de vídeo existentes. La grabadora de DVD puede reproducir
tanto DVD como CD previamente grabados. Los DVD grabados con esta
grabadora de DVD se pueden reproducir en la mayoría de los reproductores
de DVD, tanto actuales como futuros.
Dolby Digital es un estándar desarrollado por Dolby Laboratories que
transmite de 1 a 5 canales completos, así como un canal de baja frecuencia
(.1), obteniendo un total de 5.1 canales discretos. Los altavoces se disponen
de la siguiente forma: frontal, izquierdo, frontal medio, frontal derecho,
posterior izquierdo y posterior derecho. Dolby Digital es el sistema más
habitual en la actualidad y se utiliza con frecuencia en los cines.
Este producto utiliza una tecnología de protección contra copia protegida por
una patente estadounidense y por otros derechos de propiedad intelectual. El
uso de esta tecnología de protección contra copia de Macrovision Corporation
requiere la aprobación de Macrovision. Está exclusivamente destinada al uso
doméstico y a otras aplicaciones limitadas de pago por visión, a menos que
Macrovision apruebe cualquier otro uso por escrito. Queda prohibida la
realización de cualquier modificación, eliminación de componentes o
ingeniería inversa en el equipo.
DivX es un codec (abreviatura de compresión / descompresión): un programa
que comprime las imágenes de vídeo de cualquier fuente en un tamaño
transportable a través de Internet sin reducir la calidad visual del vídeo
original. Actualmente, la última versión de DivX compatible con la grabadora
es DivX5.2. Para alquilar o comprar vídeos que utilicen la tecnología DivX®,
debe registrarse.
96
Page 99

Guía del usuario de Easy DVD Recorder
IV. Descripción del producto
Mando a distancia
En primer lugar, retire la cubierta de las pilas del mando a distancia e inserte dos pilas AAA
(incluidas).
Para sustituir o desechar las pilas, consulte el capítulo Normas y certificaciones.
GRABAR
Edit Acceder al menú de edición del título.
CONTADOR
ENCENDIDO
Grabar la señal de TV o AV desde una fuente externa. Durante la grabación,
cada vez que pulse este botón se añadirán 30 minutos de tiempo de grabación.
Establecer / cambiar el programa de grabación por tiempo.
Encender/apagar.
97
Page 100

Guía del usuario de Easy DVD Recorder
0---9 Botones numéricos.
title Acceder al menú de título.
s-title Cambiar el idioma de los subtítulos.
disk-op Gestionar los discos DVD+R/RW.
clear Seleccionar el elemento actual o borrar el evento de grabación por tiempo.
zoom Ampliar /reducir la imagen actual.
OK Confirmar la selección o la entrada actuales.
MENU Acceder al menú del disco.
SETUP Acceder al menú de configuración del sistema.
pscan Cambiar el modo de exploración de salida de vídeo (Progresivo/Entrelazado).
audio Cambiar el idioma del audio.
angle Cambiar el ángulo de la cámara.
repeat Establecer las funciones de repetición.
goto Ir al título/capítulo/tiempo deseado y reproducirlo.
SOURCE
Eject
Seleccionar la fuente de señal externa.
Abrir/cerrar la bandeja de disco.
display Mostrar y ajustar el estado de la reproducción.
random Cambiar la secuencia de reproducción entre los modos Normal y Aleatorio.
DETENER/VOLVER
Púlselo una vez para detener la reproducción/grabación. Púlselo de nuevo para
volver al menú raíz (únicamente con discos VCD).
SILENCIO
Púlselo una vez para desactivar el sonido. Púlselo de nuevo o pulse el botón
“V+/V-“ para reactivar el sonido.
Slow Lenta hacia delante (1/2, 1/4, 1/8).
V-/V+
REPRODUCIR/PAUSA
Ajustar el volumen de salida de audio o mover el cursor hacia la
izquierda/derecha.
Iniciar la reproducción o detener la reproducción/grabación temporalmente.
P+/P-
Seleccionar un canal de TV o mover el cursor hacia arriba/abajo.
Título o capítulo anterior/siguiente.
Reproducir rápidamente hacia atrás / delante (2X, 4X, 16X, 32X).
98
 Loading...