

Page 1

Easy DVD User's Guide
Table of Contents
I. NOTICES.............................................................. 3
II. PRECAUTIONS....................................................... 4
SAFETY AND OPERATING PRECAUTIONS ................................ 4
DISC CARE ............................................................ 4
III. SPECIFICATIONS .................................................. 5
EASY DVD SPECIFICATIONS............................................ 5
DISC SPECIFICATIONS.................................................. 6
SPECIAL FEATURES.................................................... 8
IV. GETTING FAMILIAR............................................... 9
REMOTE CONTROL .................................................... 9
FEATURES OF YOUR EASY DVD.......................................11
V. SETTING UP.........................................................14
CONNECTING TO TV .................................................14
WATCHING TV VIA THE EASY DVD...................................15
CONNECTING TO AN AMPLIFIER .......................................16
CONNECTING INPUT AV SIGNAL USING SCART IN JACK ..............18
CONNECTING INPUT AV OR DV SIGNAL...............................19
VI. USING YOUR EASY DVD.........................................21
PLAYING DISCS ......................................................21
CONTROLLING PLAYBACK.............................................23
PARENTAL LOCK .....................................................27
SYSTEM MENU........................................................27
TV CHANNEL SETTING................................................28
RECORDING..........................................................30
TIME SETTINGS.......................................................33
EDITING DVD+R / DVD+RW DISCS..................................34
VII. TROUBLESHOOTING ............................................39
VIII. STANDARDS AND CERTIFICATIONS.........................41
2
Page 2

Easy DVD User's Guide
I. Notices
COPYRIGHT NOTICE
Packard Bell Easy DVD User’s Guide. Copyright© 2004 NEC Computers International
B.V. All Rights Reserved. No part of this manual may be reproduced or
transmitted, in any form or by any means, whether electronic, chemical, manual
or otherwise, including but not limited to photocopying , recording, or information
storage and retrieval systems, for any purpose without prior written permission of
NEC Computers International B.V.
Copyright© 1996, 2003 Digital Theater Systems, Inc. All Rights Reserved.
DISCLAIMER
NEC Computers International B.V. specifically disclaims all warranties, either
express or implied, including, but not limited to, implied warranties of
merchantability and fitness for a particular purpose with respect to this product
and documentation.
Updates to software and hardware components are made regularly. Therefore
some of the instructions, specifications and pictures in this documentation may
differ slightly from your particular situation. All items described in the
documentation supplied with the product are for illustration purposes only and
may not apply to your particular situation. No legal rights or entitlements may be
obtained from descriptions made in the documentation. NEC Computers
International B.V. reserves the right to revise or make changes or improvements to
this product or documentation at any time without obligation to notify any person
of such revisions or improvements.
In no event shall NEC Computers International B.V. be liable for any consequential
or incidental damages, including but not limited to loss of business profits or any
other commercial damages, arising out of the use of this product.
TRADEMARKS
Packard Bell is a registered trademark of NEC Computers International B.V. All
other company or product names are trademarks, registered trademarks or service
marks of their respective owners.
Manufactured under license from Dolby Laboratories. “Dolby”, "Pro Logic", and the
double-D symbol are trademarks of Dolby Laboratories. Manufactured under
license from Digital Theater Systems, Inc.
DTS and DTS Digital Surround are trademarks of Digital Theater Systems, Inc.
protected by U.S. and other world-wide patents issued and pending.
3
Page 3

Easy DVD User's Guide
II. Precautions
Safety and operating precautions
Power requirement for this appliance is AC 220-240V, 50/60 Hz. Please ensure
the power supply to your home is in this range.
The temperature of the top cover and rear panel of the recorder may be high
after playing for a long period of time. This is normal.
When the recorder is not in use, please remove the disc and turn the power
off.
Malfunctions may occur if the recorder has not been used for a long period of
time. For best results, turn it on occasionally.
Some kinds of discs may cause the unit to hang or freeze. Please restart the
unit when this occurs. Wait at least 10 seconds before restarting to extend
the life of the recorder.
This DVD recorder is a device of high technology and high precision. The
image quality may be impaired when the laser head or the disc driving parts
are dirty or damaged.
Do not use the Easy DVD where condensation may form easily, as this may
damage the disc and inner parts of the recorder.
Place the appliance in a location with adequate ventilation to prevent
internal heat build up. 5cm.
Use a soft and dry cloth for cleaning. For the stains that cannot be removed
easily, apply some diluted neutral detergent to a cloth, wring the cloth dry
and wipe the stains away, then use a dry cloth to clean. Do not use any
solvents such as thinner or benzene; as this may damage the Easy DVD.
Disc care
Periodically clean the disc to remove any dust or fingerprints. Use a soft,
scratch-free cloth or a commercial disc cleaner.
To keep the disc free of fingerprints, hold the disc with your fingers on the
outer edge or with a finger in the inner circle and a finger on the outer edge.
Always return the disc to its protective case or sleeve when you have finished
using it.
Keep the disc tray closed whenever you are not using the drive.
4
Page 4

Easy DVD User's Guide
III. Specifications
Easy DVD specifications
Power supply 220-240V AC 50/60 Hz
Power consumption 28W
Power consumption (stand by) < 4W
Size (mm) 430 x 53 x 320 (L xH x D)
Weight approximately 4.0kg
Environment temperature 15~35°C
Humidity 25~75%
This appliance adopts LSI's new generation encode-decode integrative single
chip solution, which enables to encode the TV RF signal, AV input signal from
external equipments or digital signal from iEEE1394 equipment in MPEG-2
format, and record on DVD+RW or DVD+R discs. It also adopts LSI' unique
DominoFX image processing technology, providing excellent image quality.
Compatible with all functions of ordinary DVD players.
Compatible with DVD, Super VCD, VCD, CD, CD-R discs, can play MP3 and
Picture CD.
Discs recorded with the Easy DVD are compatible with other DVD players.
Programs recorded on DVD+RW discs are editable (to change a title, change
title index picture, divide a single title into smaller parts, and hide titles).
OTR quick mode, for quick capture and record.
Supports 8 audio languages, 32 subtitle languages, and 9 viewing angles, as
well as other full functional DVD playback features.
Parental Lock Level control system.
Screensaver program for screen protection.
Coaxial digital audio out jack.
Standard video out (CVBS), S-video out, SCART IN/OUT jacks, and component
video out (Y, Cb/Pb, Cr/Pr) out jacks. 16:9 and 4:3 TV screen aspect ratio
support.
Can receive and record TV signal, as well as monitor its output.
Automatic time recording of AV signal or TV signal from external signal
sources. iEEE1394 DV in jack for video camera to record digital signal.
Up to 20 time-recording events, with three options: "Once", "Daily" and
"Weekly".
Intelligent software update.
5
Page 5
Easy DVD User's Guide
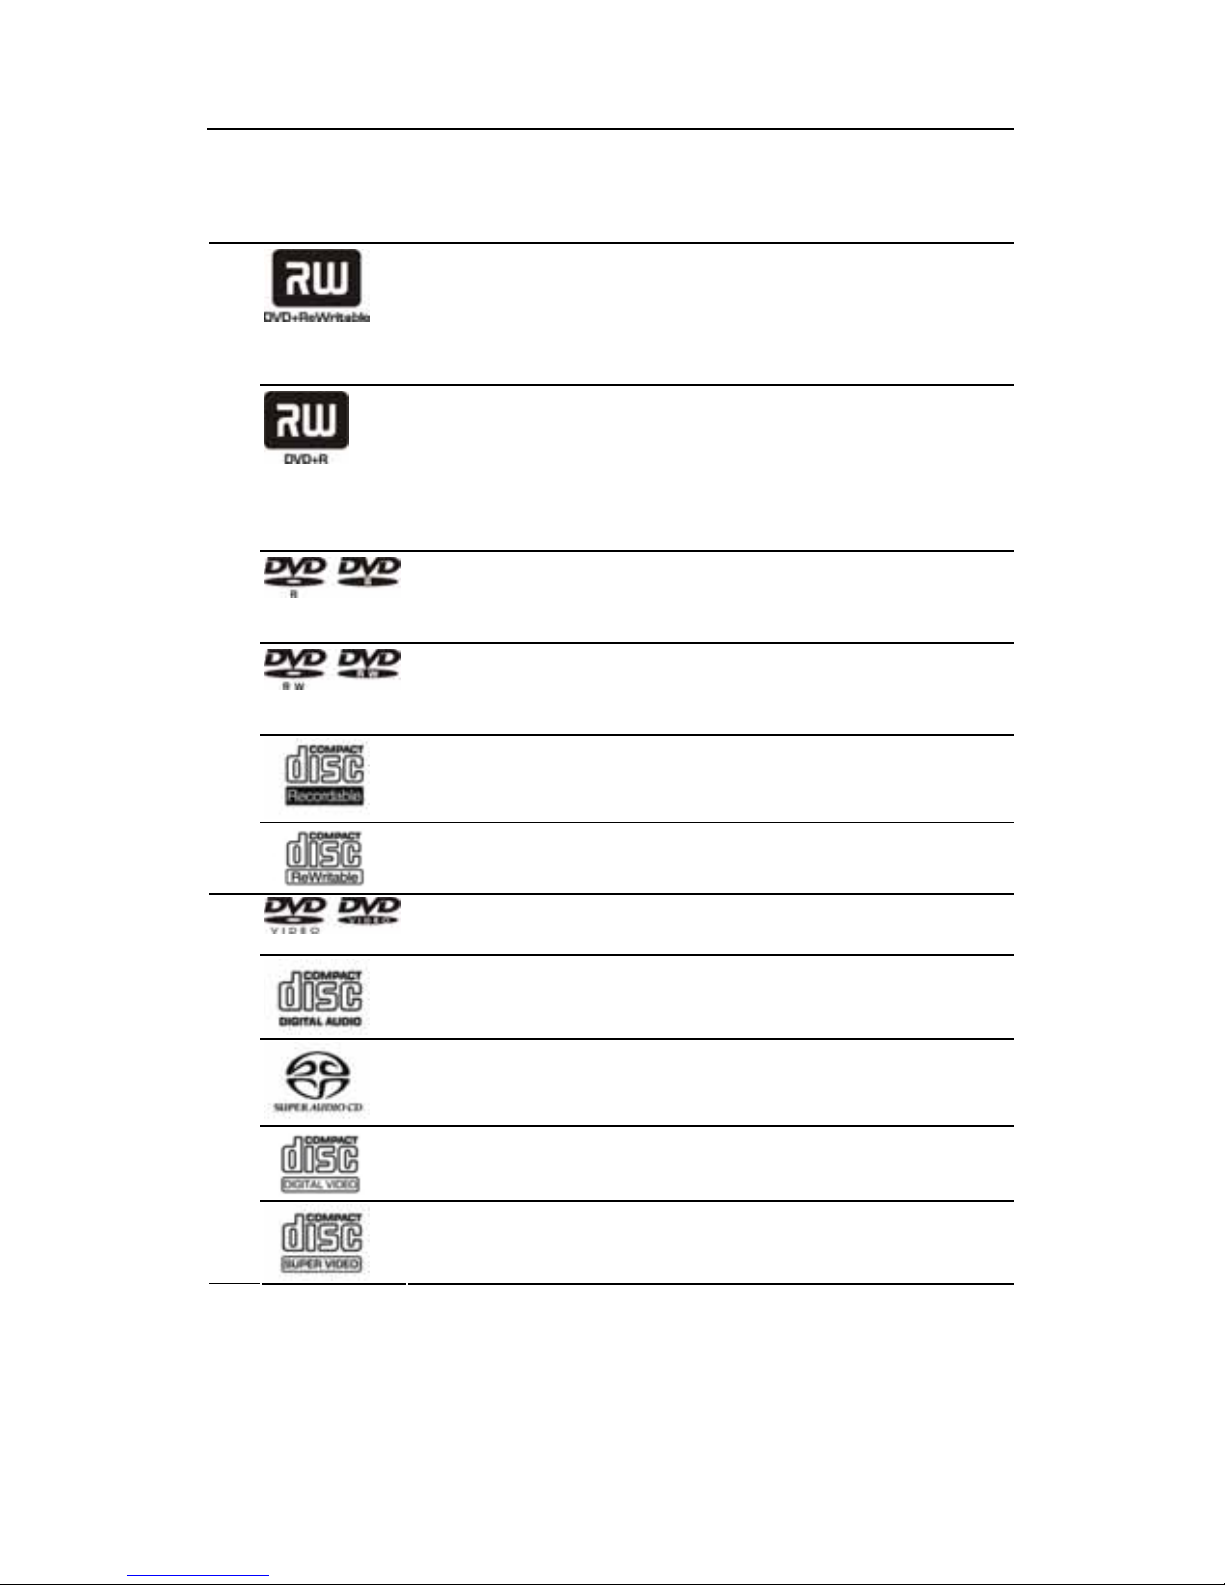
Disc specifications
DVD+RW (rewritable DVD discs)
DVD+RW is an erasable format based on CD-RW technology.
DVD+RW discs can be rewritten more than 1,000 times. Such
discs must be made compatible before they can be played by
other DVD players.
DVD+R (write-once DVD discs)
DVD+R discs can only be written once. All the capacity of the
disc does not need to be filled in one single recording. You
can add new contents later. Such discs must be finalized
before they can be played by other DVD players. You cannot
add new content to a finalized DVD+R disc.
DVD-R (write-once DVD)
Only the DVD-R discs recorded in video mode that have been
finalized can be played by the Easy DVD.
DVD-RW (rewritable DVD)
Only the DVD-RW discs recorded in video mode that have been
made compatible can be played by the Easy DVD.
Audio CD-R (write-once CD) / MP3 Compressed Music
PLAYABLE AND WRITABLE
Audio CD-RW (rewritable CD) / MP3 Compressed Music
DVD Video (Digital Versatile Disc)
Audio CD (digital audio disc)
Super Audio CD (only plays the CD layer of a hybrid SACD )
VCD (format 1.0, 1.1 and 2.0)
PLAYABLE-ONLY DISCS
Super VCD
6
Page 6

Easy DVD User's Guide
Discs composition
DVD
A DVD disc is divided into sections (titles, chapters) so that you can find s pecific
content more easily.
SVCD/VCD/AUDIO CD
SVCD/VCD/AUDIO CDs are divided into a number of tracks, which may contain
index points to divide the track into several parts.
MP3 /JPEG/MP4(DivX)
MP3 (".mp3", for music), JPEG (".jpg", for pictures), and DivX (".avi", for videos)
are compressed file formats.
It may be longer for the easy DV D to display the con tent of some discs b ecause of
the large file size or number of songs/pictures they contain.
7
Page 7
Easy DVD User's Guide
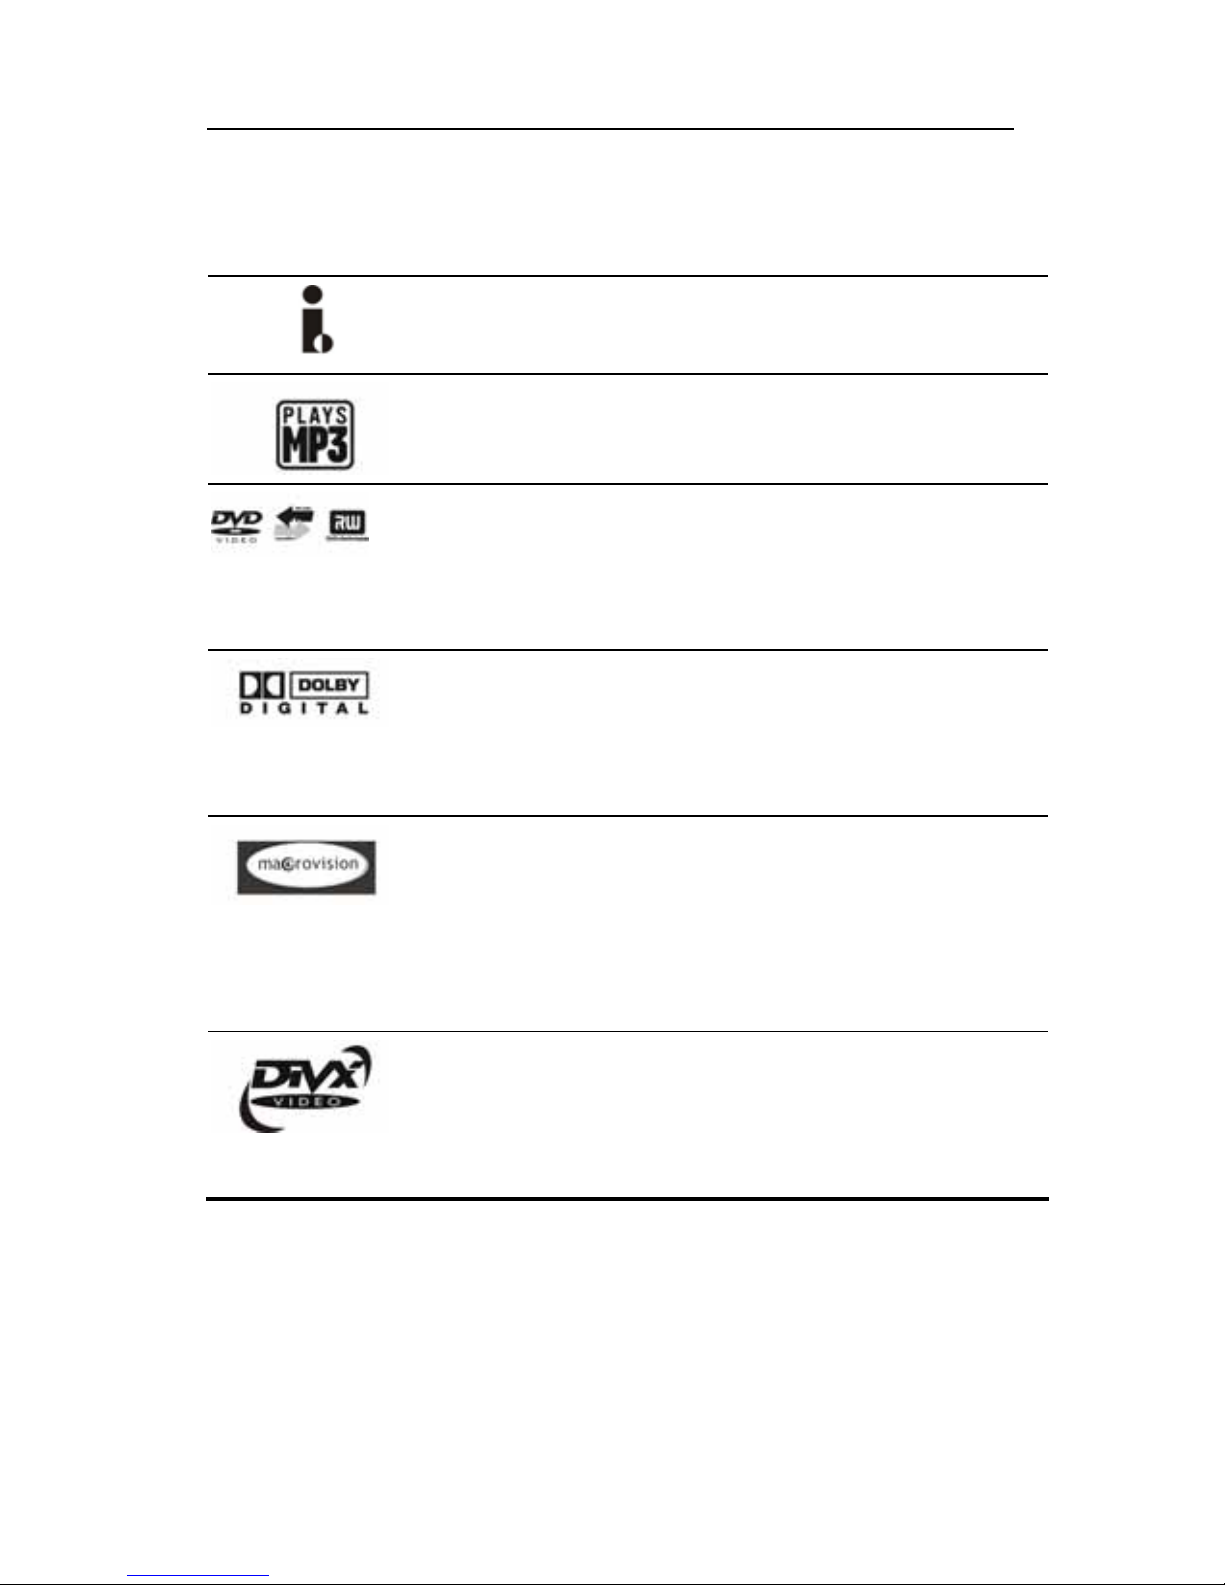
Special features
The digital input connector, known as 'firewire' or 'IEEE1394', is
used to transmit digital broadband signals. The audio and video
signals are transmitted via the same cable.
MP3 files are highly compressed music files, which compress
standard CD audio files to ~1/10 of their original size. As a result,
up to 10 hours of music can be stored on a single CD.
Ordinary the video is recorded at the current position of the disc.
This is like the tape recorder, the user can start recording at the
middle of the tape. For DVD+R discs, new video segment is always
appended to the existing video segments. The DVD recorder can
play both pre-recorded DVDs and CDs. DVDs recorded using this DVD
recorder can be played on most current and future DVD players.
Dolby Digital is a standard developed by Dolby Laboratories for
transmitting from 1 to 5 full-range channels as well as a low
frequency (.1) channel for a total of 5.1 discrete channels. The
loudspeakers are arranged as follows: front, left, front middle,
front right, rear left and rear right. Dolby Digital is currently the
most common system and is often used in cinemas.
This product contains copy protection technology, which is
protected by US Patent and other intellectual property rights. Use
of this copy protection technology from Macrovision Corporation
requires the approval of Macrovision. It is intended exclusively for
home use and other limited pay-per-view applications, unless
Macrovision approves some other use in writing. Modifications to
the equipment, removal of components and reverse engineering
are prohibited.
DivX is a codec (short for compression/decompression) - a piece of
software that compresses video from virtually any source down to a
size that is transportable over the Internet without reducing the
original video's visual quality. Currently the highest DivX version
the recorder supports is DivX5.2. To rent or purchase videos using
DivX® technology, please make sure you register.
8
Page 8

Easy DVD User's Guide
IV. Getting Familiar
Remote Control
First remove the battery cover of the remote control and insert two AAA batteries
(supplied).
For battery replacement and disposal, please refer to the Standards and
Certifications chapter.
9
Page 9

Easy DVD User's Guide
RECORD
Record TV or AV signal from external source. While recording, every
pressing on this button will add 30 minutes recording time.
Edit Access the title editing menu.
TIMER
Set/change the schedule of time recording.
POWER
Switch on/off.
0---9 Number buttons.
title Access the title menu.
s-title Change subtitle language.
disk-op Manage DVD+R/RW discs.
clear Select current item, or clear the time recording event.
zoom Zoom in/out current picture.
OK Confirm current selection or input. Press this button twice to access
playing control menu or recording control menu.
MENU Access disc menu.
SETUP Access system setup menu.
pscan Switch the scanning mode of video output (Progressive/Interlace).
audio Change audio language.
angle Change camera angle.
repeat Set repeat functions.
goto Go to desired title/chapter/time and play it.
SOURCE
Select external signal source.
Eject
Open/close the disc tray.
display Show and adjust the playback status.
random Switch the playback sequence between Normal and Random mode.
STOP/RETURN
Press once to stop playback/recording, press again to return to root
menu(only for VCD discs).
MUTE
Press once to turn off the sound, press it again or press the "V+/V-"
button to resume the sound.
Slow Slow forward (1/2, 1/4, 1/8).
V-/V+
Adjust the audio output volume, or move the cursor
leftward/rightward.
PLAY/PAUSE
Start playback, or stop playing/recording temporarily.
P+/P-
Select TV channel, or move the cursor upward/downward.
Previous/next title or chapter.
Fast reverse/forward (2X, 4X, 16X, 32X).
10
Page 10
Easy DVD User's Guide
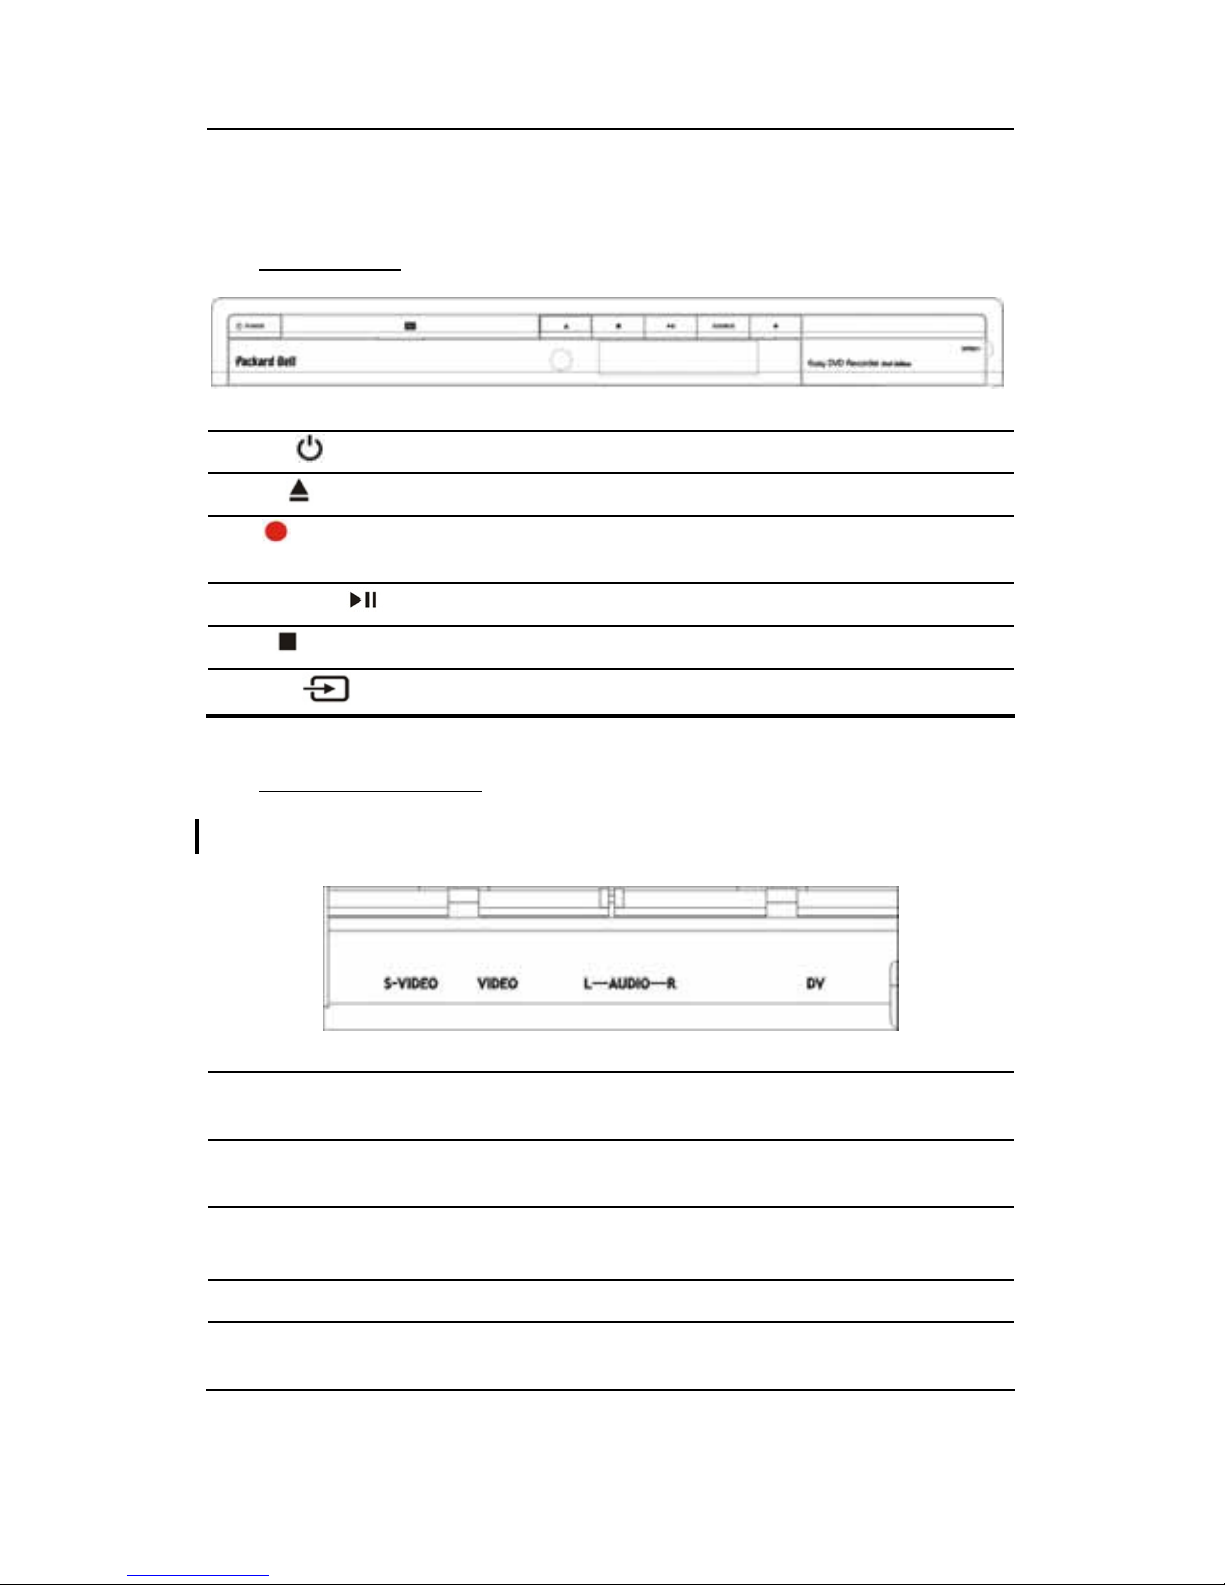
Features of your Easy DVD
Front Panel
POWER
Power on/off.
EJECT
Open/close the disc tray.
REC Record current TV program, AV or DV signals from external
signal sources.
PLAY/PAUSE Press to start playback or suspend playback.
STOP Stop playing/recording.
SOURCE
Switch input signal source.
Front connections
To access these connectors, open the flap-door on the right side of the Easy DVD.
S-VIDEO
S-Video input jack, use to connect to a SVHS/Hi8 video
camera or SVHS/Hi8 VCR.
VIDEO
Video input jack, use to connect to a SVHS/Hi8 video camera
or SVHS/Hi8 VCR.
The signal from S-VIDEO input jack has higher priority than the signal from VIDEO
input jack.
L-AUDIO-R Audio input jacks, use to connect to video camera or VCR.
DV
i-LINK/DV input jack ( iEEE1394), use to connect digital video
camera or other digital equipments.
11
Page 11
Easy DVD User's Guide
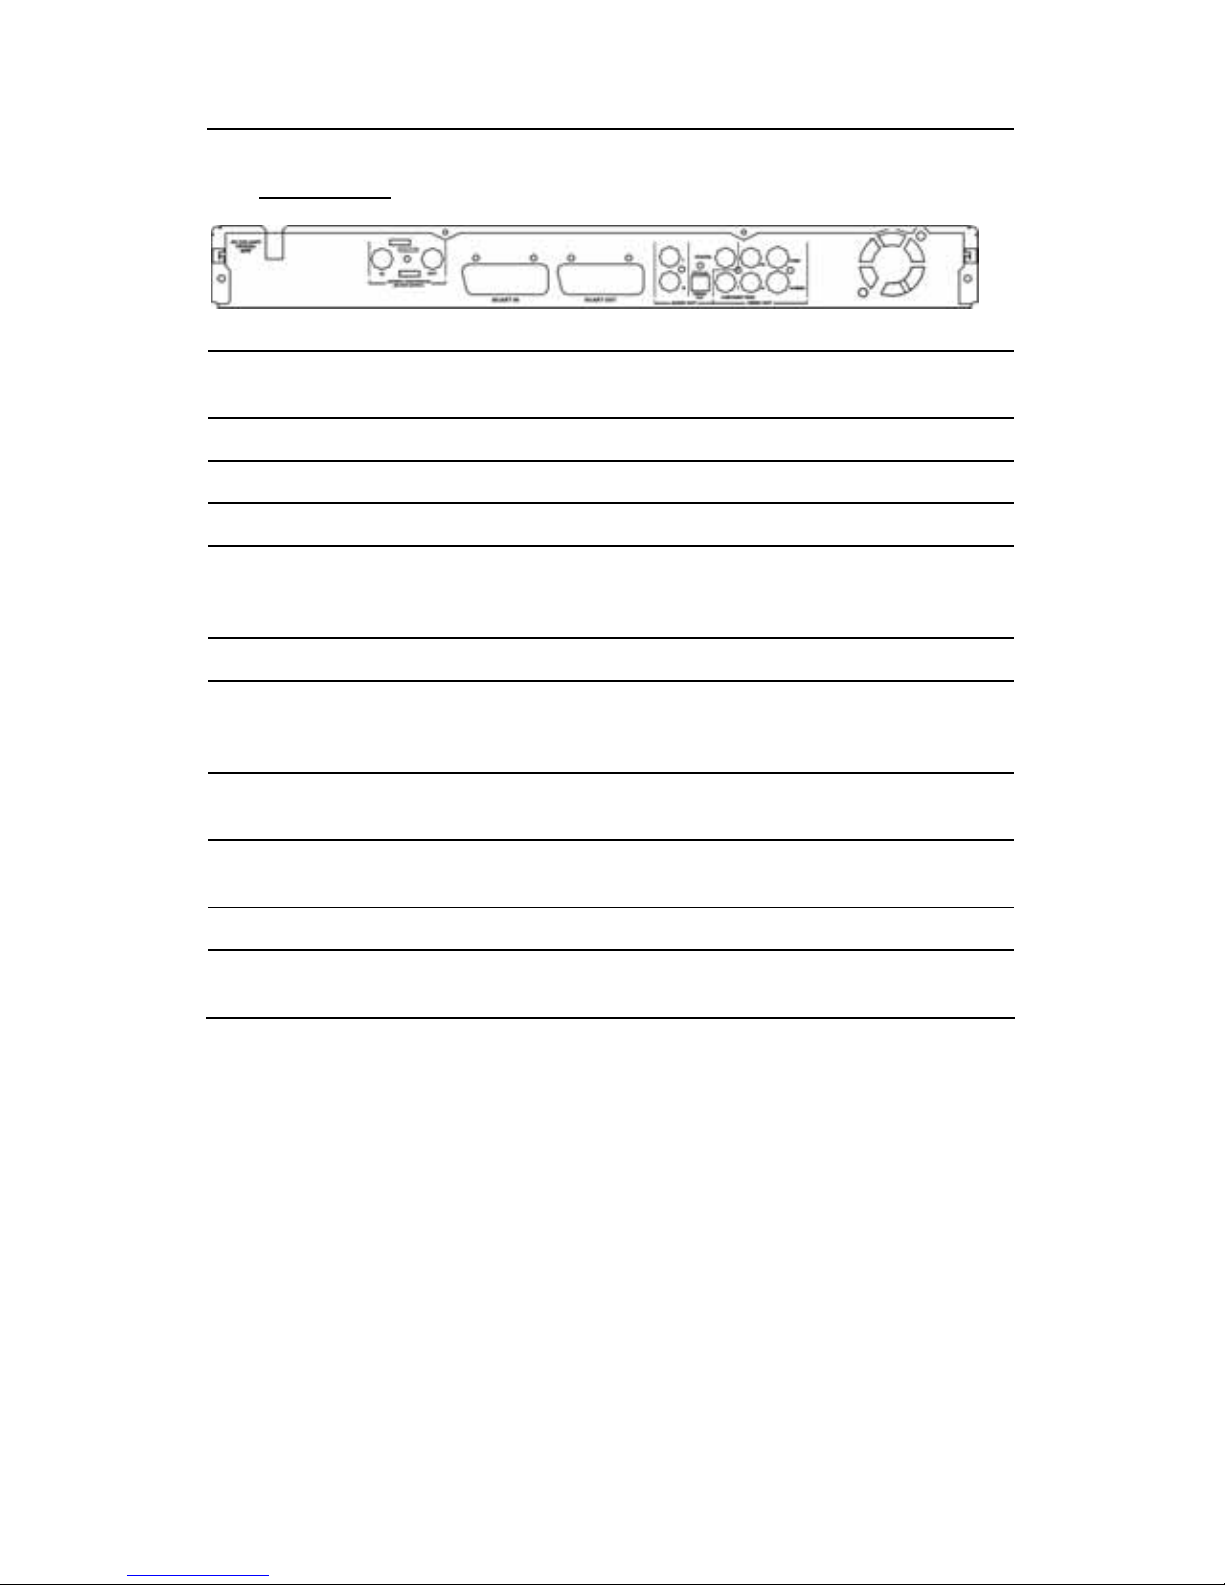
Rear Panel
AC IN ~ AC IN power cord connector to 220-240V, 50/60Hz mains
supply.
ANTENNA in Use to connect to antenna/cable TV.
ANTENNA out Use to output TV signal to TV set.
Audio output L/R Analog audio output (left and right).
Coaxial output Use to output digital audio recorded on discs by connecting to
the coaxial digital audio input on an AV amplifier or receiver
with digital audio input capability.
CVBS Use to connect to TV set with video (CVBS) input jack.
Optical output Use to output digital audio recorded on discs by connecting to
the optical digital audio input jack on an AV amplifier or
receiver with digital audio input capability.
SCART IN Use to connect to digital AV equipments with SCART OUTPUT
capability. (E.g. DVD player with SCART output jack).
SCART OUT Use to connect to TV set or other equipments with SCART in
jack.
S-Video Use to connect to TV set with S-VIDEO input jack.
Y Cb/Pb Cr/Pr Use to connect to TV set with Y Cb/Pb Cr/Pr input jacks. The
output mode can be set as progressive or interlace
13
Page 12
Easy DVD User's Guide
V. Setting up
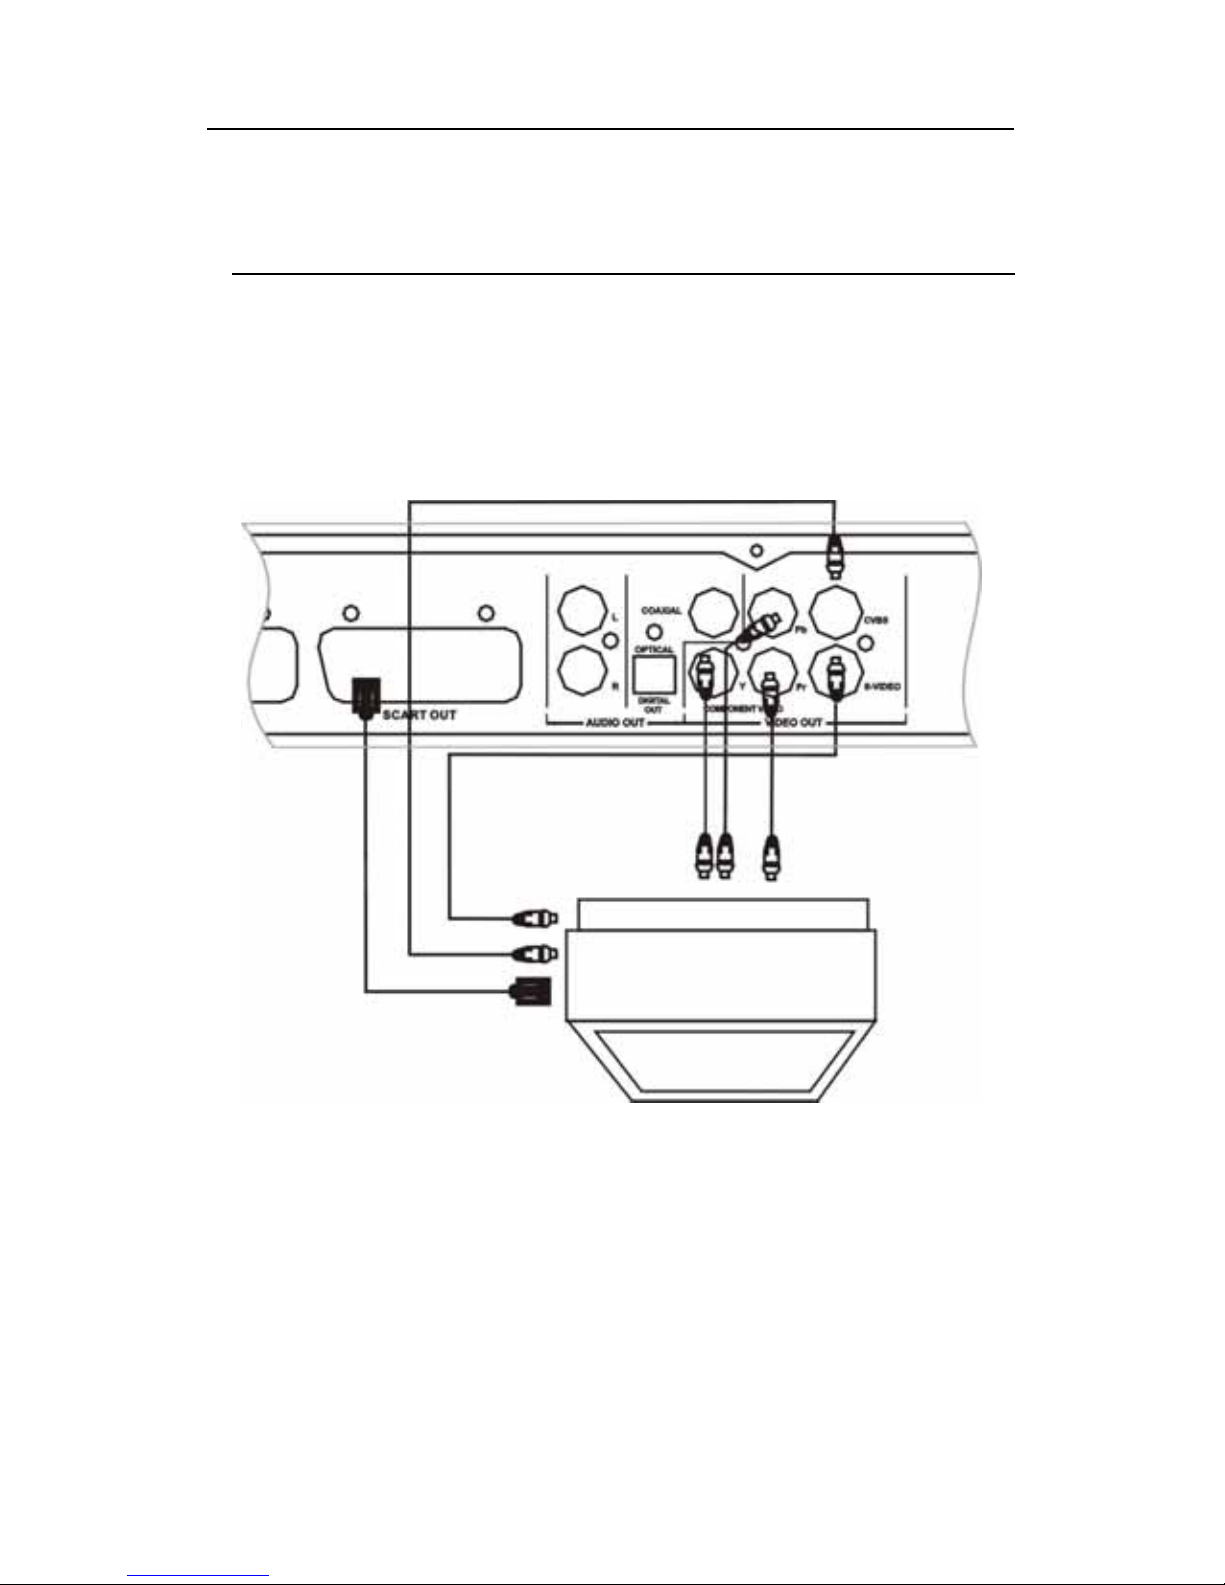
Connecting to TV
Your Easy DVD supports video connections through composite video, S-Video,
component video, and SCART. Connect the audio/video cables depending on the
specifications of your TV.
If the TV has COMPONENT VIDEO IN jacks (Y, Cb/Pb, Cr/Pr), conn ect them to
the corresponding jacks on the Easy DVD (recommended).
If the TV has an S-VIDEO IN jack, connect it to the S-VIDEO jack on the Easy
DVD.
If the TV has SCART IN jack, connect it to the SCART OUT jack on the Easy
DVD.
Connect the LEFT and RIGHT audio out jacks on the Easy DVD to the audio
input jacks that belong to the same jacks group as the video input jack on the
TV set (if applicable).
14
Page 13
Easy DVD User's Guide
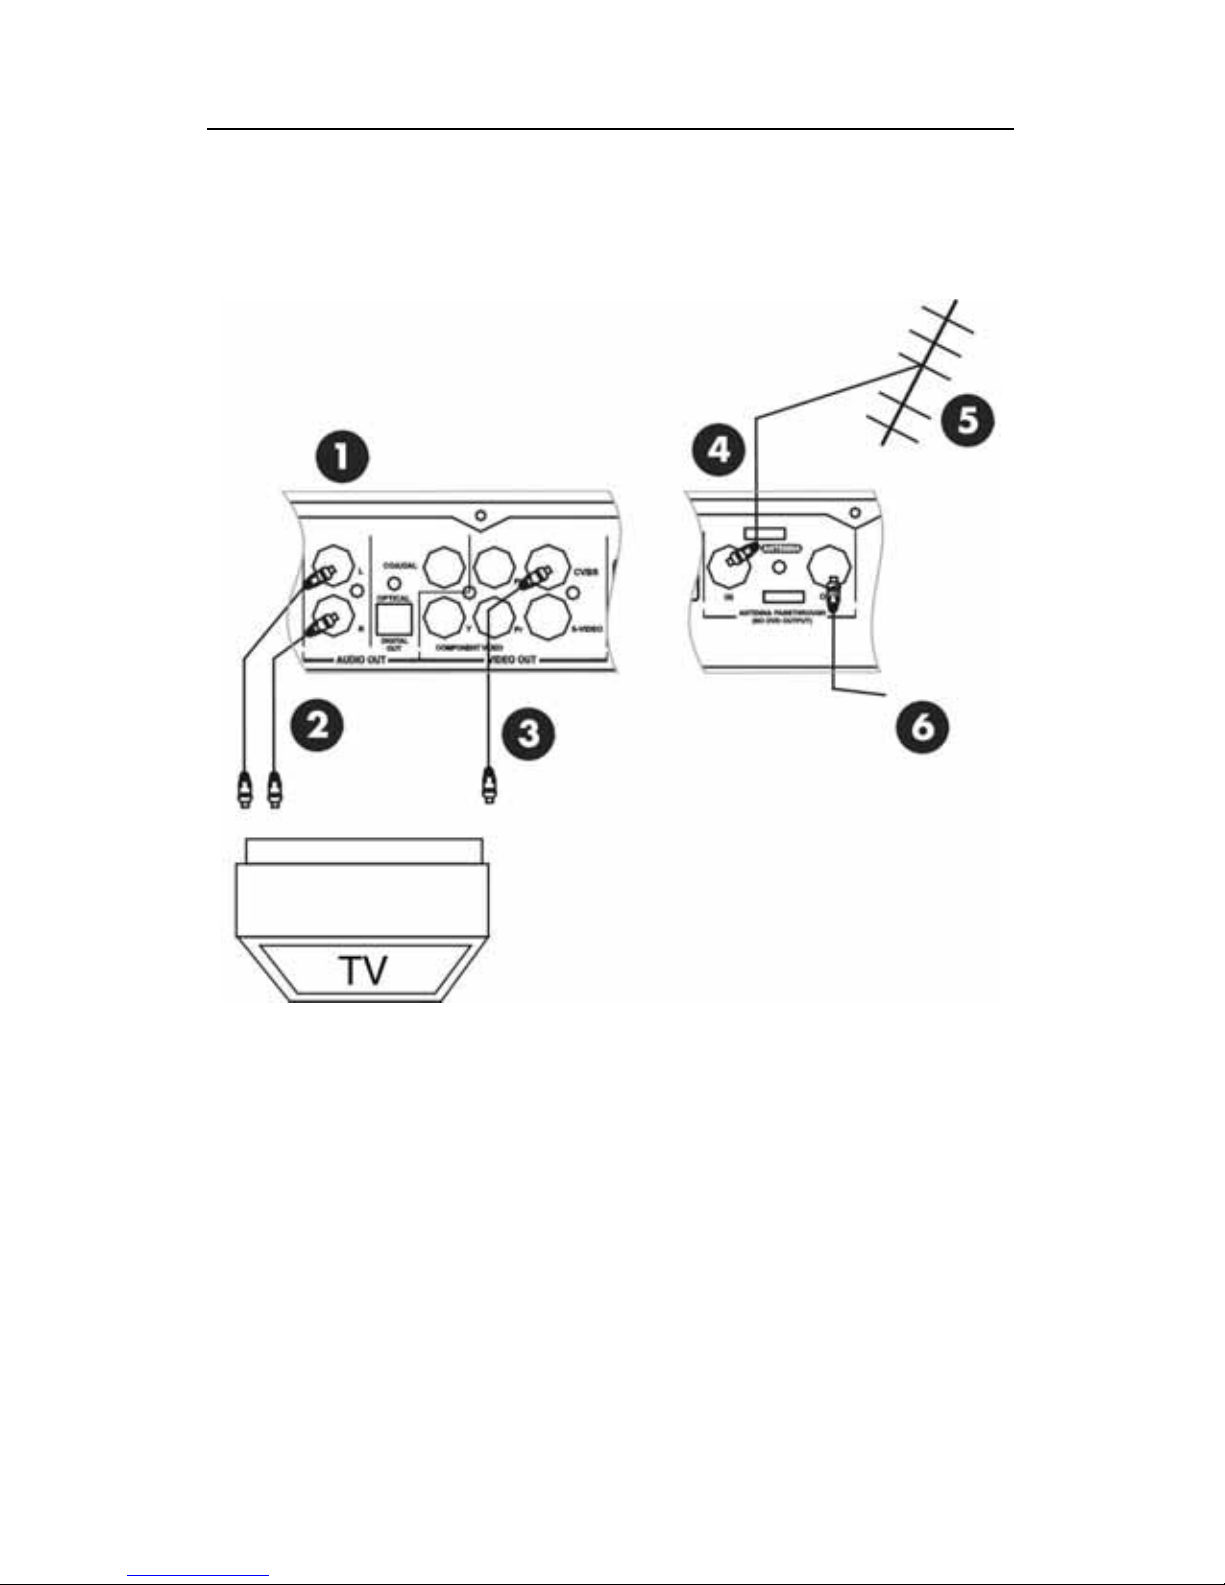
Watching TV via the Easy DVD
Press SOURCE on the remote control to switch to TV mode and start to auto scan
channels. The TV signal output jack is only a loop-through of the inputted signal.
Easy DVD
Audio
Video
Signal input
Antenna (or cable TV)
Signal output (can be used to output TV signal to another TV set's RF signal
input jack).
15
Page 14

Easy DVD User's Guide
Connecting to an amplifier
Dolby Pro Logic Decoder
You can enjoy the Dolby Surround audio effect by connecting the recorder to an
amplifier-and-speakers system with Dolby Pro Logic decoder.
To AUDIO OUT (LEFT/RIGHT) jacks
To AUDIO IN jacks
FRONT LEFT
CENTER
FRONT RIGHT
SURROUND RIGHT
SURROUND LEFT
16
Page 15

Easy DVD User's Guide
Dolby Digital or DTS Decoder
You can enjoy reproduced 5.1-channel Dolby Digital audio or Digital Theatre
Systems audio effect by connecting the recorder to an amplifier-and-speakers
system with Dolby Digital decoder or DTS decoder via a coaxial cable.
AMPLIFIER with DOLBY DIGITAL or DTS decoder
FRONT LEFT
CENTER
SUBWOOFER
FRONT RIGHT
SURROUND RIGHT
17
Page 16

Easy DVD User's Guide
SURROUND LEFT
Connecting Input AV signal using SCART
IN jack
To record signal inputted via the SCART IN jack (e.g, the AV signal from a DVD
player with SCART out jack), press INPUT on the remote control to switch the
current mode of the Easy DVD to the proper mode.
Even when the DVD recorder is in STAND-BY status, the AV signal from the
external AV signal source can be normally played on the TV set via the SCART IN
and SCART OUT jacks on the DVD recorder.
Canal+ decoder should be connected to SCART IN to obtain the decrypted TV
program.
External AV signal source (e.g. DVD)
18
Page 17

Easy DVD User's Guide
DVD recorder
Connecting Input AV or DV signal
Via the front panel
Flip down the door as indicated by the
OPEN label.
Select the correct AV signal input by pressing the SOURCE button on your remote
control. If the signal source is connected via the S-VIDEO jack, press SOURCE to
select FRONT S-VIDEO INPUT. If the signal source is connected via the DV jack,
press SOURCE to select DV INPUT.
Use S-Video jack or composite video jack
19
Page 18

Easy DVD User's Guide
Audio input jack
iEEE 1394 jack
External AV Signal
Via the rear panel
Signal output
Audio cable
Video cable
20
Page 19

Easy DVD User's Guide
VI. Using your Easy DVD
Playing Discs
DVD
1. Make sure all connections are correct, then plug the power cord into a wall
outlet.
2. Press the POWER button on the front panel or remote control to power on your
Easy DVD.
3. Insert a DVD disc when LOAD displays.
4. Use the arrow keys to select the desired title.
5. Press OK or PLAY/PAUSE. The selected title will start playing.
6. Press OK during playback to display playback information.
T01/05 C01/24 AU01/02 00 02 35
Current Title/
Total Titles
Current Chapter/
Total Chapters
Current Audio
Language/Total
Audio Languages
Elapsed Time
7. Press OK again, the playback control menu shows as below. Press the LEFT
arrow button to shut down the menu.
7. To remove the disc, press the button on the front panel.
21
Page 20

Easy DVD User's Guide
When using a DVD+RW or DVD+R, browse the DVD Index
Screen and use the ARROW keys to select the desired
title.
1. TITLE Name of the recording (the default
name is "TITLE").
01/01/2000 Recording date.
12:00:44 Recording time.
HQ 00:00:31 Quality setting and length of the
recording.
JPG/ MP3 files
If a disc contains both JPEG and MP3 files, you can play pictures and music
simultaneously.
1. Use the arrow and OK buttons to select the MP3 and JPEG folders and files for
playback.
2. For JPEG/MP3 simultaneous playback, select the MP3 file then the JPEG file.
3. Press STOP to stop the JPEG or MP3 playback. For simultaneous playback, press
STOP twice to stop both playbacks.
DivX files
If a disc contains DivX files, a playlist window will automatically display when th e
disc is loaded.
1. Use the arrow buttons to select your file and press OK to play it.
2. Use the CLEAR and UP/DOWN buttons to create a playlist in the right panel and
play files in your desired sequence.
3. Press DISPLAY to view/hide the playlist window during playback.
22
Page 21

Easy DVD User's Guide
DivX Registration
To rent or purchase videos using Divx® technology, you need to register your Easy
DVD.
1. Press SETUP and find a 16 bit Characters registration code in DivX folder of the
setup menu.
2. Use this code to create a new DivX VOD account on its official web page, please
check in details at
www.divx.com/vod.
3. To create a new DivX VOD account, press OK to generate new registration code
and repeat the above steps.
Controlling playback
Using menus
Press OK to show the control menu during playback and press the LEFT arrow
button to exit.
MODE Set the playback mode, e.g.: Repeat, Program, Random, etc.
TRACK Set the playback status, e.g.: Stop, F.F., F.R., S.F., etc.
TITLE Press OK then access the desired title and play it.
CHAPTER Enter the desired chapter number and play it.
AUDIO Select the audio language you want to use, e.g.: CHI (Chinese), ENG
(English), etc.
SUBTITLE Select the subtitle language.
ANGLE Select the camera angle (must be supported by the disc).
T-TIME Display the elapsed and remaining time.
23
Page 22

Easy DVD User's Guide
Using the remote control
Fast Forward/
Fast Reverse
Press
or repeatedly to fast reverse or forward at 4
different speeds.
Press PLAY/PAUSE to resume normal playback.
Play / Pause
Press
on the remote control or on the front panel to start
playback or pause.
Slow Forward Press SLOW during playback to slow forward at three different
speeds: SF1/2, SF1/4, and SF1/8.
Press PLAY/PAUSE to resume normal playbac k. Playback may differ depending on
the disc used.
Search Press GOTO to access the search menu (press GOTO repeatedly
to access the three modes: title, chapter or time).
Use the number buttons to select a title, and press OK to play.
Some DVD discs may not support time searching mode.
Skip
Press
or to skip to the previous / next title or
chapter.
Repeat
A-B Repeat
1. Press OK twice to access the setup menu during playback.
2. Use the UP/DOWN arrow buttons to highlight the MODE item,
and press OK.
3. Use the UP/DOWN arrow buttons to highlight the A-B REPEAT
item, press OK to mark the start point (A); press OK again to
display the A-B REPEAT item, and press OK for the third time to
mark the end point (B). The section between the start and end
points will be played repeatedly.
4. Press the LEFT arrow button to exit the menu.
Title/chapter/disc repeat
Repeatedly press REPEAT during playback to repeat
title/chapter/disc, and to resume normal playback.
Disc menu 1. Press MENU to show the disc menu.
2. Use the arrow buttons to select a title, and press OK to start
24
Page 23

Easy DVD User's Guide
playback. Alternatively, use the number buttons to play a
selected title directly.
For VCD discs, press STOP to access the upper menu (PBC ON). For VCDs 2.0 a nd
above, pressing the number buttons during playback will trigger no action.
Playing in
sequence
Press MENU to switch between VCD DISC MENU (PBC ON) and
PLAY IN SEQUENCE (PBC OFF) mode.
For SVCDs and VCDs 1.0, 1.1, the player will enter the PLAY IN SEQUENCE mode
after the disc is loaded. In this mode, you can press number buttons to select a
title, including during playback. Some discs will start to play automatically.
Viewing angle When playing a DVD, press ANGLE repeatedly to toggle
between up to 9 viewing angles.
Audio language For DVD/SVCD discs, press AUDIO repeatedly to toggle between
up to 8 audio languages or sound when the disc is recorded
with multi-languages.
Example: 1 / 4 ENG DOLBY
1: first audio language
4: 4 languages are available
ENG: the first audio language is ENGLISH
For Karaoke discs, press AUDIO to switch between the accompany music and vocal.
Subtitle
language
For DVD/SVCD discs, press S-TITLE repeatedly to toggle
between up to 32 subtitle languages when the disc is recorded
with multi-subtitles.
Example: SUBTITLE: 03 / 08 CHI
03: third subtitle
08: 8 subtitles are available
CHI: the third subtitle is CHINESE
Screen display Press OK during playback, the following information shows:
25
Page 24

Easy DVD User's Guide
26
Example: NORMAL PLAY T01/01 C01/10 AU01/02 00:01:41
NORMAL: DVD disc
PLAY: Playing
T01/01: Title
C01/10: Chapter
AU01/02: Audio language
00:01:41: Elapsed time
Press OK again during playback, the playback control menu
displays. Press the LEFT arrow button to exit the control menu.
The information displayed is related to the settings and disc contents.
Program playing 1. Press OK twice to access the playback control menu.
2. Select "Program" in the "Mode" submenu, the following
window displays:
3. Use the arrow buttons to highlight the title or chapter you
want to program play.
4. Press CLEAR, the title or chapter name will be added into
the right panel. Use this method to add all your favourite titles
or chapters.
5. Press the RIGHT arrow button to move the cursor into the
right panel, and press CLEAR to remove a title or chapter from
the list.
6. Press OK to start program playback.
To exit, press STOP, or press OK to access the control menu
and select the NORMAL status.
Page 25

Easy DVD User's Guide
Parental lock
Parental lock is a password protecting system. It enables you to prevent this
equipment from playing some discs according to their rating.
1. Press STOP twice during playback.
2. Press SETUP to access the system setup menu.
3. Press the UP/DOWN arrow buttons to highlight an item and press OK to confirm
the selection. Proceed likewise to select a RATING LEVEL.
5. Use the number buttons to enter your password (the default password is 3308)
and press OK to confirm.
6. Press OK again to display the level list, and use the UP/DOWN arrow buttons to
highlight the level you want to set. Press OK to confirm.
8. Press SETUP to exit.
Changing password
1. Repeat step 1 to step 5 as described above.
2. Use the UP/DOWN buttons to select 'NEW' and press OK.
3. Enter new password in the first box; and enter it again in the confirming box.
4. Press OK to save the new password and press SETUP to exit the menu.
System menu
1. Press SETUP when the playback is stopped to show the system menu.
2. Use the arrow buttons to select an item, press OK to confirm.
3. Press SETUP again to exit the menu.
27
Page 26

Easy DVD User's Guide
TV channel setting
To record TV programs, you must make sure that you have performed TV channel
scanning:
1. Press SETUP to access the system menu when the playback is stopped.
2. Use the UP/DOWN arrow buttons to highlight
and press OK.
28
Page 27

Easy DVD User's Guide
3. Use the UP/DOWN arrow buttons to highlight "Scan channels" and press OK.
Proceed likewise to highlight "Modify channel information".
Name
Use the arrow buttons to select and edit channel name.
Scan
mode
Use the UP/DOWN arrow buttons to select a scan mode (Frequency,
Channel, S-Channel).
Frequency Frequency of current channel. This item may be displayed as
Channel or S-Channel due to the setting of the second item. Press
the LEFT/RIGHT arrow buttons to search the next channel
downward/ upward in Frequency (Channel/S-Channel) sequence.
Sound
mode
Select TV system of the current channel.
NICAM Turn on/off the NICAM option.
Audio Change audio option. There are two options: DUAL A and DUAL B.
Skip Decide whether to skip this channel when using CH +/- buttons to
navigate between channels.
29
Page 28

Easy DVD User's Guide
Fine tune Fine tune current channel.
OK Confirm current channel's settings and save.
Cancel Discard current settings and exit the menu.
1. Use the UP/DOWN arrow buttons to select "Sort channel order", and press OK.
2. Use the UP/DOWN arrow buttons to select the channel you want to sort, and
press OK or the RIGHT button to confirm.
3. The selected channel will be moved to the right panel temporarily.
4. Press the UP/DOWN arrow button, the selected channel moves along with the
cursor. Move the cursor to your desired position, and press the LEFT button to
insert it into the left list.
Recording
When recording is stopped, press SOURCE to return to playback mode.
Basic recording
1. Insert a recordable DVD+RW or DVD+R.
3. Press SOURCE to select signal source for recording.
4. Press OK to display the current status. Press OK again to access the recording
control menu.
30
Page 29

Easy DVD User's Guide
New title Newly recorded content will be saved as a new title.
Append
title
Newly recorded content will be appended to the last title on the
disc.
Overwrite
title
The current title will be overwritten by newly recorded content.
Overwrite
disc
The whole disc will be overwritten by newly recorded content.
SIGNAL SOURCE: Use the UP/DOWN arrow buttons to select the SOURCE item, and
press OK to select a signal source.
Front CVBS Front Audio/Video Input (front panel)
Front S-VIDEO Front S-Video Input (front panel)
DV DV Input (front panel)
SCART SCART Input (rear panel)
Tuner TV program
31
Page 30

Easy DVD User's Guide
QUALITY: defines recording time on blank disc.
HQ High quality, nearly 60 minutes.
SP Standard Playback quality, nearly 120 minutes.
EP Extended Playback, nearly 240 minutes.
SLP Standard Long Playback, nearly 360 minutes.
REC TO: this option is invalid.
TRACK
STOP Stop recording.
PAUSE Suspend recording.
RECORD Start recording.
TITLE: current title name.
CHAPTER: current chapter name.
TIME: current recording time position on the disc.
You can record up to 124 chapters and 99 titles on a disc.
OTR ( One Touch Recording)
1. Press RECORD: the Easy DVD will start recording in the set recording mode.
32
Page 31

Easy DVD User's Guide
2. While recording, press the RECORD button on the front panel or on the remote
control: it will automatically record for 30 minutes. Each pressing og the RECORD
button will add 30-minutes recording.
The length of the recording time is determined by disc capacity and recording
quality. If the recording time you set exceeds the capacity of the disc, OTR will be
cancelled and the unit will automatically switch to normal recording status.
3. To stop recording, press STOP.
Time settings
Setting the clock
1. While playback is stopped, press SETUP to display the system menu.
2. Use the UP/DOWN arrow buttons to highlight the CLOCK icon and press OK.
3. Use the UP/DOWN arrow buttons to highlight the Date or Time and press OK.
4. Use the 0-9 keys to enter the information and press OK to confirm.
System time adjustment
If your TV integrates time code, the Easy DVD can automatically adjust the system
time. Only the time code integrated in the first TV channel can be used by the
Easy DVD.
Time recording
1. Make sure the clock is set accurately to your local time.
2. Press the TIMER button to display the record scheduler.
To delete a programmed event, use th e UP/DOWN arrow buttons to highlight it
and press CLEAR.
3. Use the UP/DOWN arrow buttons to highlight an event and press OK. The Item
Editor dialogue box displays.
33
Page 32

Easy DVD User's Guide
Source Select your input source
Quality Select the record quality
Mode Select the record mode (once,
daily or weekly)
Date Select the date of time
recoding event
Start Select the start time of time
recording event
End Select the end time of time
recording event
5. Move cursor to the OK button and press OK to save your settings.
6. Several minutes before the time recording event begins, a dialogue box will
appear on your TV screen prompting you to confirm or cancel the event. If you do
not make any selection, the timer recording will proceed as scheduled.
If the recorder is in standby sta tus, it will power on automatically two minutes
before the start of the time recording event.
A DVD+RW/DVD+R disc can record 360 minutes of programs. These programs can
be divided into 48 titles.
Editing DVD+R / DVD+RW discs
Editing a DVD+R disc
1. Insert a DVD+R disc into the disc tray.
2. Press DISC-OP to display the disc editing menu.
34
Page 33

Easy DVD User's Guide
Play Play recorded titles in sequence.
Rename disc Rename the disc.
Finalize disc Finalize a DVD+R disc.
Before this disc can be played in other DVD players, it must be finalized in the
DVD recorder. Once this process is completed, no further recordings can be added
New title Record new contents in a new title. This title will be the last
title on the disc.
Editing a DVD+RW title
1. Insert a DVD+RW disc with recorded contents into the disc tray. The Index
Screen appears.
2. Use the UP/DOWN arrow buttons to highlight the title you want to edit. Use the
arrow keys to scroll the title list. If there are more than 3 titles, press the DOWN
arrow button to view the other titles.
3. Press EDIT to display the title edit menu. Use the UP/DOWN arrow buttons to
highlight the target item, and press OK. Then use the UP/DOWN and OK buttons to
make selection.
35
Page 34

Easy DVD User's Guide
Title: view current title number / total number of titles.
Chapter: view current chapter number / total number of chapters.
Play: current playback status.
Chapter marker: select to add or delete chapter markers.
Hide chapter: select to hide or unhide the current chapter.
If a chapter is hidden, it will be skipped during playback. If you want to play this
chapter, you need to access the "EDIT MODE" menu, and select the "Unhide
chapter" item. Press OK to confirm your selection, and then press EDIT to exit.
Index picture: select to set the current image as the title's icon.
Split title: select to divide current title into 2 separate titles at
current point.
4. Press EDIT to exit the menu.
Editing DVD+RW titles
1. Insert a DVD+RW disc with recorded contents into the disc tray. The Index
Screen appears.
2. Use the UP/DOWN arrow buttons to highlight the title you want to edit and
press RIGHT arrow key to show the edit menu.
3. Use the UP/DOWN arrow buttons to highlight the item you want to select and
press OK to confirm your selection.
Play title Play current title.
Erase title Erase current title.
36
Page 35

Easy DVD User's Guide
Edit title Edit current title (see previous section).
Rename
title
Rename current title.
1. Press OK on this item, a keyboard displays on your TV screen.
2. Use the ARROW buttons to highlight the letter or character you
want to input and press OK to confirm.
3. Select OK and press PK to save the name.
The maximum length of a title name is 9 characters.
Overwrite
title
To set the newly recorded contents be recorded from the start of
current title and overwrite the title.
If the time length of newly recorded contents is shorter than the length of
original title, the remainder of the original title will be saved as a new title on
the disc.
If the time length of newly recorded contents is longer than the length of the
original title, the recording process will be aut omatical ly stopp e d when it ex cee ds
the end of the original title.
Append Append a new ti tle after the last title on the disc (this item appears
only if you are editing the last title on the disc).
Overwrite
disc
The newly recorded contents will overwrite the whole disc from the
start of the disc.
When you select Overwrite title/Append/Overwrite disc, and press OK to
confirm, the signal source will be automatically changed to the previous signal
source (before the disc editing). If you press SOURCE and select Rear AV Æ Rear
S-Video Æ DV Æ DVD, and then start the disc editing, the Easy DVD will
automatically switch to DV input. You can use the SOURCE button to change it to
other signal source. You can use the SOURCE button to select the signal source,
and press PLAY/PAUSE to directly go to the DVD disc title menu).
If you select Overwrite title/Append/Overwrite disc, you have to press the
RECORD button on the front panel or the remote control to start recording.
37
Page 36

Easy DVD User's Guide
Editing a DVD+RW disc
1. Insert a DVD+RW disc into the disc tray.
2. Use the UP arrow button to move the highlight to the top of the disc recording
information bar.
3. Press the RIGHT arrow button to show the disc menu. Use the UP/DOWN arrow
buttons to select an item, and press OK.
You can also press the DISC-OP button to perform steps 2 and 3.
Play Play recorded titles in sequence.
Erase disc Erase all contents on the disc.
Rename disc Rename the disc.
Make
compatible
If you have edited the DVD+RW disc, it must be made
compatible to be played by other DVD players.
New title Record new contents in a new title. This title will be saved as
the last title.
Overwrite disc Overwrite the whole disc from the start with new contents to
be recorded (see "Editing DVD+RW Titles").
Lock disc Lock current disc to protect the data it contains. The locked
disc cannot be erased or recorded until it is unlocked.
If a DVD+RW disc displays a different menu, press DISC-OP to erase the dis c first,
then you may make a new recording.
38
Page 37

Easy DVD User's Guide
VII. Troubleshooting
Problem Solution
No sound Connect the audio cables into the jacks securely.
Verify the connection from the DVD audio output to the
TV or receiver audio input. Make sure the correct AUDIO
input is selected on your TV or amplifier.
Refer to your audio amplifier documentation.
Only sound, no
picture
The scan mode of video output is incorrectly set. Press
PSCAN on the remote control to switch to correct mode.
No response Connect the power plug into the wall outlet securely.
Time recording is proceeding. Press POWER or STOP to
cancel time recording.
The appliance might encounter a technical failure.
Unplug the power cord and wait for 30 seconds before
connecting it to the wall outlet again. If it still doesn't
work, try to reset the Easy DVD to factory settings.
Remote control
does not work
The remote control is not pointing to the Easy DVD.
Please aim at the Easy DVD.
Batteries are low, replace them.
The appliance might encounter a technical failure.
Unload batteries, wait for 30 seconds before place them
back into the remote control.
Cannot play disc The disc is blank, replace it.
Incompatible disc: please check the "Disc specifications"
in this guide.
The disc is loaded with label side down. Load the disc
with label side up.
The region code does not match the region setting of
the Easy DVD.
Parental lock is on, unlock it. Default password is 3308.
Choose channel number on the TV set. C hoose a correct
channel number.
The connection between the DVD recorder and TV set is
loose. Check the connection.
Poor playing
quality (distorted
picture/sound)
The TV set is not properly adjusted.
The disc is dirty, clean it.
39
Page 38

Easy DVD User's Guide
Interference may also make the picture distorted.
Cannot record Wrong channel number. Please check the saved
channels.
The disc is write-protected. Remove the written
protection or change a disc.
The disc is a closed DVD+R disc. Change disc.
TV system mismatch. Please make sure the disc has not
been recorded in different video format (e.g. PAL or
NTSC). The Easy DVD does not support recordings of
different video format on the same DVD+R/RW disc.
The disc you use may not conform to the DVD+R/RW
standard.
Make sure it is a DVD+R (DVD plus R) or DVD+RW( DVD
plus 'RW') disc.
The Easy DVD does not record on CD-R/RW, DVD-R, DVD-
RW or DVD-RAM disc.
Please make sure the disc has not been used in a
computer before.
Time recording
does not work
The date or time is not correctly set, check them.
The time schedule is not correctly set, check it.
The disc is locked, unlock it.
The disc is a closed DVD+R disc. Change disc.
DVD+RW disc
cannot be edited
The disc is locked. Press DISC OP. on the remote control
and select Unlock Disc.
TV signal has
picture or sound
interference
Check the antenna.
Check the selected TV system in the system menu.
Distorted picture
or black-andwhite picture
The disc's colour system does not match the TV's colour
system.
The signal is not a colour signal.
No digital audio
output
Check whether the digital input jacks match the
external equipments' output jacks.
40
Page 39

Easy DVD User's Guide
VIII. Standards and Certifications
European notice
Products with the CE marking comply with both the Electromagnetic Compatibility
Directive (89/336/EEC) and the Low Voltage Directive (73/23/EEC) - modified by
the Directive 93/68/EEC - issued by the Council of the European Communities.
Compliance with these directives implies conformity to the following European
Standards:
EN55022 (1994+A1:1995+A2:1997): Radio disturbance characteristics
EN55024 (1998+A1:2000): Immunity characteristics
EN61000-3-2 (2000): Limitation of harmonic current emissions
EN61000-3-3 (1995+A1:2001): Limitation of voltage fluctuation and flicker in low-
voltage supply system
EN60950 (2000): Product Safety. If your product includes a telecommunication
network board, the input/output socket is classified as Telecommunication
Network Voltage (TNV-3).
Modifications to the Product
CE marking
NEC Computers International BV cannot be held responsible for unauthorised
modifications made by the user and the consequences thereof, which may alter
the conformity of the product with the CE Marking.
Radio frequency interference
The manufacturer is not responsible for any radio or TV interference caused by
unauthorised modifications to this equipment.
Power Supply and Cables
Power supply
The power supply socket-inlet is classified as Hazardous Voltage.
You must unplug the power supply cord to disconnect the equipment from the
power supply. In that aim, the socket-outlet should be installed near to the
equipment and should be easily accessible.
Under no circumstances should the user attempt to disassemble the power supply.
The power supply has no user-replaceable parts. Inside the power supply are
hazardous voltages that can cause serious personal injury.
41
Page 40

Easy DVD User's Guide
A defective power supply must be returned to your dealer.
Power cables
This equipment requires a 2-wire power cord. The cord length must not exceed 2.5
metres. Replace the power cord if it gets damaged. Contact your dealer for an
exact replacement. In Europe, the plug must be rated for 250 VAC, 10 amp
minimum. The plug must display an international agency approval marking. The
cord must be suitable for use in the end-user country. Consult your dealer or the
local electrical authorities if you are unsure of the type of power cord to use in
your country.
Batteries
Replacing Batteries
When replacing the batteries, use two batteries of the same type and
manufacturer. Replace the two batteries at the same time. Do not mix the use of
old and new batteries.
When not using the battery for a long period (more than one month), remove the
batteries to prevent damage from battery corrosion.
In case the battery leaks, clean the liquid and install new batteries.
Battery Disposal
Ultimate disposal of the batteries should be handled according to all national laws
and regulations. Do not place used batteries in your regular waste: the
incineration, landfilling or mixing of batteries with the municipal solid waste
stream is prohibited by law in most countries. Contact your local waste
management officials for other information regarding the environmentally sound
collection, recycling, and disposal of the batteries.
Chassis Cover Removal and Replacement
Before removing the chassis cover to service or modify the equipment, you must
disconnect all power cords. You then must close the chassis before you plug in and
switch on the equipment.
Laser Compliance Statement
The optical devices are tested and certified to be compliant with International
Electrotechnical Commission IEC60825 and European EN60825 standards for Class 1
laser products.
Class 1 laser products are not considered hazardous. The optical devices are
designed such that there is never human access to laser radiation above a Class 1
level during normal operation or prescribed maintenance conditions.
42
Page 41

Easy DVD User's Guide
The optical devices installed in your product are designed for use solely as
components of such electronic product and therefore do not comply with the
appropriate requirements of Code of Federal Regulation Sec. 1040.10 and Sec.
1040.11 for COMPLETE laser products.
Because exposure to laser radiation is extremely hazardous, under no
circumstances should the user attempt to disassemble the laser device.
43
 Loading...