

Page 1

WARNING
RISK OF ELECTRIC SHOCK
DO NOT OPEN
COPYRIGHT NOTICE
Packard Bell DVD DivX 300/350 User's Guide. Copyright 2004 NEC Computers International B.V. All Rights Reserved.
No part of this manual may be reproduced or transmitted, in any form or by any means, whether electronic, chemical, manual or
otherwise, including but not limited to photocopying, recording, or information storage and retrieval systems, for any purpose
without prior written permission of NEC Computers International B.V.
DISCLAIMER
NEC Computers International B.V. specifically disclaims all warranties, either express or implied, including, but not limited
to, implied warranties of merchantability and fitness for a particular purpose with respect to this product and documentation.
Updates to software and hardware components are made regularly. Therefore some of the instructions, specifications and
pictures in this documentation may differ slightly from your particular situation. All items described in this guide are for
illustration purposes only and may not apply to your particular situation. No legal rights or entitlements may be
obtained from descriptions made in this manual.
NEC Computers International B.V. reserves the right to revise or make changes or improvements to this product or
documentation at any time without obligation to notify any person of such revisions or improvements. In no event shall NEC
Computers International B.V. be liable for any consequential or incidental damages, including but not limited to loss of
business profits or any other commercial damages, arising out of the use of this product.
TRADEMARKS
Packard Bell is a registered trademark of NEC Computers International B.V. All other company or product names are
trademarks, registered trademarks or service marks of their respective owners.
1. Warning
To prevent fire or shock hazard, do not use the plug with an extension cord,
receptacle or other outlet unless the plug can be fully inserted, to prevent fire
or shock hazard. Do not expose this appliance to rain or moisture.
The lightning flash with arrowhead symbol
within an equilateral triangle is intended to
alert the user to the presence of uninsulated
dangerous voltage within the product's
enclosure that may be of sufficient magnitude
to constitute a risk of electric shock to persons.
WARNING: TO REDUCE THE RISK OF
ELECTRIC SHOCK, DO NOT REMOVE
THE COVER (OR BACK). NO USER
SERVICEABLE PARTS INSIDE, REFER
SERVICING TO QUALIFIED SERVICE
PERSONNEL
The exclamation point within an
equilateral triangle is intended to
alert the user to the presence of important
operating and maintenance (servicing)
instructions in the literature accompanying
the appliance.
1.1 Important Safety Precautions
Read these instructions.
Keep these instructions.
Heed all warnings.
Follow all instructions.
Do not use this apparatus near water.
Clean only with a dry cloth.
Do not block any ventilation openings. Install in accordance with the manufacturer's
instructions.
Do not install near any heat sources such as radiators, heat registers, stoves or other
apparatus (including amplifiers) that produce heat.
C
Page 2

Do not defeat the safety purpose of the polarized or grounding-type plug. A polarized
plug has two blades with one wider than the other. A grounding type plug has two
blades and a third grounding prong. The wide blade or the third prong is provided
for your safety. If the provided plug does not fit into your outlet, consult an electrician
for replacement of the obsolete outlet.
Protect the power cord from being walked on and from pinching.
Only use attachments/ accessories specified by the manufacturer.
Unplug this apparatus during lightning storms or when unused for long periods of
time.
Refer all servicing to qualified service personnel. Servicing is required when the
apparatus has been damaged in any way, has been exposed to rain or moisture,
does not operate normally or has been dropped.
Please note that the product warranty does not apply if damage to the product is
the result of a lightning strike.
Page 3

CONTENTS
1
3
4
11
12
14
2
2
3
6
11
13
22
2
9
12
12
12
13
14
22
23
24
14
13
13
13
11
11
9
8
6
6
6
14
14
1. DVD brief
1.1 Difference between DVD and other disc
1.2 Features
1.3 An introduction to your DVD player
2. Applicable symbols in this user manual
3. Buttons and connectors
4. Setting up your DVD player
4.1 Box contents
4.2 Inserting remote control batteries
4.3 Connections
4.4 Setting of your TV set
5. Operation instructions
5.1 Disc playback
6. Function buttons introduction
6.1 Screen display
6.2 Language
6.3 Angle
6.4 Subtitles
6.5 Program
6.6 MENU DVD
6.7 SUB-MENU
6.8 Direction selection buttons
6.9 Numeric buttons
6.10 PBC button (Program Backward Control)
6.11 A-B
6.12 Repeat
6.13 Zoom
6.14 Volume/ MIC-, MIC+
6.15 Random
6.16 Mute
6.17 L/R
6.18 VIDEO OUT
6.19 Progressive Scan
6.20 Pause
6.21 Forward/ Backward
6.22 Stop
7. System setup
8. MP3 Playback
9. Kodak Picture CD Playback
10. Troubleshooting
11. Disc maintenance
12. Specifications
7
9
11
14
14
24
10
Page 4

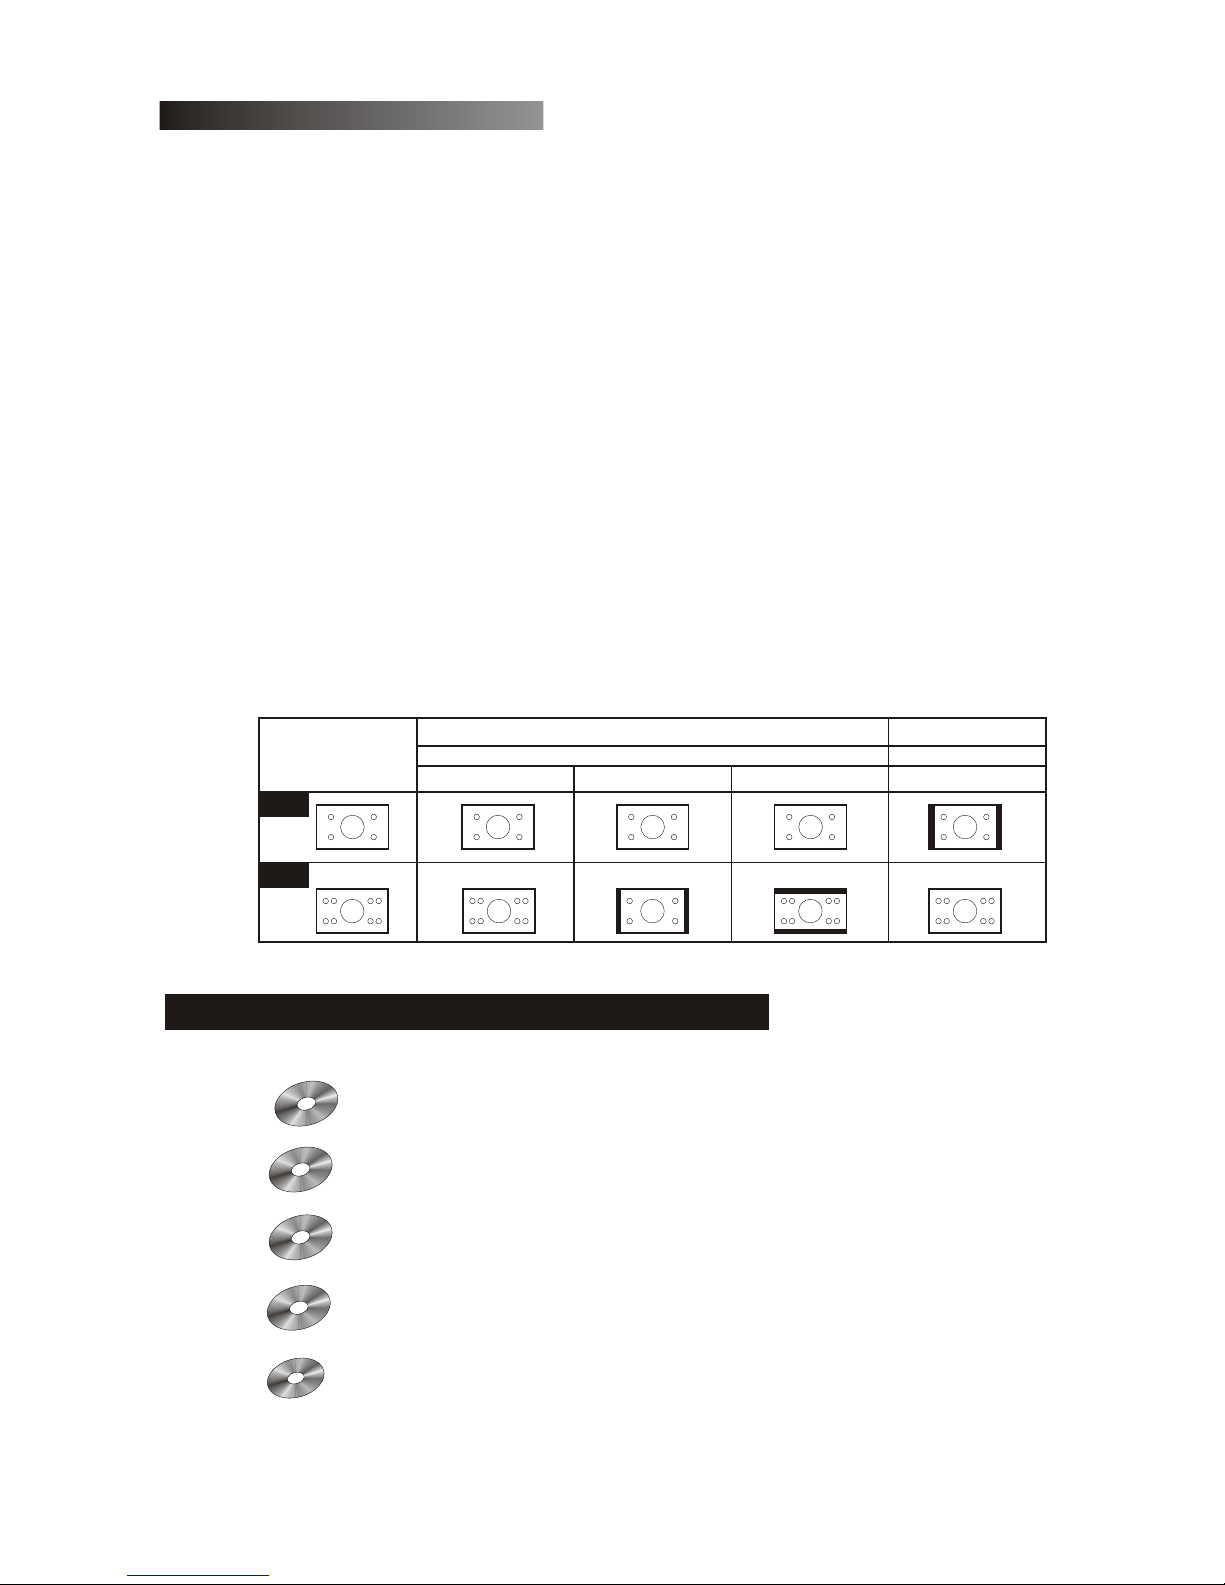
1.1 Difference between DVD and other discs
1 DVD brief
1.2 Features
2
The DVD player is a must for your home theatre system. By using this latest digital technology,
high quality, high-density sound and video has been condensed into a 12 cm disc.
DVD
SVCD
VCD
CD
LD
Recording
Digital/MPEG2
digital
digital Analogue
Capacity
Double
layer
Mono
side,
8.5GB
Mono
layer,
double
Side,
9.4GB
Double
sides,
Double
layer,
17GB
650MB
650MB
Play time
133
min
45min
74min
1side:60min
2side:102min
Disc
diameter
12cm/8cm
12cm
12cm
/8cm
30cm
/20cm
Horizontal
resolution
500 line or above
350
line
430
line
Picture
scale
Multi-scales
One
Subtitle
Language
32 subtitle language
8
Utmost 16
Sound
Dolby decoder/ linear PCM
Linear
PCM
Linear PCM,
FM
Sound
quality
44.1KHz, 48KHz,96KHz16,20,24bit
44.1KHz
/16bit
channels
Dolby digital/linear PCM:8
Dolby digital/5+1 linear PCM:8
4
2
Linear
PCM:2
Analogue:2
242
min
266
min
484
min
One side,
mono
layer
4.7GB
DVD discs can support many technologies. The following marks are available to describe
these technologies:
NTSC zone coding & TV system
DOLBY digital surround sound
Numbers of sound language
Numbers of subtitle language
Picture scale mode
Parental lock
View angle
Close caption
(Only NTSC)
ALL
NTSC
2
16:9
LB
R RESTRICTED
4
CC
Page 5
3
A. FULL COMPATIBILITY
Fully compatible with various disc formats: DVD, SVCD, VCD, CD, CD-G, DivX, WMA,
XVID, Kodak Picture CD and Mp3.
B. HIGH DEFINITION
Horizontal image definition can reach 500 lines or above.
C. DTS, Dolby 5.1 channels digital surround sound output
DTS, Dolby 5.1 channels (6 single channels) digital surround sound provide.
Listeners 3D effects and can intensify the bass effect.
D. PARENTAL LOCK
This allows protecting your children against violent or erotic material.
E. Multi story plot selection
Users can select and play different plots of a story (beginning, advancing, climax and
ending) from a disc. Available on certain discs only.
F. Multi subtitles and sound languages
Up to 32 subtitle and 8 sound languages are supported.
G. Multi view-angle
Users can view from different angles (close watching, side watching, panorama etc.).
Available on certain discs only.
Disc video
TV set screen scale
normal
pan scan
letter box
4:3
16:9
4:3
16:9
1.3An introduction to your DVD-Player
2. Applicable symbols in this user manual
These symbols indicate that it can play Mp3/ WMA discs.
This symbol indicates that it can play DVD discs.
DVD
These symbols indicate that it can play SVCD/CVD/OKO discs.
SV
CD
VCD
This symbol indicates that it can play CD discs.
CD
Mp
3
WM
A
DivX
XVID
These symbols indicate that it can play DIVX/XVID disc.
Page 6

3.Buttons introduction:
Front panel diagram (DVD DivX 300) :
WEIGHT: 2.9kg
SIZE: 420mmX42mmX240mm
Back panel diagram (DVD DivX 300):
1. Optical output jack
2. Coaxial output jack
3. Center output jack
4. Sub-woofer output jack
5. Left and right surround output jack
6. Left and right front output jack
7. Video output jack
8.S-video output jack
9.Y Cb/Pb Cr/Pr
10.Scart output jack
11.Power cable
4
4. VFD display
7. Prev button
5. I.R
8. Next button
6. Play button
1. Power button
2. DVD disc holder
3. Open/Close button
1
2
3
6
4
7
8
55
3.Buttons and connectors
1
2
3
4
5
6
7
8
10
9
11
Page 7

Front panel diagram (DVD DivX 350) :
WEIGHT: 2.5kg
SIZE: 430mmX38mmX255mm
Back panel diagram (DVD DivX 350):
1. Optical output jack
2. Coaxial output jack
3. Center output jack
4. Sub-woofer output jack
5. Left and right surround output jack
6. Left and right front output jack
7. Video output jack
8.S-video output jack
9.Y Cb/Pb Cr/Pr
10.Scart output jack
11.Power cable
4-1
4. VFD display
7. Prev button
5. Play button
8. Next button
6. Stop button
1. Power button
2. DVD disc holder
3. Open/Close button
2
3
5
6
7
1
4
8
9
11
10
1
2
3
6
4
7
8
55
Page 8
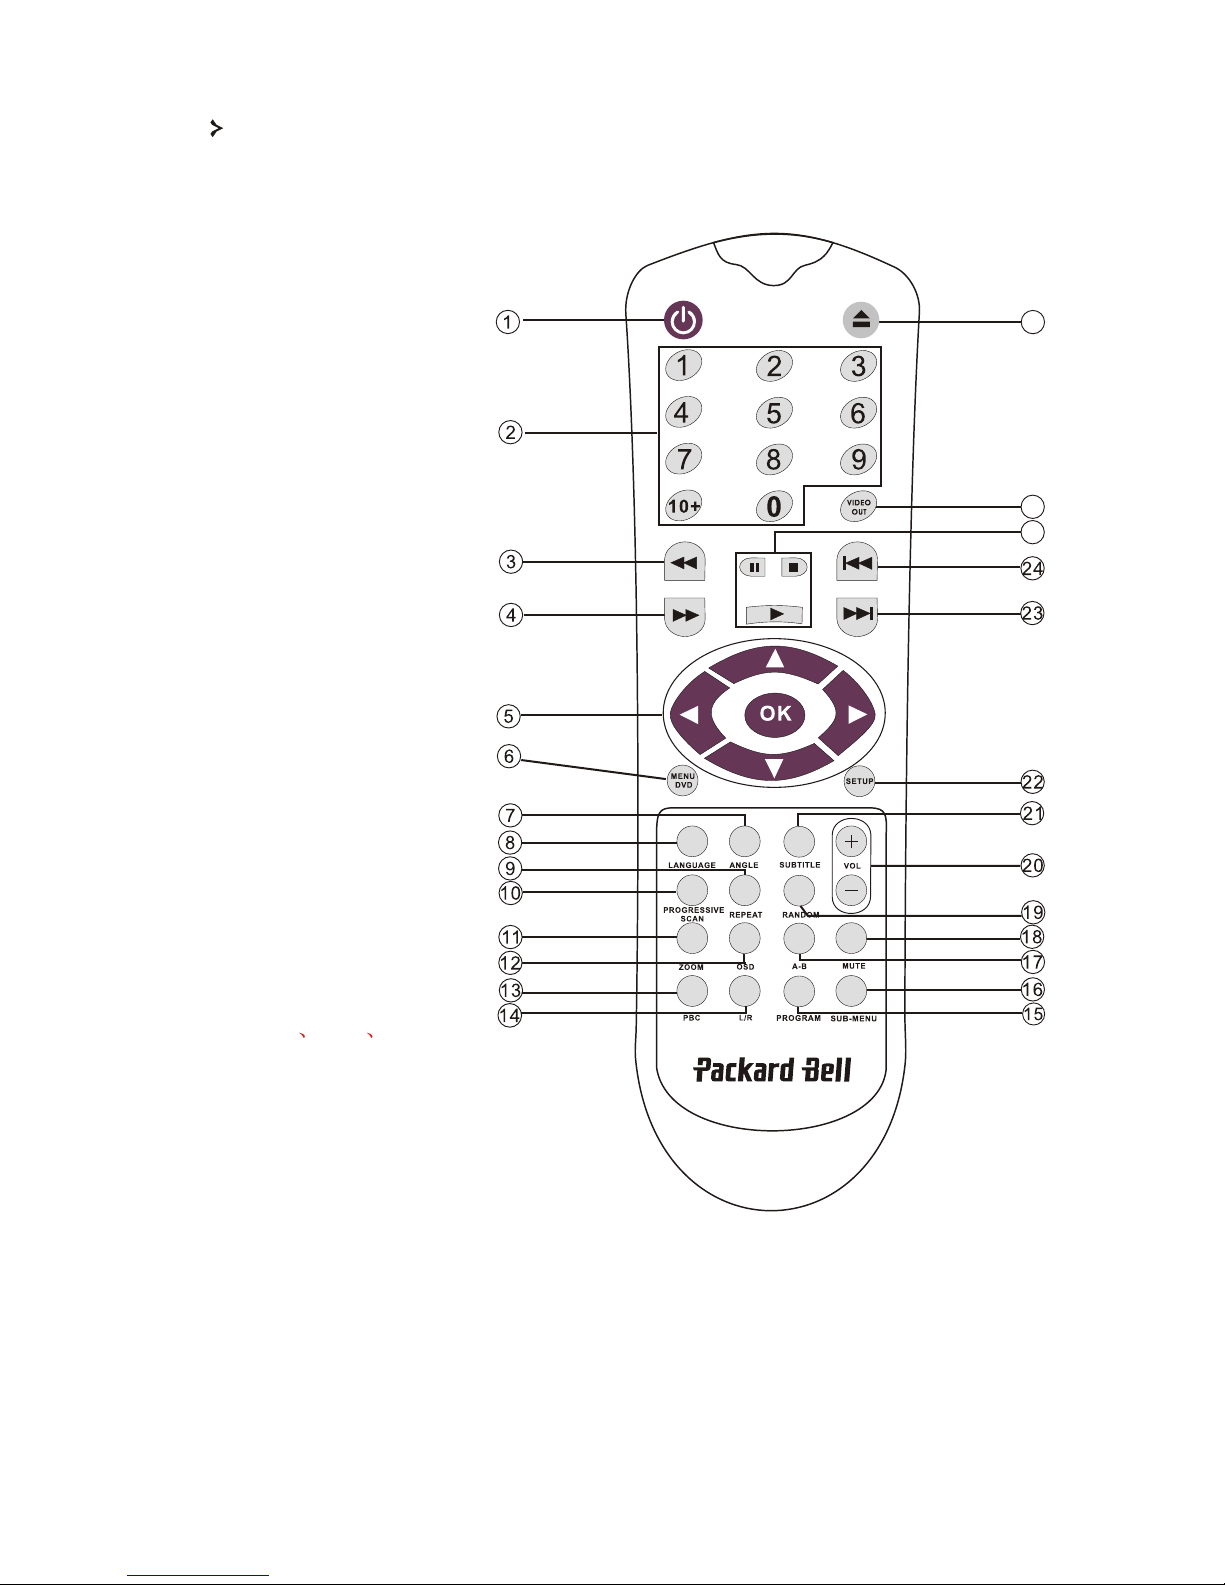
Remote control diagram:
5
1. Power
2. Numeric buttons
3. Fast forword
4. Fast Rewind
5. CURSOR CONTROL
(up, down, left, right) /
OK(enter)
6. Menu dvd
7. Angle
8. Language
9. Repeat
10.Progressive scan
11.Zoom
12.OSD
13.PBC
14.L/R
15.Program
16.Sub-menu
17.A-B
18.Mute
19.Random
20.VOL+/-
21.Subtitle
22.Setup
23.Next
24.Prev
25.Pause Stop Play
26.Video out
27.Open/Close
25
26
27
Page 9
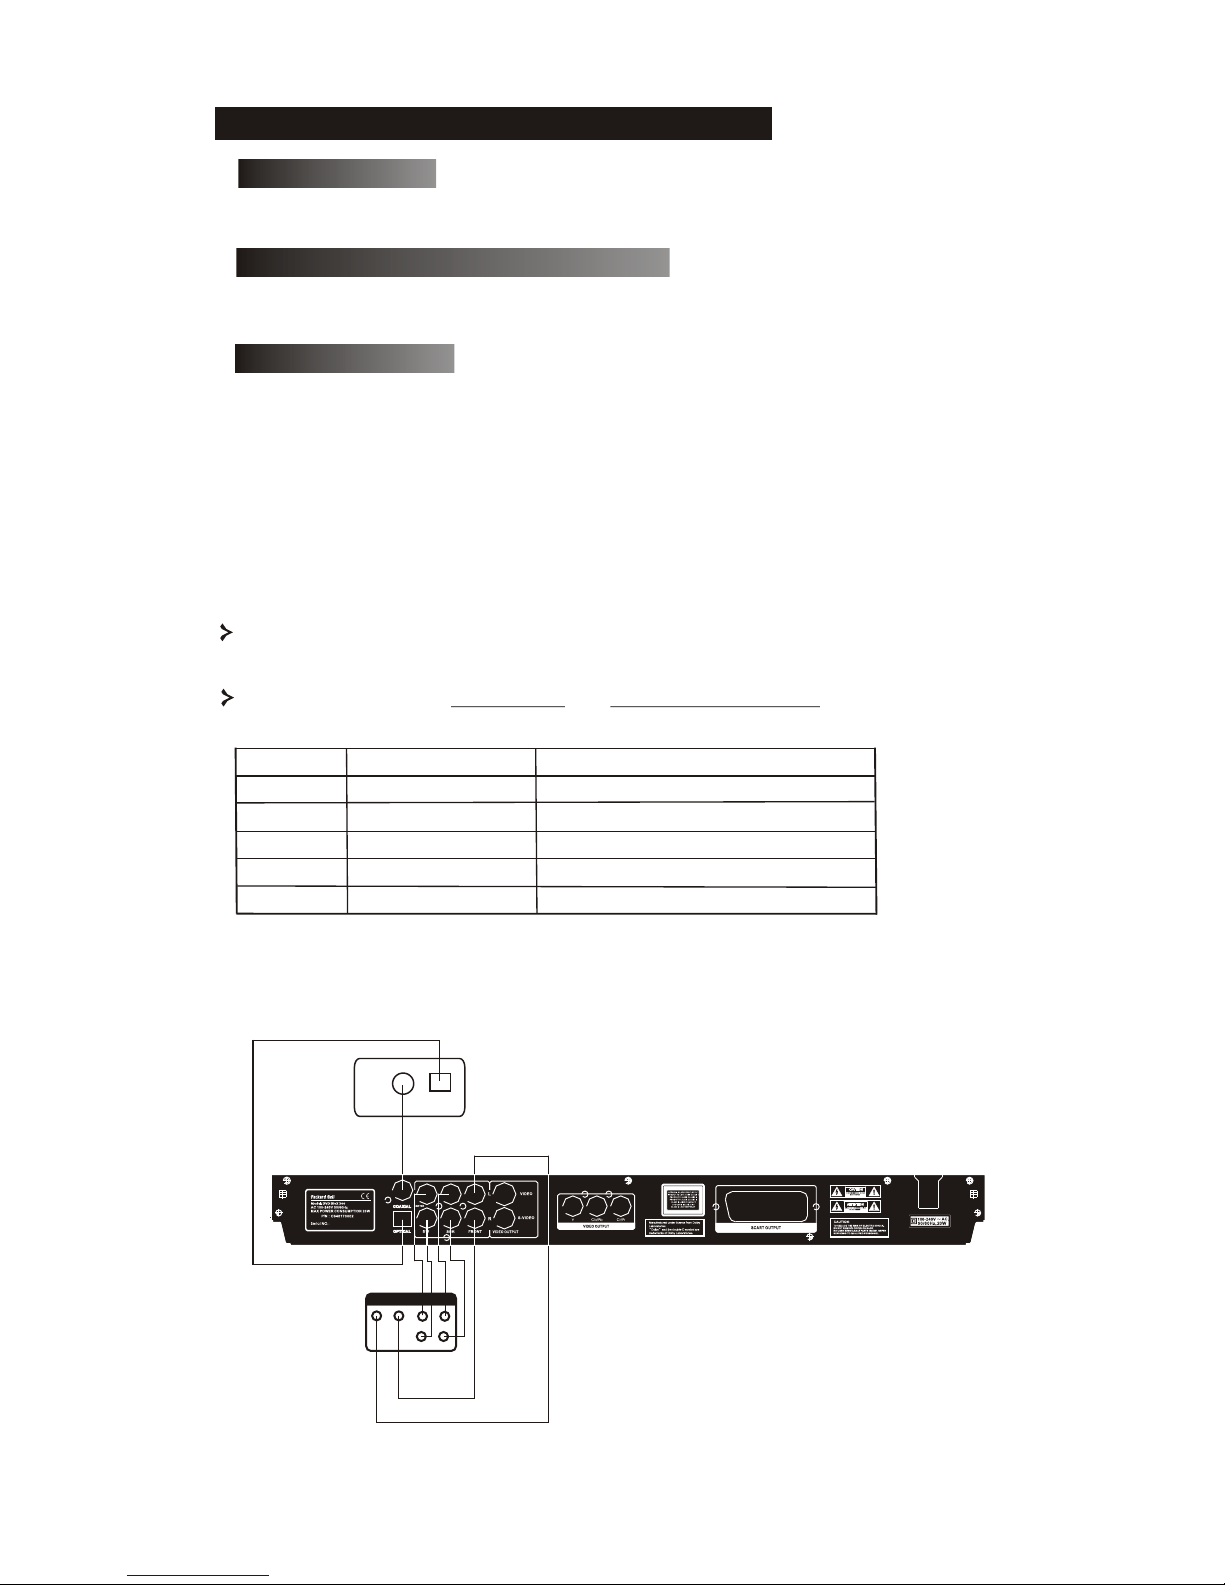
DVD player+TV set
Depending on the connectors that are available on your TV set, you may need an
additional cable. Please check your TVs documentation for the best possible
connection.
You may need to use the VIDEO OUT and PROGRESSIVE SCAN buttons to set
the video output mode correctly. Please check the table below.
6
1.Remote control 2.SCART cable
3.User manual & Service Guide
4.Batteries
Open the lid of the battery compartment and install 2 AAA batteries.
Assure correct placement.
1) Before connecting, make sure to turn off the power of all apparatus.
2) After finishing connection, turn on the power again.
The AV cable (optional) is colour coded.
Yellow plug-------- video terminal (yellow)
White plug--------- left audio terminal (white)
Red plug----------- right audio terminal (red)
Please make sure that colours of connectors and plugs correspond.
4.2 Inserting remote control batteries:
4.3 Connections
4. Setting up your DVD player:
5.1 accessories
4.1 Box contents
OUTPUT PORT
VIDEO
S-VIDEO
Y/Cb/Cr
Y/Pb/Pr
SCART
VIDEO SCANNING MODE
VIDEO OUTPUT MODE
Interleaved
Progressive scanning
CVBS, CVBS+YUV, CVBS+S-VIDEO
CVBS+S-VIDEO
RGB
CVBS+YUV
PSCAN
Interleaved
Interleaved
Interleaved
DVD player and Amplifier or Decoder (DVD DivX 300)
COAXIAL
OPTICAL
Decoder
5.1 CHANNEL SURROUND
SOUND OUTPUT
CENTER
SW
R
L
FORNT
R
SUR
L
Amplifier
Page 10

DVD player+VCR (DVD DivX 300)
If you have a VCR, you can use it to record programs played by this unit.
DVD player+Y Cb/Pb Cr/Pr or SCART (DVD DivX 300)
DVD player and Amplifier or Decoder (DVD DivX350)
DVD player+VCR (DVD DivX 350)
If you have a VCR, you can use it to record programs played by this unit.
VIDEO
VCR
AUDIO
Y
Cb/Pb
Cr/Pr
INPUT
SCART INPUT
COAXIAL
OPTICAL
Decoder
5.1 CHANNEL SURROUND
SOUND OUTPUT
CENTER
SW
R
L
FORNT
R
SUR
L
Amplifier
VIDEO
VCR
AUDIO
7
Page 11

4.4 Setting of TV system
If the picture does not appear correctly on your TV set, you should
check your TV's settings. Please refer to your TV's documentation.
8
Step 2:
Insert the disc and press the button again, the player will automatically
recognise the disc type. Press the Play button to play a disc.
Before using your DVD player, please prepare the following:
1.Switch on your TV set and select AV mode.
2.If connected with an amplifier, switch on the amplifier and select
DVD input.
3.Switch on the DVD player.
Step 1:
Press the button on the remote control to open the tray
automatically.
5.Operation instructions
NO DISC
OPEN
DISC LOADING
Step 3
CLOSE
DVD
Press the button on the remote control, the unit
will switch into standby mode; press the button again
to resume.
DVD player+Y Cb/Pb Cr/Pr or SCART (DVD DivX 350)
Y
Cb/Pb
Cr/Pr
INPUT
SCART INPUT
Page 12

Use the pause button to interrupt/ resume display.
PLAY
PAUSE
PREVIOUS
Button
button
To select the previous song or chapter.
9
5.1 Disc playback
After inserting a disc the unit will start playback.
If there is a DVD disc, the unit will show the menu
or the titles.
If there is an audio CD, the unit will play the first tune.
TITLE 02/12 CHAPTER04/06
00:00:01
DVD
CHAPTER REMAIN
00 14 25
TITLE REMAIN
01 27 12
DVD
CHAPTER ELAPSED
00 01 55
DVD
For DVD discs
Press the OSD button once.
Displays current title, chapter
and the total number of titles
and chapters on the disc.
Press again to show the remaining time Press again to show the elapsed time
Press again to show the remaining
chapter time
And again to switch off OSD display
NEXT
6. Function buttons introduction
6.1Screen display
OSD
Button
To select the next song or chapter.
When the unit plays a disc, press the OSD button to
browse through several options.
Page 13

(Note that display may vary according to disc type)
Press the OSD button once to display
single elapsed time.
Press again to display total elapsed time.
And again to switch off OSD display.
For SVCD VCD and CD discs
10
Press again to display total
remaining time.
00 00 12
SINGLE ELAPSED
SVCD
VCD
00 00 12
TOTAL ELAPSED
SVCD
VCD
00 08 12
SINGLE REMAIN
SVCD
VCD
00 54 12
TOTAL REMAIN
SVCD
VCD
7.4 Angle
AUDIO1/8 AC-3 5.1
Press the LANGUAGE button to select any of the languages supported on the disc.
6.2 Languages
L
Press the OSD button to display elapsed
time of a chapter
Press again to display remaining
chapter time.
For Mp3 DivX XVID and WMA discs
00 0 12
CHAPTER REMAIN
And again to switch off OSD display
00 00 12
CHAPTER ELAPSED
Press again to display single
remaining time.
Mp
3
WM
A
DivX
XV
ID
Page 14

If the disc you are playing supports this function, use this to select your preferred
viewing angle.
Press the SUBTITLE button several times to browse through subtitle options.
SUBTITLE OFF
6.4 Subtitle
11
6.3 Angle
PROGRAM P 00 00
6.5 Program
Use the PROGRAM button to program the playing sequence using the numeric buttons. When
finished, press the button to cancel or to start playback.
6.6 MENU DVD
6.7 SUB-MENU
SUB-MENU
To cancel a program, press
the PBC button.
Press the MENU DVD button to view the available titles on the disc. Select with the and
buttons and press to start display.
With PBC ON, press the button to display the available
options (only valid for discs with multi-menu).
SUB-MENU
When the unit is in PBC OFF or stop state, press this button to
activate the nine pictures browse function. Select the number
you wish to play.
Page 15

6.8 Direction selection buttons
12
These buttons are used to browse through several menus.
To play a track directly, press the corresponding number. Use the +10 button for
numbers above 9.
6.9 Numeric buttons
SELECT: 08
SVCD
VCD
PBC OFF
With PBC ON you must return to the main menu if you wish to select a title, chapter or song.
DISC
20
18
01:50:00
02
00
TOTAL TITLES:
PLAY ENTRIES:
PLAY TIME:
AUDIO STREAMS:
SUBPIC STREAMS:
6.11 A-B
Pressing the A-B button sets the start and end of a section you wish to repeat. Press it again to stop
repeating.
A TO B SET A
A TO B CANCELLED
A TO B SET B
6.10 PBC button (Program Backward Control)
With PBC OFF, you can select during display or stop.
Page 16

Repeats chapters or titles (not available for all functions).
6.12 Repeat
CD
REP-ONE
REP-ALL
REPEAT OFF
DVD
Repeat
TITLE REPEAT ON
CHAPTER REPEAT ON
REPEAT OFF
13
SVCD
VCD
6.13 Zoom
Zoom
ZOOM X2
ZOOM OFF
Press to zoom 1.5, 2 or 4 times. Press again for normal view.
6.14 Volume +/-
Press the VOL+ and VOL- buttons to set the volume level.
6.15 Random
Selects CD and MP3 music tracks in a random order.
MUTE
MUTE OFF
6.16 Mute
Press to mute or resume sound.
Page 17

6.17 L/R
6.18 VIDEO OUT
Switch between CVBS, CVBS+YUV, RGB, CVBS+S-VIDEO output modes.
PSCAN (Progressive Scan) output mode is available only if the unit supports
this.
6.19 Progressive Scan
14
Press the L/R button to select between different audio modes: AUDIO1, AUDIO2,
AUDIO1 VOCAL, AUDIO2 VOCAL (for DVDs), within LEFT VOCAL, RIGHT
VOCAL, MONO_LEFT, MONO_RIGHT, STEREO (for SVCD). If the disc
supports several audio languages, you can use this button to select one.
Switch between the interleaved mode and progressive scanning mode
(if supported).
6.21 Forward( )/Backward( )
Use this button for fast forward or backward display. Pressing the buttons several
times increases the speed up to its maximum level, then resumes at normal speed.
6.20 Pause( )
To temporarily interrupt and resume playback.
6.22 Stop( )
Press once to stop display and keep the position in memory. If you press play the
display will resume (certain types of discs only). If you press Stop again, this will
completely stop display.
7.System setup
In the DVD setup menu a password may be asked. The default password is '2001'.
Use the , , and buttons to browse the options and to a
sub menu or select a function. Press Setup again to exit.
A.DVD menu setup
Page 18

12 Angle Mark
If supported by the disc, you can set the Angle mark as ON or OFF.
15
1. Main page
1 1 Picture Mode
Set video functions: Picture Mode, Angle mark, OSD Language, Captions and
Screen Saver.
13 OSD language
Select one of the available OSD languages.
Auto - Selects Bob or Weave based on
'flags' that are embedded in the DVD
bitstream indicating that the original
program was from an interlaced or a
progressive video source.
Film-Ignores the embedded flag information
and uses the weave technique.
Video-Ignores the flag information and uses
the bob technique.
Smart-Same as Film Mode with additional multitap vertical filtering to reduce the side
effects of the weave method on motiom.
Super Smart (default )-Combines flag reading with pixel-based motion adaptive
processing which dynamically changes the parameters according to the instantaneous
picture content, This is the best mode for deinterlacing virtually all source material.
Page 19

14 Captions
16
Switch captions on or off.
1 5 Screen Saver
The unit automatically activates a 'bouncing ball' screensaver after a few minutes of
inactivity. This protects your TV screen.
2. Speaker Setup
SPEAKER SETUP includes Downmix, Center, Rear, Subwoofer, Center Delay, Rear
Delay and Test Tone.
2 1 Downmix
If you have connected a stereo amplifier, you should select Stereo, if your amplifier is
5.1 please set as 5.1 CH.
Page 20

17
2 2 Centre speaker
Switch the centre speaker ON or OFF.
2 3 Rear speaker
Switch the rear speakers ON or OFF.
2 4 Subwoofer
Switch the subwoofer ON or OFF.
2 5 Center Delay
Allows delaying centre speaker output.
Page 21

18
2.6 Rear Delay
Allows delaying rear speaker output.
2. 7 Test Tone
Choose the corresponding speaker layout.
A sound will be sent to each speaker.
3.1 Audio Out
Selects an audio output mode: Analogue, SPDIF/RAW or SPDIF/PCM.
Notes:
1. This unit supports both Dolby digital
or analogue audio. The karaoke function
can only be used with analogue audio.
2. If your unit doesn't support DTS mode,
you should select SPDIF/RAW or
SPDIF/PCM to play DTS discs.
3.Some models support Dolby AC-3 and
DTS. The unit sets the corresponding mode
automatically.
3. Audio Setup
3.2 OP Mode
Switch between RF and Line Out mode.
Page 22

19
3 4 Compression
3 5 LPCM output
You can select 48k or 96k audio encoding
modes.
3 3 Dual Mono
If your amplifier/decoder already supports Dolby Digital output, you can select
Stereo, L-mono, R-mono, MIX-mono for your amplifier/decoder.
To adjust the sound dynamic range.
4. PREFERENCES SETUP
Not accessible during display. The Preferences page includes TV type, Audio, Subtitle,
Disc menu, Local, Parental, Password and Defaults.
4.1 TV display
If you have a widescreen TV (16:9 Aspect Ratio) select WIDE. Use one of the NORMAL
options for any other screen type.
Page 23

Select your preferred language.
20
4 3 Audio
Select your preferred language.
4 4 Subtitle
Select your preferred language.
4 5 Disc menu
4 2 TV Type
The preferred setting in most European
countries is PAL.
Page 24

21
4 7 Parental
Select a level of Parental lock.
48 SmartNAVI
Select navigation with of without a menu.
4 9 Defaults
Use this option to restore default settings.
4 6 Locale
Select GBR for European countries.
Page 25

1.Use the direction buttons and Enter to
browse through the menu.
2.To go back to a higher-level menu, press
the folder icon.
When display is in stop mode, you can use
the Repeat and Random buttons to select a
display mode.
410 Password
The default password is '2001'. You can change it using this option.
8. MP3 PLAYBACK
3 Programmed playback
1) Press the Program button to enter
Program mode.
2) Use the Numeric buttons to select
tracks. When finished, press Stop.
3) Press the Play button to play the
program.
4) Set another play mode to exit programmed playback.
22
One Mp3 disc can contain up to 10 hours of music.
The directory and play mode will only display when SMART NAVI in the Preferences
page is set as WITH MENU.
Normal
When a directory is selected in the play mode window, each picture in the current directory will be
displayed consecutively in a slide show fashion and will be scaled to fit in the TV screen. Twelve
slide show transition modes are provided. Use PBC button to select:
Mode 0: no special transition effect (by default) Mode 7: wipe from right to left
Mode 1: wipe from top to bottom Mode 8: wipe from left/right to center
Mode 2: wipe from bottom to top Mode 9: wipe from center to left/right
Mode 3: wipe from top/bottom to center Mode 10: wipe from edge to center
Mode 4: wipe from center to top/bottom Mode 11: horizontal blinds
Mode 5: vertical blind Mode 12: random
Mode 6: wipe from left to right
9. Kodak Picture CD Playback
Playback modes
Page 26

Image Rotation
There are four modes to rotate a picture: Invert, Mirror, Left, and Right. These operations are
allowed only when a picture is being displayed normally and will be cancelled automatically when
a new picture is displayed. The arrow button is used to select the different rotation modes:
button: Invert/Normal botton: Mirror/Normal
button: Turn left button: Turn right
ZOOM
We provide both ZOOM in/out and Zoom pan functions for JPEG pictures. With the ZOOM button,
you can zoom in or out for JPEG pictures. An OSD message will indicate the current ratio.
If zoom mode is on, the and buttons are used to control the ratio of zoom in/out. With ZOOM
mode off, a picture is scaled to fit the screen.
Note: during ZOOM function, slide show transition and image transformation are disabled.
THUMBNAILS
The SUB-MENU button is used to enable JPEG thumbnail mode. Up to nine thumbnail
pictures will be displayed. With the and buttons you canto display the next and previous
nine pictures in the current directory. Each of the nine pictures will be numbered from 1 to 9.
By pressing a numeral button the corresponding picture will be enlarged to full-screen, and the thum
bnail mode will be cancelled.
23
With the PBC button you can set transition effects for the slide show. The last selection will
remain in memory.
Press the button to freeze display and the or buttons to browse through
pictures. To resume the slide show, press the or button.
Music Slide Show
With the PROGRAM button in the fully stopped state you can enter or exit the music slide show.
With the A-B button you can select an MP3 file as background audio.
Note: during Music Slide Show, image transformation, zoom and thumbnails are not allowed.
If you have any of the following problems, you could try following methods first.
If this doesn't fix the issue then please refer to your Warranty guide:
No picture
Please confirm to firm connection between the unit & other systems such as TV set etc.
Please confirm that TV set is operating regularly.
A disc can not be played
Please confirm that disc has been correctly placed on the disc tray. A single sided disc should be placed
with the label side up;
Please check if the disc is clean. Wipe it gently with a soft cloth from the inside to the outside.
The remote control doesn't work
Make sure there is nothing in between the remote control and the receiver on the unit.
Target the remote control at the unit's receiver.
Check battery power.
Picture separated
Please confirm that disc is not damaged or dirty;
Switch the DVD player off and back on again after at least 10 seconds.
DVD player freeze
Please shut down the system by pulling out the power cable. Wait at least ten seconds before
switching the unit on again.
10. Troubleshooting
Page 27

24
12.Specifications:
Types of video disc:
DVD/SVCD/VCD/CD-G(digital AV discs)/DivX/XVID 0.X/WMA
MP3/CD-DA(common music laser disc)
CDIFMV(VOD)
Kodak Picture CD
Video/picture MPEG1/MPEG2/MPEG4
Audio AC-3/DTS/MP3/WMA/
Signal output Video:1.0Vp-p
Audio: 5.1 channels 0.5Vp-p mixed stereo 2vp-p
Function operation Play/pause, stop, open/close, forward/backward, screen display,
select time, part repeat, last/next, menu, setup, enter, channels, angle,
volume control, mute, subtitle display, item and so on.
Output interface HI-HD s-terminal video output, VIDEO(CVBS), Y Cb Cr output,
Y Pb Pr output, optical output, coaxial output, SCART output.
Voltage 100V-240V AC 50/60Hz
Consuming power 20W
Frequency response: CD:4Hz--20KHz(EIAT). DVD:4Hz--22KHz(48K)(sampling)
4Hz--44KHz(96K)(sampling)
S/N: >90 db
THD: 0 .003%
Accessories: SCART cable, infrared remote control, AAA battery, user manual,
Service Guide.
(No advanced notification shall be occurred regarding changes of design, specifications & tech
parameters due to constant product improvement)
1. Manufactured under license from Dolby Laboratories. Dolby and the double-D symbol are
trademarks of Dolby Laboratories.
2. This Product incorporates copyright protection technology that is protected by method claims
of certain U.S. Patents and other intellectual property rights owned by Macrovision Corporation
and other rights owners. Use of this copyright protection technology must be authorized by
Macrovision Corporation, and is intended for home and other limited viewing uses only unless
otherwise authorized by Macrovision Corporation. Reverse engineering or disassembly is
prohibited.
Notice:
Weight: DVD DivX 300: 2.9 kg
DVD DivX 350: 2.5kg
Size: DVD DivX 300:420x42x240 mm
DVD DivX 350: 430x38x255mm
Discs protection:
Hold the disc by the inner circle and the outer edge;
Do not stick anything on the disc;
Do not touch the disc surface with your fingers;
Keep the disc clean;
A disc must be cleaned with a soft cloth regularly by directing from the disc centre to
the outside.
11. Discs maintenance
 Loading...