

Pacific Digital MamoryFrame MF-810, MamoryFrame MF-810S User Manual
Bringing Your Digital Lifestyle into View
MF-810 & MF-810S
USER’S MANUAL
TM

TABLE OF CONTENTS
1. Introduction.............................................................................1
2. Ways to Use Your MemoryFrame™.............................2
3.
Warnings...............................................................................4
4. Getting Started....................................................................5
5. Control Buttons and Connectors.....................................9
6. Using MemoryFrame with a Personal Computer.....13
6.1 Digital PixMaster™ PC Software Overview......................13
6.2 Minimum PC System Requirements..................................14
6.3 Installing Digital PixMaster™ PC Software.......................14
6.4 Installing MemoryFrame’s USB Drivers ...........................15
6.5 Using Digital PixMaster™ to Create Slideshows..............18
6.6 Transferring Slideshows to/from MemoryFrame................26
6.7 Properties........................................................................28
6.8 Help - Internet Updates....................................................28
6.9 Help - About Digital PixMaster ........................................29
6.10 Exiting Digital PixMaster.................................................29
7. Connecting a Camera to the MemoryFrame..............29
8. Connecting a USB Card-Reader or Thumb-drive....31
9. MemoryFrame Menu System........................................34
9.1 Menu Navigation.............................................................34
9.2 Main Menu......................................................................35
10.
Tips and Tricks..............................................................44
Copyright© 2002-2003 Pacific Digital, Corp Page i

10.1 Optimizing images for display on MemoryFrame...............44
10.2 Caring for the Screen: ......................................................45
10.3 Securing MemoryFrame in Office Environments...............47
10.4 How to change the decorative 8 x 10 frame........................47
10.5 Showing PowerPoint™ Slides on MemoryFrame...............48
10.6 Disabling Pop-up Reminder Messages...............................49
11.
Accessories For Your MemoryFrame
11.1 6-in-1 Easy Card Reader ..................................................49
11.2 MemoryFrame Security Lock ...........................................50
11.3 USB Thumbdrives...........................................................50
11.4 Country specific AC Adapter Power Supplies....................50
11.5 Decorative 8x10 Frames...................................................50
11.6 Purchasing Standard 8x10 Frames from Stores...................51
TM
................49
12. Troubleshooting / FAQ...............................................54
13. MemoryFrame Specifications...................................56
13.1 Federal Communications Commission Statement...............57
13.1 Worldwide Electromagnetic Emissions Statement..............58
14. Upgrading MemoryFrame Software/Firmware....59
15. MemoryFrame Limited Warranty............................62
16. Contacting Technical Support...................................64
Copyright© 2002-2003 Pacific Digital Corporation Page ii

1. Introduction
Welcome to the future of personal digital imaging. Pacific Digital is
bringing your digital lifestyle into view
TM
. MemoryFrameTM combines
the vibrant high-resolution quality of active-matrix TFT (Thin Film
Transistor) display technology with the convenience and speed of the
popular Universal Serial Bus (USB) interface for a new way to display
your photos instantly.
The Pacific Digital MemoryFrame is designed to download and display
pictures from Personal Computers, USB Mass Storage Digital Cameras,
or USB Mass Storage memory-card readers using the USB ports built
into MemoryFrame.
By using the DirectConnect
TM
feature of the MemoryFrame you can
download digital photos directly and play them back in a slideshow-type
fashion in your home or office. The USB interface provides speed and
portability, allowing you to download immediately from your own or
your friend’s camera. It is ideal for both home and office users to
proudly display family, vacation, or business related images on the desk,
shelf, or wall. For those who use a PC, you can also create, name and
save hundreds of different slideshows for easy USB transfer to/from the
PC.
MemoryFrame
stores 32+ photos and allows you to select how long each
image is displayed and what style of transition is used between each
image! The MF-810S stereo audio version plays voice clips or music to
match your slideshow.
MemoryFrameis perfect as a gift for friends, business contacts, or
relatives. Imagine preloading the MemoryFrame with those “just perfect”
photos, and sending it as a personal gift. It would leave an impression
long after the gift is opened.
For that personal touch, a wide variety of wood and lacquered frames are
available to suit any décor. Frames can be changed in moments, and
locked directly onto the MemoryFrame to be displayed on a desk,
mantelpiece, or hanging on a wall.
So let MemoryFrame free your imagination to explore the many ways
you can express yourself, not only with the photos you take, but the way
you present them.
Copyright© 2002-2003 Pacific Digital, Corp Page 1

2. Ways to Use Your MemoryFrame™
The MemoryFrame is a stand-alone device that is designed to transfer
and store images from either a PC or a camera/reader and then display
the images in a continuous slideshow. You can set a transition style and
display-time duration for each of the slides. After transferring photos, the
MemoryFrame does not need to remain connected to the USB cable in
order to display the photo slideshow. For example, after transferring
photos, the MemoryFrame can be moved to a different room for display.
Transfer Camera Images Directly to the MemoryFrame
No PC required. Take pictures with your digital camera,
DirectConnect
TM
your USB camera to MemoryFrame to select
which photos to transfer. Then disconnect your camera and simply
display them. With its easy-to-use on-screen menu system and
multi-function control buttons, users can view their digital camera
or memory card contents at a glance with easy to view thumbnails,
edit slideshows, select the time between image changes, add fun
transition and display effects, delete images from slideshows, and
much more. Manual image forward, pause, and reverse buttons and
adjustable brightness are also provided. If your camera does not
support USB Mass Storage (see Section 12 of this manual for more
information), you can use either a USB Mass Storage compatible
card-reader or a PC to transfer and display your pictures.
Connect a USB Memory-Card Reader to the MemoryFrame
No PC required. Take pictures with your digital camera, then
remove the memory card from the camera and insert it into a USB
Mass Storage compatible memory-card-reader. Next, connect the
USB card-reader to the camera USB port of the MemoryFrame to
transfer and display your pictures. If your card-reader does not
support USB Mass Storage (see Section 12 of this manual for more
information), you can use a PC to transfer and display your pictures.
You can also read images from USB thumb-drives!
Transfer Images from a PC to the MemoryFrame
Many digital camera users will want to take advantage of their
personal computer’s power, memory and user interface to edit,
enhance, and archive their photos and other images. Using the
Digital PixMaster application supplied with the MemoryFrame
you can organize a personalized photo show and download it to the
MemoryFrame using USB.
Copyright© 2002-2003 Pacific Digital Corporation Page 2
TM
,

PowerPoint™ Slides
PowerPoint slides can be saved as JPEG images or pasted into
photo-applications as JPEGs. After your slides have been converted
to JPEGs, simply drag & drop them into Digital PixMaster for quick
USB download to MemoryFrame. Integrating PowerPoint slides
into the photo slideshows is fun, and in business can make
MemoryFrame a valuable tool for many applications.
E-mail Images
When you receive a picture via e-mail, most programs allow you to
save the image file to your computer’s hard disk. Simply drag &
drop or copy & paste the picture into Digital PixMaster for quick
USB download to MemoryFrame.
Internet Images
Images found on many websites can be transferred to
MemoryFrame. First, right-click the image, then either Copy (for
later Paste into Digital PixMaster), or Save-As (to save to your hard
disk for later drag & drop into Digital PixMaster) for quick USB
download to MemoryFrame.
Paintings & Drawings
Images that you or your children have created in programs such as
Microsoft Paint or other drawing software packages can be
transferred to MemoryFrame. Simply save the images to your hard
disk for later drag & drop into Digital PixMaster for quick USB
transfer to MemoryFrame.
Voice & Music (feature of MF-810S stereo version only)
Record or transfer WAV voice or music files to play with each picture in
your slideshow. Great for narrative shows and storybook applications!
Be Creative! Mix & Match Images
Memoryframe enables you to be creative in your presentation allowing
you to mix and match multiple image types into a single slideshow
(photos, PowerPoint, email images, paint images, music, and internet
images).
Copyright© 2002-2003 Pacific Digital Corporation Page 3

3. Warnings
Do not block the ventilation holes on the back, bottom, or
sides of the MemoryFrameat any time.
Do not open the plastic case of the MemoryFrame at any
time. There is risk of electric shock. There are no User serviceable parts
inside. Opening the plastic case voids the product warranty.
The screen of the MemoryFrame is made of glass and must
be treated with care or may break. It is covered with polarizing material
that can be scratched. Follow the screen care instructions in Chapter 10
“Tips” to properly care for your MemoryFrame display.
Keep your MemoryFrame out of direct sunlight. DIRECT
SUNLIGHT MAY CAUSE DAMAGE.
MemoryFrame is sold in North America with a North
American 110V only external power-supply. If the North American
power-supply is plugged into locations outside of North America that
use 240 VAC 50 Hz (such as Europe), it will damage the unit and void
the warranty. Pacific Digital offers a separate international external
power supply for use outside of North America.
Copyright© 2002-2003 Pacific Digital Corporation Page 4

4. Getting Started
The following sections provide step-by-step instructions on setting
up your MemoryFrame for the first time.
4.1 Unpacking your MemoryFrame™
In the retail box, the MemoryFrame unit is wrapped in a cardboard
shock-absorbent holder. DO NOT RIP the plastic “shrink-wrap”
portion when removing the unit. Instead, remove the entire
cardboard shock-absorbent holder from the box, and unfold the
cardboard so that it lies flat. After unfolding the cardboard, you can
gently slide the MemoryFrame from out of the “shrink-wrap”
material. Next refold the cardboard shock-absorbent holder and
place it back in the retail box. Save the box so you can pack or store
the unit in the future.
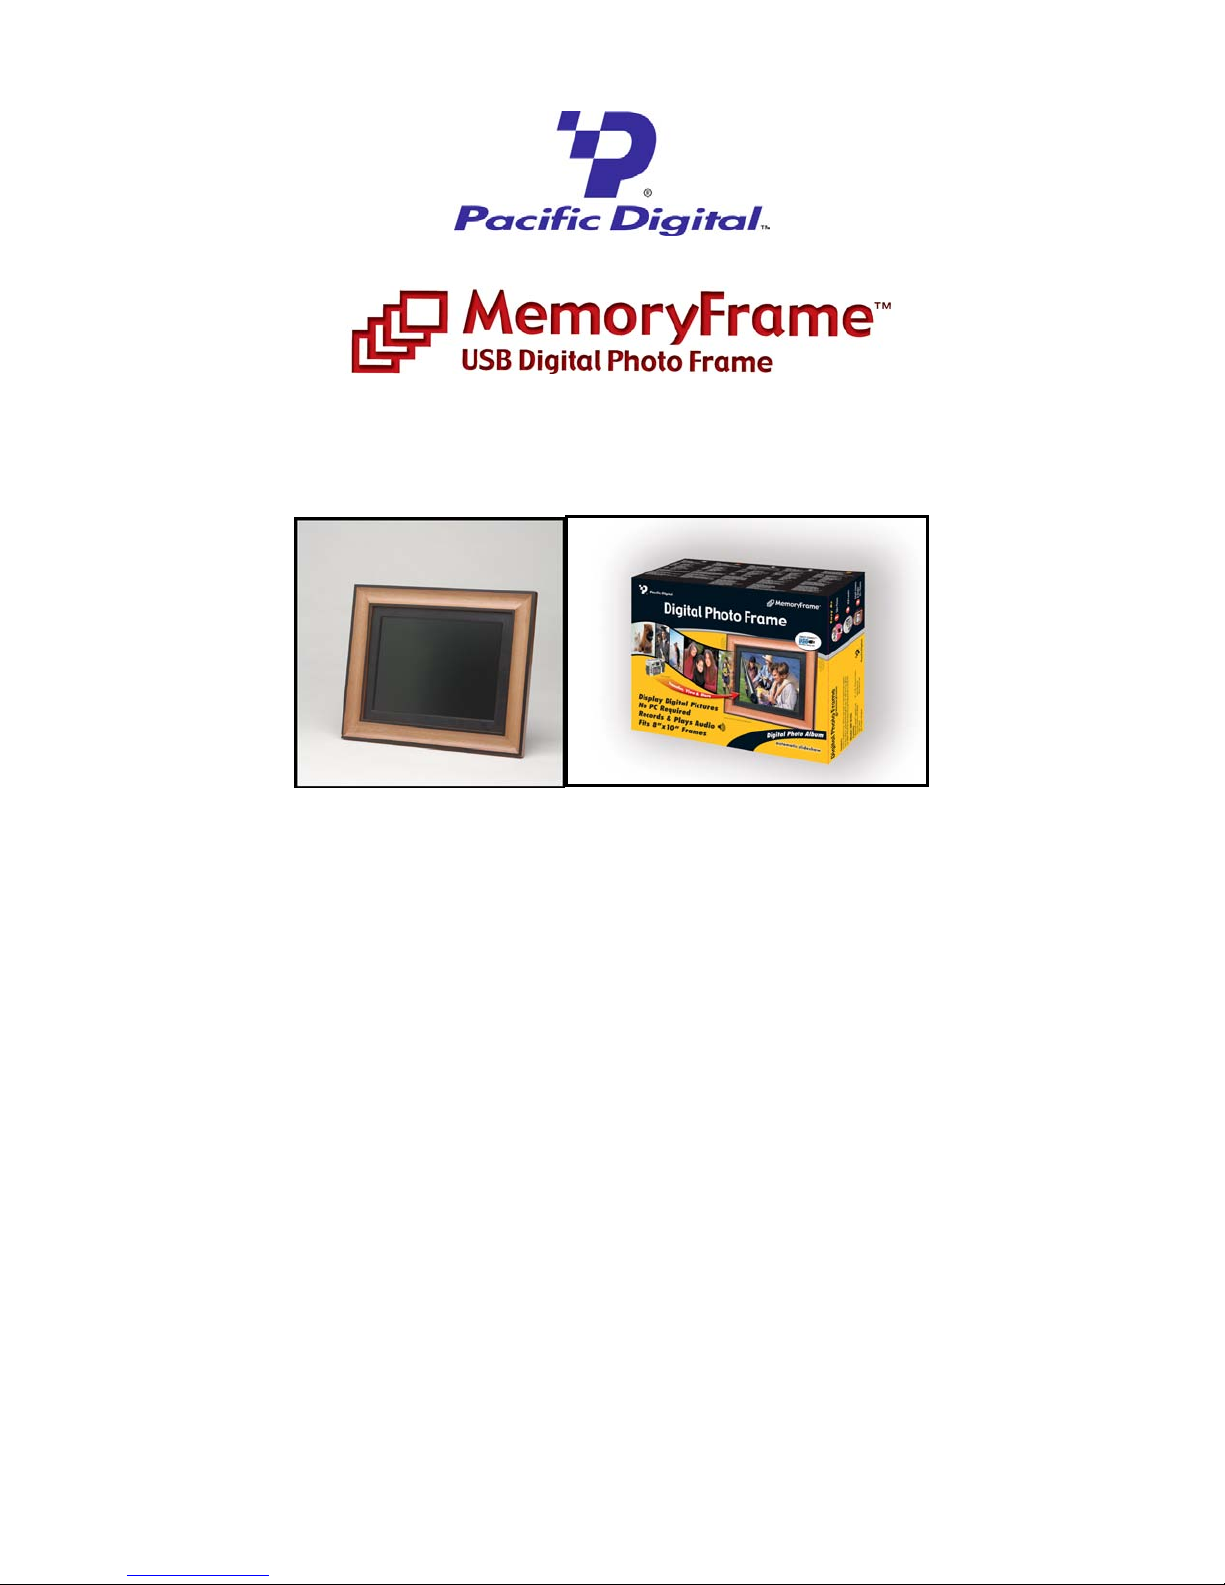
The MemoryFrame MF-810 retail pack includes:
• MemoryFrame™ Electronic USB Digital Picture Frame
• Wood 8x10 decorative frame (may be already attached to unit)
• External power supply with cable
• USB Cable (2 meters)
• Digital PixMaster™ PC compatible photo slideshow software
and USB Drivers on CD-ROM
• This Users Manual
• Mail-in registration/warranty card (inserted into manual)
If something is missing from the above list, contact customer service
at the following phone number
North America: 888-999-0732 or 949-252-1111
Europe: +353-61-702029
4.2 Registration & Your Product Serial Number
Please record the model and serial number from the bar coded label
located on the rear of the MemoryFrame to keep for reference. The
serial number is required for Technical Support and Product
Registration. See Figure 1 for location of model and serial number.
Copyright© 2002-2003 Pacific Digital Corporation Page 5

Model #
Serial #
Figure 1 – Product Serial Number Label
In order to receive your one year of free technical support, you must
register online at: http://www.PacificDigital.com
fill-out and mail the included mail-in registration card.
4.3 Removing the Protective Cover from the LCD
The MemoryFrame ships with a protective plastic cover over its
LCD screen. The purpose of this protective plastic is to prevent the
LCD screen from being scratched or damaged during manufacturing
and packaging. Note: You may choose to leave the protective
plastic on the LCD screen to keep it protected.
or alternatively
4.4 Connecting MemoryFrame to the Power Supply
MemoryFrame runs on AC power from an ordinary wall outlet. Use
only the supplied MemoryFrame external Power Supply. Other
power adapters will cause damage to MemoryFrame and void the
warranty.
Connect the External Power Supply to the Power receptacle jack on
the back of MemoryFrame. Plug the External Power supply wall
plug into an electrical socket.
Copyright© 2002-2003 Pacific Digital Corporation Page 6
Warning! Plugging the North American plug into locations outside
of North America that use 240 VAC 50 Hz will damage unit and void
warranty. European models are available for 220V-240V countries.
Pacific Digital offers an international external power supply for use
outside of North America.
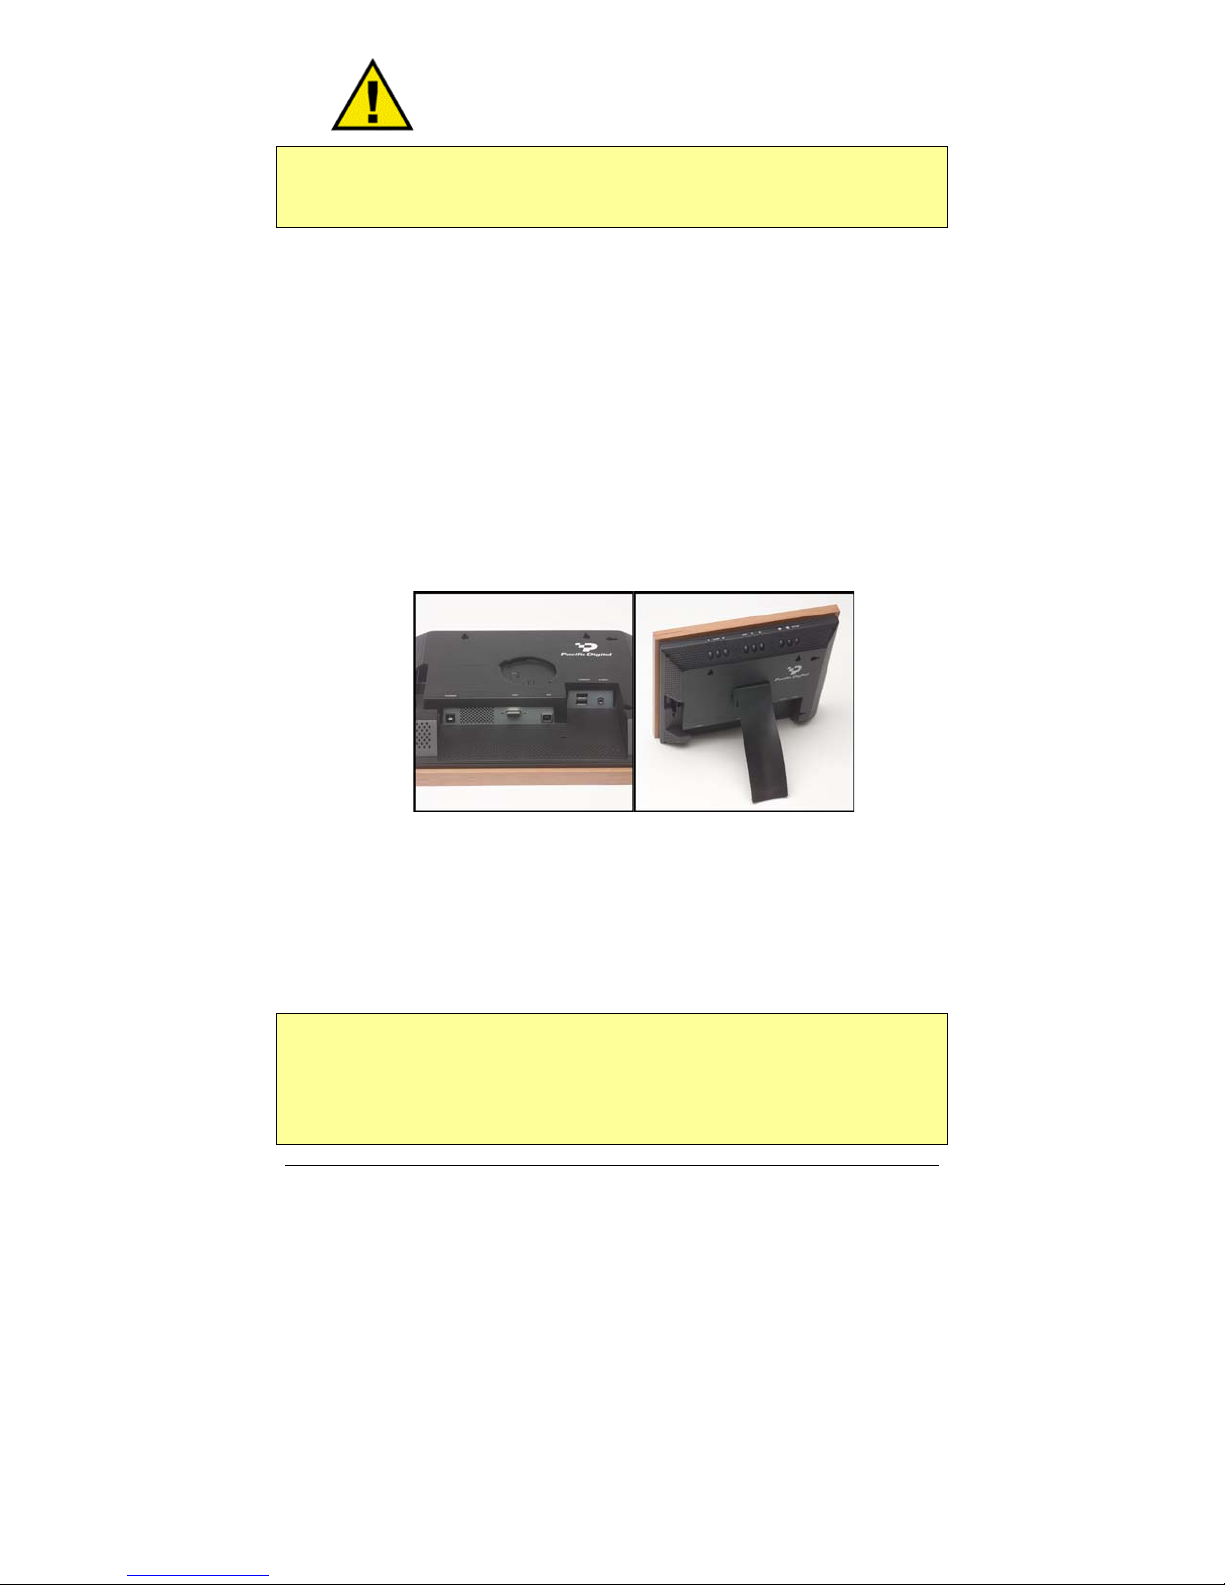
4.5 Using the Removable Stand
The removable stand is designed to properly support the
MemoryFrame in either portrait (vertical) or landscape (horizontal)
orientations. The stand is designed to support MemoryFrame on flat
surfaces only.
Insert the Stand into the rear of the MemoryFrame, and rotate to the
orientation that you prefer, and set the MemoryFrame on a flat
surface. See Figure 2 below. To wall-mount the unit, remove the
stand by rotating out.
Figure 2 – Removable Stand
4.6 Power-on Initialization
Move the MemoryFrame’s Power Switch to the “ON” position to
turn on the MemoryFrame.
Important Note: In the power-on sequence of the MemoryFrame, its
initialization screen will take a few moments to appear. The entire
power-on sequence may take several minutes and you will be unable
to use the push-button menu system until the initialization screen is
replaced by the first photo appearing on the screen.
Copyright© 2002-2003 Pacific Digital Corporation Page 7

After going through a power-on initialization sequence, the
MemoryFrame will automatically enter the slideshow mode and
begin displaying the currently loaded show (a default show is
included with the unit from the factory).
Each image in the slideshow has an assigned transition effect, and
display-time duration. When the display-time of the current image
ends, the MemoryFrame transitions to the next picture.
The type of transition and the display-time duration is selected by
the user during slideshow creation. Slideshows can be created on a
PC using the Digital PixMaster™ application. If photos were
directly loaded into MemoryFrame from a USB camera or cardreader without a PC, then MemoryFrame allows you to change/set
the transition and duration after the photos have been transferred.
Settings may be changed using the control button menus defined in
the Menu section.
Copyright© 2002-2003 Pacific Digital Corporation Page 8
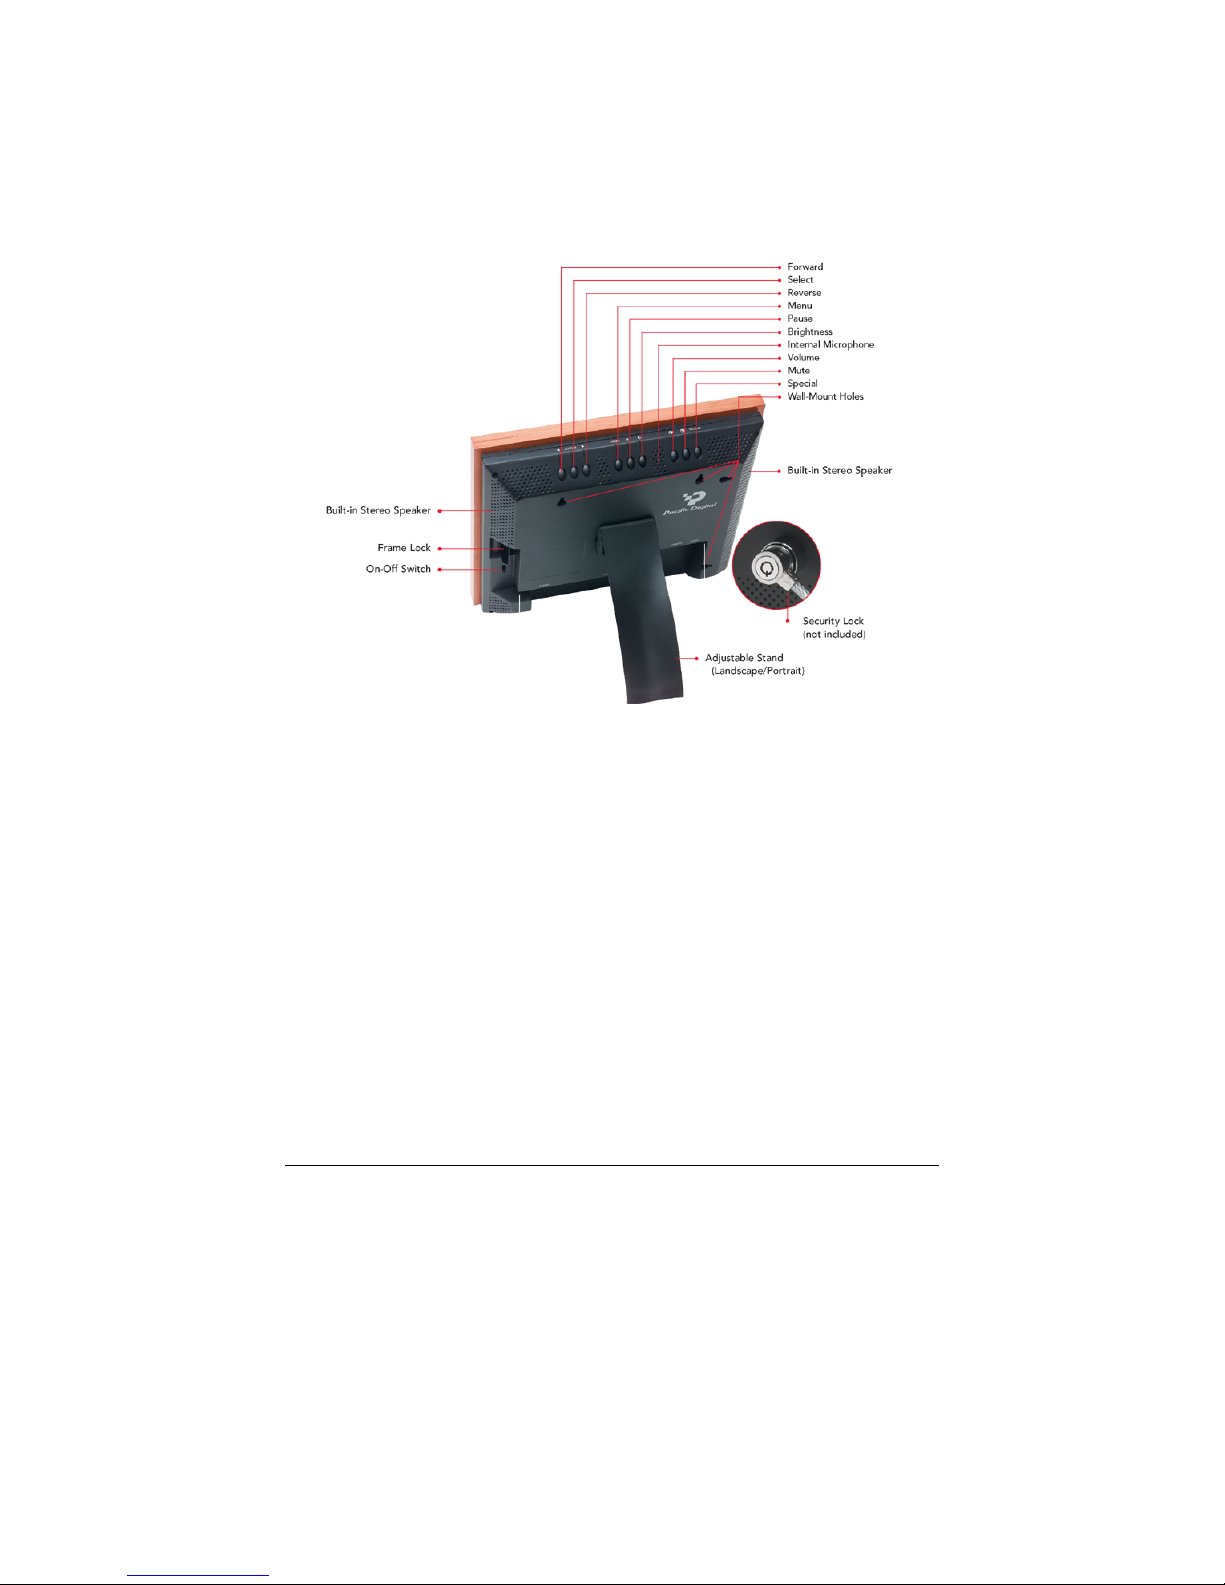
5. Control Buttons and Connectors
This section briefly summarizes the main control buttons and connectors.
The buttons can have a variety of functions while in the Menu system.
More detailed control button usage in the Menu system is discussed in
the Menu System section (Chapter 9).
Figure 3 – Buttons & Controls
On/Off Switch The On/Off switch is the main power control for
the MemoryFrame. Be sure that the power is Off
before plugging in or unplugging MemoryFrame
from the wall socket. This will help protect the
electronics from possible power surge damage.
Frame Lock The frame lock holds a decorative 8x10 frame in
place. The “Locked” position is toward the
outside of the unit.
Forward (Ź) During a slideshow, press the Ź button to
transition to the next photo in the slideshow.
When viewing a user-interface menu (see Menu
button), use this button to highlight the next
menu option. After pressing Volume or
Copyright© 2002-2003 Pacific Digital Corporation Page 9

Brightness, this button is also used to increase
the level.
Select When viewing a user-interface menu (see Menu
button), this button functions as the “Select” key
to select a photo or menu option.
Reverse (Ż) During a slideshow, press the Ż button to
transition to the previous photo in the slideshow.
When viewing a user-interface menu (see Menu
button), use this button to highlight the previous
menu option. After pressing Volume or
Brightness, this button is also used to decrease
the level.
Menu When using MemoryFrame without a PC, this
button is used to download directly from a
camera and to select and set the organization of
the MemoryFrame slide show.
Pause ( || ) Press the || button to pause or restart the slide
show. When the show is paused, the || button
resumes the slideshow.
Brightness MemoryFrame is easy to adjust for different
ambient lighting conditions. With the slideshow
in operation, adjust the brightness to create the
optimum display setting. Use this button and the
Ź and Ż buttons to change the brightness of the
image. Note: the Brightness buttons respond
only when MemoryFrame is displaying a
slideshow, and do not respond while in the
Menu system.
Internal Microphone When using MemoryFrame without a PC, the
internal microphone is used to record your voice
or music. Note: this feature is only on the
MF-810S stereo model.
Volume MemoryFrame is easy to adjust for different
ambient noise conditions. With the slideshow in
operation, adjust the volume to the optimum
setting. Use this button and the Ź and Ż
buttons to change the volume of the speakers.
Note: the volume buttons respond only when
MemoryFrame is displaying a slideshow, and do
Copyright© 2002-2003 Pacific Digital Corporation Page 10

not respond while in the Menu system. Note:
this feature is only on the MF-810S stereo
model.
Mute MemoryFrame speaker output (music or voice)
can be easily muted with one touch of this
button. Press again to un-mute. Note: this
feature is only on the MF-810S stereo model.
Special This is a one-touch short-cut button that you can
customize to quickly access a function that you
use often and to which you want to have fast
one-touch access. Note: this feature is only on
the MF-810S stereo model.
Wall Mount Slots There are four wall mount slot locations: two for
portrait and two for landscape orientation. The
slots will accept a standard #6 wood screw.
Stereo Speakers Built-in stereo speakers play y our WA V v o ice or
music files with each picture in your slideshow.
Great for narrative shows and storybook
applications! Note: this feature is only on the
MF-810S stereo model.
Power Connector The Power Connector is the connection point for
the supplied power adapter, and is used to
provide main power to the MemoryFrame. The
input is 12 VAC developed through the supplied
AC power adapter.
VGA Connector The VGA connector is the connection point for
an external wall-projector, CRT or LCD
monitor, and can be used for simultaneous
display of the images to another screen. This
allows the MemoryFrame to be used as a lowcost No PC required presentation device! Note:
this feature is only on the MF-810S stereo
model.
USB Connectors There are 3 USB connectors as shown in Figure
4. The two marked “Camera” are used to
transfer images from a camera, USB memorycard-reader, or a USB thumb-drive. The one
marked “PC” is used to transfer shows to/from a
Copyright© 2002-2003 Pacific Digital Corporation Page 11

PC running the bundled Digital PixMaster
software.
Figure 4 –Connectors
Audio Out The audio-out connector jack is the connection
point for optional externally powered speakers.
Note: this feature is only on the MF-810S
stereo model.
LCD Screen Displays your pictures in vivid color. Your
MemoryFrame LCD screen is made of glass and
should be treated with care. See Section 10.2 for
care and cleaning.
Security Lock MemoryFrame has a receptacle that accepts any
Notebook locking system (Kensington®
compatible) to add protection and securitywhen
used in business environments. (See Chapter
10.3).
Copyright© 2002-2003 Pacific Digital Corporation Page 12

6. Using MemoryFrame with a Personal Computer
Although MemoryFrame does not require a PC, many digital camera
users will want to take advantage of their personal computer’s power,
memory, user interface, and photo editing software. The PC can be used
to edit, enhance, and archive photos and other images. Using a PC, you
can simply and easily download images to your MemoryFrame. With the
stereo MF-810S model you can also download WAV audio files. You
can organize a personalized photo show and quickly transfer it to/from
the MemoryFrame using USB. In this usage scenario the PC is
momentarily connected directly to the MemoryFrame with the USB
cable that was provided with the unit.
After transferring photos, the MemoryFrame does not need to remain
connected to the PC via the USB cable in order to display the photo
slideshow. For example, after transferring photos, the MemoryFrame
can be disconnected from the USB cable and moved to a different room
for display. Alternatively, if the display location for the MemoryFrame
is near the PC, you can leave the MemoryFrame connected to the PC as
may be the case in a home office or at work.
6.1 Digital PixMaster™ PC Software Overview
A PC communicates with the MemoryFrame using Digital PixMaster
software. The Digital PixMaster software runs on your computer and is a
special application (provided in the box on a CD) used to control and
configure MemoryFrame. Digital PixMaster uses a special USB driver
to communicate (also provided on the CD). PixMaster is an innovative
solution that is incredibly easy to use, while offering key features, such
as the ability preview slideshows, rotate photos, specify transition
effects, and create/name/save unique slideshows from your vacations,
sporting events, family functions, etc. The software presents a graphical
user interface that allows you to do the following:
TM
• Easily create professional looking photo slideshows to be
displayed on the MemoryFrame. Choose the pictures, choose
the times & transitions and let Digital PixMaster do the rest. The
software easily allows you to create custom slideshows that
integrate photos from both your camera as well as images stored
anywhere on your PC. Simply drag & drop the desired photos
for a particular show into Digital PixMaster. Digital PixMaster
software can import the following picture formats: JPEG, TIFF,
BMP, PNG, or GIF.
Copyright© 2002-2003 Pacific Digital Corporation Page 13

• Retrieve an existing slideshow from the MemoryFrame and
store it on a PC with a name of your choosing for later use
(example: you can save a slideshow as HawaiiVacation.pd2).
• Quickly transfer the slideshows that you created on your PC
using the Digital PixMaster application into the MemoryFrame
via USB for instant viewing enjoyment.
• With the MF-810S stereo model you can also download WAV
audio files (voice or music). This enables narrative shows and
storybook applications.
• Digital PixMaster also allows you to upgrade the software in
your MemoryFrame as new features and enhancements become
available (see Upgrading Your MemoryFrame Software in
Chapter 14).
6.2 Minimum PC System Requirements
Digital PixMaster™ has the following minimum system requirements:
• IBM compatible PC
• Pentium II 200MHz or higher with at least 64 MB of memory.
Pentium III 300MHz or higher recommended for optimum
performance
• Microsoft Windows® XP, Windows® 2000, Windows® 2003,
Windows® 98SE, or Windows® ME
• Mouse (to drag & drop photos)
• USB port (either USB 1.1 or USB 2.0)
• VGA compatible display (or higher)
• 10MB of hard-disk space for software installation, and 50MB for
storage of slideshows. Slideshows can be stored on any media
(examples: HDD, ZIP, CD-RW, DVD, etc.)
6.3 Installing Digital PixMaster™ PC Software
Place the software CD-ROM that came with MemoryFrame in your PC’s
CD-ROM drive. If your Windows®PC is configured to auto-run, the
Install-Shield wizard for Digital PixMaster should automatically start
within one minute.
Copyright© 2002-2003 Pacific Digital Corporation Page 14

Figure 5 –Digital PixMaster Setup Program
Follow the on screen instructions to install Digital PixMaster to your
PC’s hard-drive.
If however, the InstallShield Wizard does not automatically start to
install after one minute, click your mouse on START, then RUN, then
browse to your CD drive and select SETUP.EXE from the CD drive to
run. Finally, follow the on-screen instructions to install the Digital
PixMaster software application to your PC’s hard-drive.
After the installation is completed, the Digital PixMaster icon will
automatically be located on your Windows Desktop.
Figure 6 – Digital PixMaster Icon
Digital PixMaster
To start Digital PixMaster double click on the icon.
6.4 Installing MemoryFrame’s USB Drivers
MemoryFrame has custom USB drivers from Pacific Digital that are
shipped to you on the same software CD as Digital PixMaster. To load
them, with the MemoryFrame CD in your optical drive simply connect
your PC to your MemoryFrame with the USB cable that was provided in
the box with the unit.
Connect the larger “standard USB” connector to the USB port of the PC.
Connect the smaller “mini-USB” connector to the “PC” connector of the
MemoryFrame. Figure 7 shows the location of the “PC-toMemoryFrame” connector on the back of MemoryFrame.
Copyright© 2002-2003 Pacific Digital Corporation Page 15
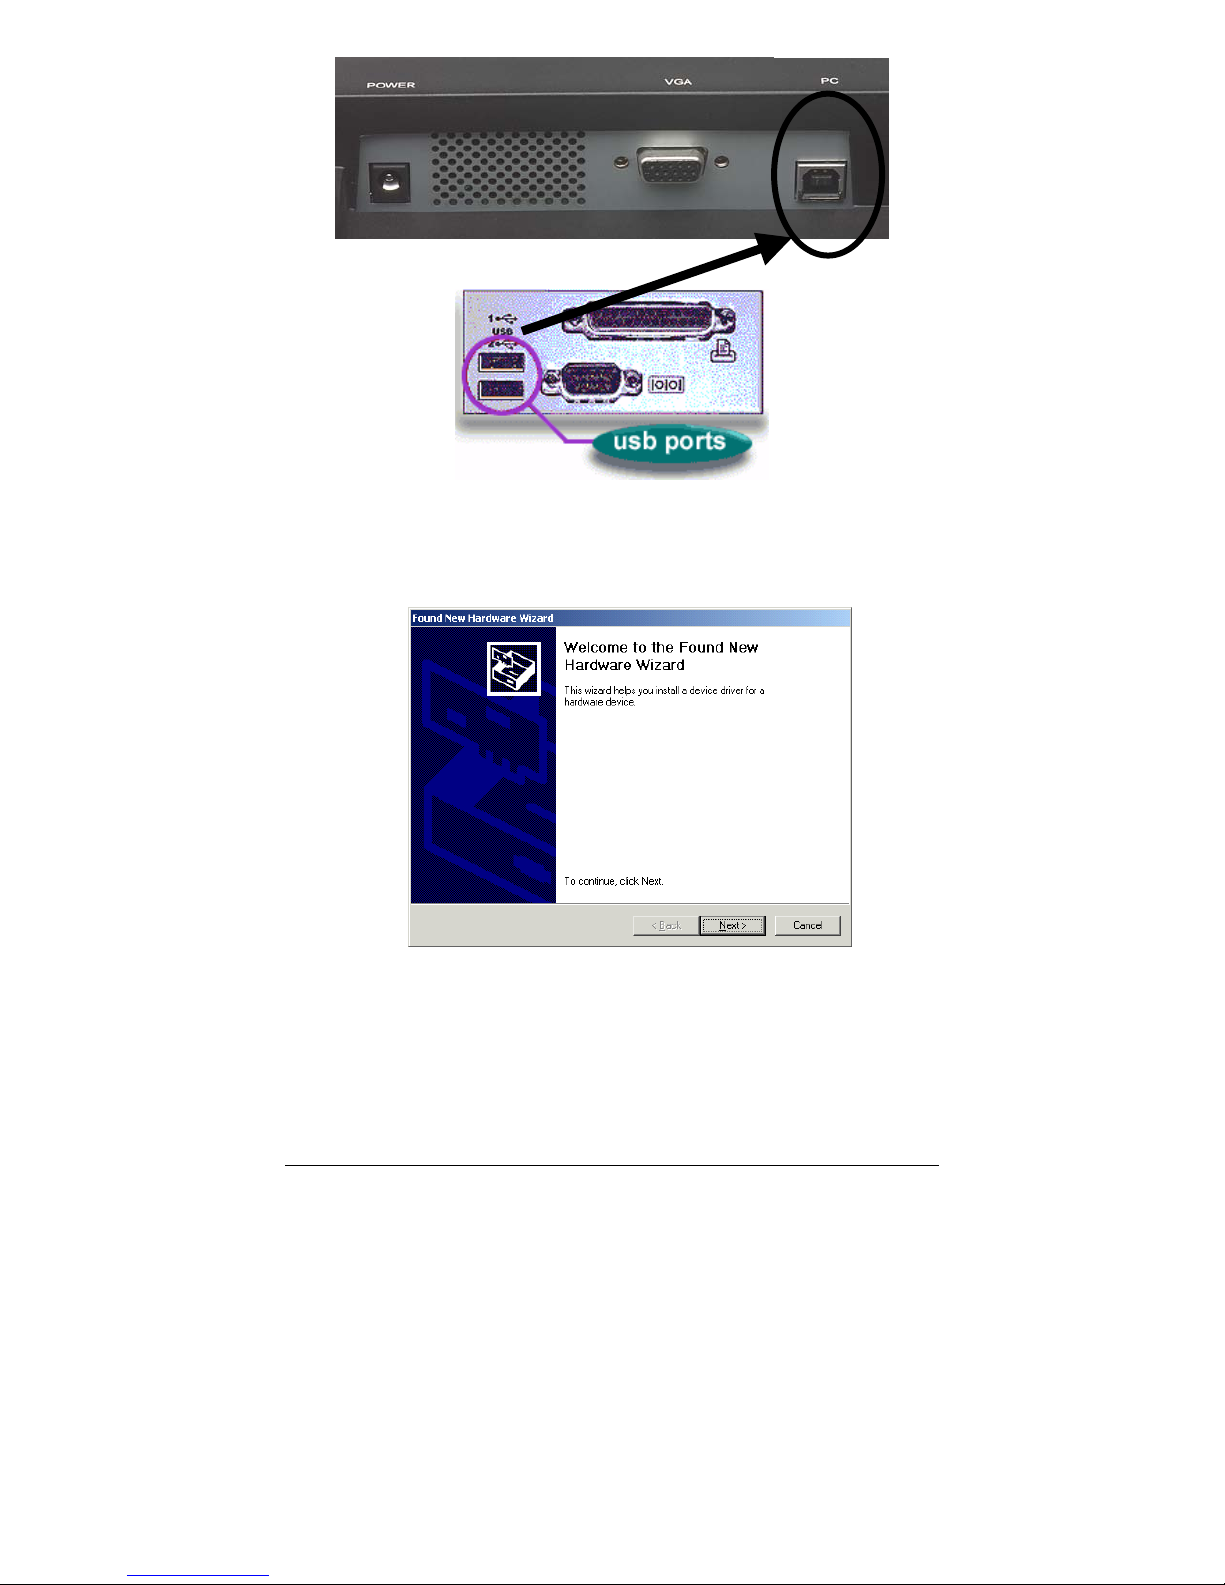
MemoryFrame
PC
Figure 7 – Connecting a PC to MemoryFrame
After connecting, the Windows® Hardware Wizard will detect the
MemoryFrame. When the Hardware Wizard begins, the following
screen should be displayed:
Figure 8 – Windows Hardware Found Wizard
Click Next to begin installation.
Copyright© 2002-2003 Pacific Digital Corporation Page 16

Since the MemoryFrame USB driver is not digitally signed, Microsoft
Windows® XP users may see the following screen during the install
process:
Press “Continue Anyway” to continue with the installation.
MemoryFrame will not impair or destabilize XP and this is just a
warning about digitally signed drivers.
Some versions of Windows® automate the following steps so that you
may not have to perform or see each of them.
The next step is INSTALL HARDWARE DEVICE DRIVERS. To do
so, select the install method for the “Digital Picture Frame”. Select
“Search for suitable driver for my device” and click Next to continue
installation.
Next, in the LOCATE DRIVER FILES screen, select the device where
the MemoryFrame “Digital Picture Frame” USB driver can be found.
The MemoryFrame “Digital Picture Frame” USB driver resides on the
Digital PixMaster software CD. With the MemoryFrame CD-ROM in
the appropriate device, select the CD-ROM drive checkbox. Then click
on Next to continue the installation.
After Windows® finds and installs the driver, the COMPLETING THE
NEW HARDWARE WIZARD screen will be displayed. Click on
Finish to complete the installation.
Copyright© 2002-2003 Pacific Digital Corporation Page 17

Some older versions of Windows® may require a system restart. If so,
you will see the following screen. If this screen is displayed, click on
Yes to restart the system.
Figure 9 – Windows Settings Change Message
If the above screen is not displayed, the system does not need to be
restarted.
Note: Once the MemoryFrame USB driver is installed the “Pacific
Digital MemoryFrame MF-810” USB device will be listed as an
“Imaging Device” in the imaging devices section of the Windows®
Device Manager.
6.5 Using Digital PixMaster™ to Create Slideshows
The PC does not need to be connected to the MemoryFrame to create
slideshows. You don’t need to connect the USB cable until you want to
transfer slideshows from the PC to your MemoryFrame, or when you
want to transfer a slideshow from MemoryFrame back to your PC.
The Digital PixMaster icon should be located on your Windows Desktop.
To start Digital PixMaster double click on its icon. By default, Digital
PixMaster will open an empty slideshow.
Copyright© 2002-2003 Pacific Digital Corporation Page 18
 Loading...