

Page 1
Installation Manual
BEFORE CALLING PACIFIC DIGITAL TECHNICAL
SUPPORT, PLEASE COMPLETELY READ THE
INSTALLATION SECTION OF THIS MANUAL
Page 2

Thank You
Thank you for purchasing a Pacific Digital product. In this manual, you will find
information designed to help you understand the capability of your new Pacific Digital
drive, as well as a step-by-step explanation of how to install your product.
PACIFIC DIGITAL TECH NICAL SUPPORT
Our technical support staff is ready to assist you with any problem you may have with
your PDC product. Our hours of operation are Monday – Friday 7:00 AM to 6:00 PM
Pacific time.
You can contact Pacific Digital Technical Support at:
E-Mail: [email protected]
Internet: http://www.PacificDigital.com
Telephone: (949) 477-5715 or (888) 999-0732
Fax: (949) 252-9397
TROUBLESHOOTING GUIDELINES
Having trouble with your PDC Drive? Want to know more about how it works?
Check the list of common questions provided in this manual; you may find the
answers you need. If you don’t, or if the problem persists, Please visit Pacific Digital
online at www.PacificD igital.com to view our online FAQs, if you still need assistance
please contact PDC Technical Support.
CALLING PDC FOR ASSISTANCE
If you need to get in touch with the PDC Technical Support Department, please have
the following information on hand when you call:
Your Customer ID or Name, Address and Phone Number.
Your PDC Product Model and Serial Number.
Your Computers CPU, RAM, and Hard drive.
For more information about our products go to our website at
http://www.PacificDigital.com
(NOTE: Pacific Digital drives are warranted for a period of One
(1) year. You must keep your receipt readily available. Pacific
Digital will NOT replace under Warranty products for ANY
reason without a receipt).
2
Page 3

Copyright, Trademarks, etc.
Copyright 1999-2002, by Pacific Digital Corporation (PDC). All rights reserved.
No part of this manual may be reproduced in any form or by any means (including
electronic storage and retrieval or translation into a foreign language) without prior
agreement and written consent from PDC as governed by United States and
international copyright laws.
It is the policy of PDC to improve products as new technology becomes available. PDC
reserves the right to revise this manual and make changes to its content at any time,
without obligation to notify any person or entity of such revisions. While great care has
been taken in preparing this manual and the products it describes, PDC cannot be held
responsible for any errors or omissions that the manual or products may contain or
exhibit. Any alteration or misuse of these products voids any expressed or implied
warranties.
“Windows” and “Windows NT” are registered trademarks of Microsoft Corporation
(U.S.) in the U.S. and other countries.
Pacific Digital Corporation herewith declares that it will not be liable in any way for
any loss of data or any other damage, whether direct or indirect, caused by the
operation or malfunctioning of this product. Backup important data to pr otect it from
possible loss.
3
Page 4

Table of Contents
Model and Serial Number
Parts and Functions
Getting Started 7
IDE / ATAPI Drive Installation 8
Settings and Connections 9
Connecting the PDC Drive 10
Connecting the Cables 11
Bundled Software 12
Bundled Software Continued 13
Handling Guide 14
Handling Guide Continued 15
Handling Discs 16
Troubleshooting 17
Notes and Information 18
5
6
4
Page 5
Model and Serial Number
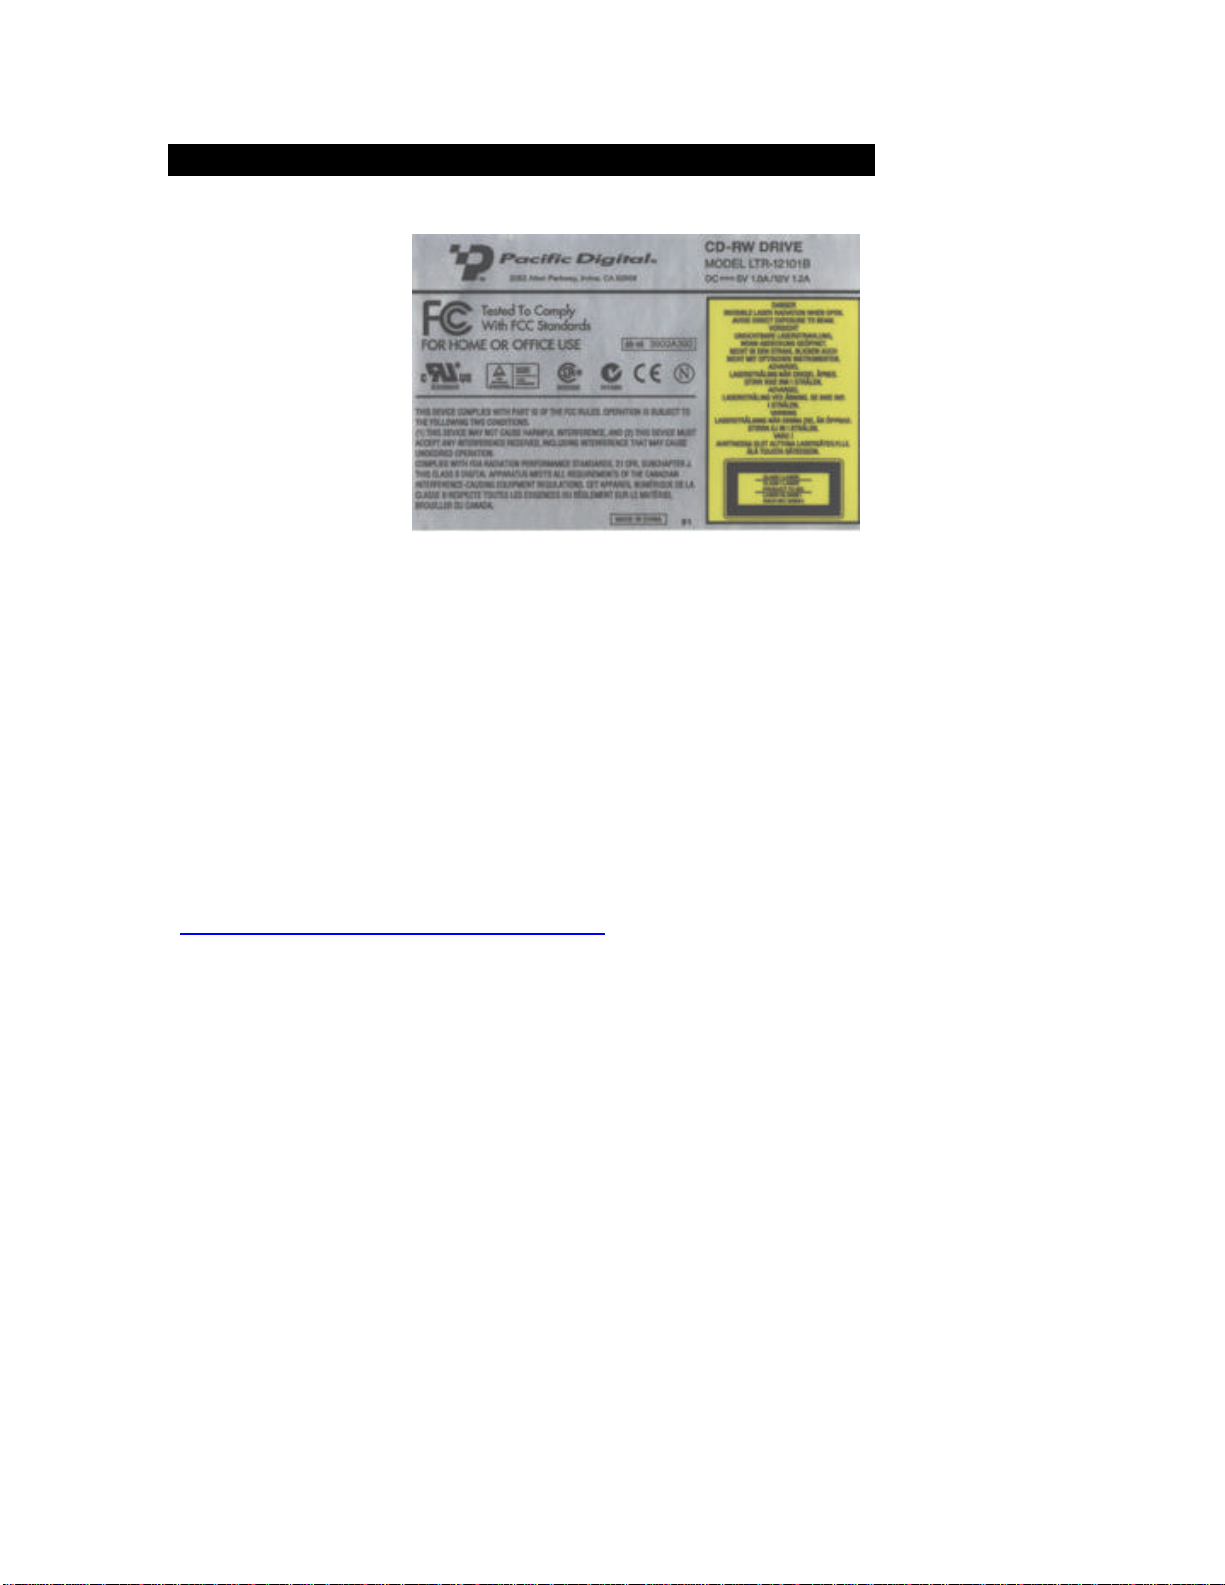
Product Model &
Serial Number are
located on top
cover of your CDRW drive, or on
the side of your
retail box.
(Example Label
May Vary)
Please write down the PDC serial number from the top of the PDC drive or the side of
the PDC box. Please record this information on page 18 of this Manual. The serial
number is located on a long bar -code label and is required for Technical Support and
Product Registration.
Do not remove the drive from the anti -static bag until time of installation. This will
protect the PDC drive from static electricity generated by handling the PDC drive
without proper protection.
Register Online at
http://www.PacificD igital.com/support/register.html
(Example Label)
5
Page 6

Parts and Functions
Front Panel
1. Operation indicator lamp
2. Manual eject hole
Used to manually eject the tray in an event when it will not open normally.
3. Open/close button
4. Shutter or tray
Rear Panel
1. AUDIO output connector
For connecting the internal audio cable.
2. Jumper connector
For setting the PDC drive to Master/Slave/Cable Select.
3. IDE connector
For connecting the internal IDE cable.
4. Power supply connector
For connecting the power cable from the computer.
5. Digital AUDIO connector
For connecting a Digital Audio Cable (Sound card must support Digital Audio)
6
Page 7
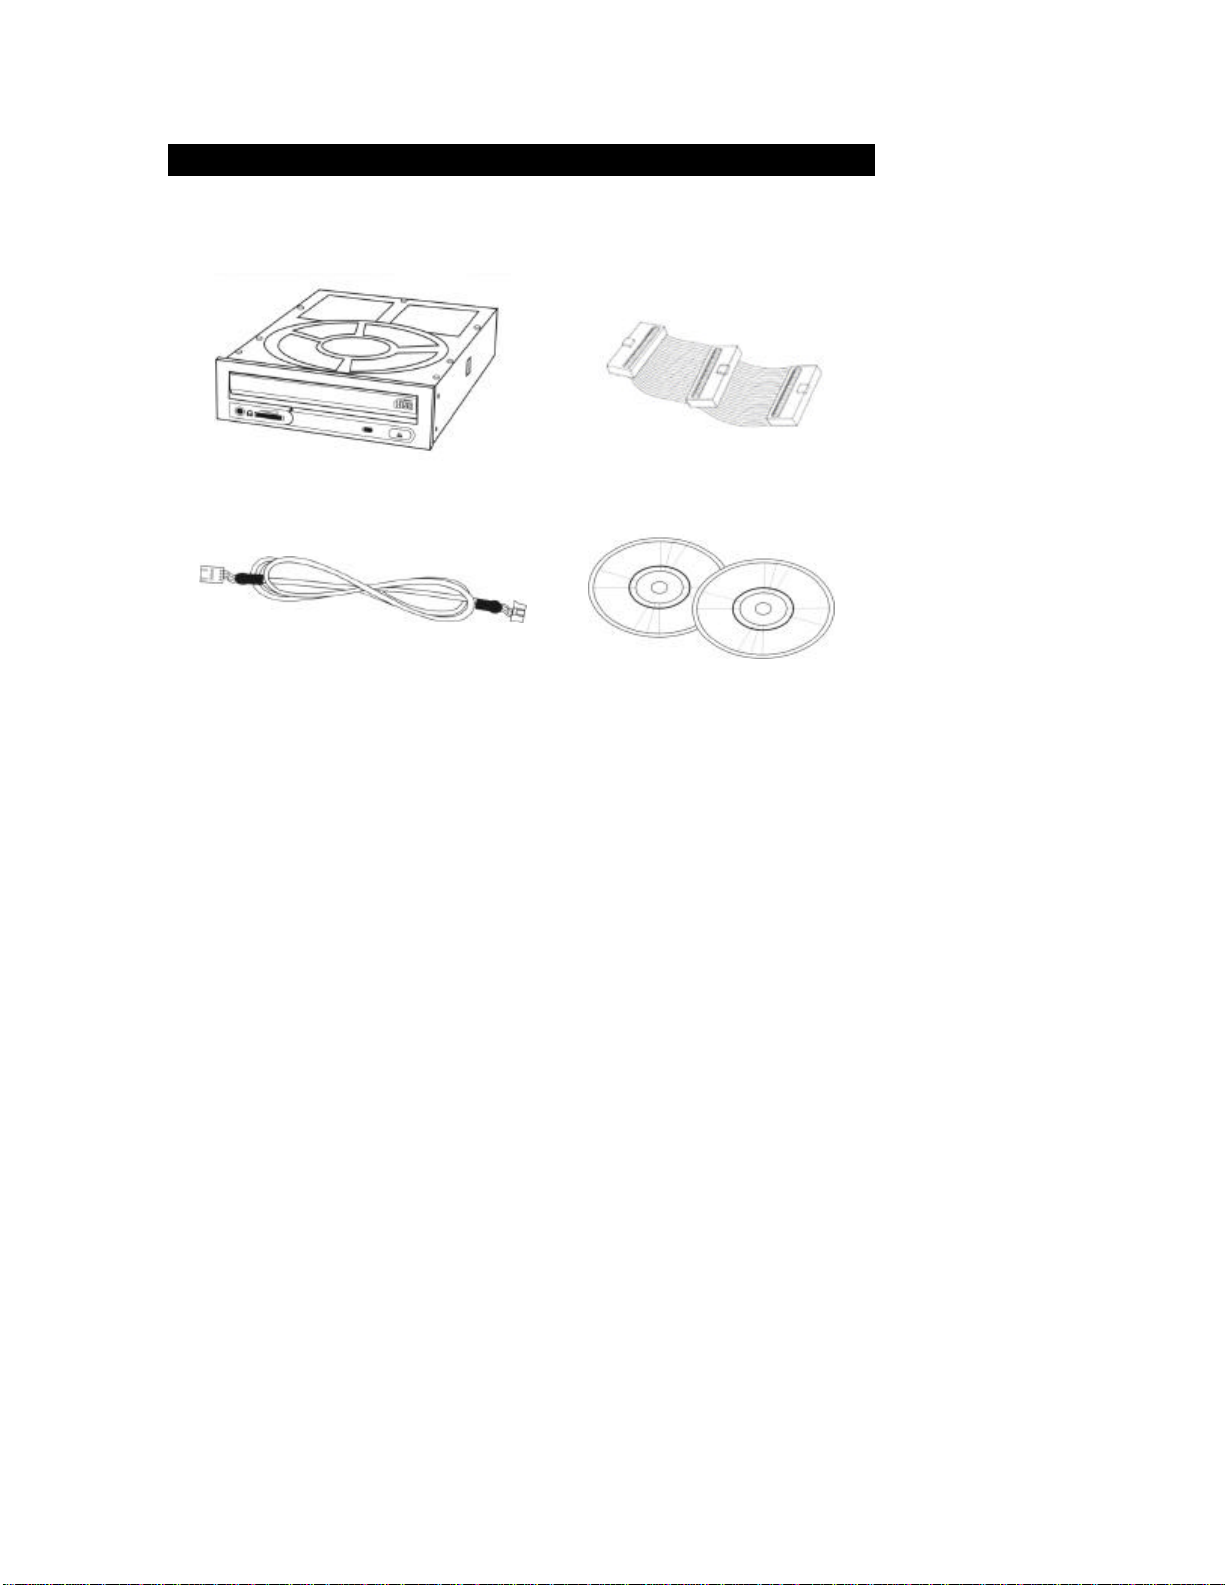
PACKAGE CONTENTS
Getting Started
Drive
Audio cable
40 Pin IDE cable for IDE drive
Burner bundle software & Blank
CD-R disk
7
Page 8

IDE / ATAPI Drive Installation
Step 1: Unpack the drive and contents. Included is a PDC Burner Bundle
software disc, one blank CD-R disc, an audio cable and the IDE data
cable. NOTE: Keep your Pacific Digital CD-RW drive in it’s Anti -Static
bag until Step 7.
Step 2: Record your drive information on page 18 of this manual.
Step 3: Shut down and turn off the computer.
Step 4: Remove the cover from the computer. Please refer to the your PC owner’s
manual for the proper way to do this.
Step 5: Remove the cover plate from an available 5.25” drive bay or remove the
drive that you want to replace. Set aside any mounting hardware for later
use.
Step 6: Set the Master/Slave/CableSelect jumper as appropriate for your system.
Refer to page 9 on setting the Master/Slave/CableSelect settings.
Step 7: Remove your drive from the Anti -Static bag and slide drive into bay and
secure properly. Refer to the page 10 for directions on mounting your
drive (Mounting hardware is not included).
8
Page 9
Settings and Connections
Connection example
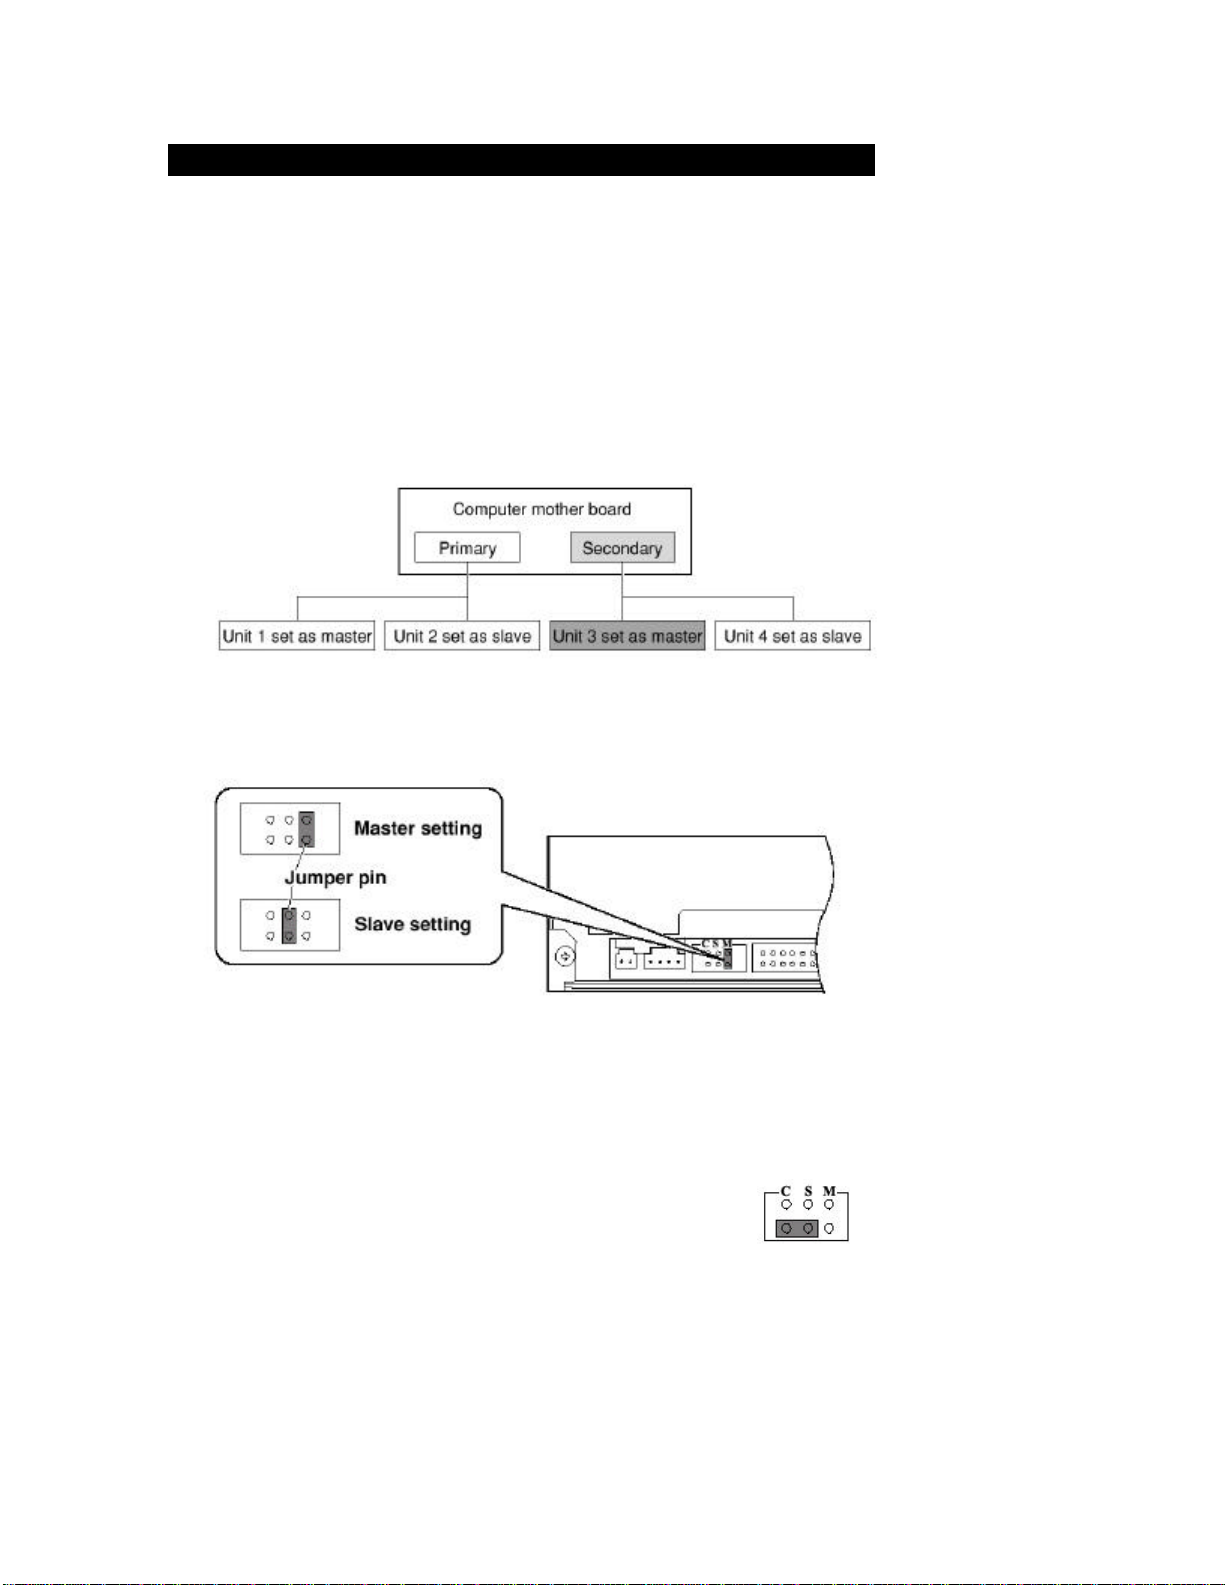
Most computer motherboards have two IDE interface connectors: a Primary and a
Secondary.
You can connect a total of four units to the motherboard: one Master and one
Slave IDE unit to the Primary and Secondary connector.
We recommend connecting the PDC drive as Secondary Master.
NOTE: This unit is set as a Mast er at the time of shipment.
NOTE: Some Compaq, HP, or Dell computers use Cable Select which is
the third set of jumpers on the left side. Please refer to your Computer
Manual if you have one of these types of computers.
Caution:
Do not mount the jumper pin sideways or in any position other
than specified. This can cause the unit to malfunction.
NOT allowed
9
Page 10
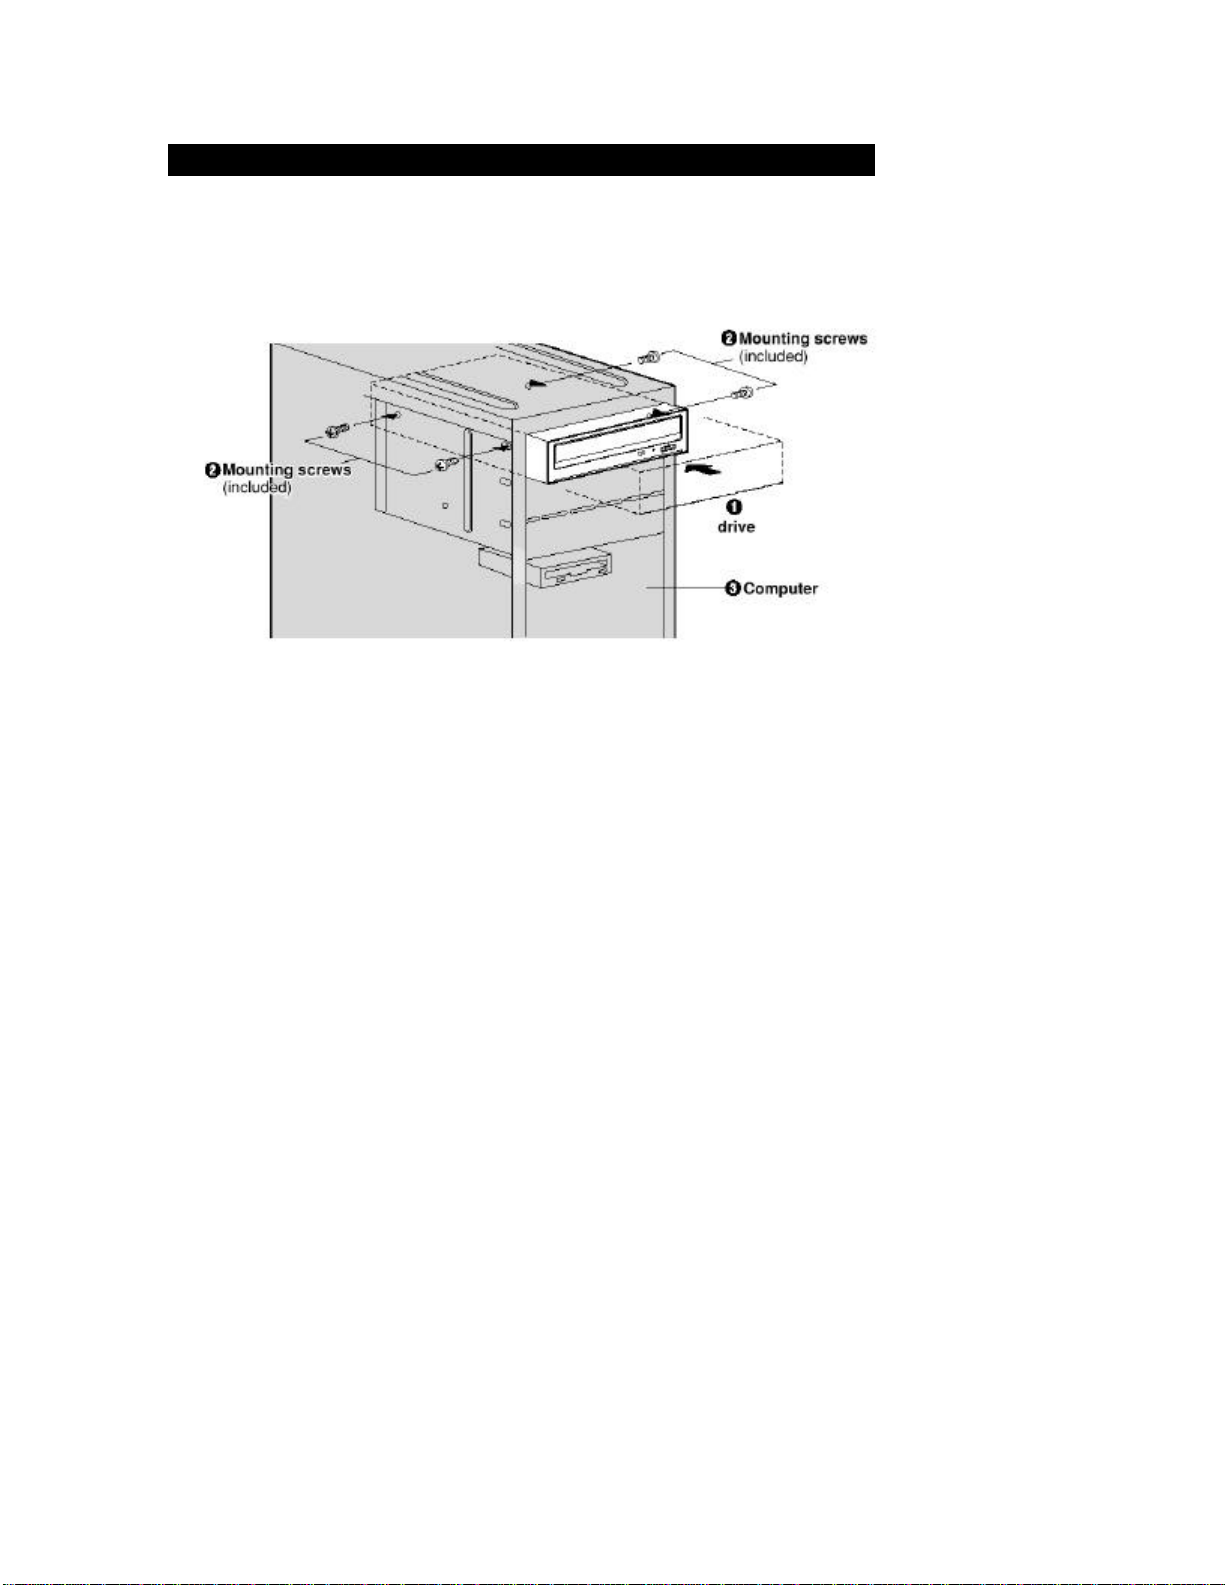
Mounting screw holes are located in four places on the right and left panels of the
PDC drive. When securing the PDC drive into a computer secure the PDC drive
firmly in place with the four mounting screws included in this kit:
NOTE:
Only use the screws included in the PDC kit. (Using screws with a different
length or diameter may damage the PDC drive).
10
Connecting the PDC Drive
Page 11
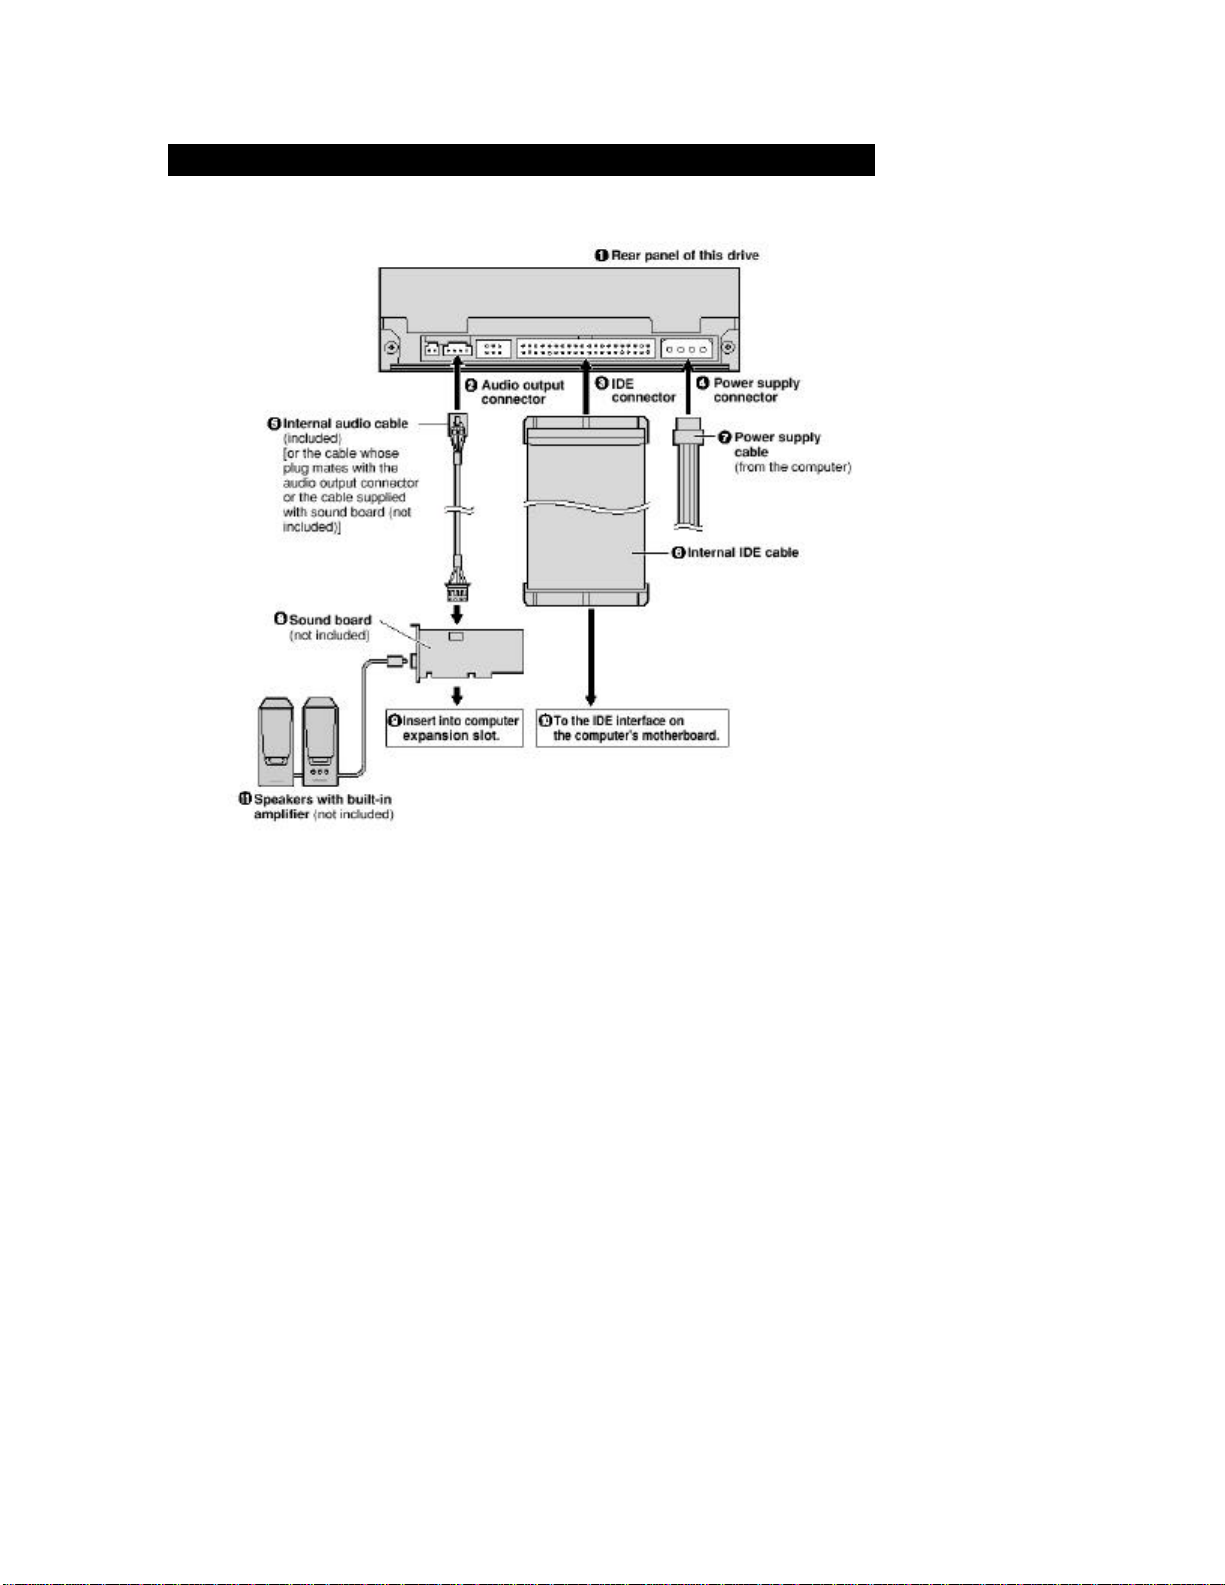
Connecting the cables
11
Page 12

Bundled Software
The following programs are supplied on the PDC Burner Bundle. Pacific Digital
supports the “Recording Master ing Software” only. All other softwares included
are either “Trial” or “Lite Versions”. Pacific Digital will not support any “Trial”
or “Lite Version” software included on the “PDC Burner Bundle”. For support on
these softwares please contact their respective manufactures.
NeoDVD (trial limited to five (5) fifteen (15) min tracks) – (DVD / VCD
Mastering Software) ( Supported by MedioStream www.mediostream.com)
?? Single solution for REAL-TIME Capturing, Encoding, Editing and
Authoring DVDs or VCDs.
?? Create DVD- or VCD-ready files from LIVE DV source in real -time.
?? Full D1 (DVD) resolution @ 30fps.
?? User-friendly interface.
?? Step-by-step animated Flash tutorial .
?? Automatic editable DVD menu generation.
?? Input support for AVI, QuickTime, DV, MPEG-1 and MPEG-2.
?? Output DV, DVD, or VCD files to HD, or recordable DVD or CD drives.
?? Automatic NTSC/PAL conversion.
?? Copy from existing non-commercial DVD or VCD disc to HD, or
recordable DVD or CD drives.
?? Ability to add audio track to video footage.
?? Basic transitions between video footage.
?? Ability to add title to video footage.
?? Discs can be played back on the PC or home DVD player.
Muvee autoProducer (lite limited to one (1) video and audio import per
session) – (Movie Editing Software) (Supported by Muvee www.muv ee.com)
With muvee autoProducer all you do is select video files, choose any music you
like, and pick one of the twenty-plus styles we provide. In minutes—seconds in
some cases—muvee autoProducer works its magic. It edits your video,
automatically adds transitions and special effects, and gives you a polished
production.
12
Page 13

Bundled Software Continued
MusicMatch (lite version) – (Audio Jukebox) (Supported by MusicMatch
www.musicmatch.com)
?? Make your own CDs from your MP3s.
?? Turn your music collection into MP3s.
?? Play MP3s, CDs and Windows Media.
?? Tune into MUSICMATCH Radio.
?? Manage your digital music collection.
?? Print custom CD labels and song lists.
?? Get free downloads and artist info.
?? Send music to your MP3 player.
Stomp Click ‘N Design (lite version) – (Label Making Software) (Supported
by Stomp Inc. www.stompinc.com)
Design like a pro and easily create beautifully spectacular, professional -looking
CD/DVD Labels and Jewel Case Inserts.
Acid Music (lite version) – (Audio Creation Software) (Su pported by Sonic
Foundry www.sonicfoundry.com)
Express your musical creativity with unprecedented ease and flexibility with
ACID Music. ACID Music is the perfect —software solution for creating original,
royalty-free music quickly and easily. "Paint" your music without messing with
complicated sequencers, drum machines or musical instruments. Enhance each
individual track with great-sounding effects that are sophisticated yet simple to
use.
Sound Forge (lite version) – (Audio Editing Software) (Supported by Sonic
Foundry www.sonicfoundry.com)
Sound Forge is Sonic Foundry's award-winning two-track digital audio editor.
Sound Forge includes a powerful set of audio processes, tools, and effects for
manipulating audio. This one-of-a-kind application is perfect for audio editing,
audio recording, effects processing and media encoding. Combine Sound Forge
with any Windows-compatible sound card to create, record, and edit audio files.
The clean and familiar Windows interface makes editing a breeze.
13
Page 14
Handling Guidelines
This section explains the handling guidelines for Media.
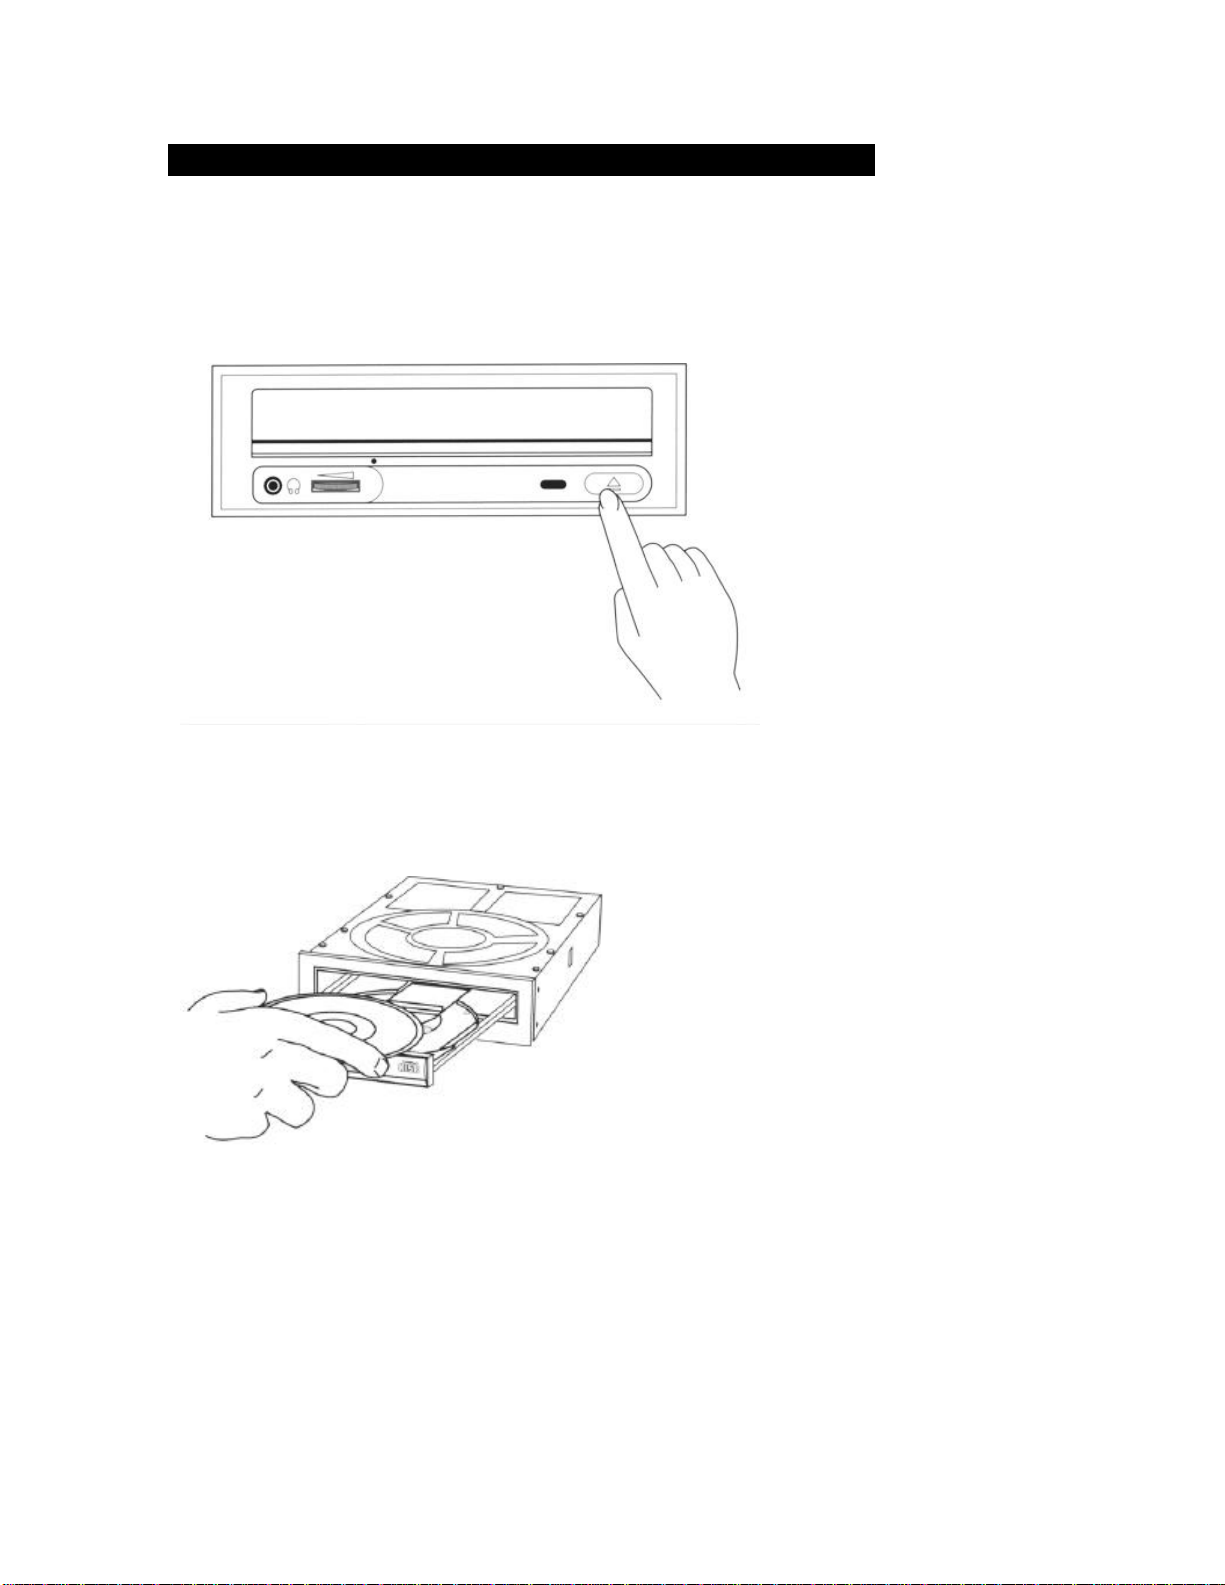
MEDIA INSERTION AND REMOVAL
Step 1: To insert the CD-ROM, CD-R or CD-RW disc, press the eject button.
Note: The disc surface must be
clean and the label should be
facing upward, also make sure
that blue side is down.
14
Page 15
Handling Guidelines Continued
Step 2: Once the disc tray has fully extended, place the CD-ROM, CD-R or CD-
RW disc into the center of the tray. Press the eject button to have the drive
accept the CD-ROM, CD-R or CD-RW disc.
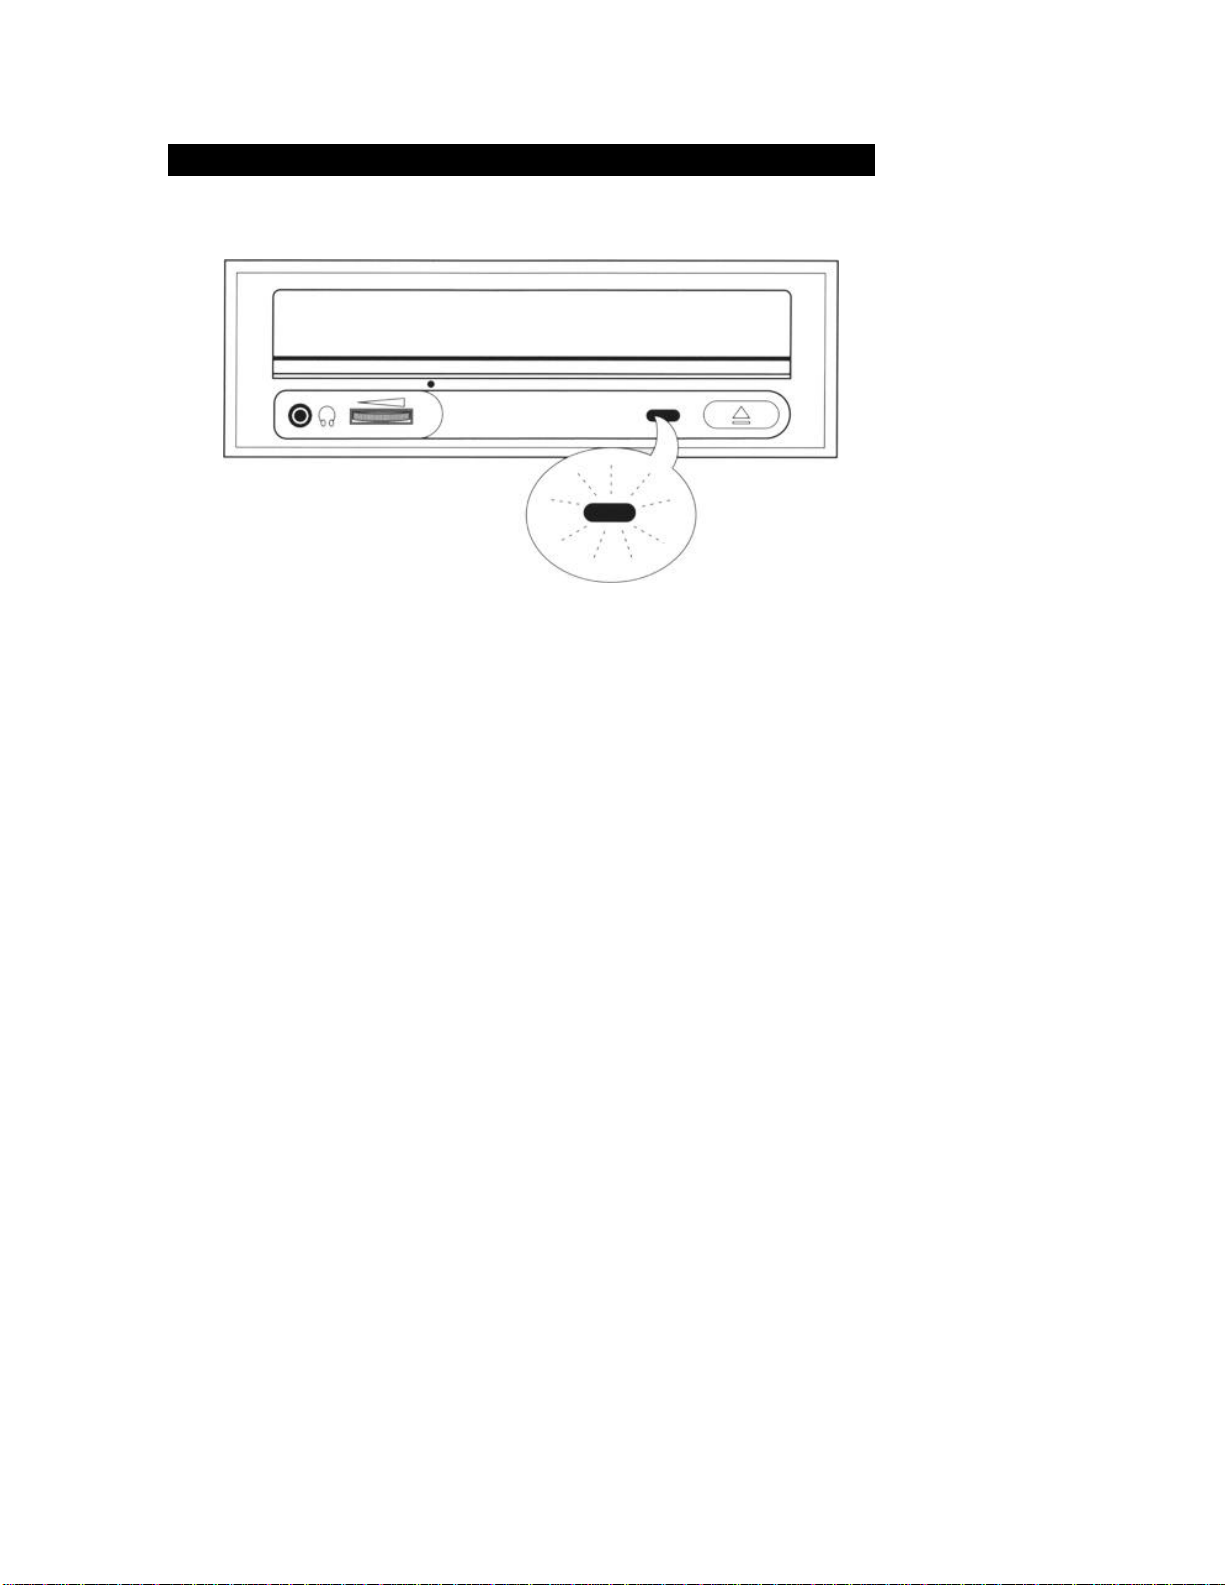
Step 3: The busy lamp will light for a few seconds to indicate that a disc has been
loaded and the drive has accepted the disc.
Step 4: To eject and insert the disc, press the EJECT button.
Note: Some software prohibits the use of the EJECT button, so a disc
cannot be ejected this way. Please refer to the instructions supplied with
your software.
Note: The disc cannot be ejected while the drive is reading or writing a
disc.
Step 5: Once it has been ejected, remove the disc by hand and return it to its jewel
case.
Step 6. If Power is off or tray will not eject correctly, insert a paper clip into the
manual eject hole, and push clip in until tray opens.
15
Page 16
Handling Discs
Handling CD-R/RWs and other CD discs.
Do not place in the following locations:
Hot or humid locations or where they will be exposed to direct sunlight.
Locations susceptible to significant differences in temperature.
Handling notes:
Do not soil or damage them.
Do not drop or bend them.
Do not write on or adhere labels to the recording side.
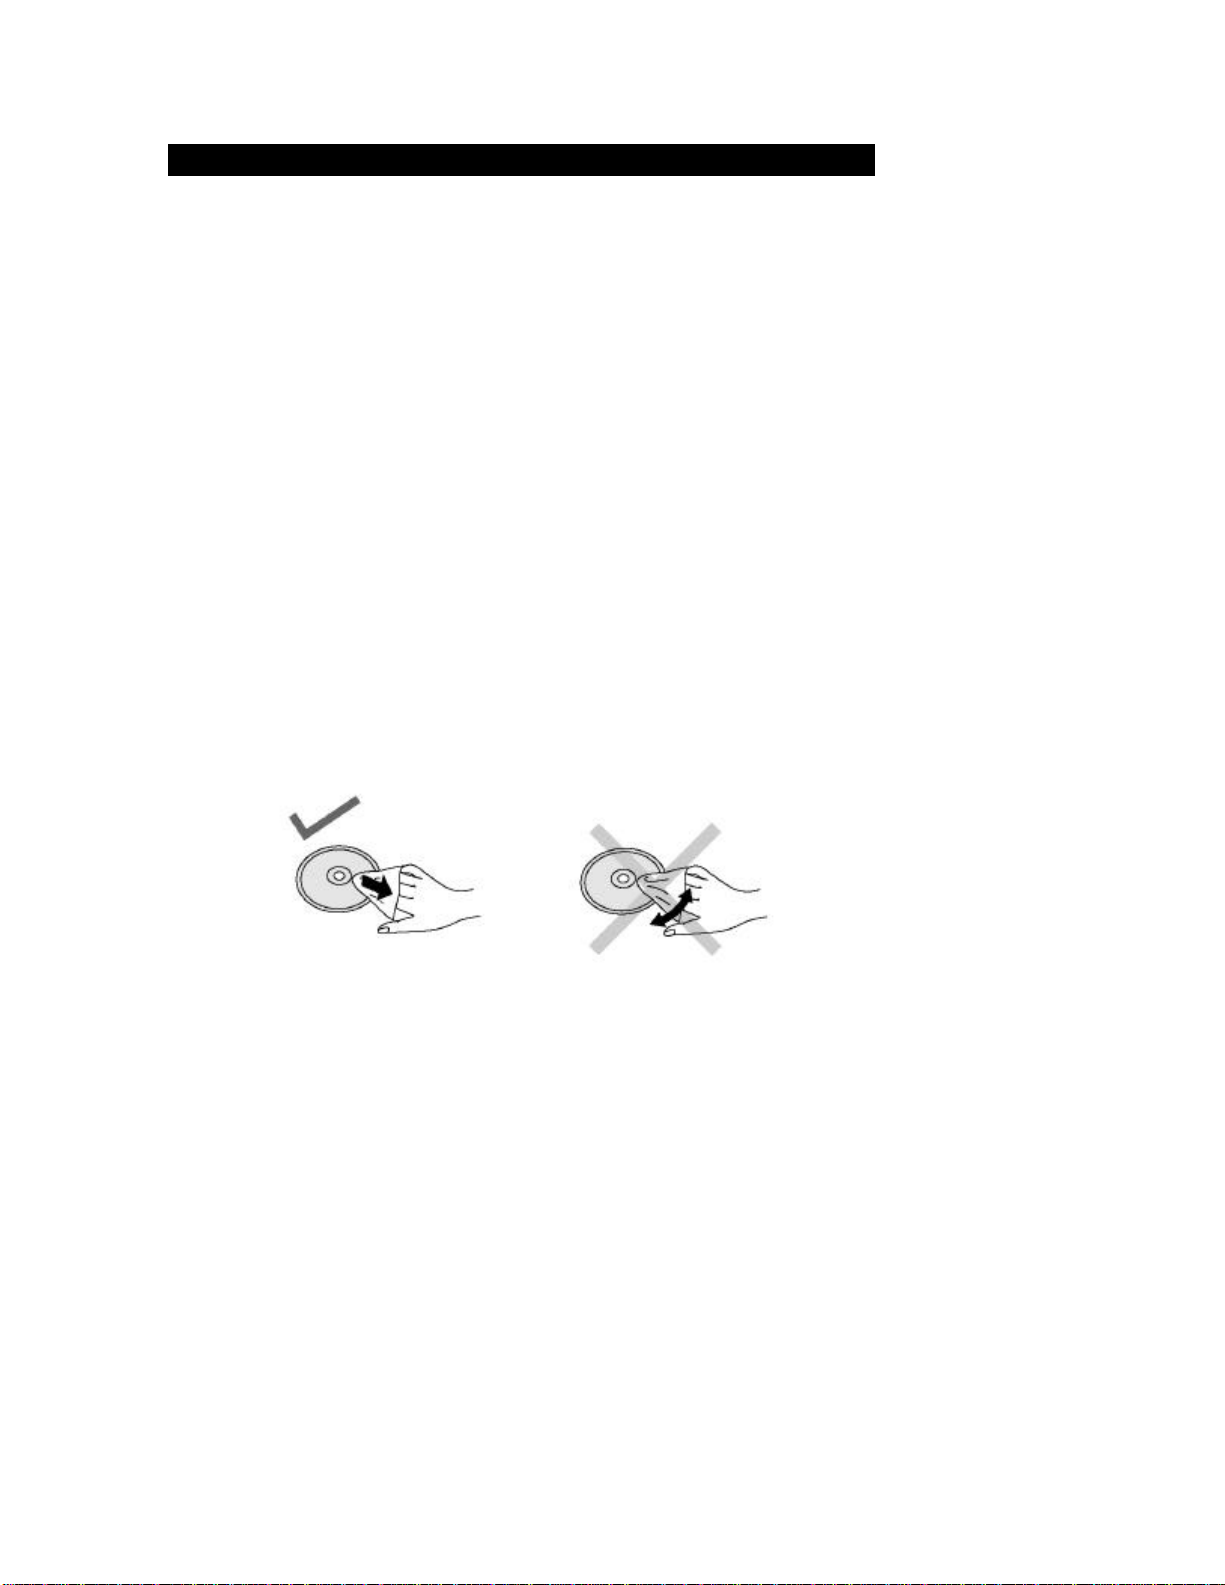
What to do when a disc is dirty
Wipe the disc using a soft lint-free cloth, which has been dipped in distilled water, and
then wipe with a dry lint-free cloth. The disc must be wiped from the inside towards
the outside.
16
Page 17
Troubleshooting
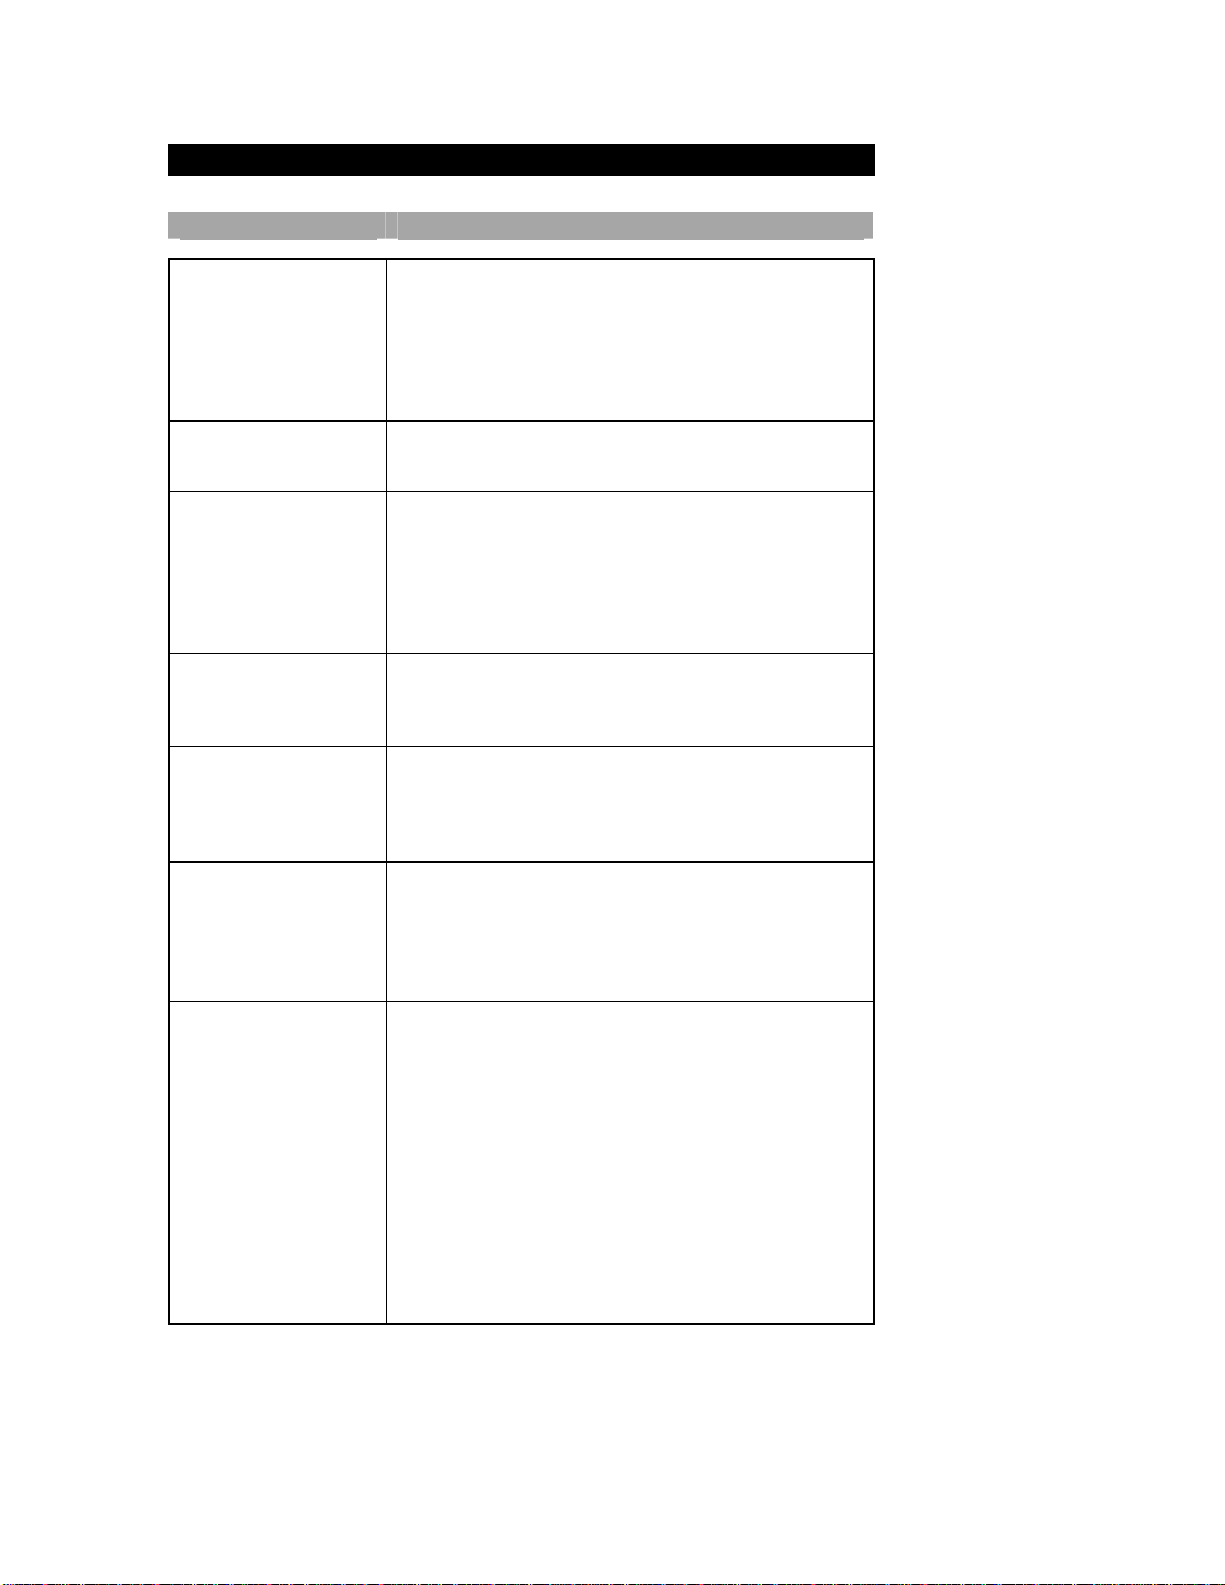
When this occurs Possible cause
Tray fails to open:
Tray fails to close:
Computer fails to work:
Drive cannot be
accessed normally:
Drive is not recognized
in Windows:
Cannot read or write
CD-R/RW disc:
Discs cannot be read:
Is the computer on?
Has the power supply cable been connected
correctly?
Has the label of the media peeled off?
Has the disc been inserted correctly?
Has the drive’s master/slave jumper pin been set
correctly?
Are the drive and computer connected correctly?
Has a floppy disk been left inside the computer?
Are the drive and computer connected correctly?
Is the device driver software installed correctly?
Is the device driver installed correctly?
Are your jumpers set correctly?
Did you initialize (format) the CD-RW disc?
Did you access the drive letter assigned to the drive?
Is the CD-R/RW disc dirty?
Did you access the drive letter assigned to the drive?
Only supported disc formats can be read.
Is the disc inserted correctly?
Are you using correct software programs for playing
discs?
Is the disc dirty, scratched, cracked, warped, and
written on the surface or has a label been put on the
recording side of the disc?
17
Page 18

Notes and Information
During installation, record the following information. This information will be needed
to contact technical support. You can contact PDC Technical Support at (888) 9990732 or by fax (949) 252-9397. When calling the Techni cal Support Department,
MAKE SURE TO HAVE THE FOLLOWING INFORMATION READILY
AVAILABLE, BECAUSE IT IS NECESSARY IN ORDER TO RECEIVE
TECHNICAL SUPPORT.
SUPPLIER INFORMATION
Date of Purchase:_____________________ Invoice #:_____________________
Product Purchased From:_____________________________________________
Seller's Tech Support Phone #:_________________________________________
PDC PRODUCT INFORMATION
PDC Part #: U-30-___________ PDC Serial #:_________________________
CD-RW Recording Software:_________________________________________
DVD Software Version: ___________________________________
OTHER INFORMATION
Processor Speed:____________________________________________________
Brand of Computer:_________________________________________________
RAM Size:________________________________________________________
CD-Rom Speed: _________________________________________________________________
18
Page 19

Pacific Digital Corporation (PDC), Consumer Products Division
2052 Alton Pkwy, Irvine, CA. 92606
www.PacificDigital.com
1862-32-02-9
 Loading...