

Pacific Digital DrumXtreme DX-100 User Manual

TABLE OF CONTENTS
1. INTRODUCTION 1
2. FEATURES 1
3. MINIMUM PC SYSTEM REQUIREMENTS 2
4. GETTING STARTED 3
4.1 Unpacking your DrumXtreme™ 3
4.2 Registration & Your Product Serial Number 5
4.3 Assembly of DrumXtreme™ 5
4.4 Adjusting Pad Positions on your DrumXtreme™ 11
5. INSTALLING USB DRIVERS FOR WINDOWS® 12
6. INSTALLING DIGITAL DRUM PC SOFTWARE 18
7. USING THE DIGITAL DRUM SOFTWARE & GAME 20
7.1 Before Starting the DrumXtreme Software Program 20
7.2 Starting the DrumXtreme Software Program 21
7.3 Main Menu 23
7.4 Digital Drum Operation Menu 24
7.5 Sound Bank Timbre Editing P anel 30
7.6 Music Game Menu 34

8. WARNINGS 38
9. EXPANDING YOUR DRUMXTREME 39
10. TROUBLESHOOTING / FAQ 40
11. DRUMXTREME LIMITED WARRANTY 50
12. CONTACTING TECHNICAL SUPPORT 52
Copyright© 2003 Pacific Digital Corporation Page ii

1. Introduction
Welcome to DrumXtremeTM, the next generation in digital music playing
and recording instruments. With the DrumXtreme you will be able to
play the backbeat to your favorite music, or create, play, and record your
own music. DrumXtreme is easy to install and use, providing a full size
professional drum ensemble consisting of 5 pads and a foot pedal. Each
of the pads emulate the drum elements including hi-hat, snare, crash,
tom, base, t-tom, and ride.
The DrumXtreme is easy to install and use, and comes complete with
tutorial software that is ideal for the beginner, and also the experienced
drummer to sharpen skills, with plenty of drills and exercises.
2. Features
Complete 'drum rack' easily configures to optimum personal playing
positions
Easy to assemble, store, and transport
Requires smaller total area to use than an acoustic drum set
7.5" pads with sensitivity adjustment for true drum feeling and
response
5 pads included, up to 6 pads supported
1 foot pedal included, up to 3 pedals supported
Advanced sampling technology for high quality audio
Easy USB installation. USB connection provides power (no wall
outlets required).
PC-based software provides easy to follow video tutorials
The drum tutorial system uses identifiable colors on the pads and on
your computer monitor to guide you through lessons. Ideal for quick
learning and skill development
Pads have 'choke' capability while playing crash or ride
Seamless operation with your PC audio system
Includes PC drumming 'game' with three levels of difficulty
Includes 110 sound combinations from 10 varying sound collections
- user configurable

The following items are included in the DrumXtreme kit:
Five (5) Percussion pads with sensitivity adjustment
Seven (7) cables to connect the percussion pads, foot pedal, and
choke control to the controller
One (1) Easy to assemble drum stand
One (1) Foot Pedal
One (1) Master controller
One (1) Set of drumsticks
One (1) Manual with complete instructions and documentation
One (1) USB cable
One (1) Software CD: Digital Drum control software & Music
Game (also includes tutorial and documentation)
One (1) Music CD: practice music for learning exercises
3. Minimum PC System Requirements
The DrumXtreme has the following minimum system requirements:
IBM compatible PC
Pentium II 300MHz or higher with at least 128 MB of memory
Microsoft Windows® XP, Windows® 2000, Windows® 98SE,
or Windows® ME
CD-ROM: 8X speed or faster
Keyboard & Mouse
USB port (either USB 1.1 or USB 2.0)
VGA compatible display (or higher)
Direct X video/graphics & sound-card drivers
100MB of free hard-disk space for software installation
Sound Card
Speakers or Earphones
Copyright© 2003 Pacific Digital Corporation Page 2
4. Getting Started
This section provides step-by-step instructions on setting up your
DrumXtreme
TM
for the first time.
4.1 Unpacking your DrumXtreme™
In the retail box, the unit is cushioned in a cardboard shockabsorbent holder. You may wish to save the box so you can pack or
store the unit in the future.
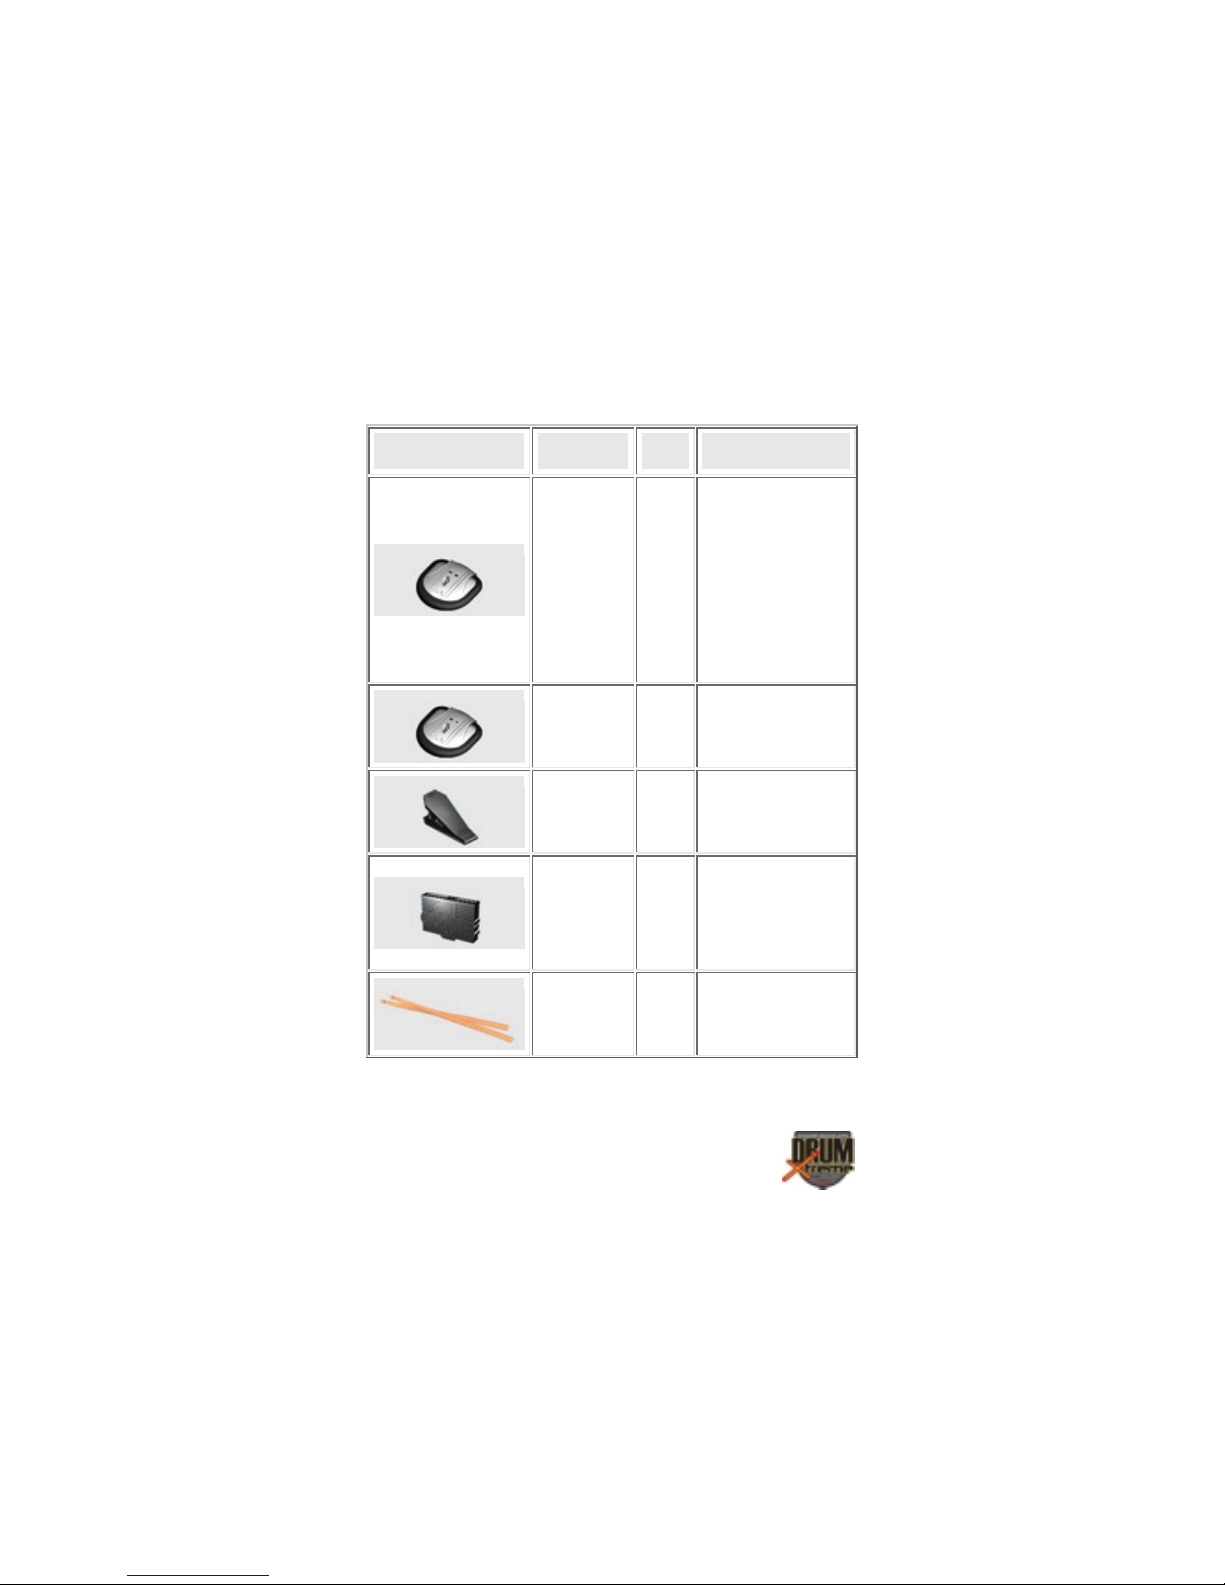
The tables below show the Parts List:
Figure Item Qty. Comments
Special Purple pad
for Cymbal &
Choke (Tone
Mute).
One
Drum DX-8
The back of this
piece
pad has two plugs
and a manual
button/switch for
choke control
(Tone Mute).
Four
Drum DX-5
Foot Drum
pedal
Master box
SV-BOX
Drum sticks
Copyright© 2003 Pacific Digital Corporation Page 3
pieces
Standard drum and
cymbal pads.
One
This pedal is used
piece
for Bass Drum.
Master Controller.
Your drum’s
One
Model# and
piece
Serial# are printed
on the back.
One
Professional wood
pair
drum sticks.

Drum stand
Cables
CD Discs
One
group
Eight
pieces
Two
pieces
The detailed parts
list for the stand is
shown in the
following table.
1. Seven audio
source cables.
(Please use the
special mono cable
line.)
2. One USB cable.
1. Data CD
(Installation
program, teaching
disc, and game
grogram)
2. Music CD
Manual One
This Manual
(includes warranty
information)
.
Table 1 – Major Parts List
Table 2 – Detailed List of Stand Parts
Make sure all of these parts are included before continuing. If something
is missing from the above tables, contact customer service at: 1-888-999-
0732.
Copyright© 2003 Pacific Digital Corporation Page 4
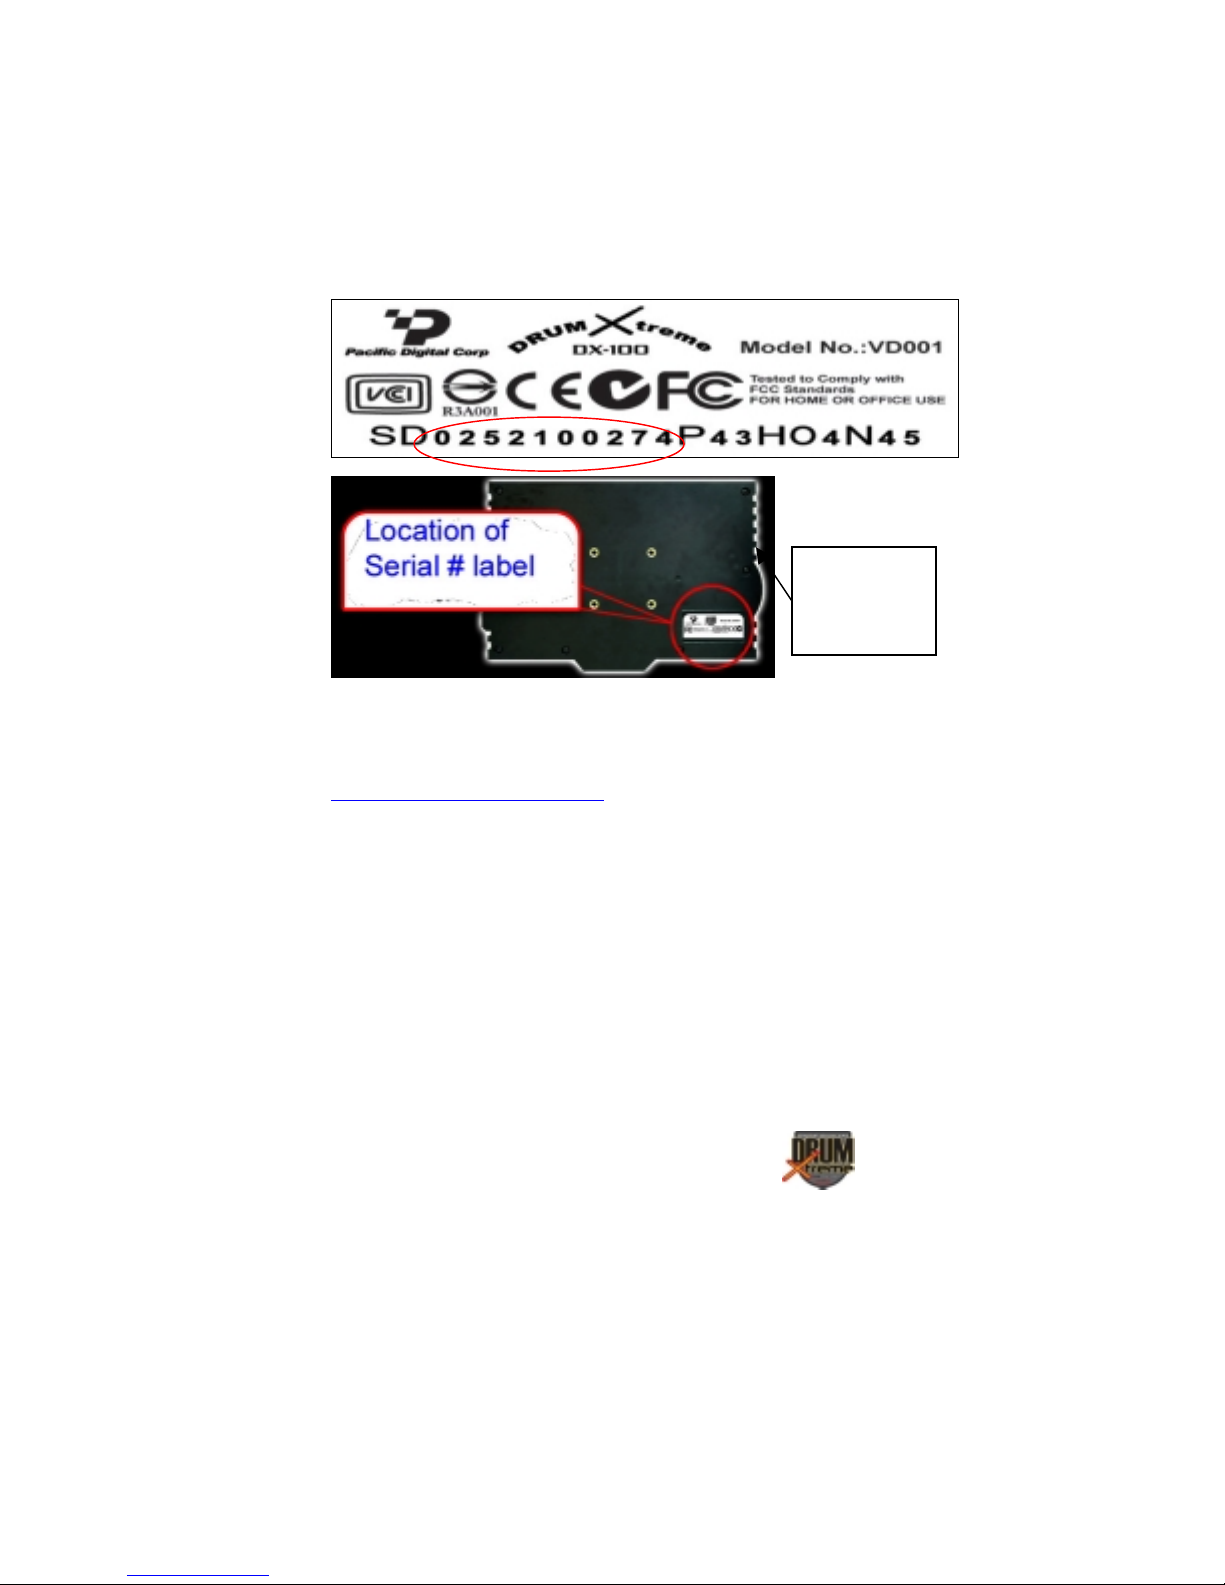
4.2
Registration & Your Product Serial Number
Please record the model and serial number to keep for reference. These
are required for Product Registration and the web-Update function. Also
record the Product ID number from the bar-coded label on the back of
your manual (this Product ID number is required for Technical Support).
This information is printed on a label on the rear of the Master Controller
(SV-BOX). The serial number is circled in the label shown in Figure 1.
Master
Controller
Box
Figure 1 – Product Serial Number Label
In order to receive technical support, you should register online at:
http://www.PacificDigital.com
4.3 Assembly of DrumXtreme™
This section provides step-by-step instructions on assembling your
DrumXtreme. Installation starts at the bottom of the stand and works
upward towards the top. Figure 2 below shows a fully assembled drum
set.
soon after your purchase date.
Copyright© 2003 Pacific Digital Corporation Page 5
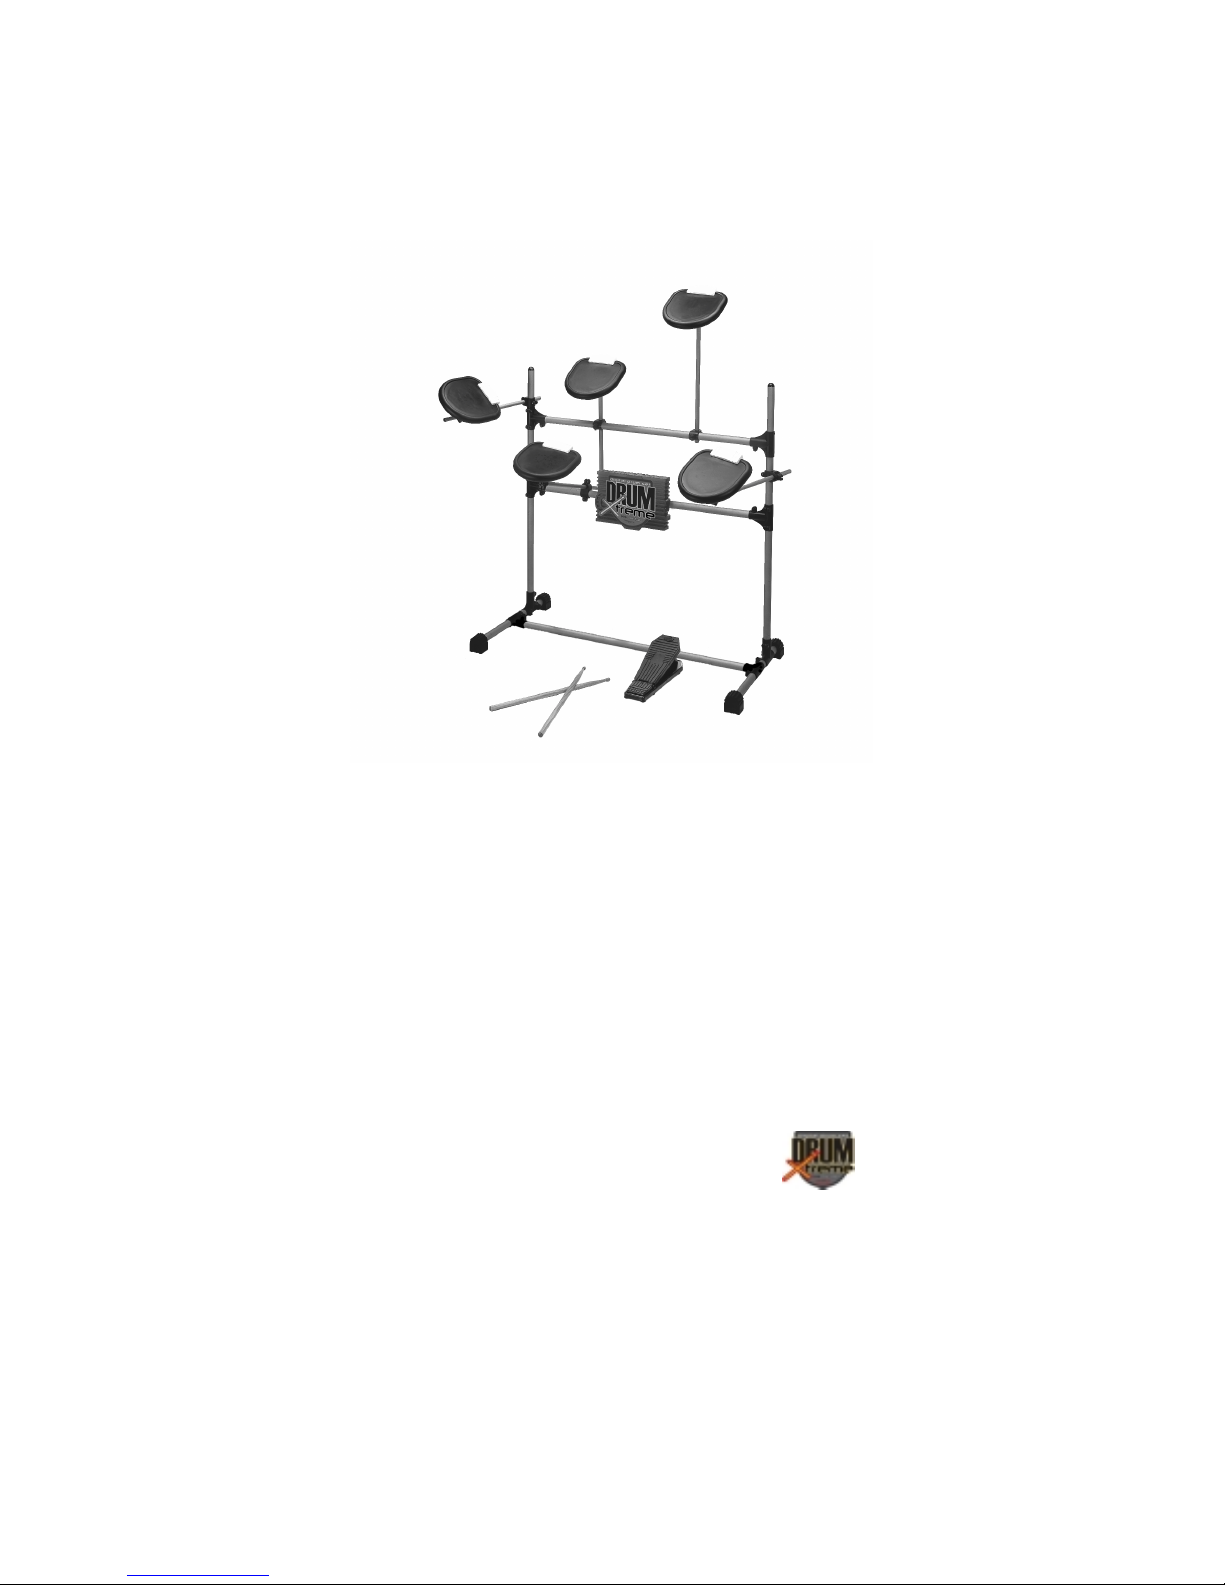
Keep Figure 2 in mind while following Steps 1 through 10 to assemble
your DrumXtreme. Figure 3 shows detailed assembly connections which
are referenced in assembly instruction steps 1 through 10
Figure 2 – Example of Assembled Stand
.
Copyright© 2003 Pacific Digital Corporation Page 6

N
ote: Do not attach the
5 “D” parts until Step 4
Connect and
tighten every joint
with a screwdriver
Figure 3 – Stand Assembly Connections
** Note: Do not over tighten screws! **
Step 1: Using Table 2 entitled “Detailed List of Stand Parts”, organize
parts A to H into separate areas/piles so you can easily find the part being
called for in steps 2 through 10.
Copyright© 2003 Pacific Digital Corporation Page 7
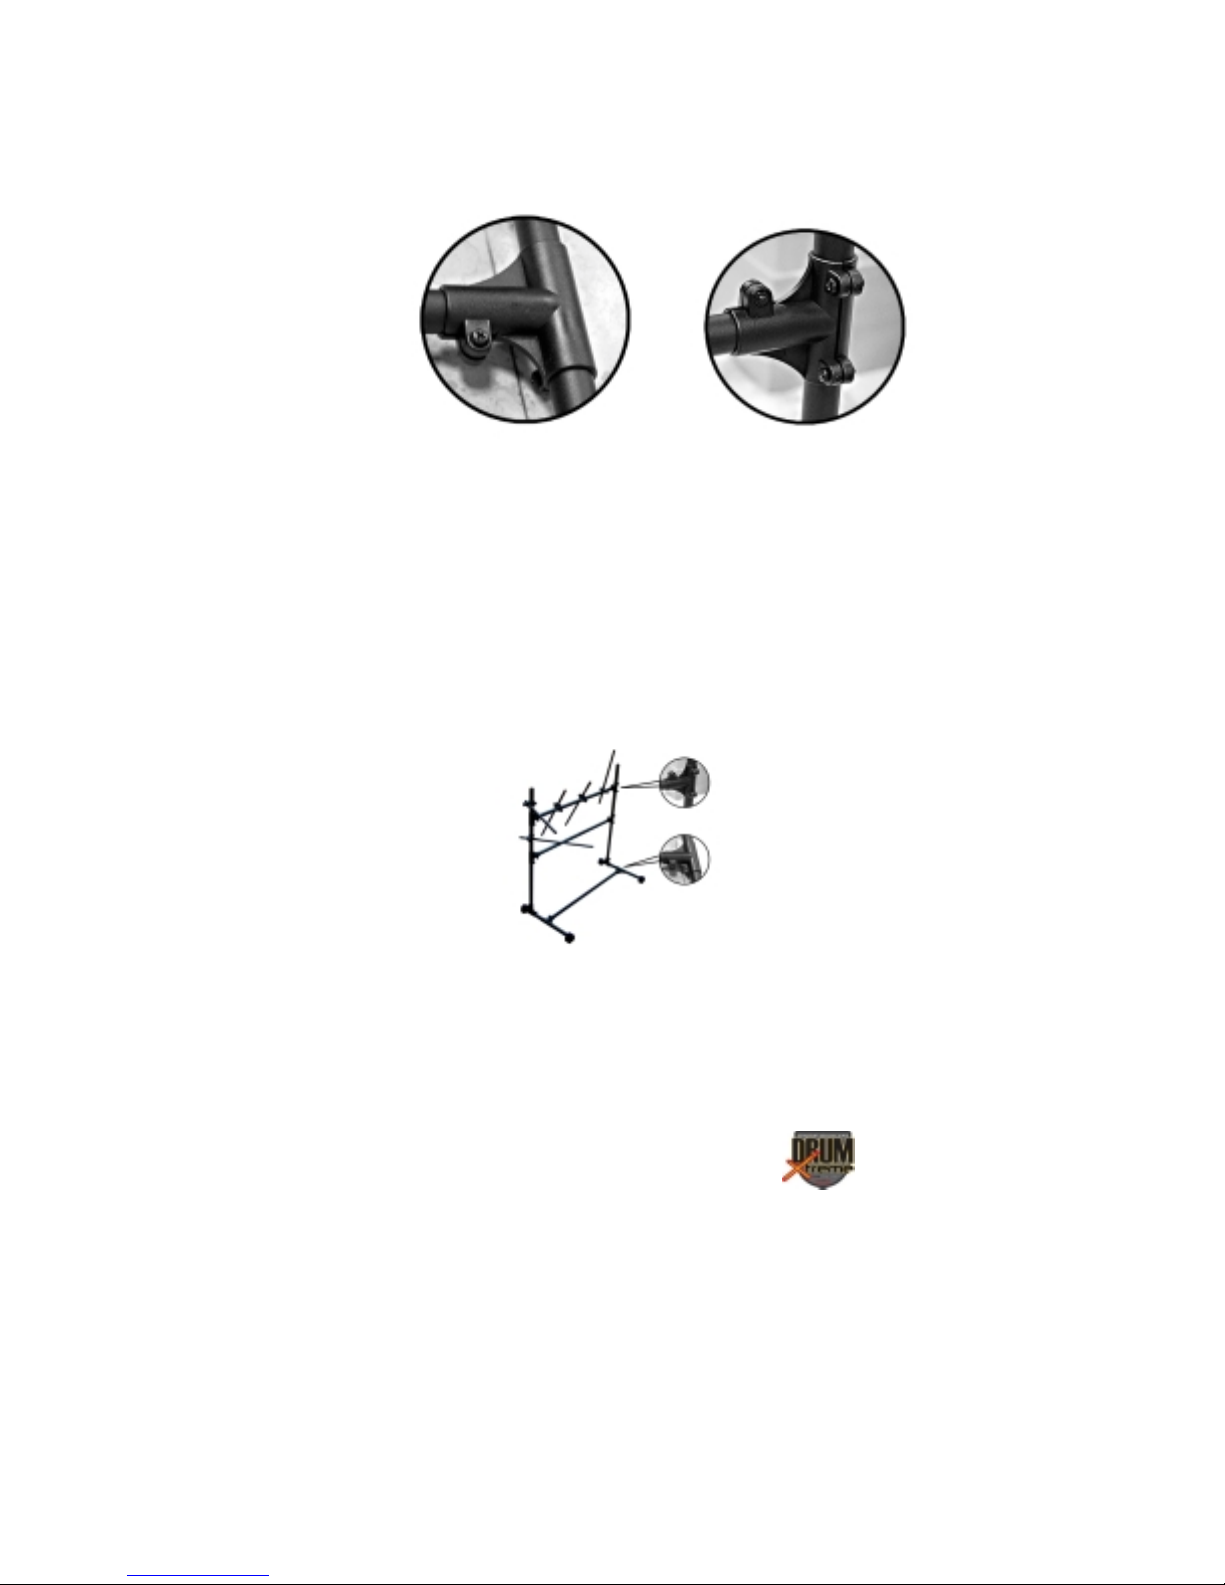
Step 2: Slide two (2) Part C clamps on each of the two stand base bars
[Part B1 (2 sets)]. One part C clamp will face vertical, and the other Part
C clamp will face horizontal. Use Parts F screws and nuts to fasten all
Part C clamps.
Figure 4 – Part C Clamp Assembly
Install (2) each rubber feet Part A1 to the ends of each stand base bar
(part B1). The flat part of rubber feet A1 faces the floor. Install (1)
horizontal bar (Part B2) to the horizontal clamp (Part C) of each of the
stand base assemblies (B1/C/A1 combination).
Step 3: Insert (2) vertical bars (Part B2) to the remaining B1/C/A1 base
assembly combinations (vertical). Insert (2) part C clamps to the ends of
(1) bar part B2. Slide this combination on the (2) vertical bars Part B2.
See illustrations in Figures 3, 4, and 5. Adjust to be about ½ way down
and tighten.
Figure 5 – Part C Clamp Assembly
Step 4: Slide (1) Part D clamp down the left hand vertical bar (B2). This
will be used later for your yellow snare-drum pad.
clamps on the remaining horizontal bar part B2. Install (2) part C clamps
Copyright© 2003 Pacific Digital Corporation Page 8
Slide (3) part D
to the ends of this bar part B2. Slide this combination onto the vertical
bars Part B2. See illustration in Figure 5. Adjust the upper bar
combination to be almost to the top (about 4 to 5 inches down from top).
Slide the remaining Part D clamp on the left vertical bar Part B2. This
will be used later for your red Hi-Hat pad.
Step 5: Install a rubber cap part A2 to the top of each of the vertical bars
part B2. Tighten all bar-connection screws and be sure the rack is stable.
Tighten all screws for parts C clamps. Tighten all screws for Part D
clamps until they are snug, but can be moved and turned.
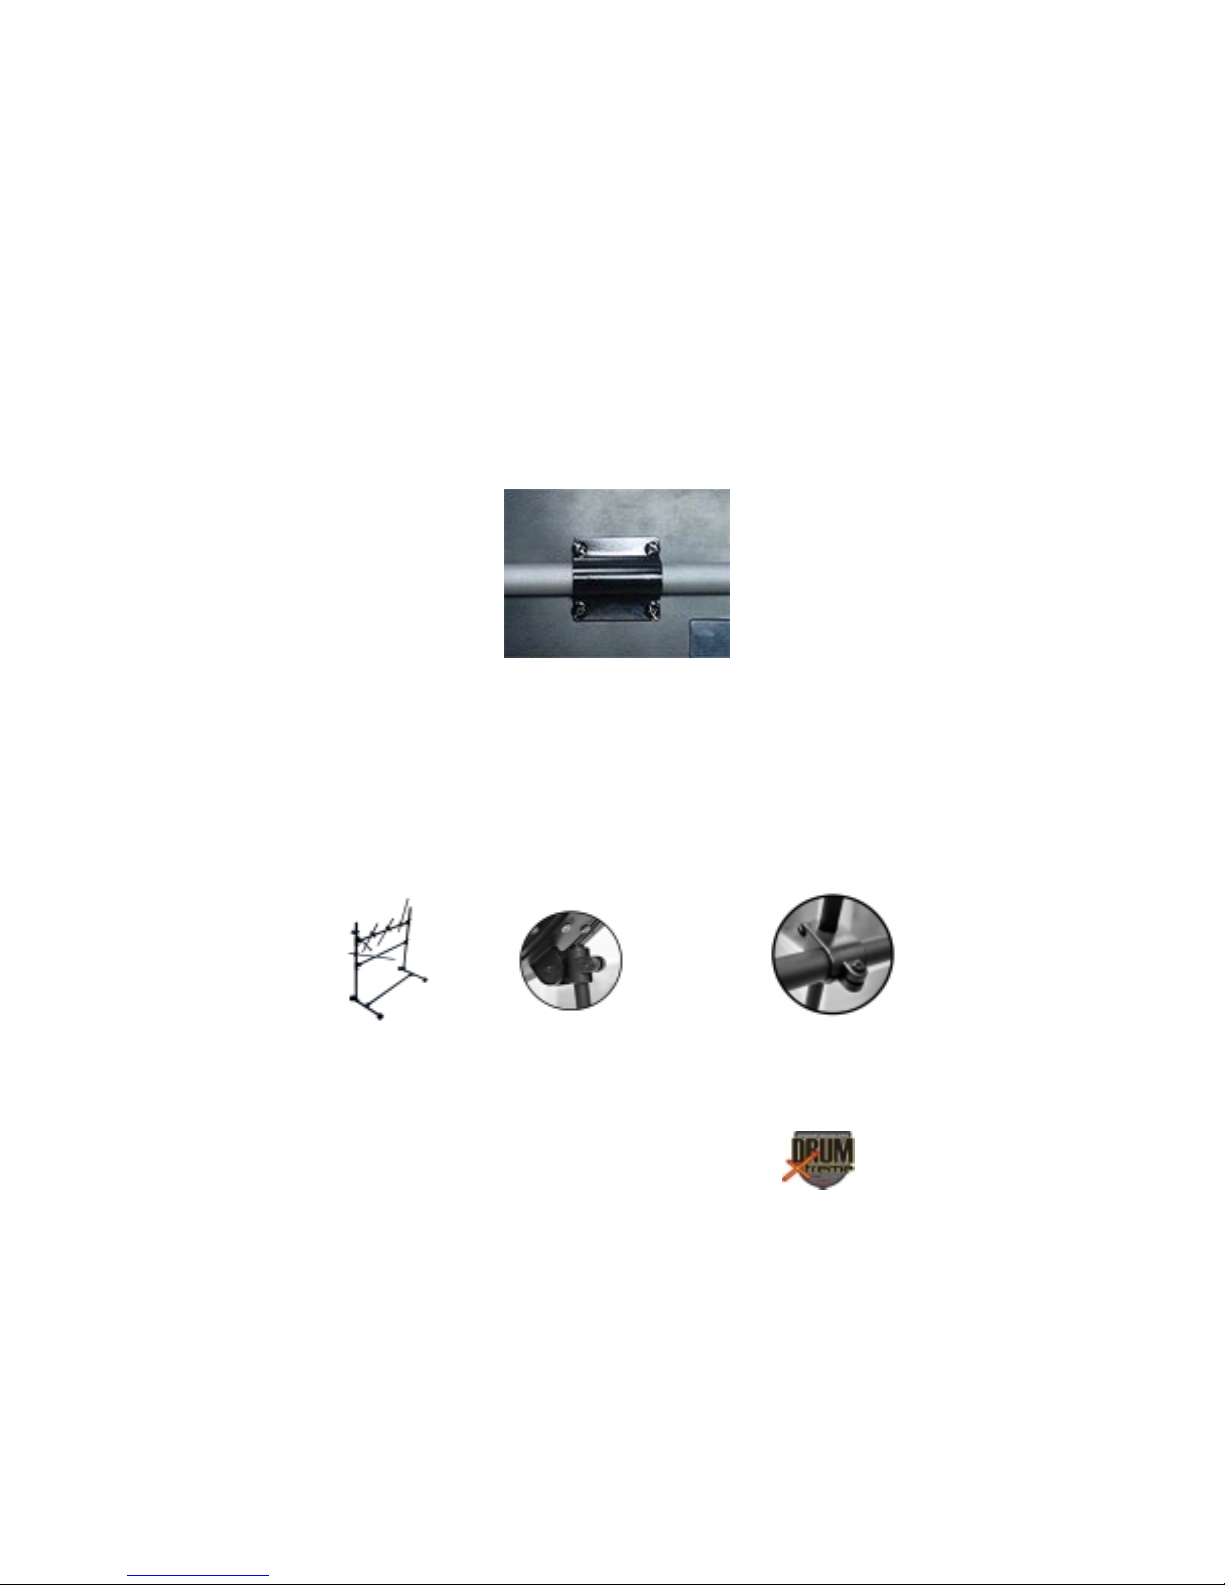
Step 6: Install the Master Controller (SV-BOX) by using the Part G
clamp to mount the Part SV-BOX to the lower (center) horizontal bar
Part B2 as shown below in Figure 6 using (4) Part H screws. The
multiple connection ports of the Master Controller should face up for
easy access. Adjust and tighten. Note: Do not tighten the screws too
hard.
Figure 6 – Attaching the Master Controller
Step 7: Each of the Percussion Pads are color coded. Use the
illustrations in Figure 7 for pad assembly. Insert (10) Part A3 to each end
of (5) drum-arm rods Parts B3. Attach (5) Part E adjustable brackets to
each of the percussion pads (one part DX-8 and 4 part DX-5) using Part
F screws and nuts. The gear side of Part E adjustable bracket matches
with the gear side of the pads (Parts DX-8 & DX-5). Tighten finger tight
only at this point.
Copyright© 2003 Pacific Digital Corporation Page 9
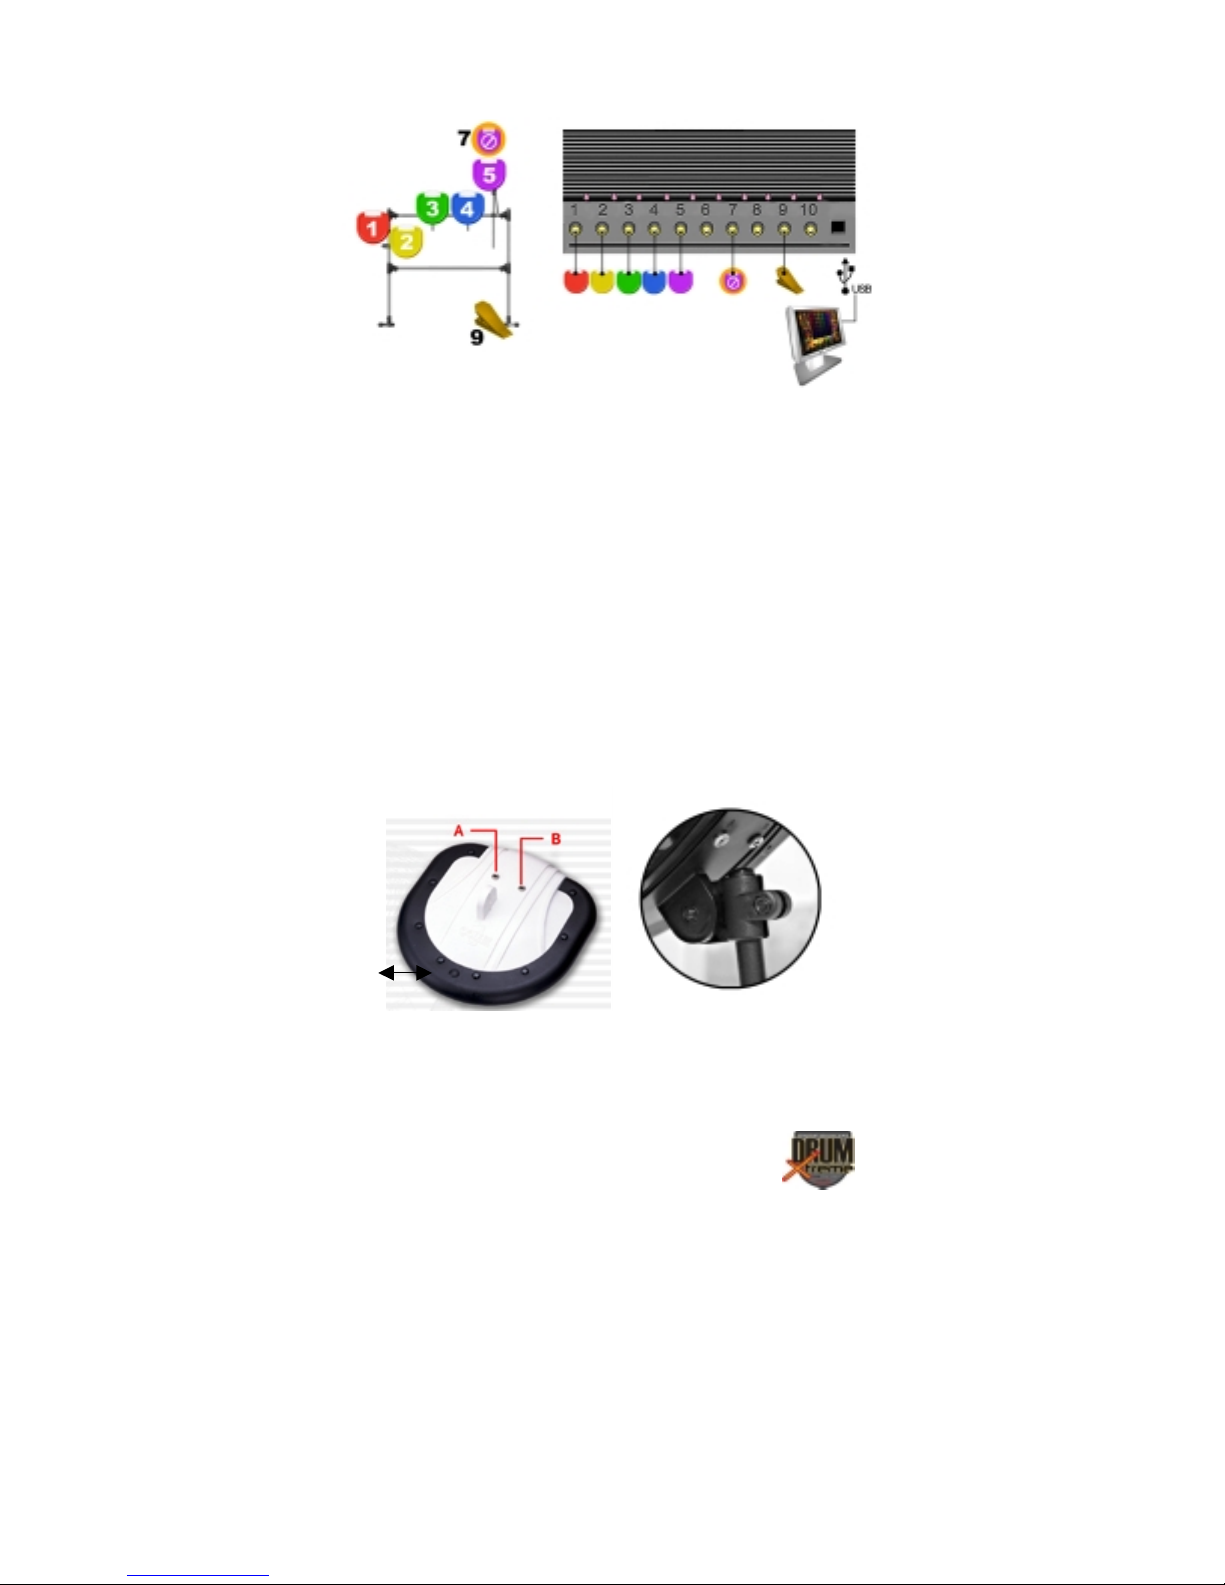
Figure 7 – Pad Rods & Pad Assembly
Step 8: Referring to Figure 7, slide (5) Part B3 drum-arm rods into the
hole of each of the remaining Part D clamps. Tighten finger tight only at
this point. Use the diagram above for reference.
Step 9: Referring to Figure 8, note that Percussion Pad Part DX-8 (hi-
top) has an extra port connection and a pressure switch/button, which is
used to control “choke” (Tone-Mute) of cymbal 5 (pad 5). During drum
play this switch can be pressed by the drummers’ finger to activate the
feature. The DX-8 percussion pad is color coded purple and should be
mounted on the right of the drum stand. Install each of the Part DX8/DX-5 Percussion Pad to the rod/clamp (B3/D) combinations. Tighten
the screws when complete (do not over-tighten).
Switch
Figure 8 -Pad DX-8 (hi-top)
Copyright© 2003 Pacific Digital Corporation Page 10

Step 10: The sound made by each drum head is based on the port
number of the SV-BOX Master Controller. Connect one end of each of
(7) audio source cables to each DX-8/DX-5 percussion pads and BD-6
foot pedal. Percussion pad DX-8 has (2) connections. Connect the other
ends of the audio source cables to the ports of the Master Controller (SVBOX) as per Table 3.
Percussion Pad
Color
Red 1 Hi-Hat
Yellow 2 Snare
Green 3 T-Tom
Blue 4 TT-Tom
Purple A (left) 5 Cymbal
Purple B (right) 7 Cymbal 5 Choke
Foot Pedal 9 Bass
Master Controller
Port
Function
(Tone-Mute)
Table 3 - Pad to Controller Cable Connections
4.4 Adjusting Pad Positions on your DrumXtreme™
DrumXtreme’s complete 'drum rack' easily configures to optimum
personal playing positions. DrumXtreme requires a much smaller total
area to use than an acoustic drum set and features easy storing, and
convenient carrying. When folded for storage or carrying, it occupies
even less space! The figure below shows how the Pad positions can be
adjusted to either configure to your personal optimal playing position or
folded for storage and carrying.
Copyright© 2003 Pacific Digital Corporation Page 11

Figure 9 -Pad Positioning & Folding for Storage
5. Installing USB Drivers for Windows®
DrumExtreme has custom USB drivers for Windows® that are shipped
to you on the software CD. Do not insert the CD at this time. To load
the USB drivers, first boot your Windows® PC. After Windows has
completely loaded, simply connect your DrumXtreme to your PC with
the USB cable that was provided with the kit.
Connect the larger “standard USB” connector to the USB port of the PC.
Connect the smaller “mini-USB” connector to the Master Controller
(SV-BOX) of the DrumXtreme. Figure 10 shows a typical USB
connector on the back of a typical PC.
Copyright© 2003 Pacific Digital Corporation Page 12

Figure 10 – Connecting DrumXtreme to PC
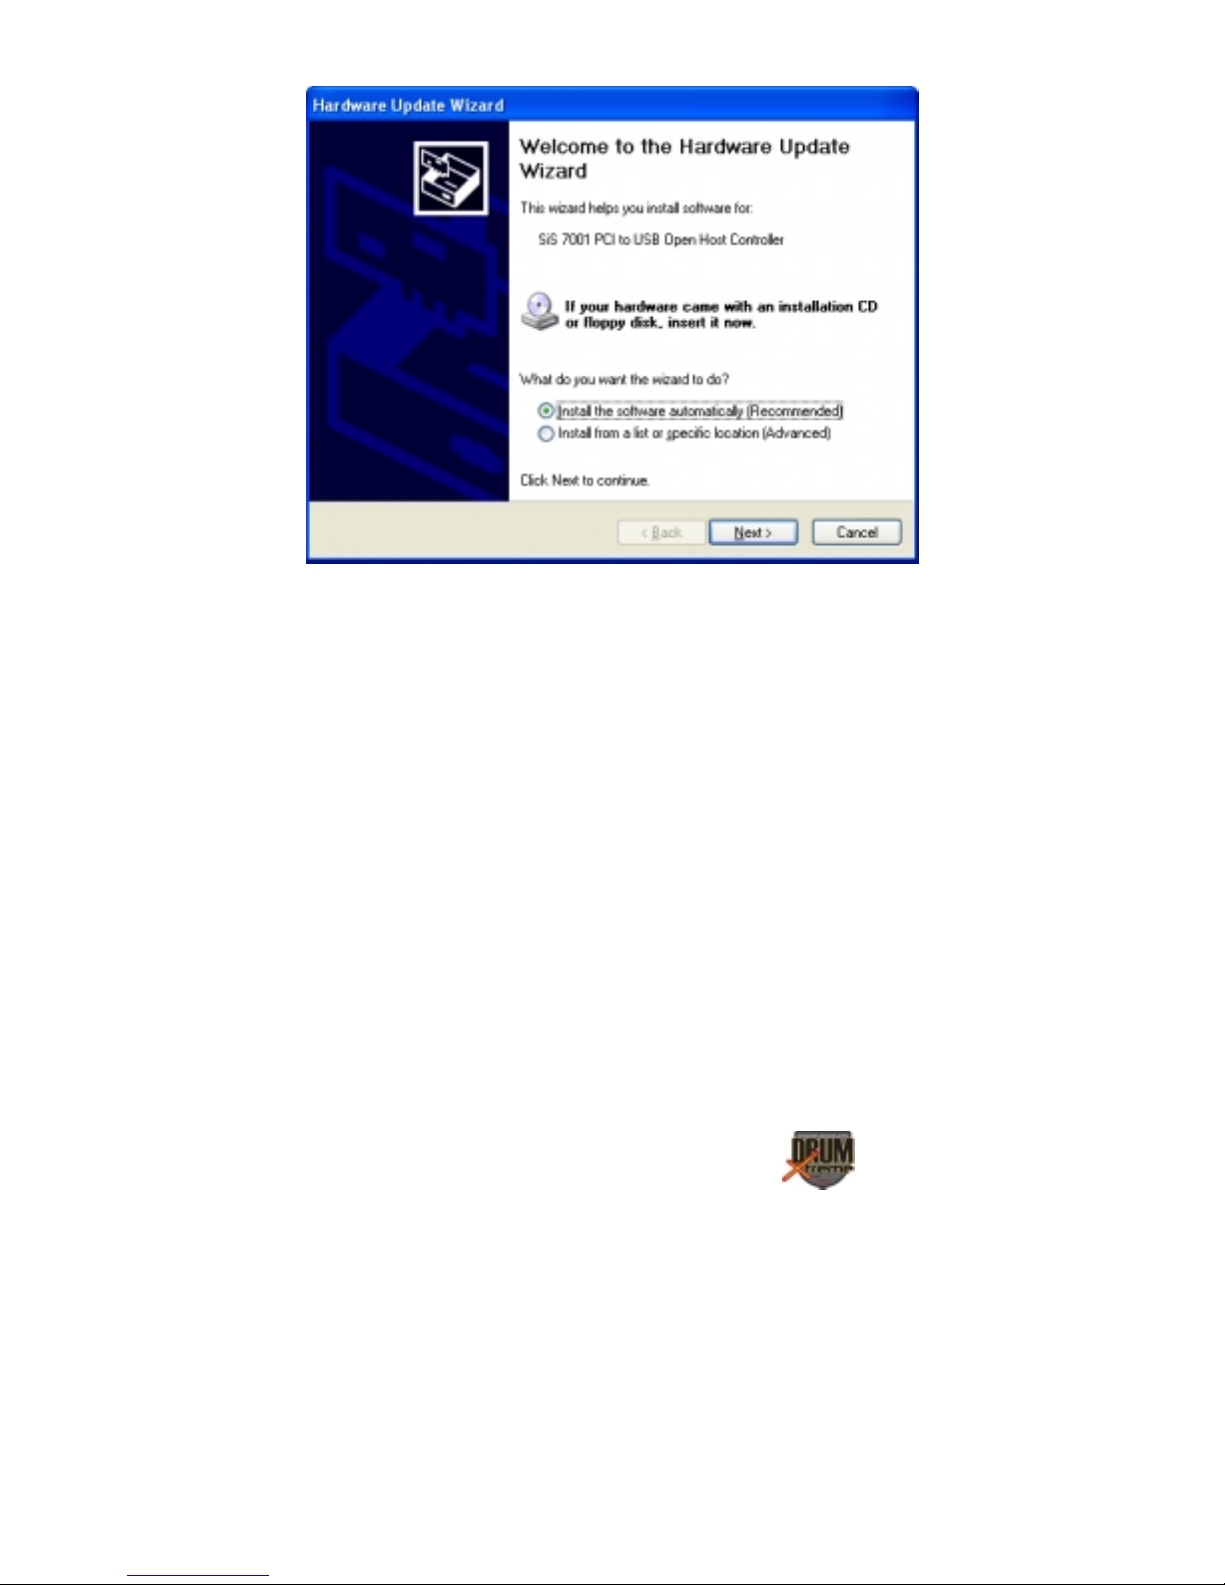
After connecting, the Windows® Hardware Wizard will detect the
connection of the DrumXtreme USB port. When the Hardware Wizard
begins, the following screen will be displayed:
Windows Hardware Found Wizard
Click “Next” to begin installation. The next step is INSTALL
HARDWARE DEVICE DRIVERS.
Copyright© 2003 Pacific Digital Corporation Page 13
Select “Install the Software automatically” and click Next to continue
installation.
Next, in the SEARCH FOR (LOCATE) DRIVER FILES screen, select
the device where the DrumXtreme USB driver can be found (the
DrumXtreme’s USB driver resides on the Digital Drum software CD).
Copyright© 2003 Pacific Digital Corporation Page 14
 Loading...