

Page 1
I
NSTRUCTIONS AND PARTS LIST VSR90#1-8/31/2011
VSR90#1 – Airbrush
Double Action - Internal Mix - Gravity Feed –
PTFE Packings.
W
ARNING: Spray materials may be harmful if
i
nhaled or allowed to come into contact with the skin
o
r eyes. Consult the product label and Material
S
afety Data Sheet supplied for the spray material.
F
ollow all safety precautions. CAUTION: Well
V
entilated Area Required to remove fumes, dust or
o
verspray. Maximum Air Pressure 75 P.S.I.
INTRODUCTION: Prime Characteristics of the Paasche® VSR90#1 Airbrush include the ability to spray fluids requiring
g
ravity feed as well as make quick color changes with the two (2) different size color cups supplied with each set. This unique
t
wo in one design allows the user choice of cup size while using only one shell. These color cups enable the user to swivel
each cup right, left or in alignment with the shell to allow an unobstructed view of their efforts. The Double Action, Internal mix
feature permits flexibility in regulation of color and air without work stoppage. The two different size Multipleheads, Tips and
Needles are quickly interchangeable to allow greater diversity in materials and coverage. PTFE Packings.
Head Sizes - Patterns - Fluid Thickness:
Size 1 - Tip size .010 inches or .25mm Size 2 -Tip size .026 inches or .66mm
-
Used for fine detail. Pencil Line to 1'' patterns - Less detail than the size 1 head. 1/32'' to 1-1/2'' patterns
- Paint must be thinned further than 2 head - Can spray slightly thicker paint than size 1 head
Working Pressures:
• Operating pressures 20-55 PSI; Maximum pressure 75 PSI
• 20-30 PSI is best for detail spraying w/ properly thinned paint
• Use the higher pressures for thicker material where fine detail is not critical or thin the paint to allow lower pressures.
Equipment Set-up:
The Airbrush is held in the same manner as a pen, with the index finger comfortably over the Trigger.
1. Attach airhose to air supply and to airbrush. If regulator set pressure between 20 -30 PSI.
2. Attach the color cup to the color socket of the airbrush.
3. Remove Head Protecting Cap #1.
Airbrush Operation:
1. Press down on Trigger to release air and pull back on Trigger to control quantity of color.
2. To spray a fine line without heavy ends, start moving the airbrush without release of color. Then start the color at the
beginning of line and stop the color at the end, but continue the motion of the airbrush after the color has stopped.
3. Practice this movement until you can spray a fine line or a broad pattern without heavy build up at the beginning or
end of your strokes.
4. Speed of movement controls density of color and fading effects at beginning and end of strokes.
5. For detail, hold the airbrush very close to the surface push down for air and pull back very slowly on the Trigger to
release a small amount of paint.
6. For background work and broad effects, hold the airbrush away from the work surface and pull back on Trigger to
release required amount of color.
7. For Stippling remove the aircap, push down on the Trigger and pump the Trigger forward and back. Adjust the air
pressure between 15 and 50 PSI for desired stipple effect.
8. For more instruction see the “22 Airbrush Lessons for Beginners” booklet enclosed with your airbrush.
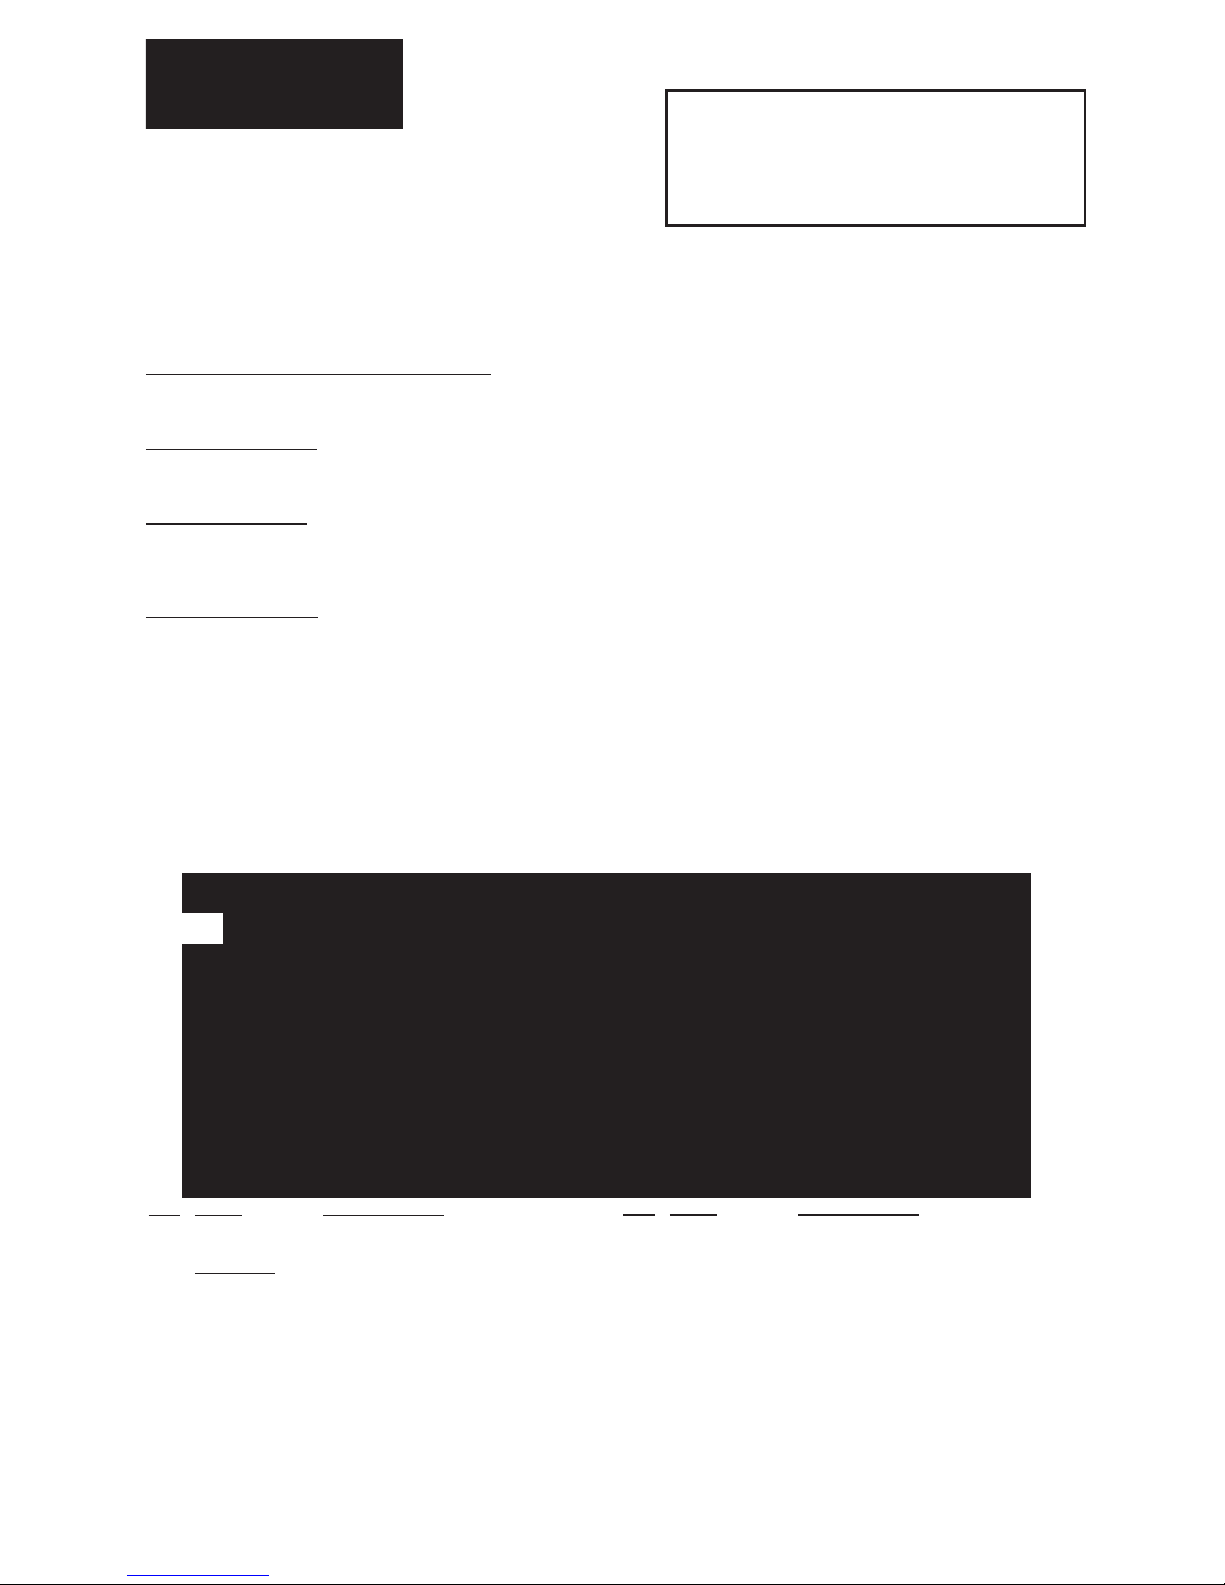
NO. PART DESCRIPTION
1. V-189 Head Protecting Cap
4. VB Aircap Body
VM-1 or 2
Multiplehead (Select Size)
3. VA-1 or 2 Aircap (Select Size)
31 or 32. VN-1 or 2 Needle (Select Size)
5. VT-1 or 2 Tip (Select Size)
6. V-210 Shell Assembly with V-20
7. V-218 PTFE Packing & Packing Nut
(sold as set)
9. VSR-1 Color Cup 1/8 oz. (3.5cc)
10. VSR-2 Color Cup 3/16 oz. (5.25cc)
12. V-217 Trigger
A. V-186 Needle Valve Assembly L/Needle
17. V-191A Rocker Assembly
21. V-140 Spring
22. V-136A Needle Adjusting Sleeve
23. V-141 Locknut
NO.
PART DESCRIPTION
24. AFV-143 Chrome Plated Metal Handle
24a. TAL-34 Handle & Stop Assembly (Optional) -
allows for preset paint flow
25. V-221 Air Valve Assembly
26. V-20 Valve Casing
27. A-53 Valve ‘O’ Ring (Pack of 6)
28. V-214 Valve Plunger (with A-53)
29. A-22 Valve Spring
30. A-23R Air Valve Nut
31. VN-1 Needle (Select Size)
32. VN-2 Needle (Select Size)
33. V-54 Reamer (Optional)
(A)
1
Page 2

2
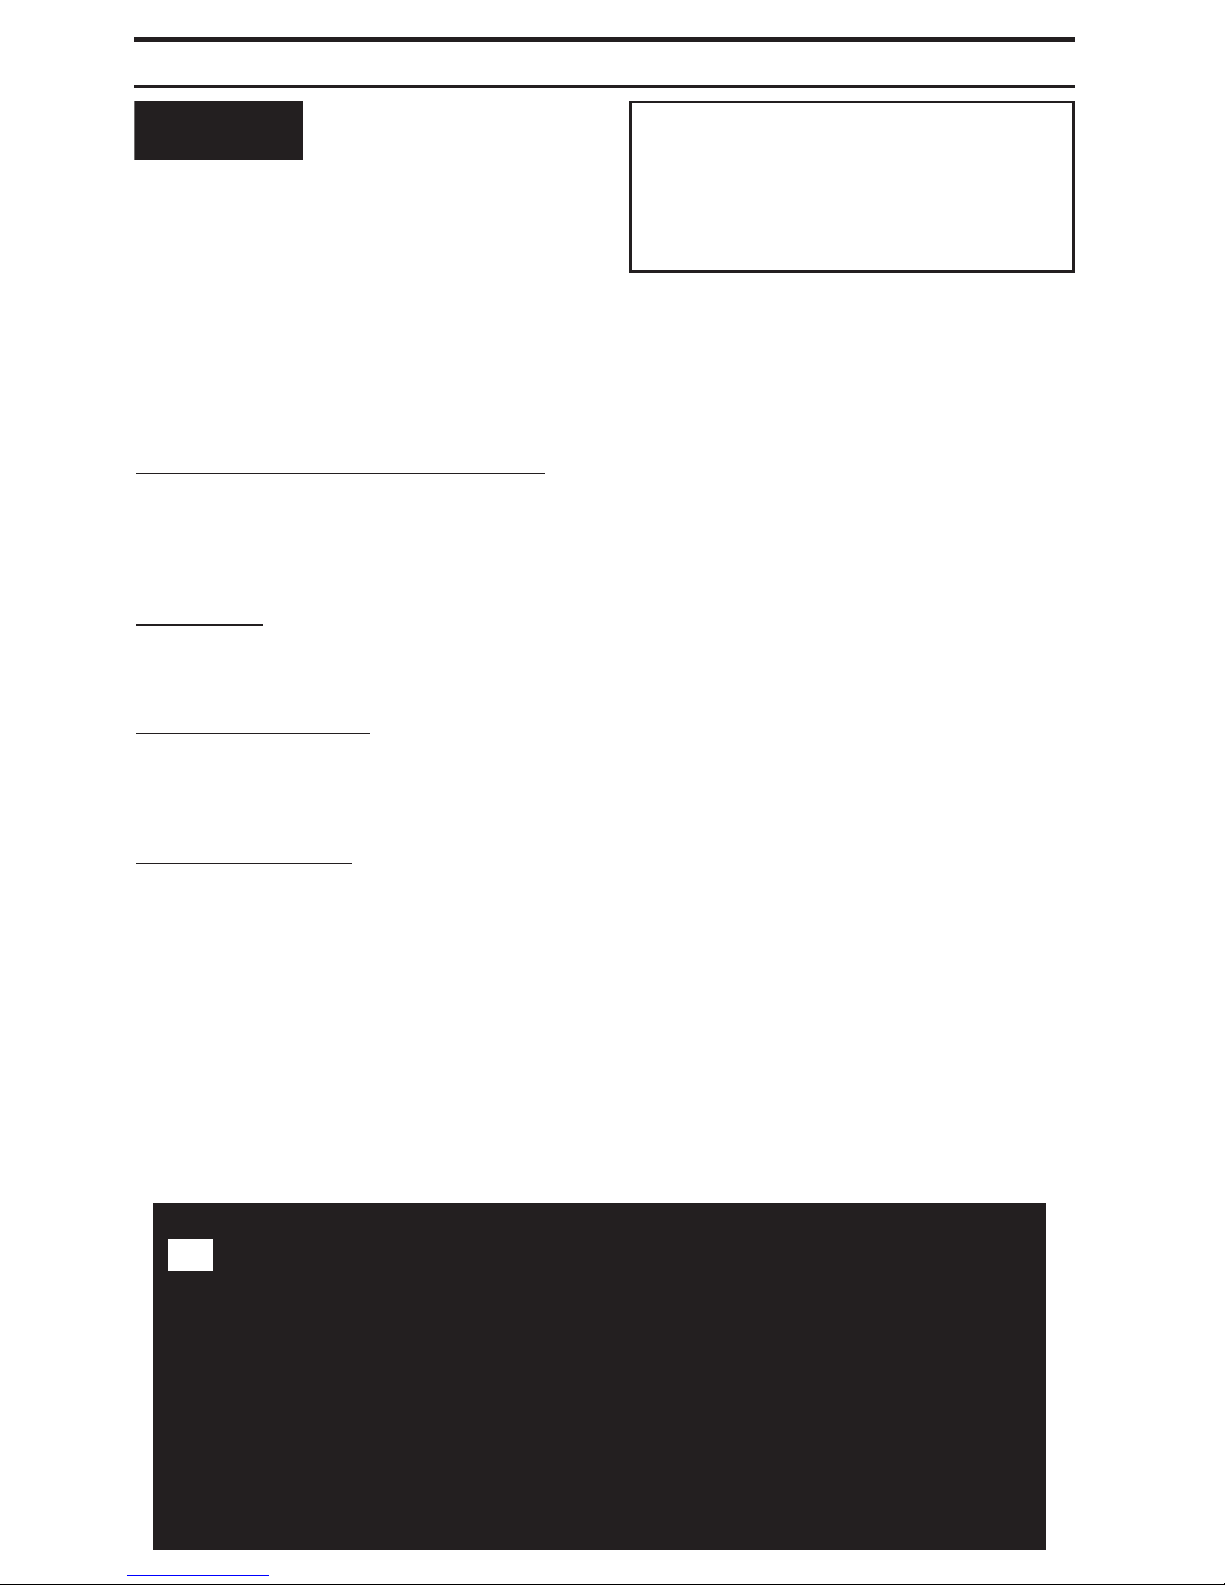
REMOVING/REPLAClNG THE NEEDLE AND HANDLE (Illustration A):
1
. Unscrew the handle and loosen the Locknut #23 by turning counterclockwise. Depress the Trigger #12 and hold in
Down position while removing or inserting the needle. This assures the needle moves freely through the trigger.
Gently remove the needle, rotating if necessary, Do NOT force out!
2. A loose needle can cause sputtering if there is any air leakage around the needle and Packing & Packing Nut #7. If
there is no noticeable drag on the needle by the packing then tighten nut of the Packing & Packing Nut Assembly #7.
3. Inspect the condition of the needle. If it is bent or misshapen in any way, replace it with a new needle. A bent needle
can damage or split the Tip #5 causing bubbles or a rough spray pattern.
4. Hold trigger in DOWN position, insert the new needle into the Rocker Assembly #17. Gently push needle through,
rotating if necessary, push gently forward until the needle stops in the front of the tip.
5. Release trigger and tighten locknut by turning clockwise.
REPLACING THE TRIGGER (Illustration B):
If the Trigger #12 is removed, it must be replaced inside the airbrush shell, before the Rocker Assembly #17 and needle
are re-inserted.
1. Hold trigger so the opening in the lever is in-line with the opening in the end of the airbrush shell (see B - END VIEW).
2. Insert trigger straight DOWN through the opening in the top of the airbrush shell (see B - TOP VIEW).
3. Once the trigger has been inserted into the valve casing, you will be able to press down on the trigger and it will
return to the up position when released. Proceed to replace rocker assembly and balance of parts as above. The
needle when inserted will prevent the removal of the trigger.
REPLACING THE TIP:
1. Remove handle, loosen Locknut #23 and withdraw needle about one inch (1").
2. Un-screw the Aircap Body #4 and remove. The Tip #5 can now be easily removed by hand. If stuck in shell tap lightly with wrench.
3. Place a new tip into position and tighten aircap body to shell with a wrench. Push needle forward until it seats fully
forward in tip and tighten locknut.
ADJUSTING WORN PACKING WASHER:
1. If PTFE Packing #7 becomes worn or loose it must be tightened or replaced.
2. Tighten the Packing Nut of the assembly #7 with small screwdriver. To reach packing, guts of airbrush must be removed.
3. Replace needle and make sure packing nut is not too tight. A slight resistance to movement is needed when needle
is passed through.
4. Completely re-assemble guts of airbrush.
CLEANING THE AIRBRUSH:
1. Paint passes from the cup connection forward so the trigger area back will most likely not need cleaning.
2. In between color changes or before storing the airbrush attach cup with appropriate cleaner and spray into sink until
it runs clear.
3. Remove needle and wipe clean then replace.
4. If paint has dried for a time you can remove the front tip, aircap and aircap body for soaking or soak just the front of
the airbrush in cleaner.
5. Use cleaner for the material you are spraying. Keep trigger area dry if soaking.
PERSONAL SETTINGS:
Needle Adjustment Sleeve- Used to increase or decrease spring tension for the trigger pull back. Thread into the shell
until the trigger stroke feels comfortable. Threading in until it stops can cause the trigger to jam.
TROUBLESHOOTING:
Bubbling in cup:
1. VB Aircap Body #4 needs to be wrench tightened
Skipping or Spitting:
1. Paint too thick -Reduce with thinner
2. Tip not seated -Tighten VB aircap body with wrench
3. Tip split or damaged Needle -Replace tip or needle
4. Needle or tip dirty -Clean and replace
5. Air pressure too low -Increase pressure or thin paint further (need 20 or more PSI to spray most paints)
Airbrush Not Spraying:
1. Clogged tip -Remove tip and clean
2. Needle not moving -Tighten needle locknut
3. Loose VB aircap body -Wrench tighten
4. Low air pressure -Increase pressure (need 20 or more PSI to spray most paints)
5. Bottle vent hole plugged -Use needle or pin to clear air hole
Sprays double line or heavy to one side:
1. Split tip or bent needle - Replace
(B)
Page 3

3
DA400R AIR COMPRESSOR (1/6 H.P.)
1/6 H.P. Piston Compressor with Auto shutoff. Compressor shuts off when airbrush is
not in use. Operating pressure 30 - 50 PSI depending on airbrush being used, delivers
up to 55 psi.. 110-120VAC, 1 Ph, 60 Hz, 42L/Min. (1.48CFM), 1720 rpm. With R-75
Regulator & Moisture Trap included. Shipping Weight: 13 lbs. 9 oz. (6.16 kgs)
D500
AIR COMPRESSOR (1/8 H.P.) (ETL Listed)
Economical and suitable for all airbrushes spraying properly thinned fluids. It is capable
of delivering up to 35 P.S.I. operating pressure depending on airbrush being used. The
Paasche D500 is an oilless piston compressor. It operates on 110-120 Volt, 1 phase,
60Hz, and delivers .4 C.F.M. @ 20 P.S.I. Shipping Weight: 8 lbs. 3 oz. (3.7kg)
D500SR
AIR COMPRESSOR (1/8 H.P.), ETL Listed with Switch & R-75
Regulator
Economical and suitable for all airbrushes spraying properly thinned fluids. Maximum
20 - 35 P.S.I. operating pressure depending on airbrush being used. The Paasche
D500SR is an oilless piston unit and comes with the R-75 Regulator/Filter with gauge.
It operates on 110-120 Volt, 1 phase, 60Hz, and delivers .4 C.F.M. @ 20 P.S.I. R75
Regulator will regulate up to 35 P.S.I. depending on usage (intermittent or constant)
and size of airbrush being used. Shipping Weight: 8 lbs. 12 oz. (3.97kg)
D220R
AIR COMPRESSOR (1/6 H.P.), with Switch & R-75 Regulator
Economical and suitable for all airbrushes spraying properly thinned fluids. It is capable
of delivering 30 - 45 P.S.I. operating pressure depending on airbrush being used. The
Paasche D220R is an oilless diaphragm unit and comes with the R-75 Regulator/Filter
with gauge. It operates on 110-120 Volt, 1 phase, 60Hz, and delivers .7 C.F.M. @ 20
P.S.I. R75 Regulator will regulate up to 45 P.S.I. depending on usage (intermittent or
constant) and size of airbrush being used. Shipping Weight: 11 lbs. (5kg)
VSR90#1 ACCESSORIES
NO. PART DESCRIPTION
9
. A-34 Airbrush Hanger
10. V-62 Airbrush Wrench
12. MT Moisture Trap (Do-It-Yourself Installation)
13. HP-1/8 PVC Red Plastic Airhose w/cplgs.
1
4. A-1/8 Braided Airhose w/Couplings
15. AC-20 1/8"-1/4"-40 Coupling (To Airbrush)
16. AC-1/8 -1/4" Coupling (To Compressor)
ACCESSORIES - not shown
PART NO. DESCRIPTION
R-75 Reg. & Filter w/Gauge
HSSB-22-16 Hobby-Shop Spray Booth
A-194 Deluxe Airbrush Hanger
Printed in the USA
2
. Dirty tip or needle - Remove and clean
3. Tip not centered in aircap - Remove head and clean airbrush seat and tip seat then reassemble. Use wrench for aircap body
Jammed trigger or poor trigger motion:
1. Adjust Needle Adj. Sleeve - Screw or unscrew the sleeve to lessen or increase tension on trigger motion
2. Paint leaking to trigger area - Remove guts of airbrush and slightly tighten packing or replace if needed
3
. Lubricate needle and trigger - Apply lubricant to needle shaft and trigger slot area
9 10
Page 4
4
DEUTSCH
VSR90#1 – Airbrush
Doppelt wirkende -Interner Mischung Fließbecher - PTFE Dichtung
WARNUNG: Zerstäubungsstoffe sind gefährlich. Nicht
Einatmen und direkten Kontakt mit der Haut oder den
Augen vermeiden. Lesen Sie die Hinweise auf dem
Etikett und das Datenblatt zur Materialsicherheit, das
dem Zerstäubungsstoff beiliegt. Befolgen Sie alle
vorbeugenden Sicherheitsmaßnahmen. VORSICHT :
An Orten mit guter Belüftung verwenden, um Dämpfe,
Staub oder zuviel gesprühtes Material entfernen zu
können. Luftdruckmaximal 75 psi .
EINFUHRUNG: Prime Merkmale der Paasche® VSR90#1 Airbrush zählt die Fähigkeit zu sprühen Flüssigkeiten
erfordern Schwerkraft Futtermitteln sowie zu schnelle Farbwechsel mit den zwei (2) unterschiedliche Größe Farbe
Tassen mit jedem Set geliefert. Diese einzigartige two in one-Design ermöglicht es dem Benutzer Wahl der
Körbchengröße, während mit nur einer Hülle. Diese Farbe Tassen ermöglichen dem Nutzer, jede Tasse rechts, links
oder in Übereinstimmung mit dem Shell-Schwenk auf eine ungehinderte Sicht auf, ihre Anstrengungen zu
ermöglichen. Der Double-Action-, Internal-Mix-Funktion ermöglicht die Flexibilität bei der Regulierung von Farbe und
Luft, ohne Arbeitsunterbrechung. Die beiden unterschiedlichen Größe Multipleheads, Tipps und Nadeln sind schnell
austauschbar, um eine größere Vielfalt in Material und Berichterstattung zu ermöglichen. PTFE Packungen.
Kopfgrößen - Muster - Flüssigkeitsviskositäten:
Größe 1 - Spitzengröße 0,010 Zoll (0,25 mm)
- Für feine Details. Bleistiftlinie bis 1 Zoll Muster
- Farbe muss stärker verdünnt werden als bei Kopf der Größe 2
Größe 2 - Spitzengröße 0,026 Zoll (0,66 mm)
- Weniger detailliert als Kopf der Größe 1. 1/32 bis 1-1/2 Zoll Muster
- Sprüht etwas schwerere Farben als Kopf der Größe 1
Arbeitsdrücke:
• Betriebsdrücke von 20 bis 55 psi; maximaler Druck 75 psi
• 20 bis 30 psi ist der beste Druck zum Zeichnen von Details mit ordnungsgemäß verdünnter Farbe
• Höhere Drücke für schwereres Material verwenden, bei denen es nicht auf feine Details ankommt, oder die Farbe
verdünnen, um niedrigere Drücke zu ermöglichen.
Vorbereitung des Airbrush:
Der Airbrush wird wie ein Stift gehalten. Der Zeigefinger ruht dabei locker auf dem Tasthebel.
1. Den Luftschlauch an die Luftversorgung und den Airbrush anschließen. Bei Verwendung eines Regulators den
Druck zwischen 20 und 30 psi einstellen.
2. Für VSR90 verbinden die Tasse an Farbe Steckdose.
3. Die Schutzkappe (Pos. 1) des Kopfes abnehmen.
Bedienung des Airbrush:
1. Den Tasthebel drücken, um Luft freizusetzen, und den Hebel nach hinten ziehen, um die Farbmenge einzustellen.
2. Um eine dünne Linie zu sprühen und breitere Endpunkte zu vermeiden, sollte zunächst ohne Farbauftrag mit dem
Airbrush gezeichnet werden. Anschließend mit Farbe am Anfang der Linie beginnen. Am Ende der Linie den
Farbauftrag einstellen, jedoch die Airbrush- Bewegung auch nach Ende des Farbauftrags fortsetzen.
3. Diesen Bewegungsablauf üben, bis eine dünne Linie oder ein breites Muster ohne Farbklecksbildung am Anfang
oder am Ende des Bewegungsablaufs aufgesprüht wird.
4. Die Bewegungsgeschwindigkeit bestimmt die Dichte des Farbauftrags und das Verwischen am Anfang und Ende
des Bewegungsablaufs.
5. Zum Zeichnen von Details den Airbrush nah an die Oberfläche heranführen, nach unten drücken, um Luft
auszulassen, und den Tasthebel sehr langsam zurückziehen, um eine geringe Farbmenge aufzusprühen.
6. Zum Zeichnen von Hintergründen und breit angelegten Effekten den Airbrush vom Objekt weit entfernt halten und
den Tasthebel zurückziehen, um die gewünschte Menge an Farbe aufzusprühen.
7. Für Punktierungs- und Körnungseffekte die Saugkappe entfernen, den Tasthebel drücken und den Hebel vor und
zurück pumpen. Den Luftdruck zwischen 15 und 50 psi einstellen, um den gewünschten Effekt zu erhalten.
8. Weitere Informationen finden Sie in der Broschüre „22 Airbrush Übungen für Anfänger“, die dem Airbrush beiliegt.
(A)
Page 5

5
AUS-/EINBAUEN VON NADEL UND GRIFF (Abbildung A):
1. Den Griff losschrauben und die Sicherungsmutter (23) gegen den Uhrzeigersinn lösen. Den Tasthebel (12) NACH
UNTEN gedrückt halten und gleichzeitig die Nadel herausnehmen bzw. einsetzen. Auf diese Weise ist sichergestellt,
dass die Nadel ungehindert am Tasthebel vorbeigeführt werden kann. Die Nadel vorsichtig herausnehmen und
gegebenenfalls drehen. NICHT mit Gewalt herausziehen!
2. Durch eine frei bewegliche Nadel kann Farbe verspritzen, wenn Nadel sowie Stopfbuchse und -mutter (7) eine
Undichtheit aufweisen. Wenn die Nadel nur unmerklich durch die Stopfbuchse zugbelastet wird, die Mutter der aus
Stopfbuchse und -mutter bestehenden Einheit (7) festziehen.
3. Den Zustand der Nadel überprüfen. Eine verbogene oder verformte Nadel durch eine neue Nadel ersetzen
. Durch
eine verbogene Nadel kann die Nadelspitze (5) beschädigt oder geteilt werden, was zu Blasenbildung oder zu einem
groben Sprühmuster führt.
4. Den Tasthebel in UNTERER Stellung festhalten und eine neue Nadel in die Nadelhalterung (17) einführen. Die
Nadel vorsichtig nach vorne durchschieben und gegebenenfalls drehen, bis sie an der Spitze des Airbrush anliegt.
5. Den Tasthebel wieder loslassen und die Sicherungsmutter im Uhrzeigersinn festziehen.
EINBAUEN DES TASTHEBELS (Abbildungen B):
Wenn der Tasthebel (12) abgebaut wurde, muss er wieder in das Airbrush-Gehäuse eingesetzt werden, bevor die
Nadelhalterung (17) und die Nadel wieder eingeführt werden.
1. Den Tasthebel so halten, dass die Öffnung im Hebel auf die Öffnung am Ende des Airbrush-Gehäuses ausgerichtet
ist (siehe B - Stirnansicht).
2. Den Tasthebel gerade NACH UNTEN durch die Öffnung oben im Airbrush-Gehäuse einführen (siehe B - Aufsicht).
3. Nachdem der Tasthebel in das Ventilgehäuse eingesetzt wurde, ist beim Drücken auf den Tasthebel eine
Federwirkung zu spüren. Die Nadelhalterung und die restlichen Teile wie oben beschrieben einbauen. Wenn die
Nadel eingesetzt ist, kann der Tasthebel nicht ausgebaut werden.
AUSTAUSCHEN DER NADELSPITZE:
1. Den Griff abnehmen, die Sicherungsmutter (23) lösen und die Nadel etwa 1 Zoll herausziehen.
2. Den Saugkappenkorpus (4) abschrauben und abnehmen. Die Spitze (5) kann nun von Hand abgenommen werden.
Falls die Spitze im Gehäuse feststeckt, leicht mit einem Schraubenschlüssel dagegen klopfen.
3. Eine neue Spitze einsetzen und den Saugkappenkorpus mit einem Schlüssel am Airbrush-Gehäuse festschrauben.
Die Nadel bis zum Anschlag in die Spitze nach vorn schieben und dann die Sicherungsmutter festziehen.
NACHSTELLEN EINER VERSCHLISSENEN STOPFBUCHSENSCHEIBE:
1. Eine verschlissene oder lockere PTFE Stopfbuchse (7) muss ausgetauscht bzw. festgezogen werden.
2. Die Stopfbuchsenmutter der Baugruppe (7) mit einem kleinen Schraubendreher festziehen. Um Zugang zur
Stopfbuchse zu erhalten, müssen alle inneren Teile ausgebaut werden.
3. Die Nadel einsetzen und sicherstellen, dass die Stopfbuchsenmutter nicht zu fest angezogen ist. Beim Einführen der
Nadel sollte ein wenig Widerstand zu spüren sein.
4. Den Airbrush wieder vollständig zusammenbauen.
REINIGEN DES AIRBRUSH:
1. Da die Farbe vom Flaschenanschluss nach vorn läuft, muss der Bereich vom Tasthebel nach hinten wahrscheinlich
P
OS.
T
EILE NR.
B
ESCHREIBUNG
1. V-189 Schutzkappe
4. VB Saugkappenkorpus
VM-1 oder 2
Mehrkopf (Größe angeben)
3. VA-1 oder 2 Saugkappe (Größe angeben)
31-32. VN-1 oder 2 Nadel
5
. VT-1 oder 2 Nadelspitze (Größe angeben)
6
. V-210 Shell-Montage mit V-20 Ventilgehäuse
7. V-218 PTFE Stopfbuchse und -mutter
(nur als Set erhältlich)
9. VSR-1 Farbbecher - 1 / 8 Unzen (3.5cc)
10. VSR-2 Farbbecher - 3/16 Unzen (5.25cc)
12. V-217 Tasthebel
A
. V-186 Nadelventil, kpl. L/Nadel
1
7. V-191A Nadelhalterung, kpl.
21. V-140 Feder
22. V-136A Nadeleinstellmuffe
23. V-141 Sicherungsmutter
P
OS.
T
EILE NR.
B
ESCHREIBUNG
24. AFV-143 Griff
24a. TAL-34 Griff und Anschlag, kpl. - zur
Voreinstellung der Farbflussrate
(optional)
25. V-221 Luftventil, kpl.
2
6. V-20 Ventilgehäuse
2
7. A-53 Ventil-O-Ring (6 Stück)
28. V-214 Ventilstößel (mit A-53)
29. A-22 Ventilfeder
30. A-23R Luftventilmutter
31. VN-1 Nadel
32. VN-2 Nadel
3
3. V-54 Spitze Reibahle (optional)
(B)
Page 6

6
n
icht gereinigt werden.
2
. Übrig gebliebene Farbe kann wieder in die Flasche zurückgespült werden. Hierfür die Saugkappe mit einem Finger
abdecken und den Tasthebel drücken und leicht nach hinten ziehen. Dadurch wird die Farbe aus dem
Flüssigkeitskanal zurück in die Flasche gedrückt. Auf keinen Fall den Becher öffnen, um die Farbe zurückzuspülen.
3
. Zwischen Farbwechseln oder vor der Lagerung des Airbrush eine Flasche mit einem geeigneten Reinigungsmittel
a
nbringen und das Mittel in ein Waschbecken sprühen, bis die Flüssigkeit klar erscheint.
4. Die Nadel ausbauen, abwischen und wieder einsetzen.
5. Falls Farbe angetrocknet ist, die vordere Spitze, die Saugkappe und das Saugkappengehäuse entfernen und
e
inweichen oder nur die Spitze des Airbrush in Reinigungsmittel einweichen.
6
. Ein Reinigungsmittel verwenden, das für das gesprühte Material geeignet ist. Den Tasthebelbereich beim
Einweichen trocken halten.
ANWENDERSPEZIFISCHE EINSTELLUNGEN:
Nadeleinstellmuffe - Mithilfe der Muffe kann die zum Zurückziehen des Tasthebels erforderliche Kraft erhöht oder
verringert werden. Die Muffe in das Airbrush-Gehäuse hineinschrauben, bis der Tasthebel bequem betätigt werden
kann. Falls die Muffe bis zum Anschlag eingeschraubt wird, kann der Tasthebel festklemmen.
P
ROBLEMBEHEBUNG:
B
lasenbildung im Becher:
1. VB Saugkappenkorpus (4) mit Schlüssel festziehen
Ungleichmäßiger oder unregelmäßiger Farbausstoß:
1. Zu dicke Farbe - Verdünner beigeben
2. Spitze nicht richtig festgezogen - VB Saugkappenkorpus mit Schlüssel festziehen
3. Spitze geteilt oder Nadel beschädigt - Spitze bzw. Nadel austauschen
4. Spitze oder Nadel verschmutzt - Reinigen und wieder einbauen
5. Luftdruck zu niedrig - Druck erhöhen oder Farbe weiter verdünnen (zum Sprühen der meisten Farben werden
mindestens 20 psi benötigt)
Airbrush sprüht keine Farbe:
1. Spitze verstopft - Spitze abnehmen und reinigen
2. Nadel bewegt sich nicht - Sicherungsmutter der Nadel festziehen
3. VB Saugkappenkorpus locker - Mit Schlüssel festziehen
4. Luftdruck zu niedrig - Druck erhöhen (zum Sprühen der meisten Farben werden mindestens 20 psi benötigt)
5. Entlüftungsöffnung der Flasche verstopft - Entlüftungsöffnung mit Nadel oder Stift reinigen
Airbrush erzeugt Doppellinie oder einseitiges Muster:
1. Spitze geteilt oder Nadel verbogen - Austauschen
2. Spitze oder Nadel verschmutzt - Abnehmen und reinigen
3. Spitze nicht in Saugkappe zentriert - Kopf abnehmen, Airbrush- und Spitzensitz reinigen und Airbrush wieder
zusammenbauen. Saugkappenkorpus mit Schlüssel festschrauben
Tasthebel festgeklemmt oder schwergängig:
1. Nadeleinstellmuffe einstellen - Muffe hinein- oder herausschrauben, um die zum Zurückziehen des Tasthebels
erforderliche Kraft zu verringern oder zu erhöhen
2. Farblecks im Tasthebelbereich - Innere Teile des Airbrush ausbauen und Stopfbuchse leicht festziehen oder austauschen
3. Nadel und Tasthebel schmieren - Schmiermittel auf den Nadelschaft und den Tasthebel-Schlitzbereich auftragen
ZUBEHÖR
NO. PART DESCRIPTION
9. A-34 Hängevorrichtung
10. V-62 Schlüssel
12. MT Moisture Trap - (selbst installieren)
13. HP-1/8 Roter PVC-Plastikluftschlauch mit Kupplungen
14. A-1/8 Luftschlauch mit Flechtmantel und Kupplungen
15. AC-20 1 / 8 "-1 / 4" -40 Kupplung (Um Airbrush)
16. AC-1/8 -1 / 4 "Kupplung (Um Kompressor)
ZUBEHÖR - nicht gezeigt
PART DESCRIPTION
F-143 Red Kunststoffgriff
R-75 Regler und Filter w / Gauge
HSSB-22-16 Hobby Shop Lackierkabinen
A-194 Deluxe-Kleiderbügel
Gedruckt in USA
9 10
Page 7

7
FRANÇAIS
VSR90#1 – Aërographe
Double Actio n – M élang e I ntern e - Alimen t ation
par Gra v ité – Jo i nts au PT F E
INTRODUCTION: Premier Caractéristiques du VSR90# 1 Paasche® Airbrush incluent la capacité de fluides de
p
ulvérisation exigeant alimentation par gravité ainsi que de faire la couleur rapide changements avec les deux (2) différents
t
asses de couleur taille fourni avec chaque ensemble. Ces deux uniques dans une conception permet à l'utilisateur le choix
de la taille de la tasse tout en en utilisant une seule coquille. Ces tasses de couleur permettent à l'utilisateur de faire pivoter
chaque droit tasse, à gauche ou dans l'alignement de la coque pour permettre une vue dégagée de leurs efforts. La double
action, mélange caractéristique interne permet une certaine souplesse dans la régulation de la couleur et de l'air sans arrêt
de travail. Les deux différents Multipleheads taille, Conseils et les aiguilles sont rapidement interchangeables pour
permettre une plus grande diversité de matériaux et de la couverture. PTFE Emballages.
Tailles de tête - Répartitions - Épaisseur de liquide :
Taille 1 - Taille de buse de 0,010 po ou 0,25 mm
- Utilisé pour les détails fins. Répartitions de trait de crayon à 1 po
- La peinture doit être diluée plus que la tête 2
Taille 2 - Taille de buse de 0,026 po ou 0,66 mm
- Moins détaillée que la tête de taille 1. Répartitions de 1/32 po à 1-1/2 po
- Peut pulvériser de la peinture légèrement plus épaisse que la tête de taille 1
Pressions de fonctionnement :
• Pressions d’exploitation de 20 à 55 psi ; pression maximum de 75 psi.
• Une pression de 20 à 30 psi est ce qu’il y a de mieux pour une pulvérisation détaillée avec une peinture correctement diluée
• Utiliser des pressions supérieures pour un produit plus épais où les détails fins ne sont pas essentiels ou diluer la
peinture pour admettre des pressions inférieures.
Mise en place des équipements :
L’aérographe se tient comme un stylo, avec l’index reposant confortablement sur la gâchette.
1. Attacher le tuyau d’arrivée d’air à l’alimentation en air et à l’aérographe. Avec un détendeur, régler la pression entre 20 et 30 psi.
2. Pour VSR90 connecter le calice jusqu'à la sortie de la peinture.
3. Retirer le capuchon protecteur de la tête n° 1, page 2.
Fonctionnement de l’aérographe :
1. Appuyer sur la gâchette pour libérer l’air et tirer sur la gâchette pour contrôler la quantité de couleur.
2. Pour vaporiser une ligne fine sans extrémités lourdes, commencer par déplacer l’aérographe sans relâcher de
couleur. Ensuite, commencer la couleur au début de la ligne et arrêter la couleur à la fin tout en continuant le
mouvement de l’aérographe une fois que la couleur est arrêtée.
3. Pratiquer ce mouvement jusqu’à ce que l’on puisse pulvériser une ligne fine ou une répartition large sans dépôt lourd
au début ou à la fin des passes.
4. La vitesse du mouvement contrôle la densité de la couleur et les effets de fondu au début et à la fin des passes.
5. Pour détailler, tenir l’aérographe très près de la surface, appuyer pour l’air et tirer très lentement sur la gâchette pour
relâcher une petite quantité de peinture.
6. Pour l’arrière-plan et des effets amples, tenir l’aérographe éloigné de la surface de travail et tirer sur la gâchette pour
libérer la quantité requise de couleur.
7. Pour faire du pointillé, retirer le chapeau d’air, appuyer sur la gâchette et pomper la gâchette d’avant en arrière.
Ajuster la pression d’air entre 15 et 50 psi pour un effet de pointillé désiré.
8. Pour de plus amples instructions, se reporter au livret « L’aérographe pour débutants en 22 leçons » fourni avec l’aérographe.
AVERTISSEMENT: Les matériaux de pulvérisation
mai être nocif s'il est inhalé ou autorisés à entrer en
contact avec la peau ou les yeux. Consulter l'étiquette
du produit et Material Safety Data Sheet fourni pour le
matériel de pulvérisation. Suivez toutes les consignes
de sécurité. ATTENTION: L'espace bien aéré requis
pour éliminer les vapeurs, poussières ou
surpulvérisation. Pression maximale aérien 75 P.S.I.
(A)
N° PIÈCE DESCRIPTION
1. V-189 Capuchon protecteur de tête
4. VB Corps de chapeau d’air
VM-1 ou 2
Tête multiple (Sélectionner la taille)
3. VA-1 ou 2 Chapeau d’air (Sélectionner la taille)
31-32. VN-1 ou 2 Aiguille
5. VT-1 ou 2 Buse (Sélectionner la taille)
6. V-210 Assemblée coquille avec V-20
7. V-218 Joints et écrou d’étanchéité au PTFE
(vendus comme jeu)
N°
PIÈCE DESCRIPTION
9. VSR-1 Godet de couleur - 1 / 8 onces (3.5cc)
10. VSR-2 Godet de couleur - 3/16 onces (5.25cc)
12. V-217 Gâchette
A. V-186 Ensemble de soupape à aiguille L/Aiguille
17. V-191A Ensemble de culbuteur
21. V-140 Ressort
22. V-136A Gaine de réglage d’aiguille
23. V-141 Contre-écrou
24. AFV-143 Manche
Page 8

8
RETRAIT/REMPLACEMENT DE L’AIGUILLE ET DU MANCHE (Illustration A) :
1. Dévisser lemanche et desserrer le contre-écrou n° 23 en tournant dans le sens contraire des aiguilles d’unemontre.
Appuyer sur la gâchette n° 12 et la tenir en position BASSE tout en retirant ou en insérant l’aiguille. Ceci pour
garantir unmouvement libre de l’aiguille dans la gâchette. Retirer délicatement l’aiguille, en la faisant tourner si
besoin est. NE PAS la sortir en forçant !
2. Une aiguille desserrée peut provoquer une pulvérisation cathodique s’il y a une fuite d’air autour de l’aiguille et de
l’ensemble de joints et d’écrou n° 7. S’il n’y a pas de résistance visible sur l’aiguille par les joints, serrer l’écrou
d’étanchéité et l’ensemble d’écrou n° 7.
3. Inspecter l’état de l’aiguille. Si celle-ci est courbée ou déformée d’une manière quelconque, la remplacer par une
nouvelle aiguille. Une aiguille courbée peut endommager ou fendre la buse n° 5 entraînant des bulles ou une
pulvérisation irrégulière.
4. Tenir la gâchette en position vers le BAS, insérer la nouvelle aiguille dans l’ensemble de culbuteur n° 17. Enfoncer
délicatement l’aiguille, en la faisant tourner si besoin est, pousser délicatement vers l’avant jusqu’à ce que l’aiguille
s’arrête devant la buse.
5. Relâcher la gâchette et serrer le contre-écrou en tournant dans le sens des aiguilles d’une montre.
REMISE EN PLACE DE LA GACHETTE (Illustration B) :
Si la gâchette n° 12 est retirée, elle doit être remise en place à l’intérieur du boîtier de l’aérographe avant de réinsérer
l’ensemble de culbuteur n° 17 et l’aiguille.
1. Tenir la gâchette de manière que l’ouverture dans le levier se trouve en ligne avec l’ouverture dans l’extrémité du
boîtier de l’aérographe (voir B).
2. Insérer la gâchette directement vers le BAS à travers l’ouverture dans le dessus du boîtier de l’aérographe (voir B).
3. Une fois la gâchette insérée dans le cache-soupape, il est possible d’appuyer sur la gâchette et celle-ci revient en
position haute une fois relâchée. Remettre en place l’ensemble de culbuteur et le reste des pièces comme cidessus. Lorsque l’aiguille est insérée, elle empêchera le retrait de la gâchette.
REMPLACEMENT DE LA BUSE :
1. Retirer le manche, desserrer le contre-écrou n° 23 et sortir l’aiguille d’un po environ.
2. Dévisser le corps de chapeau d’air n° 4 et retirer. La buse n° 5 peut maintenant être facilement retirée à la main. Si
elle est coincée dans le boîtier, taper légèrement à l’aide de la clé.
3. Placer une nouvelle buse en position et serrer le corps de chapeau d’air sur le boîtier à l’aide d’une clé. Enfoncer
l’aiguille vers l’avant jusqu’à ce qu’elle soit complètement installée dans la buse et serrer le contre-écrou.
RÉGLAGE D’UNE RONDELLE D’ÉTANCHÉITÉ USÉE :
1. Si le joint au PTFE n° 7 devient usé ou desserré, il faut le resserrer ou le remplacer.
2. Serrer l’écrou d’étanchéité de l’ensemble n° 7 à l’aide d’un petit tournevis. Pour atteindre le joint, toutes les rouages
de l’aérographe doivent être retirés.
3. Remettre l’aiguille en place et s’assurer que l’écrou d’étanchéité n’est pas trop serré. Une légère résistance au
mouvement est nécessaire lorsque l’aiguille passe à travers.
4. Remonter complètement les rouages de l’aérographe.
NETTOYAGE DE L’AÉROGRAPHE :
1. La peinture passant de la connexion du flacon vers l’avant, l’arrière de la zone de gâchette n’aura
vraisemblablement pas besoin d’être nettoyé.
2. Entre les changements de couleurs et avant d’entreposer l’aérographe, attacher le flacon avec le nettoyant
approprié et pulvériser dans l’évier jusqu’à ce que le liquide soit clair.
3. Retirer l’aiguille et l’essuyer avant de la remettre en place.
4. Si la peinture a séché pendant un certain temps, il est possible de retirer la buse avant, le chapeau d’air et le corps
du chapeau d’air pour les tremper, ou tremper uniquement l’avant de l’aérographe dans le nettoyant.
5. Utiliser le nettoyant pour le produit que l’on pulvérise. En cas de trempage, conserver la zone de gâchette au sec.
RÉGLAGES PERSONNELS :
Gaine de réglage d’aiguille - Utilisé pour augmenter ou diminuer la tension du ressort pour tirer la gâchette. Visser dans
le boîtier jusqu’à ce que chaque course de gâchette soit confortable. Le visser jusqu’à ce qu’il s’arrête peut entraîner
un blocage de la gâchette.
DEPANNAGE :
Présence de bulles dans le godet :
1. Le corps de chapeau d’air VB n° 4 doit être serré à la clé
Refus ou éclaboussures :
1. Peinture trop épaisse - Diminuer avec le diluant
2. Buse non installée - Serrer le corps de chapeau d’air VB avec la clé
3. Buse fendue ou aiguille endommagée - Remplacer la buse ou l’aiguille
4. Aiguille ou buse sale - Nettoyer et remettre en place
5. Pression d’air trop basse - Augmenter la pression ou diluer davantage la peinture (pression minimum de 20 psi
nécessaire pour pulvériser la majorité des peintures)
2
4a. TAL-34 Ensemble de manche et de butée (en
option) - permet un débit de peinture préréglé
25. V-221 Ensemble de soupape à air
2
6. V-20 Cache-soupape
27. A-53 Joint torique de soupape (lot de 6)
28. VL-214 Piston de soupape (avec A-53)
2
9. A-22 Ressort de soupape
30. A-23A Écrou de soupape à air
31. VN-1 Aiguille
3
2. VN-2 Aiguille
33. V-54 Alésoir (en option)
Page 9

9
DA400R COMPRESSEUR D’AIR (1/6 H.P.)
1/6 H.P. Compresseur à piston avec arrêt automatique. Le compresseur s’arrête
lorsque l’aérographe n’est pas utilisé. La pression d’exploitation est de 30 à 50 psi en
fonction de l’aérographe utilisé, fournit jusqu’à 55 psi. 110-120 V c.a., monophasé, 60
Hz, 42 l/min (1,48 CFM), 1 720 tr/min Avec détendeur R-75 et pot de condensation
inclus.
Poids d’expédition : 13 lbs. 9 oz. (6,16 kg)
Imprimé aux États-Unis
D500SR COMPRESSEUR D’AIR (1 / 8 H.P.), ETL avec Switch & R-75 Régulateur
Économique et adaptée à tous les aérographes fluides de pulvérisation correctement
éclaircis. Maximum de 20 à 35 P.S.I. Pression de service en fonction de l'aérographe
utilisé. Le D500SR Paasche est une unité piston Oilless et vient avec le R-75
Régulateur / filtre avec manomètre. Elle opère sur 110-120 volts, 1 phase, 60 Hz, et
délivre ,4 CFM@20 p.s.i. R75 Régulateur va réguler jusqu'à 35 P.S.I. selon l'usage
(intermittents ou constants) et la taille de l'aérographe utilisé.
Poids d’expédition: 8 lbs. 12 oz. (3,97 kg)
D500 COMPRESSEUR D’AIR (1/8 H.P.) (Homologué ETL)
Économique et adéquat pour tous les aérographes pulvérisant des liquides correctement
dilués. Capable de fournir jusqu’à 35 psi de pression d’exploitation en fonction de
l’aérographe utilisé. Le Paasche D500 est un compresseur à piston sans huile. Il
fonctionne sur du 110-120 volts, monophasé, 60 Hz et fournit 0,4 C.F.M. à 20 psi.
Poids d’expédition: 8 lbs. 3 oz. (3,7 kg)
D220R COMPRESSEUR D’AIR (1 / 6 HP), avec Switch & R-75 Régulateur
Économique et adaptée à tous les aérographes fluides de pulvérisation correctement
éclaircis. Il est capable de fournir 30 à 45 P.S.I. Pression de service en fonction de
l'aérographe utilisé. Le D220R Paasche est une unitémembrane Oilless et vient avec
le R-75 Régulateur / filtre avecmanomètre. Elle opère sur 110-120 volts, 1 phase, 60
Hz, et délivre ,7 CFM @ 20 p.s.i. R75 Régulateur va réguler jusqu'à 45 P.S.I. selon
l'usage (intermittents ou constants) et la taille de l'aérographe utilisé.
Poids d’expédition: 11 lbs. (5 kg)
L’aérographe ne pulvérise pas :
1. Buse colmatée - Retirer la buse et la nettoyer
2
. Aiguille ne se déplace pas - Serrer le contre-écrou de l’aiguille
3
. Desserrer le corps de chapeau d’air VB - Serrer à la clé
4. Pression d’air basse - Augmenter la pression (pression minimum de 20 psi nécessaire pour pulvériser la majorité des peintures)
5. Orifice de ventilation du flacon colmaté - Utiliser l’aiguille ou une épingle pour dégager l’orifice d’air
Pulvérise ligne double ou épaisse d’un côté :
1. Buse fendue ou aiguille courbée - Remplacer
2. Buse ou aiguille sale - Retirer et nettoyer
3
. Buse non centrée dans le chapeau d’air - Retirer la tête et nettoyer le siège de l’aérographe et le siège de la buse,
p
uis remonter. Utiliser une clé pour le corps du chapeau d’air
Gâchette bloquée ou mouvement de gâchette médiocre :
1. Ajuster la gaine de réglage de l’aiguille - Visser ou dévisser la gaine pour diminuer ou accroître la tension sur le
mouvement de la gâchette
2. Fuite de peinture vers la zone de gâchette - Retirer les rouages de l’aérographe et serrer légèrement le joint ou
remplacer le cas échéant
3
. Lubrifier l’aiguille et la gâchette - Appliquer du lubrifiant sur l’axe de l’aiguille et la zone de fente de gâchette
V
SR90#1
A
CCESSOIRES
NO. PART DESCRIPTION
9. A-34 Aérographe Support
10. V-62 Clé
12. MT Emprisonner l'humidité (Do It Yourself Installation).
13. HP-1/8 Tuyau d’air en plastique rouge PVC avec accouplements
14. A-1/8 Tuyau d’air tressé avec accouplements
15. AC-20 1 / 8 "-1 / 4" -40 Coupling (en aérographe)
16. AC-1/8 -1 / 4 "Coupling (au compresseur)
ACCESSOIRES
- not shown
PART NO. DESCRIPTION
F-143 manche plastique rouge
R-75 Régulateur et de filtre w / Gauge
HSSB-22-16 Hobby-Shop pour cabine de projection
A-194 Hanger Aérographe Deluxe
9
10
Page 10

10
ESPANÕL
A
DVERTENCIA: Los materiales para la pulverización
p
ueden ser dañinos si se inhalan o entran en contacto con
l
a piel o los ojos. Consulte la etiqueta del producto y la hoja
d
e datos de seguridad de materiales que se proporciona
p
ara el material de pulverización. Siga todas las
p
recauciones de seguridad. PRECAUCIÓN: Se requiere de
u
n área con buena ventilación para eliminar humos, polvo o
p
ulverización en exceso. Presión de aire máxima: 7 5 psi.
VSR90#1 – A
ERÓGRAFO
Doble Acción – Mezcla interna – Alimentación por
gravedad – Empaquetaduras de PTFE.
INTRODUCCION: Primer Características de la VSR90#1 Paasche® Airbrush incluyen la capacidad de los líquidos de
p
ulverización que requieren alimentación por gravedad, así como que el color de rápida cambios con los dos (2) diferentes
tazas color tamaño suministra con cada sistema. Este exclusivo diseño de dos en uno permite que la elección de los
usuarios del tamaño de la taza, mientras que con una sola concha. Estas tazas de color que el usuario pueda girar cada
d
erecho copa, hacia la izquierda o en la alineación con el depósito para permitir una vista sin obstáculos de sus esfuerzos.
La doble acción, mezcla interna función permite flexibilidad en la regulación de color y aire sin interrupción del trabajo. Las
dos diferentes Multipleheads tamaño, Consejos y agujas son rápidamente intercambiables para permitir una mayor
diversidad en los materiales y la cobertura. Empaquetaduras de PTFE.
Tamaños de cabezales - Patrones - Espesor del líquido:
Tamaño 1 - Tamaño de la boquilla de 0.010 pulg. o 0.25 mm
- Se utiliza para detalles finos. Patrones desde línea de lápiz a patrones de 1 pulg.
- La pintura se debe diluir para más de 2 cabezales
Tamaño 2 - Tamaño de la boquilla de 0.026 pulg. o 0.66 mm
- Menos detalles que el cabezal de tamaño 1. Patrones desde 1/32 pulg. a 1-1/2 pulg.
- Puede pulverizar suavemente pintura más espesa que el cabezal de tamaño 1
Presiones de trabajo:
• Presiones de funcionamiento de 20 a 55 psi; presión máxima de 75 psi
• 20 a 30 psi es lo mejor para la pulverización detallada con pintura correctamente diluida
• Use las presiones más altas para materiales más espesos, donde los detalles finos no son necesarios o diluya la
pintura para permitir presiones más bajas.
Instalación del equipo:
El aerógrafo se sostiene de la misma manera que un lápiz, con el dedo índice cómodamente sobre el gatillo.
1. Conecte la manguera de aire al suministro de aire y al aerógrafo. Si utiliza un regulador, fije la presión entre 20 y 30 psi.
2. Conecte la taza a la conexión en el aerógrafo.
3. Retire la tapa de protección del cabezal Nº 1, página 2.
Funcionamiento del aerógrafo:
1. Presione el gatillo para liberar el aire y tire el gatillo para controlar la cantidad del color.
2. Para pulverizar una línea fina sin extremos gruesos, comience moviendo el aerógrafo sin liberar el color. Luego,
pulverice el color al principio de la línea y deténgalo al final de ésta, pero continúe moviendo el aerógrafo después
de que se haya detenido el color.
3. Practique este movimiento hasta que pueda pulverizar una línea fina o un patrón ancho sin acumulaciones gruesas
al comienzo o al final de sus trazos.
4. La velocidad del movimiento controla la densidad del color y los efectos de atenuación al comienzo o al final de los trazos.
5. Para los detalles, sostenga el aerógrafo muy cerca de la superficie, presione para liberar aire y tire lentamente el
gatillo para liberar una pequeña cantidad de pintura.
6. Para trabajos de fondo y efectos anchos, sostenga el aerógrafo lejos de la superficie de trabajo y tire el gatillo para
liberar la cantidad de color necesaria.
7. Para el punteado, retire el capuchón de aire, presione el gatillo hacia abajo y bombee el gatillo hacia delante y hacia
atrás. Ajuste la presión de aire entre 15 y 50 psi para obtener el efecto de punteado que desee.
8. Para obtener más instrucciones consulte el folleto “22 lecciones de aerografía para principiantes” incluido con su aerógrafo.
(A)
Nº PIEZA DESCRIPCIÓN
7. V-218 Empaquetadura y tuerca del prensaestopas
de PTFE (se venden como conjunto)
9. VSR-1 Color de la Copa 1/8 oz. (3.5cc)
10. VSR-2 Color de la Copa 3/16 oz. (5.25cc)
12. V-217 Gatillo
Nº
PIEZA DESCRIPCIÓN
1. V-189 Tapa de protección del cabezal
4. VB Cuerpo del capuchón de aire
VM-1 ó 2
Cabezas múltiples (seleccione el tamaño)
3. VA-1 ó 2 Capuchón de aire (seleccione el tamaño)
33-34. VN-1 ó 2 Aguja
5. VT-1 ó 2 Boquilla (seleccione el tamaño)
6. V-210 Shell Asamblea, con la V-20
Page 11

11
N
º
P
IEZA
D
ESCRIPCIÓN
A. V-186 Conjunto de la válvula de aire sin aguja
17. V-191A Conjunto del balancín
21. V-140 Resorte
22. V-136A Casquillo de ajuste de la aguja
2
3. V-141 Contratuerca
24. AFV-143 Empuñadura
2
4a. TAL-34 Conjunto de empuñadura y detención
(opcional), permite preestablecer el
flujo de pintura
RETIRO/REEMPLAZO DE LA AGUJA Y LA EMPUÑADURA (Ilustración A):
1. Destornille la empuñadura y suelte la contratuerca Nº 23 girando en el sentido contrario al de las agujas del reloj.
Gatillo Nº 12 y sosténgalo HACIA ABAJO mientras retira o inserta la aguja. Esto garantiza que la aguja se mueva
libremente por medio del gatillo. Retire suavemente la aguja, girándola si es necesario. ¡NO la fuerce hacia fuera!
2. Una aguja suelta puede provocar barboteo si hay fugas alrededor de la aguja y el conjunto de empaquetadura y de
tuerca Nº 7. Si no hay arrastre perceptible en la aguja junto a la empaquetadura, apriete la tuerca del conjunto de
empaquetadura y tuerca Nº 7.
3. Inspeccione el estado de la aguja. Si está doblada o deformada de cualquier manera, reemplácela por una aguja nueva.
Una aguja doblada puede dañar o partir la boquilla Nº 5, lo que provoca burbujas o patrones de pulverización ásperos.
4. Sostenga el gatillo HACIA ABAJO, inserte la nueva aguja en el conjunto del balancín Nº 17. Presione suavemente
la aguja por el medio, gírela si es necesario, presione suavemente hacia adelante hasta que la aguja se detenga
frente a la boquilla.
5. Suelte el gatillo y apriete la contratuerca girándola en el sentido de las agujas del reloj.
VOLVER A COLOCAR EL GATILLO (Ilustraciones B):
Si se retiró el gatillo Nº 12, se debe volver a colocar dentro de la carcasa del aerógrafo antes de volver a insertar el
conjunto del balancín Nº 17 y la aguja.
1. Sostenga el gatillo de modo que la abertura de la palanca esté alineada con la abertura del extremo de la carcasa
del aerógrafo (consulte B).
2. Inserte el gatillo hacia ABAJO por medio de la abertura en la parte superior de la carcasa del aerógrafo (consulte B).
3. Cuando se haya insertado el gatillo en la carcasa de la válvula, podrá presionarlo y éste volverá a la posición hacia
arriba al soltarlo. Vuelva a colocar el conjunto de balancín y equilibre las piezas como se indicó anteriormente.
Cuando la aguja esté insertada impedirá el retiro del gatillo.
REEMPLAZO DE LA BOQUILLA:
1. Retire la empuñadura, suelte la contratuerca Nº 23 y retire la aguja alrededor de una pulgada.
2. Destornille el cuerpo del capuchón de aire Nº 4 y retírelo. Ahora se puede retirar la boquilla Nº 5 con la mano. Si
está atrapada en la carcasa, golpéela suavemente con una llave.
3. Coloque una boquilla nueva en la posición y apriete el cuerpo del capuchón de aire hacia la carcasa con una llave.
Presione la aguja hacia delante hasta que se ajuste completamente en la boquilla y luego apriete la contratuerca.
AJUSTE DE LA ARANDELA DE OBSTRUCCIÓN DESGASTADA:
1. Si la empaquetadura Nº 7 de PTFE se desgasta o suelta, se debe apretar o reemplazar.
2. Apriete la tuerca del prensaestopas del conjunto Nº 7 con un destornillador pequeño. Para llegar a la
empaquetadura se deben retirar las piezas internas el aerógrafo.
3. Vuelva a colocar la aguja y asegúrese de que la tuerca del prensaestopas no esté demasiado apretada. Cuando se
pasa la aguja se necesita una pequeña resistencia al movimiento.
4. Vuelva a ensamblar completamente las piezas internas.
LIMPIEZA DEL AERÓGRAFO:
1. La pintura pasa hacia delante desde la conexión de la botella, de modo que la parte trasera del área del gatillo
prácticamente no necesite limpieza.
2. Entre los cambios de color o antes de almacenar el aerógrafo, conecte la botella con el limpiador adecuado y
pulverice en el sumidero hasta que salga líquido sin color.
3. Retire la aguja, límpiela y vuelva a ponerla en su lugar.
4. Si la pintura se ha secado, puede retirar la boquilla, el capuchón de aire y el cuerpo de éste para dejarlo en remojo
o remojar sólo la parte delantera del aerógrafo en el limpiador.
5. Utilice el limpiador para el material que esté pulverizando. Mantenga el área del gatillo seca si lo deja en remojo.
CONFIGURACIONES PERSONALES:
Casquillo de ajuste de la aguja - Se usa para aumentar o disminuir la tensión del resorte para la retirada del gatillo.
Rosque hacia el interior de la carcasa hasta que el trazo sea el que desee. Si rosca hasta que se detenga puede
provocar que el gatillo se atasque.
SOLUCIÓN DE PROBLEMAS:
Hay burbujas en la copa:
NºP
IEZA
D
ESCRIPCIÓN
25. V-221 Conjunto de la válvula de aire
26. V-20 Carcasa de la válvula
27. A-53 Junta tórica de la válvula (paquete de 6)
28. VL-214 Émbolo de la válvula (con A-53)
2
9. A-22 Resorte de la válvula
30. A-23R Tuerca de la válvula de aire
3
1. VN-1 Aguja
32. VN-2 Aguja
33. V-54 Escariador - opcional
(B)
Page 12

Paasche Airbrush Company, 4311 North Normandy Avenue, Chicago, Illinois 60634-1395
Phone: 773-867-9191 • Fax: 773-867-9198 • E-mail: info@paascheairbrush.com
12
COMPRESOR DE AIRE DA400R (1/6 CV)
Compresor de pistón de 1/6 CV con apagado automático. El compresor se apaga cuando el
aerógrafo no está en uso. La presión de funcionamiento es de 30 a 50 psi , según el aerógrafo
que se utilice; proporciona hasta 55 psi. 110 a 120 V CA, monofásico, 60 Hz, 42 L/Min. (1.48
pcm), 1720 rpm. Con colector de humedad y regulador R-75 incluidos.
Peso de envío: 13 lbs. 9 oz. (6.16 kg)
COMPRESOR DE AIRE D500SR (1/8 CV) (ETL Listed), con interruptor y regulador R-75
Económico y conveniente para todos los aerógrafos pulverización líquidos adecuadamente diluido.
Máximo 20 a 35 P.S.I. presión de funcionamiento dependiendo de aerógrafo que se utiliza. El
D500SR Paasche es una unidad de pistón sin aceite y viene con el R-75 Regulador / Filtro con
indicador.Opera en 110-120 voltios, 1 fase, 60Hz, y ofrece .4CFM@20 p.s.i.R75Regulador regulará
hasta 35 P.S.I. en función del uso (intermitente o constante) y el tamaño de aerógrafo que se utiliza.
Peso de envío: 8 lbs. 12 oz. (3.97 kg)
COMPRESOR DE AIRE D500 (1/8 CV) (con certificación ETL Listed)
Económico y adecuado para todos los aerógrafos que pulvericen líquidos correctamente
diluidos. Es capaz de proporcionar hasta 35 psi de presión de funcionamiento, según el
aerógrafo que se utilice. El modelo D500 de Paasche es un compresor de pistón sin lubricación.
Funciona con 110 a 120 voltios, es monofásico, de 60 Hz y proporciona 0.4 pcm a 20 psi.
Peso de envío: 8 lbs. 3 oz. (3.7 kg)
D220R COMPRESOR DE AIRE (1 / 6 HP), con Switch & R-75 Regulador
Económico y conveniente para todos los aerógrafos pulverización líquidos adecuadamente
diluido. Es capaz de entregar 30 a 45 P.S.I. presión de funcionamiento dependiendo de
aerógrafo que se utiliza. El D220R Paasche es una unidad de membrana sin aceite y viene
con el R-75 Regulador / Filtro con indicador. Opera en 110-120 voltios, 1 fase, 60 Hz, y ofrece
.7 CFM @ 20 p.s.i. R75 Regulador regulará hasta 45 P.S.I. en función del uso (intermitente o
constante) y el tamaño de aerógrafo que se utiliza. Peso de envío: 11 lbs. (5 kg)
1
. Se necesita apretar el cuerpo del capuchón de aire VB Nº 4 con una llave
El flujo es intermitente o se producen salpicaduras:
1. La pintura es demasiado espesa - Reduzca con diluyente
2. La boquilla no está ajustada - Apriete el cuerpo del capuchón de aire VB con una llave
3. La boquilla está partida o la aguja está dañada - Reemplace la boquilla o la aguja
4
. La aguja o la boquilla está sucia - Limpie y vuelva a poner en su lugar
5. La presión del aire es muy baja - Aumente la presión o diluya aún más la pintura (20 psi o más para pulverizar la mayoría de las pinturas)
E
l aerógrafo no pulveriza:
1. La boquilla está obstruida - Retire y limpie la boquilla
2. La aguja no se mueve - Apriete la contratuerca de la aguja
3. Suelte el cuerpo del capuchón de aire VB - Apriete con una llave
4. La presión de aire es baja - Aumente la presión (necesita 20 psi o más para pulverizar la mayoría de las pinturas)
5
. El orificio de ventilación de la botella está obstruido - Utilice una aguja o un alfiler para limpiar el orificio de aire
Se pulverizan líneas dobles o gruesas en un lado:
1
. La boquilla está partida o la aguja está doblada - Reemplace
2. La boquilla o la aguja está sucia - Retire y limpie
3. La boquilla no está centrada en el capuchón de aire - Retire el cabezal, limpie el asiento del aerógrafo y de la
boquilla, y luego vuelva a ensamblar. Utilice la llave para el cuerpo del capuchón de aire
El gatillo está atascado o tiene poco movimiento:
1. Ajuste el casquillo de ajuste de la aguja - Atornille o destornille el casquillo para disminuir o aumentar la tensión del
movimiento del gatillo
2. Hay fugas de pintura hacia el área del gatillo - Retire las piezas internas del aerógrafo y apriete suavemente la
empaquetadura o reemplácela si es necesario
3. Lubrique la aguja y el gatillo - Aplique lubricante al eje de la aguja y a la ranura del gatillo
ACCESORIOS
NO. PART DESCRIPTION
9. A-34 Colgador
10. V-62 Llave
12. MT Atrapar la humedad (Do-It-Yourself de instalación)
13. HP-1/8 Manguera de aire roja plástica de PVC con acoplamientos
14. A-1/8 Manguera de aire trenzada con acoplamientos
15. AC-20 1 / 8 "-1 / 4" -40 de acoplamiento (Para aerógrafo)
16. AC-1/8 -1/4" de acoplamiento (Para Compressor)
ACCESORIOS - no se muestra
PART NO. DESCRIPTION
F-143 Red mango de plástico
R-75 Regulador y del filtro w / Gauge
HSSB-22-16 Hobby-cabina de pintura
A-194 Percha aerógrafo Deluxe
Impreso en EE.UU.
9 10
 Loading...