

Page 1

INSTRUCTIONS AND PARTS LIST VL/VLS-9/25/2012
Supersedes Instructions & Parts List VL/VLS-8/31/2011
WARNING: Spray materials may be harmful if inhaled or allowed to
come into contact with the skin or eyes. Consult the product label
VL & VLS
Internal Mix - Double Action
Airbrushes -
INTRODUCTlON:
Paasche® models VL and VLS feature hand crafted construction using quality materials. The bodies are machined brass, polished and
chrome plated. Fluid tips are made from nickel silver, needles are stainless steel, the packing washer is PTFE and the handle is nylon.
Either airbrush, preferred by professional and hobbyist alike, permits great flexibility in regulation of color and air without work stoppage.
Different size aircaps, tips and needles are quickly interchangeable to allow greater diversity in materials and coverage.
Paasche® model VLS, available in three sizes, is equipped with a threaded connection at the color socket so bottle assemblies can be
securely fastened for greater mobility. It can also be used with larger gravity feed containers for production work.
Head Sizes - Patterns - Fluid Thickness
Size 1 - Tip size .022 inches or .55mm Size 3 -Tip size .029 inches or .73mm
- Used for fine detail. Pencil Line to 1'' patterns -Less detail than the size 1 head. 1/32'' to 1-1/2'' patterns
- Paint must be thinned further than 3 & 5 heads -Can spray slightly thicker paint than size 1 head
Working Pressures:
• Operating pressures 20-55 PSI; Maximum pressure 75 PSI
• 20-30 PSI is best for detail spraying w/ properly thinned paint
• Use the higher pressures for thicker material where fine detail is not critical or thin the paint to allow lower pressures.
Equipment Set-up:
The Airbrush is held in the same manner as a pen, with the index finger comfortably over the Trigger.
1. Attach airhose to air supply and to airbrush. If using a regulator, set pressure between 20 -30 PSI.
2. For VL attach the color cup or bottle assembly to color socket. For VLS tighten lock nut to bottle with wrench
Airbrush Operation:
1. Press down on Trigger to release air and pull back on Trigger to control quantity of color.
2. To spray a fine line without heavy ends, start moving the airbrush without release of color. Then start the color at the beginning of
line and stop the color at the end, but continue the motion of the airbrush after the color has stopped.
3. Practice this movement until you can spray a fine line or a broad pattern without heavy build up at the beginning or end of your strokes.
4. Speed of movement controls density of color and fading effects at beginning and end of strokes.
5. For detail, hold the airbrush very close to the surface and then push down for air and pull back very slowly on the Trigger to release a
small amount of paint.
6. For background work and broad effects, hold the airbrush away from the work surface and pull back on Trigger to release required
amount of color.
7. For stippling remove the aircap, push down on the Trigger and pump the Trigger forward and back. Adjust the air pressure between
15 and 50 PSI for desired stipple effect.
8. For more instruction see the “22 Airbrush Lessons for Beginners” booklet enclosed with your airbrush.
PTFE Packings.
L
V
Size 5 -Tip Size .042 inches or 1.06mm
- Less detail than the size 3 head. 1/16'' to 2'' patterns
- Can spray slightly thicker paint than size 3 head
and Material Safety Data Sheet supplied for the spray material.
Follow all safety precautions. CAUTION: Well Ventilated Area
Required to remove fumes, dust or overspray. Secure airhose to
Airbrush with V-62 Wrench for safety and to prevent air leaks.
M a x i m u m A i r P r e s s u r e 7 5 P . S . I .
S
L
V
Swivel Nut
Paasche Airbrush Company
4311 North Normandy Avenue
Chicago, IL 60634-1395
Phone: 773-867-9191 • Fax: 773-867-9198
Website: paascheairbrush.com
E-Mail: info@paascheairbrush.com
Printed in the U.S.A.
Page 2
Paasche® VL & VLS Double Action Airbrushes Page 2
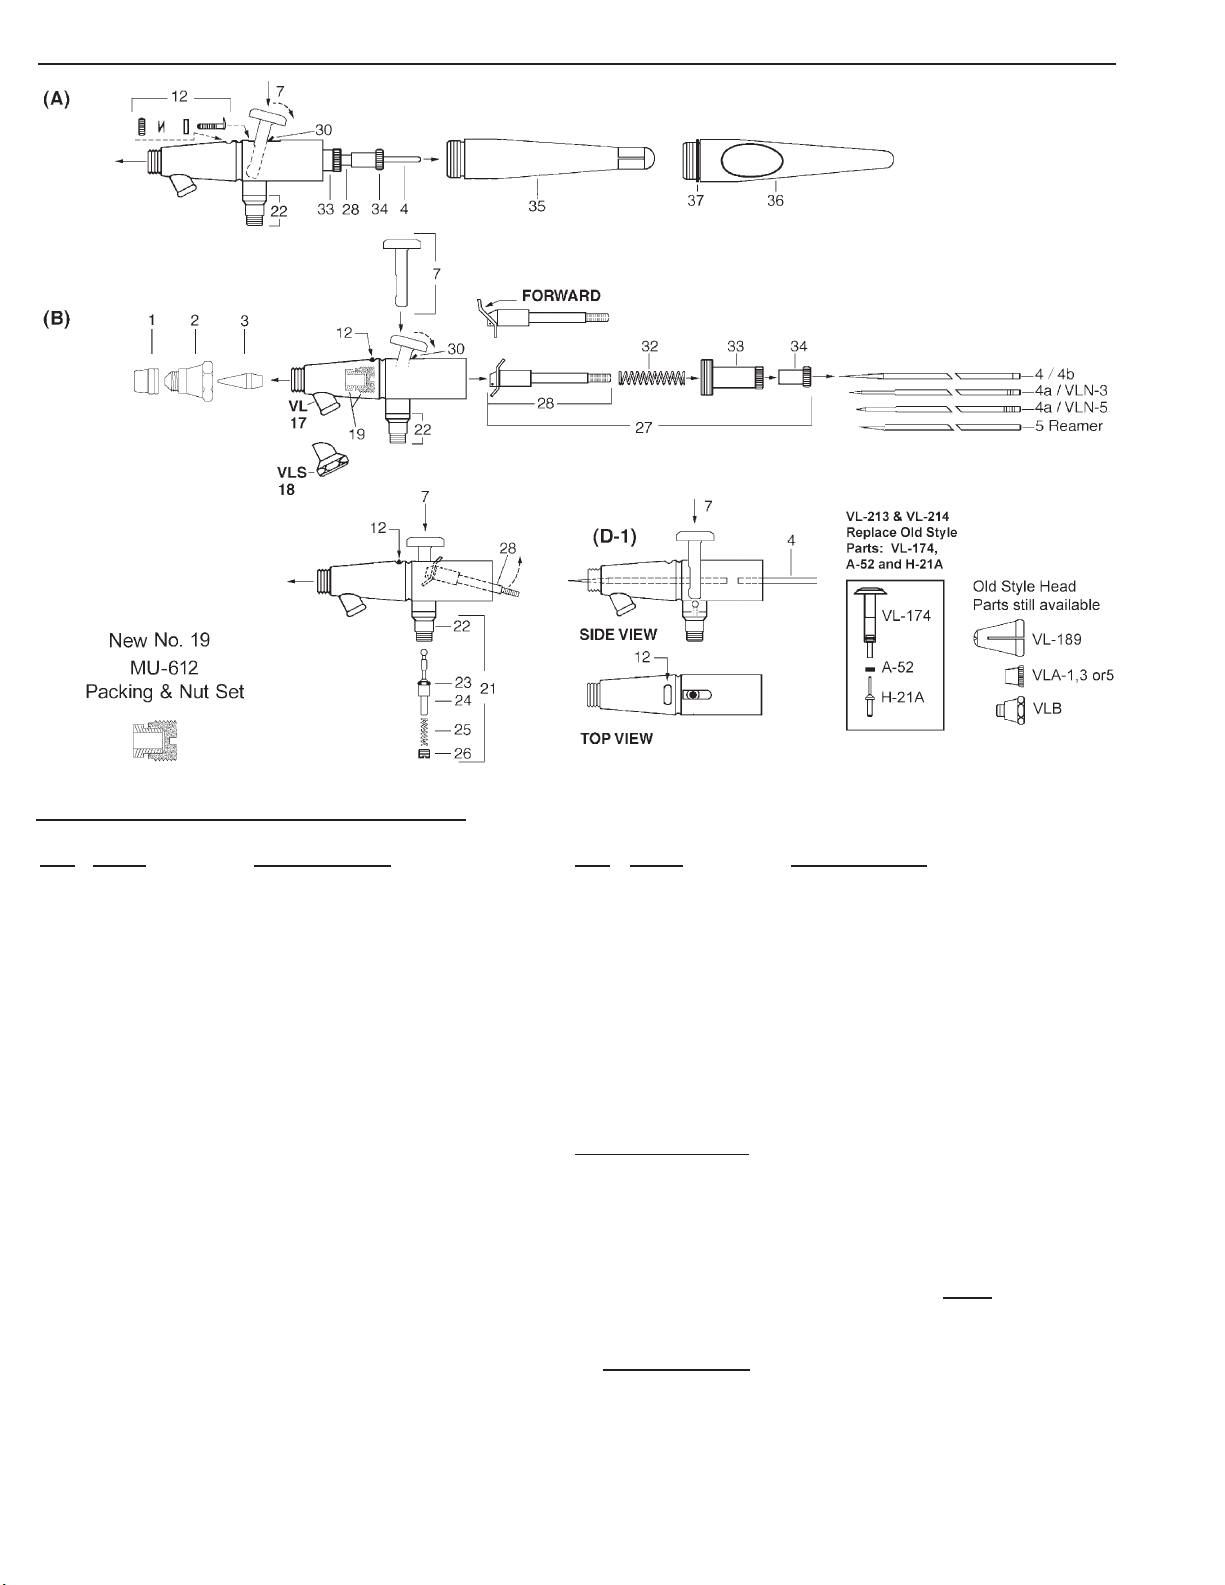
VL and VLS AIRBRUSH PARTS
NO. PART DESCRIPTION
1. XI-41 Needle Protecting Cap
2. VLH-1, 3 or 5 Head (Specify Size)
3. VLT-1, 3 or 5 Tip (Specify Size)
4. VLN-1 Needle (Specify Size)
4a. VLN-3, VLN-5 Needle (Specify Size)
7. VL-213 Trigger
12. VL-175 Line Adjustment Assembly
17. VL-163 Shell Assembly W/VL-20
18. VLS-163 Shell Assembly W/VL-20
19. MU-612 PTFE Packing & Packing Nut
(sold as set)
21. VL-215 Air Valve Assembly
22. VL-20 Valve Casing
24. VL-214 Valve Plunger (with A-53)
NO. PART DESCRIPTION
27. VL-186 Needle Valve Assembly L/Needle
28. VL-191A Rocker Assembly
32. VL-140 Spring
33. VL-136A Needle Adjusting Sleeve
34. VL-141 Locknut
35. VL-134N Handle
Optional Items:
4b. VLN-1POL Polished Needle
5. VL-54 Reamer
23. A-53 Valve ‘O’ Ring (pack of 6)
36. HVL-202 Standard Length Metal Handle with
Cut-Out and VL-224 ‘O’ Ring
VL-227-1, 3 or 5 Multiplehead (Specify Size)
25. A-22 Valve Spring
26. A-23R Air Valve Nut
VLH-1, 3 or 5 Head
VLT-1, 3 or 5 Tip
VLN-1, 3 or 5 Needle
Page 3

Paasche® VL & VLS Double Action Airbrushes Page 3
REMOVING/REPLAClNG THE NEEDLE AND HANDLE (Illustration A):
1. Unscrew the handle and loosen the Locknut #34 by turning counterclockwise. Depress the Trigger #7 and hold in Down position while
removing or inserting the needle. This assures the needle moves freely through the trigger. Gently remove the needle, rotating if necessary,
Do NOT force out!
2. A loose needle can cause sputtering if there is any air leakage around the needle and Packing & Nut Assembly #19. If there is no
noticeable drag on the needle by the packing, then tighten the Nut of the Packing & Nut Assembly #19.
3. Inspect the condition of the needle. If it is bent or misshapen in any way, replace it with a new needle.
Tip #3 causing bubbles or a rough spray pattern.
4. Hold trigger in DOWN position, insert the new needle into the Rocker Assembly #28. Gently push needle through, rotating if necessary.
until the needle stops in the front of the tip.
5. Release trigger and tighten locknut by turning clockwise.
REPLACING THE TRIGGER (Illustration D-1):
If the Trigger #7 is removed, it must be replaced inside the airbrush shell, before the Rocker Assembly #28 and needle are re-inserted.
1. Hold the trigger so the opening in the lever is in-line with the opening in the end of the airbrush shell and the flat side of the trigger stem is
to the rear. (see D-1).
2. Insert trigger so the bottom of the stem covers the round top of the valve plunger.
3. Once the trigger has been inserted into the slot on the top of the shell, you will be able to press down on the trigger and it will return to the
up position when released. Proceed to replace rocker assembly and balance of parts as above. The needle when inserted will prevent the
removal of the trigger.
REPLACING THE TIP:
1. Remove handle, loosen Locknut #34 and withdraw needle about one inch (1").
2. Un-screw the Head #2 and remove. The Tip #3 can now be easily removed by hand. If stuck in shell tap lightly with wrench.
3. Place a new tip into position and tighten head to shell with a wrench. Push needle forward until it seats fully forward in tip and tighten
locknut.
ADJUSTING OR REPLACING WORN PACKING WASHER:
1. If PTFE Packing #19 becomes worn or loose it must be tightened or replaced.
2. You will need a small screwdriver to remove or tighten the Packing Nut #19.
3. When replacing your PTFE Packing press packing onto the Packing Nut #19. Use a small screwdriver to tighten packing nut into shell until
it is tight then back out one-half turn, may vary.
4. Now insert needle - you should feel a slight resistance. If too loose or too tight adjust the packing nut with screwdriver until you feel some
slight resistance.
5. Now completely re-assemble guts of airbrush.
A bent needle can damage or split the
CLEANING THE AIRBRUSH:
1. Paint passes from the bottle connection forward so the trigger area back will most likely not need cleaning.
2. You can back flush the paint into your bottle by covering the Needle Protector with your finger and then pressing down on the trigger and
pulling slightly back. This forces paint from the fluid passage back into the bottle. Never use open cup for back flushing.
3. In between color changes or before storing the airbrush attach bottle with appropriate cleaner and spray into sink until it runs clear.
4. Remove needle and wipe clean then replace.
5. If paint has dried for a time you can remove the front tip and head for soaking, or soak just the front of the airbrush in cleaner.
6. Use cleaner for the material you are spraying. Keep trigger area dry if soaking.
PERSONAL SETTINGS:
Needle Adjustment Sleeve- Used to increase or decrease spring tension for the trigger pull back. Thread into the shell until the trigger
Line Adjustment Assembly- Used to preset paint flow. When rotated clockwise the trigger will retract opening the fluid passage. This
TROUBLESHOOTING:
Bubbling in cup
1. VLH Head #2 needs to be wrench tightened
Skipping or spitting:
1. Paint too thick -Reduce with thinner
2. Tip not seated -Tighten VLH Head with wrench
3. Tip split or damaged Needle -Replace tip or needle
4. Needle or tip dirty -Clean and replace
5. Air pressure too low -Increase pressure or thin paint further (need 20 or more PSI to spray most paints)
Airbrush not spraying:
1. Clogged Tip -Remove tip and clean
2. Needle not moving -Tighten needle locknut
3. Loose VLH Head -Wrench tighten
4. Low air pressure -Increase pressure (need 20 or more PSI to spray most paints)
5. Bottle vent hole plugged -Use needle or pin to clear air hole
stroke feels comfortable. Threading in until it stops can cause the trigger to jam.
allows a set paint flow when only pushing down on the trigger.
Sprays double line or heavy to one side:
1. Split tip or bent needle - Replace
2. Dirty tip or needle - Remove and clean
3. Tip not centered in head - Remove head and clean airbrush seat and tip seat then reassemble. Use wrench for head
Jammed trigger or poor trigger motion:
1. Adjust Needle Adj. Sleeve - Screw or unscrew the sleeve to lessen or increase tension on trigger motion
2. Paint leaking to trigger area - Remove guts of airbrush and slightly tighten packing or replace if needed
3. Lubricate needle and trigger - Apply lubricant to needle shaft and trigger slot area
Page 4

Paasche® VL & VLS Cups, Bottles and Accessories Page 4
VL and VLS BOTTLE ASSEMBLIES and CUP
up or Bottle for VL Airbrush
* C
, ‡ C
NO. PART NO. DESCRIPTION
37.* VL-3-OZ 3 oz. Glass Bottle Assembly (89cc)
VL3 3 oz. Metal Cover & Tube Assembly
H-108 3 oz. Glass Bottle (89cc)
38.* PCVL-3-OZ 3 oz. Plastic Cover & Metal Tube Assem. (89cc)
PCVL3 3 oz. Plastic Cover & Metal Tube Assembly
H-108 3 oz. Glass Bottle (89cc)
39.* VLP-3-OZ 3 oz. Plastic Cover, Tube & Bottle Assem. (89cc)
VLP3 3 oz. Plastic Cover & Tube Assembly
62-17P 3 oz. Plastic Bottle (89cc)
40.* VL-1/2-OZ 1/2 oz. Glass Bottle Assembly (14.5cc)
VL1/2 1/2 oz. Metal Cover Assembly W/Gasket
H-164 1/2 oz. Glass Bottle (14.5cc)
41.* VL-1-OZ Color Bottle Assembly (29cc)
VL1 1 oz. Cover Assembly
H-99 1 oz. Glass Bottle (29cc)
42.* VLD-3-OZ 3 oz. Decorator Bottle Assembly (89cc)
H-108 3 oz. Glass Bottle (89cc)
43.* VL-2-OZ Aluminum Cup Assembly (60cc)
VF-23 2 oz. Aluminum Cup (60cc)
44.‡ VLS-3-OZ 3 oz. Bottle Assembly (89cc)
VLS3 3 oz. Metal Cover Assembly
H-108 3 oz. Glass Bottle (89cc)
45.‡ VLPS-3-OZ 3 oz. Plastic Bottle Assembly (89cc)
VLPS3 3 oz. Plastic Cover & Tube Assembly
62-17P 3 oz. Plastic Bottle (89cc)
46.‡ PCVLS-3-OZ 3 oz. Plastic Cover & Metal Tube Assem. (89cc)
PCVLS3 3 oz. Plastic Cover & Metal Tube Assembly
H-108 3 oz. Glass Bottle (89cc)
47.‡ VLS-2-OZ Aluminum Cup Assembly (60cc)
VF-23 2 oz. Aluminum Cup (60cc)
48.‡ VLS-1-OZ Color Bottle Assembly (29cc)
VLS1 1 oz. Cover Assembly
H-99 1 oz. Glass Bottle (29cc)
49.‡* VL-1/4-OZ Metal Color Cup (7cc)
NOTE: 3-JG Gasket for 3oz and 2oz bottles
5-G Gasket for 1 oz bottles
up or Bottle for VLS Airbrush
AIRHOSES W/FACTORY INSTALLED COUPLINGS
53. HP-1/8 PVC-Red Plastic Airhose W/Couplings
54. A-1/8 Braided Airhose W/Couplings
59. VL-127 Strainer for PTFE White Color Tube Only
ACCESSORIES (not shown)
A-34 Hanger
V-62 Wrench
Recommended Compressors and Accessories
D500 AIR COMPRESSOR (1/8 H.P.) (ETL Listed)
Economical and suitable for all airbrushes spraying properly
thinned fluids. It is capable of delivering up to 35 P.S.I.
operating pressure depending on airbrush being used. The
Paasche D500 is an oilless piston compressor. It operates on
110-120 Volt, 1 phase, 60Hz, and delivers .4 C.F.M. @ 20
P.S.I. Shipping Weight: 8 lbs. (3.6kg)
D220R AIR COMPRESSOR (1/6 H.P.), with Switch
& R-75 Regulator
Economical and suitable for all airbrushes spraying
properly thinned fluids. It is capable of delivering 30 45 P.S.I. operating pressure depending on airbrush
being used. The Paasche D220R is an oilless
diaphragm unit and comes with the R-75
Regulator/Filter with gauge. It operates on 110-120
Volt, 1 phase, 60Hz, and delivers .7 C.F.M. @ 20
P.S.I. R75 Regulator will regulate up to 45 P.S.I.
depending on usage (intermittent or constant) and
size of airbrush being used.
Shipping Weight: 11 lbs. (5kg)
AIR COMPRESSOR (1/8 H.P.)
DA300R
with Switch CSA approved
1/8 H.P. Piston Compressor with Auto shutoff.
Compressor shuts off when airbrush is not in use.
Operating pressure is 20 - 30 P.S.I. depending on
airbrush being used, delivers up to 35 psi. 120 VAC, 1
Ph, 60 Hz, 1.4 A, 20L/Min. (0.7CFM), Noise 53dB,
1720 rpm. Shipping Weight: 9.14 lbs. (4.6 kgs)
DA400R
1/6 H.P. Piston Compressor with Auto shutoff.
Compressor shuts off when airbrush is not in
use. Operating pressure 30 - 50 PSI depending
on airbrush being used, delivers up to 55 psi..
110-120VAC, 1 Ph, 60 Hz, 42L/Min. (1.48CFM),
1720 rpm. With R-75 Regulator & Moisture Trap
included.
Shipping Weight: 12.2 lbs. (5.6 kgs)
AIR COMPRESSOR (1/6 H.P.)
& R-75 Regulator
 Loading...