

Page 1
INSTRUCTIONS AND PARTS LIST F#1-8/31/2011
Supersedes Parts & Instructions List F#1-10/29/2008
F#1
Single Action
External Mix Airbrush
OPERATING INSTRUCTIONS AND REPLACEMENT PARTS
INTRODUCTION:
F#1 Airbrush is the simplest in design with the least number of
parts, supplying independent control of air and color. Ideal for
use by students and hobbyists, also for touch up and decorating.
OPERATING INSTRUCTIONS: Pressures:
• 10 lbs. for stipple and granulated effects.
• 20 Ibs. for light consistency water colors, inks & dyes.
• 30 Ibs. for medium fluids, reduced lacquers,
varnishes, paints or ceramic glaze. F#1 Airbrush will
not handle heavy fluids.
1. Attach hose to air supply and allow to blow a few seconds
at full pressure. Shut off before attaching to Airbrush.
This procedure will remove dirt from airline and hose.
2. Attach AC-20 (1/8”-1/4”-40) Coupling to the Airbrush.
3. Attach Color Cup or Bottle to FN-1 Needle by exerting
a firm twisting motion to fit taper tube securely into
tapered Needle inlet. To remove Color Cup from FN-1
Needle, exert a backwards twisting and pulling motion.
4. Fill Color Cup or Bottle 1/2 to 3/4 full. Use eyedropper
or brush for adding small amounts of color to cup.
When using Color Bottle, vent hole must be kept open.
5. To Spray: Hold Airbrush like a pencil, comfortably
between thumb and forefinger using middle finger as a
guide and support.
6. Like writing, hold forefinger easily on H-155 Finger
Button-press to open air valve.
7. Regulate volume of color and size of spray by rotating
FT-1 Tip clockwise to increase, and counterclockwise
to decrease, flow of color.
8. Stipple adjustment: For a very coarse stipple, loosen
and slide back FN-1 Needle. Increase the volume of
fluid until a free flow of color is achieved. Regulate air
pressure and fluid feed for a variety of stipple effects.
WARNING: Spray materials may be harmful if inhaled or
allowed to come into contact with the skin or eyes. Consult
the product label and Material Safety Data Sheet supplied
for the spray material. Follow all safety precautions.
CAUTION: Well Ventila ted Area Requi red to rem ove
fumes , dus t or over spray. Secu re ai rhose to A irbrush
with V-62 Wr ench fo r safet y a nd to p revent air lea ks.
M a x i m u m A i r P r e s s u r e 7 5 P . S . I .
CARE AND CLEANING:
1. Pour any remaining color back into its original
container.
2. Wipe Color Cup or Bottle clean, using a cloth
moistened with proper solvent.
3. Hold airbrush at a downward angle and put a few drops
of solvent through the F-1 Color Adjusting Part
Assembly. To flush out the remaining color in the F-1
Color Adjusting Part Assembly, apply pressure to the
H-155 Finger Button.
4. Apply a tiny dab of petroleum jelly to the F-1 Color
Adjusting Part Assembly and HC-1 Aircap threads
every two or three months to prevent color build up and
consequent freezing of the Color Adjusting Part
Assembly and Aircap.
HOW TO OPEN CLOGGED FLUID PASSAGES:
1. Agitate color in Bottle Assembly by placing finger
momentarily over HC-1 Aircap while air is passing
through the Airbrush. (This will blow color back into
bottle thus opening clogged fluid passages.) Do not do
this with a cup as color may blow out.
2. Should F-1 Color Adjusting Part Assembly become
clogged, loosen H-153 Set Screw, unscrew FT-1 Tip
from FN-1 Needle, gently pull back through ball shaped
support and remove Tip.
3. Clean Parts carefully, using nothing harder than a
wooden toothpick.
4. To reassemble, reverse this procedure, making sure
the shoulder of the needle seats up against ball shaped
support.
5. If the needle and tip are completely clogged, soak in a
closed bottle of proper solvent until clean.
Paasche Airbrush Company
4311 North Normandy Avenue
Chicago, IL 60634-1395
Phone: 773-867-9191 • Fax: 773-867-9198
Website: paascheairbrush.com
E-Mail: info@paascheairbrush.com
Printed in the U.S.A.
Page 2
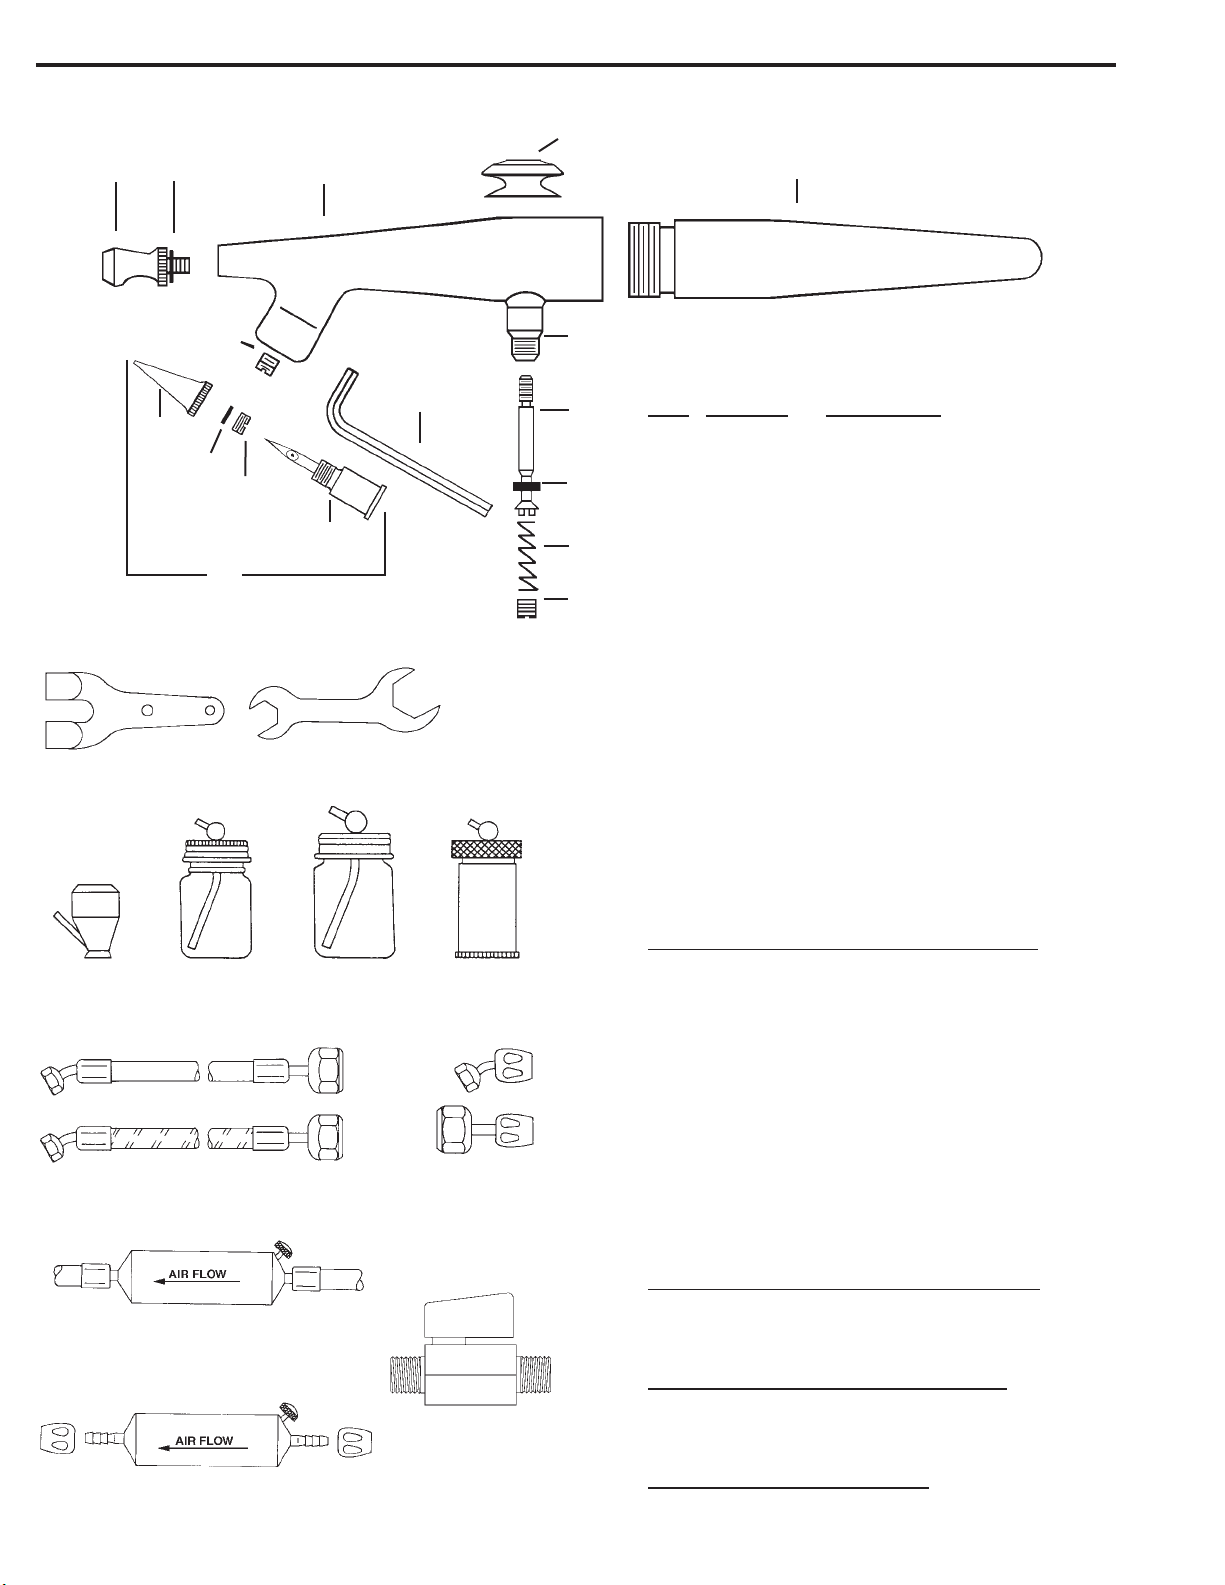
Page 2 Paasche F#1 Airbrush Replacement Parts
9
2
1
8
4
5
6
3
B
10
12
A
7
13
14
15
16
Item Part No. Description
1. HC-1 Aircap
2. 3A-4 “O” Ring
3. F-1 Color Adjusting Part
4. FT-1 Tip (Nickel Silver)
5. F-185 Packing
6. F-184 Nut
7. FN-1 Needle (Nickel Silver)
8. H-153 Set Screw
9. H-155 Finger Button
10. F-190N Shell
11. F-143 Handle
12. F-194 Valve Casing
13. F-192 Air Valve Plunger
14. A-52 Valve Washer (Pack of 6)
15. A-22 Valve Spring
16. A-23A Air Valve Nut
A. F-186 Wrench
B. A-34 Hanger
C. AFV-143 Metal Handle (Not lncluded)
11 or C
V-62 Wrench
19 20 21 22
25
23
26
24
27 Moisture Trap
with Factory Installed Couplings
27 Moisture Trap
with "Do-it-Yourself" Couplings
28
Metal Color Cups and Bottle Assemblies:
19. F-1/4-OZ 1/4oz. Metal Color Cup (7cc)
20. VFA-1/2-OZ Glass Bottle Assembly (14.5cc)
VFA1/2 1/2 oz. Cover Assembly Complete
VF-7 Color Tube
21. VFA-1-OZ Glass Bottle Assembly (29cc)
VFA1 1 oz. Cover Assembly
5-G Gasket
VF-7 Color Tube
22. V-1-OZ Aluminum Cup Assembly (29cc)
VF-26 1 oz. Aluminum Cup
VF-7 Color Tube
AE-31 Gasket
Air Hoses W/Factory Installed Couplings:
23. A-1/8-8 Braided Airhose W/Couplings
24. HP-1/8-8 PVC-Red Plastic Hose W/Cplgs.
Airhose Couplings-Replacement Only
25. AC-20 1/8"-1/4"-40 Coupling (Airbrush)
26. AC-1/8 -1/4" Coupling (Compressor)
Accessories- NOT INCLUDED
27. MT Moisture Trap
28. HF-1/4 Valve Assembly
 Loading...