

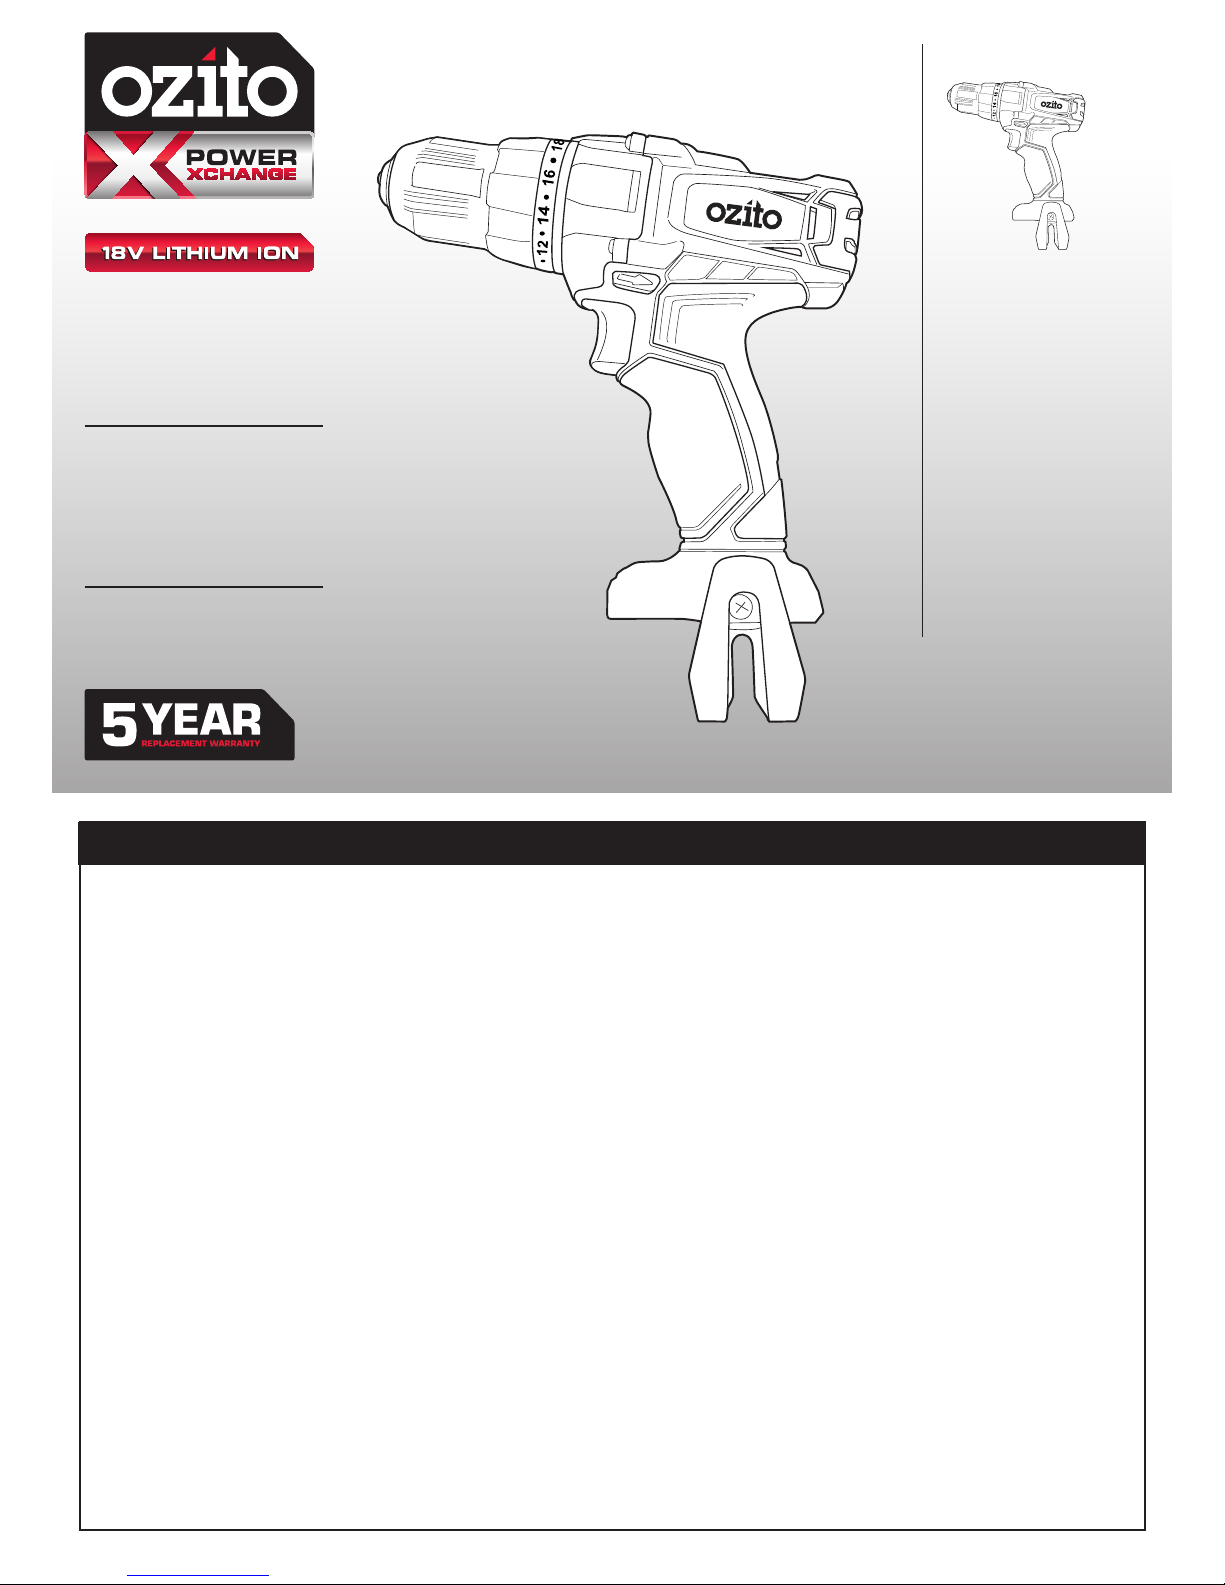
Ozito PXDDK-301U, PXHDS-301U Original Instructions Manual
SPECIFICATIONS
Input: 18V
Chuck Size: 13mm Single Sleeve
No Load Speed: 0-350 / 0-1,250/min
Torque Setting: 18
Max. Torque: 36Nm
Weight (Tool Only): 1.1kg
CORDLESS
DRILL DRIVER
ORIGINAL INSTRUCTIONS
ozito-diy.co.uk
PXDDK-301U
WHAT’S IN THE BOX
Cordless Drill Driver
WARRANTY
OZITO UK Unit 9 Stadium Court, Wirral International Business Park, Plantation Road, Bromborough, Wirral, CH62 3QG
0516
All of our products undergo strict quality checks to ensure that they reach you in perfect
condition. In the unlikely event that your device develops a fault, please contact our service
department at the address shown on this guarantee card. You can also contact us by
telephone using the customer service number shown. Please note the following terms under
which guarantee claims can be made:
1. These warranty terms regulate additional warranty services, which the manufacturer
mentioned below promises to buyers of its new products in addition to their statutory
guarantee claims are not affected by this guarantee. Our guarantee is free of charge to you.
2. The warranty services only covers defects due to material or manufacturing faults on
a product which you have bought from the manufacturer mentioned below are limited to
either the rectication of said defects on the product or the replacement of the product,
whichever we prefer.
Please note that our devices are not designed for use in commercial, trade or professional
applications. A guarantee contract will not be created if the device has been used by
commercial, trade or industrial business or has been exposed to similar stresses during the
guarantee period.
3. The following are not covered by our guarantee:
- Damage to the device caused by a failure to follow the assembly instructions or due to
incorrect installation, a failure to follow the operating instructions (for example connecting
it to an incorrect mains voltage or current type) or a failure to follow the maintenance and
safety instructions or by exposing the device to abnormal environmental conditions or by
lack of care and maintenance.
- Damage to the device caused by abuse or incorrect use (for example overloading the
device or the use or unapproved tools or accessories), ingress of foreign bodies into the
device (such as sand, stones or dust, transport damage), the use of force or damage caused
by external forces (for example by dropping it).
- Damage to the device or parts of the device caused by normal or natural wear or tear or by
normal use of the device.
4. Your Product is guaranteed for a period of 60 months from the original date of purchase
and is intended for DIY (Do It Yourself) use only. Lithium Ion batteries and chargers are
covered by a 12 month warranty. Warranty excludes consumable parts. Guarantee claims
should be submitted before the end of the guarantee period within two weeks of the defect
being noticed. No guarantee claims will be accepted after the end of the guarantee period.
The original guarantee period remains applicable to the device even if repairs are carried
out or parts are replaced. In such cases, the work performed or parts tted will not result
in an extension of the guarantee period, and no new guarantee will become active for the
work performed or parts tted. This also applies if an on-site service is used.
IN ORDER TO MAKE A CLAIM UNDER THIS WARRANTY YOU MUST RETURN THE PRODUCT TO
THE PLACE OF PURCHASE WITH YOUR REGISTER RECEIPT.
Please refer to the restrictions of this warranty concerning wearing parts, consumables and
missing parts as set out in the service information in these operating instructions.
CUSTOMER SERVICE HELPLINE
GB: 0151 294 4488
IRL: 1850 882711
Ozito-diy.co.uk
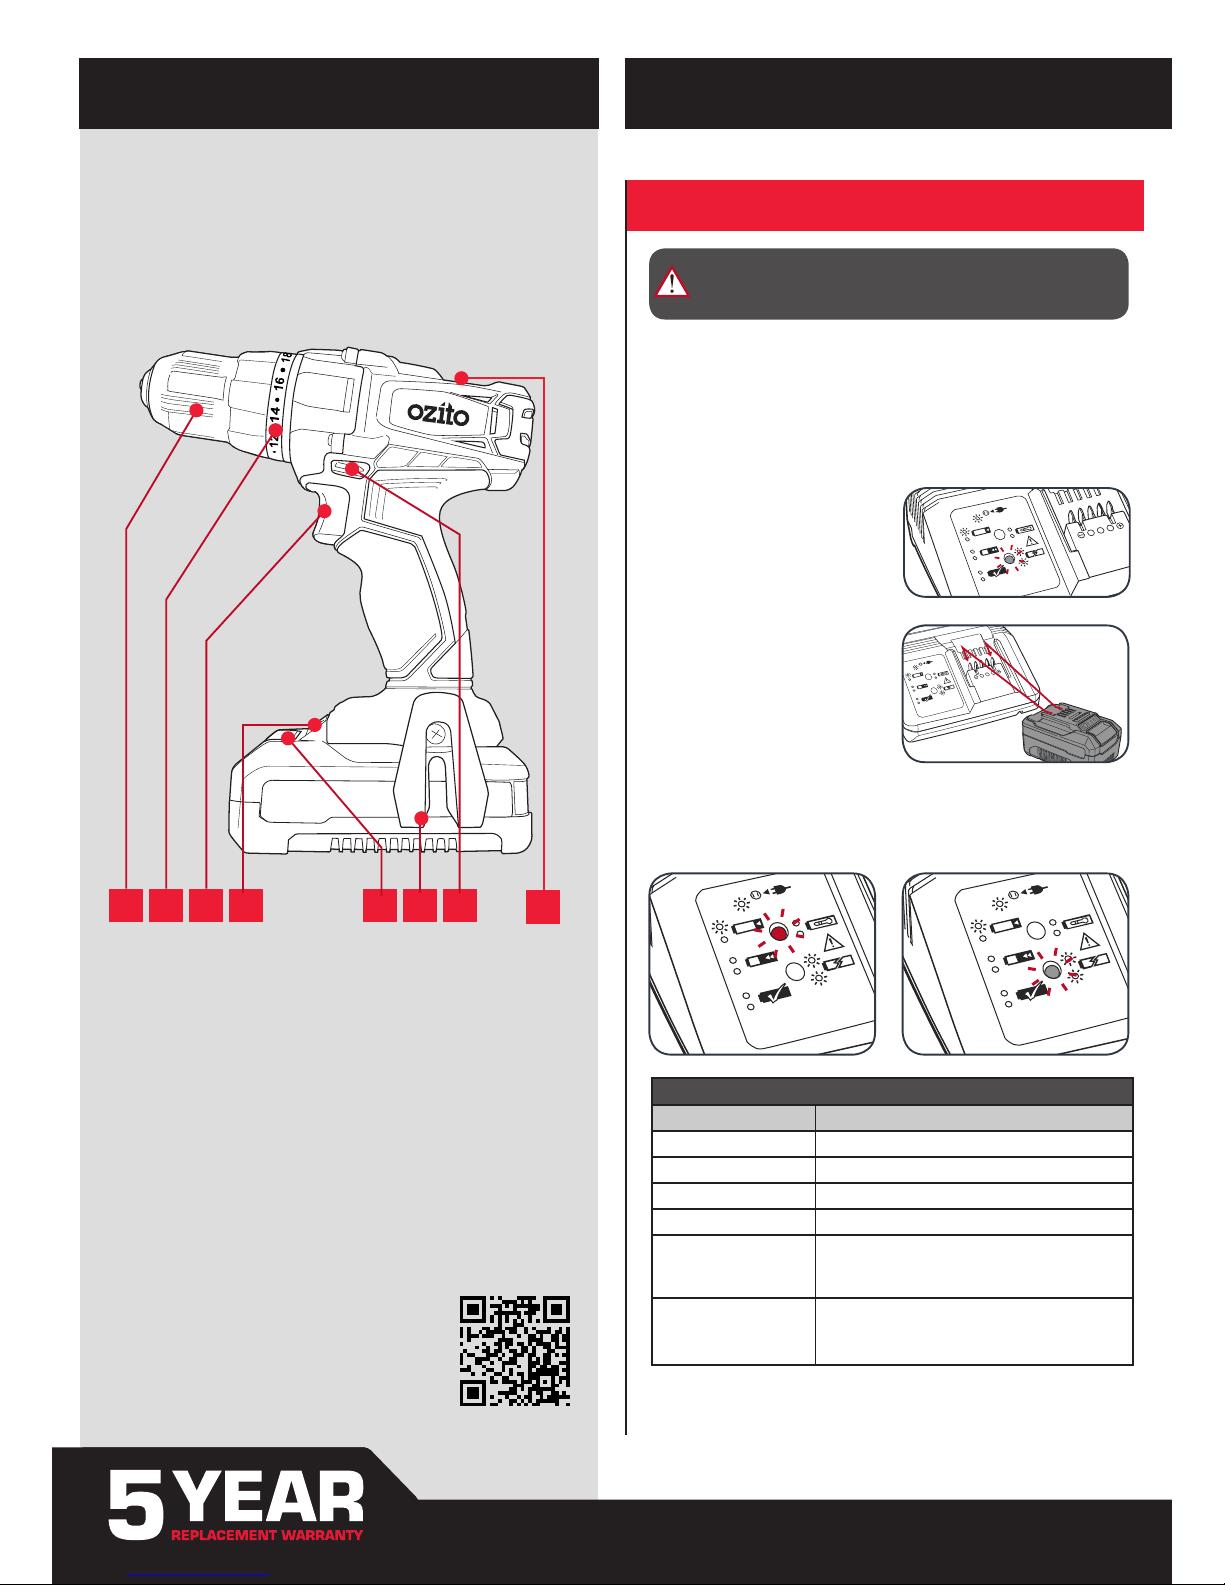
KNOW YOUR PRODUCT SETUP & PREPARATION
1. BATTERY & CHARGING
1 Keyless Chuck
2 Torque Adjustment Collar
3 Variable Speed Trigger
4 LED Light
5 Battery Release Button
6 Battery 18V (not included)
7 Forward/ Reverse Lever
8 Gearbox speed selector
CORDLESS DRILL DRIVER (PXDDS-201U)
1 2 3 4 5 6 7
8
The purchased battery will be shipped in a low charge condition, and requires charging
prior to use. Allow several cycles of charging and discharging (through use of the tool)
for the battery to reach its optimum performance / runtime.
CAUTION: THE CHARGER FOR THIS PRODUCT SHOULD
BE PROTECTED BY A RESIDUAL CURRENT DEVICE
(RATED AT 30MA OR LESS).
1 Connect the charger into a mains power outlet.
4 The charger LED will illuminate
red signifying that the battery is
charging.
3 With the charger sitting on a at
surface, align the raised ribs on
the battery with the recess in the
charger and slide onto the charger
ensuring a rm connection.
2 The charger LED will ash green
showing power is being supplied
to the charger.
5 The charger LED will illuminate
green once the battery is charged.
Charging your lithium ion battery - Fast Charger
Charger LED Indicator
LED Indicator Situation
GREEN (Flashing) Stand By (no battery pack is inserted)
RED (Flashing) Battery is charging (low charge)
RED (Illuminated) Battery is charging (mid charge)
GREEN (Illuminated) Battery is 85% - 100% charged and ready for use
BOTH(Illuminated) Battery pack is too hot or too cold (charging will begin
automatically when battery reaches correct charging
temperature).
BOTH (Flashing) Defective battery. Never charge a defective battery
pack!
Remove battery pack from charger.
ONLINE MANUAL
Scan this QR Code with your
mobile device to take you to the
online manual.
This tool is compatible with all battery and chargers from the Ozito
Power X Change Range.
BATTERY & CHARGER
2. BATTERY INSTALLATION
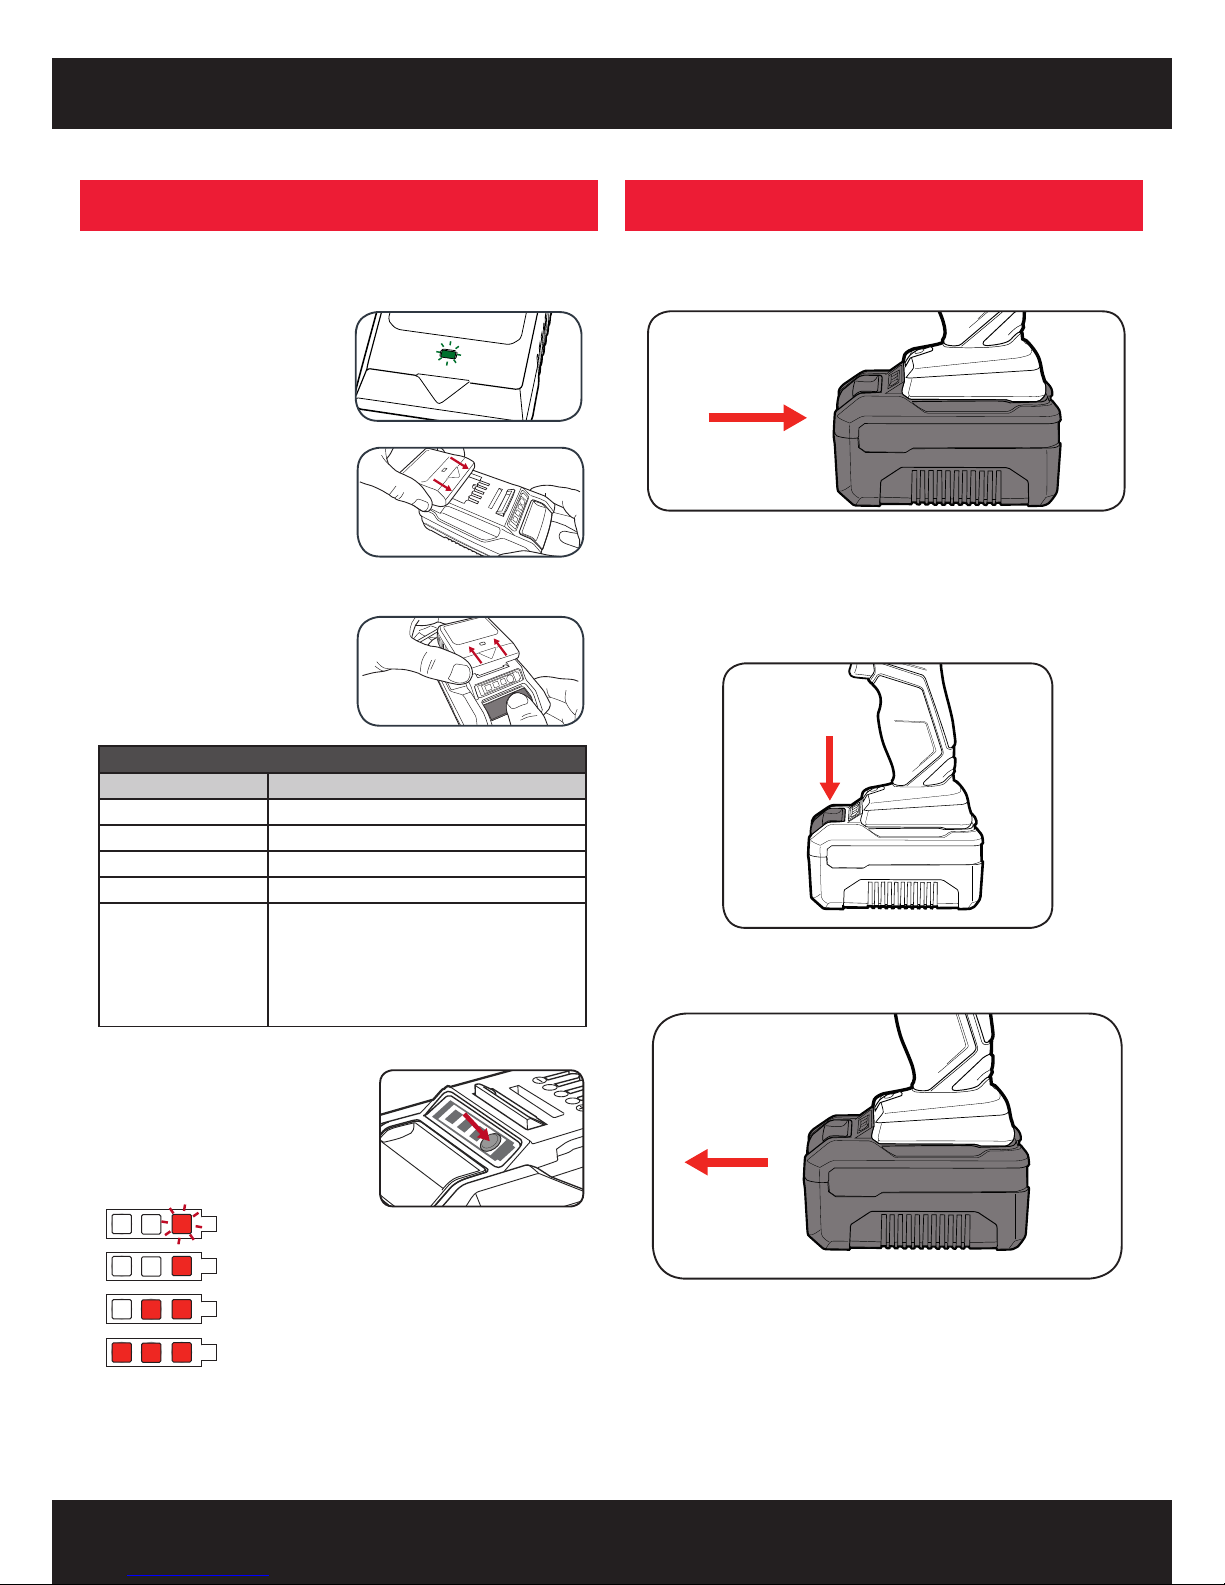
Battery Charge Indicator
The purchased battery is equipped with a
battery charge indicator to show the state of
the battery charge.
Press the charge indicator button and look to
see which LED lights.
Battery requires
immediate charging
Low state of charge, requires charging soon.
Mid state of charge
Full state of charge.
Note: The battery needs to be removed from the tool to check the state of charge.
1 Connect the charger into a mains power outlet.
4 The charger LED will illuminate red signifying that the battery is charging.
3 With the battery sitting on a at
surface, align the raised ribs on the
battery with the recess in the charger
and slide onto the battery ensuring a
rm connection.
2 The charger LED will ash green
showing power is being supplied
to the charger.
5 When removing the charger from the
battery, rst press the battery release
tab, then slide the charger from its
position.
Charging your lithium ion battery - Eco Charger
Charger LED Indicator
LED Indicator Situation
GREEN (Flashing) Stand By (no battery pack is inserted)
RED (Illuminated) Battery is charging (low charge)
GREEN (Illuminated) Battery is charged and ready for use
RED (Flashing) Battery or Charger fault
RED & GREEN (Flashing) Battery pack is too hot or too cold (remove battery from
charger and store at room temperature 20ºC. Insert
battery again when at correct charging temperature). If
this happens again, the battery is defective and needs
to be replaced.
Installing the Battery Pack
1 Slide the battery into the drill base until it clicks into place.
Removing the Battery Pack
1 Hold down the battery release button.
2 Slide the battery out.
FWD
REV
3. KEYLESS CHUCK 4. CONTROLS
OPERATION
Speed Control
1. Slide the switch forward to select
rst gear.
2. Slide the switch backward to
select second gear.
The gear selector controls the speed of the drill. First gear allows slower drilling
with more torque, while second gear is suitable when less torque but higher speed
is required.
Forward/ Reverse Lever
Variable Speed Trigger
1 For forward rotation, push the fwd/rev lever towards the left side of the drill. For
reverse rotation push fwd/rev lever to the right.
1 To start drilling squeeze the variable
speed trigger.
2 To stop drilling release the trigger.
Note: The more the variable speed trigger is depressed, the faster the drill bit will
rotate.
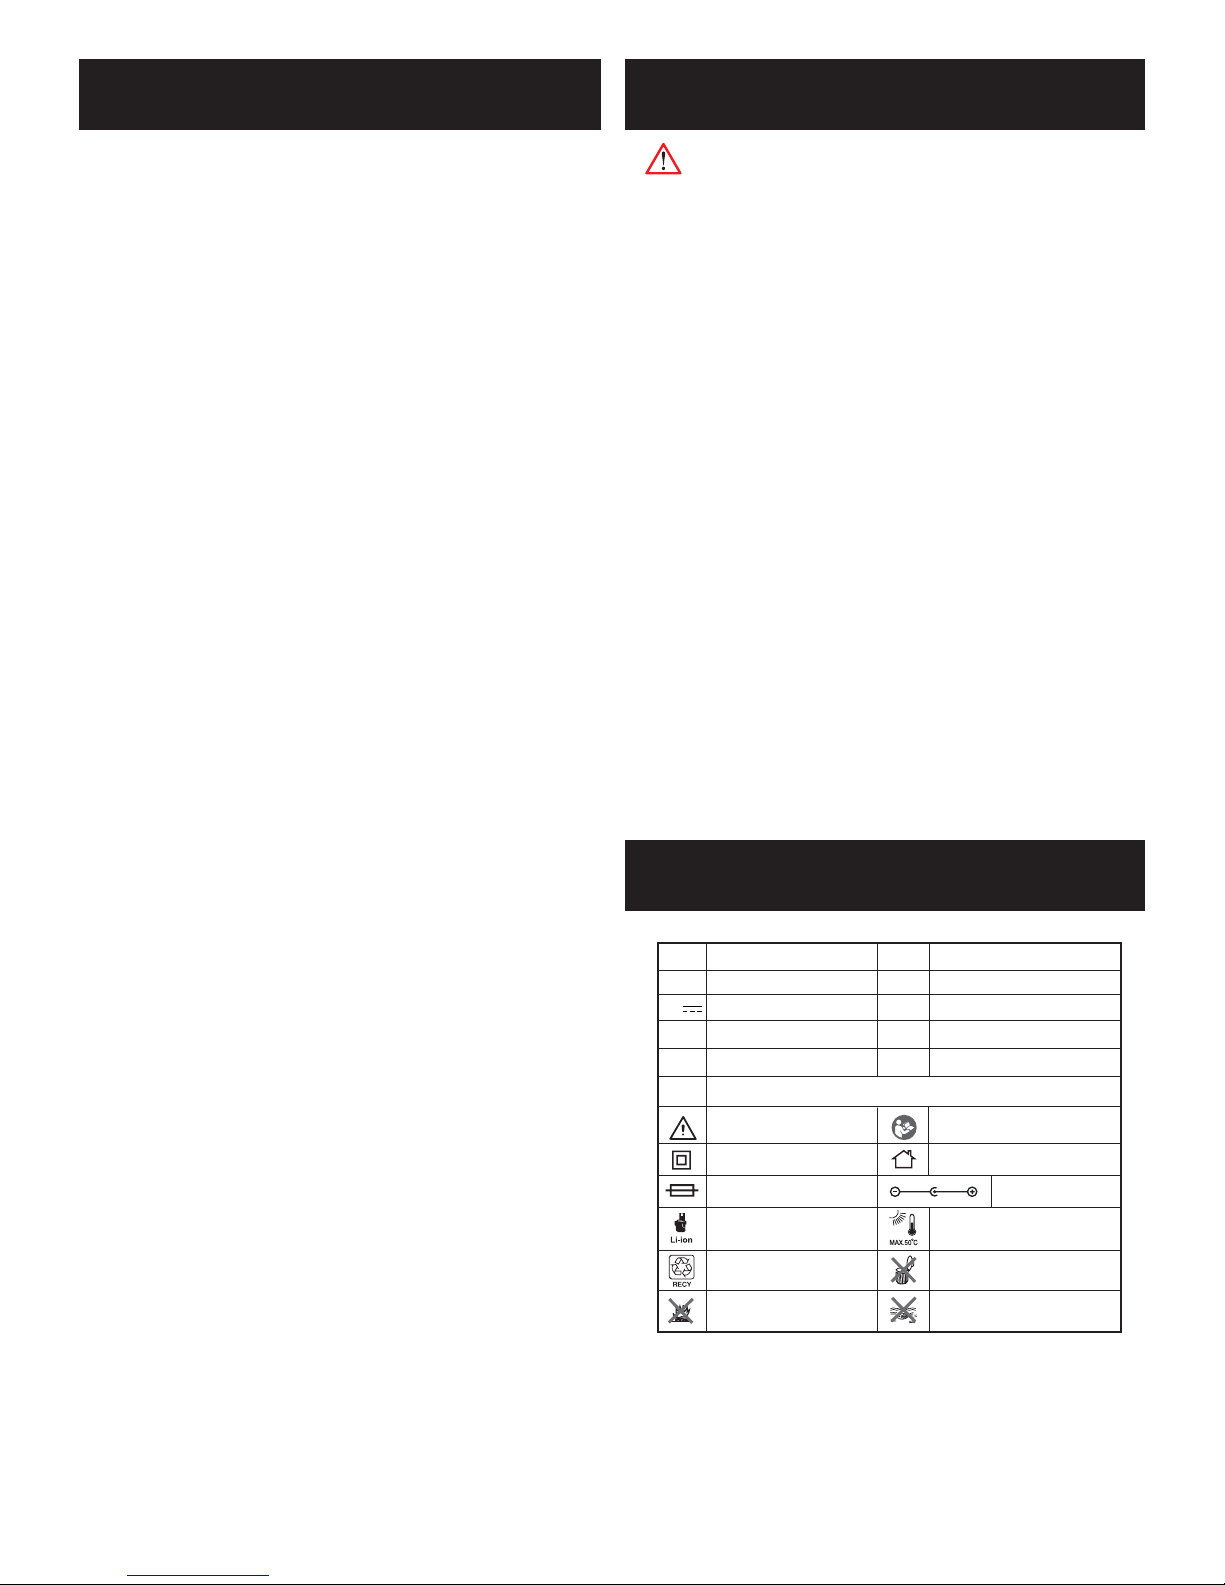
Adjusting Torque
1 Rotate the torque collar to the desired setting.
Note: Selecting a higher torque setting will allow the drill to use more torque to drive
the screw in or out. To prevent damaging the screw head, it is recommended to
start at a low torque setting and increase when necessary.
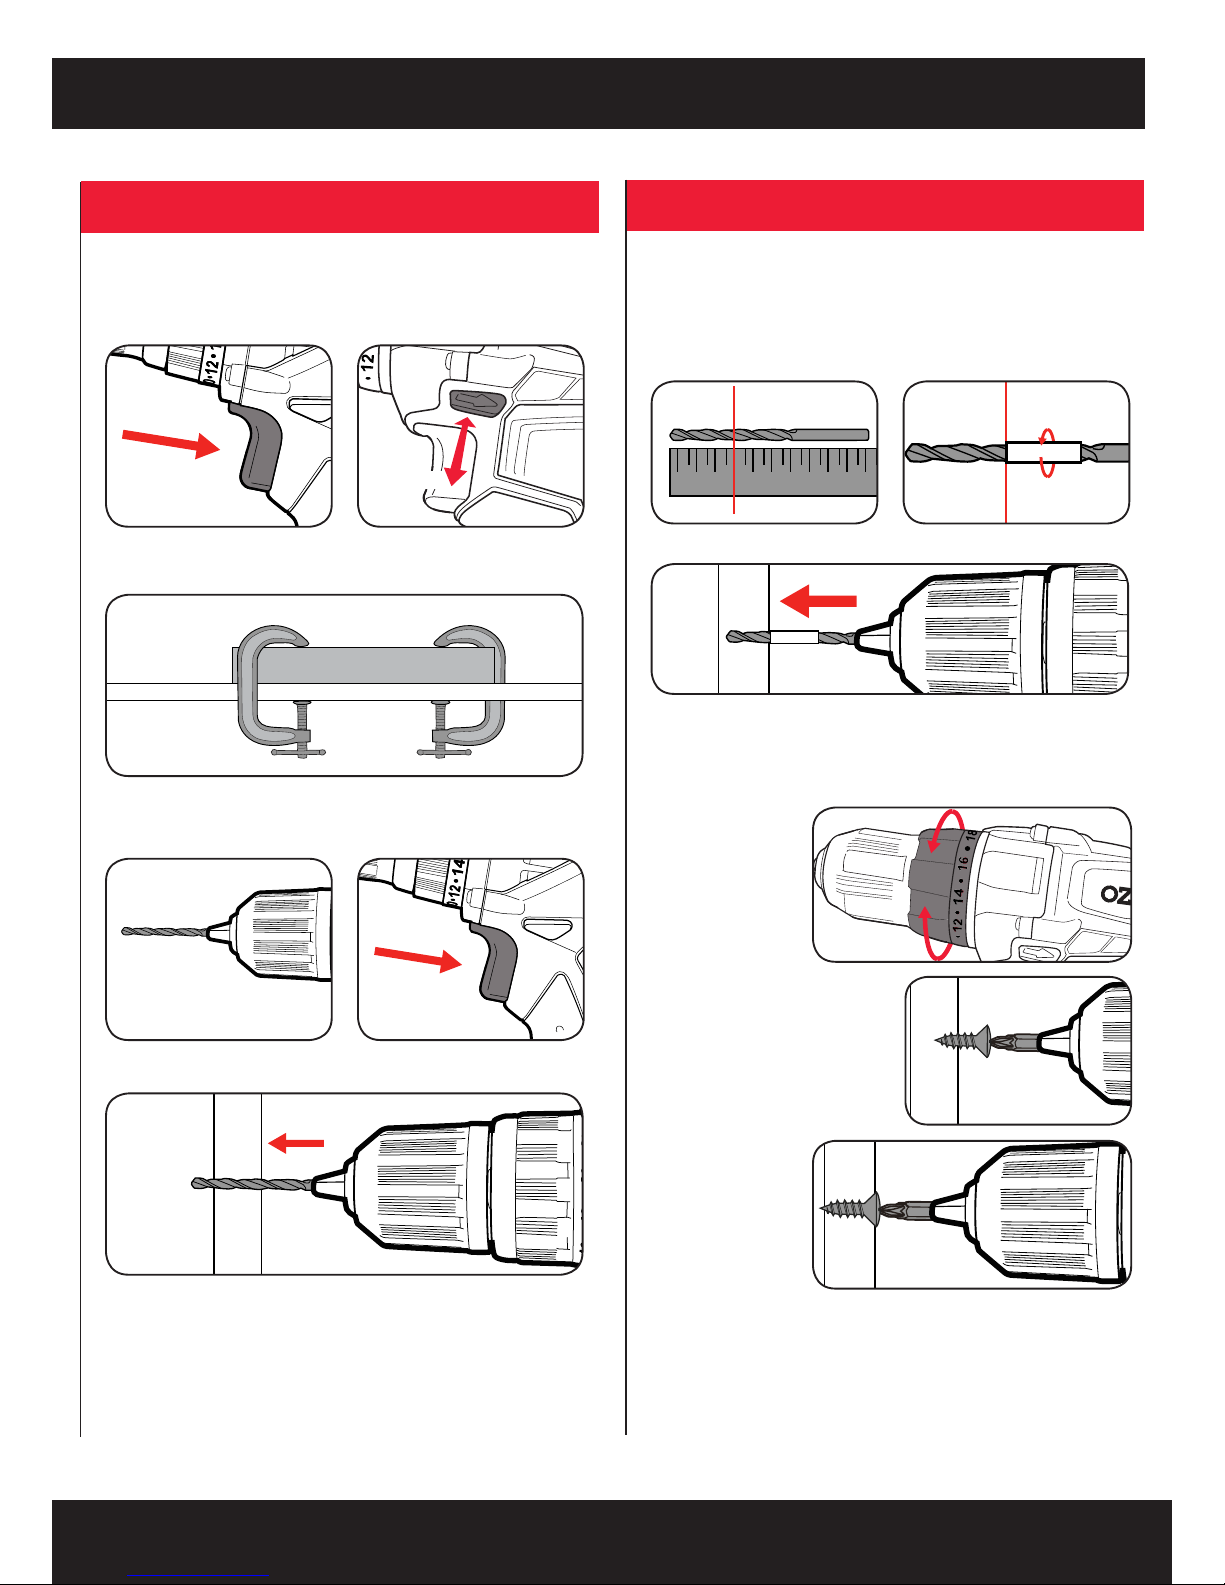
Installing a Drill Bit
Removing a Drill Bit
1 Open the chuck by rotating the
chuck collar and remove the
frill bit.
2 Insert the drill bit,
making sure it
is centred in the
chuck.
4 Pull on the bit to
ensure it is rmly
secured.
CAUTION: TO REDUCE THE RISK OF INJURY WE
RECOMMEND THE USE OF GLOVES WHEN HANDLING
DRILL BITS.
1 Rotate the chuck collar anti-
clockwise to open the chuck
3 Tighten the chuck by turning
clockwise.
WARNING! Ensure the tool is turned off & disconnected from the power
supply before performing any of the following operations.
PXDDK-301U
5. DRILLING
6.
HELPFUL TIPS
FWD
REV
Before starting to drill, perform a few simple checks.
3 Secure the material to be drilled in a vice or clamp to stop it turning whilst
drilling.
1 Depress and release the variable
speed trigger to ensure it is not
locked on.
4 Hold the drill rmly and place the
bit at the point to be drilled.
2 Check the forward/reverse lever
is on desired setting.
5 Depress the variable speed
trigger to start the drill.
6 Move the drill bit into the workpiece.
Note: Do not force the drill or apply side pressure to elongate the hole. Let
the drill do all the work.
3 Drill into the material until the surface reaches the start of the tape..
1 Measure along the drill bit to indicate
the desired depth
2 Wrap a small piece of masking tape
tightly around the drill bit.
Torque Settings
Drilling to a Preset Depth
Torque settings can alter the depth to which you can drill or drive into a surface. To
determine the torque setting required to drive a screw perfectly ush to the work
surface, follow the below steps.
A simple way of achieving a hole at a desired depth is to use masking tape.
When drilling hard, smooth surfaces, use a centre punch to mark the desired hole
location. This measure will prevent the drill bit from slipping off centre as you start the
hole.
When drilling metals, use light oil on the drill bit to keep it from overheating. The oil
will prolong the life of the bit and increase drilling action.
2 If the clutch rachets and makes
a clicking sound before screw is
ush, increase the collar setting and
continue tightening.
1 Set the torque collar
to lowest setting and
tighten the rst screw.
3 Repeat until you reach
the correct setting/
screw depth. Use
this setting for the
remaining screws.

MAINTENANCE
TROUBLESHOOTING
Battery protection system
The tool is equipped with the battery protection system, which helps to ensure a long service
life.
The output power automatically cuts off during operation when the tool and/or battery are
placed under the following situations:
• When the tool is overloaded:
If this occurs, release the trigger switch and remove causes of overload, then pull the
switch trigger again to restart.
• When the remaining battery capacity becomes low:
Recharge the battery pack.
Note: The battery protection system does not in any way damage the tool.
Note: The indicated capacity may be lower than the actual level during use or immediately
after using the tool.
LED lights do not illuminate on charger
Check the charging adaptor is securely plugged into the wall outlet.
Check the battery is rmly connected to the charging cradle.
Check that the charging jack is securely connected to the charging cradle.
Variable speed trigger is locked
Ensure that the forward / reverse lever is in the correct position; pressed left for forwards
direction, pressed right for backwards direction. If it is in between the two settings the
variable speed trigger will be locked.
The drill is stripping the screw head
Ensure you are starting with a low torque setting and holding the drill securely onto the
screw head. Increase the torque setting as required.
Drill has cut out during use
The battery charge could be completely depleted. Place the battery on the charging cradle
for 3-5 hours.
Sparking visible through the housing air vents
A small amount of sparking may be visible through the housing vents. This is normal and
does not indicate a problem.
1. When not in use, the drill should be stored in a dry, frost free location, keep
out of children’s reach.
2. Keep ventilation slots of the drill clean at all times and prevent anything from
entering.
3. If the housing of the drill requires cleaning, do not use solvents. Use of a cloth
only is recommended.
4. Blow out the ventilation slots with compressed air periodically .
Note: Ozito Industries will not be responsible for any damage or injuries caused by
repair of the drill by an unauthorised person or by mishandling.
BATTERY AND CHARGER SAFETY WARNINGS
THIS MANUAL CONTAINS IMPORTANT SAFETY AND OPERATING INSTRUCTIONS FOR YOUR BATTERY CHARGER.
1. Before using the charger read all instructions and cautionary markings on the charger, battery pack and the product
using the battery pack.
2. This charger is not intended for any uses other than charging rechargeable batteries. Any other use may result in risk of
re, electric shock or electrocution.
3. Do not place any object on top of the charger or place the charger on a soft surface that may result in excessive internal
heat. Place the charger in a position away from any heat source.
4. To reduce risk of damage to the electric plug and cord, pull by the plug rather than the cord when disconnecting the
charger.
5. Make sure the cord is located so that it will not be stepped on, tripped over, or otherwise subjected to damage or stress.
6. An extension cord should not be used unless absolutely necessary. Use of an improper extension cord could result in the risk
of re, electric shock or electrocution.
7. Do not operate the charger if it has received a sharp blow, been dropped or otherwise damaged in any way. Have it
checked by an electrician or power tool repairer.
8. Do not disassemble charger. Take it to an electrician or power tool repairer when service or repair is required. Incorrect
reassembly may result in a risk of electric shock, electrocution or re.
9. To reduce risk of electric shock, unplug the charger from the outlet before attempting any cleaning. Removing the
battery pack will not reduce this risk.
10. Never attempt to connect 2 chargers together.
11. DO NOT store or use the tool and battery pack in locations where the temperature may reach o r exceed 40ºC (s uch as i nside
sheds or metal buildings in summer).
12. The charger is designed to operate on standard household electrical power (240 volts). Do not attempt to use it on any
other voltage!
13. The battery pack is not fully charged out of the carton. First read the safety instructions and then follow the charging
notes and procedures.
14. The longest life and best performance can be obtained if the battery pack is charged when the air temperature is
between 18 - 24ºC. Do not charge the battery pack in an air temperature below 10ºC or above 40ºC. This is important
and will prevent damage to the battery pack.
15. Do not incinerate the battery pack even if it is seriously damaged or is completely worn out . The battery can explode i n a
re.
16. Never attempt to open the battery pack for any reason. If the plastic housing of the battery pac k breaks or cracks, i mmediately
discontinue use and do not recharge.
17. During charging, the battery must be placed in a well ventilated area.
DESCRIPTION OF SYMBOLS
SPARE PARTS
Spare parts can be ordered from the Special Orders Desk at your local
Bunnings Warehouse or Homebase store.
For further information, or any parts visit
www.ozito-diy.co.uk or contact Ozito Customer Service:
Great Britain: 0151 294 4488
Ireland: 1850 882711
E-mail: enquires@ozito-diy.co.uk
Warning
Read instruction manual
ø Diameter
mA Milliamperes
Recycle battery Do not put in the rubbish
Polarity
Do not incinerate Do not get battery wet
Thermal cut-out protection
Double insulated
/min Revolutions or reciprocation per minute
Ah Amp hour
Indoor use only
Lithium Ion battery
Do not use or store battery in
temperatures exceeding 50ºC
Nm Newton Meters no No load speed
V Volts Hz Hertz
ac/~ Alternating current W Watts
Direct current
dc/
 Loading...