

Ozito PXCHTS-018 Instruction Manual

CORDLESS
HEDGE TRIMMER
18V Lithium Ion
INSTRUCTION MANUAL
SPECIFICATIONS
Voltage: 18V
Cutting Speed: 2,200 SPM
Max. Cutting Capacity: 11mm
Blade Length: 460mm
Weight: 2.10kg
PXCHTS-018
WHAT’S IN THE BOX
Hedge Trimmer
Blade Cover
ozito.com.au
Battery & Charger
sold separately
ONLINE MANUAL
Scan this QR Code with your
mobile device to take you to
the online manual.
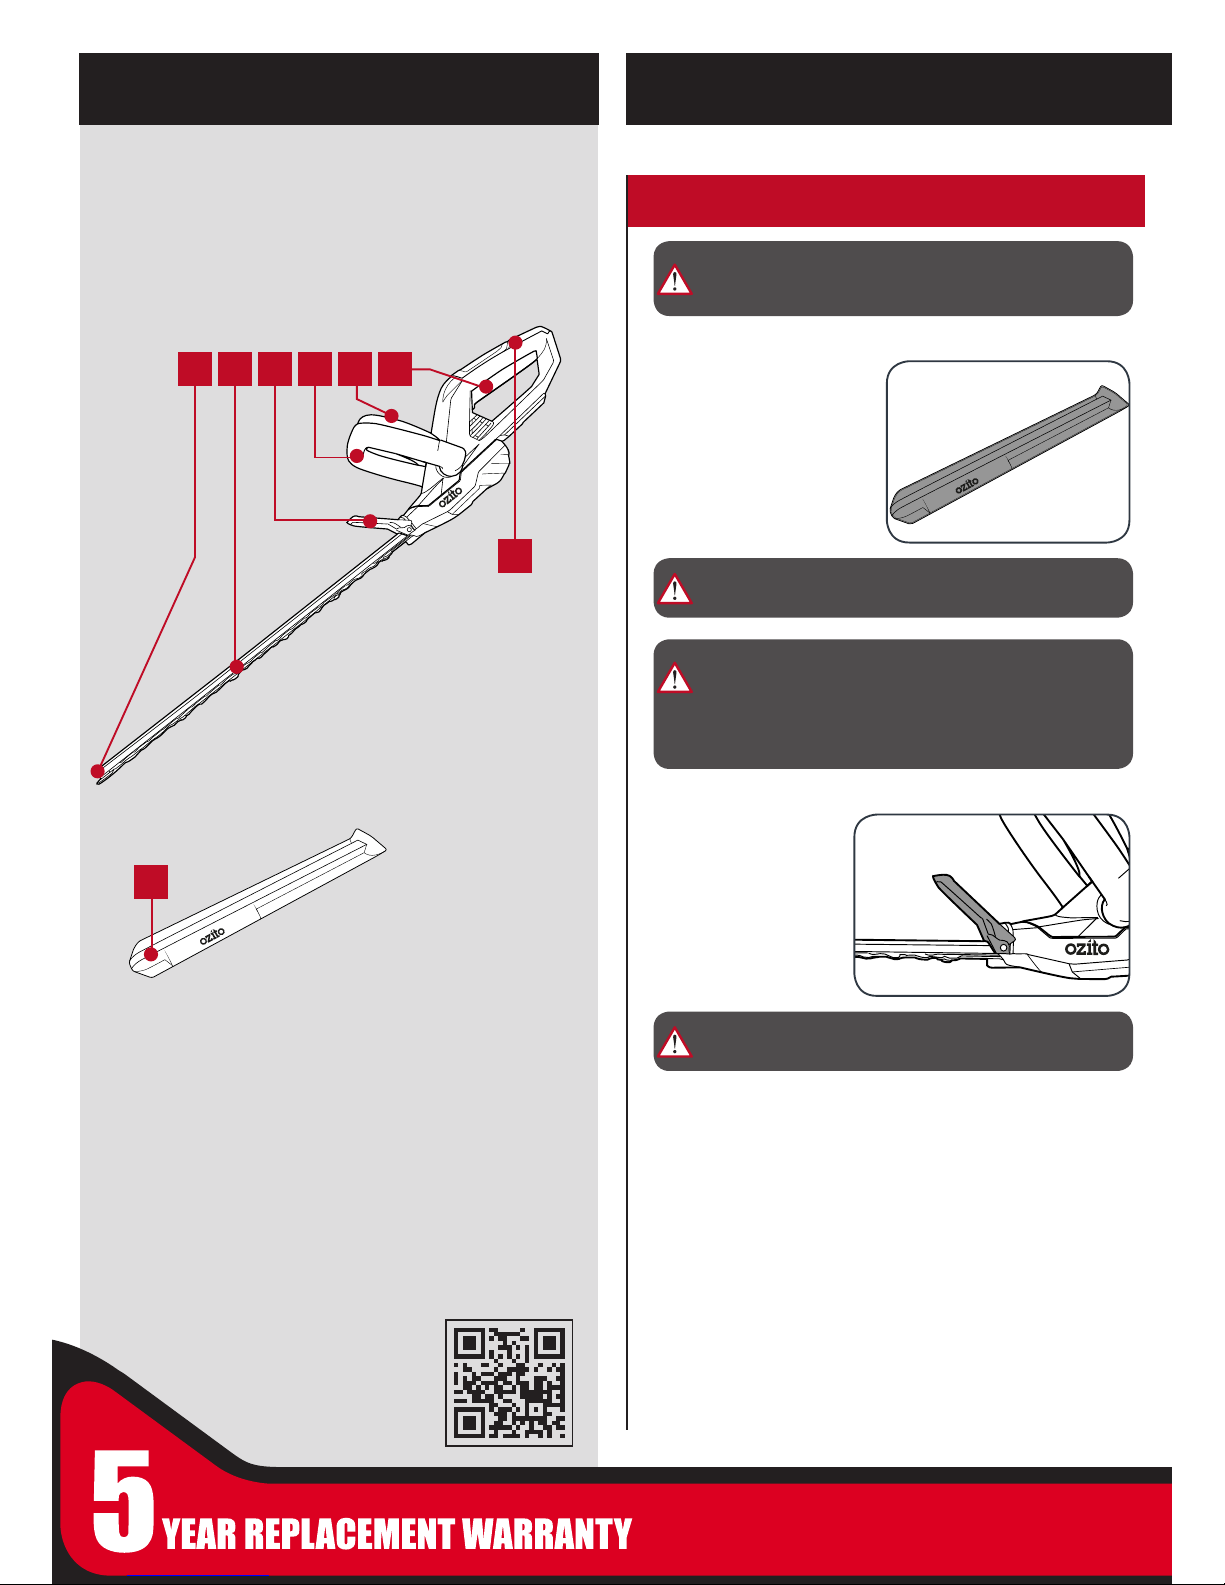
KNOW YOUR PRODUCT
1. ASSEMBLY
SETUP & PREPARATION
The blade cover protects
the blade when not in use.
Simply slide it off the blade
before use. Once nished
operating, place the cover
back over the blade.
Ensure the safety
guard is tted securely
onto the hedge trimmer
before use. Tighten the
screws on either side if
necessary.
Blade Cover
Safety Guard
WARNING! ENSURE THE TOOL IS SWITCHED OFF AND
BATTERY DISCONNECTED BEFORE PERFORMING ANY
OF THE FOLLOWING TASKS.
WARNING! NEVER USE THE HEDGE TRIMMING UNLESS
THE SAFETY GUARD IS FITTED.
WARNING! NEVER START THE HEDGE TRIMMER WHILE
THE BLADE COVER IS FITTED.
ACCESSORIES
1 2 3 4 5 6
7
8
1 Impact Guard
2 Blade
3 Safety Guard
4 Front Handle
5 Safety Switch
6 On/Off Trigger
7 Rear Handle
CORDLESS HEDGE TRIMMER
BATTERY & CHARGER (sold separately)
Compatible chargers
Eco charger PXCSCH-120
“ “ PXCG-120
Fast charger PXCFCH-030
“ “ PXCG-030
Compatible battery packs
1.5Ah PXCBAT-015
“ PXBP-150
3.0Ah PXCBAT-030
“ PXBP-300
5.2Ah PXCBAT-052
“ PXBP-520
8 Blade Cover
WARNING! WHEN HANDLING THE BLADE ASSEMBLY,
WEAR NON-SLIP, HEAVY-DUTY PROTECTIVE GLOVES. DO
NOT PLACE YOUR HAND OR FINGERS BETWEEN BLADES
OR IN ANY POSITION WHERE THEY COULD GET PINCHED
OR CUT. NEVER TOUCH BLADES OR SERVICE THE UNIT
WITH THE BATTERY PACK INSTALLED.

2. BATTERY & CHARGING (sold separately)
Charger LED Indicator
LED Indicator Situation
GREEN (Flashing) Stand By (no battery pack is inserted)
RED (Flashing) Battery is charging (low charge)
RED (Illuminated) Battery is charging (mid charge)
GREEN (Illuminated) Battery is fully charged
BOTH(Illuminated) Battery pack is too hot or too cold (charging
will begin automatically when battery reaches
correct charging temperature).
BOTH (Flashing) Defective battery. Never charge a defective
battery pack!
Remove battery pack from charger.
CAUTION: THE CHARGER FOR THIS PRODUCT SHOULD
BE PROTECTED BY A RESIDUAL CURRENT DEVICE
(RATED AT 30MA OR LESS).
The purchased battery will be shipped in a low charge condition, and
requires charging prior to use. Allow several cycles of charging and
discharging (through use of the tool) for the battery to reach its optimum
performance / runtime.
1 Connect the charger into a mains power outlet.
4 The charger LED will
illuminate red signifying that
the battery is charging.
3 With the charger sitting on a
at surface, align the raised
ribs on the battery with
the recess in the charger
and slide onto the charger
ensuring a rm connection.
2 The charger LED will ash
green showing power
is being supplied to the
charger.
5 The charger LED will
illuminate green once the
battery is fully charged.
Charging your lithium ion battery - Fast Charger
Battery Charge Indicator
The purchased battery is equipped
with a battery charge indicator to
show the state of the battery charge.
Press the charge indicator button and
look to see which LED lights.
Battery requires
immediate charging
Low state of charge, requires charging soon.
Mid state of charge
Full state of charge.
Note: The battery needs to be removed from the tool to check the state
of charge.
1 Connect the charger into a mains power outlet.
4 The charger LED will illuminate red signifying that the battery
is charging.
3 With the battery sitting on a at
surface, align the raised ribs
on the battery with the recess
in the charger and slide onto
the battery ensuring a rm
connection.
2 The charger LED will ash
green showing power
is being supplied to the
charger.
5 When removing the charger
from the battery, rst press the
battery release tab, then slide
the charger from its position.
Charging your lithium ion battery - Eco Charger
Charger LED Indicator
LED Indicator Situation
GREEN (Flashing) Stand By (no battery pack is inserted)
RED (Illuminated) Battery is charging (low charge)
GREEN (Illuminated) Battery is fully charged
RED (Flashing) Battery or Charger fault
RED & GREEN
(Flashing)
Battery pack is too hot or too cold (remove
battery from charger and store at room
temperature 20ºC. Insert battery again when
at correct charging temperature). If this
happens again, the battery is defective and
needs to be replaced.
 Loading...