

Ozito MCT-4000 Instruction Manual

COMPRESSOR
AND INFLATOR
WITH TORCH
12V
INSTRUCTION MANUAL
SPECIFICATIONS
Voltage: 12V
Max Current: 10Amp
Max Pressure: 150psi (10.3bar)
Max Flow Rate: 16l/min
Weight: 1.21kg
MCT-4000
WHAT’S IN THE BOX
IN ORDER TO MAKE A CLAIM UNDER THIS
WARRANTY YOU MUST RETURN THE PRODUCT
TO YOUR NEAREST BUNNINGS WAREHOUSE WITH
YOUR BUNNINGS REGISTER RECEIPT. PRIOR TO
RETURNING YOUR PRODUCT FOR WARRANTY
PLEASE TELEPHONE OUR CUSTOMER SERVICE
HELPLINE:
Australia 1800 069 486
New Zealand 0508 069 486
3 YEAR REPLACEMENT WARRANTY
Your product is guaranteed for a period of 36 months from
the original date of purchase. If a product is defective it will
be replaced in accordance with the terms of this warranty.
Warranty excludes consumable parts, for example: valve adaptors
and accessories.
WARNING
The following actions will result in the warranty being void.
• If the tool has been operated on a supply voltage other
than that specified on the tool.
• If the tool shows signs of damage or defects caused
by or resulting from abuse, accidents or alterations.
• Failure to perform maintenance as set out within the
instruction manual.
• If the tool is disassembled or tampered with in any way.
• Professional, industrial or high frequency use.
WARRANTY
TO ENSURE A SPEEDY RESPONSE PLEASE
HAVE THE MODEL NUMBER AND DATE OF
PURCHASE AVAILABLE. A CUSTOMER SERVICE
REPRESENTATIVE WILL TAKE YOUR CALL
AND ANSWER ANY QUESTIONS YOU MAY
HAVE RELATING TO THE WARRANTY POLICY
OR PROCEDURE.
OZITO Australia/New Zealand (Head Office) 1-23 Letcon Drive, Bangholme, Victoria, Australia 3175.
The benefits provided under this warranty are in addition
to other rights and remedies which are available to you at law.
Our goods come with guarantees that cannot be excluded
at law. You are entitled to a replacement or refund for a major
failure and for compensation for any other reasonably foreseeable
loss or damage. You are also entitled to have the goods repaired
or replaced if the goods fail to be of acceptable quality and the
failure does not amount to a major failure.
Generally you will be responsible for all costs associated with
a claim under this warranty, however, where you have suffered
any additional direct loss as a result of a defective product you
may be able to claim such expenses by contacting our customer
service helpline above.
ozito.com.au
0814
Compressor / Inator
Adaptors x 5
ONLINE MANUAL
Scan this QR Code with your
mobile device to take you to
the online manual.
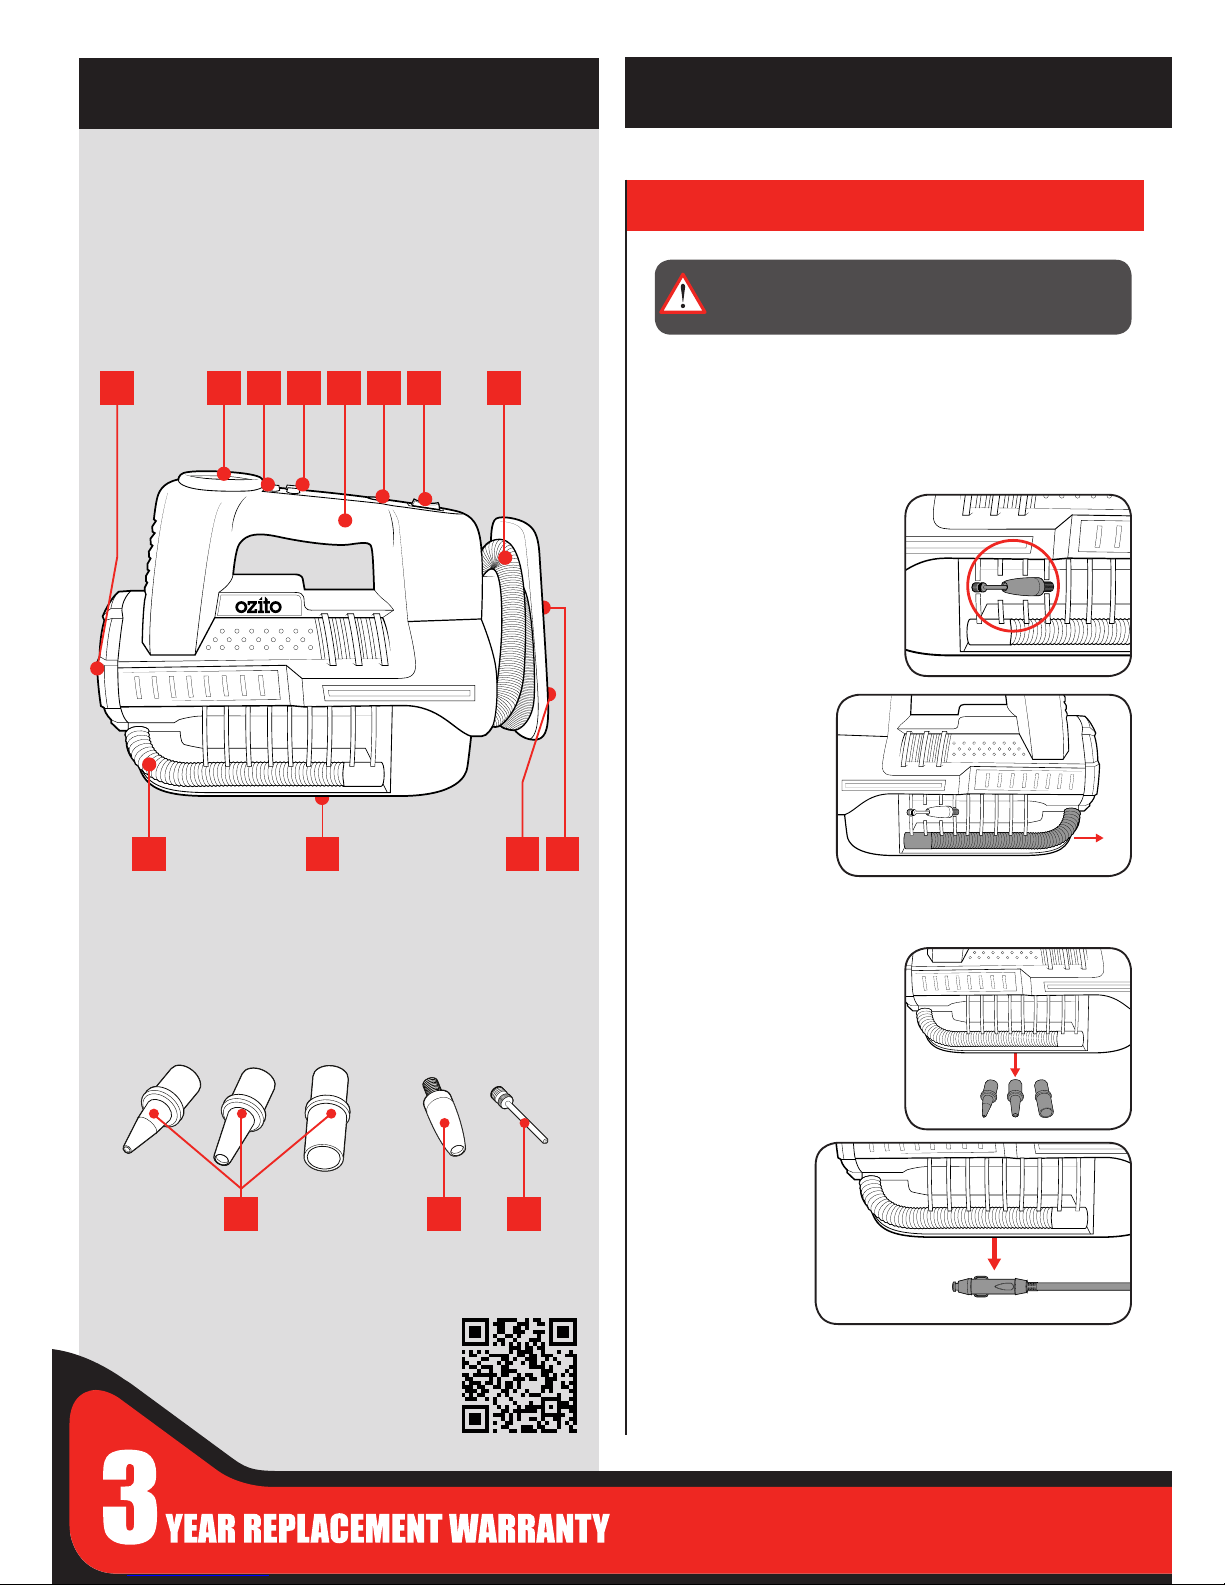
1 LED Torch
2 Digital Display
3 Pressure Units Button
4 Preset Pressure Buttons
5 Carry Handle
6 Light Button
7 On/Off Switch
8 High Pressure Air Hose
9 High Volume Air Hose
10 12V Adaptor
11 High Volume Air Outlet
12 High Volume Air Inlet
2 IN 1 AIR COMPRESSOR / INFLATOR
ACCESSORIES
KNOW YOUR PRODUCT
1. ADAPTORS & AIR HOSES
SETUP & PREPARATION
13 High Volume Adaptors
14 General Purpose Adaptor
15 Ball Adaptor
Removing Adaptors
Side Compartment
Base Compartment
1 The general purpose adaptor
and ball adaptor are stored in
the side compartment.
1 The 3 high volume adaptors
are stores in the compartment
in the base.
2 The 12V socket is
also stored in the
compartment in the
base.
2 The high volume air
hose is also stored
on the side of the
tool and can be
removed be sliding
out.
The compressor unit has 5 adaptors to suit a range of ination
applications. All the adaptors are secured in either the compartment on
the side or base of the tool.
WARNING: ENSURE THE TOOL IS SWITCHED OFF AND
DISCONNECTED FROM THE POWER SUPPLY BEFORE
PERFORMING ANY OF THE FOLLOWING STEPS.
1 2 3 4 65 7 8
9 10 11 12
13 14 15
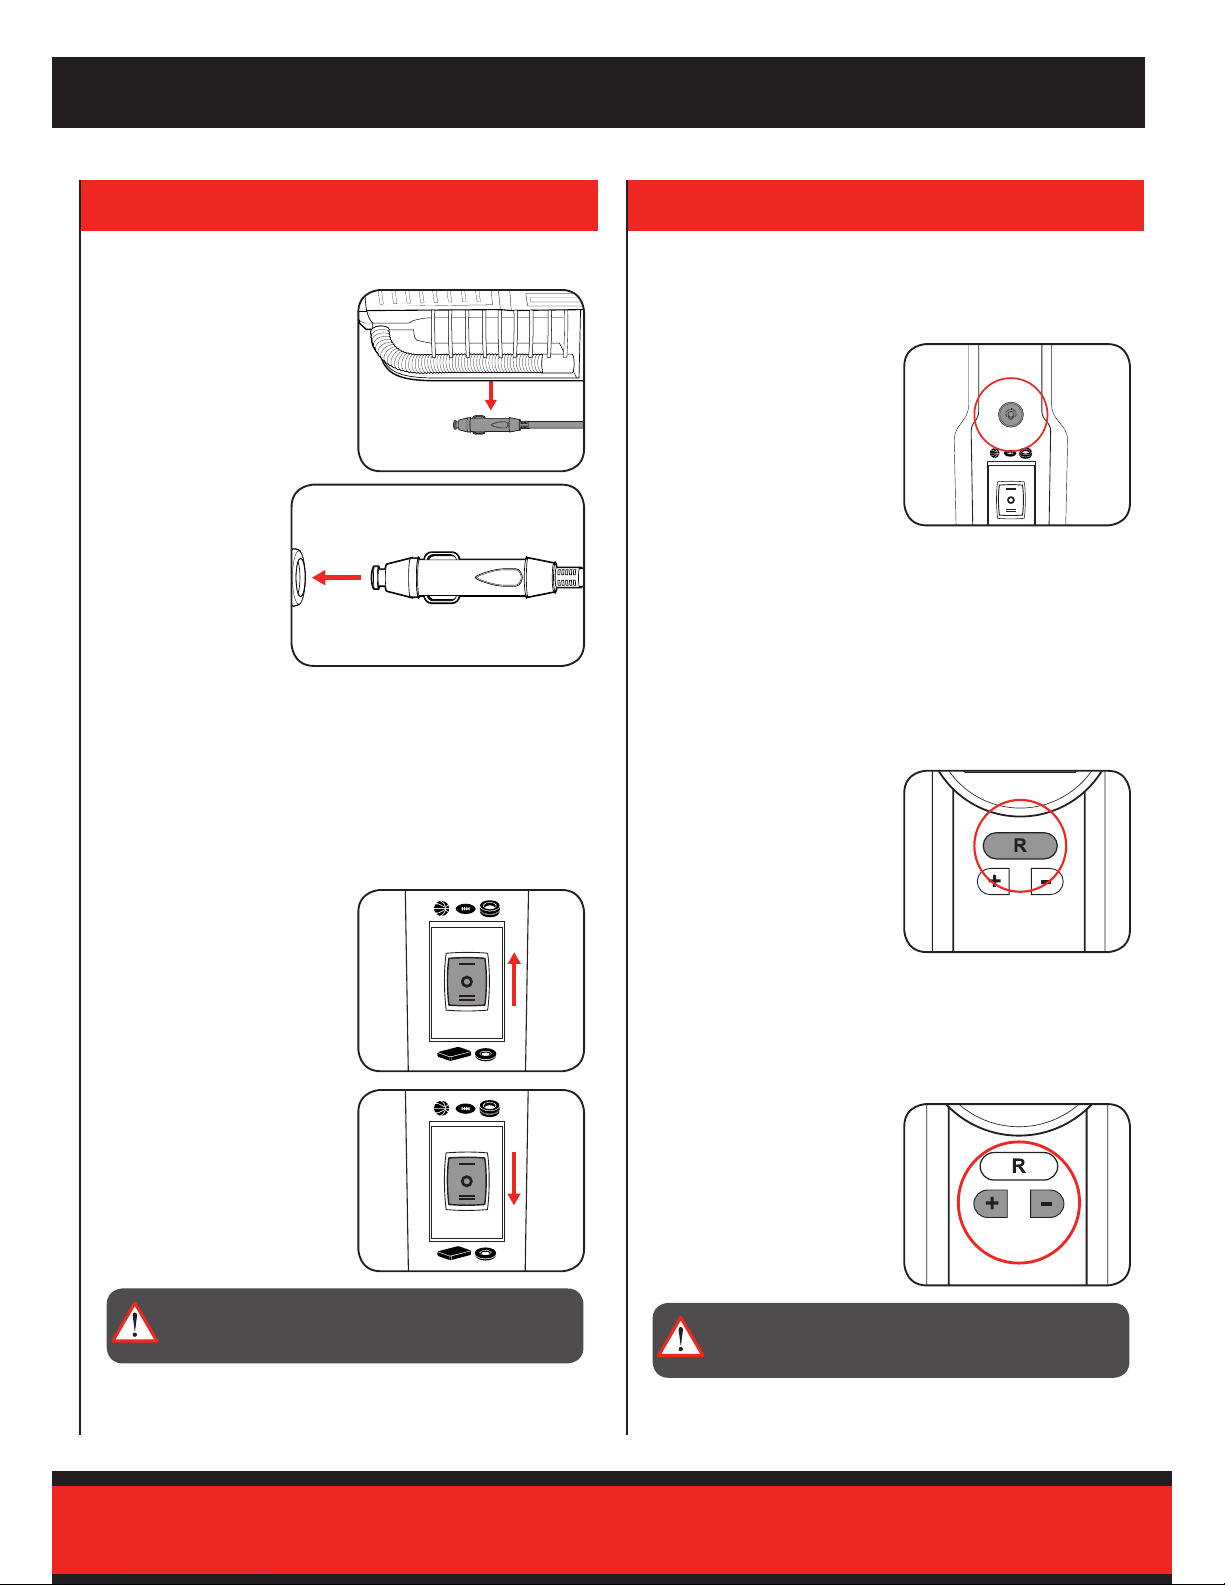
3. CONTROLS
Torch Light
Digital Display (PSI / BAR / KPa)
Preset Pressure
1 To turn the LED light on, press
the light button in.
1 To switch between the 3
pressure units, press the
pressure units button.
1 Press the increase button to
increase the preset pressure.
2 Press the decrease button to
decrease the preset pressure.
2 To turn the LED light off, press
the light button again.
Note: The compressor must be connected to the power for the LED
torch to work.
The compressor has a built-in LED torch light for ease of use at night or
in dark areas.
The digital pressure reading can be switched between PSI, BAR and
KPa to match the requirements on the item being inated.
While a high pressure item is inating, the current air pressure will be
displayed on the digital display.
A desired pressure can be preset and the compressor will automatically
shut-off once the pressure is obtained. The preset pressure must be set
before starting the tool.
2. SWITCHING ON & OFF
Connecting to a 12V outlet
Switching On and Off
1 Roll out the 12V socket from
the base of the unit.
1 To operate in high pressure
mode, press the on/off switch
forward into mode “I”.
The 2 in 1 Air compressor Inator features 2 operating modes which are
high pressure inating or high volume inating.
High Pressure Mode allows you to inate items that require high
pressures such as sporting equipment or car and bike tyres.
High Volume Mode allows fast ination for large volume items such as
an air bed or pool toys.
2 Connect the 12V
socket to a 12V DC
outlet which can be
found in your vehicle.
Note: Check car outlet
for sufcient power of up
to 120W.
2 To operate in high volume
mode, press the on/off switch
backward into mode “II”.
WARNING: COMPRESSED AIR CAN BE DANGEROUS.
NEVER POINT THE OUTLET NOZZLE TOWARDS ANY
PART OF YOUR BODY OR ANOTHER PERSON.
WARNING: AVOID INFLATING THE OBJECTS ABOVE
THE RECOMMENDED INFLATION PRESSURE. THIS MAY
LEAD TO DAMAGE AND/OR INJURIES.
 Loading...