

Ozito ACP-2420 Instruction Manual
OILED AIR
COMPRESSOR
24L 2.0HP
INSTRUCTION MANUAL
SPECIFICATIONS
Power supply: 220–240V ~ 50Hz
Motor: 1500W (S2 15min), 2.0HP
Tank Capacity: 24L
No Load Speed: 2,850/min
Max. Pressure: 8bar (116psi)
Max. Flow Rate: 165L/min
Free Air Delivery: 54.4L/min
IP Rating: IP20
Weight: 22kg
ozito.com.au
STANDARD EQUIPMENT
100
150
50
200
0
225
100
150
50
200
0
225
Air Compressor
WARRANTY
IN ORDER TO MAKE A CLAIM UNDER THIS
WARRANTY YOU MUST RETURN THE PRODUCT
TO YOUR NEAREST BUNNINGS WAREHOUSE WITH
YOUR BUNNINGS REGISTER RECEIPT. PRIOR TO
RETURNING YOUR PRODUCT FOR WARRANTY
PLEASE TELEPHONE OUR CUSTOMER SERVICE
HELPLINE:
Australia 1800 069 486
New Zealand 0508 069 486
TO ENSURE A SPEEDY RESPONSE PLEASE
HAVE THE MODEL NUMBER AND DATE OF
PURCHASE AVAILABLE. A CUSTOMER SERVICE
REPRESENTATIVE WILL TAKE YOUR CALL
AND ANSWER ANY QUESTIONS YOU MAY
HAVE RELATING TO THE WARRANTY POLICY
OR PROCEDURE.
ACP-2420
The benefits provided under this warranty are in addition
to other rights and remedies which are available to you at law.
Our goods come with guarantees that cannot be excluded
at law. You are entitled to a replacement or refund for a major
failure and for compensation for any other reasonably foreseeable
loss or damage. You are also entitled to have the goods repaired
or replaced if the goods fail to be of acceptable quality and the
failure does not amount to a major failure.
Generally you will be responsible for all costs associated with
a claim under this warranty, however, where you have suffered
any additional direct loss as a result of a defective product you
may be able to claim such expenses by contacting our customer
service helpline above.
3 YEAR REPLACEMENT WARRANTY
Your product is guaranteed for a period of 36 months from
the original date of purchase. If a product is defective it will
be replaced in accordance with the terms of this warranty.
Warranty excludes consumable parts, for example: valve adapters
and accessories.
WARNING
The following actions will result in the warranty being void.
• If the tool has been operated on a supply voltage other
than that specified on the tool.
• If the tool shows signs of damage or defects caused
by or resulting from abuse, accidents or alterations.
• Failure to perform maintenance as set out within the
instruction manual.
• If the tool is disassembled or tampered with in any way.
• Professional, industrial or high frequency use.
OZITO
Australia/New Zealand (Head Office) 1-23 Letcon Drive, Bangholme, Victoria, Australia 3175.
1118
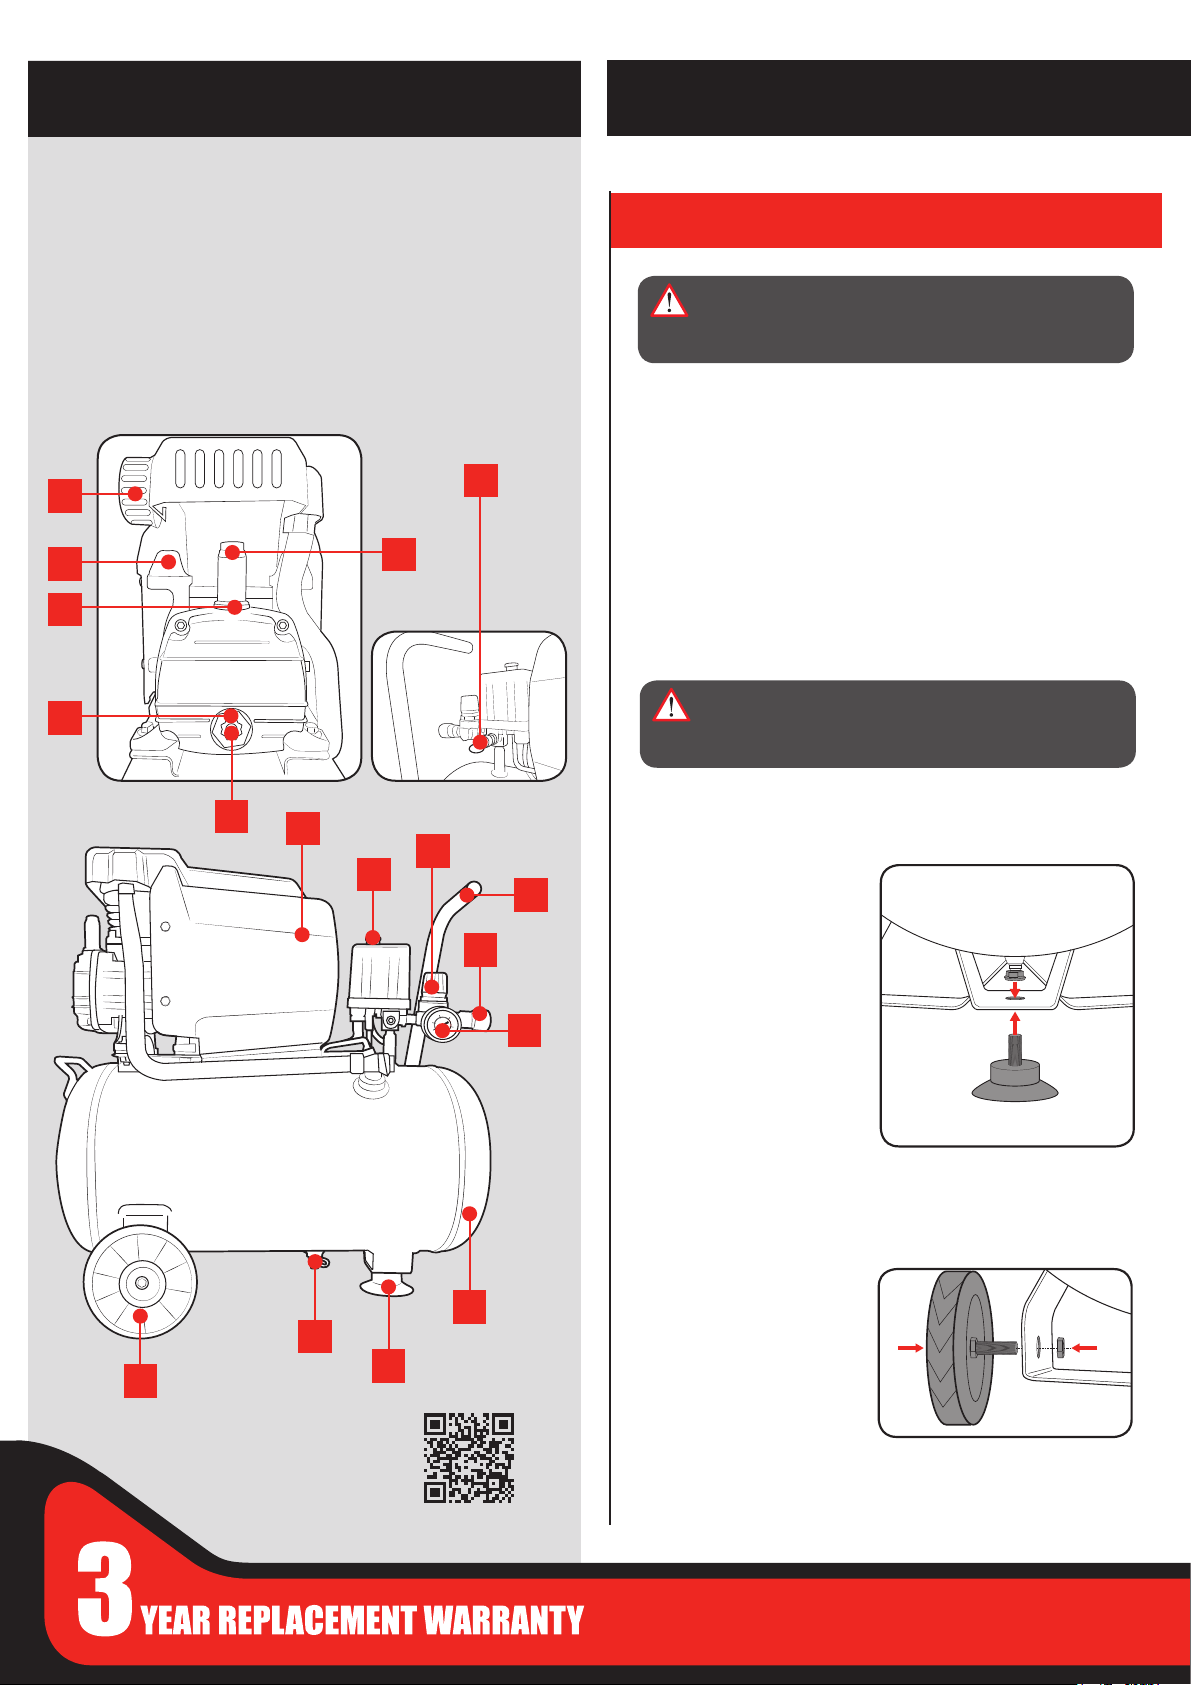
KNOW YOUR PRODUCT
AIR COMPRESSOR
1. Safety Relief Valve
2. Oil Sealing Plug
3. Intake Air Filter
4. Overload Reset Switch
5. Oil Filler Opening
6. Oil Drainage Screw
7. Oil Level Window
8. Motor Housing
9. On/O Button
3
4
5
10. Pressure Regulator
11. Transport Handle
12. Regulated Pressure Outlet
13. Regulated Pressure Gauge
14. Pressure Tank
15. Support Foot
16. Drain Valve
17. Wheels
2
SETUP & PREPARATION
1. ASSEMBLY
WARNING! ENSURE THE TOOL IS TURNED OFF
AND DISCONNECTED FROM THE POWER SUPPLY
BEFORE PERFORMING ANY OF THE FOLLOWING
OPERATIONS.
Pre-Setup Checks
• Examine the machine for signs of transit damage. If damaged, do
not use, return to place of purchase
1
• The compressor should be set up near to the user.
• Avoid long air lines and long supply lines (extensions).
• Make sure the intake air is dry and dust-free.
• Do not set up the compressor in damp or wet rooms. The
compressor is designed to be used in dry rooms. It is prohibited
to use the compressor in areas where work is conducted with
sprayed water.
• Before you use the machine, make sure that the mains voltage
complies with the specications on the rating plate.
WARNING! ALWAYS KEEP THE COMPRESSOR
6
7
8
10
9
11
12
100
150
50
200
0
225
13
UPRIGHT. TIPPING THE COMPRESSOR ON ITS SIDE
MAY CAUSE THE OIL IN THE MOTOR TO LEAK OUT
AND DAMAGE THE UNIT.
Attaching The Support
Foot
1. Insert the support foot bolt
through the hole in the frame
for the support foot and
secure it in place with a Nyloc
nut.
Attaching The Wheels
1. Place the bolt on a wheel
assembly through the hole in
the wheel bracket and fasten
it in position with a Nyloc nut.
17
14
16
15
ONLINE MANUAL
Scan this QR Code with
your mobile device to take
you to the online manual.
2. Repeat step 1 to t the second wheel on the opposite side of the
tank.
OPERATION
Max.
Min.
0
50
100
150
200
225
ON
OFF
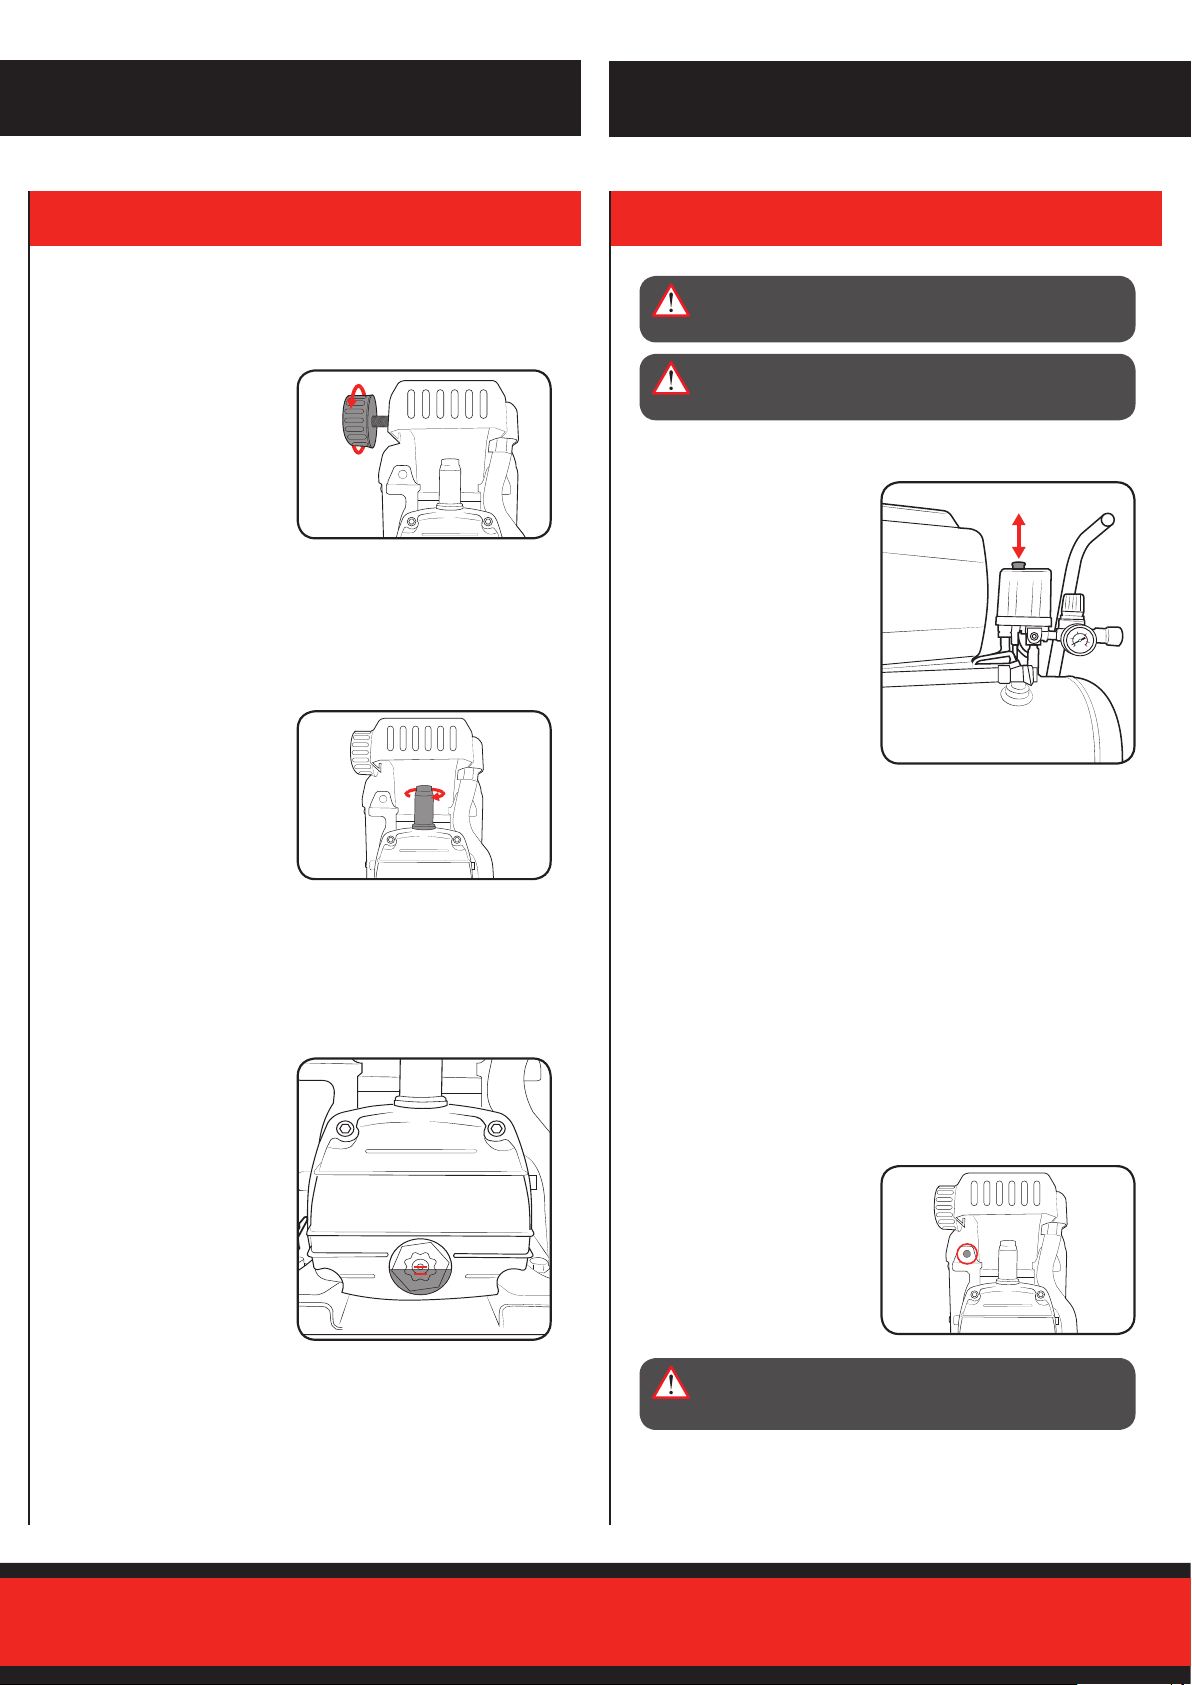
2. CONTROLS
Fitting The Air Filter
1. Remove the transportation cover from the air lter connection with
a screwdriver.
2. Attach the supplied air lter by
screwing it in clockwise.
Fitting The Oil Sealing Plug
1. Remove the transportation cover from the oil ller opening with a
athead screwdriver.
2. Insert the oil sealing plug into
the oil ller opening.
WARNING! THE AIR COMPRESSOR MUST BE USED
WITH A RESIDUAL CURRENT DEVICE WITH A
RATED RESIDUAL CURRENT OF 30MA OR LESS.
WARNING! DO NOT LEAVE THE AIR COMPRESSOR
UNATTENDED WHILE THE ON/OFF SWITCH IS IN
THE ‘ON’ POSITION.
Switching The Compressor On/O
1. To switch the compressor on,
press the on/o switch to the
‘I’ position. Allow the motor to
run and the tank to ll up.
The compressor will automatically cut o when the tank
Note:
pressure reaches 8bar and will automatically start up again when the
tank pressure drops to 5.5bar.
Checking The Oil Level
1. Place the compressor on a level surface.
2. Check that the oil level is
between the the ‘MAX’ and
‘MIN’ marks on the oil level
window.
3. If the oil level is below the ‘MIN’ mark, refer to the Maintenance
section - Changing The Oil and follow the directions for relling the
oil in the compressor.
2. To switch the compressor o, press the on/o switch to the ‘0’
position.
Restarting The Compressor If It Overloads & Shuts O
The motor is tted with an overload switch which turns o the
equipment automatically to protect the compressor from overheating.
1. If the overload switch triggers, switch o the compressor using the
On/O Switch and wait until the compressor cools down.
2. Press the Overload Reset
Switch and restart the
compressor.
WARNING! DO NOT CONTINUE USE OF THE
UNIT IF THE OVERLOAD SWITCH TRIPS AGAIN
IMMEDIATELY AFTER THE RESET.
 Loading...