

Page 1
Owner’s Manual
Page 2

Before Start!
Please download the Apps with the name of “Oxygen Audio Car
Sound 1” and “Oxygen Audio Car Radio 1” from iTunes Store.
We are thanking of you to download the Apps which provided
by Oxygen Audio.
For more details about Oxygen Audio, please browse the web-
site www.oxygenaudio.com
After the downloading of Apps, enjoy what Oxygen Audio
brings you!
Page 3

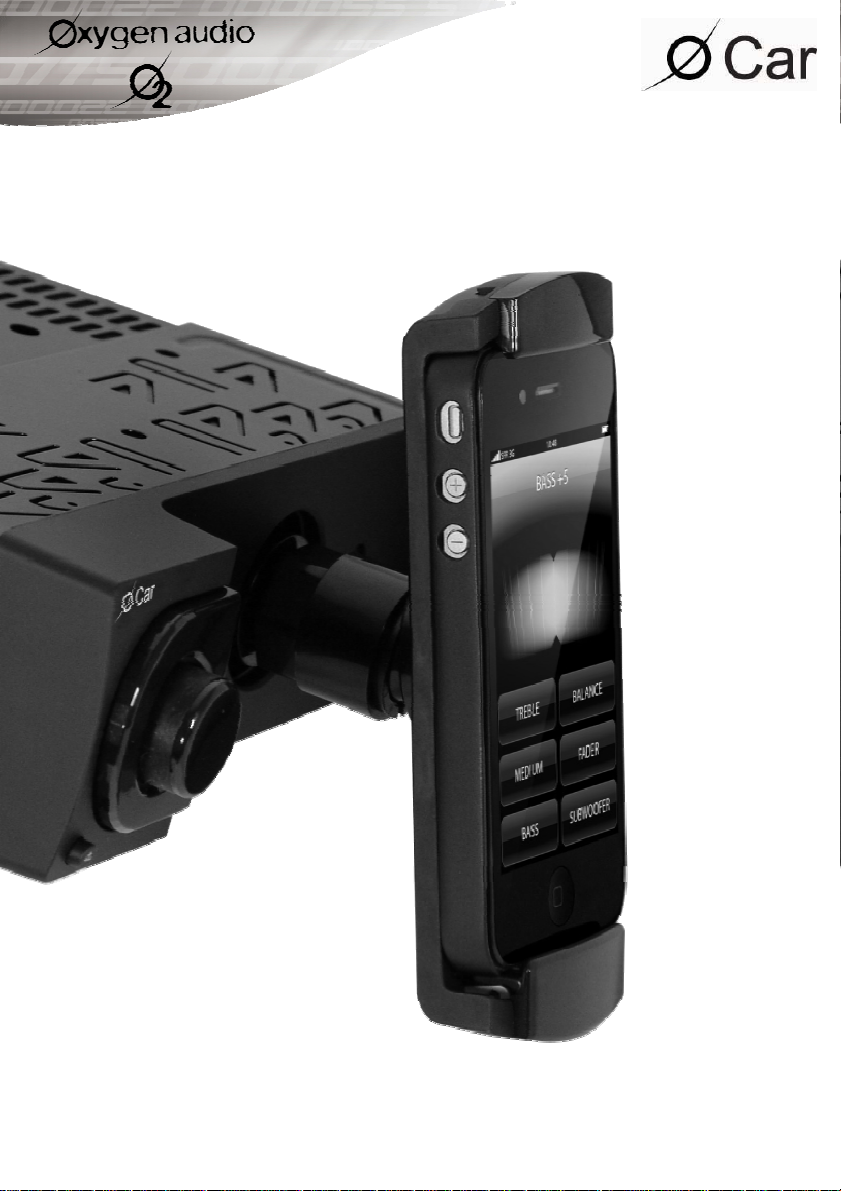
Congratulations on your purchase, and thank you for your choosing the O Car.
Your new product is quality, high technology equipment.
With O Car, you can enjoy a wide range of music, whether it is stored on your iPhone or
received through either the included RDS tuner (supported by the “Radio” application) or
an Internet radio feed. You are guaranteed outstanding sound, with its top-of-the-line
amplifier and the “Sound” application for audio controls.
O Car lets you search for and save radio stations. You also have access to all of the other
applications on your iPhone. O Car charges your smartphone and can be used as a handsfree kit for safe calling. Its Bluetooth module includes an external microphone for uncompromising communication quality.
The removable dock can hold your iPhone horizontally or vertically or even tilt i t toward
the user’s field of vision. The O Car also coordinates with your car’s interior design, with
six color themes available by pressing the “display color” key.
To get the most from your device, learn what it can do, and prevent possible risks, we
recommend reading this manual very carefully before use.
P.01 Before Using This Product
P.01 List of Equipment Provided
P.02 Installation Precautions
P.02 Electrical Precautions
P.03 Wiring Diagram
P.03 ISO Connector
P.04 Description of Inputs and Outputs
P.04 Installing the Microphone
P.05 Installing the Head Unit
P.06 Installing the Detachable Faceplate
P.07 Identifying the Parts of the Faceplate
P.08 Inserting an iPhone
P.08 Handling the Cradle
P.09 Using the Swivel
P.09 Uninstalling the Head Unit
P.10 “Sound” Application
P.13 “Radio” Application
P.16 Bluetooth Pairing
P.16 Using Other Applications
P.16 Recommendations for Use
P.17 Specifications
P.18 Troubleshooting
P.19 Warranty Policy
Page 4
Before Using This Product
O Car requires two applications to be downloaded in order to operate.
The “Radio” application is used for controlling the tuner. It can be downloaded from
the iTunes store using the keywords “Oxygen Radio” and then synced to your iPhone
through iTunes.
The “Sound” application is used for controlling the amplifier. It can be downloaded
from the iTunes store using the keywords “Oxygen Sound” and then synced to your
iPhone through iTunes.
O Car cannot work with your iPhone without these downloaded applications.
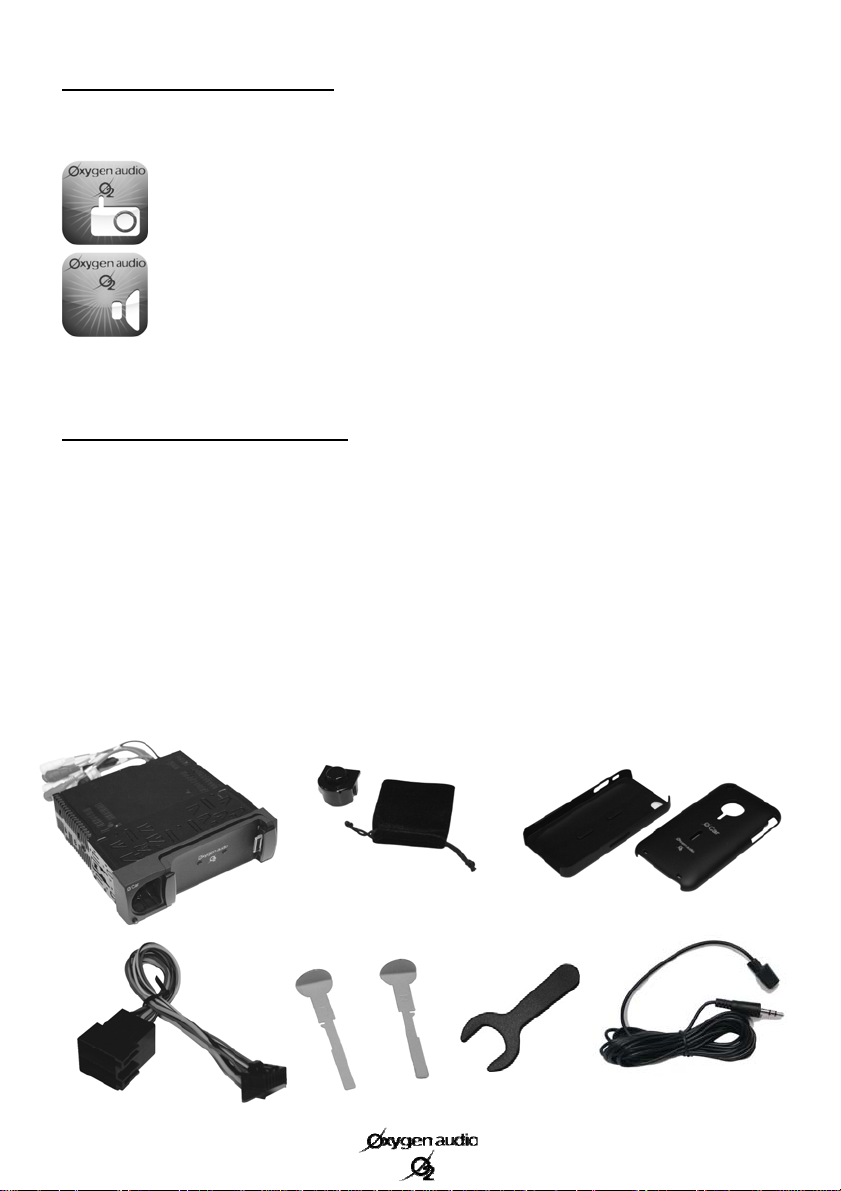
List of Equipment Provided
Your package contains the following equipment:
A multilingual owner’s manual
- (a) O Car in its mounting bracket (a)
- (b) A cloth carrying case containing the O Car’s detachable faceplate
- (c) Two protective covers, one for the iPhone 3G/3GS and the other for the iPhone 4
- (d) An ISO connection
- (e) A set of two keys for removing the O Car
- (f) A large-diameter key for adjusting the swivel
- (g) A wired microphone with a 3.5mm jack.
(d)
(b)
(a)
(e)
(f)
(c)
(g)
1
Page 5

Installation Precautions
Installing the O Car in your vehicle requires a good understanding of your car’s electrical
system. If you are not comfortable installing it yourself, we strongly recommend contacting
an approved professional to install the O Car in your vehicle.
O Car is designed for 1DIN (182 x 53mm) installations, with a custom depth to support its frame
(about 185mm).
The electronic part of O Car was designed to operate with a continuous voltage of 12V. However, it
supports operating voltages ranging from 11V to 14.5V. No matter what, your device cannot work
with electrical systems whose voltage is above or below this range.
The O Car cannot be installed on vehicles with a different operating voltage (24-volt trucks, 6-volt
mopeds, etc.).
O Car is designed only for installation in covered vehicles, protecting it from moisture, extreme
heat, and direct exposure to the sun, all of which can damage it.
Electrical Precautions
O Car comes with a 15-amp protective fuse. It is therefore recommended that you check whether
your vehicle is equipped to draw such a current. If it cannot, you must first create the ability for
your vehicle to draw a 15-amp current before continuing.
If the fuse blows, it must be replaced with an equivalent fuse. Replacing the fuse with a higher
voltage can not only destroy your device, but also seriously impact your vehicle’s entire electrical
system.
A blown fuse rarely happens on its own. It is therefore strongly recommended that you check your
entire system before replacing it.
2
Page 6

Wiring Diagram
(2)
(3)
(4)
(8)
(9)
(6)
(7)
ISO Connector (1)
A1. Not connected
A2. Not connected
A3. Not connected
A4. + permanent (yellow)
A5. Power antenna control (blue)
A6. Not connected
A7. + Switched (red)
A8. Ground (black)
(5)
A
B
ISO Connector
B1. Right rear speaker + (purple)
B2. Right rear speaker - (purple/black)
B3. Right front speaker + (gray)
B4. Right front speaker - (gray/black)
B5. Left front speaker + (white)
B6. Left front speaker - (white/black)
B7. Left rear speaker + (green)
B8. Left rear speaker - (green/black)
(1)
(10)
Depending on your vehicle’s ISO mounting, you may have to reverse the position A4 (yellow) and
A7 (red) wires using “rapid” connectors so as not to lose the memory on your device.
3
Page 7

Despite the consistency of ISO connectors, there are variations in the system whereby some connector positions are used for functions other than those initially assigned by the ISO standard. Also,
it is recommended to pay attention to the use of the wire in position A5.
Although it was originally used for powering a power antenna or an amplifier, it is sometimes also
used for other functions specific to the original car radio. In this case, we recommend looking for
another ground or electrical current on the car portion of the ISO connector in this position and
checking that it really corresponds to a power antenna control.
To avoid damaging your device, if you are uncertain about anything, we recommend disconnecting
the wire using the current connector and insulating both sides using insulating tape.
Description of Inputs and Outputs
(2) Gray wire to yellow connector: RCA video output for connecting up to two additional screens
whose input impedance modulus should not be less than 75 ohms.
(3) Gray wire to green connector: RCA subwoofer output for the use of a specific amplifier for the
base channel.
(4) Gray wire to red connector: “Right front” RCA output for connecting to an optional amplifier’s
dedicated channel.
(5) Gray wire to white connector: “Left front” RCA output for connecting to an optional amplifier’s
dedicated channel.
(6) Brown wire to white connector: “Left rear” RCA output for connecting to an optional
amplifier’s dedicated channel.
(7) Brown wire to red connector: “Right rear” RCA output for connecting to an optional amplifier’s
dedicated channel.
(8) 3.5mm jack connector: Microphone input. For connecting the supplied microphone.
(9) Antenna connector: For connecting to the vehicle’s antenna.
(10) 15-amp fuse
Installing the Microphone (required for hands-free functionality)
For better communication quality, we recommend positioning your microphone at the top corner of
your windshield on the driver’s side (toward the driver).
During telephone communications, we recommend closing the windows of your vehicle to prevent
the movement of the air from disturbing the microphone.
Obviously, we recommend using caution during telephone calls and keeping your eyes on the road.
4
Page 8
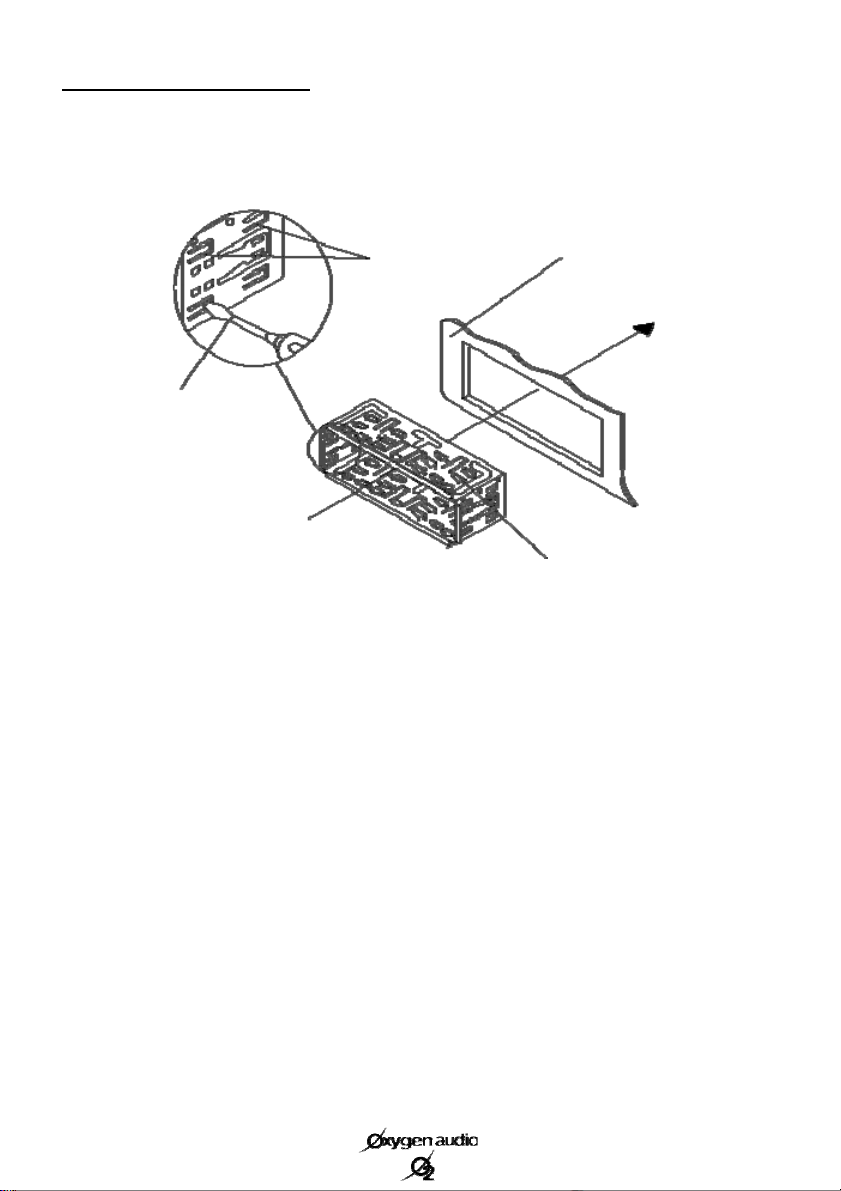
Installing the Head Unit
Using small metal inserts on each side of the bracket, remove the O Car from its housing. Next,
insert the mounting bracket into the slot on your dashboard, as described below.
Mounting bracket
Using a screwdriver, bend
the small metal tabs around
the bracket in order to firmly
secure it to the dashboard.
Make the necessary elect rical connections (see pages 3 & 4), and then insert your device into its
mounting bracket until the metal inserts go back to their original positions on the body of the car
radio. You will hear a click on each side when you car radio is properly in place.
Dashboard
Mounting tabs
5
Page 9

Installing the Detachable Faceplate
The detachable portion is located on the left side of the device’s faceplate, as described below.
Insert it into position, and then push it slightly until you hear a click.
Your device is now fully installed.
6
Page 10

Identifying the Parts of the Faceplate
(D) (F)
(A)
(A) Release button for the detachable faceplate. Pressing this button releases the detachable
faceplate, including the volume button (B), allowing it to be removed.
(B) On/off button, mute, and volume control.
- When the device is off, press this button to turn it on.
- When the device is on, hold down this button (at least 3 seconds) to turn it off.
- When the device is on, pressing this button normally will mute or un-mute your car radio.
- Turn this button clockwise to increase the sound volume.
- Turn this button counterclockwise to decrease the sound volume.
(C) Mounting tab to be inserted into your iPhone’s jack input (headphones).
(D) Cradle for holding your iPhone. This part, along with all of its components, can be removed,
tilted, and adjusted (see pages 8 & 9 for more information).
(E) Dorsal mounting tabs to be inserted into the two oval openings on the back of the iPhone’s
protective shell. They help to secure your iPhone in place.
(F) Dedicated connector, to be inserted into the iPhone’s connector.
(B)
(C)
(E)
The following are only available out of the
cradle. Please refer to the explanations on
page 8 for more information.
(G) Reset button for your unit (RESET). Use
the reset button before the first use and if your
device no longer seems to respond correctly.
(H) Security indicator: This indicator will
blink if the iPhone is not properly positioned
(G) (H)
on the cradle.
7
Page 11

Inserting an iPhone
Place your iPhone in the protective shell it came with (see page 1), and then refer to the diagram
below for more information.
(1)
(1) Connect the iPhone’s main connector to connector (F).
(2) Slide your iPhone toward the right of the head unit. Connector (F) will retract and tilt. Next,
press down on your iPhone until the tabs (E) are inserted into the holes on the back of the
protective shell.
(3) Once the iPhone, with its protective shell, is pressed into the cradle (D), slide it to the left of the
head unit in order to insert the tab (C) into the jack input (headphone connector) on your iPhone.
Performing this procedure in the opposite direction removes the iPhone from the cradle.
We recommend always using the protective shell that comes with your iPhone when using the
O Car. Using it without its protective shell can damage your iPhone and make it harder for
the O Car to hold.
(2)
(3)
Handling the Cradle
The O Car’s iPhone cradle has a system that allows it to be removed by moving it 40mm. Out of
the cradle, it can be used vertically or horizontally at a 90° angle.
(I)
Press the cradle toward the body of the head unit by pressing its sides (I). The station will move
and softly release it (with a click). It can then move 40mm. You can turn it clockwise (90°) for use
in a vertical position.
Return the cradle to a horizontal position before positioning it for removal. The cradle can be
inserted into the car radio’s body only in horizontal position.
8
Page 12

Using the Swivel
The O Car has a swivel that allows a
360° pivot and 15° tilt out of the
cradle.
The locking bolt (J) allows the swivel to be set
using the tool (f) on page 1, making it easier or
harder to position.
With the device facing you, rotate the bolt
counterclockwise to tighten it. Turn it
clockwise to loosen it.
Adjust the swivel’s flexibility so that it is
usable and so that the iPhone is properly
supported for the type of road being travelled.
Uninstalling the Head Unit
(e)
(J)
Before uninstalling your head unit, you must:
- Remove your iPhone from the cradle.
- Remove the cradle from its housing and
position it vertically.
- Remove the detachable faceplate.
Locate the disassembly keys (e) provided, and
insert them into the disassembly removal holes.
Once they are in place, pull the device toward
you (by pulling on the disassembly keys) until
the mounting bracket is removed. Finally,
disconnect the wiring.
9
Page 13

“Sound” Application
Once you have downloaded and installed the “Sound” and “Radio” applications on your iPhone,
place it on the cradle, turn on O Car (as explained on page 10), and start the “Sound” application.
The “Sound” application is used for controlling the amplifier. It is intuitive to use
with the iPhone’s touchscreen interface.
Main screen
(5)
(1)
(2)
(1) Function status display. This always shows the settings for each of the box functions (4).
(2) Adjustment area. This field is for adjusting the values of the box functions (4). Slide your finger
from right to left to increase the values of each preselected function and from left to right to decrease
their values. You also can tap your finger on the left or right side of the field to decrease or increase
their values. The setting speed will depend on how quickly your finger moves over the iPhone’s
screen.
(3) Access to the “Sound” application’s settings page
(4) This function group is used for selecting what to adjust using the control field (2):
- BASS: Adjusts the bass frequencies within a range of -14 to +14.
- MEDIUM: Adjusts the midrange frequencies within a range of -14 to +14.
- TREBLE: Adjusts the treble frequencies within a range of -14 to +14.
- SUBWOOFER: Adjusts the level of the subwoofer output (see page 3) within a range of -14 to +14.
- FADER: Adjusts whether the sounds comes out of the front or rear speakers within a range from 14F
(front) to 14R (rear).
- BALANCE: Adjusts whether the sounds comes out of the left or right speakers within a range from
14L (left) to 14R (right).
(5) Returns to the main page of the “SOUND” application.
(6) Enables or disables the “BEEP” signal to confirm use.
(7) This function displays video signals on your iPhone or on an additional screen connected to your
device’s video output (see page 3 and 4). The iPhone will have to be removed from the cradle and then
returned to it in order for changes to take effect.
For security purposes, we recommend not displaying video signals on your iPhone while driving your
vehicle.
Press the "Home" button on your iPhone to exit the "Sound" application.
(3)
(4)
SOUND
Settings page
(6)
(7)
10
Page 14

Summary
BASS
Select the function group (4) you wish to
modify.
Press the key (3) to go to the “Sound”
application settings page.
SOUND
BEEP ON
Slide your finger in the control field (2) to
change the value of the chosen function.
SOUND
“Sound” application settings page.
SOUND
Video: iPhone
11
Page 15

Enable or disable the confirmation beep by
pressing the “BEEP” button (6).
SOUND
Watching video during
driving is forbidd en.
The choice of this function is driver s
responsibility.
Cancel OK
VIDEO: IPHONE
SOUND
Using the “VIDEO” button (7), select
whether you want video signals from your
iPhone to display or whether you want to
send them to an external monitor.
When you select “video screen” or “video
iPhone” , popup a prompt dialog window .
You can choose to continue or give up.
Press the “SOUND” key to return to the
“Sound” application’s main page.
“Sound” application main page.
Press the “HOME” button
on your iPhone to exit the
application.
12
Page 16

“Radio” Application
The “Radio” application is used for controlling the tuner. It is intuitive to use with
the iPhone’s touchscreen interface.
Main screen
(4)
(5)
(6)
(7)
(8)
(1)
(2)
(3)
(1) Radio band selector. You can choose between FM1, FM2, and FM3 for FM a nd MW1 for AM.
Each band allows you to store six presets (see item (5)).
(2) RDS information display, such as the current radio station and RADIO-TEXT information.
(3) Adjustment area. This field lets you search for radio frequencies (which are also listed here).
Slide your finger from right to left to search increasing frequencies and from left to right for
decreasing frequencies. A slow movement searching by 0.05MHz increments in FM mode (9KHz in
AM mode). A quick movement launches an automatic search that will stop when the next radio
station is found.
You also can tap your finger on the left or right side of the fields to decrease or increase frequencies.
By sticking your finger you will launch an automatic search.
(4) Access to the “Radio” application’s settings page
(5) This field shows the storage of presets you can save for each band. On each of these keys, you
can store the frequency you want. If it has a name, the name will appear on the key. If it does not
have a name, the corresponding frequency will then appear. To store a station on one of the keys,
press and hold the desired key for more than three seconds. Your station will then be stored, and its
name (or frequency) will appear on the key. Quickly pressing any of the keys will bring up the stored
station.
(6) Returns to the main page of the “Radio” application.
(7) Enables (ON) or disables (OFF) the local broadcast mode (LOCAL).
(8) Each time this key is pressed, it switches between MONO and STEREO reception mode for radio
frequencies.
(9) Enables (ON) or disables (OFF) the radio mode.
(10) With the “COLOR” function (display color), you can select from among six display colors.
Available colors are
- blue, gray, green, orange, red, and yellow.
Settings page
(11)
(9)
(10)
(12)
(13)
13
Page 17

(11) With the “ REGION” function (frequency region), you can select from among six frequency
regions. Available regions are
- Global, Europe, Eastern Europe, Japan, North America and South America.
(12) Enables (ON) or disables (OFF) the alternative frequency search mode (AF). This function is
used for maintaining a program being listened to during a trip if its frequency changes. With the AF
function in ON mode, the tuner will launch an automatic search among the other broadcast
frequencies for the RDS name for the station you were listening to, stopping on another frequency
if it finds its RDS name. If no other frequency is found broadcasting the same RDS name, the tuner
will periodically scan the former frequency.
(13) Enables or disables the TA function (traffic information). When this function is enabled, the
tuner will periodically scan received frequencies and play any traffic information message that may
be broadcast.
Summary
FRANCE C.
Slide your finger in the control field (3) to
launch a search of radio frequencies
(quickly for an automatic search and slowly
for a manual search).
Press and hold (more than 3 seconds) one of
the storage boxes in the field (5) to save the
station you are listening to. Pressing it
quickly switches to the previously stored
station.
Using the band selection key (1), choose
from among the station storage bands FM1,
FM2, FM3, and MW.
14
Page 18

Press the key (4) to go to the “Radio”
application settings page.
“Radio” application settings page.
Each time the “Color” key (10) is pressed,
it changes the radio application display
color between blue, gray, green, orange,
red, and yellow.
Press the “RADIO” (6) key to return to the
“RADIO” application’s main page.
15
Each time the keys (7), (8), (9), (11), (12)
and (13) are pressed, it changes the value of
the key, as explained on pages 13 and 14.
Main page of the “RADIO” application.
Press the “Home” button on your iPhone to
leave the application.
Page 19

Bluetooth Pairing
To use the hands-free key for your car radio, you must pair the integrated Bluetooth system with
the one on your iPhone.
To do this, run a search on your iPhone for a Bluetooth device until it detects a device called “OCar
BT”. Select it, enter the code “0000”, and press OK. O Car confirms the pairing of the two devices
with a long beep, followed by three short beeps. Three consecutive beeps confirm that the two
devices are no longer connected.
When devices are connected, the Bluetooth module will cut the program sound when sending or
receiving a telephone call, and it will restore the program at the end of the call.
Using Other Applications
O Car amplifies sound in any application.
Whether you want to play a game, use the Internet telephone, listen to music stored in the iPod
application, or simply use the Internet, O Car will become your car’s multimedia interface.
Recommendations for Use
Please use common sense while driving.
Safety must always take priority over enjoyme nt, especially when driving. We recommend using
visual applications (such as Internet, video games, movies, etc.) only when you are stopped and the
engine is off.
Additional safety is built into our “SOUND” application (see (7) on page 10) when playing a video
file from O Car. Unless you are safely parked, we recommend directing video signals from your
iPhone to the dedicated video output. This way, no video broadcast can disturb your field of view
while driving.
Do not exert significant pressure on the cradle’s arm or the cradle itself, which can cause it to
break.
16
Page 20

Specifications
General
Power source:
- 12 volts DC, negative grounding
- Current range from 11 to 14.5 volts
Maximum current consumption
- 15 amperes
Tone controls:
- Bass: +/- 10 dB @ 900 Hz
- Midrange: +/- 10 dB @ 1 KHz
- Treble: +/- 10 dB @ 10 KHz
Signal-to-noise ratio (iPhone mode)
-> 95 dB (A 20 Hz – 20 KHz)
Power output:
- 4 x 22 watts RMS
- 4 x 55 watts MAX
Stereo separation: > 40 dB
RCA output current: 4 volts
Device dimensions: 187 x 58.5 x 160 mm
Device weight: 1.100 kg
AM/FM Radio Tuner
AM frequency range:
- 531 to 1602 KHz / 9 KHz (Global)
- 522 to 1620 KHz / 9 KHz (Europe)
- 522 to 1620 KHz / 9 KHz (Eastern Europe)
- 522 to 1629 KHz / 9 KHz (Japan)
- 530 to 1710 KHz / 10 KHz (North America)
- 520 to 1620 KHz / 10 KHz (South America)
- IF 450 KHz
FM frequency range:
- 87.5 to 108.0 MHz / 100 KHz (Global)
- 87.5 to 108.0 MHz / 50 KHz (Europe)
- 87.5 to 108.0 MHz / 50 KHz (Eastern Europe)
- 65.0 to 74.0 MHz / 10 KHz (Eastern Europe)
- 76.0 to 90.0 MHz / 100 KHz (Japan)
- 87.5 to 107.9 MHz / 200 KHz (North America)
- 87.5 to 108.0 MHz / 100 KHz (South America)
Selectivity (signal/noise = 30 dB): - 4µV
Stereo separation: > 25dB
Video output:
Output type: RCA analog
Output impedance: 75 ohms
Current output: 1 volt
Bluetooth module:
Module type: Bluetooth mono 1.2
Main connection: iPhone
Transmission type: Telecommunication
• “Made for iPhone” mean that an
electronic accessory has been designed to connect specifically to
iPhone, and has been certified by
the developer to meet Apple performance standards. Apple is not
responsible for the operation of this
device or its compliance with safety
and regulatory standards. Please
note that the use of this accessory
with iPhone may affect wireless
performance.
• iPhone is trademarks of Apple
Inc., registered in the U.S. and
other countries
All of this information is provided
for informational purposes only. It
can be revised at any time, without
prior notice and without changes to
how the device is used.
17
Page 21

Troubleshooting
A tiny detail may cause a problem in how your unit is working. Before sending the device to our
technical department for repair, we recommend first troubleshooting it using the table below.
Symptoms Possible Causes Solution
The device does not turn on. 1. The O Car fuse has blown.
No sound is coming out of the
speakers.
Functions are not responding
correctly.
The microphone isn’t working. 1. There is no Bluetooth pairing
2. The vehicle’s fuse has blown.
3. The detachable faceplate is not in
position.
1. The speakers are not properly
connected.
2. The amplifier to which the
speakers are connected currently
has a problem.
3. The sound is muted.
4. No application has been
launched.
5. The volume is minimized.
1. O Car’s microprocessor is
having problems.
2. The iPhone’s processing is
having problems or its memory is
full.
3. iPhone is poorly housed on the O
Car cradle.
4. The “Sound” and “Radio”
applications are not installed on the
iPhone.
between O Car and the iPhone.
2. The microphone is not properly
connected.
1 & 2. Replace the fuse with an
equivalent fuse and check your
installation before continuing.
3. Position the detachable
faceplate properly.
1. Check that the speakers are
connected.
2. Check the amplifier’s power
and connections.
3. Un-mute by pressing O Car’s
round button.
4. Launch an application, such as
iPod or the “Radio” application.
5. Turn up the volume by turning
O Car’s round button clockwise.
1. Do a RESET using the (G) key
on page 7.
2. Restart the iPhone.
3. Remove the iPhone from the
cradle and then put it back
correctly.
4. Download and install the
“Sound” and “Radio” applications
from iTunes.
Set up the pairing between the two
devices (see page 16).
Disconnect and then reconnect the
microphone properly.
If your problem is still occurring after this troubleshooting, please refer to page 19 for the warranty
clause.
18
Page 22

Terms of Warranty
This high-quality product is guaranteed against defects in its components for a period of one year from
the original owner’s date of purchase.
This warranty is defined within the following limits:
The warranty is valid only in the country where the product was sold and only for the device’s original
owner.
The device may be disassembled, modified, or repaired only by someone expressly authorized by the
distributor.
This warranty does not apply in cases of misuse, inappropriate use, or use contrary to the instructions
provided by the distributor.
In addition, the distributor denies any liability with regard to accidental, special, or indirect damage
resulting from the use or unavailability of the item.
If service is necessary, please inform your dealer and come to an agreement on the terms of repair. If
necessary, allow the dealer to ship your device to the distributor. If the device must be returned, package
the unit properly.
If possible, use the original packaging. The distributor must be notified in advance. We recommend
insuring the device during shipping, because shipments are made at the sender’s risk. The distributor is
responsible for repackaging, insuring, and shipping the device back.
This warranty is in addition to your statutory rights as a consumer and does not limit them in any way.
Use the two boxes below to indicate your serial number (appearing on the back of your car radio) and
purchase date.
Purchase Date: Serial Number:
19
Page 23

Notes
Page 24

ADMEA – OXYGEN AUDIO – IMMEUBLE SPAAK - 12 rue Jules Ferry - 93110 ROSNY SOUS BOIS
Email: webmaster@oxygenaudio.com - Fax: 04 18 12 11 06
 Loading...