

Page 1

User’s Manual
Operation and Maintenance Instructions
Oxygen E-mate
PLEASE READ ME FIRST
2nd Edition – April 2010
Page 2

2
Oxygen E-mate – Table of Contents
Page number
1. Introduction 3
2. About Oxygen E-mate and its design 4
3. The first ride 4
3.1 Preparation of bicycle for riding 4
3.2 Safety checks before first ride 7
3.3 The law requirements 8
3.4 Your own safety 8
3.5 Carrying the luggage on your bike 9
4. Regular use and basic checks 10
5. Lubrication of the bike components 11
6. Battery care and re-charging process 12
6.1 Battery charging 12
6.2 Battery care and maintenance 12
7. Regular self maintenance 13
6.1 Fitting the front wheel 14
8. Technical specification and performance 18
9. Getting maximum range from the battery 19
Page 3

3
1. Introduction
Dear customer,
Thank you for choosing the Oxygen Electric Bicycle – smart move ;-) We at Oxygen believe that
by making this purchase decision you are going to change your life and the way you move
around. We hope that the impact the bicycle is going to have on you will bring you loads of joy
and satisfaction. By using your bicycle regularly you will also have your impact on reduction of
carbon footprint and saving our environment.
If you would have any questions or comments about our product please do not hesitate to
contact us. We warmly welcome any kinds of comments and suggestions including those
negative ones. At Oxygen we aim at 100% customer satisfaction treating all kinds of comments
and suggestions very seriously.
Now it is important to read these few short notes and make sure you use your bicycle according
to the below instructions. We promise won’t be long but it’s al for your safety.
Oxygen Bicycles
Page 4

4
2. About Oxygen E-mate and its design
Oxygen E-mate electric bicycle is a two wheeled bicycle designed with the thought of
commuting and travelling on a longer distances. Its frame geometry combines all three in
one types of riding position. At Oxygen we call it SCT geometry standing for Sport City
Touring. SCT riding position has been set up to be the most optimal and ergonomic for your
power performance as well as your health condition. This makes new E-mate so comfortable
and efficient on the long distances.
The bicycle can be used for commuting and moving around the city. The bicycle can also be
used on the public roads as well as on off road pathways.
What the bicycle is not designed for:
Please do not use the bicycle in extreme conditions such as jumps and on the extreme
downhill tracks. The bicycle frame is not designed for the following applications: Extreme
Cross Country XC, Dual DS, 4X Four Cross, Free Ride FR, and Downhill DH
The maximum allowable payload for the bicycle is:
120kg for the rider
15kg of the luggage located on the rear rack
3. The First Ride
This chapter concentrates on setting up your bicycle before the first ride including your
riding position, safety checks and the aspect of your legal issues.
3.1 Preparing the bicycle before the first ride
3.1.1 It is highly important to pay attention to the first set up of your new bicycle before the
first ride. For us at Oxygen the customer is put first and this part concentrates on your
health and the proper set up of your bicycle. Before you actually have your first ride it is
crucial to set you up and your riding position that is why this point concentrates on setting
you up and your position on the bicycle.
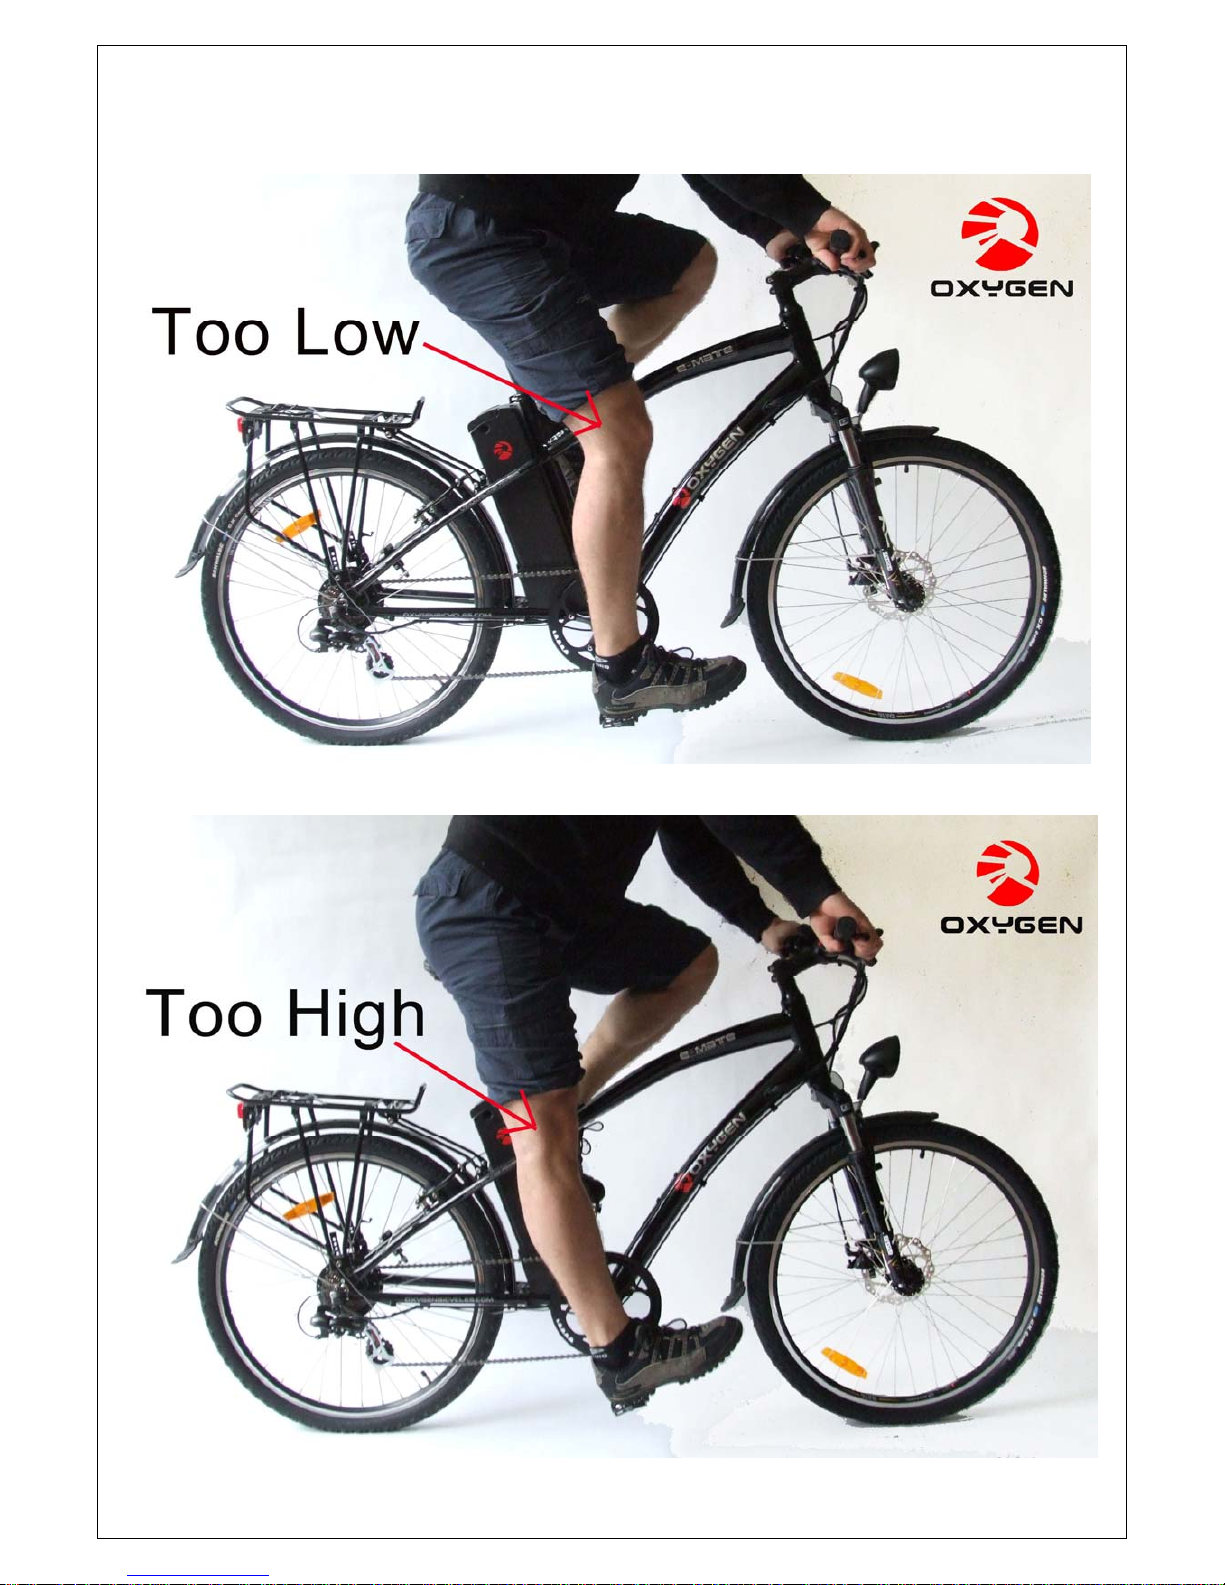
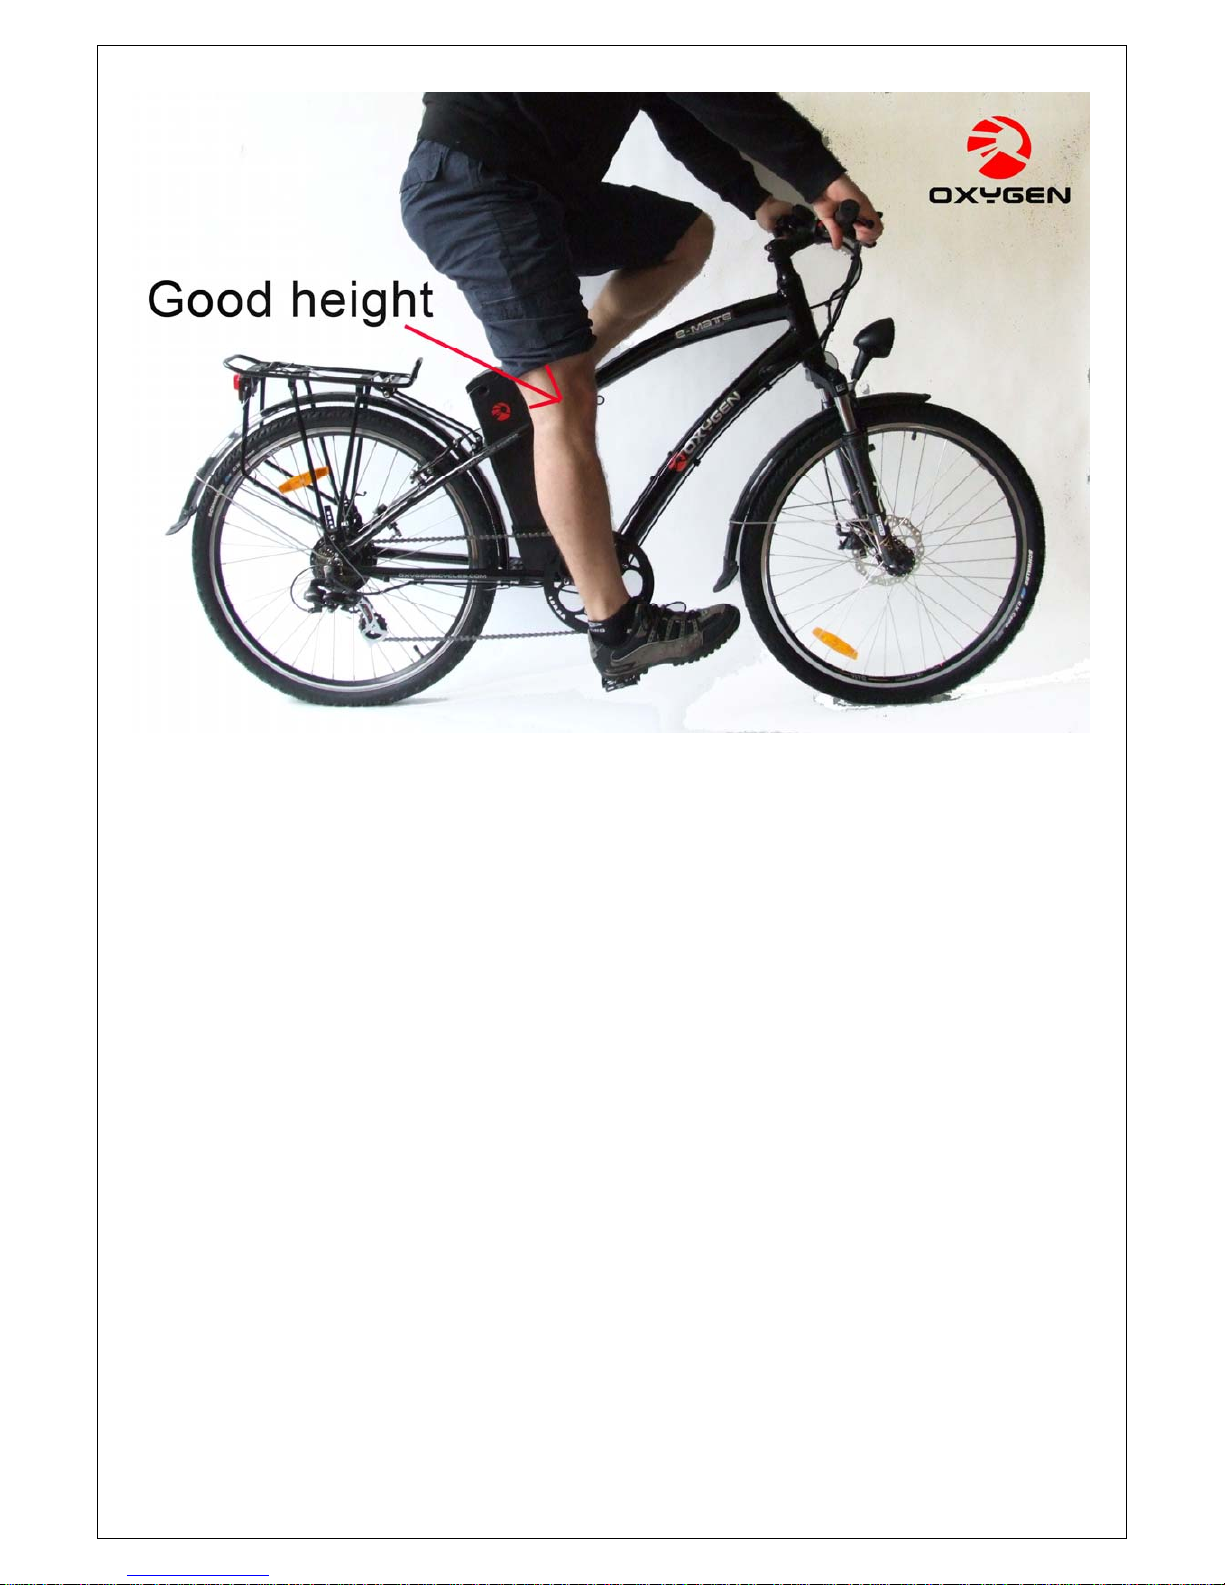
Set up of the seat (saddle) height on your bicycle.
It is important that your bike seat (saddle) is at the correct height to ensure that your bike
ride is comfortable, healthy for your knees and just as importantly, to conserve energy while
you pedal.
A. Please place yourself while seating on the bike against the wall of post.
B. By holding your brake seat on the saddle and put your heel on the pedal. Your leg
should be almost straight but your knee should be very little bent.
Page 5
5
C. Please see the pictures and see to get idea of what is correct and what is not.
Page 6
6
While adjusting the seat height please note that each seat post has the safety marking on
the seat pillar. Please do not exceed the border of safety in any circumstances. The
markings on the seat pillar always need to be hidden in the seat tube and never exposed
above it. Seat post adjusted above its acceptable limits may cause the personal injury as
well as the damage to the frame.
3.1.2 Familiarising yourself with the brake system
Before you set up for the first ride it is crucial to familiarise yourself with the brake system.
Please remember while seating on the bicycle the RIGHT HAND LEVER operates the front
brake and the LEFT HAND LEVER operates the rear brake. When you use the brakes it is
best practice to use both brakes at the same time. When you ride the bicycle in the wet
conditions it is important to estimate that the braking performance may be poorer than on
the dry surface. Always include extra distance for braking during wet conditions.
Page 7

7
3.2 Safety checks before the first ride
3.2.1 Check the tyres pressure.
All tyres have a recommended tyre pressures which should be used on the bicycle. For tyres
fitted on all Oxygen Bicycles the pressure should be set between 35-60psi. It is however
advisable to keep a higher pressure on the tyres in the region of 55psi as this reduces the
likelihood of getting the puncture on your tyres. It is also important not to pump the tyres
more than maximum recommended pressure. This may affect your comfort of riding the
bike as well increases the risk of rim damage and tyre explosion. Please note that keeping
the bike in the bright sun may also increase the pressure in the tyres therefore it is
recommended to keep a pressure at slightly lower level during the hot summer days.
3.2.2 Charge the battery for the first time
The battery should be fully charged before the first time for at least 10 hours. The charger
has an automatic charge cut off protection and even if it shows the full charge has been
made please allow the battery to condition for the few more hours.
The first few charge and discharge cycles should be deep and full. It means the battery
should be run down to nearly maximum and the same the charging process should never
been interrupted until the battery is fully charged. To fully condition your battery please
allows three to four full charges / discharge cycles. For battery charging please see the P4 of
this manual.
3.2.3 Check the handle bar and stem assembly.
Before having your first ride make sure that all the stem and handle bar assembly bolts have
been securely tight up. In order to check those please try to move handle bars up and down
and same on the side from the left to the right. All the Oxygen Bicycles should be sold and
prepared to ride by the authorised dealers however Oxygen Bicycles can not guarantee all
those procedures have been completed, particularly in the case of online sales. It is
therefore crucial to check all those components before the first ride.
Page 8

8
3.2.4 Check your brakes
Your brakes are one of the most important parts of your bike. These should always be in a
fully working condition and checked not only before the first ride but every time before you
are to ride your bike. Please note you should never ride your bike with none or even only
one working brake. Both brakes should be always in the fully working condition at all times.
3.2.5 Importance of keeping seat posts suspension cover.
Each Oxygen E-mate is equipped with suspension seat post. The moving parts of the post
are covered with the rubber protection. It is important to check the condition of rubber and
the position of fitment. It is particularly important when carrying the baby on the rear racks
saddle to prevent the pinching of fingers in the post.
3.3 The law requirements
It is important that the bicycle is equipped in the appropriate safety components such as bell
and the legal lighting system. Please remember to use the full lighting system whenever the
bicycle is ridden the dark conditions. Please note that we do not recommend using the
flashing lighting systems. This type of lighting may not be legal to use on the public roads.
The appropriate lights colours in majority of countries worldwide correspond to WHITE for
the front light and RED for the rear. Please note that the green colour for the front light is
illegal in the European Union countries and should never be installed on the bicycle’s
handlebar in any of the EU countries.
3.4 Your own safety
This last point of preparing before the first ride covers your own safety.
RULE no.1 we at Oxygen always recommend using bicycle helmets in any circumstances
whenever you ride your bicycle. Please use the cycle helmet at all times regardless of the
time or distance of your ride.
RULE no.2 there is another aspect of safety. Please never ride the bicycle under the
influence of alcohol or drugs. Riding the bike under influence of any of the above
significantly increases the risk of an accident, serious injury or even death.
Page 9

9
3.5 Carrying the luggage on your bike
3.5.1 Attaching your luggage
It is important to make sure that the luggage attached on to bike is attached securely and
within the maximum limit. Please make sure you only use the appropriate pannier sets for
your luggage needs. Each pannier should be attached to the carrier on the carrier’s railings.
3.5.2 Maximum allowable luggage
Please make sure that your total allowable luggage on the rear carrier does not exceed
15kgs including your panniers sets. The luggage should be placed equally on both sides by
maximum of 7.5kgs on each side of the carrier.
3.5.3 Warnings for the use of luggage carrier:
It is important that the luggage is placed equally on both sides of the rack without
significant differences in weight.
Please do not over load the rear carrier with the more than the maximum allowable
weight.
Please do not attach the child seat to the standard rear rack supplied. Please be
aware that for the child seat you should use specifically designed carrier
The luggage can not be modified by the user in any case. This may have a negative
impact on the rider’s safety and any sorts of modifications are not permitted.
Please check the fasteners on the rear carrier are properly fitted and regularly
checked. The carrier bolds should be tightened with 2.5nm torque.
The luggage carrier supplied with the bike is not designed to pull the trailer. Please
do not pull the trailer with this luggage carrier.
Please note that the bicycle when fully loaded may behave differently in terms of
steering and braking performance. Please take a note of that when riding the fully
loaded bicycle.
Please make sure there is no loose straps coming out of the panniers which could be
caught by the rotating spokes in the wheel.
Please make sure that the luggage fitted on the carrier does not obstruct the visibility
of the lights fitted to the carrier.
Page 10

10
4. Regular use and bike maintenance
It is very important to highlight that the bicycle used regularly might need the routine
maintenance from time to time. In order to ensure the maximum safety on your bike we
strongly recommend carrying a routine maintenance checks described in the paragraph no.2
before each ride.
Additionally once a month we would like to point out that it is very useful to carry the
following checks:
- Spokes – These should be checked after 300 miles (approx 500km) after the bike
purchase. Additionally it is a very good practice to check those every 500 miles (800km)
and make sure that all of those are not getting loosed.
- Brake pads – On the average every 500 miles it recommended to check the condition
of your brake pads. The life time of brake pads may vary very significantly and may last
as much as 5000 miles or as little as 250 miles. It all depends on the conditions the bike
is being used. In the rain and muddy conditions the brake pads are likely to last a lot less
then in the dry conditions. The ridden terrain also might have a impact on the pads
lifetime. In the hilly mountain area the pads are likely to worn out quicker than in the flat
area where a lot less braking is applied.
- Running gears – Running gears have a significant impact on the comfort of riding. The
quickly shifting gears work a lot better and make a lot less noise.
- Tyres condition – Never ride the bike with the worn out tyres. These are more likely to
have puncture as well as more importantly have a lot less safety. The new tyre performs
a lot better in every condition.
- Chain – Remember to clean and lubricate your chain from time to time. Please note that
the clean lubricated chain will last a lot longer. To lubricate the chain use only the
lubricants sold by the bike shops. Do not use engine oil or grease to lubricate your chain.
Please contact directly contact directly to the dealer for any lubricants action on your bike.
- Rims Condition – If the bicycle is using the rim V-brake type brakes it is important to
check the condition of the rim from time to time. The rims run under regular usage of
brakes and the rims wall thickness is reducing. Significantly used rim may explode under
high tyre pressure. As as result this can cause an accident, serious injury or even death.
It is however difficult to check the condition of the rim for inexperienced users therefore
we do recommend to the visit the local bicycle shop and ask for the professional advice
on the rims condition. Most of the bike shops offer the free advice on the rims
conditions. Please do not neglect this issue and check your rims regularly with the
professional service centre.
Warning:
As all mechanical components the bicycle is subjected to wear and high stresses. Different
material and components may react to wear and stress fatigue in different ways. If the design
life of the component has been exceeded, it may suddenly fail causing injuries to the rider. Any
forms of crack, scratches or colour change in the high stressed areas indicate the life of the
component has been reached and it should be replaced.
Page 11

11
5. Lubrication of the bike components
Every time you ride your bicycle its condition changes. The more you ride the
more regular maintenance will be required on the bike. We recommend you
spend a little time on the regular maintenance checks. Below table is just a
guide on how often to carry on the regular maintenance tasks.
Frequency Component Lubricant How to lubricate
Weekly
Chain
Derailleur wheels
Derailleurs
Brake levers
Chain Lube or light oil
Chain Lube or light oil
Oil
Oil
Brush on or o squirt
Brush on or o squirt
2 drops from oil can
2 drops from oil can
Monthly
Brake callipers Oil
2 drops from oil can
Every six
months
Freewheel
Brake cables
Shift levers
Oil
Lithium based grease
Lithium based grease
2 squirts from oil can
Disassemble
Disassemble
Annually
Pedals
Derailleur cables
Wheel bearings
Headset
Lithium based grease
Lithium based grease
Lithium based grease
Lithium based grease
Disassemble
Disassemble
Disassemble
Disassemble
NOTES: Please note that the above table is just the example on what kind of lubricants to
use and their frequency. Please never use the spray degreasers for lubrication. Always
contact your bike dealer for the best advice on what type of lubricant to use. If you feel
uncomfortable with carrying on the routine maintenance please use one of the bicycle
service centres
Page 12

12
6. Battery care and re-charging process
6.1 Battery charging
It i
full
plu
soc e charger’s mains
plug first and then the small rounded one to the battery.
The cle shou as the gr ars o
not that w ger the battery is still in the charging process
and th ould n from e
6.2 Battery care and maintenance
If the battery has been totally discharged it tant to charge it the same day as the
discharge has been done. Once you finish the ride please allow approx 10-20 minutes before
plugg ry in he battery n s a cooling off perio
before charge
Please note that if the bicycle is not used for longer period of time then the battery should be
charged before. Batterie r perio r 2 hours
every 2 months. The lith have a ss therefore
these have to be rechar certain period d n
battery loosing its voltage and eventual damage to the battery.
IM
aut
rule
ma
of accidents and damages caused by the unlawful battery maintenance.
s important to follow these few steps before the first charge. Firstly the battery has to be
y charged before the first use. In order to do it please take a chargers rounded plug and
g it in to the battery’s socket. Next take chargers mains plug and plug it in to the electricity
et. It is important to follow the order of this procedure and not to plug thk
full charging cy ld take as long een light appe n the chargers. Please
hile the red light appears on the char
e battery sh ot be disconnected the charger until the gr en light appears.
impor
ing the batte
it will be re
to charge. T eed d of couple of minutes
d again.
s stored for longe d of time should be cha ged for approx
ium ion batteries self discharging proce if not in use
ged every of time. The failure in oing so may result o
PORTANT: Never try to open the battery case. The battery case can be open only by
horised and trained service centre appointed by Oxygen Bicycles. Unlawful breach of this
will automatically invalidate the battery warranty. The unlawful maintenance to the battery
y also cause a serious injury or even death. Oxygen Bicycles is not responsible for any sorts
Page 13

13
-
7. Regular self maintenance
Oxygen Bicycles allows a certain parts of bicycle to be maintained by the owner. We do
ny sorts of maintenance and bike care are made by the qualified
For full manual on how to set up the Bengal Performance brakes please visit the following
however recommend that a
cycle mechanic.
The parts that are allowed to be self maintained by the owner are:
A. Brakes.
web link: http://www.bengalperformance.com.tw/download.html and click at the
appropriate language version of the mechanical brakes maintenance and set up.
For full manual on how to set up the V-brakes please visit the following web link:
cs/content/cycle/SI/BrakeSystem/BR-M431-http://techdocs.shimano.com/media/techdo
M421/8DV0A-BR-M431_M421-EN_v1_m56577569830604303.pdf
w to set up the running gears please refer to the Shimano
technical documents available here:
B Running gears
For adjustment manual on ho
http://techdocs.shimano.com/media/techdocs/content/cycle/SI/Tourney/RearDerailleur/SI5V80A-En_v1_m56577569830612967.pdf
Please note that Oxygen Bicycles does not allow for any sorts of self
maintenance to the electrical components.
rake cable anchor bolt 5N.m
Brake centre bolt M6: 11N.m
Gear shifter nuts 4N.m
V brake caliper nuts 10N.m
Rear carrier nuts 8N.m
Mudguard bracket nuts 8N.m
Other nuts torque depends on the size:
M4 2.5-4N.m
M5 4-6N.m
M6 6-7.5N.m
Torque recommendations
Rear axle nuts 33N.m
Seat pillar clamp nut/bolt 5-8N.m
B
Page 14

14
7.1 Fitting the front wheel and Quick Release set up
From time to time there is a need o the front wheel from the forks. It is h r
eel back being securely fitted in the forks.
f removing oweve
ont whimportant to know how to set up the fr
Page 15

15
What to look at during the front wheel fitment!!!
The lever should be tight up p rop erly to the end of its travel. It might occu r that the lever is too
soft during locking. In that case the please hold the locking nut on the other end of the axle
and by turning lever around you can set up to the required level.
Page 16

16
Please note what the correct and incorrect set up of the front axle
Page 17

17
Page 18

18
8. Technical specification and performance
Motor 250W high efficiency brushless Suzhou Bafang 8FUN 36V 26”
Battery Advanced Lithium Polymer 36V 13Ah
Modes On / off switch and off road from handle bars, throttle and peddle assisted
Assisted Range 13Ah Up to 60 miles (96km)
Range throttle
only
13Ah Up to 30 miles (48km)
Total weight 13Ah 23.65kg inc. battery
Maximum
speed
15.5mph (25kph) to conform to EU directives power automatically cuts off at
25kph
Gears
Shimano Tournay derailleur with 7 speed Shimano mega range 14-16-18-2022-24-28T
Forks Suspension SR Suntour
Brakes Rear; alloy V-brake calliper. Front; Bengal Performance Disc Brake
Saddle post Alloy with hinged seat for easy battery change
Chain wheel Alloy Pro-wheel 52 teeth
Pedals Bright alloy non-slip
Spokes 13g Stainless steel
Rims 26" x 1.5 Alex Rims
Chain Shimano CN UG51
Tyres Kenda 26*1.95
Page 19

19
and performance of your battery depends on the number of different factors
ffecting its performance. How to maximise your battery range:
eck your s pressure in the region of 55-60 PSI.
low tyre pressure ther ce. With the higher pressure
u will hav
le. Then less weight you carry then the longer
f the bicycle will be.
is re your own effort you will put into pedalling
them longer the range will be.
all ran
not always have an influence. The range quoted in the technical specification is based
on the riding th
t not exce
e may be n quoted. In the hilly terrain the range will also
ase as th gets the
man hen lower the temperature
n lo
your electric bicycle please do
esitate to through our website www.oxygenbicycles.com
9. Getting maximum range from the battery
The range
a
A. Ch tyres pressure. Its best to keep a tyre
e is a higher rolling resistanWith the
yo e a lot lower rolling resistance and the bike will be smoother to ride.
B. Carry the minimum extra luggage if possib
the range o
C. Try to ass t whenever possible. Then mo
The over
may
ge is however influenced by the number of other factors on which the rider
e bicycle with pedal assist mode on the flat terrain only and with the rider’s
eding 80kg in total. Please note that for those of the greater weight the weigh
rang considerably lower tha
decre ere is more being consumed during the climbing. The battery also
best perfor
outside the
ce in the average temperature of 20-25C. T
wer the range will be.
Dear user, if there is still anythi
not h
ng that you are not sure about
contact us either
or by
ding us dire enbicycles.comsen ct email to info@oxyg
 Loading...