

Page 1

Ovislink OV504WN_Quick Installation Guide
1
1 Hardware Installation
1.1 Choosing the Best Location for Wireless Operation
Many environmental factors may affect the effective wireless function of the DSL
Router. If this is the first time that you set up a wireless network device, read the
following information:
The access point can be placed on a shelf or desktop, ideally you should be able to
see the LED indicators in the front, as you may need to view them for troubleshooting.
Designed to go up to 100 meters indoors and up to 300 meters outdoors, wireless
LAN lets you access your network from anywhere you want. However, the numbers of
walls, ceilings, or other objects that the wireless signals must pass through limit signal
range. Typical ranges vary depending on types of materials and background RF
noise in your home or business.
1.2 Connecting the Device
Please follow the steps below to connect the device.
Step1 Connect the ADSL port of the DSL router with a telephone cable.
Step2 Connect the LAN port of the DSL router to the network card of the PC via
an Ethernet cable.
Step3 Plug one end of the power adapter to the wall outlet and connect the
other end to the Power port of the DSL Router.
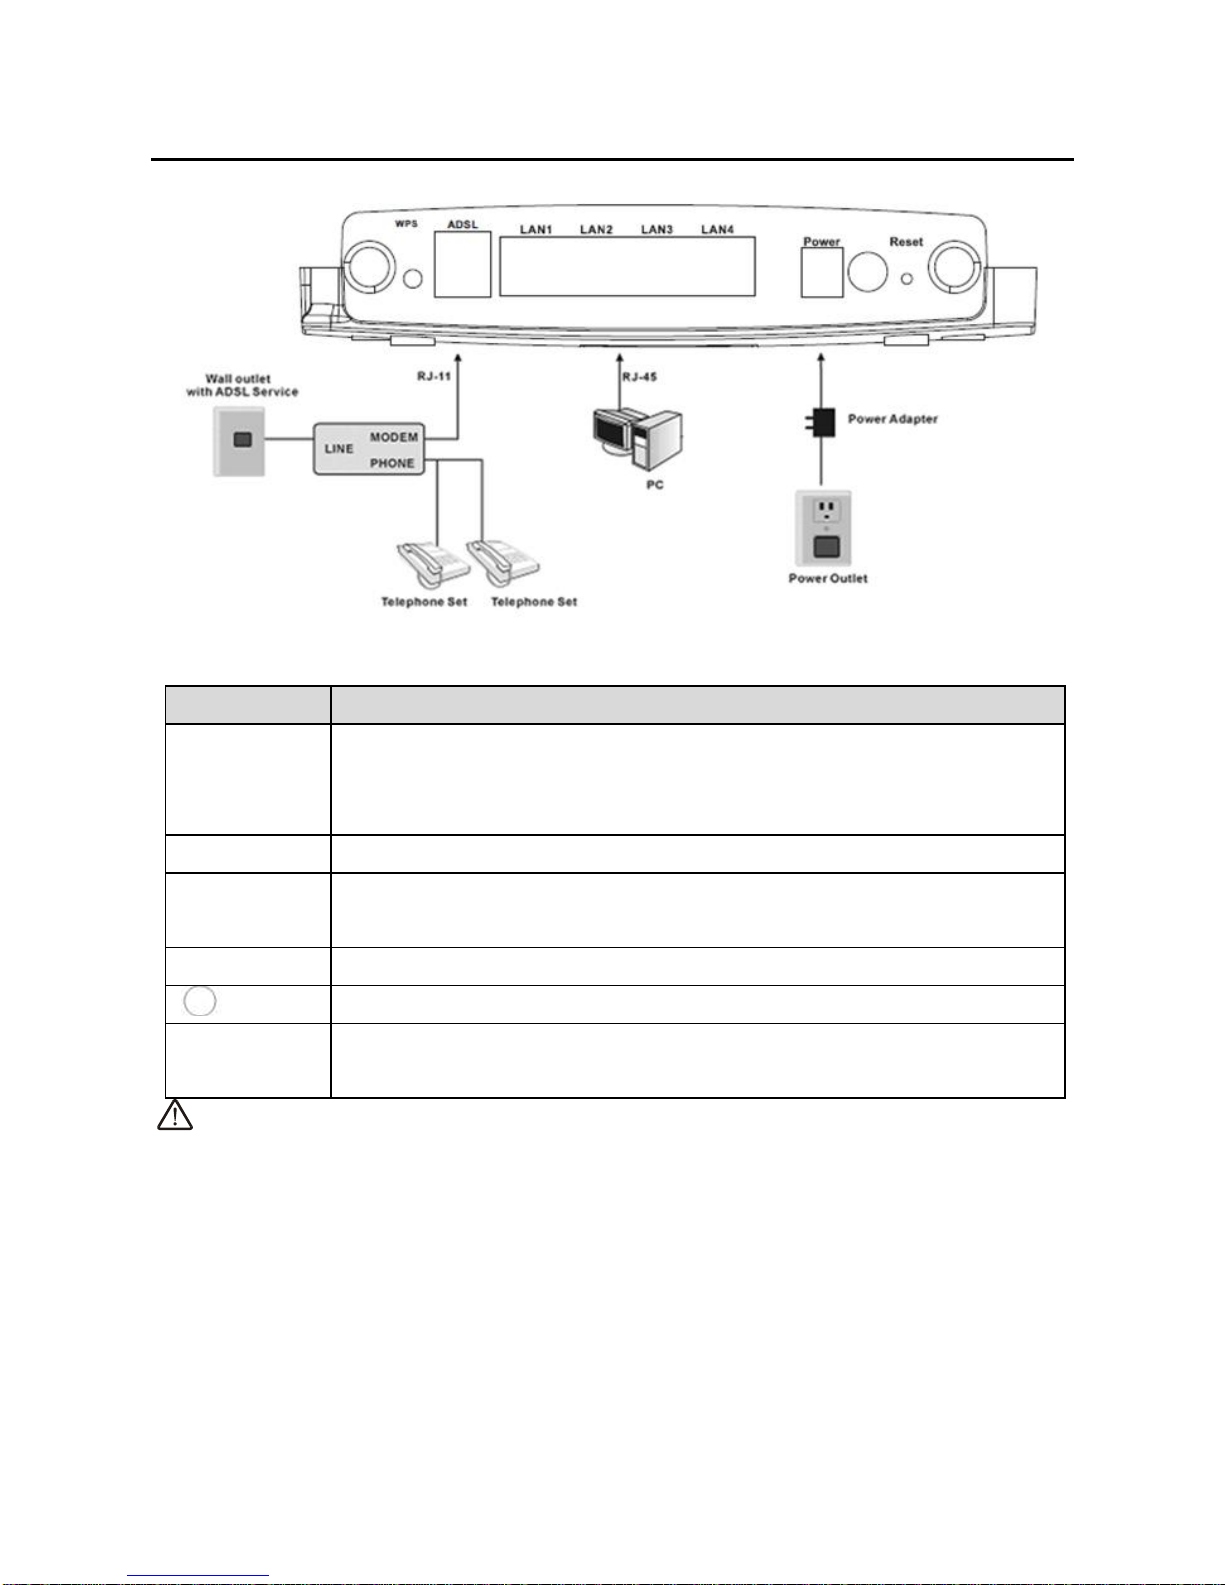
The followig figure displays the connection of the DSL router, PC, and telephones.
Page 2
Ovislink OV504WN_Quick Installation Guide
2
Figure 1 Connecting the DSL router
The following table describes the interfaces or the buttons on the rear panel.
Interface
Description
WPS
This button is used for enabling WPS PBC mode. If WPS is
enabled, press this button, and then the wireless router starts to
accept the negotiation of PBC mode.
ADSL
RJ-11 port, for connecting the ADSL cable.
LAN 1~4
RJ-45 port, for connecting the router to a PC or another network
device.
Power
Power interface, for connecting the power adapter.
Power switch.
Reset
Press the button for at least 1 second and then release it. System
restores the factory default settings.
Warning:
Do not press the Reset button unless you want to clear the current settings. The
Reset button is in a small circular hole on the rear panel. If you want to restore the
default settings, please press the Reset button gently for 1 second with a fine needle
inserted into the hole and then release the button. The system reboots and returns to
the factory defaults.
The power specification is 12V, 1A. If the power adapter does not match the
specification, it may damage the device
Page 3

Ovislink OV504WN_Quick Installation Guide
3
2 PC Network Configuration and Login
2.1 PC Network Configuration
Each network interface on the PC should either be configured with a statically defined
IP address and DNS address, or be instructed to automatically obtain an IP address
using the network DHCP server. DSL router provides a DHCP server on its LAN and
it is recommended to configure your LAN to automatically obtain its IP address and
DNS server IP address.
The configuration principle is identical but should be carried out differently on each
operating system.
The following displays the TCP/IP Properties dialog box on Windows XP.
Page 4

Ovislink OV504WN_Quick Installation Guide
4
Figure 2 IP and DNS configuration
TCP/IP configuration steps for Windows XP are as follows:
Step1 Choose Start > Control Panel > Network Connections.
Step2 Right-click the Ethernet connection icon and choose Properties.
Step3 On the General tab, select the Internet Protocol (TCP/IP) component
and click Properties.
Page 5

Ovislink OV504WN_Quick Installation Guide
5
Step4 The Internet Protocol (TCP/IP) Properties window appears.
Step5 Select the Obtain an IP address automatically radio button.
Step6 Select the Obtain DNS server address automatically radio button.
Step7 Click OK to save the settings.
2.2 Logging In to the DSL Router
To log in to the DSL router, do as follows:
Step1 Open a Web browser on your computer.
Step2 Enter http://192.168.1.1 (the default IP address of the DSL router) in the
address bar. The login page appears.
Step3 Enter the user name and the password. The default username and
password of the super user are admin and admin. The username and
password of the common user are user and user. You need not enter the
username and the password again if you select the option Remember
my password. It is recommended to change these default values after
logging in to the DSL router for the first time.
Step4 Click OK to log in to the Web page. Otherwise, please click Cancel to exit
the login page.
Page 6

Ovislink OV504WN_Quick Installation Guide
6
Figure 3 Login page
After logging in to the DSL router as a super user, you can query, configure, and
modify all the settings, and diagnose the system.
Page 7

Ovislink OV504WN_Quick Installation Guide
7
3 Web-Based Management
This chapter describes how to use Web-based management of the DSL router, which
allows you to configure and control all of DSL router features and system parameters
in a user-friendly GUI.
3.1 Quick Setup
Choose Quick Setup and the following page is displayed.
Enter the username and password your ISP has provided to you. The following page
is displayed if quick setup is successful. Click Next to see the device information.
 Loading...