

Page 1

OV504R(TR069)
User manual
Ver: 2.00
Page 2

OV504R User Manual
i
Important Safe ty Instructions
Pl ease re ad thes e instructions carefu lly:
1. Unplug the ADSL2+ Router Ethernet Adaptor from the wall outlet before
cle an ing. Do not us e liqu id cle aner s or ae rosol cle aners . Use a d amp cl oth
for cleaning.
2. Do not use the ADSL2+ Router Ethernet Adaptor near water.
3. Make sure the working platform is flat. Do not put heavy objects on the
ADSL2+Router.
4. Use the AC/DC power adapter that matches the ADSL2+ Router.
5. Disconnect the power supply and all wires from the ADSL2+ Router in
lightnin g storm , t o avoid lightning strike.
6. Ta ke water proof me asur es duri ng th e stora ge, tr ansp ortati on and r unni ng
of the ADSL2+ Router.
7. Avoid direct sunl ight.
Note: When the ADSL2 + R oute r is use d f or a long t ime, tempe rature of the
shell will rise. This is normal.
Page 3

ii
Contents
Chapter 1 Introduction............................................................................... 1
Features......................................................................................................... 1
ADSL standard supports................................................................................. 1
Encapsula tion supports................................................................................... 2
System requiremen ts......................................................................................2
LED status description.................................................................................... 3
Rear panel layout............................................................................................ 4
Chapter 2 Hardware Installation............................................................... 5
Chap ter 3 Modem Parameters Setting....................................................... 6
Configuring computer network card IP address................................................ 6
Web sett in g i nterface ...................................................................................... 6
Ethernet over ATM (RFC1483 Bridge) setting................................................. 7
PPP ov er Ether net (RFC 251 6) setting............................................................ 10
TR069 setting............................................................................................... 14
Chapter 4 Questions & Answers ........................................................... 16
Page 4

1
Chapter 1 Introduction
The device is a well-designed high-speed ADSL modem/router.
Features
• Full rate ADSL router, support Bridge/Router
• Provides 24 Mbps do w ns tr eam and 1Mbps upstream
• Maximum transmission range: 5.4 Kilometers
• Four Ethernet ports,
10/100 Mbps Auto-MDI/MDIX
• Friendly GUI for web configuration.
• Configurable as a DHCP Server on Your Network
• Compatible with all standard Internet applications
• Industry s tandard and interoperable DSL i nterface
• Si m ple we b-ba sed status page di splays a sn apshot of your
co nfigurat io n, and link s to the configuration pages.
• Downloadab le flash software upgra des
• Support up to 8 Permanent Virtual Circuits (PVC)
• Support up to 8 PPPoE sessions
• Support TR069
ADSL standard supports
• ITU G.992.1 (G.dmt) Annex A
• ITU G.992.2 (G.lite)
Page 5

2
• ANSI T1.413 Issue 2
• ITU G.992.3(ADSL2)
• ITU G.992.5(ADSL2+)
Encapsulation supports
• RFC 1483 bridge
• RFC 1483 Router
• Classical IP over ATM (RFC 1577)
• PPP over ATM (RFC 2364)
• PPP over Ethernet (RFC 2516)
System requirements
Recommended system requirements are:
• Pentium 233MHZ or above
• Memory: 64MB or above
• 10M Base-T Ethernet or above
• Win9X, Win2000, WinXP, WinMe, WinNT
• Et hern et N etwork Car d
Please collect the following information from your ADSL service provider.
This information will be very helpful for your ADSL configuration. To
ke ep a recor d f or re feren ce, you can f ill i n the colum n as fol low:
VPI
VCI
Page 6
3
Encaps ulation: VCMUX or LLC
Protocol
Standard
User name
Password
Password protocol
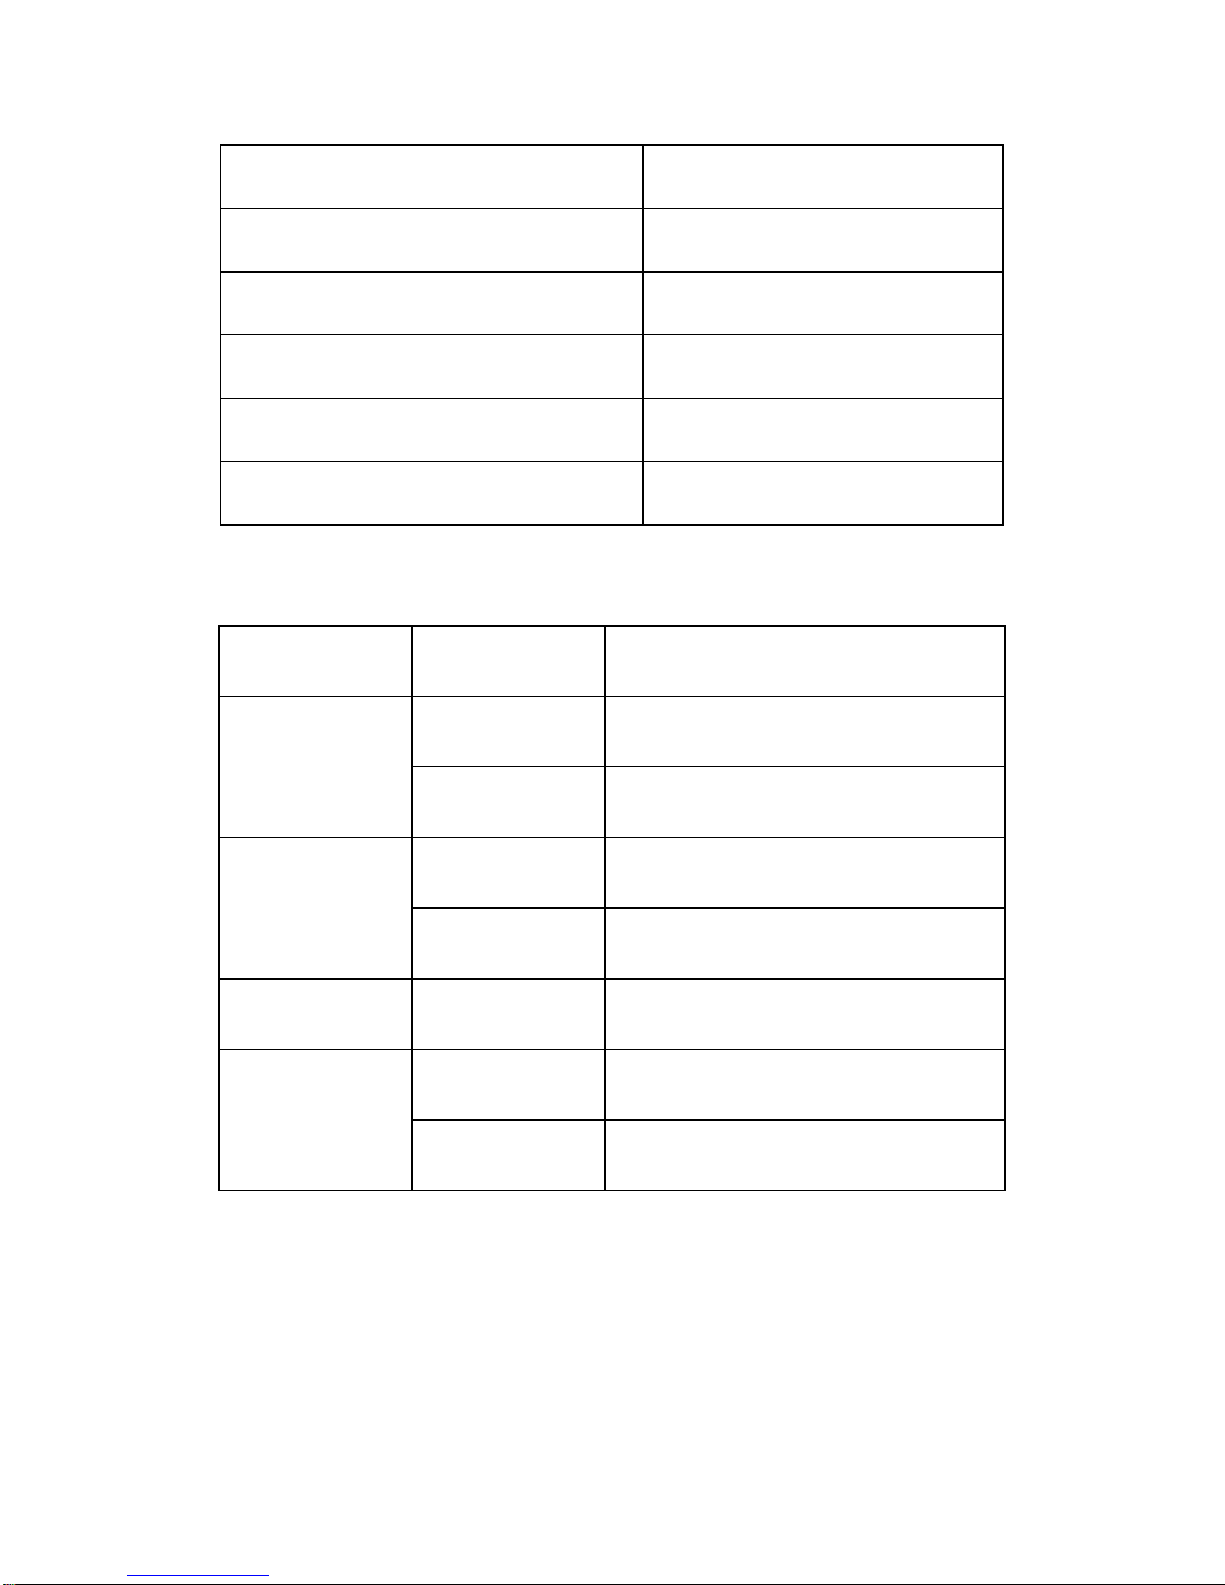
LED status description
INDICATOR STATUS Description
Off No power
Power
ON Power supplied
Quick Blink DSL line is training
ADSL
ON DSL line is connected
Data Blink DSL data transferring
ON Ethernet connection is OK
LAN
(4-1)
Blink Ethernet data transferring
Page 7

4
Rear panel layout
Interface Description
SWITCH Power on/off switch
POWER Plug in for power adaptor
Modem Reset button
Press and hold aro und 5~ 10s to reset the
har d ware. The modem will a ut o restart.
Thi s action will recover the modem’s
default configuration.
RESET
Ethernet interface for connecting to
comp ute r or Switch
Ethernet(1-4)
ADSL connector for connecting to ADSL
telephone line
LINE
Page 8

5
Chapter 2 Hardware Installation
Pl ease con nect t he device to you com put er as follow:
• If connecting to the splitter, connect the “Line” splitter to wall jack
using one telephone cable
• Use the other telephone cable to connect “MODEM” port of the
splitter and “LINE” port of the modem. The “phone” port of the
sp l itter can be use to conn ect the teleph on e by a teleph one cable.
• Use Ethernet cable to connect “Ethernet” port of the modem and
“E thernet” port of your comp uter.
If do not need to connect to the splitter,
• Connect th e modem to wall jack with a tele phone ca bl e
• Use Ethernet cable to connect “Ethernet” port of the modem and
ne twor k adaptor of you r compute r
Page 9

6
Chapter 3 Modem Parameters Setting
Configuring computer network card IP address
Configure your network card’s TCP/IP properties to Obtain an IP add ress
automatically from modem, or set the computer’s IP wit h the s ame network
mask of the modem.(For example: modem’s IP is 192.168.1.1/255.255.255.0,
Then you can set computer’s IP to:
192.168.1.x/255.255.255.0.
The range for x is from 3 to 253)
Web setting interface
Open IE or Netscape Web browser, Input http://192.168.1.1(MOD E M d efault
IP address) in the address column, then click <ENTER> button, access the
following setting interface:
Input user name and password, then click Login key to enter WEB setting
interface.
Def a u lt sett in g:
IP Addres s: 192.168.1.1
Subnet Mask: 255.255.255.0
Username: admin
Password: admin
Main inter face
After type right user name and password, the following window will pop up:
Page 10

7
Here provide the most common RFC1483 Bridge and PPP over Ethernet
(RFC2516) setting for reference. If you want to know more about other
pr otocol, please cont act your ADSL service p rovider for details
Ethernet over ATM (RFC1483 Bridge) setting
1. From t he Home page, click on “Quick S e tup ”, See the following:
Page 11

8
2. Unselect the check box to enable DSL Auto-connect process. Set any
PVC channel, Click on VPI/VCI, see the following:
3. Click the “Next” button, and you can set the encapsulation which get
from your ADS L ser vice provid er, s ee the following :
4. Click the “Next” button , select the check box below to enable this
WAN service, see the following:
Page 12

9
5. Click the “Next” button, configure the DSL Router IP Address and
Subnet Mask for your Local Area Network (LAN) , please use the
default configurations, see the fo llow ing :
6. Click the “Next” button, make sure that the settings below match the
settings provided by your ISP., see the following:
Page 13

10
7. Click the “Sav e/Reboo t” but to n, sav e your conf iguratio ns.
NOTICE:
If you select Dial-UP link, after configuring your ADSL modem, please install
the third-party dial up program to access Inter net (For example: Et hernet
300/Ethernet 500/WinPoet). If your system is WinXP, you can use its own
Intern et access progra m w i thou t any oth er add i tional progra m s.
PPP over Ethernet (RFC2516) setting
PPPoE is also named as RFC 2516. It is a method of encapsulating PPP packets
over Et h e rnet. PPP or Point-to-Poin t protocol is a m ethod of establishing a
network connection/session between network hosts. It usually provides a
mechanism of authenticating users.
To configure the MODEM for PPPoE:
1. Fr om the Hom e page , clic k on “Qu i ck Setup ” , see the f ollowing:
Page 14

11
2. Unselect the check box to enable DSL Auto-connect process. This
Quick Setup will guide you through the steps necessary to configure
your DSL Router., and you can set the PVC which get from your
ADSL service provider, see the following:
3. Click the “Next” button , select the type of network protocol and
encapsulation mode over the ATM PVC that your ISP has instructed
you to use, see the following:
Page 15

12
4. Click the “Next” button, unenable IGMP Multicast, and enable WAN
Service, see the following.
5. Click the “Next” button, Configure the DSL Router IP Address and
Subnet Mask for LAN interface, please use the default configurations,
se e t h e f ollowing.
Page 16

13
6. Click the “Next” button, make sure that the settings below match the
settings provided by your ISP. see the following:
7. Click the “Save/Rebo ot” button, sav e your conf igurat io ns, then finish
the Setting for PPPoE.
Page 17

14
TR069 setting
Inform:
Disable: modem cannot automatically se nd out the request to the TR069 server
Enable :modem can automatically se nd out the request to the TR069 server,
Select “Enable”, all items below are effective
Page 18

15
Inform Interval: Each modem how many seconds sends out the connection
request to the TR069 server
ACS
URL: the path of modem sending out the request the TR069 server
ACS User Name:the username of modem logging in TR069 server
ACS P ass w ord: t he pas sword of m odem loggin g in T R 069 server
Connect ion Reque st U ser Nam e: the usern ame of t he TR06 9 serve r vi sits
modem TR069 process.
Connection Request Password:the password of the TR069 server visits modem
TR069 proc ess.
Page 19

16
Chapter 4 Questions & Answers
1. Qu estion: Wh y all LED i ndica tors a r e off?
Answer: Check the connection between the power adaptor and the
power socket
• Check the power switch is on or not
2. Question: Why Ethernet LED is not lighting?
Answer:
• Check the connection between the ADSL modem and your
computer or Hub/Switch
• Check your PC or Hub/Switch running status and make sure
th em are wor kin g normally.
3. Question: Why DSL LED is not lighting?
Answer: Check the connection between the ADSL “line” port and the
wall ja ck.
4. Question: Why cannot visit Internet with DSL LED is on?
Answer: Make sure following information has been input correctly:
VPI/VCI
User/password.
5. Question: Why cannot open the Modem configuring web page?
Answer:
Follow below steps to check the communication between the
computer and Modem:
Page 20

17
Cl ick st art - > run (input ping de m ands )-> Pi ng 192.168.1.1 ( MODEM
IP address).
If cannot reach the modem, please check following configuration:
• The type of the network cable
• The connection between the mo dem and computer
• You computer’s TCP/IP configuration
6. Question: How to load the default setting after incorrect
configuration?
Answer: Press “reset” button 5s-10s to load the default configuration.
The modem’s default IP address: 192.168.1.1/255.255.255.0,
Userna m e/password: ad m in/admin
 Loading...