

Page 1
Wired & Wireless
ADSL 2+
ROUTER
EVO-DSL Series
Quick installation guide
Guide d’installation rapide
Guía rápida de instalación
Guia de instalação
Page 2

Page 3
ADSL2+ ROUTER
Thank you for trusting OvisLink. Your satisfaction is our goal and we assure you our quality
products will meet your expectations.
PACKAGE CONTENT:
Before installing this modem router, check that elements listed here are present:
- A router
- A power supply
- RJ-11 cable
- ADSL filter
- Ethernet Cat. 5 RJ-45 crossed cable
- USB cable (only Evo-DSL11)
- This user’s guide
If any element is missing, please contact with your distributor.
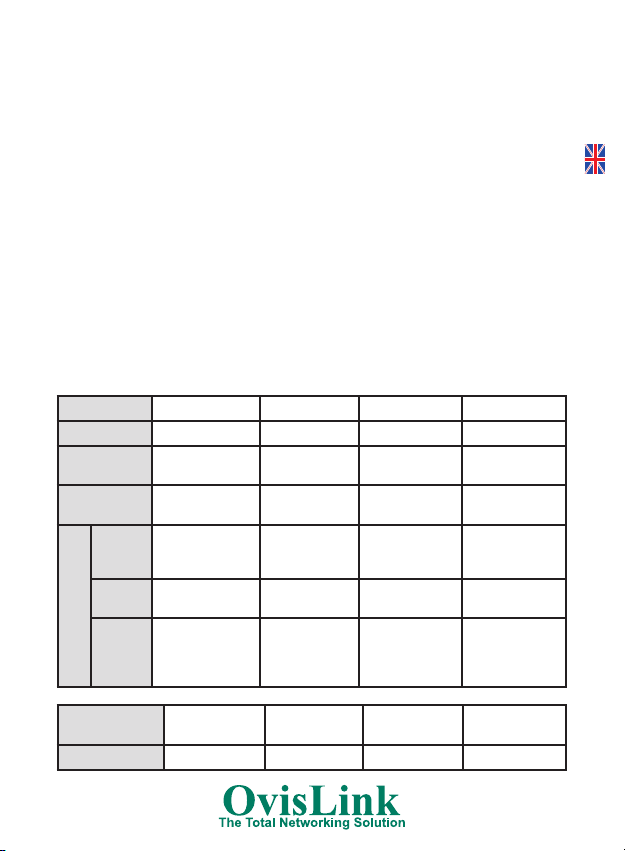
LEDs PANEL:
Evo-DSL11 Steady light Flashing Fast flashing Off
POWER (red) Power on / / Power off
LINK (yellow)
DATA (green)
Green
Red USB is connected /
PC
Orange
The modem is in
good connection
Wan is connected
Ethernet line is
connected
USB and Ethernet
are connected
In handshaking
status
/
/
/
/
Transmitting or
receiving data
Transmitting or
receiving data
Transmitting or
receiving data
Transmitting or
receiving data
Connection not
set up
Wan is not connected
Ethernet line
not connected
properly
USB is not connected properly
USB and
Ethernet are
not connected
properly
ENGLISH
Evo-DSL41 &
Evo-DSL41W
POWER (red) Power on / / Power off
Steady light Flashing Fast flashing Off
1
Page 4
DSL (yellow)
Internet (green)
ENGLISH
LAN / Wireless
(green)
The modem is
in good connection
Wan is connected
Ethernet line
or Wireless is
connected
In handshaking
status
/
/
Transmitting or
receiving data
Transmitting or
receiving data
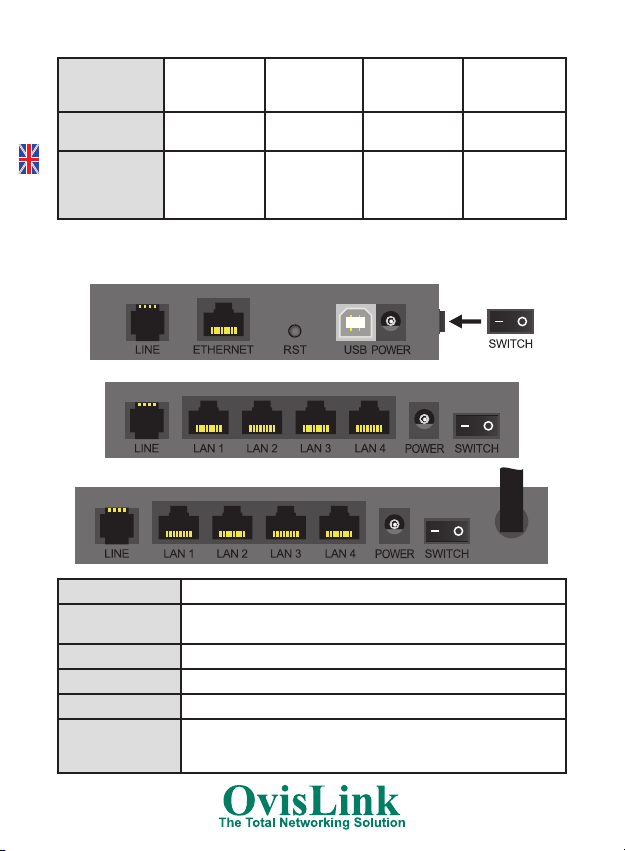
CONNECTORS:
The connectors are on the back panel :
Evo-DSL11
Evo-DSL41
Evo-DSL41W
LINE Connected with phone line or “ADSL” port of the splitter.
ETHERNET or LAN
USB To be connected to a PC by an USB cable
SWITCH To turn on / off the power.
POWER Power interface, Connect with power adapter.
RST
To be connected to a PC network card by a straight-through network
cable, also can use a crossover cable to connect to Switch or Router.
Press the reset button and turn on the power, then keep pressing the
reset button for 5 seconds. Then you can reset the modem with the
default settings.
2
/
Connection not
set up
Wan is not connected
Ethernet line
or Wireless
not connected
properly
Page 5

Note : With Evo-DSL41 and Evo-DSL41W, the Reset button is placed under the product, near to a rubber
foot.
HARDWARE INSTALLATION:
1) Use a telephone cord to connect the LINE port of the splitter with the RJ-11 port
(the phone jack) on the wall.
2) Use another telephone cord to connect the ADSL port of the splitter with the LINE
port of the ADSL Modem.
3) Use another telephone cord to connect the telephone set with the PHONE port of the
splitter.
4) Connect Ethernet port of the router with 10/100BASE-T port of the computer using the
network cable that comes with the modem. If you have a Evo-DSL11 and you want to
use the USB port, please, insert the CD-Rom first, and install the driver (setup.exe).
After that, you can plug the USB cable.
5) Plug in the power cord, and turn on the power.
COMPUTER SETUP:
1) Configure the IP adress of the computer on automatic (DHCP client), which will allow
the modem/router to set a proper IP adress to the computer so that the whole
configuration and the internet connexion can be done.
2) If you use Windows 2000/XP, open the Configuration Panel and then the Network
Connections.
3) Right click on the Local Network Connection and choose Properties.
4) Click twice on Internet Protocol TCP/IP.
5) Select the automatic IP adress.
6) Select automatic DNS server adresses.
7) Click on OK.
8) Click on Close.
Once the windows are closed, check the configuration of your internet browser.
ENGLISH
3
Page 6

BROWSER SETUP:
1) The browser must be setup so that it connects directly to the internet, without requiring
any proxy or automatic configuration.
2) For Internet Explorer, open your browser, and click on Tools and Internet Options...
ENGLISH
3) Click on Connexion tab and select Never connect.
4) Then, click on the button Network Parameters and uncheck everything. Click on OK.
5) Click on OK to close the Internet Options.
Once the options are validated, keep the Internet browser open to configure the router.
INTERNET CONNECTION:
1) In the internet browser (IE, Firefox, ...), enter the following address :
2) You are then asked to enter an username and a password to be granted access to
the configuration pages of the router. Enter these names :
3) Now, you’re in the web interface of the router. Please, click on WAN link.
4) You find a table with all the default configuration. All is in Bridge mode, so you’re
router are working as a simple adsl modem. To enable the router feature, please,
click on the Edit button in front of your VPI/VCI configuration or on the Add button.
http://192.168.1.1
Username: admin
Password: password
4
Page 7
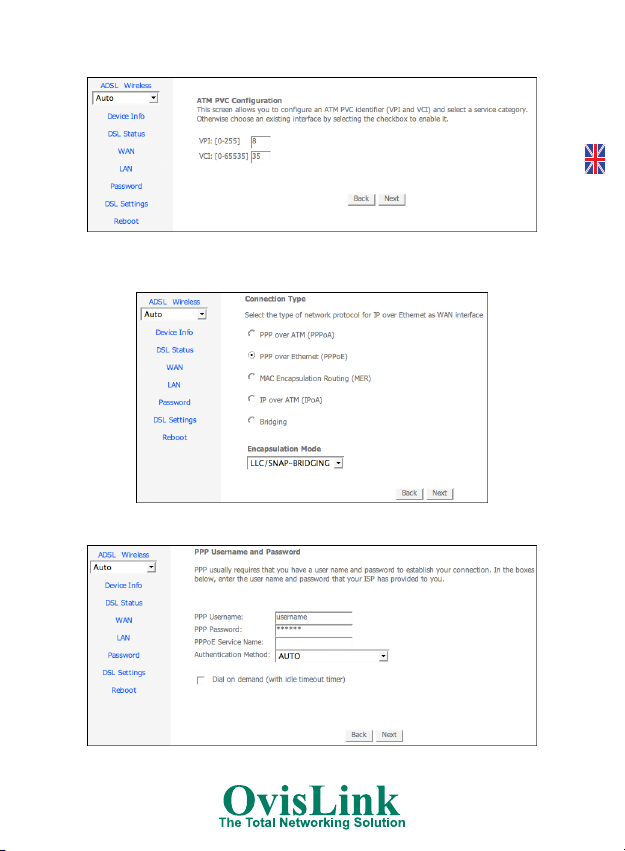
5) You can see the VPI/VCI values. Don’t modify them and click on Next button.
6) Now, you can choose your connection type. In most of case, you must use PPPoE
connection, so we’ll detail this option. Select the PPP over Ethernet option and select
your Encapsulation mode. Click on Next button.
7) Please, enter your username and password of your internet connection (please, see
your FAI contract) and click on Next button.
ENGLISH
8) Check that the « Enable WAN Service » option is selected, and you can change the
5
Page 8
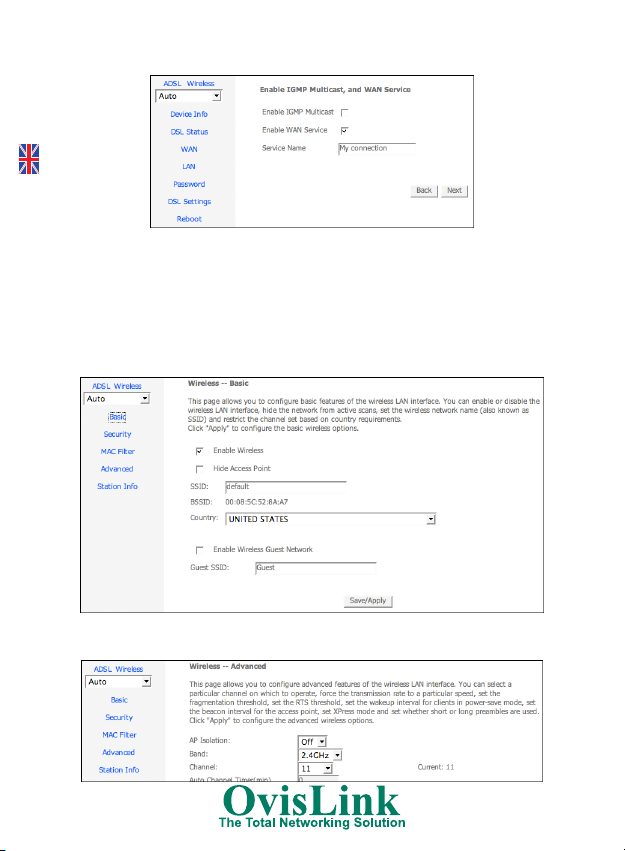
Service Name if you want (no need for the internet connection). Click on Next button.
ENGLISH
9) Now, you can see a summary table of your internet connection. Click on Save button.
WIRELESS SETUP (only for Evo-DSL41W):
1) Click on Wireless link.
2) Click on Basic link. In this part, you can enable/disable the wireless feature and
configure it. Change the SSID (name of the wireless network) if you want and select
your country. Click on Save/Apply button.
3) Click on Advanced link to change only the chanel, if you need it (to avoid some
connection issues with other access point). Click on Save/Apply button.
6
Page 9
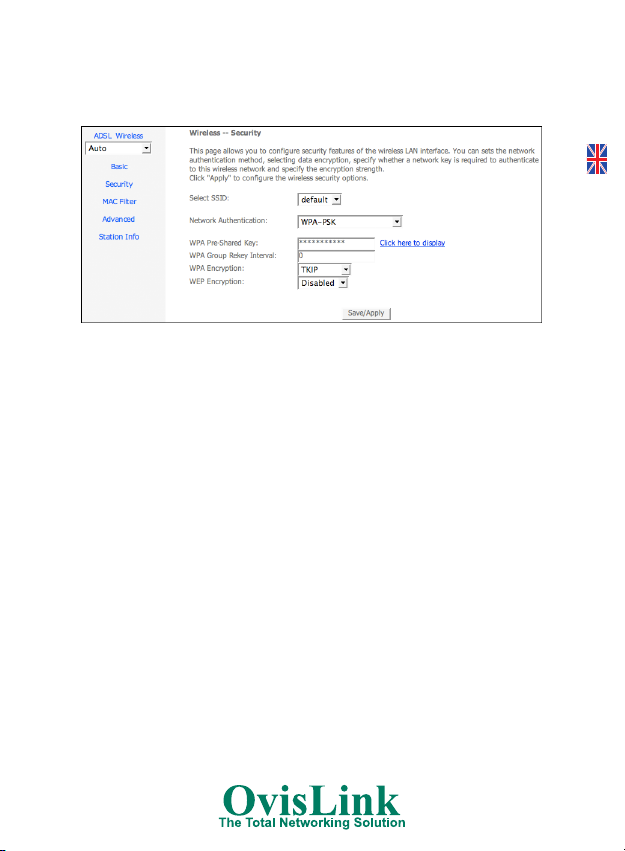
4) Now, we’ll go to secure the wireless network. Click on security link, select your SSID,
and we advice you to select WPA-PSK in the Network Authentication list. After that,
enter a WPA Pre-Shared Key that will be the encryption key for your wireless network.
Click on Save/Apply button.
ADVANCED SETUP:
This part is reserved to professional networkers. You can reach the advanced setup by
using the following address :
http://192.168.1.1/main.html
By this way, you can configure a port-forwarding, setup the firewall, ...
TECHNICAL SPECIFICATIONS:
Evo-DSL11
•Interfaces:
- 1 x RJ45 10/100 Mbps port
- 1 x RJ11 Adsl port
- 1 x USB port
•Adsl2+modemuntil24Mbps
•WANmode: Bridging, PPPoA, PPPoE, MER and IPoA
•Features: NAT, NAPT, Firewall, DHCP Server, SNMP and Parental Control
Evo-DSL41
•Interfaces:
- 4 x RJ45 10/100 Mbps ports
- 1 x RJ11 Adsl port
•Adsl2+modemuntil24Mbps
•WANmode: Bridging, PPPoA, PPPoE, MER and IPoA
ENGLISH
7
Page 10

•Features: NAT, NAPT, Firewall, DHCP Server, SNMP, Parental Control, Virtual
Servers, Dynamic DNS, DMZ and UPnP
Evo-DSL41W
•Interfaces:
ENGLISH
- 4 x RJ45 10/100 Mbps ports
- 1 x RJ11 Adsl port
- Wireless 802.11g 54 Mbps
•Adsl2+modemuntil24Mbps
•WirelessSecurity: WEP, WPA, 802.1x RADIUS and ACL
•WirelessFeatures: WDS (Bridge/Repeater) and Universal Repeater
•WANmode: Bridging, PPPoA, PPPoE, MER and IPoA
•Features: NAT, NAPT, Firewall, DHCP Server, SNMP, Parental Control, Virtual
Servers, Dynamic DNS, DMZ and UPnP
•VPNIPSec
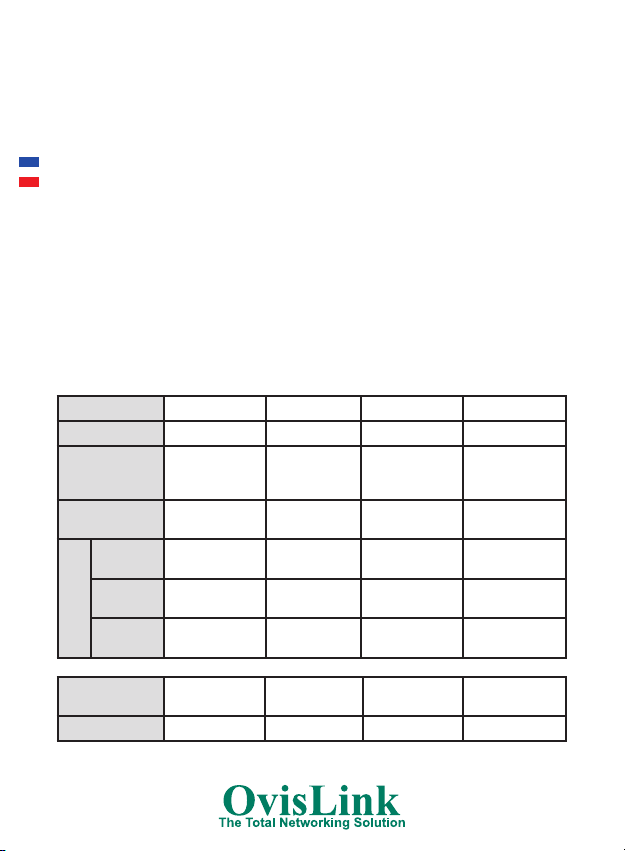
Information of radio usage in the European Community:
France
ETSI
Singapore Japan Israel
All
Others
Channel
Number
Center
Frequency
1 2412 MHz X X** X - X -
2 2417 MHz X X** X - X -
3 2422 MHz X X** X - X X
4 2427 MHz X X** X - X X
5 2432 MHz X X** X - X X
6 2437 MHz X X** X - X X
7 2442 MHz X X** X - X X
8 2447 MHz X X** X - X X
9 2452 MHz X X** X - X X
10 2457 MHz X X X X X -
11 2462 MHz X X X X X -
12 2467 MHz - X X X X -
13 2472 MHz - X X X X -
North
American
FCC
**Note: Channel can be used at a maximum of 10 dBm EIRP
8
Page 11

DECLARATION OF CONFORMITY:
Hereby, OvisLink declares that these Evo-DLS11, Evo-DSL41 and Evo-DSL41W are in
compliance with the essential requirements and other provision of Directive 1999/5/EC.
To see all the standards tested, please, visit our web www.ovislink.co.uk
The following importer/manufacturer is responsible for this declaration of conformity:
Company Name: OvisLink France S.A.
Adress: 16-18 Route de ROUEN, 27950 SAINT-MARCEL. France.
Tel.:+33(0)232711509
Fax:+33(0)232548728
Name: Horia SCURTU
Position: General Manager.
Date: 25/06/2004.
Signature:
GUARANTEE CONDITIONS FOR UNITED KINGDOM AND IRELAND.
This product has passed successfully strict quality tests that guarantee this product is in
perfect working condition; free of manufacture defects enabling best performance.
This product has a Life Time Guarantee, in the event that any fault or defect is discovered,
we will, unless the fault or defect has been caused by a misuse of the goods or
manipulation by non-qualified person or because of future incompatibilities or by the
product being used for a purpose for which it was not been designed, either repair or, at
our option, it will be replaced by other similar or better, new or repaired product free of
charge to the purchaser.
Contact with your local distributor for further information respect change procedure.
For further information, please contact with OvisLink:
United Kingdom and Ireland.
Tel.: +44 1256 398597
WEB: http://www.ovislink.co.uk
ENGLISH
9
Page 12
ROUTEUR ADSL2+
OvisLink France vous remercie de vous êtes procurer ce produit et nous croyons qu’il
remplira pleinement ses fonctions, tout en vous apportant de la satisfaction.
FRANÇAIS
CONTENU:
Avant de procéder à l’installation, veuillez vérifier que ces éléments sont présents:
- Un routeur
- Un bloc d’alimentation
- Câble RJ-11
- Filtre ADSL
- Câble Ethernet Cat. 5 RJ-45 croisé
- Câble USB (avec Evo-DSL11)
- Ce guide de l’utilisateur
Si un élément venait à manquer, veuillez consulter votre revendeur.
LEDs:
Evo-DSL11 Allumé Clignotant Clign. rapide Eteint
POWER (rouge) Produit allumé / / Produit éteint
LINK (jaune)
DATA (vert)
Vert
PC
Rouge USB connecté /
Orange
Le modem est
connecté
Connecté à
internet
Ethernet connecté
USB et Ethernet
connectés
Recherche de
la synchronisation
/
/
/
/
Transfert de
données
Transfert de
données
Transfert de
données
Transfert de
données
Pas de synchronisation
Pas connecté à
internet
Ethernet non
connecté
USB non connecté
USB et Ethernet
non connectés
Evo-DSL41 &
Evo-DSL41W
POWER (rouge) Produit allumé / / Produit éteint
Allumé Clignotant Clign. rapide Eteint
10
Page 13

DSL (jaune)
Internet (vert)
LAN / Wireless
(vert)
Le modem est
connecté
Connecté à
internet
Ethernet ou
Wireless connecté
Recherche de
la synchronisation
/
/
/
Transfert de
données
Transfert de
données
Pas de synchronisation
Pas connecté à
internet
Ethernet ou
Wireless non
connecté
CONNECTEURS:
Les connecteurs sont à l’arrière du produit:
Evo-DSL11
Evo-DSL41
Evo-DSL41W
LINE Connecté au filtre Adsl, lui même connecté sur la prise murale.
ETHERNET or LAN
USB Connecté à un port USB d’un PC sous Windows.
SWITCH Pour allumer/éteindre le routeur.
POWER Connecté au bloc d’alimentation fourni.
RST
Connecté à la carte réseau d’un ordinateur, ou sur un hub/switch avec
le câble Ethernet fourni.
Appuyez sur le bouton Reset, maintenez le enfoncer et allumer le
produit. Comptez jusqu’à 5 secondes pour relâcher
FRANÇAIS
Note : Avec l’Evo-DSL41 et l’Evo-DSL41W, le bouton Reset se trouve sous le produit, près d’une gomme.
11
Page 14

INSTALLATION MATERIELLE:
1) Utilisez le câble téléphonique fourni pour connecter le port LINE au filtre Adsl fourni.
2) Connectez le filtre Adsl sur la prise téléphonique murale.
FRANÇAIS
3) Connectez le port Ethernet ou LAN du routeur, au port Ethernet de votre ordinateur en
utilisant le câble réseau fourni. Si vous avez un Evo-DSL11 et que vous préférez
utiliser le port USB, veuillez insérez d’abord le CD fourni, et installer le pilote
(setup.exe). Une fois installé, vous pouvez branché le câble USB fourni.
4) Branchez le câble d’alimentation in the power cord, and turn on the power.
CONFIGURATION ORDINATEUR:
1) Tout d’abord, il faut configurer l’adresse IP de l’ordinateur de manière automatique
(Client DHCP), ce qui permettra au modem/routeur d’attribuer une adresse IP valide
à l’ordinateur pour effectuer la configuration et la connexion à internet.
2) Pour Windows 2000/XP, accédez au Panneau de configuration et allez dans les
Connexions réseaux.
3) Faîtes un clic droit sur la Connexion au réseau local et cliquez sur Propriétés.
4) Cliquez deux fois sur le Protocole internet TCP/IP.
5) Sélectionnez Obtenir une adresse IP automatiquement.
6) Sélectionnez Obtenir les adresses des serveurs DNS automatiquement.
7) Cliquez sur OK.
8) Cliquez sur Fermer.
Une fois les fenêtres fermées, vérifiez la configuration de votre navigateur internet.
CONFIGURATION NAVIGATEUR:
1) Il faut configurer le navigateur internet de façon à se connecter directement à internet,
sans proxy ni configuration automatique.
2) Pour Internet Explorer, veuillez ouvrir le navigateur et allez dans Outils et Options
Internet...
3) Cliquez sur l’onglet Connexion et sélectionnez Ne jamais établir de connexion.
4) Ensuite, cliquez sur le bouton Paramètres réseau ... et décochez toutes les cases.
12
Page 15

Cliquez sur OK.
5) Cliquez sur OK pour fermer les Options Internet.
Une fois les options validées, gardez le navigateur internet ouvert pour configurer le
routeur.
CONNECTION INTERNET:
1) Dans le navigateur internet (IE, Firefox, ...), tapez dans la barre d’adresse:
http://192.168.1.1
2) Une page d’accueil vous propose d’entrer un nom d’utilisateur et un mot de passe
pour accéder à la configuration du modem/routeur. Faîtes comme suit:
Nom d’utilisateur: admin
Mot de passe: password
3) Une fois dans l’interface web du routeur, veuillez cliquer sur le lien WAN.
4) Vous trouvez un tableau avec les configurations par défaut. Toutes sont en mode
Bridge, donc le produit fonctionne comme un simple modem. Pour activer les
fonctions du routeur, veuillez cliquez sur le bouton Edit en face du VPI/VCI “8/35” ou
cliquez sur le bouton Add.
FRANÇAIS
13
Page 16

5) Vous apercevez les valeurs VPI/VCI. Ne les modifiez pas et cliquez sur Next.
FRANÇAIS
6) Choisissez votre mode de connexion. Dans la plupart des cas, vous utilisez le mode
PPPoE. Sélectionnez le et ensuite, choisissez l’encapsulation LLC. Cliquez sur Next.
7) Veuillez entrer vos identifiants de connexion internet (voir votre contrat opérateur)
dans Username (utilisateur) et Password (mot de passe), puis cliquez sur Next.
8) Veuillez vérifier que l’option « Enable WAN Service » est bien cochée, et ensuite, vous
pouvez changer le nom du Service (Service Name). Ce paramètre n’est pas utile pour
14
Page 17

la connextion internet. Cliquez sur Next.
9) Vous pouvez lire le résumé de votre connexion internet. Cliquez sur Save.
CONFIGURATION WIRELESS (seulement pour Evo-DSL41W):
1) Veuillez cliquer sur le lien Wireless.
2) Cliquez sur le lien Basic. Dans cette page, vous pouvez activer/désactiver la fonction
Wireless. Changez le SSID (nom du réseau) et sélectionnez France (Country).Cliquez
sur Save/Apply.
3) Cliquez sur le lien Advanced pour changer uniquement le canal (channel), si vous
voulez éviter les interférences avec d’autres points d’accès. Cliquez sur Save/Apply.
FRANÇAIS
15
Page 18

4) Pour sécuriser le réseau Wireless, veuillez cliquer sur le lien Security. Sélectionn votre
SSID, et sélectionnez WPA-PSK dans la liste Network Authentication. Ensuite, entrer votre
clé de cryptage que vous voulez utiliser, dans WPA Pre-Shared Key. Cliquez sur Save/
Apply.
FRANÇAIS
CONFIGURATION AVANCEE:
Cette partie est réservée au professionnel du réseau. Elle est accessible à l’adresse
suivante:
Vous pourrez ainsi re-diriger des ports, configurer le firewall, ...
CARACTERISTIQUES TECHNIQUES:
Evo-DSL11
•Interfaces:
- 1 port RJ45 10/100 Mbps
- 1 port RJ11 Adsl
- 1 port USB
•ModemAdsl2+jusqu’à24Mbps
•ModeWAN: Bridging, PPPoA, PPPoE, MER et IPoA
•Fonctions: NAT, NAPT, Firewall, Serveur DHCP, SNMP et Contrôle Parental
Evo-DSL41
•Interfaces:
- 4 ports RJ45 10/100 Mbps
- 1 port RJ11 Adsl
•ModemAdsl2+jusqu’à24Mbps
•ModeWAN: Bridging, PPPoA, PPPoE, MER et IPoA
•Fonctions: NAT, NAPT, Firewall, Serveur DHCP, SNMP, Contrôle Parental,
http://192.168.1.1/main.html
16
Page 19

Virtual Servers, Dynamic DNS, DMZ et UPnP
Evo-DSL41W
•Interfaces:
- 1 port RJ45 10/100 Mbps
- 1 port RJ11 Adsl
- Wireless 802.11g 54 Mbps
•ModemAdsl2+jusqu’à24Mbps
•SécuritéWireless: WEP, WPA, 802.1x RADIUS et ACL
•FonctionsWireless: WDS (Bridge/Repeater) et Universal Repeater
•WANmode: Bridging, PPPoA, PPPoE, MER and IPoA
•Fonctions: NAT, NAPT, Firewall, Serveur DHCP, SNMP, Contrôle Parental,
Virtual Servers, Dynamic DNS, DMZ et UPnP
•VPNIPSec
Information sur l’usage de la radio dans la Communauté Européenne :
Canal Fréquence
1 2412 MHz X X** X - X -
2 2417 MHz X X** X - X -
3 2422 MHz X X** X - X X
4 2427 MHz X X** X - X X
5 2432 MHz X X** X - X X
6 2437 MHz X X** X - X X
7 2442 MHz X X** X - X X
8 2447 MHz X X** X - X X
9 2452 MHz X X** X - X X
10 2457 MHz X X X X X -
11 2462 MHz X X X X X -
12 2467 MHz - X X X X -
13 2472 MHz - X X X X -
Amérique
du Nord
FCC
ETSI
France Autres
Singapour Japon Israël
Note**: Canal utilisable avec un maximum de 10 dBm EIRP
FRANÇAIS
17
Page 20

DECLARATION DE CONFORMITE :
Par la présente, OvisLink déclare que les routeurs Evo-DSL11, Evo-DSL41 et Evo-DSL41W
sont conformes avec les caractéristiques essentielles de la directive 1999/5/EC.
L’importateur/fabricant suivant est responsable de cette déclaration de
FRANÇAIS
conformité :
Société: OvisLink France SA
Adresse: 16-18 Route de ROUEN, 27950 SAINT-MARCEL. France.
Site internet: www.ovislink.fr
Nom: Horia SCURTU
Fonction: Gérant.
Date: 25 Juin 2004
Signature:
GARANTIE. Conditions de Garantie pour la France.
Ce produit a passé les rigoureux contrôles de qualité, qui garantissent que le matériel
fonctionne correctement, sans défauts de fabrication et qui permettra d’obtenir des
performances élevées.
Ce produit est garanti à vie et dans le cas où vous rencontreriez un quelconque défaut de
fabrication ou de fonctionnement, il vous sera échanger contre un produit fonctionnel,
neuf ou réparé, équivalent ou supérieur en caractéristiques. Pour connaître la procédure
d’échange, prenez contact avec votre revendeur.
La présente Garantie ne peut s’appliquer lors d’un dégât normal, de dégâts dûs à une
mauvaise utilisation ou manipulation par une personne non qualifiée ou de l’évolution
de produits tiers entraînant une incompatibilité. OvisLink ne sera pas responsable des
dommages causés sur ce produit par un usage incorrecte.
Pour plus d’informations, prenez contact avec OvisLink :
e-mail: support@ovislink.fr
Web: www.ovislink.fr
Hotline: 0891 700 704
18
Page 21

ADSL2+ ROUTER
MANUAL DE USUARIO
Gracias por confiar en OvisLink. Seguro que la calidad del producto que acaba de
adquirir no le defraudará.
Contenido del paquete:
-RouterADSL2+
- Fuente de alimentación
- Cable RJ-11
- Filtro ADSL
- Cable Ethernet Cat. 5 RJ-45
- Cable USB (solo con Evo-DSL11)
- Esta guía de usuario
LED:
Evo-DSL11 Encendido Parpadeo
POWER (rojo) Encendido / / Apagado
LINK (amarillo)
DATA (verde)
Verde
PC
Rojo
Naranja
Hay buena
conexión
Puerto WAN
conectado
Ethernet line is
connected
Puerto USB
conectado
Puerto USB
y Ethernet
conectado
En proceso /
/
/
/
/
Parpadeo
Rápido
Transmitiendo o
Recibiendo
Transmitiendo o
Recibiendo
Transmitiendo o
Recibiendo
Transmitiendo o
Recibiendo
Apagado
No hay conexión
Puerto WAN no
conectado
No hay buena
conexión Ethernet
No hay buena
conexión USB
No hay buena
conexión USB ni
Ethernet
ESPAÑOL
Evo-DSL41 &
Evo-DSL41W
POWER (rojo) Encendido / / Apagado
DSL (amarillo)
Encendido Parpadeo
El modem tiene
buena conexión
En proceso /
Parpadeo
Rápido
Apagado
No hay conexión
19
Page 22

Internet (verde)
LAN / Wireless
(verde)
ESPAÑOL
Puerto WAN
conectado
Hay conexión
Ethernet o
Wireless
/
/
Transmitiendo o
Recibiendo
Transmitiendo o
Recibiendo
Puerto WAN no
conectado
No hay buena
conexión Ethernet ni Wireles
Conectores:
Los conectores se encuentran en el panel trasero:
Evo-DSL11
Evo-DSL41
Evo-DSL41W
LINE Conexión a la línea de teléfono o al Puerto “ADSL” del filtro.
ETHERNET or LAN Conexión a una tarjeta de red o a un switch con un cable cruzado.
USB Conexión con un PC a través del puerto USB.
SWITCH Para encender o apagar el dispositivo.
POWER Conexión a la red eléctrica.
RST
Nota : En Evo-DSL41 y Evo-DSL41W, el botón Reset se encuentra en la base, cerca de los soportes de
goma.
Presione el botón Reset y encienda el dispositivo. Mantenga presionado el “RST” durante 5 segundos para volver a la configuración
original de fábrica.
Conectando el dispositivo:
1) Utilice un cable telefónico (RJ11) para conectar el Puerto “LINE” del filtro con la línea
20
Page 23

telefónica de la pared.
2) Utilice otro cable telefónico (RJ11) para conectar el Puerto “ADSL” del filtro con el
Puerto “LINE” del modem ADSL.
3) Utilice otro cable RJ11 para conectar el Puerto “PHONE” del filtro con el teléfono.
4) Conecte el puerto Ethernet del Router con un Puerto RJ45 10/100 del ordenador
utilizando el cable UTP RJ45 proporcionado.
5) Conecte el cable de alimentación eléctrica y encienda el dispositivo.
Configurando el dispositivo:
1) Configura la dirección IP del ordenador en modo automatic (DHCP client), para que
el router pueda elegir la dirección IP apropiada.
2) Si utiliza Windows 2000/XP, abra el “Panel de Configuración” y entre en “Conexiones
de red”.
3) Haga clic con el botón derecho del ratón en “Conexiones de Area Local” y elija
“Propiedades”.
4) Haga doble clic en Protocolo de Internet TCP/IP.
5) Seleccione Direcciones IP automáticas.
6) Seleccione Direcciones de servidor DNS automáticas.
7) Haga clic en “OK” y en “Cerrar”.
Cuando la ventana esté cerrada, compruebe la configuración en su navegador de
Internet.
Configuración del Navegador:
1) El navegador tiene que configurarse de manera que se conecte directamente a
Internet, sin proxy u otra configuración automática.
2) En Internet Explorer; abra el navegador y haga clic en « Herramientas » y « Opciones
de Internet ».
3) Haga clic en la pestaña de Conexión y seleccione “Never connect/ No conectar
nunca”.
ESPAÑOL
21
Page 24

4) Haga clic en el botón ed Parámetros de red y no seleccione las opciones. Haga clic
en OK.
5) Haga clic en Ok y cierre las Opciones de Internet.
ESPAÑOL
Una vez que estas opciones se han validado, mantenga su navegador abierto para
configurar el router.
Configuración de la conexión a Internet:
1) Introduzca la siguiente dirección en el navegador:
2) Se le solicitará un nombre de usuario y una contraseña:
3) Haga clic en el link « WAN ».
4) Encontrará una tabla de configuración por defecto. Todo se encuentra en modo Bridge
así el router trabajará como un simple modem ADSL. Para habilitar las funciones de
router, haga clic en el botón “Edit” en frente de tu configuración VPI/VCI o haga clic en
el botón “Add”.
http://192.168.1.1
Usuario: admin
Contraseña: password
22
Page 25

5) Podrá visualizar los valores VPI/VCI. Sin modificarlos, haga clic en “Next”.
6) Ahora podrá elegir el tipo de conexión. Mayoritariamente deberá usar conexión
PPPoE. Elija la opción « PPP over Ethernet » y seleccione el modo de encapsulado.
Haga clic en “Next”.
7) Introduzca su nombre de usuario y contraseña de su conexión a Internet y haga clic
en “Next”.
ESPAÑOL
8) Compruebe que la opción « Enable WAN Service / Habilitar servicio WAN » está
23
Page 26

seleccionada y que se puede cambiar el nombre de Servicio si lo desea (no es
necesario). Haga clic en “Next”.
ESPAÑOL
9) Ahora, podrá ver una tabla-resumen de su conexión a Internet. Haga clic en “Save”.
Configuración inalámbrica (sólo con Evo-DSL41W):
1) Haga clic en el link “Wireless”.
2) Haga clic en la opción « Básica », donde podrá habilitar/deshabilitar y configurar la
función inalámbrica. Cambiar el SSID y seleccionar el país en el que se encuentra.
Haga clic en “Save/Apply”.
3) Haga clic en la opción « Avanzado » donde podrá sólo cambiar el canal. Haga clic
en “Save/Apply”.
24
Page 27

4) Haga clic en « Seguridad », seleccione el SSID y le recomendamos que seleccione
WPA-PSK en la lista de autenticación de red. Después, introduzca la clave (key) de
encriptación de su red inalámbrica. Haga clic en “Save/Apply”.
Configuración Avanzada:
Este apartado se reserva para los profesionales. Puede acceder a dichas configuraciones
utilizando la siguiente dirección:
http://192.168.1.1/main.html
Características técnicas:
Evo-DSL11
•Interfaz:
- 1 Puerto RJ45 10/100 Mbps.
- 1 puerto RJ11 Adsl.
- 1 puerto USB.
•ModemAdsl2+Hasta24Mbps.
•ModoWAN: Bridging, PPPoA, PPPoE, MER y IPoA.
•Funciones: NAT, NAPT, Firewall, Servidor DHCP, SNMP y control parental.
Evo-DSL41
•Interfaz:
- 4 puertos RJ45 10/100 Mbps.
- 1 puerto RJ11 Adsl.
•ModemAdsl2+hasta24Mbps.
•ModoWAN: Bridging, PPPoA, PPPoE, MER y IPoA.
•Funciones: NAT, NAPT, Firewall, Servidor DHCP, SNMP, control parental,
servidor virtual, DNS dinámica, DMZ y UPnP.
ESPAÑOL
25
Page 28

Evo-DSL41
•Interfaz:
- 4 puertos RJ45 10/100 Mbps.
- 1 puerto RJ11 Adsl.
- Wireless 802.11g 54 Mbps.
ESPAÑOL
•ModemAdsl2+hasta24Mbps.
•SeguridadWireless: WEP, WPA, 802.1x RADIUS y ACL.
•FuncionesWireless: WDS (Bridge/Repeater) y Universal Repeater.
•ModoWAN: Bridging, PPPoA, PPPoE, MER y IPoA.
•Funciones: NAT, NAPT, Firewall, Servidor DHCP, SNMP, control parental,
servidor virtual, DNS dinámica, DMZ y UPnP.
•VPNIPSec.
Canales y Frecuencias permitidas en la banda de 2.4GHz por país:
Canal Frecuencia
1 2412 MHz X X** X - X -
2 2417 MHz X X** X - X -
3 2422 MHz X X** X - X X
4 2427 MHz X X** X - X X
5 2432 MHz X X** X - X X
6 2437 MHz X X** X - X X
7 2442 MHz X X** X - X X
8 2447 MHz X X** X - X X
9 2452 MHz X X** X - X X
10 2457 MHz X X X X X -
11 2462 MHz X X X X X -
12 2467 MHz - X X X X -
13 2472 MHz - X X X X -
Norte-
América
FCC
ETSI
Francia Otros
Singapur Japon Israel
26
Page 29

DECLARACIÓN DE CONFORMIDAD:
Por medio de la presente, OvisLink declara que los routers Evo-DSL11, Evo-DSL41 y
Evo-DSL41W cumplen los requisitos esenciales de la Directiva 99/05/CE.
Para consultar las normativas aplicadas, puede visitar nuestra web:
www.ovislinkcorp.es
El siguiente fabricante/importador es responsable de esta declaración:
Nombre de la compañía: OvisLink France SA
Domicilio: 16-18 Route de ROUEN, 27950 SAINT-MARCEL. France.
Teléfono:+33(0)232711509
Fax:+33(0)232548728
Nombre: Horia SCURTU
Cargo: Director General.
Fecha: 25/06/2004
Firma:
GARANTÍA. CONDICIONES DE GARANTÍA EN ESPAÑA Y LATINOAMÉRICA
Este producto ha pasado satisfactoriamente rigurosos controles de calidad, que
garantizan que este dispositivo se encuentra en perfectas condiciones, libre de
defectos de fabricación y del que podrá obtener las máximas prestaciones.
Este producto está garantizado de por vida, por lo que en caso de encontrar algún defecto
de fabricación o avería, se le repondrá por un producto en funcionamiento, nuevo o
reparado, equivalente o superior en características. Para conocer el procedimiento de la
sustitución en garantía, póngase en contacto con su proveedor.
La presente Garantía no será aplicable por causas derivadas de un desgaste normal, ni
a los daños que puedan ocasionarse por uso indebido, inadecuado, por falta de cuidado
o accidente, manipulación por personal no cualificado, ni por futuras apariciones de
incompatibilidades con terceros productos. OvisLink no se hará responsable de los daños
derivados directa o indirectamente de un posible fallo del producto por causas de un uso
indebido.
Para más información, póngase en contacto con las siguientes sucursales:
ESPAÑOL
España.
Tel.: 902 152 608.
e-mail: garantias@ovislinkcorp.es
Web: www.ovislinkcorp.es
Latinoamérica. Chile.
Tel.:+5622642980
e-mail: servicio@ovislinkcorp.cl
Web: www.ovislinkcorp.cl
27
Page 30

ADSL2+ ROUTER
Manual de utilizador
Obrigado por confinar num produto Ovislink. A sua satisfação é o nosso objectivo
e nos asseguramos a qualidade dos nossos produtos para ir de encontro as suas
expectativas.
PORTUGUÊS
O que vem dentro da caixa:
Antes de instalar este modem router, veja os elementos que compõem a caixa
- Router
- Cabo de alimentação
- Cabo RJ-11
- Filtro ADSL
- Cabo ethernet cruzado RJ45
- Cabo USB (só para o Evo-DSL11)
- Este manual de utilizador
Painel:
Evo-DSL11 Luz parada Flashing Flash rápido Off
POWER (vermelho)
LINK (amarelo)
DATA (verde) Esta conectado /
Verde
PC
Vermelho USB conectado /
Laranja
Ligado / / Desligado
O modem tem
boa conexão
Linha Ethernet
conectada
USB e Ethernet
conectados
Á procura
de IP
/
/
/
A transmitir ou
receber dados
A transmitir ou
receber dados
A transmitir ou
receber dados
A transmitir ou
receber dados
Impossível
conectar
Não esta
conectado
Linha Ethernet
não esta
conectada
USB não esta
conectado
USB and Ethernet não estão
conectados
Evo-DSL41 &
Evo-DSL41W
POWER (vermelho)
28
Luz parada Flashing Flash rápido Off
Ligado / / Desligado
Page 31

DSL (amarelo)
Internet (verde) Esta conectado /
LAN / Wireless
(verde)
O modem tem
boa conexão
Linha Ethernet
ou Wireless
conectado
Á procura de IP /
/
A transmitir ou
receber dados
A transmitir ou
receber dados
Impossível
conectar
Não esta
conectado
Linha Ethernet
ou Wireless não
conectado
Conectores:
Os conectores encontram-se no painel traseiro:
Evo-DSL11
Evo-DSL41
Evo-DSL41W
LINE Para conectar através da linha telefónica “ADSL” do splitter.
ETHERNET or LAN
USB Para conectar a um PC através de um cabo USB
SWITCH Para ligar e desligar.
POWER Power interface para conectar ao cabo de power.
RST
Nota :Com o Evo-DSL41 e Evo-DSL41W, o botão de reste encontra-se debaixo do equipamento perto
Para conectar a uma rede ou PC através de um cabo RJ45, também
poderemos conectar através de um cabo cruzado RJ45 a um hub,
switch ou router
Pressione o botão de reset e ligue o power, fique com o botão pressionado durante 5 segundos. A seguir pode fazer o reset ao modem e
ficar com as configurações de fabrica.
29
PORTUGUÊS
Page 32

do pé de borracha.
Arrancar com o modem/router:
1) Use um cabo telefónico para conectar a porta LINE do splitter com a porta RJ-11
(phone jack) da parede.
2) Use outro cabo telefónico para conectar a porta ADSL do splitter com a porta LINE
PORTUGUÊS
do modem ADSL.
3) Use outro cabo telefónico para conectar o telefone á porta PHONE do splitter.
4) Conecte a porta Ethernet do router com a porta 10/100BASE-T do PC usando o
cabo ethernet que vem com o modem.
5) Ligue o cabo de alimentação e ligue o equipamento.
Configuração:
1) Configure o endereço IP do computador para automático (DHCP client), que irá
permitir que o modem/router defina um endereço IP apropriado para o PC para
que todas as conexões possam ser realizadas .
2) Se utilizar o Windows 2000/XP, abra o painel de controle e a seguir as conexões de
rede.
3) Botão direito em cima da conexão de rede local e escolha propriedades.
4) Clique duas vezes no protocolo internet TCP/IP.
5) Seleccione o automático endereço IP.
6) Seleccione o automático servidor DNS
7) Clique OK.
8) Clique fechar .
Logo que a janela feche, veja a configuração do internet browser.
Configuração do Browser:
1) O browser tem de ser configurado para que se conecte automaticamente á Internet,
sem haver necessidade de nenhum proxy ou configurações automáticas.
30
Page 33

2) No Internet Explorer, abra o browser, e clique em Ferramentas e opções de Internet...
3) Clique na conexão e seleccione “Nunca conectado”.
4) A seguir clique no botão dos parâmetros de rede e retire todos os vistos, clique no
OK
5) Clique no OK e feche as opções de internet.
Após as opções serem validadas, continue com o browser aberto para configurar o
router.
Configuração da conexão Internet:
1) No internet browser, escreva o seguinte endereço IP :
http://192.168.1.1
2) Terá neste momento de inserir o username e a password para ter acesso a
configuração do modem router. Insira este username e password :
Username : admin
Password : password
3) Agora encontra-se no interface do Router, Por favor clique no link Wan.
4) Encontrara uma tabela com toda a configuração de fabrica. Encontra-se em Bridge
mode, então o seu router encontra-se a trabalhar como simples ADSL modem. Para
activar as funcionalidades de router, clique no botão Edit a frente da configuração
VPI/VCI.
PORTUGUÊS
31
Page 34

5) Consegue neste momento ver os valores VPI/VCI . Não modifique nada e carregue
o botão Seguinte.
PORTUGUÊS
6) Agora poderá escolher o tipo de conexão. Na maioria dos casos, devera utilizar a
conexão PPPoE, por isso iremos detalhar esta opção. Seleccione a opção PPP sobre
Ethernet e seleccione o modo de Encapsulation. Clique o botão Seguinte.
7) Digite o seu Usernae e Password da sua conexão internet (veja no seu contrato com
o operador) clique no botão Seguinte.
32
Page 35

8) Verifique se a opção « activar o serviço WAN » se encontra seleccionada, e poderá
mudar o nome do service se quiser (não será necessário para a conexão internet.
Clique no botão seguinte.
9) Agora, poderá ver a tabela de sumario da sua conexão internet. Clique no botão
de gravar.
Configuração Wireless (só para o Evo-DSL41W) :
1) Clique no link Wireless .
2) Clique o basico link. Nesta parte poderá activar ou desactivar a função wireless e
configurar. Mude o SSID (nome da rede wireless) se quiser e seleccione o seu País.
Clique no botão Gravar / Aplicar.
PORTUGUÊS
33
Page 36

3) Clique no link avançado para mudar somente o canal, se for necessário. Clique no
botão Gravar / Aplicar.
PORTUGUÊS
4) Agora iremos para a segurança da rede wireless. Clique no link de segurança,
selecione o seu SSID, e nos aconselhamos a seleccionar WPA-PSK na lista de
autenticação. A seguir insira a chave WPA que sera a chave de incriptação para a
sua rede wireless. Clique no botão Gravar / Aplicar.
Configuração avançada :
Esta parte é reservada para profissionais. Poderá aceder a configuração avançada
usando o seguinte endereço IP:
http://192.168.1.1/main.html
Características técnicas:
Evo-DSL11
•Interfaz:
- 1 Porta RJ45 10/100 Mbps.
- 1 conector RJ11 Adsl.
- 1 porta USB.
•ModemAdsl2+até24Mbps.
•ModoWAN: Bridging, PPPoA, PPPoE, MER e IPoA.
•Funções: NAT, NAPT, Firewall, DHCP Server, SNMP e controle parental.
34
Page 37

Evo-DSL41
•Interfaz:
- 4 puertos RJ45 10/100 Mbps.
- 1 conector RJ11 Adsl.
•ModemAdsl2+até24Mbps.
•ModoWAN: Bridging, PPPoA, PPPoE, MER e IPoA.
•Funções: NAT, NAPT, Firewall, DHCP Server, SNMP, controle parental, Virtual
Server, Dynamic DNS, DMZ e UPnP.
Evo-DSL41
•Interfaz:
- 4 puertos RJ45 10/100 Mbps.
- 1 conector RJ11 Adsl.
- Wireless 802.11g 54 Mbps.
•ModemAdsl2+até24Mbps.
•SegurançaWireless:WEP, WPA, 802.1x RADIUS e ACL.
•FunçõesWireless: WDS (Bridge/Repeater) e Universal Repeater.
•ModoWAN: Bridging, PPPoA, PPPoE, MER e IPoA.
•Funções: NAT, NAPT, Firewall, DHCP Server, SNMP, controle parental, Virtual
Server, Dynamic DNS, DMZ e UPnP.
•VPNIPSec.
Canais y Frequências permitidas na banda de 2.4GHz por país:
Canal Frequência
1 2412 MHz X X** X - X 2 2417 MHz X X** X - X 3 2422 MHz X X** X - X X
4 2427 MHz X X** X - X X
5 2432 MHz X X** X - X X
6 2437 MHz X X** X - X X
7 2442 MHz X X** X - X X
8 2447 MHz X X** X - X X
9 2452 MHz X X** X - X X
10 2457 MHz X X X X X 11 2462 MHz X X X X X 12 2467 MHz - X X X X 13 2472 MHz - X X X X -
Norte-América
FCC
ETSI
França Outros
Singapur Japão Israel
*Canais que podem utilizar um máximo de 10 dBm
PORTUGUÊS
35
Page 38

DECLARAÇÃO DE CONFORMIDADE
Por meio do presente, Ovislink declara que os Evo-DSL11, Evo-DSL41 e EvoDSL41W cumprem os requisitos essenciais da Directiva 99/05/CE.
Poderá consultar as normativas aplicadas em www.ovislinkcorp.es
PORTUGUÊS
O seguinte fabricante/importador é o responsável desta declaração:
Nome da companhia: OvisLink France SA
Morada: 16-18 Route de ROUEN, 27950 SAINT-MARCEL. France.
Telefone:+33(0)232711509
Fax:+33(0)232548728
Nome: Horia SCURTU
Cargo: Director General.
Data: 25/06/2004
Assinatura:
GARANTIA. CONDIÇÕES DE GARANTIA EM PORTUGAL
Este produto passou satisfatoriamente por rigorosos controles da qualidade, que garantem que
este dispositivo está em perfeitas condições, sem defeitos de fabricação e que poderá obter o
máximo rendimento.
Este produto tem garantia para toda a vida. Caso encontre algum defeito de fabricação ou danos,
será reposto por um produto novo ou reparado, equivalente ou com características superiores. A
fim de saber mais sobre o procedimento da substituição, entre em contacto com o seu provedor.
OvisLink entende que a garantia não será aplicável nos seguintes casos: causas derivadas de
um desgaste normal, danos causados pelo uso ilegal ou inadequado, descuido, acidente,
manipulação por pessoal não qualificado, ou por futuras aparições de incompatibilidades com
terceiros produtos.
Para mais informações, entre em contacto connosco:
Visitando o nosso Web Site http://www.ovislink.pt
Na secção Foro Suporte Técnico ou escreva-nos um e-mail a hotline@ovislink.pt
36
Page 39

Page 40

Tested to Comply With
FCC Standards. FOR
HOME OR OFFICE USE
OvisLink declares that this devide is in compliance
0560 !
with the essential requirements and other relevant
All othe r trademarks o r registered t rademarks ar e property of t heir respect ive holder
provisions of directive 1999/5/EC
s
 Loading...