

Page 1
Page 2

1. SAFETY NOTES
** The product is designed for people aged 14 and up**
•
The users under 18 years of age can operate the product under adult supervision only. We suggest those,
who are just getting started to operate drones, to contact a person with more experience in this field.
•
The purpose of the safety notes is to protect both the product and its users as well as bystanders and their
property.
•
Improper operation of the product can cause injuries and property damage.
SPECIALLY DESIGNED FOR OUTDOOR USE
•
The product has been designed in a way so that it can be used only outdoors.
Before using the product, make sure that the area you chose is free from obstacles. Also, when operating the
product always keep a safe distance from people and animals.
•
Do not operate the product near power lines, in public places (crowded areas) and within airport protection
zones.
PREVENT THE PRODUCT FROM GETTING WET
Both the drone and the controller are composed of many precision electronic
components. Therefore, they must be prevented from getting wet.
Exposure to water or
moisture in any form can cause their malfunction or damage.
DO NOT OPERATE OR EXPOSE THE PRODUCT TO RAIN OR MOISTURE
BATTERY INSTRUCTIONS
To avoid a potential fire hazard, please do not short circuit, puncture or reverse the polarity
of batteries.
Battery charging should always be done under adult supervision, and at a location out of the reach of children.
•
DO NOT MIX NI-CAD AND ALKAL IN E BATTERIES
SAFETY NOTES FOR NI
-MH BATTERIES
•
Make sure the batteries are properly installed observing correct polarity (+ -).
DO NOT MIX NI
-CAD AND ALKALINE BATTERIES
•
If you plan not to use the quadcopter for extended period of time, remove the batteries from the controller to
avoid their leakage, which may damage the transmitter.
PLEASE DISPOSE
USED BATTERIES ACCORDING TO LOCAL REGULATIONS IN SPECIAL RECYCLE
SPOTS.
SAFETY NOTES FOR LI
-POLYMER BATTERIES
•
Li-Polymer batteries have higher operational risks when compared to ones of other types. Therefore, using
them, it is imperative to follow proper operational guidelines. The manufacturer and dealers assume no liabil ity
for any damage caused by improper usage.
•
In order to avoid potential fire or explosion do not use any other charger except the one included with the
product. DO NOT crush, disassembl
e, burn, or reverse the polarity of the batteries.
•
To avoid short circuits, do not allow the metal parts to touch the battery terminals. NEVER PUNCTURE
BATTERIES, OTHERWISE IT COULD CAUSE POTENTIAL FIRE HAZARD.
•
Battery charging should always be done under adult supervision, and at a location out of the reach of
children.
•
In case of unnatural excessive heating of the batteries please stop using or charging them immediately.
Otherwise, it may cause their swelling, deformation or explosion thereby increasi ng
the risk of fire.
**PLEASE DISPOSE USED B AT TERIES ACCO R D IN G T O LOCAL REGUL ATIONS IN SPEC IAL RECYCLE
SPOTS.
DO NOT DISPOSE OF OLD BATTERIES IN THE HOUSEHOLD TRAS H
DO NOT CHARGE BATTERIES OVERNIGHT
KEEP AWAY FR O M H EAT
R/C models are made from various
forms of plastic that is very susceptible to damage or deformation due to
extremely high and low temperatures. Therefore, the product should not be used or stored in places where it
would be exposed to extreme temperatures.
OBTAIN THE ASSISTANCE OF AN
EXPERIENCED DRONE PILOT
Although the product can be treated as a toy, it is not intended for those under fourteen years of age.
Those,
who are inexperienced in piloting remote
-controlled drones,
must know that there will be a slight learning curve
until yo
u become a skilled pilot. In order to make it easier to gain this skill we recommend exercises under the
supervision of professional drone pilots.
Page 3
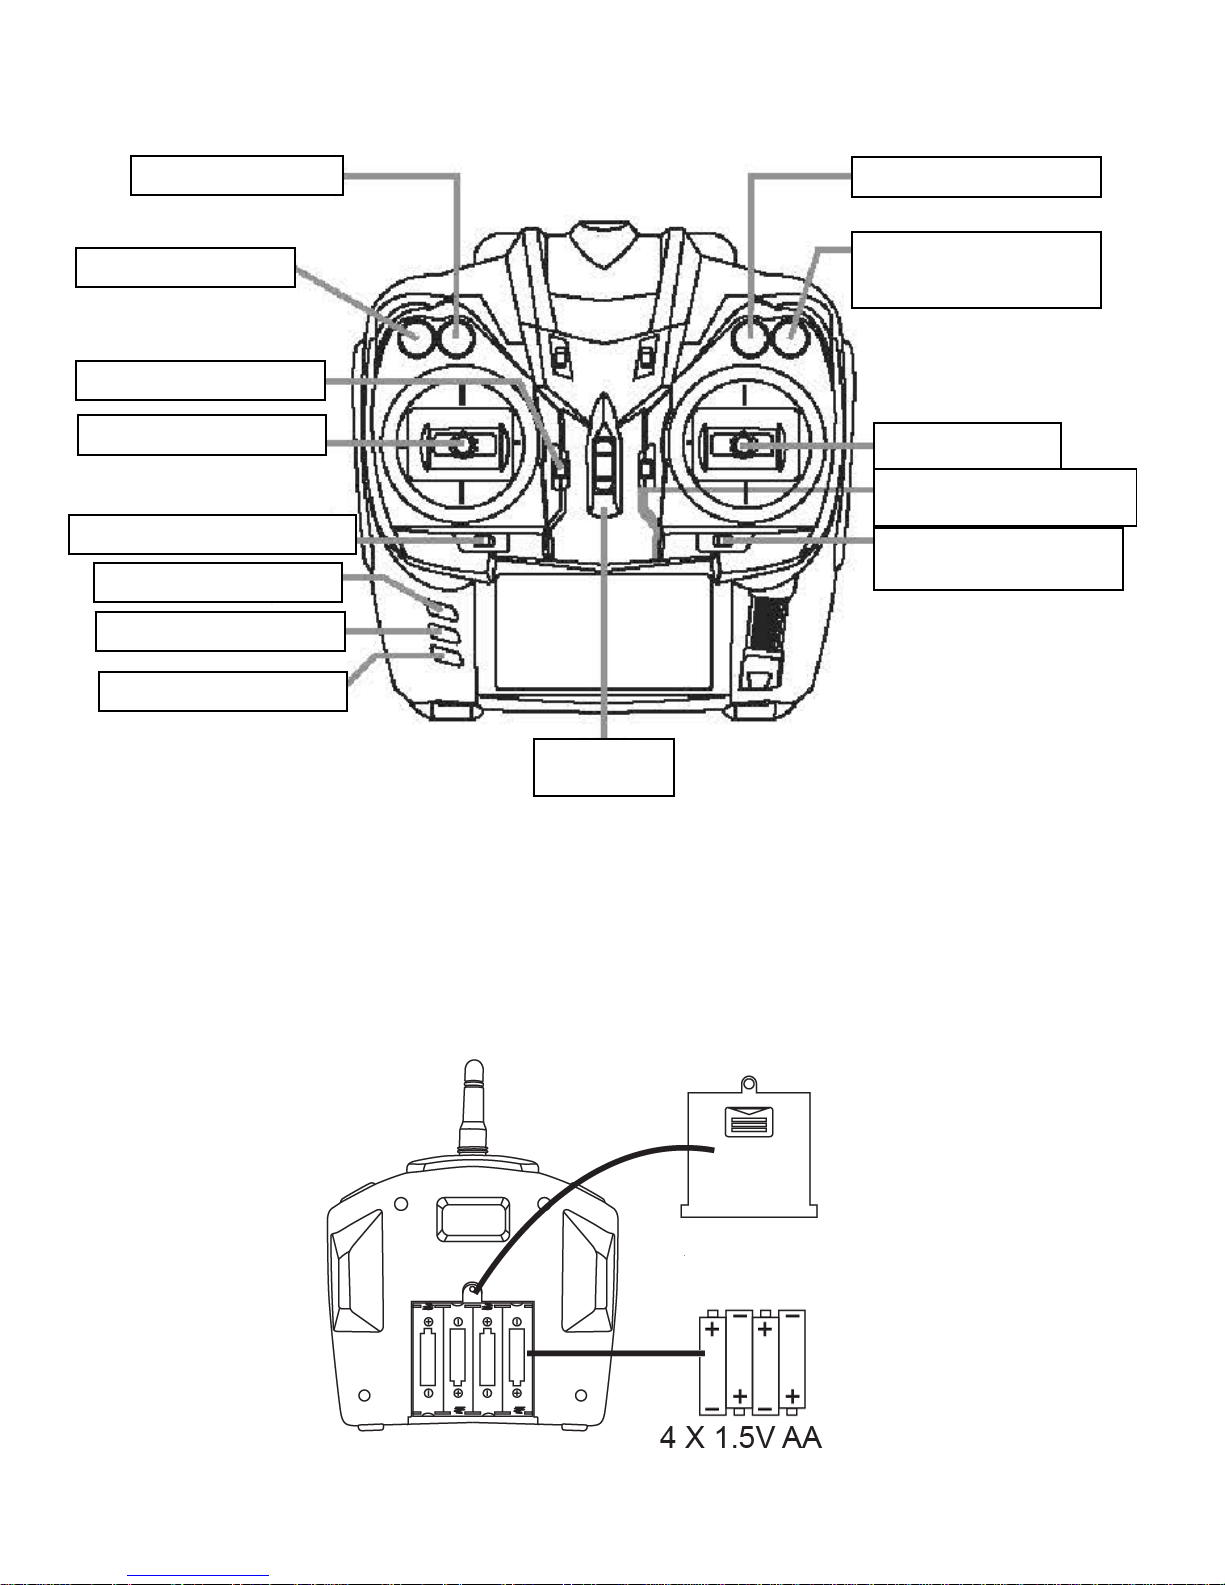
2. CONTROLLER (TRANSMITTER) DIAGRAM
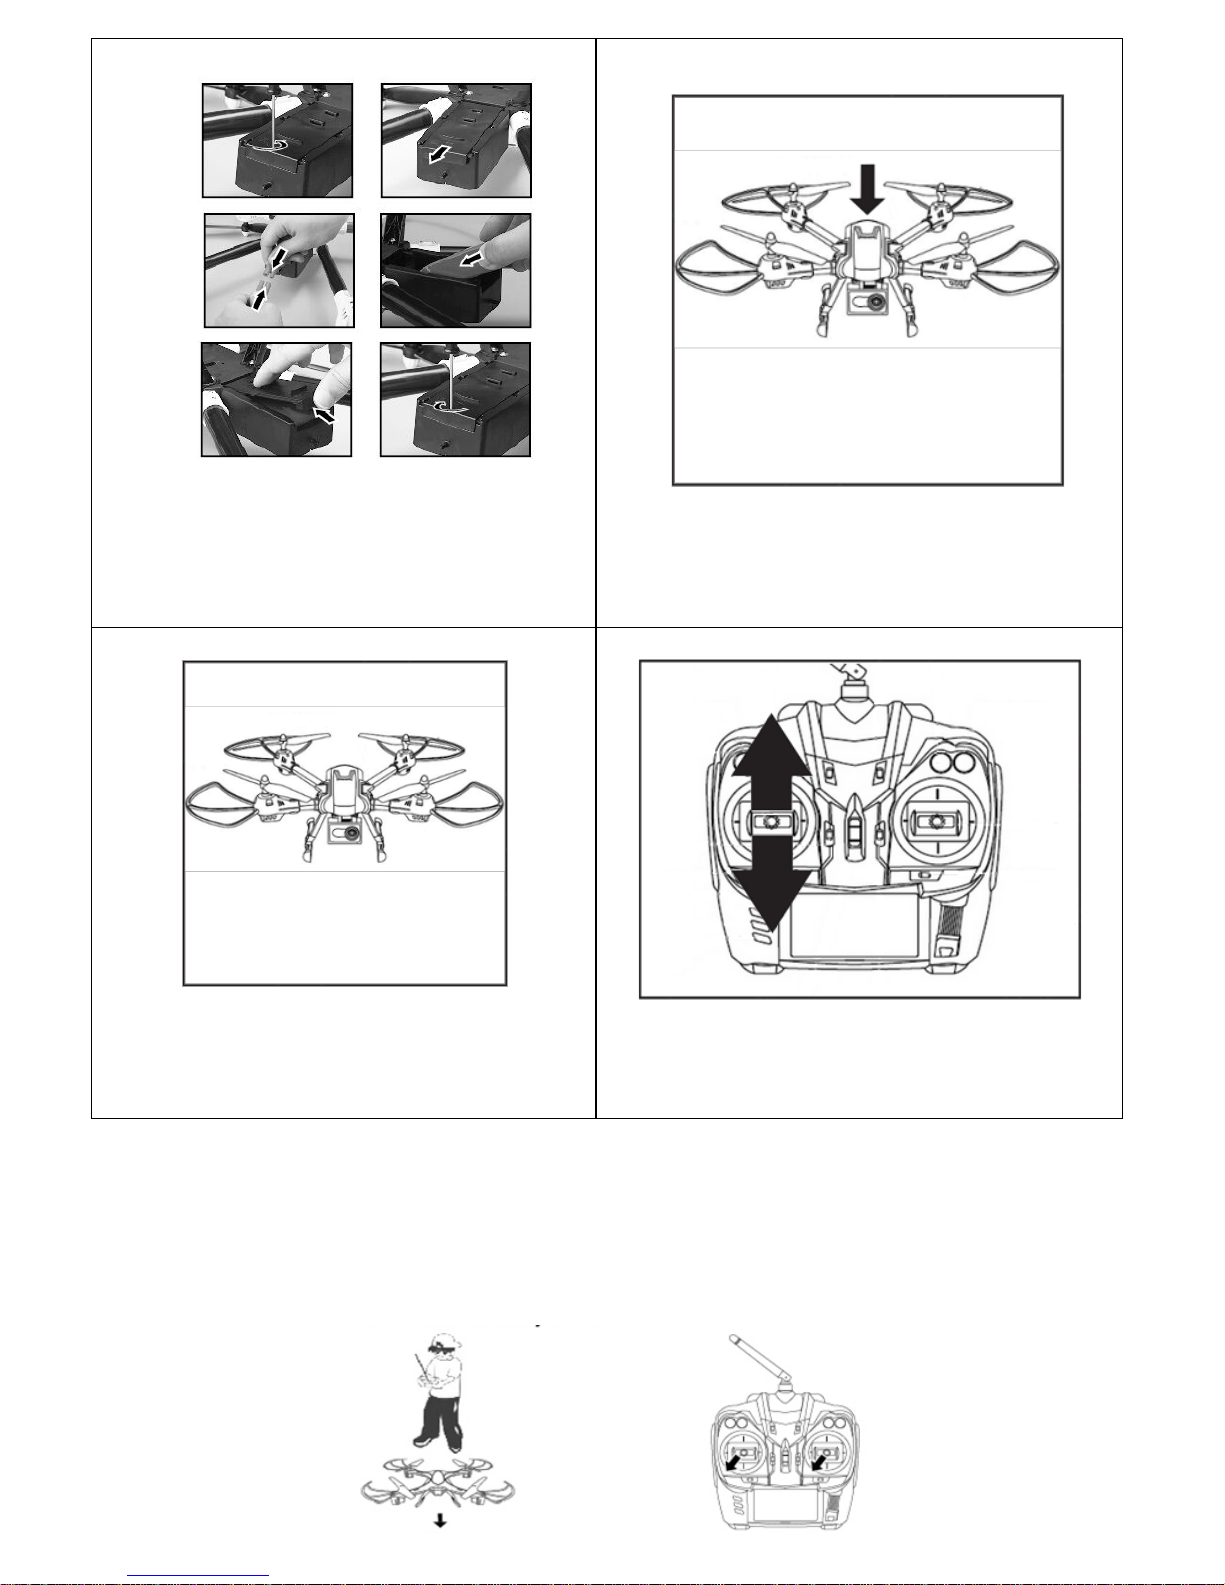
3. CONTROLLER (TRANSMITTER) BATTERY INSTALLATION
Use a screwdriver to open the battery cover.
Place 4 AA batteries in the battery compartment. Make sure the batteries are properly installed according to
correct polarity (+ -). DO NOT MIX THE BATTERIES OF DIFFERENT TYPES
Throttle stick
Right / left migration key
Right / left migration key
Direction control
stick
Back Home button
Headless mode
3D flip button
Lights button
Start / landing button
(press and hold for 3
seconds to stop the engines)
Speed mode button
Photo / video button
Camera navigation button
Power on / off
key
Forward / backward migration
key
Page 4

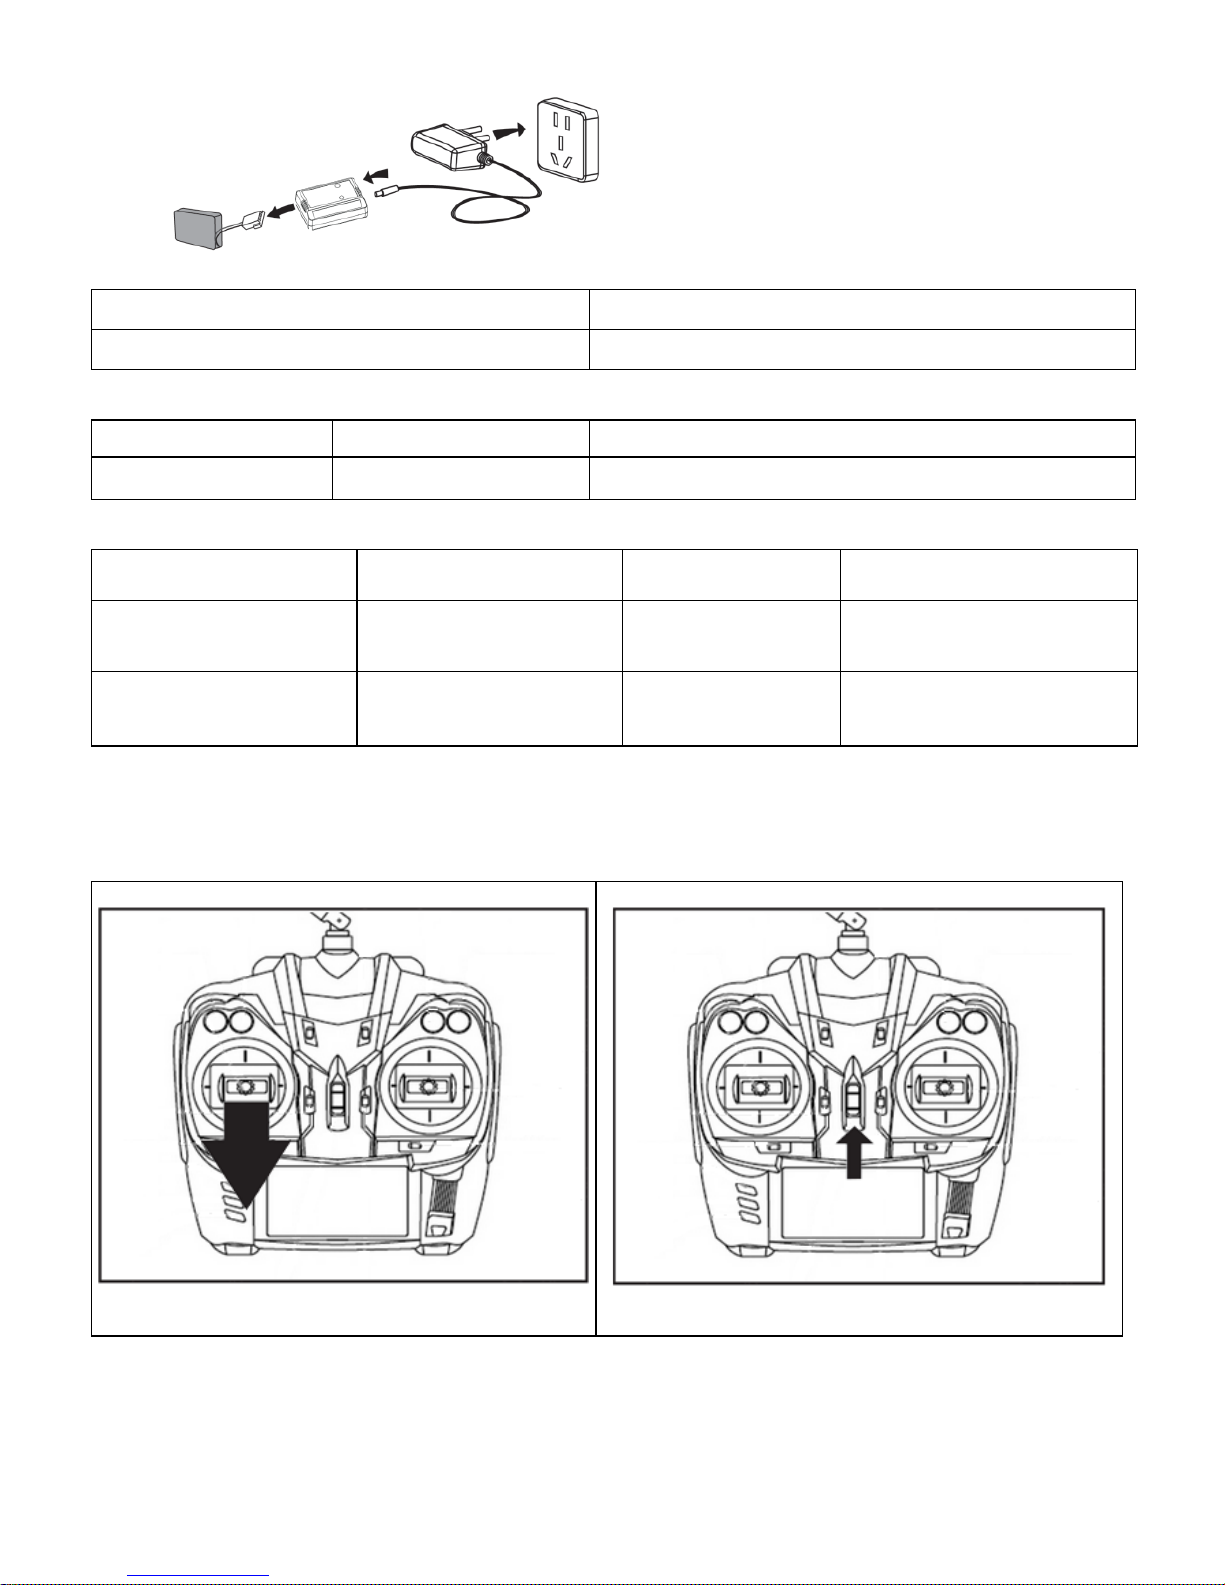
4. BATTERY CHARGING
Use the included charger to charge the battery of the
drone.
** Use ONLY the supplied charger for charging.
Battery charging should always be done under adult
supervision.
LED indicator
Red and green
- on
Red
- on
Charging completed
Charging...
Charger specifications
Input
Charging current
Maximum voltage
12V 0,6A
7.4 ± 0.03V
Battery usage and charge duration reference
Battery type
Battery specification
Single charge
working time
Charging time
Rechargeable lithium
-
polymer (Li
-Poly) battery
7.4V
Drone flight time: up to
10 minutes
About 120 minutes (charging
current approx. 0.6A)
Zinc
-carbon battery
(Non rechargeable)
1.5V
(GP 15G R4P)
Controller (transmitter)
operation time: 18
hours
Non rechargeable (do not
charge)
5. TRANSMITTER AND RECEIVER SYNCHRONIZATION
Step 1
Move the throttle stick to the lowest position.
Step 2
Turn the controller on.
Page 5

Step 3
Use a screwdriver to open the battery cover.
Place the battery in the drone's battery
compartment and connect the battery plug to the
drone’s battery slot. Close the cover and ti ghten
the screw.
Step 4
Turn your X-
Bee Drone 7.1 on using the switch
located on the upper side of the drone. The
LEDs start to blink.
Step 5
Place the drone on a flat and even surface.
Step 6
Move the throttle stick forward, and then backward.
The controller emits the sound indicating that the
connection with the drone has been established.
The LEDs start to glow steadily indicating that
Auto-calibration
Switch the speed mode to "fast" (Mode 3). Place the drone on a flat and even surface. Move both sticks to the
lower left corner positions, as shown in the picture. Hold these positions for 10 seconds. The drone's LEDs will
blink several times, and then they will start to glow steadily. Now, you can release the sticks - the drone is
ready to fly.
Page 6
6. FLIGHT CONTROL
Press the start/landing button to start the engines.
Press the same button to land. Auto-landing can be used only if the drone is at a height of less than 20
meters from the ground. Using the above at a height of 20 meters, threatening drone fall from a
considerable height and its damage.
To stop the engines, press and hold the start/landing button for 3-5 seconds.
The drone’s LEDs start flashing when the battery power is low. Shortly after that, the drone automatically lands
on the surface beneath (make sure to steer the drone to a safe landing spot the moment you receive the lowbattery signal).
WARNING: Do NOT hold the start/landing button during the flight! Failure to comply with this
instruction may cause the drone to fall from a great height, doing damage to itself and resulting in
possibility of injury to you and others.
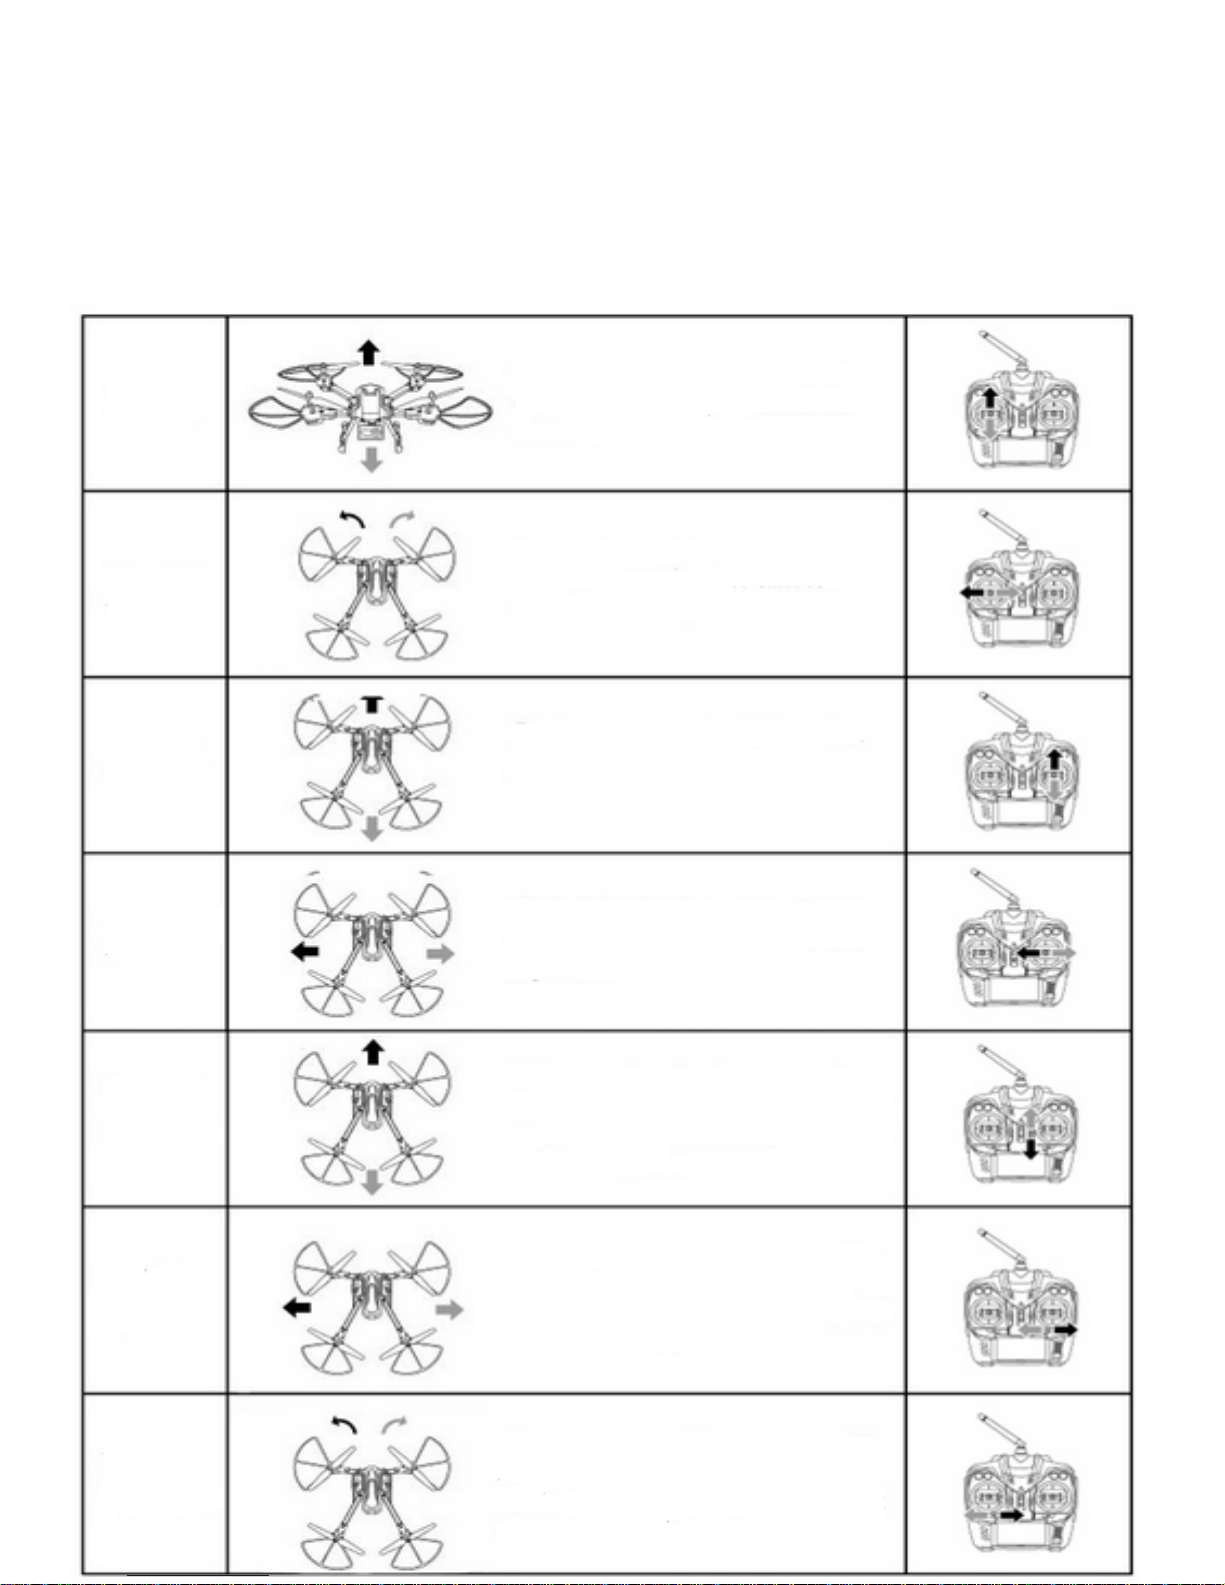
Flying up /
down
Rotating left/
right
Flying
forward and
backward
Flying left/
right
Forward /
backward
migration
calibration
Left / right
migration
calibration
Left/ right
rotate
calibration
Move the throttle stick forward to fly
the drone up.
Move the throttle st ick backward to fly
the drone down.
Move the throttle stick left / right to
rotate the drone in a given direction.
Move the direction control stick
forward / backward to fly the drone in
a given direction.
Move the direction control stick left /
right to fly the drone in a given
direction.
Press the "Forward migration" key if
the drone automatically migrates
backwards.
Press the "Backward migrat ion" key if
the drone automatically migrates
forwards.
Press the "Left migration" key if the
drone automatically migrates to the
right.
Press the "Right migration" key if the
drone automatically migrates to the
Press the "Left rotation" key if the
drone automatically rotates clockwise.
Press the "Right rotation" key if the
drone automatically rotates
counterclockwise.
Page 7

360-degree stunts
When you press the Flip mode button the controller emits a beep sound indicating that the drone is in 3D flip
mode.
When in 3D flip mode, move the direction stick forward, backward, left or right to flip the drone in the chosen
direction.
Note: Before you start doing stunts make sure that there is enough space in the area.
Speed modes
The device supports three flight speed modes. Press the flight speed button to switch between slow, normal
and fast mode. The current speed mode is indicated by a number of the beep sounds. Mode 1 - slow mode one beep; Mode 2 - normal mode - two beeps; Mode 3 - fast mode - three beeps.
7. HEADLESS MODE
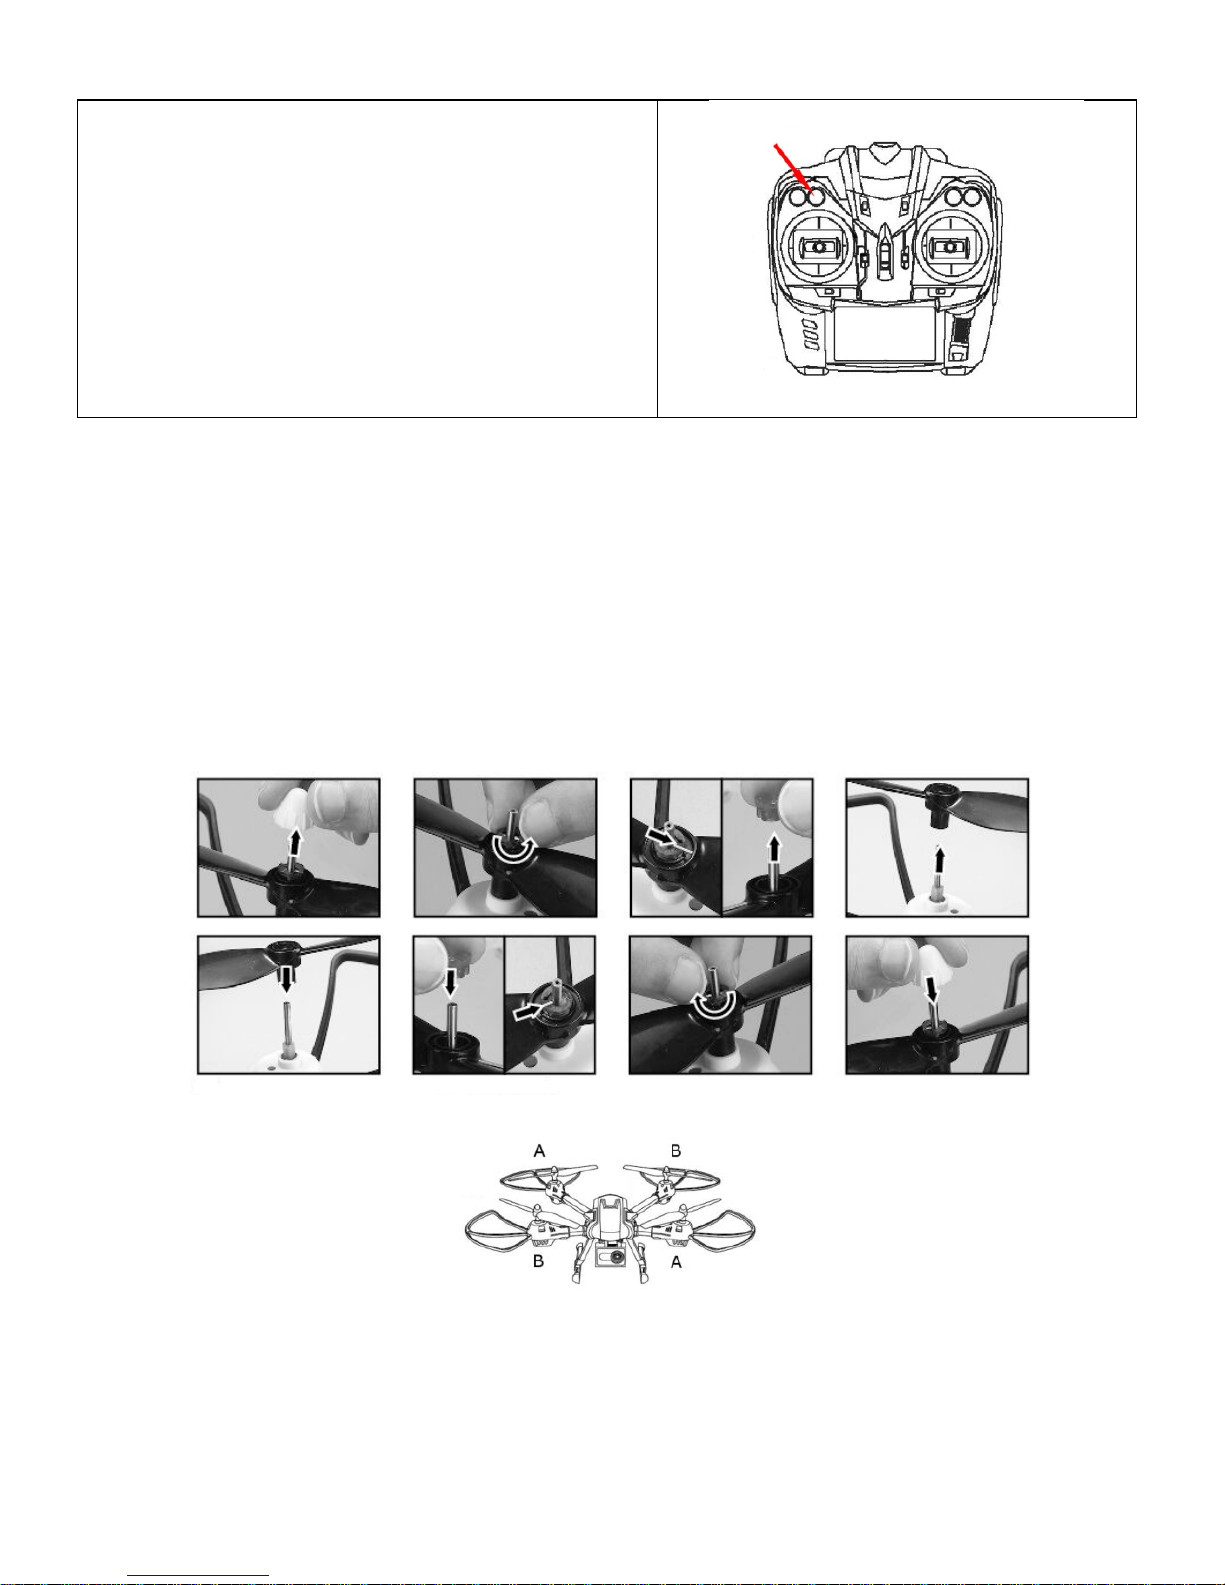
How to turn on/off the headless mode?
Press the controller's button (indicated in the picture). The controller beeps
indicating that the drone is in the HEADLESS mode.
If you want to switch your drone back to the normal control mode, press
the same button again.
In this mode, to make the operation of the drone easier, the forward flight direction is set regardless of
the drone position.
If you want to set the front side of the drone anew, you must turn the device off and configure it again.
Page 8
8. BACK HOME MODE
Before you start to fly the drone must be calibrated.
During the calibration the device saves the starting (home)
position. Then, once you press the "Back home" button,
the drone starts to fly back towards the starting point
regardless of its current position and location. In order to
abort the "Back home" mode, just move the direction stick.
Note: the drone has NO autoland function. In order to
land it, you need to control the device manually.
9. TAKING PICTURES AND SHOOTING VIDEOS
Press the photo/video button to take a photo.
Press and hold the photo/video button to start recording. Press the photo/video button
again to stop recording.
Use the camera navigation button to change the camera angle.
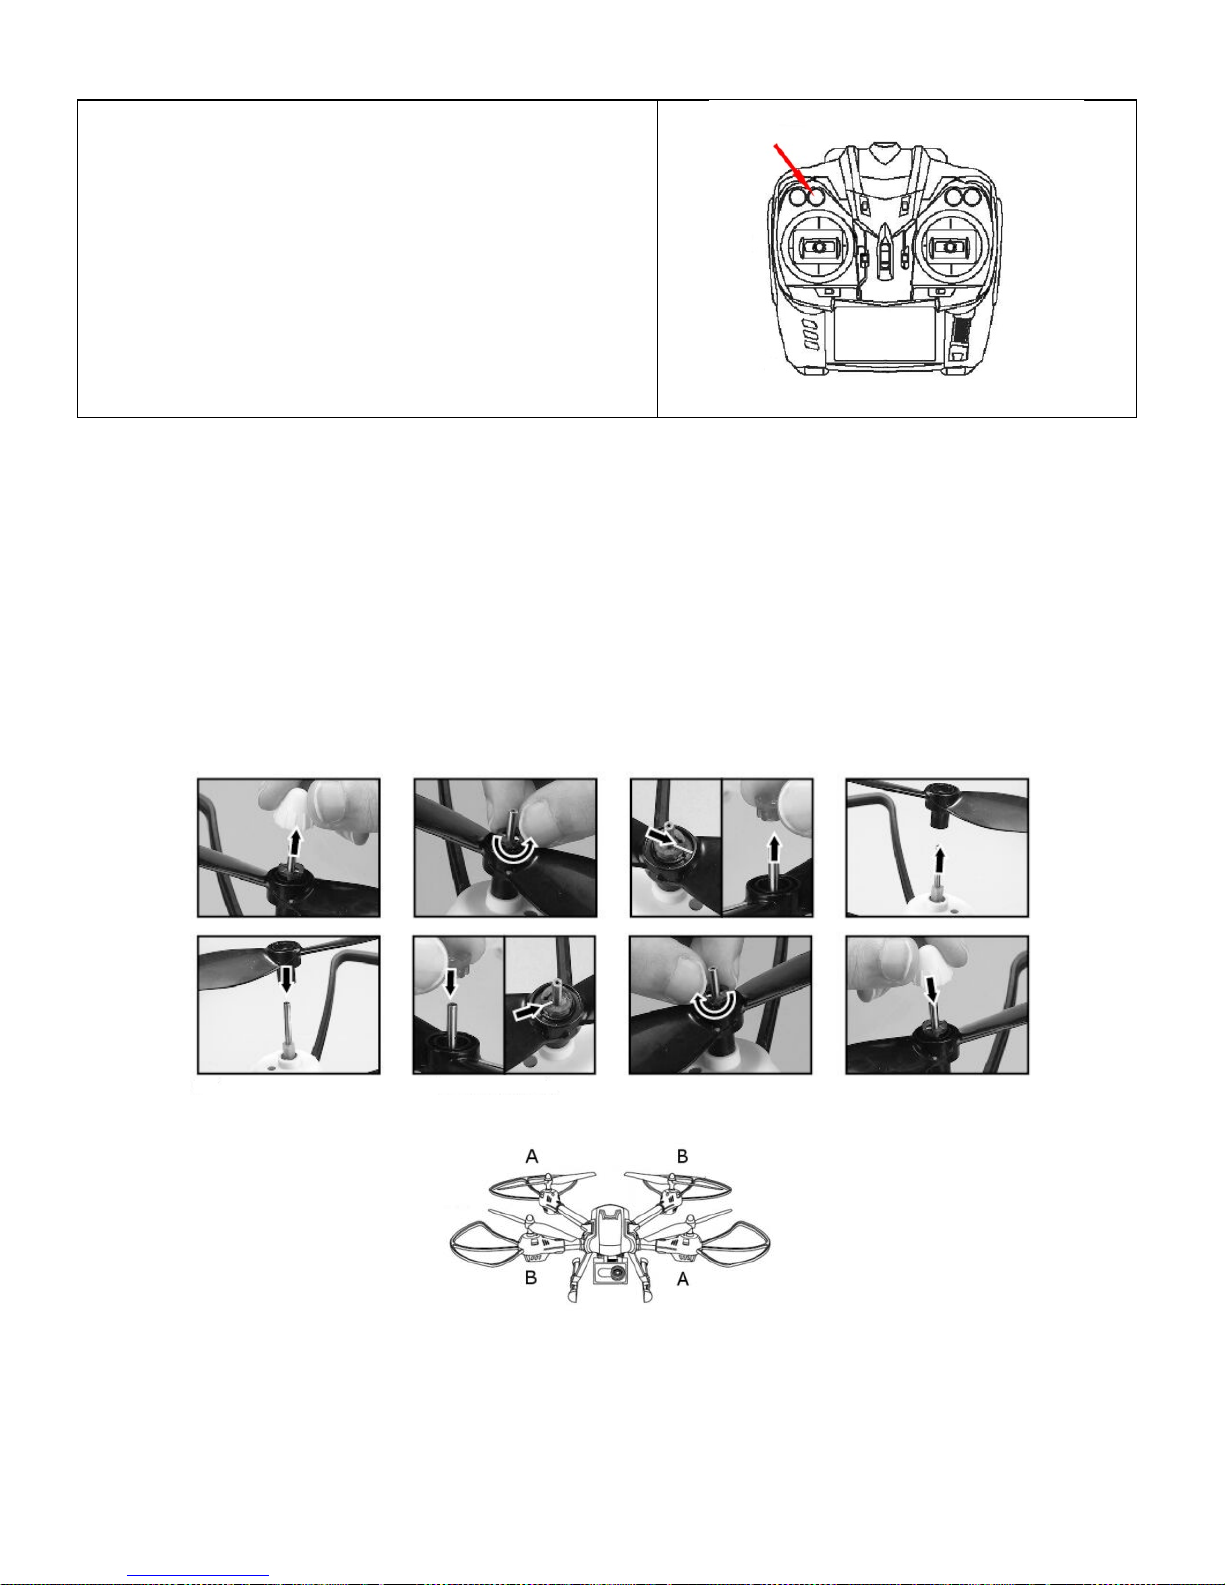
10. PROPELLER RE PLACEMENT
In order to replace the propellers follow the steps shown in the schedule below:
All the pic tu res and information in the manu al have been submitted for illustrativ e pur poses only and are subject to change without prior notice.
Page 9

Polski
Page 10
1. INFORMACJE ODNOŚNIE BEZPIECZEŃSTWA UŻYTKOWANIA
** Produkt przeznaczony jest dla osób powyżej 14 roku życia**
•
Obsługa produktu przez użytkowników poniżej 18 roku życia powinna odbywać się wyłącznie pod nadzorem
osób dorosłych.Tym, którzy dopiero zaczynają
przygodę z pilotowaniem dronów, sugerujemy kontakt z osobą
o większym doświadczeniu w tej dziedzinie.
•
Celem niniejszych zaleceń jest ochrona zarówno samego produktu i osób z niego korzystających, jak i osób
postronnych oraz ich mienia.
•
Nieprawidłowa obsługa produktu może spowodować obrażenia osób oraz zniszczenie mienia.
PRODUKT PRZEZNACZONY DO UŻ
YTKU ZEWNĘTRZNEGO
•
Niniejszy produkt przeznaczony jest do użytku zewnętrznego.
Przed rozpoczęciem korzystania z produktu należy upewnić się, że wybrany obszar
jest wolny od przeszkód,
a podczas sterowania zachowywać bezpieczną odległość od ludzi i zwierząt.
•
Nie należy korzystać z produktu w pobliżu linii elektrycznych, w miejscach publicznych (tłocznych) oraz z
strefie ochronnej lotniska.
PRODUKT NALEŻY CHRONI
Ć PRZED ZAMOCZENIEM
Zarówno dron, jak i jego kontroler to urządzenia zbudowane z precyzyjnych komponentów elektronicznych,
dlatego też nie należy dopuścić do ich zamoczenia. Kontakt z wodą, inną cieczą lub narażenie ich na działanie
wilgoci mogą spowodować
nieprawidłowe działanie urządzeń lub ich uszkodzenie.
NIE NALEŻY WYSTAWIAĆ URZĄDZENIA NA DZIAŁANIE DESZCZU ANI WILGOCI
ZALECENIA ODNOŚNIE BATERII
Aby uniknąć potencjalnego zagrożenia pożarowego, nie należy zwierać styków baterii, umieszczać ich w
komorze
niezgodnie z oznaczeniami polaryzacji, ani przekłuwać. Ładowanie akumulatora powinno odbywać
się zawsze pod nadzorem osoby dorosłej, w miejscu niedostępnym dla dzieci.
•
NIE NALEŻY MIESZAĆ BATERII NIKLOWO-KADMOWYCH Z ALKALICZNYMI
ZALECENIA DOTYCZĄCE
BATERII NI -MH
•
Upewnij się, że baterie są zainstalowane zgodnie z oznaczeniami polaryzacji (+ -).
NIE NALEŻY MIESZAĆ BATERII NIKLOWO
-KADMOWYCH Z ALKALICZNYMI
•
Jeśli wiemy, że dron nie będzie używany przez dłuższy okres czasu, należy wyjąć baterie z kontrolera, aby
uniknąć wycieku elektrolitu, który mógłby doprowadzić do uszkodzenia urządzenia.
ZUŻYTE BATERIE NALEŻY UTYLIZOWAĆ ZGODNIE Z LOKALNYMI PRZEPISAMI W PRZEZNACZONYCH
DO TEGO MIEJSCACH.
ZALECENIA DOTYCZĄCE BATERII LITOWO
-POLIMEROWYCH
•
W porównaniu z bateriami innego typu, baterie litowo-polimerowe obciążone są większym ryzykiem
wystąpienia zdarzeń niepożądanych. Bardzo ważne jest więc w ich przypadku przestrzeganie wszystkich
wytycznych operacyjnych. Producent i sprzedawca nie ponoszą ż
adnej odpowiedzialności za jakiekolwiek
szkody powstałe w wyniku niewłaściwego użytkowania.
•
Aby uniknąć ryzyka pożaru lub wybuchu należy używać wyłącznie ładowarki załączonej w zestawie. NIE
NALEŻY zgniatać, demontować, palić, ani umieszczać baterii w komo
rze niezgodnie z oznaczeniami
polaryzacji.
•
Aby uniknąć spięć, nie należy dopuszczać do sytuacji, w których części metalowe stykają się z biegunami
baterii. POD ŻADNYM POZOREM NIE NALEŻY NIGDY PRZEKŁUWAĆ BATERII, GDYŻ MOŻE TO
ZWIĘKSZYĆ RYZYKO POŻARU.
•
Ładowanie akumulatora powinno odbywać się zawsze pod nadzorem osoby dorosłej, w miejscu
niedostępnym dla dzieci.
•
W przypadku nienaturalnego nadmiernego nagrzewania się baterii lub akumulatorów należy natychmiast
zaprzestać ich używania oraz ładowania. W przeci
wnym razie może to spowodować ich spuchnięcie,
deformację lub wybuch zwiększając tym samym ryzyko wystąpienia pożaru.
**ZUŻYTE BATERIE NALEŻY UTYLIZOWAĆ ZGODNIE Z LOKALNYMI PRZEPISAMI W
PRZEZNACZONYCH DO TEGO MIEJSCACH.
**NIE NALEŻY WYRZUCAĆ ZUŻYTYCH
BATERII WRAZ Z ODPADAMI KOMUNALNYMI.
ŁADUJĄCYCH SIĘ BATERII NIE NALEŻY POZOSTAWIAĆ BEZ NADZORU (NP.
W NOCY)
PRODUKT NALEŻY TRZYMAĆ Z DALA OD OGNIA I ŹRÓDEŁ CIEPŁA
Zdalnie sterowane modele wykonane są z różnych rodzajów tworzyw sztucznych, podatnych na def
ormacje i
uszkodzenia pod wpływem działania ekstremalnych temperatur (zarówno gorąca jak i zimna). Produktu nie
należy więc pozostawiać w miejscach, gdzie byłby on narażony na działanie ekstremalnych temperatur.
POMOC OSOBY MAJĄCEJ DOŚWIADCZENIE W PILOTOWANIU DRONÓW, ·
Mimo, iż
produkt ten może być traktowany, jako zabawka, nie jest on przeznaczony dla osób poniżej
czternastego roku życia. Osobom niedoświadczonym w pilotowaniu zdalnie sterowanych modeli dronów
przypominamy, że czynność ta, zwłaszcza
na etapie początkowym, wymaga stopniowego nabierania wprawy.
Aby ułatwić osiągnięcie tej sprawności zalecamy ćwiczenia pod okiem osób wyspecjalizowanych w
pilotowaniu modeli dronów.
Page 11

2. SCHEMAT KONTROLERA (NADAJNIKA)
3. INSTALACJA BATERII W KONTROLERZE (NADAJNIKU)
Użyj śrubokręta, aby otworzyć pokrywę baterii.
W komorze baterii umieść 4 baterie typu AA. Upewnij się, że baterie są umieszczone zgodnie z oznaczeniami
polaryzacji (+ -). NIE NALEŻY ŁĄCZYĆ ZE SOBĄ BATERII RÓŻNEGO TYPU
Drążek obrotów silnika I
rotacji
Przycisk obrotów w lewo / w prawo
Przycisk lotu w lewo / w
prawo
Drążek kierunków
Przycisk Back Home
Tryb Headless
Przycisk akrobacji
Przycisk podświetlenia
Przycisk startu/lądowania
(przytrzymaj 3 sekundy aby
zatrzymać silniki)
Przycisk zmiany prędkości
Przycisk zdjęcia/wiedo
Przycisk sterowania kamerą
Włącznik
Przycisk lotu do przodu/do tyłu
Page 12
4. ŁADOWANIE AKUMULATORÓW
Użyj załączonej do zestawu ładowarki, aby
naładować akumulator drona.
** Do ładowania akumulatorów drona należy używać
WYŁĄCZNIE ładowarki załączonej w zestawie.
Ładowanie akumulatora powinno odbywać się
zawsze pod nadzorem osoby dorosłej.
Wskaźnik LED
Czerwony i zielony
- świeci
Czerwony
– świeci
Ładowanie
zakończone
Trwa
ładowanie
Specyfikacje ładowarki
Wejście
Prąd ładowania
Maksymalne napięcie
12V 0,6A
7.4 ± 0.03V
Zależności pomiędzy typem baterii, czasem pracy na jednym cyklu oraz długością ładowania
Typ baterii
Specyfikacja baterii
Czas pracy
Czas ładowania
Akumulator litowo
-
polimerowy (Li
-Poly)
7,4V
Czas lotu drona: do 10
minut
Około 120 minut (przy prądzie
ładowania ok. 0,6A)
Bateria cynkowo
-węglowa
(jednorazowa)
1,5V
(GP 15G R4P)
Czas
pracy kontrolera
(nadajnika): 18 godzin
Jednorazowa (nie należy
ładować)
5. SYNCHRONIZACJA NADAJNIKA I ODBIORNIKA RC
Krok 1
Ustaw drążek obrotów silnika do pozycji dolnej
Krok 2
Włącz kontroler
Page 13
Krok 3
Odkręć śrubkę i otwórz pokrywę baterii. Nstępnie
umieść baterię w urządzeniu podłączając wtyczkę
baterii do gniazda drona. Zamknij pokrywę
i przykręć śrubkę.
Krok 4
Włącz X-Bee Drone 7.1 używając włącznika,
znajdującego się na górze urządzenia. Diody
LED zaczną migać.
Krok 5
Postaw drona na płaskiej, równej powierzchni.
Krok 6
Przesuń drążek obrotów silnika do góry, następnie
do dołu. Pilot wyda
sygnał dźwiękowy informujący
o połączeniu kontrolera z urządzeniem. Diody LED
zaczną świecić ciągłym światłem.
Automatyczna kalibracja
Przełącz tryb prędkości na tryb szybki (Mode 3). Postaw drona na płaskiej i równej powierzchni. Przestaw oba
analogi do pozycji lewy dolny róg, tak jak na rysunku. Utrzymaj tą pozycję przez 10 sekund, diody LED drona
mrugną kilka razy po czym zaczną świecić nieprzerwanie. Następnie zwolnij analogi. Urządzenie jest gotowe
do lotu.
Page 14

6. KONTROLA LOTU
Aby uruchomić silniki, naciśnij przycisk startu/lądowania.
Aby wylądować naciśnij ten sam przycisk. Funkcji auto-lądowania można użyć jedynie jeśli dron znajduję
się na wysokości poniżej 20 metrów od ziemi. Użyci funkcji na wysokości powyżej 20 metrów, grozi
upadkiem drona ze znacznej wysokości i jego uszkodzeniem.
Aby wyłączyć silniki, naciśnij i przytrzymaj przycisk startu/lądowania przez 3-5 sekund.
Gdy bateria będzie na wyczerpaniu diody drona zaczną migać, w niewielkim odstępnie czasu dron
samoczynnie opadnie na podłoże (pamiętaj aby w szybkim czasie od informacji o słabej baterii, mieć drona w
bezpiecznym do lądowania miejscu).
UWAGA: nie przytrzymuj przycisku startu/lądowania podczas lotu, nie dostosowanie się do tej
informacji groźi upadkiem drona z dużej wysokości, jego uszkodzeniu oraz możliwości zranienia osób
trzecich i siebie.
Kontrola lotu
do góry /
dołu
Kontrola
obrotu w
lewo / prawo
Kontrola lotu
do przodu /
tyłu
Kontrola lotu
w lewo /
prawo
Kalibracja
lotu do
przodu / tyłu
Kalibracja
lotu w lewo /
prawo
Kalibracja
obrotów w
lewo / prawo
Przesuń drążek obrotów silnika do
przodu, dron poleci do góry.
Przesuń drążek obrotów silnika do
tyłu, dron poleci do dołu.
Przesuń drążek obrotów silnika
w lewo / prawo, dron obróci się
w wybranym kierunku.
Przesuń drążek kierunków do przodu
/ tyłu, dron poleci w wybranym
kierunku.
Przesuń drążek kierunków w lewo /
prawo, dron poleci w wybranym
kierunku
Naciśnij przycisk lotu do przodu, jeśli
dron leci automatycznie do tyłu.
Naciśnij przycisk lotu do tyłu, jeśli dron
leci automatycznie do przodu.
Naciśnij przycisk lotu w lewo, jeśli
dron leci automatycznie w prawo.
Naciśnij przycisk lotu w prawo, jeśli
dron leci automatycznie w lewo.
Naciśnij przycisk obrotów w lewo, jeśli
dron obraca się automatycznie w
prawo. Naciśnij przycisk obrotów w
prawo, jeśli dron obraca się
automatycznie w lewo.
Page 15

Akrobacje 360 stopni
Po naciśnięciu przycisku trybu akrobacji kontroler wyda sygnał dźwiękowy informujący o gotowości drona do
wykonania obrotu o 360 stopni.
W trybie tym, po przechyleniu drążka kierunków w lewo, w prawo, do przodu lub do tyłu, dron wykona w
wybranym kierunku obrót o 360 stopni.
Uwaga: przed wykonaniem ewolucji, upewnij się że w zasięgu drona masz wystarczająco dużo
miejsca.
Tryby prędkości
Urządzenie obsługuje trzy tryby prędkości lotu. Naciskaj przycisk trybu prędkości lotu, aby przełączać
pomiędzy trybem wolnym, zwykłym i szybkim. O tym, który tryb jest aktywowany, informuje nas ilość sygnałów
dźwiękowych. Mode 1 – tryb wolny – jeden sygnał dźwiękowy, Mode 2 – tryb zwykły – dwa sygnały
dźwiękowe, Mode 3 – tryb szybk i – trzy sygnały dźwiękowe.
7. TRYB HEADLESS
Jak włączyć/wyłączyć funkcję HEADLESS?
Naciśnij przycisk na kontrolerze (jak na zdjęciu). Kontroler będzie wydawał
dźwięk, oznacza to że jesteś w trybie HEADLESS.
Aby powrócić do zwykłego trybu, naciśnij ten sam przycisk.
Tryb ustawia kierunek lotu do przodu niezależnie od ustawienia drona dla łatwiejszej kontroli.
Jeśli chcesz zmienić ustawienie przodu drona, musisz wyłączyć urządzenie i ustawić je na nowo.
Page 16

8. TRYB POWROTU DO MIEJSCA STARTU
Przed startem należy skalibrować urządzenie. Podczas
kalibracji dron zaprogramuje sobie miejsce do którego ma
wrócić. Po naciśnięciu przycisku powrotu do miejsca
startu (niezależnie od ustawienia drona w powietrzu)
urządzenie zacznie lecieć w kierunku z którego
wystartowało. Aby przerwać powrót, wykonaj ruch prawym
analogiem.
Uwaga: urządzenie nie ląduje automatycznie i
podczas wykonywania tego polecenia należy
kontrolować lot.
9. NAGRYWANIE I ROBIENIE ZDJĘĆ
Naciśnij przycisk zdjęcia/wideo, aby wykonać zdjęcie.
Naciśnij i przytrzymaj przycisk zdjęcia/wideo, aby nagrać film. Aby zakończyć
nagrywanie naciśnij przycisk zdjęcia/wideo ponownie.
Aby zmienić kąt pochylenia kamery należy użyć przycisku sterowania kamerą.
10. WYMIANA ŚMIGIEŁ
Aby wymienić śmigła skorzystaj z poniższego schematu:
Użyte w instrukcji obsługi zdjęcia oraz informacje są poglądowe i mogą ulec zmianie bez wcześniejszej informacji.
Page 17

Romana
Page 18

1. NOTE DE SIGURANTA
** Produsul este realizat pentru persoanele in varsta de 14 ani sau mai mari**
Le sugeram celor care sunt abia la inceput in utilizarea unei drone, sa contacteze o persoana cu experienta
mai mare in acest domeniu. Utilizatorii sub 18 ani pot utiliza produsul doar sub supravegherea unui adult.
Scopul notelor de siguranta este de a p
roteja produsul si utilizatorii sai, precum si trecatorii si proprietatea lor.
• Folosirea necorespunzatoare poate provoca accidentari sau deteriorari ale aparatul ui
SPECIAL REALIZAT PENTRU FOLOSIREA IN EXTERIOR.
Produsul a fost proiectat in asa fel incat
sa poata fi utilizat numai in aer liber.
Inainte de utilizare asigurati
-va ca alegeti o zona de zbor fara obstacole si mentineti o distanta de siguranta
fata de oameni si animale.
•
Nu o folositi aproape de liniile de curent, in locuri publice (zone aglomerate) si in cadrul zonelor de protectie
aeroportuare.
PREVENITI CONTACTUL CU APA
Atat drona cat si telecomanda sunt compuse din multe componente electronice de
precizie. Prin urmare, acestea trebuie impiedicate la contactul cu apa.
Expunerea la apa
sau u
mezeala in orice fel poate provoca functionarea necorespunzatoare sau daune.
NU UTILIZATI SI NU-L EXPUNETI LA PLOAIE SAU UMEZEALA
INSTRUCTIUNI ALE BATERIEI
Pentru a evita un potential incendiu provovocat de baterii, va rugam sa nu inversati polaritatea sau sa perforati
bateriile
. Incarcarea bateriilor trebuie realizata sub supravegherea unui adult de fiecare data si intr-o locati e
departe de accesul copiilor
.
• NU AMESTECATI BATERIILE NI-CAD SI ALKALINE
ATENTIONARE DE SIGUR AN T A PENTRU BATERIILE NI-MH
•
Asigurati-va ca bateriile sunt instalate corect pentru a asigura o polaritate corecta (+ -).
*NU AMESTECATI BATERIILE NI
-CAD SI ALKALINE
•
Daca nu intentionati sa utilizati dispozitivul pentru o perioada mai lunga de timp, scoat eti bateriil e pentru a
evita scu
rgerea care poate afecta transmitatorul.
**
VA RUGAM SA ELIMINATI BATERIILE EPUIZATE IN CONFORMITATE CU LEGILE SI ORDONANTELE
LOCALE.
NOTA DE SIGURANTA PENTRU BATERIILE LI-POLYMER
•
Bateriile Li-Polymer au risc operational ridicat in comparatie cu alte baterii, astfel este imperat i v sa urmati
corect ghidul operational. Producatorii si dealeri i nu isi asuma nicio responsabi l itate pentru daune accidentale
cauzate de o utilizare necorespunzatoare.
NU utilizati altfel de incarcator in afara de cel furnizat p
entru a evita un potential incendiu sau o explozie. Nu
loviti, nu dezasamblati, nu ardeti si nu inversati polaritatea.
Evitati contactul materialelor metalice cu polaritat ea baterii l or, existand posibi l itatea de a cauza un scurt
circuit. **NU INTEPATI BATE
RIILE DEOARECE EXISTA RISCUL DE A PROVOCA UN INCENDIU.
•
Incarcarea bateriilor ar trebui facuta sub supravegherea unui adult de fiecare data si intr -
o locatie departe de
accesul copiilor.
•
Va rugam sa opriti utilizarea sau incarcarea bateriilor daca exista o crestere neobisnuita a temperaturii
bateriei dupa utilizare.
Continuarea utilizarii bateriei poate cauza o deformare, o explozie sau chiar un
potential incendiu.
**
VA RUGAM SA ELIMINATI BATERIILE EPUIZATE IN CONFORMITATE CU LEGILE SI ORDONANTELE
LOCALE
. **NU LE ELIMINATI IN MOD INCORECT.
"NU LASATI BATERIILE LA INCARCAT PESTE NOAPTE.
A SE FERI DE CALDURA
Modelele R/C sunt realizate din diverse forme de plastic fiind expuse la deteriorare sau deformare din cauza
caldurii extreme si temperaturilor scazute.
Asigurati-va ca nu veti pastra modelul la temperaturi scazute sau
prea ridicate.
OBTINE AJUT ORUL UNUI PILOT EXPERIMENTAT
Produsul poate fi tratat ca pe o jucarie,
dar nu este potrivita pentru copiii sub 14 ani. Cei care sunt lipsiti de
experienta in pilotarea de la distanta a unei drone, trebuie sa stie ca nu va fi o trecere usoara pana cand vor
deveni piloti calificati. Pentru a obtine mai usor unele abilitati recomandam exerciti i sub supravegherea unui
pilot de drone experimentat .
Page 19

2. DIAGRAMA CONTROLOR (TRANSMITATOR)
3. INSTALAREA BATERIILOR IN CONTROLOR (TRANSMITATOR)
Utilizati o surubelnita pentru a deschide capacul bateriilor.
Introduceti 4 baterii AA in compartimentul bateriilor. Asigurati-va ca bateriile sunt introduse corect in
conformitate cu polaritatea corecta (+ -). NU AMESTECATI BATERII DE DIFERITE TIPURI
Stick de acceleratie
Tasta migratie dreapta/stanga
Tasta migratie
dreapta/stanga
Stick de control al
directiei
Buton revenire acasa
Mod “Headless”
Buton 3D flip
Buton lumini
Start / buton de aterizare
(apasati si tineti apasat 3
secunde pentru a opri
motoarele)
Buton mod viteza
Buton foto/video
Buton camera
Tasta
pornire/oprire
Tasta migratie inainte/inapoi
Page 20
4. INCARCAREA BATERIEI
Utilizati incarcatorul furnizat pentru a incarca bateria
dronei.
** Utilizati DOAR incarcatorul furnizat pentru
incarcare.
Incarcarea bateriilor ar trebui facuta sub
supravegherea unui adult de fiecare data
Indic a tor LED
Rosu si verde
- aprins
Rosu
- aprins
Incarcare completa
Incarcare...
Specificatii incarcator
Input
Curent de incarcare
Tensiune maxima
12V 0,6A
7.4 ± 0.03V
Utilizarea si durata de incarcare a bateriei
Tip baterie
Specificatii baterie
Timp de lucru la o
singura incarcare
Timpul de incarcare
Baterie reincarcabila
lithium
-polymer (Li-Poly)
7.4V
Timpul de zbor al
dronei: pana la 10
minute
Aproximativ 120 de minute
(curent de incarcare aprox.
0.6A)
Baterie Zinc
-carbon
(Non reincarcabila)
1.5V
(GP 15G R4P)
Controlor
(transmitator)
- timpul
de operare: 18 ore
Non reincarcabil (nu incarcati)
5. SINCRONIZARE TRANSMITATOR SI RECEPTOR
Pasul 1
Mutati stick-ul de acceleratie la cea mai joasa
pozitie.
Pasul 2
Porniti controlorul.
Page 21
Pasul 3
Utilizati o surubelnita pentru a deschide capacul
bateriei. Plasati bateria in compartimentul
bateriei al dronei si conectati mufa bateriei la
slotul de baterie al dronei. Inchideti capacul si
strangeti suruburile.
Pasul 4
Porniti X-
Bee Drone 7.1 utilizand comutatorul
situat pe partea superioara a dronei. LED-
urile
incep sa clipeasca.
Pasul 5
Asezati drona pe o suprafata plana.
Pasul 6
Duceti stick
-ul de acceleratie inainte si apoi inapoi.
Controlorul emite un semnal sonor indicand ca
conexiunea cu drona a fost stabilita
. LED-urile
incep sa straluceasca in mod constant.
Auto-calibrare
Comutati modul de viteza la "rapid” (Modul 3). Plasati drona pe o suprafata plana. Mutati ambele stick-uri la
pozitia din coltul stanga-jos, precum in imagine. Mentineti aceste pozitii pentru 10 secunde. LED-urile dronei
vor clipi de cateva ori, apoi vor incepe sa straluceasca in mod constant. Acum, puteti elibera stick-urile – drona
este gata de zbor.
Page 22

6. CONTROLUL ZBORULUI
Apasati butonul de start/aterizare pentru a porni motoarele.
Apasati acelasi buton pentru aterizare. Auto-aterizarea poate fi utilizata numai in cazul in care drona se
afla la o inaltime mai mica de 20 de metri de sol. Utilizand functia la o inaltime mai mare de 20 de metri,
drona este in pericol sa cada de la o inaltime considerabila si sa sufere daune.
Pentru a opri motoarele, apasati si tineti apasat butonul de “start/aterizare” pentru 3-5 secunde.
LED-ul dronei incepe sa clipeasca atunci cand energia bateriei este scazuta. La scurt timp, drona aterizeaza
automat (asigurati-va ca duceti drona catre un loc de aterizare in conditii de siguranta in momentul in care
primiti un semnal de baterie slaba).
ATENTIE: Nu tineti apasat butonul de start/aterizare in timpul zborului! Nerespectarea acestei
instructiuni poate cauza caderea dronei de la o inaltime mare, provocand daune si rezultand
posibilitatea de a te accidenta pe tine sau pe altii.
Zbor sus /
jos
Rotatie
stanga /
dreapta
Zbor inainte
si inapoi
Zbor stanga
/ dreapta
Calibrare
migratie
inainte /
inapoi
Calibrare
migratie
stanga /
dreapta
Calibrare
rotatie
stanga /
dreapta
Mutati stick-ul de acceleratie inainte
pentru ca drona sa zboare in sus
Mutati stick-ul de acceleratie inapoi
pentru ca drona sa zboare in jos.
Mutati stick-ul de acceleratie stanga /
dreapta pentru a roti drona in directia
dorita.
Mutati stick-ul de control al directiei
inainte / inapoi pentru ca drona sa
zboare in directia dorita.
Mutati stick-ul de control al directiei
stanga/dreapta pentru ca drona sa
zboare in directia dorita.
Apasati tasta "Migratie inainte" daca
drona migreaza automat inapoi.
Apasati tasta "Migratie inapoi" daca
drona migreaza automat inainte.
Apasati tasta "Migratie stanga" daca
drona migreaza automat catre
dreapta.
Apasati tasta "Migratie dreapta" daca
drona migreaza automat catre stanga.
Apasati tasta "Rotire stanga" daca
drona se roteste automat in sensul
acelor de ceas. Apasati tasta "Rotire
dreapta" daca drona se roteste in
sensul invers al acelor de ceas.
Page 23

Cascadorii la 360 de grade
Cand apasati butonul Mod Flip controlorul emite un semnal sonor indicand ca drona este in modul 3D flip.
In modul 3D flip, mutati stick-ul de directie inainte, inapoi, stanga sau dreapta pentru a rostogoli drona in
directia dorita
Nota: Inainte de a incepe sa faceti cascadorii asigurati-va ca aveti suficient spatiu liber in zona.
Moduri viteza
Dispozitivul suporta 3 moduri de viteza. Apasati butonul de viteza pentru a comuta intre modurile incet, normal
si rapid. Modul curent de viteza este indicat de un numar de semnale sonore emise. Mod 1 – mod i ncet - un
beep; Mod 2 – mod normal – doua beep-uri; Mod 3 – mod rapid – trei beep-uri.
7. MOD “HEADLESS”
Cum se porneste/opreste modul headless?
Apasati butonul controlorului (indicat in imagine). Control orul va emite un
sunet indicand ca drona este in modul HEADLESS.
Daca doriti ca drona sa revina la modul normal de control apasati din nou
acelasi buton.
drone back to the normal control mode, press the same button again.
In acest mod, pentru a face utilizarea dronei mai usoara, directia de zbor inainte este setata indiferent
de pozitia dronei.
Daca doriti sa setati partea din fata a dronei din nou, trebuie sa opriti aparatul si sa configurati din nou.
Page 24

8. MODUL “BACK HOME”
Inainte de zbor, drona trebuie sa fie calibrata. In timpul
calibrarii, dispozitivul memoreaza pozitia de pornire
(acasa). Apoi, odata ce apasati butonul "Back home",
drona incepe sa zboare inapoi catre punctul de start
indiferent de pozitia si locatia curenta. Pentru a renunta la
modul "Back home” trebuie doar sa miscati stick-ul de
directie.
Nota: drona NU are functie de auto-aterizare.
Pentru a ateriza,
trebuie sa controlati dispozitivul
manual.
9. FOTOGRAFIERE SI FILMARE VIDEO
Apasati butonul “foto/video” pentru a fotografia.
Apasati si tineti apasat butonul “foto/video” pentru a incepe inregistrarea. Apasati din
nou butonul “foto/video” pentru a opri inregistrarea.
Utilizati butonul de navigare al camerei pentru a schimba unghiul.
10. SCHIMBAREA ELICELOR
Pentru a inlocui elicele urmati pasii de mai jos.
Toate imaginile si informatiile din manual au fost prezentate doar pentru motive
ilustrative si pot fi modificate fara o notificare prealabila.
Page 25

Magyar
Page 26

1. BIZTONSÁGI FIGYELMEZTETÉSEK
** A termék 14 éven felülieknek készült **
•
Ha még nem tudja, hogy repül a készülék, kérjük, vegye fel a kapcsolatot olyan személlyel, aki tudja és
mindig szülői felügyelet alatt használják a készüléket. 18 év alattiak mindig szülői felügyelet mellett használják
a készüléket
•
A biztonsági figyelmeztetések nemcsak a repülő megóvására, hanem az Ön biztonsága érdekeit is
szolgálják.
•
Nem megfelelő működés/működtetés sérülést és anyagi kárt okozhat.
S
SPECIÁLIS KÜL & BELTÉRI HASZNÁLAT
•
A terméket csak kültéren lehet használni.
•
K érj ük, mindig ügyeljen a repülési környezetre, arra hogy ne legyen semmilyen akadály és mindig tartson
megfelelő távolságot az emberektől, állatoktól.
•
Ne használja elektromos vezetékek közelében.
ÓVJA A TERMÉKET A NEDVESSÉGTŐL
Mind a drón, mind a távszabályozója precíziós elektronikai eszköz. Ezért szükséges őket óvni a nedvességtől.
Bármilyen vízzel való érintkezés vagy nedvesség a készülék hibás működését vagy hibáját eredményezheti
.
NE HASZNÁLJA ESŐBEN VAGY NEDVESSÉGBEN.
AKKUMULÁTOR HASZNÁLATA
A potenciális tűzveszély elkerülése érdekében, kérjük, ne zárja rövidre vagy ne cserélje meg a polaritásokat.
Az elemek töltését mindig felügyelet alatt végezze, és gyermektől távol tartsa.
•
NE KEVERJE A NI-CAD ÉS ALKÁLI ELEMEKET
BIZTONSÁGI FIGYELMEZTETÉSEK NI
-MH AKKUMULÁTOR ESETÉN
•
Győződjön meg róla, hogy az elemeket helyesen, megfelelő polaritással (+ -) helyezte be.
NE KEVERJEN NI
-CAD & ALKÁLI ELEMEKET
•
Ha hos szan ideig nem tervezi használni a készüléket, vegye ki az elemeket a távirányítóból, annak
érdekében, hogy kerülje a vevőegység sérülését.
**KÉRJÜK, HOGY A LEMERÜLT ELEMEK A TÖRVÉNYI ELŐÍRÁSOKNAK MEGFELELŐEN HELYEZZE EL
BIZTONSÁGI FIGYELMEZTETÉSEK LI
-POLYMER AK KUMULÁTO R ESETÉN
•
A Li-Polymer elemeknek magasabb a működési kockázatuk, mint más elemeknek, ezért kérjük, hogy
fokozottan ügyeljen annak használatakor. Gyártó és forgalmazó nem vállal felelősséget a véletlenségből és
nem megfelelő használatból eredő károkért.
NE HASZNÁLJO
N más töltőt. Csak a mellékelt töltőt használja a robbanás és tűzveszély elkerülése
érdekében. NE törje össze, égesse el vagy fordítsa meg a polaritást.
Kerülje az olyan fémes anyagokat, amik kapcsolatba léphetnek az elemek polaritásával, és ez által
rövid
zárlatot okozhatnak.
**SOHA NE SÉRTSE FEL AZ ELEMEKET, MERT TŰZ KELETKEZHET.
•
Az elemek töltését mindig felügyelet alatt végezze, és gyermektől távol tartsa.
•
Kérjük, azonnal hagyja abba az elemek használatát vagy töltését, ha az elemek hőmérséklete
szokatlanul
megemelkedik. Az elemek további használata robbanáshoz, deformálódáshoz vagy tűzhöz vezethet.
** KÉRJÜK, HOGY A LEMERÜLT ELEMEK A TÖRVÉNYI ELŐÍRÁSOKNAK MEGFELELŐEN HELYEZZE EL.
**NE DOBJA A SZEMETESBE AZ ELEMEKET.
"NE TÖLTSE AZ ELEMEKET EGÉSZ É
JJELEN KERESZTÜL
TARTSA TÁVOL A MELEGTŐL
Az R/C modellek különböző műanyagból vannak, melyek extrém magas hő vagy hideg hatására
deformálódnak. Ne tárolja a készüléket közvetlen melegnek és hidegnek kitéve.
TAPASZTAL T PIL Ó TA SEGÍTS ÉGE AJÁNLOTT
A
Quadcopter egy játék, mely 14 éven felüli gyermekeknek készült. Kezdetben kis tanulóköröket kell
elsajátítani, míg gyakorlott pilóta nem lesz a játékos. Célszerű egy tapasztalt pilóta segítségét kérni.
Page 27

2. TÁVIRÁNYÍTÓ (TRANSMITTER)
3. VEVŐEGYSÉGBE (TÁVIRÁNYÍTÓBA) VALÓ ELEM TELEPÍTÉSE
Használjon csavarhúzót az elemfedél felnyitásához.
Helyezzen be 4 „AA” elemet az elemtartóba. Ügyeljen a megfelelő polaritásra (+ -). NE KEVER JEN
KÜLÖNBÖZŐ TÍPUSÚ ELEMEKET
Gázkar
Bal / jobb vezérlő gomb
Bal / jobb vezérlő gomb
Iránykar
“Gyere haza” gomb
Headless mód
3D flip gomb
Fény gomb
Start / landoló gomb
(tartsa nyomva 3
másodpercig a motor
leállításához)
Sebseség mód gomb
Kép / video gomb
Kamera navigációs gomb
Be/ki-
kapcsoló
gomb
Előre / hátra vezérlő gomb
Page 28
4. ELEMEK TÖLTÉSE
Használja a mellékelt töltőt a drón elemeinek
töltéséhez.
** CSAK a mellékelt töltőt használja a töltéshez. Az
elemek töltését mindig szülői felügyelet al att és
gyermekektől távol kell végezni.
LED jelzőfény
Piros és zöld fény
– világít
Piros fény
– világít
Töltés befejeződött
Töltés
Töltési specifikációk
Bemenet
Töltési áramforrás
Maximális feszültség
12V 0,6A
7.4 ± 0.03V
Akkumulátorok használata és hozzávetőleges töltési idejük
Akkumulátor típusa
Akkumulátor
specifikációja
Használati idő egy
töltéssel
Töltési idő
Újratölthető
lithium-
polymer
elem
(Li-Poly)
7.4V
Drón repülési ideje
max. 10 perc
Kb.
120 perc (töltési feszültség
kb
. 0.6A)
Zinc
-carbon elem
(Nem újratölthető)
1.5V
(GP 15G R4P)
Távirányító működési
ideje: 18 óra
Nem újratölthető (ne töltse)
5. TÁVIRÁNYÍTÓ ÉS VEVŐ ÖSSZEKAPCSOLÁSA
1 lépés
Mozgassa a gázkart a legalacsonyabb pozícióba.
2 lépés
Kapcsolja be a távirányítót.
Page 29

3 lépés
A csavarhúzó segítségével nyissa fel az
akkumulátor fedelet. Helyezze be az elemeket és
csatlakoztassa a drón akkumulátor foglalatához.
Tegye vissza a fedelet és húzza meg a
csavarokat
.
4 lépés
Kapcsolja be az X-Bee Drone 7.1-
t a tetején
található gombbal. A LED fény elkezd villogni.
5 lépés
Helyezze a drón sima és egyenletes felületre.
6 lépés
Mozgassa a gázkart előre majd vissza. A távirányító
hangjelzést fog adni, majd a drónnal való kapcsolat
létrejöttét jelzi.
A LED fények elkezdenek
folyamatosan égni és az X
-Bee Drone 7.1 kész a
repülésre.
Autom ati ku s kal ibr álás
Váltson a „gyors” sebességmódba (3 mód/Mode 3). Tegye a drónt sima és egyenletes felületre. Mozgassa
mindkettő kart a bal alsó pozícióba, ahogy a képen látható. Tartsa ebben a pozícióban 10 másodpercig. A
drón LED fényei egy kis ideig villogni kezdenek, majd folyamatosan világítani. Most már elengedheti a karokat
– a drón készen álla a repülésre.
Page 30

6. REPÜLÉS IRÁNYÍTÁSA
Nyomja meg a start/landolás gombot a motor elindításához.
Nyomja meg újra ugyanazt a gombot a landoláshoz. Automatikus landolást csak akkor használja, ha a
készülék kevesebb, mint 20 méterre van a talajtól. A 20 méteres magasság feletti magasságból a drón
nagyon eshet és kár keletkezhet.
A motor leállításához tartsa nyomva a start/landolás gombot 3-5 másodpercig.
Ha az akkumulátor szint alacsony, a drón LED fényei elkezdenek villogni. Ezután a drón automatikusan elkezd
landolni az alatta lévő felületre (győződjön meg róla, hogy a drón biztonságosan tudja-e irányítani, amikor az
alacsony akkumulátor-szintet jelző fények aktiválódnak).
FIGYELEM: NE tartsa nyomva a start/landolás gombot repülés közben! Amennyiben figyelmen kívül
hagyja ezt az utasítást akkor a drón nagy magasságból leeshet és kárt tehet magában és másokban is.
Repülés
fel/le
Jobbra /
balra
fordulás
Előre és
hátra
repülés
Balra /
jobbra
repülés
Előre / hátra
vezérlő
kalibrálása
Bal / jobb
vezérlő
kalibrálása
Jobbra /
balra forgás
kalibrálása
Mozgassa a gázkart előre a drón
felfelé való reptetéséhez.
Mozgassa a gázkart visszafelé a drón
lefelé való reptetéséhez.
Mozgassa a gázkart balra / jobbra a
drón adott irányba való fordulásához.
Mozgassa az iránykart előre / hátra az
adott irányba való repüléshez.
Mozgassa az iránykart jobbra / balra
irányba való repüléshez.
Nyomja meg az "Előre vezérlő"
gombot, ha drón automatikusan hátra
tér el.
Nyomja meg a "Hátra vezérlő"
gombot, ha a drón automatikusan
előre tér el
Nyomja meg a "Bal vezérlő" gombot,
ha drón automatikusan jobbra tér el.
Nyomja meg a "Jobb vezérlő" gombot,
ha a drón automatikusan balra tér el.
Nyomja meg a “Bal forgás" gombot,
ha a drón automatikusan az
óramutató járásával megegyező
irányba forog. Vagy a "Jobb forgás"
gombot, ha a dórn automatikusan az
ellentétes irányba forog
Page 31

360-fokos mutatvány
Nyomja meg a Flip mód gombot és a távirányító beep hangot fog kiadni, ami jelzi, hogy a drón 3D flip
módban van.
3D flip módban mozgassa az iránykart előre, hátra, balra vagy jobbra és a drón a kiválasztott irányba repül.
Megjegyzés: Mielőtt elkezdi mutatványokat csinálni, győződjön meg róla, hogy elegendő van-e
rendelkezésre.
Sebesség módok
Három sebességi fokozat/mód van. Nyomja meg a sebesség gombot a gyors, lassú és normál
sebességfokozatok közötti váltáshoz. A z ak tuális sebességi módot a beep hangok száma jelzi. 1 mód - lassú
– egy beep hang; 2 mód – gyors mód – kettő beep hang; 3 mód - 3D flip mód – három beep hang.
7. HEADLESS MÓD
Hogyan kell be/ki- kapcsolni a headless módot?
Nyomja meg a (képen látható) gombot a távirányítón és tartsa nyomva 3
másodpercig, míg egy beep hangot nem hall. A távirányító hangot ad ki
minden 3. másodpercben, majd jelzi, hogy a drón HEADLESS módban
van.
Ha vissza szeretnék kapcsolni a drónt normál módba, tartsa lenyomva
ugyanazt a gombot.
Ebben a módban a drón működése egyszerűbb, az előrefelé való repülés be van állítva függetlenül a
drón helyzetétől.
Ha be szeretné állítani a drón új előrefelé mutató irányát, ki kell kapcsolnia a készüléket és újra kell
konfigurálnia.
Page 32
8. GYERE HAZA /BACK HOME/ MÓD
A drón repülésének elkezdésekor, szükséges azt
kalibrálni. Kalibráláskor a készülék elmenti a kiindul ási
(haza) pozícióját. Majd, ha megnyomja a „Gyere haza”
gombot a drón elkezd visszafelé repülni a kiindulási
helyéhez függetlenül az aktuális pozíciójától és helyétől. A
„Gyere haza” mód megszakításához, csak mozgassa meg
az iránykart.
Megjegyzés: a drónban NINCSEN automatikus
landolási funkció. A leszállást kézileg kell vezérelni.
9. KÉP és VIDEÓKÉSZÍTÉS
Nyomja meg a fénykép/videó gombot a fényképkészítéshez.
Tartsa nyomva a fénykép/videó gombot a rögzítés elindításához. Nyomja meg a
fénykép/videó gom bot újr a a rögzítés leá llítás áh o z.
Használja a kamera navigációs gombját a kamera látószögének módosításához.
10. PROPELLER SZERELÉSE
Használja a csavarhúzót a propeller leszereléséhez, majd az újat az alábbiak szerint rögzítse:
A használati útmutatóban lévő összes kép és információ illusztrációt szolgál és előzetes bejelentés nélkül megváltoztatható.
Page 33

Declaration of Conformity
Product detail s
For the following
Product : Drone
Model(s) : OV-X-BeeDrone 7.1
Declaration & Applicable standards
We, BrandLine Grou p Sp. z o.o., h ereb y declar e und er our sole resp onsi bilit y that the of
the above referenced product complies the following directives:
R&TTE Directive 1999/5/EC
EMC Directive 2004/108/EC
Low Voltage Directi v e 2006/95/EC
RoHS Directive 2011/65/EU
The following harmonized standards have been applied:
Safety and Health:
EN 62479: 2010
EN 60950-1: 2006+A11: 2009+A1: 2010+A12: 2011+A2: 2013
EMC:
EN 301 489-1 V 1.9. 2 (2011-09)
EN 301 489-17 V 2.2.1 (2012-09)
RF Spectrum Efficiency:
EN 300 328 V1.8.1 (2012-06)
Representative
BrandLine Group Sp. z o.o.
ul. Dziadoszańska 10
61-248 Poznań
Jan Libera
Page 34

 Loading...