

Page 1

Page 2

1. SAFETY NOTES
** The product is designed for people aged 14 and up**
•
We suggest those, who are just getting s tarted to operate drones, to con tact a person
with more experience in this field. The users under 18 years of age can operate the
product under
adult supervision only.
•
The purpose of the safety notes is to protect the product and its user s as well as
bystanders and their p ro perty.
•
Improper oper ation of the prod uc t can cause injur ies and property da mage.
SPECIALLY DESIGNED FOR INDOOR AND OUTDOOR U
SE
•
The product has been designed in a way so that it can be used both indoors and
outdoors.
Before using the product, make sure that the area you chose is free from obstacles. Also,
when operating the product always keep a safe distance from people and ani
mals.
•
Do not op erate the product nea r p ower lines.
PREVENT THE PROD U CT FROM GETTING WET
Both the drone and the controller are composed of many precision electronic
components. Therefore, they must be prevented from getting wet. Exposure to water or
moisture in any form can cause their malfunction or damage.
DO NOT OPERATE OR EXPOSE THE PRODUCT TO RAIN OR MOISTURE
BATTER Y INSTRUCT IONS
To avoid a potential fire hazard, please do not short circuit, puncture or reverse the
polarity of batteries. Battery charging should al ways be done under adult supervision, and
at a location out of the reach of children.
•
DO NOT MIX NI-CAD AN D ALKA L IN E B ATT ERIE S
SAFETY NOTES FOR NI
-MH BATTERIES
•
Make sure the batteries are properly installed observing correct polarity (+ -).
DO NOT MIX NI
-CAD AND ALK A L IN E BAT TERI ES
•
If you plan not to use the quadcopter for extended period of time, remove the
batteries fro m the controller to av oid their leakage , which may damage the t r ansmitter.
PLEASE DISPOSE USED BATTERIES ACCORDING TO L
OCAL REGULATIONS IN SPECIAL
RECYCLE SPOTS.
Page 3

SAFETY NOTES FOR LI
-POLYME R BATTERIES
•
Li-Polymer batteries have higher operati onal risks when com p ar ed to one s of other
types. Therefore, using them, it is imperative to follow proper operational guidelines. The
manufactur er and dealers assume no liability for any damage caus ed by improper
usage.
In order to avoid potential fire or explosion do not use any other charger except the one
inclu ded with the produc t. DO NOT cru sh, disassemble , burn, or reverse the polari ty o f th e
batteries.
To avoid sho r t circuits, d o no t allow the metal parts to touch the battery te rmi nals. NEVER
PUNCTURE
BATTERIES; OTHERWISE IT COULD CAUSE POTENTIAL FIRE H AZARD.
•
Battery charging should always be done under adult supervision, and at a locati on out
of the reach of children.
•
In case of unnatur al excessive heating of the batt eries please stop using or charging
them immediately. Otherwise, it may cause the ir swelling, de f ormation or explosion
thereby increasing the risk of fire.
**PLEASE
DISPOSE USED BATTERIES ACCORDING TO LOCAL REGULATIONS IN SPECIAL
RECYCLE SPOTS. DO NOT DISPOSE OF OLD BATTERIES IN THE HOUSEHOLD TRASH
DO NOT CHARGE BATTERIES OVERNIGHT
KEEP AWAY FROM HEAT
R/C models are made from various forms of plastic that is very
susceptible to da mage or
deformation du e to extreme ly high and low temperatur es. There fore, the p r oduct shou ld
not be used or stored in places where it would be exposed to extreme temperatures.
OBTAIN THE ASSISTANCE OF AN EXPERIENCED PILOT Although the pr
oduct can be tre ated
as a toy, it is not intended for those under fourteen years of age. Those, who are
inexperienced in piloting remote
-controlled drones, must know tha t th ere will be a sli g ht
learning curve until you become a skilled pilot. In order to m
ake it easier to gain this skill
we recommend exercises under the supervision of prof es sional drone pilots.
Page 4
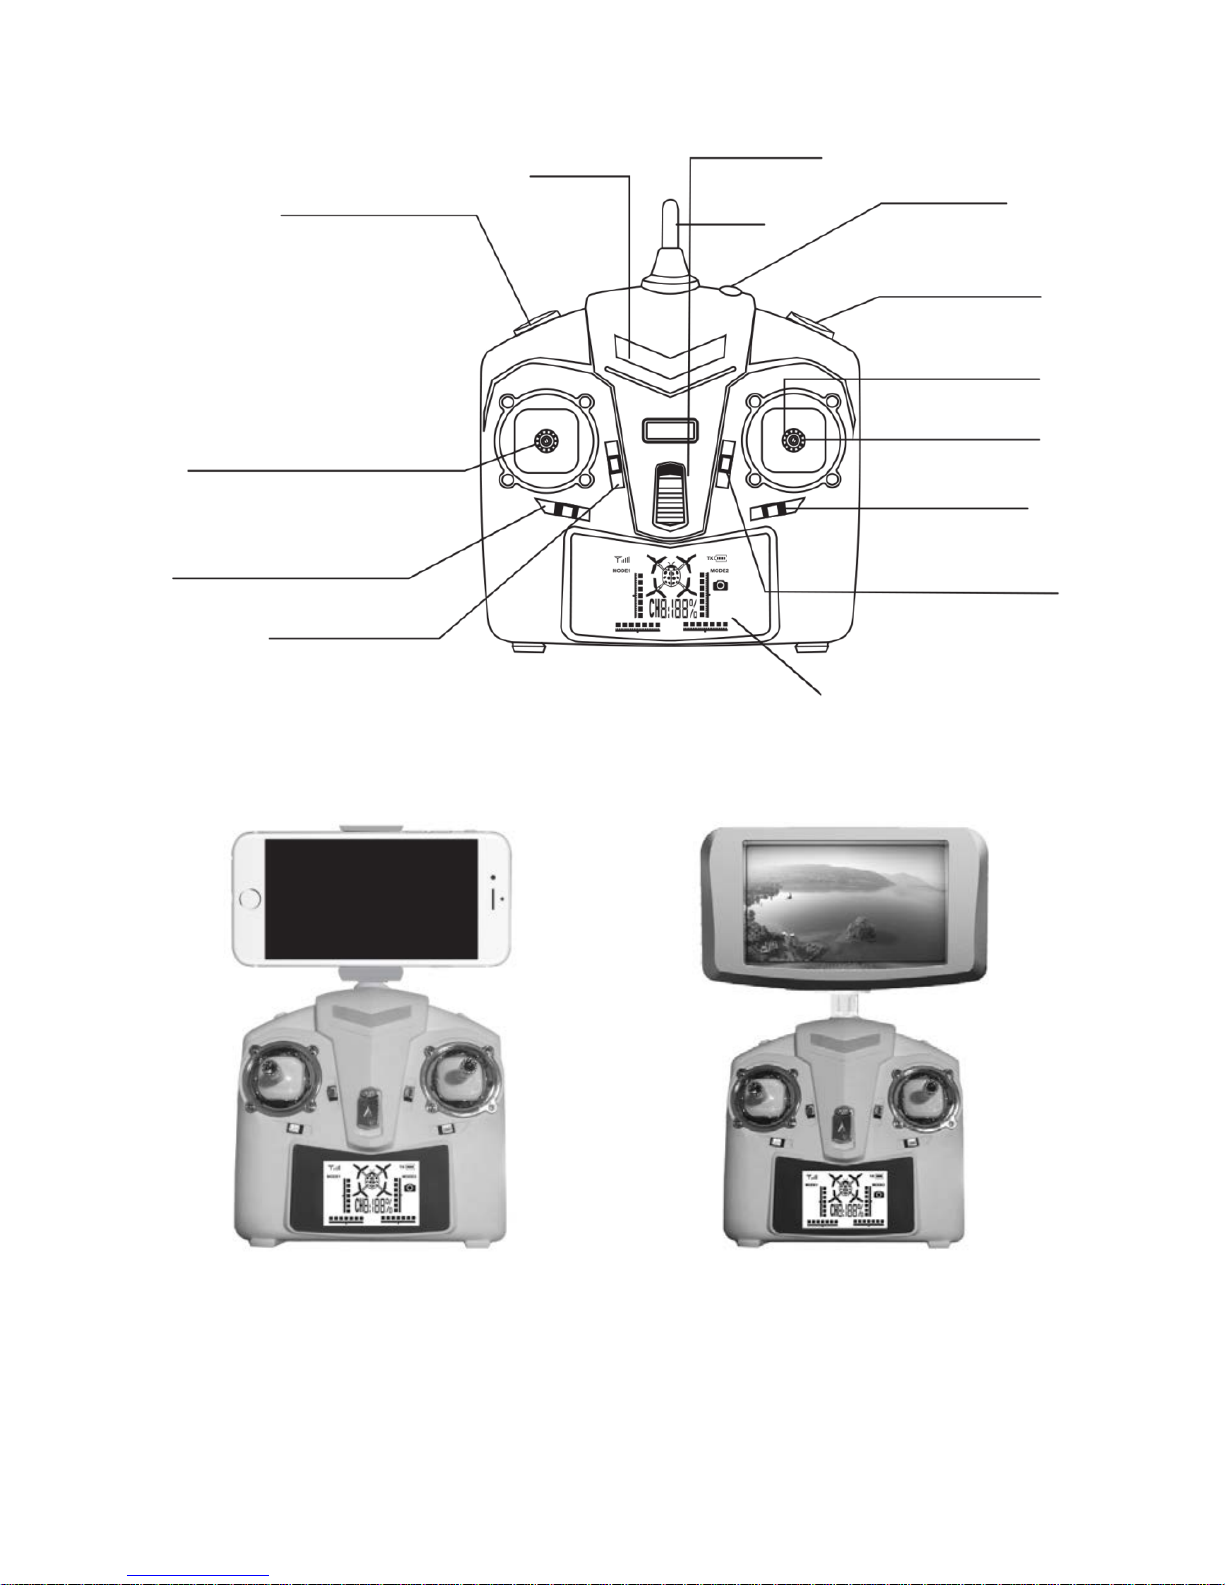
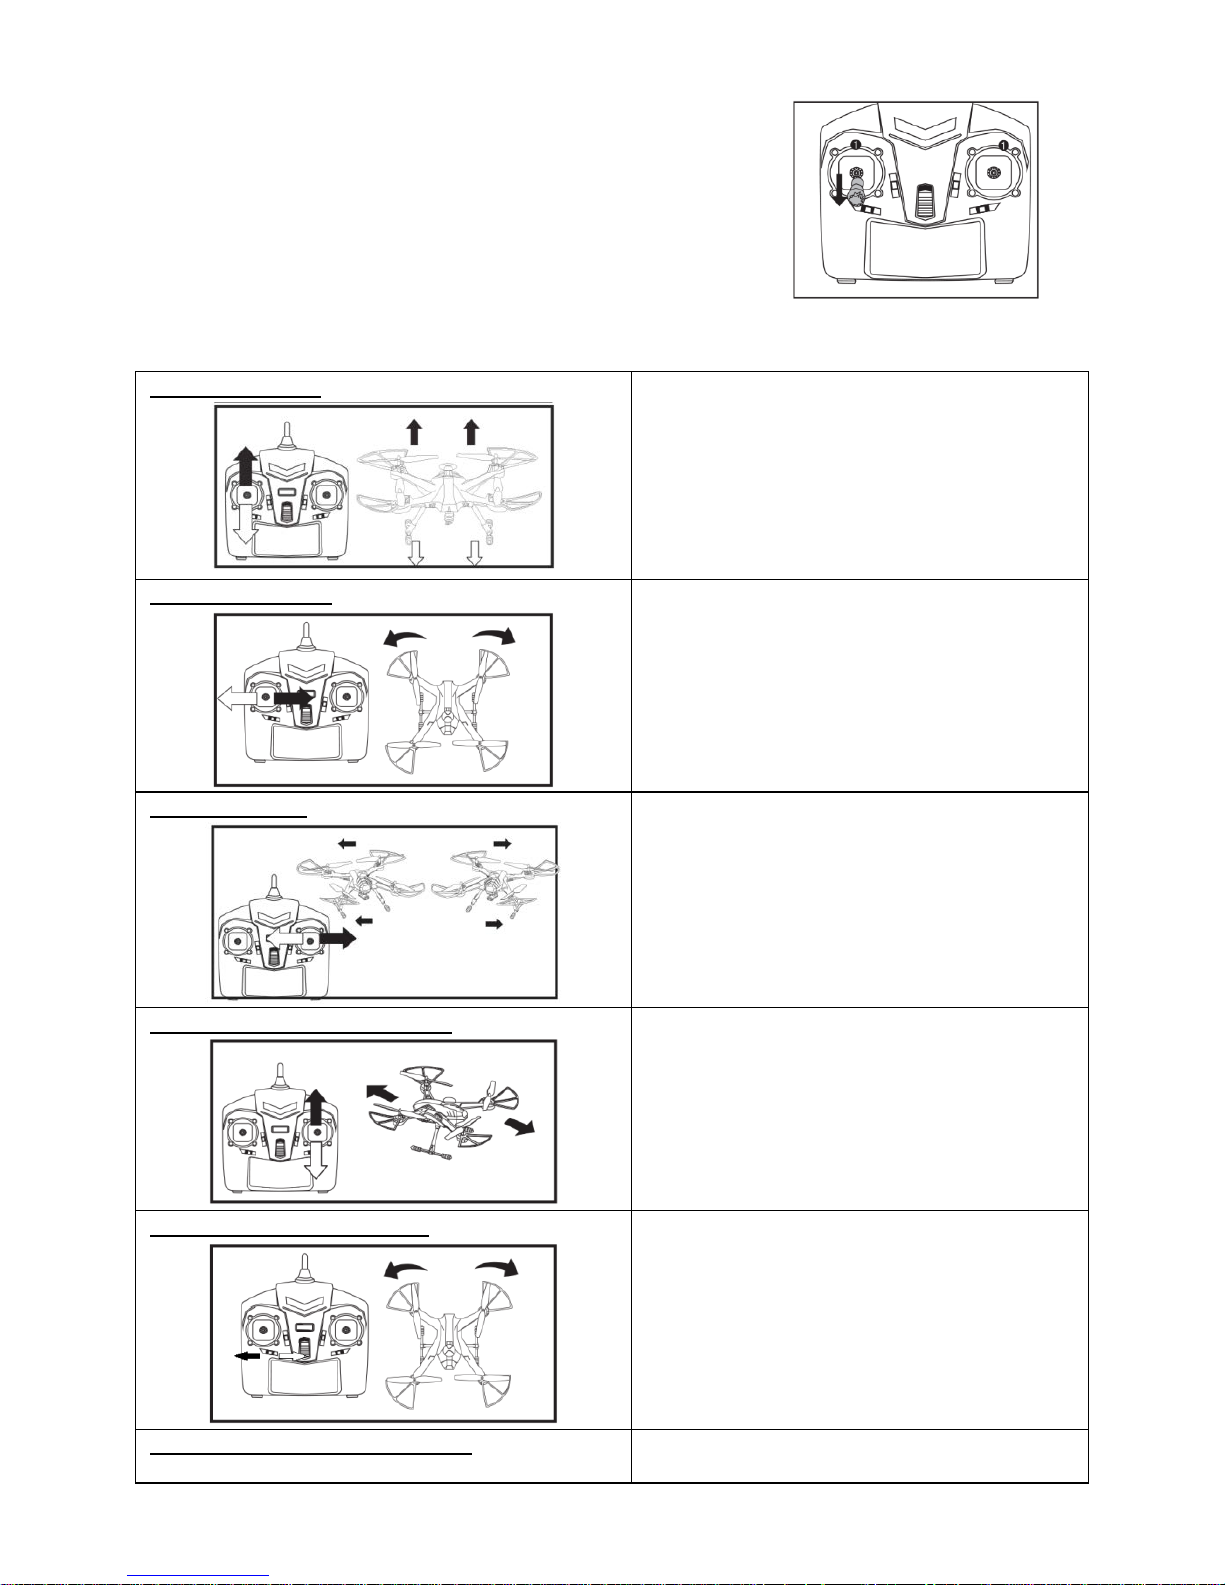
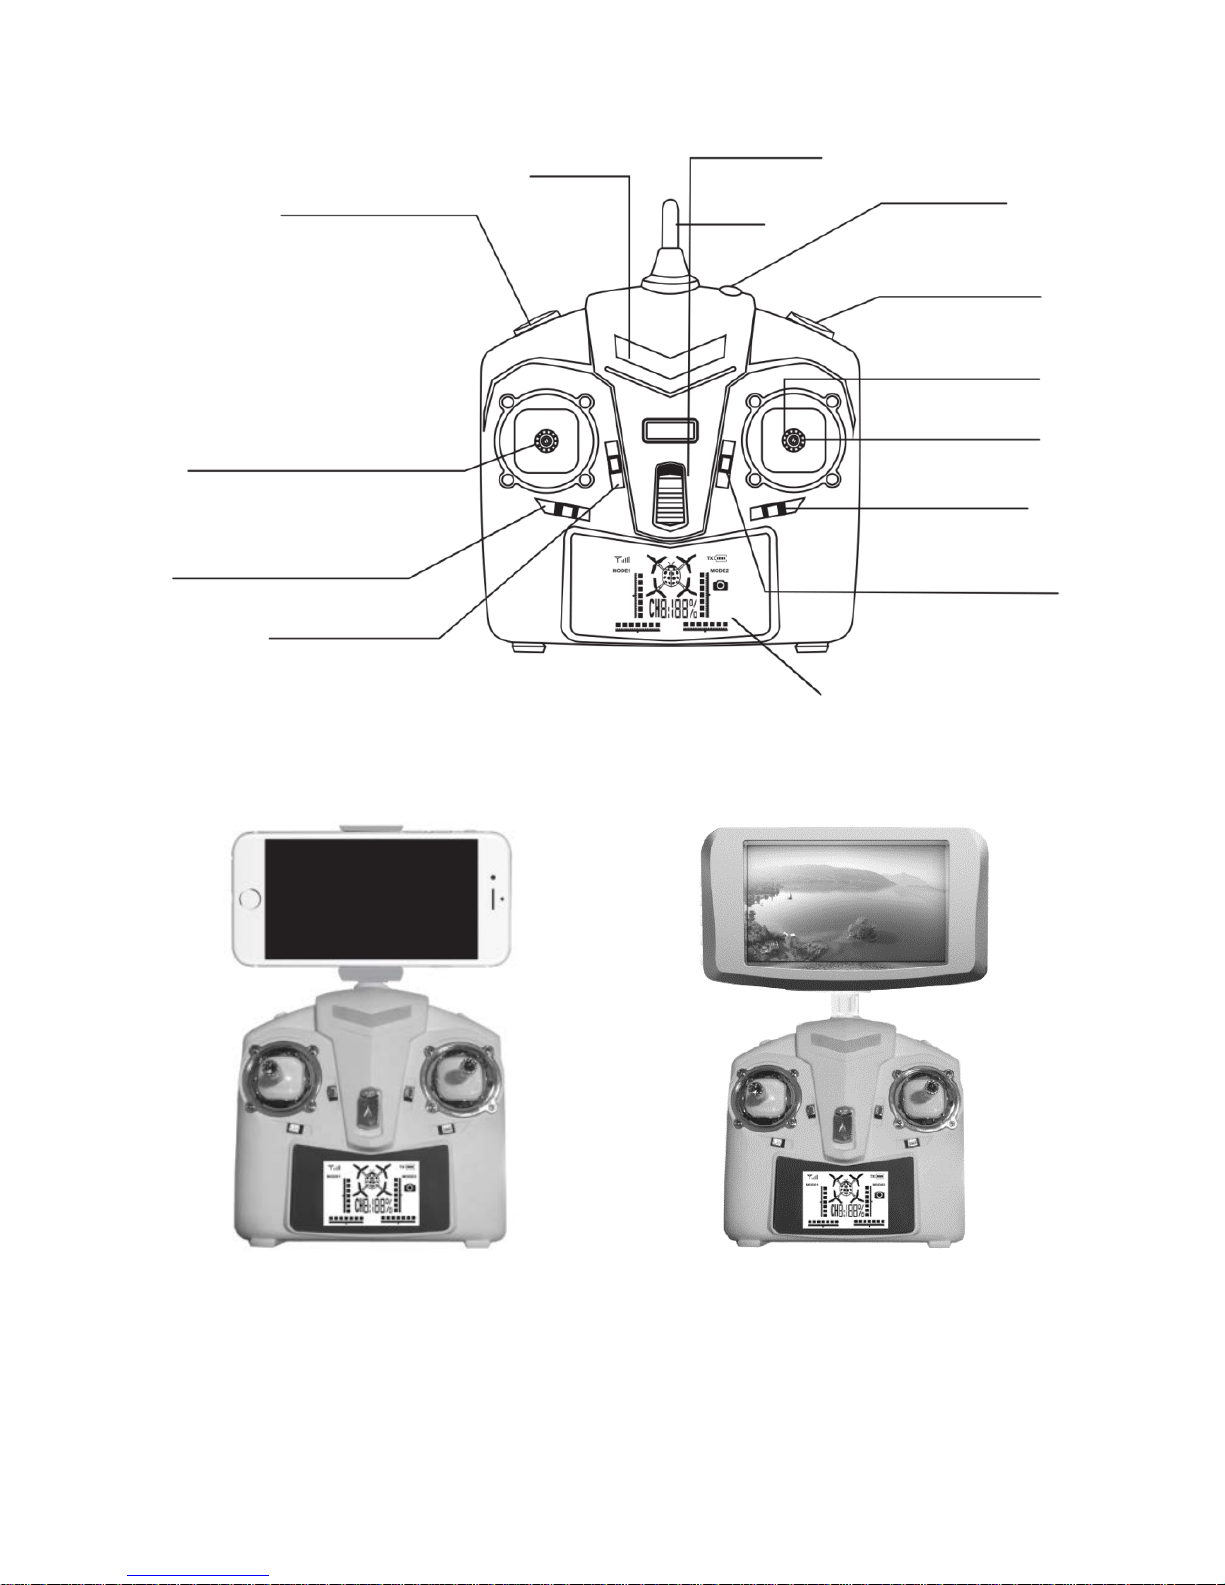
2. CONTROLLE R (TR ANSMITTER) DIAGRAM
Wi-Fi remote control
FPV remote control
(Mobile p hone not included)
LED indicator
Power on / off
Antenna
FPV monitor port
Shutter button
Video recording button
Direction stick
Throttle stick
360 flip
Right / Left migration key
Forward and Backward
migration key
LCD display
Right / Left rotation key
Headless mode
Page 5
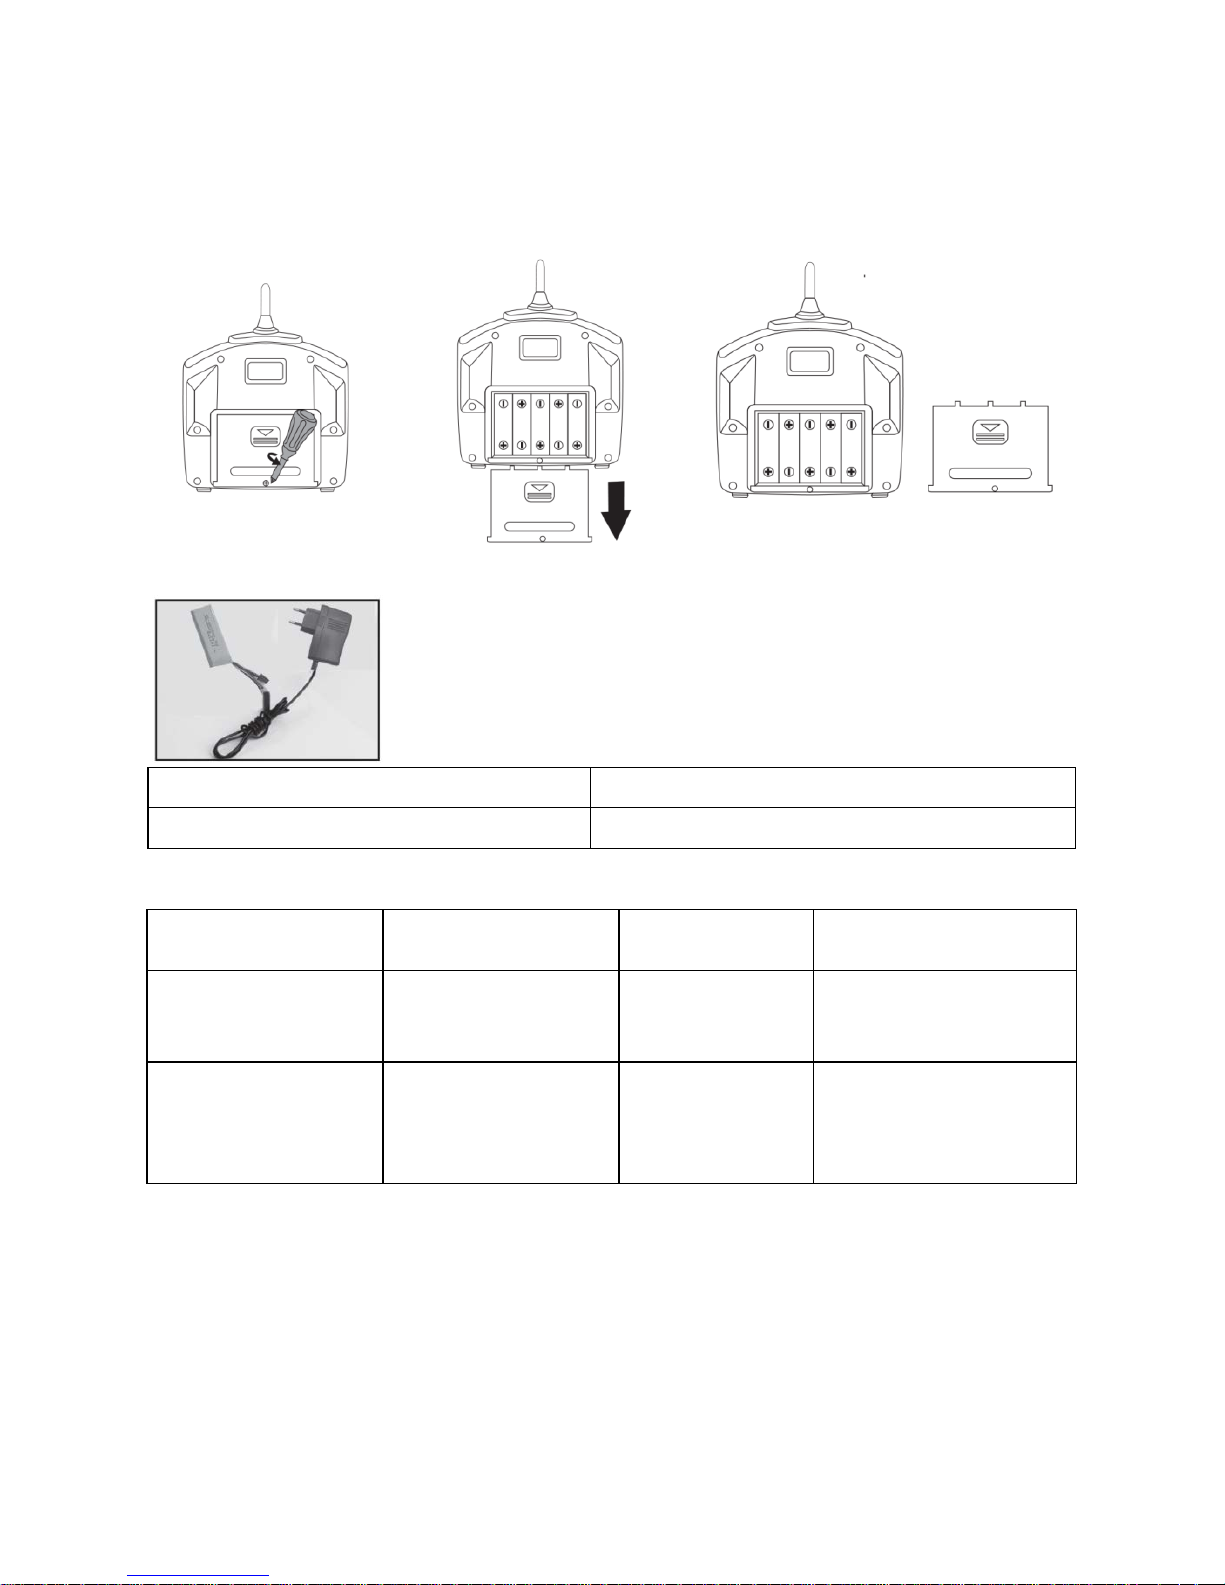
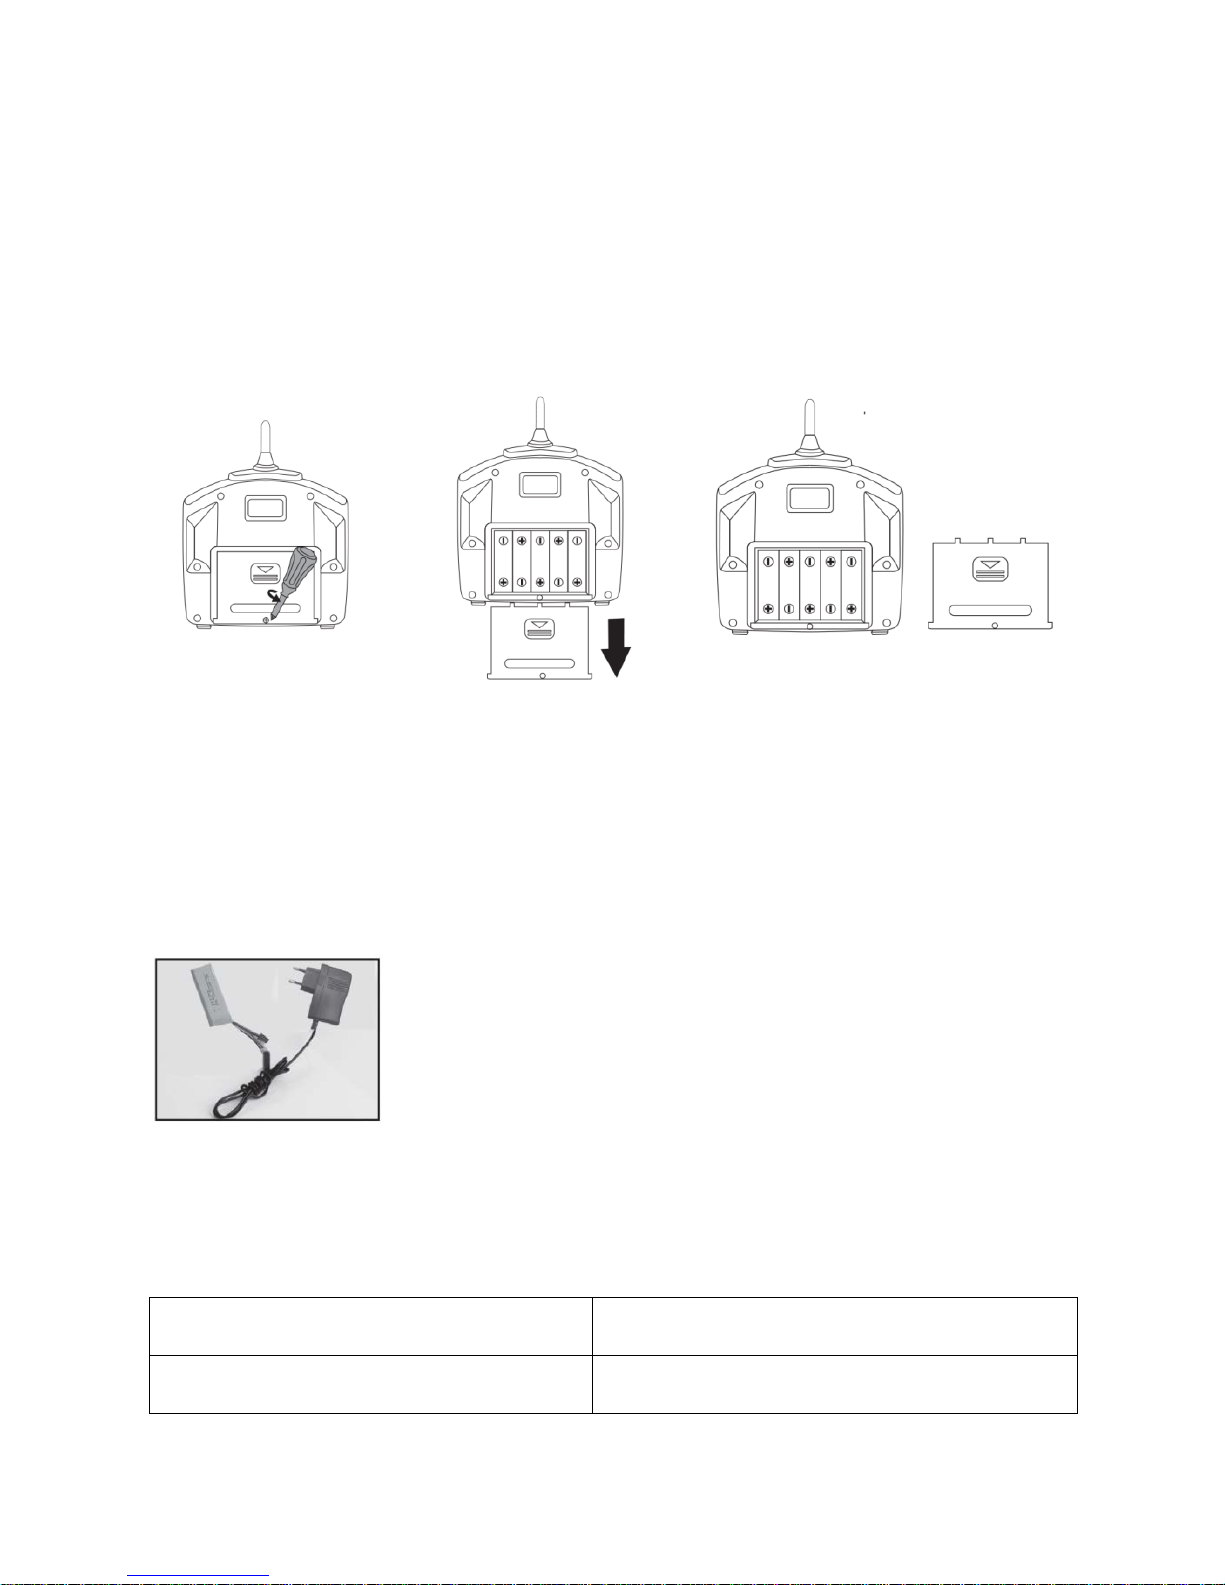
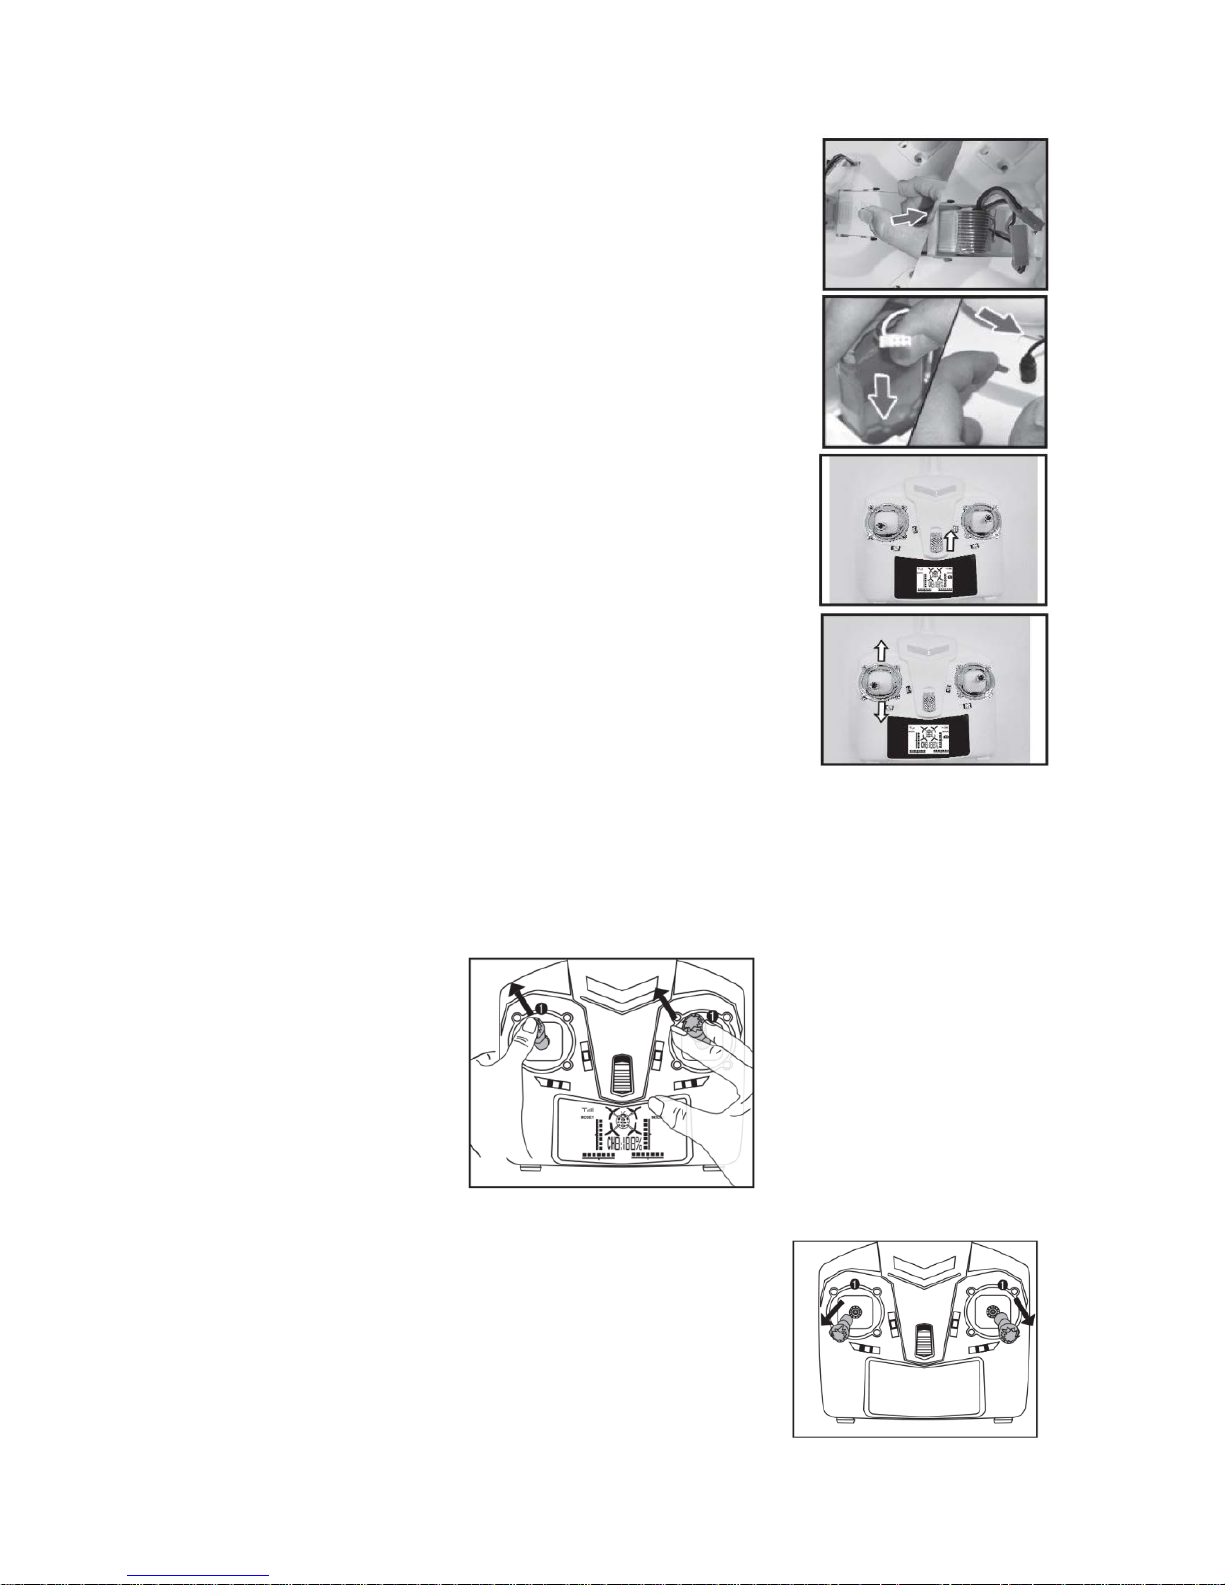
3. CONTROLLER (TRANSMITTER) BATTERY INSTALLATION
Use a screwdriver to open the battery cover.
Place 5 AA batteries in the battery compartment. Make sure the batteries are properly
installed according to correct polarity (+ -). DO NOT MIX THE BATTERIES OF DIFFERENT TYPES
4. BATTERY CHARGING
Use the included charger to charge the battery of the drone.
** Use ONLY the supplied charger for charging.
Battery charging should always be done under adult
supervision.
LED indicator
Green - on
Red - on
Charging completed
Charging...
Battery usage and charge duration reference
Battery type Battery specification
Single charge
working time
Charging time
Recharg eable lithium-
polymer (Li-Poly)
battery
7.4V 1000mAh
Drone flight time:
up to 10 minutes
About 150 minutes
(charging current
approx. 0.6A)
Zinc-carbon batte r y
(Non rechargeable)
1.5V
(GP 15G R4P)
Controller
(transmitter)
operation time: 18
hours
Non rechargeable (do
not charge)
Page 6
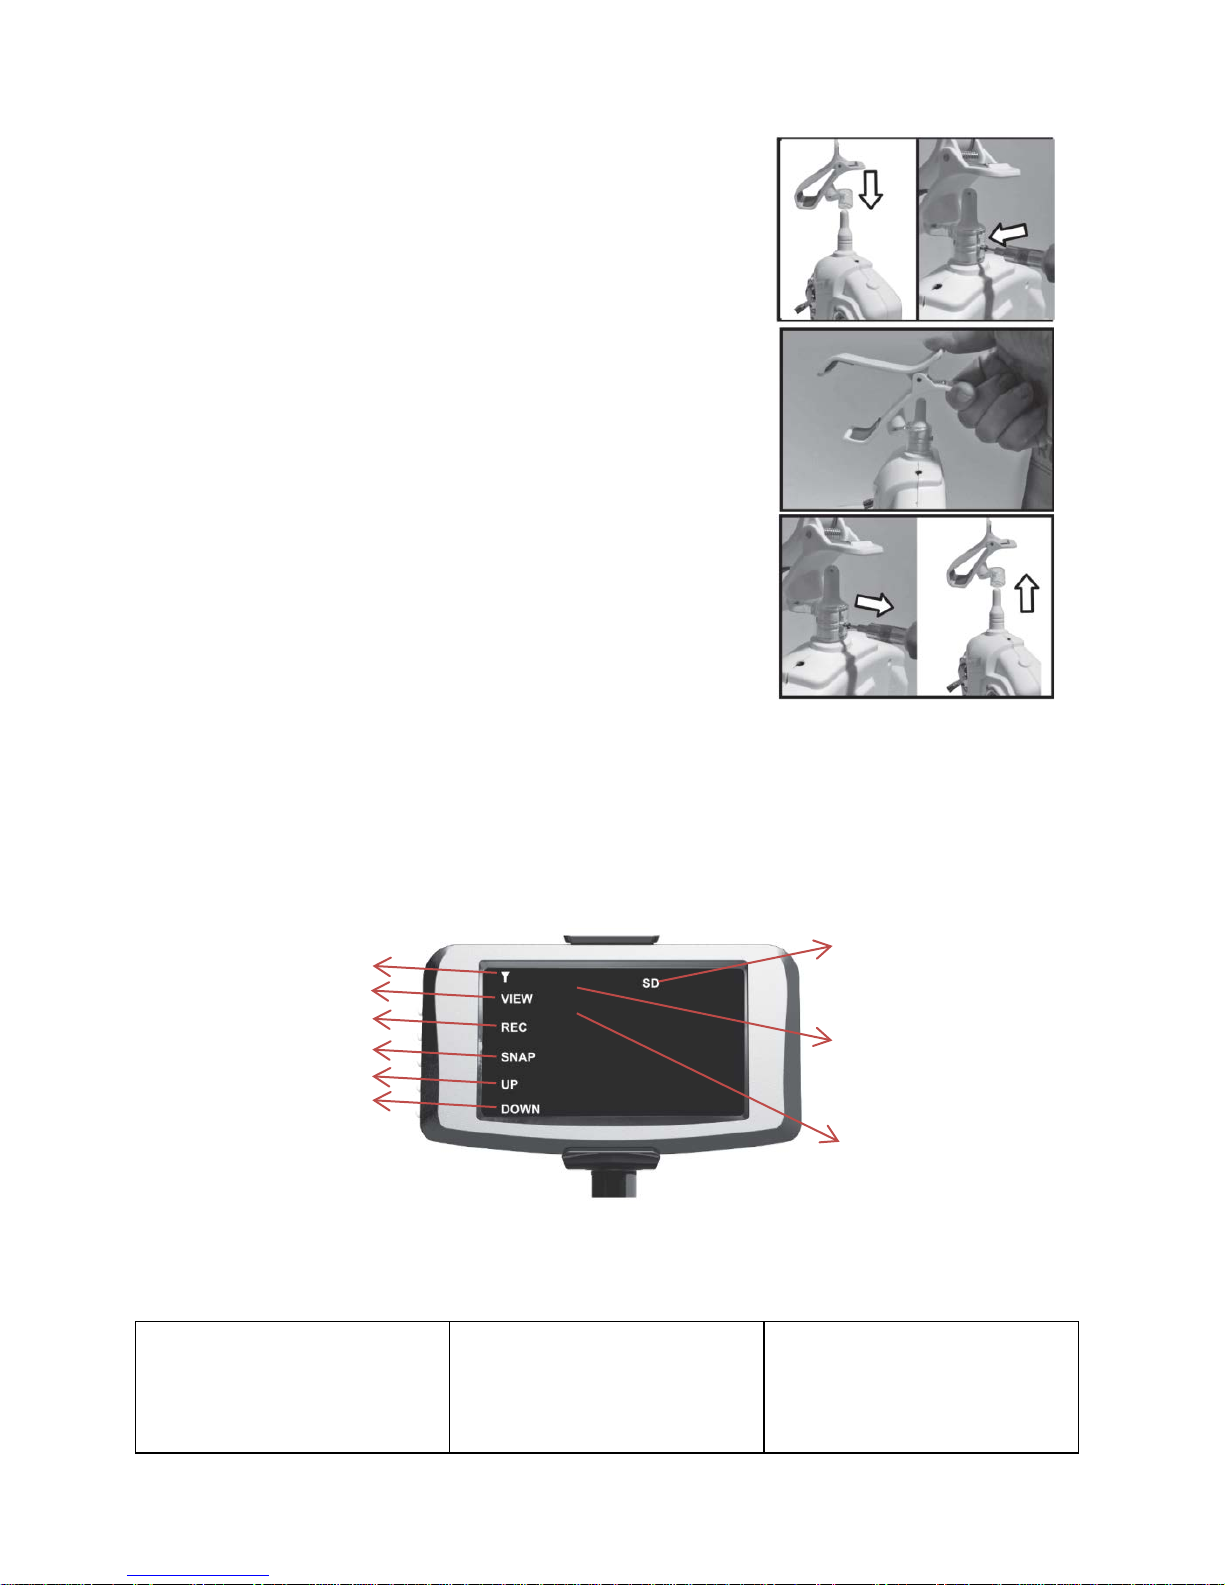
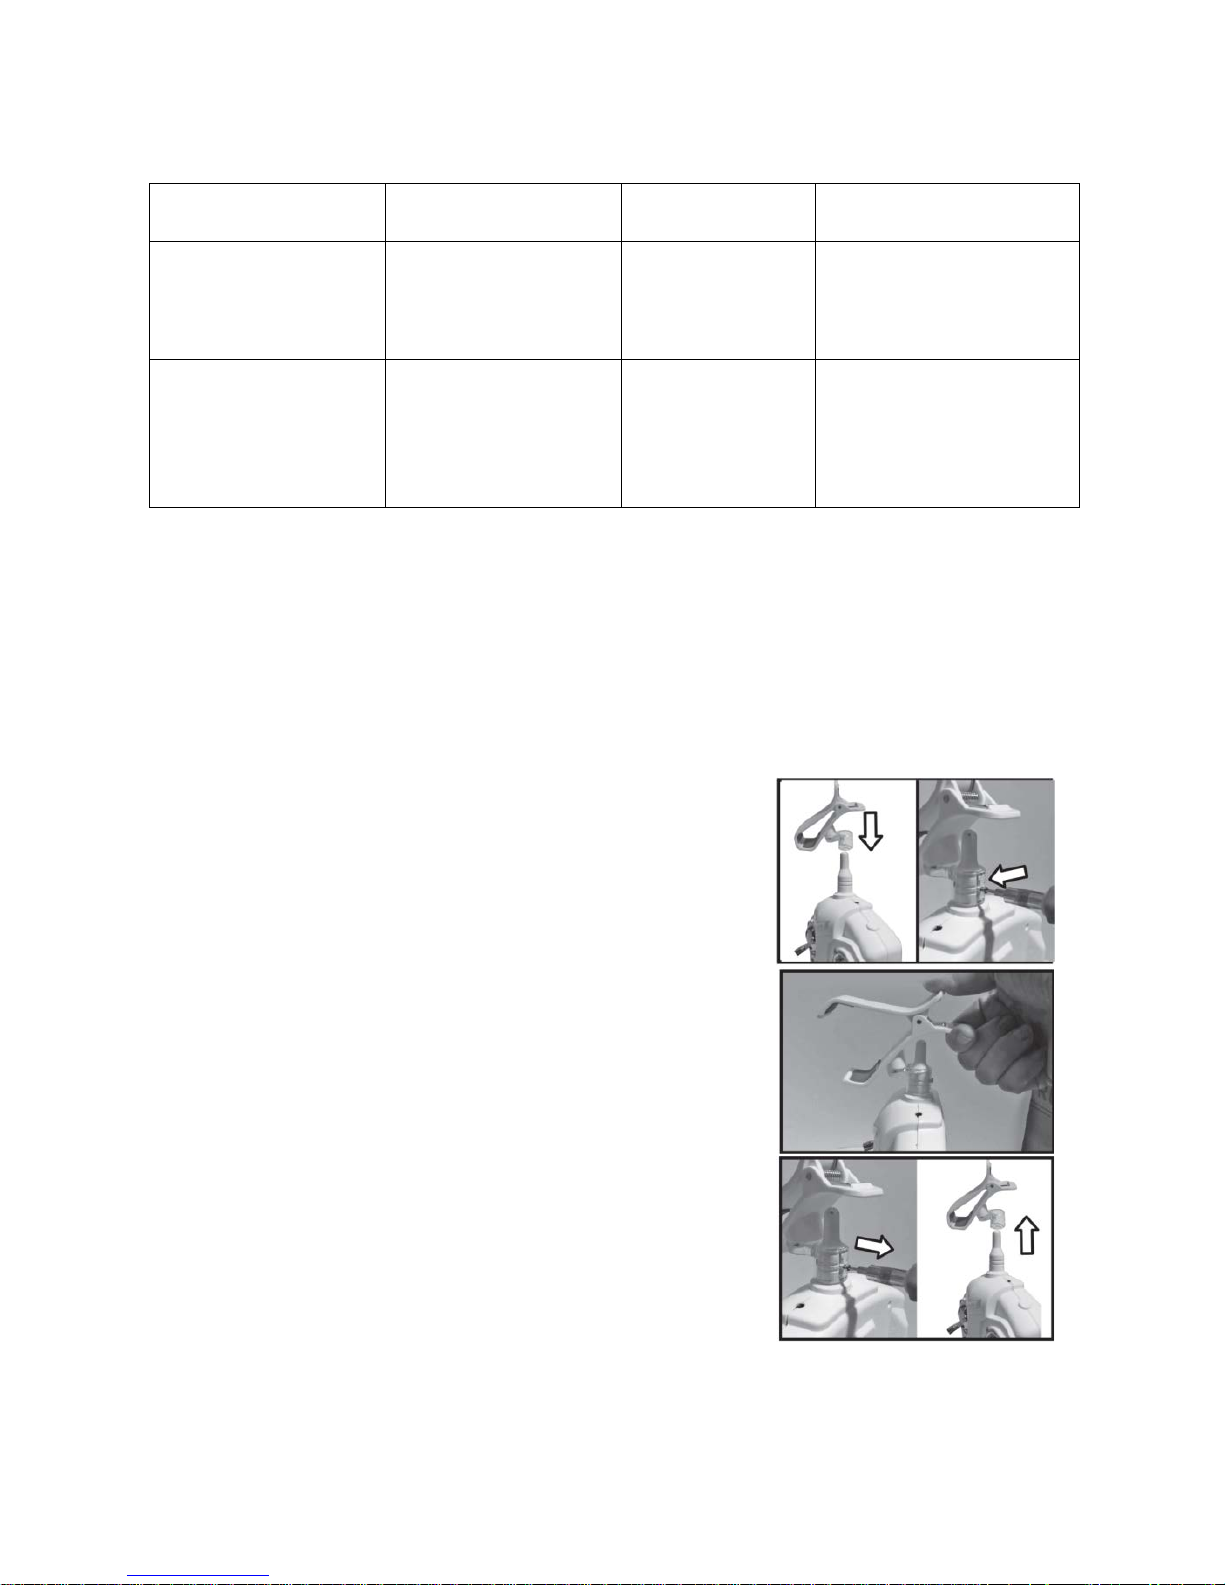
5. FPV HOLDER INSTALLATION / DEINSTALLATION
Place one end of the FPV holder on the
controller’s antenna, and then use the screwdriver
to tighten the s crew.
Once the holde r is properly in stalled and secur ed,
it is ready to use. The holder is co mpa tible with
devices of a diagonal of up to 6 inches.
In order to remove the holder, unscrew the screw
on the tip and pull the holder out of the antenna.
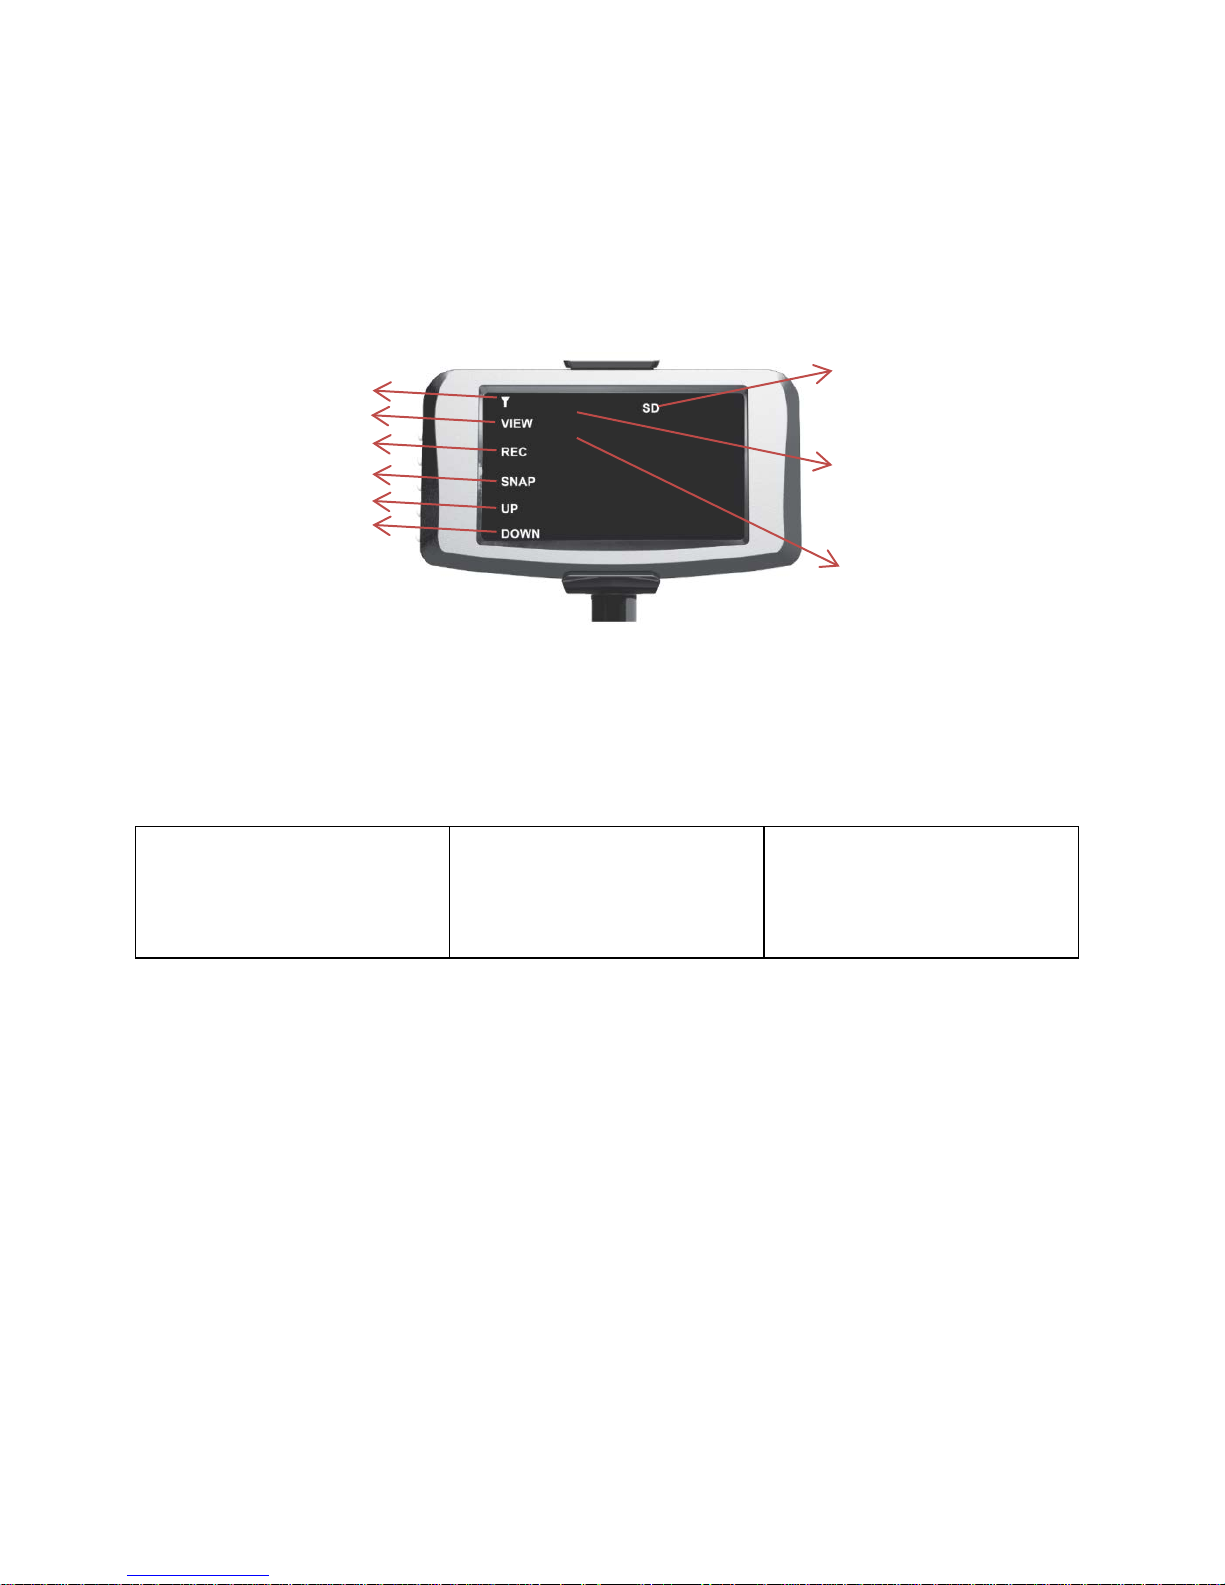
6. FPV MONITOR AND MOBILE APP DESCRIPTION
FPV MONITOR:
If you want to browse the gallery on the FPV monitor, please insert a micro SD card into the monitor’s
micro SD port.
The gallery features the following options:
VIEW
DELETE
PLAY
BACK
DOWN
UP
BACK
PREVIOUS
NEXT
FPV range
Micro S D c ard statu s info
(inserted / no card)
Gallery
Video r ecordin g
Taking pictures
Increase brigh tn ess
Decreas e brightnes s
REC
JPG
When you press the Video
recording button, the
display will show “REC”.
When you press the
Shutter bu tto n, the displ ay
will show “JPG”.
Page 7
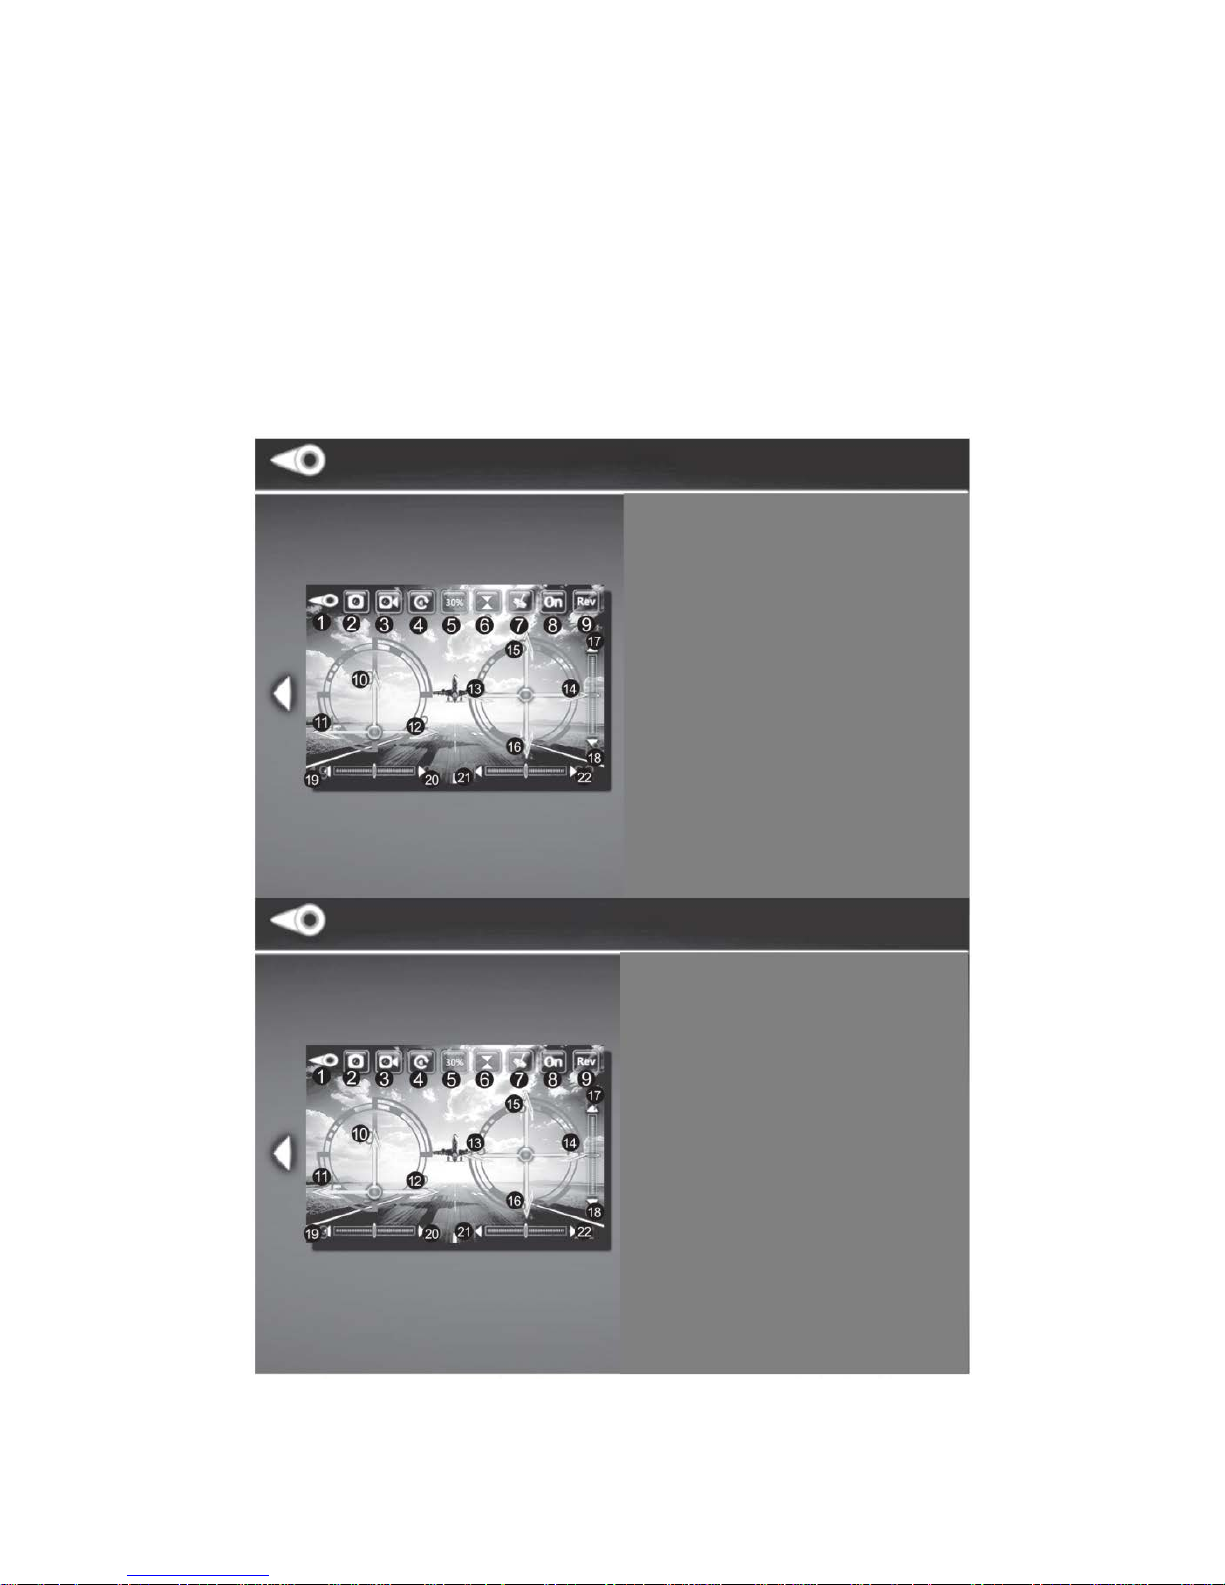
WI-FI MONITOR:
In order to use an an droid or iOS smartphone as an FPV screen please complete the
following steps:
Download the „LS -Model” app from “Play” store or „App store” and install it.
Enable Wi-Fi in your mobile phone.
Turn on your X-Bee Drone 5.2 .
Go to your smartphone’s Wi-Fi settings and search for “WIFIUFO-xxxxx” network.
Then establish the connection (no password needed).
Run the installed LS-Model app and ta p “PLAY”.
The smartphone ’s screen w i l l show the live image s from the drone’s ca mera.
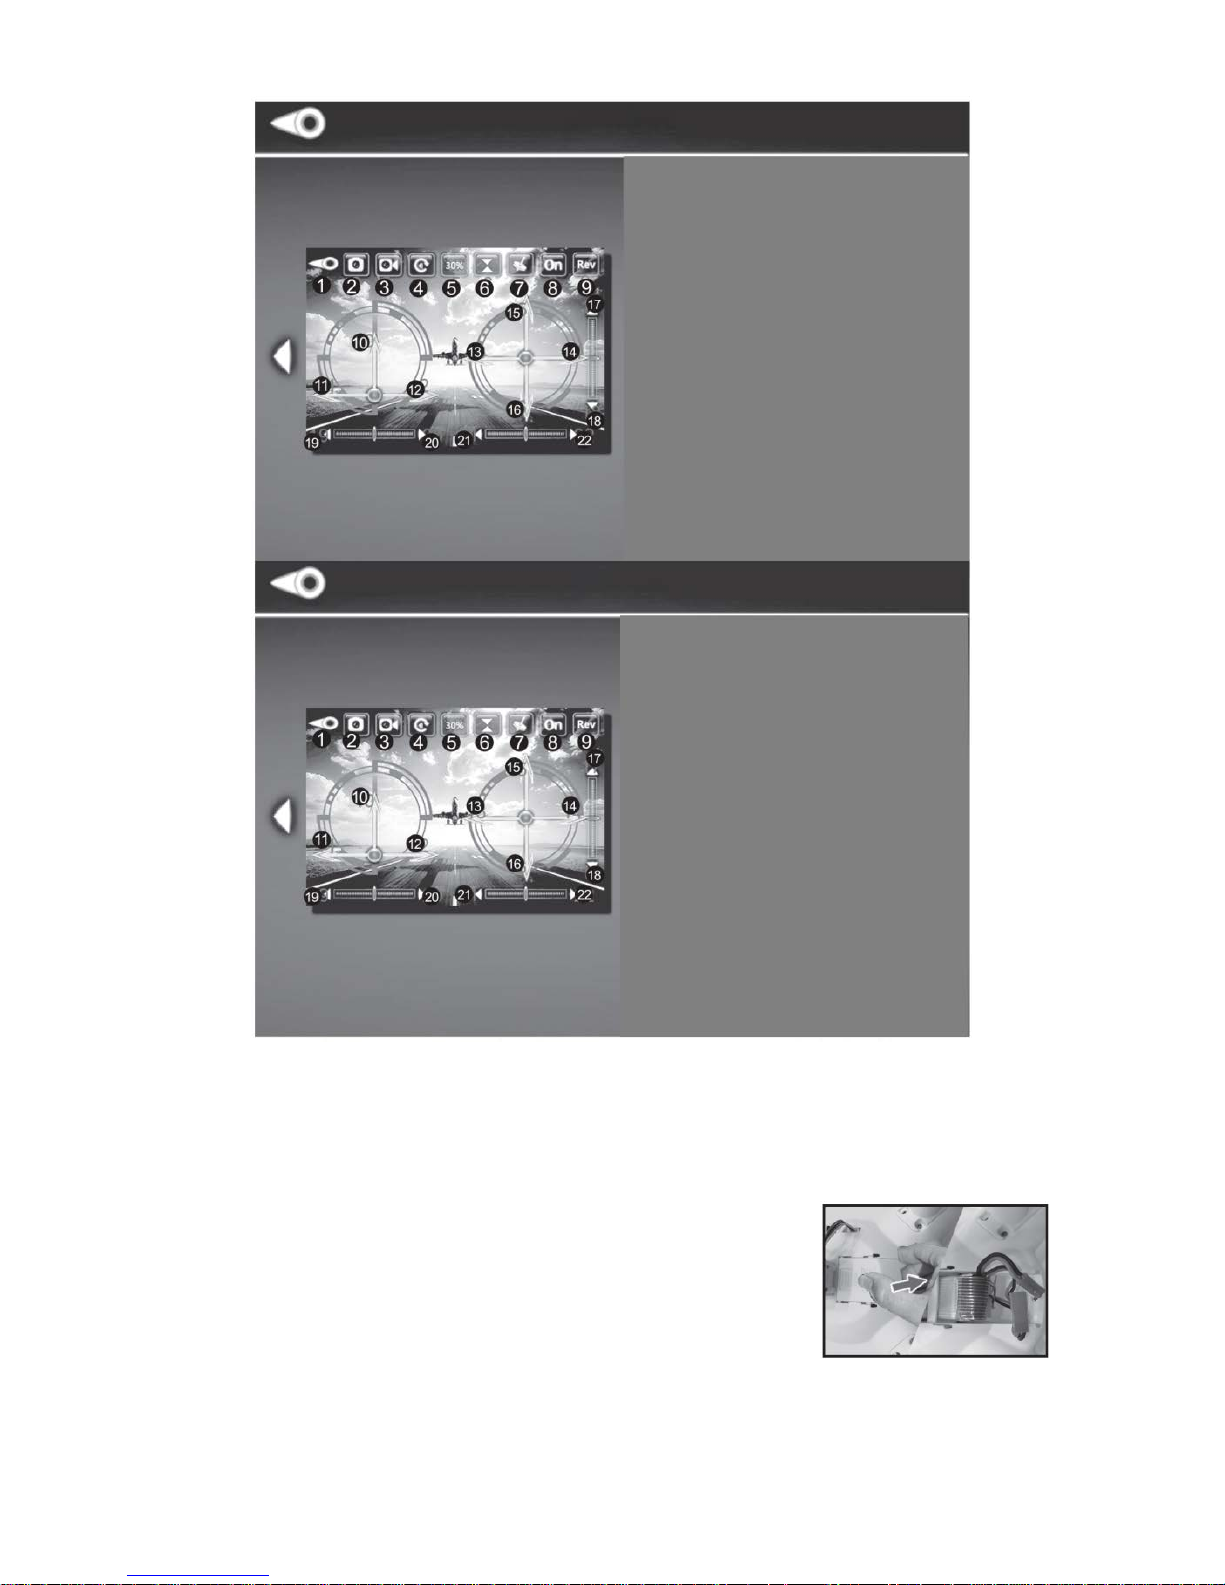
LS-Model app button description:
1. Back
2. Take a picture
3. Record a video
4. Gallery
5. Speed mode (30%, 60%,
100%)
6. Throttle lock (50%)
7. Grav ity sensor mode
8. Show / hide in terface
9. Rotate camera
10. Throttle control
11. / 12. Rotation control
13. /14/15/16. Left / right /
forward / backward
migration control
17. /18. Forward / backward
migration calibration
19. /20. Left/ right rotate
calibration
21. /22. Left / right migration
calibration
Page 8

7. CONTROLLE R (TR ANSMITTER) AND RECEIVER SYNCHR ONI ZATION
Insert and connect the drone’s battery.
Close t he battery cover and turn on your X-Bee 5.2 b y
moving the Power switch on the bottom of the housing.
Turn the controller on.
Move the left stick forward, and then backward. The
controller emits a beep sound and the drone’s LEDs starts to
glow s te adily indicating corre c t synchronization.
8. DRONE’S ENGINES CALIBRATION
Place your X-Bee Drone 5.2 on a flat and even surface. Move both sticks to the upper left
corner positions, as shown in the picture. Hold these positions for 5 seconds. The drone's
LEDs wil l blink sev eral times, and then they will start to glow steadily. Now, you can release
the sticks - the drone is ready to fly .
9. STARTING / STOPPING TH E ENGINES
In order to s tart the engine s , move the left s tick to the
lower left corner, and th e ri ght stick to the l ower ri ght
corner.
Page 9
In order to stop th e engines, move the left stick down
and hold the position until the engines stop (about 5
seconds).
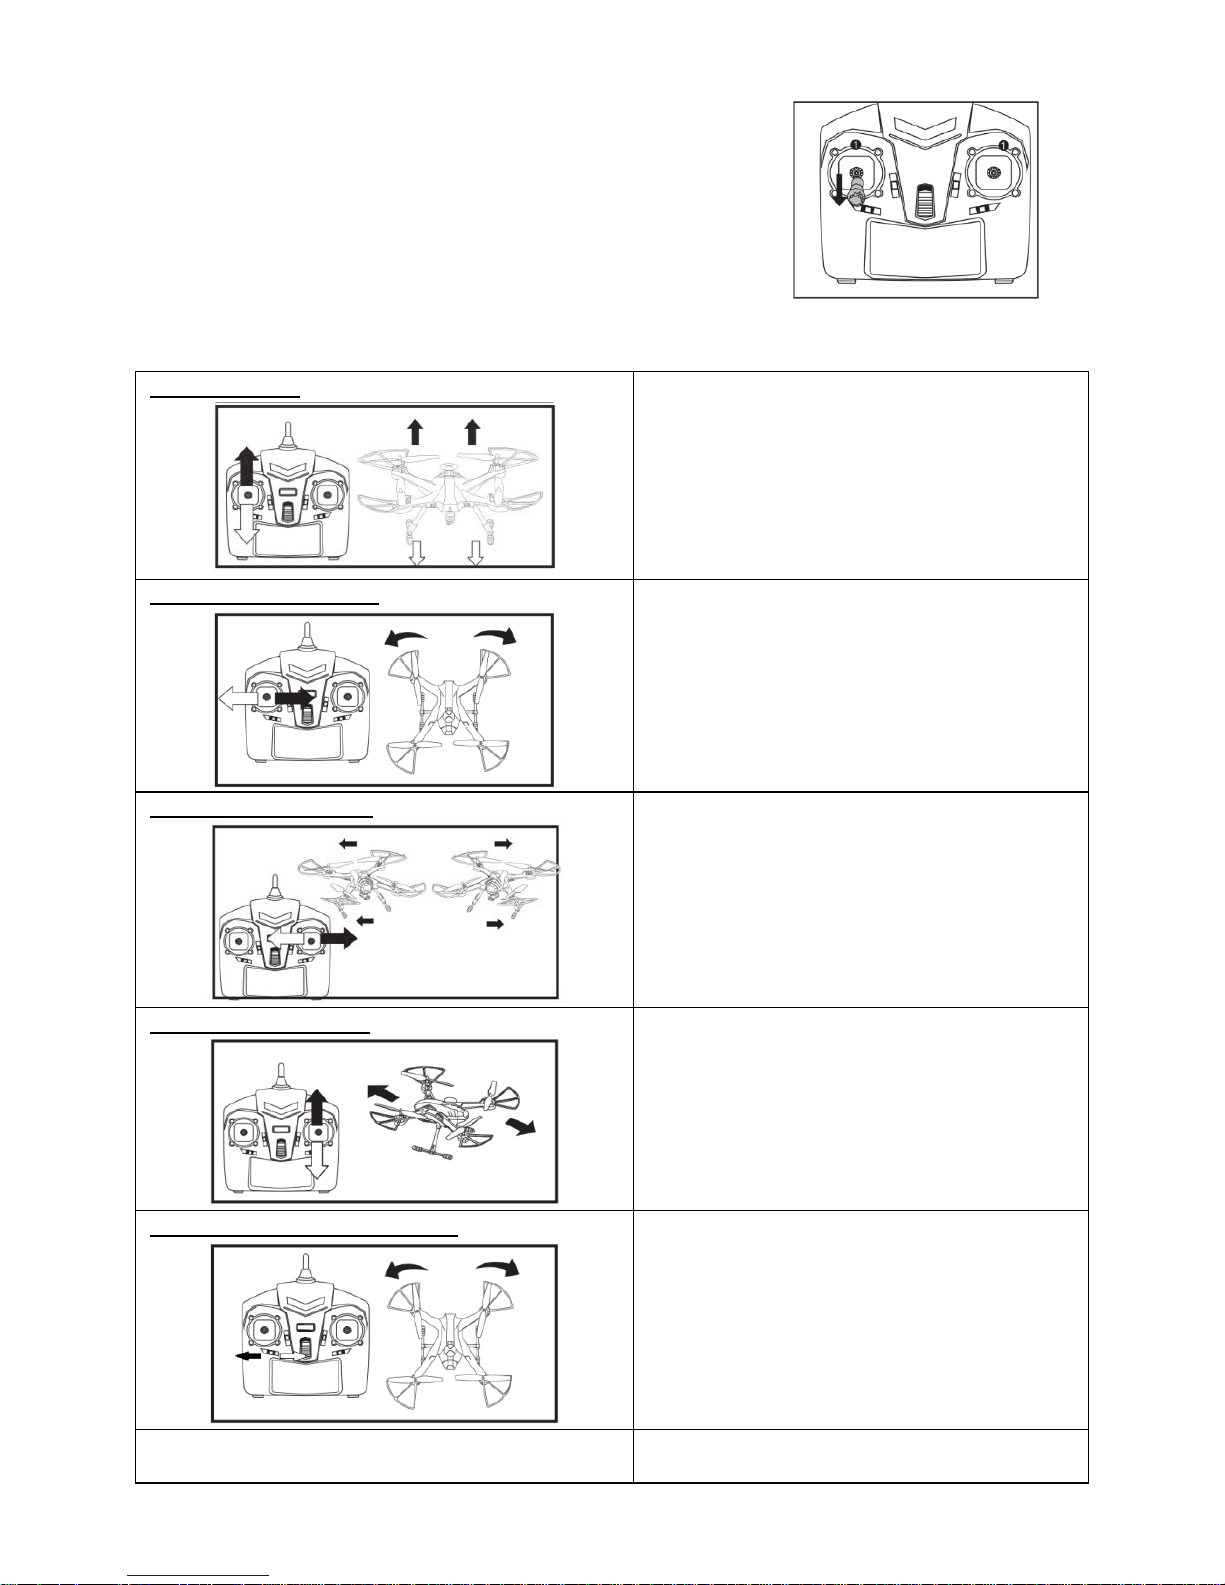
10. FLIGHT CONTROL
Flying up / down
Move the throttle stick forward to fly the
drone up.
Move the throttle stick backward to fly
the drone down.
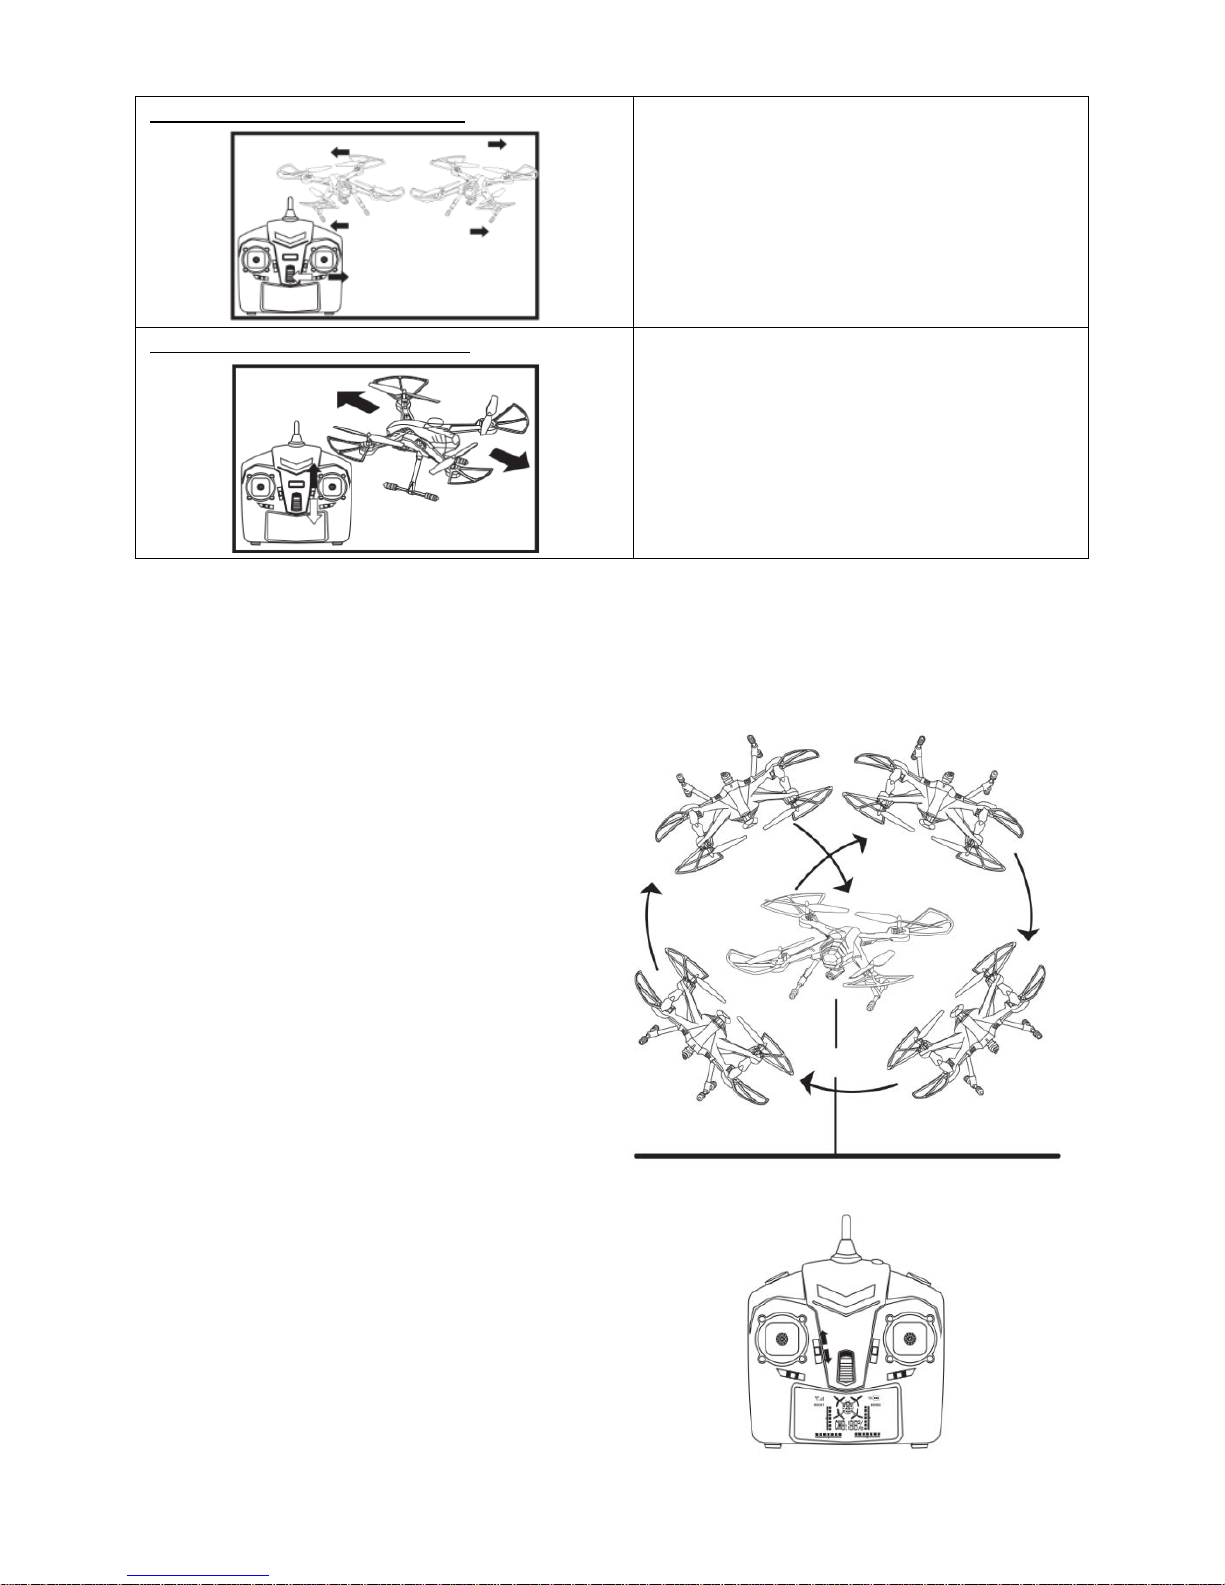
Rotating left/ right
Move the thr ottle stick le f t / ri g ht to r otate
the drone in a given direction.
Flying left/ right
Move the di rection stick l ef t / rig ht to fly
the drone in a given direction.
Flying forward and backward
Move t he directio n stick forward /
backward to fly the drone in a given
direction.
Left/ right rotate calibration
Press the "Left rotation" key if the drone
automati c ally rotates clockwise. Press the
"Right rotation" key if the drone
automatically rotates counterclockwise.
Left / right migration calibration
Page 10

Press the "Left migration" key if the drone
automati c ally migrates to the right.
Press the "Right migration" key if the
drone automatically migrates to the left.
Forward / backward migration calibration
Press the "Forward m igration" key if the
drone automatically migrat es
backwards.
Press the "Backward migration" k ey if the
drone automat ically migrates forwards.
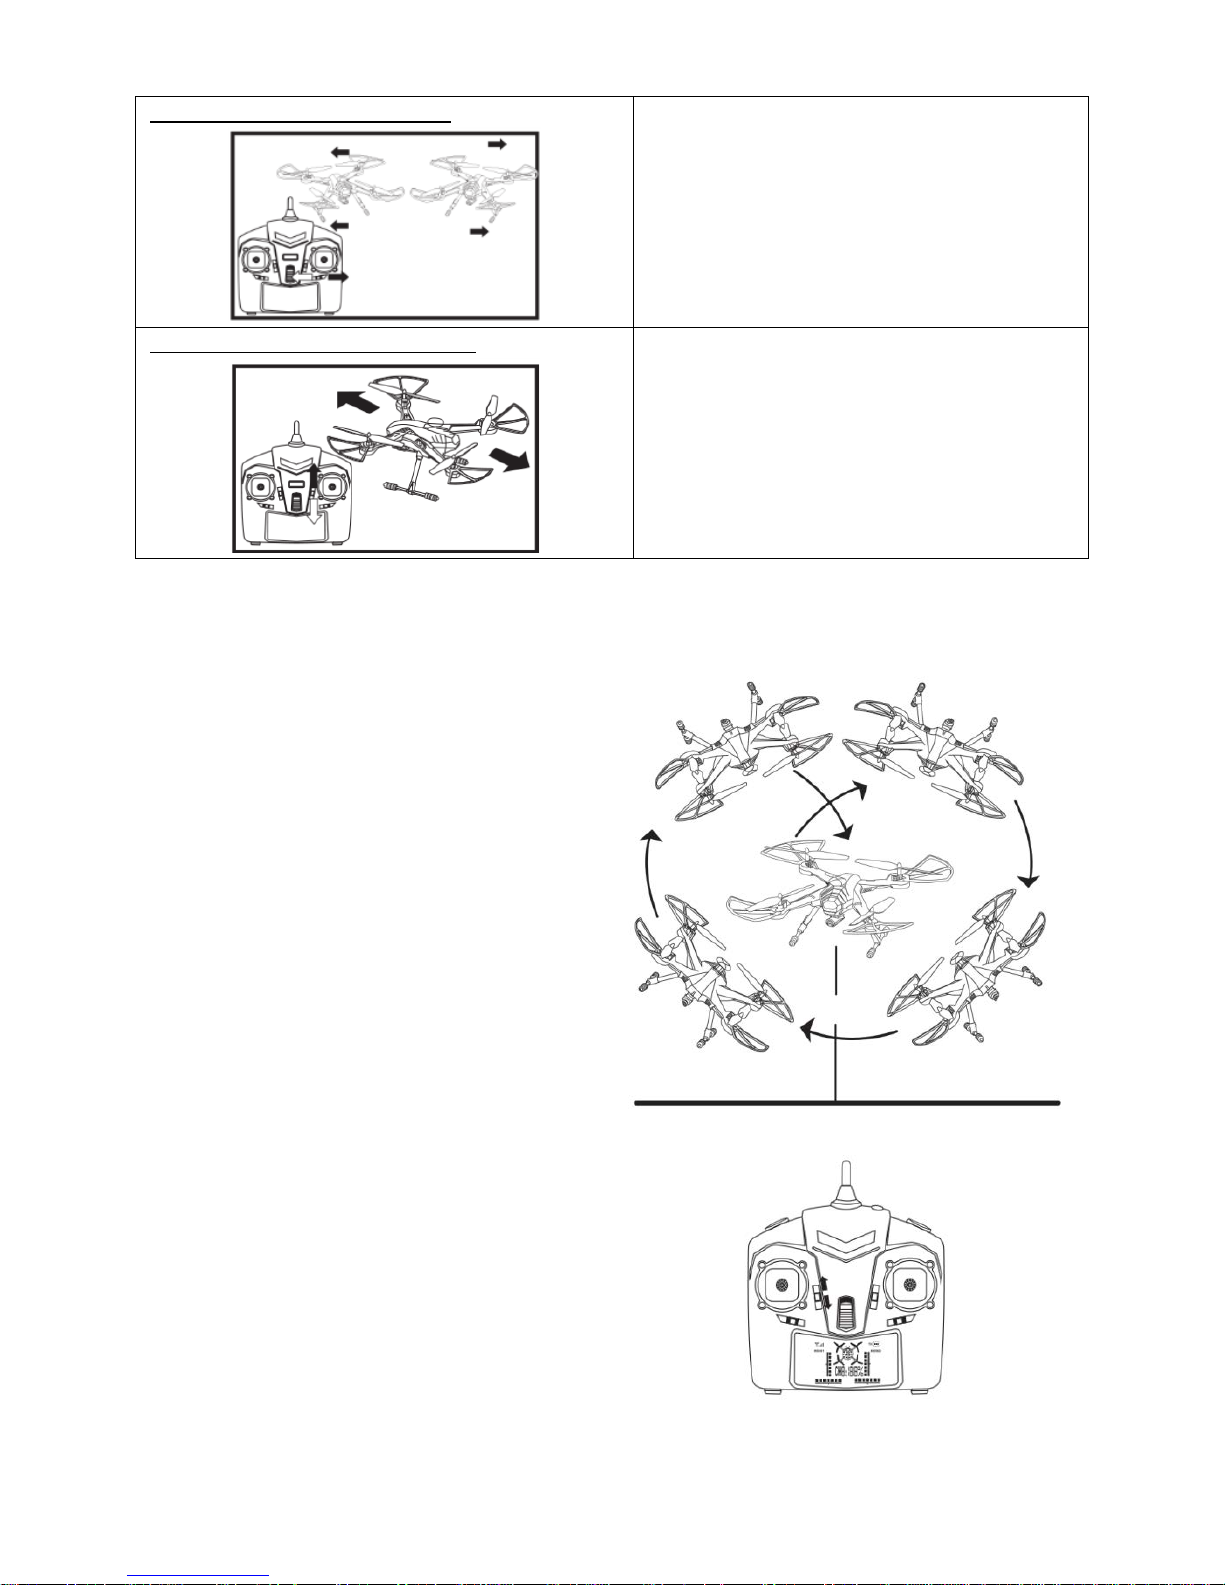
11. FUNCTIONS
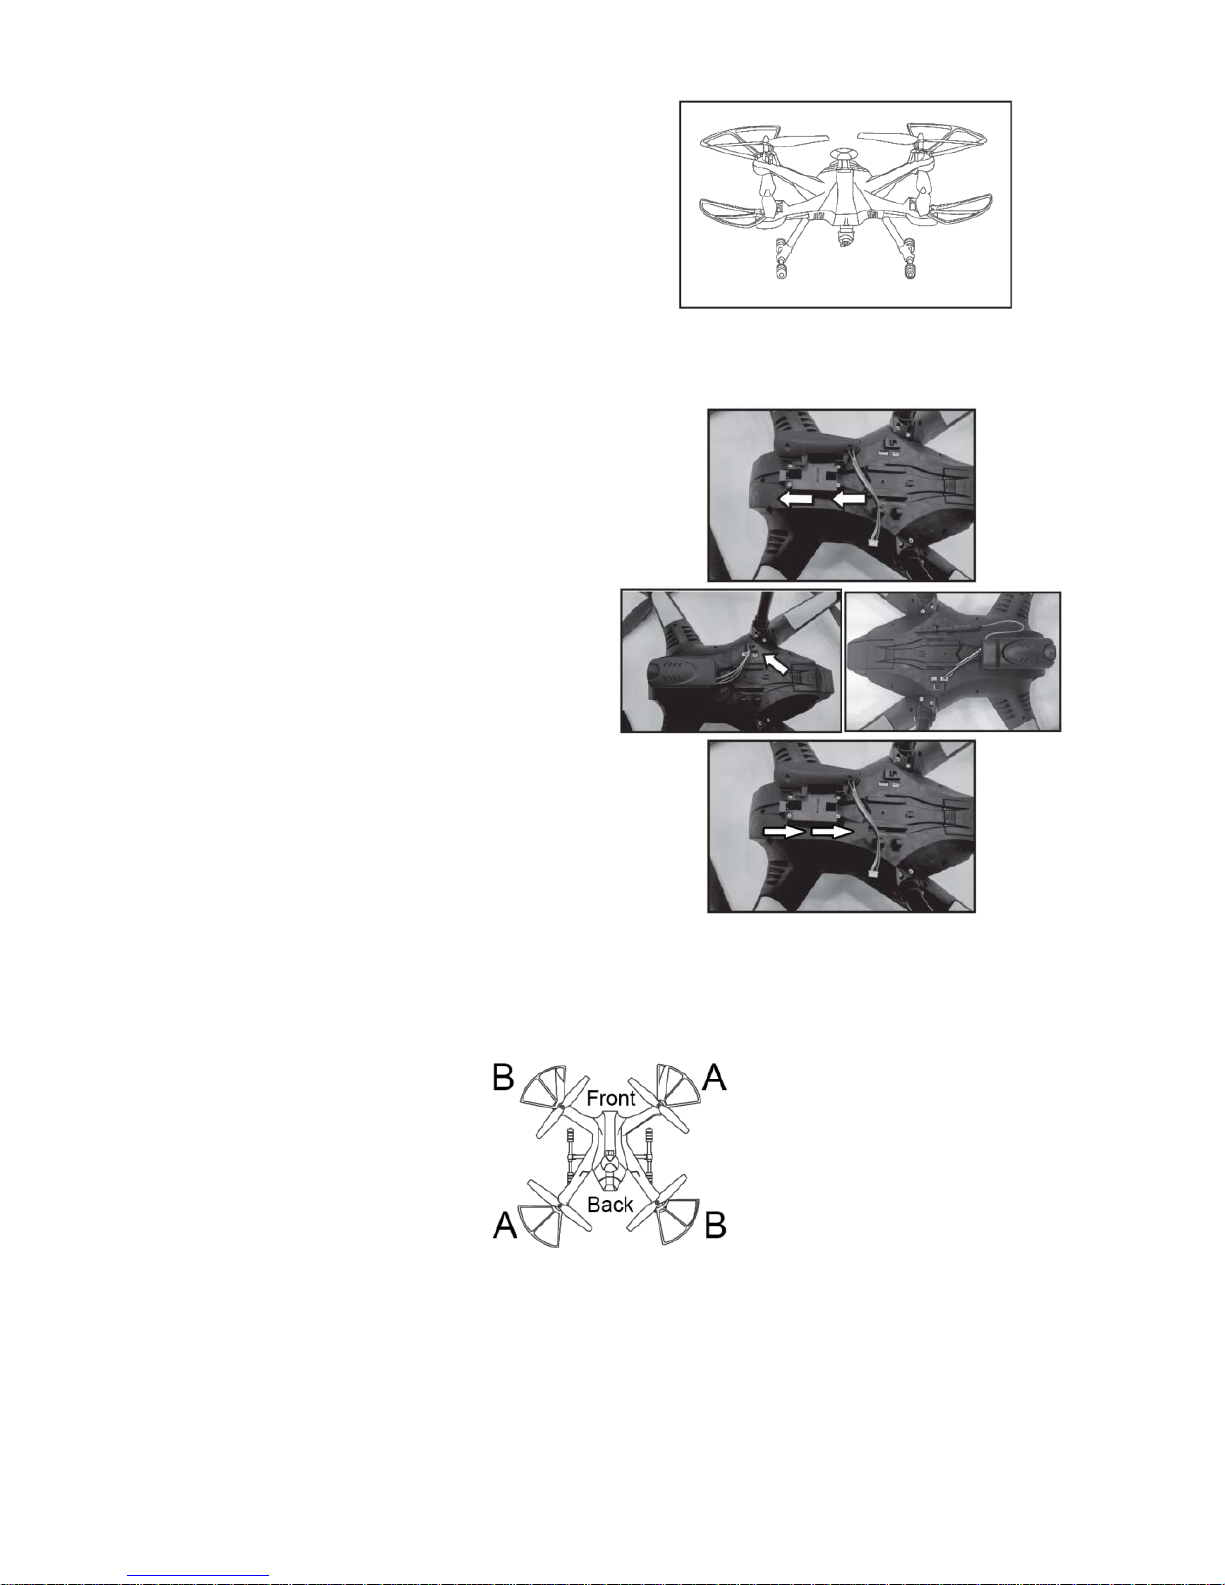
360 flip
If you want to perfo rm 360-deg re e s tunts:
Make sure the drone is at least 3
meters above the ground.
Press the right stick. The controller
starts beeping, indicating tha t
the drone is ready to fly 360-
degree stunts.
Move the right stick forward,
backward, l eft or right to flip the
drone in the chosen direction.
After the stunt, the drone quits
the flip mode and automatically
gets back to no r mal flying.
The 360-degree stunts cannot be performed when the
battery power is low (drone’s LEDs flash).
Headless mode
Slide the Headless mode button up. The
drone’s LEDs start flashing, indicating that
the drone is in the HEADLESS mode.
If you want to switch your drone back to
the normal control mode, slide the
Headless mode button down. The drone's
LEDs stop blinking.
In this mode, to make the operation of the drone
easier, the forward flight direction is set
regardless of the drone position.
Low battery note
Page 11

When the drone’s LEDs start flashing, it
means that th e ba ttery power is l ow. In this
case, please land your device and
replace the battery.
If no action is taken, the drone lands automatically when
the battery power is critical (in the place of its current
position).
12. CAMERA INSTALLATION / DEINSTALLATION
In order to attach a camera to the drone,
slide it into the guides and push towards
the front of the drone (as shown in the
picture) until you hear a snap sound.
Plug the camera cable to the po r t placed
on the drone’s housing.
Now, the camera is ready to use.
In order to unmou nt the camera , unplug
its cable from the drone’s port, move the
camera toward the back of the drone,
and then remove it from the guides.
13. PROPELLER INSTALLATION
In order to fly properly, the drone needs correct installation of the propellers. It is shown in
the following picture:
.
Each propeller is marked. The corresponding marking is also indicated on the protective faceplate of
the drone’s LE Ds.
Page 12

1. INFORMACJE ODNOŚNIE BEZPIECZEŃSTWA UŻYTKOWANIA
** Produkt przeznaczony jest dla osób powyżej 14 roku życia**
•
Tym, którzy dopiero zaczynają przygodę z pilotowaniem dronów, sugerujemy kontakt z
osobą o większym doświadczeniu w tej dziedzinie. Obsługa produktu przez użytkowników
poniżej 18 roku życia powinna odbywać się wyłącznie pod nadzorem osób dorosłych.
•
Celem niniejszych zaleceń jest ochrona zarówno samego produktu i osób z niego
korzystających, jak i osób postronnych oraz ich mienia.
•
Nieprawidłowa obsługa produktu może spowodować obrażenia osób oraz zniszczenie
mienia.
PRODUKT PRZEZNACZONY DO UŻYTKU WEWNĘTRZNEGO I ZEWNĘTRZNEGO
•
Niniejszy produkt przeznaczony jest do użytku wewnętrznego i zewnętrznego.
Przed rozpoczęciem korzystania z produktu należy upewnić się, że wybrany obszar jest
wolny od przeszkód, a podczas sterowania zachowywać bezpieczną odległość od ludzi i
zwierząt.
• Nie należy korzystać z produktu w pobliżu linii elektrycznych.
PRODUKT NALEŻY CHRONIĆ PRZED ZAMOCZENIEM
Zarówno dron jak i jego kontroler to urządzenia zbudowane z precyzyjnych
komponentów elektronicznych, dlatego też nie należy dopuścić
do ich zamoczenia.
Kontakt z wodą, inną cieczą lub narażenie ich na działanie wilgoci mogą spowodować
nieprawidłowe działanie urządzeń lub ich uszkodzenie.
NIE NALEŻY WYSTAWIAĆ URZĄDZENIA NA DZIAŁANIE DESZCZU ANI WILGOCI
ZALECENIA ODNOŚNIE BATERII
Aby un
iknąć potencjalnego zagrożenia pożarowego, nie należy zwierać styków baterii,
umieszczać ich w komorze niezgodnie z oznaczeniami polaryzacji, ani przekłuwać.
Ładowanie akumulatora powinno odbywać się zawsze pod nadzorem osoby dorosłej, w
miejscu niedostępn
ym dla dzi e ci.
• NIE NALEŻY MIESZAĆ BATERII NIKLOWO-K ADMOWYCH Z ALKALI CZNY MI
ZALECENIA DOTYCZĄCE BATERII NI-MH
•
Upewnij się, że baterie są zainstalowane zgodnie z oznaczeniami polaryzacji (+ -).
NIE NALEŻY MIESZAĆ BATERII NIKLOWO
-KADMOWYCH Z ALKALI CZNYMI
•
Jeśli wiemy, że dron nie będzie używany przez dłuższy okres czasu, należy wyjąć
baterie z kontrolera, aby uniknąć wycieku elektrolitu, który mógłby doprowadzić do
uszkodzenia urządzenia.
ZUŻYTE BATERIE NALEŻY UTYLIZOWAĆ ZGODNIE Z LOKALNYMI PRZEPISAMI W
Page 13

PRZEZNACZONYCH DO TEGO MIEJSCACH.
ZALECENIA DOTYCZĄCE BATERII LITOWO-POLIMEROWYCH
•
W porów naniu z bateriami i nnego typu, bateri e l itowo-polimerowe obciążone są
większym ryzykiem wystąpienia zdarzeń niepożądanych. Bardzo ważne jest, więc w ich
przypadku prz est
rzeganie wszystkich wytycznych ope racyjn y ch. Pro ducent i sprzedawca
nie ponoszą żadnej odpowiedzialności za jakiekolwiek szkody powstałe w wyniku
niewłaściwego użytkowania.
Aby uniknąć ryzyka pożaru lub wybuchu należy używać wyłącznie ładowarki załączonej
w zestawie. NIE NALEŻY zgniatać, demontować, palić, ani umieszczać baterii w komorze
niezgodnie z oznaczeni ami polar yzacji.
Aby uniknąć spięć, nie należy dopuszczać do sytuacji, w których części metalowe stykają
się z biegunami baterii. POD ŻADNYM POZOREM NIE NALEŻY NIGDY PRZEKŁUWAĆ BATERII,
GDYŻ MOŻE TO ZWIĘKSZYĆ RYZYKO POŻARU.
•
Ładowanie akumulatora powinno odbywać się zawsze pod nadzorem osoby dorosłej,
w miejscu niedostępnym dla dzieci.
•
W przypadku nienaturalnego nadmiernego nagrzewania się baterii lub akumulatorów
należy natychmiast zaprzestać ich używania oraz ładowania. W przeciwnym razie może
to spowodować ich spuchnięcie, deformację lub wybuch zwiększając tym samym ryzyko
wystąpienia pożaru.
**ZUŻYTE BATERIE NALEŻY UTYLIZOWAĆ ZGODNIE Z LOKALNYMI PRZEPISAMI W
PRZEZNACZONYCH DO TEGO MIEJSCACH. **NIE NALEŻY WYRZUCAĆ ZUŻYTYCH BATERII
WRAZ Z ODPADAMI KOMUNALNYMI.
ŁADUJĄCYCH
SIĘ BATERII NIE NALEŻY POZOSTAWIAĆ BEZ NADZORU (NP. W NOCY)
PRODUKT NALEŻY TRZYMAĆ Z DALA OD OGNIA I ŹRÓDEŁ CIEPŁA
Zdalnie sterowane modele wykonane są z różnych rodzajów tworzyw sztucznych,
podatnych na deformacje i uszkodzenia pod wpływem działania ekst
remalnych
temperatur (zarówno gorąca jak i zimna). Produktu nie należy, więc pozostawiać w
miejscach, gdzie byłby on narażony na działanie ekstremalnych temperatur.
POMOC OSOBY MAJĄCEJ DOŚWIADCZENIE W PILOTOWANIU DRONÓW, ·Mimo iż produkt
ten może być trak
towany, jako zabawka, nie jest on przeznaczony dla osób poniżej
czternastego roku życia. Osobom niedoświadczonym w pilotowaniu zdalnie sterowanych
modeli dronów przypominamy, że czynność ta, zwłaszcza na etapie początkowym,
wymaga s t opniowe go nabierania wp
rawy. Aby ułatwić osiągnięcie tej sprawności
zalecamy ćwiczenia pod okiem osób wyspecjalizowanych w pilotowaniu modeli dronów.
Page 14

2. SCHEMAT KONTROLERA
PILOT WIFI
PILOT FPV
(Brak tel efonu w zestawie)
Dioda LED
Włącznik
Antena
Gniazdo monitora FPV
Przycisk robienia zdjęć
Przycisk nagrywania wideo
Analog kierunkowy
Analog przepustnicy i rotacji
Flip 360
Przycisk lotu lewo/prawo
Przycisk lotu do przodu / tyłu
Wyświetlacz LCD
Przycisk obrotu w lewo / prawo
Tryb Headless
Page 15
3. INSTALACJA BATERII W KONTROLERZE
Użyj śrubokręta, aby otworzyć pokrywę baterii.
W komorze baterii umieść 5 baterie typu AA. Upewnij się, że baterie są umieszczone
zgodni e z oznacze niami polaryzacji (+ -). NIE NALEŻY ŁĄCZYĆ ZE SOBĄ BATERII RÓŻNEGO
TYPU.
4. ŁADOWANIE AKUMULATORÓW
Użyj załączonej do zestawu ładowarki, aby
naładować akumulator drona.
** Do ładowania akumulatorów drona należy używać
WYŁĄCZNIE ładowarki załączonej w zestawie.
Ładowanie akumulatora powinno odbywać się zawsze pod nadzorem osoby dorosłej.
Wskaźnik LED
Zielony - świeci
Czerwony - świeci
Ładowanie zakończone
Trwa ładowanie
Page 16
Zależności pomiędzy typem baterii, czasem pracy na jednym cyklu oraz długością
ładowania
Typ baterii
Specyfikacja baterii
Czas pracy
Czas ładowania
Akumu la tor litowo-
polimerowy (Li-Poly)
7,4V 1000mAh
Czas lotu drona:
do 10 minut
Około 150 minut (przy
prądzie ładowania ok.
0,6A)
Bat eria c ynk owo -
węglowa
(jednorazowa)
1,5V
(GP 15G R4P)
Czas pracy
kontrolera
(nadajnika): 18
godzin
Jednorazowa (nie należy
ładować)
5. MONTAŻ ORAZ DEMONTAŻ UCHWYTU FPV
Umieść końcówkę uchwytu FPV na antenie
kontrolera, następnie za pomocą śrubokrętu
dokręć śrubę.
Dobrze dokręcony uchwyt jest gotowy do użycia.
Do uchwytu można użyć urządzeń o maksymalnej
wielkości 6”
Aby zdjąć uchwyt, odkręć śrubkę znajdującą się
na końcówce uchwytu a następnie wysuń uchwyt
z anteny.
Page 17
6. OPI S MONITORA FPV ORAZ APLIKACJ NA URZĄDZENIA MOBILNE
Monitor FPV:
Aby móc przeglądać galerię z poziomu monitora FPV należy włożyć do niego kartę micro SD.
Po wejściu w galerię, dostępne będą następujące opcje:
VIEW (GALERIA)
DEL (USUŃ)
PLAY (ODTWÓRZ)
BACK (POWRÓT)
DOWN (DO DOŁU)
UP (DO GÓRY)
BACK (POWRÓT)
PRE (POPRZEDNI)
NEXT (NASTĘPNY)
Monitor WIFI:
Aby użyć smartfonu z systemem android lub IOS jako ekran fpv należy:
Pobrać i zainstalować aplikację ze sklepu Play lub sklepu IOS o nazwie LS-Model
Włączyć w telefonie obsługę sieci WiFi
Włączyć X-Bee Drone 5.2
Wyszukać w ustawieniach WiFi smartfonu, sieci o nazwie WIFIUFO-xxxxx i
połączyć się z nią (hasło nie jest wymagane)
Następnie należy wejść w zainstalowaną aplikację LS-Model i wybrać opcję
PLAY
Na ekranie pojawi się podgląd z kamery drona na żywo
Opis pr zycisków pro g r amu LS-Model:
Zasięg FPV
Infor macja o sta nie karty
micro SD (włożona/brak)
Galeria
Nagrywanie wideo
Wykonywanie zdjęć
Zwiększanie jasności
Zmniejszanie jasności
REC
JPG
Po naciśnięciu przycisku
nagrywan ia, n a ekranie
pojawi się napis REC.
Po naciśnięciu przycisku
wykonywania zdjęć, na
ekranie pojawi się napis
JPG.
Page 18
7. SYNCHRONIZACJA KONTROLERA I ODBIORNIKA RC
Zainstaluj i podłącz baterię do drona.
1. Powrót
2. Zrób zdjęcie
3. Nagraj wideo
4. Galeria
5. Prędkość (30%, 60%,
100%)
6. Blokada przepustnicy
(50%)
7. Tryb sensora grawitacji
8. Pokaż /ukryj interfejs
9. Obrót kamery
10. Kontrola przepustnic y
11. / 12. Kontrola obrotów
14. /14/15/16. Kontrola
ruchu lewo/prawo/do
przodu/tyłu
18. /18. Kalibracja lotu do
przodu/tyłu
20. /20. Kalibracja obrotu
lewo/prawo
22. /22. Kalibracja lot u
lewo/prawo
Page 19

Zamknij obudowę baterii i uruchom X-Bee 5.2, przesuwając
włącznik umieszczony na spodniej obudowie.
Włącz kontroler
Przesuń lewy analog do góry, następnie do dołu. Kontroler
wyda sygnał dźwiękowy a diody drona zaczną świecić
ciągłym światłem informując o poprawnie przeprowadzonej
procedurze synchronizacji.
8. KALIBRACJ A SI LNI K ÓW DRO N A
Postaw X-Bee Drone 5.2 na płaskiej poziomej powierzchni. Przestaw oba analogi do
pozycji lewy górny róg, tak jak na rysunku. Utrzymaj tą pozycję przez 5 sekund, diody LED
drona mrugną kilka razy, po czym zaczną świecić nieprzerwanie. Następnie zwolnij
analogi. Urządzenie jest gotowe do lotu.
9. URUCHAMIANIE I ZATRZYMYWANIE PRACY SILNIKÓW
Aby uruchomić silniki, przestaw lewy analog do pozycji
lewy dolny róg oraz prawy analog do pozycji prawy
dolny róg
Page 20

Aby zatrzymać silniki po wylądowaniu, przesuń lewy
analog do pozyc ji dolnej i utrzymaj go w tej pozycji do
momentu wyłączenia silników (około 5 sekund)
10. KONTROLA LOTU
Kontrola lotu do góry / dołu
Przesuń analog przepustnicy do przodu,
dron poleci do góry.
Przesuń analog przepustnicy do tyłu,
dron poleci do dołu.
Kontrola obrotu w lewo / prawo
Przesuń analog przepustnicy w lewo /
prawo, dron obróci się w wybranym
kierunku.
Kontrola lotu w lewo / prawo
Przesuń analog kierunkowy w lewo /
prawo, dron poleci w wybranym
kierunku.
Kontrola lotu do przodu / tyłu
Przesuń analog kierunkowy do przodu /
tyłu, dron poleci w wybranym kierunku.
Kalibracja obrotów w lewo / prawo
Naciśnij przycisk obrotów w lewo, jeśli
dron obraca się automatycznie w
prawo. Naciśnij przycisk obrotów w
prawo, jeśli dron obraca się
automatycz n ie w lewo.
Page 21
Kalibracja lotu w lewo / prawo
Naciśnij przycisk lotu w lewo, jeśli dron
leci automaty c z nie w prawo.
Naciśnij przycisk lotu w prawo, jeśli dron
leci automatyc znie w lewo.
Kalibracja lotu do przodu / tyłu
Naciśnij przycisk lotu do przodu, jeśli dron
leci automatycznie do tyłu.
Naciśnij przycisk lotu do tyłu, jeśli dron
leci automaty c z nie do przodu.
11. FUNKCJE
Flip 360
Aby wykonać akrobację 360 należy;
Upewnij się że drona znajduje się
minimum 3 metry nad ziemią
Naciśnij prawy analog, kontroler
zacznie wydawać sygnały
dźwiękowe, informujące o
gotowości drona do wykonania
ewolucji 360
Skieru j p r awy ana lo g w lewo,
prawo, górę lub dół, dron
wykona akrobację w wybranym
kierunku, po czym powróci do
pozycji lotu.
Funkcja akrobacje 360 nie zadziała gdy bateria jest
rozładowana i diody drona będą migać.
Tryb Headless
Naciśnij przycisk trybu Headless w górę.
Diody drona zaczną migać, oznacza to, że
jesteś w trybie HEADLESS.
Aby powrócić do zwykłego trybu, naciśnij
trybu Headless w dół, diody drona
przestaną migać.
Tryb ustawia kierunek lotu do przodu niezależnie
od ustawienia drona dla łatwiejszej kontroli.
Page 22

Informacja o rozładowanej baterii
Gdy diody drona zaczną migać,
oznaczać to będzie bardzo niski poziom
naładowania baterii. W takiej sytuacji
należy wylądować i wymienić baterię.
Jeśli nie zostaną podjęte działania lądowania, dron
wyląduje automatycznie w miejscu gdzie bateria będzie
najbardziej rozładowana.
12. MONTAŻ I DEMONTAŻ KAMERY
Aby zamontować kamerę na dronie,
wsuń ją w prowadniki i dociśnij w kierunku
do przodu drona (jak na zdjęciu), słyszalne
będą zatrzaski kamery.
Podłącz przewód kamery do gniazda
znajdującego się na obudowie drona.
Tak zamo ntowana kamer a j est gotowa
do użycia.
Aby zdemontować kamerę, odepnij
przewód kamery z gniazda i przesuń ją w
kierunku do tyłu drona, następnie wyjmij
kamerę z prowadników.
13. MONTAŻ ŚMIGIEŁ
Aby dron latał prawidłowo, należy wymieniać śmigła według podanego schematu:
Front = Przód , Back = Tył
Każde śmigło jest podpisane, oznaczenia znajdują się również na szybce ochronnej diod LED drona.
Page 23

1. NOTE DE SIGURANTA
** Produsul este realizat pentru persoanele in varsta de 14 ani sau mai
mari**
Le sugeram celor care sunt abia la inceput in utilizarea unei drone, sa contacteze o persoana cu
experienta mai mare in acest domeniu. Utilizatorii sub 18 ani pot utiliza produsul doar sub
supravegherea unui adult.
Scopul notelor de siguranta este d
e a proteja produsul si utilizatorii sai, precum si trecatorii si
proprietatea lor.
Folosirea necorespunzatoare poate provoca accidentari sau deteriorari ale propriet atii.
SPECIAL REALIZAT PENTRU F OLOS IREA IN INTERIOR SI EXTERIOR.
Acest produs poate fi
folosit atat in interior cat si in exterior.
Asigurati
-va ca alegeti o zona de zbor fara obstacole si mentineti o distanta de siguranta fata de
oameni si animale.
Nu o folositi aproape de liniile de curent.
PREVENITI CONTACTUL CU APA
Atat drona cat si
telecomanda sunt compuse din multe componente electronice de precizie. Prin
urmare, acestea trebuie impiedicate la contactul cu apa.
Expunerea la apa sau umezeala in orice
fel poate provoca functionarea necorespunzatoare sau daune.
NU UTILIZATI SI NU-L EXPUNETI LA PLOAIE SAU UMEZEALA
INSTRUCTIUNI ALE BATERIEI
Pentru a evita un potential incendiu provovocat de baterii, va rugam sa nu inversati polaritatea sau
sa perforati bateriile
. Incarcarea bateriilor trebuie realizata sub supravegherea unui adult de
fiecare data
si intr-o locatie departe de accesul copiilor.
•
NU AMESTECATI BATERIILE NI-CAD SI ALKALINE
ATENTIONARE DE SIGURAN T A PENTRU BATERIILE NI
-MH
•
Asigurati-va ca bateriile sunt instalate corect pent ru a asigura o polarit ate corecta (+ -).
*NU AMESTECATI BATERIILE NI
-CAD SI ALKALINE
•
Daca nu intentionati sa utilizati dispozitivul pentru o perioada mai lunga de timp, scoat eti
bateriile din controler pentru a evita scurgerea care poate afecta transmitatorul.
**
VA RUGAM SA ELIMINATI BATERIILE EPUIZATE IN CONFORMITATE CU LEGILE SI
ORDONANTELE LOCALE
.
Page 24

NOTA DE SIGURANTA PENTRU BATERIILE LI
-POLYMER
•
Bateriile Li-Polymer au risc operational ridicat in comparatie cu alte baterii, astfel este imperat i v
sa urmati corect ghidul operational. Producatorii
si dealerii nu isi asuma nicio responsabilitate
pentru daune accidentale cauzate de o utilizare necorespunzatoare.
NU utilizati altfel de incarcator in afara de cel furnizat pentru a evita un potential incendi u sau o
explozie. Nu loviti, nu dezasamblati,
nu ardeti si nu inversati polaritatea.
Evitati contactul materialelor metalice cu polaritat ea baterii l or, existand posibi l itatea de a cauza un
scurt circuit. **NU INTEPATI BATERIILE DEOARECE EXISTA RISCUL DE A PROVOCA UN
INCENDIU.
•
Incarcarea bateriilor ar trebui facuta sub supravegherea unui adult de fiecare data si intr -o
locatie departe de accesul copiilor.
•
Va rugam sa opriti utilizarea sau incarcarea bateriilor daca exista o crestere neobisnuit a a
temperaturii bateriei dupa utilizare.
Continuarea utilizarii bateriei poate cauza o deformare, o
explozie sau chiar un potential incendiu.
**
VA RUGAM SA ELIMINATI BATERIILE EPUIZATE IN CONFORMITATE CU LEGILE SI
ORDONANTELE LOCALE
. **NU LE ELIMINATI IN MOD INCORECT.
"NU LASATI BATERIILE LA INCARCAT PESTE NOAPTE.
A SE FERI DE CALDURA
Modelele R/C sunt realizate din diverse forme de plastic fiind expuse la deteriorare sau
deformare din cauza caldurii extreme si temperaturilor scazute. Asigurati
-va ca nu veti pastra
modelul la temperaturi scazute sau prea
ridicate.
OBTINE AJUTORUL UNUI PILOT EXPERIMENTAT. Produsul poate fi tratat ca o jucarie, dar nu
este potrivita pentru copiii sub 14 ani. La inceput va trebui sa inveti pana cand vei ajunge un pilot
experimentat. Este recomandat sa fiti asistat de un pilo
t cu experienta pentru a va ajuta in
perioada de inceput.
Page 25

2. DIAGRAMA CONTROLOR (TRANSMITATOR)
Control Wi-Fi
Control FP V
(Telefonul mobil nu est e inc lus)
(Ecran FPV inclus )
Indicator LED
Pornire/oprire
Antena
Port monitor FPV
Buton declansator
Buton inregistrare video
Stick directie
Stick acceleratie
360 flip
Tasta migratie
dreapta/stanga
Tasta migratie inainte si
inapoi
Display LCD
Tasta rotatie dreapta/stanga
Mod “Headless”
Page 26

3. INSTALAREA BATERIILOR IN CONTROLOR (TRANSMITATOR)
Utilizati o suru belnita pentru a deschide capac ul bateriilor.
Introduceti 5 baterii AA in compartimentul bateriilor. Asigurati-va ca bateriile sunt introduse
corect in conformitate cu polaritatea corecta (+ -). NU AMESTECATI BATERII DE DIFERITE
TIPURI.
4. Incarcarea bateriei
Utilizati cablul inclus pentru a incarca bateria dronei.
** Pentru incarcare utilizati DOAR incarcatorul furnizat. Incarcarea
bateriei trebuie mereu efectuata sub supravegherea unui adult.
Indicator LED
Verde - aprins
Rosu - aprins
Incarca r e c om pleta
Incarcare...
Utilizarea si durata de incarcare a bateriei
Tip baterie
Specificatiile bateriei
Timp de lucru la o
singura incarcare
Timpul de incarcare
Baterie
reincarcabila
lithium
-polymer (Li-Poly)
7.4V 1000mAh
Durata de zbor a
dronei: pana la 10
minute
Aproximativ 150 de
minute (curen t de
incarcare aprox.. 0.6A)
Baterie Zinc
-carbon
(Non reincarcabila)
1.5V
(GP 15G R4P)
Controlor
(transmitator)
-
timpul de
operare:
18 ore
Non reincarcabil (nu
incarcati)
Page 27

5. Instalare/dezinstalare suport FPV
Plasati un capat al suportului FPV pe antena
controlorului si apoi ut ilizati surubelnita pentru a
strange surubul.
Atunci cand suportul este instalat si asigurat in
mod corespunzator, acesta este gata de utilizare.
Suportul este compatibil cu dispozitive cu o
diagonala de pana la 6 inchi.
Pentru a inl atura suportul, desurubati surubul din
varf si trageti s uportul din antena.
6. DESCRIEREA MONITORULUI FPV SI A APLICATIEI DE MOBIL
MONITOR FPV:
Daca doriti sa cautati galeria pe monitorul FPV, va rugam sa introduceti un card microSD in portul
microSD al monitorului.
Caracteristicile si optiunile galeriei:
Vizualizare
STERGERE
REDARE
INAPOI
JOS
SUS
INAPOI
ANTERIOR
URMATORUL
Raza FPV
Info despre starea cardului
MicroS D (instala t / lipsa
card).
Galerie
Inregistr are vi deo
Fotografiere
Cresterea lum in o zitatii
Scadere luminozitate
REC
JPG
Cand apasat i butonul de
inregis trare v id eo, disp lay-
ul va afis a “ REC”.
Cand apasat i but onul
declansator, display-ul va
afisa “JPG”.
Page 28

MONITOR WI-FI:
Pentru a utiliza un smartphone android sau iOS ca pe un ecran FPV, va rugam sa
parcurget i urm atorii pasi:
Descarcati aplicatia „LS-Model” din “Play store sau „App store” si instalati-o.
Activati Wi-Fi in telefonul mo bil.
Porniti X-Bee Drone 5.2.
Mergeti la setarile Wi-Fi ale smartphone-ului si cautati reteaua “WIFIUFO-xxxxx”.
Apoi stabiliti conexiunea (nu este necesara o parola).
Rulatia aplicatia instalata LS-Model si apasa ti “PLAY”.
Ecranul smartphone-ului va afisa imagini “liv e” de la ca m era dron ei.
Descrierea butoanelor aplicatiei LS-Model:
1. Inapoi
2. Fotografiere
3. Inregi strar e video
4. Galerie
5. Mod de vi t eza (3 0%,
60%, 100%)
6. Blocare acceleratie
(50%)
7. Mod senz or de gravitatie
8. Afiseaza/ascunde
interfata
9. Rotire camera
10. Control acceleratie
11. / 12. Control rotatie
13. /14/15/16.Control
migratie Stanga /
dreapta / inainte /
inapoi
17. /18. Calibrare migratie
inaint e / inapoi
19. /20 Calibrare rotatie
stanga/dreapta
21. /22. Calibrare migratie
stanga/dreapta
Page 29

7. SINCRONIZARE CONTROLER (TRANSMITATOR) SI RECEPTOR
Introduceti si conectati bateria dronei.
Inchideti capacul bateriei si porniti X-Bee 5.2 comutand
butonul de alimentare de pe spatele carcasei.
Porniti controlerul.
Mutati sti ck-
ul stanga inainte si apoi inapoi. Controlerul va
emite un sunet de bip si LED-urile dronei incep sa
straluceasca constant, indicand sincronizarea corecta.
8. C AL IBRAREA MOTOARELOR DRONEI
Plasati X-Bee Drone 5.2 pe o suprafata plana. Mutati ambele stick -uri in pozitia din coltul
stanga-s us, preccum in imaginea de mai jos. Men tineti aceste pozitii timp de 5 secun de.
LED-urile dronei vo r clipi de ca teva ori s i apoi vor in cepe sa stra luce asc a in mod
constant. Acum, puteti elibera stick-urile – drona este gata de zbor.
9. PORNIRE/OPRIRE MOTOARE
Pentru a porni motoarele, mutati stick-ul stanga in cel
mai de j os colt din st anga si stick-ul dreapta in cel m ai
de jos colt din dreapta.
Page 30

Pentru a opri motoarele, mutati stick-ul stanga in jo s s i
mentineti pozitia pana cand motoarele se opr esc
(aproximat iv 5 secunde).
10. CONTROLUL ZBORULUI
Zbor sus/jos
Mutati stick-ul de acceleratie inainte pentru
ca drona sa zboare in sus.
Mutati stick-ul de acceleratie inapoi pentru
ca drona sa zboare in jos.
Rotire stanga/dreapta
Mutati stick-
ul de acceleratie stanga /
dreapta pentru a roti drona in directia dorita.
Zbor stanga/dreapta
Mutati stick-ul de control al directiei
stanga/dreapta pentru ca drona sa zboare in
directia dorita.
Zbor inainte si inapoi
Mutati stick-ul de control al directiei inainte /
inapoi pentru ca drona sa zboare intr-o
directie dorita.
Calibrare rotire stanga/dreapta
Apasati tasta "Rotire stanga" daca drona se
roteste automat in sensul acelor de ceas.
Apasati tasta "Rotire dreapta" daca drona se
roteste in sensul invers al acelor de ceas.
Page 31

Calibrare migratie stanga/dreapta
Apasati tasta "Migratie stanga" daca drona
migreaza automat catre dreapta.
Apasati tasta "Migratie dreapta" daca drona
migreaza automat catre stanga.
Calibrare migratie/inapoi
Apasati tasta "Migratie inainte" daca drona
migreaza automat inapoi.
Apasati tasta "Migratie inapoi" daca drona
migreaza automat inainte.
11. FUNCTII
360 flip
Daca doriti sa realizati cascadorii la 360 de
grade:
Asigurati-va c a d ro na este la cel
putin 3 metri deasupra
pamantului.
Apasati stick-ul dreapta .
Controlerul incepe sa emita
bipuri, indicand ca drona este
gata pentru cascadoriile la 360
de grade.
Mutati sti ck-ul dreapta inainte,
inapoi, stanga sau dreapta
pentru a rostogoli dron a in
directia aleasa. Dupa
cascadorie, drona iese d in
modul “Flip” si revine automat la
modul normal de zbor.
Cascadoriile la 360 de grade nu pot fi realizate atunci
cand puterea bateriei este scazuta (LED-urile dronei
clipesc).
Mod “Headless”
Deplasa ti butonul modu lui “headless” in
sus. LED-urile d ronei incep sa clipeasca,
indicand ca drona este in mod u l
HEADLESS.
Daca doriti sa schimbati modul dronei
inapoi la cel normal, deplasati butonul de
mod “Headless” in jos. LED-urile dr o nei
inceteaza sa mai clipeasca.
In acest mod, pentru a face utilizarea dronei mai
usoara, directia de zbor inainte este setata
indiferen t de pozitia dro nei.
Page 32
Notificare pentru baterie slaba
Cand LED-urile dronei incep sa clipeasca ,
inseamna ca puterea bateriei este
scazuta. In acest caz va rugam sa aterizati
dispozitivul si sa inlocuiti bateria.
In cazul in care nu se iau masuri, drona aterizeaza
automat atunci cand puterea bateriei este in stare
critica (in locul pozitiei sale curente).
12. INSTALARE / DEZINSTALARE CAMERA
Pentru a atasa camera la drona, glisati-o
in ghidaje si impingeti-o spre p artea din
fata a dronei (precum in imagine) pana
cand auziti un sunet de pocnet.
Conectati cablul camerei la portul plasat
pe carcasa dron ei.
Acum, camera este gata de utilizare.
Pentru a demonta camera, deconectati
cablul de la portul dronei, deplasati
camera spre partea din spate a dr onei si
apoi inlaturati-o de pe ghi daje.
13. INSTALAREA ELICELOR
Pentru a zbura corect, drona are nevoie de o instalare corecta a elicelor. Puteti observa
in urmatoarea imagine:
Fiecare elice este marcata. Marcajul corespunzator este, de asemenea, indicat pe masca de
protecțte a LED-urilor dr onei.
Page 33

1. SAFETY NOTES
** A termék 14 éven felülieknek készült **
•
Ha nem tudja, ho gy repül a készülék, ké rj ük , ve g ye fel a kap c solatot olyan személlyel,
aki tudja és mindig szülői felügyelet alatt használják a
készüléket. 18 év alattiak mindig
szülői felügyelet mellett használják a készüléket
•
A biztonsági figyelmeztetések nemcsak a repülő megóvására, hanem az Ön biztonsága
érdekeit is szo lg álják.
•
Nem megfelelő működés/működtetés sérülést és anyagi kárt okozhat.
SPECIÁLIS KÜL & BELTÉRI HA S ZNÁLAT
•
A terméket lehet kül-, és bel-téren egyarán t használ ni.
•
Kérjük, mindig ügyeljen a repülési környezetre, arra hogy ne legyen semmilyen akadály
és mindig tartson megfelelő távolságot az emberektől, állatoktól.
•
Ne használja elektromos vezetékek közelében.
ÓVJA A TERMÉKET A NEDVESSÉGTŐL
Mind a drón, mind a távszabályozója precíziós elektronikai eszköz. Ezért szükséges őket
óvni a nedvességtől. Bármilyen vízzel való érintkezés vagy nedvesség a készülék hibás
működését vagy hi
báját eredményezheti.
NE HASZNÁLJA ESŐBEN VAGY NEDVESSÉGBEN.
AKKUMULÁTOR HASZNÁLATA
A potenciális tűzveszély elkerülése érdekében, kérjük, ne zárja rövidre vagy ne cserélje
meg a polaritásokat. Az elemek töltését mindig felügyelet alatt végezze, és gyerm
ektől
távol ta r ts a.
•
NE KEVERJEN NI-CAD ÉS ALKÁ LI ELEMEKET
BIZTONSÁGI FIGYELMEZTETÉSEK NI
-MH AKKUMULÁTOR ESETÉN
•
Győződjön meg róla, hogy az elemeket helyesen, megfelelő polaritással (+ -) helyezte
be.
•
NE KEVERJEN NI-CAD & ALKÁLI ELEMEKET
•
Ha hosszan ideig nem tervezi használni a készüléket, vegye ki az el emeket a
távirányítóból, annak érdekében, hogy kerülje a vevőegység sérülését.
KÉRJÜK, HOGY A LEMERÜLT ELEMEK A TÖRVÉNYI ELŐÍRÁSOKNAK MEGFELELŐEN HELYEZZE
EL
!
Page 34

BIZT ONSÁGI FIGYELME ZTETÉSEK LI
-POLYMER AKKUMULÁTOR ESETÉN
•
A Li-Polymer elemeknek magasabb a működési kockázatuk, mint más elemeknek,
ezért kérjük, hogy fokozottan ügyeljen annak használatakor. Gyártó és forgalmazó nem
vállal felelősséget a véletlenségből és nem megfelelő használatból eredő károkért.
•
NE HASZNÁLJON más töltőt. Csak a mellékelt töltőt használja a robbanás és tűzveszély
elkerülé se é rdekében. NE törje össze, égesse el vagy fordítsa meg a polaritá s t.
•
Kerülje az olyan fémes anyagokat, amik kapcsolatba léphetnek az elemek
polaritásáv al, és ez
által rövidzárlatot okozhatnak.
**SOHA NE SÉRTSE FEL AZ ELEMEKET, MERT TŰZ KELETKEZHET.
•
Az elemek töltését mindig felügyelet alatt végezze, és gyermektől távol tartsa.
•
Kérjük, azonnal hagyja abba az elemek használatát vagy töltését, ha az elemek
hőmérsék
lete szokatlanul megemelkedik. Az elemek további használata robbanáshoz,
deformálódáshoz vagy tűzhöz vezethet.
KÉRJÜK, HOGY A LEMERÜLT ELEMEK A TÖRVÉNYI ELŐÍRÁSO
KNAK MEGFELELŐEN HELYEZZE
EL.
NE DOBJA A SZEMETESBE AZ ELEMEKET.
NE TÖLTSE AZ ELEMEKET EGÉSZ É
JJELEN KERESZTÜL
SAFETY NOTES FOR LI
-POLYME R BATTERIES
TARTSA TÁVOL A MELEGTŐL
Az R/C modellek különböző műanyagból vannak, melyek extrém magas hő vagy hideg
hatására deformálódnak. Ne tárolja a készüléket közvetlen melegnek és hidegnek kitéve.
TAPASZTALT PILÓTA SEGÍTSÉGE AJÁNLOTT
A Quadcopter egy játék, mely 14 éven felüli gyermekeknek készült. Kezdetben kis
tanulóköröket kell elsajátítani, míg gyakorlott pilóta nem lesz a játékos. Célszerű egy
tapasztalt pilóta segítségét kérni
.
Page 35
2. TÁVIRÁNYÍTÓ (TRANSZMITTER)
Wi-Fi távirányító
FPV távirányító
(Mobiltelefon nem tartozék)
(FPV kijelző tartozék)
LED jelző
Ki / be kapcsolás
Antenna
FPV monitor port
Exponáló gomb
Video felvevő gomb
Iránykar
Gázkar
360 flip
Jobb / Bal iránygomb
Előre és hátra
iránygomb
LCD kijelző
Jobb / bal elfordulás gomb
Headless mód
Page 36

3. ELEM TELEPÍTÉSE A TÁVIRÁNYÍTÓBA (TRANSZMITTERBE)
Csavarhúzóval nyissa ki az elemfedelet.
Helyezzen be 5 „AAA” elemet az elemtartóba. Ügyeljen a megfelelő polaritásra (+ -). NE
KEVERJEN KÜLÖNBÖZŐ TÍPUSÚ ELEMEKET
Zárja vissza a fedelet.
4. ELEMEK TÖLTÉSE
Használja a mellékelt töltőt a drón elemeinek töltéséhez.
** CSAK a mellékelt töltőt használja a töltéshez. Az elemek
töltését mindig szülői felügyelet alatt és gyermekektől távol kell
végezni.
LED jelzőfény
Zöld – világít
Piros – világít
Töltés befejeződött
Töltés...
Akkumulátorok használata és hozzávetőleges töltési idejük
Akkumulátor típusa
Akkumulátor
specifikációja
Használati idő
egyszeri töltéssel
Töltési idő
Újratölthető lithium
-
polymer elem (Li
-Poly)
7.4V 1000mAh
Drón repülési
ideje : max. 10
perc
Kb. 150 perc (töltési
feszültség kb. 0.6A)
Zinc
-carbon elem
(Nem újratölthető)
1.5V
(GP 15G R4P)
Távirányító
(transmitter)
haszná lati idej e:
18 óra
Nem újratölthető (ne
töltse)
Page 37

5. FPV T ARTÓ TE LEP Í TÉ SE / ELT ÁVO LÍ T ÁS A
Helyezze az FPV tartó egyik vé gé t a távirányító
antennára, majd a csavarhúzóval húzza meg.
Ha a tartó megfelelően lett telepítve és
biztonságos, akkor használhatja. A tar tó
kompatibilis bármely max. 6 coll átmérőjű
készülékkel.
A tartó eltávolításához c s avarozza ki és húzza ki az
antennából.
6. FPV MONITOR ÉS MOBIL ALKALMAZÁS LEÍRÁSA
FPV MONITOR:
Ha szeretne böngészni a galériábal az FPV monitoron, kérjük, helyezzen be micro SD kártyát a monitor
micro SD portjába.
A galéria tulajdonságai, funkciói a következőek:
NÉZET - VIEW
TÖRLÉS - DELETE
LEJÁTSZÁS - PLAY
VISSZA - BACK
LE - DOWN
FEL – UP
VISSZA - BACK
ELŐZŐ - PREVIOUS
KÖVETKEZŐ - NEXT
FPV táv olság
Micro SD kártya info (be van
helyezve / nin c s kár ty a)
Video r ögzítés
Képkészítés
Fényerő növelése
Fényerő csökkentése
REC
JPG
Amikor megnyomja a
Videó rögzítő gombot, a
“REC” megjelenik.
Ha megnyomja a
exponáló gombot,
megjelenik a “JPG” felirat.
Galéria
Page 38

WI-FI MONITOR:
Az Android vagy IOS rendszerű okostelefonok FPV kijelzőként való használata:
Töltse le az „LS-Model” alkal maz ást a “Play” áruházból vagy az „App store”-ból
és telepítse.
Engedélyezz e a Wi-Fi-t a mobiltelefonján.
Kapcsolja be a X-Bee D ron e 5 .2 -t.
Az okostelefon WiFi beállításai között keressen rá és csatlakozzon a WIFIUFO-xxxxx
nevű hálózathoz (jelszó nem szükséges.
Futassa a telepített LS-Model alkalmazást és érintse meg a “PLAY”-t.
Az okostelefon kijelzőjén megjelenik a drón kamerájának élő képe.
LS-Model alkalmazás gombjainak bemutatásaon:
1. Vissza
2. Képkészítés
3. Videórögzítés
4. Galéria
5. Sebesség (30%, 60%,
100%)
6. Gázkar(50%)
7. Gravitációs szenzor mód
8. Felület
mutatása/elrejtése
9. Kamera forgatása
10. Gázkar
11. / 12. Irányszab á lyozás
13. /14/15/16. Bal / jobb /
előre / hátra migrációs
szabályozásl
17. /18. Előre / hátra
migrációs kalib r álás
19. /20. Bal/ jobb forgás
kalibrálása
21. /22. Bal / Jobb migráció
kalibrálása
Page 39
7. TÁVIRÁNYÍTÓ (TRANSZMITTER) ÉS A VEVŐEGYSÉG SZINKRONIZÁCIÓJA
Helyezzen be és csatlakoztassa a drónhoz az elemeket.
Zárja be az akkumulátorfedőt és kapcsolja be az X-Bee 5.2-t
a Power kapcsoló mozgatásával.
Kapcsolja be a távirányítót.
Mozgassa a bal kart előre, majd hátra. A távirányító beep
hangot fog kiadni és a drón LED fényei elkezdenek villogni,
mely je lzi a helyes s zinkronizációt.
8. DRÓN MOTORJÁNAK KALIBRÁLÁSA
Helyezze az X-Bee Drone 5.2-t sima és egyenletes felületre. Mozgassa mindkettő kart a bal
felső pozícióba, ahogy a képen látható. Tartsa ezt a pozíciót 5 másodpercig. A drón LED
fényei néhányszor villogni fognak, majd elkezdenek folyamatosan égni. Most már
elengedhet i a karokat – a drón kés z a repülésre.
9. MOTOR INDÍTÁSA / LEÁLLÍTÁSA
A motor elindításához mozgassa a bal kart a bal alsó, a
jobb kart a jobb alsó pozícióba.
Page 40
A motor leállításához mozgassa a bal kart lefelé és tartsa
ott, míg a motor le nem áll (kb . 5 má sodperc).
10. REPÜLÉS
Fel / le repülés
Mozgassa a gázkart előre a drón felfelé
való reptetéséhez.
Mozgassa a gázkart visszafelé a drón
lefelé való reptetéséhez.
Balra / jobbra fordulás
Mozgassa a gázkart balra / jobbra a
drón adott irányba va ló fordulásához.
Balra / jobbra repülés
Mozgass a az iránykart jobbra / bal ra az
adott irányba való re püléshez.
Előre és hátra repülés
Mozgassa az iránykart előre / hátra az
adott irányba való repüléshez.
Bal / jobb fordulás kalibrálása
Nyomja meg a "Bal elforgás" gombot, ha
drón automatikusan jobbra fordul.
Nyomja meg a "Jobb elforgás" gombot,
ha a drón automatikusan balra fordul
.
Page 41
Bal / jobb vezérlő kalibrálása
Nyomja meg a "Bal vezérlő" gombot, ha
drón automatikusan jobbra tér el.
Nyomja meg a "Jobb vezérlő" gombot,
ha a drón automatikusan balra tér el
.
Előre / hátra vezérlő kalibrálása
Nyomja meg az "Előre vezérlő" gombot,
ha drón automatikusan hátrafelé indul.
Nyomja meg a "Hátra vezérlő" gombot,
ha a drón automatikusan hátra indul
.
11. FUNKCIÓK
360 flip
360-fokos fordulat:
Győződjön meg róla, hogy drón
3 méter magasan van a földtől.
Nyomja meg a jobb kart. A
távirányító elkezd han got kiad ni,
mely jelzi, hogy a drón kész a 360
fokos fordulathoz.
Mozgassa a jobb kart előre,
hátra, jobbra v agy balra a
fordulathoz a kívánt irányba. A
fordulat után a drón
automatikusan visszalép a
normál r e pülési módba.
360-fokos fordulat nem hajtható végre, ha az
akkumulátorszint alacsony (drón LED fényei villognak).
Headless mód
Csúsztass a Headless mód gombo t felfelé.
A drón LED fényei elkezdenek villogni, mely
jelzi a HE ADLESS mód aktiválását.
Ha vis sza szere tné állí tani a drónt a normál
módba, csúsztassa a Headless mód
gombot lefelé. A drón LED fényeinek
villogá sa leáll.
Ebben a módban a drón használata egyszerűbb,
az előrefelé való repülés független a drón
pozíciójától.
Page 42

Alacsony akkumulátorszint jelzés
Ha a drón LED fényei elkezdenek villogni,
akkor alacsony az akku mulátorszint.
Szálljon le a készülékkel és tegyen be új
elemeket.
Ha nem tesz semmit, akkor a landolás automatikusan
elindul, ha az akkumulátorszint kritikusan alacsony.
12. KAMERA TELEPÍTÉSE/LESZERELÉSE
Kamera csatlakoztatásához csúsztassa a
jelzett irányba (ahog y a ké p en látható),
míg kattanást nem hall.
Csatlakoztassa a kamera kabelét a drón
házának portjához.
A kamera kész a használatra.
A kamera leszereléséhez, először ki kell
húznia a kábe lt a portból, majd utána a
kamerát hátrafelé le kell húzn ia.
13. PROPELLER SZERELÉSE
A megfelelő repülés érdekében a drónhoz a propellereket helyesen kell rögzí teni – lásd
alábbi kép :
.
Mindegyik propeller meg van jelölve. A megfelelő jelölés is fel van tüntetve a drón LED-jeinek védő
előlapján.
Page 43

Declaration of Conformity
Product details
For the following
Product : Drone
Model(s) : OV-X-BeeDrone 2.3
Declaration & Applicable standards
We, BrandLine Group Sp. z o.o., hereby declare under our sole responsibility that the
of the above referenced product complies the following directives:
R&TTE Directive 1999/5/EC
EMC Directive 2004/108/EC
Low Voltage Directive 2006/95/EC
RoHS Directive 2011/65/EU
The following harmonized standards have been applied:
Safety and Health:
EN 62479: 2010
EN 60950-1: 2006+A11: 2009+A1: 2010+A12: 2011+A2: 2013
EMC:
EN 301 489-1 V 1.9.2 (2011-09)
EN 301 489-17 V 2.2.1 (2012-09)
RF Spectrum Efficiency:
EN 300 328 V1.8.1 (2012-06)
Representative
BrandLine Group Sp. z o.o.
ul. Dziadoszańska 10
61-248 Poznań
Jan Libera
Page 44

 Loading...