

Page 1
Ins. No.
Multipoint temperature compensated
FLOW COMPUTER
E-888-5-E
MODEL:EL450
1
This manual has been prepared to provide you with the information pertinent to the Multipoint
Temperature Compensated FLOW COMPUTER.
With the proper application of the information and knowledge contained in this manual, you can expect
the best possible results over a long service life of this instrument. Keep this manual for ready reference.
It is suggested that the instruction manuals for the companion pulse generator (flowmeter) and receiving
instrument be referred to at the same time.
1
Page 2

E-888-5-E
TABLE OF CONTENTS
1. BEFORE YOU BEGIN ........................................................................................................................... 4
1.1 Confirming the Nameplate .............................................................................................................. 4
1.2 Transportation Precautions ............................................................................................................. 4
1.3 Storage Precautions ........................................................................................................................ 4
2. GENERAL ........................................................................................................................................... 5
2.1 Features ........................................................................................................................................ 5
2.2 Part Names ................................................................................................................................... 5
3. INSTALLATION ................................................................................................................................... 6
3.1 Outline Dimensions ....................................................................................................................... 6
3.2 Installation ..................................................................................................................................... 6
3.2.1 Installation Location ................................................................................................................ 6
3.2.2 Panel ....................................................................................................................................... 6
3.2.3 Installation ............................................................................................................................... 6
4. WIRING ................................................................................................................................................ 7
4.1 Field Wiring Cables ....................................................................................................................... 7
4.2 Wiring Connections ....................................................................................................................... 7
4.3 Description of Terminal Blocks for External Connections .............................................................. 7
5. GENERAL SPECIFICATIONS ............................................................................................................... 9
6. INTERNAL COMPONENTS AND FUNCTIONS .................................................................................. 10
6.1 Front Panel .................................................................................................................................... 10
6.1.1 Display .................................................................................................................................... 10
6.1.2 On-Screen Menu Items ........................................................................................................... 10
6.1.3 Error Messages ...................................................................................................................... 11
6.1.4 Front Panel Keypad .................................................................................................................11
7. CALCULATION FORMULAS ............................................................................................................... 12
7.1 Uncorrected Total Flow .................................................................................................................. 12
7.2 Flow Velocity and Viscosity Related Meter Error Correction Formula (E1) .................................... 12
7.3 Meter Body's Volume Expansion (3α) Related Meter Error Correction Formula (E2) .................. 12
7.4 Correction Factor in Implementation of Temperature Correction on Petroleums .......................... 13
7.5 Flow Calculation Formula .............................................................................................................. 13
8. PREPARATIONAL CHECKS AND OPERATION ................................................................................. 14
8.1 Preparation Before Operation ....................................................................................................... 14
8.2 Preparational Checks .................................................................................................................... 14
8.3 Operation ...................................................................................................................................... 14
9. TROUBLESHOOTING ........................................................................................................................ 15
10. ERROR MESSAGES .......................................................................................................................... 16
11. BEHAVIOR IN ERRATIC CONDITIONS .............................................................................................. 16
12. OVERALL BLOCK DIAGRAM ............................................................................................................. 17
13. PRODUCT CODE EXPLANATION ..................................................................................................... 18
CONVENTIONS
Shown in this manual are the signal words NOTE, CAUTION and WARNING, as described
in the examples below:
2
NOTE: Notes are separated from the general text to bring the user's attention to
important information.
CAUTION: Caution statements signal the user about hazards or unsafe practices
which could result in minor personal injury or product or property
damage.
WARNING: Warning statements signal the user about hazards or unsafe practices
which could result in severe personal injury or death.
Page 3

E-888-5-E
COMPANION VOLUME
KEY OPERATION MANUAL Ins. No. E-880TM-E
CONTENTS
1. KEY ARRANGEMENT ........................................................................................................... 10
2. DISPLAY SCREEN ................................................................................................................ 11
3. INITIAL CHECK ..................................................................................................................... 14
4. MODE SELECTION .............................................................................................................. 18
5. RUN MODE SCREEN ...........................................................................................................23
6. SET MODE ............................................................................................................................ 36
7. SYS MODE .........................................................................................................................142
8. EL4401 ................................................................................................................................ 170
9. EL4501 ................................................................................................................................ 175
10. DIP SWITCH CONFIGURATION ........................................................................................182
(※: Model with communication capabilities)
COMMUNICATION MANUAL (※) Ins. No. E-880CM-E
CONTENTS
1. COMMUNICATION CAPABILITY OVERVIEW ........................................................................ 5
2. NETWORK CONFIGURATION ............................................................................................... 5
3. MODE SELECTION ................................................................................................................ 6
4. LOCAL / REMOTE SELECTION .............................................................................................8
5. SETUP ITEMS FOR COMMUNICATION .............................................................................. 10
6. COMMUNICATION PROCEDURE........................................................................................ 11
7. COMMUNICATION FORMAT ................................................................................................12
8. BCC / SUM CHECK .............................................................................................................. 45
9. CR / LF .................................................................................................................................. 46
10. CODES ASSIGNED TO UNITS ............................................................................................. 48
11. ASCII CODE .......................................................................................................................... 49
3
Page 4
E-888-5-E
1. BEFORE YOU BEGIN
Every OVAL product is thoroughly tested and inspected before shipment from our factory.
When received, its appearance should be inspected for possible damage by rough handling during
transit. First of all, thoroughly read the handling precautions described in this section. For topics other
than those covered in this section, refer to the respective sections of this manual.
If at any time in the future you seek our assistance, contact the nearest sales office in your area.
1.1 Confirming the Nameplate
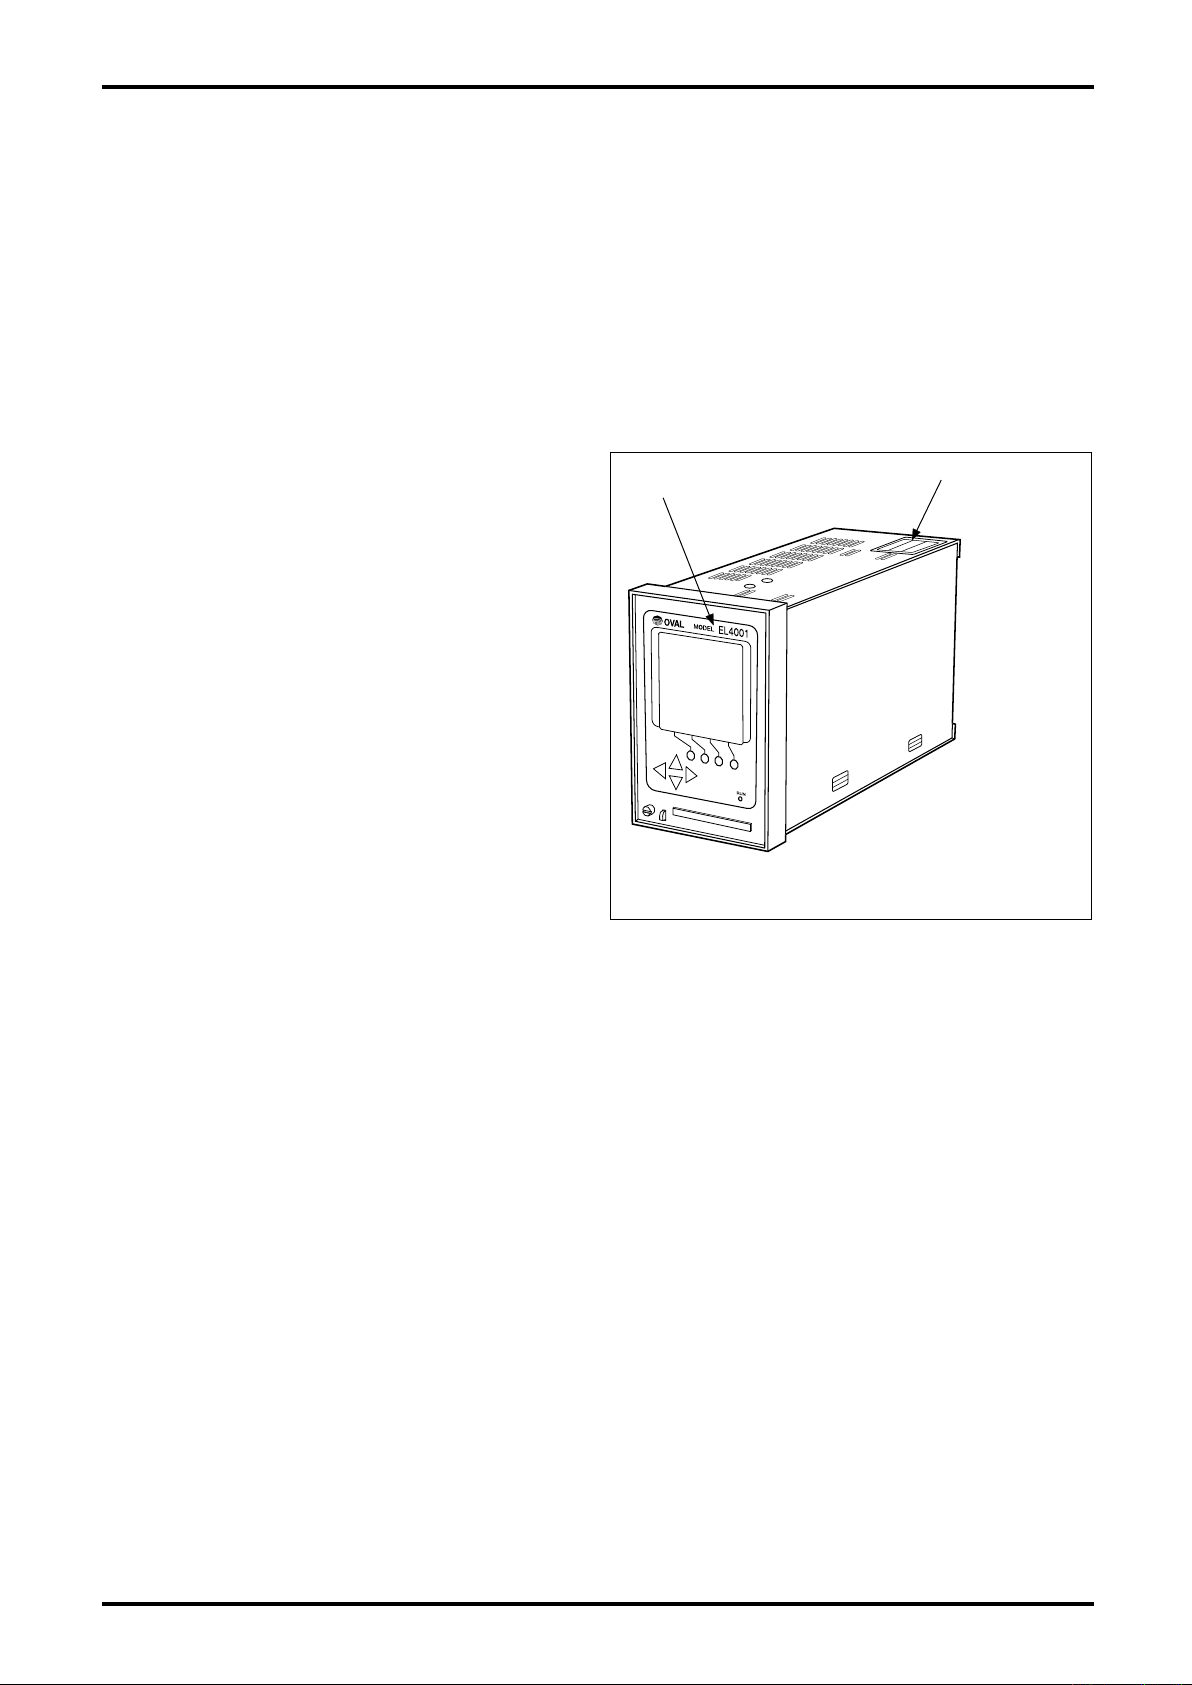
The instrument is adjusted to individual specifications
before shipment from our factory. Model number
appears on the nameplate attached to the top of
the housing.
Make sure to see that the instrument you received
conforms to the General Specifications and the
Product Code Explanation.
◆ When you inquire, supply complete informa-
tion as to the product name, model number,
product number, ratings, and other pertinent
information.
1.2 Transportation Precautions
※
Nameplate
(model number)
※ EL4001 is the
generic designation of the
EL4001 series
computers.
Fig. 1.1 Nameplate Location
(1) In order to safeguard against damage during transit, transport your instrument to the installation
location in the original package used for shipment from the factory if possible.
(2) Use care to avoid impact shocks to the instrument during transit.
1.3 Storage Precautions
If the instrument upon receipt is to be stored for extended periods of time before installation, unexpected
problems could arise. If such is the case, the following considerations should be taken:
(1) The instrument can best be stored in the original package used for transit from the factory.
(2) The place of storage should meet the following requirements:
☆ Free from rain and water
☆ Free from vibration and impact shocks
☆ With minimal temperature and humidity variation (around 25°C and 65% R.H.)
4
Page 5
E-888-5-E
MODEL
EL4001
TB
1
TB
2
TB
1
TB
2
TB
3
PLS OUT3 TEMP IN TEMP IN FLOW IN
0V
+−
B bA
+−
+−+− +−
+
−
SIG SUP
SUP
ANA OUTGND POWER
N
(
−
)
H
(
+
)
PRESS INPLS OUT1
PLS OUT2
1/1
OUT
2. GENERAL
Using the most advanced electronic tehcnologies, this digital instrument has been developed specifically
to meet the most demanding flow measurement applications in petroleum products receiving facilities
where accuracy is the prime requirement.
In response to the liquid flowrate and temperature information arriving from the sensing terminal, such as
a flowmeter, it totalizes the flow while implementing meter error and temperature corrections.
An analog output and instant flowrate (corrected for meter error and temperature) output are additional
provisions.
2.1 Features
(1) Incorporated capabilities to calibrate meter error for viscosity and flow velocity (viscosity correction),
to correct by volumetric conversion factor (temperature correction), and to display the total flow
readings readily permit the application engineer to build a petroleum products measurement system
with this single instrument.
(2) Changing the meter factor, ranges of temperature, or other parameters, of the companion
flowmeter is simple by keystrokes on the front-panel keypad, or by inserting an IC card into the slot.
(3) Built around a microprocessor, the instrument carries out calculations entirely in digital signal
processing circuits to achieve a high degree of accuracy and reliability.
(4) Variables, such as temperature and totals, can be reviewed on command with the front panel
keypad, whether or not calculation is in progress.
(5) Viscosity and density settings are continuously adjustable. Also, by switching the oil kind, the
instrument is compatible with three different kinds of oils.
(6) Remote viscosity and density read/write through the communication link is acceptable.
(7) A nonvolatile memory (E2PROM) retains all parameters and variables. Variables are resettable
following a power cycle or reset if so configured.
2.2 Part Names and Functions
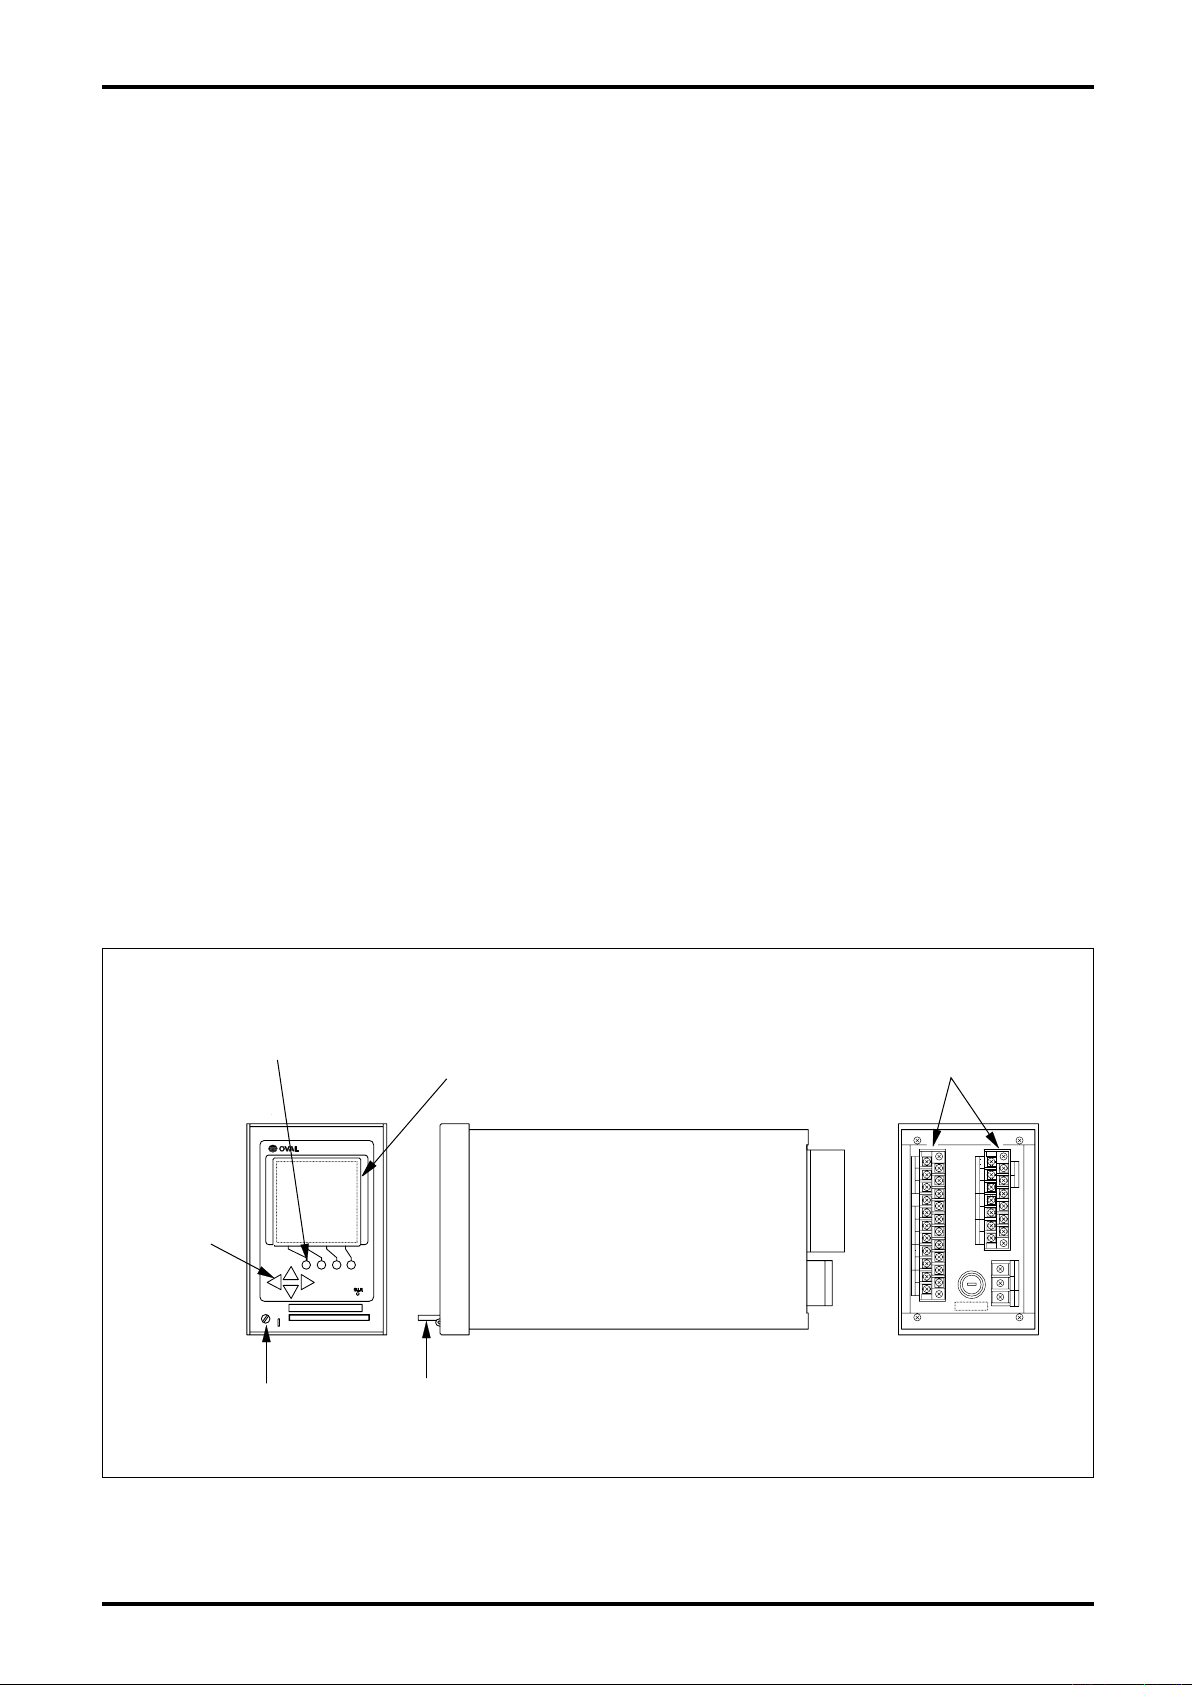
Function Keys
Shift Keys
Seal Screw
Display
IC Card
Fig. 2.1 Part Names
Terminal Blocks
5
Page 6
E-888-5-E
912596
20 232.4
144
136
Min.120
Min.220
92
±0.8
0
+1
138 0
600
1800
450
2200
Optimum
Range
AcceptableRange
Computer
3. INSTALLATION
3.1 Outline Dimensions
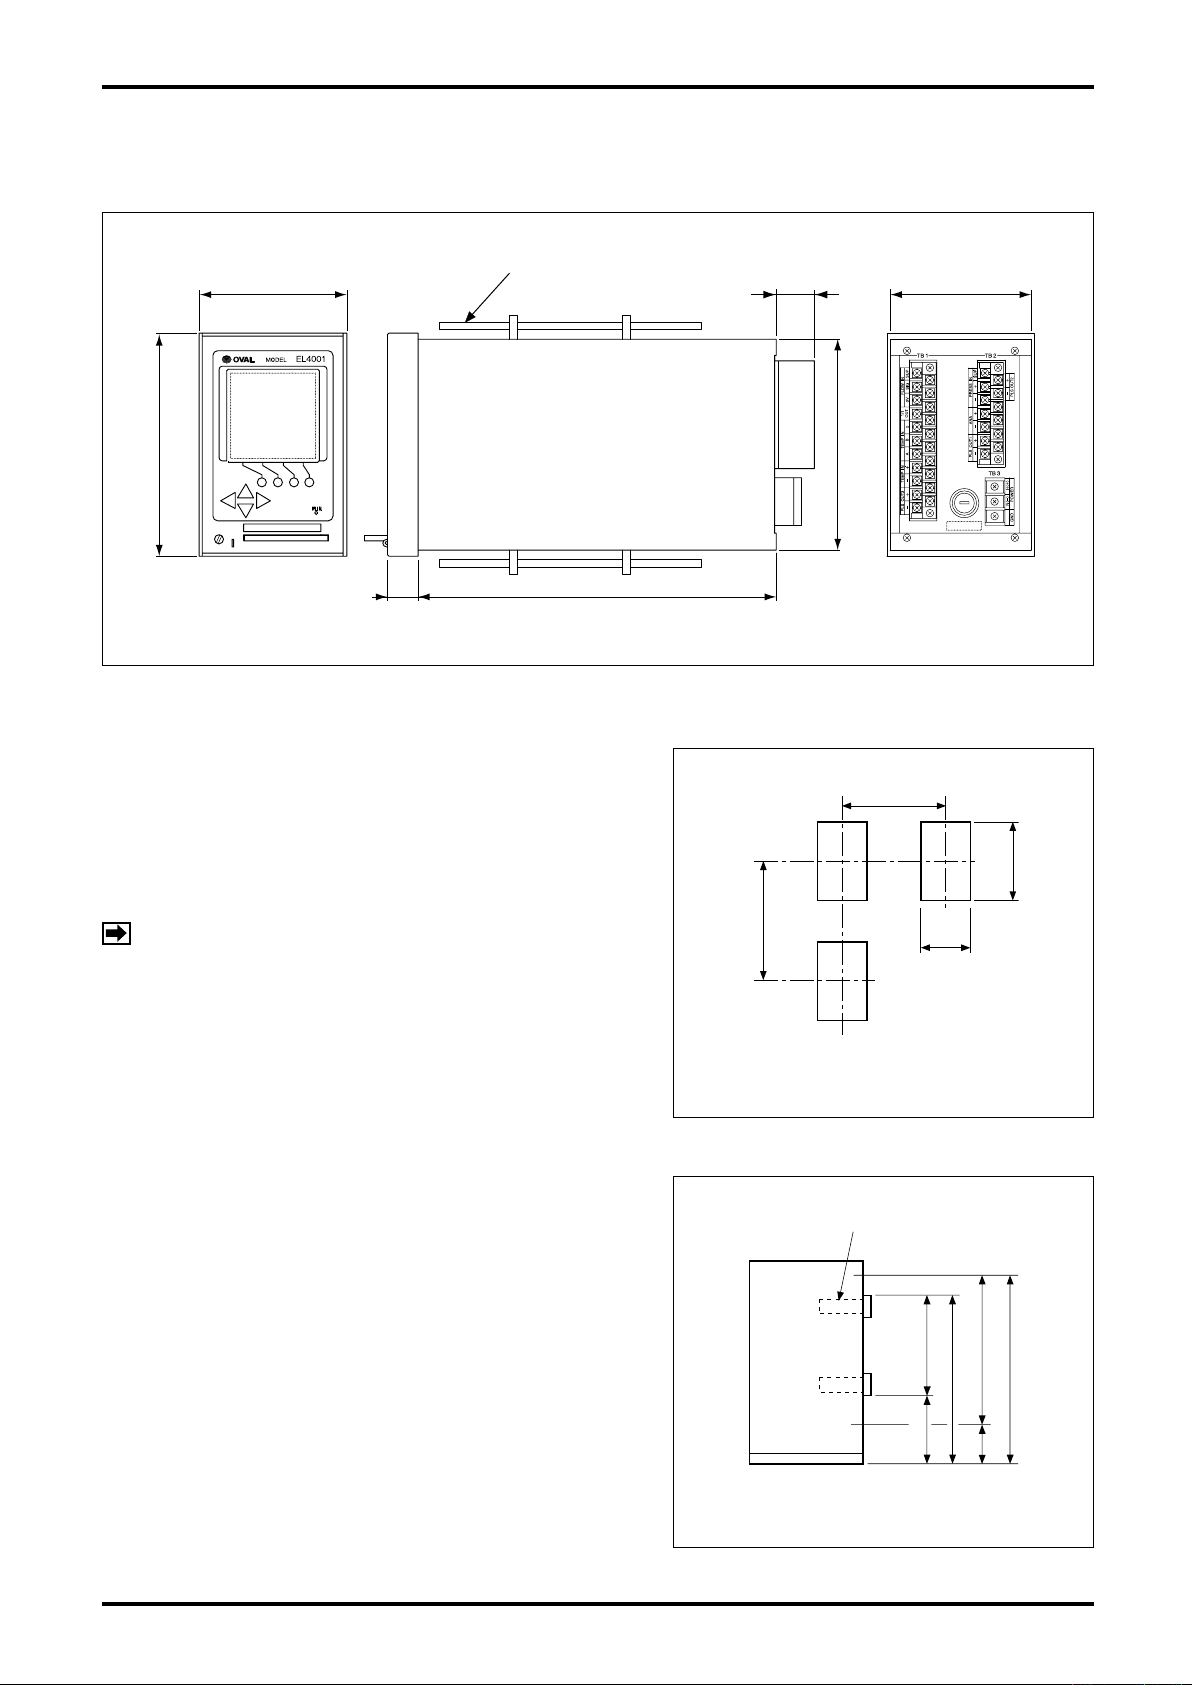
All dimensions in millimeters
Hold-down Fitting
Fig. 3.1 Outline Dimensions
3.2 Installation
3.2.1 Installation Location
Select an installation site where:
(1) Mechanical vibration, shock and corrosive gases are
negligible.
(2) Air is dry and temperature at room temperature and
stable.
NOTE: Although the manufacturer guarantees stated
performance at ambient temperatures up to
+50°C, it is recommended that the instrument
be placed in service at room temperature.
(3) Provide a sufficient working space behind the instru-
ment - at least 50 centimeters from the back panel of
the instrument to facilitate wiring and servicing.
3.2.2 Panel
(1) Use a rigid steel sheet with a minimum thickness of
1.6 millimeters. 3.2mm thick is recommended.
(2) If it is required to install instruments alongside each
other, dimensions in Fig. 3.2 are suggested.
(3) Recommended mounting height is given in Fig. 3.3.
Fig. 3.2 Panel Cut
3.2.3 Installation
(1) Front mount the instrument through the cutout in the
panel.
(2) Fit the furnished enclosure hold-down fittings into the
top and bottom slots in the enclosure and, confirming
that the instrument is positioned horizontal, secure
the instrument to the panel with hold-down fittings
(Fig. 3.1).
6
Fig. 3.3 Instrument Mounting Height
Page 7
E-888-5-E
TB 1
TB 2
1
2
3
TB
3
PLS OUT3 TEMP IN TEMP IN FLOW IN
0V
+−
B bA
+−
+− −+−
+−+− +−
+−
SIG SUP
0V SIG SUP
SUP
ANA OUT
GND POWER
N
(
−
)
H
(
+
)
PRESS INPLS OUT1
COMM1
COMM2
TEMP
PLS OUT2
1/1
OUT
DENSITY IN
4. WIRING
(See the "Wiring Guidelines" in the instruction manual of the companion pulse generator.)
4.1 Field Wiring Cables
(1) Use electrostatically shielded, polyethylene insulated, vinyl sheathed control cables (CEVS, 1.25 to 2
mm, 2-conductor or 3-conductor), or equivalent, for input signal cables from the flowmeter.
For output signal cables, use insulated vinyl sheathed cables (CVV, CVS ... JIS C 3401).
(2) Ground the end of shield wire to "G" terminal of the instrument. At the sensor end, leave the end of
shield wire unconnected.
4.2 Wiring Connections
(1) Field wiring through a conduit is recommended.
NOTE: In routing field wiring, use a separate conduit for power cable from other signal cables to
eliminate the possibility of stray current pickup.
(2) Separate field wiring from other power lines and power circuits to minimize the possibility of inductive
interference.
(3) Using crimp-type lugs for wiring, ensure good electrical connections.
Terminals are found on the back of the instrument (Fig. 4.1).
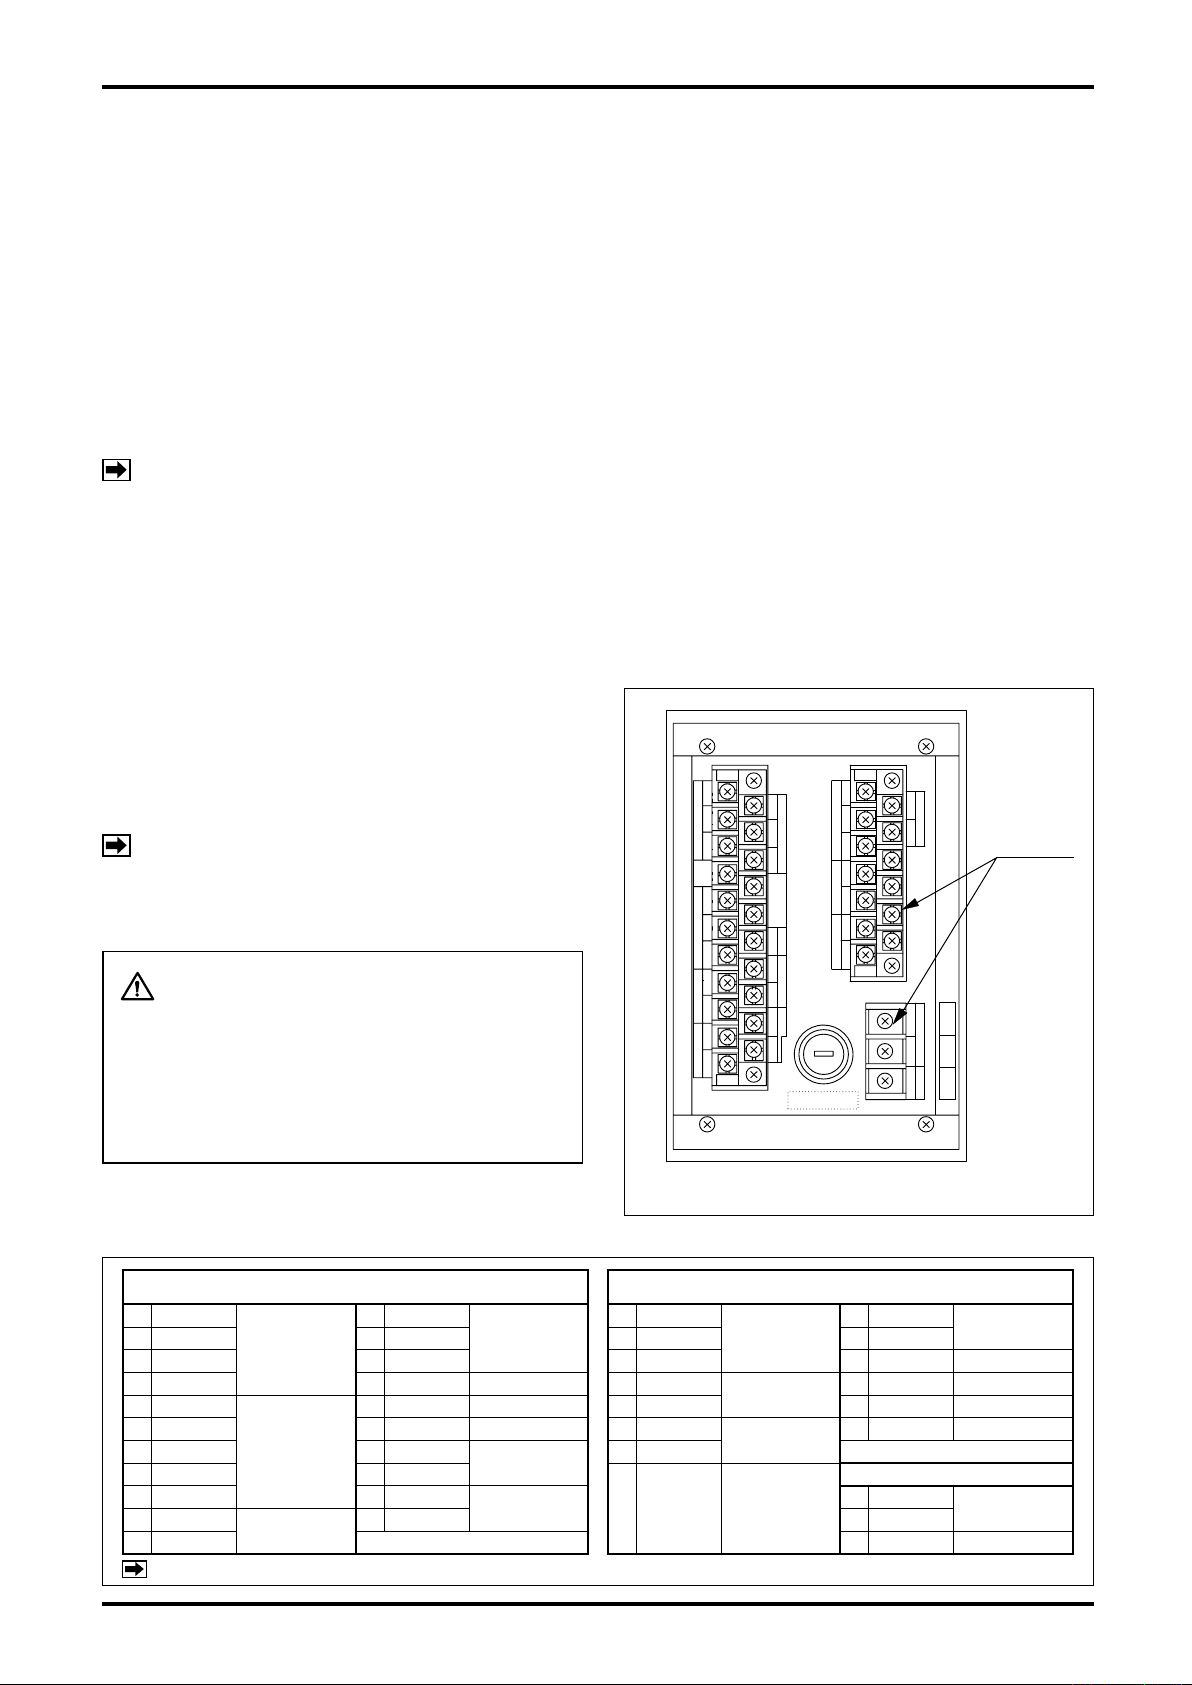
4.3 Description of Terminal Blocks for External Connections
Terminal blocks for external connections (TB1, TB2,
and TB3) are found on the back of the instrument as
shown in Fig. 4.1. Terminal identification appears
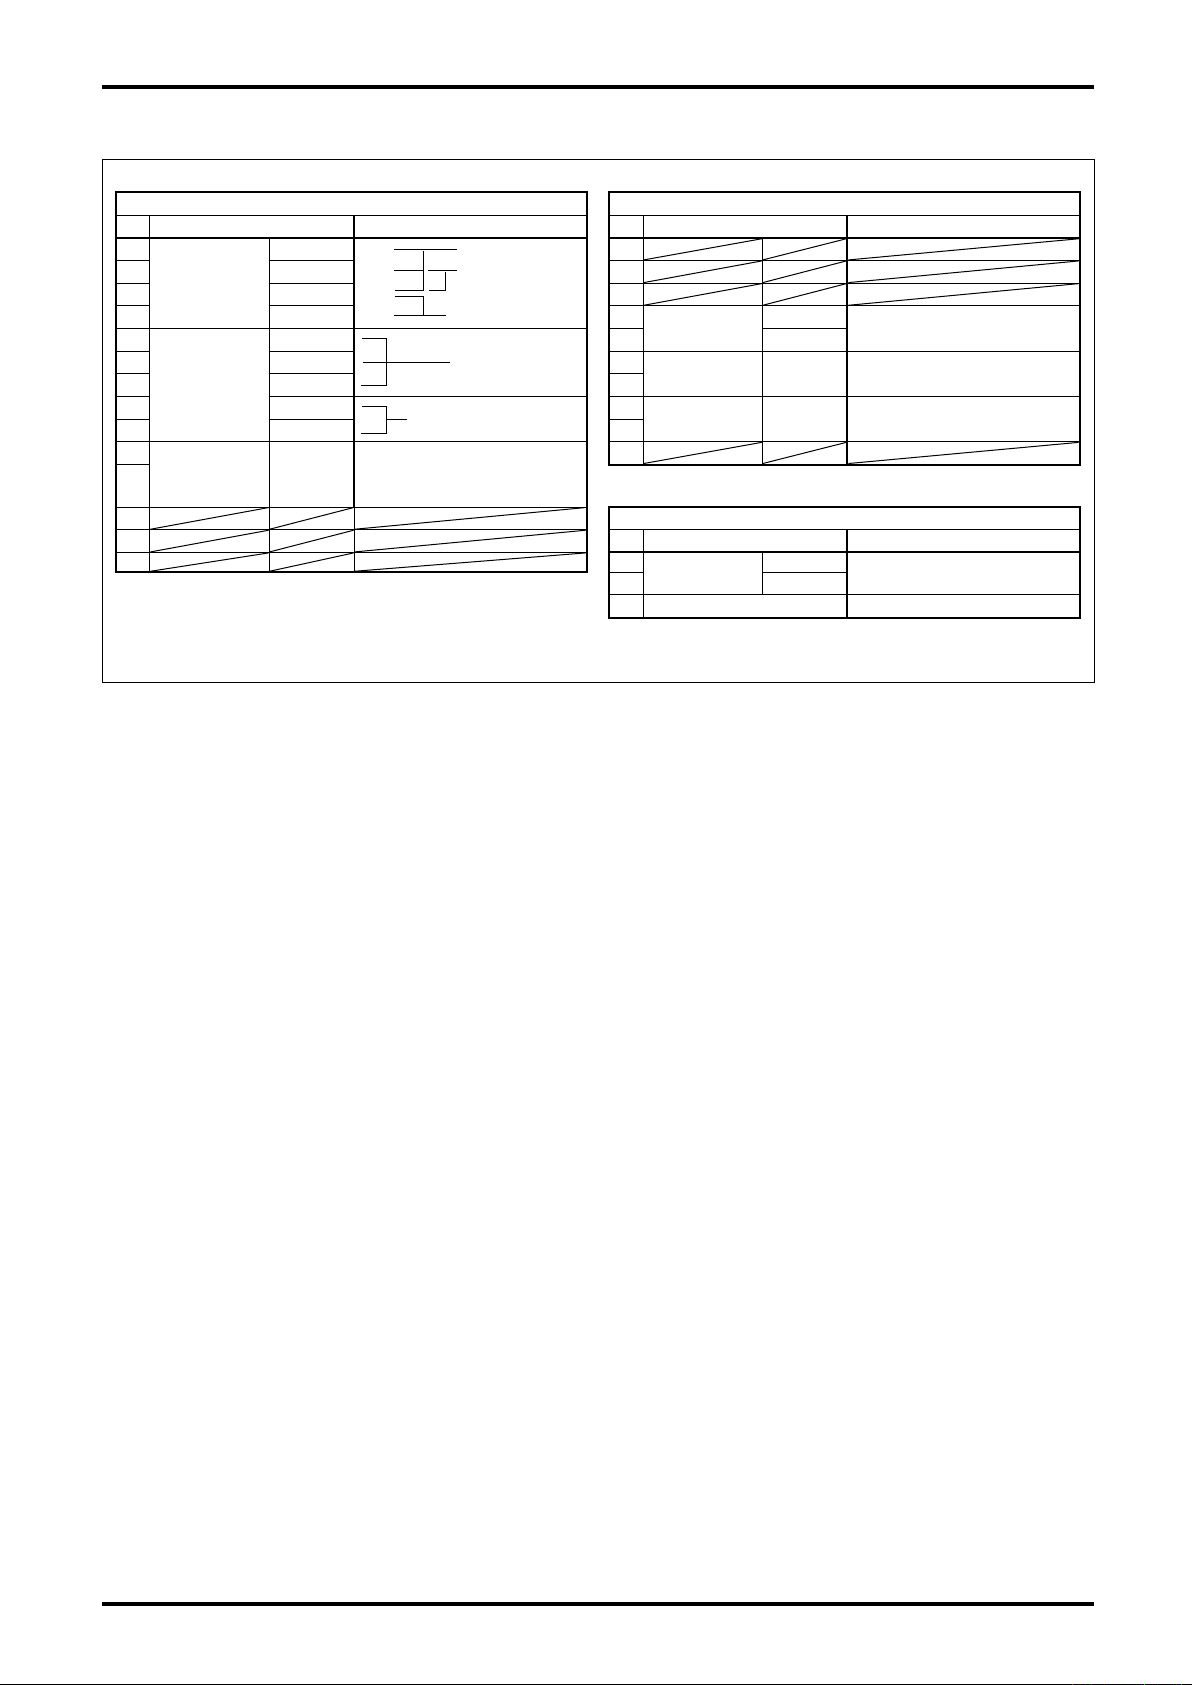
in Table 4.1 while terminal connections appear in
Table 4.2.
NOTE: TB1 and TB2 terminal numbers are
indicated on the side of terminal blocks.
CAUTION
Make wiring connections upon confirmation of the validity of flowmeter (pulse
generator) to receiving instrument combination by their product code number,
instrument number, etc.
Fig. 4.1 Terminal Blocks for Ext. Connections
Table 4.1 Terminal Identification and Functions
Terminal
Screws
(M3.5)
1 SUP.
2 SIG. 13 2 + 9 -
3 0V 14 3 - 10
4 OUT 1/1 15 4 +
5 b
6 B 17 6 +
7 A 18 +
8 + 19 - TB3
9 - 20 +
10 +
11 - 3 GND
NOTE : ※ In case of selecting“Having communication function”
Flow in
Temp. in
Alarm out
TB1 TB2
12 1 SUP.
8 +
Press. in
16 5 - 12
Comm 1
7 -
Analog out
Pulse out 1
11
13
※
Comm 2
21 - 2 N(-)
※
1 H(+)
Pulse out 2
Power
7
Page 8
E-888-5-E
Table 4.2 Terminal Connections
TB1 TB2
No
1
2 SIG. 2
3 0V 3
4 OUT 1/1 4
5
6 B 6
7 A 7
8 + 8
9 - 9
10
Pulse out 3
11
12
13
14
Label Description
SUP. 1
Flow in
(+)
(−)
(+)
b 5
Temp. in
No
polarity
Total flow corrected for
viscosity and temperature
Static relay
3-wire generator
2-wire generator
Output sync with
input signal (O.C.)
Pt100Ω 3-wire
4 to 20mADC/1 to 5VDC
Screws on the terminal block: M3.5
No
10
No
1
2
3
Label Description
Analog out
Pulse out 1
Pulse out 2
Label Description
Power
Ground
+
-
No
polarity
No
polarity
TB3
H(+)
N(-)
Temperature
4 to 20mADC/1 to 5VDC
Uncorrected total flow
Static relay
Total flow corrected for
viscosity Static relay
85 to 264VAC
or 20 to 30VDC
8
Page 9
5. GENERAL SPECIFICATIONS
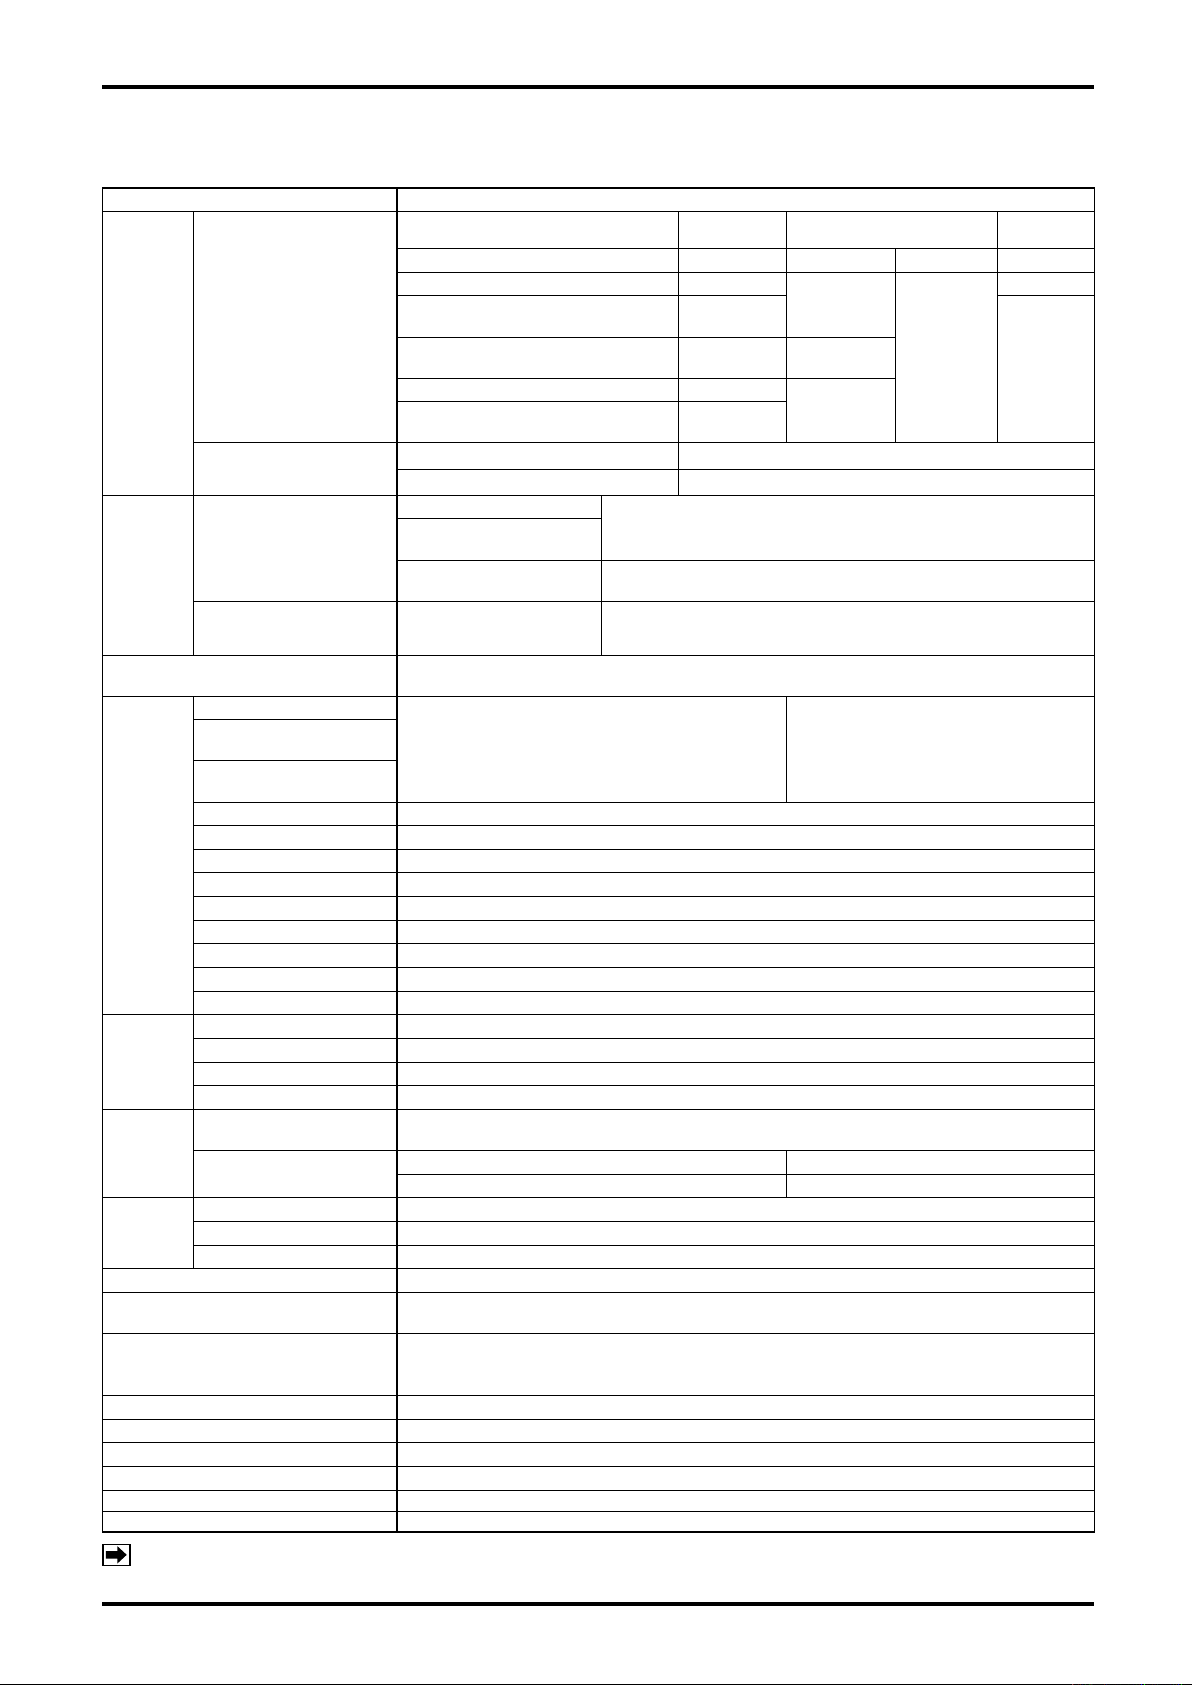
Table 5.1
Item Description
Signal name
8V 2-wire current pulse
Contact closure pulse PG20
2-wire, 12VDC 3-wire
Input
signals
Output
signals
Display type
Menu
items
Correction
range
Flow input
Temperature input
Pulse output
Analog output Temperature output
Uncorr. total flow (Q)
Total flow corr. for
dens. (Qμf)
Total flow corr. for
and temp. (Qμfρ)
Temperature To the 2nd decimal place (when ℃ is selected.)
Set density (ρ) To the 3rd decimal place (when g/cm3 is selected.)
Set viscosity (μ) To the1st decimal place (mPa・s is selected.)
Overall meter error To the 4th decimal place
Vol. conversion factor
Correction factor E1
Correction factor E2
Frequency
Error alarm
Density Crude oil: 0.6105 to 1.0750 Fuel oil: 0.6530 to 1.0750 Lube oil: 0.8000 to 1.1640
Temperature -10 to +118℃ NOTE: Except the range not covered in JIS K 2249-1995.
Ref. temperature 15℃
Viscosity
Computing
accuracy
IC card
Clock IC battery backup Lithium battery (Battery life: 10 years approx.)
Communication
Transmission cable
Power source 85 to 264VAC, 50/60Hz or 20 to 30VDC
Power consumption 20W max.
Ambient temperature -10 to +50°C
Mounting Panel mount
Finish Munsell N1.5
Weight 2.5 kilograms, approx.
Total flow corr. for
viscosity and temp.
Temperature
Type Key card
Capacity SRAM 32K
Battery backup Lithium battery (Battery life: 5 years approx.)
Voltage pulse
24VDC 2-wire
Current pulse (4/20mA)
12VDC 2-wire Current pulse
Open collector pulse
Resist. thermometer
Analog 4 to 20mADC or 1 to 5VDC
Uncorrected total flow
Total flow corr. for
dens.
Output sync with flow
input signal
Display: ST display (128×128 dots), backlighted (※1), (※2)
Information displayed: Data, units, error message simultaneously
Same as output pulse unit (l, etc.) Display capacity: 8 digits
dens.
Static relay Capacity: 230VAC/340VDC 0.2A
Pulse width: 1ms/50ms
Open collector pulse
4 to 20mADC (Max. load resistance 500Ω)
or 1 to 5VDC (Output impedance 250Ω)
Conversion accuracy: ±0.1% of F.S.
To the 4th decimal place (Field labeled measurement unit: Oil kind)
To the 4th decimal place
To the 4th decimal place
To the 4th decimal place
Number of occurring error+error message
0.4 to 199.9cP (mPa・s )
±0.075% or better
Pt 100Ω at 0℃ ±0.3% of span
4 to 20mADC or 1 to 5VDC ±0.1% of span
Interface: RS485 Multipoint (Up to 16 units can be connected.)
Dedicated protocol Baud rate: 4800 bps standard 9600 bps max.
Use 3-conductor shielded cable to the resistance thermometer bulb.
Loop resist. 5Ω max. Example: 300 meters max. with 3-conductor 1.25mm2
cable; 500 meters with 2.0mm2 cable
Pulse
generator
OPTO 01, 02
PG30,
NPG60A (F)
PA14, 15, 25,
NPG60A (E)
PG30S
FlowPet-5G,
NPG60A (E3)
Pt 100Ω at 0℃, 3-wire Rated system, current 2mA
E-888-5-E
Power to generator
8.5VDC 2kHz
13.5VDC
24.0VDC
13.5VDC
Allowable
current
40mA app.
Shortcircuit
protection
circuit
provided
Speed of
response
50Hz
2kHz
NOTES (※1): ST display stands for Super Twisted Nematic display.
(※2): Backlight life (luminance declined to one half its original luminance) : 2500 hours, approx.
9
Page 10

E-888-5-E
6. INTERNAL COMPONENTS AND FUNCTIONS
6.1 Front Panel
6.1.1 Display
The display is a 128 × 128-dot multiple function display capable of showing the data, units of measure,
error messages, and other information at the same time. (The display is backlighted.)
6.1.2 On-Screen Menu Items
The units of measurement vary with configuration. Their selection is made in the SET mode. Available
menu items are:
(1) Uncorrected total flow (TOTAL COUNT(Q))
Incoming flow pulses corrected for viscosity are integrated before correction for temperature, and the
obtained totalized flow is indicated. Resolution, or the minimum unit of measurement, which varies
with customer specifications, is set up with front-panel keys. This unit automatically becomes identical
with the output pulse unit.
While the total flow is retained irrespective of power cycling, it is resettable to zero following a power
cycle if so configured in the SYS mode.
(2) Total flow corrected for viscosity (TOTAL COUNT (Qμf))
The reading corrected for viscosity is integrated and indicated.
(3) Total flow corrected for viscosity and temperature (TOTAL COUNT (Qμfρ))
The reading corrected for viscosity and temperature is integrated and indicated.
(4) Temperature (TEMPERATURE)
The temperature value currently fed to the instrument is indicated to the second decimal place. If a
problem arises in the course of temperature conversion, such as out-of-scale, a default fallback value
is indicated.
(5) Set density (SET DENSITY(ρ))
Density value set up in the SET mode is indicated.
(6) Set viscosity (SET VISCOSITY(μ))
Viscosity value set up in the SET mode is indicated.
(7) Overall error (OVERALL ERROR)
Correction factor to correct for viscosity and temperature is indicated.
[Overall error] = E1×E2
where E1 : Viscosity and flow velocity related meter error correction factor
E2 : Flowmeter body's volumetric expansion (3α) related meter error correction factor
(8) Volumetric conversion factor (VCF)
Volumetric conversion factor which is dependent on input temperature and set density is indicated.
The oil kind currently selected is indicated in the field labeled measurement unit.
(9) Flow velocity and viscosity related meter error correction factor (E1)
Meter error correction factor which are dependent on flow velocity and viscosity is indicated.
(10) 3α correction factor (E2)
Meter error correction factor which is dependent on flowmeter body's volumetric expansion (3α)
is indicated.
(11) Pulse input frequenc (FREQUENCY)
Pulse frequency arriving from the flowmeter is indicated.
NOTE: For more information about setup items and options, see "KEY OPERATION MANUAL".
10
Page 11
E-888-5-E
MO DEL
EL4001
RUN
6.1.3 Error Messages
When an erratic condition arises, an error message automatically appears on the display.
(The information represented by error messages are listed on page 16.)
If two or more concurrent errors are involved, individual messages will be scrolled at intervals of
approximately 3 seconds. When an error condition disappears, an error message automatically goes out
and the normal display is resumed.
NOTE: An error logging function can store a maximum of 20 events each of which consists of year,
month, day, hour and minutes of error occurrence and recovery. (Complete details are
covered in the Key Operation Manual.)
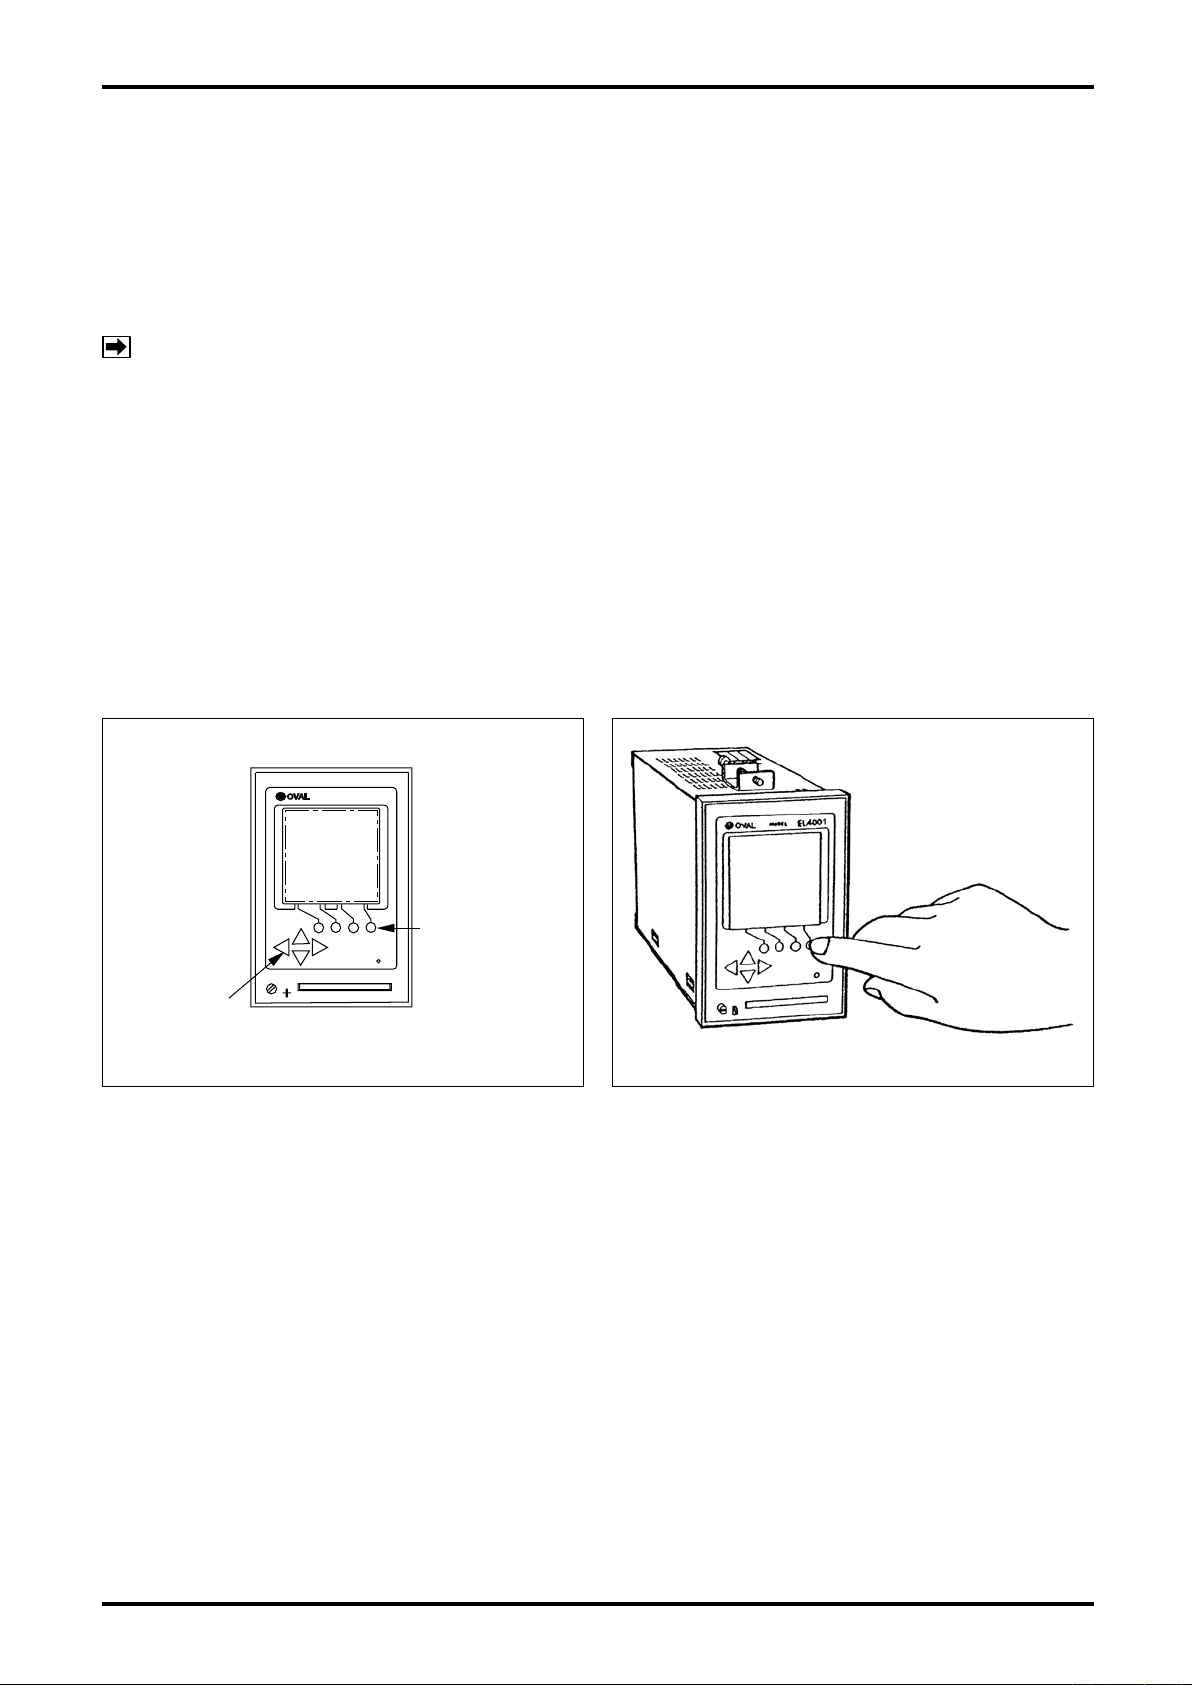
6.1.4 Front Panel Keypad
The eight front panel key switches consist of two kinds of keys - functions keys and shift keys.
・Function keys: Four round keys
Ma inly used for function selection, such as activating the input condition s selected and
reconfiguration.
・Shift keys: Four triangular keys
Used for moving the cursor, moving between menu items, or changing numerical values.
Shift Keys
Function Keys
Fig. 6.1 Front Panel Keys
Fig. 6.2 Touch Key Operation
11
Page 12

E-888-5-E
7. CALCULATION FORMULAS
7.1 Uncorrected Total Flow
Q0 = a × I
p
Q0 :Uncorrected total flow [L]
a :Meter factor[L/P]
Ip :Namber of input pulses
7.2 Flow Velocity and Viscosity Related Meter Error Correction Formula (E1)
No. μ
Flow velocity (Hz)
1 Q
2 Q
1
2
Viscosity
… … … … … …
8 Q
9 Q
If μ1 ≦ Set viscosity μS ≦ μ
E1S = E11 + (E12-E11) +
8
9
2
μ2×(μS-μ1)
μS×(μ2-μ1)
Similarly, factors are determined from E2S to E9S. The same applies to determining factors in the case
μ2 ≦μS ≦ μ3.
Next, from QS, Q1 through Q9 are determined; Qn which is nearest to QS, Q
determined, and the calculation below is performed.
E1 = 1-
{
EnS + (E
(n +1)S-EnS
1
11
E
21
E
81
E
91
E
(QS-Qn)
)×
n + 1-Qn
(Q
)
÷100
}
μ
E
E
E
E
2
12
22
82
92
n + 1
3
μ
13
E
23
E
83
E
93
E
, EnS, and E
nS + 1
are
μ
E
E
E
E
4
1S
2S
8S
9S
7.3
Flowmeter Body's Volumetric Expansion (3α) Related Meter Error Correction Factor (E2)
As factors associated with 3α compensation, the correction type, coefcients α and β, and reference
temperature are set here. If term 2α+βis used in the correction formula, select correction type α ≠ β;
if 3α is your choice, select α = β.
E2 = 1 + (2α+β)×(t-t0)
where t : Reference temperature [℃ ]
t
: Temperature [℃ ]
0
α and β: Thermal expansion coefcients
12
Page 13

E-888-5-E
7.4 Correction Factors in the Implementation of Temperature Correction of Petroleums
Correction factor for implementing calculation of error correction for temperature on petroleum products is
given by the formula
V.C.F = exp [-αTΔt (1.0 + 0.8αTΔt)
αT = K0 / (ρ15)2 + (K1 / ρ15) orαT = A + B / (ρ15)2
where ρt : Density (t℃ ) [kg/m3]
ρ15 : Density (15℃ ) [kg/m3]
αT : Thermal expansion coefcient at 15℃ [℃-1]
Δt : Temperature difference (Δt = t -15) [℃ ]
K0, K1, A and B : Constants (Shown in the table below.)
Constants
1
K
A B
CRUDE
FUEL
LUBE
Sample kind Density (15℃ ) range
Crude oil, natural
gasoline, condensate
Mobilgas
Fuel oil
Kerosene,
industrial gasoline,
aviation turbine fuel oil
Light oil, heavy oil
Petroleum-derived
lubricants
0.6105 to 1.0750 613.9723 0.0 ─ ─
0.6530≦ρ
0.7705≦ρ
0.7880≦ρ
<0.8390
0.8390≦ρ
0.8000 to 1.1640 0.0 0.6278 ─ ─
15
<0.7705
15
<0.7880
15
≦1.0750
0
K
346.4228 0.4338 ─ ─
─ ─ -0.00336312 2680.3206
15
594.5418 0.0 ─ ─
186.9696 0.4862
7.5 Flow Calculation Formula
(1) Total flow corrected for viscosity
Total flow corrected for viscosity is expressed as
Qμf = Q0×E1×E2
where E1 : Meter error correction factor dependent on viscosity and flow velocity
E2 : Meter error correction factor dependent on flowmeter body's volumetric expansion (3α)
Hence, the correction factor for correcting viscosity errors is "E1・E2" (overall meter error).
(2) Total flow corrected for viscosity and temperature
Total flow corrected for viscosity and temperature is expressed as
Qμρ= Q0×E1×E2×V.C.F
where E1 : Meter error correction factor dependent on viscosity and flow velocity
E2 : Meter error correction factor dependent on flowmeter body's volumetric expansion (3α)
V.C.F : Volumetric conversion factor
Hence, the corrected factor for viscosity and temperature correction is "E1・E2・V.C.F".
13
Page 14
E-888-5-E
8. PREPARATIONAL CHECKS AND OPERATION
8.1 Preparation Before Operation
(1) Ensure that the instrument and related equipment are correctly installed and wired with no place left
unfinished.
WARNING: Make sure to see that the power terminals are connected to a power
source of the rated voltage. Applying a power source of incorrect voltage
could ruin your instrument.
(2) Supply power to this instrument and make certain to see that the front panel display is illuminated.
The display will remain unilluminated for one second after power on, which however is by no means
any indication of fault.
8.2 Preparational Checks
CAUTION: Allow a warmup period for 60 minutes or so after you turn on the power.
Verify that the instrument does not operate with no fluid flow.
How to Check
(1) Couple sources of simulated temperature and pressure signals.
(2) Using the shift keys, select menu items and verify the information displayed.
See the KEY OPERATION MANUAL.
(3) Inject a simulated input pulse train or density signal representing the type of the companion pulse
generator.
(4) Select display menu items of the total mass flow and total calorific flow, and make sure that incoming
pulses are being accumulated. Also, verify that pulse output and analog output are properly
generated.
(5) Remove the simulated pulse input and compare the obtained readings on the display with
corresponding theoretical values. Remember that this instrument is not equipped with a counter to
accumulate incoming pulses. Hence, an external counter is required.
8.3 Operation
CAUTION: Allow a warmup period for 60 minutes or so after you turn on the power.
(1) Select your power reset or non-reset (accumulated total) option.
See the KEY OPERATION MANUAL.
(2) Turn on power. While the initial check screen remains displayed, indicating that the process of
verifying parameters and variables is in progress after you turned on the power, your instrument will
not accept any pulse input.
(3) Place your instrument in service operation by allowing the fluid to be metered.
14
Page 15
E-888-5-E
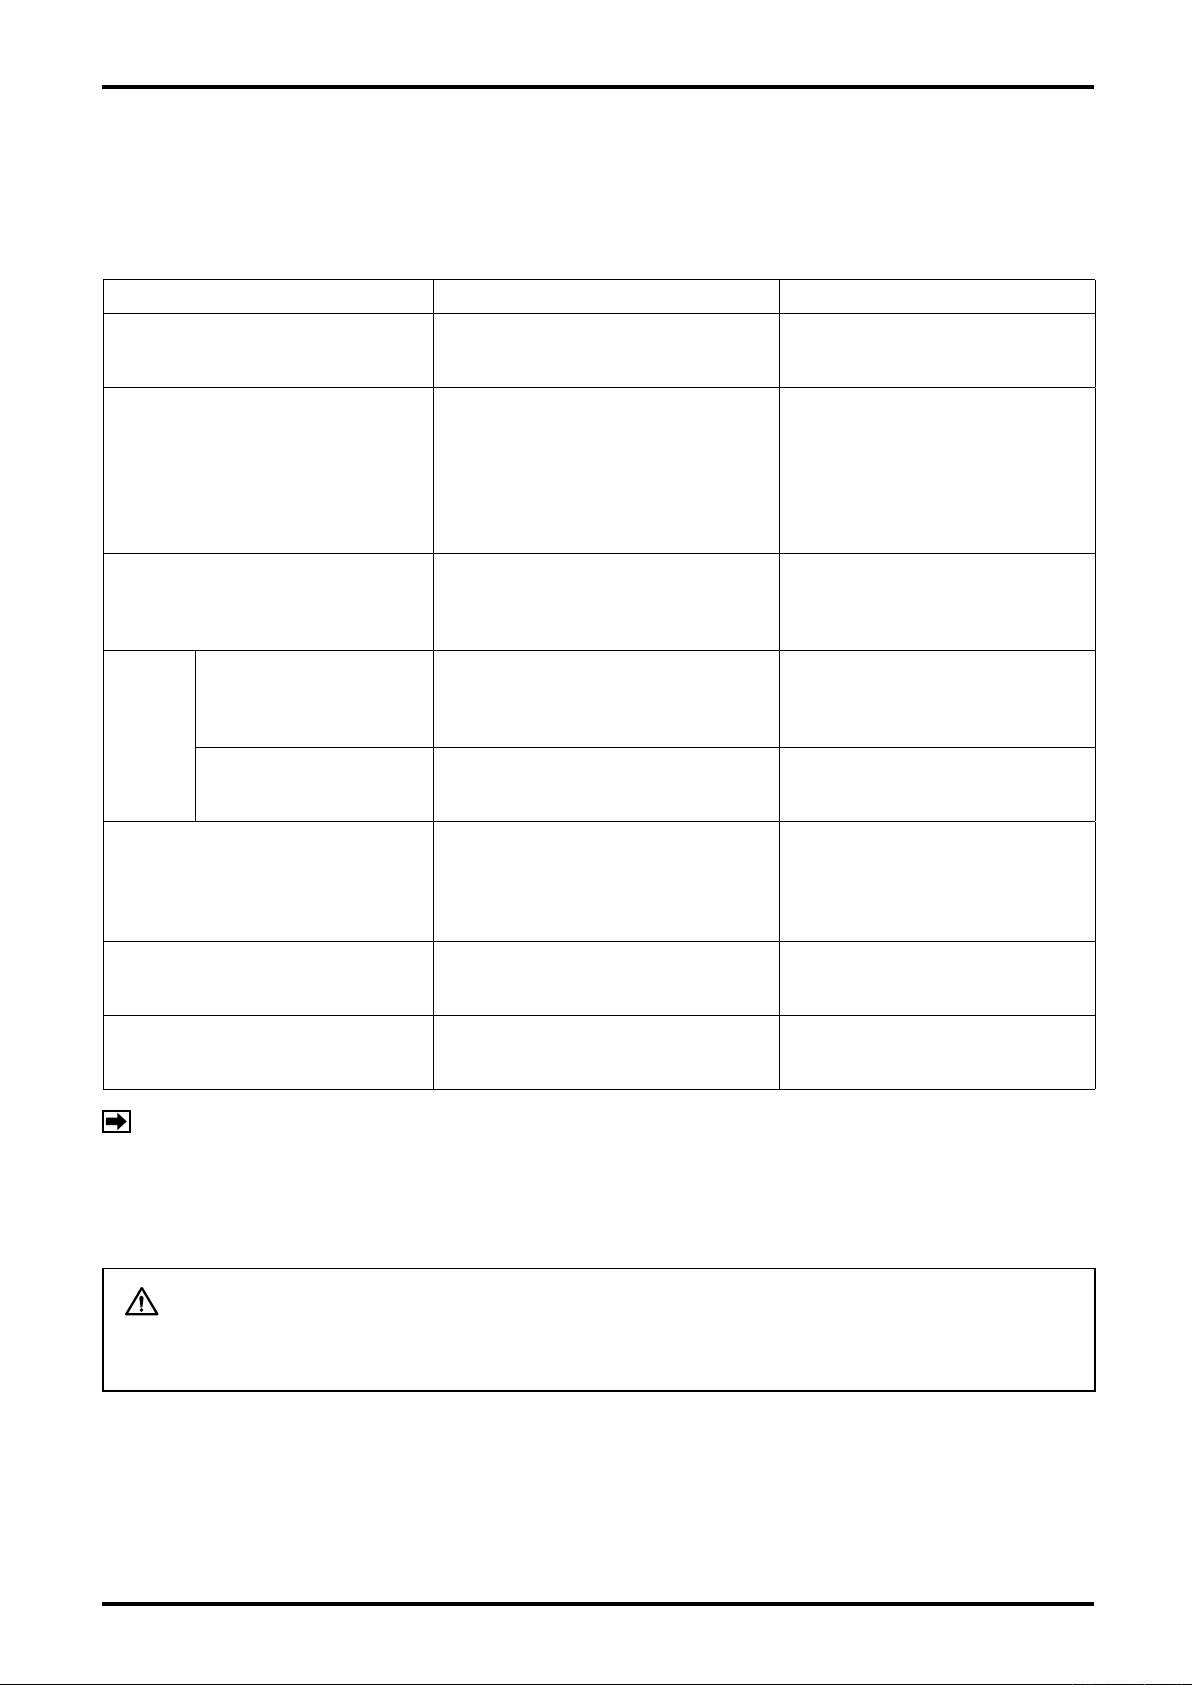
9. TROUBLESHOOTING
Reminder: If internal trouble is suspected, seek our service at the nearest sales office or
customer service representative in your area.
Table 9.1
Symptom Check Possible Causes
Display is dead. 1. Inspect fuse.
2. Make sure of power source voltage.
Faulty temperature indication.
Erratic reading
Error messages
TEMP 1 (PT) OVER
or TEMP 1 (PT) UNDER
or TEMP 1 (ANA) OVER
or TEMP 1 (ANA) UNDER
Faulty indication of meter error
correction factor and/or
temperature correction factor.
Fails to count pulses;
While
fluid is
allowed
to flow.
Error messages
A/D CONVERT ERROR
or DENSITY CONVERT ERROR
or 4mA SCALER 1 UNDER
(Same also with SCALER 2.)
Error message
SCALER 1 OVER
(Same also with SCALERS 2 and 3.)
Display fails to respond to card
insertion (it remains unchanged).
fails to produce a pulse
output.
Faulty total counter
reading.
1. Input signal line correctly wired?
2.
Input signal specifications
matched?
3. System configured correctly?
4. Temperature range set correctly?
1. Viscosity, liquid kind, and density
values set with key cards?
2. Temperature reading correct?
1. Input signal line correctly wired?
2. Pulse signal coming in?
3. Pulse generator specifications
matched?
1. Temperature reading correct?
2. Meter error and Temperature correction factor indications correct?
1. Parameters reconfigured correctly? 1. A fault in internal assembly.
1. Fuse is blown.
2. Line voltage is improper.
3. A fault in internal assembly.
1. Input wiring is incorrect.
2. Thermometer resistance bulb is
open or shorted.
3. Temperature converter is faulty.
4. A fault in internal assembly.
1. Using key cards, set up
viscosity, liquid kind, and
density values. ※
2. A fault in internal assembly.
1. Incorrect input wiring.
2. Pulse generator itself is faulty.
3. A fault in internal assembly.
1. Pulse generator itself is faulty.
2. A fault in internal assembly.
1. A fault in internal assembly.
1. Data in the card is lost.
2. Battery in the card has run out.
3. Card is defective.
NOTE : ※ Whenever meter error correction settings which are dependent on fluid velocity and
viscosity are modified, do not fail to set up liquid kind, viscosity, and density, using key
cards, following the modification.
Unless setting up using key cards is done as described above, your reconfiguration will not
be finalized.
CAUTION: Once any printed circuit board(s) of the internal assembly has been
removed for servicing, do not fail to reestablish all parameters in the
SET mode.
15
Page 16
E-888-5-E
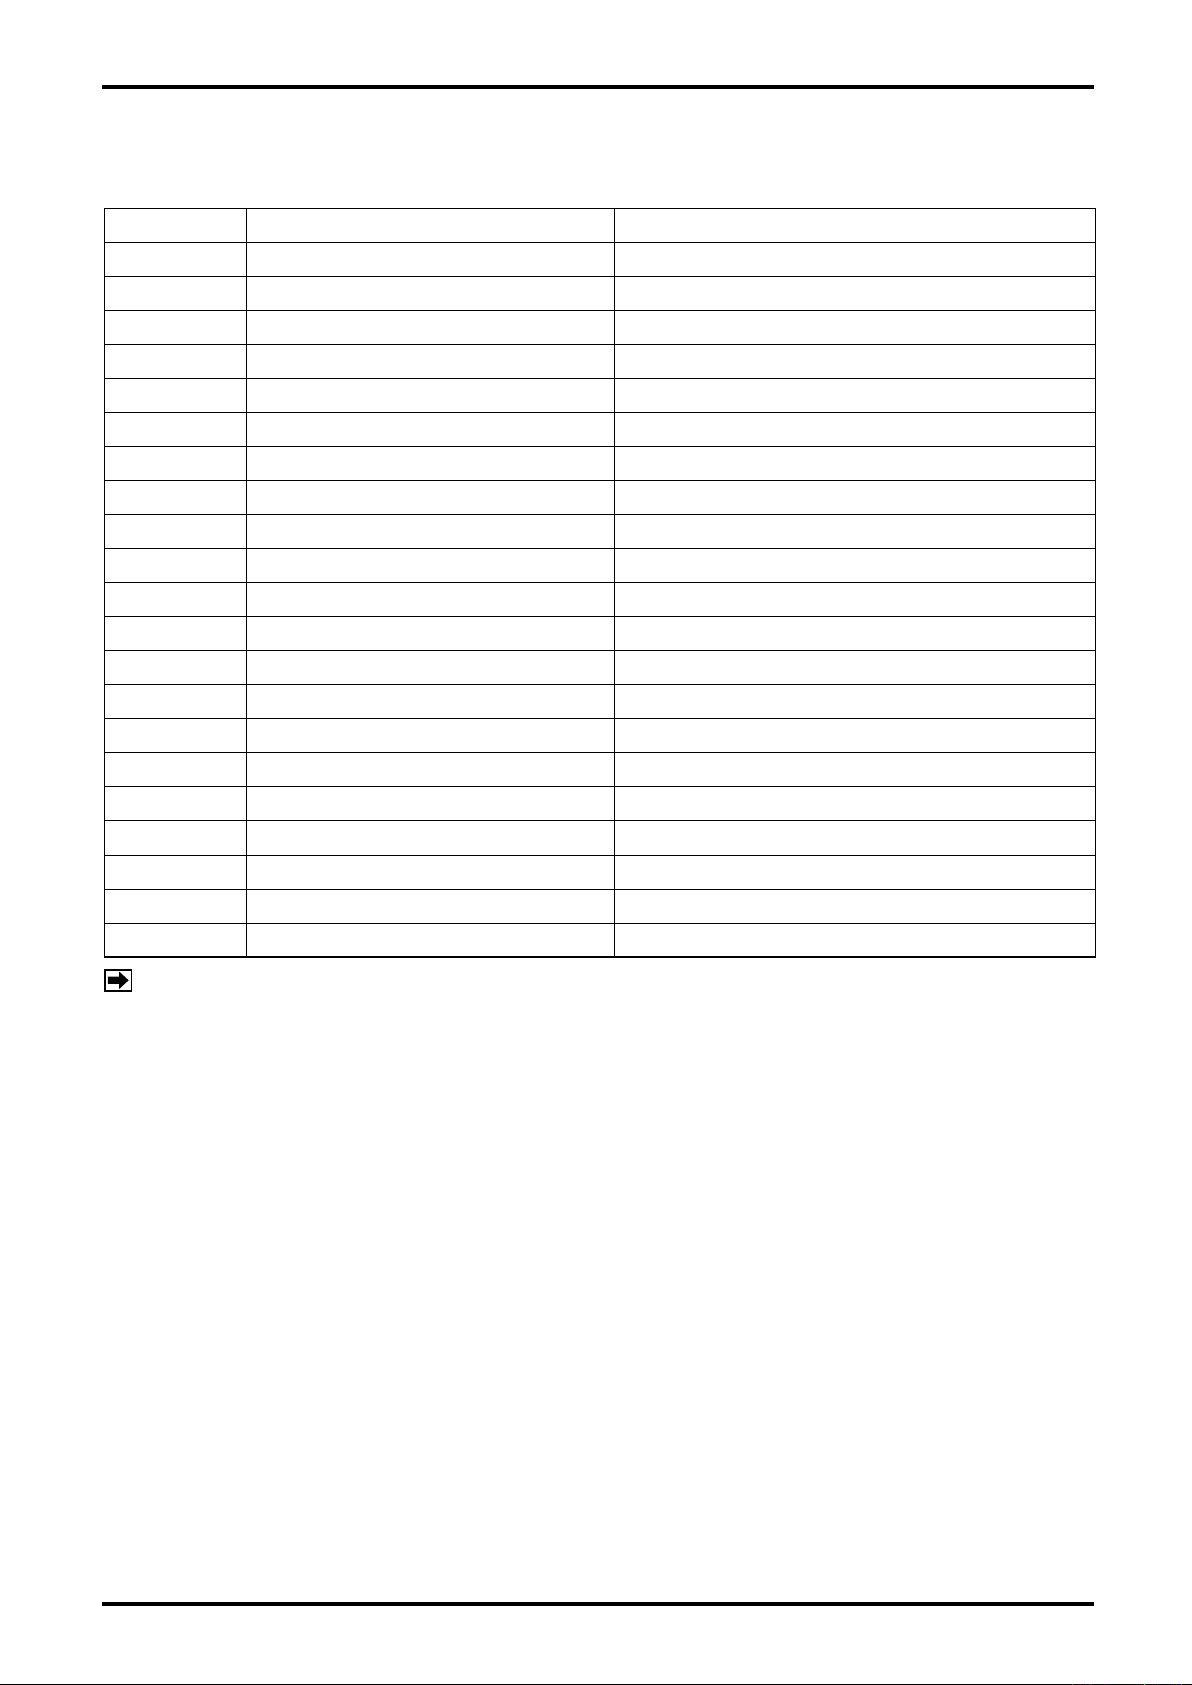
10. ERROR MESSAGES
Table 10.1 List of Error Messages
No. Error Message Description
1 ADJUST DATA ERROR Adjusted allowable range check error
12 A/D CONVERT ERROR A/D converter circuit error
13 DENSITY CONVERT ERROR Density converter circuit error
14 TEMP 1. (PT) OVER Temperature Pt input 1 overflow
15 TENP 1. (PT) UNDER Temperature Pt input 1 underflow
16 TEMP 2. (PT) OVER Temperature Pt input 2 overflow
17 TEMP 2. (PT) UNDER Temperature Pt input 2 underflow
18 TEMP 1. (ANA) OVER Analog temperature input 1 overflow
19 TEMP 1. (ANA) UNDER Analog temperature input 1 underflow
20 TEMP 2. (ANA) OVER Analog temperature input 2 overflow
21 TEMP 2. (ANA) UNDER Analog temperature input 2 underflow
22 PRESS 1. OVER Analog pressure input 1 overflow
23 PRESS 1. UNDER Analog pressure input 1 underflow
24 PRESS 2. OVER Analog pressure input 2 overflow
25 PRESS 2. UNDER Analog pressure input 2 underflow
26 DENSITY OVER Density input overflow
27 DENSITY UNDER Density input underflow
28 4mA SCALER 1 UNDER Analog output 1 underflow
29 20mA SCALER 1 OVER Analog output 1 overflow
30 4mA SCALER 2 UNDER Analog output 2 underflow
31 20mA SCALER 2 OVER Analog output 2 overflow
NOTE: Depending on the model in service, some of the messages are not shown.
11. BEHAVIOR IN ERRATIC CONDITIONS
(1) Erratic A/D Converter
If, following energization of A/D converter circuit, the conversion process is not completed within the
specified time period, it is found that the circuit has a problem. At this point, temperature and pressure
fallback values are used for calculation.
(2) Temperature and Pressure Input Out of Range
If the input exceeds the high limit or falls below the low limit, its default fallback value is used for
calculation.
(3) Analog Output Overflow
A full scale output is produced across the analog output terminals.
16
Page 17
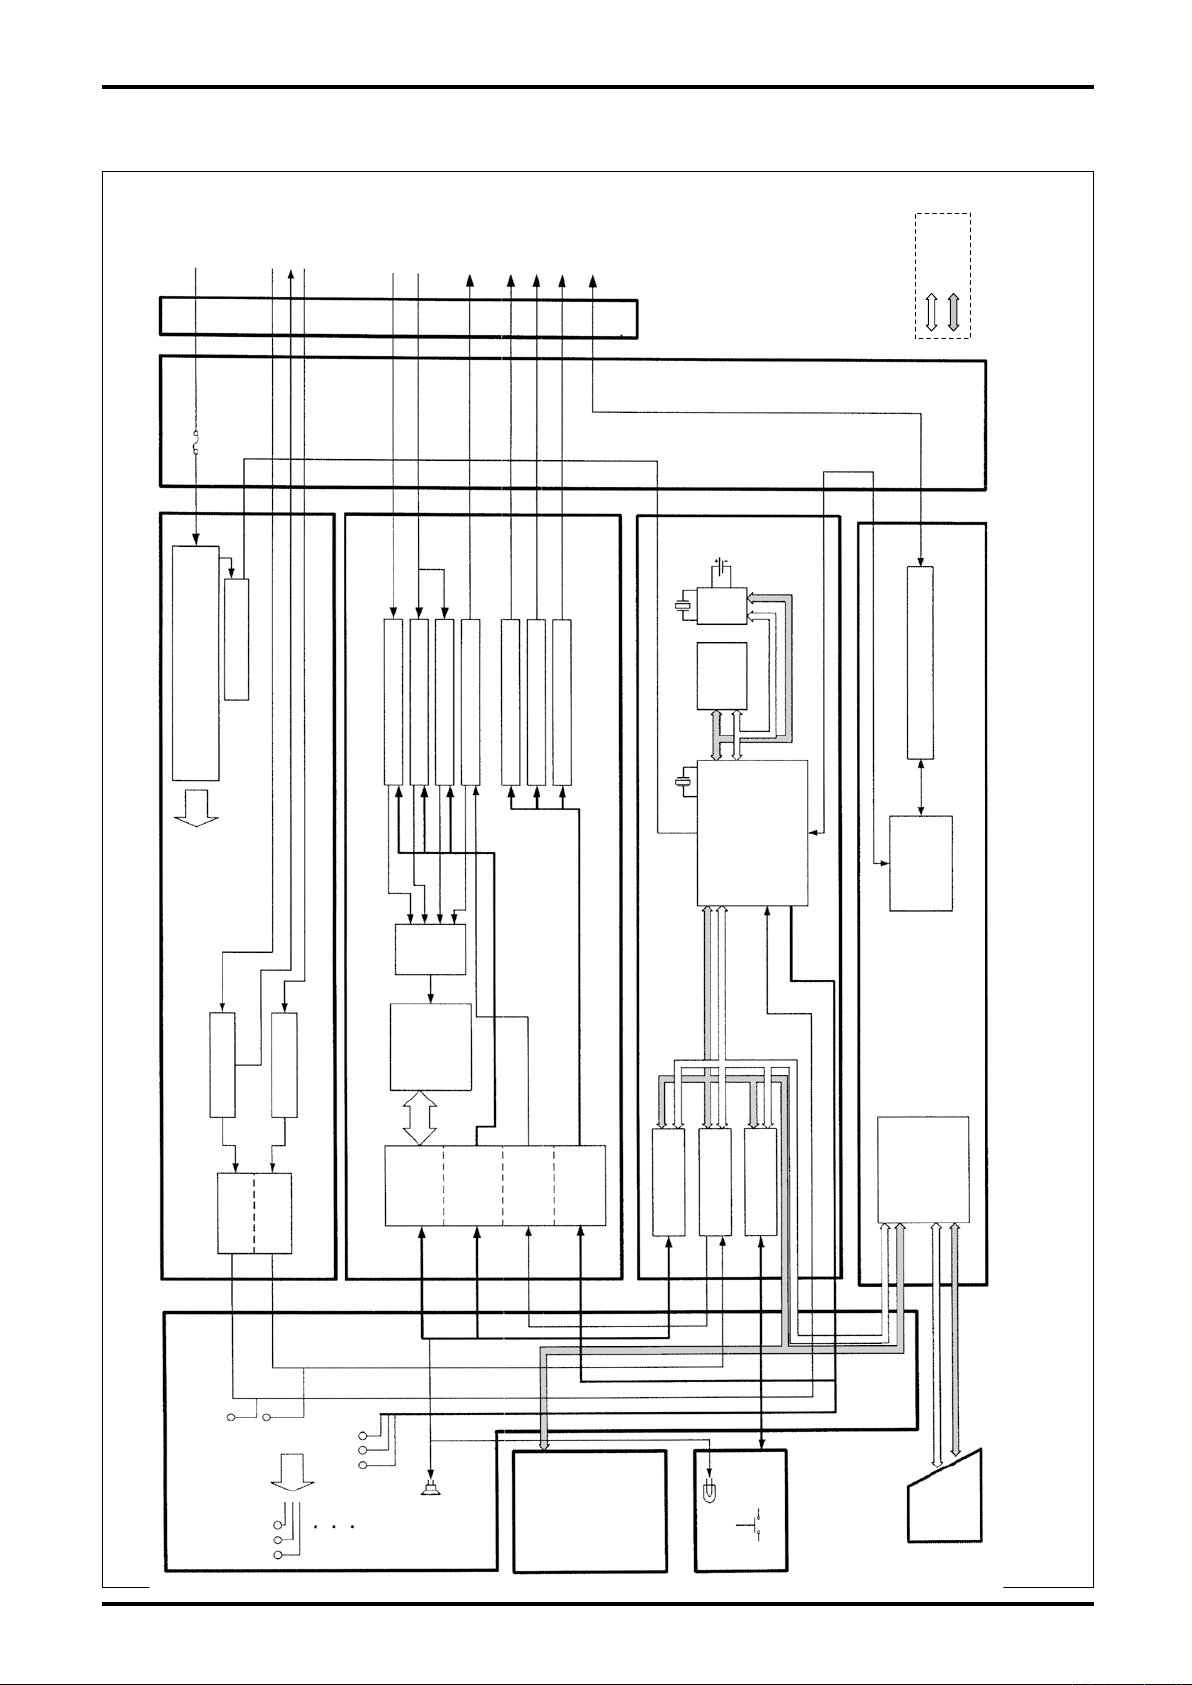
12. OVERALL BLOCK DIAGRAM
Power
Flowinput
1/1output
Densityinput
Press.input
Temp.input
Analogoutput
Pulseoutput1
Pulseoutput2
Pulseoutput3
Comport
Terminal
Block
Addresspath
Datapath
PowerBoard
InterfaceBoardCommunicationBoard
CPUBoard
I/OBoard
PowerUnit
Internal
Power
FlowInputCkt.
Dens.InputCkt.
A/D
Converter
Press.InputCkt.(analog)
Temp.InputCkt.(analog)
Temp.InputCkt.(Pt)
AnalogOutputCircuit
PulseOutputCircuit1
PulseOutputCircuit2
PulseOutputCircuit3
Multi
plexer
Isolation
TestPins
TestPins
Internal
Volt.
Buzzer
Motherboard
Keyboard
ICCard
128×128dots
STDisplay
RUN
×8keys
Isolation
Isolation
Isolation
Isolation
ParallelI/O
TimerCounter
ParallelI/O
CPU
20MHz
Memory
RS485
Isolation
ICCard
Interface
Circuit
32.768kHz
RealTime
Clock
Lithium
Battery
Isolation
PowerDetect
Fuse
E-888-5-E
Fig. 12.1 Overall Block Diagram
17
Page 18
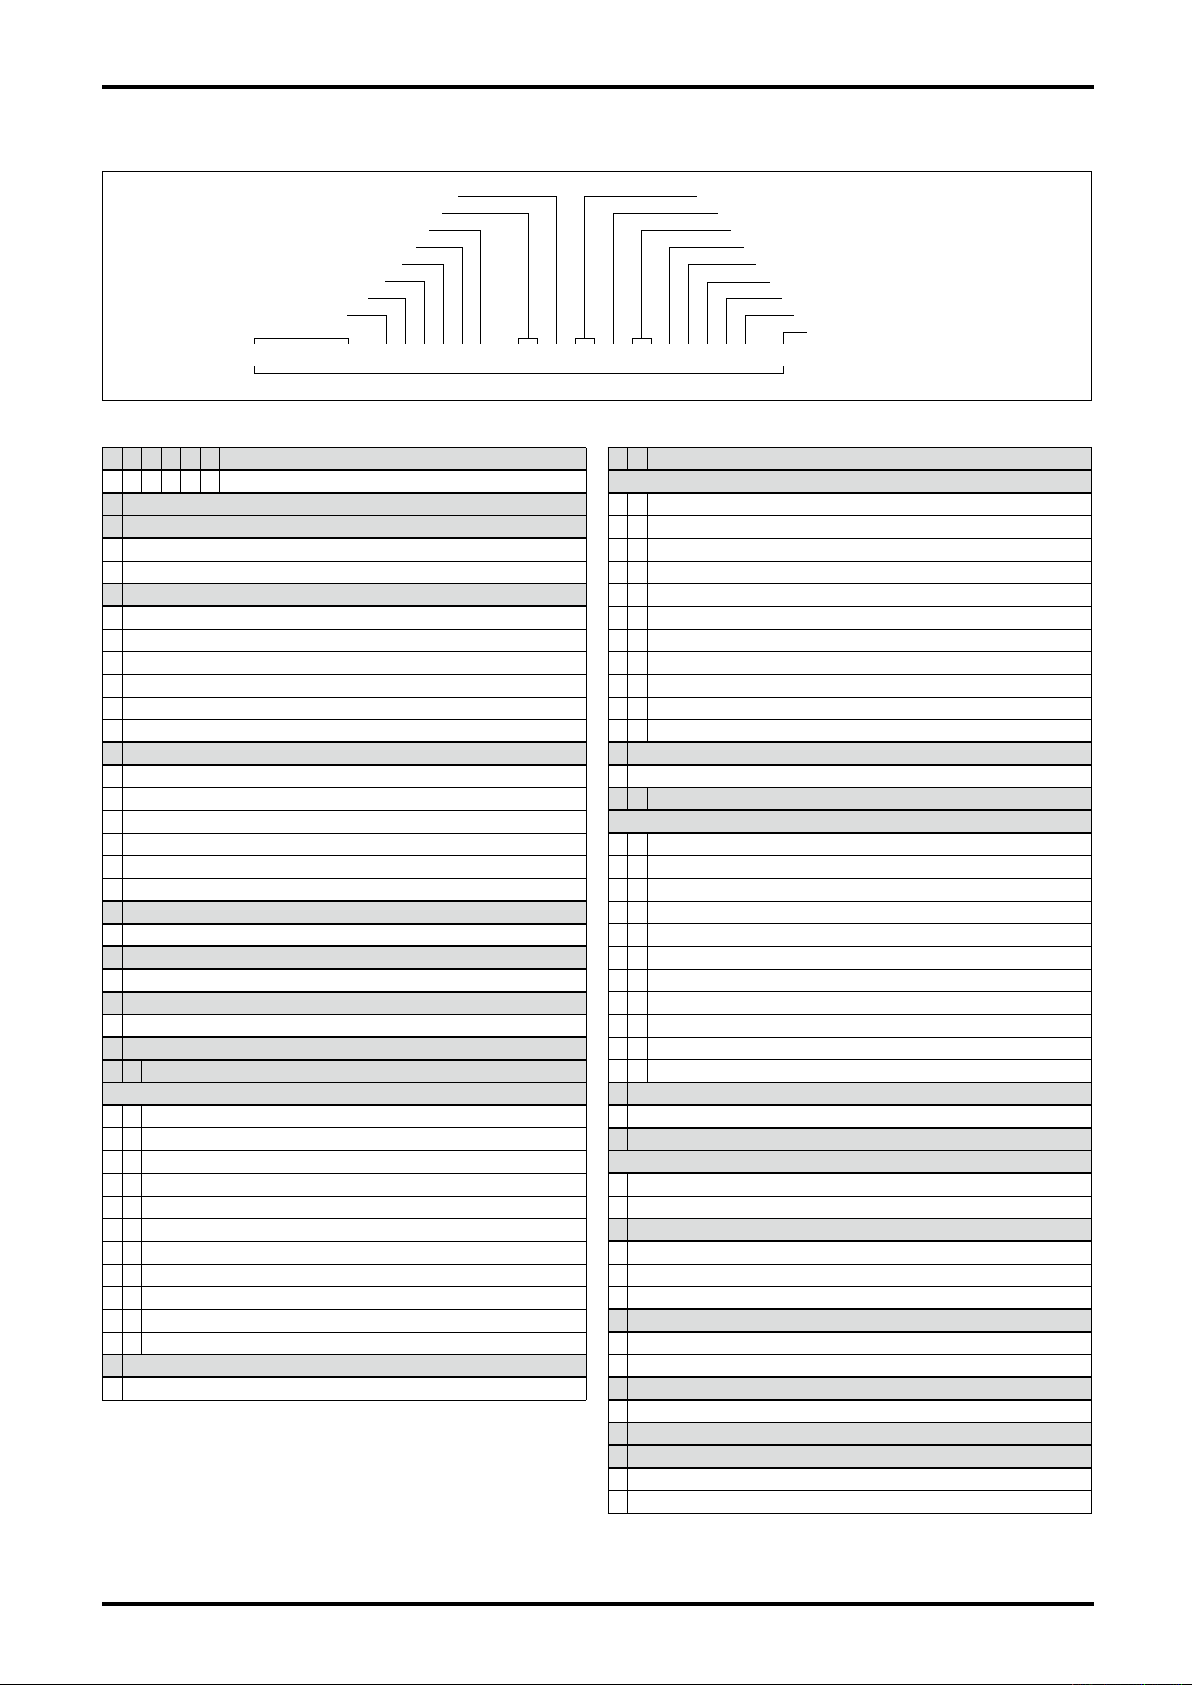
E-888-5-E
⑧−⑥⑤④③②① ⑯⑮−⑪⑩⑨ ⑰ ㉒㉑⑳ ㉔㉓ ㉕⑲⑱
Model
Input pulse signal
Power supply
Output item 1 affix code
Output item 3 affix code
Analog output hard
Output item 4
Version code
Communication function
Characteristic
Output item 2 affix code
Output item 2
Output item 3
Output item 1
Temp. input
Others
Density input
Pressure input
Main code
/ // Additional code
− ㉙㉗㉖⑫ ⑬
13. PRODUCT CODE EXPLANATION
●
Main code
① ② ③ ④ ⑤ ⑥
E L 4 5 0 1 Flow computer for multi temp. compensation for liquid
⑦
⑧
D 20 to 30VDC
J 85 to 264VAC 50/60Hz
⑨ Input pulse signal
B Voltage pulse 12V 2 wires / 3 wires
C Current pulse 12VDC (PG30S)
D Current pulse 24VDC (4/20mA)
G Open collector pulse 12VDC 2 wires / 3 wires
K Contact pulse 12VDC 2 wires / 3 wires
Z Special
⑩
N Non
B 1 to 5V
E 4 to 20mA
F Pt100Ω
G JPt100Ω
Z Special
⑪
N
⑫
N
⑬
N
⑭
⑮ ⑯
Pulse output 1
B 1 Before correction/pulse width 1ms
B 5 Before correction/pulse width 50ms
B 9 Before correction/special pulse width
V 1 After viscosity correction/pulse width 1ms
V 5 After viscosity correction/pulse width 50ms
V 9 After viscosity correction/special pulse width
T 1 After viscosity temp. correction/pulse width 1ms
T 5 After viscosity temp. correction/pulse width 50ms
T 9 After viscosity temp. correction/special pulse width
A L Alarm output
Z Z Special
⑰
N Non
18
Model
—
Power supply
Temp. input
Pressure input
Non
Density input
Non
Others
Non
—
Output item 1
Output item 1 affix code
Output item 2
⑱ ⑲
Pulse output 2
B 1 Before correction/pulse width 1ms
B 5 Before correction/pulse width 50ms
B 9 Before correction/special pulse width
V 1 After viscosity correction/pulse width 1ms
V 5 After viscosity correction/pulse width 50ms
V 9 After viscosity correction/special pulse width
T 1 After viscosity temp. correction/pulse width 1ms
T 5 After viscosity temp. correction/pulse width 50ms
T 9 After viscosity temp. correction/special pulse width
A L Alarm output
Z Z Special
Output item 2 affix code
⑳
N Non
Output item 3
Pulse output 3
B 1 Before correction/pulse width 1ms
B 5 Before correction/pulse width 50ms
B 9 Before correction/special pulse width
V 1 After viscosity correction/pulse width 1ms
V 5 After viscosity correction/pulse width 50ms
V 9 After viscosity correction/special pulse width
T 1 After viscosity temp. correction/pulse width 1ms
T 5 After viscosity temp. correction/pulse width 50ms
T 9 After viscosity temp. correction/special pulse width
A L Alarm output
Z Z Special
Output item 3 affix code
N Non
Output item 4
Analog output assignment
T Temperature
Z Special
Analog output hard
2 1 to 5V
5 4 to 20mA
Z Special
Communication function
N Non
R RS-485
Version code
A Version code: A
—
Characteristic
0 Standard
Z Special
Page 19
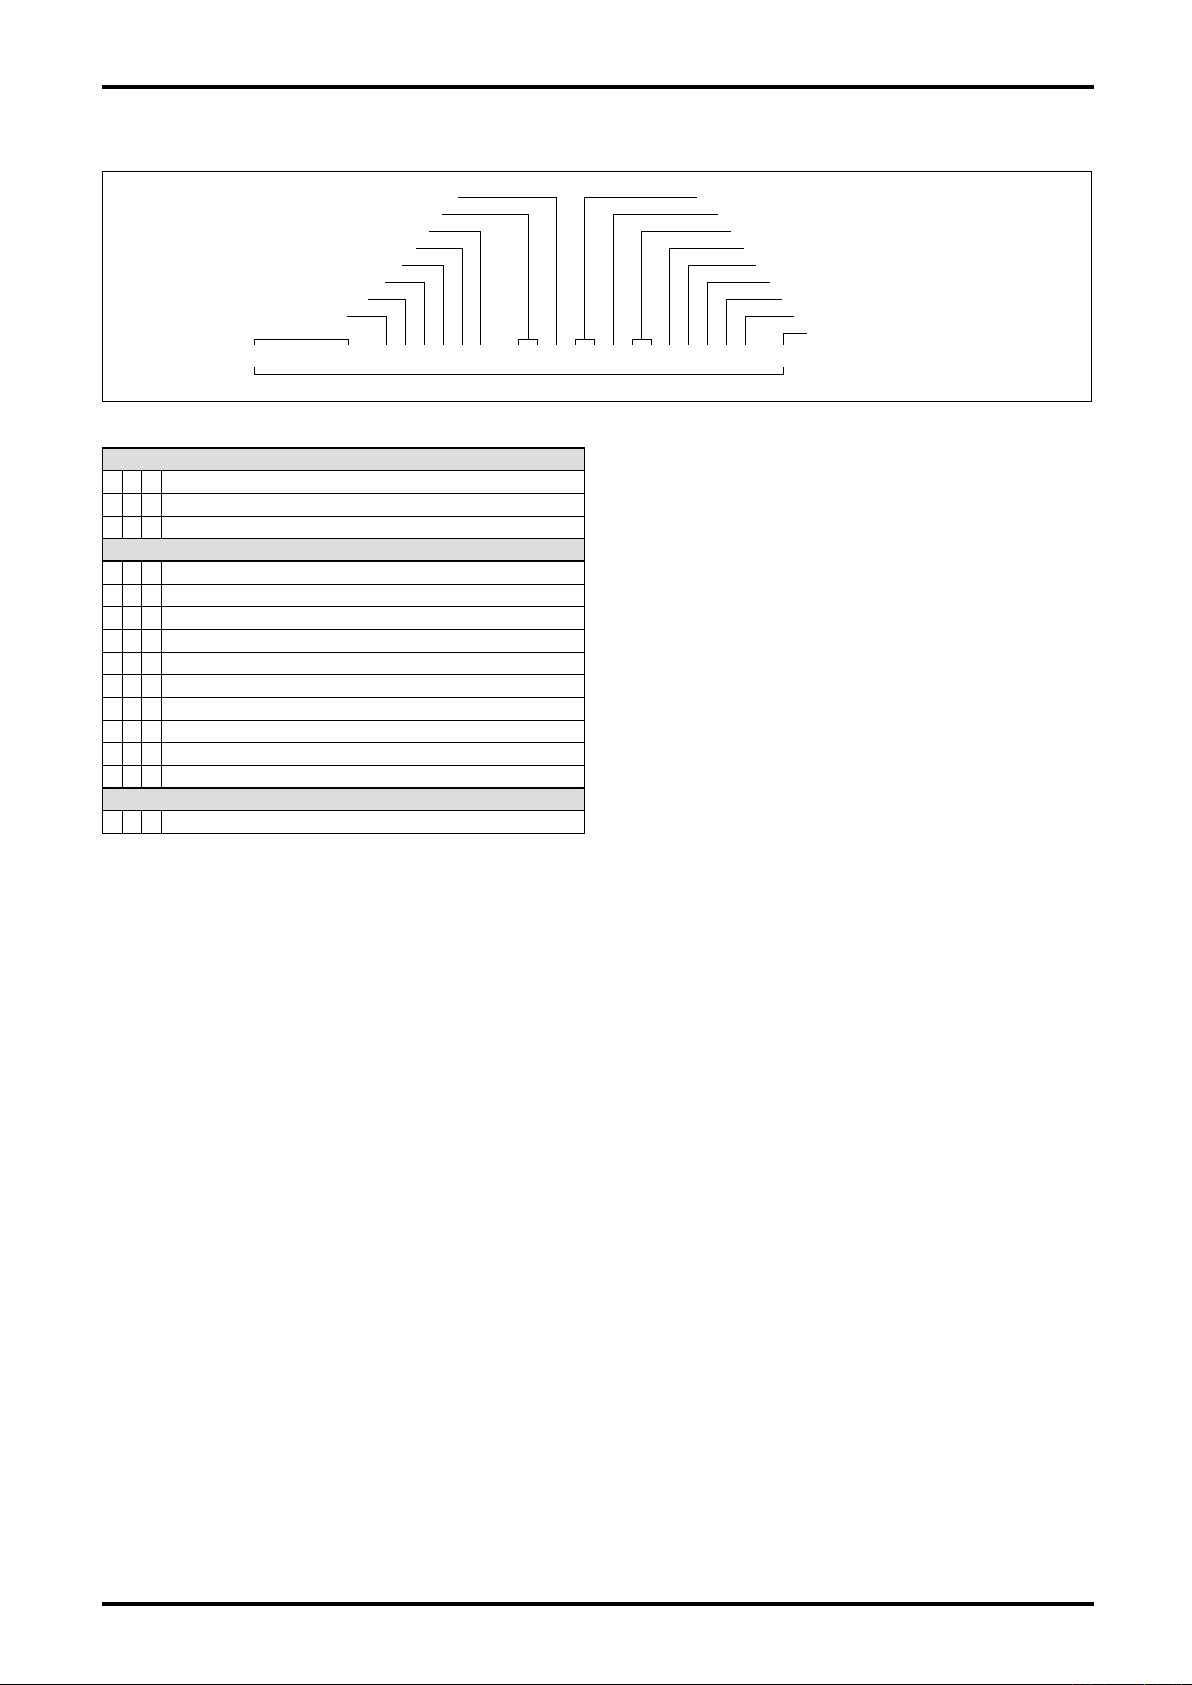
●
⑧−⑥⑤④③②① ⑯⑮−⑪⑩⑨ ⑰ ㉒㉑⑳ ㉔㉓ ㉕⑲⑱
Model
Input pulse signal
Power supply
Output item 1 affix code
Output item 3 affix code
Analog output hard
Output item 4
Version code
Communication function
Characteristic
Output item 2 affix code
Output item 2
Output item 3
Output item 1
Temp. input
Others
Density input
Pressure input
Main code
/ // Additional code
− ㉙㉗㉖⑫ ⑬
Additional code
Special test (instrumental error)
A 1 0 Taxed custody transfer
A 2 0 By certied measurer
A 3 0 Taxed alcohol
Document
D S J DWG and specications for approval (Japanese)
D S E DWG and specications for approval (English)
D R 0 Re-submission of DWG with specications
D C J Final DWG (Japanese)
D C E Final DWG (English)
D W J Wiring diagram (Japanese)
D W E Wiring diagram (English)
D T J Inspection procedure (Japanese)
D T E Inspection procedure (English)
C B J Inspection certicate: B set Only Japanese
Customer witness inspection
V 1 0 Required
E-888-5-E
19
Page 20
E-888-5-E
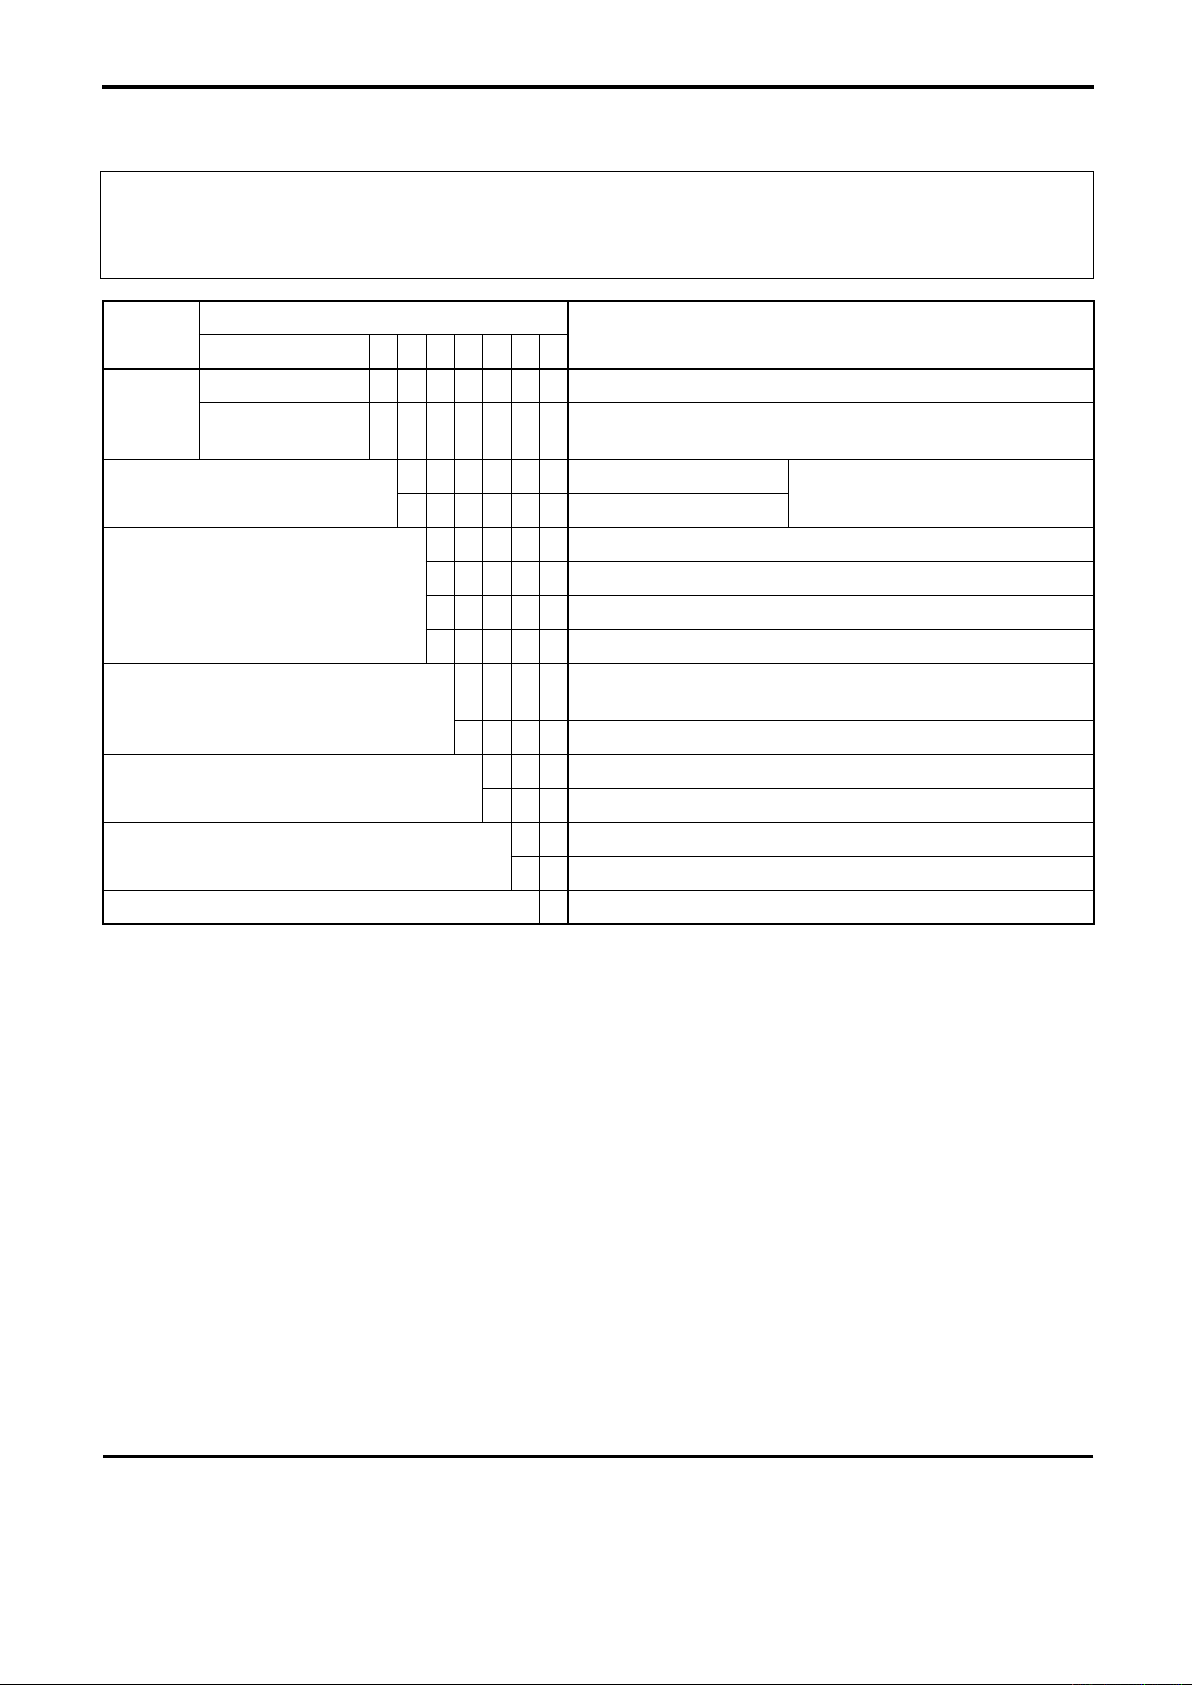
PRODUCT CODE EXPLANATIONOF THE OLD PRODUCT CODE
〈
ThenewproductcodehasbeenimplementedsinceApril2017.
Therefore,theproductcodeexplanationoftheoldproductcodewillnotbeupdatedafterApril2017.
ContactOVALifyouwishtoorderwiththeoldproductcodeforreasonssuchastypeapproval.
〉
Item
① ② ③ ④ ⑤ ⑥ − ⑦ ⑧ ⑨ ⑩ ⑪ ⑫
E L 4 5 0 1 Multipoint temperature compensated ow computer
Model
E L 4 5 1 1
Power
Temperature Input
Pulse Output
Analog Output
Communication Capability
Product Code
6 20 to 30VDC
7 85 to 264VAC, 50/60Hz
Multipoint temperature compensated ow computer
(communication interface provided)
0 None
1 Pt 100Ω at 0℃
2 4 to 20mADC/1 to 5VDC
9 Special
1
9 S
1 Temperature
9 Special
Uncorrected pulse + pulse corrected for viscosity
+ pulse corrected f
pecial
0 No (EL4501)
1 Yes (EL4511)
or viscosity and temperature
Description
Power consumption: 20W max.
Finish 1 Munsell N1.5
All specifications are subject to change without notice for improvement.
2018.12 Revised △
2008.08 Released
E-888-5-E(1)
 Loading...