

Output Euroline 4280 Owner's Manual

EuroLine
OPERATOR'S GUIDE
Part No: 066-00165-03
February 12, 1998 — Rev. F

ii
Copyright © 1991, 2000, Output Technology Corporation
All rights reserved under the Berne Convention.
TRADEMARKS
DEC LA210, LA120
Epson
Centronics
IBM
Lotus
Microsoft Windows
Corporation.
Smart Cable
TrueType
WordPerfect
We suggest you use authorized service centers. Contact us at:
For service, please have your printer model and serial numbers handy—these are located on
the back of the printer.
is a registered trademark of Epson America, Inc.
is a registered trademark of Centronics Corporation.
and
Proprinter
is a registered trademark of Lotus Development Corporation.
is a registered trademark of I.Q. Technology.
is a registered trademark of Apple Computer, Inc.
is a registered trademark of Digital Equipment Corporation.
are registered trademarks of IBM Corporation.
and
Microsoft Word
is a registered trademark of WordPerfect Corporation.
Output Technology Corporation
2310 North Fancher Road
Spokane, WA 99212-1381
Voice: (509) 536-046 8 — Fax: (509) 533-1280
are registered trademarks of Microsoft
USA
Output Technology maintains a Bulletin Board System (BBS) service. In the U.S.A., call
(509) 533-1217 to access our BBS service for the very latest drivers, firmware, pricing,
maintenance and troubleshooting aids, and application information. Also, you can contact us
at:
FTP: ftp.output.com/public/output
WWW: http://www.output.com

Operator's Guide iii
IMPORTANT SAFETY PRECAUTIONS
DANGER:
AWAY FROM MECHANISM, AND AVOID HOT
SURFACES.
VORSICHT:
DEM MECHANISMUS FERNHALTEN, UND HEISSE
FLÄCHEN MEIDEN.
DANGER:
MAINS, NI LES VETEMENTS DU MECANISME, ET
EVITER LES SURFACES CHAUDES.
PERICOLO:
INDUMENTI LONTANI DAL MECCANISMO, ED
EVITARE SUPERFICI CALDE.
PELIGRO:
VESTIMENTOS ALEJADOS DEL MECANISMO DE
IMPRESION, Y EVITE SUPERFICIES CALIENTES.
Opening or removing covers may expose you to dangerous voltage
•
points or other risks. Servicing must be done by qualified personnel
only. In the event of product damage, liquid spillage, or a distinct
change in performance requiring service, unplug the printer from the
wall outlet.
KEEP HAIR, HANDS, AND CLOTHING
HAAR, HÄNDE UND KLEIDUNG VON
N'APPROCHER NI LES CHEVEUX, NI LES
TENERE CAPELLI, MANI ED
MANTENGA CABELLOS, MANOS Y
Always plug the printer power cord into a three-wire grounded
•
receptacle.
DO NOT operate the printer unless its voltage is set to the local line
•
voltage, as described in this manual.
Keep printer vents free from obstructions.
•

iv
Keep the printer dry. If water is accidentally spilled on the printer, turn
•
the power OFF immediately and wipe it dry. Do not turn the power on
until the printer is complete ly dry.
Do not lean or stack objects on or against the printer. If an object is
•
accidentally dropped into the printer, turn OFF power and carefully
remove the object.
Use a high-quality, well-shielded interface cable. Both connectors
•
should be metal and connected to chassis (frame) ground.
Make sure the power is OFF anytime you are connecting or
•
disconnecting the power cable or interface cable.
Be sure the cover is secure while the printer is running.
•

Startup
Printer Parts.....................................................................................1
Printing ............................................................................................2
Help Menu
Contents
Paper Installation.....................................................................3
Power On...............................................................................11
Platen Adjustments................................................................12
General Adjustment.......................................................12
Fine Adjustment.............................................................13
Setting Top Of Form..............................................................13
Begin Printing........................................................................14
On Line Print Adjustments..................................................... 15
Top Of Form Adjustment...............................................15
Horizontal Positioning Adjustment.................................16
Keypad
Help...............................................................................................17
Control Panel.................................................................................19
Panel .....................................................................................19
Display Window.....................................................................20
Keyboard Keys......................................................................21
Indicators...............................................................................22
Active Keys On/Off Line ........................................................23
On Line Functions .........................................................23

vi Contents
Menu
Emulations/Setups .......................................................................25
Menu Map.....................................................................................27
Setting Print Options.....................................................................33
Off Line Functions.........................................................23
What Is Emulation................................................................. 25
Emulations Available............................................................. 25
Emulations/Setups Assigned................................................ 26
Changing Setups ..................................................................26
Permanent Changes.....................................................27
Temporary Changes..................................................... 27
Printed Menu......................................................................... 27
Menu Legend........................................................................28
Top Level Menu.................................................................... 29
Help Menu............................................................................. 30
Edit Setup Menu ...................................................................31
Tests Menu........................................................................... 32
Making Menu Print Option Changes.....................................33
Print Style Menu.................................................................... 33
Print Quality ..................................................................34
Characters Per Inch......................................................34
Ribbon Menu......................................................................... 35
Replace Count.............................................................. 36
Forms Menu.......................................................................... 37
Lines Per Inch...............................................................38
Form Length..................................................................38
Paper Width.................................................................. 38

Maintenance
Replacable Units/Ordering Parts...................................................39
Replacing The Ribbon...................................................................40
Replacing A Printhead...................................................................43
Replacing The Forms Compressor................................................47
Cleaning And Lubrication...............................................................51
Problems
Diagnostics ...................................................................................53
Problems .......................................................................................57
Operator's Guide vii
Replacable Units ...................................................................39
Ordering Parts.......................................................................39
Reset Ribbon Count..............................................................43
Power On Diagnostics ..........................................................53
Menu Diagnostics .................................................................53
Test Print ......................................................................54
Hex Dump .....................................................................55
Servicing................................................................................58
Replace Ribbon Press On Line Message .............................58
Dead Printer ..........................................................................58
Outlet Power .................................................................58
Printer Fuse ..................................................................58
Power On Problems ..............................................................60
Noise, Smoke or Odor...........................................................60
LCD Error Messages.............................................................61
Communication Problems ....................................................61
Paper Jam or Skew...............................................................62
Ribbon Tears ........................................................................63
Print Quality Problems...........................................................63
To Cancel Print .....................................................................64

viii Contents

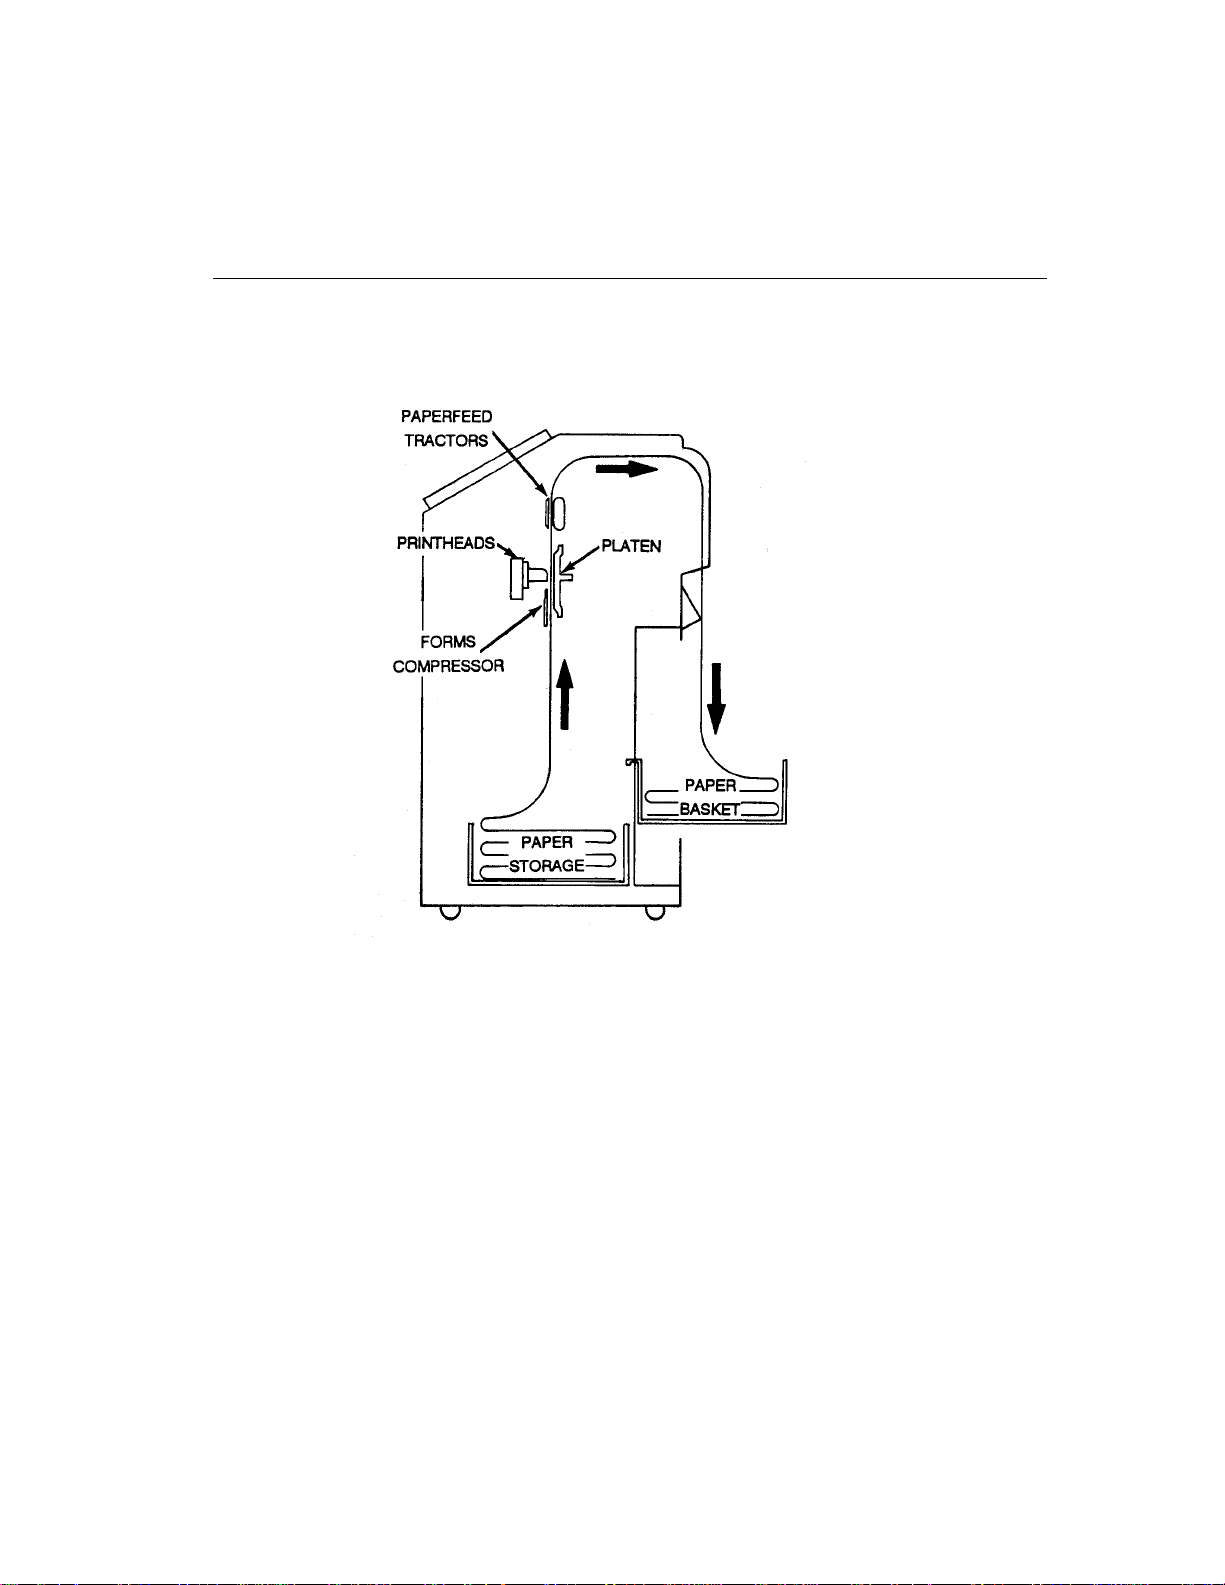
PRINTER PARTS
Startup
DBØ-A

2Startup
DBØ-B1
PRINTING
This section covers:
Paper Installation, Page 3
•
Power On, Page 11
•
Platen Adjustments, Page 12
•
Setting Top of Form, Page 13
•
Begin Printing, Page 14
•
On Line Print Adjustments, Page 15
•
Caution:
Avoid printing without paper, or printing beyond width
of paper. Printing directly onto the platen shortes
printhead life.
PAPER INSTALLATION
Operator's Guide 3
DBØ-BA
The printer accepts paper stock from 15-lb (56 g/m2) bond (18- to 20-lb or
86- to 75- g/m
2
bond is recommended) to six part forms or card stock
having 0.02” (approx. 0.5 mm) maximum thickness. Paper width can
range from 3” to 16” (approx. 76 mm to 406 mm).

4Startup
To install paper:
1. Open cabinet door and place an open box of paper on the center of
the cabinet floor.
Make sure edges of the box don’t interfere with paper flow.
Note:
For smooth paper feeding, position the paper box vertically in
line with paperfeed tractors.
2. Open operator access door and flip forward the blue paper load lever
(near the end of the platen).
DBØ-D

3. Open paper feed tractor flaps.
Operator's Guide 5
DBØ-AO

6Startup
4. Insert paper through the paper slot at the bottom of the printer and
gently push paper up until it appears between the forms compressor
and platen.
DBØ-E
5. Pull up, align, and seat paper on the paperfeed tractor sprocket pins.
6. Close paperfeed tractor flaps.
Note:
Paper must be fed through the U-shaped paper motion sensor
at the top of the left paperfeed tractor. See illustration on the
following page.
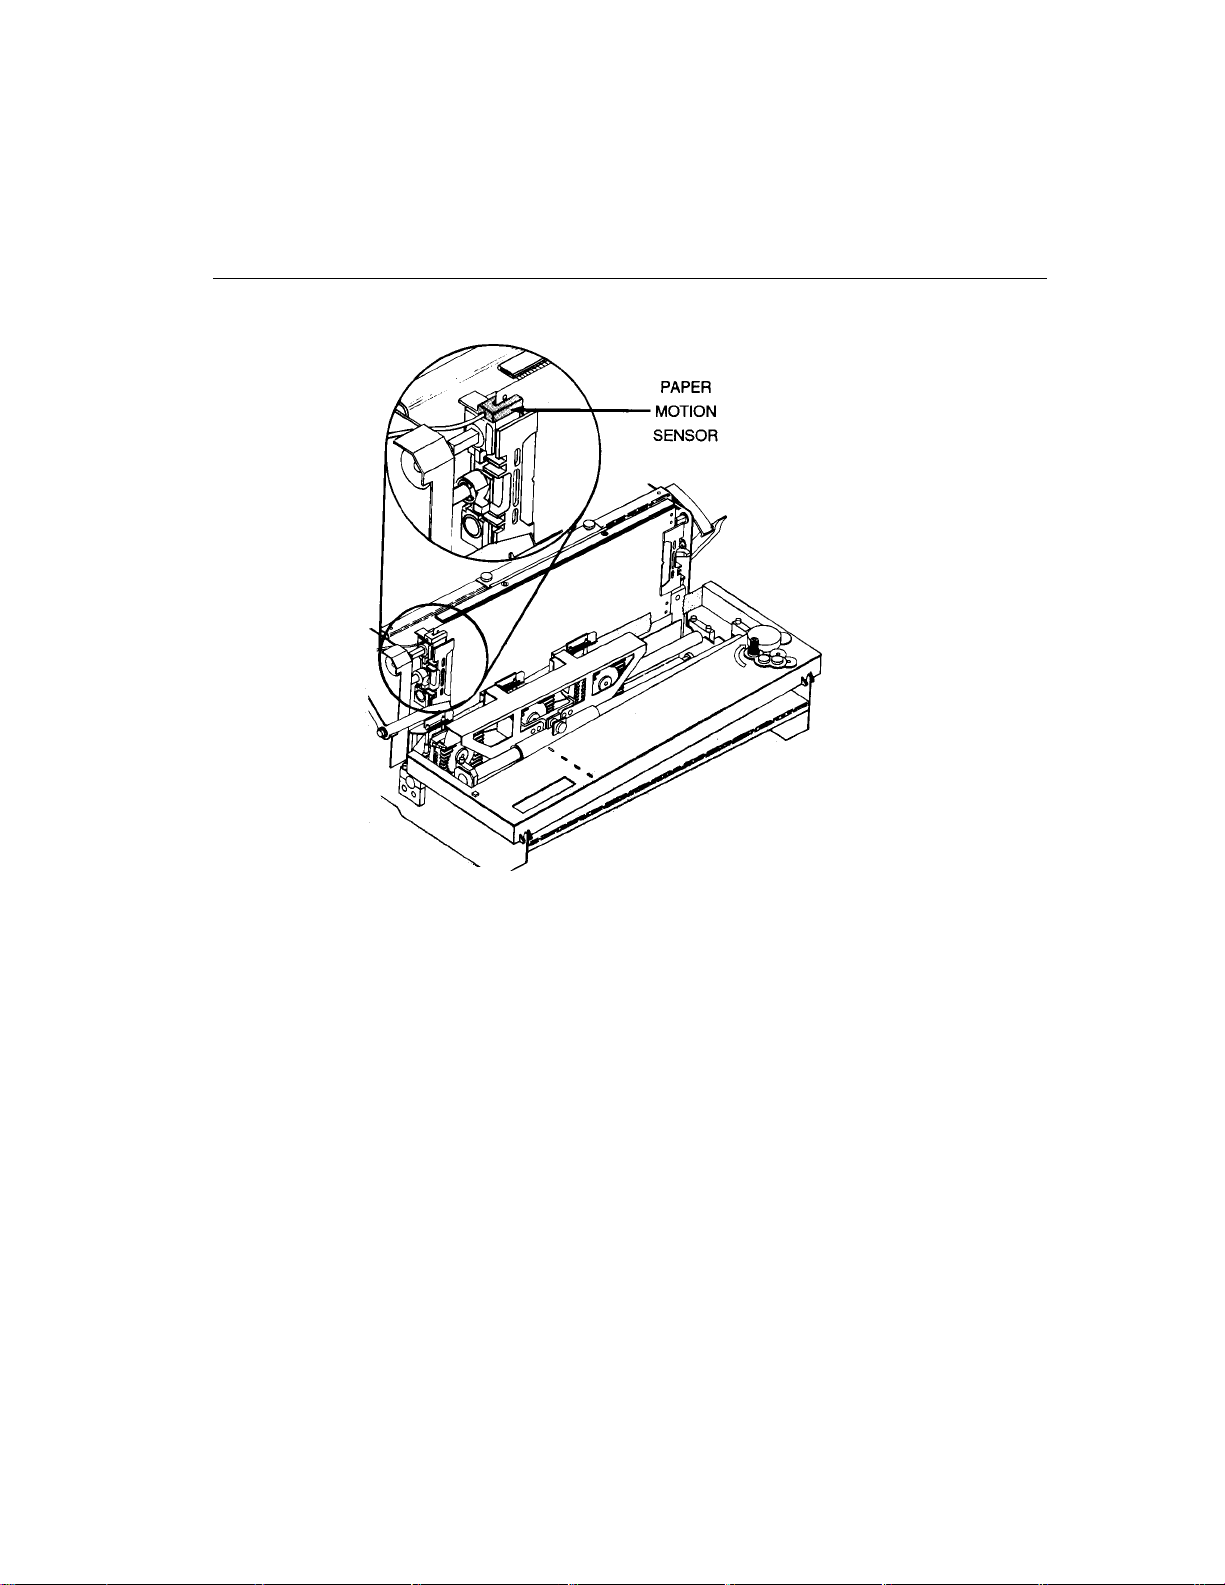
Operator's Guide 7
DBØ-F
7. Installed paper should not buckle (too loose) or be stressed (too tight)
as to cause a noticeable deformation of holes in the paper. If paper
feed tractor width adjustments are necessary (see illustrations on the
following pages):
a. Flip down release levers.
b. Slide paperfeed tractors to the desired position.
c. Flip up release levers.
Note:
Normally the leftmost paperfeed tractor is positioned at the
extreme left, against the E-ring stop. This is because the paper
present sensor is located on the left section of the mechanism.
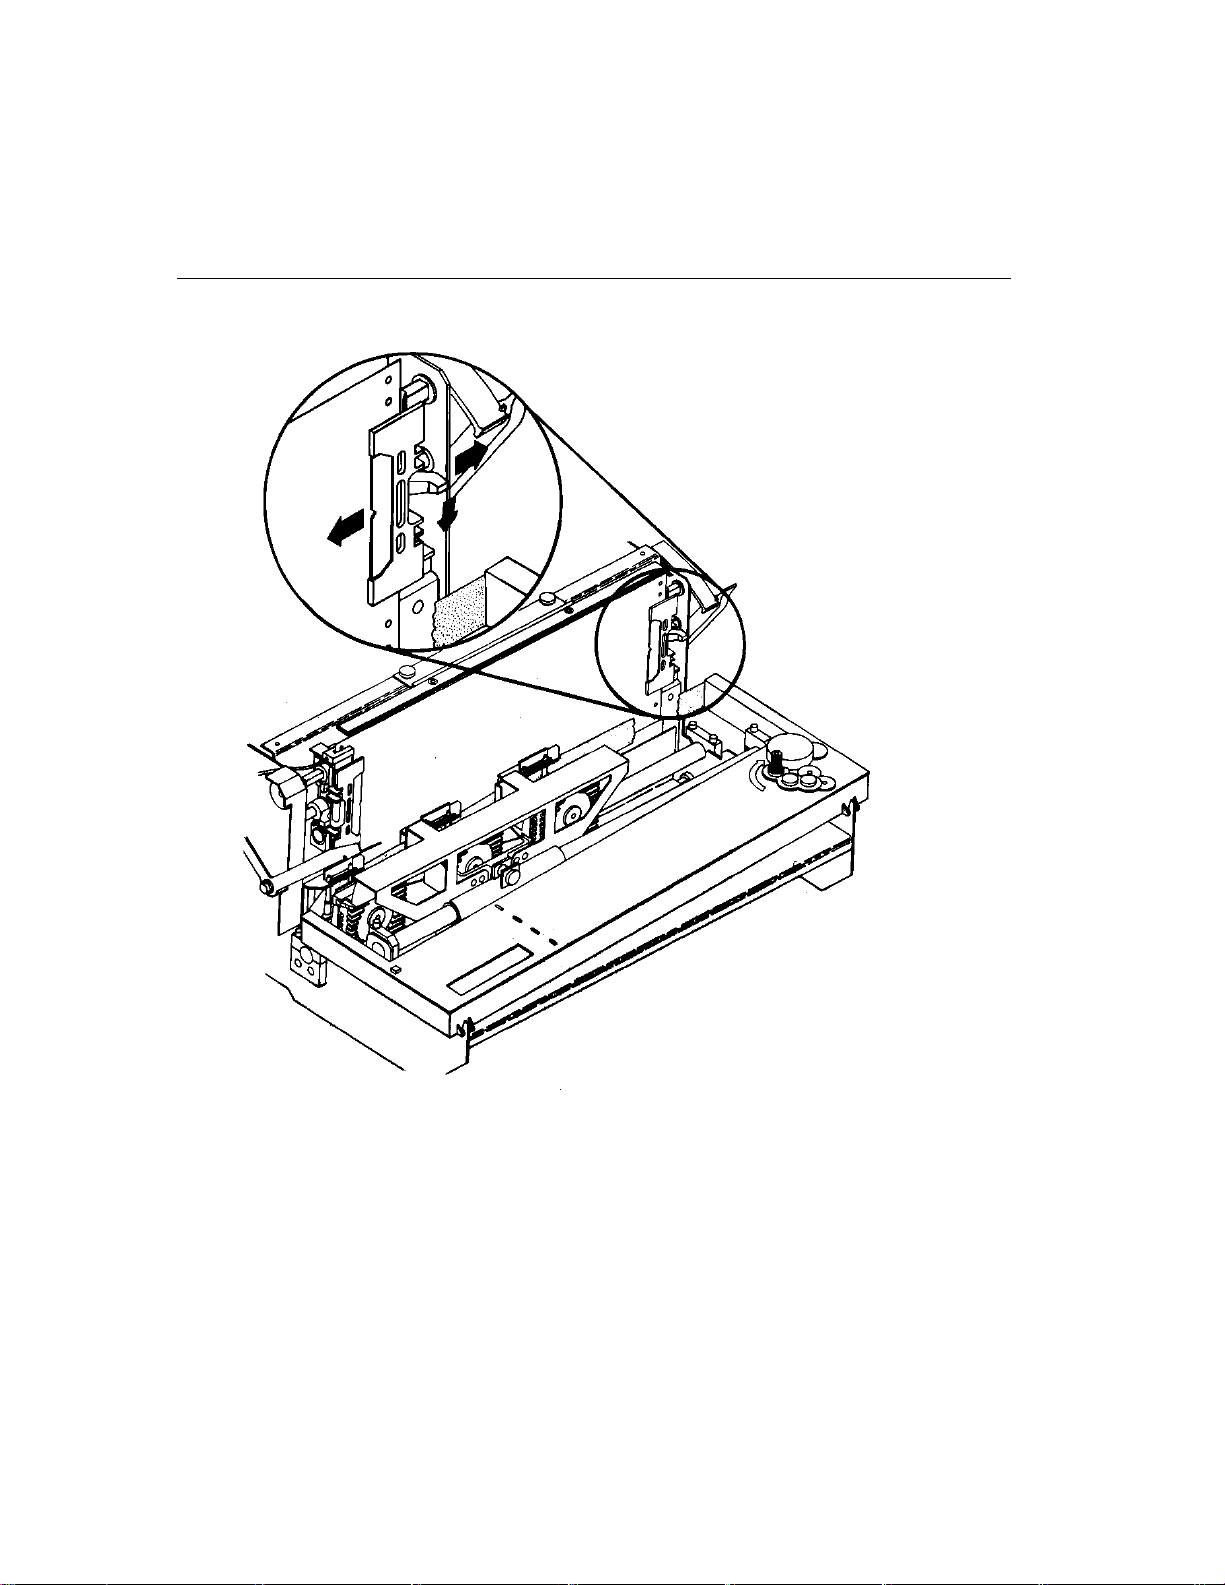
8Startup
DBØ-G
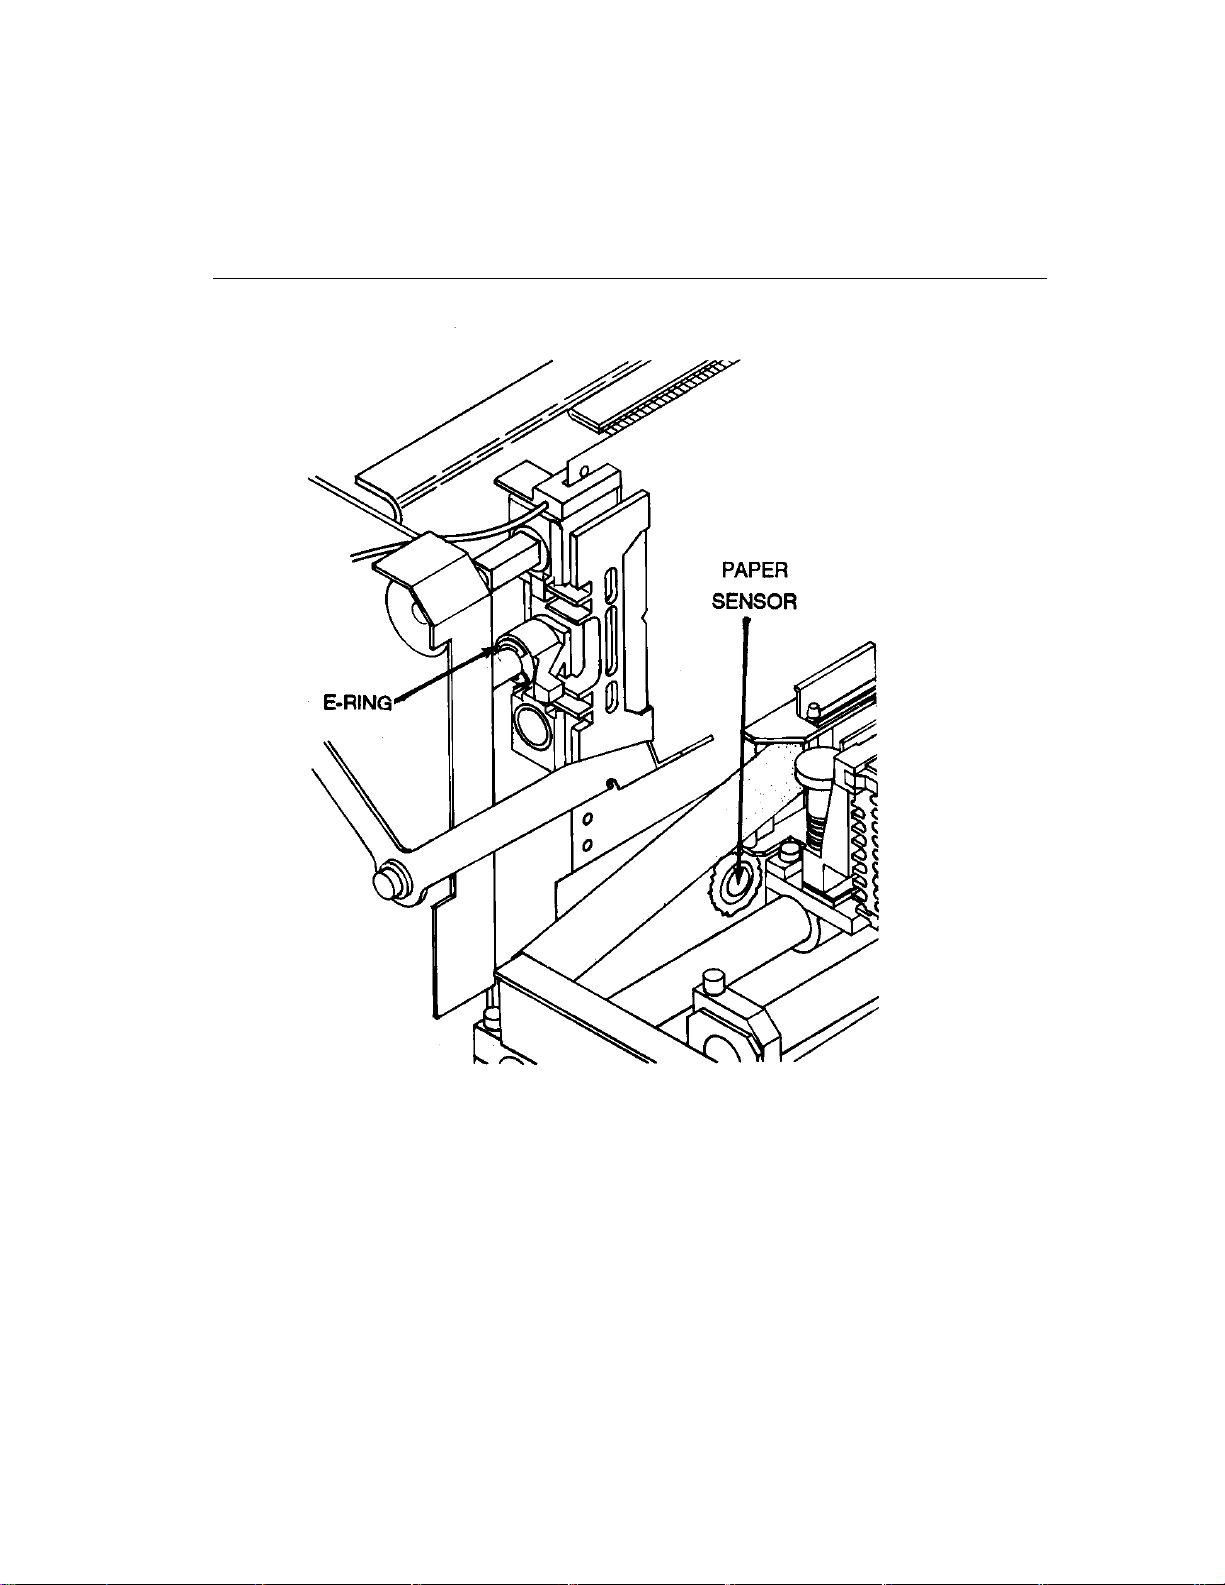
Operator's Guide 9
DBØ-AZ
10 Startup
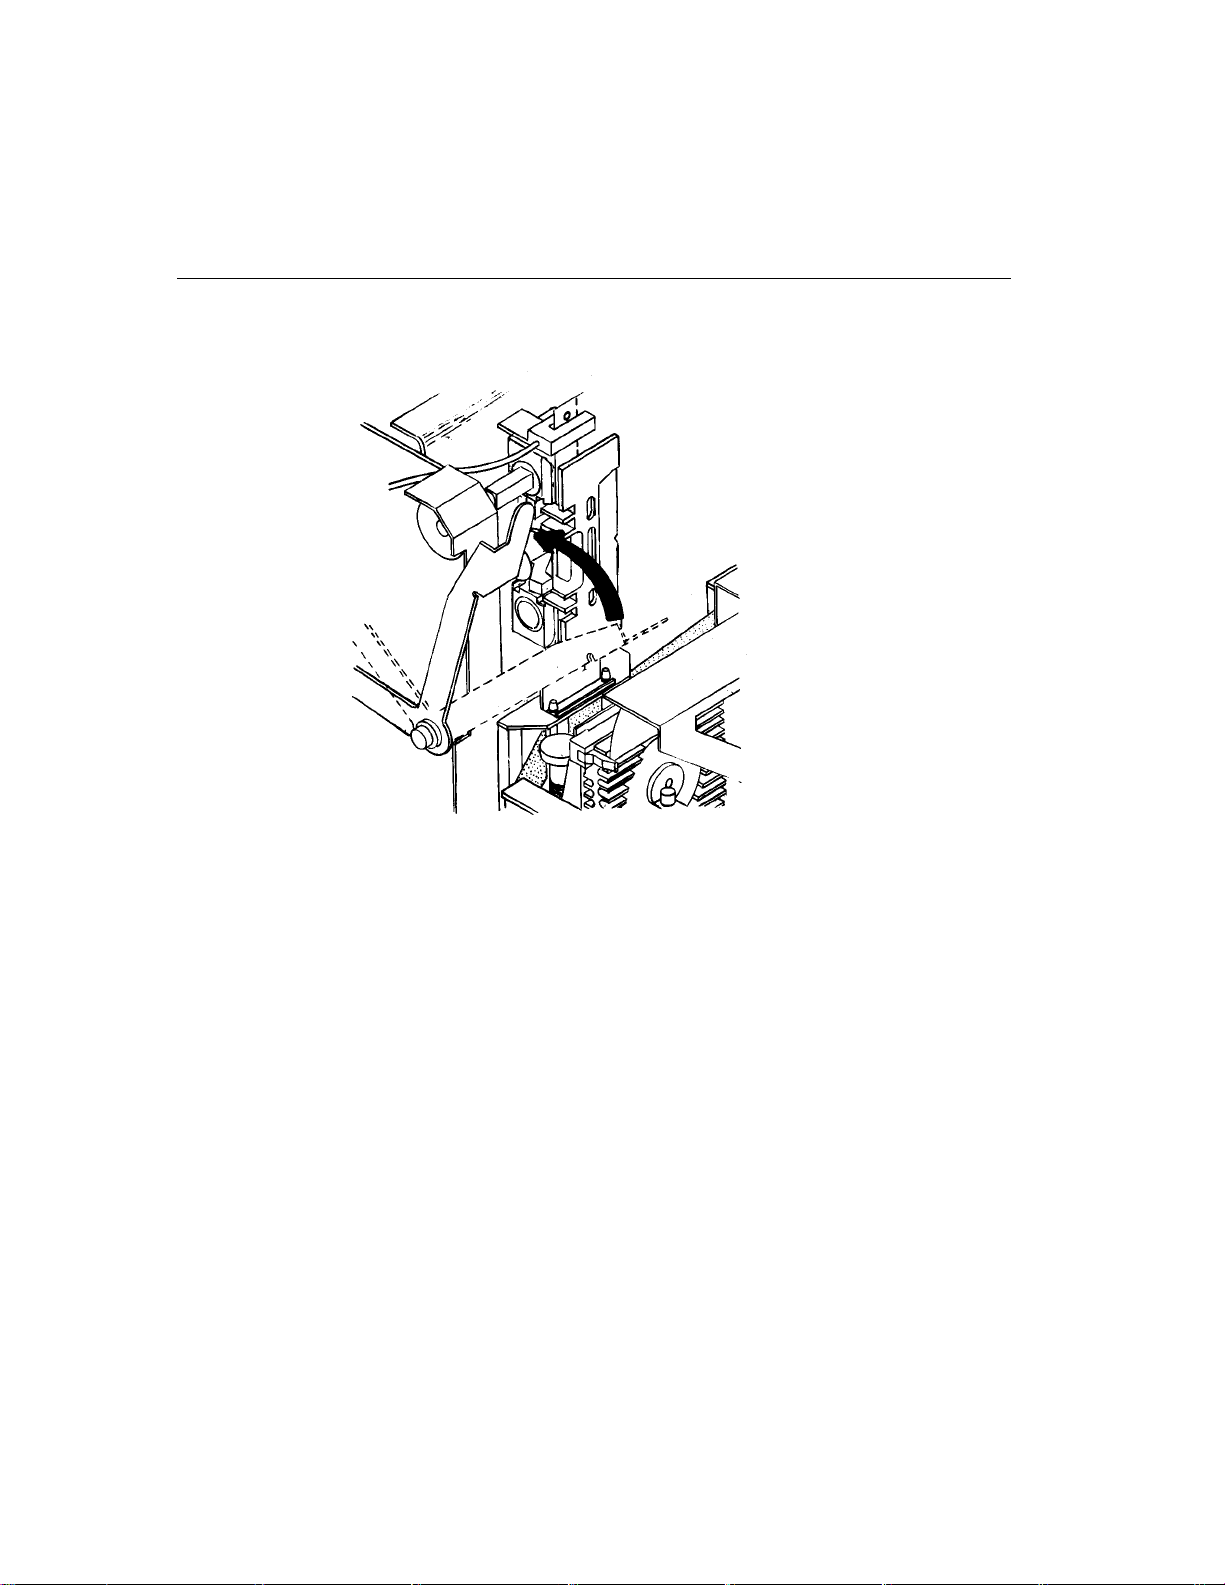
8. Flip up the blue paper load lever to compress the paper.
DBØ-AP
9. Close cabinet door and operator access cover.

Operator's Guide 11
POWER ON
Press the | side of the power ON/OFF switch located at the
left rear side of the printer.
DAØ-S1
The following cycle occurs during normal power on. It takes
approximately 10 seconds. When complete, On Line is displayed,
followed by the firmware version, and the printer is ready to accept data.
1. Power and ON LINE indicators flash.
2. Printer beeps once.
3. All indicators light briefly, POWER remain s on.
4. Diagnostic Test in Progress is displayed.
5. Printer beeps twice.
6. Setup # and firmware version are displayed.
7. Printheads move to the left.
8. ON LINE indicator lights and remains on.
9. On Line is displayed.
12 Startup
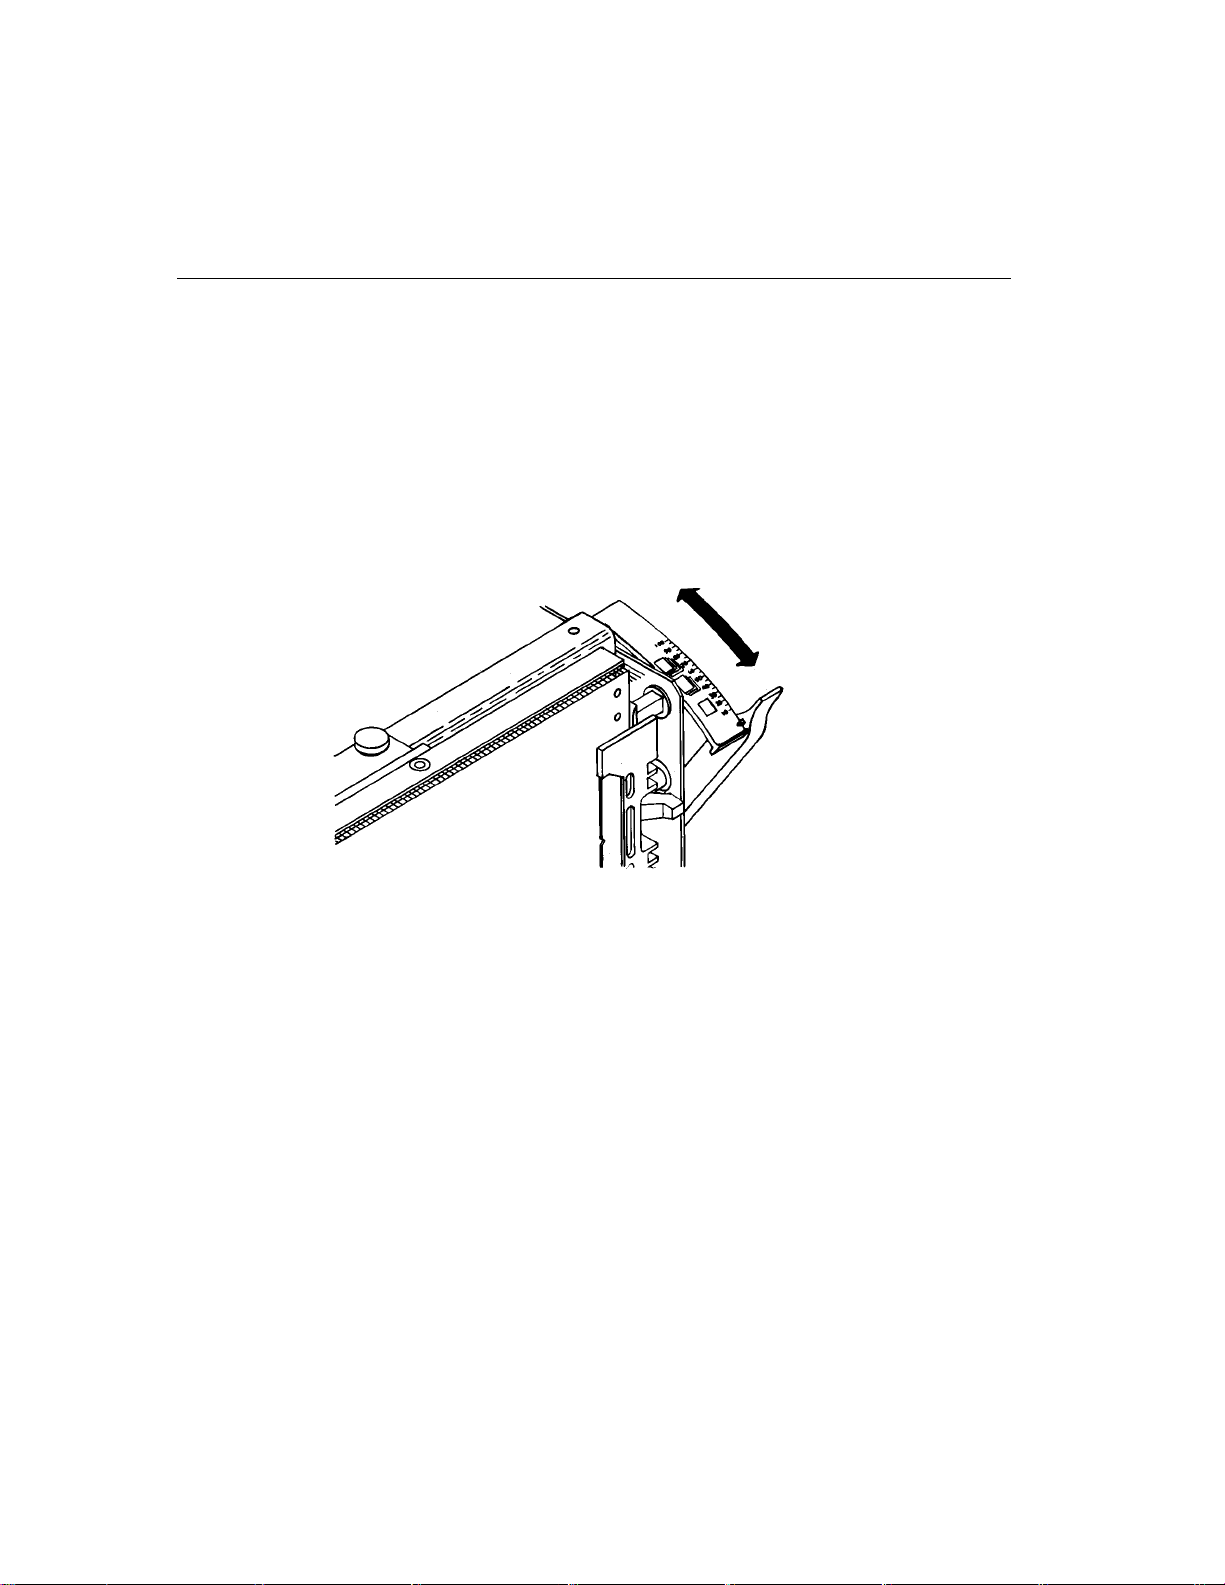
PLATEN ADJUSTMENTS
The platen adjustment lever sets the distance between the platen and
printheads. The platen is the solid surface bracing the back of the paper
as it is struck by the printheads.
When you change the paper thickness, adjust the platen to the marked
setting relating to the paper being used.
DBØ-AS
General Adjustment
The platen adjustment lever has marked settings for various paper
thicknesses.
For thin paper, move lever forward.
•
For thick paper, move lever back.
•
Note:
To lengthen prinhead and ribbon life, move platen adjustment lever
backward to the position just before dropped dots occur.

Operator's Guide 13
Fine Adjustment
Complete travel of the platen adjustment lever gives 30 notched positions
for fine adjustments. Typically fine adjsutments are performed in
conjunction with printing a task. As you begin printing, open the operator
access cover to check the print and make any desired fine adjustments.
When you open the cover, the printing stops. Printing resumes when you
close the cover.
SETTING TOP OF FORM
You must set top of form when paper is installed, or power is turned OFF
in the middle of a print task.
1. Set printer off line.
2. Open operator access cover and move the printhead carriage slightly
away from its left home position as illustrated below.
DBØ-I1

14 Startup
3. Align paper perforation to the TOF arrow on the platen. If the printer
has to TOF arrow, follow the previous illustration and align the
perforation so it is about 1/3 of the distance below the top of the
leftmost ribbon guide, or even with an alignment hole in the left end of
the platen:
Press and release LINE FEED to advance a single
line.
Press and hold LINE FEED to advance multiple lines
Press UP ARROW and DOWN ARROW for fine
adjustments.
4. Press TOP OF FORM when paper is properly
adjusted.
The printer beeps to acknowledge the setting.
BEGIN PRINTING
If the printer is off line, press ON LINE. On Line is displayed and the
printer is ready to accept data.
 Loading...