


Lg20ie
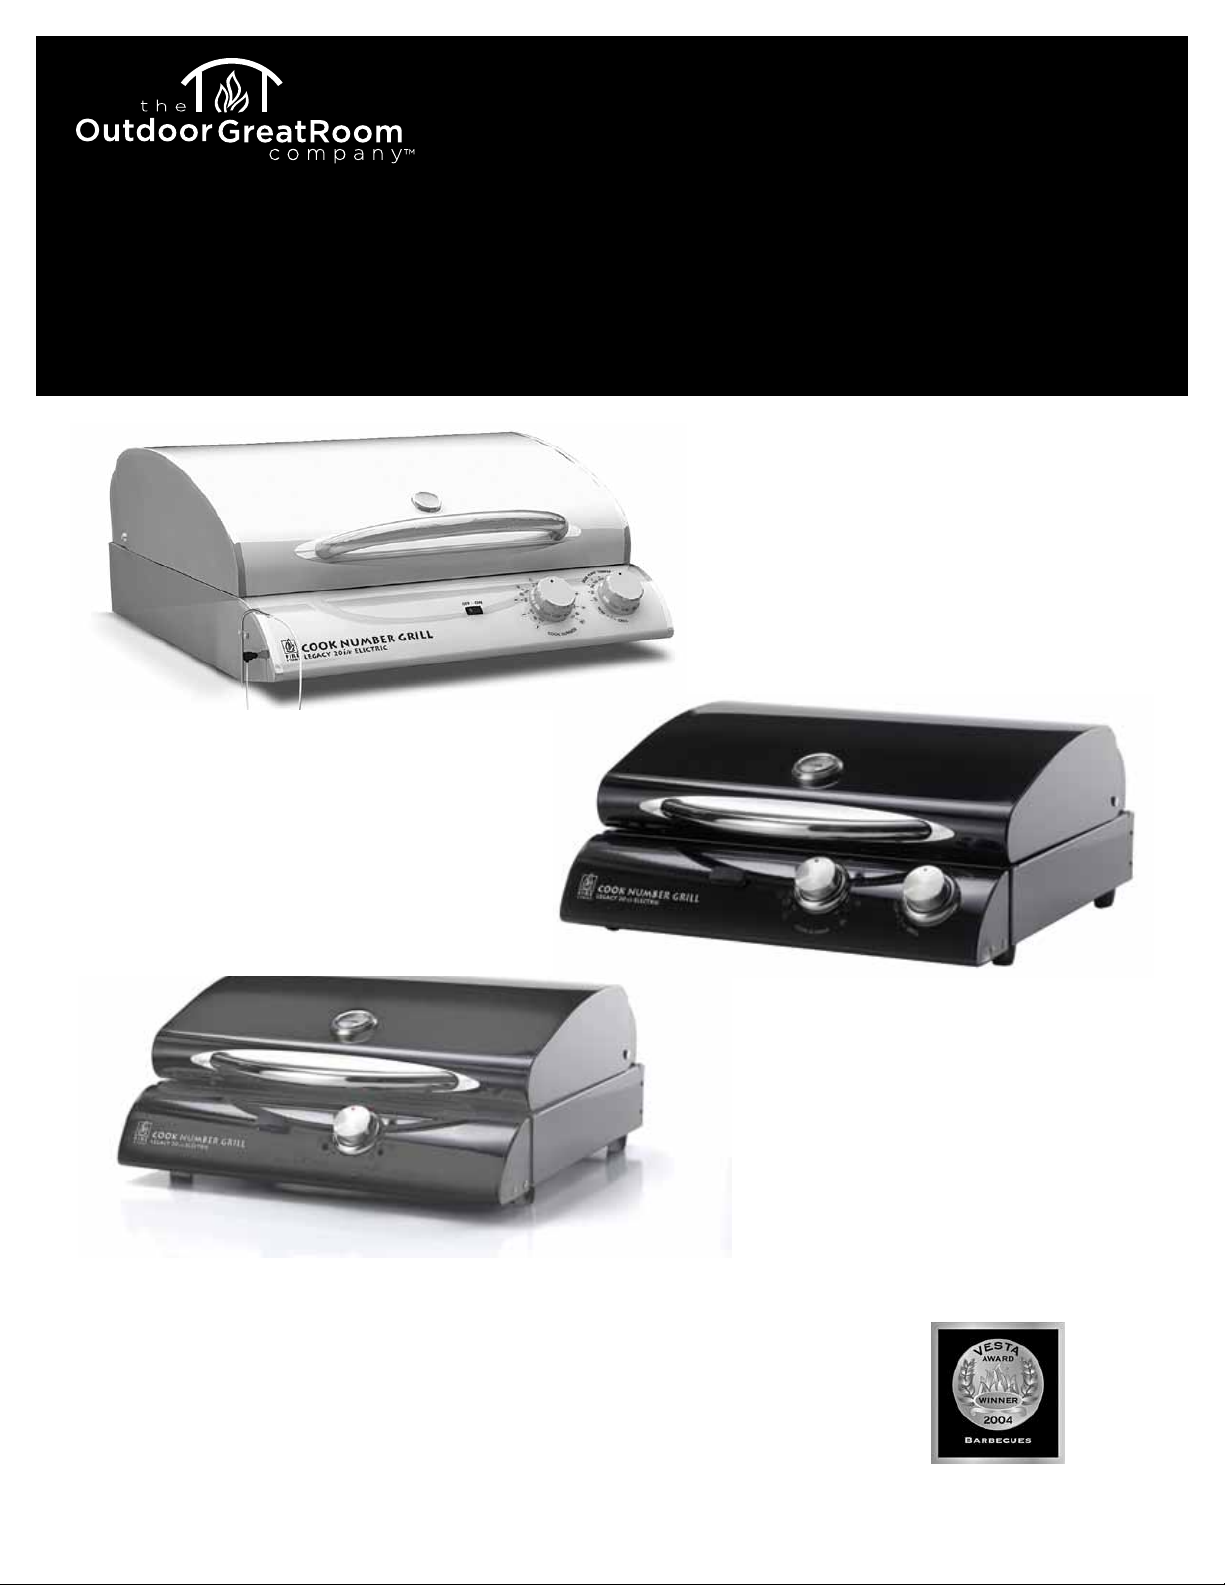
Cook Number
®
ELECTRIC Grill
Designed for Professional Results in Four Grill Cooking Formats:
Grill
n
Roast
n
Sear
n
Convection Baking
Owner’s Operating and Safety Instructions
LG20ie • JAG20e • CNE20
Dual Burner Electric Cook Number
®
Grills
LG20ie
UL Listed
CNE20
JAG20e
French Manual (Manuel en français) - page 13
OutdoorGreatrooms.com
CAUTION
DO NOT DISCARD THIS MANUAL
n Important operating and maintenance
instructions included.
n Read, understand and follow these instructions
for safe installation and operation.
n Leave this manual with party responsible for
use and operation.
WARNING:
If the information in these instructions is not
followed, a fire or explosion may result causing
property damage, personal injury or death.
FOR YOUR SAFETY
Do not store or use gasoline or other flammable
vapors and liquids in the vicinity of this or any
other appliance.
Read the following instructions carefully and be
sure your grill is properly installed, assembled
and maintained.
Failure to follow these instructions may result in
serious bodily injury and/or property damage.
If you have questions concerning assembly or
operation, consult your dealer.
Thank You for selecting the
Fire Stone COOK NUMBER GRILL
™
.
We trust you’ll be delighted with the high
quality engineering and performance you’ll
experience with this highly versatile grill and
added convection range. It has been carefully
designed to deliver professional quality
“controlled cooking” – all encompassed in a
lightweight and efficient format with features
unlike any other grill in its category.
Please follow the instructions carefully for
safe enjoyable use. We wish you years of
superior performance, entertainment & culinary
enjoyment.
Safety Instructions 3
Getting Started 4-5
Unpacking 4
Seasoning your Grill 4
Starting & Grilling 4-5
Outdoor Use 5
Indoor Use 5
How to Cook 6-7
Cleaning and Maintenance 8
Warranty 9
Recipes 10-11
Cook Number Temperature Guide 12
Fire Stone Home Products
12400 Portland Ave S
Suite 195
Burnsville, MN 55337
Fax: 952-358-7414
Customer Service: 1-866-303-4028
www.firestonehp.com
Patent pending.
© Copyright 2005, Fire Stone Home Products
FCNL20ie – V:II 2M/0206
Table of Contents
2
Cook Number Grill
®
Safety instructions
9. Do not place on or near a hot gas or electric
burner or in a heated oven.
10. Extreme caution must be used when moving
an appliance containing hot oil or other hot
liquids.
11. To disconnect, turn any control to OFF, then
remove plug from wall outlet.
PLEASE NOTE:
The OFF/ON switch found on the front panel
of the grill operates as a MANUAL switch
and DOES NOT SHUT OFF AUTOMATICALLY.
This is a design feature which enables
extended grilling times for slow roasting.
12. Do not use appliance for other than intended
use.
13. Fuel, such as charcoal briquettes, is not to be
used with appliance.
14. Use only on properly grounded outlet.
15. Clean grill often for maximum performance.
this includes grilling grates, searing plate,
grease tray and vaporizor plate (see page 8
for more info)
16. Pay close attention when grilling high
fat foods or skin-on chicken as flare-ups
can occur.
17. Keep grill covered when not in use.
NOTE: Model CNE20 does not come with a cover
but it can be purchased separately. To order
grill cover, reference part # CVR20GH.
SAVE THESE INSTRUCTIONS
3
Warning!
Never allow children to operate the grill.
Do not allow children to play near the grill.
Warning!
important
safeguards
When using electrical appliances, basic safety
precautions should always be followed including
the following:
1. Read all instructions.
2. Do not touch hot surfaces. Use handles or
knobs.
3. To protect against electrical shock, do not
immerse cord, plugs, probe or grill in water or
other liquid.
4. Close supervision is necessary when any
appliance is used near children.
5. Unplug from outlet when not in use and
before cleaning. Allow to cool before putting
on or taking off parts.
6. Do not operate any appliance with a
damaged cord or plug or after the appliance
malfunctions or has been damaged in any
manner. Return appliance to the nearest
authorized service facility for examination,
repair or adjustment.
7. The use of accessory attachments not
recommended by the appliance manufacturer
may cause injuries.
8. Do not let cord hang over edge of table or
counter, or touch hot surfaces.
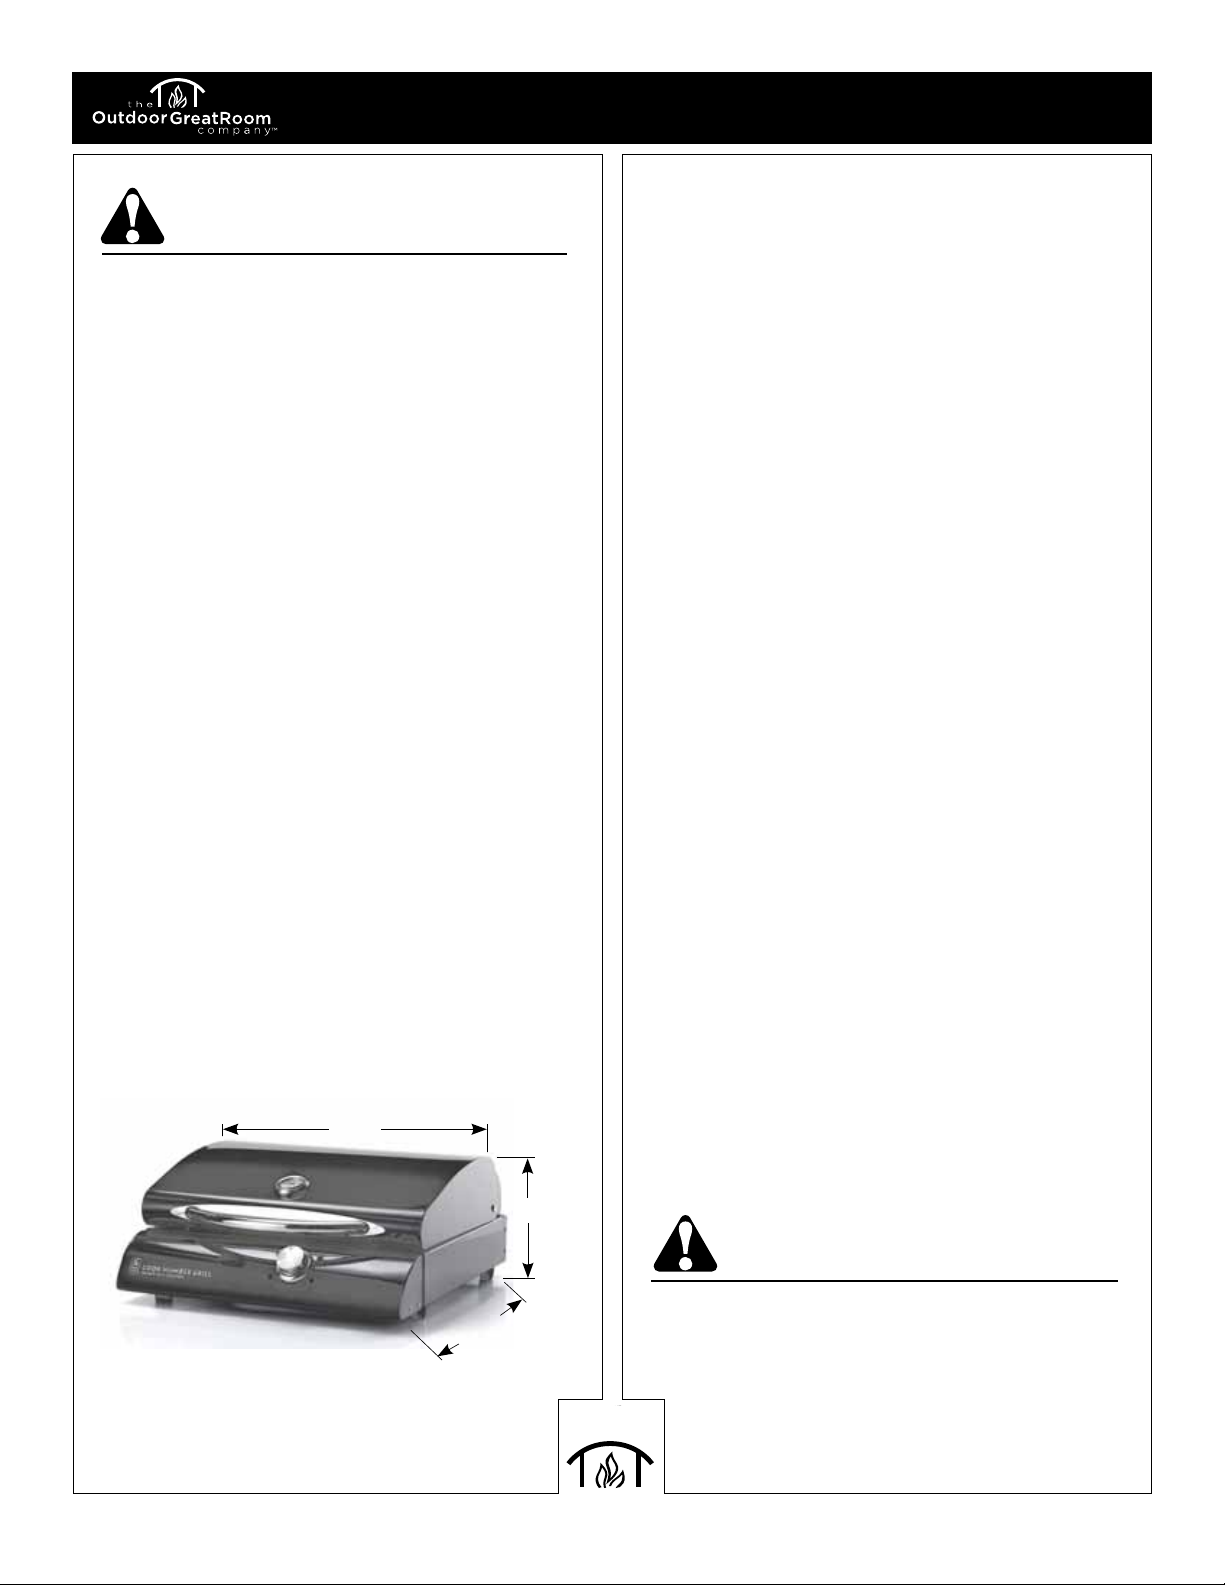
1' 9"
9"
1' 7"
Cook Number Grill
®
Getting Started
Unpacking & Initial Prep cleaning
Carefully unpack your COOK NUMBER GRILL
™
and remove all corrugated shipping elements
used to protect your grill in transit. Before you
begin, we first recommend removing the Grilling
Grate on the left side and the Searing Plate on
the right side and washing them both with warm
soapy water.
Seasoning your Fire Stone legacy
20 i
/
e Grill
Getting Started
1. Please familiarize yourself with the safety
guidelines at the front of this manual.
2. Be sure the grill is plugged in and stationed
on a clean and dry surface.
3. Open the grill lid.
4. For first time START-UP procedure, we
recommend following the steps below to
prepare your grill for optimum performance
by staging a proper initial “seasoning / burn
off” process.
Step 1.
BEFORE IGNITION, take a soft clean cloth and
apply a thin coating of cooking oil or olive oil to
the cloth and lightly wipe on both the grate and
the searing plate of the grill.
Step 2.
You’ll be seasoning both surfaces of the grill one
side at a time following the ignition instructions
below. Be sure to allow time for each side to
fully heat up and release any initial smoke
during this break-in / seasoning stage.
Fire Stone COOK
NUMBER GRILL
™
STARTING
INSTRUCTIONS:
The Fire Stone COOK NUMBER GRILLS
™
are
designed to operate either on the left side / grill
mode - or the right side / sear mode BUT NEVER
BOTH SIDES AT THE SAME TIME.
MODELS JAG20e & LG20ie
To start the LEFT Grilling & Roasting side:
1. First, turn on the grill by depressing the
black OFF / ON rocker switch on the front
panel to the right – for the ON position.
2. Turn the – far right dial COUNTER-CLOCKWISE
to start the GRILL SIDE heating element.
The Fire Stone COOK NUMBER GRILL
™
is
designed to automatically operate at HIGH
TEMPERATURE in this mode.
3. Allow 5 to 7 minutes for the GRILL SIDE
surface to reach its full temperature to
complete the initial seasoning process or to
begin grilling.
To start the RIGHT Searing Plate side:
1. Turn on the grill by depressing the black OFF/
ON rocker switch on the front panel to the
right – for the ON position.
2. Turn the – far right dial CLOCKWISE to start
the SEARING PLATE heating element and
turn the temperature to the highest setting
@ 550° for the initial seasoning / burn-off
process. Allow 5 to 7 minutes for the SEARING
PLATE surface to reach its full temperature to
complete the break-in / seasoning process or
to begin searing.
Now that your Fire Stone COOK NUMBER GRILL
™
is seasoned, you will use the searing feature by
selecting the desired temperature of your choice
using this far right knob. Searing times may vary
based on what you’re grilling.
Then, after searing is done, continues by turning
the left GRILL SIDE on by rotating the same far
right knob COUNTER-CLOCKWISE and finish
the grilling process using your convection grill
feature to achieve the desired professional
cooking results.
* Searing plate can also be used to saute
vegetables or other items. Place items on sear
plate and adjust temperature knob accordingly.
MODEL CNE20
This model has a 3-way switch to turn on the
searing plate (right side). Flip the swich to the
right. Allow 5-7 minutes for the searing plate
to reach 500F. When this temp. is reached, the
power will automatically transfer to the left side
& back again to the right side, keeping the right
sear plate between 450-500F. To turn on the left
grill side, flip the switch to the left.
4
Cook Number Grill
®
Starting & Grilling
Notes About
OUTDOOR USE
Be sure you have proper ventilation, and protect
all other surfaces near the grill.
NEVER grill in the open rain or in standing water
as this grill is an electric appliance. There is
always a hazard of electric shock while operating
this unit.
Notes About
INDOOR USE
Use the Fire Stone COOK NUMBER GRILL
™
ONLY
with:
n The proper surfaces and surroundings
to avoid fire or shock hazard.
n The proper ventilation - preferably directly
underneath an indoor cooking ventilation
hood or near a well-stabilized stone surface
such as a fireplace hearth.
n Never operate in the presence of flammable
surfaces or in standing or running water.
n While grilling, flare-ups from fats and juice
drippings can occur, so be sure to monitor
food closely so it does not burn.
Grounding
Instructions
This appliance shall be grounded while in use
to protect the operator from electrical shock.
The appliance is equipped with a 3-conductor
cord and a 3-prong grounding-type plug to fit
the proper grounding-type receptacle. Plug into
a GFCI-protected outdoor receptacle, where
available.
Extension Cords
Use only 3-wire extension cords that have
3-prong grounding-type plugs and 3-pole
cord connectors that accept the plug from the
appliance. Only extension cords identified by
the marking “Suitable for use with outdoor
appliances” shall be used outdoors. Use only
5
extension cords having an electrical rating not
less than the rating of the appliance. Do not use
damaged extension cords. Examine extension
cord before using and replace if damaged. Do
not abuse extension cord and do not tug on any
cord to disconnect. Keep cord away from heat
and sharp edges.
1. Outdoor extension cords shall be used with
outdoor use products; such cords are surface
marked with suffix letters “W-A” and with
a tag stating “Suitable for use with outdoor
appliances”
2. Connection to an extension cord shall be kept
dry and off the ground;
3. Store products indoors when not in use, out of
the reach of children; and
4. Do not clean this product with a water spray
or the like.
WARNING
HOT! DO NOT TOUCH. SEVERE
BURNS MAY RESULT. CLOTHING
IGNITION MAY RESULT.
n Keep children away.
n CAREFULLY SUPERVISE children in same area
as grill.
n Alert children and adults to hazards of
high temperatures.
n Never lean over the cooking area while
grill is on.
n Surfaces are hot during operation and
cool down.
n Clean grill often for maximum performance
and to avoid flare-ups or grease fires. this
includes cleaning the grease tray, vaporizor plate
and replacing the aluminum tray (if needed)
after each use. See page 8 for more infformaton.
Cook Number Grill
®
HOW TO use your Cook number Grill
®
Overview
1. Follow the steps for Getting Started outlined on
page 4.
MODELS JAG20e & LG20ie
2. To begin SEARING or GRILLING - push the Fire
Stone Legacy OFF/ON rocker switch to the
right for the ON position. Next, rotate the far
right searing & grilling control dial clockwise
for searing...or counterclockwise for grilling,
roasting or convection baking.
MODEL CNE20 - See page 4
How to use the FIRE STONE
Cook Number
®
Control System:
1. First, follow the start-up instructions under
the Getting Started section shown at the top
of page 4. Pre-heat the grill for 5 to 7 minutes
in the mode of your choice – either the LEFT
Grilling & Roasting side, or the RIGHT Searing
Plate side. After the grill mode you’ve selected
is up to temperature, place the food on the
pre-heated surface and insert the Cook Control
System™ Monitor Probe into the food for
worry-free controlled cooking.
For best results, be sure to insert the probe into
the deepest part of your fillet or roast.
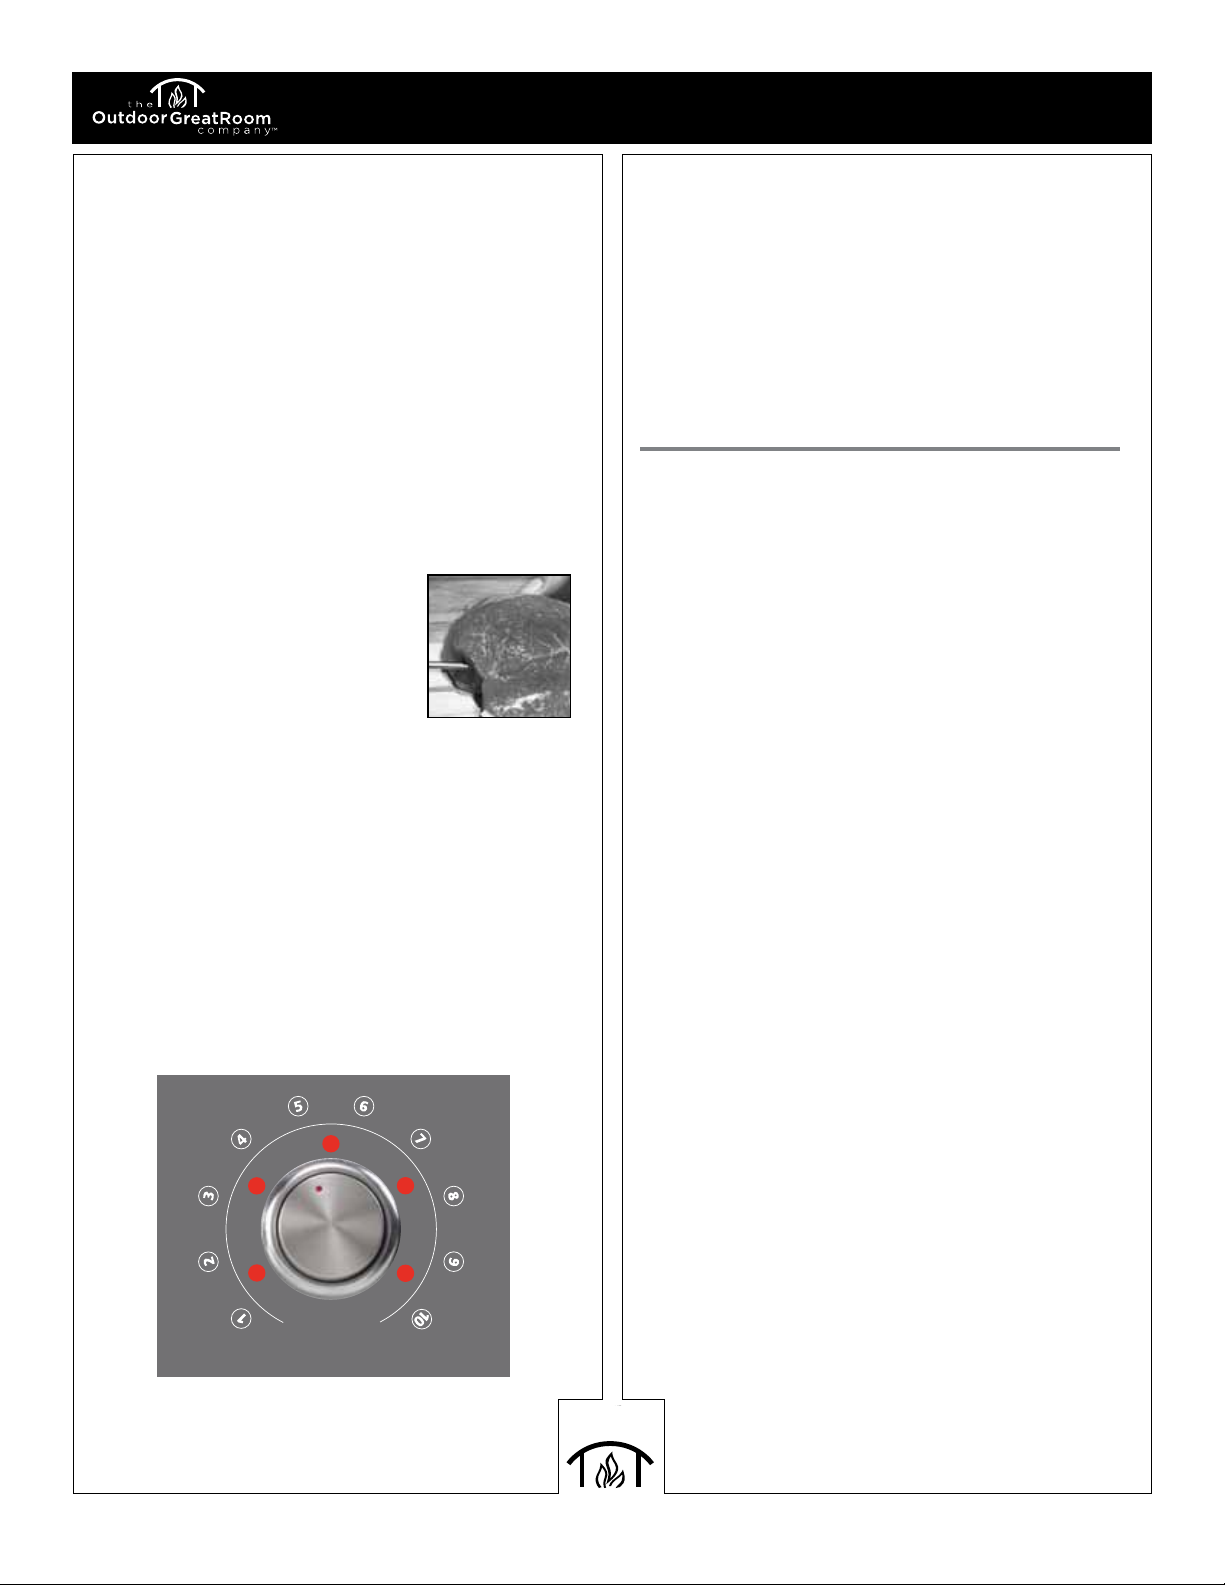
2. Set the audible temperature “controlled
cooking” monitor feature by dialing in your
Cook Number
®
to correlate with the
food you are grilling or roasting.
3. When the probe detects the food has reached
its proper temperature, the red lights will
illuminate and the alarm will sound.
Remember – thick cuts of meat such as steaks or
roasts will continue to cook after they have been
removed from the grilling surface.
4. Be sure to turn the far right control dial OFF by
pushing the black OFF / ON rocker switch to the
left OFF position, and unplug your grill after
each use.
Searing
TIP: You may want to lightly coat the searing
plate with oil or non-stick cooking spray prior
to use.
1. Follow the steps for Getting Started outlined on
page 4.
2. For a professional seared finish,
place meat or fillet on pre-
heated SEARING PLATE located
on the right side of the grill.
3. Sear meat or fillet
approximately 30-45 seconds
on each side for rare, 45-60
seconds on each side for
medium, 60-90 seconds on each side for well-
done, and slightly longer for cuts thicker than
one inch or in cold weather.
4. Once meat or fillet is seared on both sides,
rotate far right dial counterclockwise to
ignite grilling surface and continue
convection grilling.
* On model CNE20, simply flip the switch to the
left for sear mode.
5. When searing plate has reached a temperature
of about 500F, the heat will transfer
automatically to the left gril side. When it
cools down to 450 F, it will transfer back to
the right side.
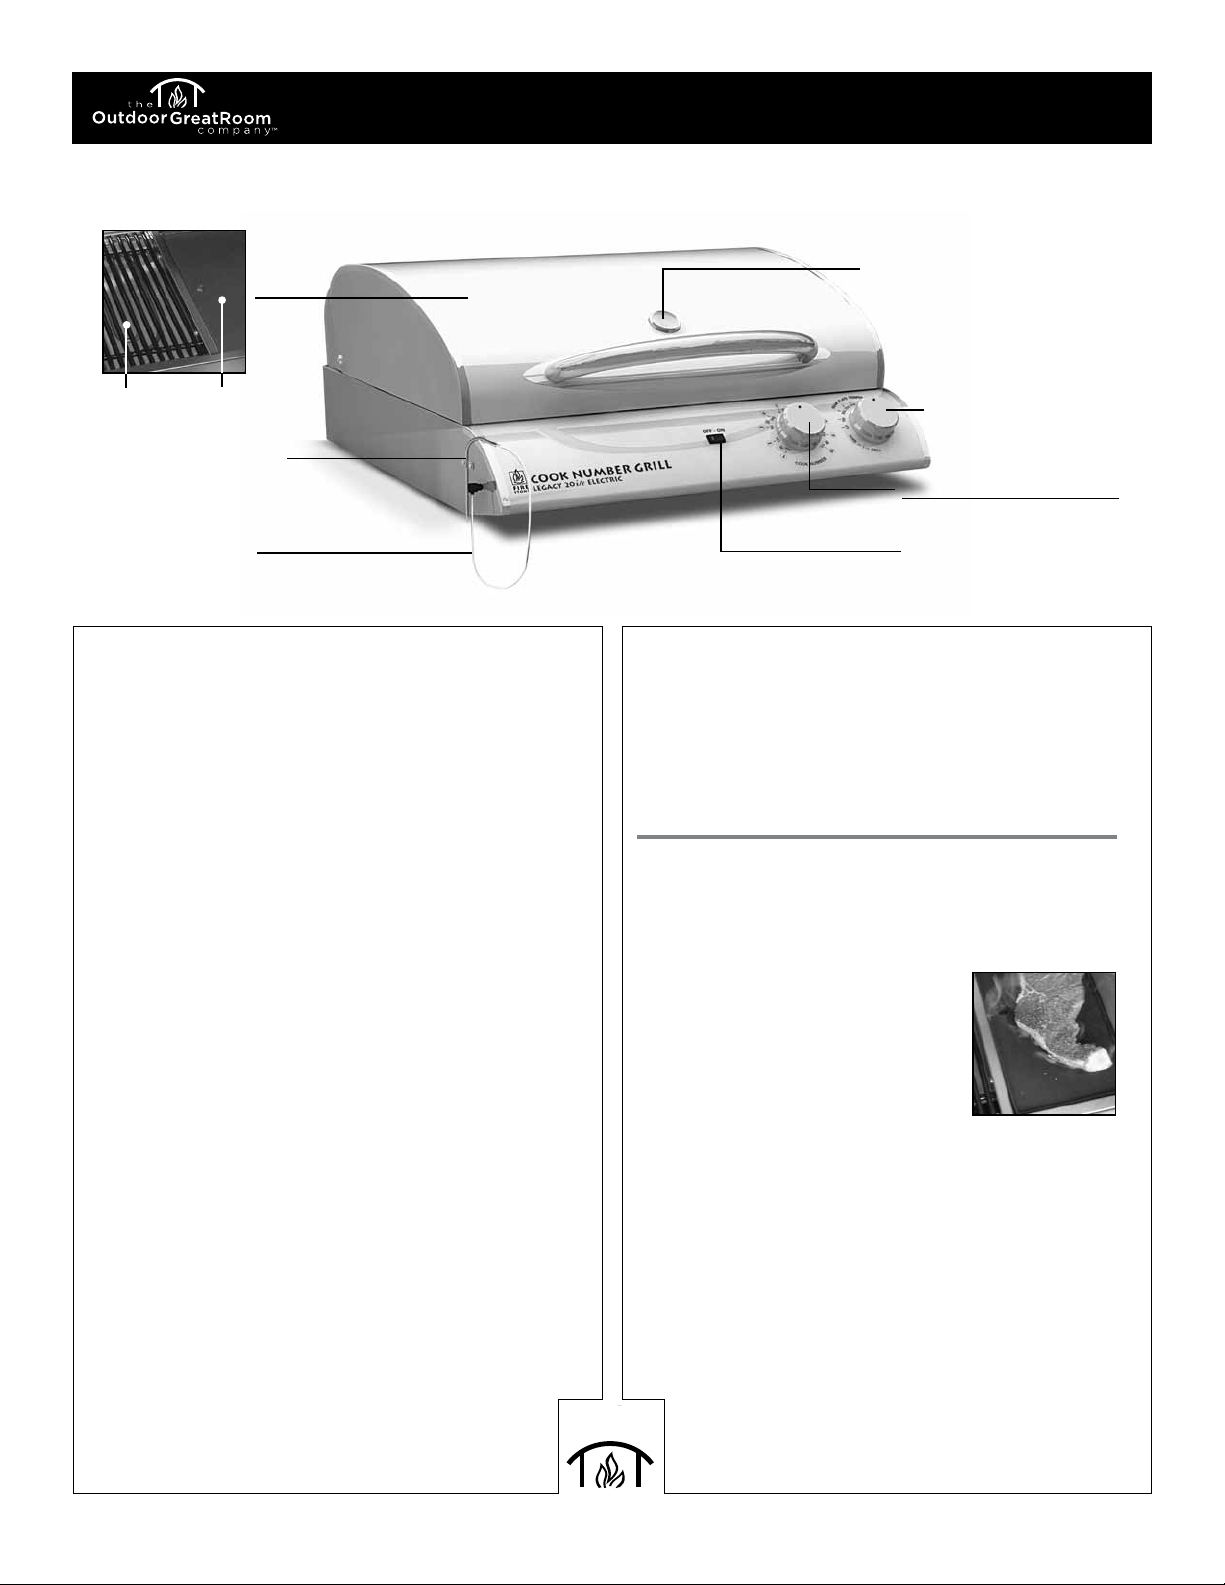
Cook Number
®
Control System
Monitor Probe
Hood Temperature Gauge
OFF/ON Rocker Switch
Searing Plate/Grill
Temperature Dial
(on models JAG20e
& LG20ie
Cook Control System™
Temperature Setting/Alert Dial
Probe Heat Shield
Cast Iron Searing Plate and
Stainless Steel Grate (inside)
6
Grill
Searing
Plate
Grilling and Roasting
1. Follow steps for Getting Started outlined on
page 4.
2. For professional grilling and convection
roasting, place meat or fillet on pre-heated
stainless steel grate. You may want to lightly
coat the steel grate with oil or non-stick
cooking spray prior to use.
3. For turkey, whole chicken, or roast, follow
recipe instructions for preparation, basting,
etc. as you normally would for indoor
range cooking. A V-shaped roasting rack is
recommended. Make sure to use a shallow
roasting pan to catch drippings.
4. Remove the COOK CONTROL
SYSTEM™ Monitor Probe from
holder and insert probe into
thick part of meat but NOT
touching the bone (see photo).
For steaks, fillets and roasts,
insert probe tip as near the
center of the meat as possible.
CAUTION: Probe gets hot during use. ALWAYS
use the probe heat shield, or high-temperature
gloves, when inserting and removing probe
from meat or fillet. NEVER let heat shield remain
inside hood when cooking.
5. Turn COOK CONTROL SYSTEM™ dial to
desired setting.
6. Close the hood and let convection cooking
do the rest. Keeping the hood closed is
important to the convection process.
7. When the probe detects the food has reached
its proper temperature, the alarm will sound
and the red lights will iilluminate.
8. When finished, wipe COOK CONTROL SYSTEM™
Probe clean and return it to holder.
9. Turn the far right control dial OFF by pushing
the black OFF / ON rocker switch to the left OFF
position, and unplug your grill after each use.
Baking
TIP: Use of seasoned baking stones, particularly
for breads and grill roasted pizza, can enhance the
quality of your baking. Experiment and discover
what works best for you.
1. Follow the steps for Getting Started outlined on
page 4.
2. For professional baking, place pan, sheet or dish
on grill.
3. Close hood, turn far right dial counterclockwise
to ignite grill, and wait for grill hood
temperature gauge to reach 300-350˚F.
4. Set a timer according to recipe instructions and
keep the hood closed as you normally would for
indoor range baking. This is important to the
convection process.
5. When finished, turn the far right control dial
OFF by pushing the black OFF / ON rocker switch
to the left OFF position, and unplug your grill
after each use.
** For best results and to prevent flareups, clean
your grill after every use. (see page 8 for more
deatils).
** It is strongly recommended that the vaporizor
plate is cleaned after each use. To clean, slide
drip tray out from back grill. Remove vaporizor
plate and scrape with a metal brush.
At Fire Stone, we’re constantly developing new
techniques to make cooking on your Electric COOK
NUMBER GRILL™ a great experience that delivers
the best results possible.
To learn more, visit www.firestonehp.com
7
HOW TO use your Cook number Grill
®
continued
T
U
N
A
S
E
A
F
O
O
D
F
I
S
H
B
R
A
T
W
U
R
S
T
G
R
O
U
N
D
B
E
E
F
P
O
R
K
B
O
N
E
L
E
S
S
-
C
H
I
C
K
E
N
-
B
R
E
A
S
T
-
W
H
O
L
E
S
T
E
A
K
S
-
-
R
A
R
E
M
E
D
I
U
M
R
A
R
E
M
E
D
I
U
M
M
E
D
I
U
M
W
E
L
L
W
E
L
L
D
O
N
E
-
-
S
T
E
A
K
S
1
3
5
º
F
1
4
0
º
F
1
4
5
º
F
1
5
0
º
F
1
5
5
º
F
1
6
0
º
F
1
6
5
º
F
1
7
0
º
F
1
7
5
º
F
C
O
O
K
N
U
M
B
E
R
S
Cleaning and Maintenance
ALWAYS BE SURE THE GRILL IS UNPLUGGED
BEFORE CLEANING
Periodically, remove the grilling grates and
searing plate and wash in soap and warm water.
Use a wash cloth or vegetable brush to clean the
cooking grids.
CAUTION: Never try to clean the cooking grids
until they are cool to the touch.
Cleaning the Grease Drawer, Vaporizor Plate,
and Aluminum Tray
To reduce the chance of fire, the grease drawer
vaporizor plate and aluminum tray should be
inspected before each grill use. Remove any
grease from the tray and scrape any residue off
the surface of the vaporizor plate. Wash with
soap and warm water. Aluminum tray should be
replaced often. To order more trays, contact your
dealer and reference part number SRVLGE60.
As with all appliances, proper care and
maintenance will keep this grill in top operating
condition. By following these cleaning
procedures on a regular basis, your Fire Stone
Legacy Grill will stay clean and work properly
with minimum effort.
WARNING Fire & Shock Risk
1. Remove the grilling grate on left for cleaning.
The vaporizer plate is designed to pull out for
cleaning with the grease tray from the back of
the unit. It can be removed for cleaning or just
scaped into place.
2. Using a putty knife or similar utensil, carefully
scrape the area below the heating element on
the left side for optimal performance.
Be careful NOT to scrape the heating element
directly.
WARNING Fire & Shock Risk
Do not line the bottom of the grill housing
with aluminum foil, sand or any substance that
will restrict the flow of grease into the grease
draining tray and receptacle.
n Failure to comply with these instructions could
result in a fire or explosion which could
cause property damage, serious bodily
injury or death.
CAUTION: Be sure the grill is OFF and cool before
cleaning.
Burning-off the grill after every cookout will
keep it ready for instant use. However, once a
year you should give the entire grill a thorough
cleaning to keep it in top operating condition.
Follow these steps:
1. Unplug the grill.
2. Brush the inside and bottom of the grill with
a stiff wire brush, and wash with soap and
warm water. Rinse thoroughly and let dry.
Cleaning Exterior Surfaces
Before initial use, and periodically thereafter,
wash the grill using soap and warm water. Use a
wash cloth or sponge for this process. Do not use
a stiff wire or brass brush that might scratch the
stainless steel surface.
Cleaning Exterior Surfaces–Stainless Steel
Weathering and extreme heat can cause exterior
stainless steel surfaces to turn tan in color.
Follow these steps for the best cleaning results:
1. Remove dirt or grease using hot water &
soap and a soft cloth. Then, polish and treat
the stainless surfaces using only an approved
stainless steel care product. Never use abrasive
cleaners or scrubbers as they will damage the
surface as well as destroy the printed graphic
surfaces used for operating instructions.
2. Finish by wiping your grill clean with a soft
cloth and allow to air dry before starting the
grill.
Black Porcelain or Powder Coated Finish
1. Folow directions above and/or use a glass
ceaner (i.e. Windex), for best results.
8
CAUTION: The OFF/ON rocker switch
found on the front panel of the Fire Stone
Legacy 20 i/e Electric COOK NUMBER
GRILL™ operates as a MANUAL switch and
DOES NOT shut off automatically. This is
a design feature which enables extended
grilling times for slow roasting.
Cook Number Grill
®
 Loading...