

Page 1
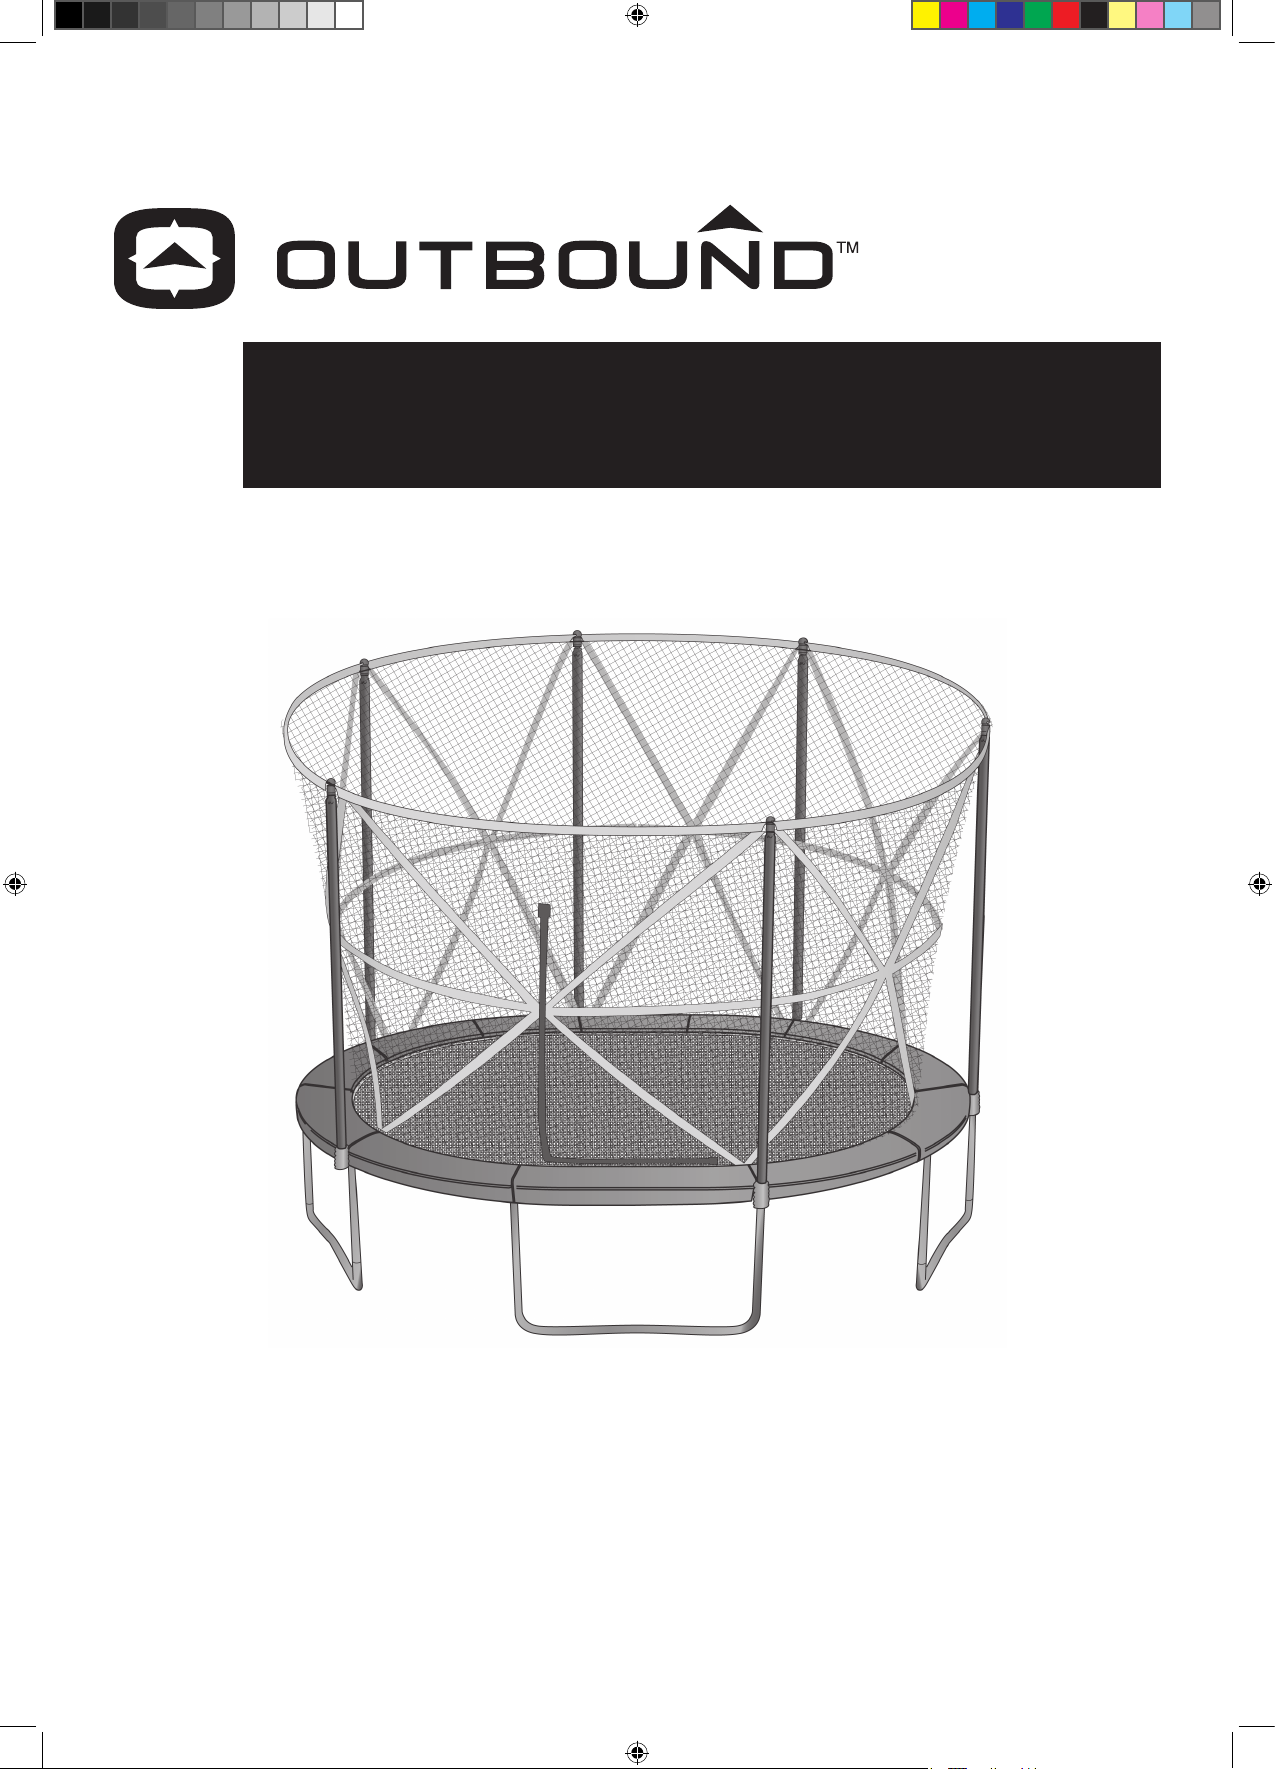
ASSEMBLY, INSTALLATION AND USE MANUAL
13x10' (4x3m) TRAMPOLINE
AND ENCLOSURE
Model No: 084-6693-4
IMPORTANT:
Please read and understand this manual
carefully before assembly. Before
beginning assembly of product, make
sure all parts are present. Compare parts
with packaging contents list. If any part
is missing, or if you have any questions,
contact the vendor’s customer service
department at 1-866-567-4089
084-6693.indd 1 12/5/2014 1:06:29 PM
Trifeuil Toronto, Canada
Toll-free: : 1-866-567-4089
Trileaf Distribution
M4S 2BS
Page 2
Model No. 084-6693-4
TM
TABLE OF CONTENTS
CHAPTER PAGE
Technical Specifications
Important Safety Instructions
Key Parts Diagram
Parts List
Assembly
17
18-19
16
Information on trampoline use
Cleaning and Maintenance
Warranty
124-25
13-5
120-23
124
Dear Customer,
Thank you for choosing an Outbound trampoline. We hope it will provide many
hours of quality exercise to make you feel better, look better and enjoy life to
its fullest. It is proven that a regular exercise program can improve physical and
mental health. The Outbound trampoline provides a convenient and simple way
to get your body in shape and achieve a happier and healthier lifestyle. Enjoy!
12
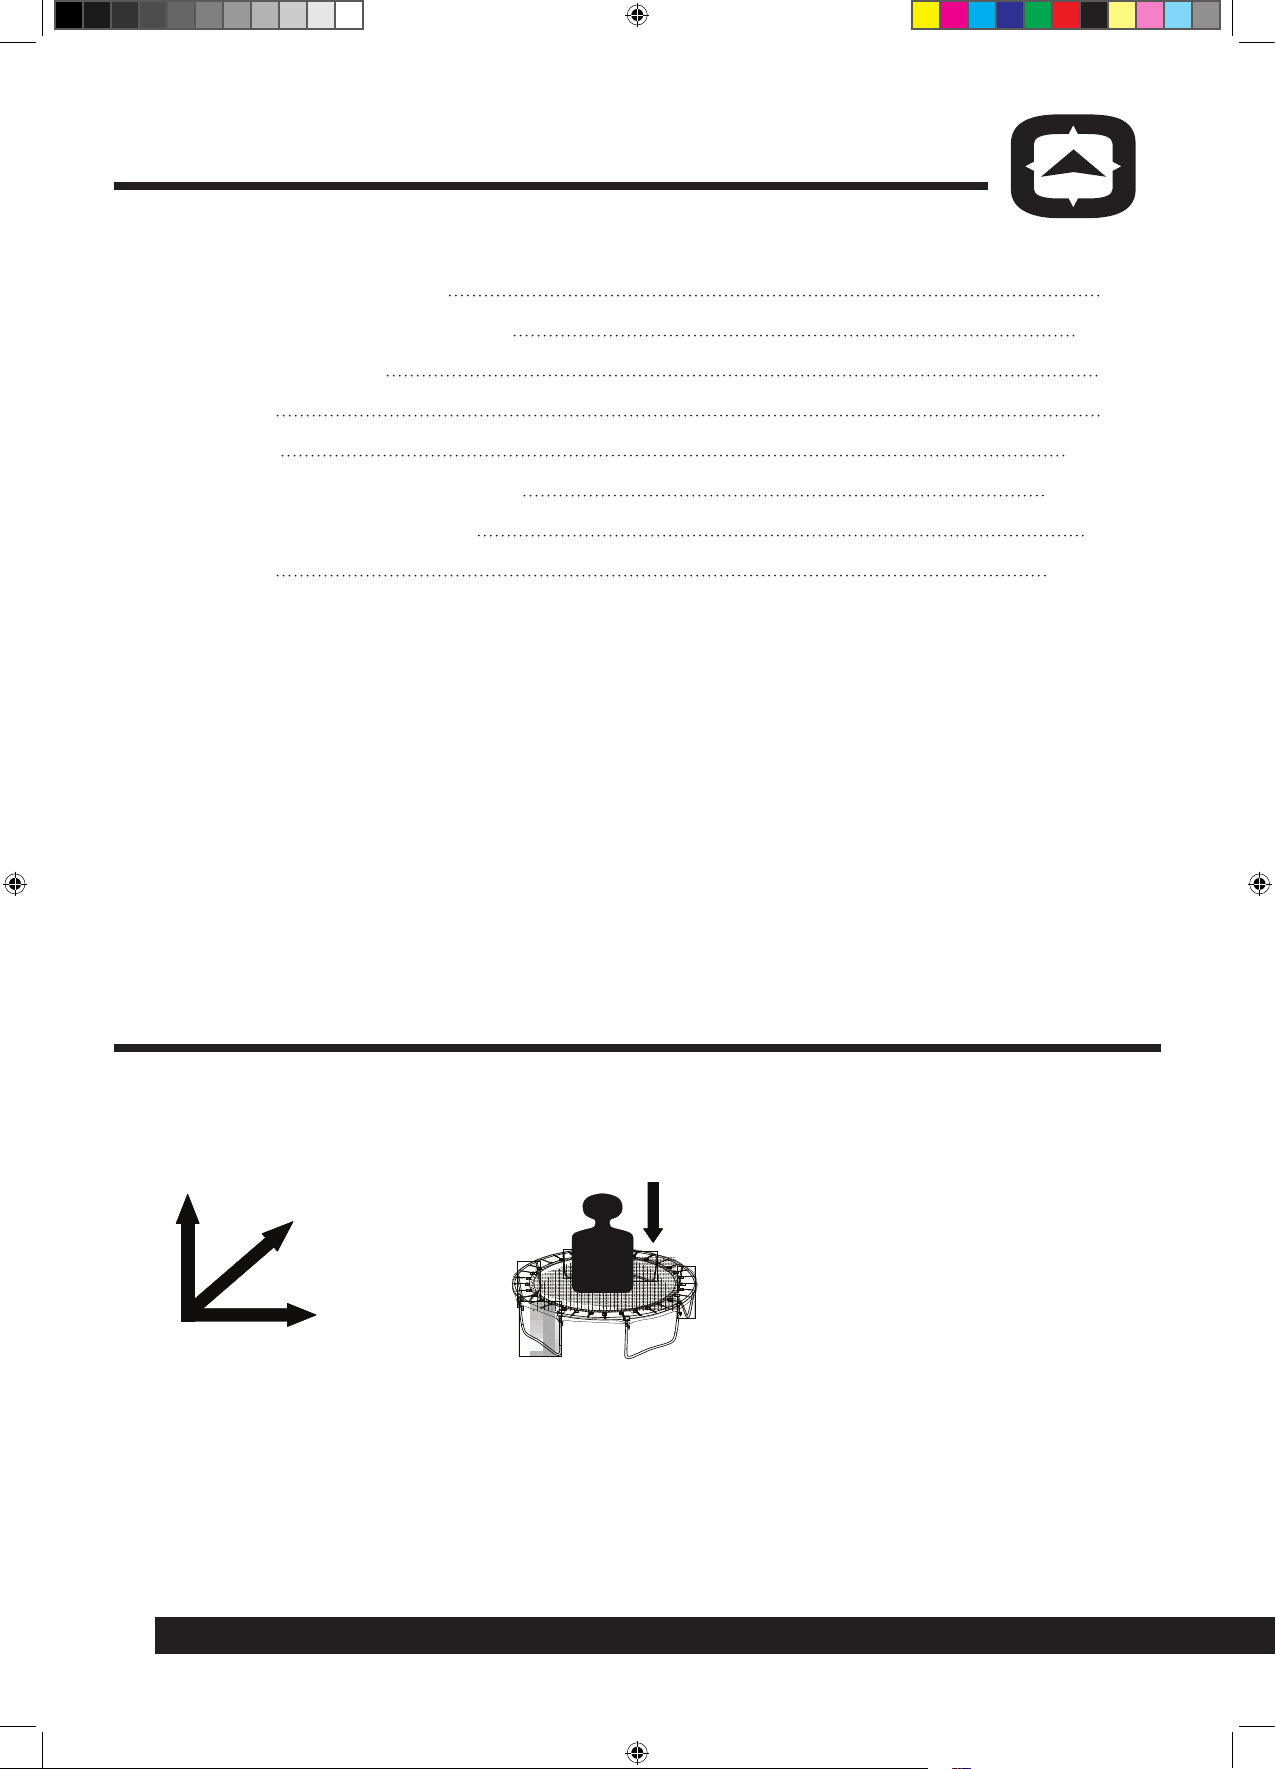
TECHNICAL SPECIFICATIONS
114 x 156” (289.5 x 396 cm)
250 lb
(113.6 kg)
2
084-6693.indd 2 12/5/2014 1:06:31 PM
Page 3
Model No. 084-6693-4
TM
IMPORTANT SAFETY INSTRUCTIONS
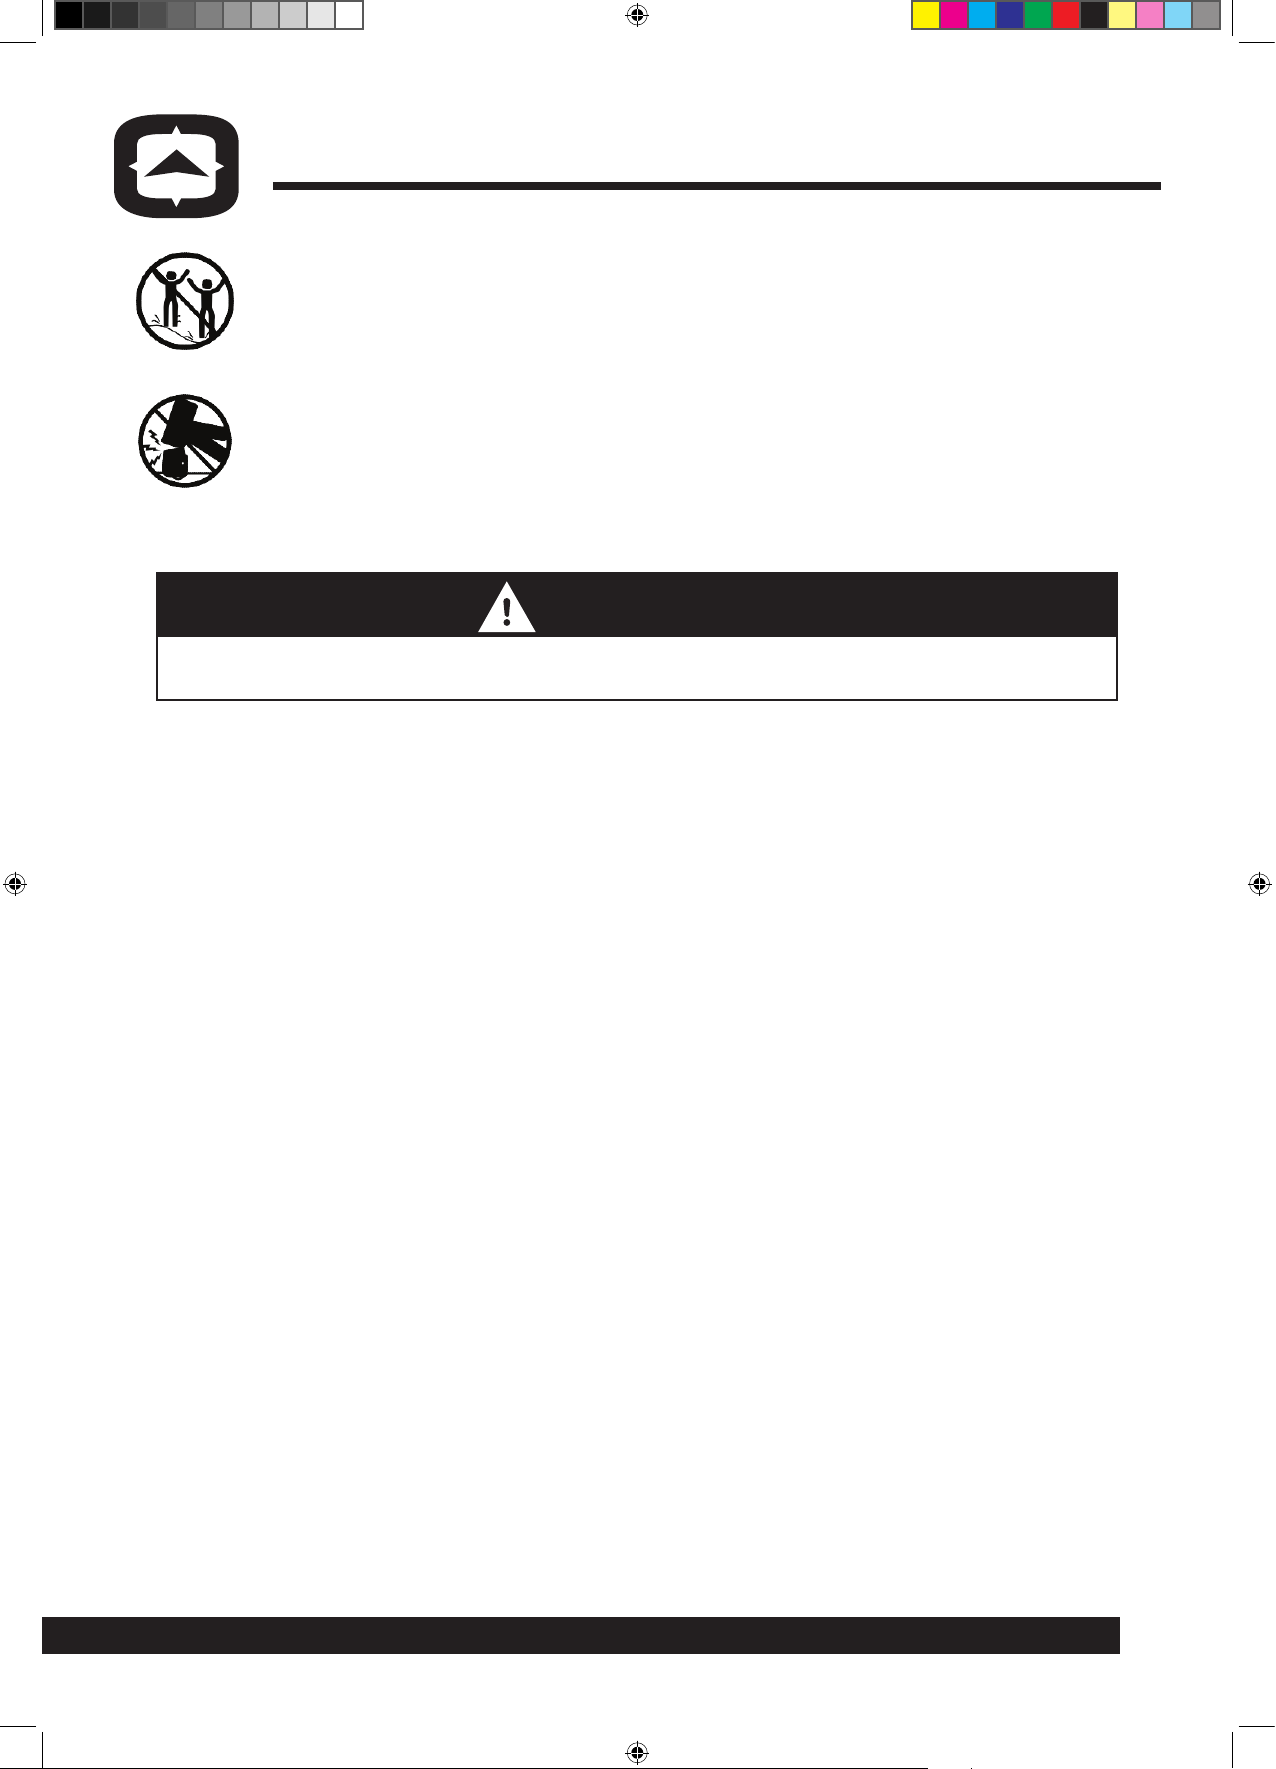
Only one person at a time is allowed on the trampoline. If more than
one person uses the trampoline at the same time, the danger of losing
control, collisions or falling from the trampoline increases. This might
lead to injuries to the head, neck, back, arms or legs.
Do not land on your head or neck. This poses danger of paralysis followed by death, even when landing in the middle of the jumping bed. To
avoid the danger of a head or neck injury never attempt to do somersaults on the trampoline.
Only use the trampoline with a responsible adult supervising.
WARNING
TO REDUCE THE RISK OF SERIOUS INJURY, READ THE FOLLOWING SAFETY
INSTRUCTIONS BEFORE ASSEMBLING AND USING THE TRAMPOLINE.
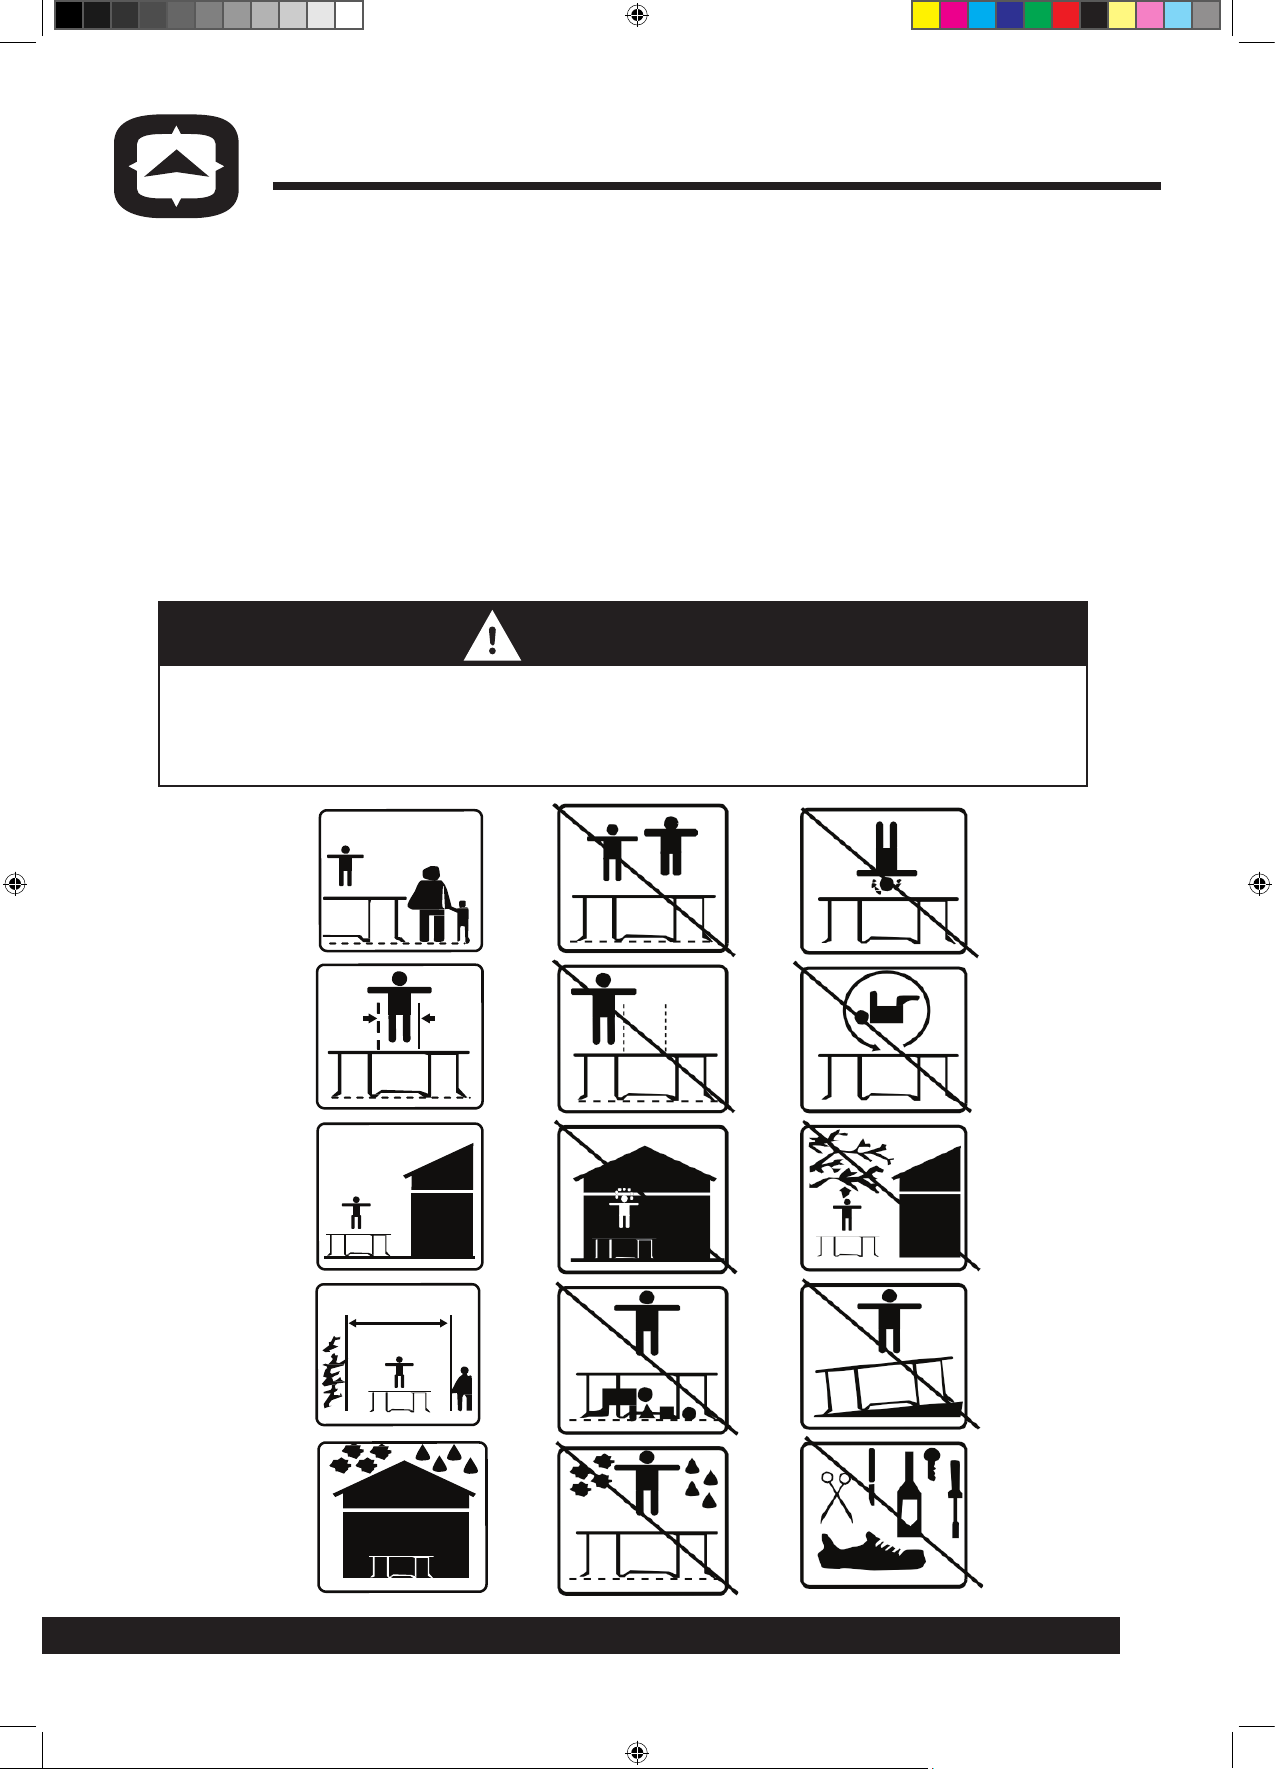
Safety instructions for trampoline
• Misuse and abuse of this trampoline is dangerous and can cause serious
injuries or death. Trampolines, being rebounding devices, propel the user to
unaccustomed heights and into a variety of body movements.
• Do not attempt or allow somersaults. Landing on the head or neck can cause
serious injury, paralysis or death, even when landing in the middle of the
trampoline.
• Do not allow more than one person on the trampoline. Use by more than one
person at the same time can result in serious injuries.
• Use the trampoline only with the supervision of a mature, knowledgeable
person.
• Trampolines over 20" (51 cm) tall are not recommended for use by children
under six years of age.
• Keep small children and pets away from the trampoline at all times, including
during use and assembly of the trampoline.
• Inspect the trampoline before each use. Make sure the frame padding is
correctly and securely positioned. Replace any worn, defective or missing
parts.
• Climb on and off the trampoline. It is a dangerous practice to jump from the
trampoline to the floor or ground when dismounting, or to jump onto the
trampoline when mounting. Do not use the trampoline as a springboard to
other objects.
3
084-6693.indd 3 12/5/2014 1:06:32 PM
Page 4

Model No. 084-6693-4
TM
IMPORTANT SAFETY INSTRUCTIONS
• Stop bouncing by flexing knees as feet come into contact with the
trampoline bed. Learn this skill before attempting others.
• Learn fundamental bounces and body positions thoroughly before trying
more advanced skills. A variety of trampoline activities can be carried out
by performing the basic fundamentals in various series and combinations,
performing one fundamental move after another, with or without feet
bounces between them.
• Avoid bouncing too high. Stay low until bounce control and repeated landing
in the centre of the trampoline can be accomplished. Control is more
important than height.
• With the head erect, focus eyes toward the perimeter of the trampoline. This
will help control bouncing.
• Avoid bouncing when tired. Keep turns short.
• Properly secure the trampoline when not in use. Protect it against
unauthorized use. If a trampoline ladder is used, the supervisor should re
move it from the trampoline when leaving the area to prevent unsupervised
access by children under six years of age.
• Keep objects away that could interfere with the user. Maintain a clear area
around the trampoline.
• Do not use the trampoline while under the influence of alcohol or drugs.
• For additional information concerning the trampoline equipment, contact the
manufacturer.
• For information concerning skill training, contact a certified trampoline
instructor.
• Bounce only when the surface of the bed is dry. Wind or air movement should
be calm to gentle. The trampoline should not be used in gusty or severe
winds.
• Read all instructions before using the trampoline. Warnings and instructions
for the care, maintenance and the use of this trampoline are included to
promote safe, enjoyable use of this equipment.
• This trampoline is for home use only. Do not use for institutional or
commercial purposes. Failure to follow this warning could result in minor or
moderate injury.
• The weight limit on the trampoline is 250 lbs. (113.6 kg).
4
084-6693.indd 4 12/5/2014 1:06:32 PM
Page 5
Model No. 084-6693-4
TM
IMPORTANT SAFETY INSTRUCTIONS
Safety instructions for enclosure net
• Do not bounce against the trampoline net.
• This enclosure net is only to be used with a trampoline of a size for which the
enclosure is designed.
• Make sure that no fire is lit close to the enclosure. In windy conditions, sparks
and embers can travel significant distances and burn holes in the enclosure
net.
• Any large trampoline with an enclosure net installed can be blown around
in high winds and cause personal injury or property damage. We recommend
removing the trampoline enclosure and disassembling the trampoline in
strong winds.
WARNING
Before starting any exercise or conditioning program consult a personal
physician to see if you require a complete physical exam. This is especially
important if you are over the age of 35, have never exercised before, are
pregnant or suffer from any illness.
084-6693.indd 5 12/5/2014 1:06:33 PM
5
Page 6
Model No. 084-6693-4
TM
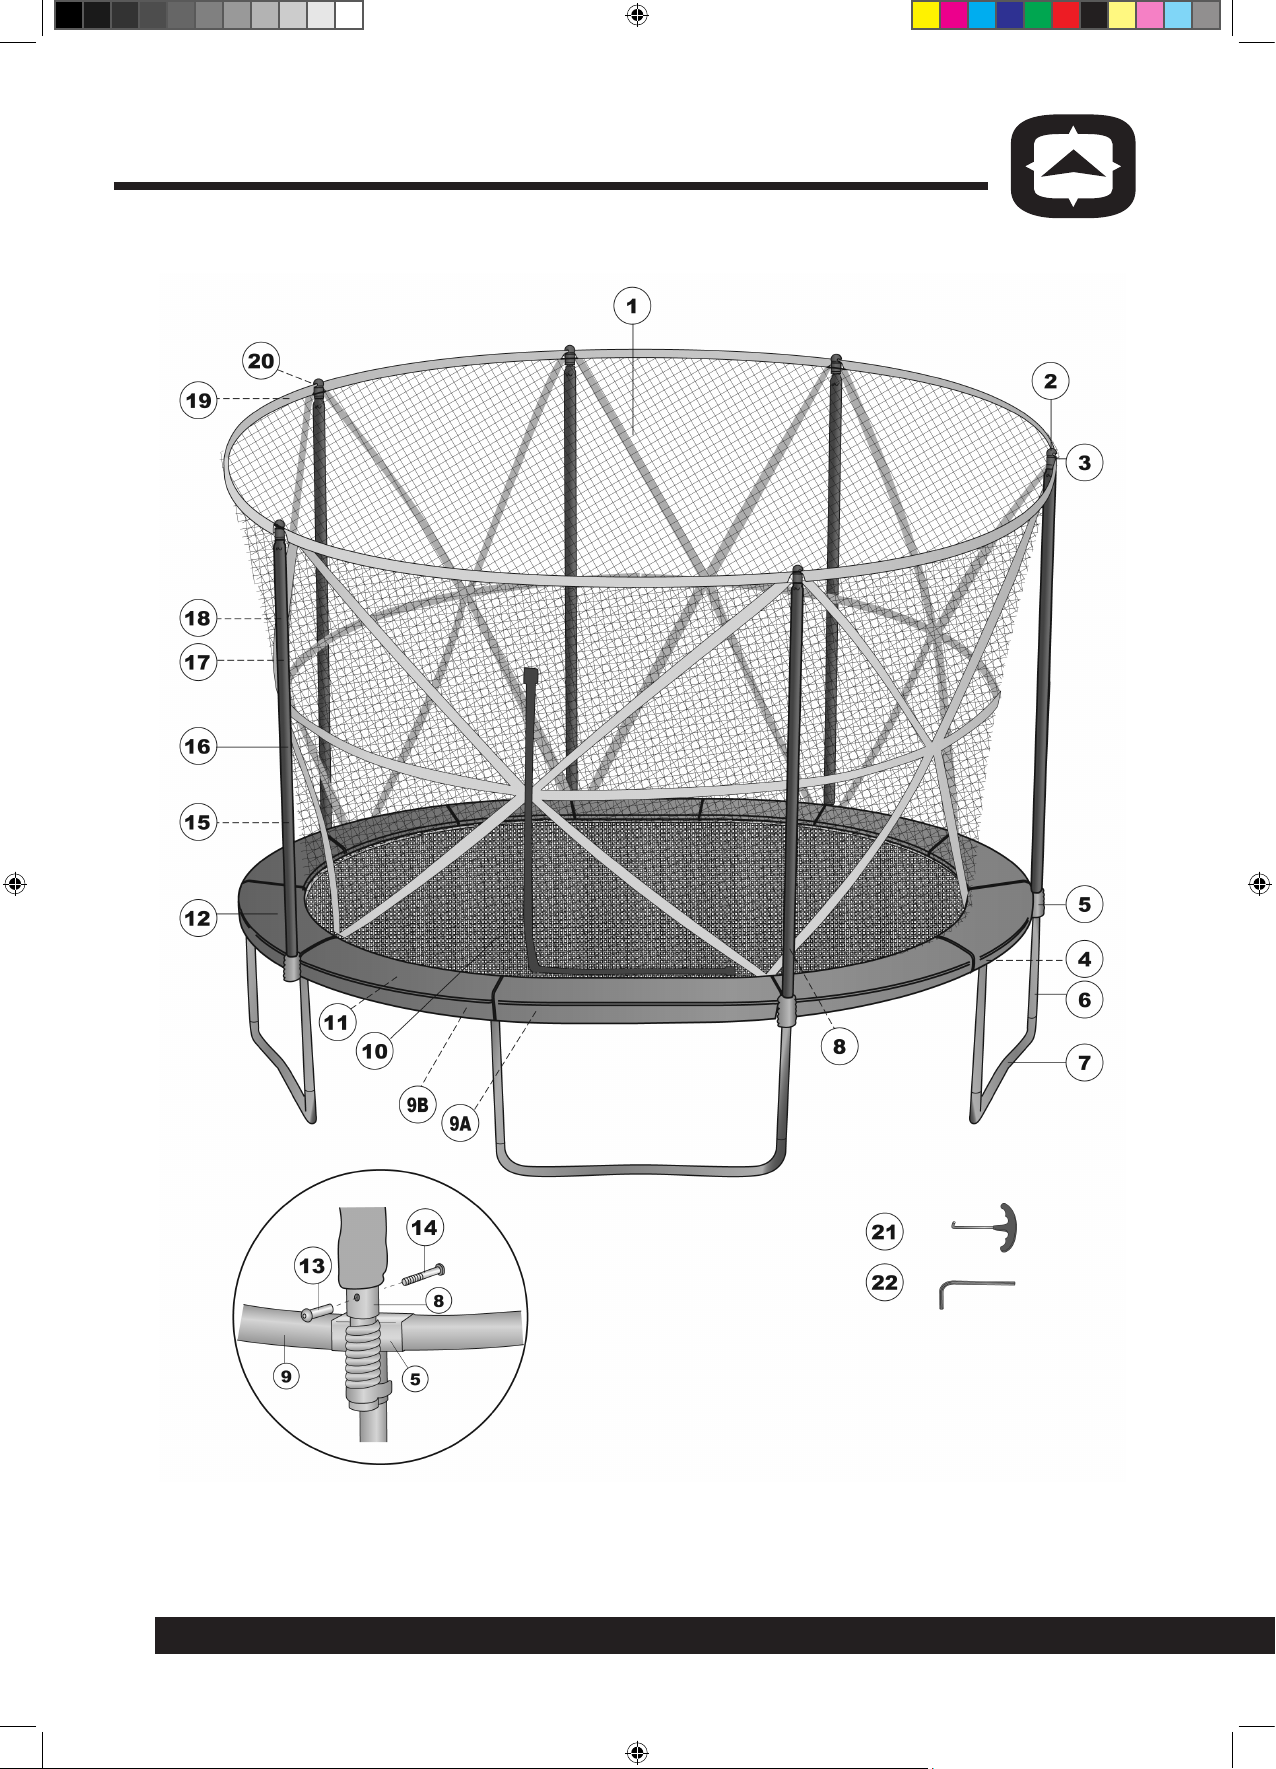
KEY PARTS DIAGRAM
6
084-6693.indd 6 12/5/2014 1:06:34 PM
Page 7
Model No. 084-6693-4
TM
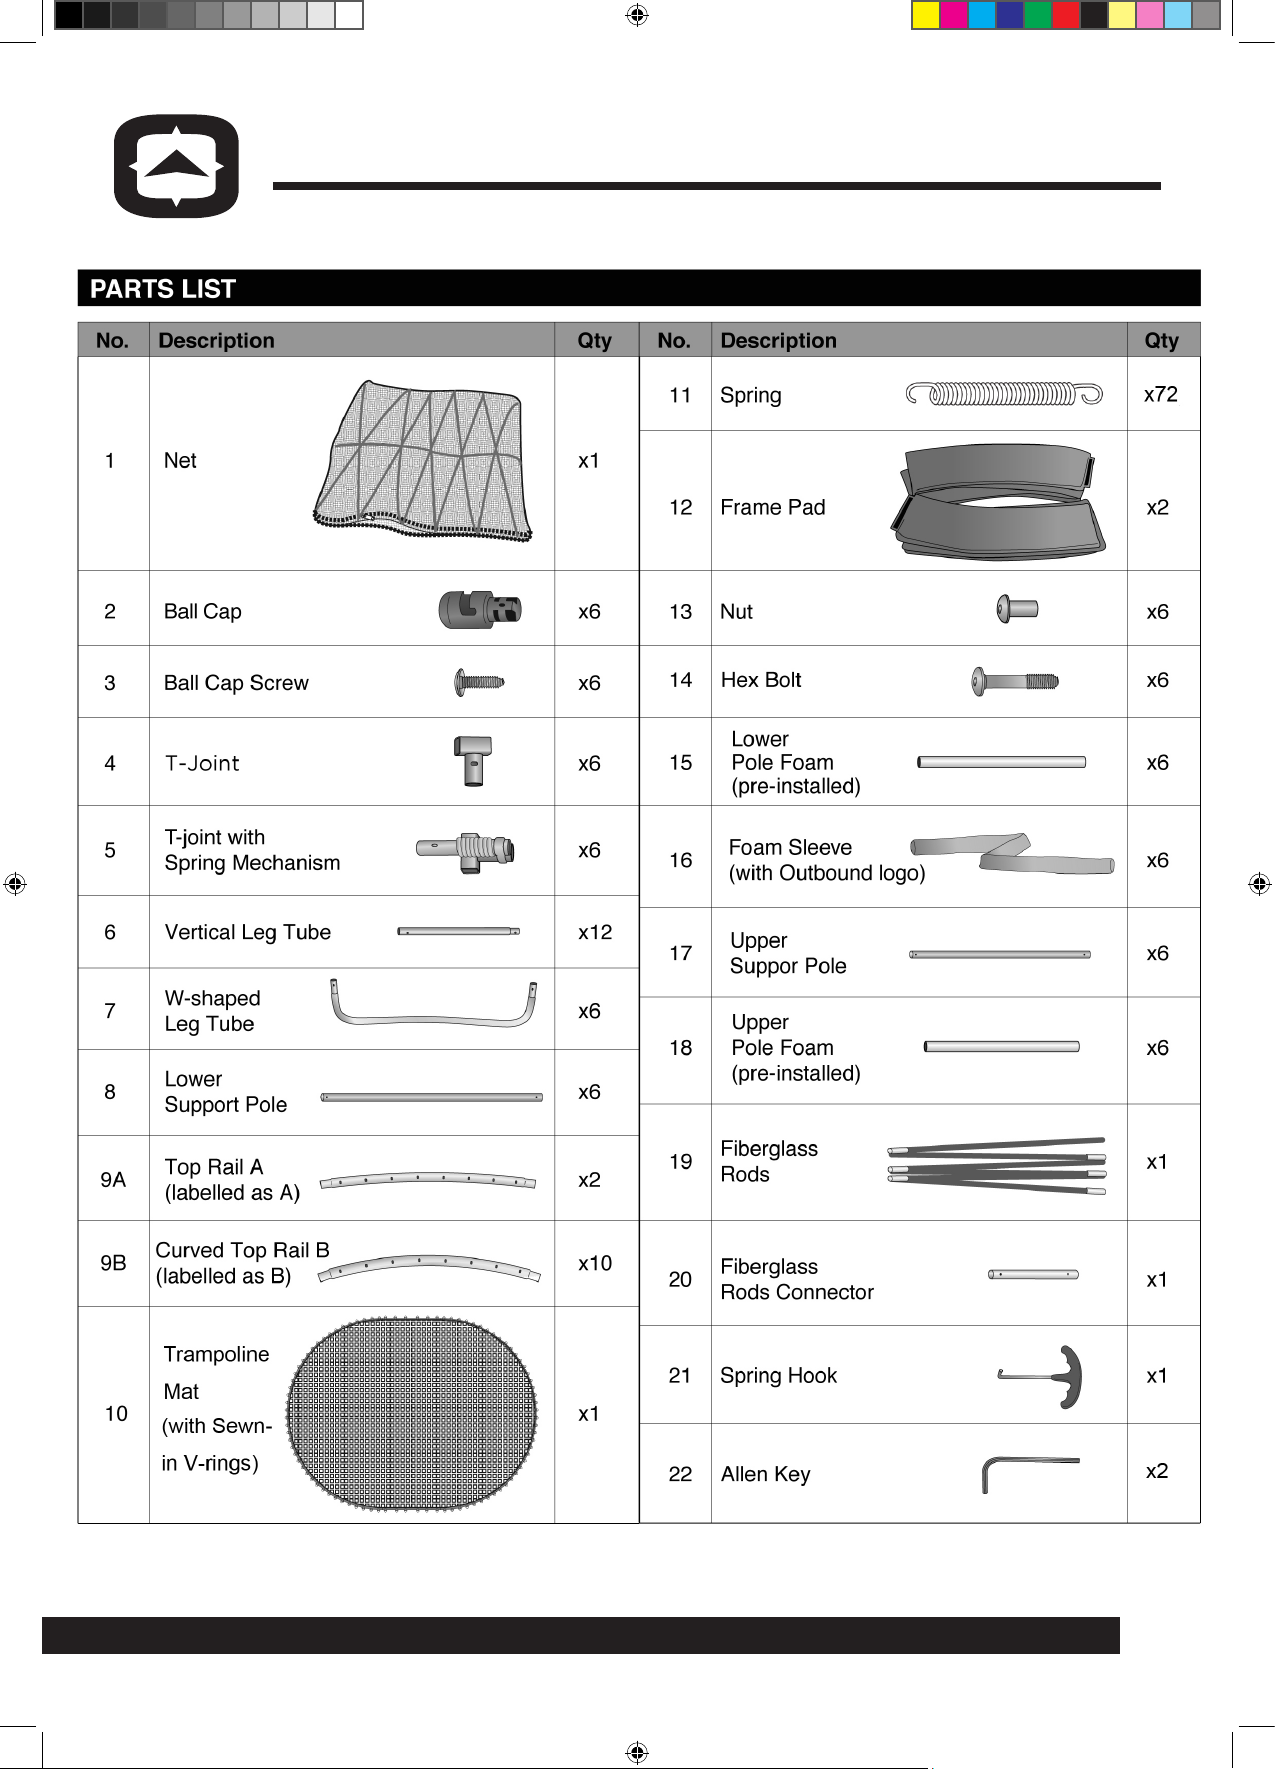
PARTS LIST
7
084-6693.indd 7 12/5/2014 1:06:34 PM
Page 8
Model No. 084-6693-4
TM
ASSEMBLY
Place all parts from the box in a cleared area and position them on
the floor in front of you. Remove all packing materials and place
them back in the box. Do not dispose of the packing materials until
assembly is completed. Read each step carefully before beginning
assembly and make sure you understand each step. If you are missing
a part, please call our toll-free number for assistance:
1-866-567-4089.
• Always use two or more strong people to assemble the
trampoline. Failure to use two or more strong people may allow
the springs to strike back and hit someone, which could cause
serious injury or death.
• Keep children and pets away from the trampoline during assembly.
WARNING
• Keep fingers away from the places where they can be pinched
or trapped.
• The frame pad must be installed before using the trampoline.
• Do not attempt to assemble the trampoline if any parts are missing.
• Adequate overhead clearance is essential. A minimum of 8 m (24 feet)
from ground level is recommended. Provide clearance for wires, tree
limbs, and other possible hazards.
• Lateral clearance is essential. Place the trampoline away from
walls, structures, fences and other play areas. Maintain a clear space on
all sides of the trampoline.
• Place the trampoline on a level surface before use.
• Use the trampoline in a well-lit area. Artificial illumination may be required
for indoor or shady areas.
• Secure the trampoline against unauthorized and unsupervised use.
• Remove any obstructions from beneath the trampoline.
• The owner and supervisors of the trampoline are responsible for making
all users aware of practices specified in the user instructions.
8
084-6693.indd 8 12/5/2014 1:06:35 PM
Page 9
Model No. 084-6693-4
TM
ASSEMBLY
Step 1: Preparation
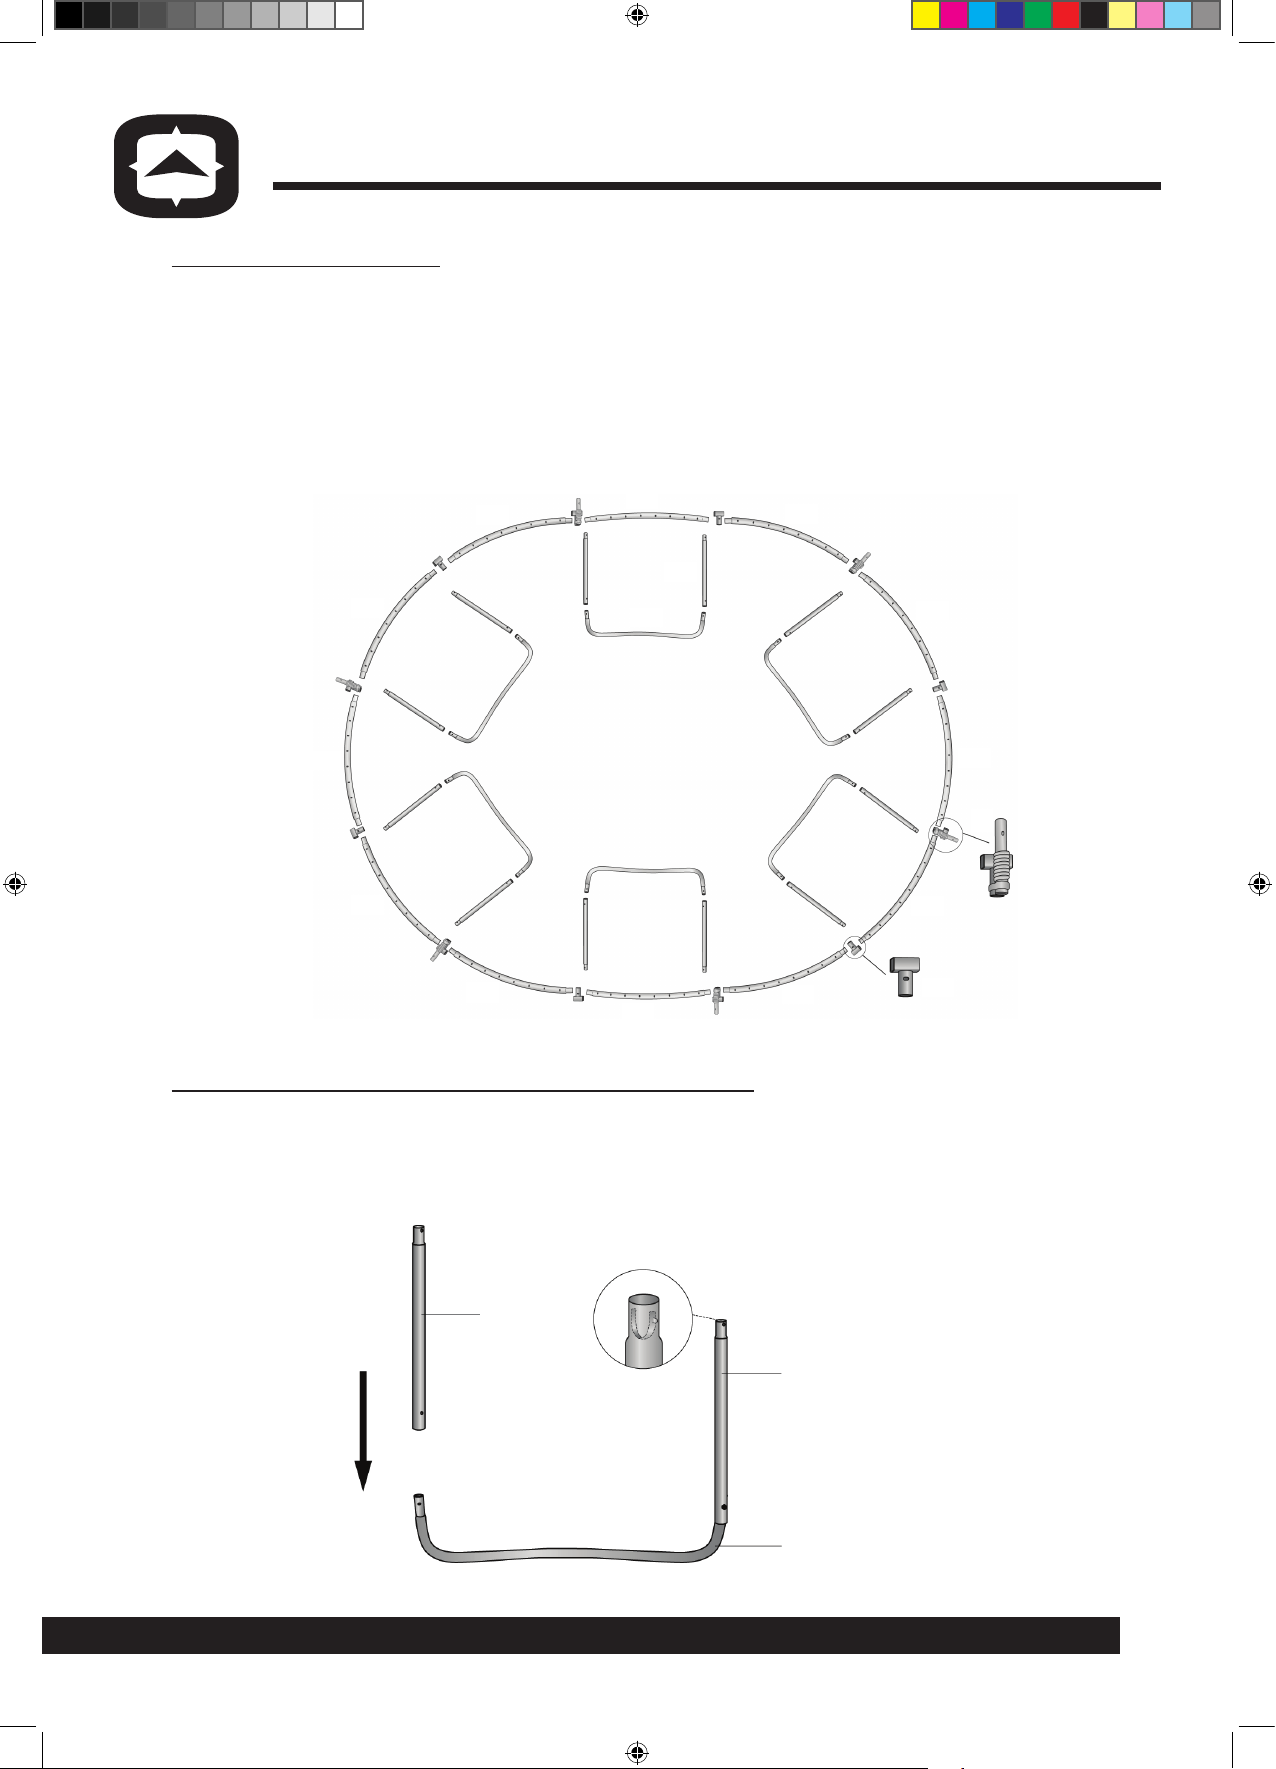
• Place the Top Rail Tubes (9A & 9B), T-Joint (4), T-Joint with Spring
Mechanism (5), Vertical Leg Tubes (6) and W-shaped Tubes (7) on a level
surface, as shown in the picture below. This provides an overview of the parts
and the way they should be assembled.
• The two types of T-Joints (4 & 5) must be alternately placed (4 – 5 – 4 – 5)
before connecting the top rail pieces.
9B
9B
9B
9B
9B
9A
6
7
9A
Step 2: Assembling the vertical leg tubes
9B
9B
9B
9B
5
9B
4
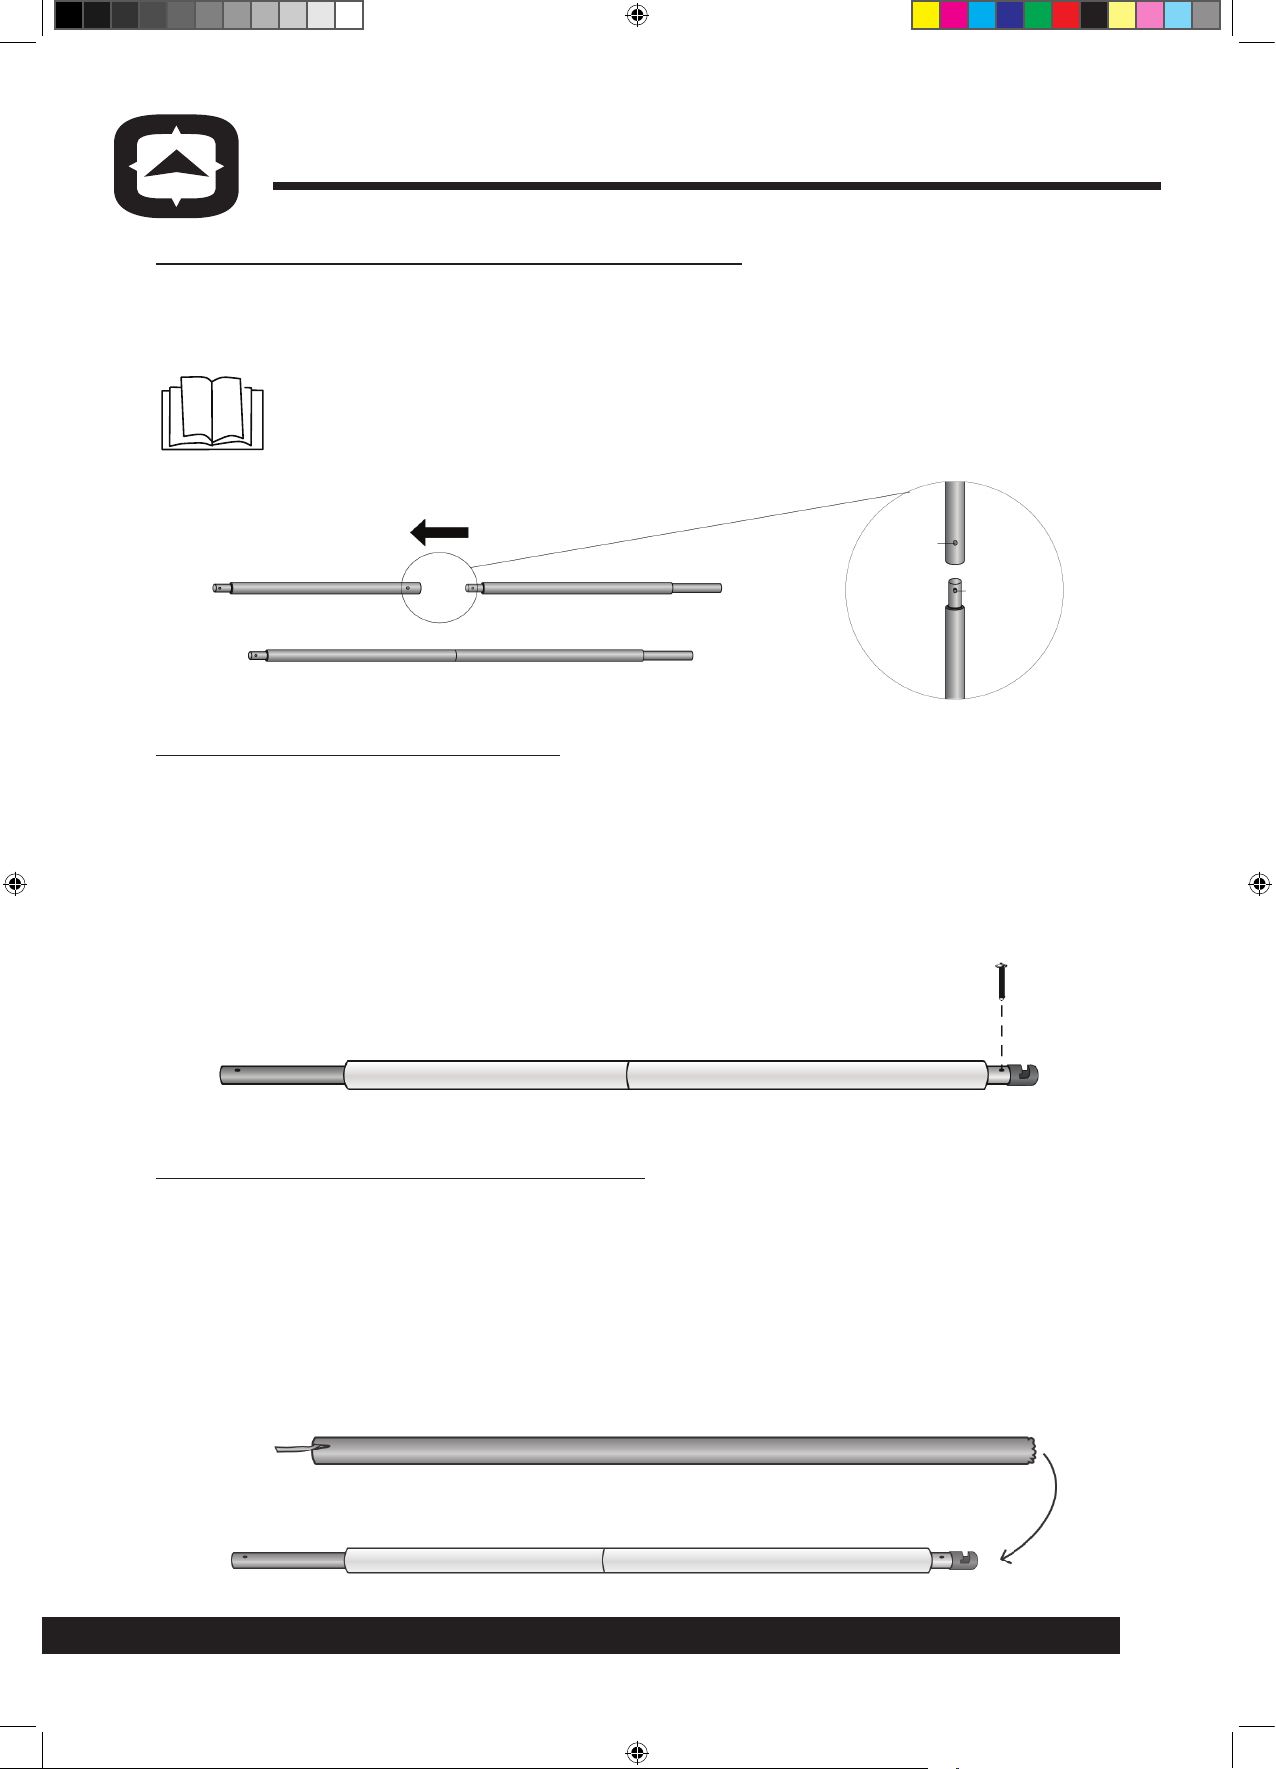
• Connect the Vertical Leg Tube (6) with W-shaped tubes (7).
Ensure spring-loaded locking pins are aligned with locking holes and pin
locks into the secured position.
6
6
7
9
084-6693.indd 9 12/5/2014 1:06:36 PM
Page 10
Model No. 084-6693-4
TM
ASSEMBLY
Step 3: Assembling the top rail frame
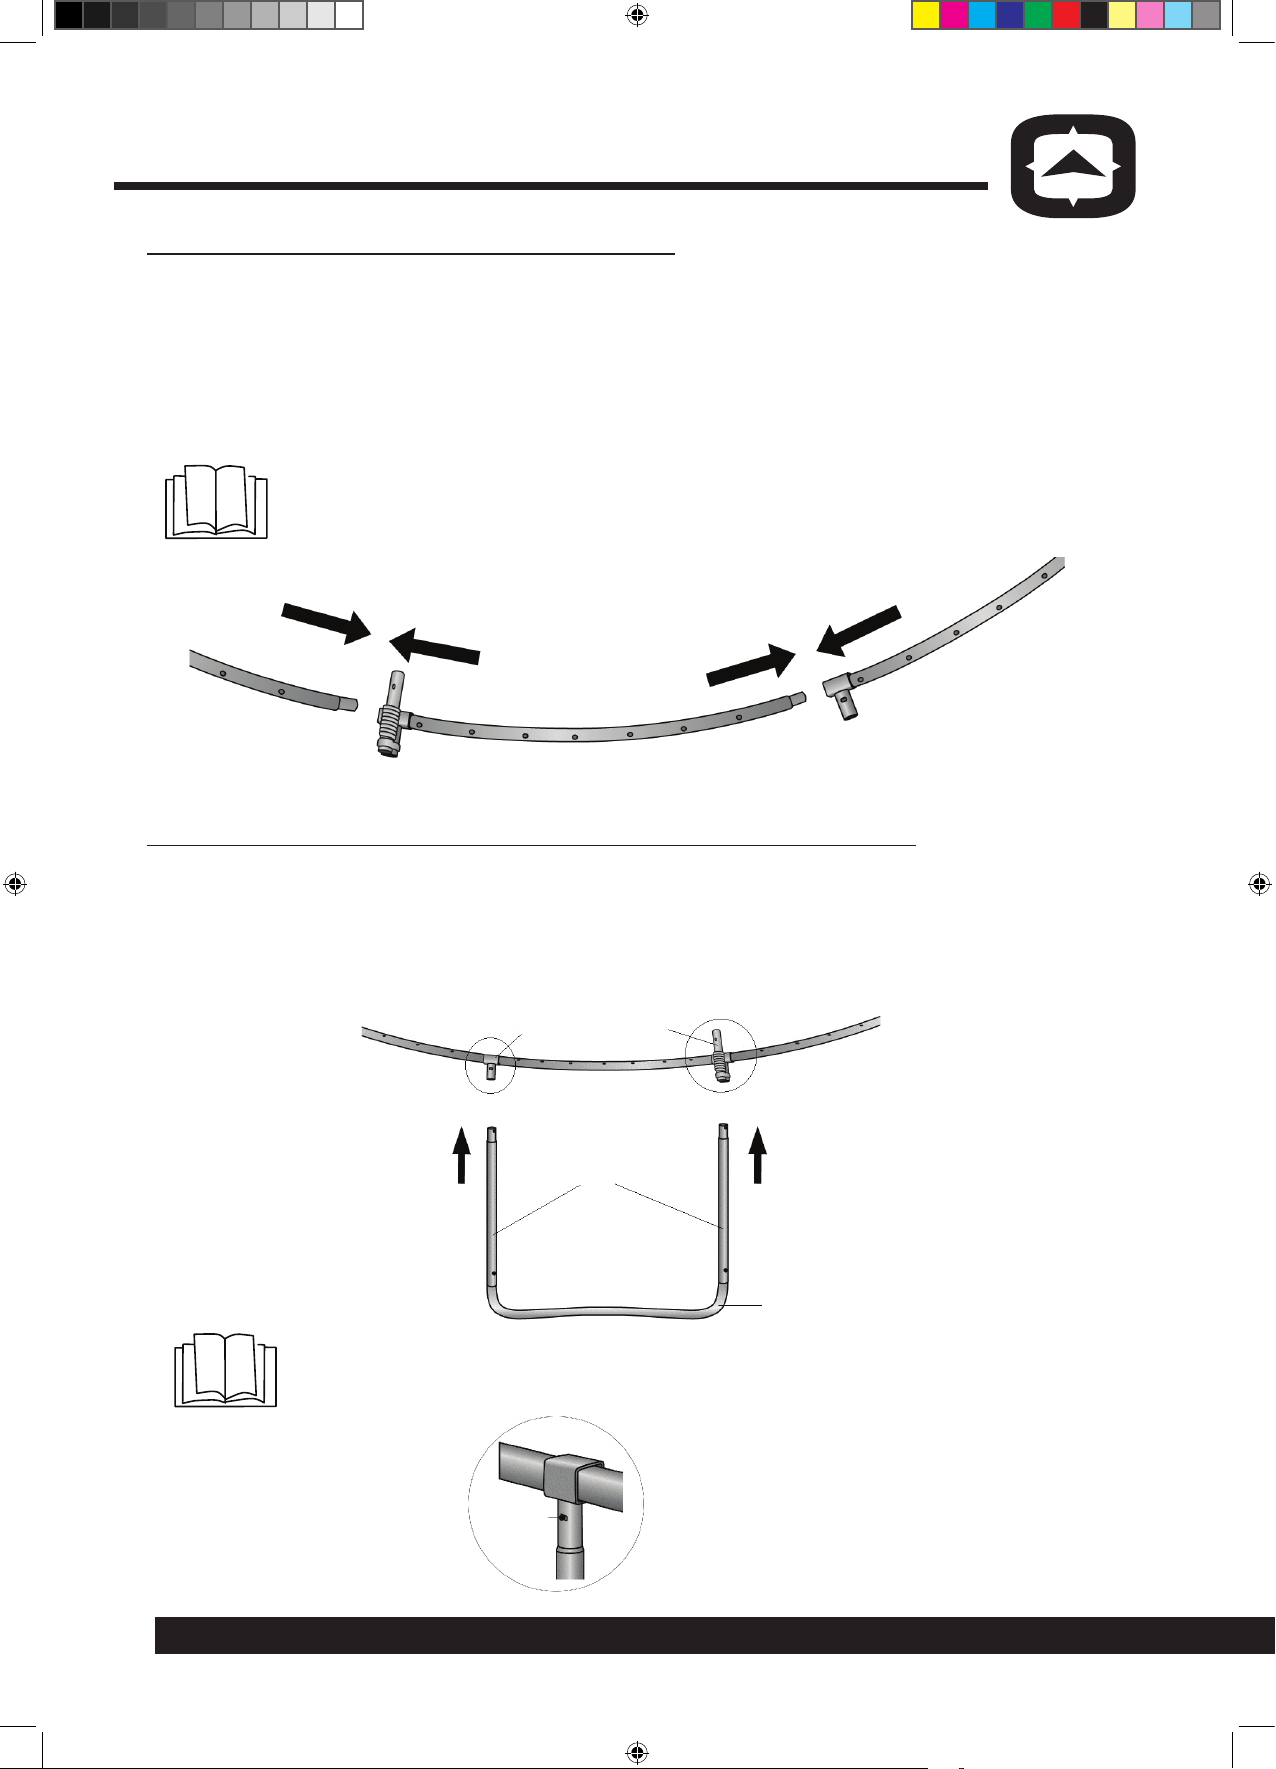
• Connect Top Rail Tubes (9A & 9B) to the T-Joints (4 & 5). Make sure
on T-Joints (5), the side with Spring Mechanism faces away from the
centre of the trampoline. Always slide the bigger end of the Top Rail
Tube (9A & 9B) into the T-shaped Joints (4 or 5) first. Repeat this step
with the other 11 rail tubes, making a total of 12 top rail sections.
• Connect all 12 assembled sections into one circle.
Note: When connecting the Top Rail Tubes (9A & 9B) to the
T-Joints (4 or 5) be sure that the hole on each T-Joint is facing the
inner side of the Top Rail Frame.
STEP 4: Assembling the leg tubes to the top rail tubes
• Connect the assembled Leg Tubes to the assembled Top Rail Frame.
• Slide the T-joints (4 & 5) into the Vertical Legs (6), make sure that the
locking tabs on the Vertical Leg Tubes (6) go through the hole on the
T-Joints (4 & 5).
4
6
Note: Make sure all the locking holes and tabs are facing inner
toward the jumping mat.
5
7
Locking
tab
10
084-6693.indd 10 12/5/2014 1:06:38 PM
Page 11
Model No. 084-6693-4
TM
ASSEMBLY
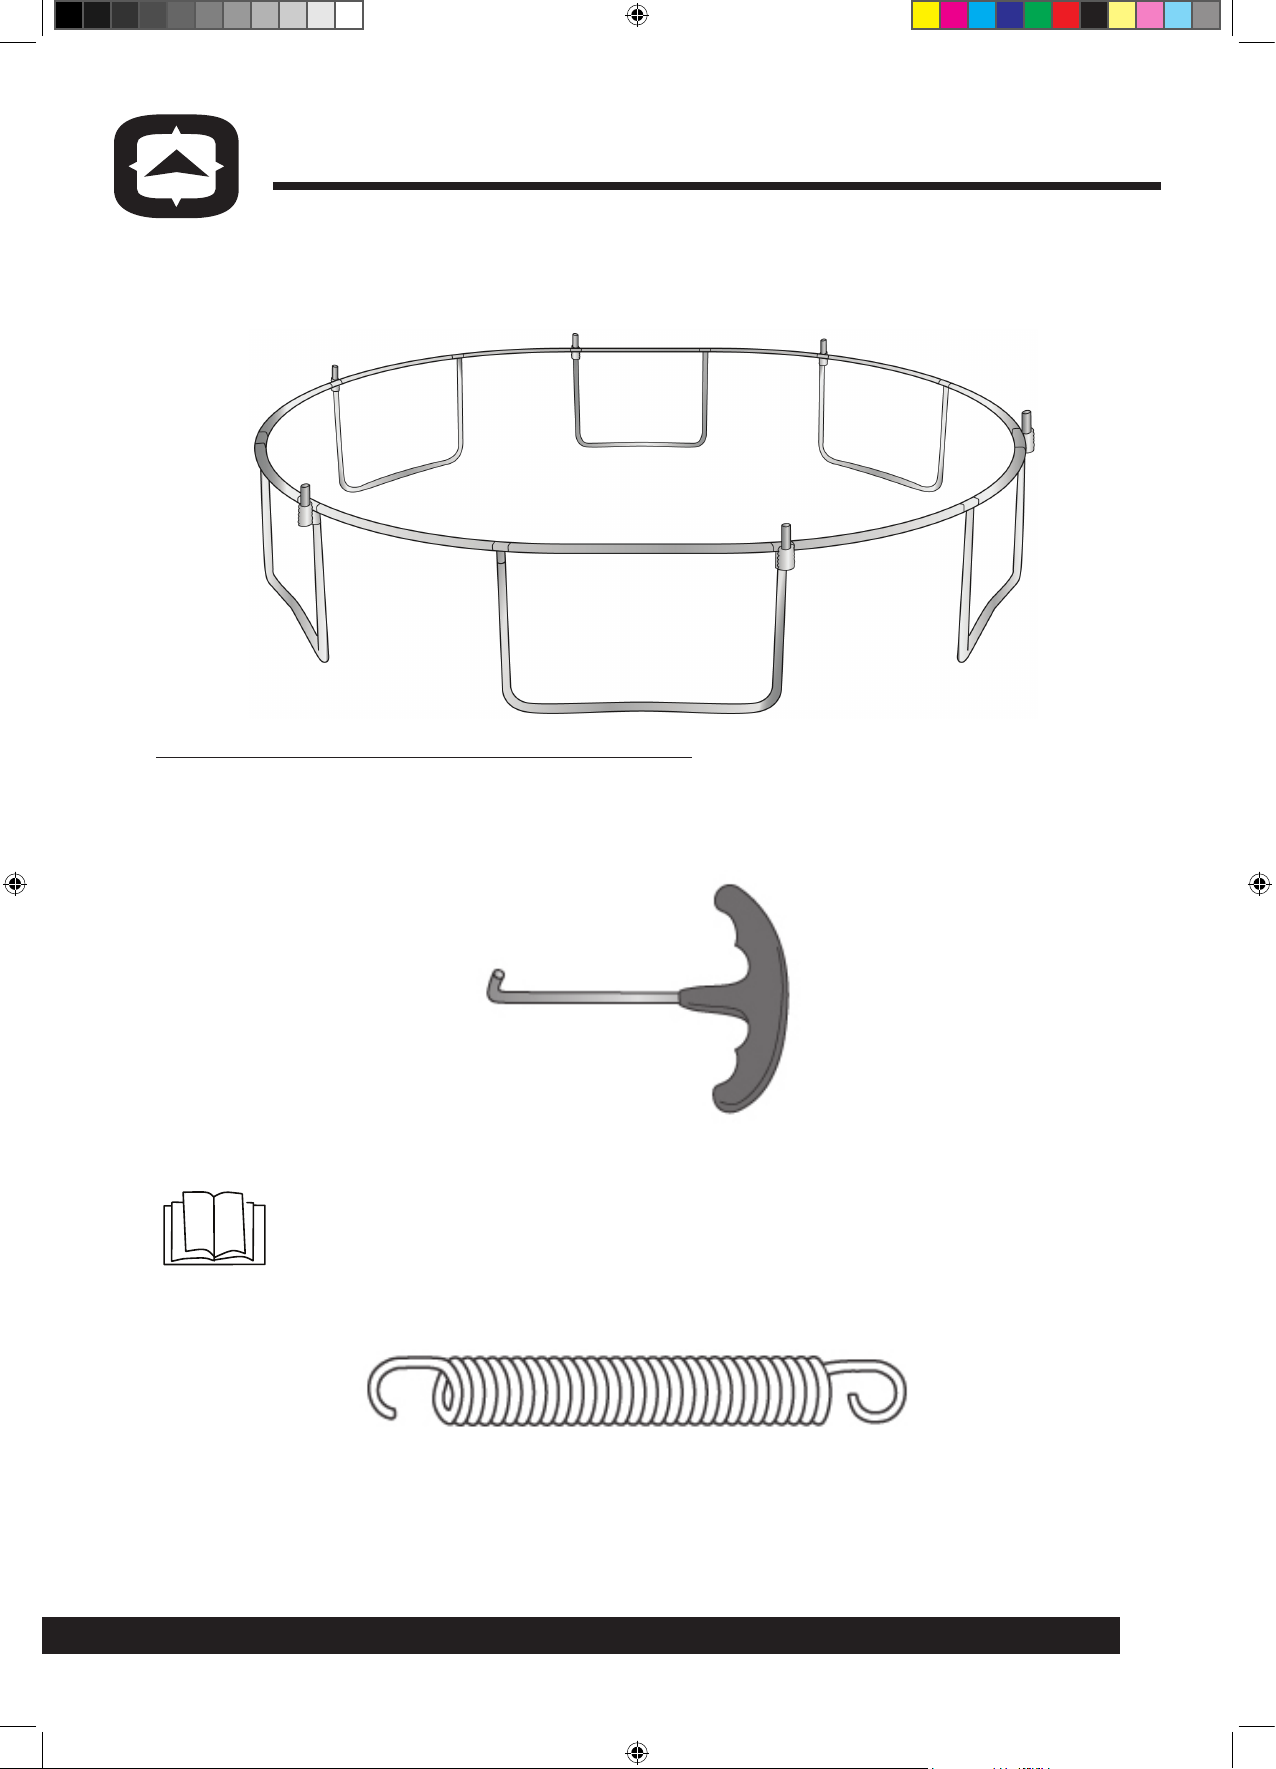
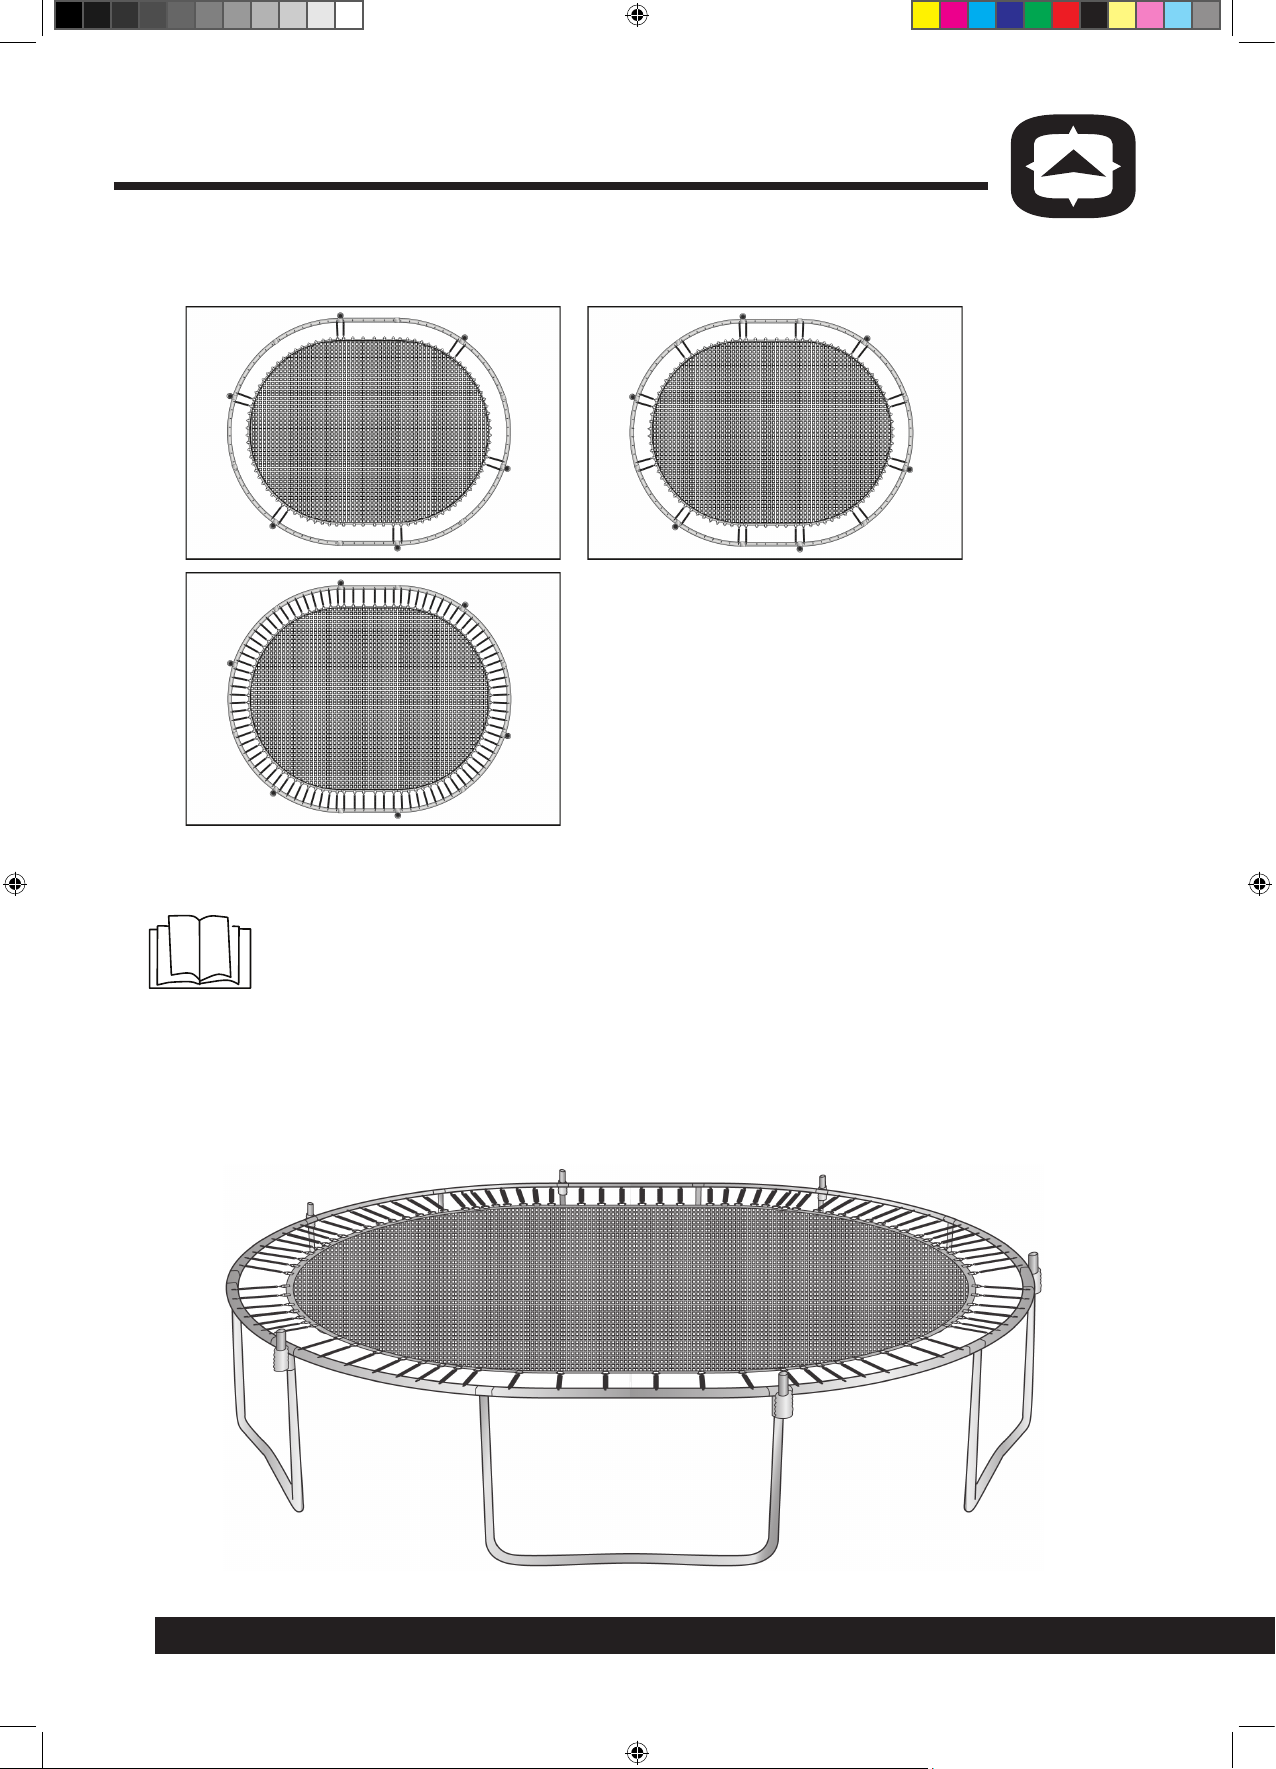
• After completing the assembly, the trampoline frame should look like
the illustration below.
STEP 5: Preparing the trampoline mat
• To facilitate the assembly of the springs to the mat, please use the Spring
Hook provided to pull the springs during assembly.
Spring hook
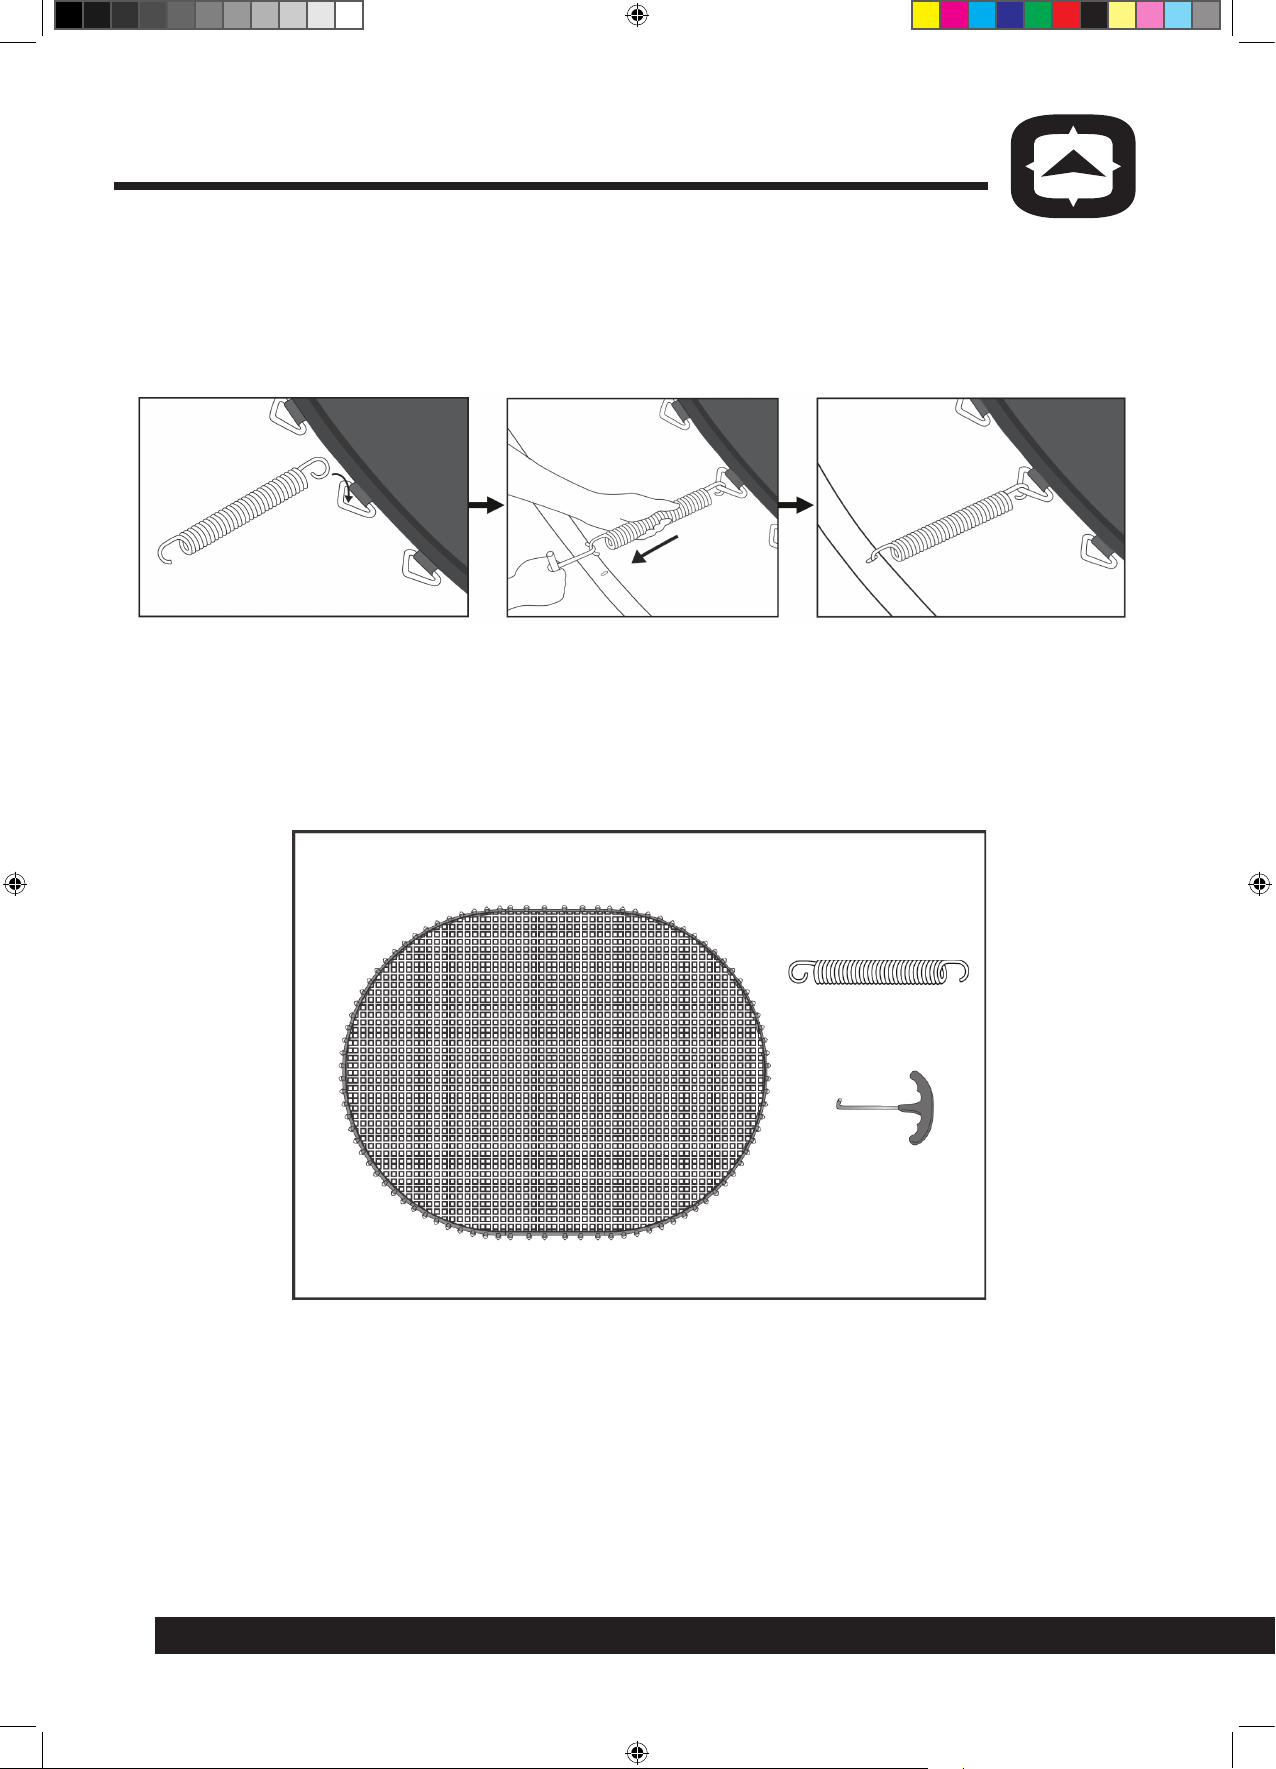
Note: The hooks at each end of the spring dierent in the opening.
One is wider, and the other is narrower. See the spring as this:
Wider opening Narrower opening
11
084-6693.indd 11 12/5/2014 1:06:38 PM
Page 12
Model No. 084-6693-4
TM
ASSEMBLY
• Put the end with narrower opening to the V-ring, and the end with
wider opening to the holes on the top rail. Please see below illustrations:
• Unfold the Trampoline Mat (10).
• Have the Springs (11) and Spring Hook Tool (21) ready for assembly.
x 72
x 1
12
084-6693.indd 12 12/5/2014 1:06:39 PM
Page 13
Model No. 084-6693-4
TM
ASSEMBLY
STEP 6: Connecting the trampoline mat to the top rail frame
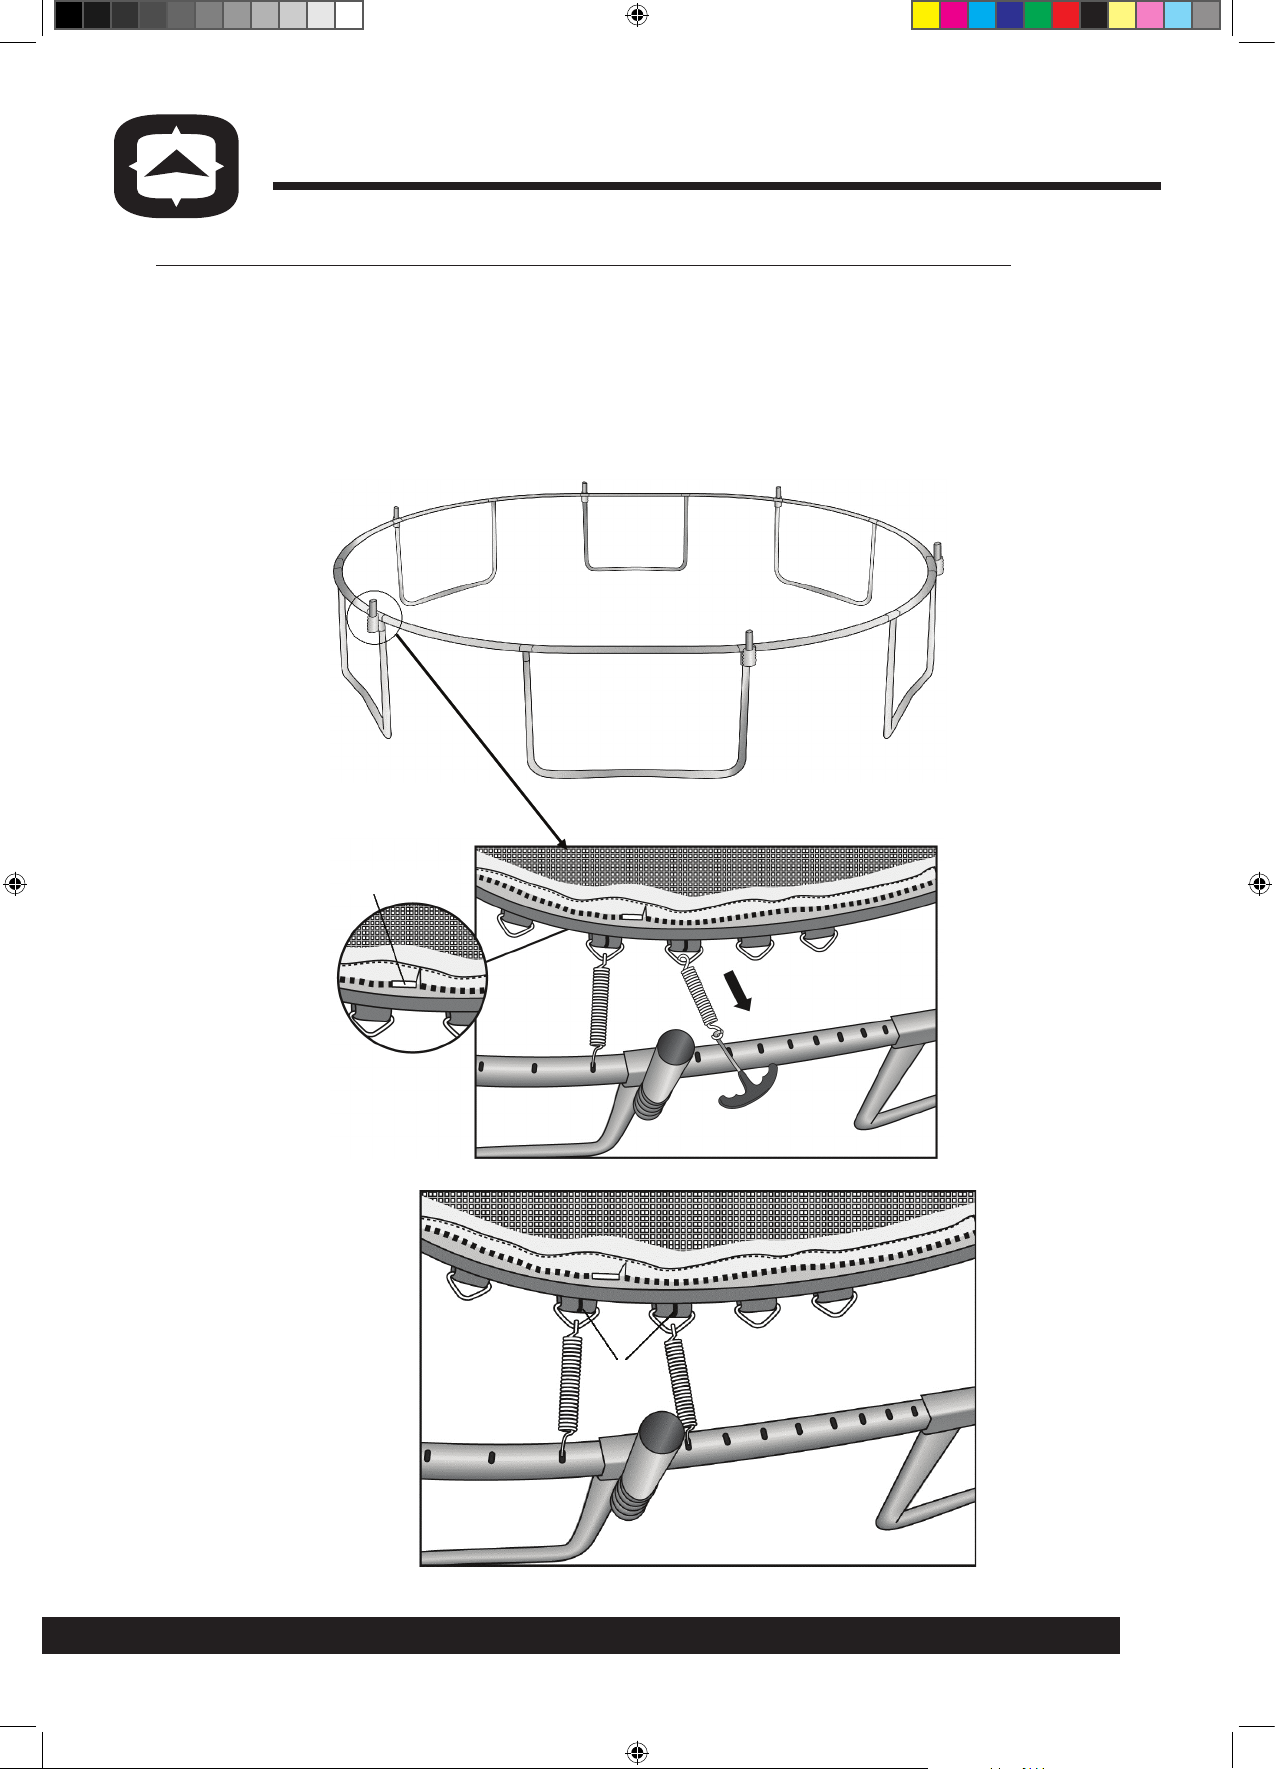
• Hang the Trampoline Mat (10) on the Top Rail Frame using the
provided Springs (11).
• Locate the Zipper Start/End in the trampoline mat and align it to the
T-joint (5). There is a red line pre-sewn at the V-ring straps. The T-joint (5)
will be placed between these two V-ring straps. When the position
confirmed; place 2 springs (11) as shown in below.
Zipper
Start/End
Red
Lines
13
084-6693.indd 13 12/5/2014 1:06:40 PM
Page 14
Model No. 084-6693-4
TM
ASSEMBLY
• Repeat the same at the rest of the T-joint with Spring Mechanism, as
shown below.
Note:
• The even distribution of tension is a critical factor in the proper
assembly of the Trampoline Mat.
• If the Springs (11) can only be inserted with the use of extensive
force, they are not inserted in the correct order and manner.
• Make sure that the Springs (11) are always inserted at an angle
of approximately 90° to the holes on the Top Rail Frame.
• After completing the assembly, the Trampoline Frame and Mat should look
like the illustration below.
14
084-6693.indd 14 12/5/2014 1:06:41 PM
Page 15
Model No. 084-6693-4
TM
ASSEMBLY
STEP 7: Assembling the supporting poles
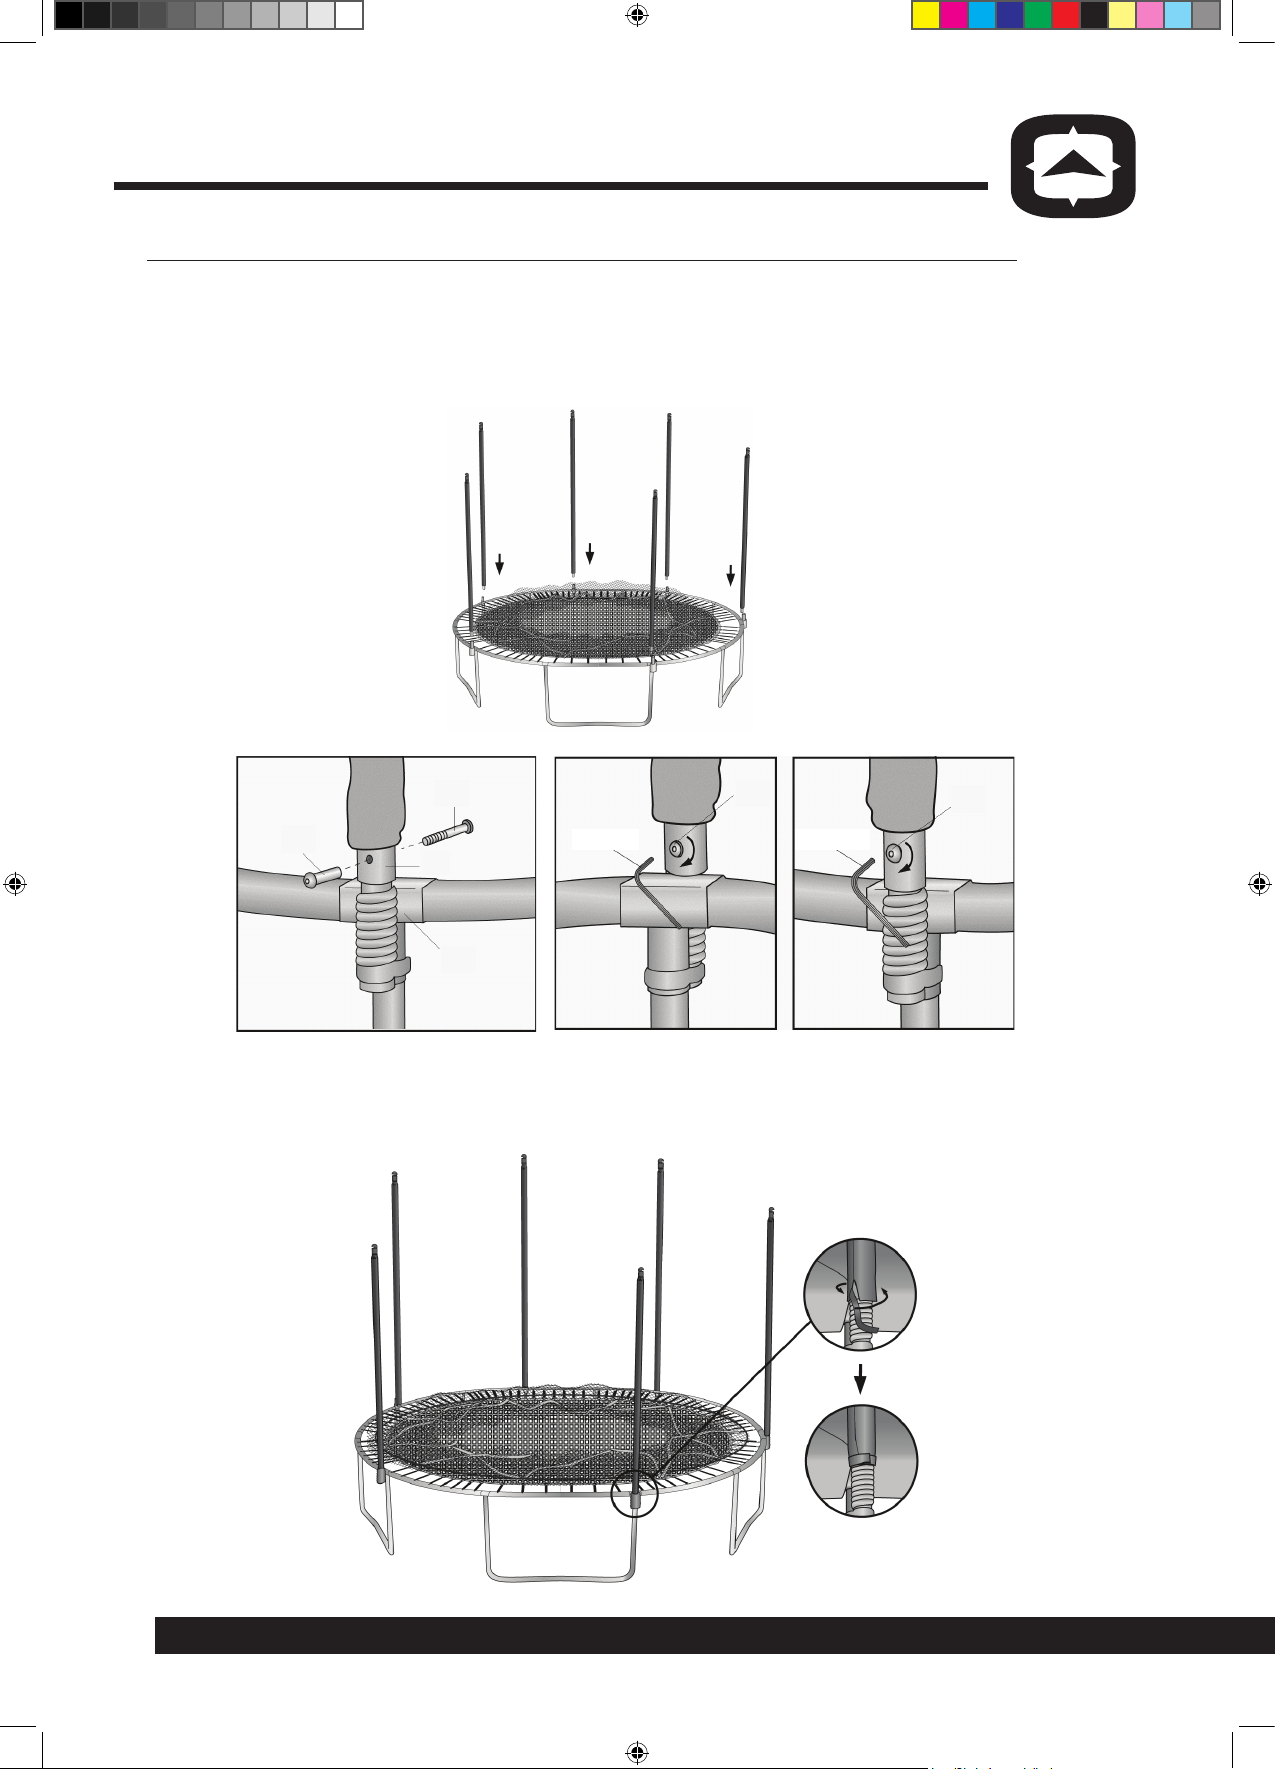
• Connect all six Upper Supporting Poles (17) to the six Lower Supporting
Poles (8). Make sure that the locking tabs “click” into the holes of the Upper
Supporting Poles (17).
Note: All of the Supporting Poles come with pre-installed
Pole Foams (18 or 15).
Hole
Locking
tab
STEP 8: Axing the ball cap
• Place a Ball Cap (2) onto the top end of each Upper Supporting Pole (17).
Make sure that the screw hole on the Ball Cap (2) is aligned with the screw
hole on the top end of the Pole.
• Fasten the Ball Caps (2) using the Ball Cap Screws (3).
3
2
STEP 9: Attaching the foam sleeve
• Insert the assembled Upper and Lower Supporting Poles (17, 8) into the
wider opening of the Foam Sleeve (16).
• Slide the assembled poles in until the top end of the Upper Supporting
Pole (18) comes out on the opposite side.
• Make sure that the Sleeve (16) covers the entire pre-installed foam of the
Supporting Poles.
15
084-6693.indd 15 12/5/2014 1:06:42 PM
Page 16
Model No. 084-6693-4
TM
ASSEMBLY
STEP 10: Axing the supporting poles to the trampoline legs
• Connect the Lower Supporting Poles (8) to the trampoline by inserting them
into each of the T-joint with Spring Mechanism (5).
• Secure each Lower Supporting Pole (8) with a Hex Bolt (14) and Nut (13)
using Allen Key (22).
14
13
8
5
14
13
Allen KeyAllen Key
• There is a hook-and-loop tapes added at the lower end of the pole foam
sleeves to prevent the whole pole foam & sleeves from sliding down to
cover up the red spring pole mechanism. Secure it as shown below.
16
084-6693.indd 16 12/5/2014 1:06:42 PM
Page 17
Model No. 084-6693-4
TM
ASSEMBLY
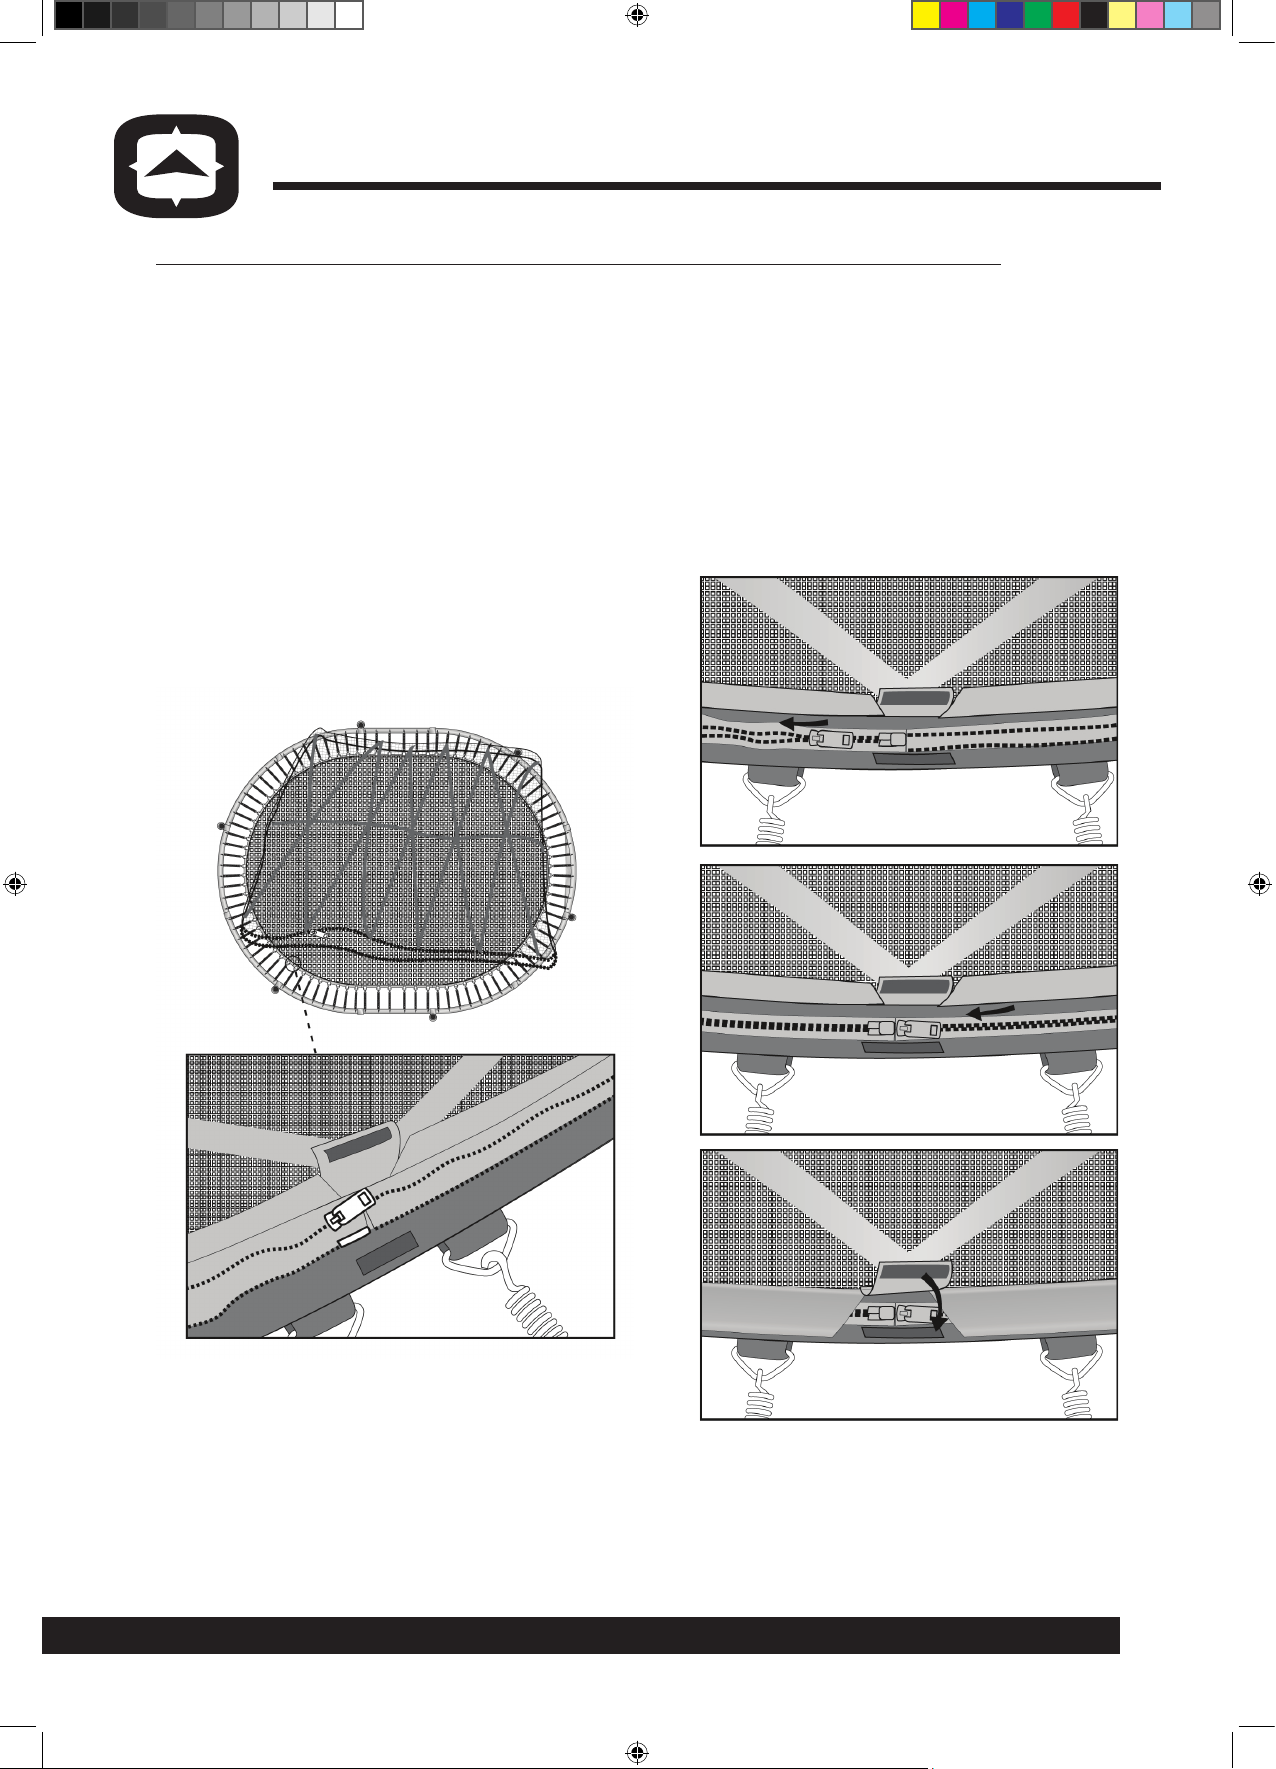
STEP 11: Connecting the jumping mat and the enclosure net
• Locate Zipper Start/End on the jumping mat align with the Zipper Puller
on the net. Zip around the whole zipper of the mat and net; and end at
the Zipper Start/End secure the hook-and-loop tapes to keep zipper pull
in position. Please see below figures.
17
084-6693.indd 17 12/5/2014 1:06:43 PM
Page 18
Model No. 084-6693-4
TM
ASSEMBLY
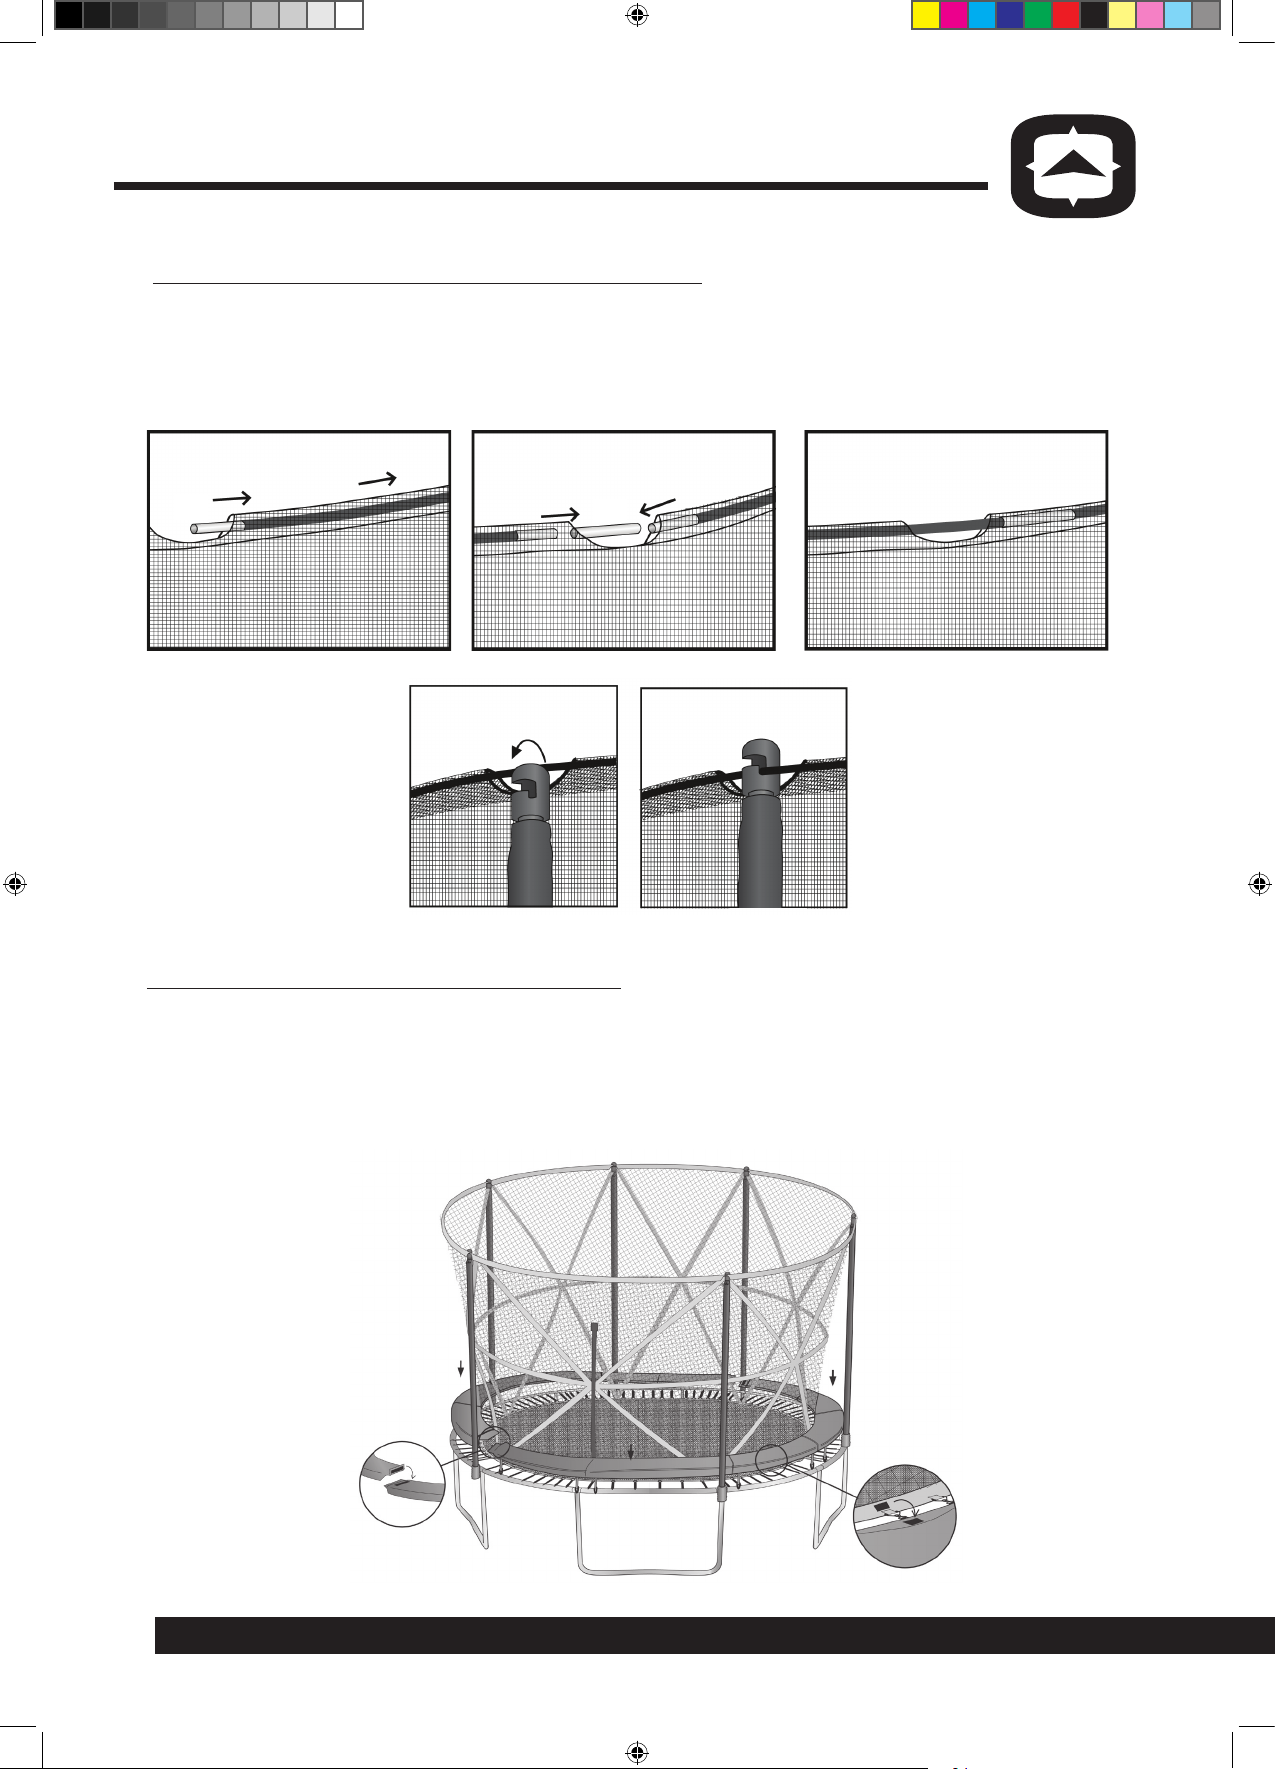
STEP 12: Assembling the enclosure net
• Slide the Fiberglass Rod (19) into the passage at the top of the Net. Connect
the Fiberglass Rod (19) together by the Fiberglass Rod Connector (20) and
place the joined fiber glass rod into the slot of the ball cap.
19
20
STEP 13: Attaching the frame pad
• Place both Frame Pads (12) on the trampoline and secure them together
with the pre-sewn hook-and-loop tapes at the end of each pad.
• Connect the pre-sewn hook-and-loop tapes at the inner side of the frame
pad and the net.
18
084-6693.indd 18 12/5/2014 1:06:44 PM
Page 19
Model No. 084-6693-4
TM
ASSEMBLY
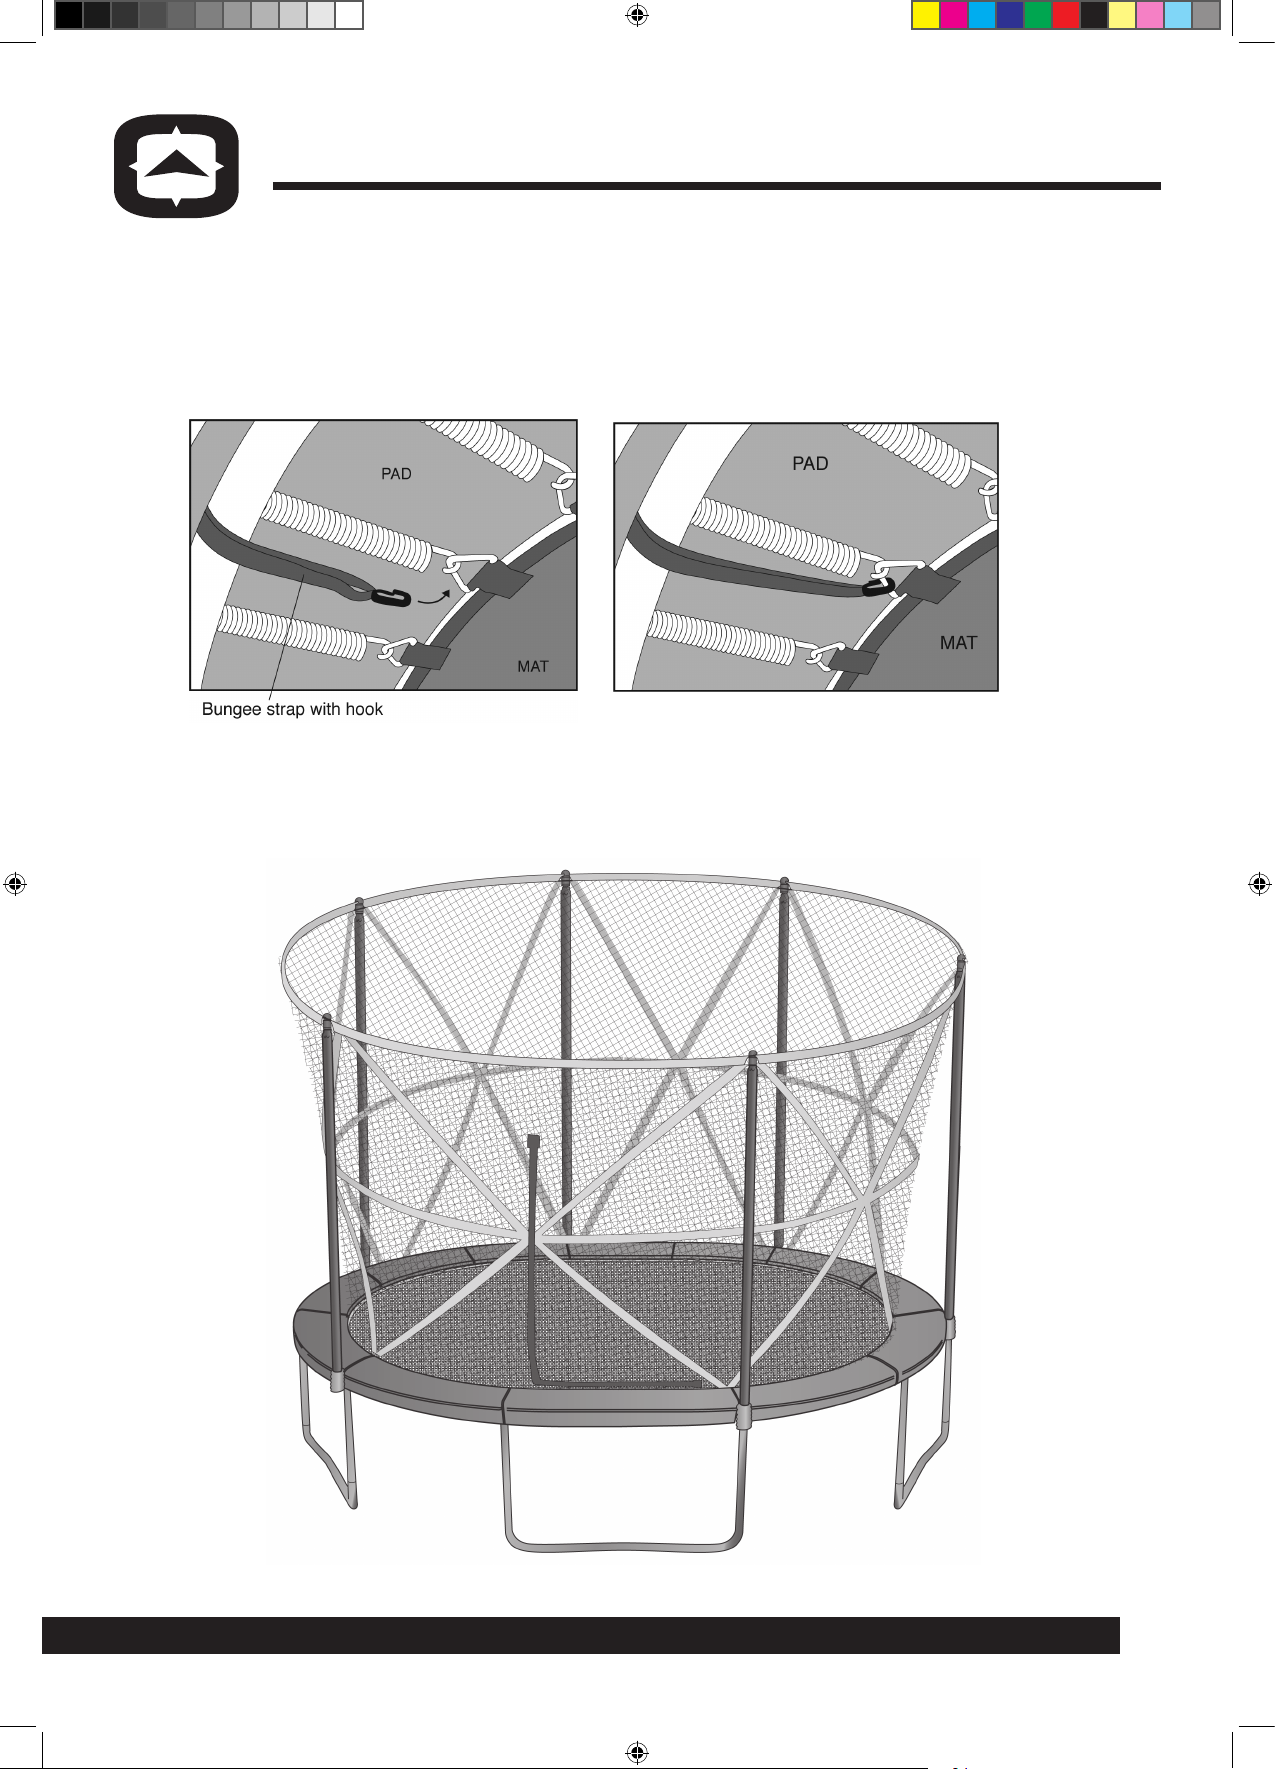
under the pad. Pull the bungee strap and clip to the nearest V-ring.
• Straighten and adjust the part of the pad that hangs over the side of the
trampoline.
• Bring the bungee strap with clip around the outside of the frame and
• Now the trampoline and enclosure are assembled.
084-6693.indd 19 12/5/2014 1:06:45 PM
19
Page 20
Model No. 084-6693-4
TM
INFORMATION ON TRAMPOLINE USE
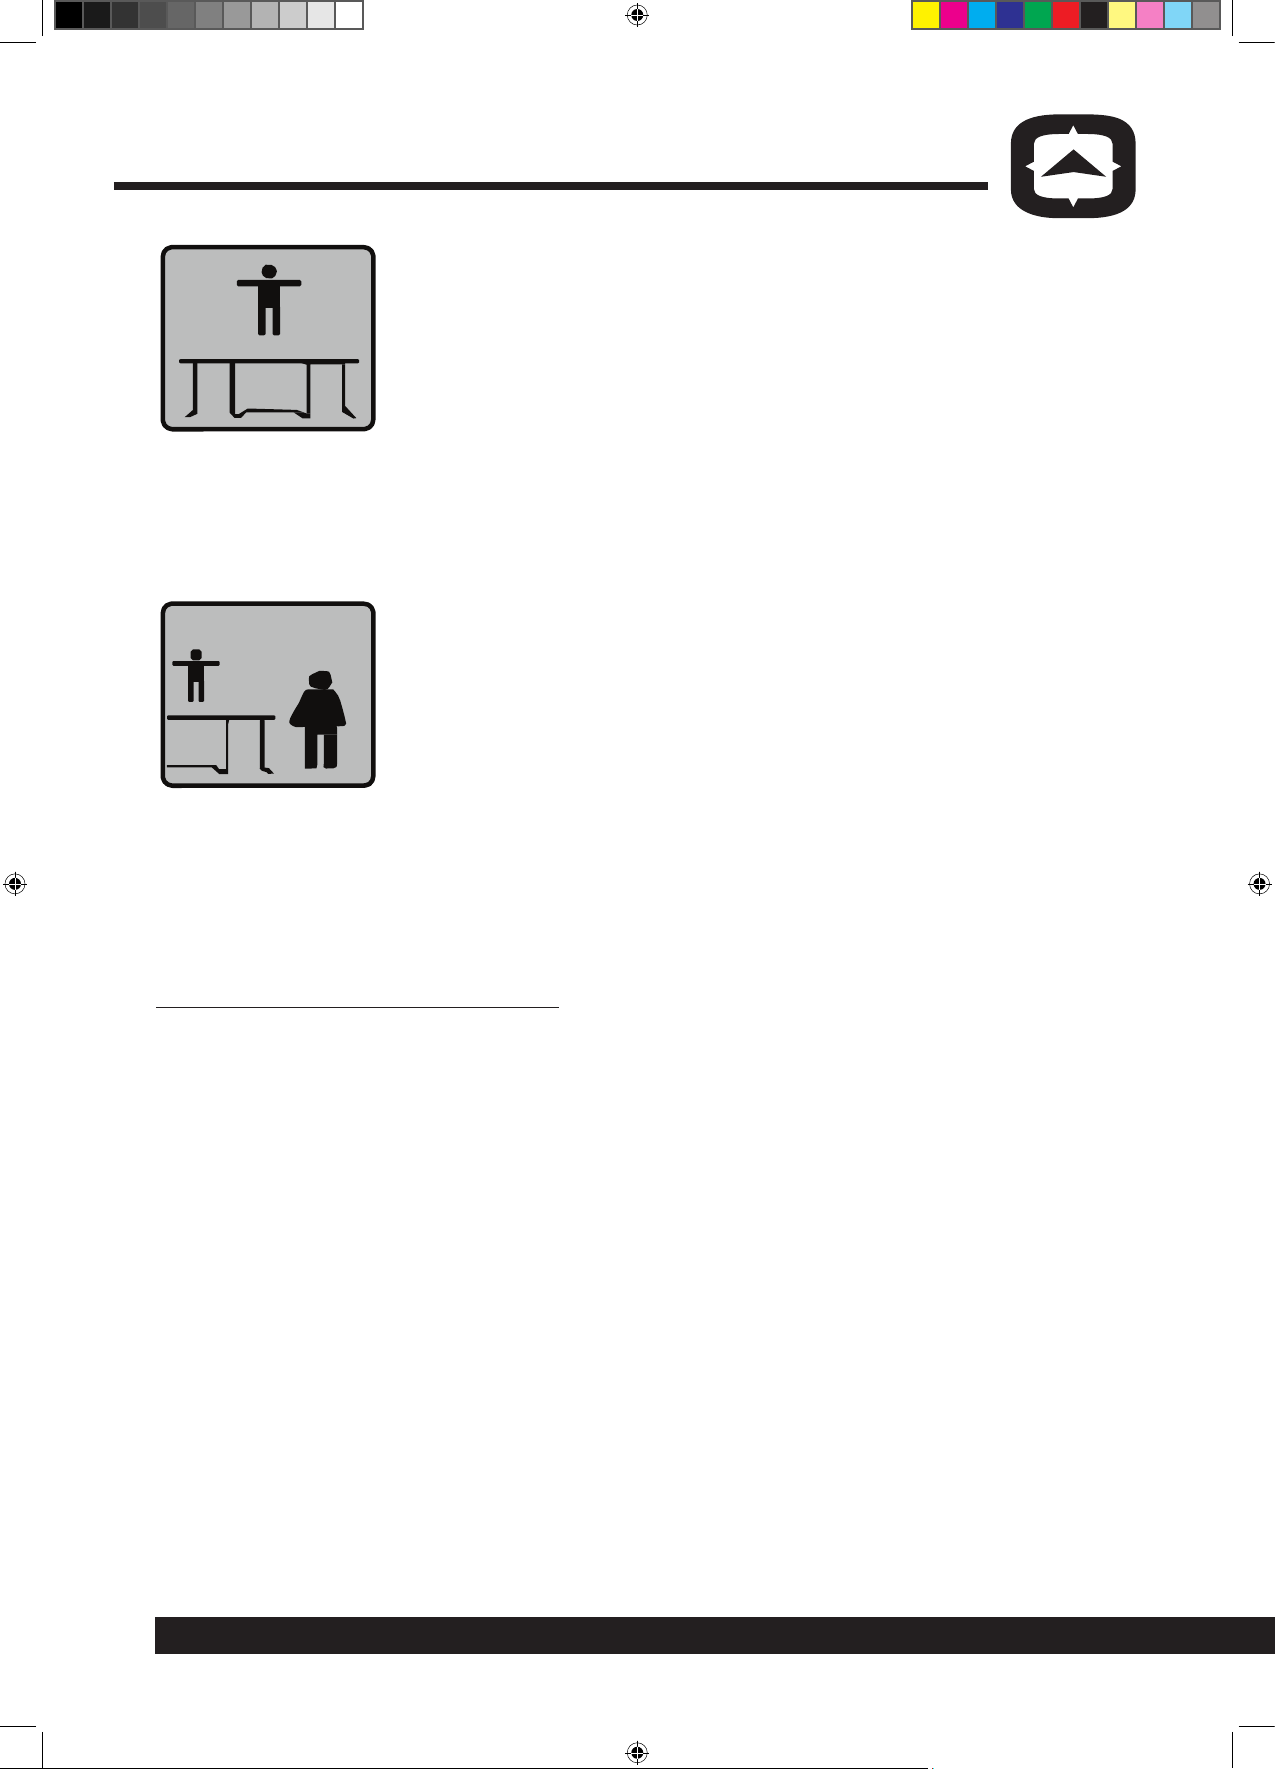
Jumpers, please pay attention to:
• Do not use the trampoline if you are tired or under the
influence of alcohol or drugs.
• Do not jump too high. To avoid fatigue, do not jump too
long. Control your jumps. When using the trampoline,
a supervisor has to be present. Do not jump alone.
• Do not wear clothes with hooks or parts that might
become entangled in the jumping bed.
• Climb onto the trampoline. Do not jump from the
trampoline. Do not use the trampoline as a springboard
to other objects.
Supervisors, please pay attention:
• It is the responsibility of the owner or the supervisor to
ensure that all users of the trampoline are sufficiently
informed about all warnings and safety instructions and to
enforce them.
• All trampoline users need a supervisor, regardless of their
age or capabilities.
• Remove all objects that might interfere with the jumper
from the surroundings of the trampoline. Pay attention to
what is above, below and around the trampoline.
• When it is not in use, keep the trampoline secured to
prevent it from being used without supervision.
Training with the trampoline
Fundamental trampoline skills
Bouncing
The most important thing about bouncing is that it should be done with control
in the centre of the mat. The basic bounce should always be low. High, reckless
bouncing should never be allowed.
Stop bouncing
This technique allows the jumper to gain control by stopping quickly. It is
achieved by keeping the feet in contact with the mat, and absorbing the
rebound of the trampoline with the knees and waist. This skill should be the first
skill learned and should be employed whenever you feel out of balance, or land
away from the centre area.
• Stand in the centre of the mat with your feet about hip-width apart.
• Attempt about three easy bounces, keeping them low and controlled.
• To keep your balance, focus your eyes toward the perimeter of the trampoline
while bouncing.
• Stop bouncing by bending your knees and at your hips when your feet come
into contact with the mat.
20
084-6693.indd 20 12/5/2014 1:06:46 PM
Page 21
Model No. 084-6693-4
TM
INFORMATION ON TRAMPOLINE USE
Arm Action
Arms are very important for proper control and
lift. Whenever you go up, your arms go up. They
go up to a set position, about shoulder height
and shoulder width. They should remain in this
balanced position until you start coming down.
Then they circle down and go slightly behind
the hips, ready to be lifted as you bounce up.
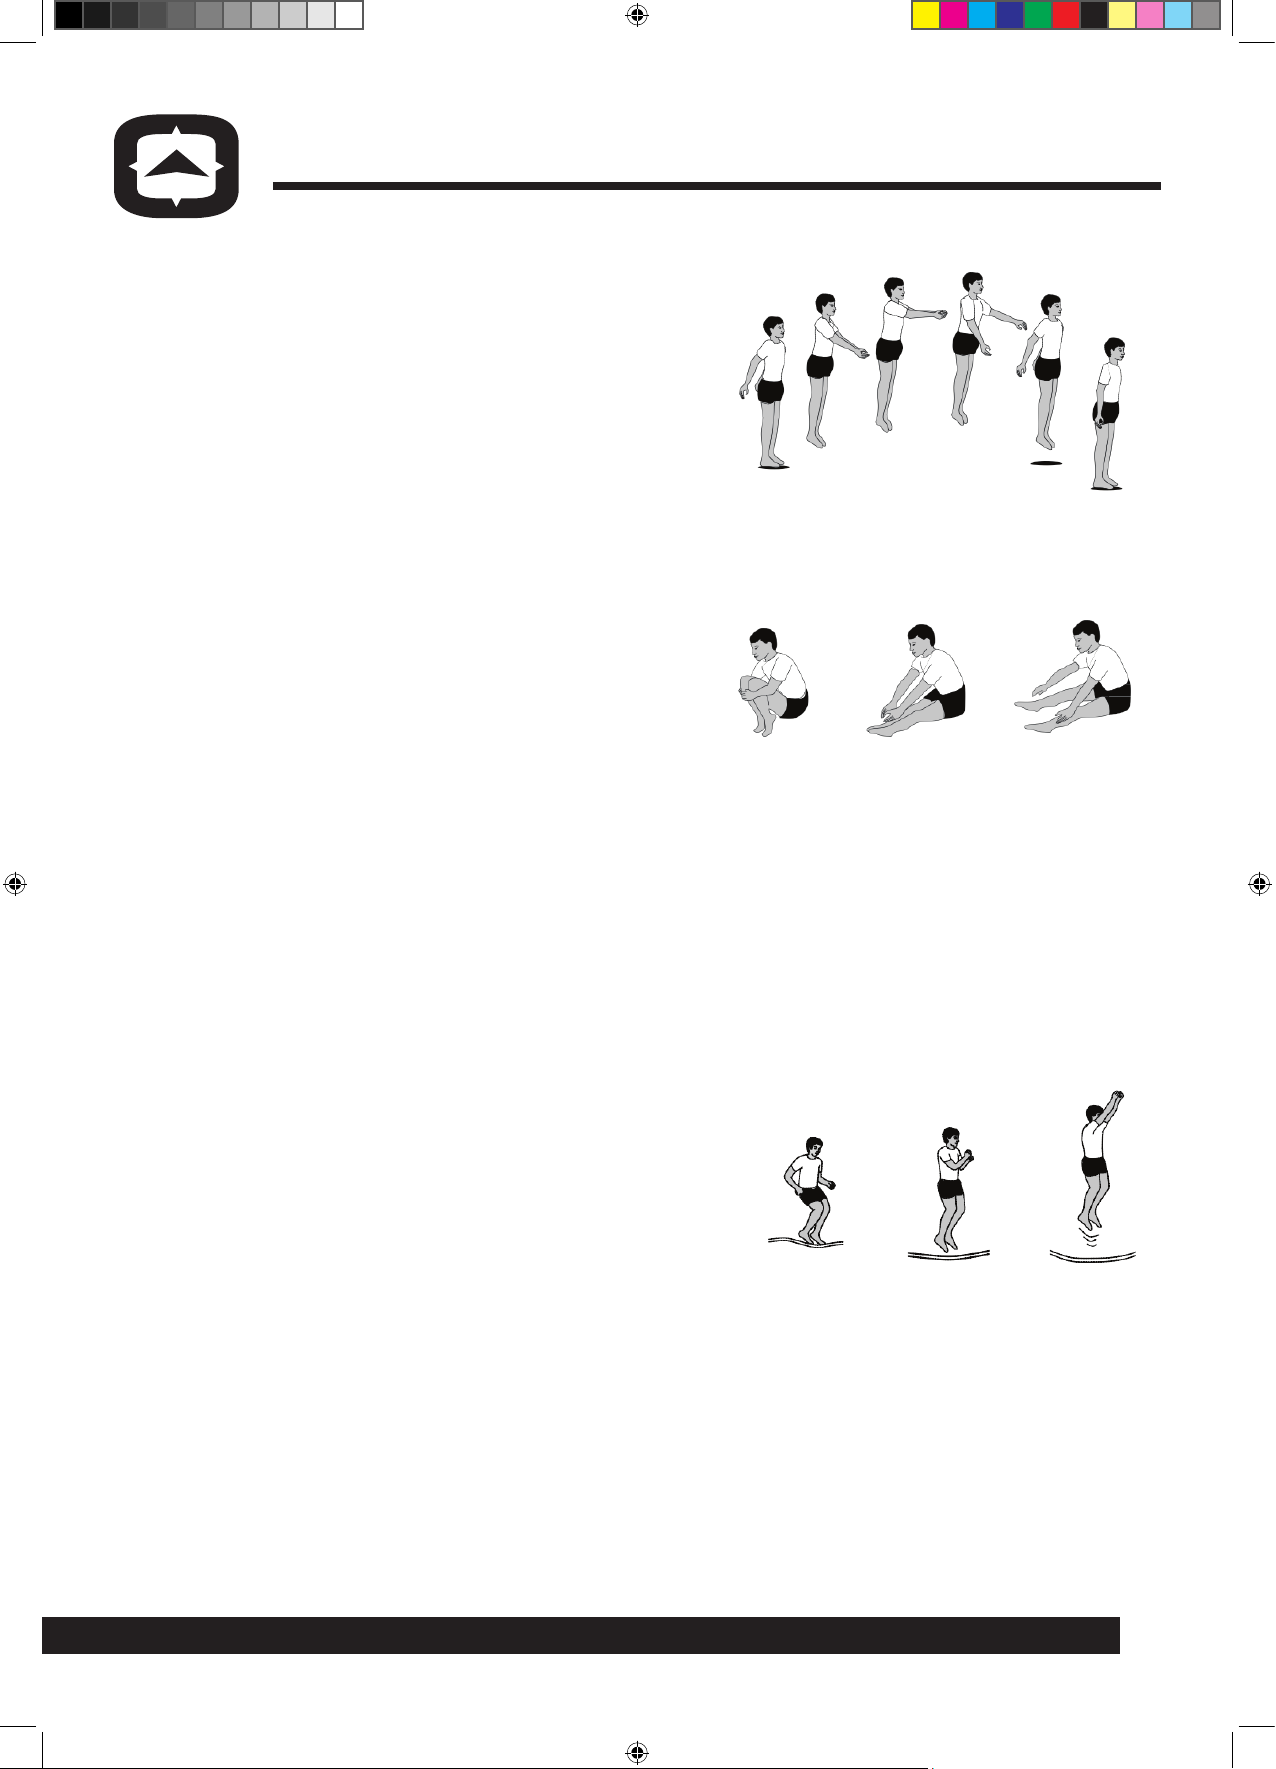
Bounce Variations
The illustration on the right shows three
variations: the tuck, the pike and the straddle
pike, respectively. These should be assumed
at the top of the bounce, before resuming the
normal landing position on your feet. Practice
these simple variations and concentrate on
perfect form. Make sure that your toes are
pointed and your fingers are straight. These are
simple variations on the basic bounce and are
very important for gaining experience in
co-ordinated movement.
Training
Basic jump
• Stand straight on the trampoline.
• Gather a little momentum with your arms and
jump at the same time from the mat.
• Hold your feet together in the air and point
your toes downward.
• To keep your balance, focus your eyes toward
the perimeter of the trampoline while bouncing.
• Hold your feet shoulder-width apart when
landing.
• When you want to stop, bend your knees and
at your hips when your feet come into contact
with the trampoline.
21
084-6693.indd 21 12/5/2014 1:06:47 PM
Page 22
Model No. 084-6693-4
TM
INFORMATION ON TRAMPOLINE USE
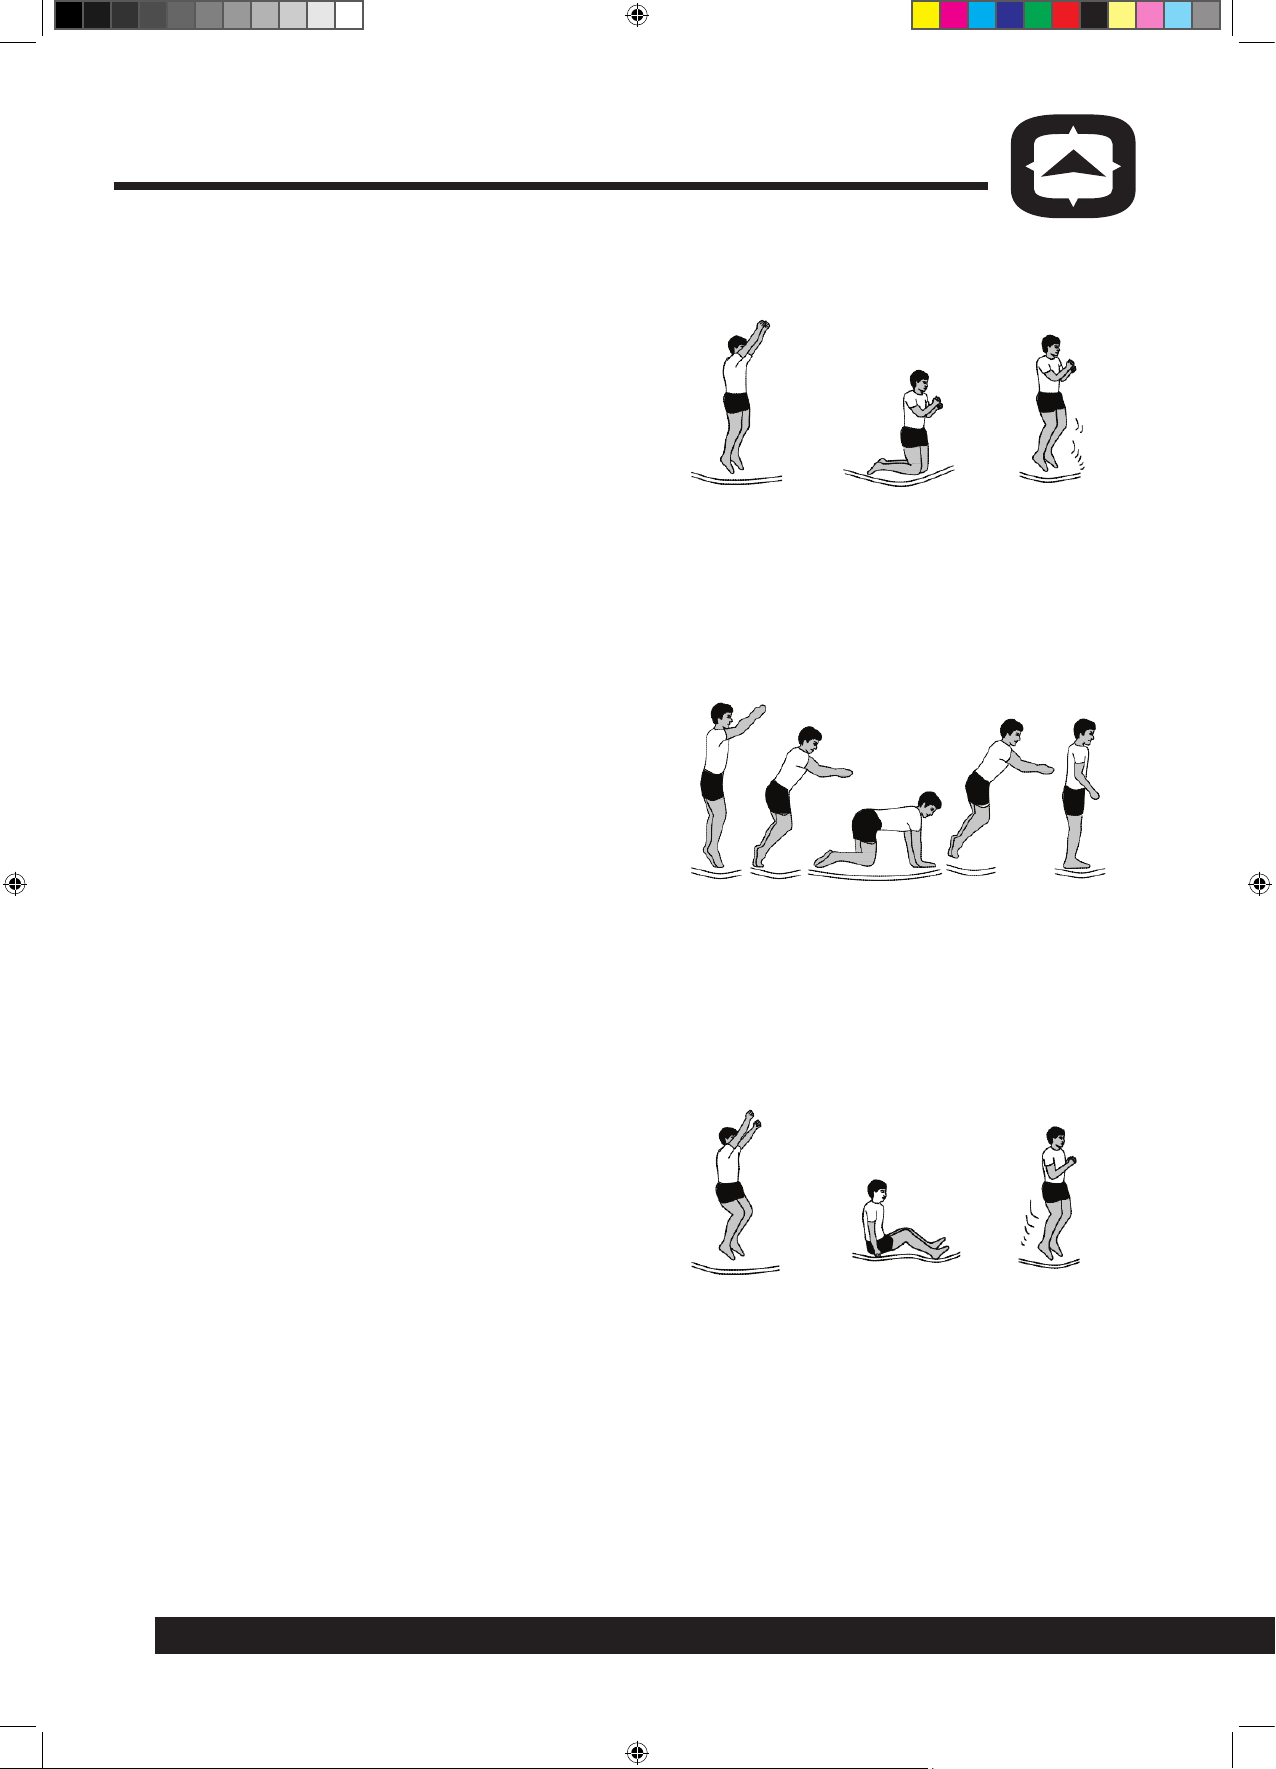
Knee bounce
• Start with the basic jump, holding a low
height.
• Land on your knees, with your back
straight.
• Keep your balance with your arms.
• Gather a little momentum with your arms
to go back to a standing position.
Hands and knee bounce
• Start with the basic jump, holding a low
height.
• Land on your hands and knees. Make sure
you put the weight on both of your
hands and knees. Do not sit on your
heels.
• Remain in this position and try to bounce.
Do not rock back and forth between
your hands and knees. Develop an even
landing on all of the four points.
• Look slightly in front of your hands when
landing. Push to rebound to your
feet.
Seat bounce
• Start with the basic jump, holding a low
height.
• Land on your bottom, with your back
straight.
• Keep your hands beside your hips. Do not
lock your elbows.
• Push yourself up to standing position
again with your hands.
22
084-6693.indd 22 12/5/2014 1:06:48 PM
Page 23
Model No. 084-6693-4
TM
INFORMATION ON TRAMPOLINE USE
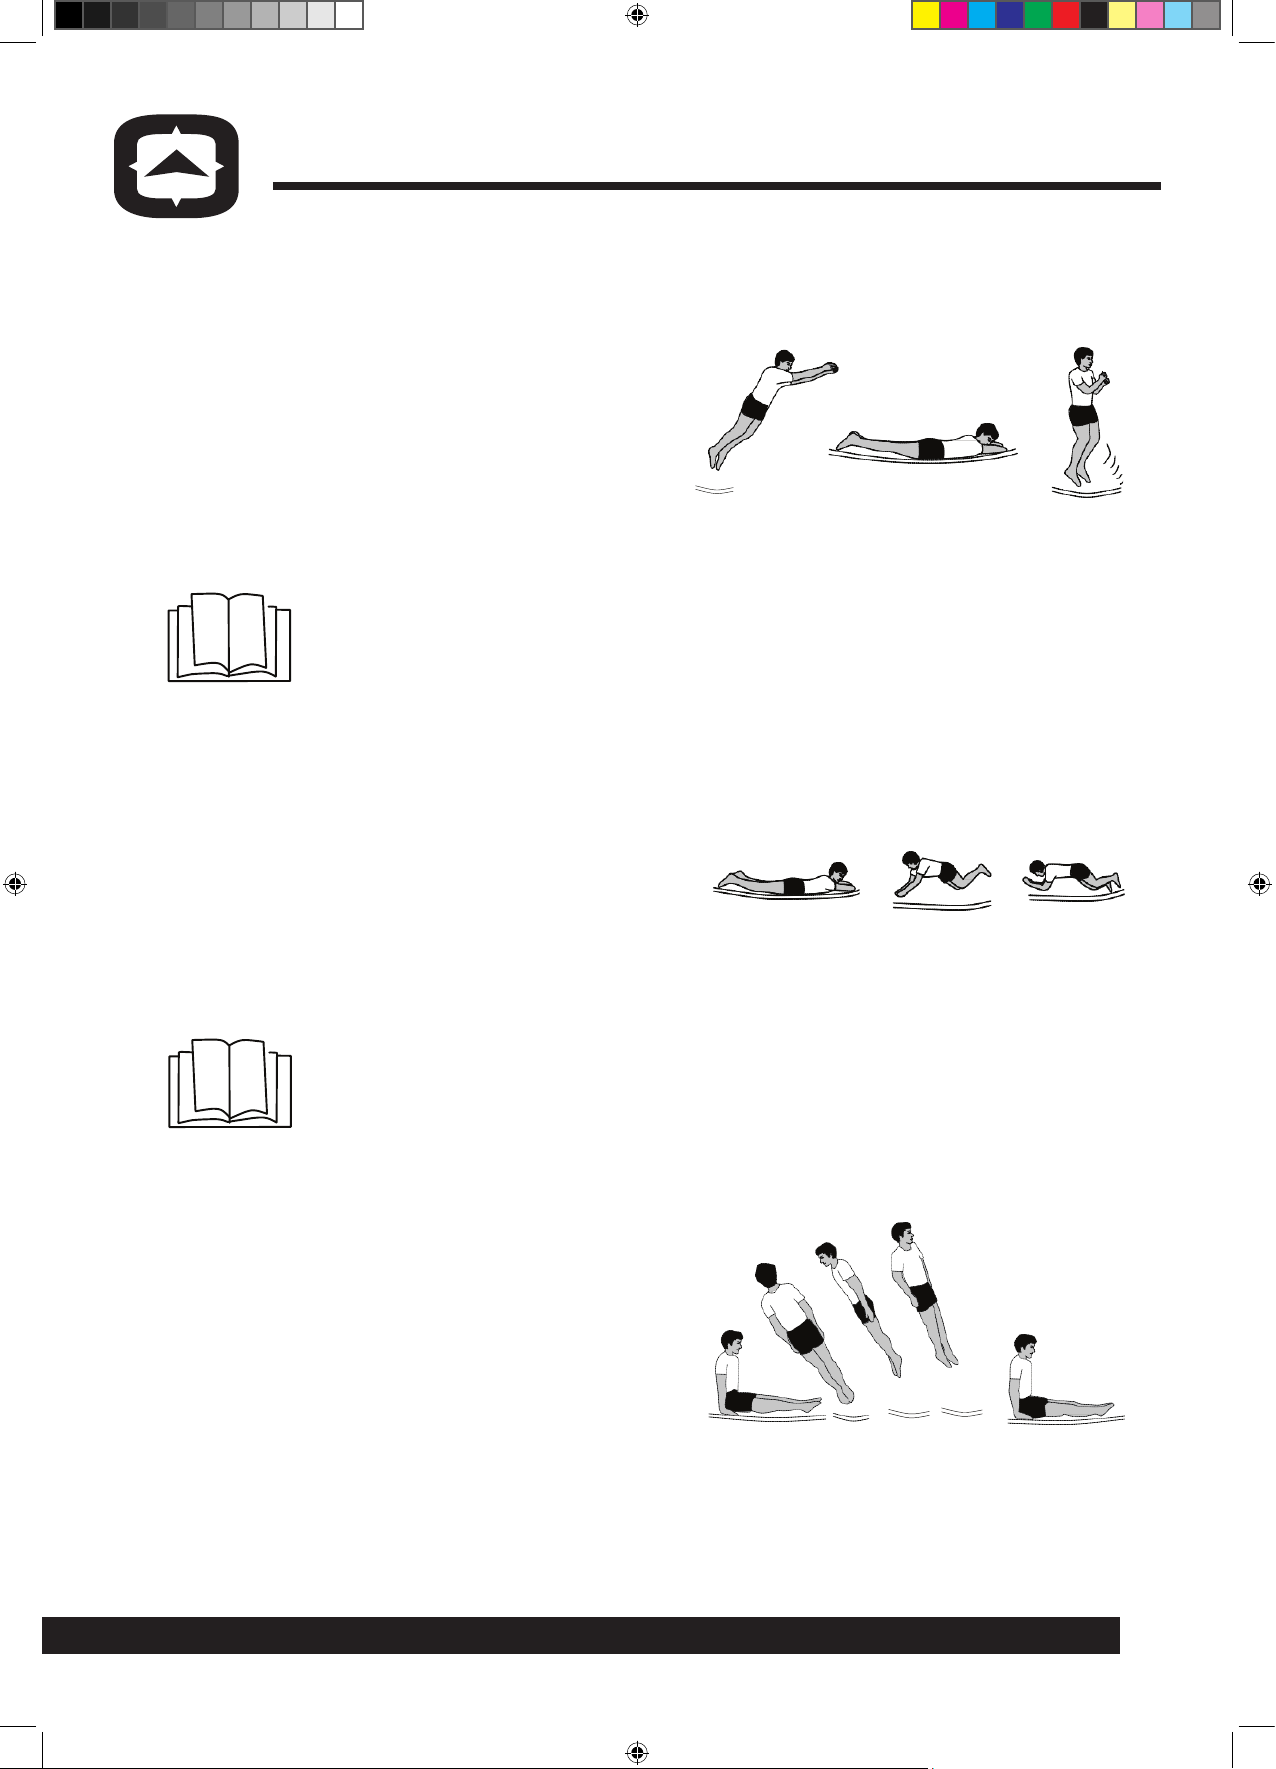
Front bounce
• Do a basic jump first.
• After landing, push yourself forward with
your feet and hold your arms in front of
you.
• Let yourself drop forward and land like
shown, with your arms crossed beneath
your head.
• Use your arms and the momentum to
get back to a standing position.
Note: Only do this jump if the
trampoline has sucient space
for it.
180° bounce
• This is a difficult jump that requires a lot
of body control.
• Do a complete front bounce first.
• After landing, use your left or right arm
and hand to make a 180° roll.
• Keep your back straight.
• After landing, jump back to a standing
position.
Note: Only do this jump if the
trampoline has sucient space
for it.
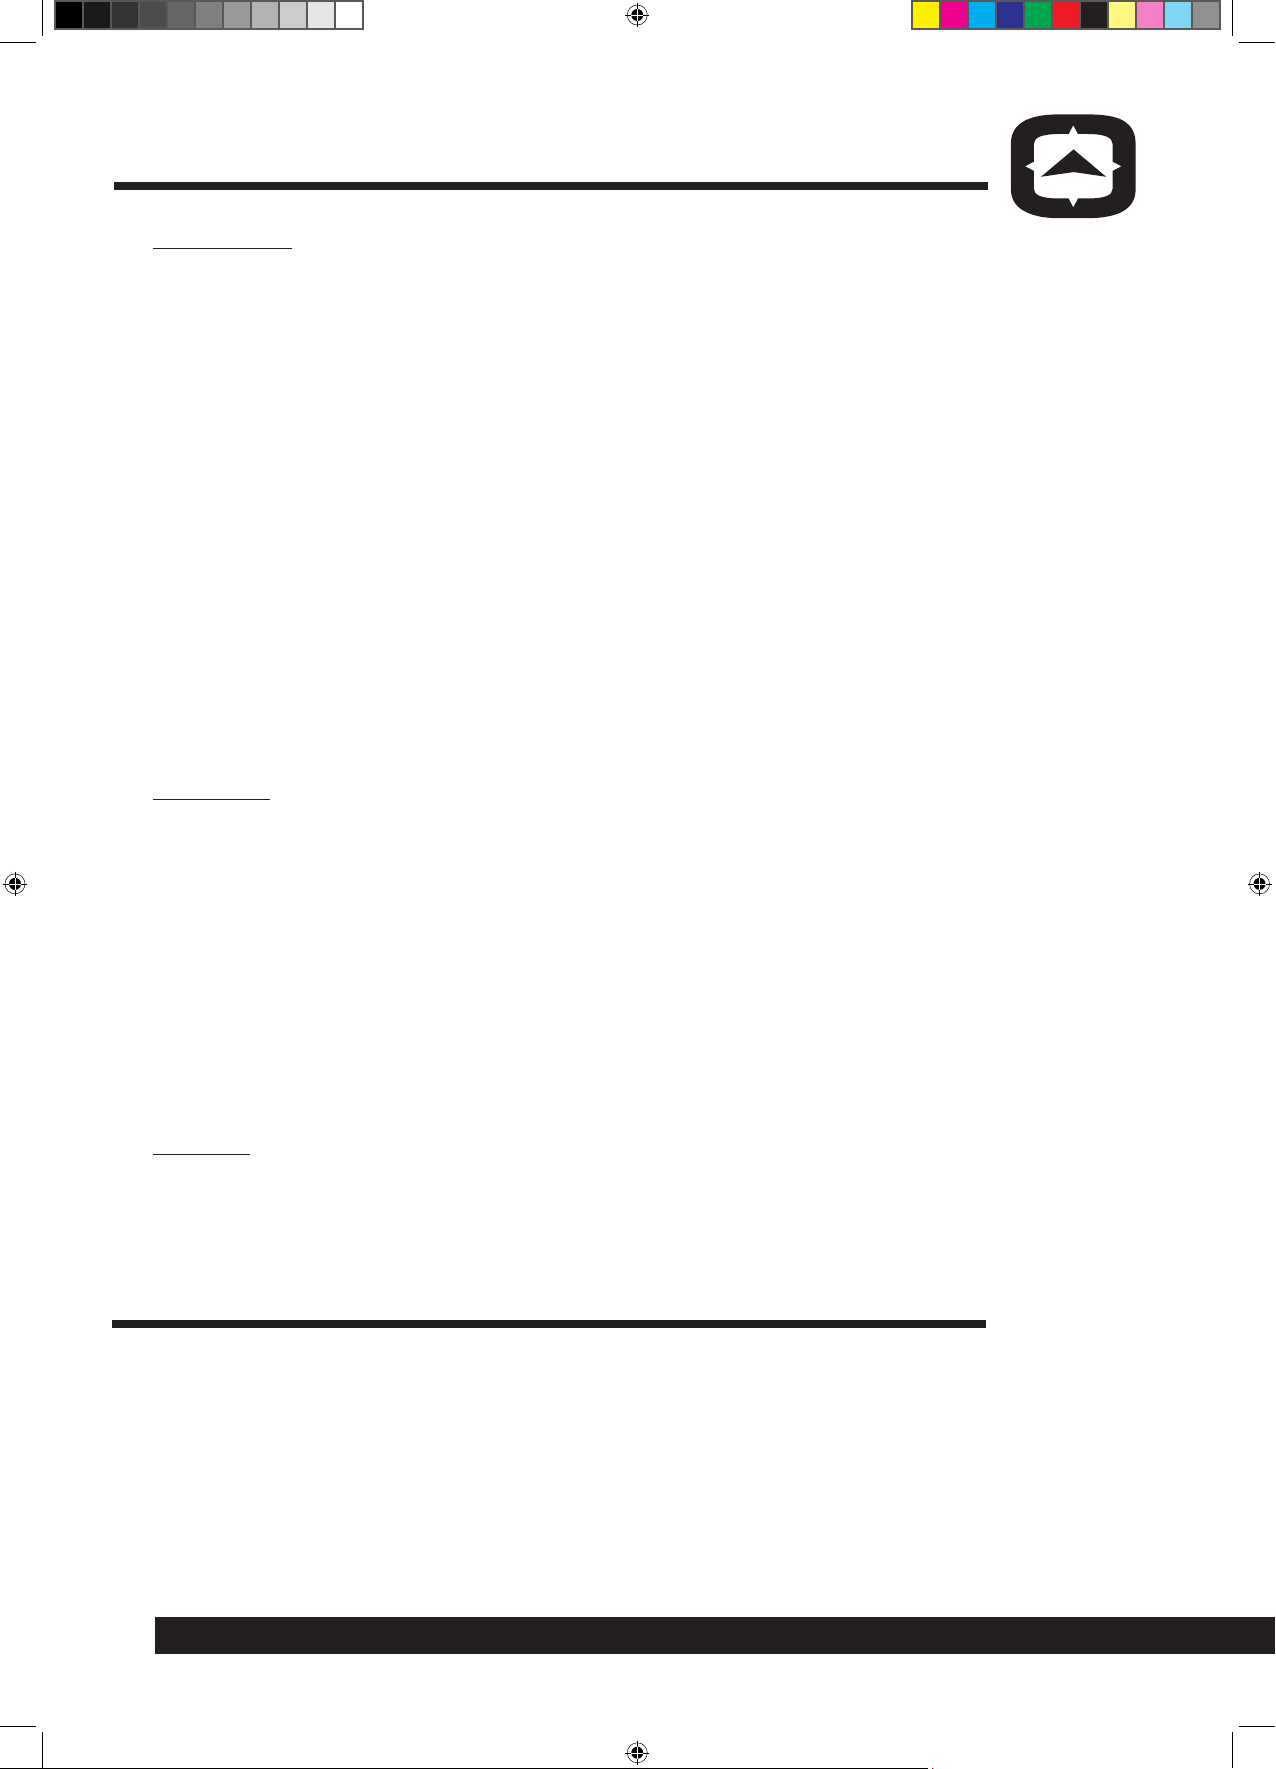
Full twist bounce
• Start with the seat bounce.
• When you bounce up, keep moving your
shoulder in the direction of the
twist.
• During the twist, place your hands by
your sides and hold your body straight.
• After the twist, finish in the seat drop
position.
23
084-6693.indd 23 12/5/2014 1:06:50 PM
Page 24
Model No. 084-6693-4
TM
CLEANING AND MAINTENANCE
Inspection
Check the trampoline and enclosure before each use for wear and damage. In
case of damage, have it repaired by your specialist retailer immediately.
The following conditions could pose potential hazards:
• Missing, improperly positioned or insecurely attached frame pad.
• Punctures, frays, tears, or holes worn in the mat or frame pad.
• Deterioration in the stitching or fabric of the mat or frame pad.
• Ruptured springs.
• A bent or broken frame.
• A sagging mat.
• Unstable or improper assembling of the Supporting Poles and the trampoline
vertical legs.
• Unaffixed enclosure net.
• Sharp protrusions on the frame or enclosure.
• Unstable parts and connections.
Cleaning
• Clean the frame pad with a soft cleanser to remove oil or dirt stains. Use
cleansers suitable for padding only.
• Clean the enclosure net with a brush or a slightly damp cloth to remove dirt
or dust.
• Remove dirt and dust with a soft and slightly damp cloth.
• When rust appears on the surface, remove it with either a wire brush or
coarse sandpaper. Then treat the spot with non-toxic paint.
• For cleaning the frame pad, do not use aggressive cleansers or cleansers
containing chemicals.
Storing
For extended periods of disuse, disassemble the enclosure net and trampoline
and store them in a clean and dry place.
WARRANTY
This Outbound product is guaranteed for one year from the date of original
retail purchase against defects in materials and workmanship.
Subject to the conditions and limitations described below, this product, if
returned to us with proof of purchase within the stated warranty period and if
covered under this warranty, will be repaired or replaced (with the same model,
or one of equal value or specification), at our discretion. We will bear the cost of
any repair or replacement and any costs of labour relating thereto.
24
084-6693.indd 24 12/5/2014 1:06:50 PM
Page 25

Model No. 084-6693-4
TM
WARRANTY
These warranties are subject to the following conditions and limitations:
a) a bill of sale verifying the purchase and purchase date must be provided;
b) this warranty will not apply to any product or part thereof that is worn or
broken or that has become inoperative due to abuse, misuse, accidental
damage, neglect or lack of proper installation, operation or maintenance (as
outlined in the applicable owner’s manual or operating instructions) or that
is being used for industrial, professional, commercial or rental purposes;
c) this warranty will not apply to normal wear and tear or to expendable parts
or accessories that may be supplied with the product and that are expected
to become inoperative or unusable after a reasonable period of use;
d) this warranty will not apply to routine maintenance and consumable items
such as, but not limited to, fuel, lubricants, vacuum bags, blades, belts, sandpaper, bits, fluids, tune-ups or adjustments;
e) this warranty will not apply where damage is caused by repairs made or
attempted by others (i.e., persons not authorized by the manufacturer);
f) this warranty will not apply to any product that was sold to the original
purchaser as a reconditioned or refurbished product (unless otherwise
specified in writing);
g) this warranty will not apply to any product or part thereof if any part from
another manufacturer is installed therein or any repairs or alterations have
been made or attempted by unauthorized persons;
h) this warranty will not apply to normal deterioration of the exterior finish,
such as, but not limited to, scratches, dents, paint chips, or to any corrosion
or discolouring by heat, abrasive and chemical cleaners; and
i) this warranty will not apply to component parts sold by and identified as
the product of another company, which shall be covered under the product
manufacturer’s warranty, if any.
Additional Limitations
This warranty applies only to the original purchaser and may not be transferred.
Neither the retailer nor the manufacturer shall be liable for any other expense,
loss or damage, including, without limitation, any indirect, incidental,
consequential or exemplary damages arising in connection with the sale, use or
inability to use this product.
Notice to Consumer
This warranty gives you specific legal rights, and you may have other rights,
which may vary from province to province. The provisions contained in this
warranty are not intended to limit, modify, take away from, disclaim or exclude
any statutory warranties set forth in any applicable provincial or federal
legislation.
25
084-6693.indd 25 12/5/2014 1:06:50 PM
 Loading...