


OAS
180, 3rd Avenue , L’Islet, Quebec, G0R 2C0, CANADA
Phone: (418) 247-3947/1 800 463-7043
Fax: (418) 247-7801/1 800 662-7801
www.ouellet.com
INSTRUCTIONS
For installation of the suspended unit heater
«OAS Series»
LOCATION OF HEATERS AND REMOTE
THERMOSTATS
1- For best results, do not exceed mounting heights as per
table below :
Maximum recommended mounting height :
2 - 10 kW 2.4 m (8 ft)
15 - 30 kW 3.0 m (10 ft)
40 - 60 kW 4.5 m (15 ft)
2- Direct discharge air streams :
- Away from room occupants.
- Away from columns, posts, machinery and partitions.
- Parallel to outside walls.
- Along the windward side of buildings exposed
to prevailing winds.
3- Locate thermostats on interior partitions, walls or posts
(insulate from cold steel posts). Install thermostats away
from cold drafts, internal heat sources and from heater
discharge.
4- Small rooms require only one unit heater. In large rooms,
arrange multiple units to provide perimeter circulation as
illustrated in fi g. 1 and 2.
Fig. 1
Fig. 2
POWER SUPPLY CONNECTIONS
The power supply may be single or three phase as shown on
the nameplate. The wiring diagram is on the inside of the
terminal compartment cover. Wire heater in accordance with
local and national codes.
TEST
- To test the unit heater, temporarily set thermostat to
maximum temperature.
- Make sure that the fan rotates in the correct direction;
airfl ow should be in the direction of the arrow such as
indicated on the fi g. 4.
WARNING
- Disconnect all power supplies before working on circuit.
- Do not heat air containing combustible materials.
- Mount heater out of reach.
- Install at least 61 cm (2 ft) from fl oor
except 40 - 60 kW at least 2.4 m (8 ft) from fl oor.
Minimum clearance from walls and ceiling are :
2 - 10 kW 10 cm (4 in.)
15 - 30 kW 15 cm (6 in.)
40 - 60 kW 30 cm (12 in.)
OVERTEMPERATURE PROTECTION
The motor and the electric heating elements are protected
against overtemperature by automatic reset thermal
high-limits.
Cycling of either high-limit is an indication of abnormal operation and should be corrected at once.
LUBRIFICATION OF MOTOR
The motor includes sealed lubrifi cation-free bearings.
MAINTENANCE
Once a year, remove the dust accumulation inside the heater
using a vacuum cleaner or compressed air. Cleaning should be
done while the heater is disconnected from the supply circuit.
A qualifi ed technician should perform any other servicing.
ATTENTION
Basic precautions should always be followed to reduce the
risk of fi re, electric shock, and injury to persons.
- Read all instructions before using this heater.
- Disconnect all power supplies before working on circuit.
- Do not heat air containing combustible materials.
- Mount heater out of reach.
- Install at least 61 cm (2 ft) from fl oor
except 40 - 60 KW at least 2.4 m (8 ft) from fl oor.
- Do not use outdoors.
- Do not insert or allow foreign objects to enter any
ventilation or exhaust opening as this may cause an
electric shock or fi re, or damage the heater.
- Do not block air intakes or exhaust in any manner.
- Heater contains arcing and sparking parts.
Do not use it in areas where gasoline, paint, or fl ammable
liquids are used or stored.
- Use this heater only as described in this manual. Any other
use not recommended by the manufacturer may cause fi re,
electric shock, or injury to persons.
WARRANTY
OUELLET CANADA INC. warrants the electric heating element of the OAS series for a one (1) year period ; and their
component parts against defects in material and workmanship
for a one (1) year period following the date of purchase, under
normal use and service, when proof of purchase of such is provided to the manufacturer. The obligation of Ouellet Canada
Inc., under the terms of this warranty, will be to supply a new
unit and this omits the manufacturer to bear the installation
costs or other secondary charges linked to replacing the unit or
the component part(s).
KEEP THIS INSTRUCTION PAMPHLET
FOR THE USER INS09-200311-03
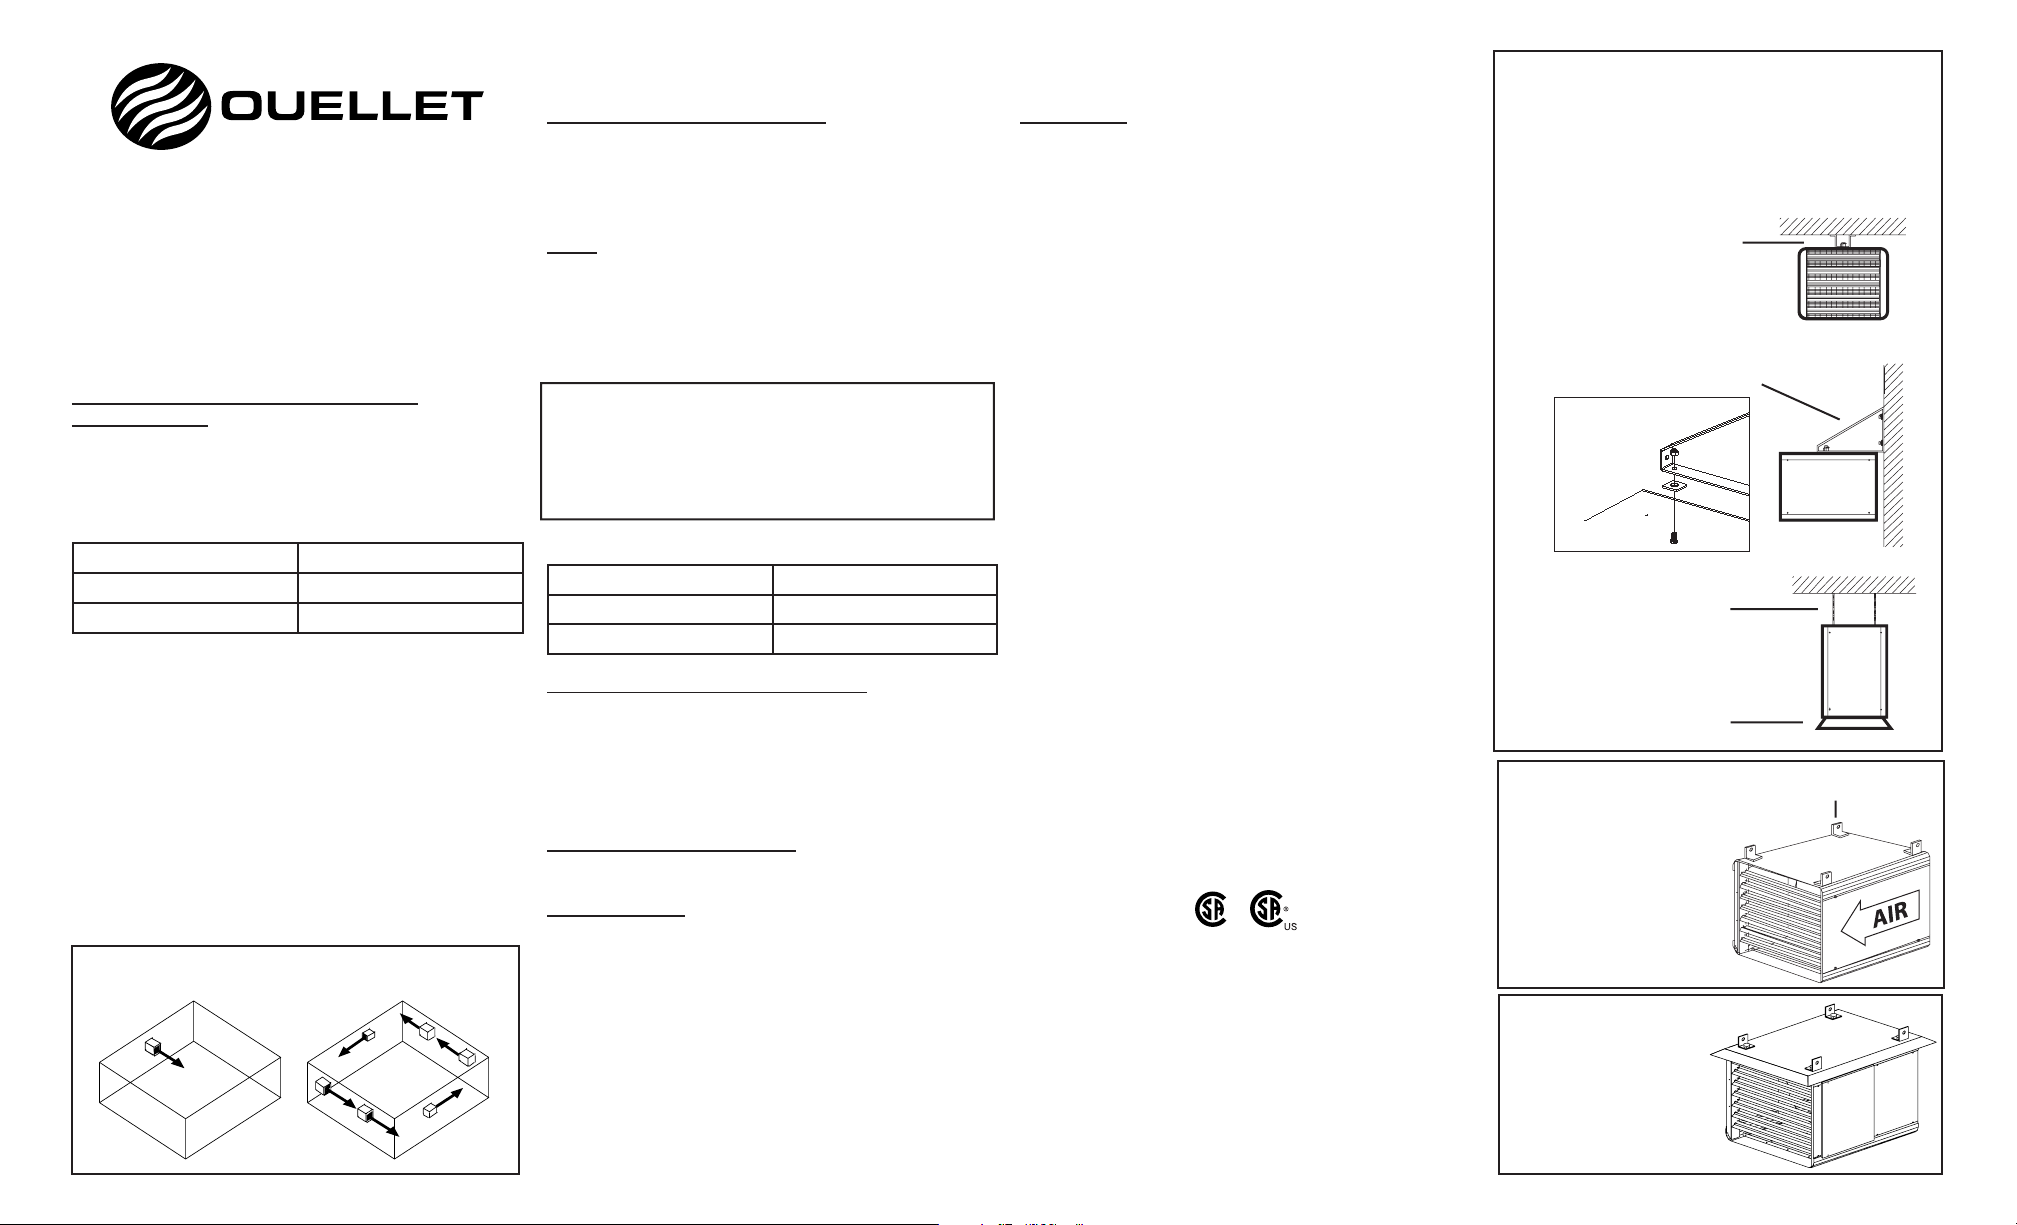
Fig. 3 - MOUNTING
OAS 2-30kW
Horizontal wall or ceiling mounting
using 1 of 2 supplied brackets
which allow 360° rotation.
Ceiling mounting
using the U-shaped bracket
Wall mounting
using the triangular braket.
How to mount it.
Vertical mounting
using 4 threaded rods
1/2 in - 13 UNC not included
Diffuser cone available
Fig. 4 - MOUNTING
OAS 40-60kW
4 hooks of suspension supplied
1/2 in -13 UNC threaded
rods not included
Fig. 5 - MOUNTING
OAS-MD 40-60kW
(Mining application)
4 hooks of suspension
supplied
1/2 in -13 UNC threaded
rods not included
Hook of suspension
 Loading...