

Form No. 102841
For Use
With
Single-
Acting
Cylinders
(Pump
includes
2-Way
Valve)
Double-
Acting
Cylinders
(Pump
includes
4-Way
Valve)
Order
No.
4000 1 0.069
0.160
0.662
0.160
2.600
0.160
7.350
0.294
2.600
0.160
7.350
0.294
1.1
2.6
10.8
2.6
42.6
2.6
120.5
4.6
42.6
2.6
120.5
4.6
10000
10000
325
10000
325
10000
325
10000
325
10000
325
10000
700 75
145
145
140
90
140
90
34.0
65.8
65.8
63.5
40.8
63.5
40.8
A 12 197
901
901
2491
9.5 l
2491
9.5 l
9
45
45
137
460
137
460
148
738
738
2245
7539
2245
7539
5.7 2.6
7.2
7.8
11.8
24.9
12.7
26.3
15.8
17.2
26.0
54.9
27.9
57.9
55
55
152
2.5 gal.
152
2.5 gal.
B
B
B
C
B
C
700
22
700
22
700
22
700
22
700
22
700
1
1
2
1
2
1
2
1
2
1
2
4002
4012
4016
4008
4017
4009
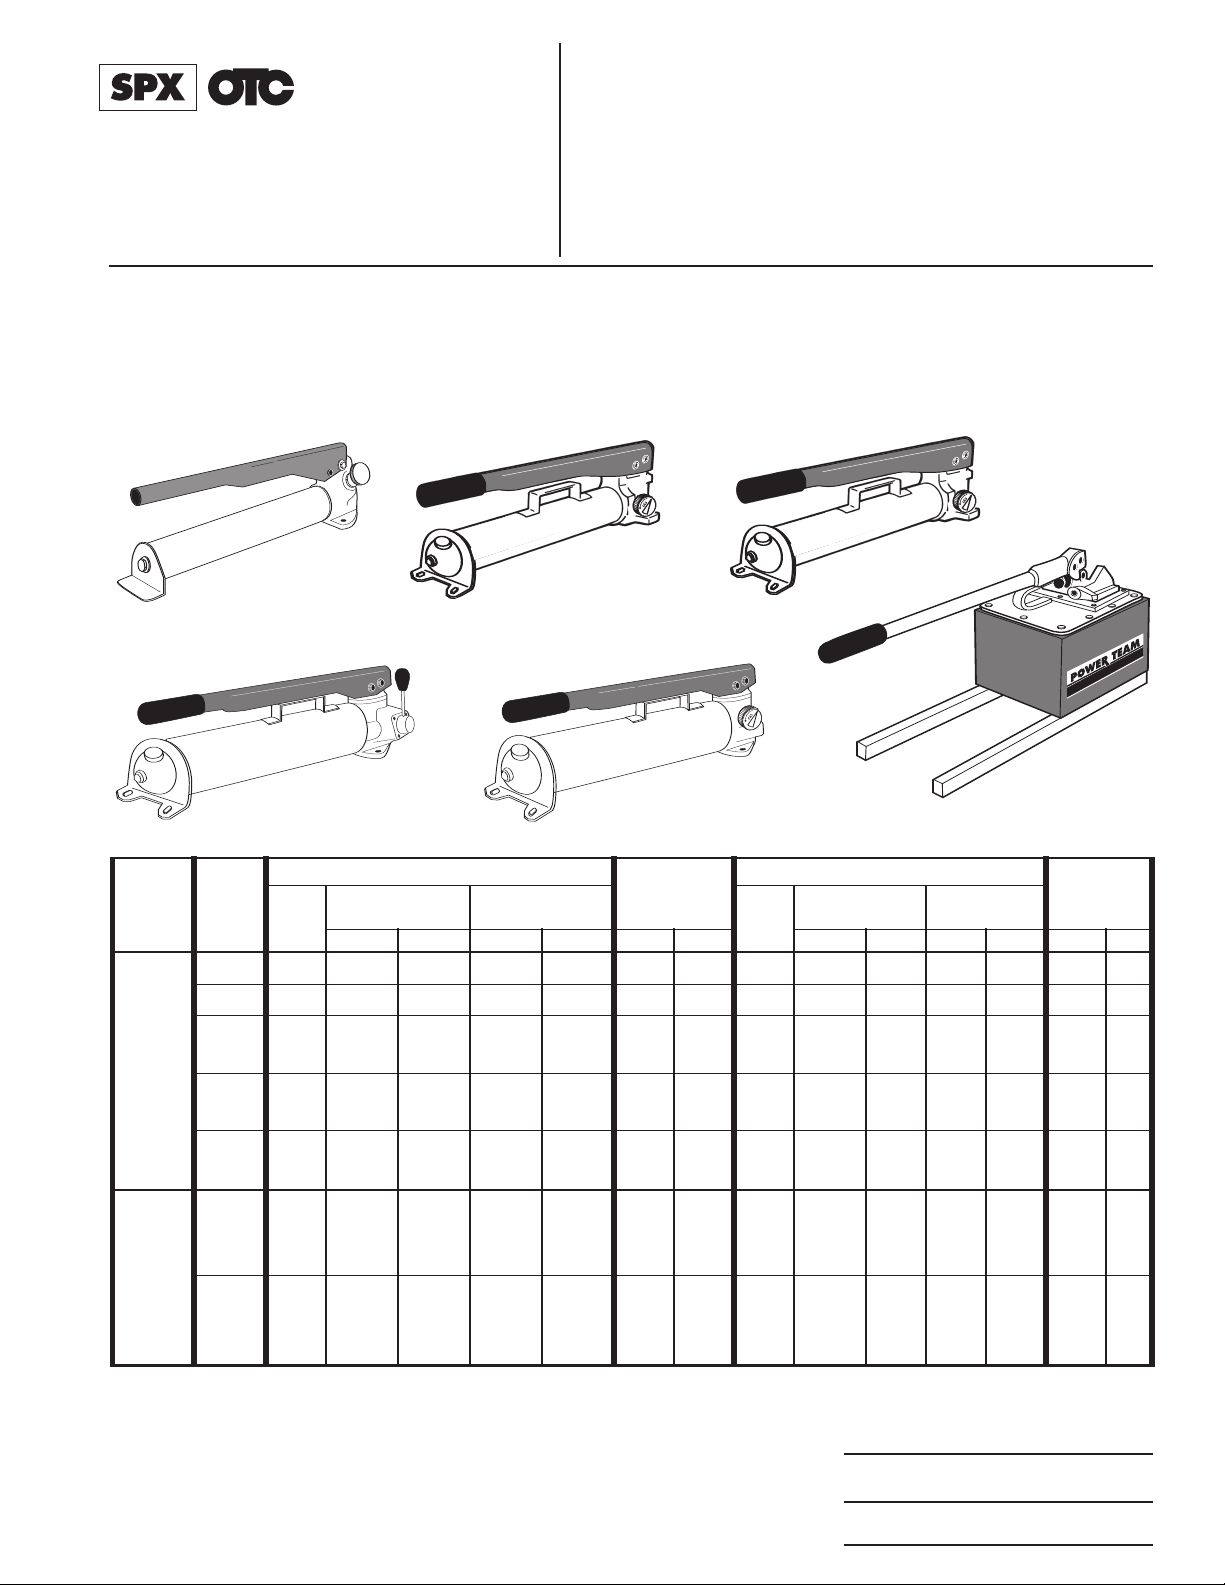
Volume & Pressure
Stage
Volume per
Stroke
In.
3
cm
3
Maximum
Pressure
psi bar
Handle
Effort
Reservoir
lbs. kg
Type
Oil
Capacity
In.
3
cm
3
Usable Oil
Capacity
In.3cm
3
Product
Weight
lbs. kg.
3/8 NPTF oil port(s) on all pumps
SPX Corporation
655 Eisenhower Drive
Owatonna, MN 55060-0995 USA
Phone: (507) 455-7000
Tech. Serv.: (800) 533-6127
Fax: (800) 955-8329
Order Entry: (800) 533-6127
Fax: (800) 283-8665
I
nternational Sales: (507) 455-7223
Fax: (507) 455-7063
Operating Instructions for:
1U-5230
(See 4002)
4000
4002
4002-ER
(See 4002)
4008
4009
4012
4016
4017
61522 (See 4002)
61821 (See 4016)
61869 (See 4016)
61871 (See 4016)
61872 (See 4016)
JTO5845
(See 4016)
SINGLE-STAGE AND TWO-STAGE
HYDRAULIC HAND PUMP
Max. Pressure: See Pump Data Plate
Definition: A hydraulic hand pump delivers hydraulic fluid under pressure by directly applied manual effort.
Note: Illustrations depict general pump configurations.
4012
4000
4002
4002-ERA
1U-5230
© SPX Corporation
4017
4016
JTO5945
61821 / 61871 / 61872
61869 / 61522
Table 1
Sheet No. 1 of 3
Rev. 4 Date: 23 Jan. 2001
4008
4009
Operating Instructions, Form No. 102841, Back sheet 1 of 3
SAFETY EXPLANATIONS
Two safety symbols are used to identify any action or lack of action that can cause personal injury. Your
reading and understanding of these safety symbols is very important.
DANGER - Danger is used only when your action or lack of action will cause serious human injury or
death.
WARNING - Warning is used to describe any action or lack of action where a serious injury can occur.
IMPORTANT - Important is used when action or lack of action can cause equipment failure, either immediate
or over a long period of time.
Pictogram Definition
Do not remove this component. For service only. Pressure must be released.
WARNING: It is the operator's responsibility to read and understand the following
safety statements,
• Only qualified operators should install, operate, adjust, maintain, clean, repair, or
transport this machinery.
• These components are designed for general use in normal environments. These
components are not specifically designed for lifting and moving people, agri-food
machinery, certain types of mobile machinery or special work environments such as:
explosive, flammable or corrosive. Only the user can decide the suitability of this
machinery in these conditions or extreme environments. OTC will supply information
necessary to help make these decisions.
These instructions are intended for end-user application needs. Most problems with new equipment are caused by
improper operation or installation. Detailed service repair instructions or parts lists can be obtained from your nearest
OTC facility.

Operating Instructions Form No. 102841
SAFETY PRECAUTIONS
ARNING: To help prevent personal injury,
W
• Before operating the pump, all hose connections must be tightened with the proper tools. Do not
vertighten. Connections need only be tightened securely and leak-free. Overtightening may cause
o
premature thread failure or high pressure fittings to split at pressures lower than their rated capacities.
• Should a hydraulic hose ever rupture, burst, or need to be disconnected, immediately shut off the pump
and shift the control valve twice to release all pressure. Never attempt to grasp a leaking hose under
pressure with your hands. The force of escaping hydraulic fluid could cause serious injury.
• Do not subject the hose to any potential hazard such as fire, extreme heat or cold, sharp surfaces, heavy
impact. Do not allow the hose to kink, twist, curl, or bend so tightly that the fluid flow within the hose is
blocked or reduced. Periodically inspect the hose for wear because any of these conditions can damage
the hose and result in personal injury.
• Do not use the hose to move attached equipment. Stress may damage the hose and cause personal
injury.
• Hose material and coupler seals must be compatible with the hydraulic fluid used. Hoses also must not
come in contact with corrosive materials such as creosote-impregnated objects and some paints.
Consult the manufacturer before painting a hose. Never paint the couplers. Hose deterioration due to
corrosive materials may result in personal injury.
• All components in the hydraulic system must match the maximum pressure rating of the pump.
Pump
• Do not exceed the PSI rating noted on the pump nameplate or tamper with internal high pressure relief
valve. Creating pressure beyond rated capacities may result in personal injury.
• Before adding hydraulic fluid, retract the system to prevent overfilling the pump reservoir. An overfill
may cause personal injury due to excess reservoir pressure created when cylinders are retracted.
• The load must be under operator control at all times.
Cylinder
• Do not exceed rated capacities of the cylinders. Excess pressure may result in personal injury.
• Do not set poorly-balanced or off-center loads on a cylinder. The load may tip and cause personal injury.
• Stay clear of lifted loads and keep others away.
• Extensions are not recommended for lifting applications.
SET-UP
Hydraulic Connections
IMPORTANT: Seal all hydraulic connections with a high grade, nonhardening thread sealant. Teflon tape may
also be used to seal hydraulic connections if only one layer of tape is used. Apply the tape carefully, two
threads back, to prevent it from being pinched by the coupler and broken off inside the pipe end. Any loose
pieces of tape could travel through the system and obstruct the flow of fluid or cause jamming of precisionfit parts.
Clean all areas around the fluid ports of the pump and cylinder
1.
Remove thread protectors from the hydraulic fluid outlets, and connect the hose assembly. Couple hose to
cylinder.
2. The use of a hydraulic pressure or tonnage gauge (not included) is strongly recommended. Remove the pipe
plug from the gauge port of the valve, thread the gauge into this port and seal as noted above.
. Clean all hose ends, couplers, and union ends.
ARNING: T
W
o help prevent personal injury
,
• The gauge must have the same pressure rating as the pump and cylinder. Personal injury can result if
the wrong gauge is used.
• Release hydraulic pressure BEFORE removing
or tightening hose couplings.
Sheet No. 2 of 3
Rev
. 4
Date: 23 Jan. 2001

Operating Instructions, Form No. 102841, Back sheet 2 of 3
OPERATION
The 4008 can be operated only in the horizontal position. All other hand pumps can be operated in a horizontal
position or in a vertical position with head pointing downward.
Refer to Table 1 and your pump name plate to determine your style of pump.
IMPORTANT: Figure 1 illustrates
normal
the
experienced when all
two-stage pumps shift from
low pressure stage to
high pressure stage.
drop of handle effort
(except 4012)
High Pressure Stage
Handle Effort
Low Pressure Stage
Unloading
Pressure
Two-way Valve
Pumps with a two-way valve are for use with single-acting cylinders.
1. To extend the cylinder, turn the valve knob clockwise to a closed (seated) position.
the pump handle up and down to build pressure.
2. To release pressure, open the valve slowly by turning the knob counterclockwise to control the load.
Four-way Valve
Pumps with a three-position, four-way valve are for use with double-acting cylinders. The hose connection for
extending a cylinder can be made to either port. With the handle in the forward position, the fluid is directed to the top
fluid port. To maintain (hold) pressure, stop the pumping action. When the valve handle is in the center position, fluid
flow is blocked to both ports.
WARNING: The operator should always release the pressure slowly.
Pressure
Figure 1
Note: Hand tight only! Work
PREVENTIVE MAINTENANCE
IMPORTANT: Any repair or servicing that requires dismantling the pump must be performed in a dirt-free
environment by a qualified technician.
Lubrication
Apply lubricant regularly to all pivot and rubbing points. Use a good grade of No. 10 motor oil or grease. Do not use
dry lubricants.
Bleeding Air From the System
Air can accumulate in the hydraulic system during the initial set-up or after prolonged use, causing the cylinder to
respond slowly or in an unstable manner. To remove the air:
1. Position the cylinder at a lower level than the pump, and turn the cylinder rod end down.
Extend and retract the cylinder several times without putting a load on the system. Air will be released into the
2.
pump reservoir. Follow the fluid level instructions for your reservoir type, release the air from the reservoir, and
top off the fluid supply.
Bleeding Air From The Pump
When the pump is first put into use, or after refilling the pump's reservoir it may be necessary to bleed any trapped air
from the pump. If this is not done the pump will not function properly (will not build pressure or has very spongy
operation).
o bleed air from the pump, turn the pressure control knob counterclockwise (CCW) and operate the pump handle up
T
and down approximately twenty times. Turn the pressure control knob clockwise (CW) to its full stop position. The
pump should now be bled of air and ready to use.
Note: Shaded areas reflect last revision(s) made to this form.

Operating Instructions Form No. 102841
Hydraulic Fluid Level
WARNING: Cylinder(s) must be fully retracted before checking the fluid level. Release all system pressure
before breaking any hydraulic connection in the system.
heck the hydraulic fluid level in the reservoir periodically. Use a funnel with a filter to add hydraulic fluid if needed.
C
Refer to Table 1 for your reservoir type.
For models with Reservoir Type A: Place the pump in a
vertical position with the pump head facing upward. Unscrew
and remove the pump head from the reservoir. The fluid level
within the reservoir should come to the fluid level mark
indicated on the reservoir body decal. Before replacing the
pump head, visually inspect the o-ring which seals the pump
head/reservoir assembly. Replace this o-ring if it is worn or
damaged. Reinstall pump head to reservoir and tighten
securely. Check for leaks.
Note: Refer
to appropriate end
view for
your pump
model
For models with Reservoir Type B: Remove the filler cap.
The fluid level should come to the bottom edge of the filler hole
when the pump is level and resting horizontally on its base and
the cylinders are retracted (see Figure 2 - appropriate view
depends on model of pump).
Figure 2
For models with Reservoir Type C: Remove the filler cap.
The fluid level should be 1/2 inch (12.7 mm) from the cover plate when the pump is level and resting horizontally
on its base and the cylinders are retracted.
OIL
LEVEL
OIL
LEVEL
Draining And Flushing The Reservoir
Drain, clean and replenish the reservoir with high-grade, approved hydraulic fluid yearly or more often if necessary.
The frequency of fluid change will depend upon the general working conditions, severity of use and
overall cleanliness and care given the pump.
IMPORTANT: Clean the exterior of the pump first. After draining and flushing the reservoir, drain and clean
the other hydraulic system components (hoses, cylinders, etc.) before connecting them to the pump again.
This will help prevent contaminated fluid from entering the pump.
Refer to Table 1 for your reservoir type.
For models with Reservoir Type A:
1. Unthread and separate the pump head from the reservoir. Drain the reservoir of the used hydraulic fluid.
2. Flush out reservoir with a small amount of clean hydraulic fluid. Clean the pump intake filter.
: Removing the filter from the pump assembly could result in its breakage. Attempt to clean it
IMPORT
as well as possible with it installed.
3. Refill the reservoir and reassemble the pump head to the reservoir. Tighten securely. Check for leaks.
For models with Reservoir Type B:
1. Remove the filler cap. Drain the hydraulic fluid through filler hole.
Remove the nut from the tie rod. Separate the reservoir from the pump body
2.
IMPORTANT
as well as possible with it installed.
3. Reassemble and fill the reservoir with hydraulic fluid. Replace the filler cap.
For models with Reservoir Type C:
Remove the ten screws fastening the reservoir cover to the reservoir
1.
Drain all hydraulic fluid and flush reservoir with a small amount of clean hydraulic fluid.
2.
Remove the pump assembly filter
3.
4. Refill the reservoir with hydraulic fluid. Place the pump and valve assembly
(with gasket) on the reservoir
ighten securely and evenly
T
ANT
. Clean the reservoir and filter
: Removing the filter from the pump assembly could result in its breakage. Attempt to clean it
, and lift the pump and valve assemblies off.
, rinse it clean, and reassemble.
, and thread the ten screws.
.
Sheet No. 3 of 3
.
Rev
. 4
Date: 23 Jan. 2001

Operating Instructions, Form No. 102841, Back sheet 3 of 3
TROUBLE-SHOOTING
WARNING: To help prevent personal injury, always release pump pressure and disconnect hoses(s)
rom pump before making repairs.
f
Refer to the appropriate pump parts list during trouble-shooting. Repairs must be performed in a dirt-free
environment by qualified personnel familiar with this equipment.
PROBLEM CAUSE SOLUTION
Pump losing pressure 1. System components leaking
2. Directional control valve leaks or
not adjusted properly
3. Fluid leaking past outlet check
seat(s)
Handle rises after each stroke 1. Fluid leaking past outlet check
seat(s)
Pump not delivering fluid 1. Low fluid level in reservoir
2. Intake filter is dirty
3. Seats worn and not seating
properly
Pump does not reach full pressure 1. Low fluid level in reservoir
2. System components leaking
3. Directional control valve leaks or
not adjusted properly
4. Improperly adjusted relief valve
5. Fluid leaking past inlet or outlet
checks or high pressure piston
seal damaged
1. Repair or replace as necessary
2.* Reseat, repair, or replace
directional control assembly and
correctly adjust
3.* Check for dirt. Reseat pump
body and/or replace poppet(s) or
ball(s)
1.* Check for dirt. Reseat pump
body and/or replace poppet(s)
or ball(s)
1. Check fluid level per instructions
2. Remove reservoir and clean
3.* Repair seats or replace pump
body
1. Check fluid level per instructions
2. Repair or replace as necessary
3.* Reseat, repair, or replace
directional control assembly and
correctly adjust
4.* Readjust
5.* Reseat or repair inlet or outlet
checks or replace high pressure
piston seal
Pump handle can be pushed down
(slowly) without raising the load
Pump handle operates with a
spongy action
Pump handle effort drops
significantly after some pressure
has been obtained
*OTC recommends these hand pump repairs be performed by an Authorized Hydraulic Service Center.
1. Inlet checks are not seating
2. Damaged piston assembly or
piston seals leaking
1. Air trapped in system
oo much fluid in reservoir
T
2.
1. This is normal operation on most
two-stage hand pumps
1.* Check for dirt and/or reseat
valve seats
2.* Replace piston assembly and/or
piston seals
1. Position cylinder lower than
pump. Extend and return
cylinder several times. Follow
bleeding instructions.
Check fluid level per instructions
2.
 Loading...