

Page 1

User Manual
French Door
Countertop Oven
Notice d’emploi
Four posable à porte
à deux battants
P.N. 188284
Visit us at www.oster.ca
MODEL/MODÈLE
TSSTTVFDXLPP-033
For product questions contact:
Jarden Consumer Service
USA: 1.800.334.0759
Canada: 1.800.667.8623
www.oster.ca
© 2016 Sunbeam Products, Inc. doing business as Jarden Consumer
Solutions. All rights reserved. In Canada, imported and distributed by
Sunbeam Corporation (Canada) Limited doing business as Jarden Consumer
Solutions, 20 B Hereford Street, Brampton, Ontario L6Y 0M1.
Pour les questions de produit:
Service à la clientèle de Jarden
États-Unis : 1 800 334.0759
Canada : 1 800 667.8623
www.oster.ca
© 2016 Sunbeam Products, Inc. faisant affaire sous le nom de Jarden
Consumer Solutions. Tous droits réservés. Au Canada, importé et distribué par
Sunbeam Corporation (Canada) Limited faisant affaire sous le nom de Jarden
Consumer Solutions, 20 B Hereford Street, Brampton (Ontario) L6Y 0M1.
Printed in China Imprimé en Chine
GCDS-OST46383-BB TSSTTVFDXLPP-033_16EFM1
TSSTTVFDXLPP-033_16EFM1.indd 40-41 6/7/16 9:46 AM
Page 2

English-42
IMPORTANT SAFEGUARDS
When using electrical appliances, basic safety precautions should
always be followed, including the following:
• READ ALL INSTRUCTIONS, PRODUCT LABELS AND WARNINGS BEFOREUSING THE
COUNTERTOP OVEN.
•
Do not touch hot surfaces. Use handles or knobs. Always use theovenhandles when
moving the unit.
• Unplug from outlet when not in use and before cleaning. Allow to cool before putting
on or taking off parts.
• To protect against risk of electrical shock, do not immerse the appliance in water or
any other liquids.
• Close supervision is always necessary when this or any appliance is used
nearchildren. Thisapplianceis not for use by children.
• Do not operate this or any appliance with a frayed or damaged cord or plug or after the
appliance malfunctions oris dropped or has been damaged inanymanner. Returnthe
countertop oven to thenearest Authorized Sunbeam Appliance Service Center
forexamination, repair or electrical ormechanical adjustment.
• Do not use attachments not recommended by the manufacturer; theymaycausefire,
electricshock orpersonalinjury.
• Do not use outdoors or for commercial purposes.
• Do not use this appliance forother than its intendeduse.
• Do not let the cord dangle over the edge of a tabletop orcountertop
ortouchhotsurfaces.
• Do not place the appliance near a hot gas or electric burner orin a heated oven.
• Extreme caution should be used when using containers constructed of material other
than metal or glass.
• A fire may occur if the countertop oven is covered or touching flammable materials,
including curtains, draperies, walls, etc., when in operation. Do not store anyitems on
top of the appliance when in operation.
• When using countertop oven, pull the unit out a minimum of 6 inches away from the
wall or other cords.
• Do not store any materials, other than manufacturer’s recommended accessories,
inthis unit when not in use.
English-43
• Do not place any flammable materials in oven, such as paper, cardboard,
plasticoranymaterials that may catch fire or melt.
• Do not cover the oven tray with metal foil. This will cause overheating oftheappliance.
• Oversized foods or metal utensils must not be inserted in the appliance astheymay
create afire orrisk of electrical shock.
• Do not clean with metal scouring pads. Pieces can break off the pad
andtouchelectrical parts involving a risk of electricalshock.
• Use extreme caution when removing pan ordisposing ofhotgrease or other hot
liquids.
• To turn this appliance off, return all controls to the “OFF”position and remove cord
from outlet.
SAVE THESE INSTRUCTIONS
This Unit Is for Household Use Only
Short Power Supply Cord Instructions
Ashortpower-supply cord is provided to reduce the risk resulting from becoming
entangled in or tripping over a longer cord. An extension cord may be used if care
is exercised in its use. If an extension cord is used, the electrical rating of the cord
must be at least as great as the electrical rating of the appliance. The extension cord
should be arranged so that it will not drape over the countertop or tabletop where it
can be pulled on by children or tripped over unintentionally.
For Products Purchased in the United States and Canada Only
To reduce the risk of electrical shock, this appliance has a polarized plug (one blade
is wider than the other). This plug fits apolarized outlet only one way; if the plug
does not fit fully intothe outlet, reverse the plug. If it still does not fit, contact a
qualified electrician. Do not attempt to defeat this safety feature.
TSSTTVFDXLPP-033_16EFM1.indd 42-43 6/7/16 9:46 AM
Page 3
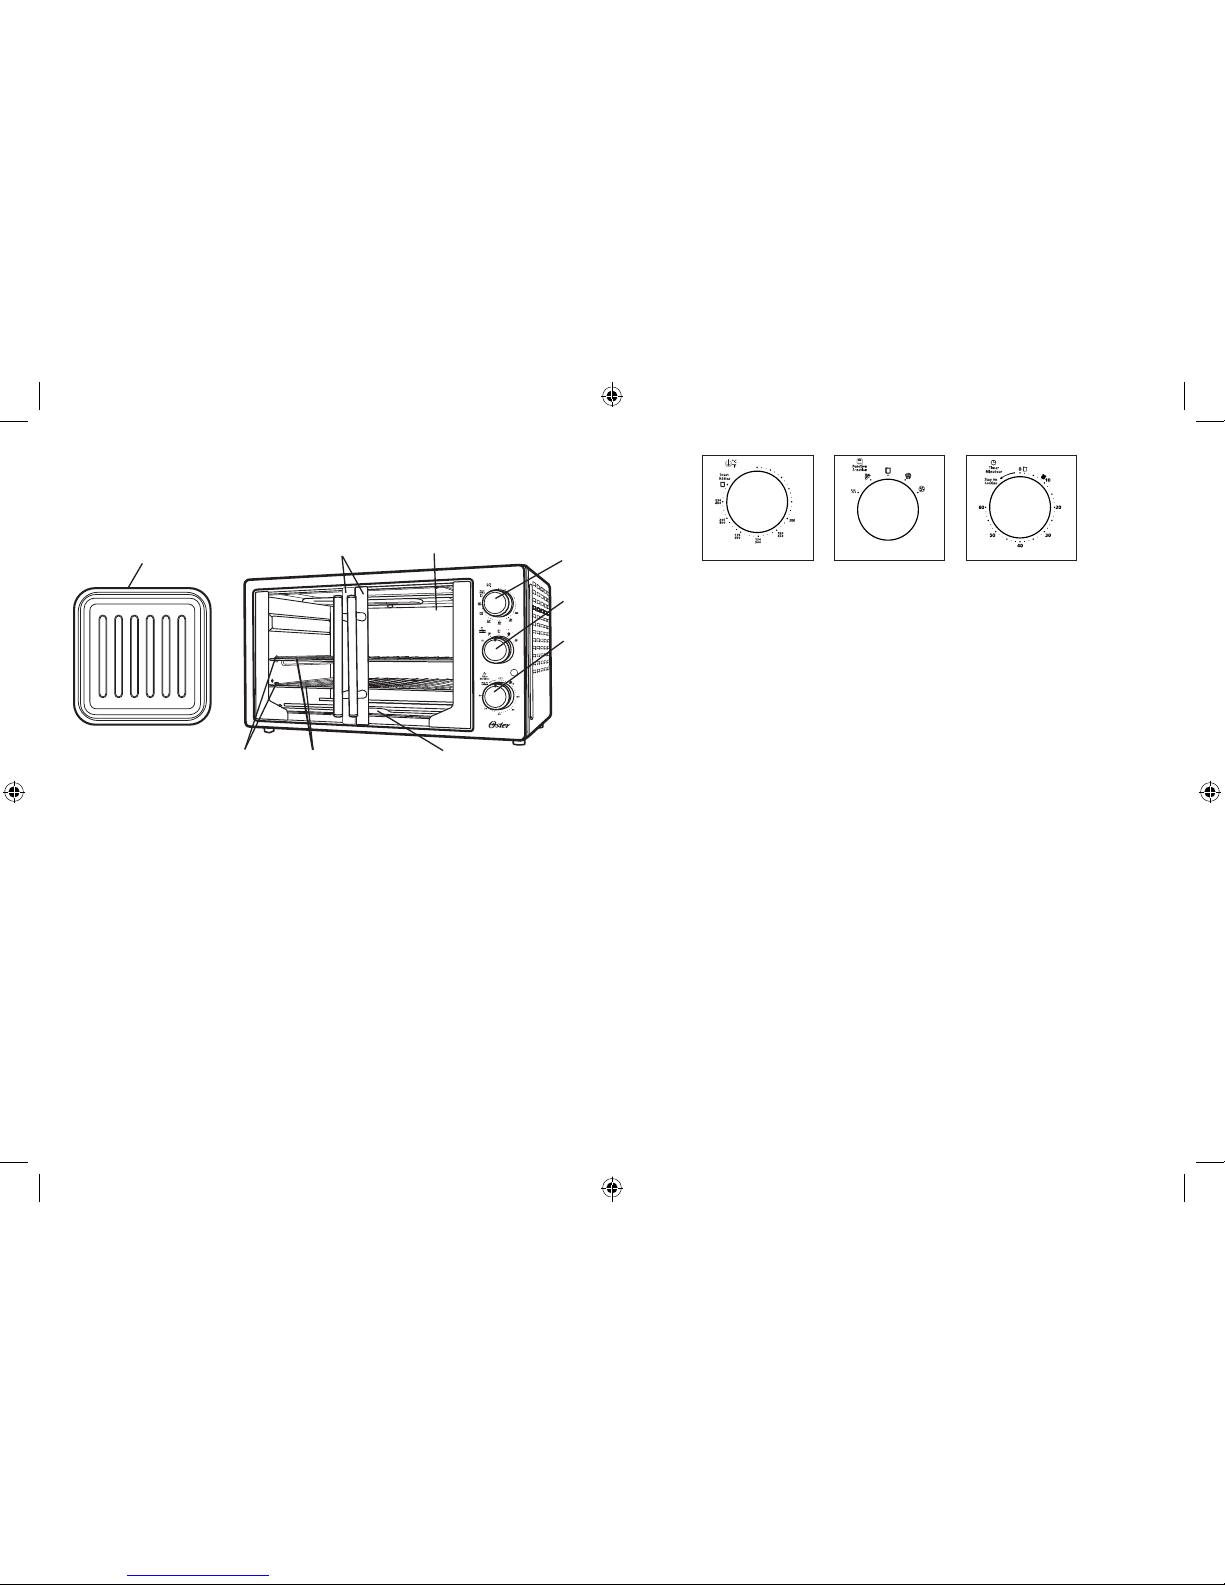
Figure 1
Figure 2 Figure 3
English-44
1. Tempered Glass Doors – For front viewing of food.
2. Easy Clean Interior Walls – Allows fast clean up.
3. Temperature Control Knob – Adjust the dial thermostat to the desired
temperature. (See Figure 1)
4. Function Selector Knob – Select cooking function by turning knob to desired
setting. (See Figure 2)
5. Timer Control Knob with Bell Signal – Set cooking time up to 60 minutes.
Will automatically turn the oven OFF at the end of the cooking time. (See
Figure 3)
6. Removable Crumb Tray – For crumb or fallen food particles collection. Pulls
out for easy cleaning.
7. Two Removable Wire/Broil Racks – Use for all your broiling and grilling
needs. See “Positioning Rack” and “Positioning Pan” sections.
8. Two Rack Positions
9. Baking Pan & Cookie sheet in one – Use for all your baking needs.
See “Positioning Pan” section.
English-45
PreP aring To Use YoU r Co U nTerTo P ove n for Th e fi rsT
Tim e
If you are using your Countertop oven for the first time, please be sure to:
• Remove any stickers from the surface of the oven.
• Open oven doors and remove all printed documents and paper from
inside the Countertop Oven.
• Clean the rack and pan with hot water, a small amount of dishwashing
liquid and a non-abrasive cleaning pad.
CAUTION: DO NOT IMMERSE THE BODY OF THE UNIT IN WATER.
• Dry the unit thoroughly before using.
• Select a location for the Countertop Oven. The location should be in
an open area on a flat counter where the plug will reach an outlet.
• Plug the Countertop Oven into a 120 Volt AC electrical outlet.
NOTE: During initial start up you may detect a slight smell and/or smoke.
Turn the temperature to max and let run for approximately 5 minutes.
WARNING: When Countertop Oven is in use or cooling down, please be
sure there is a 6-inch clearance between the Countertop Oven and any other
surface including cords. Be sure the cord is not resting against the back of the
Countertop Oven.
Le a rnin g ab oU T Yo U r CoU nTerToP ove n
8
1
7
2
3
4
5
6
9
TSSTTVFDXLPP-033_16EFM1.indd 44-45 6/7/16 9:46 AM
Page 4
English-47English-46
To Use The Toa sT fUn C Tion (see fig. 4)
Select desired rack position. (See “Positioning Rack”
Section)
NOTE: Different types of bread require different settings.
Lighter breads and waffles require lighter setting. Darker
breads, muffins and English muffins require a darker
setting.
Step 1. Place food on Wire Racks. For best toasting
results, position the rack in the upper position. **
Step 2. Close glass doors completely.
Step 3. Turn the Function dial to Toast. Both the top and
bottom heater elements will operate.
Step 4. Turn the temperature control knob to the 450º/
TOAST setting.
Step 5. To set the timer, turn the timer past the 20 minute
mark to engage timer switch and set back to
desired toast time.
Step 6. When toasting is complete, a bell will sound.
Open doors completely and remove food.
To Us e Th e TUrbo Co n v e C Tio n he a T
fU n C Tion (se e fig . 5)
The Turbo Convection Heat Function turns on a built in
fan that circulates hot air in the oven chamber cooking
your food faster and more evenly. Preheat oven 5-7
minutes at desired temperature with oven rack in place.
Step 1. Place baking pan with food inside on
wire rack.
Step 2. Close glass doors completely.
Step 3. Turn the Function dial to Turbo.
Step 4. Turn the Temperature dial to desired setting.
Step 5. Turn the Timer to desired cook time.*
Step 6. When baking is complete, open doors completely
and remove food.**
faQs aboU T TU rbo Co n ve C Tio n hea T
What is Turbo Convection Heat?
Answer: In your Countertop Oven there is a built in fan
that circulates the hot air in the oven chamber cooking
your food faster and more evenly.
How do I adjust the time for Turbo Convection?
Answer: On average, the Turbo function will shorten the
cooking time, but it varies by food. It is suggested to go
with a shorter cooking time to start with and then add
time if it is needed.
What are the best foods to use with Turbo?
Answer: While a shorter cook time is often desirable,
baked goods in particular benefit from Turbo cooking
as the circulating air keeps oven temperature consistent
throughout.
To Us e Th e ba k e fU nC Tio n (se e fig . 6)
Step 1. Place baking pan with food inside on
wire rack.
Step 2. Close glass doors completely.
Step 3. Turn the Function dial to Bake.
Step 4. Turn the Temperature dial to desired setting.
Step 5. Turn the Timer to desired cook time.*
Step 6. When baking is complete, open doors completely
and remove food.**
for Cooking Tw o Pi z za s
Step 1. Place the 2 pizzas on the wire racks.
Step 2. Cook the pizzas for about one-half the
recommended time, and then switch the
rack positions to allow the pizzas to uniformly
cook top and bottom.
Figure 4
Figure 5
Figure 6
TSSTTVFDXLPP-033_16EFM1.indd 46-47 6/7/16 9:46 AM
Page 5

English-48
To Us e Th e wa rm fUn C Tio n (se e fig . 7)
Step 1. Place baking pan with food inside on
wire rack.
Step 2. Close glass doors completely.
Step 3. Turn the Function dial to Warm.
Step 4. Turn the Temperature dial to “200º F”.
Step 5. Turn the Timer to desired to “Warm” time.*
Step 6. When Warming is complete, open doors
completely and remove food.**
To Us e Th e broi L fUn C Tion (se e fig . 8)
Adjustable Broil allows the oven to broil at any
temperature. Great for melting cheese at 150º F
or cooking fish at 400º F. Adjust as needed.
Step 1. Place food on broil rack or on baking pan if
needed. See “Positioning Rack” and “Positioning
Pan” sections.
Step 2. Close glass doors.
Step 3. Turn the Function dial to Broil.
Step 4. Turn the Temperature dial to desired
temperature.
Step 5. Turn the Timer to desired cook time.*
Step 6. When Broiling is complete, open doors
completely and remove food.**
* Special note: If cook time is less than 20 minutes, you
must turn Timer past the 20 minute mark
to engage the timer then back to desired
time.
** WARNING: Cooked food and metal rack can be
very hot, handle with care. Do not leave
Countertop Oven unattended.
English-49
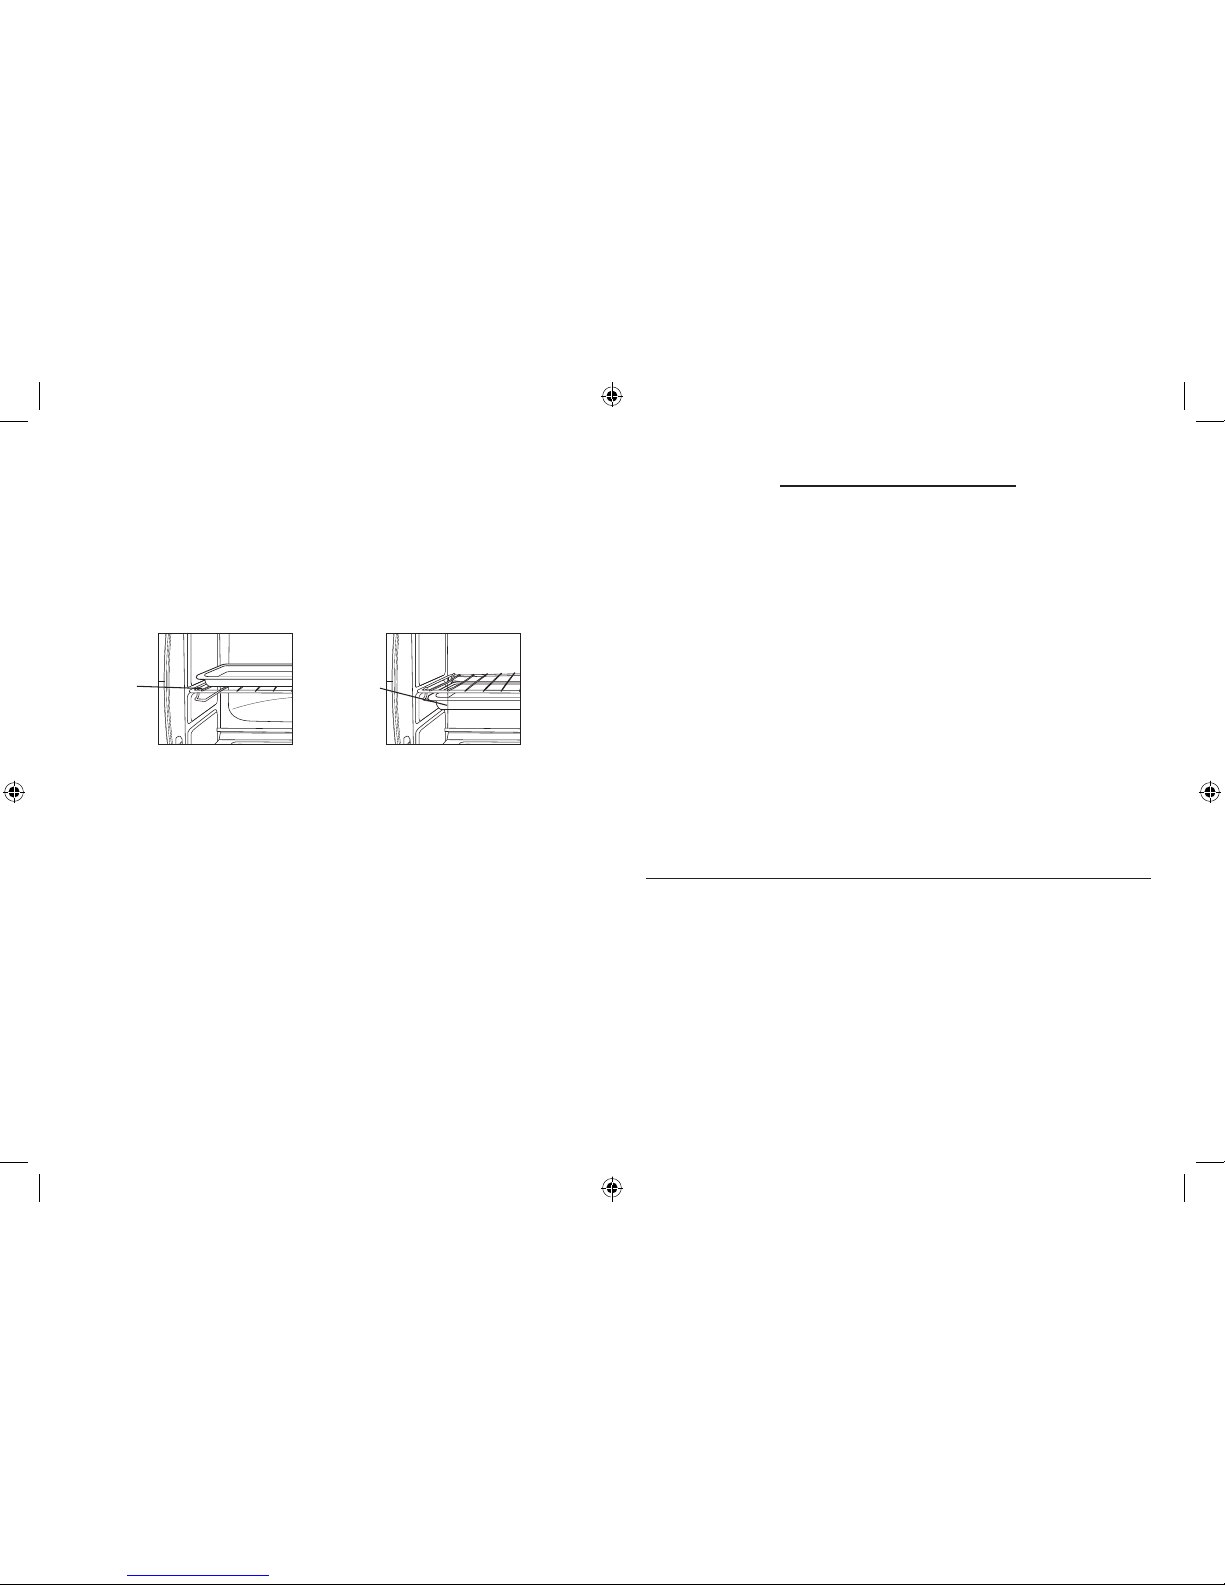
PosiTioning ra C k
• To accommodate a wide variety of foods the oven has two rack positions.
The rack can be inserted in the oven in the upper or lower rack guides. The
rack will fit into either of the rack guides inside of the Countertop Oven.
(See Figure Below)
• Before removing the rack allow the unit to cool.
• To remove the rack, open the oven doors and pull the rack towards
the front of the oven. The rack will slide on the rack guides on the inside
of the oven.
PLEASE NOTE: the oven rack may tilt downward causing food to shift when
the rack is pulled out, proceed with caution.
• Positioning of the oven rack will depend on the size of the food and
desired browning. Move the rack to the lower rack position to prevent top
browning and move the rack to the upper rack position to prevent bottom
burning.
• For best toasting results, position the rack in the upper rack guide.
ra C k gU i d e
oP Ti on s
Figure 7
Figure 8
TSSTTVFDXLPP-033_16EFM1.indd 48-49 6/7/16 9:46 AM
Page 6
English-50
PosiTioning Pan
• To accommodate a wide variety of foods the oven has two pan positions.
The pan can be placed on top of the rack or inserted into the guide rails
below the rack. (See Figure Below)
• Before removing the pan allow the unit to cool.
• Positioning of the oven pan will depend on the desired cooking method. For
baking, place the pan on top of the rack. For grilling or broiling, insert the
pan into the guide rails below the rack and place the food on top of the rack.
PLEASE NOTE: Do not to use the broil pan under the rack in the lower position.
fo r
ba k in g
fo r
gri LLin g o r
bro iLi ng
CLe an ing YoU r Co U nTerTo P ove n
CAUTION: DO NOT IMMERSE IN LIQUIDS.
Step 1. Turn all knobs to “OFF” position and remove plug from electrical
outlet. Allow to cool.
Step 2. Wipe unit down with damp cloth. DO NOT IMMERSE IN WATER.
Make sure to only use mild, soapy water. Abrasive cleaners, scrubbing
brushes and chemical cleaners will damage the coating on this unit.
Step 3. Remove crumb tray by pulling out of Countertop Oven.
Step 4. Shake off crumbs from crumb tray. Cleaning the crumb tray often will
avoid any accumulations.
Step 5. Remove wire rack and clean with damp cloth or place in top rack of
dishwasher.
sToring YoU r Co U nTerTo P ove n
Allow the appliance to cool completely before storing. If storing the
Countertop Oven for long periods of time make certain that the Countertop
Oven is clean and free of food particles. Store the Countertop Oven in a dry
location such as on a table or countertop or cupboard shelf. Other than the
recommended cleaning, no further user maintenance should be necessary.
English-51
re CiP e s
brie an d arTiCh o k e brU sCh e TTa
6 (1/3-inch-thick) slices of
round country loaf
6 tablespoons extra-virgin olive oil
2 (6 ½-oz.) jars marinated
artichoke hearts, drained
1 (2 oz.) piece prosciutto or ham
1 small red onion, chopped
1 tablespoon chopped garlic
2 tablespoons balsamic vinegar
6 oz. brie
1 tablespoon chopped fresh mint
1 tablespoon chopped fresh basil
1/4 cup parmesan shavings
Set Oster® Countertop Oven to broil and pre-heat. Arrange bread in one layer
on a baking pan, then brush tops with 2 tablespoons oil and season with
salt and pepper. Broil until golden brown and transfer to a rack. Spread thin
layer of Brie on toasted bread. Cut artichokes lengthwise into 1/4-inch-thick
slices and cut prosciutto into matchsticks. Heat 1 tablespoon oil in a 10-inch
heavy bottom skillet on moderately high heat. Add the onions and garlic. Stir
frequently until they become transparent. Add the artichokes and prosciutto,
cook the artichokes until golden (about 4 minutes) then add the balsamic
vinegar. Add the basil and mint, salt and pepper to taste. Spoon the mixture
over the toast. Top with Parmesan and serve immediately.
Cin n am on ToasT
1 tablespoon brown sugar
2 teaspoons margarine, at room
temperature
¼ teaspoon ground cinnamon
2 slices whole wheat or multigrain
bread
Combine the sugar, margarine and cinnamon in a small bowl with a fork until
well blended. Spread each bread slice with equal portions of the mixture. In
an Oster® Countertop Oven, toast until the sugar is melted and the bread is
browned to your preference.
TSSTTVFDXLPP-033_16EFM1.indd 50-51 6/7/16 9:46 AM
Page 7

English-52
re CiP e s
hone Y mUsTard ChiCke n w iTh sP iCY PeC a n Co rnfLa k e
CrU sT
1 cup Dijon mustard
½ cup chopped pecans
1 cup honey
Nonstick pan spray
3 pounds of skinless chicken thighs
and/or breasts
Olive oil for drizzling
1 teaspoon cayenne pepper
1 18-ounce box cornflake cereal,
pulsed in food processor until
flakes are crumbs
Mix the mustard and honey together in a medium shallow bowl. Thoroughly
coat the chicken on both sides. Combine cayenne pepper, cornflakes and pecans
in another shallow bowl. Spray baking pan with nonstick spray and place
chicken in pan. Drizzle top with olive oil. Bake at 375°F for 40 minutes or until
chicken reaches internal temperature of 170°F and is no longer pink in center.
roasTed TUrkeY breasT w i Th arom aTiC ve ge Ta b Le s
1 small turkey breast
2 stalks celery, cut into ¼ inch dice
2 cloves garlic, peeled
1 lemon, halved
1 or 2 sprigs each of fresh rosemary
and fresh thyme
Chili powder
1 small onion, cut into ¼ inch dice
Kosher salt and pepper
3 small carrots cut into ¼ inch dice
1 ½ cups chicken broth
Preheat Oster® Countertop Oven to 450°F. Sprinkle vegetables in bottom of
an 11 inch baking pan with 1 ½ - 2 inches sides and top with turkey breast.
Tuck garlic and herbs under breast. Squeeze lemon on top of turkey and
season with chili powder, salt and pepper. Cook for 25 minutes. Reduce oven
temperature to 325°F and pour broth into bottom of pan, about 1 inch up the
sides of the pan. Continue cooking until turkey juices run clear and it reaches
internal temperature of 180°F.
English-53
re CiP e s
mU sTard and he rb Pork Tende rLoin w iTh ro a s Te d
PoTaToe s
1 package pork tenderloin,
1 ½ - 2 pounds
5 cloves garlic, peeled and minced
3 tablespoons Dijon mustard
6 small Yukon Gold potatoes,
quartered
3 tablespoons fresh rosemary,
stemmed and chopped
2 tablespoons olive oil
3 tablespoons fresh thyme, stemmed
1 tablespoon Kosher salt, plus
additional for potatoes
1 teaspoon freshly cracked black
pepper, plus additional for
potatoes
Preheat Oster® Countertop Oven to 375°F. Coat pork with Dijon mustard. In
a small bowl, combine 2 tablespoons of rosemary, 2 tablespoons of thyme,
salt, pepper and garlic. Spread over pork tenderloins and place in a large
baking dish that fits comfortably inside toaster oven. Spread potatoes around
pork drizzle with olive oil. Sprinkle potatoes with salt and pepper and
remaining 1 tablespoon of rosemary and thyme. Cook for ½ hour or until
pork tenderloin is no longer pink in the center. Remove pork, cover with foil
and set aside. Check potatoes by piercing with fork to see if tender and cook
for an additional 15-20 minutes if necessary.
TSSTTVFDXLPP-033_16EFM1.indd 52-53 6/7/16 9:46 AM
Page 8

he LPfUL TiP s / Tro U bLeshooTin g
PROBLEM POTENTIAL CAUSE SOLUTION
Overcooked / Undercooked
Foods.
• Incorrect temperature
or time setting.
• Rack placement.
• You may have to adjust the
time and temperature to
desired taste.
• Because your Countertop Oven
is smaller than your regular
oven, it will heat up faster and
generally cook in shorter periods
of time.
• Refer to “Positioning Rack”
Section, PageEnglish-9. Rack
may need to be adjusted
toaccommodate food.
Burnt Smell. • Food build-up inside
oven, on heating
elements or in crumb
tray.
• Refer to “Cleaning Your
Countertop Oven” Section,
Page English-10.
Only one heating element is
heating up.
• Function setting
selection determines
which heating
element will operate.
• Check to see if the Broil or
Warm setting is selected.
Heating elements donot
stay ON.
• Heating elements will
cycle ON and OFF to
maintain proper heat.
• Confirm function setting is the
correct one of choice.
noTes
English-55English-54
TSSTTVFDXLPP-033_16EFM1.indd 54-55 6/7/16 9:46 AM
Page 9

English-56
1 Year Limited Warranty
Sunbeam Products, Inc. doing business as Jarden Consumer Solutions or if in
Canada, Sunbeam Corporation (Canada) Limited doing business as Jarden
Consumer Solutions (collectively “JCS”) warrants that for a period of one year
from the date of purchase, this product will be free from defects in material
and workmanship. JCS, at its option, will repair or replace this product or any
component of the product found to be defective during the warranty period.
Replacement will be made with a new or remanufactured product or component.
If the product is no longer available, replacement may be made with a similar
product of equal or greater value. This is your exclusive warranty. Do NOT
attempt to repair or adjust any electrical or mechanical functions on this product.
Doing so will void this warranty.
This warranty is valid for the original retail purchaser from the date of initial retail
purchase and is not transferable. Keep the original sales receipt. Proof of purchase
is required to obtain warranty performance. JCS dealers, service centers, or retail
stores selling JCS products do not have the right to alter, modify or any way
change the terms and conditions of this warranty.
This warranty does not cover normal wear of parts or damage resulting from any
of the following: negligent use or misuse of the product, use on improper voltage
or current, use contrary to the operating instructions, disassembly, repair or
alteration by anyone other than JCS or an authorized JCS service center. Further,
the warranty does not cover: Acts of God, such as fire, flood, hurricanes and
tornadoes.
What are the limits on JCS’s Liability?
JCS shall not be liable for any incidental or consequential damages caused by the
breach of any express, implied or statutory warranty or condition.
Except to the extent prohibited by applicable law, any implied warranty or
condition of merchantability or fitness for a particular purpose is limited in duration
to the duration of the above warranty.
JCS disclaims all other warranties, conditions or representations, express, implied,
statutory or otherwise.
JCS shall not be liable for any damages of any kind resulting from the purchase,
use or misuse of, or inability to use the product including incidental, special,
consequential or similar damages or loss of profits, or for any breach of contract,
fundamental or otherwise, or for any claim brought against purchaser by any
other party.
Some provinces, states or jurisdictions do not allow the exclusion or limitation
of incidental or consequential damages or limitations on how long an implied
warranty lasts, so the above limitations or exclusion may not apply to you.
English-57
This warranty gives you specific legal rights, and you may also have other rights
that vary from province to province, state to state or jurisdiction to jurisdiction.
How To Obtain Warranty Service
In the U.S.A.
If you have any question regarding this warranty or would like to obtain warranty
service, please call 1-800-334-0759 and a convenient service center address will be
provided to you.
In Canada
If you have any question regarding this warranty or would like to obtain warranty
service, please call 1-800-667-8623 and a convenient service center address will be
provided to you.
In the U.S.A., this warranty is offered by Sunbeam Products, Inc. doing business as
Jarden Consumer Solutions located in Boca Raton, Florida 33431. In Canada, this
warranty is offered by Sunbeam Corporation (Canada) Limited doing business as
Jarden Consumer Solutions, located at 20 B Hereford Street, Brampton, Ontario
L6Y 0M1. If you have any other problem or claim in connection with this product,
please write our Consumer Service Department.
PLEASE DO NOT RETURN THIS PRODUCT TO ANY OF THESE
ADDRESSES OR TO THE PLACE OF PURCHASE.
TSSTTVFDXLPP-033_16EFM1.indd 56-57 6/7/16 9:46 AM
Page 10

Français-58
CONSIGNES IMPORTANTES
L’utilisation de tout appareil électroménager exige l’observation de
précautions fondamentales, y compris des suivantes :
• LISEZ ATTENTIVEMENT LES INSTRUCTIONS, LES ÉTIQUETTES AINSI QUE LES
AVERTISSEMENTS AVANT D’UTILISER LE FOUR POSABLE.
• Ne touchez pas les surfaces chaudes. Servez-vous des poignées et des boutons.
Déplacez toujours le four à l’aide de ses poignées.
• Débranchez le four au niveau de la prise de courant quand il ne sert pas et avant de le
nettoyer. Attendez qu’il ait refroidi avant de monter ou de démonter toute pièce.
• Pour vous protéger du choc électrique, n’immergez ce four ni dans l’eau ni dans d’autres
liquides, quels qu’ils soient.
• Redoublez de vigilance lorsque le four – ou un autre appareil – fonctionne à proximité
d’enfants. Cet appareil n’est pas destiné à l’emploi par des enfants.
• N’employez aucun appareil dont le cordon (ou la fiche) est endommagé, qui a mal
fonctionné, a été échappé ou abîmé d’une façon quelconque. Retournez le four
posable au centre de services agréé le plus proche pour lui faire subir les vérifications,
réparations et ajustements électriques ou mécaniques nécessaires.
• N’employez pas d’accessoires que ne recommande pas formellement le fabricant, ils
risqueraient de provoquer incendie, chocs électriques ou blessures corporelles.
• Ne vous servez de cet appareil ni en plein air ni à des fins commerciales.
• N’employez cet appareil qu’aux fins auxquelles il est prévu.
• Veillez à ce que le cordon ne pende pas et ne touche aucune surface chaude.
• Ne posez le four ni près d’un foyer à gaz ou électrique chaud ni dans un four chauffé.
• Agissez extrêmement prudemment lorsque vous employez des plats autres qu’en métal
ou en verre.
• Un incendie peut se déclarer si le four est couvert ou touche des matières inflammables
– rideaux, murs, tentures, et autres, par exemple – pendant son fonctionnement.
Ne posez jamais quoi que ce soit sur un four qui fonctionne.
• Lorsque vous vous servez du four posable, tirez-le pour l’éloigner du mur et le mettre à
au moins 15 cm / 6 po du mur et de tous autres cordons.
• Entre utilisations, ne rangez aucun article dans la cavité du four, outre les accessoires
que recommande le fabricant.
• Ne placez pas de matières inflammables dans le four – papier, carton ou plastique, par
exemple – ou toute autre matière qui risquerait de s’enflammer ou de fondre.
• Ne recouvrez pas la plaque du four de feuille d’aluminium sous peine de surchauffe.
Français-59
• Ne placez surtout pas d’aliments ou de plats en métal surdimensionnés dans le four, un
incendie ou un choc électrique pourrait en résulter.
• Ne nettoyez pas l’appareil avec des tampons métalliques, des particules pourraient se
détacher et causer un risque de choc électrique.
• Observez toutes les précautions qui s’imposent lorsque vous sortez un plat du four et
lorsque vous videz de la graisse ou un liquide chaud.
• Pour éteindre le four, mettez toutes les commandes en position d’ARRÊT puis tirez
délicatement le cordon hors de la prise de courant.
GARDEZ CES INSTRUCTIONS
APPAREIL RÉSERVÉ À L’USAGE DOMESTIQUE
Instructions relatives au cordon court
Cet appareil est délibérément équipé d’un cordon court pour réduire les risques
d’empêtrement des pieds ou de trébuchement accidentel, ce que pourrait causer un
cordon plus long. Un cordon prolongateur peut être utilisé, à condition d’observer les
précautions d’usage. Les caractéristiques assignées du prolongateur doivent être au
moins égales à celles de l’appareil. De plus, la rallonge doit être disposée de telle
façon qu’elle ne pende pas d’un plateau de table ou d’un comptoir, que les enfants
ne risquent pas de la tirer et qu’elle ne puisse pas faire trébucher.
Produits achetés aux États-Unis et au Canada seulement
Pour réduire le risque de choc électrique, cet appareil est équipé d’une fiche polarisée
(une branche est plus large que l’autre). La fiche n’enfonce dans les prises de courant
polarisées que dans un sens ; si elle ne rentre pas bien, inversez la fiche. Si elle ne
pénètre toujours pas à fond, ayez recours aux services d’un électricien agréé.
Ne modifiez la caractéristique de sécurité de la fiche en aucune façon.
TSSTTVFDXLPP-033_16EFM1.indd 58-59 6/7/16 9:46 AM
Page 11

Figure 1
Figure 2 Figure 3
Français-60
fam iLiarise z -voU s ave C Le foU r P osab Le
1. Portes en verre trempé – Bonne visibilité des aliments qui cuisent.
2. Parois intérieures d’entretien facile – Nettoyage rapide et simple.
3. Sélecteur de température – Règle le thermostat à la température de cuisson
requise. (Voyez la figure 1)
4. Sélecteur de fonction – Tourner le bouton suffit pour régler le four au
mode de cuisson requis. (Voyez la figure 2)
5. Sélecteur de la minuterie à timbre sonore – Règle la durée de cuisson jusqu’à
un maximum de 60 minutes. ÉTEINT automatiquement le four en fin de
cuisson. (Voyez la figure 3)
6. Ramasse-miettes amovible – Recueille les miettes ainsi que les particules
d’aliments qui tombent ; amovible, il se nettoie facilement.
7. Deux clayettes utilisables sous le gril – Conviennent pour faire griller de
nombreux aliments. Voyez les rubriques « Positionnement des clayettes »
et « Positionnement du plat ».
8. Deux hauteurs de cuisson
9. Plat à four/plaque à biscuits – Pratique pour la pâtisserie. Voyez la rubrique
« Positionnement du plat ».
Français-61
Pré P araTion PoU r L
’
UTiLisaTion iniTiaLe dU fo U r Posab Le
Avant l’utilisation initiale du four posable, veuillez agir comme suit…
• Enlevez toutes les étiquettes apposées sur les surfaces du four.
• Ouvrez les portes du four et retirez la documentation imprimée ainsi
que le papier de la cavité.
• Lavez les clayettes ainsi que le plat à l’eau chaude additionnée d’un peu
de détergent liquide pour vaisselle, à l’aide d’un tampon non abrasif.
ATTENTION : N’IMMERGEZ PAS LA CARROSSERIE DANS L’EAU.
• Asséchez soigneusement toutes les surfaces avant l’utilisation.
• Décidez où placer le four. Mettez-le de préférence sur un comptoir plat,
dégagé et d’aplomb, à proximité de la prise de courant qui l’alimentera.
• Branchez le four sur une prise de courant alternatif de 120 volts.
REMARQUE : vous détecterez peut-être une faible odeur et/ou de la fumée
lors de la mise en marche initiale. Réglez le four à la température maximale et
laissez-le chauffer pendant environ 5 minutes pour les éliminer.
AVERTISSEMENT : durant le fonctionnement ou le refroidissement du
four, assurez-vous que le four posable se trouve bien à 15 cm / 6 po de toute
surface et de tous cordons d’alimentation. Veillez également à ce que le
cordon ne touche pas la paroi arrière de la carrosserie.
8
1
7
2
3
4
5
6
9
TSSTTVFDXLPP-033_16EFM1.indd 60-61 6/7/16 9:46 AM
Page 12

Français-62
em P Loi d e La fonCTio n rôTies (voY. La fig .
4)
Placez la clayette à la hauteur voulue. (Voyez la rubrique
« Positionnement des clayettes »)
REMARQUE : tous les pains ne grillent pas au même
réglage. Les pains légers et les gaufres requièrent un
réglage clair alors que les pains foncés et les muffins
(dont anglais) ont besoin d’un réglage plus foncé.
Étape 1. Posez les aliments sur la clayette. Pour obtenir
les meilleurs résultats, mettez de préférence la
clayette en position haute.**
Étape 2. Fermez totalement les portes en verre.
Étape 3. Réglez le sélecteur de fonction à rôties. Les
éléments de voûte et de sole chaufferont.
Étape 4. Tournez le sélecteur de température au réglage
RÔTIES 230 °C/450 °F.
Étape 5. Pour régler la minuterie, tournez son bouton
au-delà du repère 20 minutes (ce qui met la
minuterie en marche) puis revenez en arrière à
la durée de grillage désirée.
Étape 6. Un timbre retentira lorsque les rôties sont
prêtes. Ouvrez les portes en grand et sortez
prudemment les rôties du four.
Français-63
em P Loi d e La fonCTio n C U isson à
Conve CTion TUrbo (v o Y e z La fig . 5)
La fonction cuisson à convection turbo fait démarrer une
turbine incorporée qui brasse l’air chaud de la cavité, ce qui
accélère et uniformise la cuisson des aliments. Préchauffez
le four à la température désirée pendant 5 à 7 minutes, la
clayette étant en place.
Étape 1. Posez le plat de cuisson contenant les aliments
sur la clayette.
Étape 2. Fermez totalement les portes en verre.
Étape 3. Réglez le sélecteur de fonction à turbo.
Étape 4. Mettez le sélecteur de température au réglage
désiré.
Étape 5. Réglez la minuterie au temps de cuisson requis.*
Étape 6. Un timbre retentira pour signaler la fin de la
cuisson. Ouvrez les portes en grand et sortez
prudemment les aliments du four.**
Figure 4
Figure 5
TSSTTVFDXLPP-033_16EFM1.indd 62-63 6/7/16 9:46 AM
Page 13

Français-64
faQ – La CU isson à C o n v e CTio n TUrbo
Qu’est-ce que la cuisson à convection turbo ?
Réponse : le four posable incorpore une turbine qui
brasse l’air chaud dans la cavité, ce qui accélère et
uniformise la cuisson des aliments.
Comment dois-je modifier le temps pour la cuisson
à convection turbo ?
Réponse : la convection turbo réduit généralement
le temps requis pour la cuisson, ceci, en fonction des
aliments. Nous suggérons de choisir une durée écourtée
pour commencer puis de la prolonger si nécessaire.
Avec quels aliments obtient-on les meilleurs résultats ?
Réponse : une cuisson courte se révèle très souvent
préférable – la chaleur tournante uniformise la
température dans la cavité, ce qui est particulièrement
bénéfique pour la boulangerie ainsi que la pâtisserie.
fonCTion C U isson aU foU r (v oYe z La fig .
6)
Étape 1. Posez le plat contenant les aliments sur la clayette.
Étape 2. Fermez totalement les portes en verre.
Étape 3. Réglez le sélecteur de fonction à cuisson au four.
Étape 4. Réglez le sélecteur de température au besoin.
Étape 5. Mettez la minuterie au temps de cuisson voulu.*
Étape 6. Ouvrez les portes en grand à la fin de la cuisson
puis sortez le plat du four.**
CU isson de d eU x P i z za s
Étape 1. Posez les 2 pizzas sur les clayettes.
Étape 2. Faites cuire les pizzas pendant à peu près la
moitié de la durée de cuisson recommandée avant
d’inverser leur position dans le four, afin qu’elles
cuisent uniformément dessus et dessous.
Français-65
fonCTion réCh a U ffag e (v o Y e z La fig . 7)
Étape 1. Posez le plat contenant les aliments sur la clayette.
Étape 2. Fermez totalement les portes en verre.
Étape 3. Réglez le sélecteur de fonction à réchauffer.
Étape 4. Réglez le sélecteur de température à 200 °F.
Étape 5. Réglez la minuterie au temps de réchauffage requis.*
Étape 6. Ouvrez les portes en grand à la fin du
réchauffage puis sortez le plat du four.**
fonCTion g riL v ariabLe (v oYe z La fig . 8)
Cette fonction polyvalente grille à toute température
sélectionnée. Elle est idéale pour faire fondre le fromage à
150 ºF ou pour griller la viande ou le poisson à 205 °C /
400 ºF. Vous ajustez la température au besoin.
Étape 1. Disposez l’aliment sur la clayette ou dans le plat,
au besoin. Voyez les rubriques « Positionnement
des clayettes » et « Positionnement du plat ».
Étape 2. Fermez les portes en verre.
Étape 3. Réglez le sélecteur de fonction à gril.
Étape 4. Réglez la température au réglage désiré.
Étape 5. Réglez la minuterie au temps de cuisson requis.*
Étape 6. Un timbre signalera la fin du grillage. Ouvrez les
portes et sortez prudemment vos grillades.**
* Remarque si la durée est de moins de 20 minutes,
spéciale : tournez la minuterie au-delà du repère
20 minutes pour la mettre en marche puis
revenez en arrière au temps nécessaire.
** AVERTISSEMENT : aliments cuits et clayettes
métalliques peuvent être brûlants,
manipulez-les prudemment. Surveillez
toujours assidûment le four.
Figure 6
Figure 8
Figure 7
TSSTTVFDXLPP-033_16EFM1.indd 64-65 6/7/16 9:46 AM
Page 14

Français-66 Français-67
PosiTionn e m enT de s C LaYe TTes
• Deux hauteurs de cuisson sont prévues afin de pouvoir loger une variété
d’aliments dans le four. Les clayettes glissent facilement dans les coulisses du
haut ou du bas du four. (Voyez le schéma ci-dessous)
• Attendez que le four refroidisse pour sortir la clayette.
• Pour sortir la clayette, ouvrez les portes puis tirez-la vers l’avant du four – elle
glissera dans les coulisses intérieures du four.
NOTEZ que la clayette risque d’incliner vers le bas, entraînant le déplacement du
plat ou des aliments chauds – soyez très prudent.
• La hauteur de la clayette dépendra entièrement du volume des denrées et du
degré de brunissement désiré. Choisissez les coulisses inférieures pour empêcher
les aliments de dorer, les coulisses supérieures pour que le dessous ne brûle pas.
• Mettre la clayette en position haute procure des meilleurs résultats pour le
grillage du pain.
de U x oP Tio ns
de
ha UTe Ur
PosiTionn e m enT dU PLa T
• Afin d’accepter des aliments variés, le plat loge dans le four à deux hauteurs.
Il peut être posé sur une clayette ou glissé dans les supports prévus à cet effet
sous la clayette (voyez le schéma ci-dessous).
• Attendez que le four ait refroidi pour retirer le plat.
• Le positionnement du plat varie selon la méthode de cuisson. Pour cuire au
four, posez le plat sur une clayette. Pour cuire sous le gril, glissez le plat dans
les supports sous la clayette et posez les aliments à griller sur la clayette.
NOTE : n’utilisez pas le plat sous la clayette quand elle est en position basse.
Po U r La
C Ui s s on
a U fo Ur
Po U r La
C Ui s s on
s oU s Le g riL
enTre Tie n d U foU r P osab Le
ATTENTION : NE L’IMMERGEZ EN AUCUNE CIRCONSTANCE.
Étape 1. Réglez les boutons à l’ARRÊT, débranchez-le et laissez-le refroidir.
Étape 2. Essuyez-le alors avec un chiffon humide. NE L’IMMERGEZ PAS
DANS L’EAU ! Ne vous servez que d’une solution savonneuse douce
– les nettoyants abrasifs, les brosses à laver ainsi que les nettoyants
chimiques abîmeraient immanquablement la finition du four.
Étape 3. Tirez le ramasse-miettes hors du four.
Étape 4. Videz les miettes accumulées dans le ramasse-miettes. Le vider
souvent empêchera les miettes de s’accumuler.
Étape 5. Sortez la clayette du four et nettoyez-la avec un chiffon humide ou
bien lavez-la dans le panier du haut du lave-vaisselle.
rang e m enT dU foU r P o sa bLe
Laissez totalement refroidir le four avant de le ranger. Si la période de
rangement est indéfinie, veillez à ce qu’il soit immaculé et exempt de
particules alimentaires. Placez-le dans un lieu sec – sur une table, un comptoir
ou dans une armoire de cuisine, par exemple. Outre l’entretien préconisé,
vous ne devriez avoir rien d’autre à faire.
TSSTTVFDXLPP-033_16EFM1.indd 66-67 6/7/16 9:46 AM
Page 15

Français-68
re Ce TTe s
brU sC h e TTas brie e T arTiCh a U Ts
6 tranches (de 8,5 mm d’épaisseur) de
pain de campagne rond
90 mL d’huile d’olive vierge extra
2 pots (de 187 mL) de cœurs
d’artichauts marinés, égouttés
1 morceau (60 g) de prosciutto
ou de jambon
1 petit oignon rouge, haché
15 mL d’ail, haché
30 mL de vinaigre balsamique
180 g de brie
15 mL de menthe fraîche, hachée
15 mL de basilic frais, haché
50 mL de copeaux de parmesan
Sel et poivre au goût
Réglez le four posable OsterMD pour cuire sous le gril et préchauffez-le.
Disposez les tranches de pain dans un plat, en une seule couche ; badigeonnez
la face visible avec 30 mL d’huile, salez et poivrez. Passez sous le gril pour
faire dorer puis transférez les tranches sur une clayette. Étalez une mince
couche de brie sur les rôties. Coupez les cœurs d’artichauts en longueur, en
tranches de 6 mm, puis coupez le prosciutto en bâtonnets. À feu moyenélevé, chauffez 15 mL d’huile dans une poêle de 25 cm à fond épais. Ajoutez
l’oignon et l’ail. Remuez souvent jusqu’à ce qu’ils soient translucides.
Incorporez alors les artichauts et le prosciutto ; faites cuire jusqu’à ce que les
artichauts soient dorés (environ 4 minutes) et arrosez de vinaigre balsamique.
Ajoutez le basilic et la menthe puis salez et poivrez au goût. Répartissez ce
mélange sur les rôties, à la cuiller. Parsemez de parmesan et servez sans délai.
Français-69
re Ce TTe s
rôTie s a U sU C re à La Cann e LLe
15 mL de cassonade
10 mL de margarine, à la
température ambiante
2 mL de cannelle moulue
2 tranches de pain de blé entier ou
de pain multicéréales
À la fourchette, combinez bien le sucre, la margarine et la cannelle dans un
petit bol. Étalez la même quantité du mélange sur chacune des tranches de
pain. Faites griller le pain dans votre four posable OsterMD – le sucre doit
avoir fondu et le pain être doré comme vous l’aimez.
PoU Le T à La m oU Tarde e T a U m i e L, à e nrobag e é Pi C é de
fLo C ons de m aïs e T de P aC a n e s
250 mL de moutarde de Dijon
125 mL de pacanes hachées
250 mL de miel
Produit antiadhérent à vaporiser
1,5 kg de poulet sans peau – hauts
de cuisses et/ou poitrines
Huile d’olive pour asperger le poulet
5 mL de poivre de Cayenne
1 boîte de 510 g de flocons de
maïs, réduits en miettes au robot
culinaire
Mélangez la moutarde et le miel dans un bol moyen et peu profond.
Enduisez-en totalement le poulet. Combinez le poivre de Cayenne, les miettes
de flocons de maïs et les pacanes dans un autre bol également peu profond.
Roulez le poulet dans ce mélange pour bien l’enrober. Vaporisez le plat de
produit antiadhérent et déposez le poulet enrobé dans le plat. Aspergez-le
d’huile d’olive. Faites cuire à 190 °C / 375 °F pendant 40 minutes ou jusqu’à ce
que la température interne du poulet soit de 77 °C / 170 °F et que sa chair cuite
à cœur ne soit plus rosée.
TSSTTVFDXLPP-033_16EFM1.indd 68-69 6/7/16 9:46 AM
Page 16

Français-70
re Ce TTe s
PoiTrin e de dind e rô Tie aU x Lé gUm e s arom a TiQ Ue s
1 petite poitrine de dinde
2 branches de céleri, hachées en dés
de 6 mm
2 gousses d’ail, épluchées
1 citron, coupé en deux
1 ou 2 branches de romarin frais et
de thym frais
Assaisonnement au chile
1 petit oignon, haché en dés
de 6 mm
Sel casher et poivre
3 petites carottes, hachées en dés
de 6 mm
375 mL de bouillon de poulet
Préchauffez le four posable OsterMD à 230 °C / 450 °F. Au fond d’un plat
à four de 28 cm / 11 po, dont les côtés ont de 3,8 à 5 cm / 1,5 à 2 po de
hauteur, répartissez les légumes puis posez la poitrine de dinde dessus.
Placez l’ail et les herbes sous la poitrine. Pressez le citron sur la dinde puis
saupoudrez celle-ci d’assaisonnement au chile, de sel et de poivre. Faites cuire
25 minutes avant de réduire la température du four à 160 °C / 325 °F et de
verser le bouillon au fond du plat – le niveau atteindra environ 2,5 cm / 1 po
dans le plat. Prolongez la cuisson jusqu’à ce que les sucs soient incolores et
que la température interne soit de 83 °C / 180 °F.
Français-71
re Ce TTe s
fiLeTs d e Po rC m oU Tarde e T he rbe s , e n ToU rés d e
P o m m e s d e Te rre rô Tie s
1 paquet de filets de porc
de 750 g à 1 kg
5 gousses d’ail, épluchées et hachées
45 mL de moutarde de Dijon
6 petites pommes de terre Yukon
Gold, coupées en quatre
45 mL de romarin frais, tiges
enlevées, haché
30 mL d’huile d’olive
45 mL de thym frais, sans tiges
15 mL de sel casher, plus un
supplément pour les pommes de
terre
5 mL de poivre noir frais concassé,
plus un supplément pour les
pommes de terre
Préchauffez le four posable OsterMD à 190 °C / 375 °F. Enduisez le porc de
moutarde de Dijon. Dans un petit bol, combinez 30 mL de romarin,
30 mL de thym, du sel, du poivre et l’ail. Étalez ce mélange sur les filets de
porc puis placez ceux-ci dans un grand plat qui loge facilement dans la cavité
du four. Répartissez les pommes de terre autour des filets et aspergez d’huile
d’olive. Saupoudrez les pommes de terre de sel et de poivre puis de romarin et
de thym restant. Faites cuire une demi-heure ou jusqu’à ce que le porc ne soit
plus rosé à cœur. Retirez le porc du plat, couvrez-le de feuille d’aluminium
et mettez-le de côté. Vérifiez les pommes de terre à la fourchette ; prolongez
leur cuisson de 15 à 20 minutes si nécessaire.
TSSTTVFDXLPP-033_16EFM1.indd 70-71 6/7/16 9:46 AM
Page 17

Conse iLs P raTiQ Ue s / dé P ann a g e
PROBLÈMES CAUSES PLAUSIBLES SOLUTIONS
Les aliments sont
trop ou pas assez
cuits
• La température ou la
durée de cuisson est
incorrecte
• La hauteur de la clayette
• Il faut peut-être que vous ajustiez
la durée ou la température selon
vos goûts.
• Plus petite que la cavité d’un
four ordinaire, la cavité du four
posable chauffe plus vite et cuit
généralement les aliments plus
rapidement.
• Voyez « Positionnement des
clayettes » page Français-26 –
modifiez la hauteur de la clayette
pour loger le genre d’aliment.
Il y a une odeur de
brûlé
• Des particules
alimentaires adhèrent à
la cavité, aux éléments ou
au ramasse-miettes
• Consultez la rubrique
« Entretien du four posable »,
page Français-27.
Il n’y a qu’un
élément qui chauffe
• La fonction sélectionnée
détermine lequel des
éléments du four doit
fonctionner
• Vérifiez que la cuisson sous le
gril ou le réchauffage ne sont pas
sélectionnés.
Les éléments
ne restent pas
ALLUMÉS
• Les éléments s’allument
de façon INTERMITTENTE
pour maintenir la
température choisie
• Assurez-vous que la fonction
sélectionnée correspond bien au
mode de cuisson nécessaire.
noTes
Français-72 Français-73
TSSTTVFDXLPP-033_16EFM1.indd 72-73 6/7/16 9:46 AM
Page 18

Français-74 Français-75
Garantie limitée de un an
Sunbeam Products, Inc. faisant affaire sous le nom de Jarden Consumer
Solutions ou, si au Canada, Sunbeam Corporation (Canada) Limited faisant
affaire sous le nom de Jarden Consumer Solutions (collectivement « JCS »)
garantit que pour une période de un an à partir de la date d’achat, ce produit
sera exempt de défauts de pièces et de main-d’œuvre. JCS, à sa discrétion,
réparera ou remplacera ce produit ou tout composant du produit déclaré
défectueux pendant la période de garantie. Le produit ou composant de
remplacement sera soit neuf soit réusiné. Si le produit n’est plus disponible,
il sera remplacé par un produit similaire de valeur égale ou supérieure. Il
s’agit de votre garantie exclusive. N’essayez PAS de réparer ou d’ajuster toute
fonction électrique ou mécanique de ce produit, cela annulera cette garantie.
Cette garantie est valide pour l’acheteur initial du produit à la date d’achat
initiale et ne peut être transférée. Conservez votre facture d’achat originale.
Les détaillants et les centres de service JCS ou les magasins de détail vendant
les produits JCS n’ont pas le droit d’altérer, de modifier ou de changer de toute
autre manière les termes et les conditions de cette garantie.
Cette garantie ne couvre pas l’usure normale des pièces ou les dommages
résultant de toute cause suivante : utilisation négligente ou mauvaise utilisation
du produit, utilisation d’un voltage ou d’un courant incorrects, utilisation
contraire aux instructions d’utilisation, démontage, réparation ou altération
par quiconque autre que JCS ou un centre de service autorisé de JCS. En outre,
la garantie ne couvre pas : les catastrophes naturelles comme les feux, les
inondations, les ouragans et les tornades.
Quelles sont les limites de responsabilité de JCS ?
JCS ne sera pas tenu responsable de tout dommage conséquent ou accessoire
causé par la violation de toute garantie ou condition expresse, implicite ou
réglementaire.
Sauf si cela est interdit par les lois en vigueur, toute garantie ou condition
implicite de valeur marchande ou adéquation à un usage particulier est limitée
en durée à la durée de la garantie énoncée ci-dessus.
JCS exclut toute autre garantie, condition ou représentation, expresse,
implicite, réglementaire ou autre.
JCS ne sera pas tenu responsable de tout dommage de toute sorte résultant de
l’achat, de l’usage ou du mauvais usage, ou de l’incapacité à utiliser le produit
y compris les dommages ou les pertes de profits conséquents, accessoires,
particuliers ou similaires, ou pour toute violation de contrat, fondamentale ou
autre, ou pour toute réclamation portée à l’encontre de l’acheteur par toute
autre partie.
Certaines provinces, états ou juridictions ne permettent pas d’exclusion ou de
limitation pour des dommages conséquents ou accessoires ou de limitations
sur la durée de la garantie implicite, de ce fait les limitations ou exclusions
ci-dessus peuvent ne pas s’appliquer à votre cas.
Cette garantie vous donne des droits juridiques particuliers et vous pouvez
également disposer d’autres droits pouvant varier d’une province à l’autre,
d’un état à l’autre ou d’une juridiction à l’autre.
Comment obtenir le Service aux termes de la garantie
Aux États-Unis
Si vous avez des questions concernant cette garantie ou si vous souhaitez
obtenir le service aux termes de la garantie, veuillez appeler au 1 800 3340759 et l’adresse d’un centre de service approprié vous sera fournie.
Au Canada
Si vous avez des questions concernant cette garantie ou si vous souhaitez
obtenir le service aux termes de la garantie, veuillez appeler au 1 800 6678623 et l’adresse d’un centre de service approprié vous sera fournie.
Aux État-Unis, cette garantie est offerte par Sunbeam Products, Inc. faisant
affaire sous le nom de Jarden Consumer Solutions, situé à Boca Raton, Floride
33431. Au Canada, cette garantie est offerte par Sunbeam Corporation
(Canada) Limited faisant affaire sous le nom de Jarden Consumer Solutions,
situé au 20B Hereford Street, Brampton, Ontario L6Y 0M1. Pour tout autre
problème ou réclamation en relation avec ce produit, veuillez écrire à notre
département du Service à la clientèle.
NE RETOURNEZ CE PRODUIT À AUCUNE DE CES ADRESSES
NI À L’ÉTABLISSEMENT D’ACHAT.
TSSTTVFDXLPP-033_16EFM1.indd 74-75 6/7/16 9:46 AM
 Loading...