

Page 1
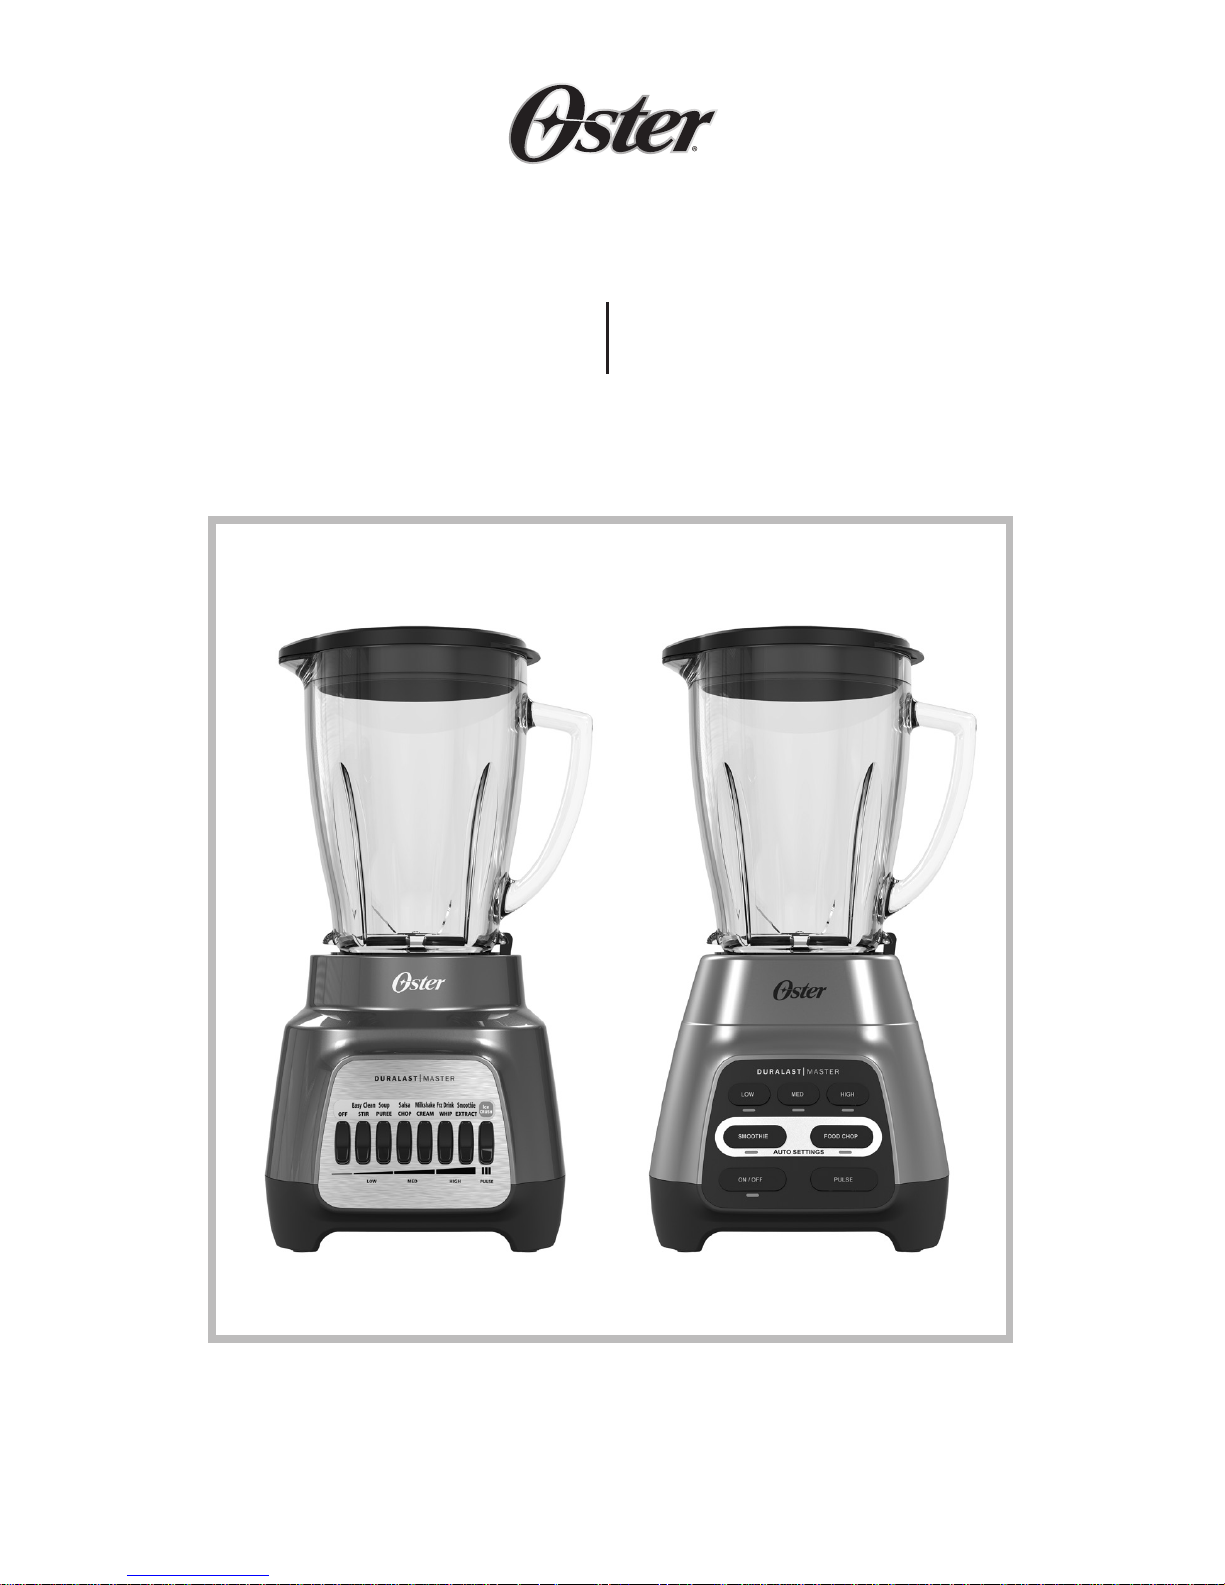
BLENDER LICUADORA
User Manual /
Manual del usuario
P.N. 189563Visit us at OsterBlending.com
MASTER SERIES
Page 2

2
IMPORTANT SAFEGUARDS
When using your blender, you should always follow basic safety precautions, including
the following:
• Read all instructions before use.
• To protect against electrical hazards, do not immerse the cord, plug or motor base in
water or other liquids.
• Always use the product on a clean, flat, hard, dry surface. There should be no material
such as a tablecloth or plastic between the unit and surface.
• Flashing light indicates blender is ready to operate. Avoid ANY contact with the
blades or moving parts.
• Keep hands and utensils out of jar while blending to reduce the risk of injury or
damage to the blender. A scraper may be used but must be used only when the blender
is not running.
• Do not operate any appliance with a damaged cord or plug or after the appliance
malfunctions, or is dropped or damaged in any manner. Return appliance to the
nearest authorized service facility for examination, repair or electrical or mechanical
adjustment.
• The blender blades are sharp. Handle carefully.
• To reduce the risk of injury, never place cutter-assembly blades on base without jar
properly attached.
• Always put the lid on the jar before operating the blender.
• When blending hot liquids beware of steam. Remove the filler cap from the lid to
allow steam to escape.
• Do not use outdoors.
• Do not allow the cord to touch hot surfaces, including the stove, or hang over the edge
of a table or counter.
• Unplug the blender when it is not in use, before taking off or putting on parts, and
before cleaning. To disconnect, turn appliance off by pressing ON/Off button and
remove plug from outlet.
• This appliance is not to be used by children or by persons with reduced physical,
sensory or mental capabilities.
• Close supervision is necessary when any appliance is used near children. Children
should not play with the appliance.
• Do not blend boiling liquids in the blender.
• The use of attachments, including canning jars, not recommended by the manufacturer
may cause a risk of injury to persons.
• When blending hot liquids, remove center piece of two-piece cover.
• Do not attempt to replace or splice a damaged cord.
Page 3

3
Food Processor Accessory Additional Precautions
• Be certain cover is securely locked in place before operating the appliance.
• Do not attempt to defeat the cover interlock mechanism.
• Never insert food by hand. Always use food pusher.
• Keep hands and utensils away from moving blades or discs while processing food to
reduce the risk of severe injury to persons or damage to the food processor. A scraper
may be used but must be used only when the food processor is not running.
• To reduce the risk of injury, never place cutting blade or discs on base without first
putting bowl properly in place.
SAVE THESE INSTRUCTIONS
This product is for household use only.
• The maximum rating marked on the product is based on the attachment that draws
the greatest load. Other attachments may draw less power.
Power Cord Instructions:
• This appliance is equipped with a polarized plug for 120V and 127V units only.
This type of plug has one blade that is wider than the other. This plug will fit in a
polarized outlet only one way. This is a safety feature intended to help reduce the
risk of electrical shock. If you are unable to insert the plug into the outlet, contact
a qualified electrician to replace the obsolete outlet. Do not attempt to defeat the
safety purpose of the polarized plug by modifying the plug in any way.
• Try to position the blender near the power source to reduce the hazards associated
with power cords (such as becoming entangled or tripping over a long power cord).
• Do not pull, twist or otherwise abuse the power cord.
• Do not wrap the power cord around the main body of the blender during or after
use.
• Do not use an extension cord with this product.
This symbol has been placed in specific areas of the User Guide portion of
this book. Its purpose is to help you easily identify instructions that require
your special attention.
Page 4

4
Table of Contents
Welcome ......................................................................................................................... 5
Learning About Your Product ......................................................................................... 6
Using Your Product ......................................................................................................... 9
Caring for Your Product .................................................................................................10
Blending Tips .................................................................................................................11
Frequently Asked Questions ...........................................................................................11
Blend-N-Go® Cup Accessory (Select Models Only) ....................................................... 12
Using Your Blend-N-Go® Cup With Oster® Master Series Blender ............................... 13
Recipes ..........................................................................................................................14
Limited Warranty ...........................................................................................................16
`
Page 5

5
Welcome
Congratulations on your new Oster® Master Series Blender. Your Oster® blender
will allow you to create delicious smoothies, milkshakes, salsas and much more
at the touch of a button! If you have any comments, questions or inquiries about
this product, please call 1-800-334-0759. Your product includes the following
features and benefits:
• User-friendly control panel.
• Advanced 6-Point Blade System which provides a wide range of food
processing & blending options.
• Extra Wide Blade design allows food to fall easily to the bottom of the jar,
for more efficient Blending!
For Best results, carefully read the instruction manual before using this
appliance.
Page 6

6
Learning About The Master Series Blender With Push
Button Control Panel
1. Filler Cap / 2 Ounce Measuring Cup: – Allows
you to add ingredients during use. Also allows
you to open to allow steam to escape when
blending hot foods.
2. Jar lid – Seals the blender jar.
3. Jar – 6-cup Dishwasher Safe Boroclass glass jar
withstands Thermal shock.
Glass Jar Blade Assembly – With locking feature
to secure blade assembly to threaded jar bottom.
Seals the jar to the blade for leak-proof operation.
4. Sealing Ring :
5. Blade – 50% Larger blade system than
traditional Oster Blenders.
6. Threaded Jar Bottom With Locking Lever –
Advanced design for simple assembly to jar.
7. Motor Base – Holds the jar securely. Contains
a powerful, variable speed motor.
8. Control Panel
a. Power Button (Off button) – Turns the
product Off.
b. Variable Control settings range from Stir to
Extract and also indicate the food results:
from Easy Clean to Smoothie.
c. Pulse button – Press to pulse and release to
stop. Perfect for Crushing Ice.
D U RA L A S T M A ST E R
a
1
2
3
4
5
6
7
8
b
c
Page 7

7
D UR AL AST M AS TE R
Learning About The Master Series Blender With Electronic
Control Panel (Select Models only)
1. Filler Cap / 2 Ounce Measuring Cup: – Allows you to
add ingredients during use. Also allows you to open
to allow steam to escape when blending hot foods.
2. Jar lid – Seals the blender jar.
3. Jar – 6-cup Dishwasher Safe Boroclass glass jar
withstands Thermal shock.
Glass Jar Blade Assembly – With locking feature to
secure blade assembly to threaded jar bottom. Seals
the jar to the blade for leak-proof operation.
4. Sealing Ring :
5. Blade – 50% Larger blade system than traditional
Oster Blenders.
6. Threaded Jar Bottom With Locking Lever –
Advanced design for simple assembly to jar.
7. Motor Base – Holds the jar securely. Contains a
powerful, variable speed motor.
8. Control Panel
a. Power Button (On/Off button) – Turns the
product On and Off.
b. Pre-Programmed Settings: Use for flawless
results at the touch of a button. Select the desired
setting and your Oster® Master Series blender
cycle through the program, delivering expert
results at the touch of a button. Unit will Stop
after running through the cycle. Select From:
Green/ Frozen Smoothies
Food Chop / Salsa
c. Manual Controls: Select from Low-Med-High
d. Pulse button – Press to pulse and release to stop.
Using The Oster® Master Series Blender
Before you use the product for the first time, separate the lid, filler cap and blade from
the jar. Wash in warm, soapy water, or top rack in the dishwasher. Rinse and dry well.
WARNING: Blade is sharp. Handle with care.
1
2
3
4
5
6
7
8
a ad d
c
b
Page 8
8
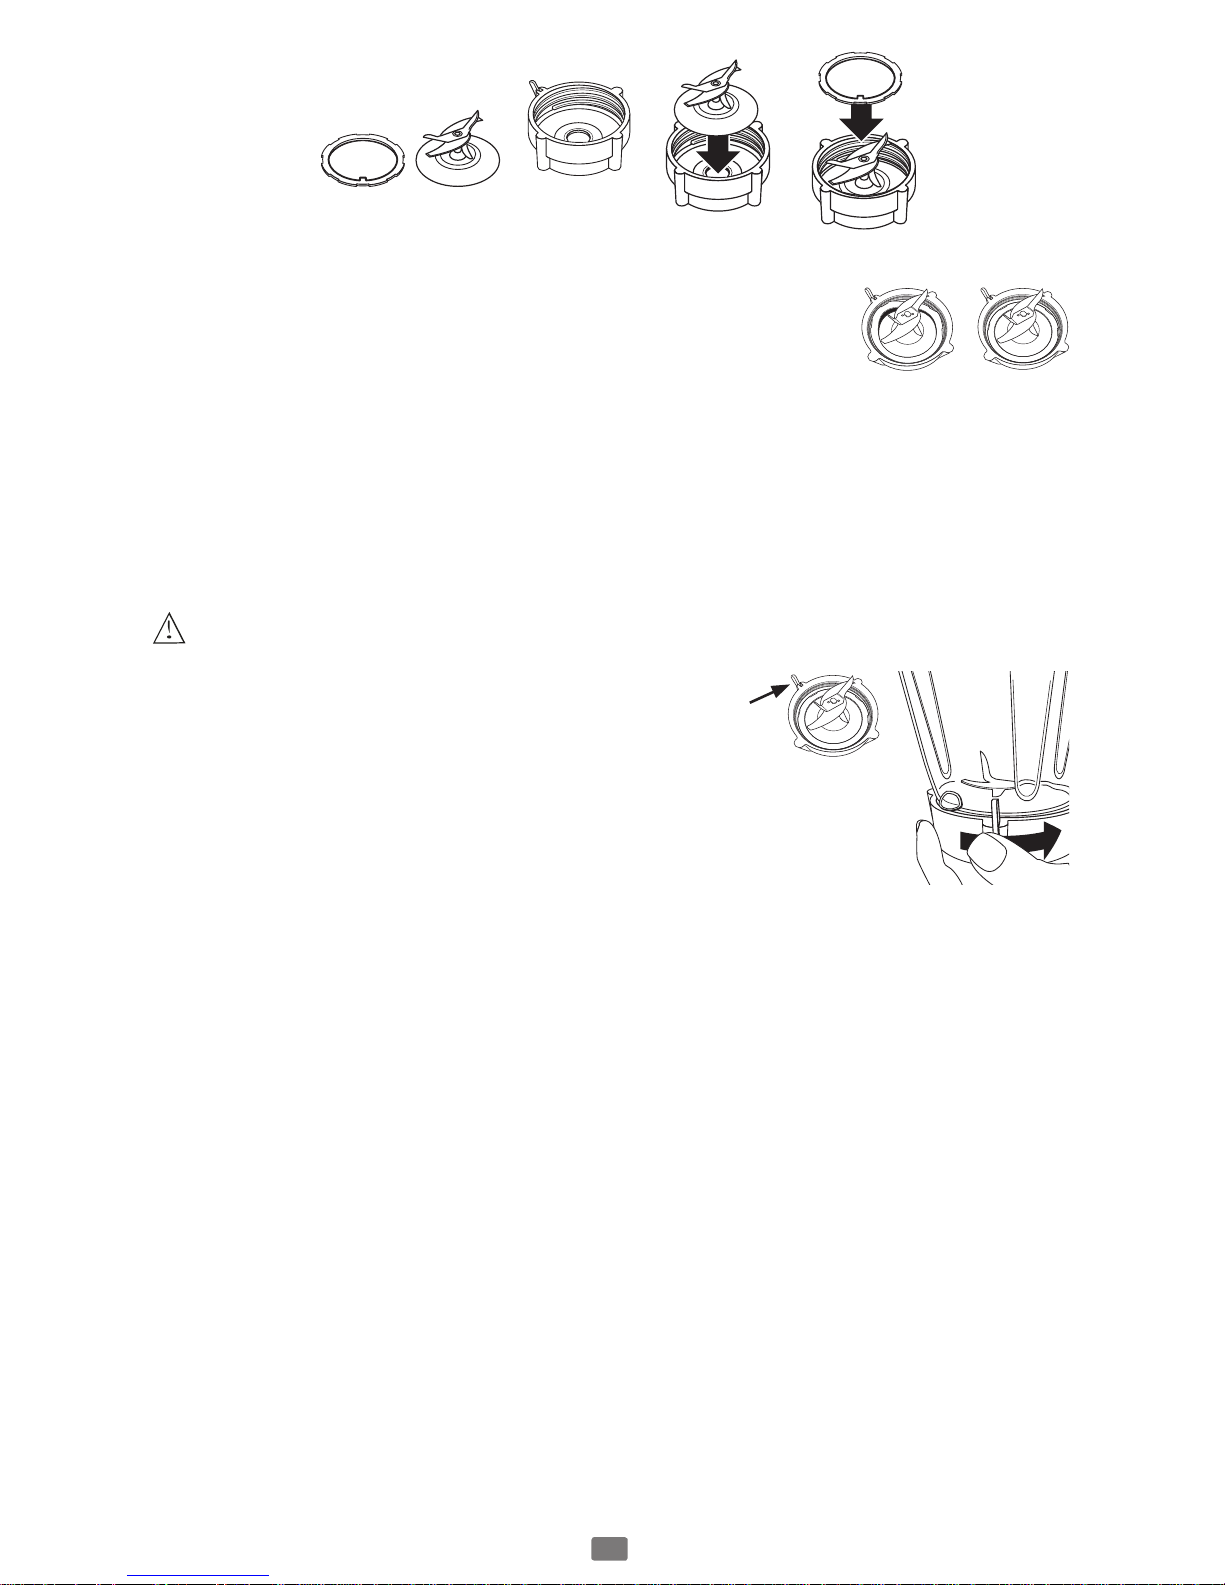
6 Cup glass Jar Assembly
1. Place Blade into Threaded Jar Bottom (Fig.1).
2. Place sealing ring over blade assembly. Carefully press
and tuck sealing ring into locking groove (Fig2).
3. Ensure the locking sealing ring is fully and evenly
tucked in place and holding the blade assembly to the
threaded jar bottom. For correct assembly see (Fig3).
4. Install the Integrated Blade Assembly onto the Jar. Turn clockwise to tighten.
Be sure the Integrated Blade Assembly is tightened to the jar before using.
NOTE: For proper installation onto Blender Motor base, make sure locking
lever rotates past the anti-rotation tabs on the Blender jar or smoothie cup.
See (Fig4).
CAUTION: If Locking Lever is damaged or missing, do not operate blender,
and contact Customer Service for a replacement.
5. Put the ingredients into the jar.
6. Secure the lid and filler cap.
7. Place the jar onto the base.
8. Plug the power cord into a standard household
120/127-volt, 60 hz. AC outlet. You are now ready to start.
ALWAYS PLACE HAND ON CONTAINER COVER
WHILE OPERATING BLENDER.
Using the Push Button Control Panel
1. Make Sure the “OFF” button is pressed before plugging in the blender.
2. Select setting and blend ingredients to desired consistency. Note: Control
panel lists function as well as desired outcome.
3. Press OFF to stop and turn off blender.
4. Press and hold ICE CRUSH / PULSE for ice crushing and chopping. Repeat
as needed.
Fig1
Fig2
Locking
Sealing Ring
Threaded Jar
Bottom with
locking lever
Fig3
Incorrect Correct!
Blade
Fig4
Locking Lever
Page 9

9
Using the Pre-Programmed Settings (Select Models Only)
1. Press the ON/OFF power button to turn the product on. The power light
will blink, indicating the product is active and ready to use. The light will
stay on when the motor is running.
2. Select and Press the desired Pre-Programmed Setting Button:
- “Green/Frozen Smoothie”
- “Food Chop/Salsa”
3. To change your selection, press ON/OFF twice followed by another Pre-
Programmed Setting button (“Frozen Drinks & Shakes” or “Food Chop”)
4. Once the program is complete the product automatically stops. Please note:
You may press the ON/OFF button to cancel the program at any time. The
blinking bule light indicates that the blender is ready.
5. Press the ON/OFF power button to turn the product off. This product is
pre-programmed to turn off automatically if not used for a period of several
minutes. All lights will turn off when the unit automatically powers down.
Using the Manual Controls
The Manual Controls include:
Low
Med
High
Pulse
Use these controls for personal recipes or to continue blending after a
Programmed Setting is finished.
1. Press the ON/OFF power button to turn the product on. The power light
will blink, meaning the product is active and ready to use. The light will stay
on when the motor is running.
2. Put the ingredients into the jar.
3. Secure the lid and the filler cap.
High
1. Press the “High” button to run the product at a high speed.
2. Press the ON/OFF power button to turn the product off.
Medium
1. Press the “Medium” button to run the product at a medium speed.
2. Press the ON/OFF power button to turn the product off.
Low
1. Press the “Low” button to run the product at a low speed.
2. Press the ON/OFF power button to turn the product off.
Pulse
1. Verify that the blue light is blinking. This indicates that the blender is turned on.
2. Press and hold the “Pulse” button.
3. Release the pulse button to stop.
4. Press the ON/OFF power button to turn the product off.
Use pulse button to crush ice or chop food.
Page 10
10
Caring for Your Product
After Use
1. Press the OFF button and unplug blender. Lift the jar straight up from the
base, remove the lid and empty the jar.
2. If necessary, use a rubber spatula to scrape foods away from the sides of the jar.
Cleaning
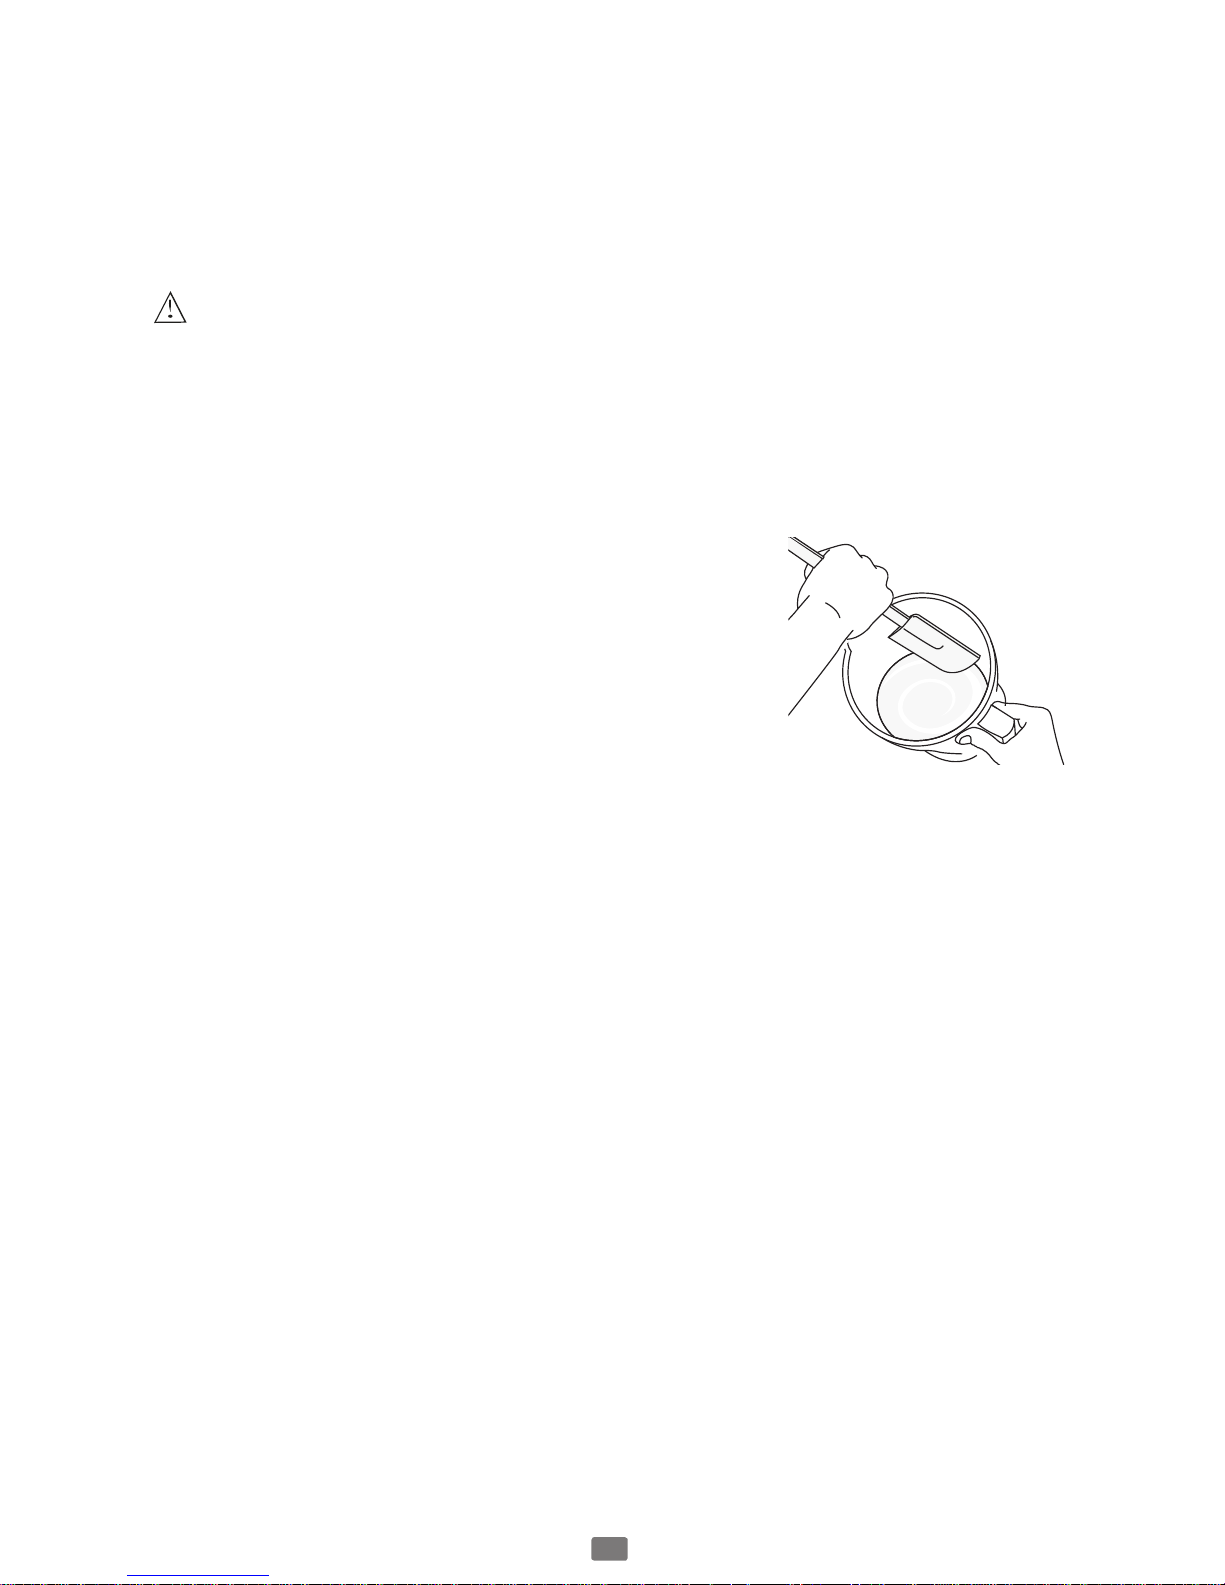
WARNING: Blades are sharp. Handle carefully.
CAREFULLY release the blade from the bottom of the jar by turning the
threaded jar bottom counterclockwise. The jar lid, filler cap and blade are
dishwasher safe. Use the top rack of the dishwasher for the jar lid, filler cap, and
blade. Place sealing ring into bottom basket of dishwasher.
You can also wash the parts in warm, soapy water. Rinse well and dry. Wipe
the base with a soft, damp cloth to clean. Never submerge the blender base in a
liquid.
Check the parts as you put them back together.
TIP: Run blender with soapy water for 20-30 seconds
at Low or Medium Speed for cleaning without
disassembly. Follow with clean water rinse.
Storing
Reassemble the blender for storage. Leave the lid open a
gap so no odors are retained.
NOTICE: Never put the jar, or any other parts, in a microwave oven. Never store foods
or drinks in the jar.
Servicing
This appliance has no user serviceable parts. Any servicing beyond the cleaning
described in the Cleaning section should be performed by an authorized service
representative only.
If repairs are needed, send your appliance only to an authorized OSTER®
Appliance Service Center. Replacement parts are available on www.oster.com or
call 1-800-334-0759.
Page 11

11
Blending Tips
Liquids
Put liquids into the jar first, unless the recipe says otherwise. Add more liquid if
ingredients are not blending properly.
Using the Filler Cap
Do not remove the lid while in use. Instead, open the filler cap to add smaller
ingredients.
Ice Crushing
Without Liquid: use pulse button until you achieve desired results.
With Liquid: Add desired amount of ice cubes and water until ice floats. Blend
on High until you achieve desired results then strain off water.
Working with Hot Foods or Liquids
WARNING: When you work with HOT FOODS, remove the filler cap to
vent steam. Tilt the lid away from you partially covering the opening. Keep
hands and other exposed skin away from the lid opening to prevent
possible burns.
WARNING:When you work with HOT LIQUIDS, remove the filler cap and
start at a low speed, and then gradually increase to a faster speed. Do not
add liquid over the 4 cup (1L) level. Always keep hands away from steam.
Ingredient Quantities
Use only the amount of food suggested in the recipes. If you want greater
amounts, prepare in batches. Using larger amounts may overload and strain
the motor. You might also get different results from those described.
Frequently Asked Questions
Why doesn’t the blender turn on?
• Make sure the base is plugged in an active power receptacle.
• Verify blinking blue light is active after pushing on/off button.
How can I prevent liquids from leaking out?
Check to see that the sealing ring is correctly assembled in between
the blade and the jar.
Page 12

12
Blend-N-Go® Smoothie Cup Accessory (Select Models Only)
NOTE: For proper installation onto Blender Motor base, make sure locking
lever rotates past the anti-rotation tabs on the smoothie cup.
A. Locking Lever
B. Anti-Rotation Tabs
C. Blender base
NOTE: Blend-N-Go® Smoothie cup attachment is only compatible with thread-
ed jar bottom with locking lever, See Images below
To Purchase Smoothie Kit visit OsterBlending.com
A
B
C
Figure 1 Figure 2
Smoothie Cup
with Drink Lid
Smoothie Cup
& Threaded
Jar Bottom
NOTE: Threaded Jar
base with Locking Lever
MUST be used with
Smoothie cup attachment
Page 13

13
Using Your Blend-N-Go® Cup With Your Oster Master Series
Blender
Before washing ensure the blender is off and unplugged. Wash all components
except blender base with soapy water with a soft sponge and a bottle brush. Do
not use abrasive cleansers or sponges for cleaning. Rinse well and dry. Parts are
also dishwasher safe. Do not blend hot liquids.
Place desired ingredients into smoothie cup in the following order:
Liquids, fresh ingredients, frozen fruit, ice, yogurt and ice cream.
(Cut all firm fruits, vegetables and other foods into pieces no larger than 1/2-inch
(1.25 cm) by 2 inches (5.0 cm).
• Place Blade into Threaded Jar Bottom or adapter.
• Place sealing ring over blade assembly. Carefully press and tuck sealing ring into
locking groove. (See page 7 for more detailed instructions for blade assembly)
• Place blade assembly into cup. (See Figure 1 on Page 17)
• Be sure the Integrated Blade Assembly is tightened to the jar before using.
• Place cup assembly onto Blender base. (See Figure 2 on Page 17)
• Hold cup in position. Operate Blender according to the instructions in your
Blender User Manual. Blend until desired consistency.
• Place lid on cup and turn clockwise to tighten.
Enjoy your blended drink!
ALWAYS PLACE HAND ON CONTAINER
WHILE OPERATING BLENDER.
Page 14

14
Recipes
Honey-Vanilla Blast
Makes 1 serving
1 cup fat free milk 1 cup (8 oz.) fat free vanilla yogurt
¼ cup protein powder 3 chunks frozen banana, about 1 medium
2 Tbsp. honey
1. In jar, place ingredients in order given above.
2. Cover jar with lid. Press “On / Off” button, then press
“Smoothies” button until desired results are achieved.
3. Pour into tall glass to serve.
Very Berry Smoothie
Makes 1 serving
1 cup orange juice ½ cup vanilla low fat yogurt
1 cup frozen mixed berries 2 frozen banana chunks, about 1 small
2 Tbsp. Agave
1. In jar, place ingredients in order given above.
2. Cover jar with lid. Press “On / Off” button, then press
“Smoothies” button until desired results are achieved.
3. Pour into tall glass to serve.
Fiery Red Salsa Recipe
Makes 3 cups
2 large garlic cloves
1 can (15 oz.) whole tomatoes, drained
1 medium onion, cut into ¼ (4 pieces)
½ cup cilantro leaves
1-4 jalapeno peppers, quartered
½-1 tsp. sugar
Salt to taste
1 Tbsp. lime juice
1 can (15 oz each) whole tomatoes, drained
Tortilla chips for serving
1. In jar, place ingredients, except tortilla chips, in order given above. (Note:
Place one can of tomatoes in after garlic cloves and second can after rest of
ingredients are added. Also, place onion in middle of jar to avoid blockage.)
2. Cover jar with lid. Press “On / Off” button, then press “PULSE” button.
3. Pour into bowl; serve with tortilla chips.
Page 15

15
Peachy Applesauce
Makes 1 ¼ cups
1 large apple, pared, cored and quartered
1 large peach, pitted, peeled and quartered (If out of season, use 2 canned
peach halves.)
2 Tbsp. water
1. In small saucepan, cook fruits in water 5-8 minutes or until very tender.
2. In jar, place fruits and liquid.
3. Cover jar with lid. Press “On/Off” button, then press “Pulse” button 3 or 4
times until smooth.
4. Remove from jar; place in covered containers.
5. Chill or freeze at once.
Peachy Green Smoothie
Makes: 2 servings
1 banana 1 peach, stone removed
½ avocado 1 cup Greek yogurt
1 cup ice 1 cup baby spinach
½ cup coconut water 1 tablespoon honey or agave
½ teaspoon vanilla extract
1. Place all ingredients into the tall blender jug. Secure the lid.
2. Blend on HIGH speed until all of the ingredients are blended, or use the
Frozen Smoothies button function.
3. Pour into a tall glass. Serve.
Banana Chai Thick Shake
Makes: 3 servings
4 frozen bananas 3 cups skim milk or coconut water
1 cup ice ½ teaspoon ground cinnamon
½ teaspoon ground turmeric ¼ teaspoon ground cardamom
¼ teaspoon ground ginger ½ teaspoon ground star anise
Pinch sea salt
1. Place all ingredients into the tall blender jug. Secure the lid.
2. Blend on HIGH speed until all of the ingredients are blended, or use the
Frozen Smoothies button function.
3. Pour into a tall glass. Serve.
Page 16

16
3 Year Satisfaction Guarantee
Sunbeam Products, Inc. doing business as Jarden Consumer Solutions or if in Canada, Sunbeam Corporation
(Canada) Limited doing business as Jarden Consumer Solutions (collectively “JCS”) warrants that for a period of
three (3) years from the date of purchase, this product will be free from defects in material and workmanship.
JCS, at the Consumer’s sole option, will repair, or replace this product or any component of the product found to
be defective during the guarantee period. This guarantee is valid for the original retail purchaser from the date
of initial retail purchase and is not transferable. Keep the original sales receipt. Proof of purchase is required to
obtain satisfaction guarantee performance. JCS dealers, service centers, or retail stores selling JCS products do
not have the right to alter, modify or any way change the terms and conditions of this guarantee.
All Metal Drive Ten (10) Year Limited Warranty
JCS also warrants that for a period of ten (10) years from the date of purchase, the All Metal Drive base unit
metal coupling will be free from defects in material and workmanship. JCS, at its option, will repair or replace
the metal drive stud component of the All Metal Drive coupling if found to be defective during the warranty
period. Replacement will be made with a new or remanufactured product or component. If the product is
no longer available, replacement may be made with a similar product of equal or greater value. This is your
exclusive warranty. Do NOT attempt to repair or adjust any electrical or mechanical functions on this product.
This warranty does not cover damage resulting from any of the following: negligent use or misuse of the
product, use on improper voltage or current, use contrary to the operating instructions, disassembly,
repair or alteration by anyone other than JCS or an authorized JCS service center. Further, the warranty
does not cover: Acts of God, such as fire, flood, hurricanes and tornadoes.
This warranty is valid for the original retail purchaser from the date of initial retail purchase and is
not transferable. Keep the original sales receipt. Proof of purchase is required to obtain warranty
performance. JCS dealers, service centers, or retail stores selling JCS products do not have the right to
alter, modify or any way change the terms and conditions of this limited warranty.
What are the limits on JCS’ Liability?
JCS shall not be liable for any incidental or consequential damages caused by the breach of any
express, implied or statutory warranty or condition. Except to the extent prohibited by applicable law,
any implied warranty or condition of merchantability or fitness for a particular purpose is limited in
duration to the duration of the above limited warranty. JCS disclaims all other warranties, conditions or
representations, express, implied, statutory or otherwise. JCS shall not be liable for any damages of any
kind resulting from the purchase, use or misuse of, or inability to use the product including incidental,
special, consequential or similar damages or loss of profits, or for any breach of contract, fundamental
or otherwise, or for any claim brought against purchaser by any other party. Some provinces, states or
jurisdictions do not allow the exclusion or limitation of incidental or consequential damages or limitations
on how long an implied warranty lasts, so the above limitations or exclusion may not apply to you.
This limited warranty gives you specific legal rights, and you may also have other rights that vary from
province to province, state to state or jurisdiction to jurisdiction.
How to Obtain Satisfaction Guarantee and/or Limited Warranty Service
In the U.S.A.
If you have any question regarding this guarantee or limited warranty or would like to obtain guarantee
or limited warranty service, please call 1-800-334-0759 and a convenient service center address will be
provided to you.
In Canada
If you have any question regarding this guarantee or limited warranty or would like to obtain guarantee
or limited warranty service, please call 1-800-667-8623 and a convenient service center address will be
provided to you.
In the U.S.A., this guarantee and limited warranty is offered by Sunbeam Products, Inc. doing business
as Jarden Consumer Solutions located in Boca Raton, Florida 33431. In Canada, this guarantee and
limited warranty is offered by Sunbeam Corporation (Canada) Limited, located at 20 B Hereford Street,
Brampton, Ontario L6Y 0M1. If you have any other problem or claim in connection with this product,
please write to the Consumer Service Department.
PLEASE DO NOT RETURN THIS PRODUCT TO ANY OF THESE
ADDRESSES OR TO THE PLACE OF PURCHASE.
For inquiries regarding recycling and proper disposal of this product,
please contact your local waste management facility.
Page 17

17
MEDIDAS DE SEGURIDAD
IMPORTANTES
Siempre tenga en cuenta las precauciones de seguridad básicas al usar la licuadora, incluidas
las siguientes:
• Lea todas las instrucciones antes de usarla.
• No sumerja el cable, el enchufe ni la base del motor en agua u otros líquidos, a fin de
protegerse de riesgos de descargas eléctricas.
• Siempre use el producto sobre una superficie plana, dura, limpia y seca. Asegúrese de
que no haya materiales como manteles o plástico entre la unidad y la superficie.
• Potencia de luz parpadeante indica listo para funcionar. Evitar cualquier tipo de
contacto con hojas o partes móviles. Mantenga las manos y los utensilios fuera del
vaso durante el mezclado para evitar heridas corporales o dano al electrodoméstico.
Puede usar una espátula de goma sólo cuando la licuadora no este funcionando.
• Mantenga las manos y utensilios fuera del vaso cuando esté licuando para reducir el
riesgo de lesiones personales o daños a la licuadora. Un material para raspar se puede
utilizar, pero debe usarse sólo cuando la licuadora no esté funcionando.
• No opere ningún aparato con un cable o enchufe dañado o después de un mal
funcionamiento, o que se haya caído o dañado de cualquier manera. Devuelva el
aparato al centro de servicio autorizado más cercano para su revisión, reparación o
ajuste eléctrico o mecánico.
• Devuelva el producto al Centro de Servicio para Electrodomésticos autorizado más
cercano para realizar una comprobación de seguridad, ajuste o reparación.
• Las cuchillas de la licuadora son afiladas. Manipule con cuidado.
• Para reducir el riesgo de lesiones personales, nunca coloque la cuchilla ni sus accesorios
sobre la base sin el vaso debidamente ajustado.
• Siempre coloque la tapa sobre la jarra antes de poner la licuadora en funcionamiento.
• Al licuar líquidos calientes, tenga cuidado con el vapor. Retire la tapa de llenado de la
tapa del vaso para que pueda salir el vapor.
• No use el electrodoméstico al aire libre.
• No permita que el cable toque superficies calientes ni cuelgue sobre el borde de una mesa
o mostrador.
• Desenchufe la licuadora cuando no esté en uso, antes de retirar o colocar piezas y antes
de realizar la limpieza.
• Nunca deje el electrodoméstico sin atención mientras esté en funcionamiento.
• Este electrodoméstico no debe ser utilizado por los niños o por personas con su
capacidad física, psíquica o sensorial reducida.
• Todo aparato eléctrico utilizado cerca de los niños requiere la supervisión cercana de un
adulto. Los niños no deben jugar con el aparato.
• No licue líquidos hirviendo en la licuadora.
• El uso de accesorios, incluyendo latas o frascos regulares y otras partes de su ensamblaje
no es recomendado por el fabricante y puede representar un riesgo de lesiones a las
personas.
• Cuando vaya a licuar líquidos calientes, retire la pieza del centro de la tapa de dos piezas.
• No intente reemplazar o cortar un cable dañado.
Page 18

18
Precauciones Adicionales para el Accesorio de Procesador de Alimentos
• Asegúrese que la tapa esté bien cerrada y en su lugar antes de poner a funcionar el
artefacto.
• No trate de interrumpir el mecanismo de bloqueo de la tapa.
• Nunca inserte alimentos con la mano. Siempre use el empujador de alimentos.
• Para reducir el riesgo de lesiones severas a las personas o daño al procesador de
alimentos, mantenga las manos y los utensilios lejos de las cuchillas o los discos en
movimiento mientras esté procesando los alimentos.
• Para reducir el riesgo de lesiones, nunca coloque las cuchillas o los discos en la base
sin antes colocar el recipiente correctamente en su lugar.
CONSERVE ESTAS INSTRUCCIONES
Este producto es para uso doméstico únicamente.
• La calificación máxima comercializada del producto está basada en el accesorio que
genera la carga más alta. Los otros accesorios pueden generar menos potencia.
Instrucciones sobre el cable de alimentación:
• Este aparato está equipado con un enchufe polarizado de 120V y 127V unidades sólo.
Este es un dispositivo de seguridad diseñado para reducir el riesgo de una descarga
eléctrica. Si no puede introducir el enchufe en el tomacorriente, comuníquese con un
electricista calificado para que cambie el tomacorriente obsoleto. No intente anular
la función de seguridad del enchufe de dos espigas, efectuando modificaciones al
enchufe.
• Intente colocar la licuadora cerca de la fuente de alimentación para reducir los riesgos
asociados a los cables de alimentación (atrapado porque se enreda o se tropieza con
un cable de alimentación largo).
• No tire, tuerza ni abuse del cable de alimentación de ninguna forma.
• No coloque el cable de alimentación alrededor del cuerpo principal de la licuadora
durante o después de usarla.
• No use un cable alargador con este producto.
Este símbolo se ha utilizado en áreas específicas de la parte titulada Guía
del usuario de este libro. Tiene como fin ayudarlo a identificar fácilmente
las instrucciones que requieren atención especial.
Page 19

19
Índice:
Bienvenido................................................................ ................................................20
Conozca su producto................................................. ...............................................21
Uso del producto...................................................... ................................................22
Cuidado del producto................................................ ...............................................25
Consejos para licuar.................................................. ...............................................25
Preg unt as fre cue ntes.................................................. ............................................... 26
Accesorio de Vaso Blend-N-Go® (Sólo Algunos Modelos)..................... ..................27
Uso de su Vaso Blend-N-Go® con la Licuadora Oster® Master Series....................28
Recetas .................................................................................................. ..................29
Garantía Limitada.........................................................
.............................................
31
Page 20

20
Bienvenido
Felicitaciones por su nueva Licuadora Oster® Master Series. Su Licuadora Oster®
le permitirá crear deliciosos batidos, merengadas, salsas y mucho más con el
solo toque de un botón! Si usted tiene algún comentario, pregunta o inquietudes
acerca de este producto, por favor llame al 1-800-334-0759. Su producto incluye
las siguientes características y beneficios:
• Panel de control fácil de usar.
• Sistema Avanzado de Cuchilla de 6 puntos que ofrece una amplia gama de
procesamiento de alimentos y opciones de licuado.
• El diseño de Cuchilla Extra Ancha permite que los alimentos caigan
fácilmente en el fondo del vaso para un licuado ¡más eficiente!
Para Mejores resultados, lea cuidadosamente el manual de instrucciones antes de
usar este producto.
Page 21

21
Conocimiento sobre la Licuadora Master Series con Panel
de Control de Botones a Presión
1. Tapa de Llenado / taza de medición de 2 onzas:
- Permite agregar los ingredientes durante el uso.
También le permite abrir para permitir que escape
el vapor al mezclar los alimentos calientes.
2. Tapa del Vaso de la Licuadora – Sella el vaso de
la licuadora.
3. Vaso– Vaso de vidrio Boroclass de 6 tazas, apto
para el lavaplatos, es resistente a choque térmico.
Ensamblaje de la Cuchilla del Vaso de Vidrio Con una propiedad de bloqueo para asegurar el
enroscado de los accesorios de la cuchilla a la parte
inferior del vaso. Une el vaso a la cuchilla para un
funcionamiento a prueba de derrames.
4. Aros de Goma:
5. Cuchilla – Sistema de cuchilla 50% más grande
que el de las Licuadoras Oster tradicionales.
6. Rosca Inferior del Vaso con palanca de bloqueo. -
Diseño avanzado para el simple ensamblaje del vaso.
7. Base – Mantiene el vaso firmemente. Contiene
un potente motor, velocidad variable.
8. Panel de Control
a. Botón de apagado (Off) – Apaga el producto.
b. Ajustes de control variable incluyen desde
Revolver (Stir) hasta Extraer (Extract)
y también indican los resultados de los
alimentos: desde Limpieza Fácil (Easy
Cleaning) hasta Batido (Smoothie).
c. Botón de Pulsar (Pulse) – Presione para pulsar
y suelte para detener la función. Perfecto para
triturar hielo (Ice Crushing).
1
2
3
4
5
6
7
8
D U RA L A S T M A ST E R
b
c
a
Page 22

22
Conocimiento sobre la Licuadora Master Series con
Panel de Control Electrónico
(Sólo Algunos Modelos)
1. Tapa de Llenado / taza de medición de 2 onzas:
- Permite agregar los ingredientes durante el uso.
También le permite abrir para permitir que escape el
vapor al mezclar los alimentos calientes.
2. Tapa del Vaso de la Licuadora – Sella el vaso de la
licuadora.
3. Vaso– Vaso de vidrio Boroclass de 6 tazas, apto
para el lavaplatos, es resistente a choque térmico.
Ensamblaje de la Cuchilla del Vaso de Vidrio - Con
una propiedad de bloqueo para asegurar el enroscado
de los accesorios de la cuchilla a la parte inferior del
vaso. Une el vaso a la cuchilla para un funcionamiento
a prueba de derrames.
4. Aros de Goma:
5. Cuchilla – Sistema de cuchilla 50% más grande que el
de las Licuadoras Oster tradicionales.
6. Rosca Inferior del Vaso con palanca de bloqueo. -
Diseño avanzado para el simple ensamblaje del vaso.
7. Base – Mantiene el vaso firmemente. Contiene un
potente motor, velocidad variable.
8. Panel de Control
a. Botón de Encendido (Botón On / Off) – Enciende
el producto y lo apaga.
b. Ajustes Pre-Programados: Para resultados
impecables con el toque de un botón. Seleccione
el ajuste deseado y su licuadora Master Series
Oster® completará un ciclo a través de la función,
proporcionando resultados profesionales con el
toque de un botón. La unidad se detendrá después
de completar el ciclo. Seleccione Desde:
Verdes / Batidos Congelados
Alimentos Picados / Salsa
c. Controles Manuales: Seleccione desde
Bajo-Med-Alta
d. Botón de Pulsar (Pulse) – Presione para pulsar y
suelte para detener.
1
2
3
4
5
6
7
8
D UR AL AST M AS TE R
a ad d
c
b
Page 23

23
Ensamblaje del Vaso de Vidrio de 6 Tazas
1. Coloque la cuchilla dentro de la Rosca Inferior del Vaso. (Fig 1)
2. Coloque el aro de goma sobre la Cuchilla. Cuidadosamente
presione y ajuste el aro a la ranura de bloqueo (Fig 2).
3. Asegúrese de que el aro de doma sellador con función
candado esté completamente ajustado en su lugar y
mantenga la cuchilla sujeta a la rosca inferior del vaso.
Para ver el ensamblaje correcto vea (Fig.3).
4. Instale la Cuchilla ya ensamblada al Vaso. Gire a la derecha para apretar.
Asegúrese de que la Cuchilla Ensamblada esté ajustada al vaso antes de usar.
NOTA: Para una instalación adecuada sobre la base de la Licuadora,
asegúrese que la palanca de bloqueo gire más allá de las lengüetas
anti-rotación en el vaso de la licuadora o taza de batido. Ver (Fig 4).
NOTA: En caso que la palanca de bloqueo esté dañada o ausente, no
opere la licuadora. Favor de llamar Sunbeam
Customer Service para obtener un reemplazo.
5. Ponga los ingredientes en el vaso.
6. Asegure la tapa del vaso y la tapa de llenado.
7. Coloque el vaso en la base.
8. Conecte el cable eléctrico a un tomacorriente
de 120/127-volt,. 60 hz.. Ahora está listo para
comenzar.
SIEMPRE PONGA LA MANO SOBRE LA
TAPA DEL RECIPIENTE AL OPERAR LA LICUADORA.
Uso del Control a Presión
1. Asegúrese de que el botón de apagado (OFF) esté presionado antes de
enchufar la licuadora.
2. Seleccione el ajuste y mezcle los ingredientes a la consistencia deseada.
NOTA: El panel de control indica las funciones al igual que los resultados.
3. Presione el botón de apagado para detener y apagar la licuadora.
4. Presione y sostenga el botón de Triturar Hielo y Pulsar (ICE CRUSH and
PULSE) para triturar hielo y picar. Repita según sea necesario.
Fig1
Fig2
Aro de Goma Sellador
con función candado
Rosca Inferior del
Vaso con palanca
de bloqueo.
Cuchilla
Fig3
Incorrecto ¡Correcto!
Fig4
Palanca de Bloqueo
Uso de la Licuadora Oster® Master Series
Antes de utilizar el producto por primera vez, separe la tapa, la tapa de llenado
y la cuchilla del vaso. Lave con agua tibia y jabón, o en la rejilla superior del
lavaplatos. Enjuague y seque bien.
La cuchilla es afilada. Manipule con cuidado.
Page 24

24
Uso de las Funciones Pre-Programadas (Sólo Algunos Modelos)
1. Presione el botón de encendido ON / OFF para encender el producto. La luz
de encendido hará destellos, indicando que la unidad está activa y lista para
usar. La luz permanecerá encendida cuando el motor está en marcha.
2. Seleccione y Presione el Botón de Configuración Pre-Programada de acuerdo
a su deseo:
- “Smoothie / Frozen Drink (Congelada)”
- “Dip (Crema) / Salsa”
3. Para cambiar su selección, presione el botón de encendido/apagado (ON/
OFF) dos veces, seguido de otro botón de ajuste pre-programado (“Frozen
Drinks & Shakes” o “alimento de la tajada”)
4. Una vez que la función termine, el producto se detiene automáticamente.
Por favor observe: Usted puede presionar el botón ON / OFF para cancelar
el programa en cualquier momento. La luz azul intermitente indica que la
licuadora está lista.
5. Presione el botón ON / OFF para apagar el producto. Este producto está
pre-programado para apagarse automáticamente si no se utiliza durante un
período de varios minutos. Todas las luces se apagarán cuando la unidad se
detenga automáticamente.
Uso de los Controles Manuales
Los Controles Manuales incluyen:
Velocidad Baja ( Low)
Velosidad Media (Media)
Velocidad Alta (High)
Pulsar (Pulse)
Utilice estos controles para las recetas personales o continuar mezclando después
que una Configuración Programada haya terminado.
1. Presione el botón de encendido ON / OFF para encender el producto. La luz
de encendido hará destellos, lo que significa que el producto está activo y listo
para usar. La luz permanecerá encendida cuando el motor esté en marcha.
2. Ponga los ingredientes en el vaso.
3. Asegure la tapa del vaso y la tapa de llenado.
Velocidad Alta (High)
1. Pulse el botón de Velocidad Alta (“High”) para operar el producto a una
velocidad alta.
2. Presione el botón de encendido ON/OFF para apagar el producto.
Velocidad Media (Medium)
1. Pulse el botón de Velocidad Media (“Medium”) para operar el producto a una
velocidad media.
3. Presione el botón de encendido ON/OFF para apagar el producto.
Velocidad Baja (Low)
1. Pulse el botón de Velocidad Baja (“Low”) para operar el producto a una
velocidad baja.
3. Presione el botón de encendido ON/OFF para apagar el producto.
Uso de la Función de Pulsar
1. Verifique que la luz azul haga destellos. Esto indica que la licuadora está encendida.
2. Presione y suelte el botón “Pulse”.
3. Suelte el botón de pulsar para detener.
4. Presione el botón de encendido ON / OFF para apagar el producto.
Utilice el botón de ‘Pulse’ (pulsar) para picar hielo o picar alimentos.
Page 25

25
Cuidado del producto
Después del uso
1. Pulse el botón OFF y desenchufe la licuadora. Levante el frasco hacia arriba
desde la base, retire la tapa y el frasco vacío.
2. Si es necesario, use una espátula de goma para retirar los restos de alimentos
de los lados de la jarra.
Limpieza
La cuchilla es AFILADA! CUIDADOSAMENTE libere la cuchilla de la parte
inferior del vaso girando la rosca inferior del vaso en sentido contrario a las
agujas del reloj. La tapa del vaso, la tapa de llenado y la cuchilla son aptas para
el lavaplatos. Utilice la rejilla superior del lavaplatos para la tapa del vaso, tapa
de llenado y la cuchilla. Coloque el anillo de sellado en la cesta inferior del
lavaplatos.
También puede lavar las piezas con agua tibia y detergente. Enjuague y seque
bien. Limpie la base con un paño suave y húmedo.
Nunca sumerja la base de motor en líquidos.
Compruebe que las piezas no están dañadas al volver a
unirlas.
CONSEJO: Enjuague la licuadora con agua jabonosa
durante 20-30 segundos para limpiarlo sin desmontar.
Luego enjuague con agua limpia.
Almacenamiento
Vuelva a ensamblar la licuadora para su almacenamiento. Deje la tapa abriendo
un pequeño vacío para que se conserve sin olores.
NOTA: Nunca coloque la jarra, o ninguna de las demás piezas, en un horno microondas. Nunca
guarde alimentos o bebidas en la jarra.
Servicio
Si se necesitan reparaciones, envíe su aparato solamente a un Centro de Servicio
Autorizado OSTER®. Las piezas de repuesto están disponibles en www.oster.com
o llame al 1-800-334-0759.
Consejos para licuar
Líquidos
Coloque los líquidos en la jarra primero, salvo que la receta indique lo contrario.
Añada más líquido si los ingredientes no se están mezclando correctamente.
Usando la Tapa de Llenado
No quite la tapa mientras esté en uso. En su lugar, abra la tapa de llenado para
agregar ingredientes más pequeños.
Picado de Hielo
Sin Líquido: utilice el botón de “pulse” hasta que logre los resultados deseados.
Page 26

26
Con Líquido: Agregue la cantidad deseada de cubitos de hielo y agua hasta que
el hielo flote. Mezcle a Alta velocidad hasta que logre los resultados deseados y
luego cuele el agua.
Uso de la licuadora con alimentos o líquidos calientes
ADVERTENCIA: Cuando trabaje con ALIMENTOS CALIENTES, quite
la tapa de llenado para ventilar el vapor. Incline la tapa para alejarla de
usted y cubrir parcialmente la apertura. Mantenga las manos y otras partes
del cuerpo expuestas lejos de la apertura de la tapa para evitar posibles
quemaduras.
ADVERTENCIA: Cuando se trabaja con LÍQUIDOS CALIENTES, quite
la tapa de llenado y comience con una velocidad baja y luego aumente
gradualmente a una velocidad más rápida. No agregue líquidos por encima
del nivel de 4 tazas (1 litro). Siempre mantenga las manos lejos del vapor.
Cantidades de ingrediente
Use únicamente la cantidad de alimentos sugerida en las recetas. Si desea
cantidades más grandes, prepare en lotes. Usar cantidades más grandes puede
sobrecargar y forzar el motor. Además, es posible que obtenga resultados
diferentes a los que se describen.
Preguntas frecuentes
¿Por qué la licuadora no se enciende?
• Compruebe que la base esté enchufada a un tomacorriente activo.
• Compruebe que la luz roja parpadeante esté activa después de pulsar el
botón on/off.
• Asegúrese de que el botón de control se presione para comenzar.
¿Cómo puedo evitar el derrame de líquidos?
Compruebe que el anillo sellador esté colocado correctamente entre la hoja
multifuncional y la jarra.
Page 27

27
Accesorio de Vaso Blend-N-Go® (Sólo Algunos Modelos)
NOTA: Para una instalación adecuada sobre la Base de la Licuadora, asegúrese que
la palanca de bloqueo gire más allá de las lengüetas anti-rotación en el vaso de batido.
A. Palanca de Bloqueo
B. Lengüetas Anti-Rotación
C. Base de la Licuadora
NOTA: El accesorio de Vaso de Batido Blend-N-Go® es compatible solamente con la
rosca inferior del vaso con palanca de bloqueo. Ver las imagenes a continuación.
Para Adquirir el Juego de Batido, visite OsterBlending.com
A
B
C
Figura 1
Figura 2
Vaso de Batido
con Tapa para
Bebida
Vaso de Batido
y Rosca
Inferior del
Vaso
NOTA: La base de
la rosca del Vaso con
Palanca de Bloqueo
DEBE ser utilizada con
el accesorio de vaso de
Batido.
Page 28

28
Uso de su Vaso Blend-N-Go® con su Licuadora Oster®
Master Series
Antes de lavar asegúrese que la licuadora esté apagada y desenchufada. Lave
todos las partes excepto la base de la licuadora con agua jabonosa, con una
esponja suave y un cepillo para botellas. No use limpiadores abrasivos o
esponjas de limpiar. Enjuague bien y seque. Las partes son también aptas para el
lavaplatos. No licue líquidos calientes.
Place desired ingredients into smoothie cup in the following order:
Líquidos , ingredientes frescos , frutas congeladas , hielo, yogurt y helados.
(Cortar todas las frutas firmes, vegetales y otros alimentos en pedazos no más
grandes de 1/2-pulgada ( 1.25 cm) por 2 pulgadas ( 5,0 cm).
• Coloque la cuchilla dentro de la Rosca Inferior del Vaso o al adaptador.
• Coloque el aro de goma sobre la Cuchilla. Cuidadosamente presione y ajuste
el aro a la ranura de bloqueo. (Consulte la página 7 para instrucciones más
detalladas del ensamblaje de la cuchilla)
• Coloque la cuchilla ya ensamblada en el Vaso. (Véase la Figura 1 en página 37)
• Asegúrese de que el Ensamblaje de la Cuchilla esté ajustado firmemente al
vaso antes de usar.
• Coloque el vaso ensamblado sobre la base de la Licuadora. (Véase la Figura 2
en página 37)
• Sostenga el vaso en posición. Opere la Licuadora de acuerdo con las
instrucciones del Manual de Usuario. Licue hasta obtener la consistencia deseada.
• Retire la cuchilla y el aro de goma.
• Coloque la tapa sobre el vaso y gire hacia la derecha para apretar.
Disfrute de su bebida licuada!
Page 29

29
Recetas
Explosión de miel y vainilla
Rinde 1 porción
1 taza de leche descremada 2 cucharadas de miel
¼ taza de polvo de proteínas
1 taza (8 onzas [250 cm3]) de yogur de vainilla descremado
3 trozos de banana congelada, aproximadamente, una banana mediana
1. Coloque los ingredientes en la jarra en el orden mencionado.
2. Coloque la tapa a la jarra. Presione el botón “On/Off” y, a continuación, el
botón “Frozen Smoothies”.
3. Vierta en un vaso alto y sirva.
Batido de bayas
Rinde 1 porción
1 taza de jugo de naranja ½ taza de yogur de vainilla descremado
2 cucharadas de miel 1 taza de mezcla de bayas congelada
2 trozos de banana congelada, aproximadamente, una banana pequeña
1. Coloque los ingredientes en la jarra en el orden mencionado.
2. Coloque la tapa a la jarra. Presione el botón “On/Off” y, a continuación, el
botón “Green/Frozen Smoothies”.
3. Vierta en un vaso alto y sirva.
Salsa roja ardiente
Rinde 3 tazas
2 dientes de ajo grandes
1 lata (15 onzas [450 cm3]) de tomates enteros, deshidratados
1 cebolla mediana, cortada en cuartos (4 partes)
½ taza de hojas de cilantro
1 a 4 pimientos jalapeños, en cuartos
½ a 1 cucharadita de azúcar
Sal a gusto
1 cucharada de jugo de lima
1 lata (15 onzas [450 cm3]) de tomates enteros, deshidratados
Trozos de tortilla para servir
1. Coloque los ingredientes en la jarra, excepto los trozos de tortilla, en el orden
mencionado. (Nota: Coloque una lata de tomates después de los dientes de
ajo, y la otra lata después de agregar el resto de los ingredientes. Además, debe
colocar la cebolla en el medio de la jarra para evitar bloqueos).
2. Coloque la tapa a la jarra. Presione el botón “On/Off” y, a continuación, el
botón “Food Chop/Salsa”.
3. Vierta en el recipiente; sirva con los trozos de tortilla.
Page 30

30
Compota de manzana con durazno
Rinde 1 ¼ tazas
1 manzana grande, sin piel, con corazón y cortada en cuartos
1 durazno grande, sin carozo, pelado y en cuartos (si no es la temporada, use 2
mitades de duraznos en lata).
2 cucharadas de agua
1. Cocine las frutas en agua entre 5 y 8 minutos, o hasta que estén muy tiernas,
en una cacerola pequeña.
2. Coloque las frutas y el líquido en la jarra.
3. Cubra el vaso con la tapa. Presione el botón “On / Off”, luego presione el
botón “Pulse” 3 o 4 veces hasta que quede suave.
4. Retire de la jarra y coloque en recipientes cubiertos.
5. Enfríe o congele de inmediato.
Batido Verde con Durazno
Rinde: 2 porciones
1 banana 1 melocotón, sin hueso
½ aguacate 1 taza de yogurt griego
1 taza de hielo 1 taza de espinaca bebé
½ taza de agua de coco 1 cucharada de miel o agave
½ cucharadita de extracto de vainilla
1. Coloque todos los ingredientes en el vaso alto de la licuadora. Asegure la tapa.
2. Mezcla a velocidad alta hasta que todos los ingredientes se mezclen, o puede
utilizar la función del botón “Frozen Smoothies” (batidos congelados).
3. Vierta en un vaso alto. Sirva.
Batido Espeso de Banana Chai
Rinde: 3 porciones
4 bananas congelados 3 tazas de leche descremada o agua de coco
1 taza de hielo ½ cucharadita de canela molida
½ cucharadita de cúrcuma molida ¼ cucharadita de cardamomo molido
¼ cucharadita de jengibre molido ½ cucharadita de anís estrellado molido
Una pizca de sal marina
1. Coloque todos los ingredientes en el vaso alto de la licuadora. Asegure la tapa.
2. Mezcla a velocidad ALTA hasta que todos los ingredientes se mezclen, o puede
utilizar la función del botón “Frozen Smoothies” (batidos congelados).
3. Vierta en un vaso alto. Sirva.
Page 31

31
Garantía de Satisfacción de 3 Años
Sunbeam Products, Inc. haciendo negocios como Jarden Consumer Solutions, o en Canadá, Sunbeam
Corporation (Canada) Limited haciendo negocios como Jarden Consumer Solutions (colectivamente “JCS”)
garantiza por un período de tres (3) años desde la fecha de compra, que este producto estará libre de defectos
de material y manufactura. JCS, a la discreción del consumidor, reparará, o reemplazará este producto o
cualquiera de sus componentes que se encuentren defectuosos durante el período de la garantía. Esta garantía
es válida para el comprador original desde la fecha de compra inicial, y no es transferible. Guarde el recibo original
de venta. La prueba de compra es requerida para obtener la garantía de satisfacción. Los establecimientos
autorizados de JCS, Centro de servicios o tiendas de venta al por menor que vendan los productos de JCS no
tienen el derecho de alterar, modificar o cambiar de cualquier manera los términos y condiciones de esta garantía.
Garantía Limitada de Diez (10) Años de la Tracción de Metal
JCS también garantiza que por un período de diez (10) años desde la fecha de compra, la tracción de metal de la
base de la unidad y el acoplamiento de metal estarán libres de defecto en cuanto su material y manufactura. JCS,
a su propia discreción, reparará o reemplazará el componente corchete de la tracción de metal que se encuentra
en el acoplamiento de tracción de metal, si se encuentra que está defectuoso, durante el período de la garantía.
El reemplazo será con un producto o componente nuevo o re-manufacturado. Si el producto ya no se encuentra
disponible, el reemplazo se hará con un producto similar de igual o mayor valor. Esta es su garantía exclusiva. No
intente reparar, ajustar cualquier función eléctrica o mecánica en este producto. De hacerlo se anulará esta garantía.
Esta garantía no cubre el daño que resulte de cualquiera de los siguientes: uso negligente o mal uso del producto, uso
en el voltaje o corriente no adecuados, uso contrario a lo que se indica en las instrucciones de operación, desmontaje,
reparación o alteración por cualquier otro que no sea un establecimiento autorizado de JCS o un centro de servicio de
JCS. Más aún, la garantía no cubre: fenómenos naturales tales como fuego, inundaciones, huracanes o tornados.
Esta garantía es válida para el comprador original desde la fecha de la compra inicial y no es transferible.
Guarde el recibo original. La prueba de la compra se requiere para obtener la garantía.
Los establecimientos autorizados de JCS, centros de servicio, o tiendas de venta al por menor de productos JCS no tienen
el derecho de alterar, modificar o cambiar de ninguna manera los términos y condiciones de esta garantía limitada.
¿Cuáles son los Límites de Responsabilidad de JCS?
JCS no será responsable por cualquier daño adicional o resultante causado por el rompimiento de
cualquier garantía o condición estatutarias expresa o implícita. Con excepción de lo que fuese prohibido
por la ley, cualquier garantía o condición de comercio implícita o diseñada para un propósito particular es
limitada de acuerdo a la duración de la garantía limitada aquí arriba. JCS niega cualquier otra garantía,
condición o representación, expresa implícita estatutaria o cualquiera que fuese. JCS no se encontrará
responsable por ningún daño de ninguna manera que resulte de la compra, uso o mal uso, o inhabilidad
de usar el producto incluyendo daños adicionales, especiales, resultantes o daños similares, o pérdida de
utilidades, o por cualquier rompimiento de contrato, fundamental o de otra forma, o por ningún reclamo
en contra del comprador por un tercero. Algunas provincias, estados o jurisdicciones no permiten la
exclusión o limitación de daños adicionales o resultantes o limitaciones en cuanto al tiempo de duración
de la garantía limitada, de modo que las limitaciones aquí arriba o exclusiones, puede que no sean
aplicables a usted. Esta garantía limitada le da derechos específicos legales, y también puede tener otros
derechos los cuales varían de provincia a provincia, estado a estado, o jurisdicción a jurisdicción.
Cómo Obtener Servicio de Satisfacción Garantizada y/o Garantía Limitada
En los Estados Unidos.
Si tiene cualquier pregunta acerca de esta garantía o garantía limitada o si desease obtener garantía limitada o
servicio de garantía, Por favor llame al 1-800-334-0759 y se le proporcionará la dirección de un centro de servicio.
En Canadá
Si tiene cualquier pregunta acerca de esta garantía o garantía limitada o quisiera obtener garantía o servicio
limitado, por favor llame al 1-800-667-8623 y se le proporcionará la dirección de un centro de servicio.
En los Estados Unidos, esta garantía y garantía limitada es ofrecida por by Sunbeam Products, Inc
también haciendo negocio como Jarden Consumer Solutions ubicada en Boca Raton, Florida 33431.
En Canadá, esta garantía y garantía limitada es ofrecida por Sunbeam Corporation (Canada) Limited,
ubicada en20 B Hereford Street, Brampton, Ontario L6Y 0M1. Si tiene cualquier otro problema o reclamo en
conexión con este producto, por favor escribanos al departamento de servicio al consumidor.
POR FAVOR NO DEVUELVA ESTE PRODUCTO A NINGUNA DE
ESTAS DIRECCIONES NI AL LUGAR DE COMPRA.
Para preguntas acerca del reciclaje y el desecho apropiado de este producto,
por favor contacte a su oficina local de la administración de desperdicios.
Page 32

For product questions contact:
Sunbeam Consumer Service
USA : 1.800.334.0759
Canada : 1.800.667.8623
www.oster.com
©2016 Sunbeam Products, Inc., doing business as
Jarden Consumer Solutions. All rights reserved.
In the U.S., distributed by Sunbeam, Products, Inc.,
doing business as Jarden Consumer Solutions, Boca Raton, FL 33431
In Canada, imported and distributed by Sunbeam Corporation (Canada) Limited,
doing business as Jarden Consumer Solutions, Brampton (Ontario) L6Y 0M1.
TritanTM is a trademark of Eastman Chemical company used with permission.
Para preguntas sobre los productos llame:
Sunbeam Consumer Service
EE.UU. : 1.800.334.0759
Canadá : 1.800.667.8623
www.oster.com
©2016 Sunbeam Products, Inc., operando bajo el nombre de
Jarden Consumer Solutions. Todos los derechos reservados.
En los EE. UU., distribuido por Sunbeam Products, Inc.,
operando bajo el nombre de Jarden Consumer Solutions, Boca Raton, FL 33431
En Canadá, importado y distribuido por Sunbeam Corporation (Canada) Limited, operando
bajo el nombre de Jarden Consumer Solutions, Brampton (Ontario) L6Y 0M1.
TritanTM es una marca comercial de Eastman Chemical company usada con su permiso.
Printed in USA Impreso en EEUU
Master Series Blender_16ESM1 GCDS-OST47250-BB
 Loading...