

Page 1

INSTRUCTION MANUAL
BOTANY BAY IMPORTS EXPORTS PTY LTD
ABN 54 001 164 307
14/2 Burrows Road South,
St Peters NSW 2044 Australia Ph: (02) 9550 3890
Email: info@botanybayimports.com.au
Website: www.botanybayimports.com.au Fax: (02) 9516 2243
Large Animal
Clipper
&
Electric Shearing
Handpiece
Sole Australian Importer:
Page 2

Listed below are those precautions regarded to be essential for
the safe use of the appliance.
1. Read the user instructions carefully.
2. Unplug when the appliance is not in use and before cleaning.
3. Do not operate the appliance with a damaged cord or after
the appliance has been dropped or damaged in any manner.
If damage is suspected, return the appliance to an Oster
Service Agent.
4. Do not use the appliance with an extension cord unless the
cord has been checked and tested by a qualified electrician.
5. Do not allow the cord or extension cord to contact sharp
edges or damp ground.
6. Close supervision is necessary when the appliance is used
near children.
7. Do not use the appliance with worn or badly adjusted blades.
8. Do not use the appliance with hot blades.
9. Never immerse the appliance in water or other liquids, but
wipe the appliance with a cloth to clean external surfaces.
10. Do not use the appliance on a wet animal or under wet
conditions.
1
IMPORTANT SAFEGUARDS
SAVE THESE INSTRUCTIONS
Page 3
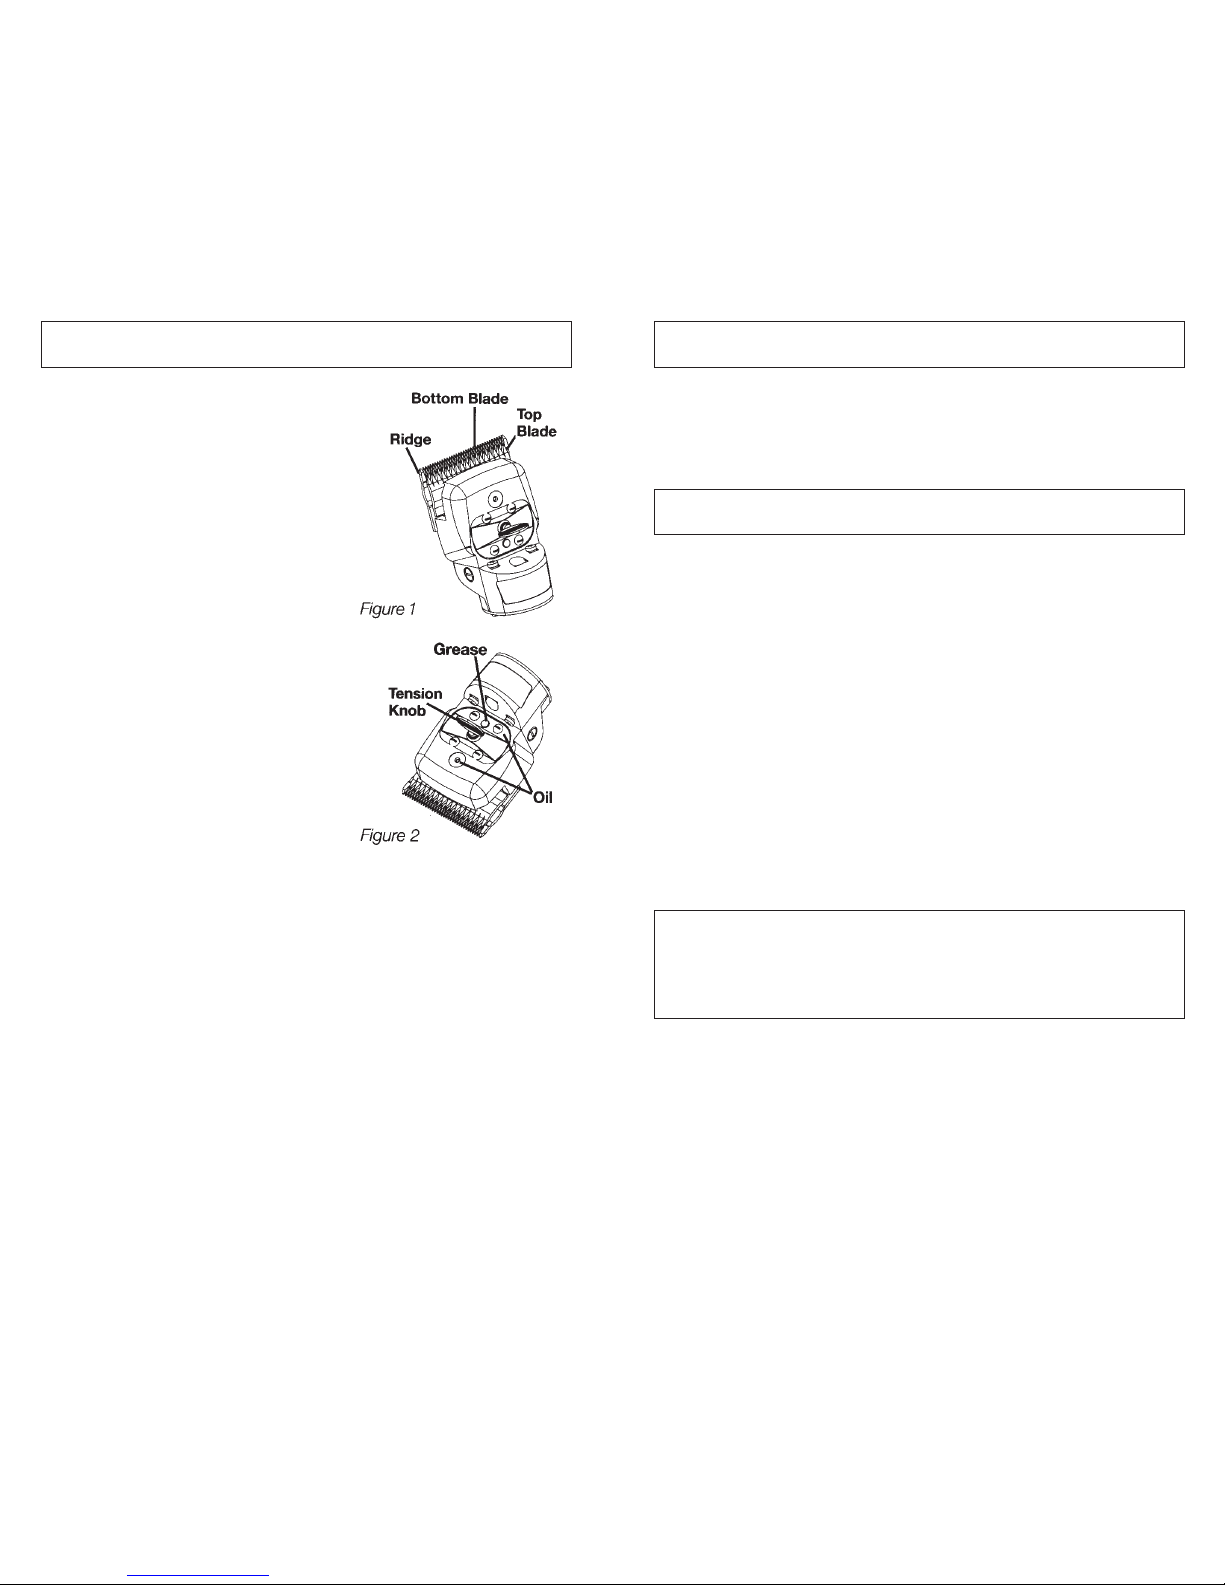
SETTING THE BLADES:
Check the setting of the blades to
be sure they are in the correct
position. When correctly set, the
top blade should be set back 1/32"
(0.8mm) to 1/16" (1.6mm) from the
ridge on the bottom blade (Fig 1).
ADJUSTING THE TENSION:
T ension is applied to the top b lade of
the animal clipper by a flexible
tension principle that eliminates all
friction on top of the cutting blade.
Underneath the tension screw plate
is an equalising cross bar which
supplies pressure on two sets of leaf
springs. This presses the top blade
down against the lower blade to giv e
the best possible cutting tension.
The clipper will not cut freely with a light tension, but tension should
not be so loose as to let hair or dirt get in between the cutting
surfaces of the blades. Excessively tight tension will dull the blades
quickly. Cutting surfaces should be kept clean and oiled while
clipping. At the beginning when the blades are too shar p, tension
should be lightly applied. As the blades begin to dull, tension
should be increased. When the tension knob is tightened as far as
it will go and the blades refuse to cut, they must be sharpened.
To adjust the tension, tur n the tension knob counter-clockwise until
resistance is felt. Do not force the knob against the resistance.
Rotate the tension knob clockwise; approximately 2-3 complete
turns until a light resistance is felt. Continue turning one-half turns.
The tension knob should then be correctly adjusted to start clipping.
BEFORE USE APPLY OIL IN THE OPENINGS SHOWN IN
FIGURE 2 AND TO THE FRICTION POINTS OF THE BLADES.
REPEAT OILING EVERY 10 MINUTES DURING USE.
2
OSTER LARGE ANIMAL CLIPPER
Make sure the switch on the side of the clipper is in the "OFF"
position. Then inser t the plug into an electrical outlet. Slide the
switch to the "ON" position and begin clipping.
OILING AND CLEANING THE BLADES:
Keep the clipper blades oiled and clean well while clipping. When
clipping is completed, remove the blades and w ash them in Oster
Blade Wash. Wipe the blades and the other parts and secure
cord and place in original box with clipping head to prevent oil
from seeping down the armature shaft into the motor.
CLEANING THE AIR FILTER:
Ensure that the air filter is free of hair and dirt.
The hair and dirt that collect on the filter screen must be
frequently removed so that air can freely pass through the screen
to cool the motor.
3
BEFORE BEGINNING TO CLIP
MAINTENANCE
IMPORTANT
Do not remove the head from motor housing.
Contact an authorised service centre for service
Page 4

SETTING THE COMB AND CUTTER:
Loosen the comb screws, insert comb and lightly tighten tension
the screws. Release the tension nut to raise the fork and permit
insertion of the cutter under the fork yokes. Press down on the
fork making sure the conical tips on the outer fork yokes engage
in the holes at the tip of the outer cutter teeth. Tighten the tension
nut sufficiently to hold the cutter in place.
BLADE ADJUSTMENT:
The cutter teeth points must operate on the sharpened surface on
the comb teeth (Fig. 3). It may be necessary to move on the comb
to the correct position (Fig. 4). Check the movement of the cutter,
outer cutter teeth must cut at the end of each stroke, the comb can
be moved from side to side to the correct position (Fig.5). Release
the tension nut and secure the comb screws. Reset the conical tips
in the cutter teeth and tighten the tension nut to hold the cutter in
place.
4
OSTER ELECTRIC SHEARING HANDPIECE
ADJUSTING THE TENSION:
Final tension adjustment should be made with the machine
running. If wool is not being sheared smoothly, increase the
tension slightly and repeat the test, continue until smooth cutting
is achieved.
Combs and cutter stay sharp and last longer when used with the
minimum tension required for smooth cutting.
Further adjustment should not be necessary until the cutter
begins to dull, as indicated by chewed off wool rather than
smoothly sheared wool. For most effective results, keep the
comb points on the sheep’s skin and operate the correct comb
angle (Fig. 6). Carry out tension tests on a part of the sheep
where the comb enters the wool, freely and not on the wool on
the belly or hind legs as it is often dirty and matted.
When clipping cattle, blades should be oiled every 10 minutes
during operation. The oiling intervals can be longer when
shearing sheep due to the natural oils in the wool.
AIR FILTER:
Ensure that the air filter is free from hair and dirt.
RESHARPENING:
Sharp blades, combs and cutters are essential for good clipping,
shearing. Dull blades must be sharpened with special grinding
discs. These discs and custom sharpening facilities are available
through:
Botany Bay Imports Exports Pty Ltd
PO Box 182
St Peters NSW 2044
Phone: 02 9550 3890
Fax: 02 9516 2243
Email: info@botanybayimports.com.au
5
Page 5

1. Keep the motor drive, shearing and clipping heads clean. It
is recommended that you remove the blades after use and
clean them thoroughly.
2. Lubricate the heads and blade cutting surfaces while in use
and after use.
3. Keep the air filter free of hair and dirt.
4. Keep blades, comb and cutter sharp for maximum efficiency
and long life.
PROFESSIONAL CLIPPER BLADE CARE
Lengthens the Life of Clipper Blade Sets
1. Before you start clipping, apply a thin film of Oster Oil to the
matting faces of the cutting blades and tension spring guide.
2. If you have new blades that do not seem to cut right, it may
be that the factory-applied preservative used to inhibit rust
has congealed. To remedy this, with the clipper running,
submerge only the cutting blades in Oster Blade Wash. Wipe
the outside surface of the blades dry with a clean dry cloth
and begin clipping again.
3. During the time you are clipping, use "Kool=Lube" coolant
occasionally. The primar y benefit will be to cool the cutting
blades and provide some lubrication.
4. If during the clipping operation you find the blade starts to
"drag" or "streak", it could be that hair has accumulated
between the upper and lower blades. To remedy this, with
the clipper running, submerge the cutting blades in Oster
Blade Wash. Wipe the outside surface of the blades dry with
a clean dry cloth and begin clipping again.
5. If after submerging Oster Blade Wash your blade is still not
cutting properly, it is possible that very fine hair did not wash
6
MAINTENANCE
FOR BEST RESULTS
out from between the blades. If this is the case, remove the
upper blade by sliding it out from under the tension spring (do
not loosen tension spring screws) and wiping the mating
surfaces of the blades clean. Slide the upper blade back into
position, re-assemble back on the clipper and apply a light
film of oil to the blades (preferably with the clipper running).
6. After grooming, submerge the cutting blades in Blade Wash.
Wipe dry. Use Oster Spray Disinfectant liberally on the
cutting blades. Wipe dry with a clean cloth and apply a thin
film of Oster Oil before grooming again.
Never turn on the motor of an animal clipper close to the horse,
especially where the horse cannot see it. Introduce it to the horse
and condition the horse to the new sound.
To introduce a horse to an animal clipper, hold the unit with the
switch OFF, close enough to the horse for the horse to see and
smell it, before starting to clip.
It may be less disturbing to the animal to begin body clipping on
the left shoulder. He is probably accustomed to being handled on
the left side and to being touched on the shoulder or neck.
Certain areas of the horse will require special attention – between
the front legs, the face, and the legs. There are folds of skin
where the leg joins the body. When clipping this area, smooth the
skin with your free hand. Smaller clippers may be necessary for
clipping the face, ears, and around the fetlocks.
The skin of the horse is very sensitive. Should the blades
become too hot, they may burn or frighten the horse. Lubricate
the clippers frequently.
7
CLIPPING THE HORSE
Page 6

Your Oster clipper is covered by Botany Bay Imports Exports Pty
Ltd for a period of 1 year from date of purchase against defects
in workmanship and material.
Kindly retain the sales docket as proof of purchase and attach the
docket to this warranty card should you need to claim. This
warranty does not cover misuse or negligent handling or if not
used in accordance with instructions. The warranty excludes
breakables, such as the plastic or ceramic body and blades,
which are, wear out parts.
If maintenance service or service under warranty is required
forward your clipper to place of purchase or Botany Bay Imports
Exports Pty Ltd, 14/2 Burrows Road South St Peters NSW 2044.
When returning the product for service or warranty please
ensure the following:
1. Postage is prepaid
2. Use sturdy packaging to protect the clipper against damage
in transit, such damage is not covered by the warranty
3. Include, your name, address and the purchase proof
4. Provide a detailed description of the fault.
5. When sending a clipper do send the blades – but not
attached to clipper to avoid damage in transit.
Our Oster Service Department carries the full range of
replacement parts for the complete range of Oster clippers and
blades for speedy service and repairs.
"Sole Australian Importer" – Note:We do not sell direct, we sell to
distributors and wholesalers only, contact us if you would like
details of you’re nearest Oster reseller:
BOTANY BAY IMPORTS EXPORTS PTY LTD
14/2 Burrows Road South
St Peters NSW 2044 Australia
Phone: 02 9550 3890
Fax: 02 9516 2243
E-mail: info@botanybayimports.com.au
Internet: www.botanybayimports.com.au
WARRANTY
89
Page 7

INSTRUCTION MANUAL
BOTANY BAY IMPORTS EXPORTS PTY LTD
14/2 Burrows Road South,
St Peters NSW 2044 Australia Ph: (02) 9550 3890
Email: info@botanybayimports.com.au
Website: www.botanybayimports.com.au Fax: (02) 9516 2243
Large Animal
Electric Shearing
Life’s Hairy Enough
Get the System
You Can
Trust!
Sole Australian Importer:
 Loading...