

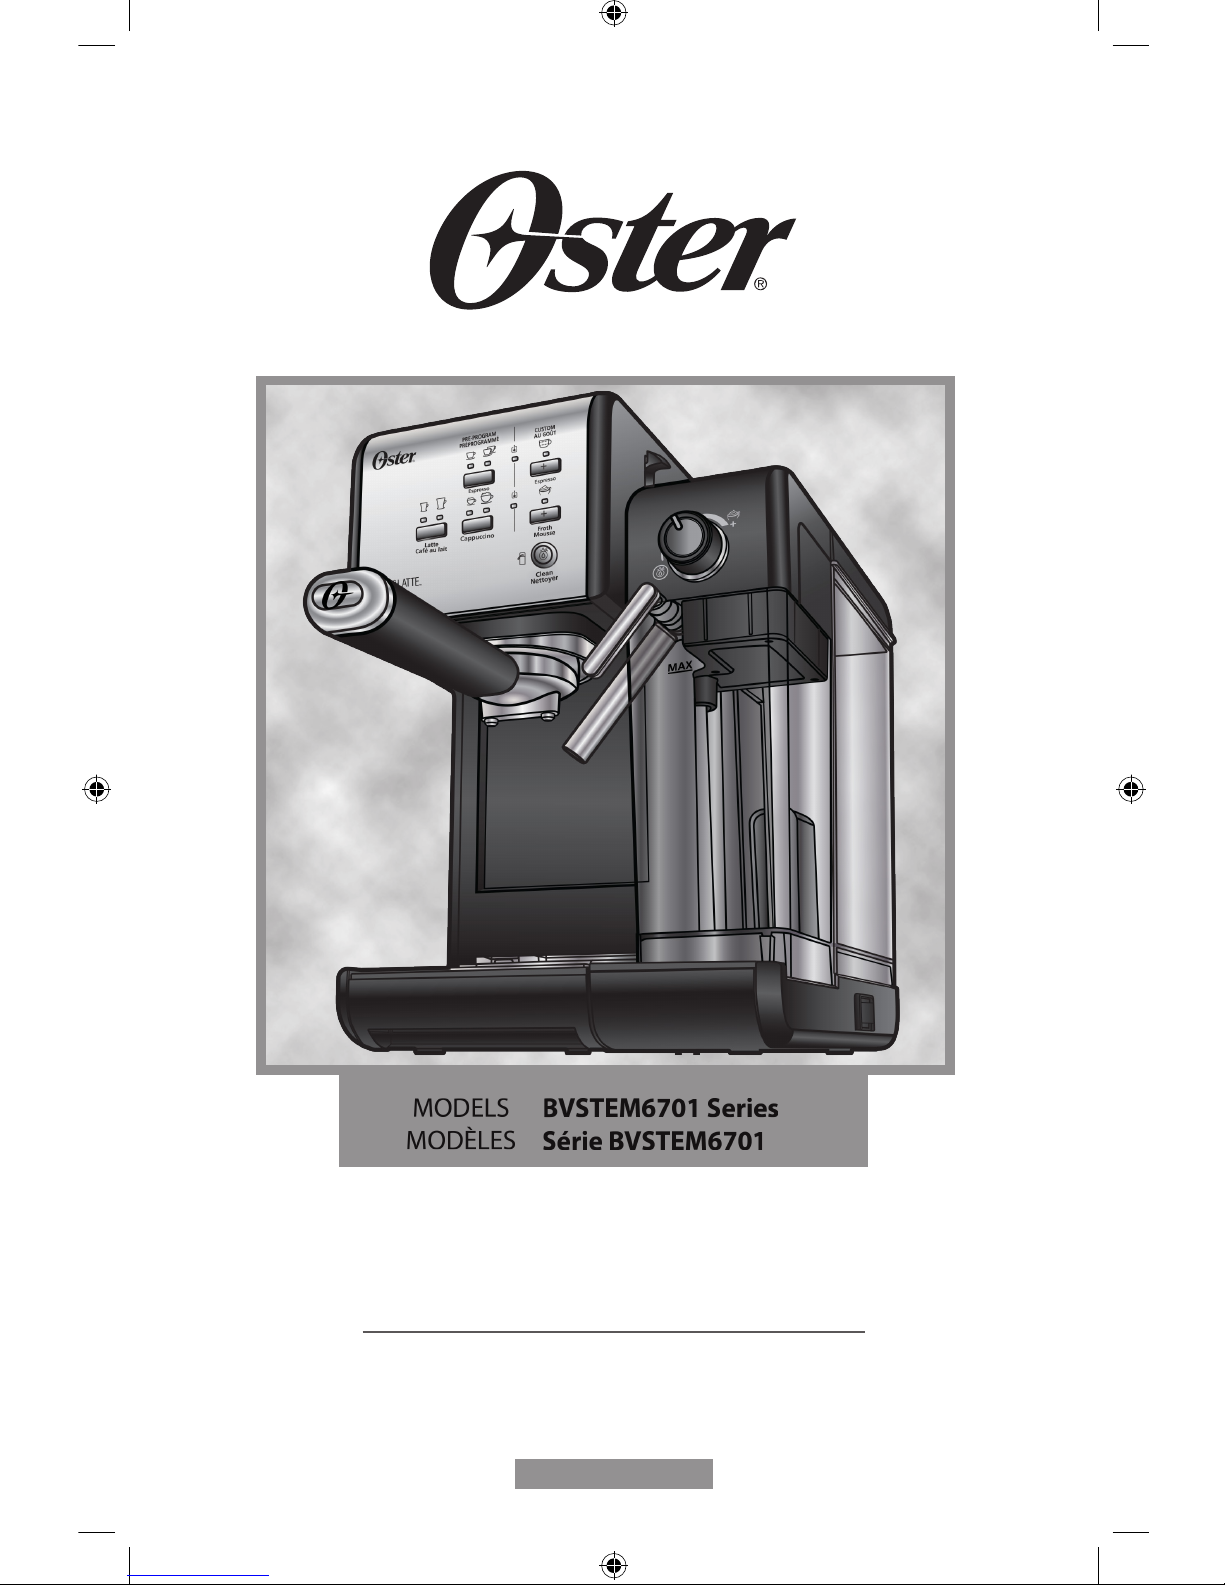
/MD
Instruction Manual
AUTOMATIC ESPRESSO, CAPPUCCINO & LATTE MAKER
READ ALL INSTRUCTIONS BEFORE USING THIS APPLIANCE
Notice d’emploi
MACHINE AUTOMATIQUE À EXPRESSO, CAPPUCCINO ET CAFÉ LATTÉ
LIRE TOUTES LES INSTRUCTIONS AVANT D’UTILISER CET APPAREIL
P.N. 191979
MODELS
MODÈLES
BVSTEM6701 Series
Série BVSTEM6701
www.oster.ca

English-1
IMPORTANT SAFEGUARDS
When using electrical appliances, basic safety precautions should always
be followed to reduce the risk of fire, electric shock and/or injury to persons,
including the following:
1. READ ALL INSTRUCTIONS BEFORE USING THE APPLIANCE.
2. DO NOT touch hot surfaces . Use handles or knobs.
3. To protect against electric shock, DO NOT immerse cord, plug or appliance in water
or other liquids.
4. Press the switch located on the side of the unit to the off position “O” and unplug
unit from electrical outlet when not in use and before cleaning. Allow it to cool before
putting on or taking off parts and before cleaning it.
5. DO NOT operate any appliance with a damaged cord or plug or after the appliance
malfunctions or has been damaged in any manner. Return this appliance only to the
nearest Authorized Oster® Service Center for examination, repair or adjustment.
6. The use of accessory attachments not recommended for Oster® products may result
in re, electric shock or injury to persons.
7. DO NOT use outdoors or for commercial purposes.
8. DO NOT let cord hang over edge of table or countertop or touch hot surfaces.
9. DO NOT place this appliance on or near a hot gas or electric burner or in a heated oven.
10. To disconnect, turn any control to the off position then remove plug from wall outlet.
11. DO NOT use appliance for anything other than its intended use.
12. Use on a hard, at level surface only, to avoid interruption of airow underneath the
appliance.
13. Always be sure to place the water reservoir tightly back in the unit with its lid closed
and ll with water before turning appliance on.
14. In order to avoid possible burns to body parts and/or other injury from hot steam and
water or damages to the unit, never remove the water reservoir or the porta-lter while
your Oster® espresso, cappuccino and latte maker is brewing coffee or frothing. Make
sure the three lights are on, the unit is turned OFF, and unplugged before you can
remove the porta-lter to make additional cups of coffee. If you need to add more water
or milk to the reservoirs, please make sure the three lights are on and ensure to switch
off the unit by pressing the red button on the side of the unit to the off position “O”.
15. Use caution while removing the porta-lter since the metal parts will be hot. Please
make sure to hold it by the handle and dispose the grounds. Caution should be taken
when moving the unit with hot liquids
16. This appliance is not intended for use by persons (including children) with reduced
physical, sensory or mental capabilities, or lack of experience and knowledge, unless
they have been given supervision or instruction concerning use of the appliance by a
person responsible for their safety. Children should be supervised to ensure that they
DO NOT play with the appliance.
17. Close supervision is necessary when any appliance is used by or near children, or
incapacitated individuals.
18. This appliance is not intended to be operated by means of an external timer or
separate remote-control system.
19. This appliance is intended to be used in household and similar applications such as:
staff kitchen areas in shops, ofces and other working environments farm houses by
clients in hotels, motels and other residential type environments bed and breakfast
type environments.

English-2
20. If coffee does not drip, the lter is blocked. Turn off the appliance and allow it to cool
down. The blockage may be caused by the coffee being too nely ground. See the
“PROBLEMS AND CAUSES” section.
21. WHEN CLEANING THE FROTHED MILK DISPENSING TUBE: Place a large cup under
the frothed milk dispensing tube. Fill the milk reservoir with water and place it back on the
unit. Turn the froth control knob counter clockwise to the clean position “ ” then press
the clean button “ ” to activate the cleaning function. Let the unit dispense the water
through the tube for approximately 40 seconds and then press the clean button “ ”
once again to stop the process.
NOTE: In order for your unit to work properly time after time, it is recommended to
clean it after every use.
NOTE: It’s normal during the clean operation that moisture may accumulate on the
front panel. This can be easily removed with a dry paper towel after the cleaning
cycle is complete.
SAVE THESE INSTRUCTIONS
THIS UNIT IS FOR HOUSEHOLD USE ONLY.
POLARIZED PLUG
The appliance has a polarized plug (one blade is wider than the other). To reduce the risk
of electric shock, this plug is intended to t into a polarized outlet only one way. If the plug
does not t fully into the outlet, reverse the plug. If it still does not t, contact a qualied
electrician. Do not attempt to modify the plug in any way.
POWER CORD INSTRUCTIONS
1. A short power supply cord is provided to reduce the hazards resulting from becoming
entangled in or tripping over a longer cord.
2. An extension cord may be purchased and used if care is exercised in its use.
3. If an extension cord is used, the marked electrical rating of the extension cord must
be the same or higher than that of the product. The extended cord must be arranged
so that it will not drape over the counter top or tabletop where it can be pulled on by
children or tripped over accidentally.
CORRECT USE OF GROUND COFFEE FOR ESPRESSO MAKERS
Do not use sugar roasted* ground coffee or sugar roasted coffee beans as these will clog
the lter and damage the appliance. If sugar roasted coffee is accidentally used, stop
using the unit and bring it to the closest service center for maintenance.
We recommend descaling the machine periodically to keep it in good working condition.
Contact our service centers to learn about this process.
(*) GROUND WITH SUGAR
English-3
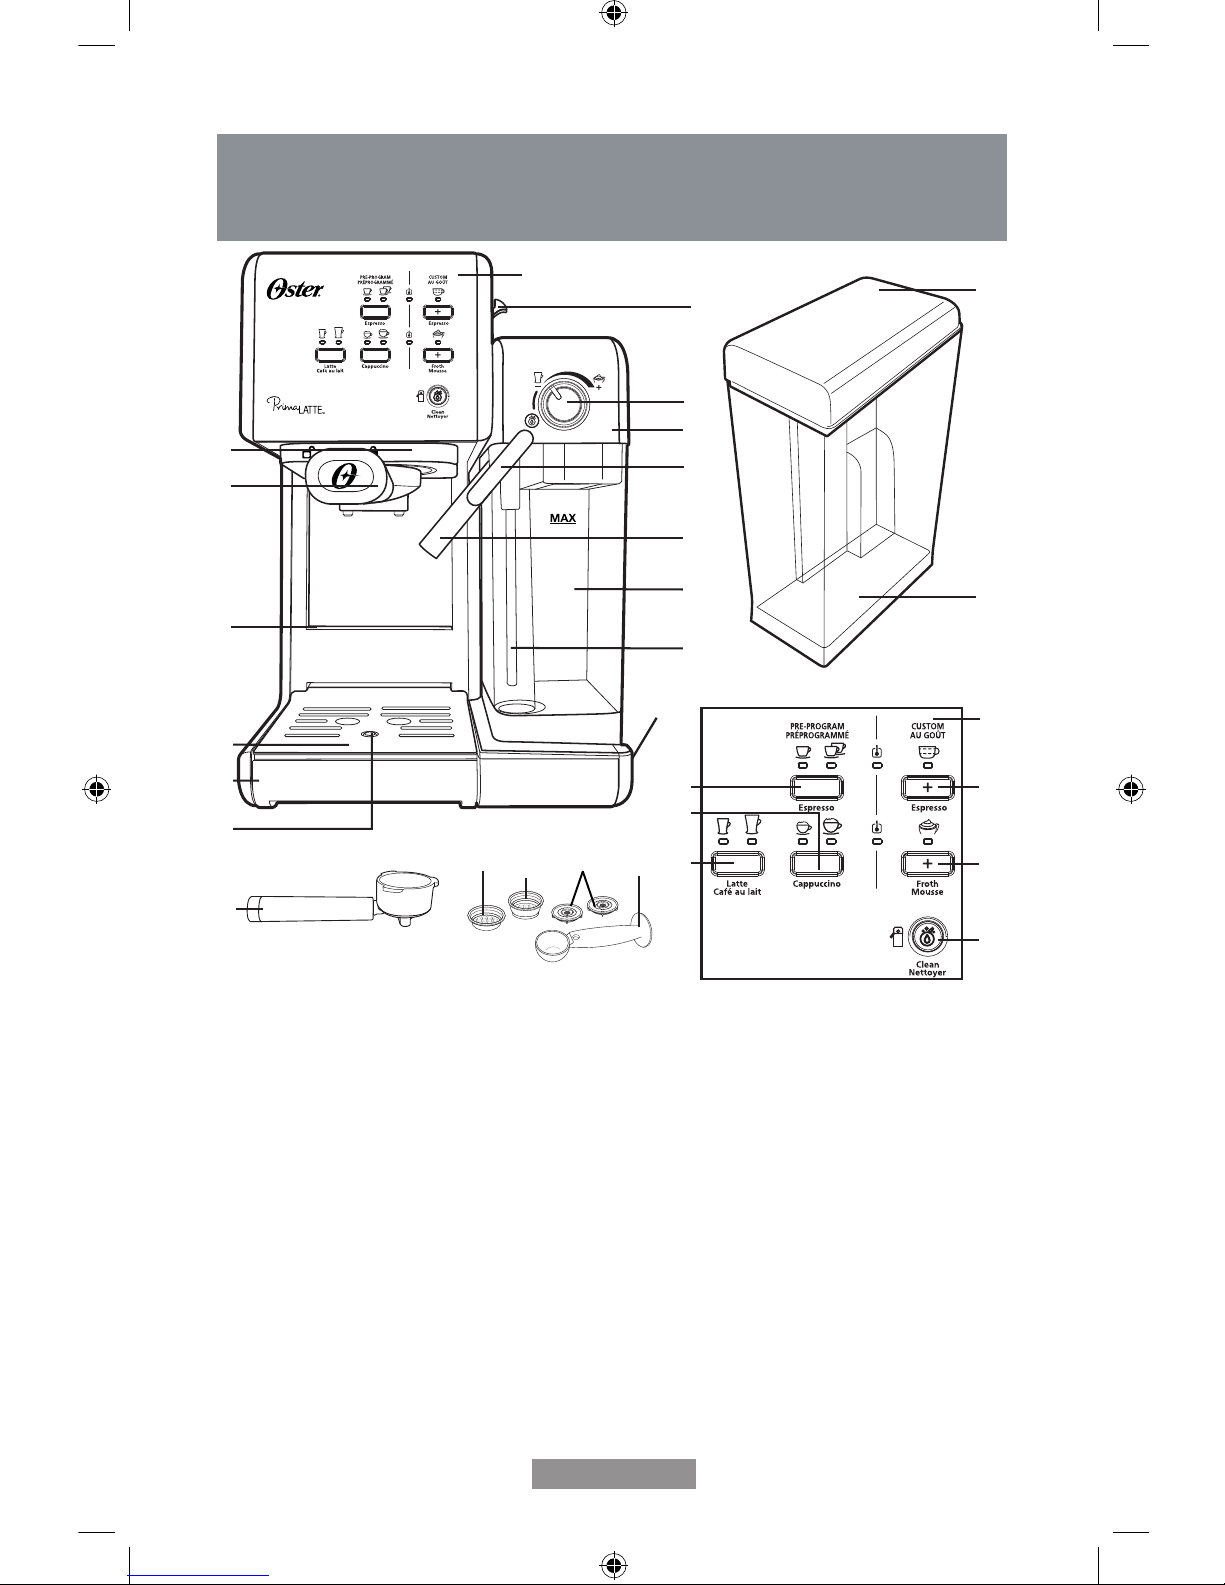
1. Brew Head
2. Porta-Filter:
a. Porta-Filter for Ground Coffee and
E.S.E. pods (45mm)
3. Height Adjusting Slot for Small Cups
4. Removable Drip Grid
5. Removable Drip Tray
6. Drip Tray Overow Floater
7. Filters For:
a. Single Shot of Espresso and
E.S.E. pods (45mm)
b. Double Shot of Espresso
c. Detachable Bottom Covers of Filters
8. Measuring Scoop/Tamper
9. Control Panel
a. Single and Double Espresso Button with
Indicator Lights
b. Manual Espresso Brew Button with
Indicator Light
c. Small and Large Cappuccino Button with
Indicator Lights
d. Small and Large Latte Button with
Indicator Lights
e. Manual Milk Frothing Button with
Indicator Light
f. Clean Button with Indicator Light
10. Removable/Clear Milk Reservoir
11. Milk Reservoir Lid
12. Milk Reservoir Release Button
13. Milk Froth Level Control Knob
14. Milk Frothing Tube Guide Lever
15. Frothed Milk Dispensing Tube
16. On/Off Switch “I/O”
17. Removable Water Tank
18. Water Tank Lid
19. Milk Hose
DESCRIPTION OF THE APPLIANCE
16
1
3
12
9
13
14
15
19
11
10
2
4
5
6
9a
9c
9d
18
17
2a
7a
7c
7b 8
9
9b
9e
9f

English-4
INTRODUCTION
Congratulations! You have selected the new and innovative Oster® Automatic Espresso,
Cappuccino, and Latte Maker. This unique appliance has been designed to help
you prepare delicious espressos, cappuccinos and lattes quickly, conveniently, and
automatically with the touch of a button.
ESPRESSO
A unique method of coffee brewing in which hot water is forced through nely ground
coffee. Popular in Europe, it is a far richer and more full-bodied brew than regular drip
coffee. Because of its richness, espresso is usually served in 44 to 59 mL (1.5 to 2 oz.)
portions, in demitasse cups.
CAPPUCCINO
A drink made with about 1/3 espresso, 1/3 steamed milk, and 1/3 frothed milk.
LATTE
A drink made with about 1/4 espresso and 3/4 steamed milk.
Please read ALL of the instructions, cautions, notes and warnings included in this
instruction manual carefully before you begin to use this appliance. When this unit is
used, some parts and accessories get hot and need to cool down. Proper care and
maintenance will ensure the long life of the Oster® Automatic Espresso, Cappuccino,
and Latte Maker and its trouble-free operation. Save these instructions and refer to them
often for cleaning and care tips.
Your Oster® Automatic Espresso, Cappuccino, and Latte Maker can be used with ground
coffee as well as E.S.E. pods (45 mm), making it exceptionally practical and versatile to
prepare single shots of espresso, cappuccino and latte.
English-5
BEFORE USING YOUR
APPLIANCE FOR THE FIRST TIME
CLEANING AND PRIMING THE UNIT PRIOR TO FIRST USE
Please refer to the “Description of the Appliance” section to familiarize yourself with
the product and identify all parts.
1. Please make sure the unit is off “O” by pressing the on/off “I/O” switch located on
the right side of the unit. Make sure it is unplugged from the electrical outlet.
2. Remove stickers and labels from the unit.
3. REMOVE RED PLUG FROM THE BOTTOM OF THE WATER RESERVOIR.
4. First remove and then wash the water reservoir, the milk reservoir, the two
porta-lters, the three lters and measuring scoop/tamper in a mixture of mild
detergent and water. Rinse each thoroughly and place them back into the unit.
5. Refer to the instructions on “PLACING THE PORTA-FILTER” section before placing
or removing the porta-lter and any lter from the unit.
6. To clean the inside of the appliance, follow the steps listed on the “PREPARING
CAPPUCCINO” section using water in both reservoirs and no ground coffee in the lter.
Do not immerse the appliance in water or attempt to reach any of its internal parts.
IMPORTANT - PRIME THE UNIT
To prime unit, run the steam cycle by following the steps below:
1. Fill water reservoir up to the “MAX” line and make sure to place the water reservoir
tightly back in the unit with its lid closed (if you removed it to ll it up).
2. Fill the milk reservoir with water up to the MAX level and place the milk reservoir
back in its place. You should feel the milk reservoir lock in place.
3. Select one of the lters (single or double espresso) and place it in the porta-lter
for ground coffee. Place the porta-lter in the unit ensuring it is properly locked and
place a large cup under it. Also, make sure the tip of the frothed milk dispensing
tube is pointing inside the cup.
4. Plug the appliance into the appropriate outlet.
5. Turn the power button on “I”.
6. The 2 control panel lights (Espresso heater “ ” and Steam heater “ ”) will start
blinking. Once these lights become solid, press the manual espresso button
“ ”. The water will ow and stop automatically.
7. Dispose of water in the cup and place it back in the unit.
8. Press the manual froth button “ ”. The water will ow and stop automatically.
9. The 2 control panel lights (Espresso heater “ ” and Steam heater “ ”) will turn on
solid. Now your unit has been primed and is ready to be used.
 Loading...