

Page 1
–––
User Manual
Manual de Instrucciones
Manuel d’Instructions
MODEL/MODÈLE
MODELO
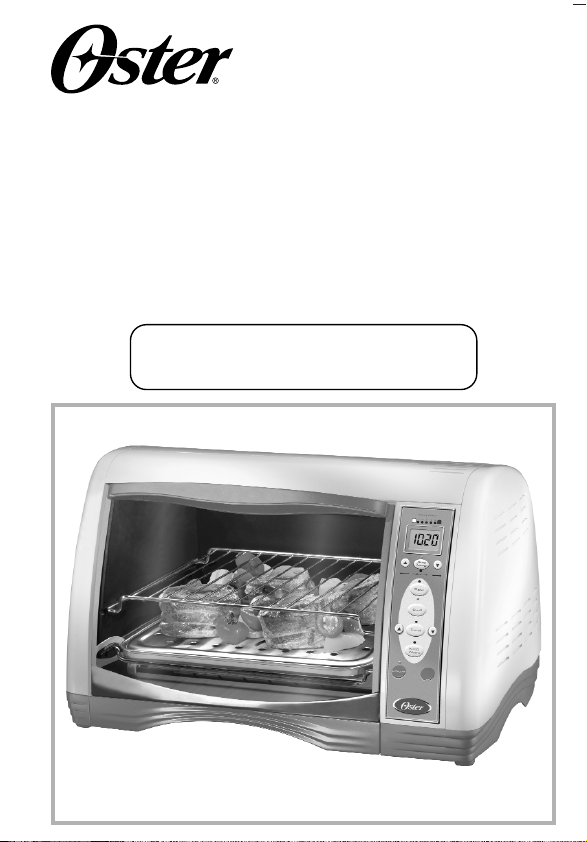
6-Slice Toaster Oven
Horno Tostador
de 6 Rebanadas
Grille-Pain Four
de 6 Tranches
6239
Visit us at www.oster.com
P.N. 111339
Page 2

IMPORTANT SAFEGUARDS
S
E
L
E
C
T
T
o
a
s
t
C
o
l
o
r
T
i
m
e
T
e
m
p
K
e
e
p
W
a
r
m
B
a
k
e
B
r
o
i
l
T
o
a
s
t
S
T
A
R
T
S
T
O
P
Keep
W
arm
Bake
Broil
Toa s t
Toast Color
When using electrical appliances, basic safety precautions should always be followed
including the following:
READ ALL INSTRUCTIONS BEFORE USE
• Do not touch hot surface. Use oven handles or knobs. Always use oven mitts when handling
hot materials and allow metal parts to cool before cleaning. Allow the unit to cool thoroughly
before putting in or taking off parts.
• When the unit is not in use and before cleaning, unplug the toaster oven from the wall outlet.
N
OTE
: Make sure the oven is turned off before unplugging.
• To protect against electric shock, do not immerse cord, plug or any parts of the oven in water
or other liquids.
• Close supervision is necessary when this or any appliance is used near children. This appliance
is not for use by children.
• Do not operate this or any appliance with a frayed or damaged cord or plug or after the
appliance malfunctions or is dropped or has been damaged in any manner.
• Do not use attachments not recommended by the manufacturer; they may cause fire, electric
shock or personal injury.
• Do not use outdoors or for commercial purposes.
• Do not use this appliance for other than its intended use.
• Do not let cord dangle over the edge of a tabletop or countertop or to touch hot surfaces.
• Do not place appliance on or near a hot gas or electric burner, or in a heated oven or in a
microwave oven.
• Extreme caution should be used when using containers constructed of other than metal or glass.
• A fire may occur if the oven is covered or touching flammable materials, including curtains,
draperies, walls, and the like, when in operation. Do not store any item on the top of the oven
during operation.
• Do not store any materials, other than manufacturer’s recommended accessories, in this oven
when not in use.
• Do not place any flammable materials in the oven, such as paper, cardboard, plastic, or any
materials that may catch fire or melt.
• Do not cover the oven with metal foil. This will cause overheating of the appliance.
• Oversized foods or metal utensils must not be inserted in the appliance, as they may create
a fire or risk of electric shock.
• Do not clean with metal scouring pads. Pieces can break off the pad and touch electrical parts
involving a risk of electric shock.
• When broiling, use extreme caution when removing tray or disposing of hot grease or other
hot liquids.
• To turn this appliance off, return all controls to the “OFF” position.
• When operating the oven keep at least four inches of space on all sides of oven to allow for
adequate air circulation.
SAVE THESE INSTRUCTIONS
T
To reduce the risk of electrical shock, this appliance has a polarized plug (one blade is wider
than the other). This plug fits a polarized outlet only one way; if the plug does not fit fully into
the outlet, reverse the plug. If it still does not fit, contact a qualified electrician. Do not attempt
to defeat this safety feature.
F
OLD
HISUNITIS FORHOUSEHOLDUSEONLY
English-1 English-5English-4 English-6
Page 3
ELCOME
S
E
L
E
C
T
T
o
a
s
t
C
o
l
o
r
T
i
m
e
T
e
m
p
K
e
e
p
W
a
r
m
B
a
k
e
B
r
o
i
l
T
o
a
s
t
S
T
A
R
T
S
T
O
P
Keep
W
arm
Bake
Broil
Toa s t
Toast Color
Congratulations on your purchase of an OSTER®6-Slice Toaster Oven! To learn more
about OSTER
EARNING ABOUT YOUR TOASTER OVEN
L
®
products, please visit us at www.oster.com.
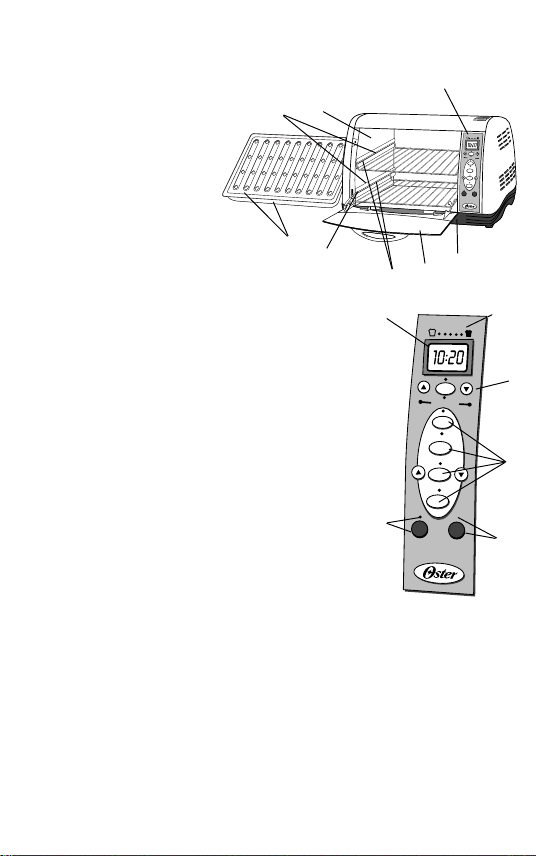
1. Digital Control Panel
W
1
3
7
1a. LCD Display
1b. Bake, Broil, Toast and Keep Warm
Buttons and Indicator Lights
1c. Toast Shade Setting Indicator
1d. Start Button and Indicator Light
1e. Stop Button and Indicator Light
1f. Timer and Temperature Setting
Button and Indicator Lights
2. Viewing Window
3. Continuous Clean Interior Walls
4. Baking Pan and Broiling Tray
5. Auto Advance Rack
4
5
6
1a
8
2
Toast Color
6. Two Rack Positions
7. Two Removable/Reversible Wire Racks
8. Removable Crumb Tray
TOASTER OVEN FEATURE BENEFITS
1. Digital Control Panel
1a. LCD Display – For easy viewing of temperature and time
settings
1b. Bake, Broil, Toast and Keep Warm Buttons and Indicator
Light – Buttons are easy to read and easy to use. The
indicator light will show what option (bake, broil, toast or
keep warm) has been selected.
1c.
Toast Shade Setting Indicator Light – Allows you to visually see
1d
Time
Temp
S
E
L
E
C
T
Bake
Broil
Toast
Keep
Warm
START
STOP
the toaster shade setting selected.
1d. Start Button and Indicator Light – Press this button to begin
all functions and the according indicator light will illuminate.
1e. Stop Button – Allows you to stop the baking, broiling,
toasting or keep warm function at any time.
1f. Timer and Temperature Setting Button – Allows you to toggle between the temperature
and timer setting. The buttons allow you to set the time and temperature you desire.
The “
▲” button allows you to increase the temperature or time and the “▼” button
to decrease the temperature or time.
2. Viewing Window – Allows you to see food cooking.
3. Continuous Clean Interior Walls – Allows food to dissipate off for easy cleaning.
4. Baking Pan and Broiling Tray – Makes all of your baking and broiling needs easy.
5. Auto Advance Rack – For easy and safe removal of cooked foods.
6. Two Rack Positions – To accommodate a wide variety of foods from pizza to tall roasts.
7. Two Removable/Reversible Wire Racks – To accommodate multiple foods and sizes.
8. Removable Crumb Tray – Allows for easy cleaning of crumbs and fallen food particles.
1c
1f
1b
1e
Page 4

PREPARING YOUR TOASTER OVEN
Keep
W
arm
Bake
Broil
Toa s t
Toast Color
If you are using your toaster oven for the first time, please be sure to:
• Remove any stickers from the surface of the oven.
• Open oven door and remove all printed documents and paper from inside the toaster oven.
• Clean the racks, tray, and pan with hot water, a small amount of dishwashing liquid and
a non-abrasive sponge or cleaning pad. DO NOT IMMERSE THE BODY OF THE UNIT
IN WATER.
• Dry the unit thoroughly before using.
• Select a location for the toaster oven. The location should be in an open area on a flat counter
where the plug will reach an outlet.
• Insert bottom rack over hooks on glass door so rack moves with door.
• Plug the toaster oven into an electrical outlet.
USING YOUR TOASTER OVEN
Plug the unit in, “- - -” will appear in the LCD. The indicator lights will not illuminate.
Every time that you press a button, your oven will make a confirmation beep.
N
OTE
: You will need to press one of the menu buttons “keep warm”, “broil”, “bake”,
or “toast” for the unit to start. Then you can set the Time and Temperature.
MENU BUTTONS
If you press one of the buttons from the four menus, “keep warm”, “broil”, “bake”, “toast”,
the corresponding indicator light will illuminate and the LCD will display the default time setting.
You will then be able to toggle between Time and Temperature with the Time/Temp button.
Time: Press the “
Temperature: Press the “
to decrease temperature.
The maximum cooking time is 120 minutes (2 hours), the time will appear in the LCD display.
” button to increase the time or press the “▼” button to decrease time.
▲
▲
” button to increase the temperature or press the “▼” button
START BUTTON
Press this button to begin all functions and the corresponding indicator light will illuminate.
If you do not press the “start” button within 30 seconds of choosing your menu selection,
the LCD display will go back to “- - -” and all indicator lights will turn off.
STOP BUTTON
Press this button to turn off the power. The display will revert to “- - -”. When the operation
is finished or you press the “stop” button, the unit will turn off, “- - -” will appear in the
LCD and all of the indicator lights will turn off.
English-3English-2
Page 5

EEPER FUNCTION
Keep
W
arm
Bake
Broil
Toa s t
Toast Color
B
(1) When you plug the unit in, the beeper sounds once and “ - - - ”appears in the LCD.
(2) When you press one of the four menu buttons the beeper will sound one time.
(3) When you press the adjustable button, every time you press the button, the beeper
will sound once. If you press the button continually, the beeper only sounds one time.
(4) When you press the start button the beeper will sound once, and “:” will flash, that means
the unit is in operation. Once the unit has begun the cooking cycle, the menu selection,
time or temperature cannot be changed. The unit must be stopped and reset.
(5) When the unit is in operation, press the stop button, the beeper will sound once and the unit
will stop operation.
(6) At the end of pre-set time, the unit will sound a long beep to remind you the work is done.
USING THE BAKE FUNCTION
• The bake function may be used to bake cake, cookies, poultry, beef and pork.
• When you select the bake function, the bake indicator light will illuminate.
– The default Time is 30 minutes.
– The default Temperature is 450°F.
• Both Time and Temperature are adjustable.
• Set the Time: The default Time will appear first on the LCD. Press the
to increase the time and the
minute increments. Once 5 minutes is reached, you have the option of decreasing in one minute
increments when you press “▼” (4 minutes, 3 minutes...).
• Set the Temperature: Press the Time/Temp button to set the Temperature. This button will toggle
between Time and Temperature. The default Temperature will appear on the LCD display.
the
“▲” button
Temperature changes in 25°increments each time you press
• Press Start – The unit starts working. The LCD displays the time. The “:” begins flashing
and the time starts counting down. Both top and bottom elements will heat up.
• When the baking cycle is complete, the unit will sound a long beep and turn the unit off
automatically. The “---“ will appear on the display and the “Bake” indicator light will turn off.
SING THE
U
• The broil function may be used to broil steak, fillets, poultry and other favorite foods
according to package or recipe instructions.
• When broiling, always use baking/broiling tray with the broiling insert.
• Close the door to the first notch, leaving approximately a 3-inch gap at the top.
• When you select the broil function, the broil indicator light will illuminate.
– The default Time is 30 minutes.
– The default Temperature is 450
• The Time is adjustable. Time will
reached, you have the option of decreasing in one minute increments when you press “
(4 minutes, 3 minutes...).
• Set the Time: The default Time will appear first on the LCD. Press the
to increase the time and
N
OTE
to increase the temperature and
BROIL FUNCTION
:
During broiling, only top heating element will heat up.
“▼” button
“▼” button
to decrease the time. Time will
“▼” button
°
F. The temperature cannot be adjusted.
“▲” or “▼” in 5 minute increments. Once 5 minutes is
to decrease the time.
to decrease the temperature.
“
▲
“▲” or “▼”.
“
▲
” button
“▲” or “▼” in 5
Press
”
▼
” button
Page 6

• Press Start – The unit starts working. The LCD displays the time. The “:” begins flashing
Keep
W
arm
Bake
Broil
Toa s t
Toast Color
and the time starts counting down.
• When the broiling cycle is complete, the unit will sound a long beep and turn the unit off
automatically. The “---” will appear on the display and the “Broil” indicator light will turn off.
USING THE
KEEP WARM FUNCTION
• The keep warm function is for defrosting foods or keeping food warm.
OTE
: For best results, do not set the timer more than 60 minutes because the food will
N
no longer warm but overcook.
• When you select the Keep Warm function, the Keep Warm indicator light will illuminate.
– The default Time is 30 minutes.
– The default Temperature is 150°F and is NOT adjustable.
• Time is adjustable and can be set at a maximum of 120 minutes. Time will
in 5 minute increments.
one minute increments when you press “
Once 5 minutes is reached, you have the option of decreasing in
” (4 minutes, 3 minutes . . . ).
▼
• Set the Time: The default Time will appear first on the LCD. Press the
to increase the time and
“▼” button
to decrease the time.
“▲” or “▼”
“▲” button
• Set the Temperature: Press the Time/Temp button to set the Temperature. This button will
toggle between Time and Temperature. The default Temperature will appear on the LCD.
• Press Start – The unit starts working. The LCD displays the setting time. The “:” begins
flashing and the time starts counting down. Both top and bottom elements will heat up.
• When the Keep Warm cycle is complete, the unit will sound a long beep and turn the unit off
automatically. The “ – – – ” will appear on the display and the “Key Warm” indicator light
will turn off.
USING THE TOAST FUNCTION
• The toast function may be used to toast bread, muffins and waffles or your favorite recipe
according to package or recipe instructions.
• When you select the Toast function, the toast indicator light will illuminate.
• The default temperature is 450°F. The temperature is not adjustable.
• Set the Toast Shade Setting: (See Figure 1) The default setting is
the lightest toast shade option. Press the
on either side of the Toast button. Press the
increase the toast shade and
“▼” button
shade. The toast shade indicator lights above the LCD panel
will illuminate. (See Figure 2)
NOTE: No default time or temperature will appear when the
Time/Temperature button is pressed. The Toast Shade setting
can only be adjusted with the toast
• Press Start – The unit starts working. The LCD displays the
setting time. The “:” begins flashing and the time starts
counting down. After the temperature appears on LCD for
30 seconds, the LCD will go back to show time automatically.
• When the toasting cycle is complete, the unit will sound a long
beep and turn the unit off automatically. The “
on the display and the “Toast” indicator light will turn off.
“▲” or “▼”
“▲” button
buttons
to
to decrease the toast
“▲” or toast “▼” button.
–––
” will appear
IGURE 1
F
F
IGURE 2
Page 7

POSITIONING
To accommodate a wide variety of foods the oven has two reversible racks and two rack
positions. The racks can be inserted in the oven in the up position or down position. The racks
will fit into either of the rack guides inside of the toaster oven (see Figure).
Before removing the racks allow the unit to cool.
To remove a rack, open the oven door and pull the rack towards the front of the oven. The rack
will slide on the rack guides on the inside of the oven.
Positioning of the rack will depend on the size of the food and desired browning.
OTE
N
IPS
T
Adjust rack downward to prevent top browning and upward to prevent bottom burning.
For best toasting results, position the rack in the up position on the lower rack guide.
When broiling, position the rack in the up position on the upper rack guide.
To replace the rack in the oven, align rack in rack guide and slide toward the back of the oven.
OTE
N
RACKS
: Lower rack will not auto advance unless the rack is inside hooks on the glass door.
:
: Heating elements may cycle ON and OFF to maintain the desired temperature.
CLEANING YOUR TOASTER OVEN
Before cleaning your OSTER®Toaster Oven, unplug it and allow it to cool. To clean, wipe with
damp cloth. DO NOT IMMERSE IN WATER! Make sure to use only mild, soapy water.
Abrasive cleaners, scrubbing brushes and chemical cleaners will damage the continuous clean
coating on this unit. Empty crumb tray frequently to avoid accumulation of crumbs.
STORING YOUR TOASTER OVEN
Allow the appliance to cool completely before storing. If storing the toaster oven for long periods
of time make certain that the toaster oven is clean and free of food particles. Store the toaster
oven in a dry location such as on a table or countertop or in a cupboard shelf. Wind the
electrical cord around the cord storage brackets. Other than the recommended cleaning,
no further user maintenance should be necessary.
Page 8

One-Year Limited Warranty
S
E
L
E
C
T
T
o
a
s
t
C
o
l
o
r
T
i
m
e
T
e
m
p
K
e
e
p
W
a
r
m
B
a
k
e
B
ro
il
T
o
a
s
t
S
T
A
R
T
S
T
O
P
S
E
L
E
C
T
Toast Color
Time
Temp
Keep
Warm
Bake
Broil
Toast
START
STOP
unbeam Products, Inc., or if in Canada, Sunbeam Corporation (Canada) Limited (collectively “Sunbeam”)
S
warrants that for a period of one year from the date of purchase, this product will be free from defects
material and workmanship. Sunbeam, at its option, will repair or replace this product or any component
the product found to be defective during the warranty period. Replacement will be made with a new
remanufactured product or component. If the product is no longer available, replacement may be made
with a similar product of equal or greater value. This is your exclusive warranty.
This warranty is valid for the original retail purchaser from the date of initial retail purchase and is not
transferable. Keep the original sales receipt. Proof of purchase is required to obtain warranty
performance. Sunbeam dealers, service centers, or retail stores selling Sunbeam products do not have
the right to alter, modify or any way change the terms and conditions of this warranty.
This warranty does not cover normal wear of parts or damage resulting from any of the following:
negligent use or misuse of the product, use on improper voltage or current, use contrary to the operating
instructions, disassembly, repair or alteration by anyone other than Sunbeam or an authorized Sunbeam
service center. Further, the warranty does not cover: Acts of God, such as fire, flood, hurricanes and
tornadoes.
in
of
or
What Are the Limits on Sunbeam’s Liability?
Sunbeam shall not be liable for any incidental or consequential damages caused by the breach of any
express, implied or statutory warranty or condition.
Except to the extent prohibited by applicable law, any implied warranty or condition of merchantability
or fitness for a particular purpose is limited in duration to the duration of the above warranty.
Sunbeam disclaims all other warranties, conditions or representations, express, implied, statutory or otherwise.
Sunbeam shall not be liable for any damages of any kind resulting from the purchase, use or misuse of, or
inability to use the product including incidental, special, consequential or similar damages or loss of profits, or
for any breach of contract, fundamental or otherwise, or for any claim brought against purchaser by any other
party.
Some provinces, states or jurisdictions do not allow the exclusion or limitation of incidental
or consequential damages or limitations on how long an implied warranty lasts, so the above
limitations or exclusion may not apply to you.
This warranty gives you specific legal rights, and you may also have other rights that vary from
province to province, state to state or jurisdiction to jurisdiction.
How to Obtain Warranty Service
In the U.S.A. –
If you have any question regarding this warranty or would like to obtain warranty service,
please call 1.800.334.0759 and a convenient service center address will be provided to you.
In Canada –
If you have any question regarding this warranty or would like to obtain warranty service,
please call 1.800.667.8623 and a convenient service center address will be provided to you.
In the U.S.A., this warranty is offered by Sunbeam Products, Inc., located in Boca Raton,
Florida 33431. In Canada, this warranty is offered by Sunbeam Corporation (Canada) Limited,
located at 5975
PLEASE DO NOT RETURN THIS PRODUCT TO ANY OF
Falbourne Street
, Mississauga, Ontario L5R 3V8.
THESE ADDRESSES OR TO THE PLACE OF PURCHASE.
English-7 Español-2 Español-3Español-1
Page 9

For product questions contact:
S
E
L
E
C
T
T
o
a
s
t
C
o
l
o
r
T
i
m
e
T
e
m
p
K
e
e
p
W
a
r
m
B
a
k
e
B
ro
il
T
o
a
s
t
S
T
A
R
T
S
T
O
P
S
E
L
E
C
T
Toast Color
Time
Temp
Keep
Warm
Bake
Broil
Toast
START
STOP
Sunbeam Consumer Service
USA : 1.800.334.0759
Canada : 1.800.667.8623
www.oster.com
©2003 Sunbeam Products, Inc. All rights reserved.
OSTER®is a registered trademark of Sunbeam Products, Inc.
Distributed by Sunbeam Products, Inc., Boca Raton, FL 33431
Pour les questions de produit:
Sunbeam Consumer Service
États-Unis : 1.800.334.0759
Canada : 1.800.667.8623
www.oster.com
©2003 Sunbeam Products, Inc. Tous droits réservés.
OSTER®est une marque déposée de Sunbeam Products, Inc.
Distribué par Sunbeam Products, Inc., Boca Raton, Florida 33431
Para preguntas sobre los productos llame:
Sunbeam Consumer Service
EE.UU. : 1.800.334.0759
Canadá : 1.800.667.8623
www.oster.com
©2003 Sunbeam Products, Inc. Todos los derechos reservados.
OSTER®es una marca registrada de Sunbeam Products, Inc.
Distruibido por Sunbeam Products, Inc., Boca Raton, FL 33431
ay
m
bbbboooobb
09.37
30
2
003
bb
Printed in China Imprimé en Chine Impreso en China
 Loading...