

Page 1
MODEL/MODÈLE
MODEL/MODÈLE
MODELO
MODELO
Instruction Manual
6052
6052
MULTI-FUNCTION OVEN
READ ALL INSTRUCTIONS BEFORE USING THIS APPLIANCE
Manuel d’Instructions
FOUR A MULTI-FONCTIONS
LIRE TOUTES LES INSTRUCTIONS AVANT D ’ UTILISER CET APPAREIL
Manual de Instrucciones
HORNO MULTI-FUNCION
LEA TODAS LAS INSTRUCCIONES ANTES DE USAR ESTE APARATO
Manual de Instruções
FORNO MULTI-FUNÇÃO
LEIA TODAS AS INSTRUÇÕES ANTES DE USAR ESTE APARELHO
Page 2

IMPORTANT SAFEGUARDS
When using electrical appliances, basic safety precautions should always be followed
including the following:
READ ALL INSTRUCTIONS, PRODUCT LABELS AND WARNINGS BEFORE USING
THE MULTI-FUNCTION OVEN.
• DO NOT touch hot surfaces. Always use oven mitts when handling hot materials and
allow metal parts to cool before cleaning. Allow the unit to cool thoroughly before
putting in or taking off parts. Always use the oven handles when moving the unit.
• When the unit is not in use and before cleaning, unplug the oven from the wall outlet.
Note: Make sure the oven is turned off before unplugging.
• To protect against risk of electrical shock, do not immerse the appliance in water or any
other liquids.
• Close supervision is always necessary when this or any appliance is used near
children. This appliance is not for use by children.
• DO NOT operate this or any appliance with a frayed or damaged cord or plug or after
the appliance malfunctions or is dropped or has been damaged in any manner. Take
this appliance only to the nearest Authorized Oster® Service Center for examination,
repair or adjustment.
• DO NOT use attachments not recommended by the manufacturer; they may cause fire,
electric shock or personal injury.
• DO NOT use outdoors or for commercial purposes.
• DO NOT use this appliance for other than its intended use.
• DO NOT let the cord dangle over the edge of a tabletop or countertop or touch hot
surfaces.
• DO NOT place the appliance near a hot gas or electric burner or in a heated oven.
• Extreme caution should be used when using containers constructed of material other
than metal or glass.
• A fire may occur if the toaster oven is covered or touching flammable materials,
including curtains, draperies, walls, etc., when in operation. Do not store any items on
top of the appliance when in operation.
• When using the oven, pull the unit out a minimum of 15 cm (6 inches) away from walls
on all sides. Remove cords from other products from behind the oven.
• DO NOT store any materials, other than manufacturer’s recommended accessories, in
this unit when not in use.
• DO NOT place any flammable materials in oven, such as paper, cardboard, plastic or
any materials that may catch fire or melt.
• DO NOT cover the oven with metal foil. This will cause overheating of the appliance.
1
Page 3

• Oversized foods or metal utensils must not be inserted in the appliance as they may
create a fire or risk of electrical shock.
• DO NOT clean with metal scouring pads. Pieces can break off the pad and touch
electrical parts involving a risk of electrical shock.
• When broiling, use extreme caution when removing tray or disposing of hot grease.
• The door and the outer surface may get hot when appliance is used.
• To turn this appliance off, return all controls to the off “O” position.
THIS UNIT IS FOR HOUSEHOLD USE ONLY.
SAVE THESE INSTRUCTIONS
(For 120 & 127 Volts Only)
To reduce the risk of electrical shock, this appliance has a polarized plug (one blade is
wider than the other). This plug fits a polarized outlet only one way. This is a safety
feature intended to help reduce the risk of electrical shock. If the plug does not fit fully
into the outlet, reverse the plug. If it still does not fit, contact a qualified electrician.
Do not attempt to defeat this safety feature.
SHORT POWER SUPPLY CORD INSTRUCTIONS
A short power-supply cord is provided to reduce the risk resulting from becoming
entangled in or tripping over a longer cord. An extension cord may be used if care is
exercised in its use. If an extension cord is used, the electrical rating of the cord must be
at least as great as the electrical rating of the appliance. The extension cord should be
arranged so that it will not drape over the countertop or tabletop where it can be pulled on
by children or tripped over unintentionally.
2
Page 4

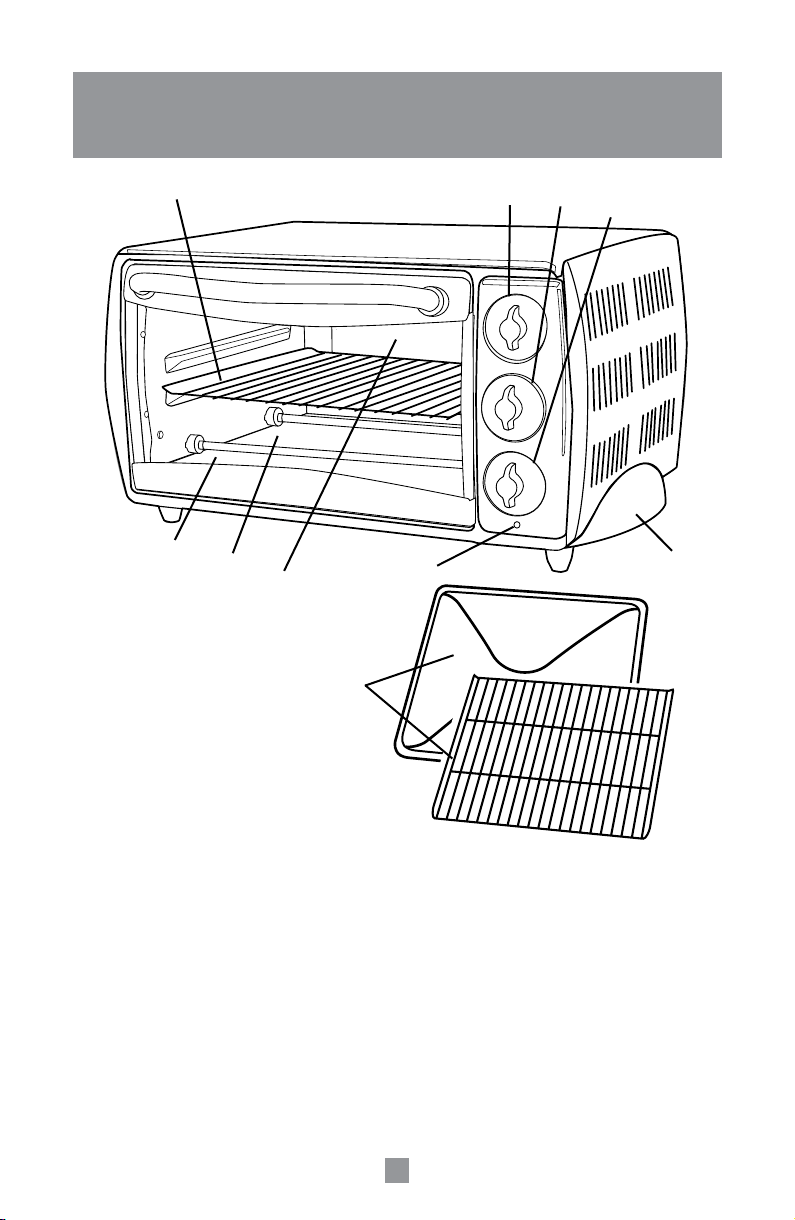
DESC RIPTION OF THE APPLIANC E
1
7
8
9
10
5
2
4
3
6
1. One Removable/Reversible Wire Rack
2. Temperature Selector Knob
3. Function Selector Knob
4. Timer Control Knob
5. Power Light
6. Cool-Touch Side Handles
7. Removable Crumb Tray
8. Glass Door
9. Easy Clean Interior Walls
10. Baking Pan and Broiling Rack
3
Page 5
LEARNING ABOUT YOUR MULTI-FUNCTION OVEN
1. Removable/Reversible Wire Rack – To accommodate a wide variety of foods the
oven has one reversible rack.
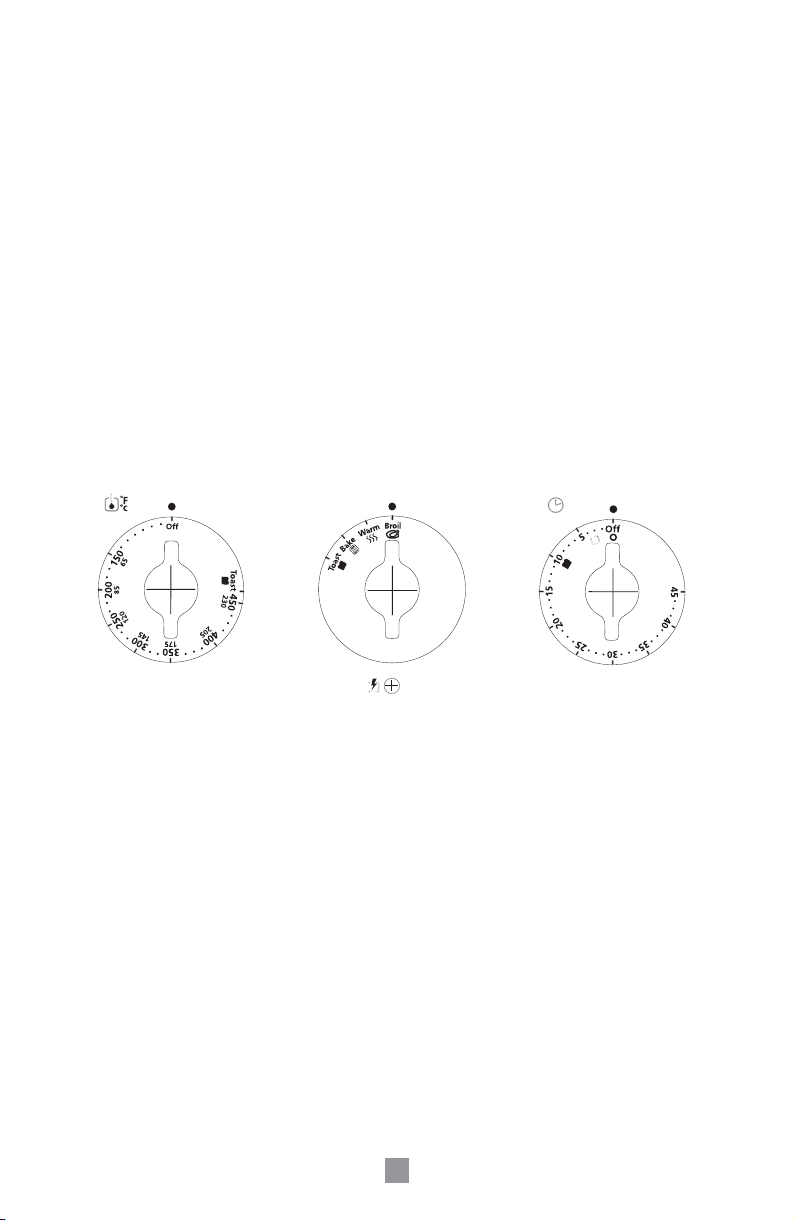
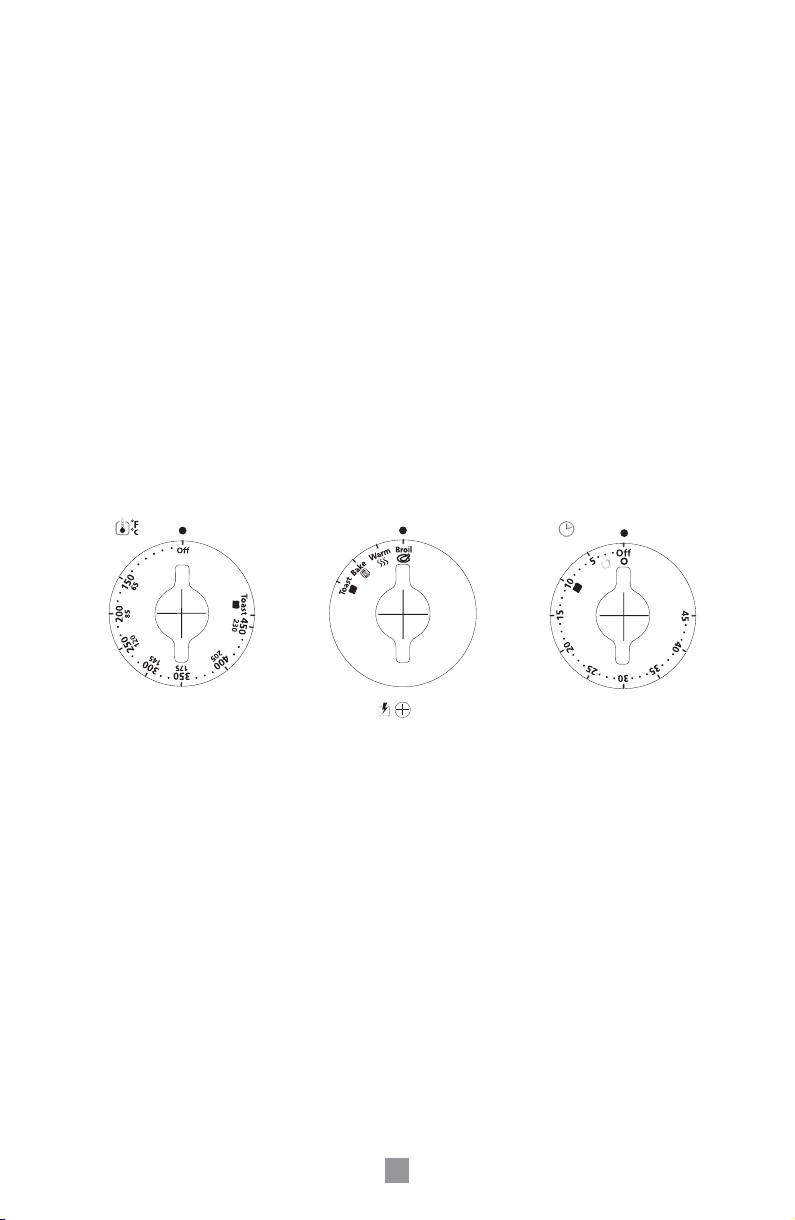
2. Temperature Selector Knob – Adjust the thermostat dial to the desired temperature.
(See Figure 1)
3. Function Selector Knob – Select cooking function by turning knob to desired setting.
(See Figure 2)
4. Timer Selector Knob – Allows to adjust the dial to the desired time for up to 45
minutes. Oven will automatically shut off when cooking is completed. (See Figure 3)
5. Power Light – Indicates that oven is plugged in and that the timer is set to begin
warming.
6. Cool-Touch Side Handles – For easy movement of the oven.
7. Removable Crumb Tray – For crumb or fallen food particles collection. Pulls out for
easy cleaning.
8. Glass Door – Allows you to see food while is cooking.
9. Easy Clean Interior Walls – Allows for easy cleaning.
10. Baking Pan and Broiling Rack – Use for all your baking, broiling and grilling needs.
Figure 1 Figure 2 Figure 3
PREPARING TO USE YOUR MULTI-FUNCTION
OVEN FOR THE FIRST TIME
If you are using your multi-function oven for the first time, please be sure to:
Remove any stickers from the surface of the oven. Open oven door and remove all
printed documents and paper from inside the toaster oven. Clean the rack, tray, and pan
with hot water, a small amount of dishwashing liquid and a non-abrasive sponge or
cleaning pad.
DO NOT IMMERSE THE BODY OF THE UNIT IN WATER.
Dry the unit thoroughly before using.
Select a location for the oven. The location should be in an open area on a flat counter
where the plug will reach an outlet. Plug the oven into the appropriate electrical outlet.
4
Page 6

USING YOUR MU LTI-FUNCTI ON OVEN
Preheating the Oven
Place oven rack into the desired position before heating the oven.
(See “Positioning Rack” Section)
Turn the temperature control knob to the desired temperature.
Turn the function selector knob to the desired setting.
Set the timer knob to desired time and allow 7 – 9 minutes for the oven to preheat.
To Use the Warm Function
NOTE: The warm function is for warming and keeping food warm after heating.
Select desired oven rack position. (See “Positioning Rack” Section)
Arrange food on the wire rack or in the baking pan.
Turn the temperature control knob to the desired temperature.
Turn the function selector knob to the warm “ ” setting. Only the bottom heater
element will operate. (The heater element will cycle ON and OFF to maintain
temperature.) Turn the timer knob to the desired time. The timer can be set for up to 45
minutes. At the end of the cooking time a bell signal sounds and the oven turns off
automatically. To set the timer for less than 20 minutes, turn the timer past the 20-minute
mark to engage timer switch and then turn it back to desired time; it can then be set for
cooking that will only require a few minutes.
When warming is completed, open door fully and remove food carefully.
WARNING: Cooked food can be very hot, especially pastry fillings. Handle with care.
To Use the Variable Broil Function
Select desired oven rack position. (See “Positioning Rack” Section)
Place broil rack in oven pan to use it as broiler pan.
Arrange food on broiler rack.
Place broiler pan on oven rack.
Close the door to the first notch, leaving approximately a 7.6 cm (3-inch) gap at the top.
This will insure adequate airflow during broiling.
Turn the temperature control knob to the desired temperature.
Turn the function selector knob to the broil “ ” setting. Only the top heater element will
operate.
Turn the timer knob to the desired time. (The timer can be set to STAY ON or for up to
45 minutes.) At the end of the cooking time a bell signal sounds and the oven turns off
automatically. To set the timer for less than 20 minutes, turn the timer past the 20-minute
mark to engage timer switch and then turn it back to desired time; it can then be set for
cooking that will only require a few minutes.
Turn food over about halfway through the broiling time.
When broiling is completed, open door fully and remove food carefully.
WARNING: Do not leave the oven unattended.
5
Page 7

To Use the Bake Function
Select desired oven rack position. (See “Positioning Rack” Section)
Arrange food on the wire rack or in the baking pan.
Turn the temperature control knob to the desired temperature.
Turn the function selector knob to the bake “ ” setting. Both the top and bottom heater
elements will operate.
Turn the timer knob to the desired time. At the end of the cooking time a bell signal
sounds and the oven turns off automatically. To set the timer for less than 20 minutes,
turn the timer past the 20-minute mark to engage timer switch and then turn it back to the
desired time; it can then be set for cooking that will only require a few minutes.
NOTE – The top-heating element will cycle ON and OFF to maintain the desired
temperature.
When baking is completed, open door fully and remove food carefully.
Defrosting Tip – When defrosting do not preheat oven. Turn Temperature Control to
120°C (250°F). Allow 15 to 20 minutes per side for meats or fish to defrost. Always cook
food promptly after thawing.
To Use the Toast Function
Select desired oven rack position. (See “Positioning Rack” Section)
NOTE – Different types of bread require different settings. Lighter breads and waffles
require a lighter setting. Darker breads, muffins, and English muffins require a darker
setting.
Arrange food on the wire rack:
1. Turn the temperature control knob to the toast “ ” setting.
2. Turn the function selector knob to the toast “ ” setting. Both the top and bottom heater
elements will operate.
3. To set the timer, turn the timer past the 20-minute mark to engage timer switch and set
back to desired toast setting.
When toasting is completed, open door fully and remove food carefully.
NOTE – The top-heating element will cycle ON and OFF to maintain the desired
temperature.
WARNING: Cooked food can be very hot. Handle with care. Do not leave Oven
unattended.
6
Page 8
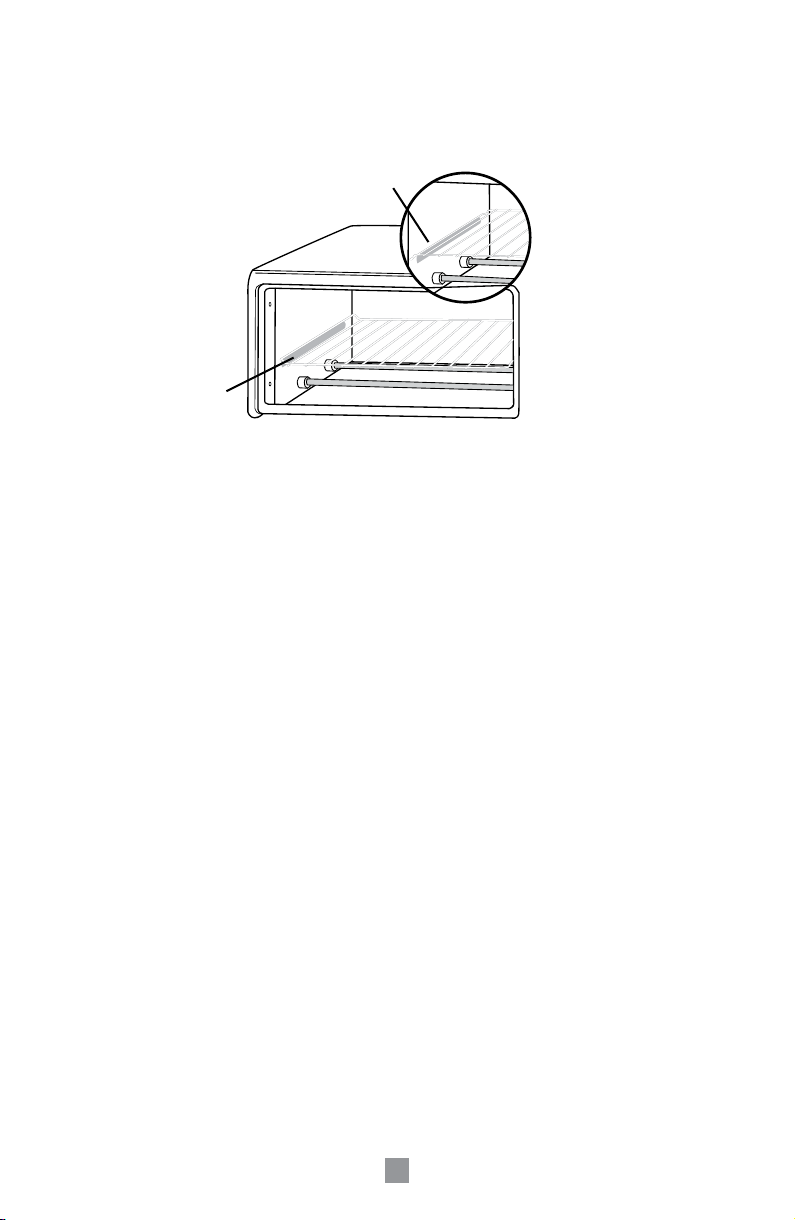
Positioning Rack
To accommodate a wide variety of foods, the oven has a reversible rack. The rack can
be inserted in the oven in the up position or down position in the bottom rack guide inside
the oven. (See Figure 4)
Rack in the
down position
Before removing the rack allow the unit to cool.
To remove the rack, open the oven door and pull the rack towards the front of the oven.
Positioning of the rack will depend on the size of the food and desired browning.
Rack in the up
position
Figure 4
CLEANING YOUR MULTI-FUNCTION OVEN
Before cleaning your Oster® Multi-Function Oven, unplug it and allow it to cool. To clean,
wipe with damp cloth. DO NOT IMMERSE IN WATER! Make sure to use only mild, soapy
water. Abrasive cleaners, scrubbing brushes and chemical cleaners will damage the
continuous clean coating on this unit. Empty crumb tray frequently to avoid accumulation of crumbs. Oven racks are dishwasher safe (top of dishwasher only). Other than the
recommended cleaning, no further user maintenance should be necessary.
STORING YOUR MULTI-FUNCTION OVEN
Allow the appliance to cool completely before storing. If storing the oven for long periods
of time make certain that it is clean and free of food particles. Store the oven in a dry
location such as on a table or countertop or cupboard shelf.
7
Page 9
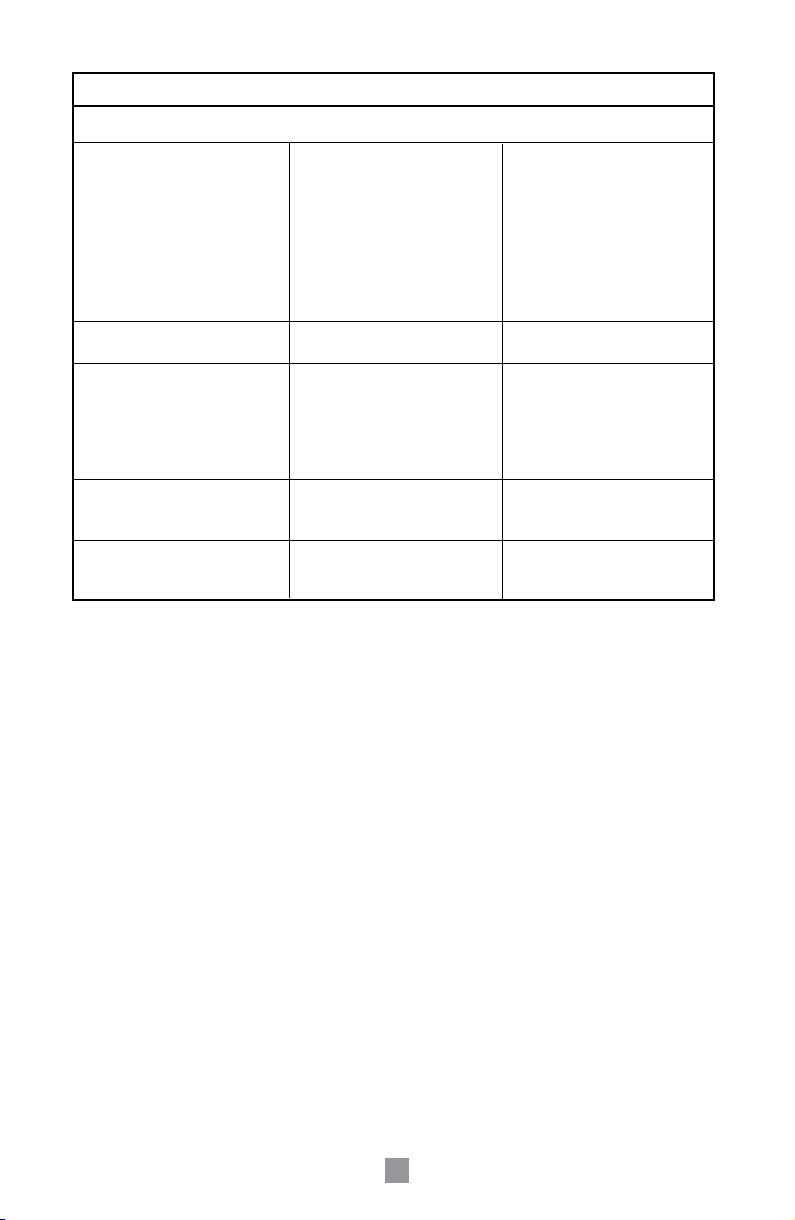
HELPFUL TIPS/ TROUBLESHOOTING
PROBLEM
• Overcooked / undercooked foods.
• Burnt smell.
• Oven does not turn ON.
• Only one heating element is heating
up.
• Heating elements do not stay ON.
POTENTIAL CAUSE
• Incorrect temperature or time
setting.
• Rack placement.
• Food build-up inside oven, on
heating elements or in crumb tray.
• Unit is unplugged.
• Function setting selection
determines which heating element
will operate.
• Heating elements will cycle ON and
OFF to maintain proper heat.
SOLUTION
• You may have to adjust the time and
temperature to the desired taste.
• Because your oven is smaller than
your regular oven, it will heat up
faster and generally cook in shorter
periods of time.
• Refer to “Positioning Rack” Section.
Rack may need to be adjusted to
accommodate food type.
• Refer to “Cleaning Your Toaster
Oven” Section.
• Plug the toaster oven into
appropriate electrical outlet.
• Set timer knob and temperature
knob to the desired setting. Both
must be turned on to operate the
toaster oven.
• When toasting, make sure the oven
is not set to broil setting.
• Be certain that function is as
desired.
8
Page 10

IMPORTANTES MESURE S DE SE CURITE
Lors de l’utilisation d’un appareil électroménager, prenez toujours les precautions de
base, ainsi que celles qui suivent:
LISEZ SOIGNEUSEMENT TOUTES LES DIRECTIVES, LES ÉTIQUETTES ET LES
MISES EN GARDE AVANT DE VOUS SERVIR DU FOUR A MULTI-FONCTIONS.
• Ne touchez pas les surfaces chaudes. Portez toujours des gants de cuisine lorsque
vous maniez un appareil chaud. Laissez les pièces métalliques de l’appareil refroidir
avant de le nettoyer.
• Lorsque vous n’utilisez pas le Four a Multi-Fonctions et avant de le nettoyer,
débranchez le cordon. REMARQUE: Assurez-vous bien de couper le courant du Four a
Multi-Fonctions avant de le débrancher.
• Pour vous protéger contre les risques d’électrocution, ne plongez pas le Four a Multi Fonctions dans l’eau ou tout autre liquide.
• Assurez-vous de surveiller étroitement les enfants lorsque le Four a Multi-Fonctions est
utilize dans leur présence. Cet appareil n’est pas prévu pour un usage par des enfants.
• Ne mettez pas le Four a Multi-Fonctions, ni aucun autre appareil électrique, sous
tension si le cordon est effiloché ou la fiche du cordon est endommagée. N’essayez
pas de le faire fonctionner s’il est défectueux, tombé à terre ou endommagé. En cas de
réparation, veuillez retourner cet appareil uniquement au Centre de Service autorisé
Oster® le plus proche de chez vous.
• N’utilisez jamais de pièces de rechange non recommandées par le fabricant, car elles
pourraient causer un incendie, un choc électrique ou des blessures corporelles.
• N’utilisez pas le Four a Multi-Fonctions à l’extérieur à des fins commerciales.
• N’utilisez pas cet appareil à des fins autres que celles spécifiquement prévues.
• Ne laissez pas le cordon pendre du bord de la table ou du comptoir. Ne le laissez pas
non plus entrer en contact avec des surfaces chaudes.
• Ne placez pas le Four a Multi-Fonctions près d’un brûleur à gaz ou électrique ni d’un
four chaud.
• Faites preuve d’extrême prudence lors du maniement de contenants faits de metal ou
de verre.
• Un incendie risque de se déclarer si le Four a Multi-Fonctions est en fonctionnement
et entre en contact avec un objet inflammable (rideaux, draperie, mur, etc.) ou en est
recouvert. Ne placez pas d’articles sur l’appareil lorsqu’il est en fonctionnement.
• Lorsque le four grille-pain est en fonction, garder l’unité à une distance d’au moins
15 cm (6 po) des murs sur tous les côtés. Retirer les cordons d’alimentation des autres
appareils qui pourraient se trouver derrière le four grille-pain.
• Lorsque le Four a Multi-Fonctions n’est pas en fonctionnement, n’y entreposez pas
d’objets autres que les accessoires recommandés par le fabricant.
9
Page 11

• Ne placez pas d’objets inflammables à l’intérieur du Four a Multi-Fonctions, tels que
du papier, des cartons, des objets en plastique ou tout autre objet qui peut fonder et
s’enflammer.
• Ne recouvrez pas la plaque d’une feuille d’aluminium, car vous risquez de faire sur
chauffer l’appareil.
• N’introduisez pas d’aliments de grande dimension ni d’ustensiles en métal dans le Four
a Multi-Fonctions, car cela pourrait causer un incendie ou un choc électrique.
• N’utilisez jamais de tampons à récurer en métal. Des morceaux peuvent se detacher
et entrer en contact avec des pièces électriques de l’appareil, ce qui présente un risqué
d’électrocution.
• Lors de la cuisson au grilloir, faites preuve d’extrême prudence lorsque vous retirez la
plaque ou éliminez la graisse chaude.
• Il est possible que porte et surface extérieure deviennent brûlantes lorsque l’appareil
est en service.
• Mettez le Four a Multi-Fonctions hors tension et remettez toutes les commandes à la
position « ARRÊT » (O).
CET APPAREIL EST DESTINÉ À UN USAGE MÉNAGER UNIQUEMENT.
CONSERVEZ CES DIRECTIVES
(Uniquement pour 120 & 127 volts)
Pour diminuer le risque d’électrocution, cet appareil est muni d’une fiche polarisée (une
des lames est plus large que l’autre). Cette fiche ne convient qu’aux prises polarisées. Si
les lames ne rentrent pas dans la prise dans un sens, inversez les lames. Si la fiche n’y
rentre toujours pas, prenez contact avec un électricien qualifié. Ne pas tenter de modifié
la prise d’aucune façon.
RECOMMANDATIONS D’USAGE DU CABLE D’ALIMENTATION
Le câble d’alimentation est court afin de réduire les risques d’enchevêtrement et de
chute. Si vous utilisez une rallonge, faites preuve de prudence lors de son utilisation.
Si vous utilisez une rallonge, assurez-vous que le cordon a une puissance équivalente à
celle de l’appareil. Ne pas laisser pendre le câble d’alimentation sur le bord d’un comptoir
ou d’une table, un enfant pourrait tirer dessus ou s’y accrocher involontairement.
10
Page 12
DESCRIPTION DE L’AP PAREIL
1
7
8
9
10
5
2
4
3
6
1. Un Grille Amovible/Réversible
2. Sélecteur de Température
3. Témoin de Mise Sous Tension
4. Bouton de Minuterie
5. Poignées Latérales Froides au Toucher
6. Sélecteur de Fonction
7. Plateau pour les Miettes Amovible
8. Porte en Vitre
9. Murs Intérieurs Faciles à Nettoyer
10. Plat à Four et Grille de Lèchefrite
11
Page 13
SE RENSEIGNER SUR VOTRE MULTI-FONCTIONS FOUR
1. Grille Amovible/Réversible: Permet la cuisson d’une large variété d’aliments – le
four est équipé de un grille réversible.
2. Sélecteur de Température: Ajuster le thermostat à cadran à la température désirée.
(Voir Figure 1)
3. Bouton de Minuterie avec Sonnerie: Permet de sélectionner la fonction de cuisson.
Pour ce faire, il suffit de le régler sur la fonction souhaitée. (Voir Figure 2)
4. Bouton de Minuterie: Permet de régler le temps de cuisson jusqu’à 45 minutes. Une
fois le temps de cuisson écoulé, la minuterie met le four automatiquement HORS
tension. (Voir Figure 3)
5. Témoin de Mise sous Tension: Indique que le Four a Multi-Fonctions est branché
sur la prise d’alimentation électrique et que la minuterie est actionnée pour
commencer le chauffage.
6. Poignées Latérales Froides au Toucher: Permettent de facilement
déplacer le Four a Multi-Fonctions.
7. Plateau pour les Miettes Amovible: Sert à cueillir les miettes ou les particules
d’aliments. Il suffit de retirer le plateau et de l’essuyer pour un nettoyage facile de
votre Four a Multi-Fonctions.
8. Porte en Vitre : Permet d’observer la progression de la cuisson.
9. Murs intérieurs faciles à nettoyer: Assurent un nettoyage facile en tout temps.
10. Plat à Four et Grille de Lèchefrite: Servent à effectuer la cuisson et le
rôtissage de tous genres d’aliments.
Figure 1 Figure 2 Figure 3
PRÉPARATION DU FOUR A MULTI-FONCTIONS
À LA PREMIÈRE MISE EN SERVICE
Lors de la première utilisation de votre four a multi-fonctions, veuillez observer les consignes suivantes:
Retirez les vignettes de la surface de l’appareil.
Ouvrez le hublot et retirez du four le guide d’utilisation et les fiches techniques.
Nettoyez la grille, la plaque et le plat à four à l’aide de l’eau chaude, d’un detergent
liquide pour vaisselle et d’une éponge ou d’un tampon nettoyeur non abrasif.
NE PLONGEZ PAS LE BOÎTIER DU FOUR A MULTI-FONCTIONS DANS L’EAU.
Séchez soigneusement l’appareil avant de l’utiliser.
Choisissez un emplacement sécuritaire pour votre Four a Multi-Fonctions. Placez-le sur
un comptoir dégagé, permettant le branchement facile du cordon sur la prise murale.
Raccordez le Four a Multi-Fonctions à une prise électrique.
12
Page 14

UTILISATION DU FOUR A MULTI-FONCTIONS
Préchauffez le Four
Avant de chauffer le four, installez la grille au niveau désiré.
(Voir la rubrique « Emplacement de la grille »)
Tournez le sélecteur de température sur l’intensité désirée.
Tournez sélecteur de fonction sur le mode de cuisson désirée.
À l’aide du bouton de minuterie, choisissez le temps de cuisson voulue.
Ajoutez de 7 à 9 minutes pour le préchauffage du four.
Utilisation de la Fonction Maintien au Chaud
REMARQUE : CETTE FONCTION SERT À RÉCHAUFFER ET À CONSERVER AU
CHAUD LES ALIMENTS APRÈS LEUR CUISSON.
Sélectionnez le niveau désiré de la grille. (Voir la rubrique « Emplacement de la grille ».)
Placez les aliments sur la grille ou dans le plat à four.
Tournez sélecteur de température sur l’intensité désirée.
Tournez le sélecteur de fonction sur la position « MAINTIEN AU CHAUD » ( ). Seuls les
éléments de chauffage supérieurs sont mis en fonctionnement
continu. (Les éléments partie inférieure se mettent à basculer entre les positions «
MARCHE » et « ARRÊT » (On et Off) pour maintenir la température.)
Réglez le bouton de minuterie sur le temps de maintien au chaud désiré. Vous
pouvez choisir un maximum de 45 minutes. Une fois ce temps écoulé, la sonnerie se
déclenche et met le four automatiquement hors tension. Pour régler la minuterie sur un
délai de moins de 20 minutes, tournez-la de façon à dépasser la graduation de 20 minutes pour enclencher son mécanisme, puis revenez à la graduation désirée. Ainsi, vous
pouvez régler la minuterie sur quelques minutes de réchauffage seulement.
Une fois le réchauffage terminé, ouvrez la porte complètement et retirez les aliments tout
en prenant soin de ne pas vous brûler.
AVERTISSEMENT : LES ALIMENTS CHAUFFÉS PEUVENT ÊTRE TRÈS CHAUDS, EN
PARTICULIER LES FOURRAGES DE PÂTISSERIE. SOYEZ PRUDENT.
Utilisation de la Fonction Cuisson au Grilloir Variable
Sélectionnez le niveau désiré de la grille. (Voir la rubrique « Emplacement da la grille ».)
Insérez la grille lèchefrite dans le plat à four pour convertir ce dernier en un plat
lèchefrite.
Placez les aliments dans le plat pour les faire rôtir.
Placez le plat lèchefrite sur la grille du four.
Fermez la porte à la première encoche, ce qui laisse environ un écart de 8 cm (3 po)
dans le haut et assure une bonne circulation d’air lors de la cuisson au grilloir.
Tournez le sélecteur de température sur l’intensité désirée.
Tournez le sélecteur de fonction sur la position « CUISSON AU GRILLOIR » ( ).
Seul l’élément de chauffage supérieur est mis en fonctionnement continu.
Réglez le bouton de minuterie sur le temps de maintien au chaud désiré. (Le temps de
FONCTIONNEMENT maximal est de 45 minutes.) À la fin de la grillade, la sonnerie se
déclenche et met le four automatiquement hors tension. Pour régler la minuterie sur un
délai de moins de 20 minutes, tournez-la de façon à dépasser la graduation de 20 minutes pour enclencher son mécanisme, puis revenez à la graduation désirée. Ainsi, vous
pouvez régler la minuterie sur quelques minutes de cuisson seulement.
Une fois la moitié du temps de grillade écoulé, tournez les aliments pour les faire
rôtir de l’autre côté.
13
Page 15

Une fois la grillade terminée, ouvrez la porte complètement et retirez les aliments
tout en prenant soin de ne pas vous brûler.
AVERTISSEMENT : Ne laissez pas le grille-pain tour sans surveillance.
Utilisation de la Fonction Cuisson
Sélectionnez le niveau désiré de la grille. (Voir la rubrique « Emplacement de la grille ».)
Placez les aliments sur la grille ou dans le plat à four.
Tournez le sélecteur de température sur l’intensité désirée.
Tournez le sélecteur de fonction sur la position « CUISSON » ( ). Les elements de
chauffage supérieur et inférieur sont mis en fonctionnement.
Réglez le bouton de minuterie sur le temps de cuisson désiré. À la fin de la cuisson,
la sonnerie se déclenche et met le four automatiquement hors tension. Pour régler la
minuterie sur un délai de moins de 20 minutes, tournez-la de façon à dépasser la graduation de 20 minutes pour enclencher son mécanisme, puis revenez à la graduation désirée. Ainsi, vous pouvez régler la minuterie sur quelques minutes de cuisson seulement.
AVERTISSEMENT : Les aliments chauffés peuvent être très chauds, en particulier les
fourrages de pâtisserie. Soyez prudent.
Conseil sur la Décongélation – Une fois la cuisson terminée, ouvrez la porte
complètement et retirez les aliments tout en prenant soin de ne pas vous brûler.
Ne préchauffez pas le four pour la décongélation des aliments. Mettez le sélecteur de
température sur 120°C (250°F). Décongelez chaque côté de la viande ou du poisson
pendant 15 ou 20 minutes. Veillez à toujours faire cuire tout aliment immédiatement
après sa décongélation.
Utilisation de la Fonction Grille-Pain
Sélectionnez le niveau désiré de la grille. (Voir la Rubrique «Emplacement de la Grille ».)
REMARQUE : Divers types de pain nécessitent différents réglages d’intensité de
chaleur. Grillez les pains légers et les gaufres à faible température. Les pains bruns, les
muffins et les muffins anglais exigent une température élevée.
Placez les aliments sur la grille:
1. Tournez le sélecteur de température sur GRILLAGE. ( )
2. Tournez le sélecteur de fonction sur la position GRILLAGE. ( ) Les éléments de
chauffage supérieur et inférieur sont mis en fonctionnement.
3. Pour ce faire, tournez le bouton au-delà de la graduation de 20 minutes pour faire
s’enclencher la minuterie et revenez à la graduation désirée. Une fois le grillage
terminé, ouvrez la porte complètement et retirez les aliments tout en prenant soin de
ne pas vous brûler.
REMARQUE : Les éléments de chauffage supérieurs se mettent à basculer entre les
positions « MARCHE » et « ARRÊT » pour maintenir la température désirée.
AVERTISSEMENT : Les aliments chauffés peuvent être très chauds, en particulier les
fourrages de pâtisserie. Soyez prudent.
14
Page 16

Emplacement de la Grille
Pour effectuer la cuisson d’une large variété d’aliments, le four est équipé d’une
grille réversible. (Voir Figure 4)
Grille en position
haute
Grille en
position basse
Avant de retirer la grille, laissez l’appareil refroidir.
Pour retirer une grille, ouvrez la porte du four et tirez la grille vers l’avant. La grille
glissera sur les guide-grille du four.
L’emplacement de la grille dépend de la taille de l’aliment et du degré de rôtissage désiré.
Figure 4
NETTOYAGE DU FOUR A MULTI-FONCTIONS
Avant de nettoyer votre Four a Multi-Fonctions Oster®, débranchez-le et laissez-le
refroidir. Pour le nettoyer, essuyez-le à l’aide d’un chiffon humide. Ne plongez pas
l’appareil dans l’eau ! Utilisez uniquement de l’eau et un savon doux. Les nettoyants
abrasifs, les brosses d’astiquage et les nettoyants forts à base de produits chimiques
abîmeront l’enduit de nettoyage continu de votre Four a Multi-Fonctions. Videz
régulièrement le plateau de miettes pour éviter leur accumulation. Les grilles pour le Four
a Multi-Fonctions sont résistents au lave-vaisselle (partie supérieure de lave-vaisselle
seulement). À part le nettoyage recommandé, aucun autre entretien n’est requis.
RANGEMENT DU FOUR A MULTI-FONCTIONS
Laissez l’appareil refroidir complètement avant de l’entreposer. Pour l’entreposage à
long terme, assurez-vous que le Four a Multi-Fonctions est propre et exempt de toute
particule d’aliment. Rangez-le dans un endroit sec, tel qu’une table ou un comptoir ou la
tablette d’un placard.
15
Page 17

ASTUCES UTILES/DÉPANNAGE
PROBLÈME
• Aliments trop cuits/ne pas assez
cuits.
• Odeur d’aliments brûlés.
• Le four ne s’allume pas.
• Seul un élément de chauffage
fonctionne.
• Les elements de chauffage ne
demeurent pas allumés.
CAUSE PROBABLE
• Mauvais réglage de température ou
de temps de cuisson.
• Mauvais placement de la Grille.
• Accumulation de résidus alimen
taires à l’intérieur du four, sur les
éléments de chauffage et dans le
plateau de miettes.
• L’appareil est débranché.
• La sélection de fonction détermine
lequel des éléments sera mis en
fonctionnement.
• Les éléments inférieurs se mettent
à basculer entre les positions «
MARCHE » et « ARRÊT » (On et
Off) pour maintenir la bonne
température.
SOLUTION
• Vous devez modifier la température
et letemps de cuisson selon votre
goût.
• Puisque le Four a Multi-Fonctions
est plus petit qu’un four ordinaire, sa
puissance de chauffer est plus
rapide. Il fera donc cuire les
aliments dans des délais plus
courts.
• Reportez-vous à la rubrique «
Emplacement de la grille ». Il se
peut que l’emplacement des grilles
doive être changé pour convenir au
type d’aliment à faire cuire.
• Reportez-vous à la rubrique « Net
toyage du Four a Multi-Fonctions ».
• Branchez le Four a Multi-Fonctions
sur une prise électrique.
• Réglez le bouton de minuterie et
le sélecteur de température sur la
position souhaitée. Les deux doivent
être actionnés pour que le Four a
Multi-Fonctions puisse fonctionner
comme prévu.
• Lors d’un grillage, assurez-vous que
le four n’est pas réglé sur la position
Cuisson au grilloir.
• Assurez-vous d’avoir bien sélec
tionné la fonction du four selon le
mode de cuisson souhaitée.
16
Page 18

PRECAUCIONES IMPORTANTES
Cuando utilice su horno, siempre debe seguir precauciones básicas de seguridad,
incluyendo las siguientes:
LEA TODAS LAS INSTRUCCIONES, LAS ETIQUETAS DEL PRODUCTO Y LAS
ADVERTENCIAS, ANTES DE UTILIZAR SU HORNO MULTI-FUNCION.
• NO toque las superficies calientes. Siempre use guantes cuando maneje materiales
calientes y permita que las partes metálicas se enfríen antes de limpiar. Permita que
la unidad se enfríe completamente antes de poner o quitar partes. Siempre use las
asas del horno cuando mueva la unidad.
• Desconecte el horno del tomacorriente cuando la unidad no esté en uso y antes de
limpiarla. NOTA: Verifique que el horno esté apagado antes de desenchufarlo.
• Para protegerse contra una descarga eléctrica, no sumerja el artefacto en agua o en
otros líquidos.
• Es necesaria una supervisión continua cuando éste o cualquier otro artefacto esté
siendo utilizado cerca de los niños. Este artefacto no debe ser usado por los niños.
• Cuando use el horno, coloque la unidad a un mínimo de 15 cm (6 pulgadas) de la
pared en todos sus lados. Retire los cables de otros productos que se puedan
encontrar detrás del horno.
•
NO opere ningún artefacto con un cable o enchufe dañado, después de que el
artefacto haya fallado o si se cae al suelo o se daña de cualquier otra manera.
Regrese el artefacto al Centro de Servicio Oster® Autorizado más cercano para
examinarlo, repararlo o para ajustarlo mecánica o eléctricamente.
• NO utilice accesorios o aditamentos no recomendados por el fabricante, ya que
pueden causar incendios, descargas eléctricas o lesiones personales.
• NO utilice este artefacto al aire libre o para propósitos comerciales.
• NO utilice este artefacto más que para lo que ha sido diseñado.
• NO permita que el cable cuelgue sobre el borde de la mesa o mostrador o toque
superficies calientes.
• NO lo coloque sobre o cerca de quemadores de estufas de gas o eléctricas, tampoco
dentro de un horno caliente.
• Tenga extremo cuidado cuando use contenedores que no estén fabricados de vidrio o
de metal.
• Puede ocurrir un incendio si el horno está en operación y está en contacto o cubierto
con materiales inflamables, incluyendo cortinas, tapicería, paredes, etc. NO coloque
ningún objeto sobre el artefacto cuando esté funcionando.
• Cuando esta unidad no se esté utilizando, no almacene en su parte interior ningún
material que no sea un accesorio recomendado por el fabricante.
• NO coloque dentro del horno ningún material inflamable como papel, cartón, plástico o
cualquier material que se pueda incendiar o derretir.
17
Page 19

• NO cubra la bandeja para migas o ninguna parte del horno con papel aluminio o
metálico. Esto puede causar el sobrecalentamiento del artefacto.
• Los alimentos grandes o utensilios metálicos no deben ser introducidos en el horno
ya que pueden causar incendios o descargas eléctricas.
• NO limpie con esponjas o fibras metálicas. Se pueden desprender trozos de la
esponja o fibra y tocar partes eléctricas creando el riesgo de descargas eléctricas.
• Cuando ase alimentos, tenga extremo cuidado al remover la charola o desechar la
grasa caliente.
• La puerta y la superficie exterior pueden calentarse cuando el artefacto está en
funcionamiento.
• Para apagar este artefacto, coloque todos los controles en la posición de apagado “O”.
ESTA UNIDAD ESTA DISEÑADA SOLO PARA USO DOMESTICO.
CONSERVE ESTAS INSTRUCCIONES
(Para 120 y 127 Voltios Solamente)
Para reducir el riesgo de una descarga eléctrica, este artefacto cuenta con un enchufe
polarizado (una clavija es más ancha que la otra). Este enchufe entra sólo de una
manera en un tomacorriente polarizado. Si el enchufe no entra correctamente en el
tomacorriente, simplemente colóquelo al revés. Si todavía no entra, comuníquese con
un electricista competente. De ninguna manera intente modificar o forzar la conexión
diseñada como medida de seguridad.
USO DE UN CABLE ELECTRICO CORTO
Se incluye un cable eléctrico corto para evitar que se enrede o que cause tropiezos.
Un cable de extensión puede utilizarse con cuidado. Si se usa un cable de extensión, la
capacidad nominal marcada en el cable de extensión debe ser por lo menos igual o
mayor a la del artefacto. El cable de extensión debe colocarse de manera que no
cuelgue del mostrador o de la mesa, donde pueda causar tropiezos accidentalmente.
18
Page 20

DESCRIPCION DEL ARTEFACTO
1
7
8
9
10
5
2
4
3
6
1. Rejilla de Alambre Removible y Reversible
2. Perilla de Control de Temperatura
3. Perilla para Seleccionar la Función
4. Cronómetro
5. Luz de Encendido
6. Asas Laterales Frías al Tacto
7. Bandeja Removible para Migas
8. Puerta de Vidrio
9. Paredes Interiores Fáciles de Limpiar
10. Bandeja para Hornear y Rejilla Para Asar
19
Page 21

CONOCIENDO SU HORNO MULTI-FUNCION
1. Rejilla de Alambre Removible y Reversible – El horno cuenta con una rejilla
reversible que puede colocarse en dos posiciones para cocinar una amplia
variedad de alimentos.
2. Perilla de Control de Temperatura - Ajuste el termostato a la temperatura deseada.
(Ver Figura 1)
3. Perilla para Seleccionar la Función – Seleccione la función de cocción al girar la
perilla a la función deseada. (Ver Figura 2)
4. Cronómetro – Permite seleccionar el tiempo de cocción hasta por 45 minutos.
Automáticamente apagará el horno al final del tiempo de cocción. (Ver Figura 3)
5. Luz de Encendido – Indica que el horno está conectado y listo para iniciar el
calentamiento.
6. Asas Laterales Frías al Tacto – Para mover el horno fácilmente.
7. Bandeja Removible para Migas – Para recolectar las migas o partículas de
alimentos. Puede sacarse para limpiarla fácilmente.
8. Puerta de Vidrio – Permite observar la cocción de los alimentos.
9. Paredes Interiores Fáciles de Limpiar – Facilita la limpieza.
10. Bandeja para Hornear y Rejilla para Asar – Utilice para todas sus necesidades de
hornear, asar y cocinar a la parrilla.
Figura 1 Figura 2 Figura 3
PREPARANDOSE PARA USAR SU HORNO
MULTI-FUNCION POR PRIMERA VEZ
Si va a utilizar su horno multi-función por primera vez, asegúrese de lo siguiente:
Retire cualquier calcomanía de la superficie de su horno y límpiela con un paño húmedo.
Abra la puerta del horno y retire los documentos impresos y papeles del interior del
mismo. Limpie la rejilla, la bandeja para hornear y la bandeja de migas con agua caliente
y una pequeña cantidad de detergente líquido para lavar platos, utilice una esponja
suave y no abrasiva.
NO SUMERJA EL HORNO EN AGUA.
Seque completamente la unidad antes de utilizarla.
Seleccione un lugar para colocar el horno. El lugar debe ser una área abierta sobre un
mostrador con superficie plana donde el enchufe tenga alcance a un tomacorriente.
Enchufe el horno en el tomacorriente eléctrico correspondiente.
20
Page 22

USAND O SU HORNO M ULTI-FU NCION
Precalentando su Horno
Coloque la rejilla en la posición deseada antes de calentar el horno. (Ver la Sección
Colocando la Rejilla)
Gire la perilla de control de temperatura y colóquela en la temperatura deseada.
Gire la perilla para seleccionar la función hasta la función deseada.
Coloque la perilla del cronómetro en el tiempo de cocción deseado y permita que transcurran
de 7 a 9 minutos para que el horno se caliente previamente.
Utilizando la Función de Calentamiento
NOTA: La función de calentamiento es para mantener los alimentos tibios después de
calentarlos.
Seleccione la posición deseada de las rejillas. (Ver la Sección Colocando la Rejilla)
Coloque los alimentos sobre la rejilla metálica o dentro de la bandeja para hornear. Gire la
perilla de control de temperatura y colóquela en la temperatura deseada.
Gire la perilla para seleccionar la función a la posición de calentamiento “ ” . Solamente el
elemento calefactor de la parte superior estará en funcionamiento. (Los elementos
calefactores se encenderán y apagarán alternadamente para mantener la temperatura.)
Coloque la perilla del cronómetro en el tiempo de cocción deseado. Usted puede
seleccionar hasta 45 minutos. Al final del ciclo de cocción, emitirá una señal auditiva y el
horno se apagará automáticamente. Para fijar el cronómetro por menos de 20 minutos, gire el
cronómetro pasando la marca de los 20 minutos y así activará el interruptor del cronómetro;
puede fijarlo para cocinar alimentos que sólo requieren algunos minutos de cocción. Cuando
se haya completado el calentamiento, abra la puerta completamente y saque los alimentos
cuidadosamente.
ADVERTENCIA: Los alimentos pueden estar muy calientes, especialmente los rellenos
de los postres. Manéjelos con cuidado.
Utilizando la Función de Asado Variable
Seleccione la posición deseada de la rejilla. (Ver la Sección Colocando la Rejilla)
Coloque la rejilla para asar dentro de la bandeja para hornear y así tendrá una bandeja para
asar.
Coloque los alimentos en la rejilla para asar.
Coloque la bandeja para asar sobre la rejilla del horno.
Cierre la puerta colocándola en la primera marca, dejando abierto aproximadamente un
espacio de 7,6 cm (3 pulgadas) en la parte superior. Esto asegurará que el aire fluya de
manera adecuada durante el proceso de asado.
Gire la perilla de control de temperatura y colóquela en el nivel de temperatura deseado.
Gire la perilla para seleccionar la función a la posición de asar “ ”. Solamente el elemento
calefactor de la parte superior estará en funcionamiento.
Coloque la perilla del cronómetro en el tiempo de cocción deseado. (El cronómetro puede
seleccionarse para que esté OPERANDO hasta por 45 minutos.) Al final del ciclo de cocción,
emitirá una señal auditiva y el horno se apagará automáticamente. Para fijar el cronómetro
por menos de 20 minutos, gire el cronómetro pasando la marca de los 20 minutos y así
activará el interruptor del cronómetro; puede fijarlo para cocinar alimentos que sólo requieren
algunos minutos de cocción.
Volteé los alimentos aproximadamente a la mitad del ciclo de cocción.
Cuando se haya completado la cocción, abra la puerta completamente y retire los alimentos
cuidadosamente.
ADVERTENCIA: No deje el horno desatendido.
21
Page 23

Utilizando la Función de Horneado
Seleccione la posición deseada de las rejillas. (Ver la Sección Colocando la Rejilla)
Coloque los alimentos en la rejilla metálica o dentro de la bandeja para hornear.
Gire la perilla de control de temperatura al nivel deseado de temperatura.
Gire la perilla para seleccionar la función a la posición de hornear “ ”. Ambos elementos
calefactores, el superior y el inferior estarán en funcionamiento.
Coloque la perilla del cronómetro en el tiempo de cocción deseado. Al final del ciclo de
cocción, emitirá una señal auditiva y el horno se apagará automáticamente. Para fijar el
cronómetro por menos de 20 minutos, gire el cronómetro pasando la marca de los 20 minutos
y así activará el interruptor del cronómetro; puede fijarlo para cocinar alimentos que sólo
requieren algunos minutos de cocción.
NOTA – Los elementos calefactores superiores se encenderán y apagarán alternadamente
para mantener la temperatura. Cuando se haya completado el horneado, abra la puerta
completamente y saque los alimentos cuidadosamente.
Sugerencia para Descongelar – Cuando esté descongelando alimentos, no caliente el
horno previamente. Gire el control de temperatura y colóquelo en 120°C (250°F).
Utilizando la Función de Tostar
Seleccione la posición deseada de la rejilla. (Ver la Sección Colocando la Rejilla).
NOTA – Diferentes tipos de pan requieren de diferentes niveles de tostado. Los panes más
ligeros y wafles requieren un tostado más ligero. Los panes más oscuros, panqués y muffins
o panecillos ingleses requieren un tostado más oscuro.
Coloque el alimento en la rejilla:
Gire la perilla de control de temperatura al nivel de temperatura máxima “ ”.
1.
2. Gire la perilla para seleccionar la función a la posición de tostar “ ”. Ambos elementos
calefactores, el superior y el inferior estarán en funcionamiento.
3. Para fijar el cronómetro, gire el cronómetro pasando la marca de los 20 minutos y así
activará el interruptor del cronómetro y regréselo al nivel de tostado deseado. Coloque los
alimentos en la rejilla metálica.
Cuando se haya completado el tostado, abra la puerta completamente y saque las alimentos
cuidadosamente.
NOTA – Los elementos calefactores superiores se encenderán y apagarán alternadamente
para mantener la temperatura.
ADVERTENCIA: Los alimentos pueden estar muy calientes. Manéjelos con cuidado.
22
Page 24

Colocando la Rejilla
Para preparar una gran variedad de alimentos, el horno cuenta con una rejilla reversible.
La rejilla puede colocarse en el horno volteada hacia arriba o hacia abajo. (Ver Figura 4)
Rejilla volteada
hacia arriba
Rejilla
volteada
hacia abajo
Figura 4
Antes de remover la rejilla, permita que la unidad se enfríe.
Para remover la rejilla, abra la puerta del horno y hale la rejilla hacia al frente del
horno. La posición de la rejilla dependerá del tamaño de los alimentos y del dorado
deseado.
LIMPIANDO SU HORNO MULTI-FUNCION
Antes de limpiar su Horno Multi-Función Oster®, desconéctelo y permita que se enfríe.
Limpie con un paño suave y húmedo. ¡NO LO SUMERJA EN AGUA! Asegúrese
de usar solamente jabón suave y agua. Los limpiadores abrasivos, cepillos y
limpiadores químicos pueden dañar el recubrimiento de limpieza continua de esta
unidad. Vacíe la bandeja para migas frecuentemente para evitar la acumulación
de residuos. Las rejillas del horno pueden lavarse en lavadora de platos (la
parte superior del lavaplatos automático exclusivamente). No es necesario otro tipo de
mantenimiento que no se sea la limpieza recomendada en este manual.
GUARDANDO SU HORNO MULTI-FUNCION
Permita que el artefacto se enfríe completamente antes de guardarlo. Si va a guardar el
horno por períodos prolongados, asegúrese de que el horno no contenga partículas o
residuos de alimentos. Almacene el horno en un lugar seco como encima de una mesa o
mostrador, o sobre una repisa.
23
Page 25
PROBLEMAS Y SOLUCIONES
PROBLEMA
• Cocción excesiva o insuficiente de
los alimentos.
• Olor a quemado.
• El horno no inicia su operación.
• Solamente un elemento calefactor
se calienta.
• El elemento calefactor no se
mantiene encendido.
CAUSA POTENCIAL
• Temperatura o tiempo incorrectos.
• Posición de la rejilla.
• Acumulación de residuos de
alimentos en el interior del horno,
en los elementos calefactores o en
la rejilla para migas.
• La unidad está desconectada.
• La selección de la función determina
qué elemento calefactor operará.
• Los elementos calefactores se
encenderán y se apagarán para
mantener la temperatura adecuada.
SOLUCION
• Usted puede ajustar el cronómetro y
la temperatura al gusto.
• Porque su horno es más
pequeño que su horno regular,
entonces se calentará más
rápidamente y generalmente
cocinará en períodos de tiempo más
cortos.
• Consulte la Sección “Colocando la
Rejilla”.
• Las rejillas pueden necesitar
ajustarse para colocar los diferentes
tipos de alimentos.
• Consulte la Sección “Limpieza de
Su Horno Multi-Función”.
• Enchufe el horno en un
tomacorriente eléctrico.
• Coloque la perilla del cronómetro
y la de la temperatura en la posición
deseada. Ambas deben de girarse
para poner en funcionamiento el
horno.
• Cuando tueste alimentos,
asegúrese de que el horno no se
encuentre en la función de asado.
• Asegúrese de que la función
seleccionada es la función que
desea
utilizar.
24
Page 26

PRECAUÇÕES IMPORTANTES
Ao usar seu forno multi-função, é importante seguir precauções básicas de segurança
como as que seguem:
LEIA TODAS AS INSTRUÇÕES, AS ETIQUETAS DO PRODUTO E AS
ADVERTÊNCIAS, ANTES DE USAR SUE FORNO MULTI-FUNÇÃO.
• NÃO toque nas superfícies quentes. Use luvas sempre que for manusear com
materiais quentes e deixe que as peças metálicas se esfriem antes de limpar. Deixe
o aparelho esfriar bem antes de colocar ou tirar peças e acessórios. Use as alças
laterais quando for mover o forno.
• Desligue o forno da tomada quando não estiver sendo utilizado e antes de limpá-lo.
OBSERVAÇÃO: Certifique-se que o forno está desligado antes de tirar o fio da tomada.
• Para se proteger contra uma descarga elétrica, NÃO se deve submergir o aparelho na
água ou em outros líquidos.
• É necessário a supervisão constante quando este aparelho ou qualquer
eletrodoméstico estiver sendo utilizado próximo a crianças. Este aparelho não deve
ser usado por crianças.
• Quando usar o forno, coloque o aparelho a pelo menos 15 cm (6 polegadas) de
distância da parede em todos os seus lados. Tire os fios de outros produtos que
possam estar atrás do forno.
• NUNCA use um eletrodoméstico com o fio ou plugue danificados, se o mesmo tiver
apresentado falhas ou caso tenha caído no chão ou se danificado de qualquer outra
forma. Leve o eletrodoméstico ao Centro de Serviço Autorizado Oster® mais próximo
para ser examinado, reparado ou para que efetuem quaisquer ajustes mecânicos ou
elétricos que sejam necessários.
• NÃO use acessórios ou peças que não sejam recomendadas pelo fabricante, pois
podem causar incêndios, choques elétricos ou ferimentos.
• NÃO use este eletrodoméstico ao ar livre ou para fins comerciais.
• NÃO utilize este aparelho para fins que não sejam aqueles para os quais o mesmo foi
desenvolvido.
• NÃO deixe que o fio fique pendurado na borda da mesa ou do balcão da cozinha ou
que encoste em superfícies quentes.
• NÃO coloque o aparelho sobre ou próximo a bocas de fogões a gás ou elétricos, o
mesmo de um forno quente.
• Tome muito cuidado ao usar recipientes que não forem de vidro ou metal.
• Pode ocorrer um incêndio se o forno estiver sendo usado e estiver em contato ou
coberto por materiais inflamáveis, incluindo cortinas, tapeçarias, paredes, etc. NÃO
coloque nenhum objeto sobre o aparelho enquanto o mesmo estiver em funcionamento.
• Quando este aparelho não estiver sendo usado, NÃO guarde em seu interior nenhum
material que não seja um acessório recomendado pelo fabricante.
25
Page 27

• NÃO coloque dentro do forno, nenhum material inflamável como papel, papelão,
plástico ou qualquer material que possa ser queimado ou derretido.
• NÃO cubra a bandeja para migalhas ou nenhuma parte do forno com papel de
alumínio. Isso poderá causar uma sobrecarga no aparelho.
• Os alimentos grandes ou utensílios metálicos não devem ser colocados no forno, pois
podem causar incêndios ou descargas elétricas.
• NÃO limpe o forno com esponjas o fibras metálicas. Pedaços da esponja ou fibras
poderão se soltar e tocar as peças elétricas criando o risco de descargas elétricas.
• Ao grelhar alimentos, tome todo cuidado ao retirar a bandeja ou ao jogar o óleo
quente.
• A porta e a superfície externa do forno podem estar quentes durante o funcionamento.
• Para desligar este eletrodoméstico, coloque todos os controles na posição de des
ligado “O”.
ESTE APARELHO FOI DESENVOLVIDO SOMENTE PARA O USO DOMÉSTICO.
GUARDE ESTAS INSTRUÇÕES
(Somente para 120 e 127 Volts)
Este aparelho vem com uma tomada polarizada (um pólo é mais largo que o outro).
Para reduzir o risco de descarga elétrica, esta tomada entra só de uma maneira em
uma tomada polarizada. Se a tomada não encaixar simplesmente coloque ao
contrario. Se ainda não encaixar chame um eletricista de confiança. De nenhuma
maneira tente modificar esta medida de segurança.
USO DE UM FIO ELÉTRICO CURTO
O aparelho vem com um fio elétrico curto como medida de segurança para prevenir
o risco de tropeços. Caso seja necessário usar um fio de extensão, o mesmo poderá
ser usado com cuidado. Se estiver usando um fio de extensão, certifique-se de que a
capacidade elétrica nominal do fio de extensão é igual a do produto. Posicione o fio de
extensão de maneira que não fique pendurado na mesa ou balcão onde uma criança
poderia acidentalmente tropeçar nele
26
Page 28

DESCRIÇÃO DO APARE LHO
1
7
8
9
10
5
2
4
3
6
1. Grade Metálica Removível e Reversível
2. Botão Seletor de Temperatura
3. Botão Seletor de Funções
4. Botão de Controle do Relógio
5. Luz de Aceso
6. Alças Laterais Frias ao Tato
7. Bandeja Removível para Migalhas
8. Porta de Vidro
9. Paredes Interiores Fáceis de Limpar
10. Bandeja para Assar e Grade para Grelhar
27
Page 29

CONHECENDOO SEU FORNO MULTI-FUNÇÃO
1. Grade Metálica Removível e Reversível – O forno inclui uma grade reversível
que pode ser colocada em duas posições para preparar uma grande variedade de
alimentos.
2. Botão do Controle da Temperatura – Ajuste o termostato na temperatura desejada
(Veja Figura 1).
3. Botão Seletor de Funções – Seleciona a função ao girar o botão para função
desejada (Veja Figura 2).
4. Botão para Controle do Timer – Possibilita ajustar o tempo de cozimento em até 45
minutos. Apagará o forno automaticamente no final do tempo de preparo (Veja Figura 3).
5. Luz de Aceso – Indica que o forno está conectado e que o relógio está pronto para
começar a esquentar.
6. Alças Laterais Frias ao Tato – Para mover o forno com facilidade.
7. Bandeja Removível para Migalhas – Para coletar as migalhas ou partículas de
alimentos. Poder ser fácilmente retirada para limpar.
8. Porta de Vidro – Possibilita a observar o preparo dos alimentos.
9. Paredes Interiores Fáceis de Limpar – Facilita a limpeza.
10. Bandeja para Assar e Grade para Grelhar – Use para todas suas necessidades
quando for assar, grelhar e cozinhar na chapa.
Figura 1 Figura 2 Figura 3
PREPARANDO PARA USAR SEU FORNO
MULTI-FUNÇÃO PELA PRIMERA VEZ
Quando for usar seu forno multi-função pela primeira vez, siga os passos indicados abaixo:
Retire qualquer decalque da superfície de seu forno e limpe-o com um pano úmido. Abra
a porta do forno e retire os documentos impressos e papeis do interior do mesmo. Limpe
a grade, a bandeja para assar e a bandeja de migalhas com água quente e um pouco de
detergente líquido para lavar louças, use uma esponja macia.
NÃO SUBMERGIR O FORNO NA ÁGUA.
Seque o aparelho completamente antes de utilizá-lo.
Selecione um local adequado para colocar o forno. O local escolhido deve ser uma área
aberta em cima de um balcão com superfície plana onde o fio chegue até a tomada
Ligue o forno em uma tomada que tenha a voltagem correspondente à do seu forno.
28
Page 30

UTILIZANDO SEU FORNO MULTI-FUNÇÃO
Pré-Aquecendo seu Forno
Coloque a grade na posição desejada antes de esquentar o forno(Veja a Seção “Colocando
a Grade”).
Gire o botão de controle de temperatura e coloque-o na temperatura desejada.
Gire o botão seletor de funções colocando-o na função desejada.
Ajuste o botão do timer selecionando o tempo de cozimento desejado e deixando entre 7 e 9
minutos adicionais para que o forno pré-aqueça.
Utilizando a Função para Esquentar
OBSERVAÇÃO: A função para esquentar serve para manter quente os alimentos após
serem aquecidos.
Selecione a posição desejada para as grades (Veja a Seção “Colocando a Grade”).
Coloque os alimentos sobre a grade metálica ou dentro da bandeja para assar.
Gire o botão de controle de temperatura e coloque-o na temperatura desejada.
Gire o botão seletor de funções colocando-o na posição para esquentar “ ”. Somente os
elementos térmicos superiores irão funcionar (Os elementos térmicos irão acender e apagar
de forma alternada para manter a temperatura).
Coloque o botão do timer selecionando o tempo de cozimento desejado. O timer pode ser
ajustado em até 45 minutos. Ao final do ciclo de preparo, o forno irá emitir um sinal auditivo
e o forno se apagará. automaticamente. Para ajustar o timer por menos de 20 minutos, gire
o botão do timer até passar um pouco dos 20 minutos para acionar o interruptor do mesmo
e aí pode colocá-lo para cozinhar alimentos que só precisem de alguns minutos para serem
preparados.
Quando o aquecimento terminar, abra a porta do forno e retire os alimentos com cuidado.
CUIDADO: Os alimentos podem estar muito quentes, principalmente os recheios de doces e
sobremesas. Manuseie com cuidado.
Utilizando a Função Ajustável para Grelhar
Selecione a posição desejada para a grade (Veja a Seção “Colocando a Grade”).
Coloque a grade para grelhar dentro da bandeja do forno e com isso servirá com uma
bandeja para grelhar.
Coloque os alimentos na grade para grelhar.
Coloque a bandeja para grelhar sobre a grade do forno.
Feche a porta colocando-a na primeira posição (entreaberta) que deixará um espaço aberto
de aproximadamente 8 cm (3 polegadas) entre a porta e a parte superior do forno. Isto garantirá que o ar flua bem enquanto estiver grelhando.
Gire o botão do controle da temperatura para colocá-lo no nível desejado
Gire o botão seletor de funções e coloque-o na posição para grelhar “ ”. Apenas os elementos térmicos superiores irão funcionar.
Coloque o botão para controle do timer na posição que corresponda ao tempo de preparo
desejado. (O timer pode ser colocado para funcinar até 45 minutos). Ao final do tempo de
preparo o forno irá emitir um sinal sonoro e o forno se apagará automaticamente. Para ajustar
o timer por menos de 20 minutos, gire o botão do timer até passar um pouco dos 20 minutos
para acionar o interruptor do mesmo e aí pode colocá-lo para cozinhar alimentos que só
precisem de alguns minutos para serem preparados.
Vire os alimentos aproximadamente na metade do tempo de preparo.
Quando o cozimento terminar, abra a porta e retire os alimentos com cuidado.
CUIDADO: Não deixe o forno sem supervisão em nenhum momento.
29
Page 31

Utilizando a Função para Assar
Selecione a posição desejada para a grade (Veja a Seção “Colocando a Grade).
Coloque os alimentos na grade metálica ou dentro da bandeja para assar.
Gire o botão para controle da temperatura colocando-o no nível desejado.
Gire o botão seletor de funções colocando-o na posição para assar “ ”. Tanto os elementos
térmicos superiores quanto os inferiores irão funcionar.
Coloque o botão do timer no tempo de cozimento desejado. Ao final do tempo de preparo o
forno irá emitir um sinal sonoro e o forno se apagará automaticamente. Para ajustar o timer
por menos de 20 minutos, gire o botão do timer até passar um pouco dos 20 minutos para
acionar o interruptor do mesmo e aí pode colocá-lo para cozinhar alimentos que só precisem
de alguns minutos para serem preparados.
OBSERVAÇÃO: Os elementos térmicos superiores irão acender e apagar de forma alter-
nada para manter a temperatura no mesmo nível. Quando os alimentos estiverem assados,
abra a porta e retire os alimentos com cuidado.
Sugestão para Descongelar – Quando estiver descongelando alimentos, não pré-aqueça
o forno antes de usar. Gire o botão para controle da temperatura e coloque-o em 120°C
(250°F).
Utilizando a Função para Torrar
Selecione a posição desejada para a grade (Consulte a Seção “Colocando a Grade).
OBSERVAÇÃO – Cada tipo de pão deve ser torrado a sua maneira. Os pães mais claros
e leves devem ser torrados mais claros. Os pães mais escuros e bolos devem ser torrados
mais escuros.
Coloque o alimento na grade:
1. Gire o botão para controle da temperatura e coloque-o no nível máximo “ ”.
2. Gire o botão seletor de funções e coloque-o na posição para torrar “ ”. Tanto os
elementos térmicos superiores quanto os inferiores irão funcionar.
3. Para ajustar o timer, gire o botão do timer até passar um pouco dos 20 minutos para
acionar o interruptor do mesmo e aí volte com o botão até chegar ao nível que se deseja
torrar. Coloque os alimentos na grade metálica.
Quando terminar de torrar, abra a porta e retire os alimentos com cuidado
OBSERVAÇÃO: Os elementos térmicos superiores irão acender e apagar de forma
alternada para manter o nível de temperatura.
CUIDADO: Os alimentos podem estar muito quentes. Manuseie-os com cuidado.
30
Page 32

Colocando a Grade
O forno conta com uma grade reversível que pode ser colocada em duas posições o que
lhe possibilitará preparar uma grande variedade de alimentos. A grade pode ser colocada no
forno virada para cima ou para baixo (Veja Figura 4).
Grade virada
para cima
Grade virada
para baixo
Antes de retirar a grade, deixe que o aparelho esfrie.
Para retirar a grade, abra a porta do forno e puxe a grade para a frente do forno. A
colocação da grade dependerá do tamanho dos alimentos e do dourado que deseje.
Figura 4
LIMPANDO SEU FORNO MULTI-FUNÇÃO
Antes de limpar seu Forno Multi-Função Oster®, desligue-o da tomada e deixe que se
esfrie. Limpe-o com um pano macio e úmido. NÃO SUMERGIR NA ÁGUA! Use somente
sabão suave e água. Os produtos de limpeza abrasivos, escovas e produtos de limpeza
químicos poderão danificar o revestimento de limpeza do aparelho. Esvazie a bandeja
para migalhas com freqüência para evitar o acumulo de resíduos. As grades do forno
podem ser lavadas na lava-louças (somente na prateleira superior). Não é necessário
outro tipo de manutenção que não seja a limpeza recomendada neste manual.
GUARDANDO SEU FORNO MULTI-FUNÇÃO
Deixe o forno esfriar completamente antes de guardá-lo. Caso for guardar seu forno por
períodos prolongados certifique-se que não contenha partículas ou resíduos de
alimentos. Guarde o forno em um local seco como um balcão, mesa ou prateleira.
31
Page 33

PROBLEMAS E SOLUÇÕES
PROBLEMA
• Cozinha demais ou pouco os
alimentos.
• Cheiro a queimado.
• O forno não começa a funcionar.
• Apenas um elemento térmico
esquenta
• O elemento térmico não fica aceso.
POSSÍVEL CAUSA
• Temperatura ou tempo não estão
corretos
• Posição da grelha.
• Acumulo de resíduos de alimentos
no interior do forno, dos elementos
térmicos o una bandeja para
migalhas.
• O aparelho está desligado da
tomada.
• A seleção da função determina qual
elemento térmico deve funcionar.
• Os elementos térmicos irão acender
e apagar para manter a temperatura
adequada.
SOLUÇÃO
• A temperatura e o timer podem ser
ajustados segundo sua preferência.
• Como seu forno multi-função é
menor que seu forno regular irá
esquentar mais rápido e cozinhará
em períodos de tempo mais curtos.
• Consulte a Secção “Colocando
a Grade”. As grades têm que ser
ajustadas para acomodar vários
tipos de alimentos.
• Consulte a Seção “Limpando Seu
Forno Multi-Função”.
• Ligue o forno na tomada.
• Coloque o botão do timer e de
controle da temperatura na posição
desejada. Ambas devem ser giradas
para que o forno funcione.
• Quando for torrar alimentos,
certifique-se que o forno não está
na função para grelhar.
• Certifique-se que a função selecio
nada é a função que você deseja
usar.
32
Page 34

PARA MÉXICO SÓLAMENTE - FOR MEXICO ONLY
HORNO ELÉCTRICO OSTER
MODELO 6052, 6052-013
IMPORTADOR: SUNBEAM MEXICANA, S.A. DE C.V.
AV. JUÁREZ No. 40-201,
EX–HACIENDA DE SANTA MÓNICA,
TLALNEPANTLA, ESTADO DE MÉXICO,
C.P. 54050, R.F.C. SME570928G90, TEL. 53660800
PAÍS DE ORIGEN: CHINA
PAÍS DE PROCEDENCIA: CHINA, E.U.A.
LEA EL INSTRUCTIVO ANTES DE USAR EL APARATO
CARACTERÍSTICAS ELÉCTRICAS
60 Hz 120 V 900 W
CONTENIDO: 1 PIEZA
®
©2007 Sunbeam Products, Inc. All rights reserved. Distributed by Sunbeam Latin America, LLC,
©2007 Sunbeam Products, Inc. Tout droit réservé. Distribué par by Sunbeam Latin America, LLC,
Une année de garantie limitée – veuillez lire le feuillet sur la garantie pour plus de détails.
©2007 Sunbeam Products, Inc. Todos los derechos reservados. Distribuido por Sunbeam Latin
Garantía limitada de un año – por favor consulte los detalles en el inserto.
©2007 Sunbeam Products, Inc. Todos os direitos reservados. Distribuído pela Sunbeam Latin
Garantia limitada de um ano – para maiores detalhes, consulte o certificado.
5200 Blue Lagoon Drive, Suite 470, Miami, FL 33126.
One year limited warranty – please see insert for details.
5200 Blue Lagoon Drive, Suite 470, Miami, FL 33126.
America, LLC, 5200 Blue Lagoon Drive, Suite 470, Miami, FL 33126.
America, LLC, 5200 Blue Lagoon Drive, Suite 470, Miami, FL 33126.
Printed in China Imprimè en Chine Impreso en China Impresso na China
P.N. 123530
CBA -100107
 Loading...