

Page 1
Instruction Manual
Steam Iron
PLEASE READ ALL INSTRUCTIONS BEFORE USING THIS APPLIANCE
Manuel d'Instructions
Fer À Vapeur Professionnel
LIRE TOUTES LES INSTRUCTIONS AVANT D'UTILIZER CET APPAREIL
Manual de Instrucciones
Plancha de Vapor
LEA TODAS LAS INSTRUCCIONES ANTES DE USAR ESTE APARATO
Manual de Instruções
Ferro Elétrico a Vapor
LEIA TODAS AS INSTRUÇÕES ANTES DE USAR ESTE APARELHO
6020 & 6021
6020 & 6021
DURA PRESS™
Page 2

1
IMPORTANT SAFEGUARDS
When using electrical appliances, basic safety instructions should always be followed,
including the following:
• READ ALL INSTRUCTIONS BEFORE USING THE STEAM IRON.
• Use Iron only for its intended use.
• To protect against risk of electric shock, do not immerse the Iron in water or other
liquids.
• The Fabric Select Dial and Steam Lever should always be turned to Off/Apag. and
O/Off before plugging or unplugging from outlet. Never yank Cord to disconnect from
outlet; instead, grasp plug and pull to disconnect.
• Do not allow Cord to touch hot surfaces. Let Iron cool completely before putting
away. Loop Cord loosely around Iron when storing.
• Always disconnect Iron from electrical outlet when filling with water or emptying
and when not in use.
• Do not operate Iron with a damaged Cord or if the Iron has been dropped or damaged.
To avoid the risk of electric shock, do not disassemble the Iron. Take it to an Oster®
Authorized Service Center for examination and/or repair. Incorrect reassembly can
cause a risk of electric shock when the Iron is used.
• Close supervision is necessary for any appliance being used by or near children.
Do not leave Iron unattended while plugged in or turned on or on an ironing board.
• Burns can occur from touching hot metal parts, hot water or steam. Use caution when
you turn a Steam Iron upside down - there may be hot water in the Reservoir.
• If the Iron is not operating normally, disconnect from the power supply and have the
Iron serviced by an Oster® Authorized Service Center.
• Your OSTER® Iron is designed to rest on the heel rest. Do not leave the Iron
unattended. Do not set the Iron on an unprotected surface, even if it is on its
heel rest.
• This is a high wattage appliance. To avoid a circuit overload, do not operate another
high wattage appliance on the same circuit.
• If an extension cord is absolutely necessary, a 15-ampere cord should be used. Cords
rated for less amperage may overheat. Care should be taken to arrange the extension
cord so that it cannot be pulled or tripped over.
Page 3

2
SAVE THESE INSTRUCTIONS
(For 120 & 127 Volts)
To reduce the risk of electrical shock, this appliance has a polarized plug (one blade is
wider than the other). This plug fits a polarized outlet only one way. This is a safety
feature intended to help reduce the risk of electrical shock. If the plug does not fit fully
into the outlet, reverse the plug. If it still does not fit, contact a qualified electrician. Do
not attempt to defeat this safety feature.
Page 4

3
Welcome
Congratulations on your purchase of an OSTER® Steam Iron!
We have designed your Iron to provide the utmost in quality, ease of use and
convenience. Your Steam Iron offers the following features:
• SPRAY MIST® Button - A powerful water spray mist to remove wrinkles and dampen
fabrics for creases.
• SHOT OF STEAM® Button - An extra burst of steam to remove stubborn wrinkles.
• Vertical Shot of Steam - A vertical burst of steam to remove stubborn wrinkles from
hung garments or drapes.
• Vertical Steam - Removes wrinkles from hung garments or drapes.
• Patented MOTION SMART® Auto-Off Function (model 6021 only) - Senses time,
motion and position. Automatically turns Iron off if the Iron is not moved after 30
seconds in the ironing position and/or after 15 minutes in the upright position.
The Iron will not reheat unless it is moved.
• Self-Cleaning - Prevents mineral build up that can reduce the life of your Iron.
• Anti-Calcium System - Removes calcium from water and reduces mineral build-up
on Soleplate.
• 360° Tangle-Free Swivel Cord - Keeps the power Cord off of the fabric and out of your
way, whether you are right or left handed.
• Longer Power Cord (model 6021 only) - Provides 12 feet of power Cord to give you
added flexibility when ironing.
• Covered Large Water Fill Hole - Allows you to fill the Water Reservoir faster while
reducing water spills and drips.
• Accepts Tap Water - Eliminates the necessity of keeping distilled water on hand for
ironing.
• Power Indicator Light - Lights steadily to let you know the Iron is plugged in; blinks to
let you know that the patented MOTION SMART® Auto-Off function has activated
(model 6021 only); and is unlit when the Iron is unplugged.
• Soft Grip Handle - Provides a comfortable grip and helps eliminate slipping.
Page 5
4
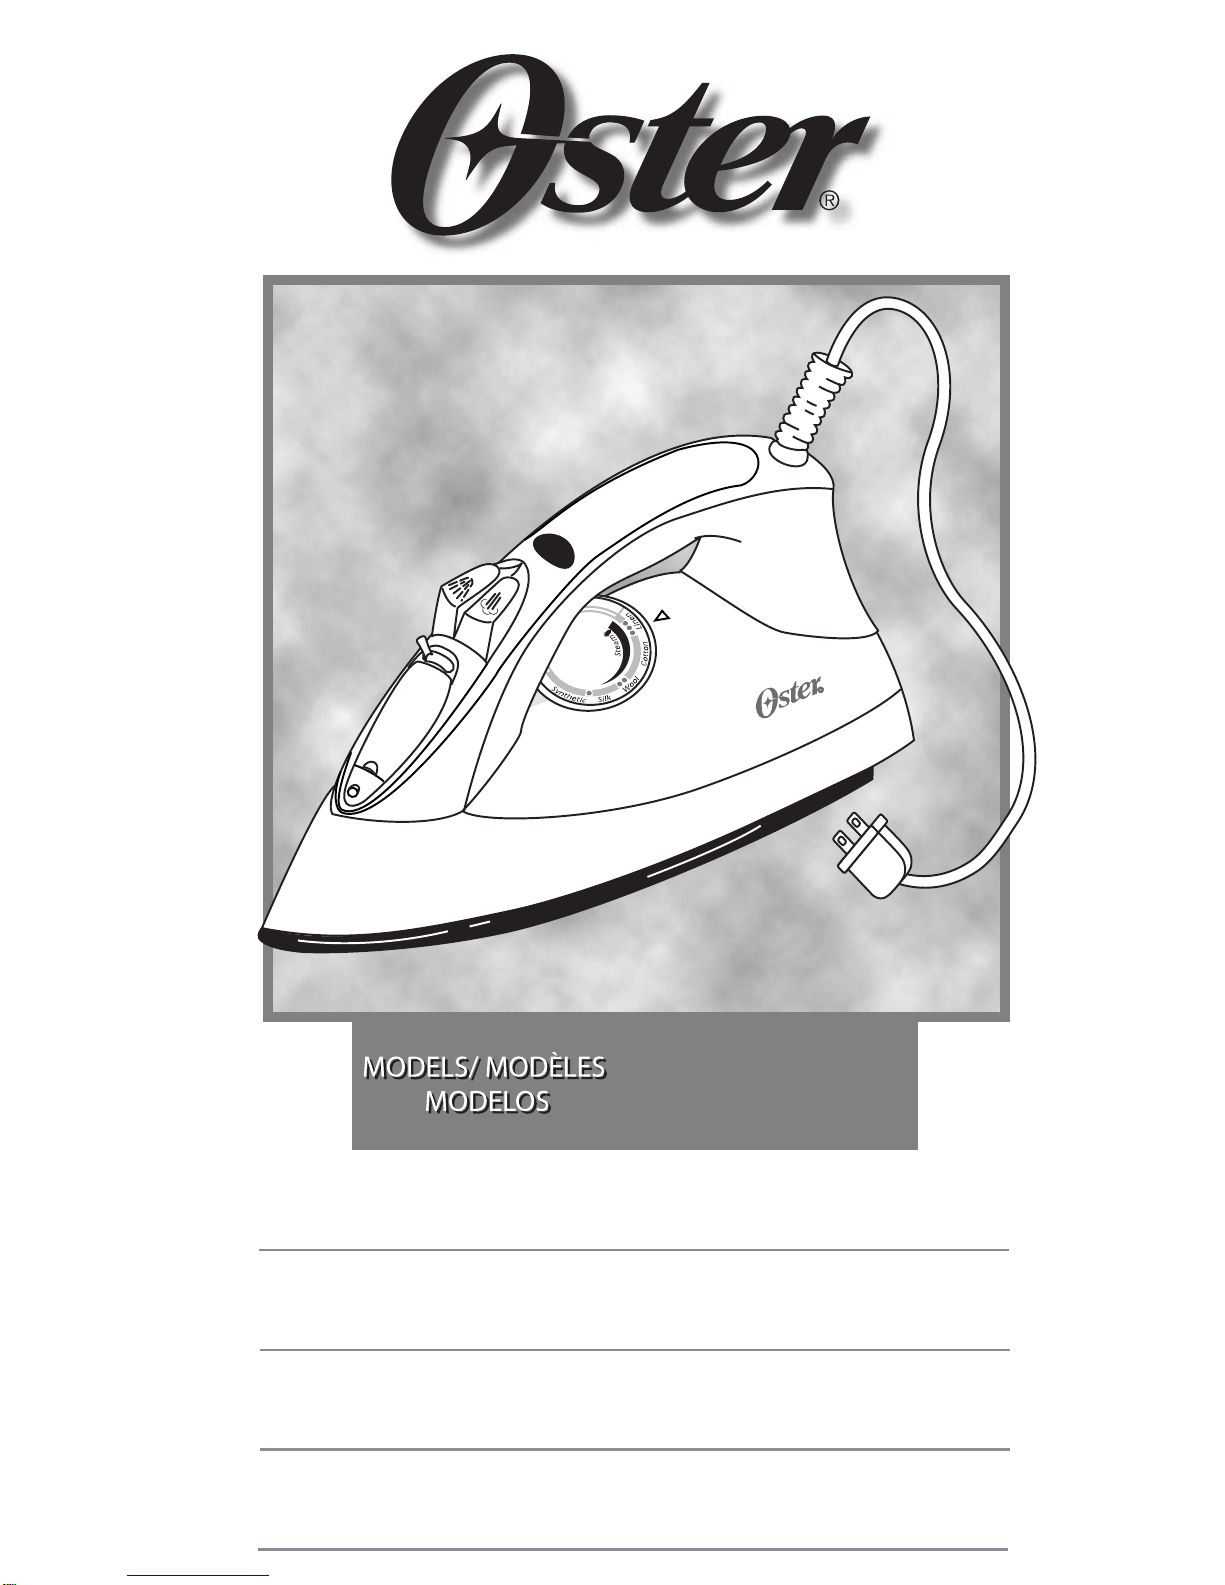
1. SPRAY MIST® Release
2. Covered Water Fill Hole
3. Variable Steam/ Self-Clean Lever
4. SPRAY MIST® Button
5. SHOT OF STEAM®/ Vertical Shot of Steam Button
6. Power Indicator Light/ MOTION SMART® Auto-Off Indicator
Blinking Light (model 6021 only)
7. 360° Tangle-Free Swivel Cord
8. Fabric Select Dial
9. See-Through Water Reservoir
10. Soleplate
11. Soft Grip Handle
12. Anti-Calcium System Inside Water Reservoir
DESCRIPTION OF THE APPLIANCE
1
2
3
4
5
6
7
8
9
10
11
12
Page 6
5
INSTRUCTIONS FOR USE
Filling With Water
You must fill the Water Reservoir with water to use the SHOT OF STEAM® and SPRAY
MIST® features and to get steam out of your Iron.
TIP: Each Iron is tested at the factory to ensure that they function correctly. The test
may leave a small, harmless amount of water within the Water Reservoir.
Before you fill the Water Reservoir, please consider the following:
• While this Iron was designed for use with tap water, very hard water will reduce the
performance of the Iron. If your water is very hard, it is recommended that you use tap
water the first time, then consider using demineralized or distilled water for
subsequent use. You should use tap water once a month, however, to maintain the
Iron's optimal steam performance.
• Do not use water that has passed through a home water softening system. This type
of water contains minerals that will decrease the performance and shorten the life of
your Iron. Use demineralized or distilled water, instead.
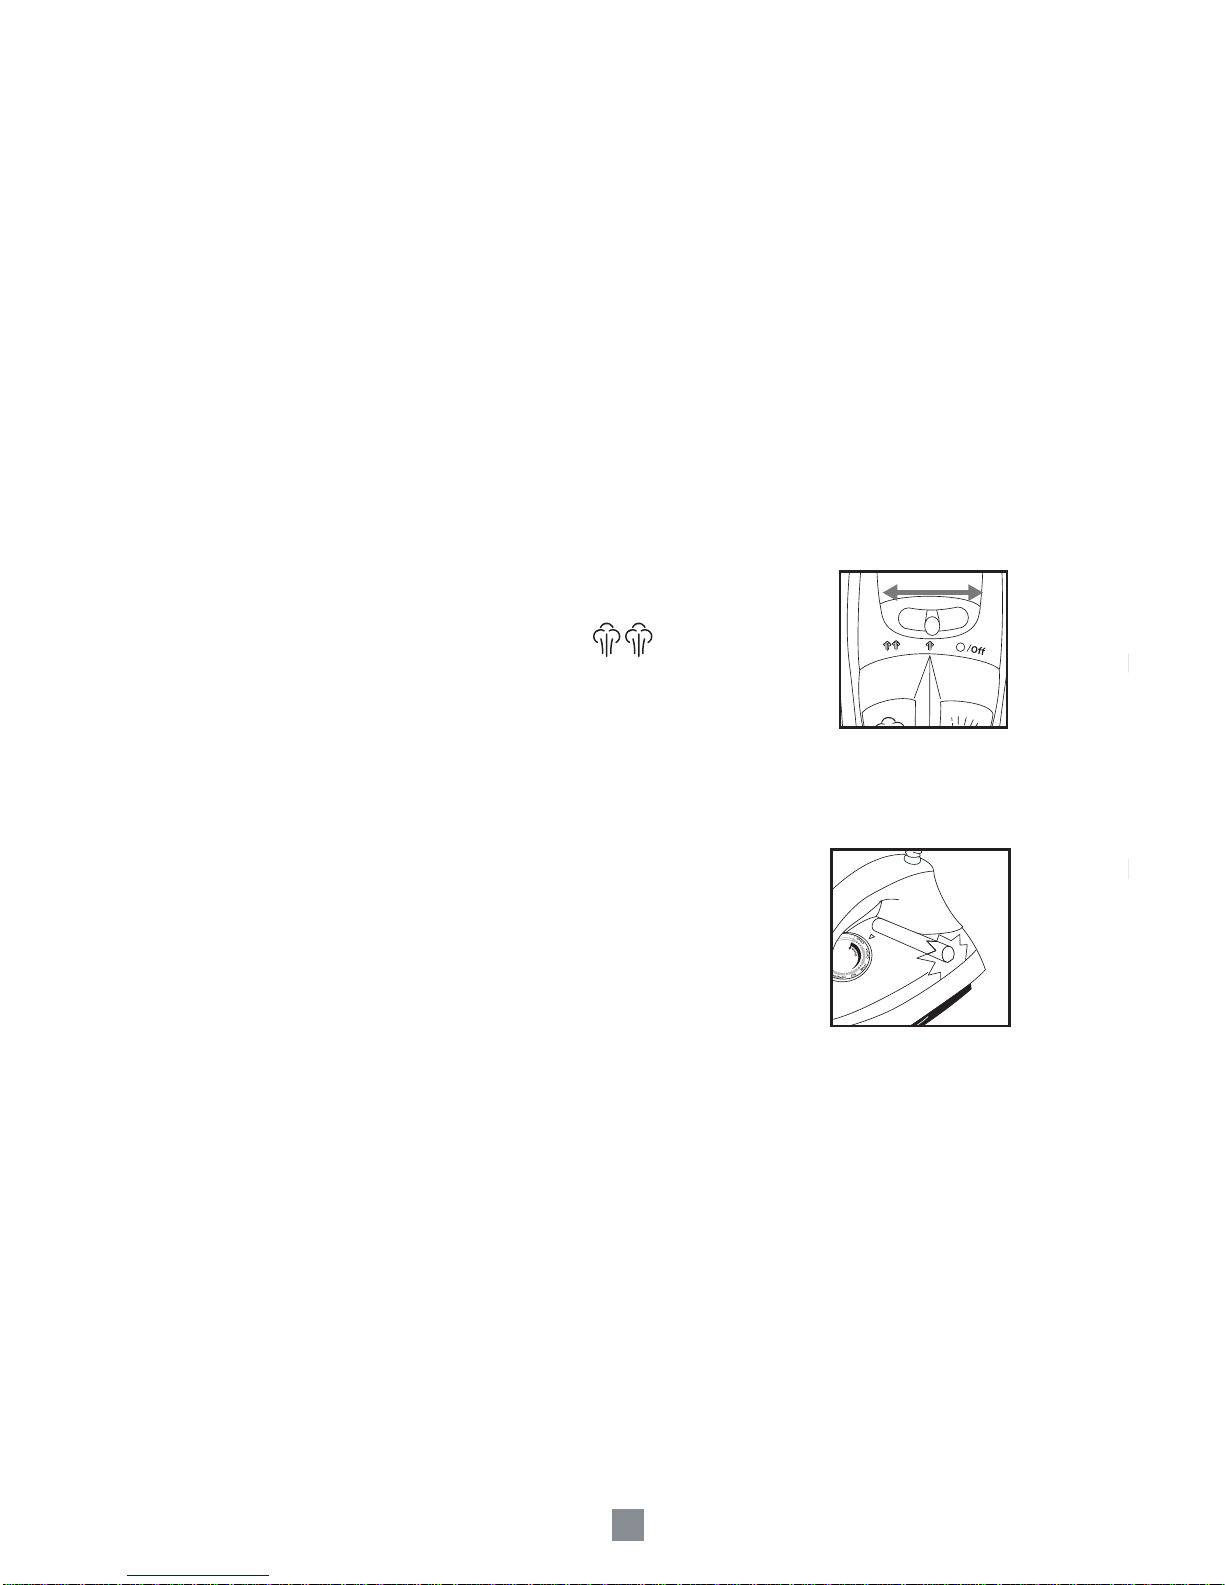
IMPORTANT: When not ironing, always set the Steam Lever to O/OFF and the Fabric
Select Dial to Off/Apag.
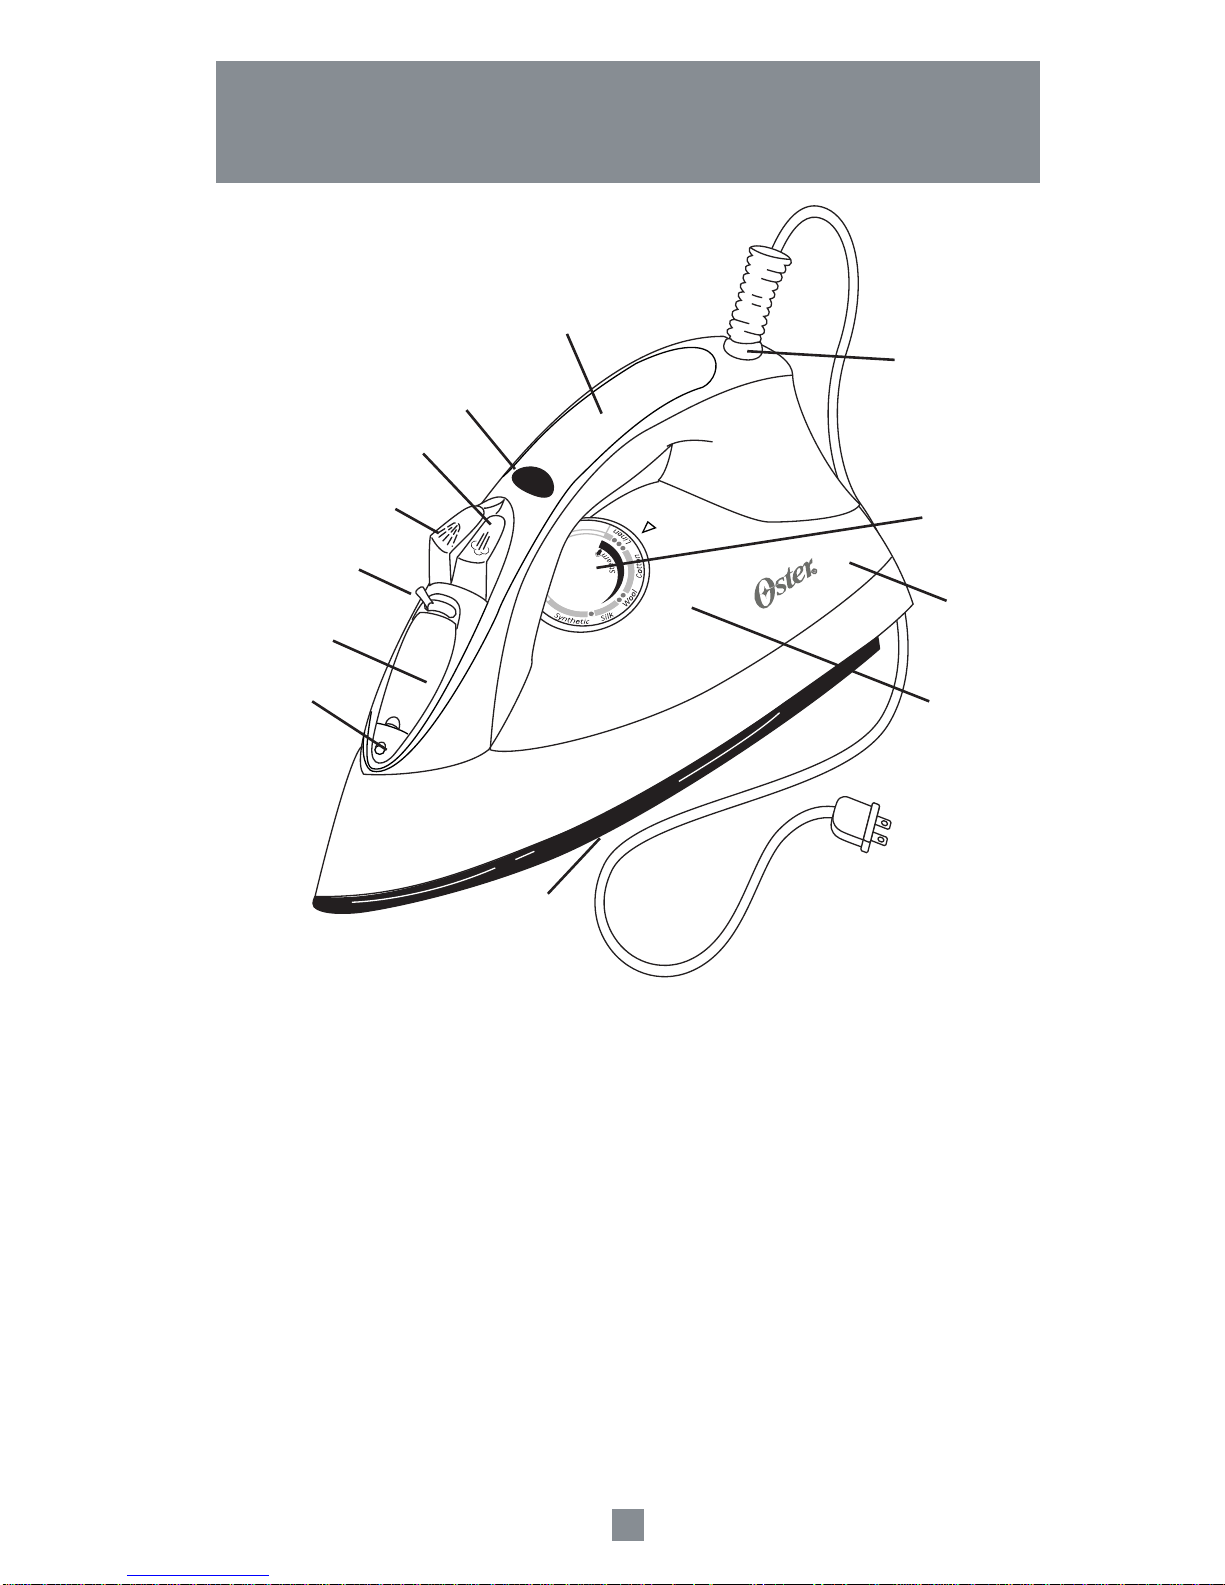
To fill the Water Reservoir:
1. Lift the Water Fill Hole Cover.
2. Make sure the Iron is unplugged. Set the
Steam Lever to O/OFF and the Fabric
Select Dial to Off/Apag.
3. Fill Water Cup with water. Pour water into
Iron's Water Reservoir. Do not fill Water Reservoir beyond maximum fill level.
WARNING: To prevent the risk of burns, be careful when filling a hot iron with water.
Hot metal parts, hot water and steam can cause injuries.
Page 7
4. After the Iron has heated (2 minutes), turn the Steam Lever
to desired steam setting.
IMPORTANT: When not ironing, always set the Steam Lever
to O/Off and the Fabric Select Dial to Off/Apag.
6
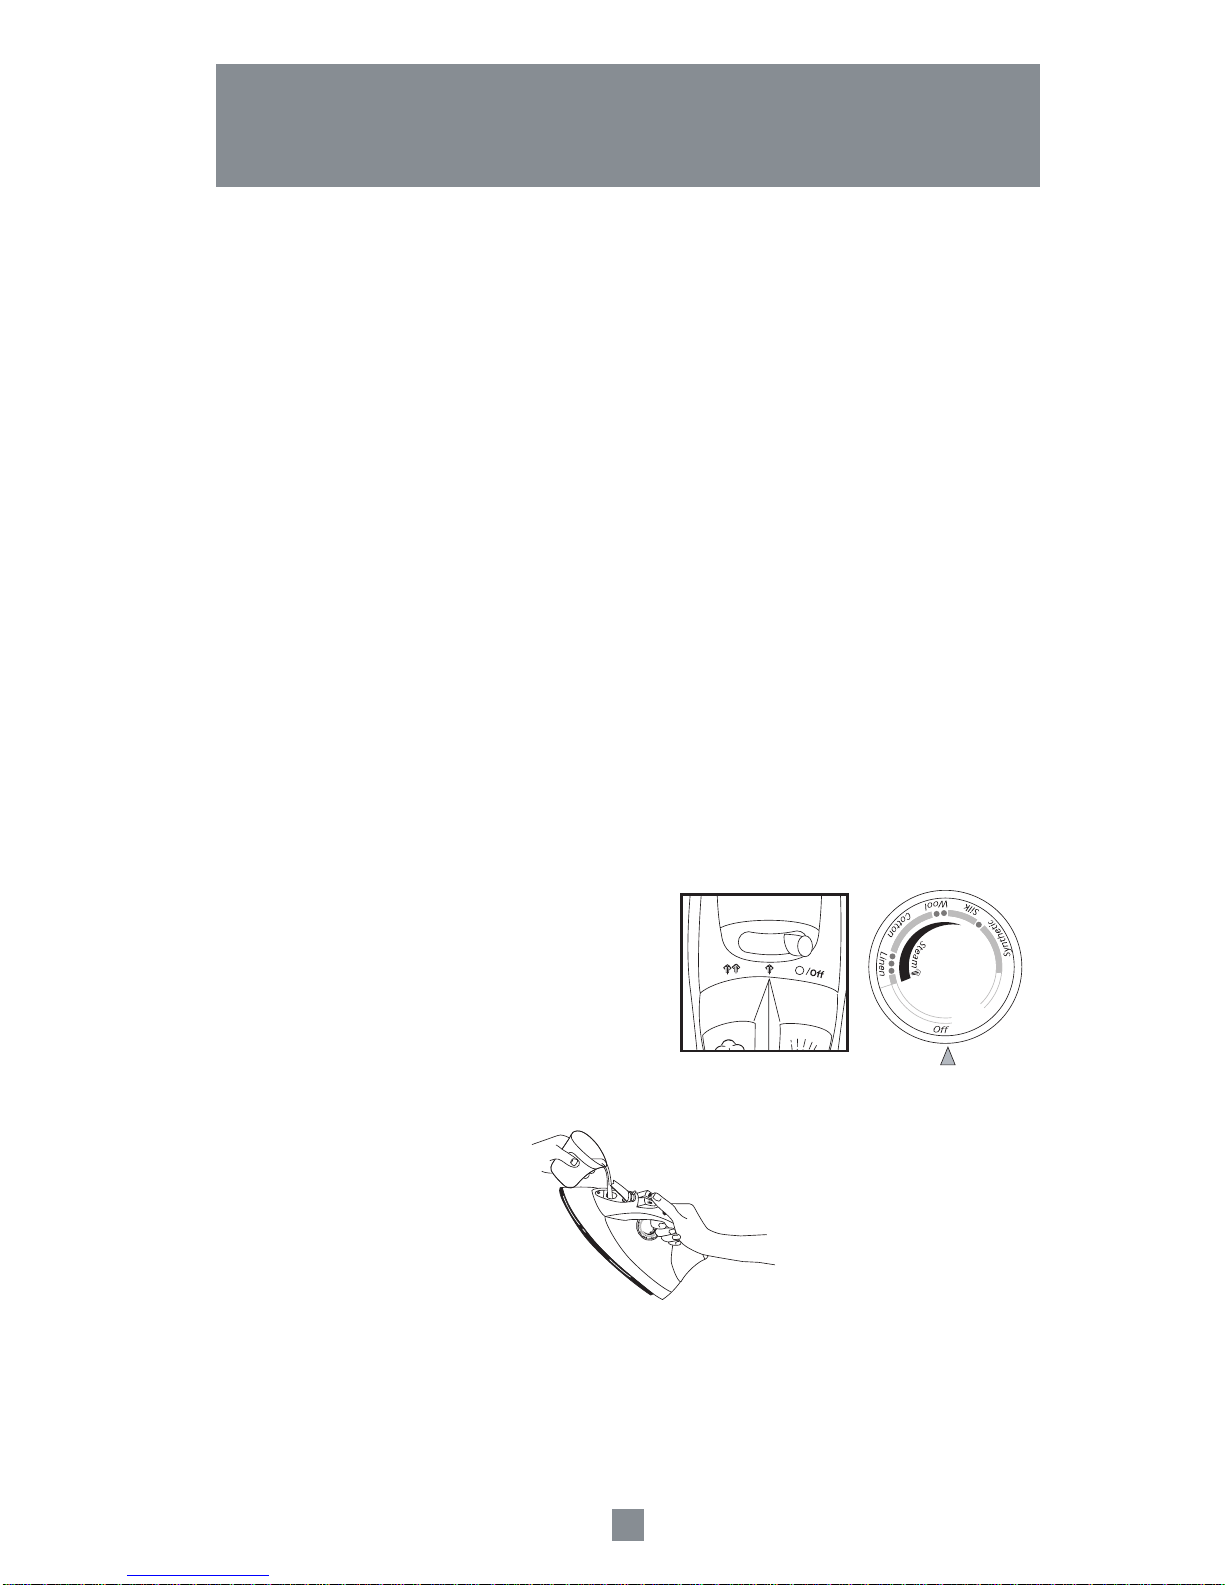
Dry Ironing
1. Make sure the Steam Lever is turned to the O/Off (Dry) setting.
2. Plug the Cord into the outlet.
3. Turn the Fabric Select Dial to the fabric setting you desire
(Silk or Synthetics).
Allow the Iron to heat for 2 minutes. While the Iron is heating,
make sure it is sitting on its heel rest on a stable, protected
surface.
NOTE: While the Steam Lever is turned to the O/Off (Dry)
setting, you may still use the SHOT OF STEAM®
or SPRAY MIST® features. Please make sure the
Water Reservoir is 1/4 full of water.
TIP: Refer to the "Ironing Guide" for the recommended setting for your fabric.
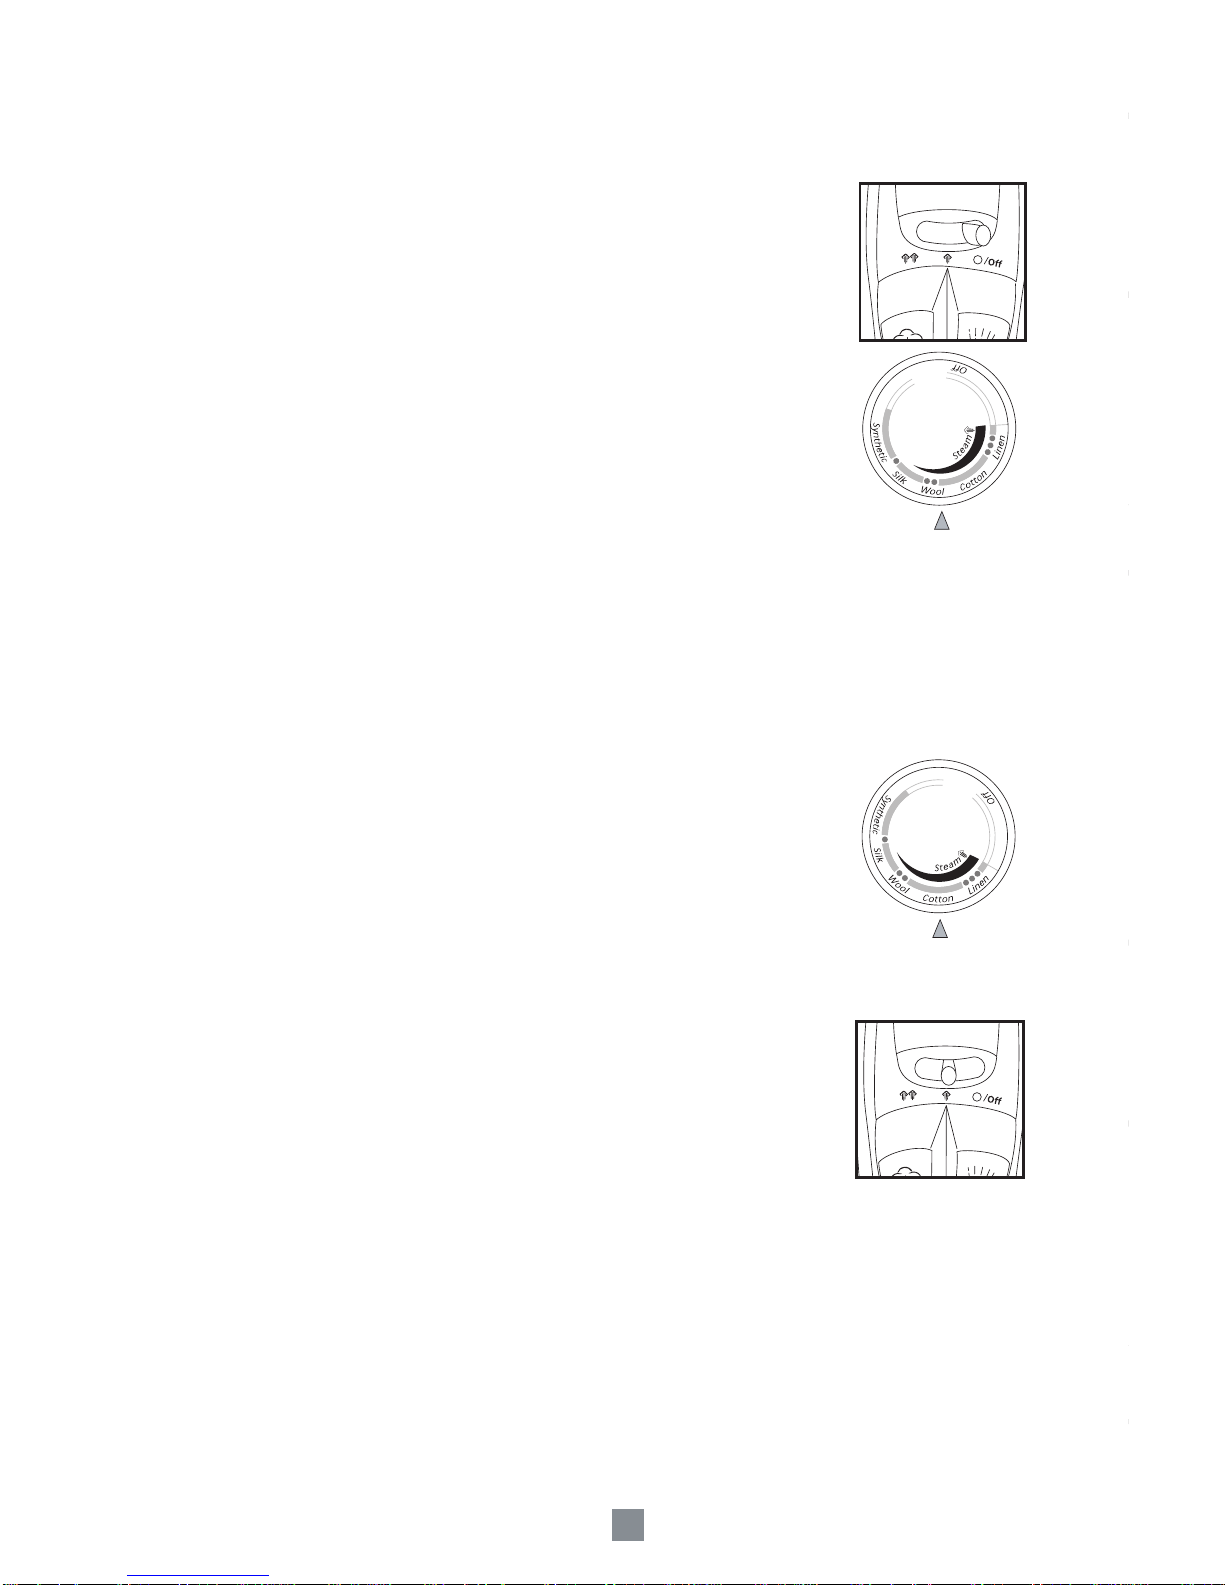
Steam Ironing
1. Follow the instructions for "Filling With Water".
2. Plug the Cord into the outlet. The Power Indicator will light.
3. Turn the Fabric Select Dial to the steam ironing fabric setting
you desire (Linen, Cotton, Wool or Silk) and allow the Iron to
heat for 2 minutes. While the Iron is heating, make sure it is
sitting on its heel rest on a stable, protected surface.
TIP: Refer to the "Ironing Guide" for the recommended setting for your fabric.
Page 8

7
Ironing Tips
• Always read garment labels and follow the manufacturer's ironing instructions.
• Sort the articles to be ironed according to the type of fabric.
• You should first iron garments requiring low temperature (e.g., silks and synthetics)
to avoid damaging them with an iron that is too hot.
• If you are unsure of the fabric content of the garment, test a small area, such as a
seam or facing, before ironing a visible area. Start with a low temperature and
gradually increase the heat to find the best setting.
• When changing the temperature from a high setting to a low setting, allow
approximately 5 minutes for the lower temperature to be reached.
• When steam ironing, use long, slow passes over the fabric. This will allow the steam
to penetrate the fabric while allowing the heat of the Soleplate to dry out the moisture.
• To iron linens, turn garment inside out. Be careful not to use an iron that is too hot
because the lining may melt or stick to the Soleplate.
• To iron zippers, use an ironing cloth or make sure the zipper is closed and iron over
the flap. Never iron directly over an unprotected zipper.
• Use the "Ironing Guide" to select the best setting and method for the fabric you plan
to iron.
Page 9
8
* An ironing cloth is a cotton, dry-cleaned cloth that you place over the garment you are ironing
to prevent the fabric from looking shiny.
Note: Some fabrics may require more steam than others. Your iron has the capability to adjust
steam as needed.
Suggested
Steam
Setting
Ironing
Recomendations
Fabric Select
Dial Slecting
Fabric
Ironing Guide
Acrylic
Acetate
Silk
Viscose
Nylon
Polyester
Rayon
Wool
Wool Blends
Cotton Blends
Corduroy
Cotton
Linen
Denim
Synthetic
Synthetic
Silk
Silk
Silk
Synthetic
Synthetic
Wool
Wool
Cotton
Cotton
Cotton
Linen
Linen
Iron garment inside out
Iron garment inside out while still
damp.
Iron garment inside out. Use an
ironing cloth* to prevent shine
marks.
Mainly dry iron; steam may be
used under garment
manufacturer’s instructions.
Iron garment inside out while still
damp.
Iron garment inside out while still
damp.
Iron garment inside out.
Iron garment inside out or use an
ironing cloth.*
Iron garment inside out or use an
ironing cloth.*
Follow garment manufacturer’s
instructions.Use setting for the
fiber requiring the lowest setting.
Iron garment inside out or use an
ironing cloth* and then brush the
garment with your hand to raise
the texture of the fabric.
Iron dark fabrics inside out to
prevent shine marks.
Iron garment inside out or use an
ironing cloth* to prevent shine
marks (especially on dark fabrics).
Use the SPRAY MIST® feature
and/or the SHOT OF STEAM®
for deeper penetration to remove
wrinkles.
O/ Off
O/ Off
O/ Off
O/ Off
O/ Off
O/ Off
O/ Off
Page 10
9
USING THE IRON'S SPECIAL FEATURES
Spray Mist® Feature
The SPRAY MIST® feature is a powerful water spray mist
that dampens the fabric to aid in removing wrinkles from
heavy fabrics and for setting creases.
To use the SPRAY MIST® feature: Press the
SPRAY MIST® Button firmly.
Shot Of Steam® Feature
The SHOT OF STEAM® feature provides an extra burst of steam for deep penetration
of stubborn wrinkles. You can use this feature while dry or steam ironing, but the Water
Reservoir must be at least 1/4 full of water.
To use the SHOT OF STEAM® feature: Place the Iron
on top of the wrinkle and press the SHOT OF STEAM®
Button each time you would like an extra burst of steam.
The SHOT OF STEAM® feature may be used
continuously with just a short pause between shots.
Vertical Steam and Vertical Shot of Steam
The Vertical Steam feature allows your Iron to function as a garment steamer.
TIP: When using the Vertical Steam on clothing, hang the clothing on a clothes hanger
for best results. Hanging curtains and drapes may also be steamed.
To use Vertical Steam:
1. Make sure that the Iron has heated up (2 minutes).
2. Hold the Iron in a vertical position, with the Iron close to but
not touching the fabric you want to steam.
3. With your other hand, pull the fabric tight.
4. Press the SHOT OF STEAM® Button in approximately
3-second intervals as you move the Iron across the
wrinkled area.
WARNING: To prevent the risk of burns, keep your hand
away from the area being steamed.
WARNING: DO NOT steam garments while wearing them; this may result in injuries.
Page 11
10
Patented Motion Smart® Auto-Off Feature
(Model 6021 Only)
When the Iron is plugged in, the Power Indicator will light steadily, indicating that there
is power to the Iron.
If you leave the Iron:
• In a horizontal position without moving it, or accidentally
tip the Iron over, it will automatically stop heating after
30 seconds. The Power Indicator will blink to let you
know that the Iron has stopped heating.
• In a vertical position (on its heel rest) without moving it,
the Iron will automatically turn off after 15 minutes.
The Power Indicator will blink to let you know that the
Iron has stopped heating.
IMPORTANT: The Power Indicator will continue to blink
until the Iron is unplugged or reset.
To reset the Iron:
Move the Iron back and forth and allow it to reheat for
2 minutes. The Indicator Light will stop blinking and
the Iron will start heating again.
WARNING: The patented MOTION SMART® Auto-Off is a safety feature, not a
recommended means for turning your Iron off. See "Caring for Your Iron
After Use" for information on turning off your Iron and storing it safely
between use.
Anti-Calcium System
The Anti-Calcium System is a permanent system located inside the Water Reservoir.
This system removes calcium from the water and reduces calcium build-up on
the Soleplate.
Page 12
11
CARING FOR YOUR IRON AFTER USE
Turning Off Your Iron
1. Turn the Steam Lever to O/Off and Fabric Select Dial to Off/Apag.
2. Unplug the Iron from the power source.
WARNING: NEVER yank the power Cord when unplugging the Iron. This can damage
the Cord.
Storing Your Iron
1. Allow the Iron to cool.
2. If you do not use your Iron on a daily basis, empty the Water
Reservoir after each use for a longer Iron life. To do so,
unplug the Iron, turn the Iron upside down, open the Fill Hole
Cover, and allow water to flow from the Fill Hole. Shake the
Iron gently to remove trapped water drops.
3. Loosely loop the power Cord around the heel rest and store
the Iron on its heel rest.
IMPORTANT: Wrapping the Cord around the Iron too tightly can
damage the Cord.
TIP: When not ironing, always set the Steam Lever to O/Off and
the Fabric Select Dial to Off/Apag
.
O
f
f
S
y
n
t
h
e
t
i
c
S
i
l
k
W
o
o
l
C
o
t
t
o
n
L
i
n
e
n
S
t
e
a
m
Page 13
12
Maintaining Your Steam Iron
CLEANING THE SOLEPLATE
Clean the Soleplate if starch or other residue accumulate.
To clean the Soleplate:
1. Allow the Iron to cool and then wipe it with a soft, damp cloth.
WARNING: DO NOT use abrasive cleansers, scouring pads or vinegar to clean the
Soleplate. This will damage the finish.
2. Run the Iron over an all-cotton cloth to remove any residue.
USING THE SELF-CLEANING FEATURE
You should use the Self-Cleaning feature to maintain the optimal performance of your
iron. The Self Cleaning feature will clean the Water Reservoir and steam vents of
accumulated minerals, dust and lint.
To use the Self-Cleaning feature:
1. Move the Steam Lever from O/Off to several
times to remove debris and minerals from the steam valve.
CLEANING THE ANTI-CALCIUM SYSTEM
Your Steam Iron houses an Anti-Calcium Filter in the Reservoir, which eliminates
impurities from the water.
To prolong the efficiency of this filter:
1. Unplug the Iron and allow it to cool.
2. Locate the water cup that accompanied the Iron. Fill it
with water to the Max Fill mark. Add 1 teaspoon of salt
to the water and fill the Water Reservoir with this solution.
3. Leave the solution in the Water Reservoir for 15 minutes,
then empty it.
4. Fill the Water Reservoir a second time with the salt water solution and empty it again
after 15 minutes.
5. Fill the Reservoir with fresh water to rinse and empty.
The Anti-Calcium System should be cleaned approximately once a month.
Page 14

13
1 - YEAR LIMITED WARRANTY
Sunbeam Products, Inc, warrants that for a period of ONE year from the date of
purchase, this product will be free from defects in material and workmanship. Sunbeam,
at its option, will repair or replace this product or any component of the product found to
be defective during the warranty period. Replacement will be made with a new or
remanufactured product or component. If the product is no longer available,
replacement may be made with a similar product of equal or greater value. This is your
exclusive warranty.
This warranty is valid for the original retail purchaser from the date of initial retail
purchase and is not transferable. Keep the original sales receipt. Proof of purchase is
required to obtain warranty performance. Oster® dealers, service centers, or retail
stores selling Oster® products do not have the right to alter, modify or any way change
the terms and conditions of this warranty.
This warranty does not cover normal wear of parts or damage resulting from any of the
following: negligent use or misuse of the product, use on improper voltage or current,
use contrary to the operating instructions, disassembly, repair or alteration by anyone
other than an Oster® Authorized Service Center. Further, the warranty does not cover:
Acts of God, such as fire, flood, hurricanes and tornadoes.
Sunbeam shall not be liable for any incidental or consequential damages caused by the
breach of any express, implied or statutory warranty or condition. Except to the extent
prohibited by applicable law, any implied warranty or condition of merchantability or
fitness for a particular purpose is limited in duration to the duration of the above warranty.
Sunbeam disclaims all other warranties, conditions or representations, express, implied,
statutory or otherwise. Sunbeam shall not be liable for any damages of any kind
resulting from the purchase, use or misuse of, or inability to use the product including
incidental, special, consequential or similar damages or loss of profits, or for any breach
of contract, fundamental or otherwise, or for any claim brought against purchaser by
any other party.
How To Obtain Warranty Service: Please see the country specific warranty insert or
contact your local authorized distributor.
PLEASE DO NOT RETURN THIS PRODUCT TO THE PLACE OF PURCHASE
Page 15

14
MESURES PRÉVENTIVES IMPORTANTES
Les mesures de sécurité de base doivent toujours être suivies, lorsque vous utilisez des
appareils électriques, et elles comprennent ce qui suit:
• LIRE TOUTES LES DIRECTIVES AVANT L'UTILISATION.
• N'utilisez le fer que pour l'usage auquel il a été conçu.
• Veillez à ne pas submerger le fer dans l'eau ou dans d'autres liquides afin de vous
protéger contre le risque d'électrocution.
• Le cadran de sélection de tissus et le levier pour la vapeur doivent toujours être
tournés à "O/Off" avant de brancher ou de débrancher l'appareil de la prise. Ne tirez
jamais le cordon pour débrancher celui-ci de la prise; saisissez la fiche et tirez sur
celle-ci pour débrancher.
• Veillez à ne pas permettre au cordon de toucher des surfaces chaudes. Laissez le fer
refroidir parfaitement avant de le ranger. Enroulez de façon lâche le cordon autour du
fer au moment de le ranger.
• Débranchez toujours le fer de la prise électrique lors du remplissage avec de l'eau,
lors de la vidange et lorsqu'il n'est pas utilisé.
• Veillez à ne pas faire fonctionner le fer avec un cordon détérioré ou lorsque le fer a
été échappé ou endommagé. Ne démontez pas le fer afin de vous protéger contre le
risque d'électrocution. Apportez-le à un centre de service autorisé Oster® pour un
examen et/ou une réparation. Un ré-assemblage inapproprié peut occasionner un
risque d'électrocution lors de l'utilisation du fer.
• Une surveillance étroite est nécessaire lorsque tout appareil est utilisé par des enfants
ou près de ceux-ci. Ne laissez pas le fer sans surveillance lorsqu'il est branché ou en
marche ou sur une planche à repasser.
• Le fait de toucher les parties métalliques chaudes, l'eau chaude ou la vapeur peut
occasionner des brûlures. Soyez prudent lorsque vous retournez un fer à vapeur à
l'envers - de l'eau chaude pourrait se trouver dans le réservoir.
• Débranchez le fer de l'alimentation électrique et faites-le examiner dans un centre de
service autorisé Oster® s'il ne fonctionne pas correctement.
• Votre fer OSTER® est conçu pour s'appuyer sur le support de talon. Ne laissez pas le
fer sans surveillance. Ne déposez pas le fer sur une surface non protégée même s'il
repose sur le support de talon.
• Cet appareil consomme beaucoup d'énergie. Ne faites pas fonctionner un autre
appareil à haute consommation d'énergie sur le même circuit.
Page 16

15
CONSERVER CES DIRECTIVES
(Pour 120 & 127 Volts)
Cet appareil possède une fiche polarisée (une lame est plus large que l'autre) afin de
vous protéger contre le risque d'électrocution. Cette fiche ne s'adapte que d'une seule
façon à une prise polarisée. Ceci est une caractéristique de sécurité conçue pour aider
à réduire le risque d'électrocution. Inversez la fiche si elle ne s'insère pas parfaitement
dans la prise. Consultez un électricien qualifié si la fiche ne s'adapte toujours pas
correctement. Ne cherchez pas à contourner cette caractéristique de sécurité.
• Un cordon de 15 ampères doit être utilisé si une rallonge électrique est absolument
nécessaire. Des cordons possédant une valeur nominale inférieure peuvent
surchauffer. Vous devez disposer la rallonge électrique prudemment afin de ne pas
l'arracher ou de trébucher sur celle-ci.
Page 17

16
Bienvenue
Nous vous félicitons pour l'achat votre fer à repasser OSTER® !
Nous avons conçu votre fer de façon à fournir la qualité à son plus haut degré, la facilité
d'utilisation et la commodité. Votre fer à vapeur offre les caractéristiques suivantes:
• Bouton du jet pulvérisé - Jet puissant d'eau pulvérisée pour enlever les faux plis et
pour humecter les tissus pour plisser.
• Bouton du jet de vapeur - Jet supplémentaire de vapeur pour enlever les faux plis
tenaces.
• Jet vertical de vapeur - Jet vertical de vapeur pour enlever les faux plis tenaces des
vêtements suspendus ou des rideaux.
• Vapeur verticale - Enlève les faux plis des vêtements suspendus ou des rideaux.
• Fonction brevetée d'arrêt automatique (modèle 6021 seulement) - Perçoit le
temps, le mouvement et la position. Éteint automatiquement le fer s'il n'est pas
déplacé de sa position de repassage pendant 30 secondes et/ou de sa position
verticale pendant 15 minutes. Le fer ne se réchauffera pas à moins qu'il ne soit déplacé.
• Auto-nettoyage - Empêche l'accumulation de minéraux qui peuvent réduire la durée
de vie de votre fer.
• Système anticalcium - Élimine le calcium de l'eau et réduit l'accumulation de minéraux
sur la semelle.
• Cordon pivotant 360° qui ne s'emmêle pas - Garde le cordon d'alimentation éloigné
du tissu et hors de votre chemin, que vous soyez droitier ou gaucher.
• Cordon d'alimentation plus long (modèle 6021 seulement) - Vous donne 3,7 m
(12 pieds) de cordon d'alimentation pour vous permettre plus de flexibilité lorsque
vous repassez.
• Grande ouverture recouverte de remplissage d'eau - Vous permet de remplir plus
rapidement le réservoir d'eau tout en réduisant les renversements d'eau et les
égouttements.
• Accepte l'eau du robinet - Élimine la nécessité de conserver sous la main de l'eau
distillée pour le repassage.
• Témoin indicateur d'alimentation - S'allume sans arrêt pour vous signifier que le fer
est branché; clignote pour vous avertir que la fonction brevetée d'arrêt automatique
s'est activée (modèle 6021 seulement); il est éteint lorsque le fer est débranché.
• Poignée confortable - Fourni une prise confortable et aide à éliminer le glissement.
Page 18

17
1. Détente du Jet Pulvérisé
2. Ouverture Recouverte de Remplissage d'eau
3. Levier Variable de Vapeur/Auto-Nettoyage
4. Bouton du Jet Pulvérisé
5. Bouton de Jet de Vapeur/ de Vapeur Verticale
6. Témoin Indicateur d'alimentation/Témoin Clignotant d'arrêt
Automatique (modèle 6021 seulement)
7. Cordon pivotant 360° qui ne S'emmêle Pas
8. Cadran de Sélection de Tissus
9. Réservoir d'eau Transparent
10. Semelle
11. Poignée Confortable
12. Système Anticalcium à l'intérieur du Réservoir d'eau
DESCRIPTION DE L'APPAREIL
1
2
3
4
5
6
7
8
9
10
11
12
Page 19

18
DIRECTIVES D'UTILISATION
Remplissage Avec De L'Eau
Vous devez remplir le réservoir d'eau avec de l'eau pour utiliser les caractéristiques du
jet de vapeur et du jet pulvérisé et pour obtenir de la vapeur de votre fer.
CONSEIL : Chaque fer est testé à l'usine pour assurer qu'il fonctionne correctement.
L'essai peut laisser une petite quantité inoffensive d'eau à l'intérieur du
réservoir.
Prière de réfléchir à ce qui suit avant de remplir le réservoir d'eau :
• Quoique ce fer ait été conçu pour utiliser l'eau du robinet, une eau très dure va réduire
la performance du fer. Il est recommandé que vous utilisiez l'eau du robinet la
première fois, si votre eau est très dure, et qu'ensuite vous envisagiez l'utilisation
d'eau déminéralisée ou distillée lors des usages suivants. Cependant, vous devriez
utiliser l'eau du robinet une fois par mois pour maintenir le rendement optimal de
vaporisation du fer.
• N'utilisez pas de l'eau provenant d'un système domestique d'adoucissement de l'eau.
Ce type d'eau contient des minéraux qui vont diminuer le rendement et raccourcir la
durée de vie de votre fer. Utilisez, à la place, de l'eau déminéralisée ou distillée.
IMPORTANT : Réglez toujours le levier de vapeur sur O/Off et le cadran de sélection
de tissus sur Off/Apag. lorsque le fer n'est pas utilisé.
Pour remplir le réservoir d'eau :
1. Soulevez le couvercle de l'ouverture de
remplissage d'eau.
2. Assurez-vous que le fer est débranché.
Réglez le levier de vapeur sur O/Off et le
cadran de sélection de tissus sur Off/Apag.
3. Remplissez le gobelet avec de l'eau.
Versez l'eau dans le réservoir d'eau en fer.
Ne remplissez pas le réservoir d'eau de
façon à dépasser le niveau maximum de
remplissage.
AVERTISSEMENT : Soyez prudent lorsque vous remplissez un fer chaud avec de
l'eau afin d'éviter le risque de brûlures. Les parties métalliques
chaudes, l'eau chaude et la vapeur peuvent occasionner des
blessures.
Page 20

19
Repassage À Sec
1. Assurez-vous que le levier de vapeur est tourné sur le réglage
O/Off (sec).
2. Branchez le cordon dans la prise.
3. Tournez le grand cadran de sélection de tissus sur le réglage
de tissu que vous désirez (soie ou synthétiques).
Laissez chauffer le fer pendant 2 minutes. Pendant que
le fer chauffe, assurez-vous que celui-ci repose sur son
support de talon sur une surface stable et protégée.
NOTE : Vous pouvez toujours utiliser les caractéristiques du
et de vapeur ou du jet pulvérisé lorsque le levier de
vapeur est tourné sur le réglage O/Off (sec).
Prière de vous assurer que le réservoir contient 1/4 de
sa capacité d'eau.
CONSEIL : Référez-vous au guide de repassage pour obtenir le réglage recommandé
pour votre tissu.
Repassage À La Vapeur
1. Suivez les directives du "remplissage du réservoir d'eau".
2. Branchez le cordon dans la prise.
3. Tournez le grand cadran de sélection de tissus sur le réglage
de tissu que vous
désirez (synthétiques, soie, lingerie, coton ou laine). Laissez
chauffer le fer pendant 2 minutes. Pendant que le fer chauffe,
assurez-vous que celui-ci repose sur son support de talon sur
une surface stable et protégée.
CONSEIL : Référez-vous au guide de repassage pour obtenir le
réglage recommandé pour votre tissu.
4. Laissez chauffer le fer pendant 2 minutes et tournez ensuite le
levier de vapeur sur le réglage approprié.
IMPORTANT : Réglez toujours le levier de vapeur sur O/Off (sec) et le cadran de
sélection de tissus sur Off/Apag. lorsque le fer n'est pas utilisé.
Page 21

20
Conseils De Repassage
• Lisez toujours les étiquettes des vêtements et suivez toujours les directives de
repassage du fabricant.
• Triez les articles à repasser selon le type de tissu.
• Vous devriez repasser en premier les vêtements qui demandent une température peu
élevée (par exemple la soie et les synthétiques) afin d'éviter de les abîmer avec un fer
trop chaud.
• Faites l'essai sur une petite partie telle qu'une couture ou un revers, si vous êtes
incertain du contenu du tissu, avant de repasser une partie visible. Commencez avec
une température peu élevée et augmentez graduellement la chaleur pour trouver le
meilleur réglage.
• Attendez environ 5 minutes pour atteindre le réglage de température moins élevé
lorsque vous changez le réglage d'une température plus élevée à une température
moins élevée.
• Employez de longs et lents mouvements de va-et-vient sur le tissu lorsque vous
repassez à la vapeur. Ceci va permettre à la vapeur de pénétrer à travers le tissu
tout en permettant que la chaleur de la semelle puisse assécher l'humidité.
• Tournez le vêtement à l'envers pour repasser la lingerie. Surveillez prudemment que
le fer n'est pas trop chaud car la doublure peut fondre ou coller à la semelle.
• Lorsque vous repassez une fermeture-éclair, utilisez un linge de repassage ou
assurez-vous que la fermeture-éclair est fermée et repassez par-dessus le rabat.
Ne repassez jamais directement par-dessus une fermeture-éclair non protégée.
• Utilisez le guide de repassage pour choisir le meilleur réglage et la meilleure méthode
pour le tissu que vous désirez repasser.
Page 22

21
Sélection Du
Tissu Réglage
De La Vapeur
Réglage Du
Cadran
Recommandations De
Repassage
Tissu
Suggéré
Guide de Repassage
Acrylique
Acétate
Soie
Viscose
Nylon
Polyester
Rayonne
Laine
Laines variées
Cotons variés
Velours côtelé
Coton
Lingerie
Toile (jeans)
Synthétique
Synthétique
Soie
Soie
Soie
Synthétique
Synthétique
Laine
Laines
Coton
Coton
Coton
Lingerie
Lingerie
Repasser le vêtement à l'envers.
Repasser le vêtement à l'envers
pendant qu'il est encore humide.
Utiliser un linge de repassage*
pour éviter les marques luisantes.
Repassage principalement à sec;
la vapeur peut être utilisée selon
les directives du fabricant.
Repasser le vêtement à l'envers
pendant qu'il est encore humide.
Laine, laine et vapeur, repasser le
vêtement à l'envers ou utiliser un
linge de repassage*.
Repasser le vêtement à l'envers
pendant qu'il est encore humide.
Repasser le vêtement à l'envers.
Repasser le vêtement à l'envers
ou utiliser un linge de repassage*.
Repasser le vêtement à l'envers
ou utiliser un linge de repassage*.
Suivre les directives du fabricant
du vêtement. Utiliser le réglage du
tissu qui demande le réglage le
moins élevé.
Repasser le vêtement à l'envers
ou utiliser un linge de repassage*
et brosser ensuite le vêtement
avec la main pour soulever le
grain du tissu.
Repasser les vêtements foncés à
l'envers pour éviter les marques
luisantes.
Repasser le vêtement à l'envers
ou utilisez un linge de repassage*
pour éviter les marques luisantes
(surtout les tissus foncés).
Utiliser la caractéristique SPRAY
MIST® et/ou le SHOT OF
STEAM® pour une pénétration
plus profonde afin d'enlever les
faux plis.
* Un linge de repassage est un coton, un tissu nettoyé à sec que vous placez par-dessus le
vêtement que vous repassez afin de prévenir les marques luisantes sur le tissu.
Note : Certains tissus peuvent réclamer plus de vapeur que d'autres. Votre fer possède la
capacité de régler la vapeur comme cela est nécessaire.
O/ Off
O/ Off
O/ Off
O/ Off
O/ Off
O/ Off
O/ Off
Page 23

22
CARACTÉRISTIQUES SPÉCIALES
Caractéristique Du Jet Pulvérisé
La caractéristique du jet pulvérisé est un puissant jet d'eau
pulvérisé qui humecte le tissu pour aider à enlever les faux
plis des tissus lourds et pour plisser.
Appuyez fermement sur le bouton du jet pulvérisé pour
utiliser la caractéristique du jetd'eau pulvérisé.
Caractéristique De Jet De Vapeur
La caractéristique du jet de vapeur fourni un jet supplémentaire de vapeur pour une
profonde pénétration des faux plis tenaces. Vous pouvez utiliser cette caractéristique
lorsque vous repassez à sec ou avec la vapeur, mais le réservoir doit contenir au moins
1/4 de sa capacité d'eau.
Si vous désirez utiliser la caractéristique du jet de vapeur:
Placez le fer par-dessus le faux pli et appuyez sur le bouton
du jet de vapeur chaque fois que vous désirez obtenir un jet
supplémentaire de vapeur. La caractéristique du jet de vapeur
peut être continuellement utilisée en ne faisant qu'une courte
pause entre les jets.
Vapeur Verticale et Jet de Vapeur Vertcale
La caractéristique de vapeur verticale permet d'utiliser votre fer comme un presseur de
vêtements.
CONSEIL : Accrochez le vêtement sur un cintre pour obtenir de meilleurs résultats
lorsque vous utilisez la vapeur verticale sur un vêtement. Les draperies et
les rideaux suspendus peuvent aussi être traités à la vapeur.
Si vous désirez utiliser la vapeur verticale :
1. Assurez-vous que le fer est réchauffé (2 minutes).
2. Tenez le fer en position verticale et proche du tissu que vous
voulez vaporiser mais sans le toucher.
3. Tenez le tissu bien tendu avec votre autre main.
4. Appuyez sur le bouton du jet de vapeur durant des intervalles
de 3 secondes pendant que vous déplacez le fer d'un côté à
l'autre de la région froissée.
AVERTISSEMENT : Gardez vos mains éloignées de la région vaporisée afin d'éviter
les risques de brûlures.
AVERTISSEMENT : NE PAS vaporiser des vêtements pendant que vous les portez;
cela peut occasionner des blessures.
Page 24

23
Fonction Brevetée D'Arrêt Automatique
(Modèle 6021 seulement)
Le témoin d'alimentation va s'allumer sans arrêt pour vous signifier que le fer est
alimenté lorsque celui-ci est branché.
Si vous laissez le fer:
• Dans une position horizontale sans le déplacer ou que vous
le faites tomber, il s'arrêtera automatiquement de chauffer
après 30 secondes. Le témoin d'alimentation
va clignoter pour vous avertir que le fer a cessé de chauffer.
• Dans une position verticale (sur son support de talon) sans
le déplacer, il s'arrêtera automatiquement de chauffer
après 15 minutes. Le témoin d'alimentation va clignoter
pour vous avertir que le fer a cessé de chauffer.
IMPORTANT: Le témoin d'alimentation va continuer de
clignoter jusqu'à ce que le fer soit débranché
ou réactivé.
Pour réactiver le fer:
Déplacez le fer par un mouvement de va-et-vient et
laissez-le réchauffer pendant 2 minutes. Le témoin va cesser
de clignoter et le fer va recommencer à chauffer.
AVERTISSEMENT: La fonction brevetée d'arrêt automatique est une caractéristique
de sécurité, non pas un moyen recommandé de fermer votre fer.
Voir "Les soins pour votre fer après son utilisation" pour
l'information comment fermer votre fer et le ranger de façon
sécuritaire entre les utilisations.
Système Anticalcium
Le système anticalcium est un système permanent localisé à l'intérieur du réservoir
d'eau. Ce système enlève le calcium de l'eau et il réduit les accumulations de calcium
sur la semelle.
Page 25

O
f
f
S
y
n
t
h
e
t
i
c
S
i
l
k
W
o
o
l
C
o
t
t
o
n
L
i
n
e
n
S
t
e
a
m
24
SOINS POUR VOTRE FER
Arrêt De Votre Fer
1. Tournez le levier de vapeur sur O/Off (sec) et le cadran de sélection de tissus
sur O/Off.
2. Débranchez le fer de l'alimentation électrique.
AVERTISSEMENT: Ne tirez jamais sur le cordon d'alimentation lorsque vous
débranchez le fer. Ceci pourrait endommager le cordon.
Rangement De Votre Fer
1. Laissez refroidir le fer.
2. Videz le réservoir d'eau après chaque utilisation, pour une plus
longue durée de vie de votre fer, si vous n'utilisez pas votre fer
tous les jours. Pour ce faire, débranchez le fer, retournez le fer
à l'envers, ouvrez le couvercle de l'ouverture de remplissage et
laissez l'eau s'écouler par l'ouverture de remplissage. Agitez
doucement le fer pour enlever les gouttes d'eau prisonnières.
3. Enroulez de façon lâche le cordon d'alimentation autour du
support de talon et rangez le fer sur son support de talon.
IMPORTANT: Le fait d'enrouler de façon trop serrée le cordon
autour du fer peut endommager le cordon.
CONSEIL: Réglez toujours le levier de vapeur sur O/Off (sec)
et le cadran de sélection de tissus sur O/Off lorsque
le fer n'est pas utilisé.
Page 26

25
Entretien De Votre Fer À Vapeur
NETTOYAGE DE LA SEMELLE
Nettoyez la semelle si de l'amidon ou d'autres dépôts s'y accumulent.
Pour nettoyer la semelle:
1. Laissez refroidir le fer et essuyez-le ensuite avec un linge doux et humide.
AVERTISSEMENT: NE PAS utiliser de nettoyeurs abrasifs, de tampons à récurer ou
du vinaigre pour nettoyer la semelle. Ceci va endommager la
finition.
2. Glissez le fer sur un linge tout en coton pour enlever tout dépôt.
UTILISATION DE LA CARACTÉRISTIQUE AUTO NETTOYANTE
Vous devriez utiliser la caractéristique auto nettoyante une fois par mois pour conserver
la performance maximale de votre fer.
Pour utiliser la caractéristique auto nettoyante :
1. Déplacez à plusieurs reprises le levier de vapeur de façon à
effectuer un aller-retour de la position O/Off (sec) pour enlever
les dépôts et les minéraux de la soupape de vapeur. Ceci
permet à l'eau de circuler dans la chambre de vapeur.
NETTOYAGE DU SYSTÈME ANTICALCIUM
Votre fer à vapeur loge, dans le réservoir, un filtre anticalcaire qui élimine les impuretés
de l'eau.
Afin de prolonger l'efficacité de ce filtre :
1. Débranchez le fer et laissez-le refroidir.
2. Trouvez le gobelet d'eau livré avec le fer. Remplissez-le avec
de l'eau jusqu'à la marque de remplissage maximum. Ajoutez
à l'eau une cuiller à café de sel et remplissez le réservoir avec
cette solution.
3. Laissez reposer la solution dans le réservoir pendant 15 minutes
et videz ensuite le réservoir.
4. Remplissez une seconde fois le réservoir avec la solution d'eau salée et videz-le
encore une fois après 15 minutes.
5. Remplissez le réservoir, avec de l'eau fraîche, pour le rincer et videz-le.
Le système anticalcium devrait être nettoyé environ une fois par mois.
Page 27

26
1 - AN DE GARANTIE LIMITÉE
Sunbeam Products, Inc. ("Sunbeam") garantit que pour une période de UN an à compter
de la date d'achat, ce produit ne présentera aucun vice mécanique ou électrique,
matériel ou de fabrication. Sunbeam, selon son choix, réparera ou remplacera ce
produit ou tout autre élément défectueux, durant la période de couverture de la garantie.
Le remplacement consistera en un produit ou un élément nouveau ou remanufacturé.
Si le produit n'est plus disponible, il sera remplacé par un produit d'une valeur
comparable ou supérieure.
Cela constitue votre garantie exclusive.
Cette garantie est valable pour l'acheteur original à partir de la date d'achat initiale et ne
peut être transférée. Conserver le reçu d'achat original. Une preuve d'achat est requise
pour obtenir une application de la garantie. Les revendeurs, Centres de Service ou
magasins de revente Oster ®, n'ont pas le droit de transformer, modifier ou changer de
quelque façon les termes et les conditions de cette garantie.
La présente garantie ne couvre ni l'usure normale des pièces ni les dommages entraînés
par l'un quelconque des cas suivants: l'utilisation inappropriée ou négligente du produit,
son utilisation à une tension ou à un courant inadéquats, son utilisation contraire aux
directives du mode d'emploi, ou son démontage, sa réparation, son remaniement, sa
modification ou sa transformation par toute personne autre qu'un centre de service
après-vente agréé de Sunbeam. De plus, la garantie ne couvre aucun des actes de
Dieu comme incendie, inondation, ouragans et tornades.
Sunbeam n'acceptera aucune responsabilité de dommages conséquents ou accessoires
découlant du manquement à quelque garantie explicite ou implicite sur ce produit.
Sauf dans la mesure où l'empêchent les lois applicables, la durée de toute garantie
implicite sur la qualité marchande ou le caractère utilisable de ce produit pour un but
précis se limite à la durée de la garantie susmentionnée.
Pour Obtenir le Service de Garantie : Veuillez consulter l'insert de garantie correspondant
au pays spécifique ou contacter votre distributeur agréé local.
NE PAS RETOURNER CE PRODUIT À SON EMPLACEMENT D'ACHAT
Page 28

27
PRECAUCIONES IMPORTANTES
Cuando use algún aparato eléctrico siempre deben seguirse precauciones básicas de
seguridad incluyendo las siguientes:
• LEA TODAS LAS INSTRUCCIONES ANTES DE USAR.
• Use la Plancha únicamente para el uso al que está destinada.
• Para protegerse contra el riesgo de un choque eléctrico, no sumerja la Plancha en
agua ni en otros líquidos.
• La Perilla Selectora de Telas y la Palanca de Vapor siempre deben estar en Off/Apag.
y O/Off antes de enchufar o desenchufar la Plancha del tomacorriente. Nunca tire del
cable para desconectarla del tomacorriente, sujete el enchufe y tire de él para
desconectarla.
• No permita que el cable toque superficies calientes. Deje enfriar la Plancha por
completo antes de guardarla. Envuelva el cable flojamente alrededor de la Plancha
para guardarla.
• Siempre desconecte la Plancha del tomacorriente eléctrico cuanto esté llenándola de
agua o vaciándola y también cuando no esté en uso.
• No haga funcionar la Plancha si el cable está dañado o si la Plancha se ha caído o
dañado. Para evitar el riesgo de choque eléctrico, no desarme la Plancha. Llévela a
un Centro de Servicio Oster® Autorizado para que la examinen y/o reparen. El
rearmado incorrecto puede provocar el riesgo de un choque eléctrico al usar la
Plancha.
• Es necesario vigilar cuidadosamente a los niños cuando usen cualquier aparato o se
encuentren cerca de él. No deje la Plancha sin vigilancia mientras esté enchufada,
encendida o sobre una tabla de planchar.
• Se pueden producir quemaduras por contacto con las partes de metal calientes, el
agua caliente o el vapor. Tenga cuidado al voltear una plancha de vapor ya que puede
quedar agua caliente en el Tanque.
• Si la Plancha no funciona normalmente, desconéctela del tomacorriente y hágala
revisar por un Centro de Servicio Oster® Autorizado.
• Su Plancha Oster® está diseñada para apoyarse en el talón de apoyo. No deje la
Plancha sin vigilancia. No apoye la Plancha sobre una superficie no protegida, aun
cuando sea sobre el talón de apoyo.
• Este aparato funciona con alto vataje. Para evitar una sobrecarga del circuito no haga
funcionar otro aparato de alto vataje en el mismo circuito.
Page 29

28
(Para 120 & 127 Voltios)
Para reducir el riesgo de choque eléctrico, este aparato tiene un enchufe polarizado
(una clavija es más ancha que la otra). Este enchufe calza en un tomacorriente
polarizado sólo de una manera; si el enchufe no cabe totalmente en el tomacorriente,
gire el enchufe. Si aun así no calza, consulte a un electricista calificado. No intente
anular esta característica de seguridad.
• Si resulta absolutamente necesario usar un cable de extensión, se debe usar un
cable de 15 amperios. Los cables con tensiones nominales menores pueden
sobrecalentarse. Se debe cuidar de poner el cable de extensión de modo tal que no
pueda ser arrancado o provocar tropiezos.
GUARDE ESTAS INSTRUCCIONES
Page 30

29
Bienvenido
¡Felicitaciones por su compra de una Plancha de Vapor OSTER®!
Hemos diseñado su Plancha para brindarle la mayor calidad, facilidad de uso y
comodidad. Su Plancha OSTER® ofrece las siguientes funciones:
• Botón de Rociador Fino de Agua - Un poderoso spray de agua para eliminar
arrugas y humedecer las telas para marcar los dobleces.
• Botón de Golpe de Vapor Adicional - Un chorro de vapor adicional para eliminar
arrugas persistentes.
• Golpe de Vapor Vertical - Un chorro de vapor vertical adicional para eliminar arrugas
persistentes de prendas colgadas o cortinas.
• Vapor Vertical - Elimina las arrugas de prendas colgadas o cortinas.
• Función Patentada de Apagado Automático (modelo 6021 únicamente) - Detecta
el tiempo, el movimiento y la posición. Apaga la Plancha automáticamente si no se
mueve al cabo de 30 segundos en la posición de planchado y/o al cabo de 15 minutos
en posición vertical. La Plancha no calentará nuevamente a menos que se mueva.
• Autolimpieza - Impide la acumulación de minerales que pueden reducir la vida útil de
su Plancha.
• Sistema Anti Calcio - Elimina el calcio del agua y reduce la acumulación de minerales
en la Base.
• Cable Giratorio de 360° Sin Enredos - Mantiene el cable eléctrico alejado de la tela
y fuera de su camino, sea usted diestro o zurdo.
• Cable Eléctrico Más Largo (modelo 6021 únicamente) - Con 12 pies (3,7 metros)
de cable eléctrico para brindarle mayor flexibilidad al planchar.
• Gran Orificio Para Cargar Agua con Tapa - Le permite llenar el Tanque con Agua
más rápido y a la vez reduce los derrames y goteos de agua.
• Acepta agua del grifo - Elimina la necesidad de tener agua destilada a mano para
planchar.
• Luz Indicadora de Encendido - Queda prendida permanentemente para indicar que
la Plancha está enchufada, titila para indicar que la función de apagado automático
(modelo 6021 únicamente) se ha activado y permanece apagada cuando la plancha
está desenchufada.
• Mango Suave al Tacto - Brinda un manejo cómodo y ayuda a eliminar el
deslizamiento.
Page 31

30
1. Accionador de Rociador Fino de Agua
2. Orificio para Cargar Agua con Tapa
3. Palanca de Vapor Variable/ Autolimpieza
4. Botón de Rociador Fino
5. Botón de Golpe de Vapor/ Golpe de Vapor Vertical
6. Luz Indicadora de Encendido / Luz Titilante Indicadora
de Apagado Automático (modelo 6021 únicamente)
7. Cable Giratorio de 360° Sin Enredos
8. Perilla Selectora de Telas
9. Tanque de Agua Transparente
10. Base
11. Mango Suave al Tacto
12. Sistema Anti Calcio - dentro del Tanque de Agua
DESCRIPCIÓN DE LA PLANCHA DE VAPOR
1
2
3
4
5
6
7
8
9
10
11
12
Page 32

31
INSTRUCCIONES PARA USO
Llenando Con Agua
Debe llenar el Tanque de Agua para utilizar las funciones Golpe de Vapor y Rociador
Fino de Agua y para planchar con vapor.
Consejo: Se hace pruebas con cada Plancha en la fábrica para asegurarse de que
funcione correctamente. Es posible que después de la prueba quede una
pequeña cantidad de agua en el Tanque de Agua, la cual no afecta la
Plancha en lo absoluto.
Antes de llenar el Tanque de Agua, por favor tome en cuenta lo siguiente:
• Si bien esta Plancha ha sido diseñada para uso con agua de grifo, el agua muy dura
reducirá el rendimiento de la Plancha. Si tiene agua muy dura, se recomienda usar
agua de grifo la primera vez y luego considere la posibilidad de usar agua
desmineralizada o destilada para los usos posteriores. Sin embargo, debería usar
agua de grifo una vez por mes, para mantener el rendimiento de vapor óptimo de la
Plancha.
• No use agua que haya pasado por un sistema doméstico de ablandamiento de agua.
Este tipo de agua contiene minerales que disminuyen el rendimiento y reducen la vida
útil de su Plancha. Use agua desmineralizada o destilada.
Importante: Cuando no esté planchando, siempre ponga la Palanca de Vapor en
O/Off y la Perilla de Selección de Telas en Off/Apag.
Para llenar el Tanque de Agua
1. Levante la Tapa del Orificio para Cargar Agua.
La Tapa se puede abrir y se puede volver a
cerrar cuidadosamente.
2. Asegúrese de que la Plancha esté
desenchufada. Ponga la Palanca de Vapor en
O/Off y la Perilla de Selección de Telas en
Off/Apag.
3. Llene la taza con agua. Vierta el agua en el Tanque de Agua de la Plancha. No
llene el Tanque de Agua más del nivel máximo de llenado.
ADVERTENCIA: Para prevenir el riesgo de quemaduras, tenga cuidado al llenar
una Plancha caliente con agua. Las partes de metal calientes, el
agua caliente y el vapor pueden causar lesiones.
Page 33

32
Planchando En Seco
1. Asegúrese de que la Palanca de Vapor esté en la posición
O/Off.
2. Enchufe el Cable en un tomacorriente.
3. Gire la Perrilla Selectora de Telas en la posición deseada para
planchando en seco (Seda o Sintéticos) y deje que la Plancha
se caliente durante 2 minutos. Mientras la Plancha se está
calentando, asegúrese de que esté apoyada sobre su talón
de apoyo, encima de una superficie estable y protegida.
NOTA: Mientras que la Palanca de Vapor esté en la posición
O/Off, Usted todavía puede usar la característica de
Golpe a Vapor o Rociador Fino. Por favor asegúrese que
el Tanque de Agua esté lleno de agua hasta 1/4.
SUGERENCIA: Consulte la "Guía de Planchado" para conocer el nivel de temperatura
adecuado para su tela.
Planchando Al Vapor
1. Siga las instrucciones de la sección "Llenando Con Agua".
2. Enchufe el Cable en el tomacorriente.
3. Gire la Perilla Selectora de Telas a la posición deseada
(Sintéticos, Seda, Lino, Algodón o Lana). Deje que la Plancha
se caliente durante 2 minutos. Mientras la Plancha se está
calentando, asegúrese de que esté apoyada sobre su talón de
apoyo, encima de una superficie estable y protegida.
SUGERENCIA: Consulte la "Guía de Planchado" para conocer
el nivel de temperatura adecuado para su tela.
4. Permita que la Plancha se caliente por 2 minutos y después
mueva la Palanca de Vapor a la posición que desea.
IMPORTANTE: Cuando no esté planchando, siempre ponga la
Palanca de Vapor en O/Off y la Perilla de Selección de Telas en
Off/Apag.
Page 34

33
Recomendaciones Para El Planchado
• Siempre lea las etiquetas de la prenda y siga las instrucciones de planchado del
fabricante.
• Clasifique las prendas que va a planchar según el tipo de tela.
• Primero debe planchar las prendas que requieren baja temperatura (por ejemplo, las
prendas de seda y tela sintética) a fin de evitar dañarlas con una plancha que esté
demasiado caliente.
• Si no está seguro de cuál es el contenido de la tela de una prenda, pruebe planchando
un área pequeña, como por ejemplo una costura o guarnición, antes de planchar un
área visible. Empiece con una temperatura baja y auméntela gradualmente hasta
encontrarla temperatura apropiada.
• Cuando cambie la temperatura de un valor alto a un valor bajo, deje pasar
aproximadamente 5 minutos para llegar a la temperatura menor.
• Cuando planche al vapor, utilice pasadas largas y lentas de la Plancha sobre la tela.
Esto permitirá que el vapor penetre en la tela y que el calor de la placa de base seque
la humedad.
• Para planchar prendas de lino, voltee de adentro para afuera la prenda. Tenga
cuidado de no usar una plancha demasiado caliente porque el forro puede derretirse
o adherirse a la placa de Base.
• Para planchar cremalleras, use un paño de planchar o asegúrese de que la cremallera
esté cerrada y planche sobre la solapa. Nunca planche directamente sobre una
cremallera desprotegida.
• Use la "Guía de Planchado" que se proporciona para seleccionar el mejor método y
regulación para la tela que va a planchar.
Page 35

34
* Un paño de planchar es una tela de algodón lavada en seco que se coloca sobre la prenda
que se está planchando para evitar que se vea brillosa.
NOTA: Algunas telas pueden necesitar más vapor que otras. Su plancha tiene la capacidad
de regular el vapor conforme se necesite.
Selección
de Vapor
Sugerida
Disco de
Selección
de Tela
Recomendaciones
de Planchado
Tela
Guía de Planchado
Acrílico
Acetato
Seda
Viscosa
Nylon
Poliéster
Rayón
Lana
Combinaciones
de Lana
Combinaciones
de Algodón
Pana
Algodón
Lino
Mezclilla/Jean
Sintéticos
Sintéticos
Seda
Seda
Sintéticos
Sintéticos
Sintéticos
Lana
Lana
Algodón
Algodón
Algodón
Lino
Lino
Planche la prenda por el revés.
Planche la prenda por el revés
mientras está húmeda.
Planche la prenda por el revés.
Planche la prenda por el revés o
use un paño de planchar* para
evitar marcas brillosas.
Planche la prenda principalmente
en seco; se puede usar vapor
según las instrucciones del
fabricante de la prenda.
Planche la prenda por el revés
mientras está húmeda.
Planche la prenda por el revés
mientras está húmeda.
Planche la prenda por el revés o
use un paño de planchar.*
Planche la prenda por el revés o
use un paño de planchar.*
Siga las instrucciones del
fabricante de la prenda. Use la
selección que corresponde a la
fibra que requiere la selección
más baja.
Planche la prenda por el revés o
use un paño de planchar* y luego
cepille la prenda con la mano
para levantar la textura de la tela.
Planche las telas oscuras por el
revés para evitar marcas brillosas.
Planche la prenda por el revés o
use un paño de planchar* para
evitar marcas brillosas
(especialmente en telas oscuras).
Use la función de Rociador Fino
y/o Golpe de Vapor a fin de lograr
una penetración más profunda
para eliminar las arrugas.
O/ Off
O/ Off
O/ Off
O/ Off
O/ Off
O/ Off
O/ Off
Page 36

35
FUNCIONES ESPECIALES DE LA PLANCHA
La Función De Rociador Fino
La función de Rociador Fino es un poderoso spray de agua
que humedece la tela para ayudar a eliminar las arrugas de
las telas gruesas y para marcar los dobleces.
Para usar la función de Rociador Fino: Presione el Botón
de Rociador Fino firmemente.
La Función De Golpe De Vapor
La función de Golpe de Vapor brinda un chorro de vapor adicional para penetración
profunda en arrugas persistentes. Puede usar esta función mientras planche en seco o
con vapor, pero por lo menos 1/4 del Tanque de Agua debe estar lleno.
Para usar la función de Golpe de Vapor: Ponga la Plancha
sobre la arruga y presione el Botón de Golpe de Vapor cada
vez que desee aplicar un chorro adicional de vapor. La función
de golpe de vapor se puede usar en forma continua con sólo
una breve pausa entre chorros.
Vapor Vertical y Golpe de Vapor Vertical
La función de Vapor Vertical permite que su Plancha funcione como vaporizador para
prendas.
CONSEJO: Cuando use el Vapor Vertical sobre las prendas, cuélguelas de una percha
para obtener mejores resultados. También se puede usar en cortinas y
cortinados colgados.
Para usar el Vapor Vertical:
1. Asegúrese de que la Plancha se haya calentado (2 minutos).
2. Sostenga la Plancha en posición vertical, con la Plancha cerca
de la tela que desea vaporizar pero sin tocarla.
3. Con la otra mano, mantenga tensa la tela.
4. Presione el Botón de Golpe de Vapor a intervalos de
aproximadamente 3 segundos a medida que mueve la Plancha
por la zona arrugada.
ADVERTENCIA: Para prevenir el riesgo de quemaduras, mantenga las manos alejadas
de la zona que está vaporizando.
ADVERTENCIA: NO vaporice las prendas mientras las tenga puestas ya que esto
puede provocar lesiones.
Page 37

36
Función Patentada De Apagado Automático
(Modelo 6021 Únicamente)
Cuando la Plancha está enchufada, el indicador de encendido quedará encendido todo
el tiempo para señalar que llega energía eléctrica a la Plancha.
Si deja la Plancha:
• En posición horizontal sin moverla, o la voltea
accidentalmente, automáticamente dejará de calentar al
cabo de 30 segundos. El Indicador de Encendido titilará
para hacerle saber que la plancha ha dejado de calentar.
• En posición vertical (sobre su talón de apoyo) sin moverla,
la Plancha se apagará automáticamente al cabo de 15
minutos. El Indicador de Encendido titilará para hacerle
saber que la Plancha ha dejado de calentar.
IMPORTANTE: El Indicador de Encendido continuará
titilando hasta que la Plancha
sea desenchufada o reiniciada.
Para reiniciar la Plancha:
Mueva la Plancha hacia atrás y hacia adelante y déjela
volver a calentar durante 2 minutos. El Indicador dejará
de titilar y la Plancha comenzará a calentar nuevamente.
ADVERTENCIA: La Función Patentada de Apagado Automático es una función de
seguridad, no una forma recomendada de apagar su Plancha.
Consulte en "Cuidado de su Plancha ", la información sobre cómo
apagar su plancha y almacenarla con seguridad después del uso.
Sistema Anti Calcio
El Sistema Anti Calcio es un sistema permanente ubicado dentro del Tanque de Agua.
Este sistema elimina el calcio del agua y reduce la acumulación de sarro en la Base de
la Plancha.
Page 38

O
f
f
S
y
n
t
h
e
t
i
c
S
i
l
k
W
o
o
l
C
o
t
t
o
n
L
i
n
e
n
S
t
e
a
m
37
CUIDADO DE SU PLANCHA
Apagado De Su Plancha
1. Ponga la Palanca de Vapor en O/Off y la Perilla Selectora de Telas en Off/Apag.
2. Desenchufe la Plancha del tomacorriente.
ADVERTENCIA: NUNCA tire del Cable para desenchufar la Plancha. Esto puede dañar
el Cable.
Almacenamiento De Su Plancha
1. Deje enfriar la Plancha.
2. Si no usa la Plancha diariamente, vacíe el Tanque de Agua
después de cada uso para que la misma tenga una mayor vida
útil. Para hacerlo, desenchufe la Plancha, inviértala, abra la
Tapa del Orificio para cargar agua y deje que salga el agua por
el orificio. Sacuda la Plancha suavemente para eliminar las gotas
de agua retenidas.
3. Enrolle el Cable alrededor del talón de apoyo y almacene la
Plancha parada sobre su talón de apoyo.
IMPORTANTE: Si se enrolla el cable de manera muy ajustada
alrededor de la Plancha se puede dañar el cable.
CONSEJO: Cuando no esté planchando, siempre ponga la
Palanca de Vapor en O/Off y la Perilla de Selectora
de Telas en Off/Apag.
Page 39

38
Mantenimiento De Su Plancha
LIMPIEZA DE LA BASE
Limpie la base si se acumula almidón o algún otro residuo.
Para limpiar la base:
1. Deje enfriar la Plancha y luego pásele un paño suave y húmedo.
ADVERTENCIA: NO use limpiadores abrasivos, esponjas de metal ni vinagre para
limpiar la base. Esto dañará el acabado.
2. Pase la Plancha por un paño de puro algodón para eliminar cualquier residuo.
USO DE LA FUNCIÓN DE AUTOLIMPIEZA
Debe usar la función de autolimpieza una vez al mes para mantener el rendimiento
óptimo de su Plancha.
Para usar la Función de Autolimpieza:
1. Mueva varias veces la Palanca de Vapor O/Off de un lado
hacia el otro para eliminar los residuos y los minerales de
la válvula de vapor. Esto permite que el agua fluya en el
compartimiento del vapor.
LIMPIEZA DEL SISTEMA ANTI CALCIO
Su plancha OSTER® contiene un filtro anti calcio en el Tanque, que elimina las
impurezas del agua.
Para prolongar la eficiencia de este filtro:
1. Desenchufe la Plancha y déjela enfriar.
2. Encuentre la taza para agua que vino con la Plancha. Llene
la taza con agua hasta el indicador de nivel máximo del
Tanque de Agua. Agregue 1 cucharadita de sal al agua y
llene el Tanque de Agua con esta solución.
3. Deje la solución en el Tanque de Agua durante 15 minutos y
luego vacíelo.
4. Llene el Tanque de Agua por segunda vez con la solución de agua salada y vacíelo
nuevamente al cabo de 15 minutos.
5. Llene el Tanque con agua fresca para enjuagar y vacíelo.
El Sistema Anti Calcio debe limpiarse aproximadamente una vez por mes.
Page 40

39
GARANTÍA LIMITADA DE 1 AÑO
Sunbeam Products, Inc. ("Sunbeam") garantiza que este producto estará libre de
defectos en material o mano de obra por un período de un año a partir de la fecha de la
compra. Sunbeam, a su elección, reparará o reemplazará este producto o cualquier
componente del producto que se encuentre defectuoso durante el período de garantía.
El reemplazo será efectuado por un producto o componente nuevo o remanufacturado.
Si el producto ya no está disponible, el reemplazo podrá efectuarlo por un producto
similar de igual o mayor valor. Esta es su garantía exclusiva.
Esta garantía es válida para el comprador original al detalle desde la fecha de compra
original al detalle y no es transferible. Guarde el recibo de venta original. Se requiere
prueba de compra para obtener la garantía. Los concesionarios Oster®, Centros de
Servicio Oster® Autorizado, o almacenes de ventas al detalle de productos Oster® no
tienen el derecho de alterar, modificar o cambiar, de manera alguna, los términos y
condiciones de esta garantía.
Esta garantía no cubre el desgaste normal de las piezas o daños resultantes de
cualquiera de los siguientes: uso negligente o mal uso del producto, uso en voltaje o
corriente inapropiada, uso contrario a las instrucciones de operación, desarme,
reparación o alteración por cualquier persona que no sea de un Centro de Servicio
Oster® Autorizado. Además, esta garantía no cubre: Actos de la naturaleza, tales como
incendios, inundaciones, huracanes o tornados.
Sunbeam no será responsable por ningún daño incidental o consecuente causado por
el incumplimiento de la garantía o condición expresa, implícita o reglamentaria. Excepto
hasta donde lo prohíben las leyes aplicables, cualquier garantía implícita o condición de
comerciabilidad o aptitud para un propósito particular, está limitada en duración a la
duración de la garantía descrita arriba.
Sunbeam niega cualquier otra garantía, condición o representación, expresa, implícita,
reglamentaria o de otra manera. Sunbeam no será responsable por ningún tipo de
daño que resulte de la compra, uso o mal uso, o inhabilidad de usar el producto
incluyendo daños incidentales, especiales, consecuentes o similares o pérdida de lucro,
o por cualquier incumplimiento de contrato, fundamental o de otra manera, o por
cualquier reclamo contra el comprador iniciado por cualquier otra tercera persona.
Cómo Obtener Servicio de Garantía
Por favor consulte el inserto de la garantía correspondiente al país o póngase en
contacto con su distribuidor autorizado local.
NO REGRESE ESTE PRODUCTO AL LUGAR DE COMPRA
Page 41

40
PRECAUÇÕES IMPORTANTES
Sempre que utilizar eletrodomésticos, você deve tomar algumas precauções básicas
de segurança, como as que seguem:
• LEIA E GUARDE TODAS AS INSTRUÇÕES ANTES DE USAR O FERRO A VAPOR.
• Use o Ferro a Vapor somente para o fim a que ele se destina.
• Para evitar o risco de choque elétrico, não coloque o Fio, plugue ou o Ferro em água
ou outros líquidos.
• O Botão Seletor de Tecidos e a Alavanca do Vapor devem estar sempre na posição
de delisgados O/Off antes de que o Ferro seja conectado ou desconectado à tomada.
Jamais puxe o Fio para desconectar o Ferro da tomada, segure o plugue e puxe-o
para desconectar.
• Não deixe que o Fio elétrico entre em contato com superfícies quentes. Deixe o Ferro
esfriar completamente antes de guardá-lo. Enrole o Fio sem forçar ao redor da parte
posterior do Ferro para guardá-lo.
• Sempre desligue o Ferro a Vapor da tomada, quando estiver enchendo ou esvaziando
o mesmo com água ou quando o mesmo não estiver sendo usado.
• Não use o Ferro a Vapor se o Fio ou o plugue estiver danificado. Não utilize o Ferro
caso o mesmo tenha caído ou estiver danificado. Para avaliação e conserto
adequado, leve o Ferro a Vapor a um Centro de Serviço Técnico Autorizado Oster®
mais próximo. O conserto incorreto pode apresentar riscos de choque elétrico para o
usuário.
• É necessário muito cuidado quando o aparelho estiver sendo usado próximo a
crianças. Nunca deixe o Ferro a Vapor desatendido enquanto estiver ligado ou sobre
a tábua de passar.
• Queimaduras podem ocorrer ao tocar às partes quentes do Ferro a Vapor, a água
quente e o vapor. Seja cauteloso ao virar o Ferro a Vapor de cabeça para baixo, pois
pode haver água quente dentro do Reservatório de Água.
• Caso o Ferro a Vapor não estiver funcionando normalmente, desconecte-o da tomada
e leve-o para ser avaliado por um Centro de Serviço Técnico Autorizado Oster®.
• Seu Ferro a Vapor Oster® foi desenvolvido para ser colocado na posição vertical
sobre a Base de descanso posterior. Não deixe o Ferro desatendido. Não o coloque
sobre uma superfície não protegida, mesmo que estiver colocado sobre sua a base
de descanso.
Page 42

41
(Para 120 & 127 Volts)
Para reduzir o risco de choque elétrico, este aparelho possui um plugue polarizado
(uma das lâminas é mais larga do que a outra), encaixando-se em uma tomada
polarizada de uma única forma. Esse é um recurso de segurança planejado para
reduzir o risco de choque elétrico. Caso o plugue não se encaixe completamente na
tomada, inverta-o. Se, mesmo assim, ainda não encaixar, entre em contato com um
eletricista habilitado. Não tente eliminar esse recurso de segurança.
• Este aparelho funciona com alta potência. Para evitar uma sobrecarga no circuito,
não ligue outro aparelho com alta potência no mesmo circuito elétrico.
• Caso seja absolutamente necessário usar um fio de extensão, use um fio de 15
ampères. Os fios com tensões nominais menores podem super aquecer. Deve-se
usar o fio de extensão de modo a que não possa ser arrancado ou provocar tropeços.
GUARDE ESTAS INSTRUÇÕES
Page 43

42
¡Parabéns Pela Sua Compra Do Ferro A Vapor Oster®
Este Ferro a Vapor foi desenvolvido para dar maior qualidade, facilidade de uso e
conforto. Seu Ferro a Vapor OSTER® lhe proporcionará com as seguintes funções:
• Botão de Spray Fino de Água - Produz um forte spray de água para eliminar rugas e
umedecer os tecidos ou formar vincos.
• Botão de Jato de Vapor Adicional - Trata-se de um jato de vapor adicional que ajuda
a eliminar rugas mais difíceis e persistentes.
• Jato de vapor Vertical - Um jato de vapor vertical adicional para eliminar rugas
persistentes de roupas penduradas on cortinas.
• Vapor Vertical - Elimina rugas de peças penduradas e cortinas.
• Função Patenteada de Desligamento Automático (somente no modelo 6021) -
Detecta tempo, movimento e posição. Desliga o Ferro automaticamente caso o mesmo
permaneça 30 segundos sem movimento na posição de passar e/ ou em 15 minutos
se estiver na posição de vertical de descanso. O Ferro não se aquecerá novamente a
menos que seja colocado em movimento outra vez.
• Autolimpeza - Impede o acumulo de minerais que pode reduzir a vida útil de seu Ferro
a Vapor.
• Sistema Anticálcio - Elimina o cálcio da água e reduz o acumulo de minerais da base.
• Fio Giratório de 360° - Mantém o Fio fora do caminho tanto para destros quanto para
canhotos.
• Fio Mais Longo (somente no modelo 6021) - Tem aproximadamente 3,7 metros
(12 pés) de comprimento para maior flexibilidade.
• Abertura para Encher Água com Tampa - Permite encher o reservatório de água
rapidamente sem vazamentos.
• Aceita água da torneira - Elimina a necessidade de usar água destilada para o Ferro.
• Luz Piloto - Fica acesa sempre que o Ferro estiver conectado na tomada. Pisca
intermitentemente para indicar que a Função Patenteada de Desligamento Automático
está ativada (somente no modelo 6021) e permanece apagada quando o Ferro está
desconectado da tomada.
• Empunhadura Macia - Proporciona conforto ao passar..
Page 44

43
1. Acionador do Spray Fino
2. Orifício para Encher com Água com Tampa
3. Alavanca de Vapor/ Autolimpeza
4. Botão do Spray Fino
5. Botão do Jato de Vapor Adicional/ Jato de Vapor Vertical
6. Luz Piloto/ Luz que Pisca Intermitentemente na Função
de Desligamento Automático (Somente no Modelo 6021)
7. Fio Giratório de 360°
8. Botão Seletor de Tecidos
9. Reservatório de Água Transparente
10. Base
11. Empunhadura Macia
12. Sistema Anticálcio - dentro do Reservatório de Água
DESCRIÇÃO DO FERRO A VAPOR
1
2
3
4
5
6
7
8
9
10
11
12
Page 45

44
INSTRUÇÕES PARA O USO
Enchendo Com Água
Deve-se encher o Reservatório de Água para utilizar as funções de Jato de Vapor, de
Spray Fino de Água e para passar com vapor.
DICA: Todo Ferro é testado na fábrica para garantir o funcionamento adequado. É
possível que após os testes de fábrica uma pequena quantidade de água
poderá ter ficado no Reservatório de Água, a qual não afeta o desempenho do
Ferro em nada.
Antes de encher o Reservatório de Água, favor levar em conta o seguinte:
• Embora este Ferro tenha sido desenvolvido para ser usado com água da torneira, a
água muito dura reduz o rendimento do Ferro. Se a água for muito dura,
recomenda-se usar água da torneira na primeira vez e logo em seguida avalie a
possibilidade de usar água sem minerais ou destilada para seguir usando o Ferro.
De qualquer maneira, deve-se usar água da torneira pelo menos uma vez por mês,
para manter o rendimento de vapor ideal do Ferro.
• Não use água que tenha sido tratada em um sistema doméstico para diminuir sua
dureza. Esse tipo de água contém minerais que diminuem o rendimento e reduzem a
vida útil de seu Ferro. Use água sem minerais ou destilada.
IMPORTANTE: Coloque sempre a Alavanca de Vapor na posição O/Off e o Botão
Seletor de Tecidos na posição Off/Apag. quando não estiver
passando.
Para encher o Reservatório de Água
1. Levante a Tampa do Orifício para Encher
Água.
2. Certifique-se de que o Ferro esteja desligado
da tomada. Coloque a Alavanca de Vapor em
O/Off e o Botão Seletor de Tecidos em
Off/ Apag.
3. Encha o copinho com água. Coloque a água
no Reservatório de Água do Ferro. Não encha
o Reservatório de Água além do nível máximo indicado no mesmo.
CUIDADO: Para evitar o risco de queimaduras, tome cuidado ao encher o Ferro a
Vapor quando o mesmo estiver quente. As superfícies quentes, a água
quente e o vapor podem causar queimaduras.
Page 46

45
Passando A Seco
1. Certifique-se de que a Alavanca de Vapor esteja na posição
O/Off.
2. Conecte o plugue na tomada.
3. Gire o Botão Seletor de Tecidos colocando-o na posição
desejada para passar a seco (Seda ou Sintéticos) e deixe que
o Ferro esquente por 2 minutos. Enquanto o Ferro estiver
esquentando, certifique-se de que o mesmo esteja colocado
sobre a base de descanso posterior sobre uma superfície
estável e protegida.
OBSERVAÇÃO: Mesmo enquanto o Alavanca de Vapor estiver
na posição de desligada O/Off, você poderá
usar as funções de Jato de Vapor Adicional ou
Spray Fino. Certifique-se de que o Reservatório
de Água esteja com água em pelo menos ¼ de
sua capacidade máxima.
SUGESTÃO: Consulte o "Guia para Passar" para saber qual é a temperatura mais
adequada para o tecido a ser passado.
Passando Com Vapor
1. Siga as instruções da seção "Enchendo Com Água"
2. Conecte o plugue na tomada.
3. Gire o Botão Seletor de Tecidos colocando-o na posição
desejada [Sintéticos, Seda, Lino (Linho), Algodón (Algodão)
ou Lana (Lã)]
SUGESTÃO: Consulte o "Guia para Passar" para saber qual
é a temperatura mais adequada para o tecido a
ser passado.
4. Deixe que o Ferro esquente por 2 minutos e depois coloque
a Alavanca de Vapor na posição desejada.
IMPORTANTE: Quando não estiver passando, coloque a
Alavanca de Vapor na posição O/Off e o Botão
Seletor de Tecidos em O/Off.
Page 47

46
Recomendações Para Passar
• Leia sempre as etiquetas das peças e siga as instruções para passar do fabricante.
• Classifique as peças a serem passadas segundo os tipos de tecido.
• Passar primeiro as peças que requerem temperaturas mais baixas (por exemplo, as
peças de seda e tecidos sintéticos) evitando assim danificá-las com o Ferro muito
quente.
• Caso não tenha certeza de qual é a composição do tecido de uma determinada peça,
faça uma prova em uma área pequena, como por exemplo, uma costura, antes de
passar uma área mais visível. Comece com uma temperatura baixa e vá aumentando
gradualmente até atingir a temperatura adequada.
• Quando mudar a temperatura de um nível mais alto para um nível mais baixo,
aguarde aproximadamente 5 minutos para atingir a temperatura mais baixa.
• Ao passar com vapor, mova o Ferro lentamente e ao longo de toda a extensão do
tecido. Isso fará com que o vapor penetre na tela e que o calor da Base seque a
umidade.
• Para passar zíperes, use um pano para passar ou certifique-se que o zíper esteja
fechado e passe acima do tecido que cobre o zíper. Nunca passe diretamente sobre
um zíper desprotegido.
• Use o "Guia Para Passar" para selecionar a melhor seleção para o tecido a ser
passado.
Page 48

47
Seleção da
Alavanca
de Vapor
Seleção do
Botão Seletor
de Tecidos
Recomendações
ao Passar
Seleção do
Tecido
Guia Para Passar
Acrílico
Acetato
Seda
Viscose
Nylon
Poliéster
Rayón
Lã
Combinações
de Lã
Combinações
de Algodão
Veludo
Algodão
Linho
Jeans
Sintéticos
Sintéticos
Seda
Seda
Sintéticos
Sintéticos
Sintéticos
Lana (Lã)
Lana (Lã)
Algodón
(Algodão)
Algodón
(Algodão)
Algodón
(Algodão)
Lino
(Linho)
Lino
(Linho)
Passar do lado avesso.
Passar do lado avesso enquanto
estiver úmida.
Passar do lado avesso.
Passar do lado avesso ou usar
um pano para passar* para
evitar marcas com brilho.
Passar praticamente só a seco;
usar vapor caso as instruções
da etiqueta do tecido assim
indiquem.
Passar do lado avesso enquanto
estiver úmida.
Passar do lado avesso enquanto
estiver úmida.
Passar do lado avesso ou usar
um pano para passar*.
Passar do lado avesso ou usar
um pano para passar*.
Seguir as instruções do
fabricante da peça. Usar a
seleção correspondente a fibra
que requer a seleção mais baixa.
Passar do lado avesso ou usar
um pano para passar* e em
seguida use a mão para levantar
"pentear" a textura do tecido.
Passar escuras do lado avesso
para evitar marcas com brilho.
Passar escuras do lado avesso
para evitar marcas com brilho
(especialmente em tecidos
escuros).
Passar do lado avesso ou use
o Spray Fino e/ ou o Jato de
Vapor Adicional para obter uma
penetração mais profunda para
eliminar as rugas.
* Um pano para passar pode ser de algodão lavada a seco para ser colocada em cima do
tecido a ser passado evitando assim que o mesmo fique marcado com brilho.
NOTA: Alguns tecidos podem precisar de mais vapor do que outros. Seu Ferro permite ajustar
a quantidade de vapor segundo seja necessário.
O/ Off
O/ Off
O/ Off
O/ Off
O/ Off
O/ Off
O/ Off
Page 49

48
USO DAS FUNÇÕES ESPECIAIS DO FERRO
Spray Fino
O spray fino produz um forte borrifo de água que umedece
o tecido e ajuda a eliminar rugas das telas mais grossas e
formar vincos.
Para usar a o Spray Fino: Pressione o Botão de Spray Fino
firmemente direcionando o Ferro à parte do tecido que
estiver passando.
Jato De Vapor Adicional
O Jato de Vapor Adicional proporciona um jato adicional de vapor que penetra
profundamente as rugas mais resistentes. Esta função pode ser usada tanto ao passar
a seco quanto ao passar com vapor, contanto o Reservatório de Água contenha água
até pelo menos ¼ de sua capacidade máxima.
Para usar o Jato de Vapor: Coloque o Ferro a Vapor sobre a
ruga e pressione o Botão de Jato de Vapor Adicional toda vez
que desejar aplicar um jato adicional de vapor. O jato de vapor
adicional pode ser usado de forma contínua contanto que seja
dada uma pequena pausa entre um jato e outro
Vapor Vertical e Jato de Vapor Vertical
O Vapor Vertical permite que o seu Ferro a Vapor funcione como um vaporizador de
tecidos.
DICA: Ao usar o Vapor Vertical sobre os tecidos, pendure a peça por um cabide para
melhores resultados. Também pode ser usado em cortinas.
Para usar o Vapor Vertical:
1. Certifique-se de que o Ferro a Vapor esteja quente (2 minutos).
2. Mantenha o Ferro na posição vertical próximo ao tecido que
deseja vaporizar sem tocar o mesmo.
3. Com a outra mão, mantenha o tecido esticado.
4. Aperte o Botão de Jato de Vapor em intervalos de
aproximadamente 3 segundos enquanto estiver movendo o
Ferro a Vapor no tecido com rugas.
CUIDADO: Para evitar o risco de queimadura, mantenha as
mãos longe da região que estiver vaporizando.
CUIDADO: Não vaporize nenhuma roupa quando estiverem vestidas, pois isso poderá
causar lesões.
Page 50

49
Função Patenteada De Desligamento Automático
(Somente No Modelo 6021)
Quando o Ferro estiver ligado na tomada, a Luz Piloto ficará acesa o tempo todo,
indicando que está conectado a energia elétrica.
Se o Ferro for deixado:
• Na posição horizontal sem movimento ou caso caia ligado
na posição horizontal, o Ferro automaticamente parará de
aquecer em 30 segundos. A Luz Piloto piscará
intermitentemente avisando que o Ferro parou de aquecer.
• Na posição vertical apoiado na base posterior de apoio
sem movimento, o Ferro apagará automaticamente em
15 minutos. A Luz Piloto piscará intermitentemente
avisando que o Ferro parou de aquecer.
IMPORTANTE: A Luz Piloto continuará piscando até que
o Ferro seja desligado da tomada ou for
acionado outra vez.
Para acionar o Ferro:
Mover o Ferro para frente e para trás e deixe-o esquentar
por 2 minutos. A Luz Piloto parará de piscar e o Ferro
começará a esquentar novamente.
CUIDADO: A Função Patenteada de Desligamento Automático é uma função de
segurança, não uma maneira para desligar seu Ferro. Consulte a seção
"Cuidados Com Seu Ferro" para maiores informações sobre como desligar
seu Ferro e como guardá-lo com segurança após o uso.
Sistema Anticálcio
O Sistema Anticálcio é um sistema fixo localizado dentro do Reservatório de Água.
Esse sistema elimina o cálcio da água e reduz o acumulo do mesmo na base do Ferro.
Page 51

O
f
f
S
y
n
t
h
e
t
i
c
S
i
l
k
W
o
o
l
C
o
t
t
o
n
L
i
n
e
n
S
t
e
a
m
50
CUIDADOS COM SEU FERRO
Desligue Seu Ferro
1. Coloque a Alavanca de Vapor em O/Off e o Botão Seletor de Tecidos em Off/Apag.
2. Desligue o Ferro da tomada.
CUIDADO: Jamais puxe pelo Fio para desligar o Ferro, pois isso poderá danificar o
mesmo.
Guardando O Ferro
1. Deixe o Ferro esfriar.
2. Caso não use o Ferro diariamente, esvazie o Reservatório de
Água após cada uso para que o Ferro tenha uma vida útil
prolongada. Para esvaziar o Reservatório desligue o Ferro da
tomada e vire-o de ponta cabeça abrindo a Tampa do Orifício
para encher de água e deixe que saia pelo orifício. Sacuda o
Ferro levemente para escorrer as gotas que ainda permanecerem.
3. Enrole o Fio ao redor da área próxima a base de apoio posterio
e guarde o Ferro em pé sobre a base de apoio.
IMPORTANTE: Cuidado para não enrolar o Fio muito apertado ao
redor do Ferro para não forçar e danificar o Fio.
SUGESTÃO: Quando não estiver usando o Ferro a Vapor, coloque
a Alavanca de Vapor sempre em O/Off e o Botão
Seletor de Tecidos em Off/ Apag.
Page 52

51
Manutencão E Limpeza
LIMPEZA DA BASE
Limpe a Base caso haja acumulo de goma ou algum outro resíduo.
Para limpar a Base:
1. Deixe o Ferro esfriar e logo em seguida passe um pano macio úmido.
CUIDADO: Não use materiais ou produtos para limpar abrasivos, esponjas de metal,
palha de aço nem vinagre para limpar a Base. Isso poderá danificar o
revestimento.
2. Passe o Ferro em um pano de puro algodão para eliminar algum resíduo.
USO DA FUNÇÃO DE AUTOLIMPEZA
A Função de Autolimpeza deve ser usada pelo menos uma vez por mês para garantir
um ótimo desempenho de seu Ferro a Vapor.
Para usar a Função de Autolimpeza:
1. Mova a Alavanca de Vapor O/Off de um lado para o outro para
eliminar os resíduos e minerais da válvula de vapor. Isso fará
com que a água flua no compartimento de vapor.
LIMPEZA DO SISTEMA ANTICÁLCIO
Seu Ferro OSTER® tem um filtro anticálcio no Reservatório de Água que elimina as
impurezas da água.
Como prolongar a eficiência do filtro:
1. Desligue o Ferro da tomada e deixe-o esfriar.
2. Usando o copinho que veio com o Ferro encha-o com água e
adicione uma colherinha de sal. Encha o Reservatório de Água
com essa solução.
3. Deixe a solução no Reservatório de Água durante 15 minutos
e esvazie em seguida.
4. Encha o Reservatório de Água novamente com a solução
salgada e esvazie novamente em 15 minutos.
5. Encha o Reservatório com água comum para enxaguar e esvazie em seguida.
O Sistema Anticálcio deve ser limpo aproximadamente uma vez por mês.
Page 53

52
GARANTIA LIMITADA DE 1 ANO
Sunbeam Products, Inc. ("Sunbeam") garante que, por um período de UM ano a partir
da data de compra, este produto ficará livre de defeitos materiais e de mão-de-obra. A
seu critério, a Sunbeam reparará ou substituirá este produto ou qualquer componente
do produto que possa apresentar defeitos durante o período de garantia. A substituição
será feita com um novo produto ou componente novo e recondicionado. Se o produto
não estiver mais disponível, a substituição poderá ser feita com um produto semelhante
de igual ou maior valor. Esta é a sua garantia exclusiva.
Esta garantia é válida para o comprador original em varejo a partir da data de compra
de varejo inicial, e não poderá ser transferida. Guarde o recibo original de venda. Para
obter serviços de garantia, é necessário ter um comprovante de compra.
Os distribuidores, postos de assistência técnica ou lojas de varejo da Sunbeam que
vendem os produtos da Sunbeam não têm o direito de alterar, modificar ou mudar de
qualquer maneira os termos e condições desta garantia.
Esta garantia não cobre o desgaste normal de peças ou danos resultantes de qualquer
dos seguintes casos: uso negligente ou errôneo do produto, uso de tensão ou corrente
inadequadas, uso contrário às instruções operacionais, desmonte, conserto ou
alterações efetuadas por outrem que não a Sunbeam ou Centro de Serviço Oster ®
Autorizado. Além disso, a garantia não cobre casos de força maior, tais como incêndios,
enchentes, furacões e tornados.
Sunbeam não se responsabilizará por quaisquer danos emergentes ou indiretos
causados pela violação de qualquer garantia expressa ou implícita. Exceto na medida
proibida pelas leis aplicáveis, quaisquer garantias implícitas de comerciabilidade ou
adequação a um fim específico limitam-se à duração expressa pela garantia acima.
Como Obter Serviço Autorizado na Garantia: Consulte as condições da garantia
específica do país ou entre em contato com o seu representante local.
NÃO DEVOLVA ESTE PRODUTO AO LOCAL ONDE ELE FOI COMPRADO
Page 54

Printed in China Imprimé en Chine Impreso en China Impresso na China
P.N. 114980
PARA MÉXICO SÓLAMENTE - FOR MEXICO ONLY
PLANCHA DE VAPOR OSTER®
MODELOS 6020, 6020-013, 6021, 6021-013
IMPORTADOR: SUNBEAM MEXICANA, S.A. DE C.V.
AV. JUÁREZ No. 40-201,
EX–HACIENDA DE SANTA MÓNICA,
TLALNEPANTLA, ESTADO DE MÉXICO,
C.P. 54050, R.F.C. SME570928G90, TEL. 53660800
PAÍS DE ORIGEN: CHINA
PAÍS DE PROCEDENCIA: CHINA, E.U.A.
LEA EL INSTRUCTIVO ANTES DE USAR EL APARATO
CARACTERÍSTICA ELÉCTRICAS
60 Hz 120 V~ 1200 W
CONTENIDO: 1 PIEZA
©2004 Sunbeam Products, Inc. All rights reserved.
OSTER®, SHOT OF STEAM®, SPRAY MIST® and MOTION SMART® are
registered trademarks of Sunbeam Products, Inc.
Dura Press™ is a trademark of Sunbeam Products, Inc.
Distributed by Sunbeam Products, Inc., Boca Raton, FL. 33431.
©2004 Sunbeam Products, Inc. Tous droists réservés.
OSTER® est une marque déposée de Sunbeam Products, Inc.
Distribué par Sunbeam Products, Inc., Boca Raton, FL. 33431.
©2004 Sunbeam Products, Inc. Todos los derechos reservados.
OSTER® es una marca registrada de Sunbeam Products, Inc.
Distribuido por Sunbeam Products, Inc., Boca Raton, FL. 33431.
©2004 Sunbeam Products, Inc. Todos os direitos reservados.
OSTER® é uma marca registrada da Sunbeam Products, Inc.
Distribuído pela Sunbeam Products, Inc., Boca Raton, Florida 33431.
 Loading...