

Page 1
Instruction Manual
Steam Iron
PLEASE READ ALL INSTRUCTIONS BEFORE USING THIS APPLIANCE
5104, 5105 & 5106
5104, 5105 & 5106
Page 2

1
IMPORTANT SAFEGUARDS
When using electrical appliances, basic safety instructions should always be followed,
including the following:
• READ ALL INSTRUCTIONS BEFORE USING THE STEAM IRON.
• The Iron should always be turned to the "Off" position before plugging or unplugging
from outlet. Never yank Cord to disconnect from outlet; grasp Plug and pull to
disconnect.
• Before connecting the Steam Iron, make sure the voltage in your outlet is the same
as the voltage indicated on the appliance's rating label. Use it with wall receptacle
only.
• To protect against risk of electrical shock, do not immerse the Power Cord, plug or the
Steam Iron in water or other liquid.
• Never use the Steam Iron if you have wet hands.
• Never leave the Steam Iron unattended while it is turned on or is on top of the ironing
board.
• Unplug from outlet while not in use.
• Let Steam Iron completely cool off in the upright position before storing it. Wind the
Power Cord around the Heel Rest before storing.
• Burns may occur by touching hot parts, the hot water or the steam. Be careful if you
have to turn the Steam Iron upside down, since there still may be hot water in the
Reservoir.
• Do not operate Iron with a damaged cord or if the Iron has been dropped or
damaged. To avoid the risk of electric shock, do not disassemble the Iron, take it
to an Authorized Service Center for examination and repair. Incorrect reassembly can
cause a risk of electric shock when the Iron is used.
• Do not use it outdoors.
• Do not let the Power Cord come in contact with hot surfaces.
• This Steam Iron is intended for household use only.
• Use the Steam Iron only for the purpose intended.
• Do not leave Steam Iron unattended while using it. Be careful; if you leave the Steam
Iron unattended, always turn it off, disconnect the unit from the electric outlet and set
the Iron in an upright position.
Page 3

2
• Repairs to the appliance may only be carried out by trained personnel. As a result of
incorrect repairs considerable dangers for the user may result. Please contact an
Authorized Service Center in the event of repairs being necessary.
• Always disconnect the Steam Iron from the wall socket when filling it with water or
emptying it out.
• Avoid overfilling the Reservoir. Never fill it above the maximum water level.
• In order to avoid overloading the circuits, never use another appliance with high
wattage on the same circuit.
• The manufacturer is not liable for any damages, which are caused by using the
appliance for any other purpose than that intended or incorrect use.
• If a longer detachable power-supply cord or extension cord is used, (1) the marked
electrical rating of the extension cord should be at least the same as the appliance
and (2) extension cord shall be arranged so that it will not drape over
the countertop or tabletop where it can be pulled on by children or tripped over
unintentionally.
• This appliance is not intended for use by persons (including children) with reduced
physical, sensory or mental capabilities, or lack of experience and knowledge, unless
they have been given supervision or instruction concerning use of the appliance by a
person responsible for their safety. Children should be supervised to ensure that they
do not play with the appliance.
• Close supervision is necessary when any appliance is used by or near children, or
incapacitated individuals.
SAVE THESE INSTRUCTIONS
Page 4
3
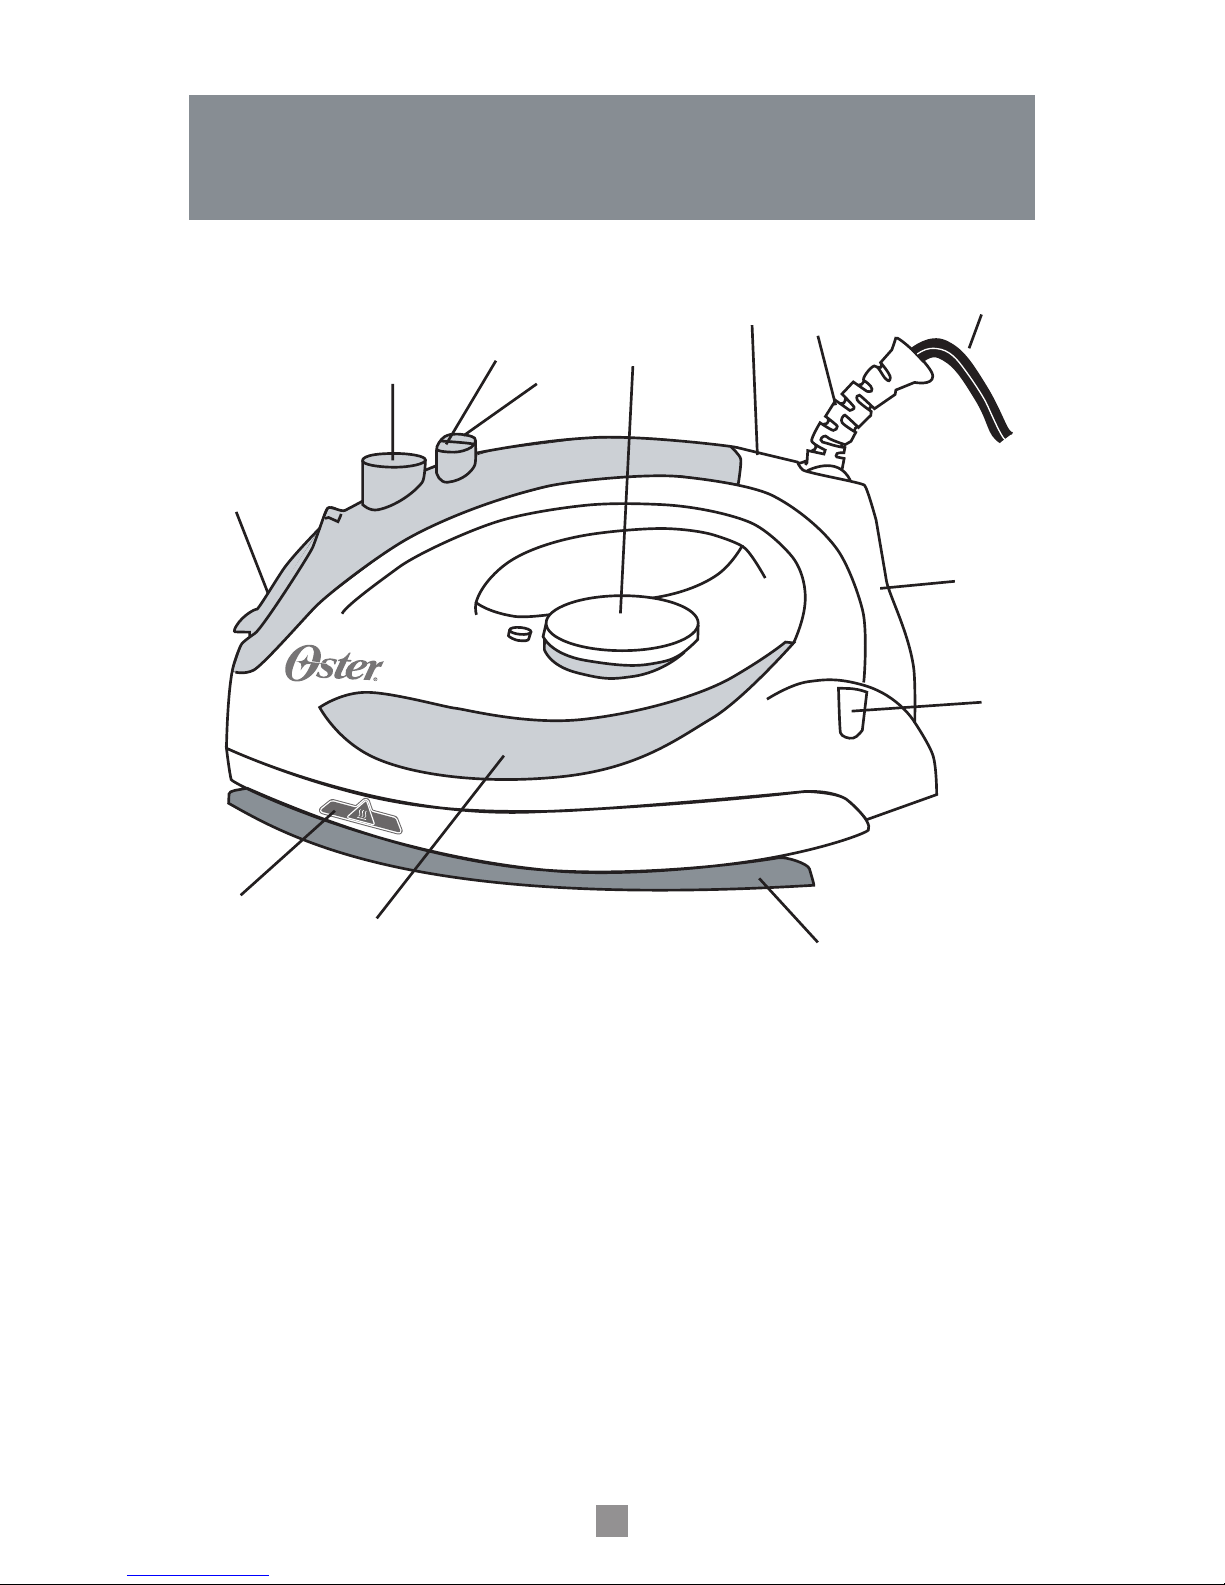
1. Temperature Control Dial
2. Steam Select Dial
3. Water Reservoir Lid
4. See Through Water Window
5. Large Soleplate
6. Spray Mist Button
7. Shot of Steam Button (model 5105 & 5106 only)/ Vertical Shot of Steam
Button (model 5106 only)
8. Indicator Light
9. 180
o
Swivel Cord
10. Wide Heel Rest
11. Cord Wrap Area
12. Power Cord
13. Temperature Indicator
DESCRIPTION OF THE APPLIANCE
1
2
3
4
5
6
7
8
9
10
11
12
13
Page 5

4
Before First Use
• When using the Iron for the first time, test it on a piece of old cloth to be sure that the
Soleplate and the Water Reservoir are clean.
• It is possible that the Iron will discharge some smoke or give off a slight odor during
its first usage. This is due to the initial heating of the materials used. This is
completely normal and will stop shortly afterwards.
• When not ironing, always have the Steam Select Dial turned to the closed
position .
Instructions For Use
USING THE STEAM IRON
• First of all set the Steam Iron in an upright position and insert the plug in the wall
electrical outlet.
• Select the desired temperature on the Temperature Control Dial.
• The Indicator Light will go on and once the selected temperature is reached, the light
will go off and you can begin to Iron. The Indicator Light will be on every time the Iron
is heating. Once it reaches the temperature setting, the Indicator Light will turn off.
The Light will turn on and off from time to time while you are ironing since the
thermostat automatically maintains the Soleplate at the same temperature.
• If you select a lower temperature after having ironed at the higher temperature, do not
start to iron again until the Indicator Light goes back on.
• The Large Soleplate increases ironing efficiency while the non-stick finish
makes gliding through the fabrics even smoother.
• Another important feature of your Steam Iron is the 180º Swivel Cord, which prevents
tangling and allows for easy use by both right handed as well as left handed.
CHOOSING THE RIGHT WATER
• This Steam Iron may be used with normal tap water. However, if the water of the
region in which you live is especially hard, it is recommended to use distilled water to
prolong the life of your Iron.
• Do not use water that has been desalinated with chemicals.
Page 6
5
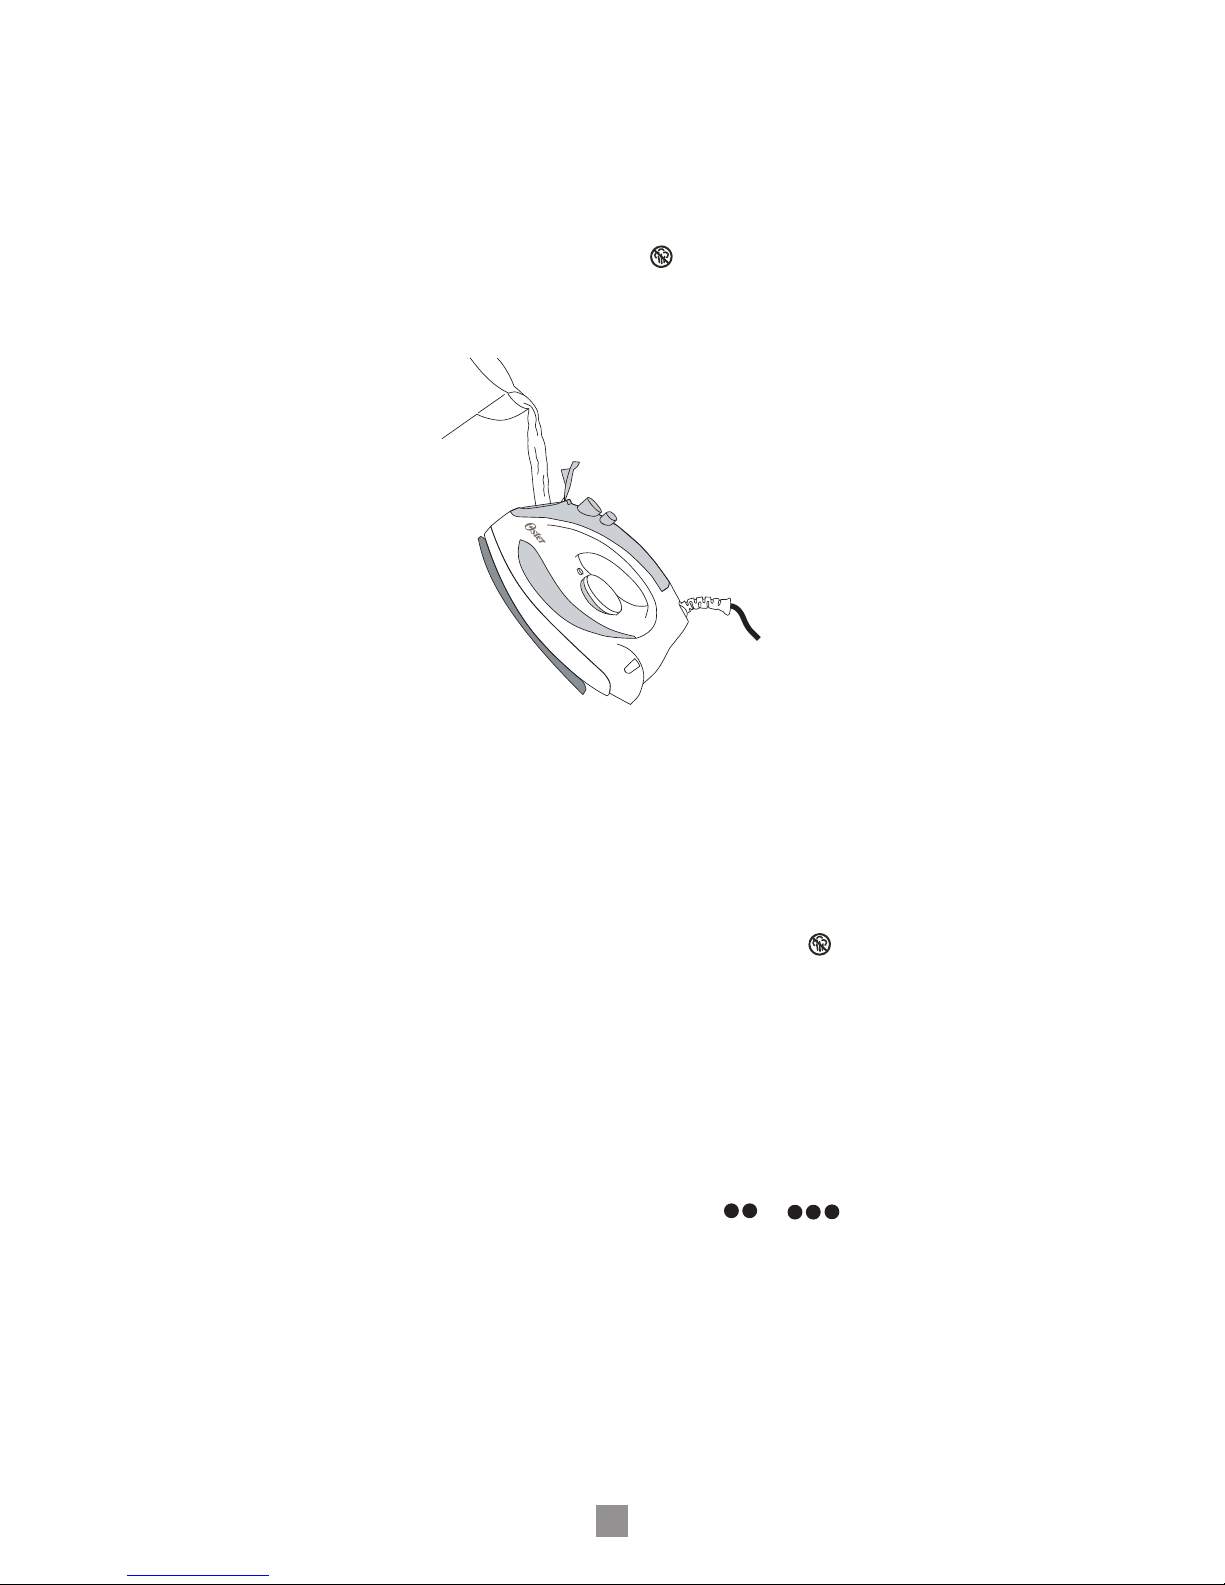
Filling With Water
• Turn off the Iron and disconnect the plug from the electrical wall outlet before filling
the Iron with water.
• Turn the Steam Select Dial to the off position .
• Set the Iron in the position indicated below (figure 2) and fill it with water, no higher
than the Max fill level shown on the See Through Water Window.
(figure 2)
Dry Ironing
• Insert the plug in the electrical wall socket.
• Make sure that the Steam Select Dial is in the closed position .
• Select the desired temperature in the Temperature Control Dial.
• After the Indicator Light goes off, you may start to iron.
Steam Ironing
• Steam ironing is only possible at high temperatures (" ", " "), as indicated
on the Temperature Control Dial.
• Be sure that there is enough water in the Reservoir.
• Set the iron in an upright position.
• Plug in the steam Iron into the wall electrical outlet.
• Select the temperature by setting the Temperature Control Dial in the desired position
within the range of temperatures included in the steam area of the dial.
Page 7
6
• Wait for a short while until the Indicator Light goes on and off again.
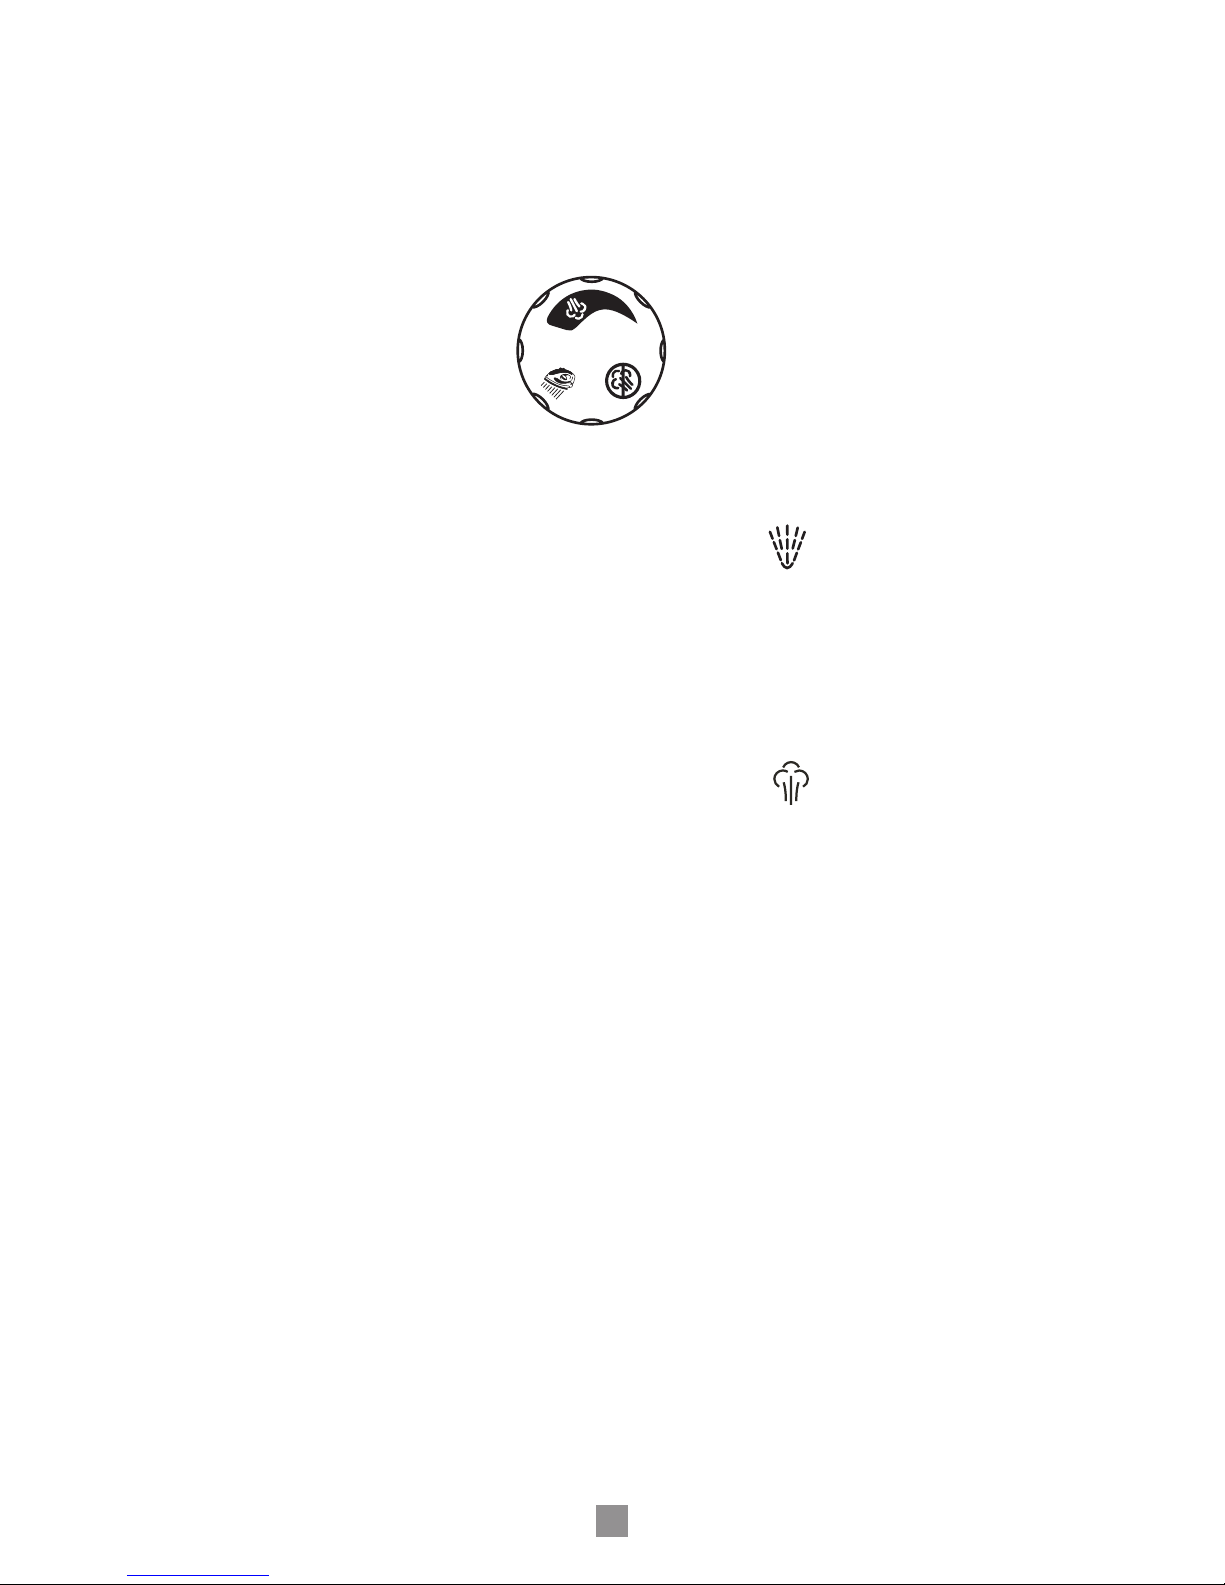
• Set the Steam Select Dial in the desired steam level position (figure 3). You are now
ready to start steam ironing. The steam will be released evenly through seventeen
vents located in the soleplate for easier ironing.
(figure 3)
Spray Mist Feature
• Use the Spray Mist feature to dampen fabrics with stubborn wrinkles.
• Press the Spray Mist button firmly to produce spray.
Shot Of Steam Feature
(Model 5105 & 5106 Only)
• The Shot of Steam feature provides an extra burst of steam for deep penetration of
stubborn wrinkles. The Shot of Steam feature can be used with dry or steam ironing
provided the tank is at least full of water and the Temperature Control Dial is set
within the steam band.
• Allow the iron to heat for approximately two minutes.
• Press the Shot of Steam Button several times to prime the pump.
• Press the Shot of Steam Button another three to four times in order to clean the unit.
• The Shot of Steam feature is now ready for use. The Shot of Steam feature can
be used continuously with just a short pause between shots. The Shot of Steam
feature is most effective with the Iron held in a horizontal position just above the fabric
being ironed.
• If the Water Reservoir runs dry, unplug the Iron and refill with water. The Iron may be
filled with water while it is hot. Note: It may be necessary to re-prime the pump before
using the Shot of Steam feature again.
• Vertical Shot of Steam
feature allows for vertical ironing, as well (model 5106 only)
Page 8
7
Ironing Temperature
• Check the ironing instructions on the label of the item that you wish to iron. Check the
following table for further instructions.
• Should the specific ironing instructions not appear on the label, follow instructions on
the following table. This table is only valid for the fabrics indicated and does not apply
to special textiles with a gloss finish, etc. Textiles with special coatings (such as gloss,
relief wrinkles, etc.) are best ironed at very low temperatures. If the textile consists of
several different types of fibers, always select the lowest temperature, i.e. the
temperature recommended for the most delicate fiber in the composition (for example,
if the composition consists of 60% polyester and 40% cotton, you should iron at the
temperature indicated for polyester).
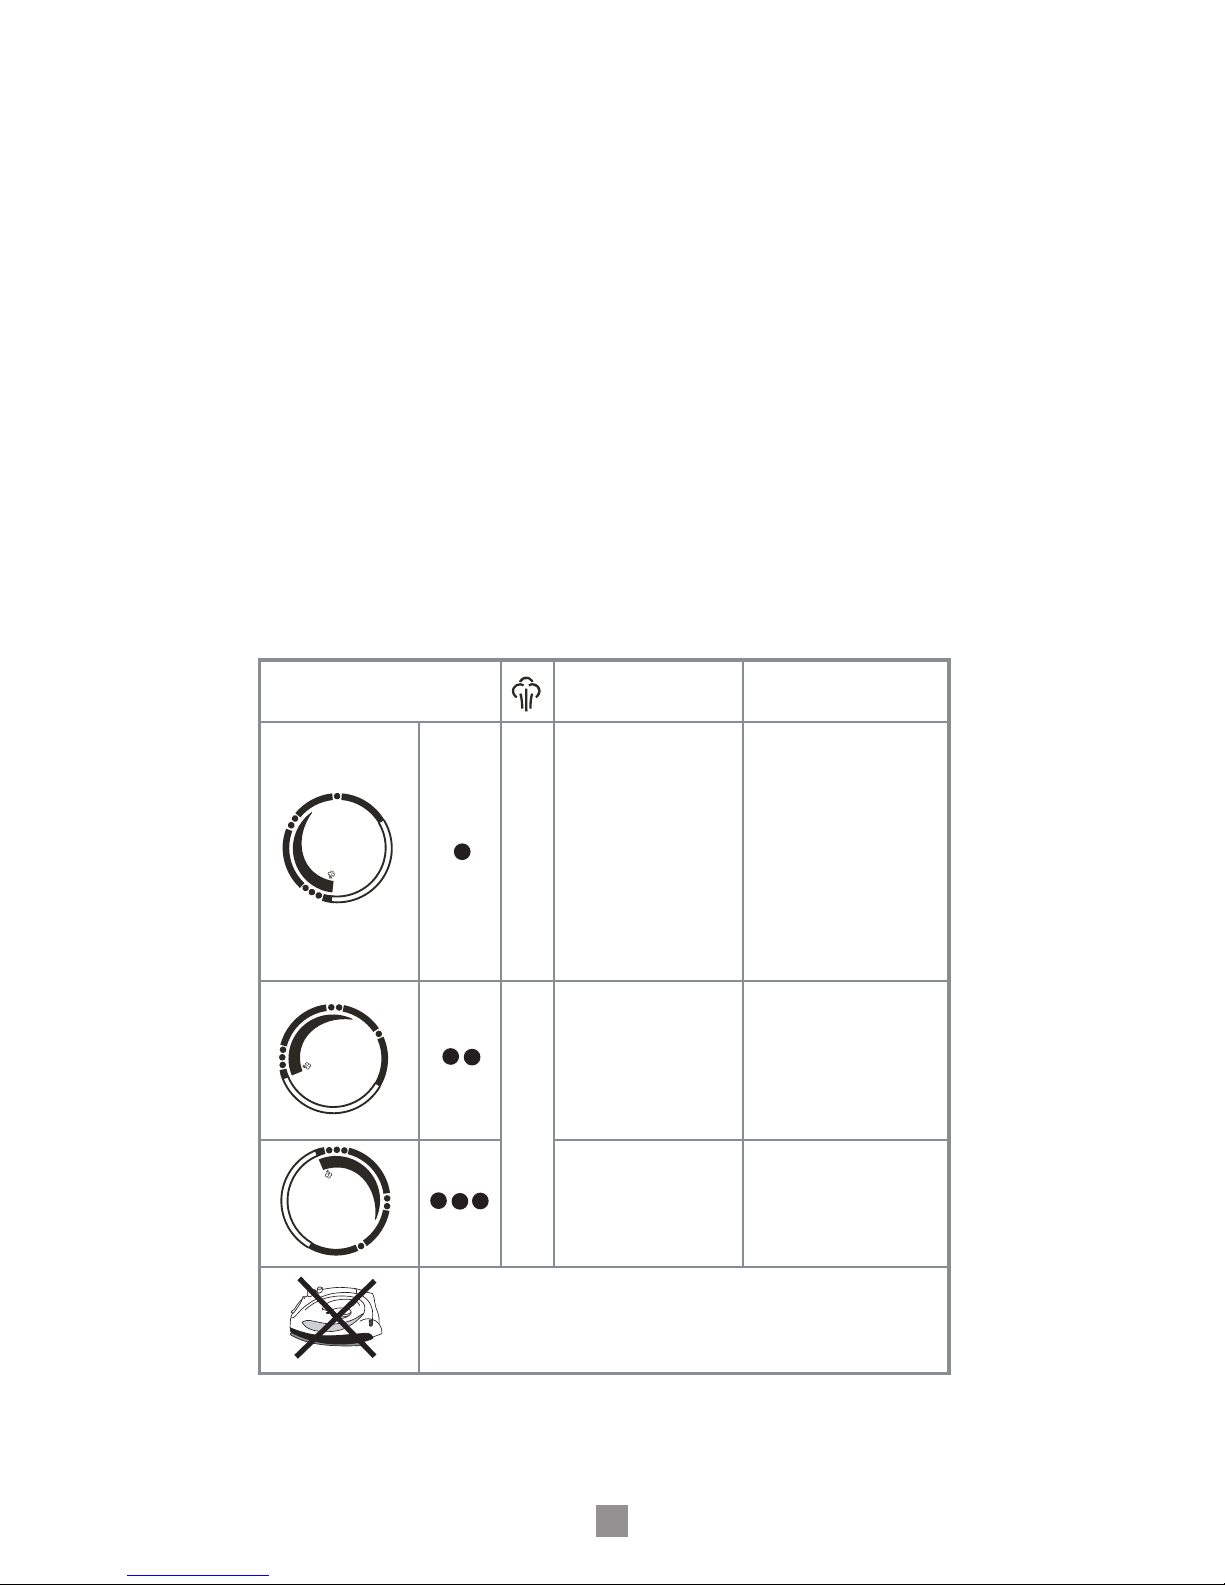
Temperature Settings Table
Temperature Kind of Textile Fiber Material
synthetic
synthetic
synthetic
Acrylic, modacryl
polypropylene,
polyrethane
acetate, triacetate
metalized, cupro,
polyamide (nylon),
polyester
silk
wool
cotton
silk
wool
cotton
linen
linen
on the label means: This article cannot be ironed
(e.g. chlorofiber, elastodiene)
Control Dial
DRY
STEAM
Page 9

8
• The non-stick coating prevents sticking of fabrics and starch residue to the Soleplate.
• Avoid all contact of the Soleplate with metal objects.
Note: Scratches in the non-stick Soleplate do not affect the performance of the Iron.
• Before cleaning the Iron, always make sure that it is disconnected from the electrical
wall socket and is completely cool.
Non-Stick Finish
Maintenace And Cleaning
Setting The Temperature
• Set the Iron in an upright position.
• Connect the Iron to an electrical wall socket.
• Set the Temperature Control Dial (figure 4) to the correct ironing temperature as
indicated in the label or the following table.
(figure 4)
Page 10

9
STEAM VALVE
• The steam valve is removable for easy cleaning of lint and scale build-up. Make sure
to clean the steam valve once a month to maintain the optimal performance of your
Iron.
• To remove the steam valve, empty the Water Reservoir and place the Iron on the
Soleplate.
• Turn the Steam Select Dial to the position.
• The valve will "pop-up".
• Pull up to remove the steam valve fully.
• Wipe the tip gently with a damp cloth to clean.
• To place it back, align the with the indicator mark.
• Push down and rotate clockwise to the position.
Note: Do not pour water into the steam valve hole.
SOLEPLATE
• Residue on the Soleplate can be wiped off with a cloth soaked in a solution of water
and vinegar.
• To clean the Soleplate, allow Iron to cool and wipe with a soft using a mild vinegar
solution.
• Do not use scouring pads, abrasives or chemical cleaning solvents as they may
damage the finish.
HOUSING
• The housing can be cleaned with a moist cloth and then wiped dry.
Other than the recommended cleaning, no further user maintenance should be
necessary. If for any reason your Steam Iron should require repairs, do not try to fix it
yourself. Send it to an Authorized Service Center.
Storing The Iron
• Your Oster® Steam Iron includes a temperature indicator which changes from red to
black when iron is ready for a safe storage
• Turn off the iron and disconnect the plug from the electrical wall socket.
• Set the Iron in an upright position and let it cool down completely.
• Set the Steam Select Dial to the closed position.
• Empty out all the water remaining in the Water Reservoir by opening the Water
Reservoir Lid by inverting the Iron over the sink.
• The Power Cord can be wound around the Heel Rest for easier and tidy storing. The
Iron should always be stored in an upright position.
Page 11

10
WARRANTY
Sunbeam Products, Inc doing business as Jarden Consumer Solutions, its affiliates and
subsidiaries (hereinafter collectively referred to as “SPI”) warrant that, for a period of two
(2) years from the date of purchase, this product will be free from defects in material and
workmanship (the “Warranty”). Please preserve the Warranty Card and Cash Memo duly
stamped and signed by the dealer, as this will be required for any claims under this
Warranty.
• The rights and benefits under this Warranty are additional to your statutory rights,
which are not affected by this Warranty.
• During the period Warranty, SPI at its choice will repair or replace this product or any
component of the product found to be defective free of cost through (the Dealer from
whom the product was purchased or through the service center listed in card-business
people to confirm), provided that:
- SPI is promptly informed of the defect.
- The product has not been altered in any way or subjected to misuse or repair by
the person other than a person authorized by SPI.
• No rights are given under the Warranty to a person acquiring the product second
hand.
• Any repaired or replaced product will be warranted on these terms for the remaining
portion of the Warranty in the country where the product was purchased.
• Liability for consequential loss or damage is neither accepted nor is it implied.
• The following are not covered under SPI’s Warranty:
a. If product was used in any manner other than the intended use.
b. If product has not been used according to the instruction manual/User’s Manual,
included with the product.
c. If defects are caused by improper or reckless use.
d. If product was altered or repaired by anyone other than those authorized by the
national manufacturer, importer or respective merchant.
e. Use of incorrect current or voltage or faulty electric power supply.
f. Normal wearing and tearing of parts and accessories resulting from regular use.
g. Damages resulting from transportation, accidents, mishandling or negligence on
the part of the customer.
h. The following part/components:
• Glass container
• Light bulb
• Accessories
i. Industrial or commercial use of product.
Waste electrical products should not be disposed of with household waste.
Please recycle where facilities exist.
Page 12

11
AUTHORIZED SERVICE CENTERS
Region Location Customer Service Center Address Area / Towns Covered
WEST
Mumbai
S P Services
Shop No. 10, Abdul Sattar Compound Near Railway Station Elphinston
Road (West) Mumbai – 400013 Maharashtra, India
Phone # (022) 24326726, 24312623
Mumbai, Navi Mumbai & Thane
Pune
Shree Ganraj Services
Shop No. 8, Shri Ganesh Gayatri Complex, 291 Sombar Peth, Pune 411011 Maharashtra, India
Phone # (020) 32949014
Pune, Pimpri & Chinchwad
Goa
Jolly Enterprises
Shop # G-2, 78/A Nuvem Enclave Along NH-17 Highway, Belloy Nuvem
Salcete - 403 604 Goa, India
Phone # (0832) 2791800
Goa
Ahmedabad
Shree Sainath Associates
Basement - 2, Shaan Building Opp. Town Hall, Behind Sakar- 4 Ellisbridge
Ahmedabad – 380006 Gujarat, India
Phone # (079) 26581635
Ahmedabad, Vodadara, Nadiad
& Anand
Surat
Smart Care
A-5, Taj Chambers, 3rd Floor Opp. Congress Bhavan, Near Silk House
Market Sona Faliya, Chowk Bazar Surat - 395003 Gujarat, India
Phone # (0261) 6509394
Surat, Bharuch, Navsari, Bardoli,
Valsad, Vapi, Silvasa
SOUTH
Chennai
G C Services
Old No. 12, New No. 37 1st Floor, Sattanna Naicken Street Nehru Timber
Market, Choolai Chennai - 600 112 Tamil Nadu, India
Phone # (044) 26690084 / 42822868
Chennai
Hyderabad
Bright Engg Works
# 7-4-195/1&2, Geeta nagar Ferozguda, Near BBR Hospital Beside
Bharath Lodge, Balanagar Secunderabad – 500011 Andhra Pradesh, India
Phone # (040) 23774648 / 23771842
Hyderabad & Secunderabad
Bangalore
Electrocare Services
No. 151/1, Second Main 7th Cross, Chamrajpet, Bangalore – 560018
Karnataka, India
Phone # (080) 65993911, 26605762
Bangalore
NORTH
Delhi
S. T. Services
M-131, 1st Floor Guru Harkishan Nagar Paschim Vihar New Delhi 110041 India
Phone # (011) 32958438 / 45586987
North, West & South Delhi
Delhi
Pant Sales and Service
A-11, Pandav Nagar Near Mother Dairy Factory Delhi - 110092 India
Phone # (011) 22486687
East & Central Delhi, Noida,
Faridabad & Ghaziabad
Gurgaon
Avon Services
House No. 902/3, Gali No. 2 Rajeev Nagar (East) Gurgaon – 122001
Haryana, India
Phone # 9212406014 / 9810813256
Gurgaon
Chandigarh
Sai Sales Corporation
SCO 68-70, Basement Chamber No. 66 Sector 17-A, Chandigarh
Chandigarh, India
Phone # (0172) 5078028 / 3064028
Chandigarh, Panchkula, Mohali,
Zirakpur & Nayagaon
Ludhiana
Creations Enterprise
D-3, 2nd Floor, Girja Ghar Market, Books Market Chowk, Chaura Bazar
Ludhiana - 141 008 Punjab, India
Phone # (0161) 2720523 / 2740523
Ludhiana, Jalandhar, Chandigarh
& Jammu
EAST
Kolkata
Europa Sales and Service
56 - C /1 Kankulia Road Golpark, Kolkata – 700029 West Bengal, India
Phone # (033) 32548558
Kolkata & Suburbs
Page 13

12
Page 14

13
Page 15

14
5105
5106
5106
Page 16

15
Page 17

16
Page 18

17
5105
5106
5106
Page 19

18
Page 20

19
Page 21

20
Page 22

21
Page 23

22
g[d©g g|Qa
{ks= ‘kgj lfoZl lsaVj ds uke doj fd, x, bykds
if’pe
eqacbZ
esllZ ,l- ih- lfoZlsl
‘kkWi ua- 10] vCnqy ‘kVj dEikmaM] fQVokyk jksM] lrxq: n’kZu fcfYMax ds ihN]
jsyos LVs’ku ds ikl] ,yfQaLVu jksM if’pe eqcbZ&400013 egkjk”Vª] Hkkjr
Qksu ua- % 022&24326726@24312623
eqacbZ] Bk.ks vkSj uoh eqacbZ
iq.ks
esllZ Jh x.kjkt lfoZlsl
‘kkWi ua- 8] Jh] x.ks’k xk;=h dkWEIysDl] 291] lkseokj isB] iq.ks&411011 egkjk”Vªk]
Hkkjr
Qksu ua- % 020&32949014
iq.ks] fiaijh vkSj fpapokM
xksok
tkSyh ,UVjizkbtsl
th&2, 78@,] uqose ,Udyso] ,u ,p & 17 gkbZos ds lkFk] chykS; uqose
lkylsV&403604 xksok] Hkkjr
Qksu uaa- % 0832&2791800
xksok
vgenkckn
esllZ Jh lkabZukFk ,lksfl,V~l
cslesaV&2] lku fcfYMax ds foijhr] Vkmu gky ds ihNs] ldj&4 ,fylfczt
vgenkckn&380006 xqtjkr] Hkkjr
Qksu u-a % 079&26581635
vgenkckn] oksMknjk] ukfnvkn
vkSj vkuan
Lkwjr
LekVZ ds;j
,&5] rkt pSEcj] rhljk ry dkaxzsl Hkou ds ihNs] flYd gkml ekdsZV lksuk
Qkfy;k pkSd cktkj ds ikl lwjr&395003 xqtjkr] Hkkjr
Qksu ua- % 0261&6509394
lwjr] Hkk:p] uolkjh] ckjnksyh]
oylkn] okih vkSj flYoklk
nf{k.k
psUubZ
esllZ thlh lfoZlst+ s
iqjkuh la[;k- 12] ubZ la[;k 37 igyh eafty] lUrkuk uk;d ekxZ usg: fVEcj
ekdsZV pksybZ] psUubZ&600012 rfeyukMw] Hkkjr
Qksu ua- % 044&26690084@42822868
psUubZ
gSnjkckn
czkbV bath- oDlZ
7-4-195@1 vkSj 2] xhrk uxj] fQjkst+xqM] chchvkj vLirky ds ikl Hkkjr ykWt ds
ikl] ckykuxj] fldUnjkckn&500011 vka/kz izns’k] Hkkjr
Qksu ua- % 040&23774648@23771842
gSnjkckn vkSj fldUnjkckn
caxyq:
esllZ bysDVªksds;j lfoZlst
ua- 151@1] lsdUM esu 7 oka ØkWl] pkejktisB] caxyq:&560018 dukZVdk] Hkkjr
Qksu ua- % 080&26605762@65993911
caxyq:
mRrj
fnYyh
esllZ ,l- Vh- lfoZl ikWbaV
e&131] igyh eathy] xq: gjd`”.k uxj] if’pe fogkj ubZ fnYyh&110041 Hkkjr
Qksu ua- % 011&45586987@32958438
mRrj] if’pe vkSj nf{k.k] fnYyh
fnYyh
esllZ iar lsy ,.M lfoZlst+ ,&11] ikaMo uxj] enj Msjh QSDVªh ds ikl
fnYyh&110092 Hkkjr
Qksu ua- % 011&22486687
Qfjnkckn] uks,Mk] xkft;kckn]
iwoZ vkSj dsUnzh; fnYyh
xqM+xkWao
,oksu lfoZlsl
edku ua- 902@3] xyh ua- 2 jktho uxj osLV xqM+xkWao&122001 gfj;k.kk] Hkkjr
Qksu ua- % 9212406014@9810813256
xqM+xkWao
paMhx<+
esllZ lkbZa lsYl dksiksZjs’ku ,l lh vks 68&70] cslesaV pSEcj ua% 66 lsDVj 17&,]
paMhx<+ paMhx<] Hkkjr
Qksu u- % 0172&5078028@3064028
paMhx<+] iapdqyk] eksgkyh] ftjkdiqj
vkSj u;kxkWao
yqf/k;kuk
esllZ Øh,’kal ,aVjikbts+l
Mh&3] nwljh eft+y] fxjhtk ?kj ekdsZV] cqDl ekdsZV pkSd pkSjk cktkj
yqf/k;kuk&141008
Qksu u- % 0161&2720523@2740523
yqf/k;kuk] tya/kj] paMhx<+ vkSj tEew
iwoZ
dksydkrk
esllZ ;wjksik lsy ,.M lfoZlsl 56 lh@1 dudqfy;k jksM+ xksy ikdZ]
dksydkrk&700029 if’pe caxky] Hkkjr
Qksu ua- % 033&32548558
dksydkrk vkSj lqccZ
Page 24

Model No. :
Date of Purchase :
Dealer’s Stamp :
P.N. 159030
CBA -062612
© 2012 Sunbeam Products, Inc. doing business as Jarden Consumer Solutions.
All rights reserved. Manufactured by Sunbeam Products, Inc. doing business as Jarden Consumer Solutions,
2381 Executive Center Drive, Boca Raton, Florida 33431 U.S.A.
Distributed by Jarden Consumer Solutions of India Private Limited, Unit B-204,
Universal Business Park, Off Saki Vihar Road, Chandivali Farm Road, Andheri (E)
Mumbai 400 072, India.
1-800-102-6300
1-800-102-6300
© 2012
WARRANTY CARD
Printed in India
^maV _| àHm[eV
 Loading...